

Pella 205Y0000 User Manual
ENTRY DOOR
WARNING
DEADBOLT SENSOR
QUICK START GUIDE
This Qu ick Start G uide is intend ed only to provide an overview
of the produc t and its use. B efore using this product, read the
complete Product Guide and warnings.
Scan t he QR Code® or visit Insynctive.Pella.com/
EntryDoorDeadboltSensor for complete Product Guide
and war nings, instruc tional videos and ot her Pella®
™
Insynctive
WHAT’S INCLUDED:
• ENTRY DOOR LOCK SENSOR: SENSOR will transmit a signal to BRIDGE
when deadbolt is locked or unlocked.
• ENTRY DOOR OPEN/CLOSE SENSOR: SENSOR will t ransmit a signal to
BRIDGE when the door is op ened or closed.
• ENTRY DOOR OPEN /CLOSE SENSOR BATTERY COVER
• QUICK S TA RT GUIDE
WHAT’S REQUIRED:
• BRIDGE (required — sold separately): Wirelessly connects your Insynctive
products to STATUS INDICATOR or a compatible security or home
automation system.
• STATUS INDICATOR (optional — sold separately): Lights indicate status of
Pella® Ins ynctive SENSORS. Or you can use a compatible securi ty or home
automation system to monitor your entry door.
• PELLA ENTRY DO OR PREPPED FOR ENTRY DOOR DEA DBOLT SENSOR
• FLATHEAD SCREWDRIVER
• PHILLIPS-HEAD SCREWDRIVER
• DRILL AND 1/8-I NCH DRILL BIT
quick tips.
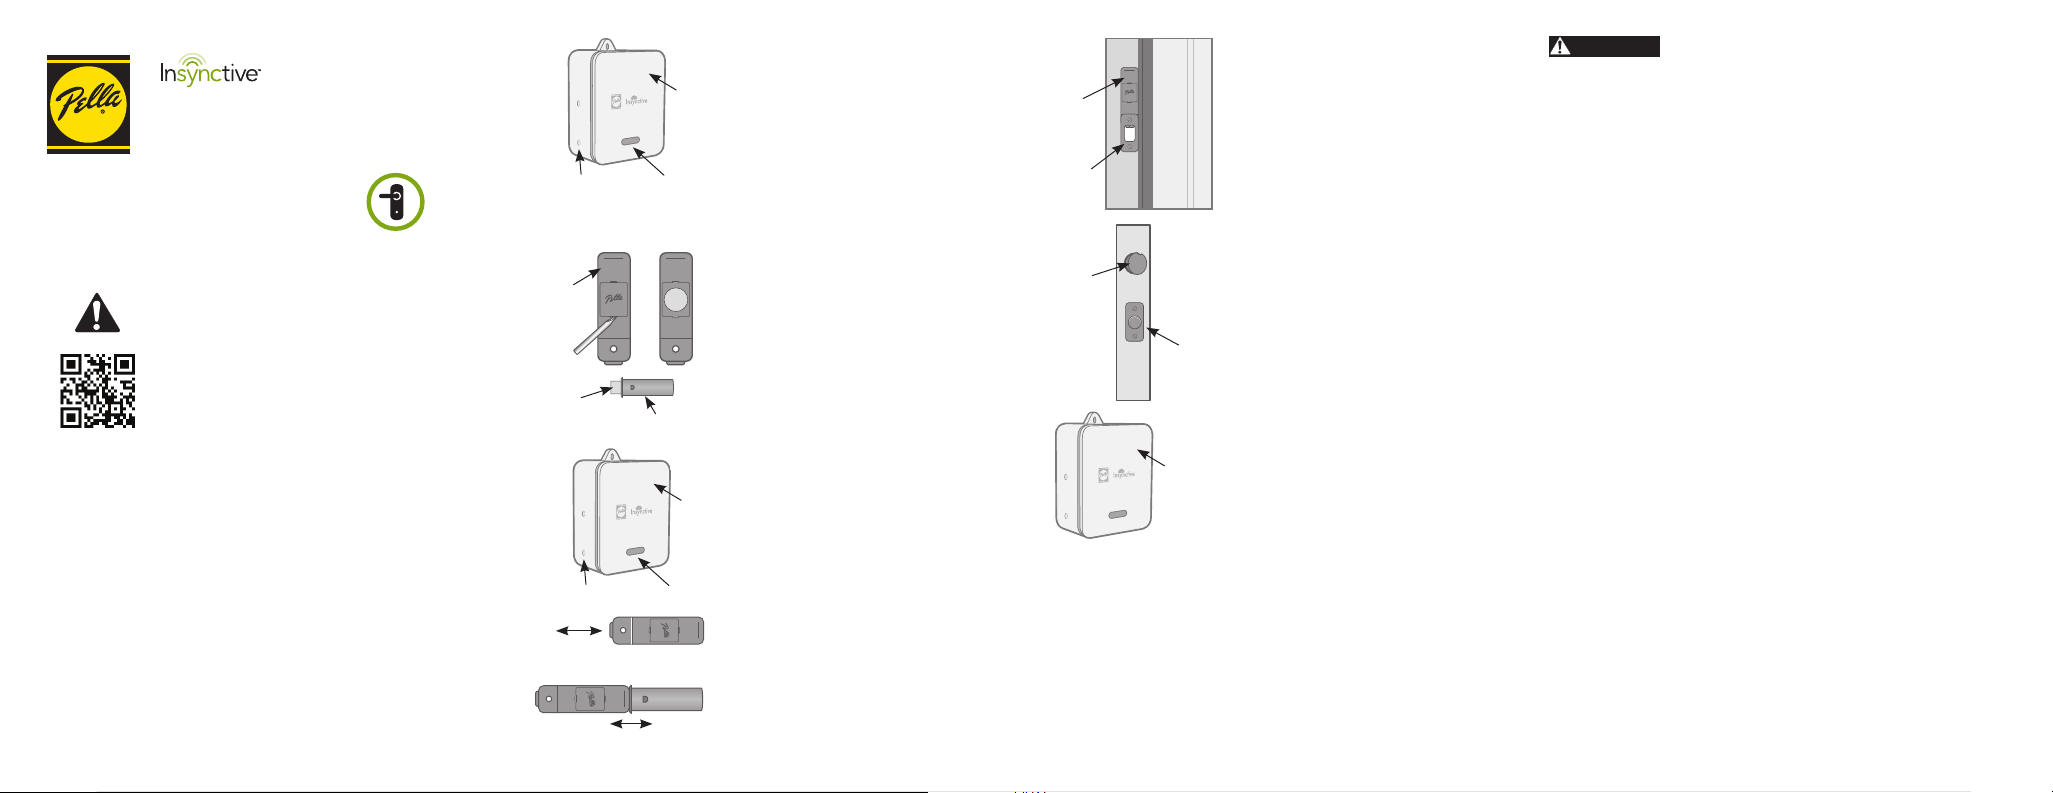
SYNC BU TTON
LOCK
SENSOR
PLAS TIC
TAB
OPEN/C LOSE
SENSOR
SYNC BU TTON
Depre ss twice wit hin 2 seconds .
Separ ate by at least 1 i nch
twic e within 2 seco nds.
1. Get Started
• Plug BRIDGE into elec trical outlet
BRIDGE
LIGHT
(light will turn green and then fl ash blue).
NOTE: Fo llow Bridge Q uick Start G uide to set up BR IDGE.
2. Prepare SENSORS
• Use f lathead screwdriver to remove
battery cover from LOCK SENSOR.
• Remove battery and plastic tab from
LOCK SENSOR. Reinser t battery.
• Remove plastic tab from OPEN/CLOSE
SENSOR battery.
• Replace bat tery cover s. (OPEN/CLOSE
SENSOR battery cover is included in a bag
within package.)
NOTE: You wi ll have 2 minute s to sync your SE NSORS
once th e plastic ta bs are removed . If 2 minutes p ass
witho ut a success ful sync, r emove and inse rt the
battery again.
BRIDGE
3. Sync SENSORS to BRIDGE
• Press and release the Sync bu tton on BRI DGE
(but ton nearest the ligh t). Orange light will fl ash
continuously. BRIDGE is in sync mode while the
LIGHT
light is fl ashing orange.
• Dep ress LOCK SENSOR plung er twice within
2 seconds.
• Green light on BRIDGE and beep will
indicate success.
• Touch OPEN/CLOSE SENSOR to t he recesse d
line at t he top of LOCK SENSOR, and s eparate
by at least 1 inch. Repea t twice within 2 seconds.
• Gre en light on BRIDGE and beep will
indicate success.
• To exit s ync mode: press and hold Sync bu tton
on BRID GE until light stops fl ashing orang e.
4. Install LOCK SENSOR
• Open the door and locate the deadbolt
LOCK
SENSOR
DEADBOLT
STRIKE PLATE
strike plate.
• Use a Phillips-head screwdriver to remove
the deadbolt s trike plate screws.
• Remove the de adbolt s trike plate and blac k
plastic insert.
• Visit Insynctive.Pella.com/EntryDoor
DeadboltSensor for specifi c Entry Door
Deadbolt Sensor installation instructions, as
requirement s vary by door type.
5. Install OPEN/CLOSE SENSOR
• Open the door and locate the black plastic
OPEN/C LOSE
SENSOR
DEADBOLT
cover on the side of the door panel above the
deadbolt.
• Use a fl athead screwdr iver to remove the black
plastic cover.
• Insert OPEN/CLOSE SENSOR unt il it is fl ush
with the edge of the door panel.
6. Test SENSORS
• Unlock your e ntry door w ith SENSORS installed,
and BRIDGE should beep twice.
• Open your entry door with SENSORS installed,
BRIDGE
If you will be using the Pella® Insync tive™ STATUS INDI CATOR to
monitor your entry doors, please reference the Quick Start Guide
in the S TATUS IN DICATOR package to sync.
HAVE A HOME AUTOMATION OR SECURIT Y SYSTEM?
For ins truc tions on how to sync a Pella Insynctive ENTRY DOOR
DEAD BOLT SENSOR to it, visit Insynctive.Pella.com/HomeAutomation.
NEED HELP WITH THE STEPS ABOVE?
Find troubleshooting information and videos at
Insynctive.Pella.com/Support or call 855-473-5524.
WANT TO EASILY REGISTER PELLA INSYNCTIVE PRODUCTS?
Visit Insynctive.Pella.com/Registration for instant access to
instructions, warranties and how-to videos.
and BRIDGE should beep twice.
WARNIN G! OPEN/CLOSE SE NSOR may indic ate a closed
stat us when door is n ot complete ly closed. S ee Product
Guide o n Insynctive.Pella.com for complet e review of
ENTRY DOOR DEADBOLT SENSOR operation.
Failure to adhere to the warnings below may result in death, serious injury
and/or loss of valuables.
• Pella® Insynctive
Product Guide and the Warning in Step 6 of this Quick Star t Guide for more
information). Therefore, Pella Insynctive products should not be relied upon
in situations where life, saf ety and/or protec tion of valuables are s olely
depen dent on their f unction. Test each produc t at least once per year to
help ensure proper operation.
• Pella Insync tive produ cts are not a subst itute for careful adult su pervision
of children.
• Keep battery and s mall part s out of reach of c hildren. If swallowed,
immediately seek medical help.
Read the complete Product Guide for additional warnings and information.
FCC Compliance and Industry Canada
This equipment has been tested and found to comply with the limits for Class B
digit al devices, pursuant to Par t 15 of the FCC Rules. These limits are designed
to provide reasonable protection against harmful interference in a residential
inst allation. This equipment generates, uses and can radiate radio frequency
energy and, if not inst alled and used in accordance with the instruct ion manual,
may cause harmful interference to radio communications. However, there is
no guarantee that interference will not occur in a particular installation. If this
equipment does cause harmful interference to radio or television reception, which
can be determined by turning the equipment of f and on, the us er is encouraged
to try to correct the inter ference by one or more of the following measures:
• Reorient or relocate the receiving antenna.
• Increase the separa tion between the equipment and receiver.
• Connect the equipment to an outlet on a different circuit from the receiver.
• Consult the dealer or an experienced r adio/TV contractor for help.
Changes or modifi cations not expressly approved by Pella Corporation could
void the user’s authority to operate the equipment.
This device complies with Industry Canada license- exempt RSS st andard(s).
Operation is subjec t to the following two conditions: (1) this device may not
cause interference, and (2) this device must accept any interference, including
inter ference that may cause undesired operation of the device.
Cet appareil est conforme avec Industrie Canada exempt s de licence standard
RSS. L’opération es t soumise aux deux conditions suivantes: (1) cet appareil ne
peut causer d’interférences, et (2) cet appareil doit accepter toute interférence,
y compris les interférences qui peuvent causer un mauvais fonctionnement de
l’appareil.
FCC ID: SO7-205Y0000 FCC ID: SO7-205Z0000
IC ID: 11009A-205Y0000 IC ID: 11009A-205Z0000
™
products a re not 100% reliable for a variet y of reasons (se e
© 2014 Pella Corp oration
IQ SGED 0414
SENSOR PARA PESTILLO
DE PUERTA DE ENTRADA
GUÍA DE INICIO RÁPIDO
Est a guía de inicio r ápido está diseñada únic amente con la
fi nalidad de brindar una descripción general del producto
y de su uso. Antes de usar el produc to, lea toda la guía del
producto y las advertencias.
Escanee el QR Code® o vi site Insynctive.Pella.com/
EntryDoorDeadboltSensor par a obtener toda la guía del
produ cto y las adve rtencia s, videos inf ormativos y otros
consejos rápidos Pella® Insynctive™.
LO QUE INCLUYE:
• SENSOR DE BLOQUEO D E PUERTA DE ENTR ADA: El SENSOR trans mitirá
una señal al PUENTE cuando el pes tillo esté con segu ro o sin seguro.
• SENSOR DE APERTURA/CIERRE DE PUER TA DE ENTR ADA: El SENSOR
transmitirá una señal al PUENTE cuando la puerta s e abra o se cierre.
• CUBIERTA DE BATERÍ A DEL SENSOR DE APERTU RA/CIERRE DE PUE RTA
DE ENTRADA
• GUÍA D E INICIO RÁ PIDO
SE REQUIERE:
• PUENTE (se requiere, se vende por separado): Conec ta de forma inalám
bric a sus produc tos Insync tive a un IND ICADOR DE ESTADO o a un sistema d e
seguridad o de automatización de hogar compatible.
• INDICADOR DE ESTADO (opcional, se vende por separado): Las luces
indic an el estado de los SENSORES Pella® Insynct ive o puede usar un sistema
de seguridad o de automatización del hogar compatible para monitorear su
puerta de entrada.
• PUERTA DE ENTRADA PE LLA PREPAR ADA PARA UN SEN SOR PARA
PESTILLO DE PU ERTA DE ENTRADA
• DESTORNILLADOR DE CABEZA PLANA
• DESTORNILLADOR PHILLIPS
• TALADRO Y BROCA DE 1/8 PULG
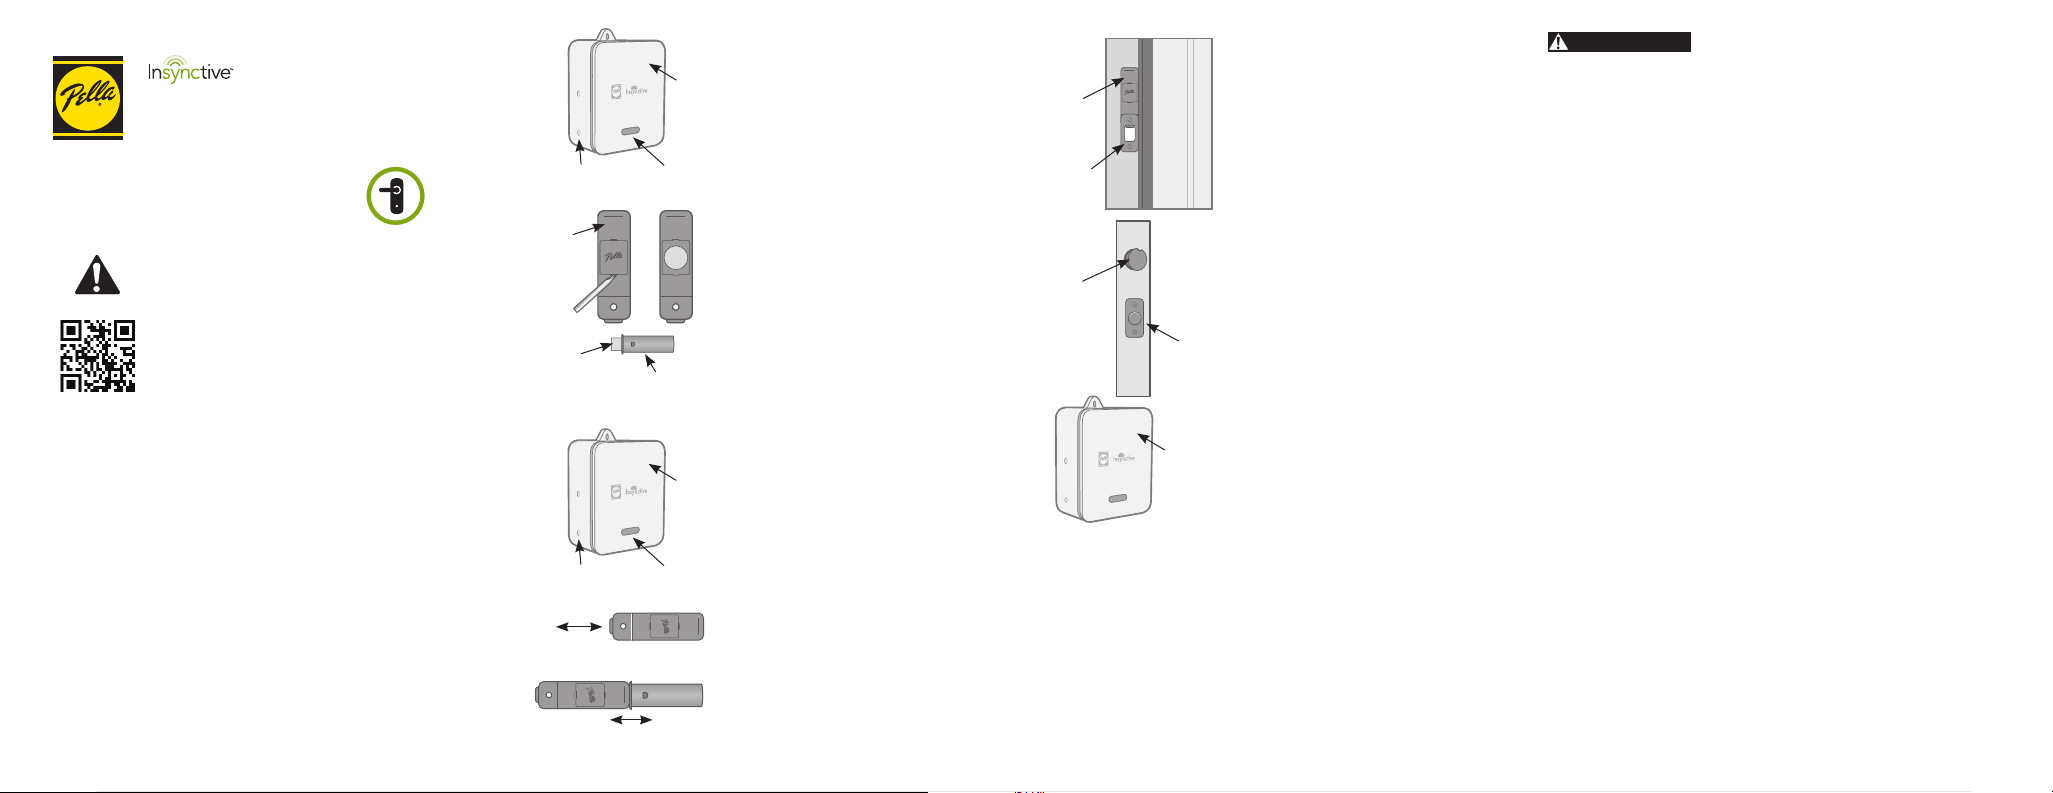
BOTÓN DE
SINCRONIZACIÓN
SENSOR D E
BLOQUEO
PESTAÑA
PLÁSTIC A
BOTÓN DE
SINCRONIZACIÓN
Presione dos veces en menos
de 2 segundos.
Separ e 2,54 cm como mí nimo dos
veces en menos de 2 segundos.
LUZ
SENSOR D E
APERTURA/CIERRE
LUZ
1. Empiece
• Enchufe el PUENTE en un tomacorriente
PUENTE
(la luz se pondrá verde y luego titilará azul).
NOTA: Siga l a guía de inicio r ápido del pue nte para
confi gurar el PUENTE.
2. Prepare los SENSORES
• Use el destornillador de cabeza plana para
retir ar la cubierta de la batería del SENSOR DE
BLOQUEO.
• Retire la batería y la pestaña plástica del
SENSOR DE BLOQUEO. Vuelva a colocar la
batería.
• Retire la pes taña plást ica del SENSOR DE
APERTURA /CIERRE.
• Vuelva a coloc ar las cubier tas. (La cubierta de la
bater ía del SENSOR DE APERTURA/CIERRE se
incluye en una bolsa den tro del paquete).
NOTA: Ust ed tendrá 2 min utos para sin cronizar lo s
SENSOR ES después d e retirar la s pestañas p lásticas .
Si pasa n 2 minutos sin q ue logre la sin cronizaci ón, retire
la bate ría y vuélval a a colocar.
3. Sincronice los SENSORES al PUENTE
• Presione y suelte el botón de s incronización
en el PUENTE (el botón más cercano a la luz).
PUENTE
La luz anaranjada des tellará con tinuamente. El
PUENT E está en modo sincronizac ión mientras
la luz destell e naranja.
• Presione el gatill o del SENSOR DE BLO QUEO
dos veces en menos de 2 segundos.
• La luz verde en el PUENT E y el sonido breve
indic arán que tuvo éxito.
• Toque el SENSOR DE APERTURA /CIERRE en
la línea incrustad a en la parte su perior del
SENSOR DE BLOQUEO y separe 2,54 cm como
mínimo. Repit a la operación dos vec es en
menos de 2 segundos.
• La luz verde en el PUENT E y el sonido breve
indic arán que tuvo éxito.
• Para salir del modo sincronización: mantenga
presionado el botón de sincronización en el
PUENT E hasta que la l uz deje de destellar
anaranjado.
4. Instale el SENSOR DE BLOQUEO
• Abra l a puerta y ubique la placa de la cerradura
con pestillo.
• Use un destor nillador Phil lips para retirar los
SENSOR D E
BLOQUEO
PL ACA PAR A
CERRADURA
CON PESTILLO
tornillos de la placa de la cerradura con pestillo.
• Retire la plac a de la cerradu ra con pestillo y el
acces orio de plástico negro.
• Visi te Insynctive.Pella.com/EntryDoor
DeadboltSensor para obtener instrucciones
de instalación específi c as para el sensor para
pest illo de la puer ta de entrada, ya que los
requerimientos varían según el tipo de puerta.
5. Instale el SENSOR DE APERTURA/CIERRE
• Abra l a puerta y ubique la cubierta plás tica
negra a l costado de l panel de la puerta sobre
SENSOR D E
APERTURA /
CIERRE
PESTILLO
el pestillo.
• Use un destor nillador de cabeza plana para
retir ar la cubier ta plástic a negra.
• Introduzca el SENSOR D E APERTURA/CIERRE
hast a que esté al ra s del borde del panel de la
puerta.
6. Pruebe los SENSORES
• Quite el segu ro a su puert a de entrada co n los
SENSOR ES instalados, y el PUENTE debería
sonar dos veces .
• Ab ra su puert a de entrada c on los SENSOR ES in-
PUENTE
Si va a usar el INDICADOR DE ESTADO de Pella® Insynctive™ para
monitorear sus puertas de entrada, consulte la guía de inicio rápido
en el paquete del INDICADOR DE ESTADO para sincronizar.
¿CUENTA CON UN SISTEMA DE SEGURIDAD O DE AUTOMATIZACIÓN
DEL HOGAR?
Para obtener instrucciones sobre cómo sincronizarlo con los productos
Pella Insync tive, visite Insynctive.Pella.com/HomeAutomation.
¿NECESITA AYUDA CON LOS PASOS ANTERIORES?
Encuentre información sobra la solución de problemas y videos en
Insynctive.Pella.com/Support o llame 855-473-5524.
¿DESE A REGISTRAR DE FORMA SENCILLA LOS PRODUCTOS PELLA
INSYNCTIVE?
Visite Insynctive.Pella.com/Registration para acceder rápidamente a
instrucciones, garantías y videos instructivos.
sta lados, y el PUEN TE debería s onar dos veces .
¡ADVERTENCIA! Los SENSORES DE APERTURA/CIERRE
puede n indicar un es tado de cerr ado aun cuand o la puerta
no est á completam ente cerrad a. Consult e la guía del
producto en Insynctive.Pella.com para obtener una
descripción completa del funcionamiento del SENSOR
PARA PES TILLO DE PUER TA DE ENTRADA.
ADVERTENCIA
El no respectar las advertencias a continuación puede ocasionar la muerte,
lesiones graves o pérdida de objetos valiosos.
• Los productos Pella® Insynctive
(consul te la guía del pro ducto y la adverte ncia en el paso 6 d e esta guía de
inicio rápido para obtener más información). Por tanto, no debe confi ar en los
productos Pella Insy nctive en s ituacione s en las que la vida, la segu ridad o la
protección de bienes valiosos dependan exclusivamente de su buen funcionamiento. Pruebe cada producto al meno s una vez por año pa ra ayudar a ase gurar
un funcionamiento adecuado.
• Los pr oductos Pella Insyncti ve no sustit uyen una supe rvisión atenta de niños
por par te de adulto s.
• Mant enga la bater ía y las piezas p equeñas fue ra del alcanc e de los niños. S i se
ingiere, busque ayuda médica de inmediato.
Lea toda la guía del producto para obtener información y advertencias adicionales.
Cumplimien to con FCC y con el Minist erio de Industrias de Canadá
Este equipo ha sido probado y se ha verifi c ado que cumpl e con los límites para
dispositivos digitales clase B, conforme a la parte 15 de las reglas de la FCC . Estos
límites han sido diseñados para proporcionar una protección razonable contra la
interferencia perjudicial en una instalación residencial. Este equipo genera, utiliza y
puede irradiar energía de radiofrecuencia y, si no se ins tala y usa de acuerdo con el
manual de instrucciones, puede causar interferencia perjudicial a las comunicaciones
de radio. Sin embargo, no se g arantiza que no se producirá n interferencias e n una
instalación en especial. Si este equipo genera una interferencia perjudicial para la
recepción de radio o televisión, que se puede determinar apagando y encendiendo
el equipo, se recomienda al usuar io que intente corregir la interferencia con una o
más de las siguientes medidas:
• Reorientar o reubicar la antena de recepción.
• Aumentar la separación entre el equipo y el rece ptor.
• Conec tar el equipo a un tomacorriente de un c ircuito dis tinto al del receptor.
• Solicitar ay uda al concesionario o a un técnico con experien cia en radio/ TV.
Los cambios o modifi cacione s que no estén ex presamente aprobados por Pella
Corporation podrían anular la autorización del usuario para utilizar el e quipo.
Este dispositivo c umple con las normas RSS sin licencia del Ministerio de Industrias
de Canadá.
El funcionamiento está sujeto a las siguientes dos condiciones: (1) este dispositivo no
debe causar interferencia, y (2) este dispositivo debe aceptar cualquier interferencia
recibida, incluso aqu ella que pudiese caus ar un funcionamiento no deseado del
dispositivo.
Cet app areil est conforme avec Industrie Canada exempt s de licence standar d RSS.
L’opération est soumise au x deux condit ions suivantes: (1) cet appareil ne peut caus er
d’interférences, et (2) cet appareil doit accepter toute interférence, y compris les
interférences qui peuvent causer un mauvais fonctionnement de l’appareil.
FCC ID: SO7-205Y0000 FCC ID: SO7-205Z0000
IC ID: 11009A-205Y0000 IC ID: 11009A-205Z0000
™
no son 100% confi ables por diferentes razones
© 2014 Pella Corp oration
IQ SGED 0414
 Loading...