


Calipsa® Milestone Integration
User Guide
Document number:C6740M
Publication date:03/23
C6740M | 03/23 1

Calipsa® Milestone Integration User Guide
Table of Contents
Introduction 3
Milestone Plugin Integration 3
Overview 3
Running the Installers 3
The Calipsa Agent Service 4
Prerequisites 4
Windows User With XProtect Access 4
Ensuring Analytics Events are Enabled 5
Network Access 5
Recording Rules 5
Activating the Milestone Plugin 6
Troubleshooting Questions 9
Milestone - Manual Entry 10
Creating a Site 10
Setting up Event Alerting within Milestone 11
Setting up SMTP Alerting within Milestone 11
Setting up a New Notification Profile within Milestone 12
Creating a New Event Rule within Milestone 13
Sending alarms back to Milestone 15
Adding your Monitoring Station SMTP Details 18
Accessing Calipsa Account Settings 18
Editing Global Configuration 18
Inputting Your Credentials 19
C6740M | 03/23 2
Calipsa® Milestone Integration User Guide
Introduction
This guide covers the steps required to integrate your Milestone cameras with the Calipsa platform.
Other common integration steps, such as configuring your system to send alarms to your gmail account
are also covered.
When integrating with Milestone, you have two options for performing the integration:
l
Milestone Plugin Integration
l
Milestone - Manual Entry
Milestone Plugin Integration
This guide walks you through the process of installing and setting up the Calipsa Milestone Plugin
Integration.
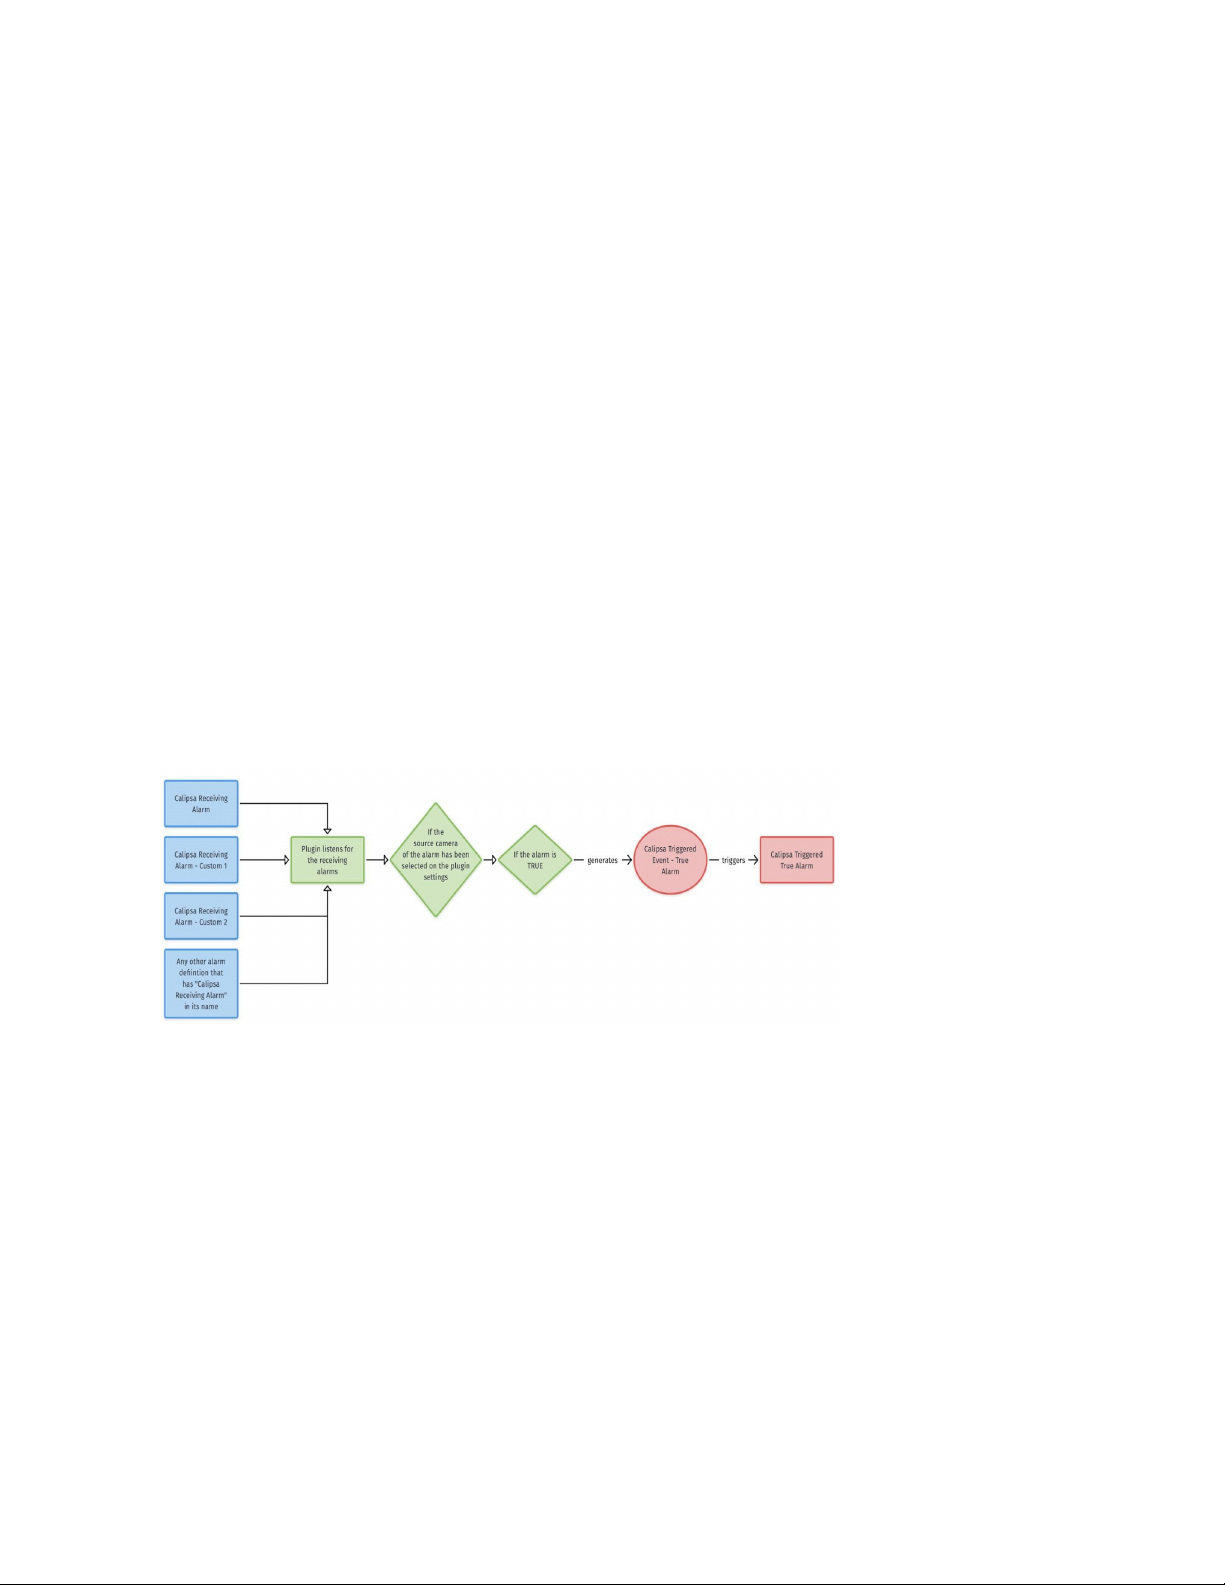
Overview
The plugin will listen to any alarms generated by XProtect that have Calipsa Receiving Alarmas a
substring of their name. Before processing, Calipsa closes these alarms as they come in.
If Calipsa marks the alarm as true, it will generate the Calipsa Triggered Event - True Alarmanalytics
event that the plugin created itself. This event will, in turn, trigger the Calipsa Triggered True
Alarmalarm. This can be verified by looking at the triggers of the Calipsa Triggered True Alarm definition.
The definition of Calipsa Receiving Alarm controls what kinds of events i.e., system, analytics, device
events, etc. that the plugin listens for. By extending/updating this definition, we can change what Calipsa
responds to and what it discards.
l
Calipsa Triggered Event - True Alarmand Calipsa Triggered True Alarmcan also be viewed in the
Smart Client.
l
Calipsa Internally Triggered True Alarm - Plugin Network Failureis an alarm definition that will be
triggered against an event in case of communication failures such as the internet connection to
Calipsa’s AI in the cloud.
Running the Installers
l
After downloading the two installers (for the pluginand the agent) please ensure that they’re not
blocked by Windows or any antivirus software.
l
Run the two installers one by one, granting admin access to both.
l
Running the plugininstaller will invoke an Event Server and Management Client restart.
l
Please make sure that this is not a problem during the time the installation is to be done.
C6740M | 03/23 3
Calipsa® Milestone Integration User Guide
The Calipsa Agent Service
l
The agentinstaller will install a Windows service running in the background that is essential for
alarm processing. When running this installer, please specify an appropriate name for this service
and a TCP port that is vacant on the machine (the defaults are CalipsaAgentServiceInstanceand
60000, respectively).
l
After successful installation, the Calipsa agentservice will be responsible for receiving events
from the plugin running within the Event Server. The agentwill then fetch images and send them
to Calipsa’s AI in the cloud for analysis.
Prerequisites
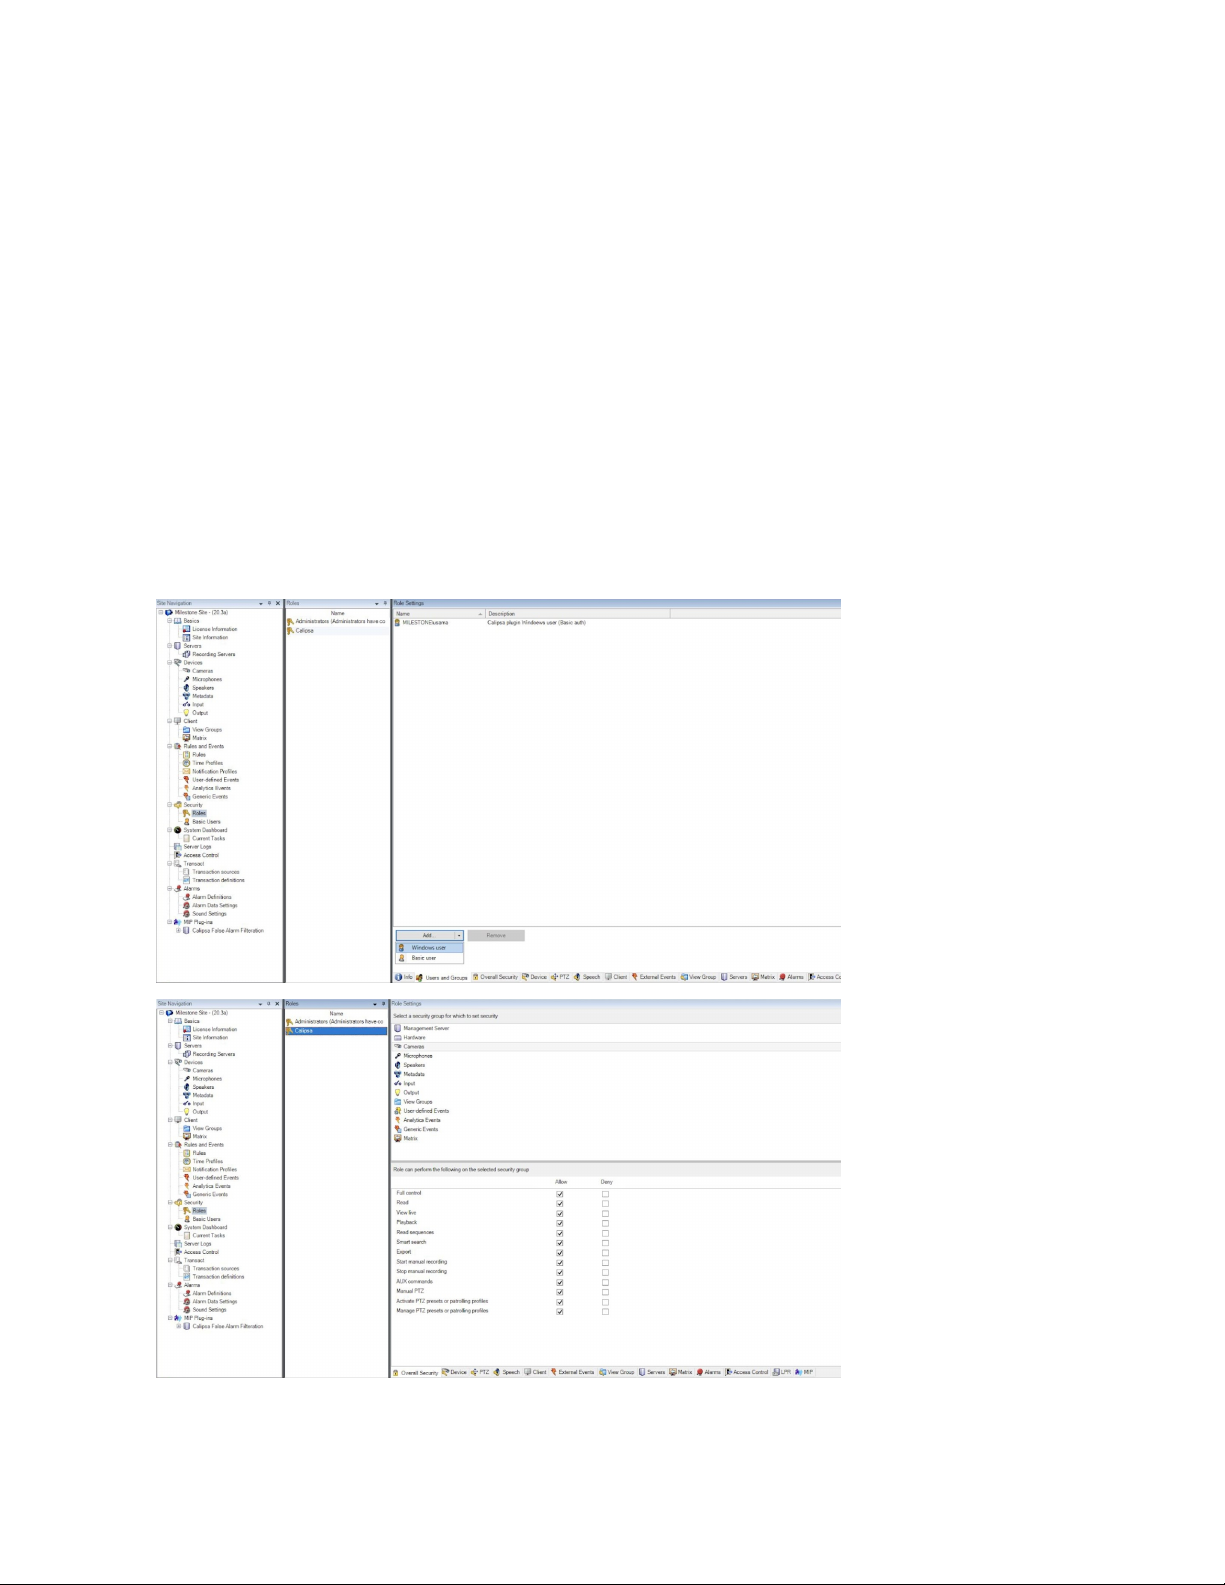
Windows User With XProtect Access
l
The integration requires a Windows user with XProtect access that allows camera footage
retrieval and remote logins.
l
Creating a new dedicated Windows user, solely for the integration with a dedicated role, is
considered good practice since it allows isolating access. Existing users can be used just as
easily.
C6740M | 03/23 4
Calipsa® Milestone Integration User Guide
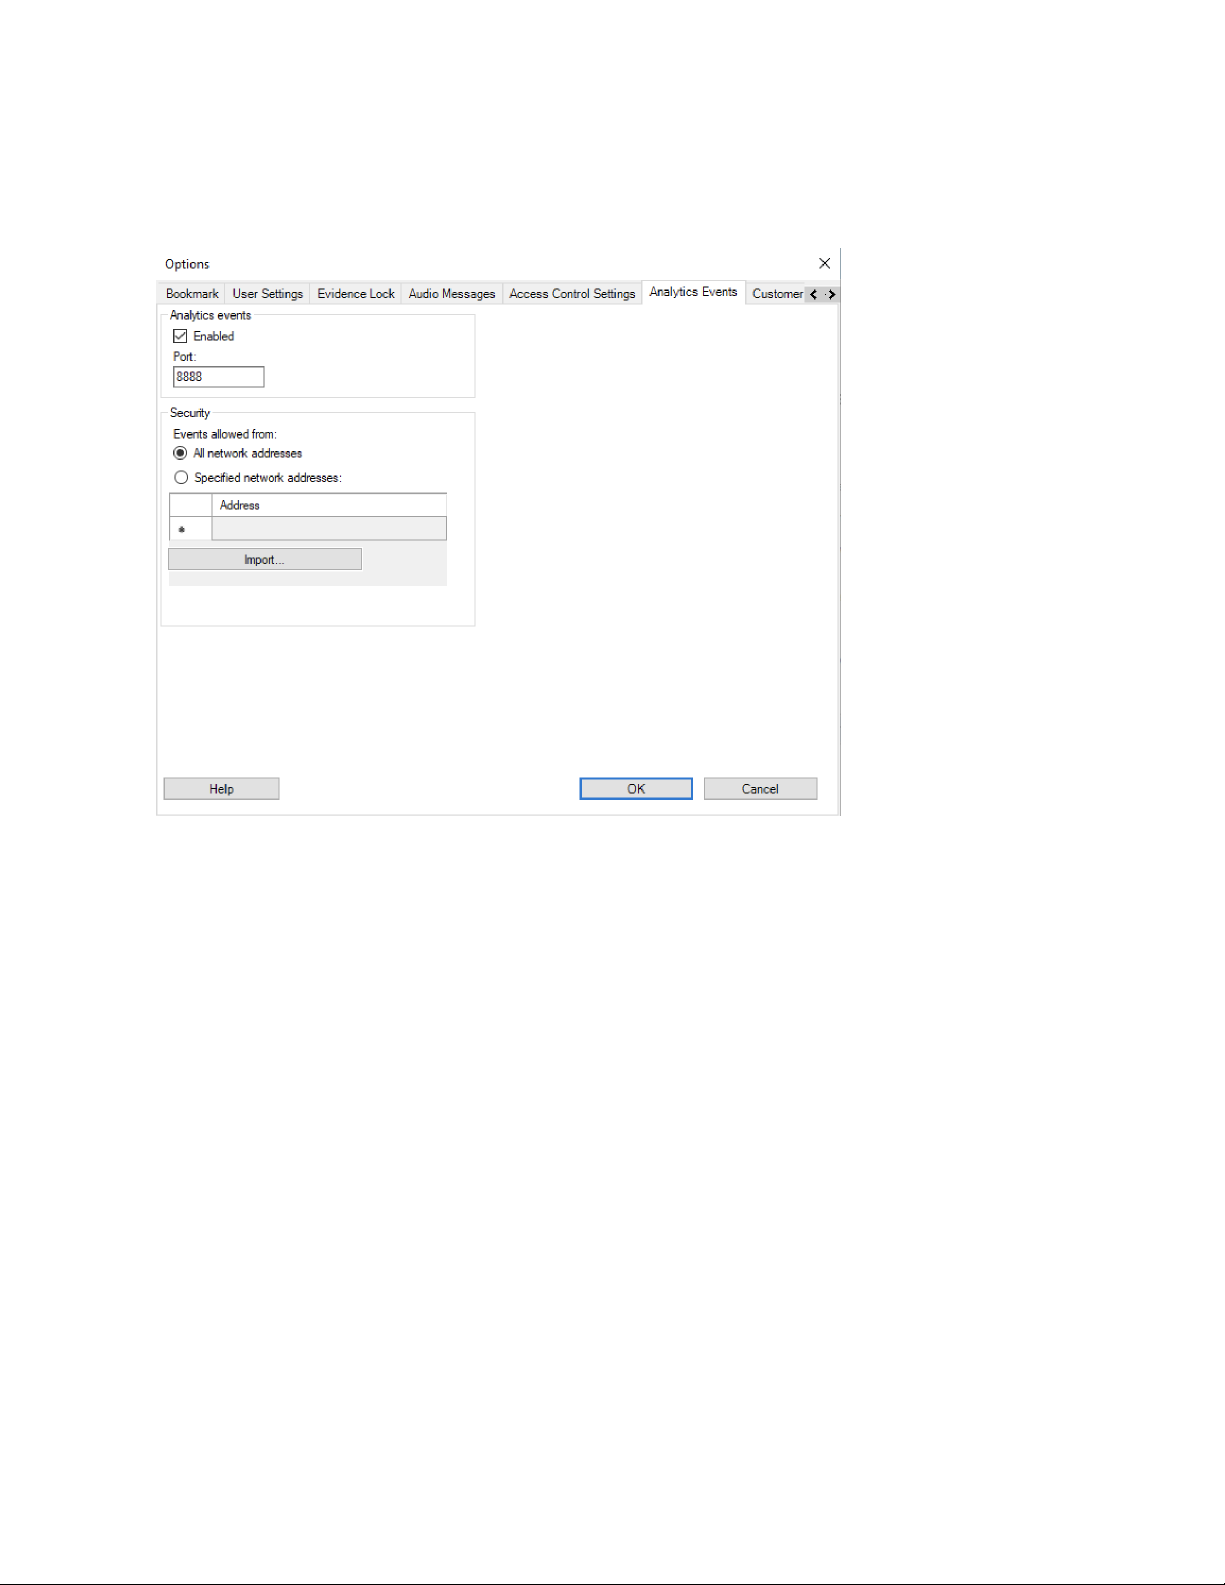
Ensuring Analytics Events are Enabled
1. Under Tools, select Options.
2. Ensure that Analytics Events are enabled and verify the port as well.
Network Access
l
Ensure the port numberchosen on the agent installation (60000 by default) is accessible by the
plugin running in the Event Serverand not blocked by any firewall rules.
l
Ensure the Management Server, which by default runs on thelocal 80 port, is accessible by the
agent. The agent communicates with the Management Server to do a login via the Windows user.
This login is necessary for the subsequent image retrieval from the Recording Server.
l
Ensure the Recording Server, which by default runs on the local 7563 port, is accessible by the
agent. The agent communicates with the Recording Server to fetch images.
l
Ensure Analytics Eventsare enabled, as mentioned earlier, and the respective port (local 9090 or
8888 by default) is accessible by the agent. The agent communicates with this port to post true
alarms.
l
Ensure the agent servicehas access to the internet such that it can communicate over HTTPs
with milestone.calipsa.ioon the remote port 443. If there’s a proxy involved, please let Calipsa
support know and we’ll manage a solution as the integration supports HTTP proxies as well.
Recording Rules
l
The integration relies on footage saved to disk when trying to fetch images for a camera against
an event. XProtect recording rules determine when footage gets saved. Please ensure that
appropriate and correctly timed recording rules are in place. Otherwise image retrieval may not
function properly.
C6740M | 03/23 5
Calipsa® Milestone Integration User Guide
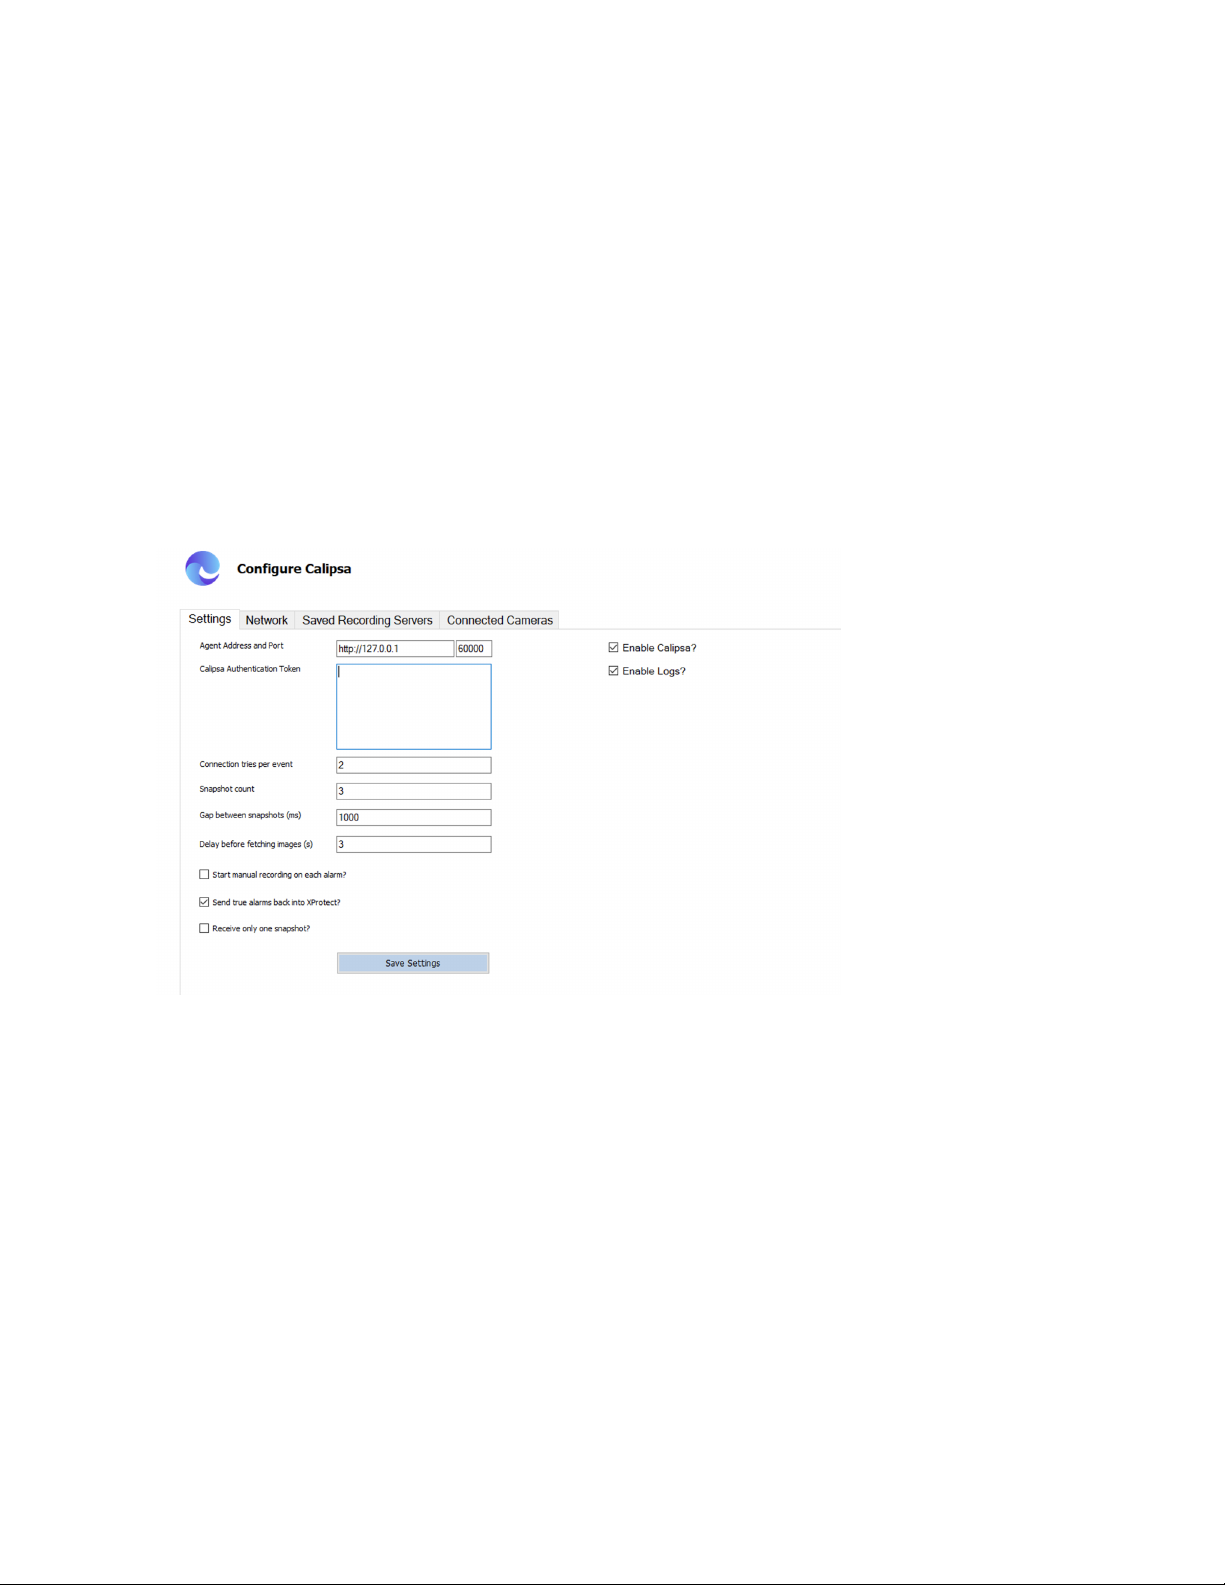
Activating the Milestone Plugin
1. After restarting the Management Client, you’ll find the Calipsa False Alarm Filterplugin under the
MIP Plug-insleaf within the Site Navigation panelon the left-hand side of the screen
2. Ensure that the Agent Address and Portfields point to the agent service installed earlier.
3. Create a Calipsa Authentication Tokenby logging into the Calipsa Dashboard.
4. Log into the Calipsa Dashboard.
5. Click Settings.
6. Click the …symbol next to Integrations.
7. Click Milestone.
8. Click Create new token….
9. Copy the token presented within the Calipsa window into the Calipsa Authentication Tokentext
field within Milestone.
10. Click Save Settings.
11. On the Networktab, enter and commit details for recording servers on the system.
Note: The Usernameand Passwordrefer to the credentials of the Windows user with XProtect access
mentioned earlier.
C6740M | 03/23 6
 Loading...