

Page 1

Calipsa® Hikvision Integration
User Guide
Document number:C6739M
Publication date:03/23
C6739M | 03/23 1
Page 2

Calipsa® Hikvision Integration User Guide
Table of Contents
Introduction 3
Adding a Hikvision Camera to Calipsa 3
Creating a Site 3
Adding a Camera 3
Configuring Cameras 4
Copying Calipsa Configuration Email Address 5
Editing the Camera DNS Settings 6
Editing Camera Email Settings 6
Setting up Smart Event Alerting 7
Setting up Basic Event Alerting 9
Troubleshooting Questions 10
Adding a Hikvision NVR to Calipsa 11
Creating a Site 11
Setting up Smart Event Alerting 13
Setting up Basic Event Alerting 14
Common Troubleshooting Questions 16
Copying Calipsa Configuration Email Address 17
Editing the Camera DNS Settings 18
Editing the Camera Email Settings 19
Troubleshooting Questions 20
Hikvision NVR Single Image Alarms - Calipsa Workaround 21
Adding your Monitoring Station SMTP Details 23
Accessing Calipsa Account Settings 23
Editing Global Configuration 23
Inputting Your Credentials 24
C6739M | 03/23 2
Page 3

Calipsa® Hikvision Integration User Guide
Introduction
This guide covers the steps required to integrate your Hikvision cameras with the Calipsa platform. Other
common integration steps, such as configuring your system to send alarms to your gmail account are
also covered.
Use the following sections to help connect to Hikvision cameras and NVRs:
l
Adding a Hikvision Camera to Calipsa
l
Adding a Hikvision NVR to Calipsa
l
Hikvision NVR Single Image Alarms - Calipsa Workaround
Adding a Hikvision Camera to Calipsa
This guide walks you through the manual process of configuring aHikvision camerato send email alerts
to Calipsa when it is not connected to a Hikvision NVR.
Creating a Site
1. Once you’ve created a Clientin Calipsa, create a Site.
2. When asked Is this a DVR/NVR site, select No.
3. Click Add site.
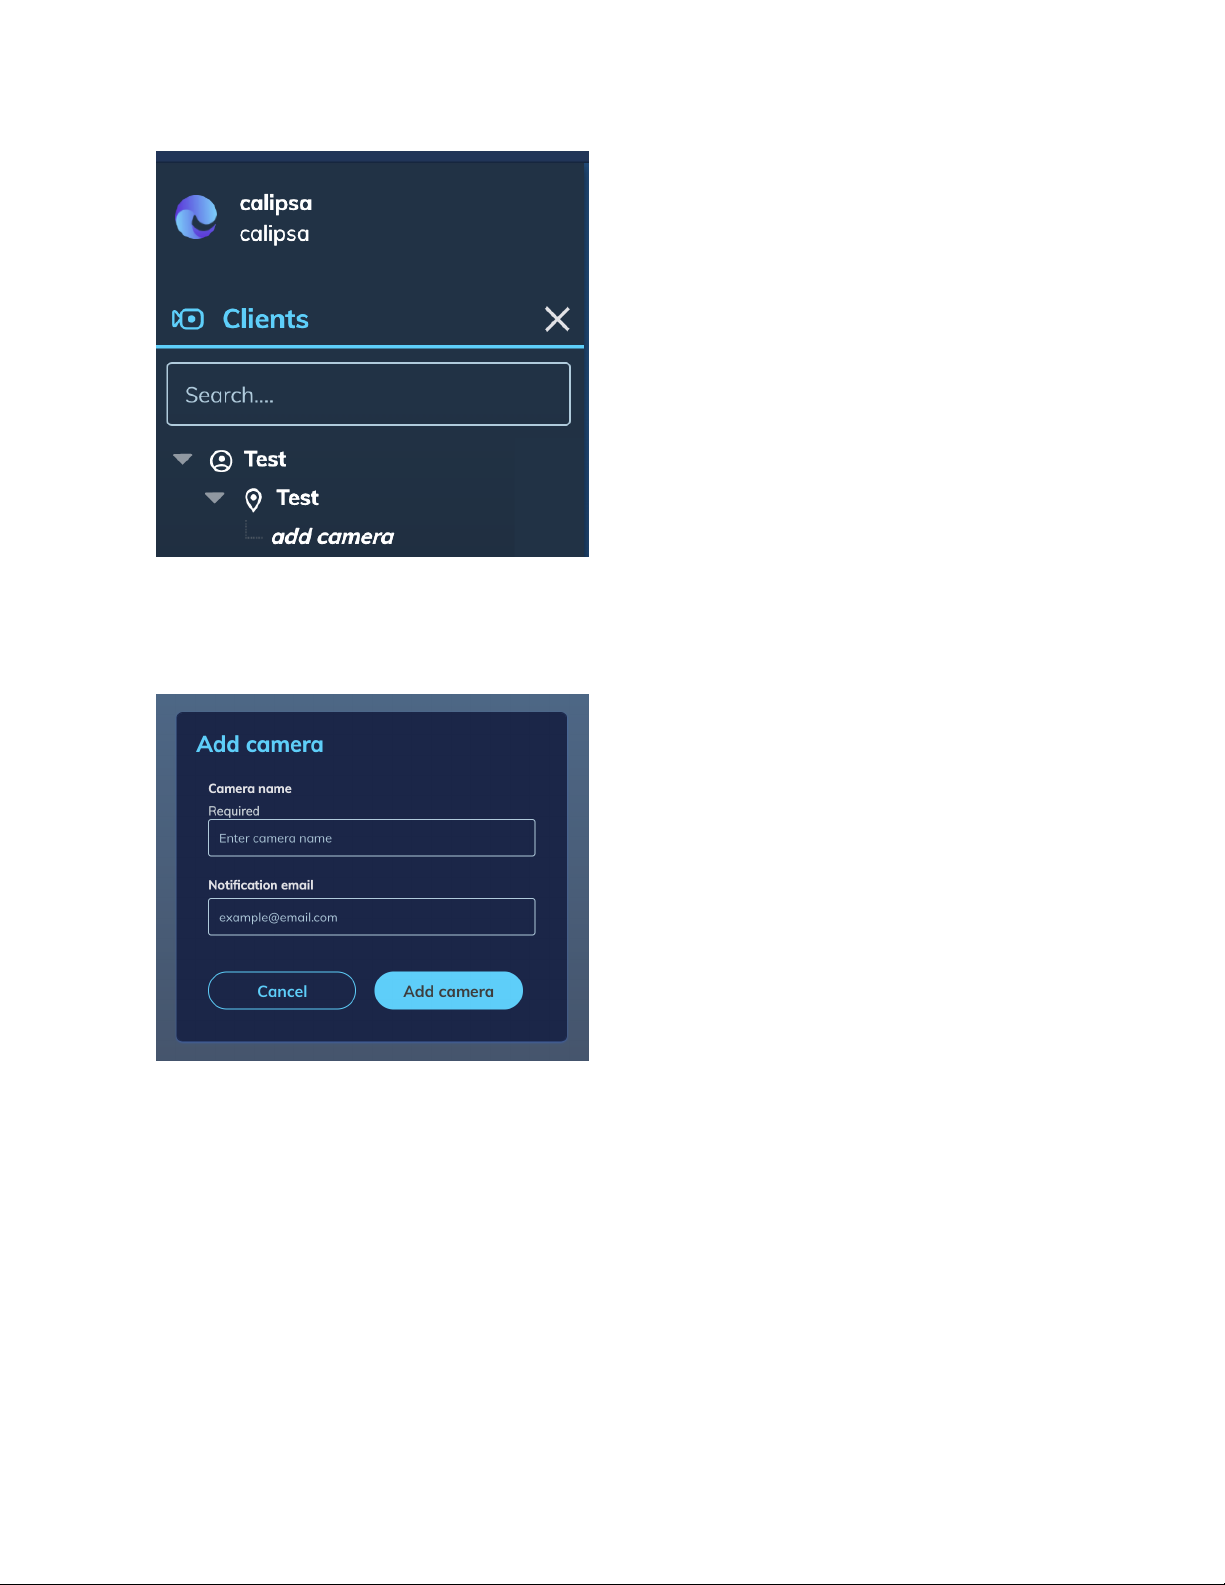
Adding a Camera
1. Once the site has been created, click add camera in the left-hand tree.
C6739M | 03/23 3
Page 4
Calipsa® Hikvision Integration User Guide
2. Input the Camera name.
3. Input the Notification email if applicable.
Note: use the email address where you would like Calipsa to forward alarm events toe.g., Immix Snumber, or Gmail address, etc.
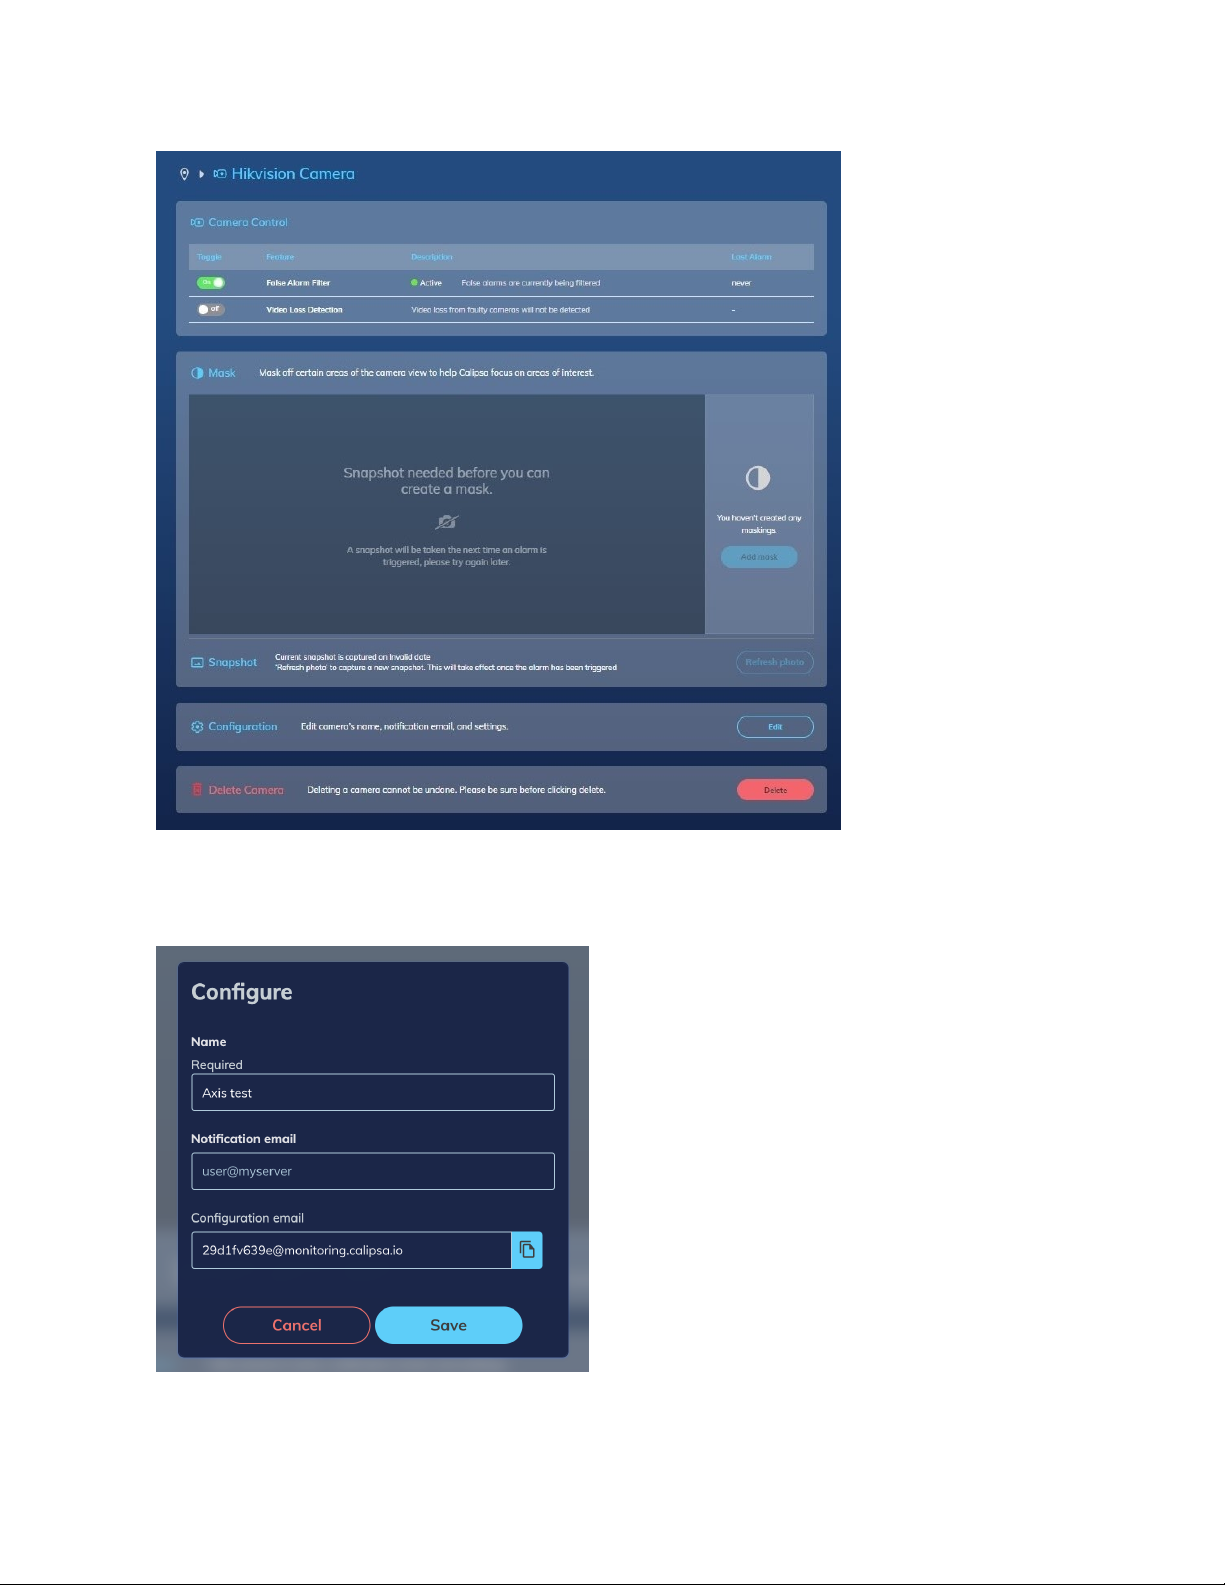
Configuring Cameras
1. Once the camera is created, under the Configurationsection, click Edit.
C6739M | 03/23 4
Page 5
Calipsa® Hikvision Integration User Guide
Copying Calipsa Configuration Email Address
1. Under the Configuresection, click the blue icon to the right of Configuration email to copy the
Calipsa configuration email to your clipboard.
C6739M | 03/23 5
Page 6

Calipsa® Hikvision Integration User Guide
Editing the Camera DNS Settings
1. Log into your Hikvision camera.
2. Click Network > Basic Settings > TCP/IP
3. Enter Preferred DNS Server→8.8.8.8
4. Enter Alternate DNS Server→8.8.4.4
5. ClickSave.
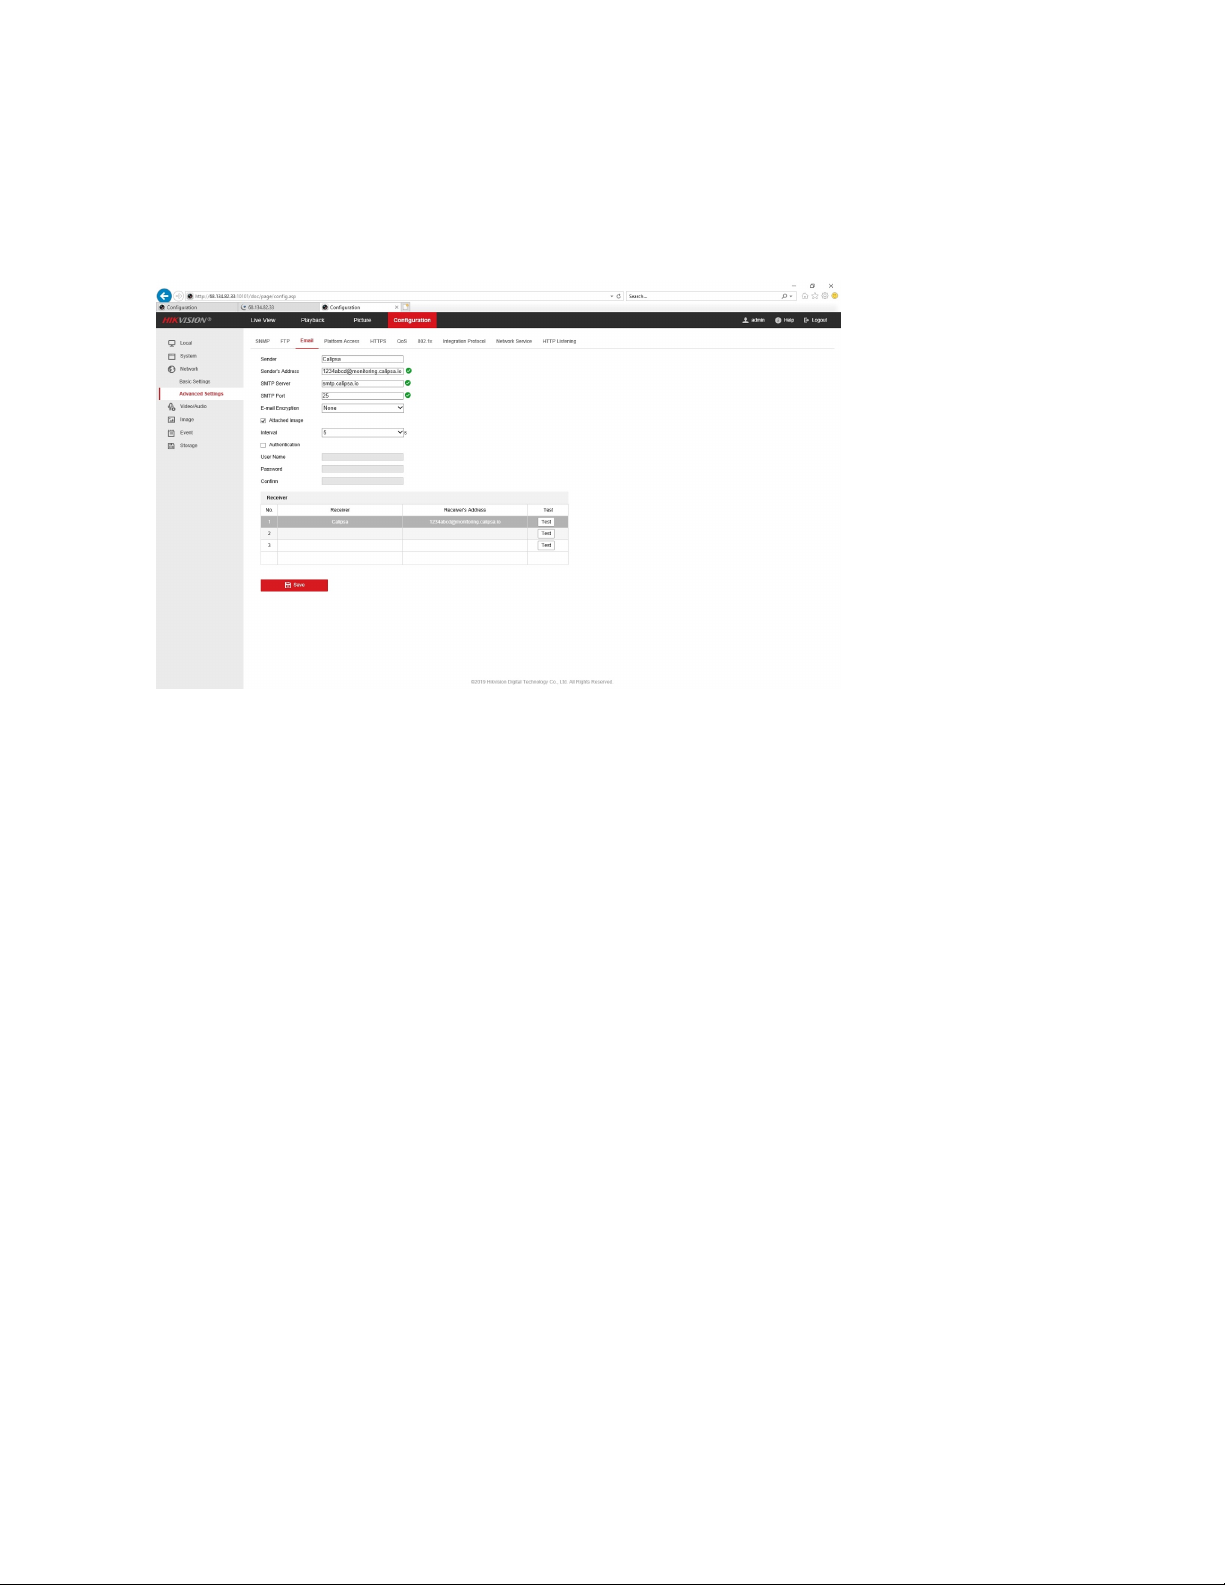
Editing Camera Email Settings
1. Under Network, click Advanced Settings.
2. Click Email.
3. Enter the following parameters to direct the camera to send alarm emails to Calipsa:
l
Sender: <Immix “S” address for this specific camera>
l
Sender’s Address: <Immix “S” address for this specific camera>
l
SMTP Server: smtp.calipsa.io
l
SMTP Port: 25
l
Email Encryption: None
l
Attached Image: Select this box
l
Interval: 5
C6739M | 03/23 6
Page 7
Calipsa® Hikvision Integration User Guide
l
Receiver: Calipsa
l
Receiver’s Address: <Calipsa configuration email for this specific camera (ex.
1234abc@monitoring.calipsa.io)>
4. Click Testto verify that the connection is successful.
Setting up Smart Event Alerting
Note: if Smart Eventalerting is not available on your particular device, please skip to the Setup Basic
Event Alerting Section of this guide instead.
1. Click Configuration > Event > Smart Event.
2. Click Intrusion Detection> Enable.
3. Click Area Settings> Clear All> Draw Area
4. Draw a region of interest that you would like Calipsa to receive alarm events for.
5. Click Stop Drawing
6. Click Save.
C6739M | 03/23 7
Page 8

Calipsa® Hikvision Integration User Guide
7. Under Arming Schedule, verify that the alarm event Arming Scheduleis correct.
8. Click Save.
C6739M | 03/23 8
Page 9

Calipsa® Hikvision Integration User Guide
9. Under Linkage Method, selectSend Email.
10. Click Save.
Setting up Basic Event Alerting
Skip this section if Smart Eventalerting was configured in the previous section.
1. Click Configuration > Event > Basic Event
2. Click Motion Detection> Enable Motion Detection
3. Click Area Settings> Clear All> Draw Area>Draw a region of interest that you would like Calipsa
to receive alarm events for.
4. Click Stop Drawing
5. Click Save.
C6739M | 03/23 9
Page 10

Calipsa® Hikvision Integration User Guide
6. Click Arming Schedule andverify that the alarm event Arming Scheduleis correct.
7. Click Save.
8. Under Linkage Method,select Send Email .
9. Click Save.
The camera screenshot will appear in Calipsa once an alarm is triggered. Continue the process untilyou
have configured all cameras you wish to add to Calipsa.
Troubleshooting Questions
Q: Test email was unsuccessful, what can I try next?
C6739M | 03/23 10
Page 11

Calipsa® Hikvision Integration User Guide
A:Change the SMTP Portfrom 25to 26and try the test again.
Q: I’m still not seeing any alarms come into the Reporting page on the Calipsa dashboard.
A: Make sure the device firmware is completely up to date:
1. Log in to your Hikvision device.
2. Under Configuration, select System, then select System Settings.
3. Note the Firmware Version. Visit the manufacturers website and upgrade the firmware to the
newest version supported by your particular device.
Adding a Hikvision NVR to Calipsa
This guide walks you through the process of configuring a Hikvision NVR to send email alerts to Calipsa
Creating a Site
1. Once you’ve created a Clientin Calipsa, create a Site.
2. When asked Is this a DVR/NVR site, select Yes.
3. Enter all relevant information.
4. Click Add site.
C6739M | 03/23 11
Page 12

Calipsa® Hikvision Integration User Guide
If the setup is successful, you will see the following screen.
C6739M | 03/23 12
Page 13

Calipsa® Hikvision Integration User Guide
5. Click Done.
Setting up Smart Event Alerting
If Smart Eventalerting is not available on your particular device, please skip to the Setup Basic Event
AlertingSection of this guide instead.
1. Under Configuration, select Event, then select Smart Event.
2. Under Intrusion Detection, then select Enable.
3. Click Area Settings> Clear All> Draw Area>Draw a region of interest that you would like Calipsa
to receive alarm events for.
4. Click Stop Drawing
5. Click Save.
6. Click Arming Scheduleand verify that the alarm event Arming Scheduleis correct.
7. Click Save.
C6739M | 03/23 13
Page 14

Calipsa® Hikvision Integration User Guide
8. Click Linkage Method ,select Send Email.
9. Click Save.
Setting up Basic Event Alerting
Skip this section if Smart Eventalerting was configured in the previous section.
1. Click Configuration > Event > Basic Event
2. Click Motion Detection> Enable Motion Detection
3. Click Area Settings> Clear All> Draw Area>Draw a region of interest that you would like Calipsa
to receive alarm events for.
4. Click Stop Drawing.
5. Click Save.
C6739M | 03/23 14
Page 15

Calipsa® Hikvision Integration User Guide
6. Click Arming Schedule and verify that the alarm event Arming Scheduleis correct.
7. Click Save.
8. Under Linkage Method,select Send Email .
9. Click Save.
C6739M | 03/23 15
Page 16

Calipsa® Hikvision Integration User Guide
The camera screenshot will appear in Calipsa once an alarm is triggered. Continue the process until you
have configured all cameras you wish to add to Calipsa.
Common Troubleshooting Questions
Q: The automatic site configuration setup was ‘unsuccessful’ - what can I try next?
A:If any of the steps in the automatic configuration process fail (see screenshot below), you’ll have to
manually configure the NVR instead (see Manually Configure Hikvision NVR instructions below).
C6739M | 03/23 16
Page 17

Calipsa® Hikvision Integration User Guide
Q: How do I configure my Hikvision NVR manually in preparation for Calipsa integration?
A:Follow the 3 stepsbelow to manually add your Hikvision NVR into Calipsa if you have issues with the
Calipsa automatic site setup feature:
Copying Calipsa Configuration Email Address
1. Under the Configuresection, click the blue icon to the right of Configuration email to copy the
Calipsa configuration email to your clipboard.
C6739M | 03/23 17
Page 18

Calipsa® Hikvision Integration User Guide
Editing the Camera DNS Settings
1. Log in to your Hikvision NVR.
2. Under the Configuration tab, navigate to Network > Basic Settings > TCP/IP.
3. Under Preferred DNS Server, enter 8.8.8.8
4. Under Alternate DNS Server, enter 8.8.4.4
5. Click Save.
C6739M | 03/23 18
Page 19

Calipsa® Hikvision Integration User Guide
Editing the Camera Email Settings
1. Under Network, select Advanced Settings
2. Click Email.
3. Enter the following parameters to direct the camera to send alarm emails to Calipsa:
l
Sender: <Immix “S” address for this specific camera>
l
Sender’s Address: <Immix “S” address for this specific camera>
l
SMTP Server: smtp.calipsa.io
l
SMTP Port: 25
l
Email Encryption: None
l
Attached Image: Select this box
l
Interval: 5
l
Receiver: Calipsa
l
Receiver’s Address: <Calipsa configuration email for this specific camera e.g.,
1234abc@monitoring.calipsa.io>.
4. Click Testto verify the connection was successful.
C6739M | 03/23 19
Page 20

Calipsa® Hikvision Integration User Guide
Troubleshooting Questions
Q: The NVR test email was unsuccessful, what can I try next?
A:Change the SMTP Portfrom 25to 26and try the test again.
Q: I’m still not seeing any alarms come into the Reporting page on the Calipsa dashboard.
A: Cameras will begin to automatically populate into Calipsa as those devices alarm on respective alarm
events. If cameras are still not populated, make sure the device firmware is completely up to date:
1. Log in to your Hikvision device.
2. Under Configuration, select System then select System Settings.
3. Note the Firmware Version. Visit the manufacturers website and upgrade the firmware to the
newest version supported by your particular device.
C6739M | 03/23 20
Page 21

Calipsa® Hikvision Integration User Guide
Hikvision NVR Single Image Alarms - Calipsa Workaround
What is the issue?
In recent times it has been noticed that some Hikvision NVRs are sending through alarms with only one
image included compared to the three images we would usually expect. In some instances it affects all
alarms from a given camera(s) while in other instances it affects sporadic alarms.
Click here for more details on what may cause this issue.
What is Calipsa's solution?
Unfortunately this issue is not something that is controlled by Calipsa, the issue is that the required
images are not being attached to the alarm email generated by the Hikvision NVR.However, he have
made adjustments within our own Hikvision integration to try and resolve this issue as much as we can.
In the instance that we receive a Hikvision alarm that contains only a single image (or no images at all)
Calipsa will attempt to connect back to the NVR to pull further snapshots to be used for AI analysis.
NOTE: This solution is only available for Hikvision NVR's connected directly to Calipsa (not via
integrations such as Sentinel/Immix AI-link.)
What is required for this to work?
There are some basic setup requirements in order for this solution to work:
l
The NVR network must be open to Calipsa.
l
You will need to either open up the IP/port for the site completely or whitelist the specific IP
addresses below:
l
52.19.32.51
l
52.212.236.183
l
The site cannot be connected via a VPN (we require a direct connection to your NVR.
l
Authentication methods on the NVR may need to be altered.
l
Depending on your setup you may have the authentication method set to "digest", for Calipsa
to be able to connect to your NVR we require that the authentication method be changed to
"digest/basic" or just "basic".
l
NVR File Path: Configuration -> System -> Security -> Authentication
C6739M | 03/23 21
Page 22

Calipsa® Hikvision Integration User Guide
Common Troubleshooting Questions
1. What do I do if I am having the single image issue via Immix-AI link?
Sites connected via Immix have two possible options for alarm footage:
Attached Footage: images attached to the alarm email from the NVR
Recorded Footage: footage retrieved from the NVR by Immix connecting back to the NVR
In order to avoid single image alarms from coming through you will simply need to disable the
attached footage from coming through on the NVR (This can be found in the Network/Email
settings of the NVR) and then you will need to ensure you have alarm recording actions set in
Immix to connect to the NVR and pull relevant footage when an alarm is triggered.
2. Why am I still seeing single image alarms even though I have the above setup correctly?
The solution we have created is a workaround, not a fix to the issue (as it is out of Calipsa's
control), while it should work in most cases there may be certain circumstances where our solution
may not work.
For example, if the root cause of the issue is an unstable network connection, then when Calipsa
tries to connect to the NVR to pull images the connection may fail as the network drops. In this
instance we will revert to just presenting the information we have which is just the single image.
But if you have checked the general causes of this problem and found no issues please do reach
out to the Calipsa support team (support@calipsa.io) and we will help investigate the situation
with you.
C6739M | 03/23 22
Page 23

Calipsa® Hikvision Integration User Guide
Adding your Monitoring Station SMTP Details
This guide is for manually configuring Calipsa to forward true alarms to your monitoring station software
via email.
NOTE: Please ensure our Calipsa IP addresses are whitelisted on your monitoring station software
before completing this setup. Otherwise the true alarms sent to you may get blocked. See the Calipsa
Email Alarm Notifications Manual for instructions on Whitelisting Calipsa's IP addresses.
Accessing Calipsa Account Settings
1. Log into your Calipsa account.
2. In the bottom left-side panel, select Settings.
Editing Global Configuration
1. Under Account Settings, navigate to Global configuration.
2. Next to Global configuration, click Edit.
C6739M | 03/23 23
Page 24

Calipsa® Hikvision Integration User Guide
Inputting Your Credentials
Under Global configuration, input the credentials of your monitoring station software. The credentials
include the server information you would have had the cameras/NVRs alarming to before incorporating
Calipsa into your process.
1. Under Host/IP Address, enter the IP address/DNS of your server
2. Under HTTP port, enter the HTTP port number. If unsure, try entering 25.
3. Under Username and Password, enter the login credentials for your server. If you are using
Immix, leave this section blank.
4. Under Test Email, use the example email address belonging to that sever. For example,
S123@immixalarms.com for an Immix server.
5. Test the connection.
6. If connected, click Save.
NOTE: These settings will automatically apply to all new sites added. To direct a specific site to a
different location, you will need to change the monitoring station SMTP details on the site level.
Troubleshooting Questions
Q: The Test email said successful however I cannot see a test email received in Calipsa.
A: If the test fails please follow the steps below in order.
1. Check that you whitelisted our relevant IP addresses within your monitoring station sever.
2. Check that you entered the correct credentials. Even the test email needs to be an email address
that exists within your server.
3. Try enabling "Use proper Helo". this is a different method of connection to fit with the additional
security requirements of some systems.
4. Reach out to the Calipsa support team by submitting a request or emailing: support@calipsa.io
Q: Can I send alarms to an email address instead?
A: Yes you can send to an email server as long as the specified email server allows it within their security
settings. Please see the Calipsa Email Alarm Notifications Manual for an example.
C6739M | 03/23 24
Page 25

Calipsa® Hikvision Integration User Guide
Pelco, Inc.
625 W. Alluvial Ave., Fresno, California 93711 United States
(800) 289-9100 Tel
(800) 289-9150 Fax
+1 (559) 292-1981 International Tel
+1 (559) 348-1120 International Fax
www.pelco.com
Pelco, the Pelco logo, and other trademarks associated with Pelco products referred to in this publication are trademarks of Pelco,
Inc. or its affiliates. ONVIF and the ONVIF logo are trademarks of ONVIF Inc. All other product names and services are the property of
their respective companies. Product specifications and availability are subject to change without notice.
© Copyright 2023, Pelco, Inc. All rights reserved.
 Loading...