

Page 1

Calipsa® Genetec Integration
User Guide
Document number:C6750M
Publication date:04/23
C6750M | 04/23 1
Page 2

Calipsa® Genetec Integration User Guide
Table of Contents
Introduction 3
Genetec 5.10 3
Prerequisites 3
Downloads 3
Installation 3
Running the Installer 3
Logging on to the Windows Service 4
Troubleshooting Installation 6
Configuration 6
Starting application 7
Restarting service 7
Connecting via VMS 8
Creating an Access Token in Calipsa 8
Connecting to Calipsa via Cloud Configuration 9
Configuring Connector 9
Configuring Failover 10
Configuring SMPT 11
Reseting SMPTConfigurationSettings 12
Entities 12
Adding and Removing Cameras 12
Selecting Behaviors 13
Masks 13
Updating Masks 13
Exporting Camera Lists 14
Validating that the Connector is Running 16
Troubleshooting 16
Resources 16
Enabling Genetec Logs 16
Disabling Genetec Logs 17
Switching Parallel Image Processing to Serial 17
Checking Version 17
Known Issues 17
Too long processing for camera: <guid> 17
Not Enough Images for Camera: <guid> or Too Long Processing for Camera <guid> 18
The SSL Connection could not be established 18
Masks for specific Cameras are not sending updates to Calipsa 19
Error while handling subscriber events 20
The number of cameras does not match on primary and failover servers. 20
The wrong service’s states are displayed on the failover configuration tab 21
Adding your Monitoring Station SMTP Details 22
Accessing Calipsa Account Settings 22
Editing Global Configuration 22
Inputting Your Credentials 23
C6750M | 04/23 2
Page 3

Calipsa® Genetec Integration User Guide
Introduction
This guide covers the steps required to integrate your Genetec cameras with the Calipsa platform. Other
common integration steps, such as configuring your system to send alarms to your gmail account are
also covered.
Genetec 5.10
This guide outlines the steps involved in installing and configuring the Calipsa Integration with Genetec
5.10.
Prerequisites
l
Calipsa subscription (Basic/Detect or higher)
l
Genetec Security Center 5.10 SDK installed
l
Part number: GSC-1SDK-CALIPSA-DETECT
l
Genetec firewall rules opened
l
Motion detection enabled for Genetec cameras
l
Installed Microsoft C and C++ (MSVC) Runtime libraries
l
.NET Framework version 4.8 Runtime
Downloads
https://github.com/msicie/SaaS-Aware-Video-Module_Calipsa-Plugins/releases
https://drive.google.com/drive/folders/1wE1LYXRVh-XI3Ek-PoZKKFhTTHHPNv4c
https://learn.microsoft.com/en-us/cpp/windows/latest-supported-vc-redist?view=msvc-170
http://go.microsoft.com/fwlink/?prd=11324&pver=4.5&sbp=AppLaunch&plcid=0x409&o1=.NETFramew
ork,Version=v4.8&processName=Vms.Plugin.exe&platform=0009&osver=6&isServer=1&shimver=4.0.
30319.0
Installation
Running the Installer
1. Run installer Calipsa.Integration.Genetec.Installer-[version].msi.
2. Specify service login method.
3. Wait for the installation to finish.
4. Click Finish.
C6750M | 04/23 3
Page 4

Calipsa® Genetec Integration User Guide
5. The Calipsa Integration Service icon will appear on your desktop.
Logging on to the Windows Service
During the installation process you can choose which option should be used to log in to the Windows
service. When no specific user is required, leave the default setting as Local System account.
C6750M | 04/23 4
Page 5

Calipsa® Genetec Integration User Guide
Changing the Service Log in Method
You can change which method should be used to log in to Calipsa. You can also set the account to a
local user or domain user.
1. Under Log on as:, select This account:
2. Next to this account:, always include the domain name or computer name, such as
DomainName\UserName.
3. Enter password, then re-enter password to confirm.
4. Click Next.
C6750M | 04/23 5
Page 6

Calipsa® Genetec Integration User Guide
Troubleshooting Installation
If the service fails to start with the provided account and password, the following dialog will appear:
1. First, click Retry and re-enter your login credentials.
2. If you are still unsuccessful, verify with your system administrator that you have sufficient
privileges.
Configuration
This section is used for configuring the connection between the VMS and Calipsa. You can also modify
how the connector behaves.
C6750M | 04/23 6
Page 7

Calipsa® Genetec Integration User Guide
Starting application
The Calipsa application is divided into two parts: a windows service and User Interface application. The
windows service should be running in the background at all times. After running the UI application, you
can find the icon in the bottom-right windows tray. If you do not see the Calipsa icon, try selecting the
carrot icon to expand the menu.
Restarting service
In the bottom-right corner menu, you will see the Calipsa icon. If there is a red circle on the icon, it means
the service is not running.
1. To restart Calipsa, right-click the Calipsa icon.
2. Select Start Service from the menu.
C6750M | 04/23 7
Page 8

Calipsa® Genetec Integration User Guide
Connecting via VMS
1. Under Settings, enter the VMSGeneral Settings.
2. Under Server, enter the VMS IP address or hostname and the port number.
3. Enter username and password.
4. Click Save VMSSettings.
5. The connector icon will turn green if the connection is successfully.
Creating an Access Token in Calipsa
To make a secure request to the Calipsa service API, you need to create an Access Token.
1. Under Settings, click Security.
2. Navigate to Integrations, then to Calipsa API.
3. Click +Create New Token.
4. Copy the token.
C6750M | 04/23 8
Page 9

Calipsa® Genetec Integration User Guide
Connecting to Calipsa via Cloud Configuration
1. Under Cloud Configuration, click the toggle to enable.
2. Select the Calipsa instance region from the drop-down menu.
3. Enter the Calipsa authentication token you copied in the previous section.
4. Click Save Calipsa settings.
5. After the Calipsa site is created, the site name should appear in the user interface.
Configuring Connector
You can decide how long Calipsa keeps modified images:
l
Time : remove files after a certain number of days
l
Size: remove oldest files after reaching a certain number of files in the directory
You can set up periodic mask updates:
l
Select the number of days and times when automatic mask update task should be executed
l
Select optional email address for mask update notifications
You can enable or disable alarm storing on the disk. For optimization purposes, you should disable it.
You can choose a logging level.
C6750M | 04/23 9
Page 10

Calipsa® Genetec Integration User Guide
Configuring Failover
Failover allows you to configure redundant Integration Service instances when using two different
machines. If the Integration Service works properly, only the primary node communicates with VMS and
Calipsa. The primary node sends updates to the secondary node. If for any reason the primary instance
is stopped, the secondary node takes over its responsibilities and communicates with VMS and Calipsa.
The secondary node is always in read only mode, which means that cameras and behaviors can be
managed only by the primary node.
Failover functionality requires:
l
Communication between primary and secondary machines. Port 60000 needs to be opened.
l
The same Calipsa region, site name and token should be used on both machines.
l
Time needs to be synchronized between machines.
l
The same application version on both machines
Configuring the Primary machine
1. Configure connection to the VMS in the VMS tab.
2. In the Calipsa tab, change the region and the site name if necessary.
3. Set a token.
4. Click Save Configuration.
5. After successfully saving configuration, define entities.
6. On the Failover tab proper IP addresses must be specified
7. Click Save Failover Settings.
Configuring the Secondary machine
1. On the secondary machine, enter VMS connection setting. Use the same region, site name and
token that you used on the primary node.
2. Change the default site name on the secondary node. It must be different from the primary node.
C6750M | 04/23 10
Page 11

Calipsa® Genetec Integration User Guide
3. Do not configure Entities, since they are reused from the primary machine.
4. Under the Failover tab, set the Failover settings to match those on the primary machine.
5. Optional: you can provide an email address on both machines to receive email notifications about
service state changes.
Configuring SMPT
This section demonstrates how to configure the SMTP server to send email notifications. A recipient mail
address should be provided in other sections as well. Currently, notifications are only available for
scheduled mask updates and failover.
Before configuring the server to send email notifications, you need to turn on SMPT.
1. Under SMPT Conifguration, enter the mail server address and port number.
Note: You can usually find the information on mail server addresses and port numbers in the Help
Section of your email provider.
2. Enter the Sender Address.
3. Select Use SSL/TLS. We recommend using SSL/TLS.
4. Select Enable Authentication.
5. Enter your username and password.
6. Under Testing SMPT, enter a recipient address.
7. To test the configuration, click Send Message.
Note: By clicking Send message, you are only sending a test message.
8. After a few seconds, you will receive a pop-up informing you if connection was successful.
9. Check your email to ensure that you received the test email. If not, either the SMPT configuration
or the test message need to be corrected.
10. If you received the test email, click Save SMPT settings. You will now receive email updates from
Calipsa.
C6750M | 04/23 11
Page 12

Calipsa® Genetec Integration User Guide
Reseting SMPTConfigurationSettings
1. To reset the SMTP configuration settings, click Reset settings.
2. Click Save SMTP settings to save the empty configuration settings.
Entities
The Entities section is used for configuring cameras and behaviors. Configuring cameras and their
behaviors, allows you to tell Calipsa how to process events.
Adding and Removing Cameras
1. Navigate to the Entities section.
2. On the Cameras tab, select the cameras from the list .
3. Click Add to Calipsa to add them to Calipsa. The green cloud icon indicates that the camera is
added to Calipsa.
4. To remove a camera from Calipsa, select it and click Remove from Calipsa.
5. You can filter cameras from the list by typing their name in the Search bar.
C6750M | 04/23 12
Page 13

Calipsa® Genetec Integration User Guide
Selecting Behaviors
By selecting certain behaviors from the list, you can determine what types of alarms will be processed by
Calipsa.
1. In the Entities section, navigate to behaviors.
2. Select the cameras.
3. Click Save behaviors.
Masks
While sending cameras to Calipsa, the Genetec areas of interest are converted to Masks. This ensures
these areas are excluded when processing the same image areas in VMS.
Masks for only the first Motion Zone defined for a particular camera are used by Calipsa.
Updating Masks
1. Switch to the Settings tab
2. On the Connector tab, turn on feature by clicking the Enable toggle
C6750M | 04/23 13
Page 14

Calipsa® Genetec Integration User Guide
3. On the Entities tab, use the Add to Calipsa option to add or update the masks.
Note: Potential issues will be displayed as a triangle-shaped tool-tip next to the related camera.
Exporting Camera Lists
You can export a list of cameras with current statuses to .csv format.
1. Switch to the Cameras tab
2. Click on Export
C6750M | 04/23 14
Page 15

Calipsa® Genetec Integration User Guide
3. Choose where you want to save report file.
4. You are now able to open the file in excel and view the exported camera list.
C6750M | 04/23 15
Page 16
Calipsa® Genetec Integration User Guide
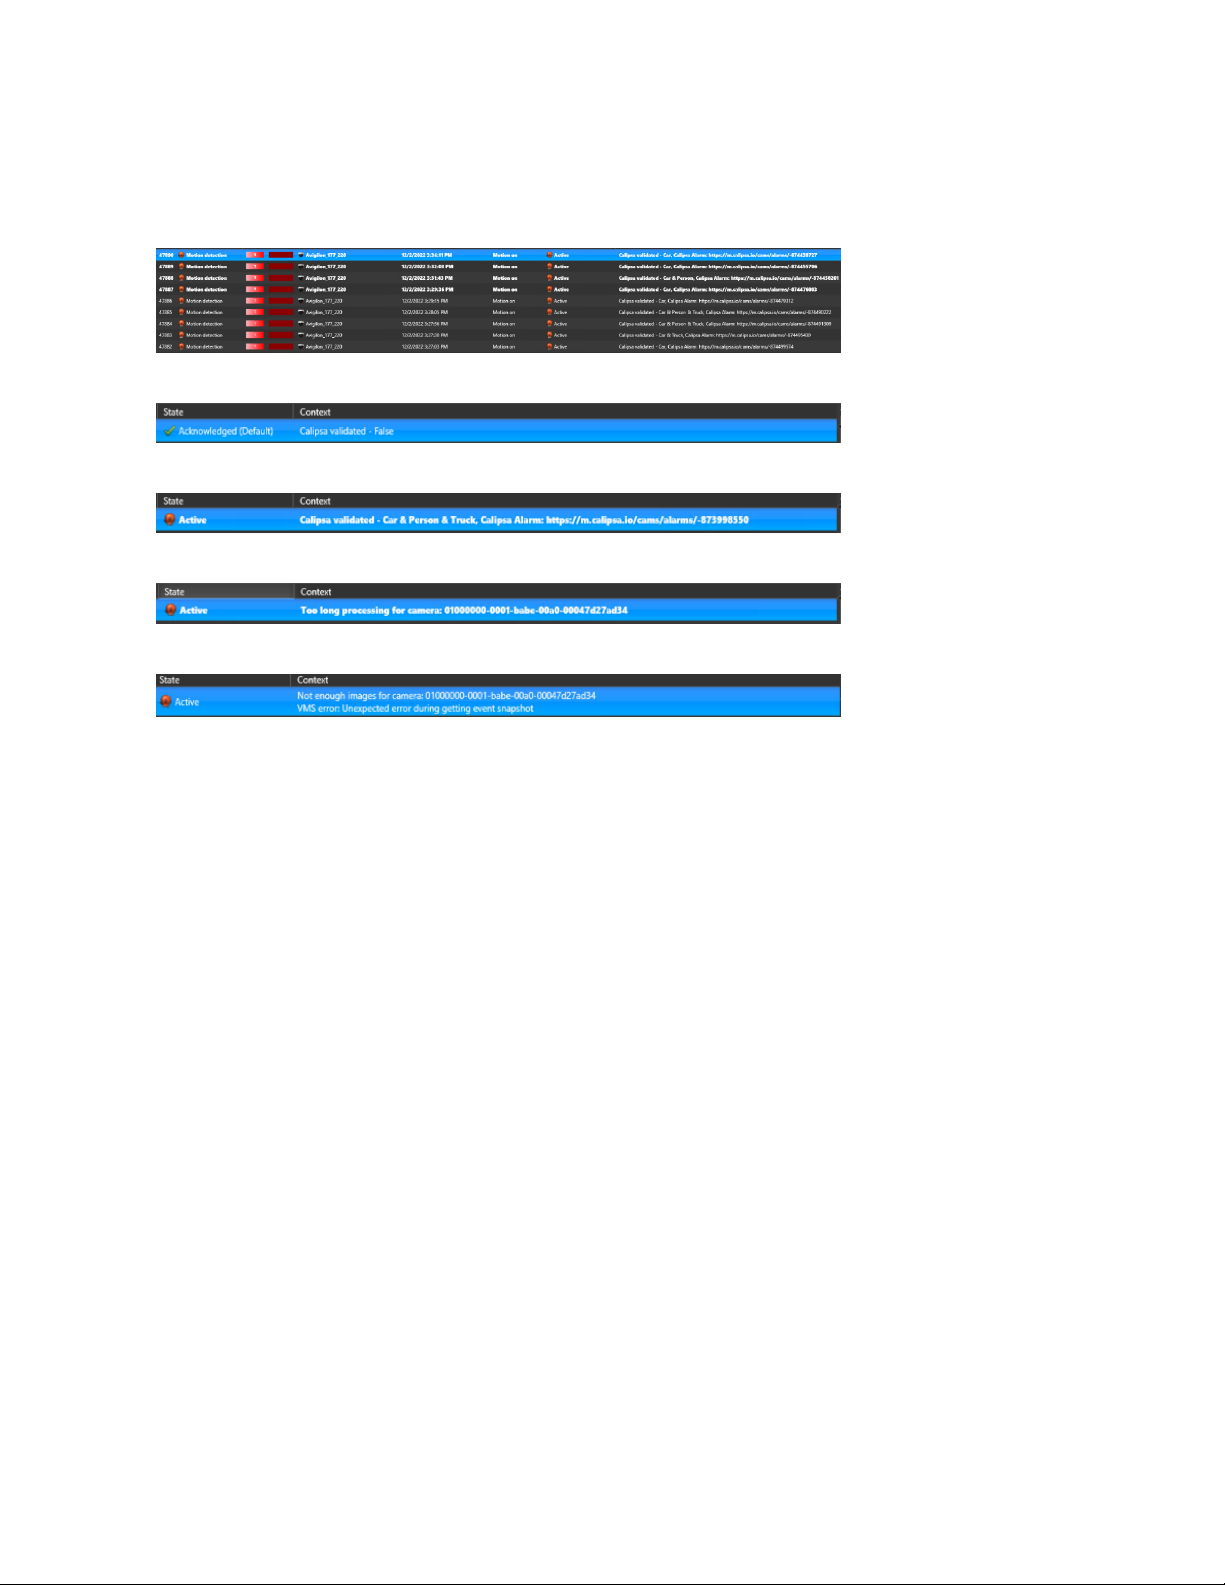
Validating that the Connector is Running
You can check GenetecTM VMS alarm monitoring. The context column should be filled with information
from Calipsa.
If Calipsa does not find any issues with the connection, the operator does not have to check the alarm.
If Calipsa finds an issue with a car, person, or truck, the operator has to check the alarm.
If there is an error processing the connection, the operator has to check the alarm.
If there is an error while getting event snapshot, the operator has to check the alarm.
Troubleshooting
Resources
Log Location
l
C:\ProgramData\Motorola Solutions\Calipsa Integration Service\Logs
Data Location
l
C:\ProgramData\Motorola Solutions\Calipsa Integration Service\Data
User Settings
l
C:\Windows\System32\config\systemprofile\AppData\Local\Motorola_Solutions,_INC\...
Enabling Genetec Logs
1. Stop Calipsa Integration Service
2. Copy file LogTargets.gconfig into folder: C:\Program Files (x86)\Motorola Solutions\Calipsa
Integration\Service\Plugin
3. Start Calipsa Integration Service
4. Logs are created in the folder: C:\ProgramData\Genetec Security Center 5.10\Logs”. Check for
files with prefix “Trace__Vms.Plugin.exe_
C6750M | 04/23 16
Page 17

Calipsa® Genetec Integration User Guide
Disabling Genetec Logs
1. Stop Calipsa Integration Service
2. Remove file LogTargets.gconfig from folder: C:\Program Files (x86)\Motorola Solutions\Calipsa
Integration\Service\Plugin
3. Start Calipsa Integration Service
Switching Parallel Image Processing to Serial
1. Provide Extend VMS configuration in the application client:
l
{"DisableParallelImages" : true }
Checking Version
The current version number can be found in the lower left corner of application.
Known Issues
Too long processing for camera: <guid>
Make sure that required ports are open:
Archiver:
l
TCP 555 Live and playback stream requests
l
TCP 605 Edge playback stream
l
TCP 80 HTTP port
l
TCP 443 HTTPS port
l
TCP 554 RTSP
Auxiliary Archiver:
l
TCP 558 Live and playback stream requests
l
TCP 554, 560 Live and playback stream requests
Redirector:
l
TCP 560, 5004 Live and playback stream requests
l
TCP 554 Communication with Media Router (Security Center Federation™)
l
TCP 555 Communication with Archiver
l
TCP 558 Communication with Auxiliary Archiver
l
TCP 80 HTTP port
C6750M | 04/23 17
Page 18

Calipsa® Genetec Integration User Guide
l
TCP 443 HTTPS port
l
TCP 554 RTSP
Media Router:
l
TCP 554 Live and playback stream requests, Federated Media Router stream requests
Media Gateway:
l
TCP 654 Live and playback stream requests
Troubleshoot
l
Test-NetConnection -ComputerName 172.28.249.6 -Port 560
Not Enough Images for Camera: <guid> or Too Long Processing for Camera <guid>
Make sure that time between service, VMS and cameras are synchronized.
You can also solve this by increasing allowed time per VMS request.
The SSL Connection could not be established
If you get an error message saying SocketException (10060), this means that the connection attempt
failed because the connected party did not properly respond after a period.
1. Under Log On, select This account.
2. For This account, enter Administrator.
3. Enter password, then re-enter password to confirm.
4. Click OK.
5. Then, restart the service.
C6750M | 04/23 18
Page 19

Calipsa® Genetec Integration User Guide
Masks for specific Cameras are not sending updates to Calipsa
Simplify the area you are trying to exclude by editing the masks.
1. Make sure the mask does not exclude area surrounding the zone you want to monitor.
2. Make sure that the excluded area does not surround the smaller included area.
C6750M | 04/23 19
Page 20

Calipsa® Genetec Integration User Guide
3. Make sure the area is not made of too many small rectangles.
Error while handling subscriber events
When hosting on separate machines, you may receive the following error message: [ALARM] processed
by service with result: FALSE. Unknown error on camera:<guid>.
System.ArgumentOutOfRangeException: Specified argument was out of the range of valid values i.e.,
Parameter: delay.
This means there was an error while handling subscriber events.
1. To fix this, make sure the time between the integration service and the VMS are synchronized.
The number of cameras does not match on primary and failover servers.
This means there was a failover configuration.
C6750M | 04/23 20
Page 21

Calipsa® Genetec Integration User Guide
1. Click Refresh action on Entities, and navigate to the Cameras page in our UI application. You
need to do this on both machines.
2. Wait 3 minutes (for data synchronization between machines ) and repeat step 1) again.
3. Counters should now match.
The wrong service’s states are displayed on the failover configuration tab
This means there was a failover configuration.
1. Make sure date and time are synchronized between machines.
2. Make sure the same Calipsa token is used on both machines.
3. Verify that port 60000 is opened.
C6750M | 04/23 21
Page 22

Calipsa® Genetec Integration User Guide
Adding your Monitoring Station SMTP Details
This guide is for manually configuring Calipsa to forward true alarms to your monitoring station software
via email.
NOTE: Please ensure our Calipsa IP addresses are whitelisted on your monitoring station software
before completing this setup. Otherwise the true alarms sent to you may get blocked. See the Calipsa
Email Alarm Notifications Manual for instructions on Whitelisting Calipsa's IP addresses.
Accessing Calipsa Account Settings
1. Log into your Calipsa account.
2. In the bottom left-side panel, select Settings.
Editing Global Configuration
1. Under Account Settings, navigate to Global configuration.
2. Next to Global configuration, click Edit.
C6750M | 04/23 22
Page 23

Calipsa® Genetec Integration User Guide
Inputting Your Credentials
Under Global configuration, input the credentials of your monitoring station software. The credentials
include the server information you would have had the cameras/NVRs alarming to before incorporating
Calipsa into your process.
1. Under Host/IP Address, enter the IP address/DNS of your server
2. Under HTTP port, enter the HTTP port number. If unsure, try entering 25.
3. Under Username and Password, enter the login credentials for your server. If you are using
Immix, leave this section blank.
4. Under Test Email, use the example email address belonging to that sever. For example,
S123@immixalarms.com for an Immix server.
5. Test the connection.
6. If connected, click Save.
NOTE: These settings will automatically apply to all new sites added. To direct a specific site to a
different location, you will need to change the monitoring station SMTP details on the site level.
Troubleshooting Questions
Q: The Test email said successful however I cannot see a test email received in Calipsa.
A: If the test fails please follow the steps below in order.
1. Check that you whitelisted our relevant IP addresses within your monitoring station sever.
2. Check that you entered the correct credentials. Even the test email needs to be an email address
that exists within your server.
3. Try enabling "Use proper Helo". this is a different method of connection to fit with the additional
security requirements of some systems.
4. Reach out to the Calipsa support team by submitting a request or emailing: support@calipsa.io
Q: Can I send alarms to an email address instead?
A: Yes you can send to an email server as long as the specified email server allows it within their security
settings. Please see the Calipsa Email Alarm Notifications Manual for an example.
C6750M | 04/23 23
Page 24

Calipsa® Genetec Integration User Guide
Pelco, Inc.
625 W. Alluvial Ave., Fresno, California 93711 United States
(800) 289-9100 Tel
(800) 289-9150 Fax
+1 (559) 292-1981 International Tel
+1 (559) 348-1120 International Fax
www.pelco.com
Pelco, the Pelco logo, and other trademarks associated with Pelco products referred to in this publication are trademarks of Pelco,
Inc. or its affiliates. ONVIF and the ONVIF logo are trademarks of ONVIF Inc. All other product names and services are the property of
their respective companies. Product specifications and availability are subject to change without notice.
© Copyright 2023, Pelco, Inc. All rights reserved.
 Loading...