

Page 1

®
DX7000 Series
Remote Site
Software
Installation/
Operation Manual
C688M-D (11/01)
Pelco • 3500 Pelco Way • Clovis, CA 93612-5699 USA • www.pelco.com
In North America and Canada: Tel (800) 289-9100 • FAX (800) 289-9150
International Customers: Tel +1(559) 292-1981 • FAX +1(559) 348-1120
Page 2

CONTENTS
LIST OF ILLUSTRATIONS
Section Page
DESCRIPTION...................................................................................................................3
INSTALLATION ..................................................................................................................3
REGISTERED SITE SETUP......................................................................................4
OPERATION ......................................................................................................................5
VIEW .......................................................................................................................... 6
PTZ CONTROL MODE ..............................................................................................6
PATTERN...........................................................................................................7
PRESETS ..........................................................................................................7
PRESET TOURS ...............................................................................................8
SEARCH MODE ........................................................................................................9
SELECT DATE AND TIME................................................................................10
EMERGENCY AGENT SOFTWARE.........................................................................1 1
BACKUP VIEWER SOFTWARE .......................................................................................12
BACKUP VIEWER OPERATION ......................................................................................13
WATERMARKING TOOL ..................................................................................................14
WATERMARKING TOOL OPERATION ....................................................................14
WARRANTY AND RETURN INFORMATION....................................................................16
Figure Page
1 DX7000 Series Remote User Software Installation Menu .................................3
2 Setup Screen .....................................................................................................4
3 Online Mode.......................................................................................................5
4 PTZ Controls ......................................................................................................6
5 Pattern and Preset Bars.....................................................................................8
6 Search Mode......................................................................................................9
7 Playback Control Buttons..................................................................................10
8 Emergency Agent Window ................................................................................11
9 Backup Viewer ..................................................................................................13
10 The Image Has Not Been Altered .....................................................................14
11 The Image Has Been Altered............................................................................15
2 Pelco Manual C688M-D (11/01)
Page 3

01199
DESCRIPTION
Free remote site software is included with the DX7000 to provide remote site viewing of live
and recorded video. The software is compatible with Windows 98 and Windows 2000.
INSTALLATION
To install the remote users software:
1. Start Windows 98 or Windows 2000.
2. Close all programs, including any anti-virus programs.
3. Insert the Remote Users Software CD into the CD-ROM drive.
4. The Windows 98 Setup wizard starts. Follow the instructions that appear.
5. The DX7000 Series software installation program appears.
a. Install Microsoft Direct X 7.0.
b. Install the Remote Client program.
6. Restart the computer.
IMPORTANT:
Screen
setup for the Remote User
Software:
– 32 bit
– Resolution 1024 x 768
The remote site software
may not be compatible with
your video card. For best
results Pelco recommends
the following VGA cards:
•ATI RAGE 128
•ATI RAGE 128Pro
• RIVA TNT2 Model 64/
Model 64 Pro
• GeForce2 MX 400
• S3 PCI Card
• Inter 82815 Graphics
Controller
•SAVAGE4
• Any video card utilizing
the SAVAGE PRO chip
set
Figure 1. DX7000 Series Remote User Software Installation Menu
Pelco Manual C688M-D (11/01) 3
Page 4
REGISTERED SITE SETUP
1
9
5
6
2
3
4
7
10 8
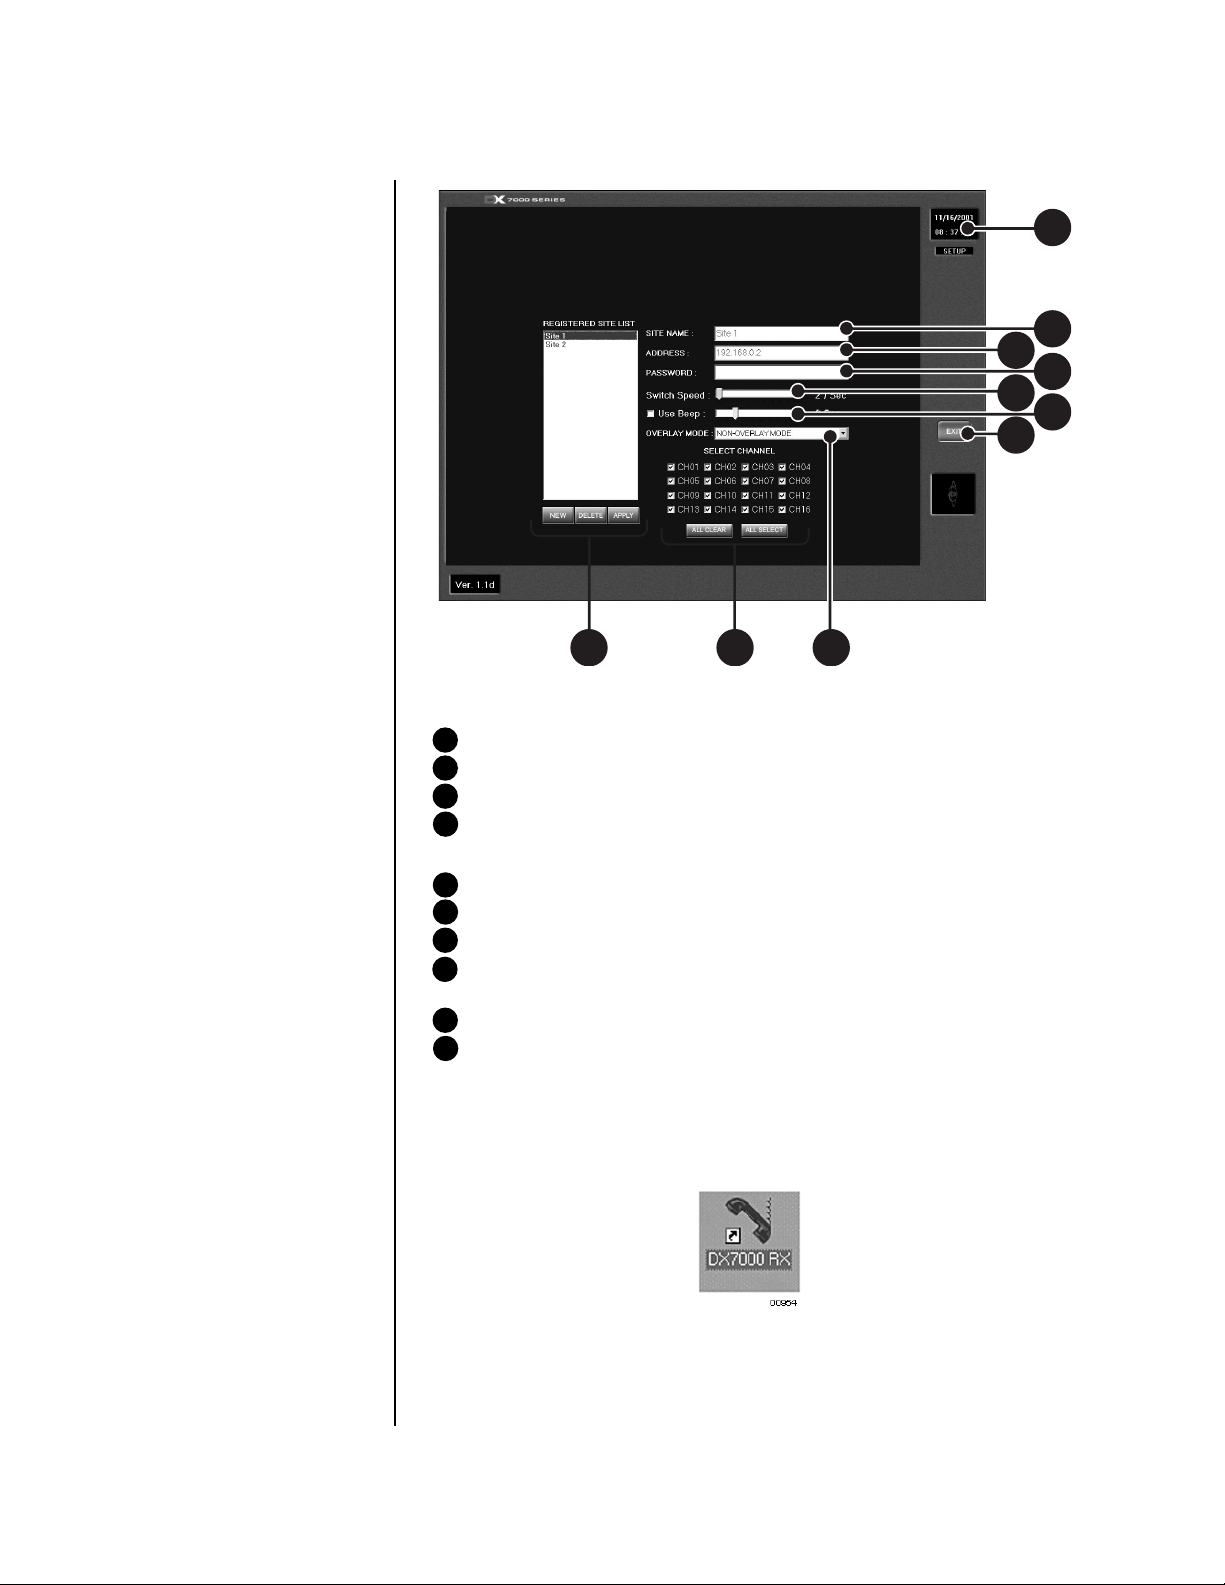
Figure 2. Setup Screen
1 Date and Time Indicator – Displays current date and time.
2 SITE NAME – Enter the name of the site.
3 ADDRESS – Input the IP address or phone number of site.
4 PASSWORD – Use only if the DX7000 registered site is CLIENT USER password
protected. The password must be the same as the registered site password for
CLIENT USER.
5 SWITCH SPEED (Sequencing speed.) Set the sequencing time between cameras.
6 USE BEEP – Motion detection beep.
7 EXIT – Exit setup screen.
8 OVERLAY MODE – Select NON-OVERLAY MODE if your PC video card does not
support multi-layering.
9 SELECT CHANNEL – Selects cameras to view.
10 REGISTERED SITE LIST – Creates a new registered site or deletes a registered
site from the list.
To setup a registered site:
1. Start Windows 98 or Windows 2000.
2. Click on the icon for the DX7000 Remote Client Software.
3. Click the SETUP button.
4. At the bottom of the REGISTERED SITE LIST, press NEW.
5. Input the site name, IP address or phone number, and client password.
6. Check the desired cameras to be displayed.
7. Click the APPLY button.
8. Click the EXIT button to finish setup.
4 Pelco Manual C688M-D (11/01)
Page 5
OPERATION
1
2
3
4
9
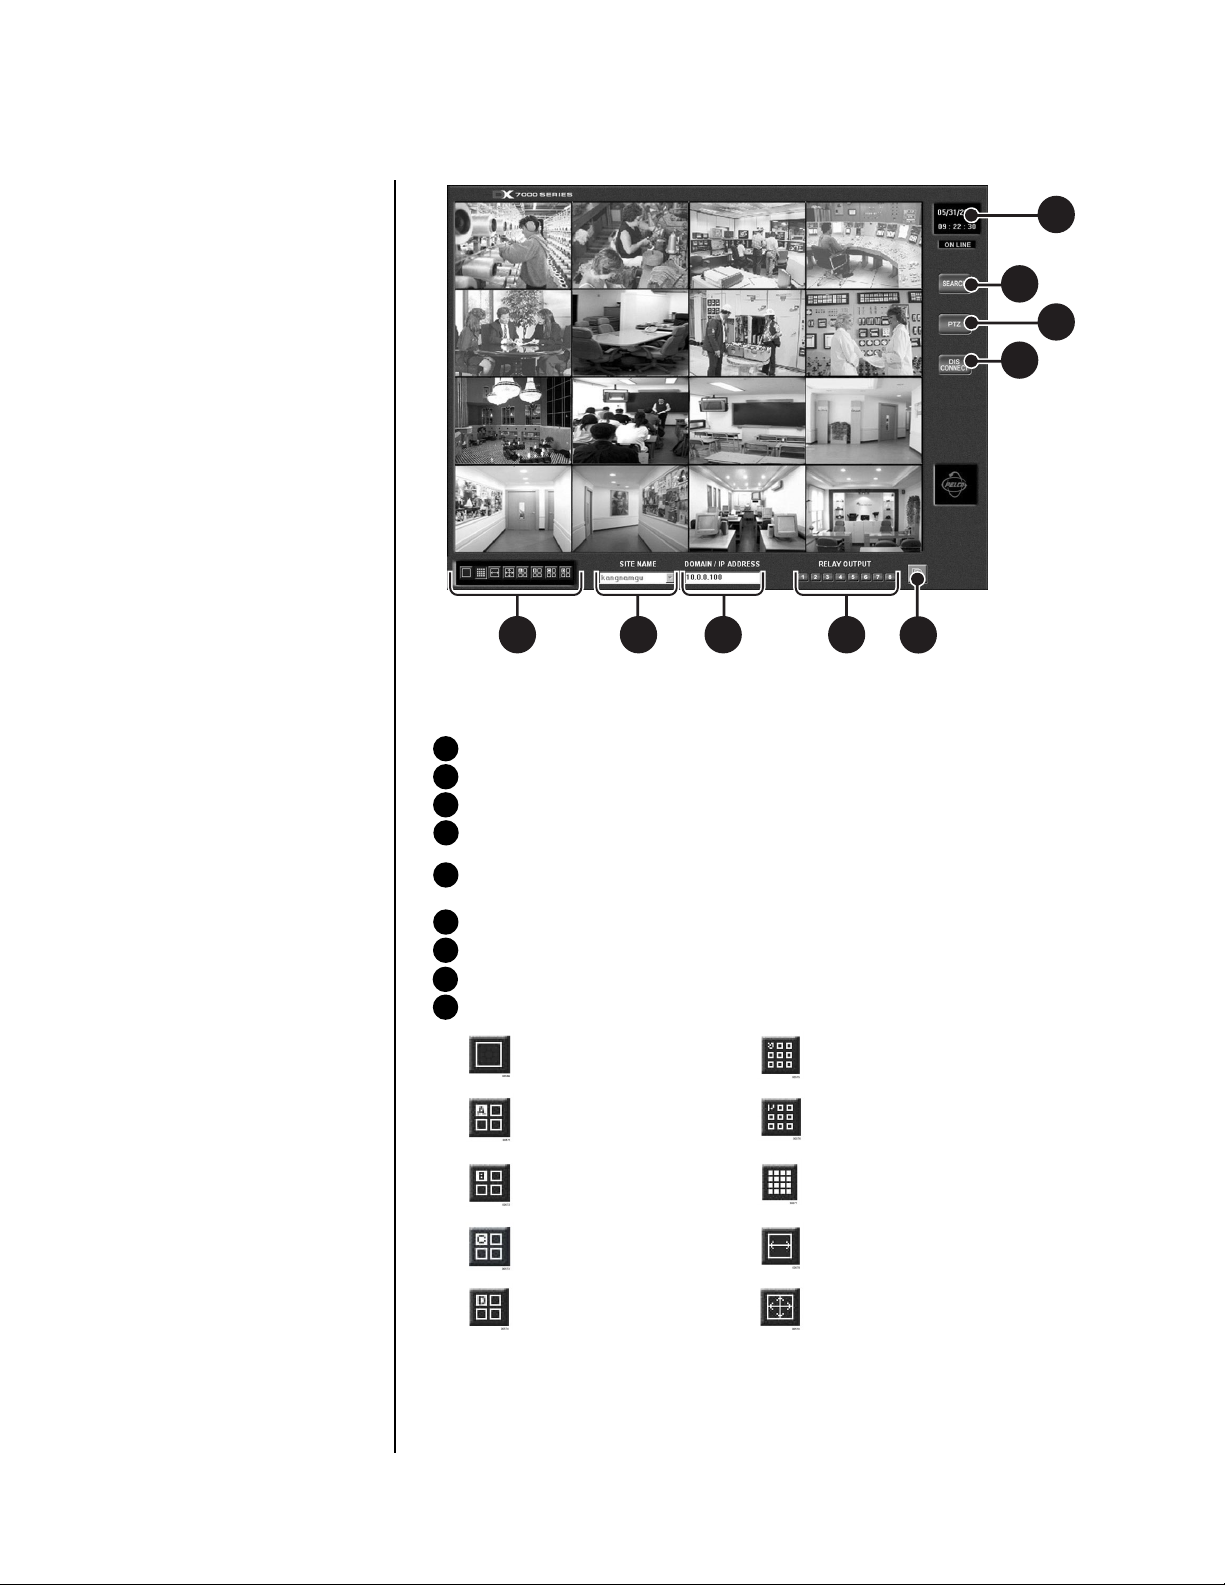
Figure 3. Online Mode
1 Date and Time Indicator – Displays current date and time.
2 SEARCH Button – Plays back and searches recordings by date and time.
3 PTZ Control Button – Controls pan, tilt, and zoom functions.
4 CONNECT/DISCONNECT Button – Connects to the domain site or disconnects
from the domain site.
5 AVI Button – Creates and saves an AVI file to a backup storage device. To view
saved AVI files use a PC Media Player that supports the AVI file format.
6 RELAY OUTPUT – Turns relay connected to DX7000 DVR ON/OFF.
7 DOMAIN/IP ADDRESS – Displays address of domain site.
8 SITE NAME – Displays name of domain site.
9 Screen Division –
Single camera display Displays cameras 1-9
Quad display, cameras 1-4 Displays cameras 10-16
Quad display, cameras 5-8 Displays all 16 cameras
678
5
01178
Quad display, cameras 9-12 Sequencing mode – Sequence using
Quad display, cameras 13-16 Full-screen display – Removes menu
To connect to a remote site:
1. Select the site name by scrolling through the site selection window.
2. Enter DOMAIN/IP ADDRESS.
3. Click the CONNECT button.
Pelco Manual C688M-D (11/01) 5
single, four, or nine camera displays.
bars from display. Click the right mouse
button to return to previous screen display.
Page 6

VIEW
It is not necessary to use the screen division buttons located in the lower left corner of the
screen to change the camera view. You can use the left and right mouse buttons to instantly view a single camera or remove the menu bars from the display.
To change screen view:
1. Move the cursor to the desired camera view and click with the left mouse button.
A single view of the selected camera appears.
2. To switch to full screen view (remove menu bars from the display), click the right
mouse button on the screen. Click the right mouse button one more time to return to
the previous view.
3. Click the left mouse button to return to the multiple-screen view.
PTZ CONTROL MODE
To operate pan/tilt/zoom functions on controllable systems do the following:
1. Select a camera.
a. Move the cursor to a camera screen view and click the left mouse button.
b. A single camera view appears on the screen and the camera number (1 through 16)
appears in the center of the pan and tilt control (refer to Figure 4).
2. Use the buttons to pan left and right.
3. Use the buttons to tilt up and down.
4. If required use the FOCUS settings (+/-) to obtain the clearest picture.
5. Use the ZOOM settings (+/-) to zoom far/near.
▲
▼
▲
▼
LEFT
UP
RIGHT
CAMERA
DOWN
00949
Figure 4. PTZ Controls
6 Pelco Manual C688M-D (11/01)
Page 7

PATTERN
A pattern is a user-defined, viewable camera path with a definite beginning and end.
The pattern can consist of any standard pan and tilt or lens commands. Once defined the
pattern is easily activated with the press of an on-screen menu button. The pattern will run
continuously until it is deactivated with another press of the menu button.
How to Program a Pattern
1. Click the PTZ button in the DISPLAY Mode. The PTZ Mode appears.
2. Select a camera.
3. Click on P-SET and move the camera through a series of movements using the pan
and tilt, zoom, and focus commands.
4. To stop programming the pattern, reclick the P-SET button.
5.
To run the pattern, click the P-RUN button. To stop the pattern, reclick the P-RUN button.
PRESETS
A preset is a user-defined camera position using pan and tilt, zoom, and focus commands.
The DX7000 Series DVR has programming capacity for 12 preset locations.
NOTE:
The selected camera is indicated by the number displayed in the center of
the PTZ controls.
How to Move to a Preset
1. Click the MOVE button.
2. Click a preset button 1-12. The camera moves to the programmed preset position.
Pelco Manual C688M-D (11/01) 7
Page 8

PRESET TOURS
A preset tour is a programmed sequential execution of preset positions.
How to Run A Preset Tour
1. Click the PTZ button in the DISPLAY Mode. The PTZ Mode appears.
2. Click the left mouse button on PRESET.
3. Click the TOUR button, the preset tour starts.
4. To stop the tour click the TOUR button.
PATTERN BAR PRESET BAR
FOR
FUTURE
USE
PRESET
BUTTONS
CAMERA
01196
Figure 5. Pattern and Preset Bars
8 Pelco Manual C688M-D (11/01)
Page 9

SEARCH MODE
1
2
3
4
5
6
7
9 8
Figure 6. Search Mode
1 Date and Time Indicator – Displays current date and time.
2 Search Date – Select month and year to search video.
3 Search Time – Select the time (hour and minute) to search video.
4 Select Camera – Review video of selected camera.
5 Copy and Print Buttons – Save a recorded image to a diskette, print an image or
create and save an AVI file to a backup storage device.
6 EXIT – Exit search screen.
7 Playback Control Buttons – Refer to Figure 6.
8 Screen Division Buttons
9 Calendar – Dates with a yellow circle indicates video was recorded on that day.
00955
Pelco Manual C688M-D (11/01) 9
Page 10

SELECT DATE AND TIME
1. Enter the year and month in the SEARCH DATE area of the menu. Click the up or
down arrow buttons to make a selection.
2. Enter the hour and minute in the SEARCH DATE area of the menu. Click the arrow
buttons up or down to make a selection.
3. Click the CALENDAR BUTTON.
4. The calendar menu appears in the lower left-hand corner of the screen.
5. Dates with recordings are highlighted with a yellow circle. Click a highlighted date.
6. Use the playback buttons to review a recording. Refer to Figure 7.
PLAYBACK
PREVIOUS IMAGE
GO TO THE FIRST IMAGE
RECORDED ON HDD
Figure 7. Playback Control Buttons
FAST PLAYBACK
NEXT IMAGE
STOP
GO TO LAST IMAGE
RECORDED ON HDD
00953
10 Pelco Manual C688M-D (11/01)
Page 11

EMERGENCY AGENT SOFTWARE
00950
Figure 8. Emergency Agent Window
Emergency Agent software alerts the remote site client of any triggered alarm at the surveillance site. When an alarm is triggered a popup widow appears on the monitor of the remote
site client. The window displays a detailed list (date and time) of all images recorded during
the alarmed event.
NOTE:
For the Emergency
Agent Software to operate
the DX7000 System at the
surveillance site must be
setup for remote alarm
operation. To setup the
DX7000 DVR for remote
alarm operation, refer to the
Schedule Setup section of
the DX7000 Series Digital
Video Recorder Installation
and Operation Manual.
To view the transmitted images use the playback buttons located at the bottom of the Emergency Agent software window.
To install the Emergency Agent software:
1. Start windows 98.
2. Close all programs, including any anti-virus programs.
3. Insert the Remote Users Software CD into the CD-ROM drive.
4. The Windows 98 Setup wizard starts. Follow the instructions that appear.
5. The DX7000 Series software installation program appears. Click on the Emergency
Agent software button and follow the instructions.
6. Restart the computer.
Pelco Manual C688M-D (11/01) 11
Page 12

BACKUP VIEWER SOFTWARE
Use the Backup Viewer software to search images stored on backup media, DAT tape or
DVD disc.
To install the Backup Viewer:
1. Start windows 98.
2. Close all programs, including any anti-virus programs.
3. Insert the Remote Users Software CD into the CD-ROM drive.
4. The Windows 98 Setup wizard starts. Follow the instructions that appear.
5. The DX7000 Series software installation program appears. Click on the Backup
Viewer software button and follow the instructions.
6. Restart the computer.
12 Pelco Manual C688M-D (11/01)
Page 13

BACKUP VIEWER OPERATION
1
3
4
6
2
7
8
9
12
5
10
13
14 1115
01202
Figure 9. Backup Viewer
1 Date and Time Indicator – Displays current date and time.
2 Search Date – Displays year, month, and time of search.
3 Search Window – Flashes when system is searching through cameras.
4 Search Index Button – Shows or hides search index.
5 Exit – Exits to display mode.
6 Playback Buttons – Refer to Figure 7.
7 Backup Button – Search button for backup storage device. Only appears i f CD-R W
software and CD-RW drive are installed.
8 AVI Button – Creates and saves an AVI file to a backup storage device.
9 Print Button – Prints image.
10 FDD Button – Saves recorded image to 3.5-inch diskette.
11 Zoom/Contrast/Brightness – Adjusts levels for recorded image. (Use with single
display playback only.)
12 Camera – Displays camera selection buttons for search index.
13 Calendar Button – Displays calendar with recording days highlighted.
14 Camera Enable and Selection Buttons
15 Screen Division Buttons
Pelco Manual C688M-D (11/01) 13
Page 14

WATERMARKING TOOL
The Watermark tool allows you to verify if an original image has been altered. The
Watermarking Viewer software is available on the Remote Site Software CD. To install the
Watermark Viewer:
1. Start Windows 98.
2. Close all programs, including any anti-virus programs.
3. Insert the Remote Users Software CD into the CD-ROM drive.
4. The Windows 98 Setup wizard starts. Follow the instructions that appear.
5. The DX7000 Series software installation program appears. Install the Watermark
Viewer software.
6. Restart the computer.
WATERMARKING TOOL OPERATION
1. Load the Watermark Tool.
2. Click the File menu. Select the directory where the JPG or BMP image is located.
3. Select an image file.
Figure 10. The Image Has Not Been Altered
14 Pelco Manual C688M-D (11/01)
Page 15

Figure 11. The Image Has Been Altered
RED FRAME
SHADING
MESSAGE
00957
There are three indications that an image has been altered:
1. A red frame around the image.
2. The image is shaded.
3. The message “Image has been altered or has not been watermarked” appears in the
lower left-hand corner of the screen.
Pelco Manual C688M-D (11/01) 15
Page 16

PRODUCT WARRANTY AND RETURN INFORMATION
WARRANTY
Pelco will repair or replace, without charge, any merchandise proved defective in material or
workmanship for a period of one year after the date of shipment.
Exceptions to this warranty are as noted below:
• Five years on FT/FR8000 Series fiber optic products.
®
• Three years on Genex
• Three years on Camclosure
CC3701H-2X, CC3751H-2, CC3651H-2X, MC3651H-2, and MC3651H-2X camera models,
which have a five-year warranty.
•Two years on standard motorized or fixed focal length lenses.
•Two years on Legacy
fixed dome products.
•Two years on Spectra
continuous motion applications.
•Two years on Esprit
• Eighteen months on DX Series digital video recorders, NVR300 Series network video
recorders, and Endura
• One year (except video heads) on video cassette recorders (VCRs). Video heads will be
covered for a period of six months.
• Six months on all pan and tilts, scanners or preset lenses used in continuous motion
applications (that is, preset scan, tour and auto scan modes).
Pelco will warrant all replacement parts and repairs for 90 days from the date of Pelco
shipment. All goods requiring warranty repair shall be sent freight prepaid to Pelco, Clovis,
California. Repairs made necessary by reason of misuse, alteration, normal wear, or accident
are not covered under this warranty.
Pelco assumes no risk and shall be subject to no liability for damages or loss resulting from
the specific use or application made of the Products. Pelco’s liability for any claim, whether
based on breach of contract, negligence, infringement of any rights of any party or product
liability, relating to the Products shall not exceed the price paid by the Dealer to Pelco for
such Products. In no event will Pelco be liable for any special, incidental or consequential
damages (including loss of use, loss of profit and claims of third parties) however caused,
whether by the negligence of Pelco or otherwise.
The above warranty provides the Dealer with specific legal rights. The Dealer may also have
additional rights, which are subject to variation from state to state.
Series products (multiplexers, server, and keyboard).
®
and fixed camera models, except the CC3701H-2,
®
, CM6700/CM6800/CM9700 Series matrix, and DF5/DF8 Series
®
, Esprit®, ExSite™, and PS20 scanners, including when used in
®
and WW5700 Series window wiper (excluding wiper blades).
™
Series distributed network-based video products.
If a warranty repair is required, the Dealer must contact Pelco at (800) 289-9100 or
(559) 292-1981 to obtain a Repair Authorization number (RA), and provide the following
information:
1. Model and serial number
2. Date of shipment, P.O. number, Sales Order number, or Pelco invoice number
3. Details of the defect or problem
If there is a dispute regarding the warranty of a product which does not fall under the
warranty conditions stated above, please include a written explanation with the product
when returned.
Method of return shipment shall be the same or equal to the method by which the item was
received by Pelco.
RETURNS
In order to expedite parts returned to the factory for repair or credit, please call the factory at
(800) 289-9100 or (559) 292-1981 to obtain an authorization number (CA number if returned
for credit, and RA number if returned for repair).
All merchandise returned for credit may be subject to a 20% restocking and refurbishing
charge.
Goods returned for repair or credit should be clearly identified with the assigned CA or RA
number and freight should be prepaid. Ship to the appropriate address below.
If you are located within the continental U.S., Alaska, Hawaii or Puerto Rico, send goods to:
Service Department
Pelco
3500 Pelco Way
Clovis, CA 93612-5699
If you are located outside the continental U.S., Alaska, Hawaii or Puerto Rico and are
instructed to return goods to the USA, you may do one of the following:
If the goods are to be sent by a COURIER SERVICE, send the goods to:
Pelco
3500 Pelco Way
Clovis, CA 93612-5699 USA
If the goods are to be sent by a FREIGHT FORWARDER, send the goods to:
Pelco c/o Expeditors
473 Eccles Avenue
South San Francisco, CA 94080 USA
Phone: 650-737-1700
Fax: 650-737-0933
REVISION HISTORY
Manual # Date Comments
C688M 4/01 Original version.
C688M-A 5/01 Add note on video card compatibility.
C688M-B 7/01 Added new GUI software revisions.
C688M-C 11/01 Revised manual, added information on preset tours.
C688M-D 11/01 Added Overlay Mode information.
® Pelco, the Pelco logo, Spectra, Genex, and Legacy are registered trademarks of Pelco. © Copyright 2001, Pelco
™ Esprit and Camclosure are trademarks of Pelco. All rights reserved.
 Loading...