

Page 1

Istruzioni dʼuso IT
Instructions for use EN
Notice dʼemploi FR
Gebrauchsanleitung DE
Instrucciones de uso ES
Instruções para uso PT
Gebruiksaanwijzing NL
Használati útmutató HU
Navodila za uporab SL
Инструкции по пользованию RU
Kullanim klavuzu TR
ΟΔΗΓΙΕΣ ΧΡΗΣΕΩΣ EL
Merenda
FI000601I65
Page 2

1
2
3
5
4
6
Page 3

7
8
9 10
A
B
11 12
A
A
B
Page 4

A
A
13
B
B
14
A
15
B
16
17
18
Page 5
19 20
21 22
Page 6

Merenda
2
4
5
1
8
3
6
7
9
Page 7
Merenda
IT•ITALIANO
• IMPORTANTE: leggere attentamente le istruzioni
prima dellʼuso e conservarle per riutilizzarle in
futuro.
1 ARPI0386•
2 SPST5859D•
3 SPST5859S•
4 SPST5883•
5 ARPI0387• (EU only)
5 ARPI0387 • NA (Nord America and
Australia only)
6 ARPI0388• (EU only)
6 ARPI0388• NA (Nord America and
Australia only)
7 ARPI0389• (EU only)
7 ARPI0389• NA (Nord America and
Australia only)
8 BMSMER•
9 MUCI5P15GR
IT• Ricambi disponibili in piú colori da
specificare nella richiesta.
EN• Spare parts available in different colours
to be specified when ordering.
FR• Pièces de rechange disponibles en
plusieurs couleurs à spécifier dans la
demande.
DE• Ersatzteile in mehr Farben vorhanden,
die in der Anfrage spezifiziert werden
müssen.
ES• Repuestos disponibles en otros colores
que se especificarán en el pedido.
PT• Peças de reposição disponíveis em cores
alternativas a serem especificadas no
pedido.
NL• Reserveonderdelen verkrijgbaar in
meerdere kleuren, bij bestelling te
specificeren.
HU• A tartalék alkatrészek különböző
színekben elérhetők, melyeket
rendeléskor kell kiválasztani.
SL• Rezervni deli so na voljo v več barvah, ki
jih je treba navesti pri naročilu.
RU• Запчасти имеются различных цветов,
необходимый указать в запросе.
TR• Siparişte belirtilen değişik renklerdeki
yedek parçalari mevcuttur.
EL• Ανταλλακτικά διαθέσιμα σε διάψορα
χρώματα. Προσδιορίστε όταν
παραγγείλετε.
• Peg Perego potrà apportare in qualunque
momento modifiche ai modelli descritti in questa
pubblicazione, per ragioni di natura tecnica o
commerciale.
Peg Perego S.p.A. è certificata ISO 9001.
La certificazione offre ai clienti e
ai consumatori la garanzia di una
trasparenza e fiducia nel modo di lavorare
dell'impresa.
SERVIZIO ASSISTENZA
Se fortuitamente parti del modello vengono perse o
danneggiate, usare solo pezzi di ricambio originali
Peg Perego. Per eventuali riparazioni, sostituzioni,
informazioni sui prodotti, la vendita di ricambi
originali e accessori, contatta il Servizio Assistenza
Peg-Perego:
tel.:0039-039-60.88.213,
fax: 0039-039-33.09.992,
e-mail: assistenza@pegperego.it,
www.pegperego.com
La Peg Perego è a disposizione dei suoi Consumatori
per soddisfare al meglio ogni loro esigenza. Per
questo, conoscere il parere dei ns. Clienti, è per noi
estremamente importante e prezioso. Le saremo
quindi molto grati se, dopo aver utilizzato un
ns. prodotto, vorrà compilare il QUESTIONARIO
SODDISFAZIONE CONSUMATORE che troverà in
internet al seguente indirizzo: www.pegperego.com/
SSCo.html.it,
segnalando eventuali osservazioni o suggerimenti.
ISTRUZIONI DʼUSO
PER ASSEMBLARE IL SEGGIOLONE
1• Aprire la seduta del seggiolone, facendo scorrere i
montanti posteriori lateralmente alla seduta fino al
click di aggancio.
2• Disporre le gambe in posizione verticale in modo
da distinguere le gambe anteriori, le più alte, da
quelle posteriori, le più basse.
3• Svitare le quattro viti con dado dai montanti
anteriori e posteriori, facendo attenzione a non
perderli.
4• Inserire le gambe anteriori, le più alte, nei
montanti anteriori. Fissare le gambe anteriori
riavvitando con l'aiuto di un cacciavite.
5• Girare la seduta e inserire le gambe posteriori,
le più basse, nei montanti posteriori. Fissare le
gambe riavvitando con l'aiuto di un cacciavite.
6• La figura mostra l'esatta disposizione dei montanti
ad operazione finita.
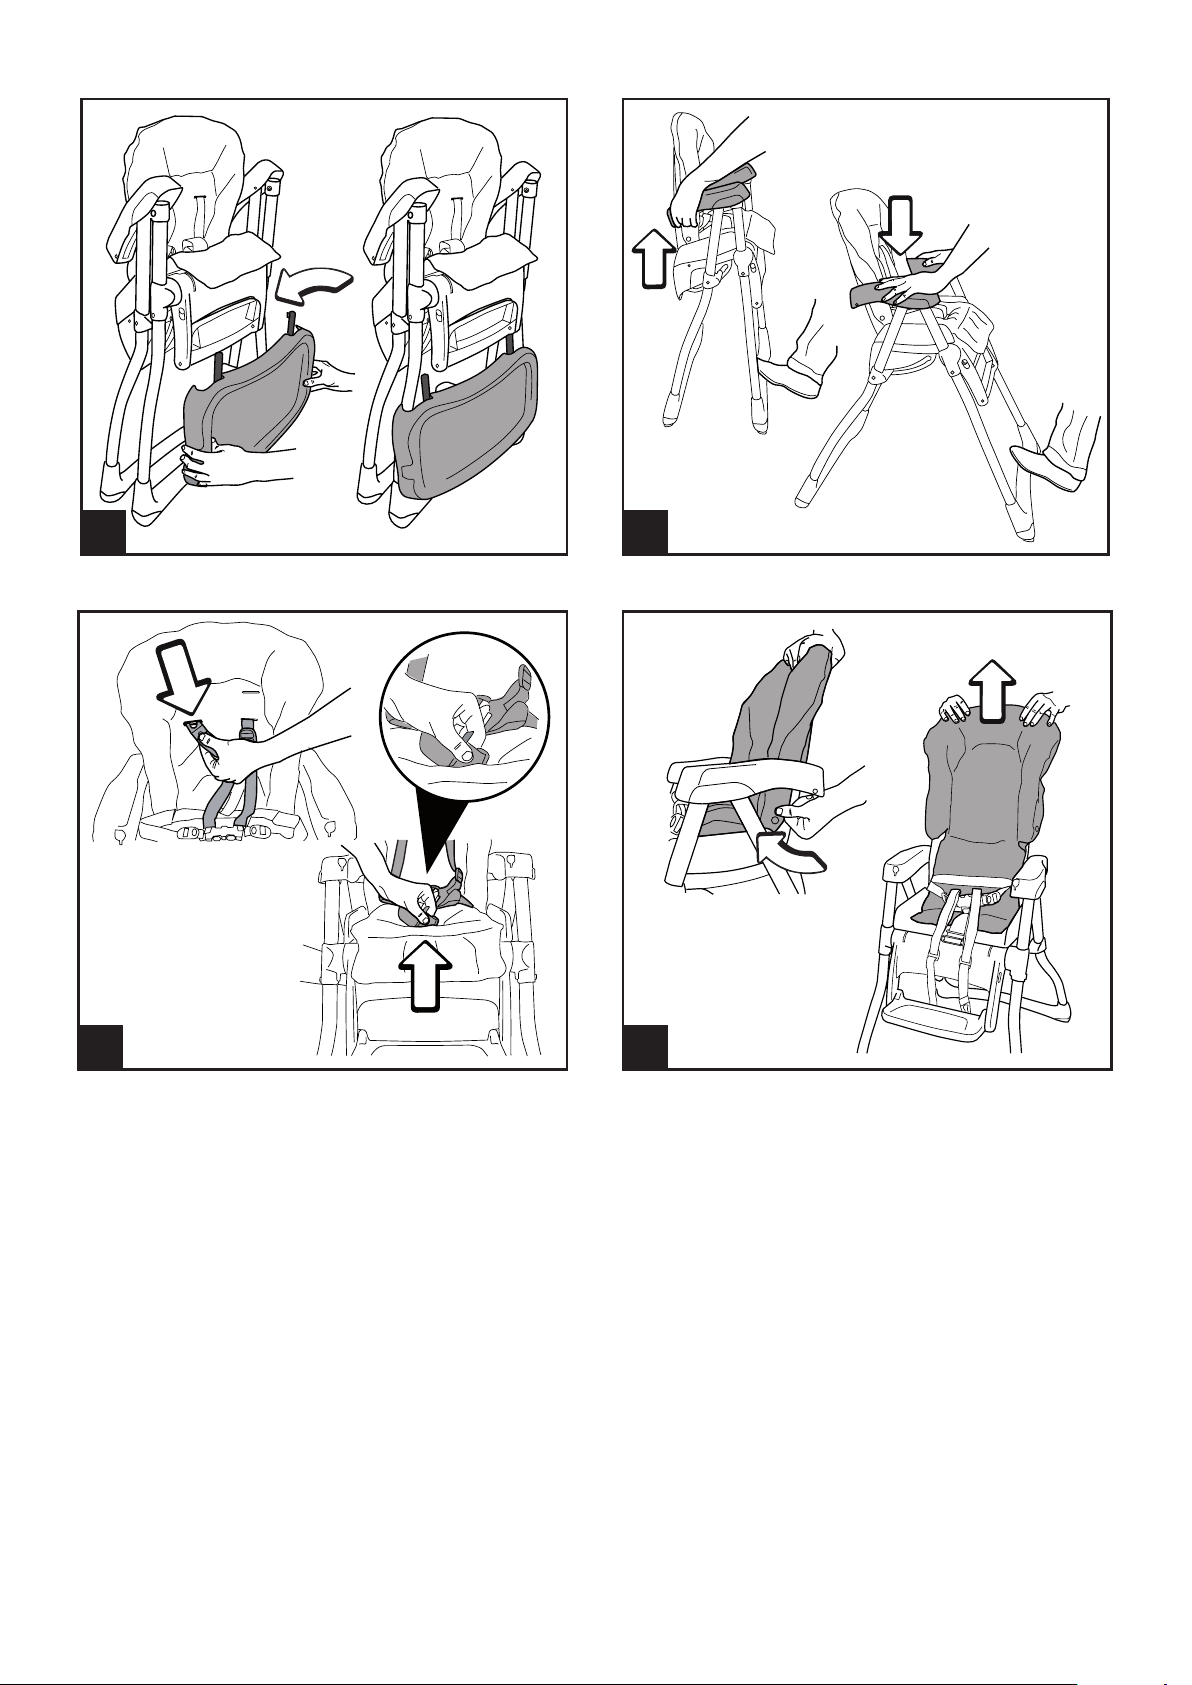
7• Abbassare il poggiapiedi del poggiagambe
ruotandolo come in figura.
VASSOIO
8• Per applicare il vassoio, tenere premuto le leve
collocate sotto lo stesso e contemporaneamente
infilarlo nei braccioli spingendolo fino in fondo
come in figura (prima posizione). Accertarsi del
corretto posizionamento dal click tirando appena
il vassoio verso di sè.
9• Il vassoio del seggiolone è posizionabile in due
posizioni; per posizionare il vassoio nella seconda
posizione, occorre premere le leve collocate sotto
lo stesso e tirare il vassoio verso di sé fino al
Page 8
secondo click.
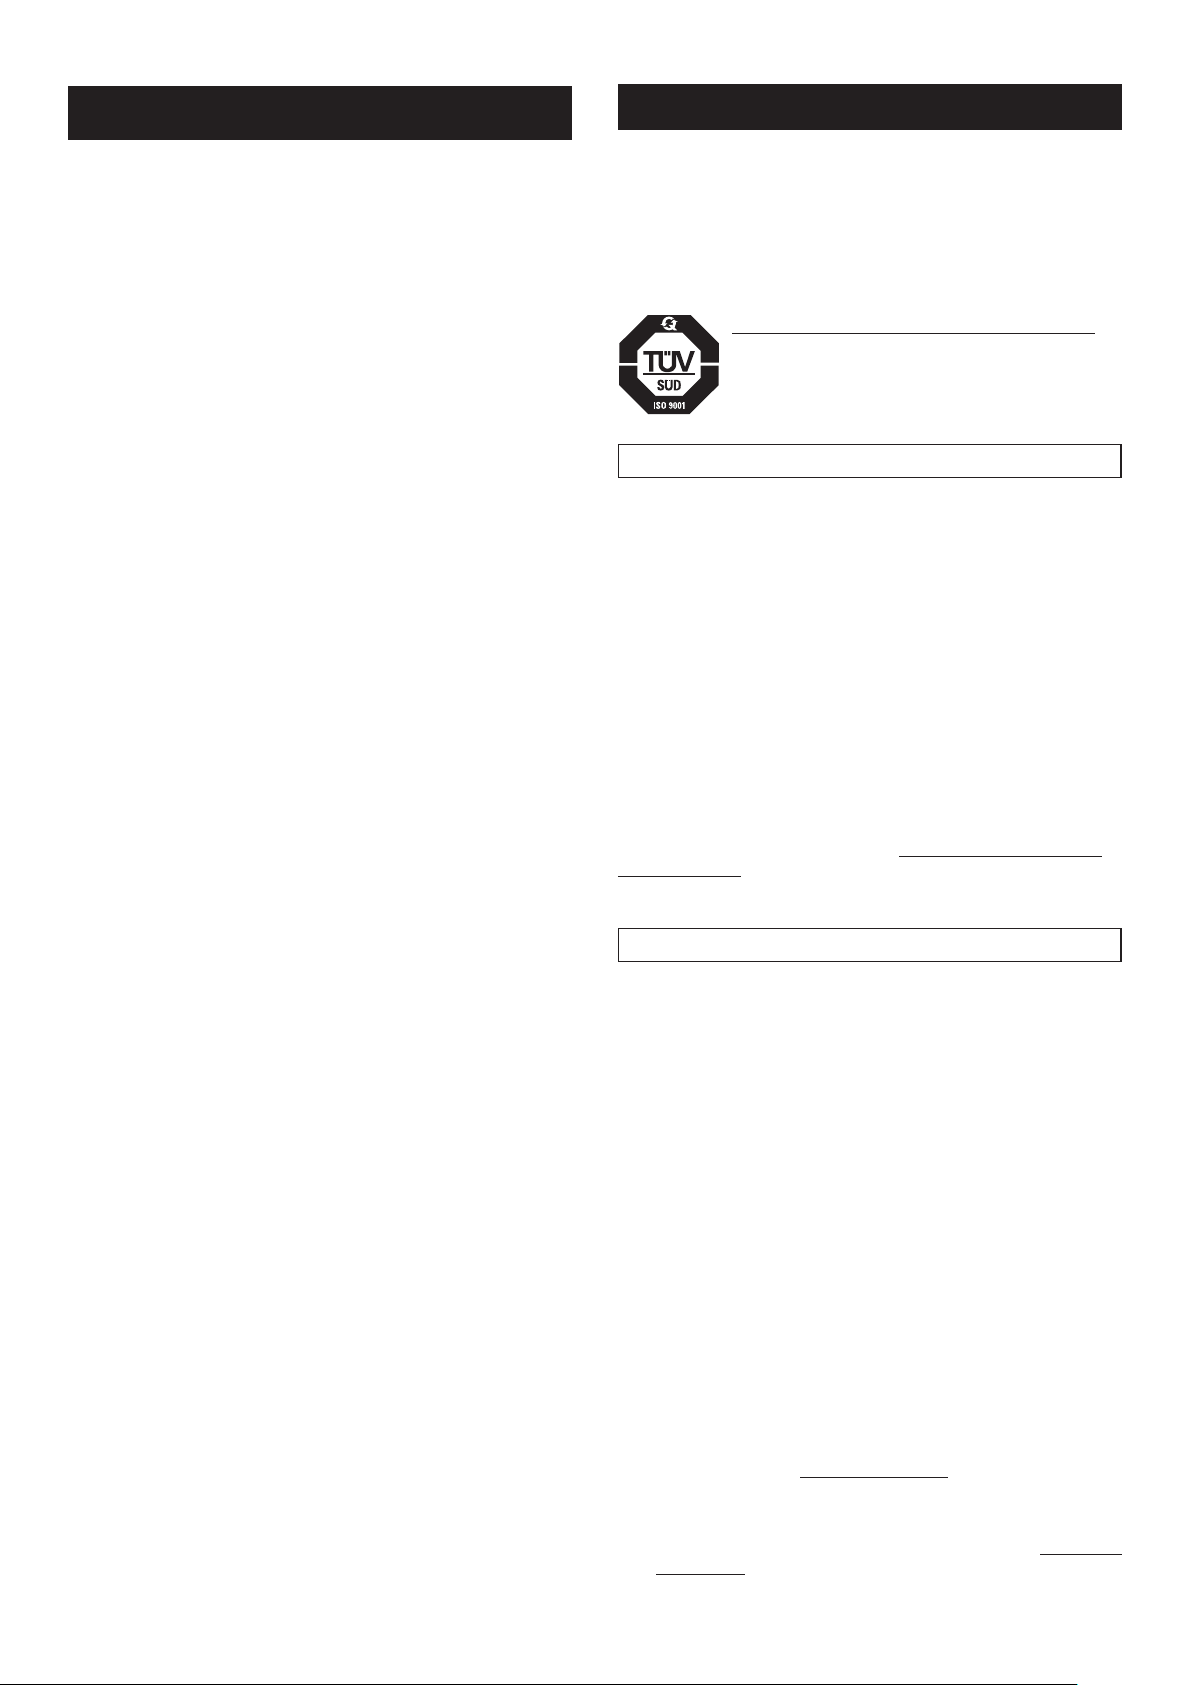
• Per estrarre il vassoio, tenere premuto le leve
collocate sotto lo stesso e contemporaneamente
spingere verso di sè il vassoio fino ad estrarlo.
10• Il seggiolone è dotato di doppio vassoio, su quello
inferiore si può giocare e su quello superiore
si può mangiare in tutta igiene perchè si lava
facilmente (anche nella lavastoviglie).
• Per rimuovere il vassoio della pappa, occorre
sganciarlo dal vassoio sottostante sollevandolo
come in figura.
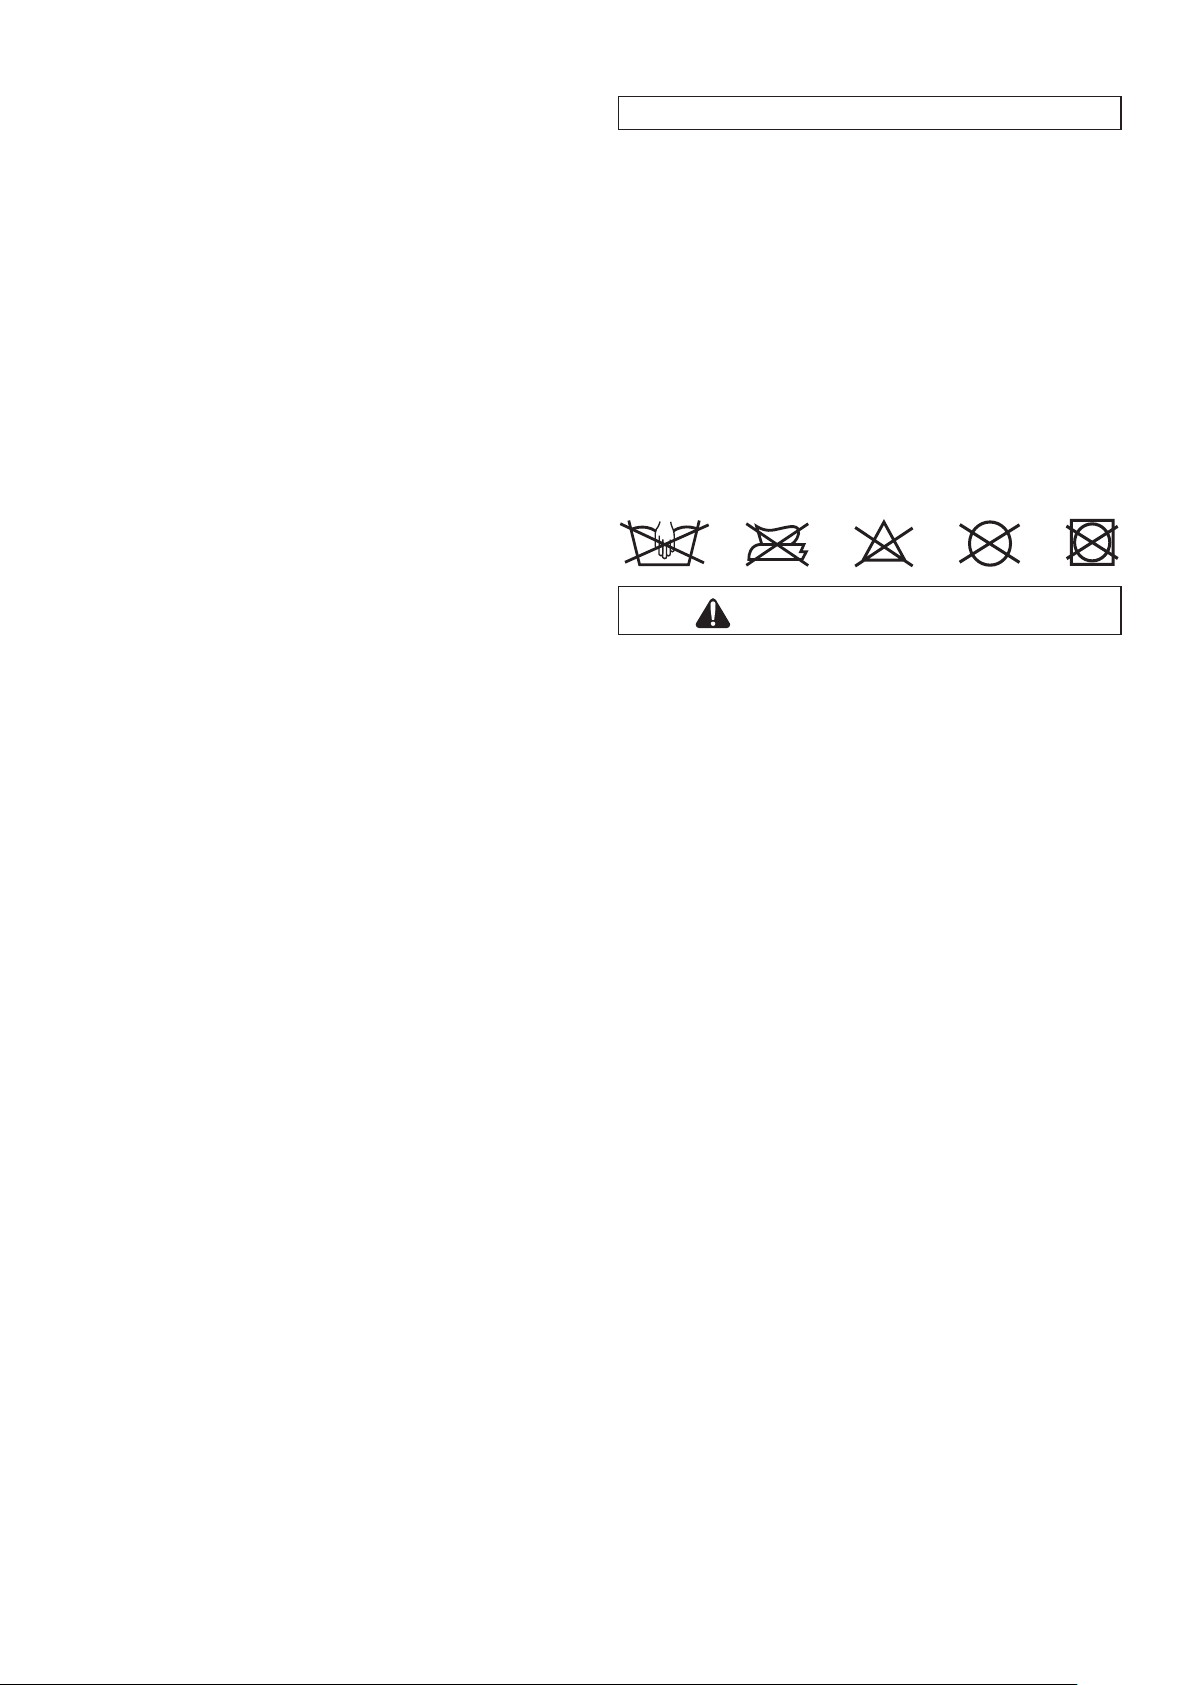
CINTURA DI SICUREZZA
11• Assicurarsi che la bretella sia correttamente
inserita spingendo come in figura A. Agganciare la
cintura girovita agendo come in figura B.
12• Per sganciare la cintura, premere ai lati della
fibbia (fig.A) e contemporaneamente tirare verso
lʼesterno il cinturino girovita (fig.B).
13• Le bretelle del cinturino possono essere regolate
in altezza in due posizioni; sganciare il cinturino
da dietro lo schienale, spingendo la fibbia verso il
basso (fig.A). Sfilare il cinturino dalla sacca (fig.B).
14• Infilare poi la fibbia del cinturino nell'altra fessura
dello schienale (fig.A) e agganciare la fibbia al
piolo, tirando il cinturino fino al click di aggancio
(fig.B).
SCHIENALE RECLINABILE
15• Lo schienale del seggiolone é reclinabile fino a
quattro posizioni: per la pappa, il gioco, il relax
o la nanna. Per regolarlo alzare la maniglia posta
dietro lo schienale e bloccarlo nella posizione
desiderata. Questa operazione puó essere
eseguita anche con il bambino nel seggiolone.
POGGIAGAMBE REGOLABILE
16• Il poggiagambe del seggiolone è regolabile in due
posizioni.
- Per alzare il poggiagambe, sollevarlo verso l'alto.
- Per abbassare il poggiagambe, inserire le dita
nelle levette laterali spingendole verso il basso e
successivamente abbassare il poggiagambe.
• Questa operazione puó essere eseguita anche con
il bambino nel seggiolone.
PER CHIUDERE IL SEGGIOLONE
17• Prima di chiudere il seggiolone:
- Togliere il vassoio.
- Portare lo schienale nella posizione eretta.
- Abbassare il poggiagambe.
- Richiudere il poggiapiedi del poggiagambe.
Premere il pulsante di sicurezza e spingere
18•
verso l'alto la leva di chiusura posta nella parte
posteriore del seggiolone; contemporaneamente
con l'altra mano spingere sulla parte anteriore del
seggiolone fino a chiuderlo. Il seggiolone quando
é chiuso rimane in piedi da solo.
19• Riporre il vassoio sulla parte inferiore delle gambe
in modo tale che non sia d'ingombro come in
figura.
PER APRIRE IL SEGGIOLONE
20• Per aprire il seggiolone, appoggiare un piede sulle
gambe anteriori per bloccarlo e con entrambe le
mani alzare la parte posteriore dei braccioli fino
ad aprirlo. Aperto il seggiolone nella sua massima
estensione, premere sui braccioli verso il basso
fino al click, in modo da bloccarlo.
PULIZIA E MANUTENZIONE
Il vostro prodotto necessita un minimo di
manutenzione. Le operazioni di pulizia e
manutenzione devono essere effettuate solo da adulti.
• Si raccomanda di tenere pulite tutte le parti in
movimento e se occorre, lubrificarle con olio
leggero.
• Asciugare le parti in metallo del prodotto per
prevenire la ruggine.
• Periodicamente pulire le parti in plastica con un
panno umido, non usare solventi o altri prodotti
simili.
• Proteggere il prodotto da agenti atmosferici, acqua,
pioggia o neve; lʼesposizione continua e prolungata
al sole potrebbe causare cambiamenti di colore in
molti materiali.
• Conservare il prodotto in un luogo asciutto.
• Non immergere la sacca in acqua, ma pulirla con un
panno umido e detersivo neutro.
ATTENZIONE
• LE OPERAZIONI DI MONTAGGIO E DI REGOLAZIONE
DEL PRODOTTO DEVONO ESSERE EFFETTUATE DA
UN ADULTO; NON UTILIZZARE IL PRODOTTO SE IL
MONTAGGIO NON Eʼ CORRETTAMENTE COMPLETATO
E SE IL PRODOTTO PRESENTA ROTTURE O PEZZI
MANCANTI.
• PREVENITE LA CADUTA DEL BAMBINO O IL SUO
SCIVOLAMENTO; UTILIZZATE SEMPRE LE CINTURE DI
SICUREZZA A CINQUE PUNTI; UTILIZZATE LE CINTURE
SIA IN POSIZIONE RECLINATA CHE IN POSIZIONE
ERETTA.
• NON LASCIATE MAI INCUSTODITO IL VOSTRO
BAMBINO; TENETE SEMPRE DI VISTA IL BAMBINO.
• NON USARE IL PRODOTTO FINCHÈ IL BAMBINO NON È
IN GRADO DI RESTARE SEDUTO DA SOLO.
• IL VASSOIO E I SUOI ACCESSORI NON SONO
PROGETTATI PER REGGERE IL PESO DEL BAMBINO;
IL VASSOIO NON È DISEGNATO PER MANTENERE
IL BAMBINO NELLA SEDUTA E NON SOSTITUISCE IL
CINTURINO DI SICUREZZA.
• ASSICURARSI CHE IL PRODOTTO SIA SU UNA
SUPERFICIE ORIZZONTALE.
• POSIZIONARE IL PRODOTTO IN MODO DA TENERE
IL BAMBINO LONTANO DA PERICOLI COME CAVI
ELETTRICI, SORGENTI DI CALORE O FIAMME.
• NON INTRODURRE LE DITA NEI MECCANISMI E
PRESTARE ATTENZIONE ALLA POSIZIONE DEGLI
ARTI DEL BAMBINO DURANTE LE OPERAZIONI DI
REGOLAZIONE.
• POTREBBE ESSERE PERICOLOSO UTILIZZARE
ACCESSORI NON APPROVATI DAL COSTRUTTORE.
• NON UTILIZZARE IL PRODOTTO IN VICINANZA DI
SCALE O GRADINI.
• PRESTARE ATTENZIONE A NON POSIZIONARE IL
PRODOTTO VICINO A SORGENTI DI CALORE O FUOCO
COME FORNELLI A GAS, STUFE ELETTRICHE, ECC….
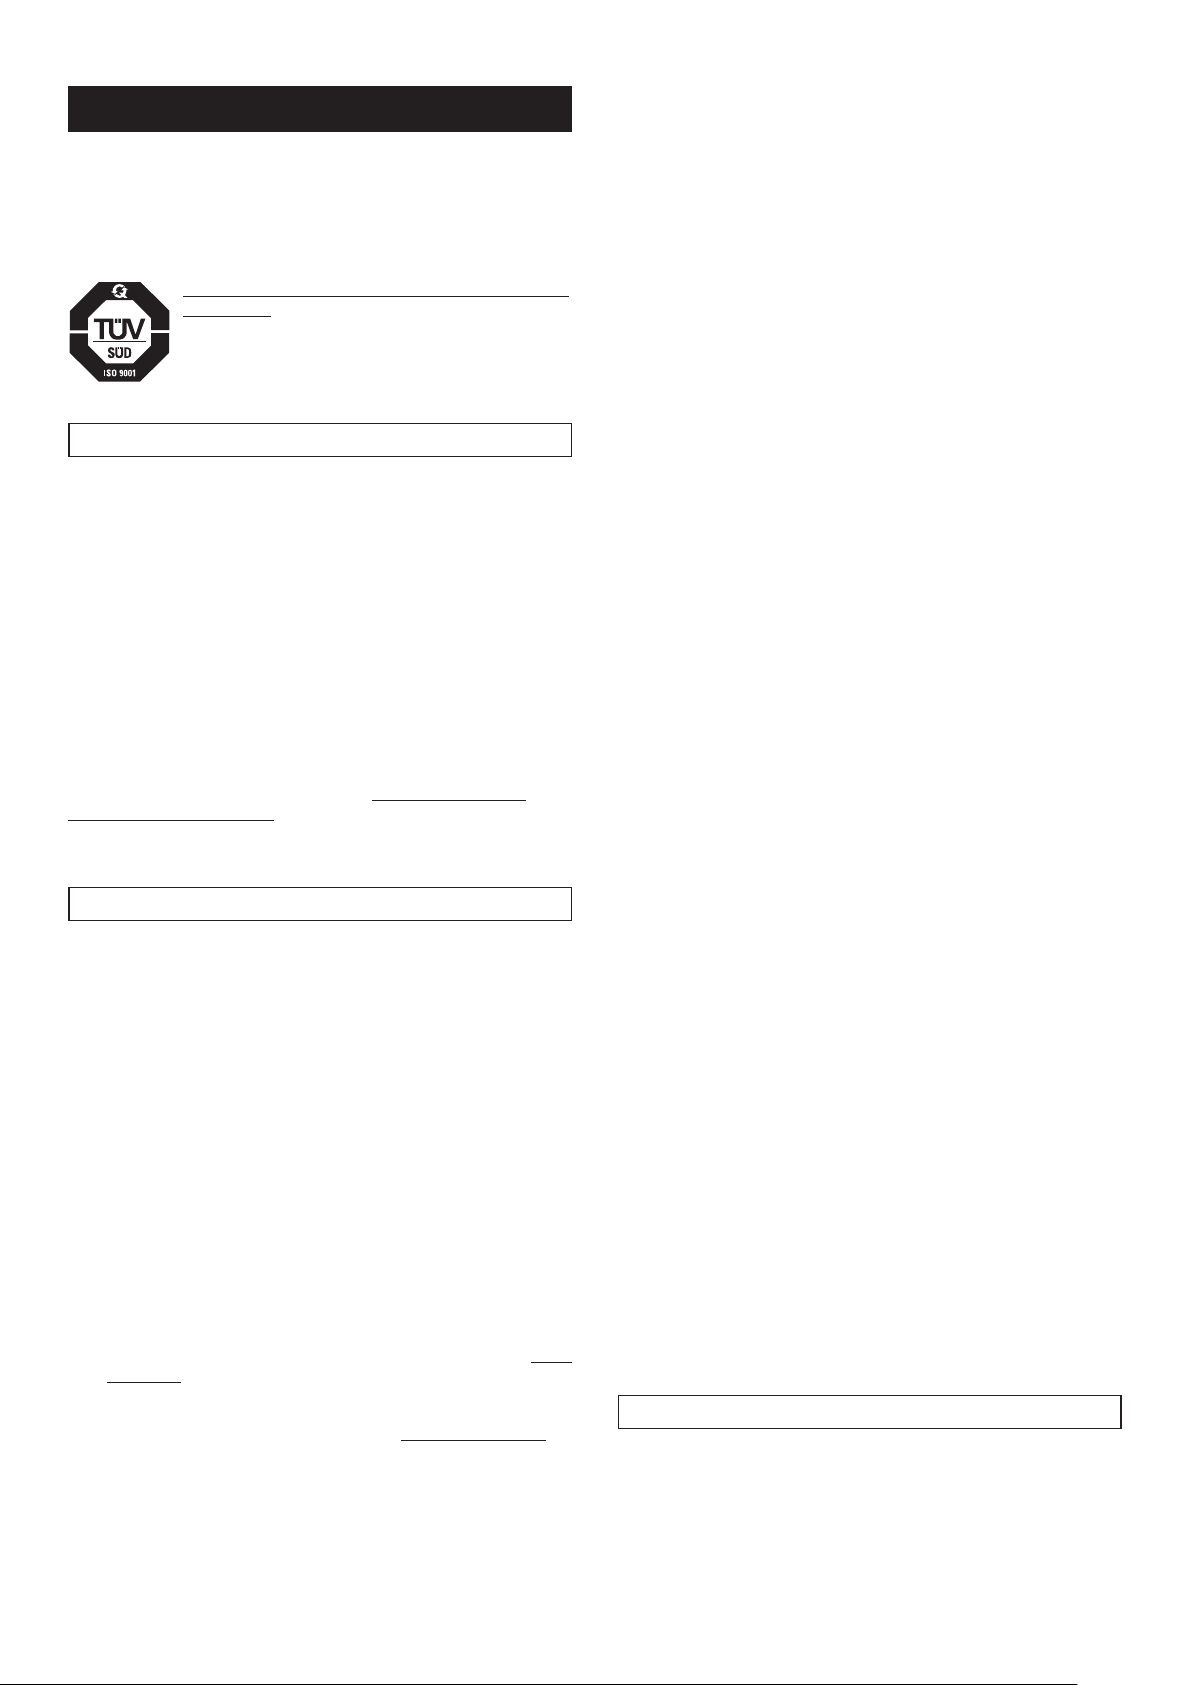
SFODERABILITÁ
21• Per sfoderare il seggiolone, sfilare la cintura dallo
schienale e da sotto la seduta.
22• Sbottonare la sacca dai lati dello schienale e sfilare
la sacca dallʼalto.
Page 9
EN•ENGLISH
• IMPORTANT: read the instructions carefully before
use. Save the instructions for future reference.
• PEG PEREGO reserves the right to make any
necessary changes or improvements to the products
shown at any time without notice.
Peg Perego S.p.A. is an ISO 9001 certified
company.
The fact that we are certified provides
a guarantee of our honesty for our
customers, and fosters trust in the
companyʼs way of working.
CUSTOMER SERVICE
If parts of the model are accidentally lost or damaged,
use only original Peg Perego spare parts. Contact
the Peg Perego Customer Service for all repair work,
replacements, information about products, and sale of
original spare parts and accessories, at the following:
tel.: 0039-039-60.88.213
fax: 0039-039-33.09.992
e-mail: assistenza@pegperego.it,
www.pegperego.com
clean and is dishwasher safe.
• To remove the meal tray from the highchair,
detach it from the bottom tray by lifting it as
shown in the figure.
SAFETY BELT
11• Make sure that the shoulder strap is correctly
inserted, by pressing on it as shown in figure A.
Fasten the lap belt as shown in figure B.
12• To unfasten the safety belt, press the sides of the
buckle (Fig. A) while pulling the lap belt outwards
(Fig. B).
13• The shoulder straps can be adjusted to two
different heights. Unfasten the safety belt from
behind the backrest by pushing the buckle
downwards (Fig. A). Slip the safety belt out of the
sack (Fig. B).
14• Slip the safety belt buckle through the other
opening in the backrest (Fig. A), and fasten the
buckle to the peg, pulling the safety belt until it
clicks into place (Fig. B).
ADJUSTABLE BACKREST
15• The backrest can be reclined to four positions, for
eating, playing, relaxing or sleeping. To adjust the
backrest, hold the handle behind it, pull upwards,
and lock the backrest into the desired position.
This operation can also be carried out with the
child in the chair.
Peg Perego is at the consumer's service, meeting
every need in the best way possible. This is why our
customers' opinions are so important and valuable
to us. We would be very grateful if you would kindly
fill in the CUSTOMER SATISFACTION QUESTIONNAIRE
after using one of our products. You will find the
questionnaire on the Internet at "www.pegperego.
com/SSCo.html.en-UK".
Please note any observations or suggestions you may
have on the questionnaire.
INSTRUCTIONS FOR USE
ASSEMBLING THE HIGHCHAIR
1• Open the highchair seat, pushing the back braces
along the side of it until they click into place.
2• Hold the legs upright, to distinguish the front legs
(longer) from the back legs (shorter).
3• Loosen the four screws and nuts from the front
and back of the highchair. Be careful not to lose
the screws.
4• Put the front legs (longer) into the front braces.
Use a screwdriver to fasten the legs in place.
5• Turn the seat, and insert the back legs (shorter)
into the back braces. Use a screwdriver to fasten
the back legs.
6• The figure shows the correct position for the
braces after the legs have been mounted.
7• Lower the footboard on the leg rest, turning it as
shown in the figure.
TRAY
8• To attach the tray, press the levers under it while
slipping it onto the arms of the highchair. Push
the tray all the way in, as shown in the figure (first
position). Pull the tray slightly towards you, until it
clicks into its correct position.
9• The highchair tray can be adjusted to two different
positions. To set the tray to the second position,
press the levers under the tray and pull the
tray towards you until it clicks into the second
position.
• To remove the tray, press the levers under the tray
and pull the tray off the highchair.
10• The highchair comes with a double tray. The
bottom tray can be used for playtime and the top
tray for mealtimes. The top tray is easy to keep
ADJUSTABLE LEG REST
16• The highchair leg rest can be adjusted to two
different positions.
- To lift the leg rest, pull it upwards.
- To lower it, push the little side levers downwards
while lowering the leg rest.
• This operation can also be carried out with the
child in the chair.
FOLDING UP THE HIGHCHAIR
17• Before folding up the highchair:
- Remove the tray.
- Put the backrest into the upright position.
- Lower the leg rest.
- Close the footboard on the leg rest.
18• Press the safety button and push the lever on
the back of the highchair upward while pushing
down on the front with your other hand to close
the highchair. The highchair stands upright when
closed.
19• For convenience, place the tray on the lower part
of the legs as shown in the figure.
OPENING THE HIGHCHAIR
20• To open the highchair, place one foot on the front
legs to hold it while you use both hands to lift the
back part of the armrests. Once the highchair is
completely opened, press down on the armrests
until they click into place. This locks the highchair
in the open position.
REMOVABLE LINING
21• To remove the lining from the highchair, remove
the belt from the back and under the seat.
22• Unbutton the sack at the sides of the backrest,
and slip the sack off the top of the highchair.
CLEANING & MAINTENANCE
The product you have purchased requires a small
amount of maintenance. Cleaning and maintenance
must be carried out by adults only.
• We recommend keeping all moving parts clean, and
oiling them if necessary.
• Keep the metal parts dry, to avoid rust.
• Periodically clean the plastic parts with a damp cloth.
Do not use solvents or similar products.
Page 10

• Protect the product from atmospheric agents, water,
rain or snow. Prolonged exposure to the sun may
cause materials to fade.
• Keep the product in a dry place.
• Do not immerse the sack in water. Use a damp cloth
and mild detergent to clean it.
FR•FRANÇAIS
• AVERTISSEMENT: lire attentivement les instructions
avant dʼutiliser le produit et les conserver pour toute
référence ultérieure.
• Pour des raisons techniques et commerciales,
PEG PEREGO pourra apporter à tout moment des
modifications aux modèles décrits dans ce manuel.
WARNING
• ALL ASSEMBLY AND OPERATING PROCEDURES
SHOULD BE PERFORMED BY AN ADULT; DO NOT USE
THE PRODUCT IF IT HAS BROKEN OR MISSING PARTS.
• TAKE PRECAUTIONS TO PREVENT THE CHILD FROM
FALLING OR SLIPPING OUT OF THE PRODUCT.
ALWAYS USE THE 5-POINT SAFETY BELT. USE THE
SAFETY BELT WHEN THE CHILD IS LYING DOWN AND
SITTING UP.
• NEVER LEAVE THE CHILD UNATTENDED; ALWAYS
KEEP CHILD IN VIEW WHILE IN THE HIGHCHAIR.
• DO NOT USE THIS PRODUCT FOR YOUR CHILD UNTIL
HE OR SHE IS ABLE TO SIT UPRIGHT ALONE.
• TRAY AND ACCESSORY TRAYS ARE NOT DESIGNED
TO SUPPORT THE CHILDʼS WEIGHT; TRAY IS NOT
DESIGNED TO HOLD THE CHILD IN THE CHAIR.
• ALWAYS USE THE HIGHCHAIR ON A FLAT,
HORIZONTAL SURFACE.
• BE CAREFUL OF WHERE YOU PLACE THE PRODUCT.
AVOID PLACING THE CHILD NEAR SAFETY HAZARDS
SUCH AS ELECTRICAL CORDS, SOURCES OF HEAT, OR
FLAMES.
• DO NOT PUT FINGERS IN THE MECHANISM. MAKE
SURE YOUR CHILDʼS ARMS AND LEGS ARE CLEAR OF
THE MOVING PARTS DURING ADJUSTMENT.
• USING ACCESSORIES THAT HAVE NOT BEEN
APPROVED BY THE MANUFACTURER MAY BE
HAZARDOUS.
• DO NOT USE THE PRODUCT NEAR STAIRS OR STEPS.
• BE CAREFUL NOT TO PLACE THE PRODUCT NEAR
SOURCES OF HEAT OR FLAMES, SUCH AS GAS
STOVES, ELECTRIC HEATERS, ETC.
Peg Perego S.p.A. bénéficie de la
certification ISO 9001.
La certification assure aux clients et
aux consommateurs une garantie de
transparence et de confiance dans la
façon dont travaille lʼentreprise.
SERVICE DʼASSISTANCE
En cas de perte ou dommage fortuit de pièces
du modèle, utilisez exclusivement les pièces de
rechange originales Peg Perego. Pour les éventuelles
réparations, substitutions, informations sur les
produits, la vente de pièces de rechange originales et
dʼaccessoires, contactez le Service dʼassistance PegPerego:
tél.: 0039-039-60.88.213
fax: 0039-039-33.09.992
e-mail: assistenza@pegperego.it
www.pegperego.com
Peg Perego est à la disposition de ses consommateurs
pour satisfaire au mieux toutes leurs exigences.
À cette fin, connaître lʼavis de nos clients est pour
nous extrêmement important et précieux. Nous vous
saurions donc gré, après avoir utilisé lʼun de nos
produits, de bien vouloir remplir le QUESTIONNAIRE
SATISFACTION DU CONSOMMATEUR que vous
trouverez sur Internet à lʼadresse suivante:
“www.pegperego.com/SSCo.html.en-UK”,
et de nous faire vos éventuelles observations ou
suggestions.
NOTICE DʼEMPLOI
ASSEMBLAGE DE LA CHAISE HAUTE
1• Ouvrir lʼassise de la chaise haute en faisant glisser
les montants latéralement jusquʼà ce quʼelle soit
enclenchée (déclic).
2• Placer les pieds en position verticale de façon à
distinguer les pieds avant (les plus hauts) des
pieds arrière (les plus bas).
3• Dévisser les quatre vis avec écrou des montants
avant et arrière, en faisant attention de ne pas les
perdre.
4• Introduire les pieds avant (les plus hauts) dans les
montants avant. Fixer les pieds avant en revissant
à lʼaide dʼun tournevis.
5• Retourner la chaise haute et introduire les pieds
arrière (les plus bas) dans les montants arrière.
Fixer les pieds arrière en revissant à lʼaide dʼun
tournevis.
6• La figure montre le positionnement exact des
montants une fois lʼopération terminée.
7• Abaisser la pédale du repose-pieds en procédant
comme indiqué sur la figure.
PLATEAU
8• Pour monter le plateau, appuyer sur les
leviers situés sous le plateau et, dans le même
temps, lʼintroduire dans les accoudoirs en le
poussant jusquʼau bout, comme indiqué sur
la figure (première position). Tirer légèrement
le plateau vers soi. Le déclic garantit son bon
positionnement.
9• Deux positions sont prévues pour le plateau de
Page 11

la chaise haute; pour mettre le plateau dans la
seconde position, appuyer sur les leviers situés
sous le plateau puis le tirer vers soi jusquʼau
second déclic.
• Pour enlever le plateau, appuyer sur les leviers
situés sous le plateau et, dans le même temps,
tirer le plateau vers soi jusquʼà lʼavoir enlevé.
10• La chaise haute est équipée dʼun double plateau:
un plateau inférieur pour jouer et un plateau
supérieur pour manger, dans la plus grande
hygiène; facile à nettoyer (même au lave-vaisselle).
• Pour enlever le plateau repas, le détacher du
plateau inférieur en le soulevant comme indiqué
sur la figure.
CEINTURE DE SECURITE
11• Sʼassurer que la bretelle soit correctement
enclenchée en poussant comme indiqué sur la
figure A. Accrocher la sangle ventrale en procédant
comme indiqué sur la figure B.
12• Pour décrocher la ceinture, appuyer sur les côtés
de la boucle (fig. A) et, dans le même temps, tirer
vers lʼextérieur la sangle ventrale (fig. B).
13• La hauteur des bretelles de la ceinture peut être
réglée suivant deux positions; détacher la sangle
de lʼarrière du dossier, en poussant la boucle vers
le bas (fig. A). Faire passer la sangle à travers la
housse (fig. B).
14• Faire ensuite passer la boucle de la sangle dans
lʼautre passant du dossier (fig. A) et accrocher la
boucle à lʼélément de fixation, en tirant la sangle
jusquʼà entendre le déclic (fig. B).
par le dessous de lʼassise.
22• Déboutonner la housse des côtés du dossier et
lʼenlever en la faisant glisser par le haut.
NETTOYAGE ET ENTRETIEN
Ce produit requiert un entretien minimum. Les
opérations de nettoyage et dʼentretien doivent être
effectuées uniquement par des adultes.
• Il est recommandé de nettoyer régulièrement les
parties mobiles et, si nécessaire, de les lubrifier avec
une huile légère.
• Sécher les parties métalliques du produit afin dʼéviter
la formation de rouille.
• Nettoyer régulièrement les parties en plastique avec
un linge humide; ne pas utiliser de solvants ou tout
produit similaire.
• Protéger le produit des agents atmosphériques (eau,
pluie ou neige); une exposition continue et prolongée
au soleil peut provoquer la décoloration de nombreux
matériaux.
• Conserver le produit dans un endroit sec.
• Ne pas immerger la housse dans lʼeau; la nettoyer
avec un linge humide et un produit nettoyant neutre.
AVERTISSEMENT
DOSSIER INCLINABLE
15• Le dossier de la chaise haute peut être incliné en
quatre positions: pour manger, jouer, se détendre
ou dormir. Pour le régler, relever la poignée située
derrière le dossier et le bloquer dans la position
souhaitée. Cette opération peut être effectuée avec
lʼenfant installé dans la chaise haute.
REPOSE-PIEDS RÉGLABLE
16• Le repose-pieds peut être réglé suivant deux
positions.
- Pour relever le repose-pieds, le soulever.
- Pour abaisser le repose-pieds, pousser les petits
leviers latéraux vers le bas puis abaisser le reposepieds.
• Cette opération peut être effectuée avec lʼenfant
installé dans la chaise haute.
FERMETURE DE LA CHAISE HAUTE
17• Avant de refermer la chaise haute:
- Enlever le plateau.
- Mettre le dossier à la verticale.
- Abaisser le repose-pieds.
- Replier la pédale du repose-pieds.
18• Appuyer sur le bouton de sécurité et pousser vers
le haut le levier de fermeture situé dans la partie
inférieure de la chaise haute; dans le même temps,
pousser de lʼautre main la partie avant de la chaise
haute jusquʼ
fermée, la chaise haute reste debout toute seule.
19• Placer le plateau aux pieds de la chaise haute,
comme indiqué sur la figure, de façon à limiter
lʼencombrement.
OUVERTURE DE LA CHAISE HAUTE
20• Pour ouvrir la chaise haute, la bloquer au sol en
posant un pied sur le support antérieur et, des
deux mains, relever la partie arrière des accoudoirs
jusquʼà ouverture complète. Une fois la chaise
haute complètement ouverte, appuyer sur les
accoudoirs jusquʼau déclic de façon à la bloquer.
POUR RETIRER LA HOUSSE
21• Pour retirer la housse de la chaise haute, enlever la
ceinture en la faisant glisser à travers le dossier et
à ce quʼelle soit refermée. Une fois
• LES OPÉRATIONS DE MONTAGE ET DE RÉGLAGE
DU PRODUIT DOIVENT ÊTRE EFFECTUÉES PAR
UN ADULTE; NE PAS UTILISER LE PRODUIT SI LE
MONTAGE NʼEST PAS CONVENABLEMENT TERMINÉ
ET SI LE PRODUIT PRÉSENTE DES PIÈCES CASSÉES OU
MANQUANTES.
• EMPÊCHER LA CHUTE OU LE GLISSEMENT DE
LʼENFANT EN UTILISANT TOUJOURS LES CEINTURES
DE SÉCURITÉ À CINQ POINTS; UTILISER LES
CEINTURES EN POSITION INCLINÉE ET À LA
VERTICALE.
• NE JAMAIS LAISSER LʼENFANT SANS SURVEILLANCE;
TOUJOURS GARDER LʼENFANT EN VUE.
• NʼUTILISER LE PRODUIT QUE SI LʼENFANT EST
CAPABLE DE RESTER ASSIS TOUT SEUL.
• LE PLATEAU ET SES ACCESSOIRES NʼONT PAS ÉTÉ
CONÇUS POUR SUPPORTER LE POIDS DE LʼENFANT;
LE PLATEAU NʼA PAS ÉTÉ CONÇU POUR MAINTENIR
LʼENFANT EN POSITION ASSISE ET NE REMPLACE PAS
LA CEINTURE DE SÉCURITÉ.
• SʼASSURER QUE LE PRODUIT EST INSTALLÉ SUR UNE
SURFACE HORIZONTALE.
• INSTALLER LE PRODUIT DE MANIÈRE À CE QUE
LʼENFANT NE PUISSE ÊTRE MIS EN DANGER PAR DES
CÂBLES ÉLECTRIQUES, DES SOURCES DE CHALEUR OU
DES FLAMMES.
• NE PAS METTRE LES DOIGTS DANS LES MÉCANISMES
ET FAIRE ATTENTION À LA POSITION DES MEMBRES
DE LʼENFANT AU COURS DES OPÉRATIONS DE
RÉGLAGE.
• LʼUTILISATION DʼACCESSOIRES NʼAYANT PAS
ÉTÉ APPROUVÉS PAR LE FABRICANT PEUT ÊTRE
DANGEREUSE.
• NE PAS UTILISER LE PRODUIT À PROXIMITÉ DE
MARCHES OU DʼESCALIERS.
• FAIRE ATTENTION À NE PAS POSITIONNER LE
PRODUIT À PROXIMITÉ DE SOURCES DE CHALEUR OU
DE FEUX COMME LES POÊLES À GAZ, LES RADIATEURS
ÉLECTRIQUES, ETC.
NOTICE RÉSERVÉE AU MARCHÉ FRANÇAIS:
• Conforme aux exigences de securite.
• Norme NF S 54-007.
Page 12

DE•DEUTSCH
• ACHTUNG: Die Anleitung vor Gebrauch aufmerksam
durchlesen und sorgfältig aufbewahren.
• Farbliche und technische Änderungen vorbehalten.
Peg Perego S.p.A. ist gemäß ISO 9001
zertifiziert.
Die Zertifizierung garantiert den
Kunden und Verbrauchern Transparenz
und ermöglicht das Vertrauen in die
Arbeitsweise unseres Unternehmens.
KUNDENDIENST
Bei Verlust oder Beschädigung ausschließlich
Originalersatzteile von Peg Perego verwenden. Für
eventuelle Reparaturen, Produktinformationen,
den Austausch diverser Teile bzw. den Kauf von
Originalersatzteilen oder Zubehörteilen wenden Sie
sich bitte an den Kundendienst Peg-Perego:
Tel.: 0039-039-60.88.213,
Fax: 0039-039-33.09.992,
E-Mail: assistenza@pegperego.it,
www.pegperego.com
Als Peg Perego stehen wir unseren Kunden für jeden
Bedarf immer gerne zur Seite. Deshalb ist es auch
extrem wichtig, über die Meinung unserer Kunden
Bescheid zu wissen. Wir bitten Sie, das FORMULAR
ÜBER DIE KONSUMENTENZUFRIEDENHEIT nachdem Sie
unsere Produkte ausprobiert haben, auszufüllen. Das
Formular ist unter folgender Internetadresse abrufbar:
“www.pegperego.com/SSCo.html.en-UK”
Wir würden uns über Anmerkungen und Ratschläge
freuen.
• Zum Abnehmen des Tabletts die Hebel unter
dem Tablett gedrückt halten und gleichzeitig
das Tablett zu sich ziehen, bis es vollständig
herausgezogen ist.
10• Der Hochstuhl ist mit einem doppelten Tablett
ausgestattet. Das untere Tablett dient als
Unterlage zum Spielen, auf dem oberen kann man
auf einer sauberen Oberfläche die Mahlzeiten
einnehmen, denn es lässt sich ganz einfach
abwaschen (auch in der Spülmaschine).
• Um das Esstablett zu entfernen, muss es vom
darunter liegenden Tablett abgenommen werden.
Dazu hebt man es nach oben (siehe Abbildung).
SICHERHEITSGURT
11• Sicherstellen, dass der Schulterriemen richtig
befestigt ist: dazu den Riemen wie auf Abbildung
A einführen. Den Hüftgurt wie auf Abbildung B
schließen.
12• Zum Öffnen des Gurtes die Seiten der Schnalle
(Abb. A) zusammendrücken und gleichzeitig den
Hüftgurt herausziehen (Abb. B).
13• Die Schulterriemen des Gurtes können in zwei
verschiedene Höhen eingestellt werden. Dazu den
Gurt von der Rückenlehne lösen und die Schnalle
nach unten drücken (Abb. A). Den Gurt aus dem
Bezug herausziehen (Abb. B).
14• Dann die Schnalle des Gurtes in die andere
Öffnung der Rückenlehne einziehen (Abb. A) und
die Schnalle an der Sprosse befestigen, indem
man am Gurt zieht, bis er einrastet (Abb. B).
ZURÜCKKLAPPBARE RÜCKENLEHNE
15• Die Rückenlehne des Kinderhochstuhls ist 4-
fach verstellbar: Zum Essen, Spielen, Ausruhen
oder Schlafen. Zum Verstellen den Griff hinter
der Rückenlehne nach oben ziehen und in der
gewünschten Position blockieren. Die Rückenlehne
kann auch verstellt werden, wenn das Kind im
Stuhl sitzt.
GEBRAUCHSANLEITUNG
ZUSAMMENSETZEN DES KINDERHOCHSTUHLS
1• Den Sitz des Hochstuhls öffnen, indem man die
hinteren Rahmenträger der Sitzseite entlang
schiebt, bis sie mit einem Klick einrasten.
2• Die Stuhlbeine senkrecht aufstellen, so dass
man die Vorder- und Hinterbeine voneinander
unterscheiden kann: die Vorderbeine sind länger
als die Hinterbeine.
3• Die vier Schrauben mit Mutter von den vorderen
und hinteren Rahmenträgern losschrauben und
sorgfältig aufbewahren.
4• Die Vorderbeine (die längeren Beine) in die
vorderen Rahmenträger stecken. Die Vorderbeine
mit Hilfe eines Schraubenziehers anschrauben.
5• Den Sitz umdrehen und die Hinterbeine
(die kürzeren Beine) in die hinteren
Rahmenträger stecken. Die Beine mit Hilfe eines
Schraubenziehers anschrauben.
6• Die Abbildung zeigt die korrekte Stellung der
Rahmenträger, nachdem sie montiert wurden.
7• Die Fußstütze drehen und herunterklappen (siehe
Abbildung).
TABLETT
8• Zum Anbringen des Tabletts die Hebel unter dem
Tablett gedrückt halten, gleichzeitig das Tablett
in die Armlehnen einführen und dabei wie auf
der Abbildung vollständig hinein schieben (erste
Stellung). Das Tablett zu sich ziehen: hört man ein
Klick, so wurde das Tablett korrekt angebracht.
9• Das Tablett des Hochstuhls lässt sich in zwei
verschiedene Positionen verstellen. Um das Tablett
in die zweite Position zu stellen, auf die Hebel
unter dem Tablett drücken und das Tablett zu sich
ziehen, bis zum zweiten Klick.
VERSTELLBARE FUSSSTÜTZE
16• Die Fußstütze des Kinderhochstuhls kann in zwei
Positionen verstellt werden.
- Zum Hochheben die Fußstütze nach oben ziehen.
- Zum Herunterklappen die Finger in die kleinen
Hebel auf der Seite stecken; die Hebel nach unten
drücken und die Fußstütze hinunterklappen.
• Die Fußstütze kann auch verstellt werden, wenn
das Kind im Stuhl sitzt.
SCHLIESSEN DES KINDERHOCHSTUHLS
17• Bevor man den Kinderhochstuhl schließt:
- Das Ablagetablett entfernen.
- Die Rückenlehne senkrecht stellen.
- Die Fußstütze hinunterklappen.
- Das Fußbrett der Fußstütze hochklappen.
18• Die Sicherheitsvorrichtung lösen und den
Verschlusshebel auf der Rückseite des
Kinderhochstuhls nach oben drücken; gleichzeitig
mit der anderen Hand auf die Vorderseite drücken,
bis der Stuhl geschlossen ist. Zusammengeklappt
bleibt der Hochstuhl frei stehen.
19• Das Tablett an den unteren Teil der Beine stecken,
um es zu versorgen (siehe Abbildung).
ÖFFNEN DES KINDERHOCHSTUHLS
20• Zum Öffnen des Hochstuhls einen Fuß auf die
Vorderbeine stellen, so dass sie blockiert werden,
und mit beiden Händen den hinteren Teil der
Armlehnen hochziehen, bis der Stuhl aufklappt.
Sobald der Stuhl vollständig geöffnet ist, auf die
Armlehnen drücken, bis sie einrasten und so den
Stuhl standfest machen.
ABZIEHEN DES BEZUGS
21• Zum Abziehen des Stuhlbezugs den Gurt aus der
Rückenlehne und unter dem Sitz herausziehen.
Page 13

22• Den Bezug von den Seiten der Rückenlehne
abknöpfen und dann von oben her abziehen.
ES•ESPAÑOL
REINIGUNG UND PFLEGE
Ihr Produkt ist nur wenig wartungsbedürftig. Die
Reinigung und Instandhaltung darf ausschließlich von
Erwachsenen durchgeführt werden.
• Alle beweglichen Teile unbedingt sauber halten und
wenn nötig mit Leichtöl schmieren.
• Die Metallteile gut trocknen, damit sie nicht rosten.
• Die Kunststoffteile regelmäßig mit einem feuchten
Lappen reinigen - keine Lösungsmittel oder ähnliche
Produkte verwenden.
• Das Produkt vor Witterungseinflüssen, Wasser, Regen
oder Schnee schützen. Falls das Produkt längere Zeit
in der Sonne steht, können verschiedene Materialien
eine Farbänderung erfahren.
• Das Produkt an einem trockenen Ort aufbewahren.
• Den Bezug nicht in einem Wasserbad waschen,
sondern mit einem feuchten Lappen und neutralem
Reinigungsmittel reinigen.
ACHTUNG
• DIE MONTAGE UND EINSTELLUNG DES PRODUKTS
DÜRFEN AUSSCHLIESSLICH VON ERWACHSENEN
DURCHGEFÜHRT WERDEN; DAS PRODUKT NICHT
BENUTZEN, SOLANGE DIE MONTAGE DES PRODUKTS
NICHT VOLLSTÄNDIG ERFOLGT IST ODER SCHÄDEN
BZW. FEHLENDE TEILE AUFWEIST.
• DEM HERAUSRUTSCHEN ODER RUNTERFALLEN DES
KINDES VORBEUGEN; VERWENDEN SIE IMMER DIE
5- PUNKT- SICHERHEITSGURTE; VERWENDEN SIE
DIE GURTE SOWOHL BEIM SITZEN IN AUFRECHTER
POSITION, ALS AUCH BEI RÜCKENLAGE DES KINDES.
• LASSEN SIE IHR KIND NIE UNBEAUFSICHTIGT;
BEHALTEN SIE IHR KIND IMMER IM AUGE.
• PRODUKT NICHT VERWENDEN, SOLANGE DAS KIND
NICHT SELBSTÄNDIG SITZEN KANN.
• DAS TABLETT UND SEIN ENTSPRECHENDES ZUBEHÖR
SIND NICHT ENTWICKELT, UM DEM GEWICHT DES
KINDES STAND HALTEN ZU KÖNNTEN; DAS TABLETT
IST NICHT DAFÜR GEDACHT DEM KIND IM SITZ HALT
ZU GEBEN UND ERSETZEN FOLGLICH NICHT DIE
SICHERHEITSGURTE.
• SICHERSTELLEN, DASS SICH DAS PRODUKT AUF
EBENEM GRUND BEFINDET.
• DAS PRODUKT SO POSITIONIEREN, DASS IHR
KIND FERN VON GEFAHRENSITUATIONEN WIE
ELEKTROKABELN, WÄRMEQUELLEN ODER FEUER
SITZT.
• FINGER NICHT IN MECHANISMEN STECKEN UND
WÄHREND DEM EINSTELLEN DES PRODUKTS AUF DIE
GLIEDMASSEN DES KINDES ACHTEN.
• DER GEBRAUCH VON NICHT GENEHMIGTEM ZUBEHÖR
SEITENS DES HERSTELLERS KANN GEFÄHRLICH SEIN.
• PRODUKT NICHT IN DER NÄHE VON TREPPEN ODER
STUFEN BENUTZEN.
• ES WIRD DAVOR GEWARNT DAS PRODUKT IN
DER NÄHE VON WÄRMEQUELLEN WIE GASHERDE,
ELEKTRISCHE HEIZGERÄTE ETC. ABZUSTELLEN.
• IMPORTANTE: leer detenidamente las instrucciones
antes del uso y conservarlas para poder utilizarlas en
el futuro.
• PEG PEREGO podrá modificar los modelos descritos
en este prospecto, por razones técnicas o
comerciales.
Peg Perego S.p.A. cuenta con la
certificación ISO 9001.
Dicha certificación ofrece tanto a los
clientes como a los consumidores la
garantía de una transparencia y confianza
por lo que concierne al modo de trabajar
de la empresa.
SERVICIO DE ASISTENCIA
Si por casualidad alguna parte del modelo se pierde o
se rompe, usar sólo piezas de repuesto originales Peg
Perego. Para todo lo que concierne las reparaciones,
cambios, informaciones sobre los productos y la venta
de repuestos originales y accesorios, contacte con el
Servicio de Asistencia Peg-Perego:
Tel.: 0039-039-60.88.213
Fax: 0039-039-33.09.992
e-mail: assistenza@pegperego.it
www.pegperego.com
Peg Perego está a disposición de sus Consumidores
para satisfacer lo mejor posible todas sus exigencias.
Por eso, conocer lo que piensan nuestros Clientes,
es para nosotros muy importante y fundamental. Le
agradeceremos mucho si, después de haber utilizado
uno de nuestros productos rellena el FORMULARIO DE
SATISFACCIÓN DEL CONSUMIDOR que encontrará en
internet en la siguiente dirección: “www.pegperego.
com/SSCo.html.en-UK”,
indicando las posibles observaciones o sugerencias.
INSTRUCCIONES DE USO
PARA MONTAR LA SILLA
1• Abrir el asiento de la silla, deslizando los
bastidores traseros a los lados del asiento hasta
oír el clic que indica que se ha enganchado.
2• Poner las patas en posición vertical para ver cuales
son las patas delanteras, que son más altas que
las traseras.
3• Quitar los cuatro tornillos con tuerca de los
bastidores delanteros y traseros; cuidado con no
perderlos.
4• Meter las patas delanteras, las más altas, en los
bastidores delanteros. Fijar las patas delanteras
poniendo los tornillos con un destornillador.
5• Girar el asiento y meter las patas traseras, las
más bajas, en los bastidores traseros. Fijar las
patas traseras poniendo los tornillos con un
destornillador.
6• La figura muestra la posición exacta de los
bastidores una vez concluida la operación.
7• Bajar el peldaño del reposapiés girándolo como
indica la figura.
BANDEJA
8• Para poner la bandeja, mantener presionadas las
palancas que hay debajo de la misma y al mismo
tiempo meterla en los reposabrazos empujando
hasta el fondo como indica la figura (primera
posición). Para comprobar que está bien colocada
hay que oír el clic de tope tirando solo un poco
hacia sí la bandeja.
9• La bandeja de la silla se puede poner en dos
Page 14

posiciones; para ponerla en la segunda posición
hay que presionar las palancas que hay debajo de
la misma y tirar de la bandeja hacia sí hasta oír el
segundo clic.
• Para extraer la bandeja hay que mantener
presionadas las palancas que hay debajo de la
misma y al mismo tiempo empujar hacia sí la
bandeja hasta que salga.
10• La silla lleva una bandeja doble; en la de abajo se
puede jugar y en la de arriba se puede comer con
la máxima higiene pues se lava fácilmente (incluso
en el lavavajillas).
• Para quitar la bandeja de la comida hay
que desengancharla de la bandeja de abajo
levantándola como indica la figura.
CINTURÓN DE SEGURIDAD
11• Asegurarse de que el tirante esté bien metido
empujando como indica la figura A. Enganchar la
correa de la cintura como indica la figura B.
12• Para desenganchar el cinturón presionar a los
lados de la hebilla (fig. A) y al mismo tiempo tirar
hacia fuera la correa de la cintura (fig. B).
13• Los tirantes de las correas de la cintura
pueden regularse en altura en dos posiciones;
desenganchar la correa por detrás del respaldo,
empujando la hebilla hacia abajo (fig. A). Sacar la
correa de la cintura de la funda (fig. B).
14• Luego meter la hebilla de la correa de la cintura en
la otra ranura del respaldo (fig. A) y enganchar la
hebilla a la espiga, tirando de la correa hasta oír
clic de enganche (fig. B).
RESPALDO RECLINABLE
15• El respaldo de la silla se puede reclinar en cuatro
posiciones: para comer, jugar, descansar o dormir.
Para regularlo levantar el asa que está detrás del
respaldo y bloquearlo en la posición deseada. Esta
operación puede hacerse también con el niño en
la silla.
REPOSAPIÉS REGULABLE
16• El reposapiés de la silla se puede regular en dos
posiciones.
- Para levantar el reposapiés, levantarlo hacia arriba.
- Para bajar el reposapiés meter los dedos en las
palanquitas laterales empujándolas hacia abajo y
luego bajar el reposapiés.
• Esta operación puede hacerse también con el niño
en la silla.
PARA CERRAR LA SILLA
17• Antes de cerrar la silla:
- Quitar la bandeja.
- Poner el respaldo en la posición erecta.
- Bajar el reposapiés.
- Volver a cerrar el peldaño del reposapiés.
18• Presionar el botón de seguridad y empujar hacia
arriba la palanca de cierre que hay en la parte de
detrás de la silla; al mismo tiempo con la otra
mano empujar en la parte delantera de la silla
hasta que se cierre. La silla cuando está cerrada se
sostiene en pie sola.
19• Meter la bandeja en la parte de abajo de las patas
de manera que no moleste, como indica la figura.
sacar la funda por arriba.
LIMPIEZA & MANTENIMIENTO
Este producto necesita un mínimo de mantenimiento.
Las operaciones de limpieza y mantenimiento tienen
que hacerlas solo los adultos.
• Se aconseja mantener limpias todas las partes en
movimiento y si hiciera falta, lubricarlas con aceite
ligero.
• Secar las partes de metal del producto para prevenir
que se oxiden.
• Limpiar las partes de plástico periódicamente con
un paño húmedo, no usar disolventes ni otros
productos símiles.
• Proteger el producto contra los agentes
atmosféricos, agua, lluvia o nieve; la exposición
continua y prolongada al sol puede causar
alteraciones del color en muchos materiales.
• Conservar el producto en un lugar seco.
• No meter la funda en el agua sino limpiarla con un
paño húmedo y detergente neutro.
CUIDADO
• LAS OPERACIONES DE MONTAJE Y DE REGULACIÓN
DEL PRODUCTO TIENEN QUE SER REALIZADAS
POR UN ADULTO; NO UTILIZAR EL PRODUCTO SI
EL MONTAJE NO HA SIDO COMPLETADO Y SI EL
PRODUCTO PRESENTA ROTURAS O FALTAN PIEZAS.
• PREVENIR LA CAÍDA DEL NIÑO O QUE RESBALE;
UTILIZAR SIEMPRE LOS CINTURONES DE SEGURIDAD
DE CINCO PUNTOS. UTILIZAR LOS CINTURONES
TANTO EN POSICIÓN RECLINADA COMO ERECTA.
• NO DEJAR NUNCA AL NIÑO SIN VIGILANCIA; NO
PERDER NUNCA DE VISTA AL NIÑO.
• NO USAR EL PRODUCTO HASTA QUE EL NIÑO NO
SEA CAPAZ DE ESTAR SENTADO SOLO.
• LA BANDEJA Y SUS ACCESORIOS NO HAN SIDO
CONCEBIDOS PARA SOPORTAR EL PESO DEL NIÑO;
LA BANDEJA NO HA SIDO DISEÑADA PARA SUJETAR
AL NIÑO EN EL ASIENTO Y NO SIRVE COMO
CINTURÓN DE SEGURIDAD.
• ASEGURARSE DE QUE EL PRODUCTO ESTÉ SOBRE
UNA SUPERFICIE HORIZONTAL.
• PONER EL PRODUCTO DE MANERA QUE EL NIÑO
ESTÉ LEJOS DE POSIBLES PELIGROS COMO CABLES
ELÉCTRICOS, FUENTES DE CALOR O LLAMAS.
• NO INTRODUCIR LOS DEDOS EN LOS MECANISMOS
Y PRESTAR ATENCIÓN A LA POSICIÓN DE
LAS EXTREMIDADES DEL NIÑO DURANTE LAS
OPERACIONES DE REGULACIÓN.
• PUEDE SER PELIGROSO UTILIZAR ACCESORIOS NO
HOMOLOGADOS POR EL FABRICANTE.
• NO UTILIZAR EL PRODUCTO CERCA DE ESCALERAS O
ESCALONES.
• PRESTAR ATENCIÓN A NO PONER EL PRODUCTO
CERCA DE FUENTES DE CALOR O FUEGO COMO
HORNILLOS DE GAS, ESTUFAS ELÉCTRICAS, ETC.
PARA ABRIR LA SILLA
20• Para abrir la silla apoyar un pie en las patas
delanteras para bloquearla y con las dos manos
levantar la parte trasera de los reposabrazos hasta
que se abra. Cuando la silla se abre totalmente
presionar en los reposabrazos hacia abajo hasta
oír clic para que se bloquee.
CÓMO SE QUITA LA FUNDA
21• Para quitar la funda de la silla sacar el cinturón
por el respaldo y por debajo del asiento.
22• Desabrochar la funda de los lados del respaldo y
Page 15

PT•PORTUGUÊS
• IMPORTANTE: leia atentamente as instruções antes
do uso e conserve-as para reutilizá-las futuramente.
• A Peg Perego poderá efectuar em qualquer
momento modificações aos modelos descritos nesta
publicação, por motivos de natureza técnica ou
comercial.
A Peg Perego S.p.A. é certificada ISO
9001.
A certificação oferece aos clientes e
aos consumidores a garantia de uma
trasparência e confiança no modo de
trabalhar da empresa.
SERVIÇO DE ASSISTÊNCIA
No caso de perda ou dano de partes do modelo, use
somente peças originais Peg Perego. Caso necessite
de reparar, substituir, informar-se sobre os produtos
Perego, ou também, adquirir peças originais e
acessórios, procure o Serviço de Assistência PegPerego:
tel.:0039-039-60.88.213,
fax: 0039-039-33.09.992,
e-mail: assistenza@pegperego.it,
www.pegperego.com
A Peg Perego é a disposição de seus Consumidores
para satisfazê-los no melhor modo possível. Por
isto, conhecer a opinião dos nossos Clientes,
para nos é muito importante e precioso. Portanto
agradecemos muito se logo após ter utilizado um
nosso produto V.Sa. queira preencher, enviando-nos
suas observações ou sujestões, o QUESTIONÁRIO
SATISFAÇÃO DO CONSUMIDOR que encontrarás em
internet ao seguinte endereço: “www.pegperego.com/
SSCo.html.it”.
INSTRUÇÕES DE UTILIZAÇÃO
para si até sentir o clique.
• Para retirar a bandeja, mantenha premidas as
alavancas existentes em baixo da mesma e
simultaneamente empurre para si a bandeja, até
retirá-la.
10• A cadeira possui uma bandeja dupla, naquela
debaixo pode-se brincar e naquela de cima,
pode-se comer com toda higiene, porque è
facilmente lavável (também na máquina de lavar
louças).
• Para remover a bandeja da papa, è preciso soltá-la
da bandeja debaixo a levantá-la como na figura.
CINTO DE SEGURANÇA
11• Certifique-se que a fita esteja correctamente
inserida a empurrar como na figura A. Enganche o
cinto da cintura, assim como indica a figura B.
12• Para soltar o cinto, prema dos lados da fivela (fig.
A) e ao mesmo tempo, puxe para fora o cinto da
cintura (fig. B).
13• As fitas do cintinho podem ser reguladas na altura
em duas posições; solte o cintinho por trás do
encosto, a empurrar a fivela para baixo (fig. A).
Retire o cintinho da vestidura (fig. B).
14• Introduza então a fivela do cintinho na outra
abertura do encosto (fig. A) e prenda a fivela ao
pino, a puxar o cintinho até sentir o clique (fig. B).
ENCOSTO RECLINÁVEL
15• O encosto da cadeira para criança é reclinável
em quatro posições para a papa, a brincadeira,
o descanso ou a nana. Para regulá-lo levante a
manilha colocada atrás do encosto e bloqueieo na posição desejada. Esta operação pode ser
efectuada com a criança na cadeira.
REPOUSA-PÉS REGULÁVEL
16• O repousa-pés da cadeira é regulável em duas
posições.
- Para levantar o repousa-pés, erga-o para cima.
- Para baixá-lo, introduza os dedos nas pequenas
alavancas laterais, empurrando-as para baixo e
sucessivamente abaixe o repousa-pés.
• Esta operação pode ser efectuada com a criança
na cadeira.
PARA MONTAR A CADEIRA DE CRIANÇA
1• Abra o assento da cadeira de criança, a fazer
deslizar os eixos traseiros lateralmente em relação
ao assento, até sentir o clique do encaixe.
2• Coloque as pernas na posição vertical de forma
a diferenciar as pernas dianteiras, mais altas,
daquelas mais baixas.
3• Desatarraxe os quatro parafusos dos eixos
dianteiros e traseiros, a prestar atenção em não
perder-lhes.
4• Coloque as pernas dianteiras, as mais altas, nos
eixos dianteiros. Fixe as pernas dianteiras a
parafusar com a ajuda de uma chave de fendas.
5• Gire o assento e introduza as pernas traseiras, as
mais baixas, nos eixos traseiros. Fixe as pernas a
parafusar com a ajuda de uma chave de fendas.
6• A figura mostra a posição exacta dos eixos ao
término desta operação.
7• Abaixe o estribo do repousa-pés a virá-lo como
na figura.
BANDEJA
8• Para aplicar a bandeja, mantenha premidas
as alavancas existentes sob a mesma e
simultaneamente, introduza-a nos braços a
empurrá-la até o fim, como na figura (primeira
posição). Certifique-se da colocação correcta a
sentir o clique puxando a bandeja para si.
9• A bandeja da cadeira de criança pode ser colocada
em duas posições; para colocar a bandeja na
segunda posição, è preciso premer as alavancas
existentes em baixo da mesma, e puxar a bandeja
PARA FECHAR A CADEIRA PARA CRIANÇA
17• Antes de fechar a cadeira para criança:
- Retire a bandeja.
- Coloque o encosto na posição erecta.
- Abaixe o repousa-pés.
- Feche o estribo do repousa-pés.
18• Prema o botão de segurança e empurre para cima
a alavanca de fechamento existente na parte de
trás da cadeira; ao mesmo tempo, com a outra
mão, empurre a parte dianteira da cadeira até
fechar. A cadeira para criança quando fechada,
permanece em pé sozinha.
19• Recoloque a bandeja na parte inferior das pernas,
de modo a não disturbar, assim como na figura.
PARA ABRIR A CADEIRA PARA CRIANÇA
20• Para abrir a cadeira para criança, apoie um dos
pés nas pernas dianteiras para bloqueá-la e
com ambas as mãos, levante a parte traseira dos
braços até sentir clique. Após abrir a cadeira na
sua máxima abertura, prema os braços para baixo
até sentir o clique, de modo a bloqueá-la.
RETIRADA DA VESTIDURA EM TECIDO
21• Para retirar a vestidura da cadeira, retire o cinto
do encosto e debaixo do assento.
22• Desabotoe a vestidura dos lados do encosto e
retire-a por cima.
Page 16

LIMPEZA E MANUTENÇÃO
NL•NEDERLANDS
O seu produto precisa de uma manutenção mínima.
As operações de limpeza e manutenção devem ser
efectuadas somente por adultos.
• Aconselha-se manter limpas as partes em
movimento e se necessário, lubrifique-as com óleo.
• Enxugue as partes do produto em metal de modo a
prevenir a formação de ferrugem.
• Periodicamente limpe as partes em plástico com um
pano húmido, não use solventes ou outros produtos
similares.
• Proteja o produto dos agentes atmosféricos, água,
chuva ou neve; a exposição contínua e prolongada
ao sol poderia causar alterações na cor de muitos
materiais.
• Conserve o produto num sítio seco.
• Não coloque a vestidura na água, mas limpe-a com
pano húmido e detergente neutro.
ATENÇÃO
• AS OPERAÇÕES DE MONTAGEM E DE REGULAGEM
DO PRODUTO DEVEM SER EFECTUADAS POR UM
ADULTO; NÃO UTILIZE O PRODUTO SE A MONTAGEM
NÃO ESTIVER CORRECTAMENTE TERMINADA E SE O
PRODUTO APRESENTAR QUEBRAS OU PARTES QUE
FALTEM.
• PREVINA A POSSIBILIDADE QUE A CRIANÇA POSSA
CAIR OU ESCORREGAR; UTILIZE SEMPRE OS CINTOS
DE SEGURANÇA DE CINCO PONTOS. UTILIZE OS
CINTO QUER NA POSIÇÃO RECLINADA, QUER NA
POSIÇÃO ERECTA.
• NÃO DEIXE JAMAIS SUA CRIANÇA SOZINHA; OLHE
SEMPRE SUA CRIANÇA.
• NÃO USE O PRODUTO ENQUANTO A CRIANÇA NÃO
FOR CAPAZ DE SENTAR-SE SOZINHA.
• A BANDEJA E SEUS ACESSÓRIOS NÃO SÃO
PROJECTADOS PARA SUPORTAR O PESO DA CRIANÇA;
A BANDEJA NÃO FOI DESENHADA PARA CONSERVAR
A CRIANÇA NO ASSENTO E NÃO SUBSTITUI O CINTO
DE SEGURANÇA.
• CERTIFIQUE-SE QUE O PRODUTO ESTEJA SOBRE UMA
SUPERFÍCIE HORIZONTAL.
• POSICIONE O PRODUTO DE MODO A CONSERVAR
A CRIANÇA LONGE DE PERIGOS COMO CABOS
ELÉCTRICOS, FONTES DE CALOR OU CHAMAS.
• NÃO INTRODUZA OS DEDOS NOS MECANISMOS E
PRESTE ATENÇÃO NA POSIÇÃO DOS MEMBROS DA
CRIANÇA DURANTE AS OPERAÇÕES DE REGULAGEM.
• PODERIA SER PERIGOSO UTILIZAR ACESSÓRIOS NÃO
APROVADOS PELO FABRICANTE.
• NÃO UTILIZE O PRODUTO NAS PROXIMIDADES DE
ESCADAS OU DEGRAUS.
• PRESTE ATENÇÃO EM NÃO COLOCAR O PRODUTO
NAS PROXIMIDADES DE FONTES DE CALOR E FOGO,
COMO FOGÃO À GÁS, AQUECEDORES ELÉCTRICOS,
ETC.
• BELANGRIJK: lees vóór het gebruik deze handleiding
met instructies met aandacht. Bewaar de handleiding
voor een toekomstige raadpleging.
• Peg Perego kan op ieder gewenst moment
wijzigingen aanbrengen op de modellen die in
deze publicatie beschreven worden, om reden van
technische of commerciële aard.
Peg Perego S.p.A. heeft een ISO 9001-
certificaat.
De certificiëring biedt klanten
en consumenten de garantie van
doorzichtigheid en vertrouwen in de
manier van werken van het bedrijf.
ASSISTENTIEDIENST
Indien delen van het model per ongeluk verloren
gaan of beschadigd raken dan dient u alleen originele
reserveonderdelen van Peg Perego te gebruiken. Voor
eventuele reparaties of vervanging van de producten,
alsmede voor informatie over de producten,
de verkoop van originele reserveonderdelen
en accessoires, neemt u contact op met de
Assistentiedienst van Peg-Perego:
tel.: 0039-039-60.88.213,
fax: 0039-039-33.09.992,
e-mail: assistenza@pegperego.it,
www.pegperego.com
Peg Perego staat ter beschikking van de Consument
om zo goed mogelijk aan diens wensen tegemoet te
komen. Daarom is het voor ons uiterst belangrijk om
de mening van onze klanten te kennen. Wij zullen u
daarom dankbaar zijn indien u, na het gebruik van
één van ozne producten, de VRAGENLIJST TEVREDEN
KLANTEN wilt invullen die u in het internet vindt, op
het volgende adres: “www.pegperego.com/SSCo.html.
it”, waarbij u opmerkingen kunt plaatsen of suggesties
kunt doen.
INSTRUCTIES VOOR HET GEBRUIK
IN ELKAAR ZETTEN VAN DE KINDERSTOEL
1• Open de zitting van de kinderstoel door de
achterste staanders langs de zijkanten van
de zitting te laten schuiven tot de klik van
aankoppeling gehoord wordt.
2• Zet de poten in de verticale stand zodat
onderscheid gemaakt wordt tussen de langere
voorpoten en de kortere achterpoten.
3• Draai de vier schroeven met moer van de voorste
en achterste staanders los en zorg ervoor ze niet
te verliezen.
4• Plaats de langere voorpoten in de voorste
staanders. Bevestig de voorpoten door ze
met behulp van een schroevendraaier vast te
schroeven.
5• Draai de zitting en plaats de kortere achterpoten
in de achterste staanders. Bevestig de poten door
ze met behulp van een schroevendraaier vast te
schroeven.
6• De afbeelding toont de exacte opstelling van
de staanders nadat bovenstaande handelingen
verricht zijn.
7• Plaats de voetensteun omlaag door hem te draaien
zoals de afbeelding toont.
VOORZETBLAD
8• Om het blad te bevestigen, houd u de hendels die
zich eronder bevinden ingedrukt en steekt u het
blad op hetzelfde moment in de armleuningen
Page 17

waarbij u het blad tot het einde vast duwt zoals de
afbeelding toont (eerste stand). Het blad is correct
geplaatst wanneer u de klik hoort terwijl u het
blad licht naar u toe trekt.
Het blad van de kinderstoel kan in twee standen
9•
gezet worden. Om het blad in de tweede stand te
zetten, drukt u op de hendels onder het blad en trekt
u het blad naar u toe tot u de tweede klik hoort.
• Om het blad los te trekken, drukt u op de hendels
onder het blad en duwt u op hetzelfde moment
het blad naar u toe tot u het los kunt trekken.
10• De kinderstoel is uitgerust met een dubbel
voorzetblad. Op het onderste blad kan het
kind spelen en op het bovenste blad kan
het op hygiënische wijze eten omdat het
gemakkelijk afgewassen kan worden (ook in de
vaatwasmachine).
• Om het etensblad te verwijderen, haakt u het los
van het onderste voorzetblad, door het op te tillen
zoals de afbeelding toont.
VEILIGHEIDSGORDEL
11• Controleer of de riem op correcte wijze naar
binnen gestoken is, zoals afbeelding A toont.
Bevestig de tailleriem door te werk te gaan zoals
afbeelding B toont.
12• Om de riem los te maken drukt u op de zijkanten
van de gesp (afb. A) en trekt u op hetzelfde
moment de tailleriem in buitenwaartse richting
(afb. B).
De riemen van de gordel kunnen in twee posities in
13•
hoogte ingesteld worden. Maak de gordel vanachter
de rugleuning los door de gesp omlaag te duwen
(afb. A). Trek de riem naar buiten (afb. B).
14• Steek de gesp van de gordel vervolgens in de
andere opening van de rugleuning (afb. A) en
bevestig de gesp aan de pen. Trek aan de gordel
tot u de klik van aankoppeling hoort (afb. B).
beide handen de achterzijde van de armleuningen
op tot de stoel geopend wordt. Is de stoel volledig
geopend, dan drukt u de armleuningen omlaag tot
de klik, zodat de stoel geblokkeerd wordt.
VERWIJDEREN VAN DE BEKLEDING
21• Om de bekleding van de kinderstoel weg te
nemen, maakt u de gordel los van de rugleuning
en van onder de zitting.
22• Knoop de zak los van de zijkanten van de
rugleuning en trek de zak in bovenwaartse
richting los.
REINIGING EN ONDERHOUD
Dit product vereist een minimum aan onderhoud.
Reiniging en onderhoud mogen alleen door
volwassenen uitgevoerd worden.
• Het wordt aanbevolen alle bewegende delen schoon
te houden en zonodig met een lichte olie te smeren.
• Droog de metalen delen van het product om
roestvorming te voorkomen.
• Reinig de plastic delen regelmatig met een vochtige
doek. Gebruik geen oplosmiddelen of gelijkaardige
producten.
• Bescherm het product tegen de
weersomstandigheden, water, regen of sneeuw.
De voortdurende en langdurige blootstelling aan
zonlicht kan een verandering van kleur van vele
materialen tot gevolg hebben.
• Bewaar het product op een droge plek.
• De zak niet in water dompelen, maar met een
vochtige doek en een mild reinigingsmiddel reinigen.
KANTELBARE RUGLEUNING
15• De rugleuning van de kinderstoel kan in vier
posities gezet worden: om te eten, om te spelen,
om te relaxen en voor het slaapje. Om de
rugleuning in te stellen tilt u de handgreep aan
de achterkant van de rugleuning op en zet u hem
vast in de gewenste positie. Dit kan ook gedaan
worden terwijl het kind in de stoel zit.
INSTELBARE BENENTEUN
16• De benensteun van de kinderstoel kan in twee
standen gezet worden.
- Om de benensteun omhoog te plaatsen tilt u hem
in opwaartse richting op.
- Om de benensteun omlaag te plaatsen steekt u uw
vingers in de zijhendeltjes en duwt u ze omlaag,
waarna u de benensteun omlaag plaatst.
• Deze handelding kan ook uitgevoerd worden
terwijl het kind in de stoel zit.
SLUITEN VAN DE KINDERSTOEL
17• Voordat u de kinderstoel sluit:
- Neem het voorzetblad weg.
- Zet de rugleuning in de rechte stand.
- Zet de benensteun omlaag.
- Sluit de voetensteun van de benensteun.
18• Druk op de veiligheidsknop en duw de sluithendel
omhoog die zich op de achterzijde van de
kinderstoel bevindt. Op hetzelfde moment duwt
u met de andere hand op de voorzijde van de
kinderstoel zodat deze gesloten wordt. De
gesloten kinderstoel blijft los overeind staan.
19• Plaats het voorzetblad op het lage deel van de
poten, zodat het geen belemmering vormt, zie de
afbeelding.
OPENEN VAN DE KINDERSTOEL
20• Om de kinderstoel te openen, zet u een voet op de
voorpoten om de stoel te blokkeren en tilt u met
LET OP
• DE WERKZAAMHEDEN DIE VERBAND HOUDEN MET
DE MONTAGE EN DE INSTELLING VAN HET PRODUCT
MOETEN DOOR EEN VOLWASSENE UITGEVOERD
WORDEN; GEBRUIK HET PRODUCT NIET INDIEN DE
MONTAGE NIET CORRECT TEN EINDE GEBRACHT IS
EN INDIEN HET PRODUCT BREUKEN VERTOOND OF ER
ONDERDELEN ONTBREKEN.
• VOORKOM DAT HET KIND VALT OF UITGLIJDT;
GEBRUIK ALTIJD DE VEILIGHEIDSGORDELS MET VIJF
BEVESTIGINGSPUNTEN; GEBRUIK DE GORDELS ZOWEL
IN DE GEKANTELDE ALS IN DE RECHTE POSITIE.
• LAAT UW KIND NOOIT ZONDER TOEZICHT ACHTER;
HOUDT HET KIND ALTIJD IN HET ZICHT.
• GEBRUIK HET PRODUCT NIET ZOLANG HET KIND NIET
IN STAAT IS ALLEEN OVEREIND TE ZITTEN.
• HET VOORZETBLAD EN BIJBEHORENDE ACCESSOIRES
ZIJN NIET ONTWORPEN OM HET GEWICHT VAN HET
KIND TE DRAGEN; HET BLAD IS NIET ONTWORPEN OM
HET KIND IN DE ZITTING TE HOUDEN EN VERVANGT
NIET DE VEILIGHEIDSGORDEL.
• VERZEKER U ERVAN DAT HET PRODUCT OP EEN
HORIZONTALE ONDERGROND STAAT.
• BRENG HET PRODUCT ZO IN POSITIE DAT HET KIND
ZICH VER VAN GEVAREN ALS ELEKTRICITEITSKABELS,
WARMTEBRONNEN OF VLAMMEN BEVINDT.
• STEEK UW VINGERS NIET IN DE MECHANISMEN EN LET
OP DE POSITIE VAN DE LEDEMATEN VAN HET KIND
TIJDENS DE INSTELLINGSWERKZAAMHEDEN.
• HET ZOU GEVAARLIJK KUNNEN ZIJN GEBRUIK TE
MAKEN VAN ACCESSOIRES DIE NIET DOOR DE
FABRIKANT GOEDGEKEURD ZIJN.
• GEBRUIK HET PRODUCT NIET NABIJ TRAPPEN OF
TREDEN.
• ZORG ERVOOR HET PRODUCT NIET OP TE STELLEN
NABIJ WARMTEBRONNEN ZOALS GASFORNUIZEN,
ELEKTRISCHE KACHELS, ENZ.
Page 18

HU•MAGYAR
• FONTOS: a használat előtt figyelmesen olvassák el az
utasításokat és azokat őrizzék meg a későbbiekben
történő tanulmányozás céljából.
• A Peg Perego az ebben a kiadásban ismertetett
modelleknél műszaki vagy kereskedelmi jellegű
okokból kifolyólag bármikor végrehajthat
módosításokat.
Peg Perego R.t. ISO 9001 tanúsítvánnyal
A tanúsítvány a vállalati munkamódszer
Ha véletlenül a modell részei elvesznek vagy
károsodnak, akkor csak eredeti Peg Perego
alkatrészeket használjon! Az esetleges javítások,
cserék, a termékekkel kapcsolatos információk
valamint az eredeti alkatrészek és tartozékok
értékesítése ügyében vegye fel a kapcsolatot a Peg
Perego Vevőszolgálatával:
tel.:0039-039-60.88.213,
fax: 0039-039-33.09.992, a
e-mail: assistenza@pegperego.it,
www.pegperego.com
A Peg Perego a fogyasztóinak rendelkezésére áll
minden igényük legjobb kielégítése céljából. Ehhez
az ügyfeleink véleményének megismerése számunkra
rendkívül fontos és értékes. Ezért nagyon hálásak
lennénk, ha a termékünk használatbavétele után
kitöltené a FOGYASZTÓ ÉRTÉKELÉSE KÉRDŐÍVET,
amelyet az alábbi internet címen talál meg: www.
pegperego.com/SSCo.html.it.
Ott feltüntetheti az esetleges észrevételeit vagy
ötleteit.
AZ ETETŐSZÉK ÖSSZEÁLLÍTÁSA
1• Nyissák szét az etetőszék ülőkéjét úgy, hogy
csúsztassák a hátsó tartórudakat az ülőke két
oldala mellett a beakadást jelző kattanásig.
2• Állítsák a lábakat függőleges pozícióba oly
módon, hogy a hosszabb lábak elől míg a
rövidebb lábak hátul legyenek.
3• Csavarozzák ki a négy, anyacsavarral rögzített
csavart az első és a hátsó tartórudakból,
miközben vigyázzanak arra, hogy el ne veszítsék a
csavarokat.
4• Illesszék be az első, hosszabb lábakat az első
tartórudakba. A csavarokat egy csavarhúzó
segítségével becsavarozva rögzítsék az első
lábakat.
5• Fordítsák meg az ülőkét és illesszék be a
hátsó, rövidebb lábakat a hátsó tartórudakba.
A csavarokat egy csavarhúzó segítségével
becsavarozva rögzítsék a lábakat.
6• Az ábra a tartórudak helyes felállítását mutatja a
művelet végén.
7• Engedjék le a lábszártámasz lábtartóját úgy, hogy
fordítsák lefelé az ábra szerint.
TÁLCA
8• A tálca felerősítéséhez tartsák benyomva
az alatta elhelyezett karokat és egyidejű
vezessék be a tálcát a kartámlákba majd teljesen
nyomják be az ábra szerint (első pozíció). Kissé
húzzák maguk felé a tálcát és a kattanást hallva
rendelkezik.
rendszerezettségének és az abban való
bizalomnak a garanciáját kínálja az
ügyfeleknek és a fogyasztóknak.
VEVŐSZOLGÁLAT
HASZNÁLATI UTASÍTÁS
leg
meggyőződhetnek a helyes beillesztésről.
9• Az etetőszék tálcája két pozícióba állítható be;
a tálca második pozícióba történő beállításához
nyomják be az alatta elhelyezett karokat és
húzzák a tálcát maguk felé a második kattanásig.
• A tálca levételéhez tartsák benyomva az alatta
elhelyezett karokat és egyidejűleg tolják maguk
felé a tálcát, míg azt le nem veszik.
10• Az etetőszék dupla tálcával van felszerelve, az
alsó a játszásra szolgál míg a felsőn étkezni lehet
teljesen higiénikus körülmények mellett, mivel
könnyen elmosható (mosogatógépben is).
A papizó tálca eltávolításához azt az alatta lévő
•
tálcáról le kell kapcsolni és felemelni az ábra szerint.
BIZTONSÁGI ÖV
11• Győződjenek meg arról, hogy a vállpánt helyesen
be van-e vezetve oly módon, hogy nyomják be az
A ábra szerint. Kapcsolják be a derékövet a B ábra
szerint.
12• Az öv kikapcsolásához nyomják be a csat oldalait
(A ábra) és egyidejűleg húzzák a kültér irányába a
derékövet (B ábra).
13• Az öv vállpántjainak magassága két pozícióba
állítható be; kapcsolják ki az övet a háttámla
mögött úgy, hogy nyomják lefelé a csatot (A ábra).
Húzzák ki az övet a huzatból (B ábra).
14• Ezután vezessék be az öv csatját a háttámla másik
nyílásába (A ábra) és kapcsolják be a csatot a
kapocsba, majd húzzák meg az övet a beakadást
jelző kattanásig (B ábra).
LEHAJTHATÓ HÁTTÁMLA
15• Az etetőszék háttámlája lehajtható négy
pozícióba: a papizáshoz, a játékhoz, a relax-hoz
vagy az alváshoz. A szabályozásához húzzák fel
a háttámla mögött felszerelt fogantyút és a kívánt
pozícióban rögzítsék a háttámlát. Ezt a műveletet
akkor is elvégezhetik, amikor a gyermek az
etetőszékben van.
ÁLLÍTHATÓ LÁBSZÁRTÁMASZ
16• Az etetőszék lábszártámasza két pozícióba
állítható.
- A lábszártámasz megemeléséhez azt húzzák
felfelé.
- A lábszártámasz leengedéséhez tegyék az ujjukat
az oldalsó kis karokra, nyomják lefelé és ezt
követően engedjék le a lábszártámaszt.
• Ezt a műveletet akkor is elvégezhetik, amikor a
gyermek az etetőszékben van.
AZ ETETŐSZÉK ÖSSZECSUKÁSA
17• Az etetőszék összecsukása előtt:
- Vegyék le a tálcát.
- Helyezzék a háttámlát függőleges pozícióba.
- Engedjék le a lábszártámaszt.
- Csukják össze a lábszártámasz lábtartóját.
18• Nyomják be a biztosító gombot és tolják felfelé az
etetőszék hátsó részén elhelyezett zárókart; ezzel
egyidejűleg a másik kézzel nyomják befelé az
etetőszék első részét addig, amíg az össze nem
csukódik. Az etetőszék összecsukott állapotban
egymagában megáll.
19• Helyezzék vissza a tálcát a lábak alsó részére az
ábra szerint, hogy az ne foglaljon helyet.
AZ ETETŐSZÉK SZÉTNYITÁSA
20• Az etetőszék szétnyitásához az egyik lábukat az
első széklábakra támasztva rögzítsék a széket
és mindkét kézzel emeljék fel a kartámlák hátsó
részét addig, amíg a szék szét nem nyílik. Miután
az etetőszék a teljes méretére szétnyílt, akkor
a rögzítés végett nyomják lefelé a kartámlákat
kattanásig.
HUZAT LEVÉTELE
21• Az etetőszék huzatának levételéhez húzzák ki az
Page 19
övet a háttámlából és az ülőkéből.
22• Gombolják le a zsákot a háttámla oldalairól és
felülről húzzák le a zsákot.
TISZTÍTÁS ÉS KARBANTARTÁS
A termék minimális karbantartást igényel. A tisztító és
karbantartó műveleteket csak felnőttek végezhetik.
• Valamennyi mozgó rész tisztántartása javasolt és
amennyiben az szükséges, olajjal vékonyan kenjék
be azokat.
• Szárítsák meg a termék fémből készült részeit a
rozsdásodás megelőzése céljából.
• Egy nedves törlőruhával rendszeresen tisztítsák meg
a műanyagból készült részeket, ne használjanak
oldószereket vagy egyéb hasonló termékeket.
• Óvják a terméket a légköri hatóerőktől, víztől,
esőtől vagy hótól; a folytonos és hosszadalmas
napsütésnek való kitétel sok anyagban színváltozást
okozhat.
• Száraz helyen tárolják a terméket.
• Ne merítsék a zsákot vízbe, hanem egy nedves
törlőruhával és semleges mosószerrel tisztítsák.
SL•SLOVENŠČINA
• POMEMBNO: skrbno preberite navodila pred uporabo
in jih shranite, da jih boste lahko še kdaj prebrali.
• Peg Perego se lahko kadarkoli odloči, da bo
spremenil modele, objavljene v katalogu, najsi bo to
zaradi tehničnih ali tržnih razlogov.
Peg Perego S.p.A. ima certifikat ISO 9001.
Certifikat za stranke in porabnike pomeni
garancijo transparentnosti in zaupanja v
delo podjetja.
POMOČ UPORABNIKOM
Če izgubite ali poškodujete sestavni del izdelka,
uporabite izključno originalne rezervne dele Peg
Perego. Za morebitna popravila, zamenjave, podatke
o izdelkih, prodajo originalnih rezervnih delov
in dodatkov, stopite v stik s centrom za pomoč
uporabnikom Peg Perego:
tel.:0039 (039) 60-88-213,
faks: 0039 (039) 33-09-992,
e-pošta: assistenza@pegperego.it,
www.pegperego.com
VIGYÁZAT
• A TERMÉK ÖSSZESZERELÉSI ÉS BEÁLLÍTÁSI
MŰVELETEIT FELNŐTTNEK KELL VÉGREHAJTANIA;
NE HASZNÁLJÁK A TERMÉKET, HA NEM HELYESEN
VÉGEZTÉK EL AZ ÖSSZESZERELÉST VAGY HA A
TERMÉKEN TÖRÉST ÉSZLELNEK VAGY ABBÓL
ALKATRÉSZEK HIÁNYOZNAK.
• AKADÁLYOZZÁK MEG A GYERMEK KIESÉSÉT VAGY
KICSÚSZÁSÁT; MINDIG ÖT PONTOS BIZTONSÁGI
ÖVET HASZNÁLJANAK; HASZNÁLJÁK AZ ÖVET
EGYARÁNT AKÁR A LEHAJTOTT AKÁR A FELEMELT
POZÍCIÓBAN.
• SOHA NE HAGYJÁK A GYERMEKÜKET FELÜGYELET
NÉLKÜL; MINDIG TARTSÁK SZEM ELŐTT A
GYERMEKET.
• NE HASZNÁLJÁK A TERMÉKET ADDIG, AMÍG A
GYERMEK NEM KÉPES EGYEDÜL ÜLVE MARADNI.
• A TÁLCÁT ÉS A TARTOZÉKAIT NEM ÚGY TERVEZTÉK,
HOGY AZOK A GYERMEK SÚLYÁT ELBÍRJÁK; A
TÁLCA NEM ARRA SZOLGÁL, HOGY AZ ÜLŐKÉBEN
VISSZATARTSA A GYERMEKET ÉS NEM HELYETTESÍTI A
BIZTONSÁGI ÖVET.
• GYŐZŐDJENEK MEG ARRÓL, HOGY A TERMÉK
VÍZSZINTES FELÜLETEN VAN-E.
• ÚGY HELYEZZÉK EL A TERMÉKET, HOGY AZ OLYAN
VESZÉLYFORRÁSOKTÓL, MINT VILLAMOS KÁBELEK,
HŐFORRÁSOK, VAGY NYÍLT LÁNG A GYERMEK TÁVOL
MARADJON.
• NE TEGYÉK AZ UJJUKAT A SZERKEZETEKBE ÉS
FIGYELJENEK A GYERMEK VÉGTAGJAINAK HELYZETÉRE
A BEÁLLÍTÁSI MŰVELETEK FOLYAMÁN.
• A GYÁRTÓ ÁLTAL JÓVÁ NEM HAGYOTT TARTOZÉKOK
HASZNÁLATA VESZÉLYES LEHET.
• NE HASZNÁLJÁK A TERMÉKET LÉPCSŐ VAGY
LÉPCSŐFOKOK KÖZELÉBEN.
• ÜGYELJENEK ARRA, HOGY NE HELYEZZÉK A
TERMÉKET HŐ- VAGY TŰZFORRÁSOK KÖZELÉBE,
MINT PÉLDÁUL GÁZTŰZHELY, VILLANYKÁLYHA, STB.
Peg Perego je vedno na voljo svojim strankam, da
v kar največji meri izpolni njihove potrebe. Zato je
za nas zelo pomembno, da poznamo mnenje svojih
strank.
Hvaležni vam bomo, če si boste, ko boste uporabili
naš izdelek, vzeli čas in izpolnili VPRAŠALNIK O
ZADOVOLJSTVU STRANK, ki ga boste našli na naših
spletnih straneh, na naslovu “www.pegperego.com/
SSCo.html.en-UK”, in nam sporočite vaše pripombe in
predloge.
NAVODILA ZA UPORABO
DA BI SESTAVILI STOLČEK
1• Odprite sedalo stolčka, tako da zadrsate zadnje
nosilce prosto ob boku sedala do klika, ki se
zasliši ob spenjanju.
2• Noge postavite pokonci, tako da ločite sprednje, ki
so višje, od zadnjih, ki so nižje.
3• Odvijte štiri vijake z maticami s sprednjih in
zadnjih nosilcev in pazite, da jih ne boste izgubili.
4• Sprednji, daljši nogi, vstavite v sprednja nosilca.
Pritrdite sprednji nogi, tako da ju privijete z
izvijačem.
5• Zavrtite sedalo in vstavite zadnji, nižji nogi v
zadnja nosilca. Pritrdite nogi, tako da ju privijete z
izvijačem.
6• Na sliki je prikazana pravilna razporeditev
nosilcev, ko privijanje končate.
7• Spustite naslon za noge in ga zavrtite, kot
prikazuje slika.
PLADENJ
8• Da bi pritrdili pladenj, pritisnite vzvoda pod njim
in ga sočasno nataknite na ročaja ter potisnite do
konca, kot prikazuje slika (prvi položaj). Ali ste
ga pravilno položili se prepričate tako, da pladenj
povlečete nekoliko proti sebi - če klikne, je bil
postopek izveden pravilno.
9• Pladenj stolčka je mogoče postaviti v dva položaja;
da bi postavili pladenj v drugi položaj, morate
pritisniti vzvoda pod njim in pladenj povleči proti
sebi, dokler ne zaslišite drugega klika.
• Da bi izvlekli pladenj, pritisnite vzvoda pod njim
in ga sočasno potisnite proti sebi, dokler ga ne
izvlečete.
10• Stolček je opremljen z dvema pladnjema, spodnji
Page 20

je primeren za igro, zgornji pa za hranjenje.
Zgornji pladenj je izdelan tako, da ga lahko zelo
preprosto očistite in ga je mogoče pomivati tudi v
pomivalnem stroju.
• Da bi odstranili pladenj za hranjenje, ga je treba
odpeti s spodnjega pladnja, kot je prikazano na
risbi.
VARNOSTNI PAS
11• Prepričajte se, da je naramnica pravilno vstavljena,
kot je prikazano na risbi A. Zapnite pas okoli
pasu, kot je prikazano na risbi B.
12• Da bi odpeli pas, pritisnite ob straneh sponke
(risba A) in sočasno jermenček okoli pasu
potegnite navzven (risba B).
13• Naramnice pasu je mogoče po višini uravnati na
dva položaja; odpnite jermenček za naslonom,
tako da sponko potisnete navzdol (risba A).
Izvlecite jermenček iz vreče (risba B).
14• Nato sponko jermenčka potisnite v drugo režo
naslona (risba A) in zapnite sponko na zatič, nato
pa povlecite jermenček, dokler zaponka ne klikne
(risba B).
PREMIČNI HRBTNI NASLON
15• Hrbtni naslon stolčka je premičen v štiri položaje:
za hranjenje, za igro, za sprostitev ali spanje. Da
bi ga lahko naravnali, dvignite ročico za naslonom
in jo zaustavite v želenem položaju. To lahko
naredite tudi, ko je otrok v sedežu.
NASTAVLJIVI NASLON ZA NOGE
16• Naslon za noge je mogoče postaviti v dva
položaja.
- Da bi ga dvignili, ga povlecite navzgor.
- Da bi ga spustili, s prsti sezite v bočna vzvoda,
potisnite ju navzdol in nato spustite naslon za
noge.
• To lahko naredite tudi, ko je otrok v sedežu.
DA BI STOLČEK ZAPRLI
17• Preden stolček zaprete:
- Odstranite pladenj.
- Naslonjalo postavite v pokončni položaj.
Spustite naslon za noge.
-
- Zaprite naslon za noge.
18• Pritisnite varnostni gumb in potisnite navzgor
zapiralni vzvod na zadnji strani stolčka; sočasno z
drugo roko potisnite sprednji del stolčka, tako da
se zapre. Ko je stolček zaprt, sam stoji na nogah.
19• Postavite pladenj na spodnji del nog, tako da ni v
napoto, kot prikazuje slika.
• Izdelek zaščitite pred atmosferskimi vplivi, vodo,
dežjem ali snegom; daljše izpostavljanje soncu lahko
povzroči spremembo barve veliko materialov.
• Izdelek hranite v suhem prostoru.
• Vreče ne namakajte v vodi, ampak jo očistite z
mokro krpo in nevtralnim detergentom.
POZOR
• IZDELEK MORA SESTAVITI IN NASTAVITI ODRASLA
OSEBA; NE UPORABLJAJTE IZDELKA, ČE SESTAVLJANJE
NI BILO PRAVILNO IZVEDENO, ČE SO DELI NA
IZDELKU POLOMLJENI ALI ČE MANJKAJO.
• PAZITE, DA OTROK NE BI PADEL ALI ZDRSNIL; VEDNO
UPORABLJAJTE PETTOČKOVNE VARNOSTNE PASOVE.
UPORABLJAJTE VARNOSTNI PAS V LEŽEČEM IN V
POKONČNEM POLOŽAJU.
• OTROKA NIKOLI NE PUŠČAJTE SAMEGA. OTROKA
IMEJTE VEDNO NA OČEH.
• IZDELKA NE UPORABLJAJTE, DOKLER OTROK NE SEDI
SAMOSTOJNO.
• PLADENJ IN DODATKI NISO NAMENJENI TEMU, DA BI
DRŽALI TEŽO OTROKA; PLADENJ NI NAMENJEN TEMU,
DA BI ZADRŽAL OTROKA NA SEDEŽU IN NE MORE BITI
ZAMENJAVA ZA VARNOSTNI PAS.
• PREPRIČAJTE SE, DA IZDELEK STOJI NA VODORAVNIH
TLEH.
• IZDELEK POSTAVITE TAKO, DA BO OTROK ODDALJEN
OD NEVARNIH PREDMETOV, KOT SO ELEKTRIČNI
KABLI, VIRI TOPLOTE ALI ODPRTEGA OGNJA.
• S PRSTI NE SEGAJTE V MEHANIZME IN PAZITE NA
POLOŽAJ OTROKOVIH UDOV MED PRILAGAJANJEM
STOLČKA.
• UPORABLJANJE DODATNE OPREME, KI JE NI ODOBRIL
PROIZVAJALEC, BI LAHKO BILO NEVARNO.
• NE UPORABLJAJTE IZDELKA OB LESTVAH ALI
STOPNICAH.
• PAZITE, DA IZDELKA NE BOSTE POSTAVILI OB VIR
TOPLOTE ALI ODPRTEGA PLAMENA, KOT SO PLINSKI
ŠTEDILNIK, ELEKTRIČNE PEČI ITD.
DA BI STOLČEK ODPRLI
20• Da bi stolček odprli, položite nogo na sprednje
noge, da bi ga blokirali, nato pa z obema rokama
dvignite zadnji del naslonov za roke, dokler se
stolček ne odpre. Ko je stolček do konca odprt,
potisnite naslona za roke navzdol, dokler ne
kliknete, tako da ga blokirate.
SNEMANJE PREVLEKE
21• Da bi sneli prevleko s stolčka, izvlecite pas iz
hrbtnega naslona in izpod sedala.
22• Ob straneh odpnite vrečo s hrbtnega naslona iz od
zgoraj snemite vrečo.
ČIŠČENJE IN VZDRŽEVANJE
Izdelek ne potrebuje veliko vzdrževanja. Čistijo in
vzdržujejo ga lahko samo odrasli.
• Svetujemo vam, da redno čistite vse premikajoče se
dele in jih, če je to potrebno, podmažete z lahkim
oljem.
• Kovinske dele obrišite do suhega, da ne bi zarjaveli.
• Plastične dele redno brišite z vlažno krpo. Ne
uporabljajte topil ali drugih podobnih izdelkov.
Page 21

RU•PУССКИЙ
• ВАЖНО: перед применением изделия внимательно
прочтите инструкции, и храните их для
использования в будущем.
• Пег Перего имеет право внести в любой момент
изменения в модели, описанные в данном
руководстве, по техническим или коммерческим
причинам.
Peg Perego S.p.A. сертифицирована по
Сертификация гарантирует заказчикам
Если вы случайно потеряли или повредили какиенибудь детали изделия, заменяйте их только
фирменными запасными частями Пег Перего. Для
ремонта, замены, получения сведений о продукции,
приобретения фирменных запасных частей и
принадлежностей обращайтесь в Сервисную службу
Пег-Перего:
тел.: 0039-039-60.88.213,
факс: 0039-039-33.09.992,
e-mail: assistenza@pegperego.it,
www.pegperego.com
норме ISO 9001.
и потребителям, что компания работает,
соблюдая принципы гласности
доверия.
ОБСЛУЖИВАНИЕ
и
при легком смещении лотка к себе.
9• Лоток высокого стула устанавливается в двух
положениях; для установки лотка во второе
положение необходимо нажать расположенные
под ним рычаги и потянуть лоток к себе, пока не
послышится второй щелчок.
• Для выдвижения лотка нажмите и не отпускайте
рычаги, расположенные под лотком, и
одновременно с этим
выдвижения.
10• Высокий стул имеет двойной лоток. На нижнем
лотке можно играть, а на верхнем можно есть
в условиях полной гигиены, так как он легко
моется (даже в посудомоечной машине).
• Для удаления лотка для еды необходимо
отсоединить его от расположенного ниже лотка,
поднимая его так
РЕМЕНЬ БЕЗОПАСНОСТИ
11• Убедиться в том, что лямка вставлена правильно,
нажимая, как показано на рисунке А. Соедините
поясной ремень, действуя по рисунку В.
12• Для отсоединения ремня нажмите с боков
пряжки (рис. А) и одновременно потяните
наружу поясной ремешок (рис. В).
13• Лямки ремешка можно отрегулировать
в двух положениях. Отсоедините ремешок с
задней стороны спинки, смещая пряжку вниз
(рис.A). Снимите ремешок с обивки (рис. B).
14• После этого пропустите пряжку ремешка через
другую щель спинки (рис. A) и зацепите пряжку
за стопор, потянув за ремешок вплоть до щелчка
(рис. B).
сместите лоток к себе до
, как показано на рисунке.
по высоте
Фирма Пег Перего находится в распоряжении
своих потребителей для
образом удовлетворить все их требования. Поэтому,
для нас очень важно и ценно знать мнение наших
заказчиков. Мы будем вам очень признательны,
если, после использования нашего изделия, вы
пожелаете заполнить АНКЕТУ УДОВЛЕТВОРЕННОСТИ
ПОТРЕБИТЕЛЯ, которую вы найдете в интернете на
сайте:
“www.pegperego.com/SSCo.html.en-UK”,
выразив там свои пожелания или советы.
ИНСТРУКЦИИ ПО
СБОРКА ВЫСОКОГО СТУЛА
1• Откройте сиденье высокого стула, смещая
задние стойки сбоку сиденья до их
защелкивания по месту.
2• Установите ножки в вертикальном положении
так, чтобы отличать передние ножки (высокие) от
задних (низких).
3• Отвинтите четыре винта с гайкой от передних и
задних стоек, обращая внимание на то, чтобы не
потерять их
4• Вставьте передние (высокие) ножки в передние
стойки. Закрепите передние ножки, завинчивая
их отверткой.
5• Поверните сиденье и вставьте задние (низкие)
ножки в задние стойки. Закрепите ножки,
завинчивая их отверткой.
6• На рисунке показано правильное расположение
стоек после завершения операции.
7• Опустите нижнюю часть подножки, смещая ее,
как показано на рисунке.
.
того, чтобы наилучшим
ПОЛЬЗОВАНИЮ
ОПУСКАЕМОЕ СИДЕНЬЕ
15• Сиденье высокого стула опускается
положения: для еды, для игры, для отдыха
или для сна. Для его регулировки поднимите
рукоятку, находящуюся сзади спинки, и
заблокируйте ее в необходимом положении. Эту
операцию можно выполнить даже тогда, когда
ребенок сидит на высоком стуле.
РЕГУЛИРУЕМАЯ ПОДНОЖКА
16• Подножка высокого стула регулируется в двух
положениях.
- чтобы перевести
поднимите ее вверх.
- Чтобы перевести подножку в нижнее положение,
вставьте пальцы в два боковых рычага и
сместите их вниз, после чего опустите подножку.
• Эту операцию можно выполнить даже тогда,
когда ребенок сидит на высоком стуле.
ДЛЯ СКЛАДЫВАНИЯ ВЫСОКОГО СТУЛА
17• Перед складыванием высокого стула:
Снимите лоток.
-
- Переведите спинку в прямое положение.
- Опустите подножку в нижнее положение.
- Закройте нижнюю часть подножки.
18• Нажмите предохранительную кнопку и сместите
вверх закрывающий рычаг, расположенный в
задней части высокого стула. Одновременно
с этим, другой рукой нажмите на переднюю
часть высокого стула до его складывания.
В сложенном состоянии высокий
самостоятельно.
19• Установите лоток на нижнюю часть ножек, как
показано на рисунке, чтобы он не мешался.
подножку в верхнее положение,
в четыре
стул стоит
ЛОТОК
8• Для установки лотка нажмите и не
отпускайте рычаги, расположенные под
лотком, и одновременно с этим вставьте их
в подлокотники, смещая их до упора, как
показано на рисунке (первое положение).
Убедитесь в правильном расположении, о
котором свидетельствует щелчок, издаваемый
ДЛЯ РАСКЛАДЫВАНИЯ ВЫСОКОГО СТУЛА
20• Для раскладывания высокого стула поставьте
ногу на передние ножки и заблокируйте его,
после чего двумя руками поднимите заднюю
часть подлокотников до раскладывания
высокого стула. После раскладывания высокого
стула до максимального раздвижения нажмите
на подлокотники вниз до щелчка, чтобы
Page 22

заблокировать его.
СНЯТИЕ ОБИВКИ
21• Для снятия обивки выньте ремень из спинки и
из-под сидения.
22• Отстегните обивку с боков спинки, после чего
извлеките обивку сверху.
ЧИСТКА И УХОД
TR•TÜRKÇE
• ÖNEMLİ: Kullanımdan önce talimatları dikkatlice
okuyunuz ve ilerde tekrar kullanmak üzere muhafaza
ediniz.
• Pegperego ihbarsiz olarak herhangi bir zamanda
üründe değişiklik yapmak ve islah etmek haklarini
sakli tutar.
Ваше изделие нуждается в несложном уходе.
Операции по чистке и уходу должны выполнять
только взрослые.
• Рекомендуется содержать в чистоте все
движущиеся
легким маслом.
• Вытрите насухо металлические части изделия,
чтобы предотвратить образование ржавчины.
• Периодически очищайте пластмассовые части
влажной тканью, не пользуйтесь растворителями
или сходными с ними веществами.
• Защитите изделие от атмосферных осадков - воды,
снега или дождя. Постоянная и продолжительная
подверженность солнечным лучам может вызвать
цветовые изменения
• Храните изделие в сухом месте.
• Не погружайте обивку в воду, а протирайте
влажной тканью и нейтральным моющим
средством.
части, при необходимости смажьте их
многих материалов.
ВНИМАНИЕ
• ОПЕРАЦИИ ПО СБОРКЕ И РЕГУЛИРОВКЕ ИЗДЕЛИЯ
ДОЛЖНЫ ВЫПОЛНЯТЬ ТОЛЬКО ВЗРОСЛЫЕ;
НЕ ИСПОЛЬЗУЙТЕ ИЗДЕЛИЕ, ЕСЛИ СБОРКА
НЕПРАВИЛЬНО ЗАВЕРШЕНА, А ТАКЖЕ ЕСЛИ
ИЗДЕЛИЕ ОБНАРУЖИВАЕТ ПОЛОМКИ ИЛИ
НЕДОСТАЮЩИЕ ДЕТАЛИ.
• НЕ ДОПУСКАЙТЕ ПАДЕНИЕ ИЛИ СПОЛЗАНИЕ
РЕБЕНКА; ВСЕГДА ИСПОЛЬЗУЙТЕ РЕМНИ
БЕЗОПАСНОСТИ С ПЯТЬЮ ТОЧКАМИ КРЕПЛЕНИЯ;
ИСПОЛЬЗУЙТЕ РЕМНИ КАК В ОПУЩЕННОМ, ТАК И В
СТОЯЩЕМ ПОЛОЖЕНИИ
• НИКОГДА НЕ ОСТАВЛЯЙТЕ ВАШЕГО РЕБЕНКА БЕЗ
ПРИСМОТРА; НЕ УПУСКАЙТЕ ЕГО ИЗ ВИДА.
• НЕ ПОЛЬЗУЙТЕСЬ ИЗДЕЛИЕМ, ПОКА РЕБЕНОК НЕ
УМЕЕТ СИДЕТЬ САМОСТОЯТЕЛЬНО.
• ЛОТОК И ЕГО ПРИНАДЛЕЖНОСТИ НЕ
ПРЕДНАЗНАЧЕНЫ ДЛЯ ВЫДЕРЖИВАНИЯ ВЕСА
РЕБЕНКА; ЛОТОК НЕ ПРЕДНАЗНАЧЕН ДЛЯ
УДЕРЖИВАНИЯ РЕБЕНКА НА СИДЕНИИ, И ОН НЕ
ЗАМЕНЯЕТ РЕМЕНЬ БЕЗОПАСНОСТИ.
• УБЕДИТЕСЬ, ЧТО
ГОРИЗОНТАЛЬНОЙ ПОВЕРХНОСТИ.
• УСТАНОВИТЕ ИЗДЕЛИЕ ТАК, ЧТОБЫ ДЕРЖАТЬ
РЕБЕНКА ВДАЛИ ОТ ТАКИХ ИСТОЧНИКОВ
ОПАСНОСТИ, КАК ЭЛЕКТРИЧЕСКИЕ КАБЕЛИ,
ИСТОЧНИКИ ТЕПЛА ИЛИ ОГОНЬ.
• ИЗБЕГАЙТЕ ПОПАДАНИЯ ПАЛЬЦЕВ В МЕХАНИЗМЫ,
И ОБРАТИТЕ ВНИМАНИЕ НА ПОЛОЖЕНИЕ
КОНЕЧНОСТЕЙ РЕБЕНКА ПРИ ВЫПОЛНЕНИИ
ОПЕРАЦИЙ ПО РЕГУЛИРОВКЕ.
• ИСПОЛЬЗОВАНИЕ ПРИНАДЛЕЖНОСТЕЙ, НЕ
ОДОБРЕННЫХ ИЗГОТОВИТЕЛЕМ, МОЖЕТ БЫТЬ
ОПАСНЫМ.
НЕ ПОЛЬЗУЙТЕСЬ ИЗДЕЛИЕМ ВБЛИЗИ ЛЕСТНИЦ
•
ИЛИ СТУПЕНЕК.
• ОБРАТИТЕ ВНИМАНИЕ НА ТО, ЧТОБЫ НЕ СТАВИТЬ
ИЗДЕЛИЕ ВБЛИЗИ ТАКИХ ИСТОЧНИКОВ ТЕПЛА
ИЛИ ОГНЯ, КАК ГАЗОВЫЕ ПЛИТЫ, ЭЛЕКТРИЧЕСКИЕ
НАГРЕВАТЕЛИ И Т.Д.
ИЗДЕЛИЕ СТОИТ НА
СПИНКИ.
Peg Perego S.p.A. ISO 9001 sertifikalıdır.
Bu sertifika ile müşterilere ve tüketicilere
Şayet kazara ürünün birtakım parçaları kaybolacak ya
da zarar görecek olursa, yedek parça olarak yalnızca
orijinal PegPerego parçalarını kullanın. Muhtemel
tamir, değiştirme, ürün hakkında bilgi alma, orijinal
yedek parça ve aksesuar satışı işlemleri için PegPerego
Satış Destek hattına başvurun:
tel.: 0039-039-60.88.213,
fax: 0039-039-33.09.992,
e-mail: assistenza@pegperego.it,
www.pegperego.com
Peg Perego olarak tüketicilerin her türlü gereksinimini
en iyi şekilde karşılamak üzere daima onlara hizmet
etmeye hazırız. Dolayısı
önerileri bizim için son derece önemli ve değerlidir.
Bu nedenle, bir ürünümüzü satın alıp kullandıktan
sonra, görüş ve önerilerinizi bildirmek üzere Internet
üzerinde “www.pegperego.com/SSCo.html.en-UK”
adresinde yer alan MÜŞTERİ MEMNUNİYETİ FORMUNU
dolduracak olursanız size gerçekten minnettar
kalacağız.
MAMA SANDALYESİNİN MONTAJI
1• Yan taşıyıcıları oturma gurubuna doğru
tam oturana kadar çekmek suretiyle mama
sandalyesini açınız.
2• Ayakları dik konumda yerleştirmek suretiyle kısa
olan arka ayaklardan daha uzun olan ön ayakları
ayırınız.
3• Somonlu dört vidayı, kaybetmemeye dikkat
ederek, ön ve arka taşıyıcılardan sökünüz.
4• Daha uzun olan ön ayakları ön taşıyıcılara
geçiriniz. Bir tornavida kullanmak suretiyle ön
ayakları tespit ediniz.
5• Oturma gurubunu çeviriniz ve kısa olan arka
ayakları arka taşıyıcılara geçiriniz. Bir tornavida
kullanmak suretiyle ayakları tespit ediniz.
6• İşlem bitiminde taşıyıcıların alması gereken doğru
konum şekilde gösterilmiştir.
7• Bacak dayama kısmının ayak dayama pedalını,
şekilde gösterildiği gibi, çevirmek suretiyle aşağı
konuma getiriniz.
TEPSİ
Tepsiyi takmak için alt kısımda yer alan iki kolu
8•
bastırınız ve ayni zamanda, sonuna kadar itmek
suretiyle kol dayama yerlerine geçiriniz (ilk konum).
Tepsinin tam oturduğundan emin olmak için hafifçe
kendinize doğru çekerek kontrol ediniz.
9• Mama sandalyesinin tepsisi iki farklı konumda
ayarlanabilir; tepsiyi ikinci konumda ayarlamak
için alt kısmında bulunan kollara bastırınız ve
tepsiyi ikinci “klik” sesini duyana kadar kendinize
doğru çekiniz.
• Tepsiyi çıkartmak için alt kısımda yer alan kolları
çekin ve aynı anda da tepsiyi yerinden tamamen
kurumun şeffaf işleyişinin ve tam bir
güven ortamının garantisi verilmektedir.
MÜŞTERİ SERVİSİ
yla, müşterilerimizin görüş ve
KULLANIM KILAVUZU
Page 23
çıkacak biçimde kendinize doğru çekiniz.
10• Mama sandalyesinde iki adet tepsi bulunmaktadır,
alt kısımda bulunan tepsi, üzerinde oyun
oynanması içindir; üst kısımda bulunan tepsi ise
üzerinde mama yenmesi içindir ki bu tepsi kolayca
temizlenebildiği (bulaşık makinesinde de) için
hijyeniktir.
• Mama yenen tepsiyi çıkartmak için şekilde
gösterildiği gibi altta bulunan tepsiden çıkartmak
gerekmektedir.
EMNİYET KEMERİ
11• Kemerin A şeklinde gösterildiği gibi tamamen
yerleştirilmek suretiyle doğru bir şekilde takıldığını
kontrol ediniz. Bel kemerini B şeklinde gösterildiği
gibi takınız.
12• Kemeri çıkartmak için tokanın yan kısımlarına
bastırınız (şekil A) ve ayni zamanda da bel
kemerini d
13• Kemerin omuz kayışları iki farklı boy konumunda
ayarlanabilir; kemeri, tokayı aşağı doğru itmek
suretiyle, sırt dayama yerinin arka tarafından
çıkartınız (şekil A). Kemeri torbadan çıkartınız
(şekil B).
14• Daha sonra kemer tokasını sırt dayama yerinde
bulunan diğer yuvaya takınız (şekil A) ve tokayı,
kemeri “klik” sesini duyana kadar çekmek
suretiyle, askılığa takınız (şekil B).
ışarı doğru çekiniz (şekil B).
oturma ve sırt dayama kısmının altındaki kayışı
çıkartınız.
22• Kılıfı sırtlığın kenarlarındaki düğmeleri açtıktan
sonra yukarı doğru çekerek çıkartınız.
TEMİZLEME VE BAKIM
Ürününüz çok az bir bakım gerektirir. Temizlik
ve bakım işlemleri yalnızca yetişkinler tarafından
yapılmalıdır.
• Bütün hareketli kısımların temiz tutulması ve
gerekirse ince yağla yağlanması önerilir.
• Metal kısımlar
kurulayınız.
• Düzenli olarak plastik kısımları nemli bir bezle silin,
çözücü veya benzeri maddeler kullanmayınız.
• Ürünü su, yağmur ve kar gibi dış etkenlerden
koruyun, güneşte devamlı ve uzun kalış birçok
malzemede renk değişimine sebep olabilir.
• Ürünü kuru bir ortamda muhafaza ediniz.
• Kılıfı suya sokmayınız, ancak nemli bir bez ve nötr
deterjan ile temizleyiniz.
ını, paslanmayı önlemek için iyicene
YATIRILABİLİR MAMA SANDALYESİ
15• Mama sandalyesi geriye doğru dört konumda
yatırılabilir: Mama konumu, oyun konumu,
istirahat konumu ve uyku konumu. Sandalyenin
sırtlığını ayarlamak için arkalığın arkasında yer
almakta olan tutma kolunu yukarı kaldırın ve
kolu arzu ettiğiniz konumda sabitleyiniz. Bu
işlemler bebek mama sandalyesinde otururken de
yapılabilir.
AYARLANABİLİR AYAK DAYAMA PEDALI
16• Mama sandalyesinin ayakdayama pedalı iki farklı
konumda ayarlanabilir.
- Ayak dayama pedalını yüksek kouma getirmek için
yukarıya doğru kaldırınız.
- Ayak dayama pedalını alçak konuma getirmek için
parmaklarınızı yanlarda yer alan küçük kollara
geçiriniz ve aşağı doğru itiniz, bunu müteakiben
de ayak dayama pedalını aşağı doğru çekiniz.
• Bu işlemler bebek mama sandalyesinde otururken
de yap
MAMA SANDALYESİNİ KAPATMAK İÇİN
17• Mama sandalyesini kapamadan önce:
- Tepsiyi çıkartınız.
- Arkalığı dik konuma getiriniz.
- Bacak dayama kısmını aşağı konuma getiriniz.
- Ayak dayama pedalını kapatınız.
18• Emniyet düğmesine basınız ve mama
sandalyesinin alt kısmında yer alan kapama
kolunu yukarı doğru itiniz; ayni zamanda da diğer
elinizle mama sandalyesinin ön kısmına, sandalye
kapanana kadar, basınız. Mama sandalyesi kapalı
konumdayken kendiliğinden ayakta durabilir.
19• Tepsiyi, yer kaplamaması amacıyla, şekilde
gösterildiği gibi, ayak kı
yerleştiriniz.
ılabilir.
smının alt tarafına
DİKKAT
• TÜM MONTAJ VE AYAR İŞLEMLERİNİN YETİŞKİN BİR
KİŞİ TARAFINDAN YAPILMASI GEREKMEKTEDİR;
ÜRÜNÜN MONTAJ İŞLEMLERİ TAMAMEN BİTMEDEN VE
ÜRÜNDE KIRIK YA DA EKSİK PARÇA OLMASI HALİNDE
ÜRÜNÜ KULLANMAYINIZ.
• ÇOCUĞUN DÜŞMESİNE VE KAYMASINA MANİ OLUNUZ;
HER ZAMAN BEŞ NOKTALI EMNİYET KEMERLERİNİ
KULLANINIZ; ÇOCUĞUNUZU GÖZÜNÜZÜN ÖNÜNDEN
AYIRMAYINIZ; EMNİYET KEMERLERİNİ GEREKEN
YATAR VE GEREKSE DİK KONUMLARDA KULLANINIZ.
• ÇOCUĞUNUZU KESİNLİKLE YALNIZ BIRAKMAYINIZ;
ÇOCUĞUNUZU GÖZÜNÜZÜN ÖNÜNDEN AYIRMAYINIZ.
• ÜRÜNÜ, ÇOCUĞUNUZ KENDİLİĞİNDEN DİK OTURUR
VAZİYETE GELMEDEN EVVEL KULLANMAYINIZ.
• TEPSİ VE BUNA BAĞLI AKSESUARLAR ÇOCUĞUN
AĞIRLIĞINI TA
ÇOCUĞU OTURUR KONUMDA MUHAFAZA ETMEK İÇİN
TASARLANMAMIŞ OLUP, EMNİYET KEMERİ GÖREVİNİ
YAPAMAZ.
• ÜRÜNÜN DÜZ BİR ZEMİN ÜZERİNE
KONUMLANDIRILDIĞINDAN EMİN OLUNUZ.
• ÜRÜNÜ, ÇOCUĞU ELEKTRİK KABLOSU, ALEV VE
SAİR ISI KAYNAKLARI GİBİ TEHLİKELERDEN UZAK
TUTABİLECEK BİR ŞEKİLDE KONUMLANDIRINIZ.
• PARMAKLARINIZI MEKANİZMALARA SOKMAYINIZ
VE AYAR İŞLEMLERİ ESNASINDA ÇOCUĞUN EL VE
KOLLARININ KONUMUNA DİKKAT EDİNİZ.
• ÜRETİCİ TARAFINDAN ONAYLANMAMIŞ
AKSESUARLARIN KULLANILMASI TEHLİKE
DOĞURABİLİ
• ÜRÜNÜ MERDİVEN VEYA BASAMAK GİBİ YERLER
YAKININDA KULLANMAYINIZ.
• ÜRÜNÜN, GAZ OCAĞI, ELEKTRİK SOBASI,
VS. GİBİ ALEV VE ISI KAYNAKLARINA YAKIN
KONUMLANDIRILMAMASINA DİKKAT EDİNİZ.
ŞIMAK İÇİN TASARLANMAMIŞTIR; TEPSİ
R.
MAMA SANDALYESİNİ AÇMAK İÇİN
20• Mama sandalyesini açmak için sandalyenin ön
ayaklarını ayağınızla tutarak sabitleyin ve iki
elinizle kol dayama yerlerinin arka kısımlarından
tutarak, sandalye açılana kadar, yukarı doğru
kaldırınız. Mama sandalyesini tamamen açtıktan
sonra kol koyma yerlerine “klik” sesini duyana
kadar bastırmak suretiyle sabit konuma getiriniz.
DÖŞEMENİN ÇIKARTILMASI
21• Mama sandalyesinin döşemesini çıkartmak için
Page 24
ΕL•EΛΛΗΝΙΚΑ
• ΣΗΜΑΝΤΙΚΟ: διαβάστε με προσοχή τις οδηγίες
χρήσεως πριν από τη χρήση και φυλάξτε τις για
μελλοντική αναφορά.
• Η PEG PEREGO διατηρεί το δικαίωμα να κάνει ότι
αλλαγές είναι αναγκαίες ή βελτιώσεις σε αυτά τα
προιόντα οποτεδήποτε χωρίς ειδοποίηση.
Η Peg Perego S.p.Α. διαθέτει
Η πιστοποίηση παρέχει στους πελάτες
Εάν τυχόν χαθούν μέρη του μοντέλου ή υποστούν
κάποια βλάβη, χρησιμοποιείτε μόνο γνήσια
ανταλλακτικά Peg Perego. Για τυχόν επισκευές,
αντικαταστάσεις, πληροφορίες σχετικά με τα
προϊόντα, την πώληση γνήσιων ανταλλακτικών
και αξεσουάρ, επικοινωνήστε με την Υπηρεσία
Εξυπηρέτησης Peg Perego:
τηλ: 0039-039-60.88.213,
fax: 0039-039-33.09.992,
e-mail: assistenza@pegperegο.it,
www.pegperegο.cοm
Η Peg Perego είναι στη διάθεση των Καταναλωτών
της για την καλύτερη εξυπηρέτηση των αναγκών
τους. Για το λόγο αυτό είναι για μας εξαιρετικά
σημαντικό και πολύτιμο να γνωρίζουμε τη γνώμη
των Πελατών μας. Θα σας είμαστε λοιπόν πολύ
ευγνώμονες εάν, αφού χρησιμοποιήσετε ένα
προΪφόν μας,
ΙΚΑΝΟΠΟΙΗΣΗΣ ΚΑΤΑΝΑΛΩΤΗ που θα βρείτε στο
ιξterξet στην ακόλουθη διεύθυνση: “www.pegperegο.
cοm/SSCο.html.en-UK”,
επισημαίνοντας ενδεχόμενες παρατηρήσεις ή
υποδείξεις.
πιστοποίηση ΙSΟ 9001.
και στους
της διαφάνειας και της εμπιστοσύνης
στον τρόπο με τον οποίο εργάζεται η
εταιρία.
ΕΞΥΠΗΡΕΤΗΣΗ ΠΕΛΑΤΩΝ
συμπληρώσετε το ΕΡΩΤΗΜΑΤΟΛΟΓΙΟ
καταναλωτές την εγγύηση
συγχρόνως περάστε τον στα μπράτσα
σπρώχνοντάς τον μέχρι κάτω όπως φαίνεται
στην εικόνα (πρώτη θέση). Βεβαιωθείτε για τη
σωστή τοποθέτηση από το κλικ τραβώντας
μόλις το δίσκο προς το μέρος σας.
9• Ο δίσκος του καθίσματος μπορεί να
τοποθετηθεί σε δύο θέσεις. Για να
τοποθετήσετε το δίσκο στη δεύτερη θέση,
χρειάζεται
βρίσκονται κάτω από το δίσκο και να τραβήξετε
το δίσκο προς το μέρος σας μέχρι να ακουστεί
το δεύτερο κλικ.
• Για να βγάλετε το δίσκο, κρατήστε πατημένους
τους μοχλούς που βρίσκονται κάτω από το
δίσκο και συγχρόνως σπρώξτε το δίσκο προς το
μέρος σας μέχρι
10• Το κάθισμα διαθέτει διπλό δίσκο, στον κάτω το
παιδί μπορεί να παίξει και στον επάνω να φάει
με πλήρη ασφάλεια ως προς την υγιεινή καθώς
πλένεται με ευκολία (ακόμη και στο πλυντήριο
πιάτων).
• Για να αφαιρέσετε το δίσκο του φαγητού,
χρειάζεται να τον αποσυνδέσετε από τον
δίσκο σηκώνοντάς τον όπως φαίνεται στην
εικόνα.
ΖΩΝΗ ΑΣΦΑΛΕΙΑΣ
11• Βεβαιωθείτε ότι η τιράντα έχει τοποθετηθεί
σωστά ωθώντας όπως φαίνεται στην εικόνα
A. Συνδέστε τη ζώνη που περιβάλλει τη μέση
ενεργώντας όπως δείχνει η εικόνα B.
12• Για να αποσυνδέσετε τη ζώνη, πατήστε στα
πλαϊνά της αγκράφας (εικ.A) και ταυτόχρονα
τραβήξτε
περιβάλλει τη μέση (εικ.B).
13• Οι τιράντες της ζωνούλας μπορούν να
ρυθμιστούν ως προς το ύψος σε δύο θέσεις.
Αποσυνδέστε τη ζωνούλα από πίσω από την
πλάτη, σπρώχνοντας την αγκράφα προς τα
κάτω (εικ.A). Τραβήξτε τη ζωνούλα από το σάκο
(εικ.B).
14• Περάστε στη
ζωνούλας στην άλλη σχισμή της πλάτης (εικ.
A) και συνδέστε την αγκράφα στο άγκιστρο,
τραβώντας τη ζωνούλα μέχρι να ακουστεί το
κλικ της σύνδεσης (εικ.B).
να πιέσετε τους μοχλούς που
να τον βγάλετε.
κάτω
προς τα έξω τη ζωνίτσα που
συνέχεια την αγκράφα της
ΟΔΗΓΙΕΣ ΧΡΗΣΕΩΣ
ΓΙΑ ΝΑ ΣΥΝΑΡΜΟΛΟΓΗΣΕΤΕ ΤΟ ΚΑΘΙΣΜΑ
1• Ανοίξτε τη θέση του καθίσματος, τραβώντας
τους πίσω ιστούς στα πλαϊνά της θέσης μέχρι
να ακουστεί το κλικ της σύνδεσης.
Τακτοποιήστε τα πόδια σε κάθετη θέση έτσι
2•
ώστε να ξεχωρίζουν τα μπροστινά πόδια, τα
πιο ψηλά, από τα πίσω, τα πιο χαμηλά.
3• Ξεβιδώστε τις τέσσερις βίδες με παξιμάδι
από τους μπροστινούς και πίσω ιστούς,
προσέχοντας να μην τους χάσετε.
4• Περάστε τα μπροστινά πόδια, τα πιο ψηλά,
στους μπροστινούς ιστούς. Σταθεροποιήστε
τα μπροστινά πόδια ξαναβιδώνοντας με τη
βοήθεια ενός κατσαβιδιού.
5• Γυρίστε τη θέση και περάστε τα πίσω
πόδια, τα πιο χαμηλά, στους πίσω ιστούς.
Σταθεροποιήστε τα πόδια ξαναβιδώνοντας με
τη βοήθεια ενός κατσαβιδιού.
6• Η εικόνα δείχνει την ακριβή διάταξη των ιστών
αφού ολοκληρωθεί ο χειρισμός.
7• Κατεβάστε την πλατφόρμα του εξαρτήματος
στήριξης των ποδιών γυρνώντας το όπως
φαίνεται στην εικόνα.
ΔΙΣΚΟΣ
8• Για να τοποθετήσετε το δίσκο, κρατήστε
πατημένους τους μοχλούς που είναι
τοποθετημένοι κάτω από το δίσκο και
ΑΝΑΚΛΙΝΟΜΕΝΗ ΠΛΑΤΗ
15• Η πλάτη του καθίσματος είναι ανακλινόμενη
μέχρι τέσσερις θέσεις: για το φαγητό, το
παιχνίδι, το relax ή τον ύπνο. Για
ρυθμίσετε σηκώστε τη λαβή που βρίσκεται
πίσω στην πλάτη και μπλοκάρετέ την στη θέση
που επιθυμείτε. Η ενέργεια αυτή μπορεί να
εκτελεσθεί ακόμη και με το παιδί στο κάθισμα.
ΡΥΘΜΙΖΟΜΕΝΗ ΒΑΣΗ ΣΤΗΡΙΞΗΣ ΤΩΝ ΠΟΔΙΩΝ
16• Η βάση στήριξης των ποδιών είναι ρυθμιζόμενη
σε δύο θέσεις.
- Για να ανυψώσετε
ποδιών, σηκώστε την προς τα πάνω.
- Για να κατεβάσετε τη βάση στήριξης των
ποδιών, περάστε τα δάχτυλα στους πλευρικούς
μοχλούς ωθώντας τους προς τα κάτω και στη
συνέχεια κατεβάστε τη βάση στήριξης των
ποδιών.
• Η ενέργεια αυτή μπορεί να εκτελεστεί ακόμη και
με το παιδί στο
ΓΙΑ ΝΑ ΚΛΕΙΣΕΤΕ ΤΟ ΚΑΘΙΣΜΑ
17• Προτού να κλείσετε το κάθισμα:
- Αφαιρέστε το δίσκο.
- Τοποθετήστε την πλάτη στην όρθια θέση.
- Κατεβάστε τη βάση στήριξης των ποδιών.
- Ξανακλείστε την πλατφόρμα της βάσης
στήριξης των ποδιών.
18• Πατήστε το κουμπί ασφαλείας και ωθήστε προς
τα πάνω το μοχλό κλεισίματος
τη βάση στήριξης των
κάθισμα.
να τη
που βρίσκεται
Page 25
στην πίσω πλευρά του καθίσματος. Ταυτόχρονα
με το άλλο χέρι σπρώξτε στην μπροστινή
πλευρά του καθίσματος μέχρι να το κλείσετε.
Το κάθισμα όταν είναι κλειστό παραμένει όρθιο
μόνο του.
19• Τοποθετήστε και πάλι το δίσκο στην κάτω
πλευρά των ποδιών έτσι ώστε να μην εμποδίζει
όπως φαίνεται στην εικόνα.
ΓΙΑ
20• Για να ανοίξετε το κάθισμα, ακουμπήστε το ένα
ΑΦΑΙΡΕΣΗ ΤΗΣ ΕΠΕΝΔΥΣΗΣ
21• Για να αφαιρέσετε την επένδυση του
22• Ξεκουμπώστε το σάκο από τα πλαϊνά της
Το προϊόν σας χρειάζεται μία ελάχιστη συντήρηση.
Οι εργασίες καθαρισμού και συντήρησης πρέπει να
εκτελούνται μόνον από ενήλικες.
• Συμβουλεύουμε να διατηρείτε καθαρά όλα τα μέρη
• Στεγνώνετε τα μεταλλικά μέρη του προϊόντος για
• Περιοδικά καθαρίζετε τα πλαστικά μέρη με ένα
• Προστατεύετε το προϊόν από ατμοσφαιρικούς
• Φυλάξτε το προϊόν
• Μην βυθίζετε το σάκο σε νερό, αλλά να τον
ΝΑ ΑΝΟΙΞΕΤΕ ΤΟ ΚΑΘΙΣΜΑ
πόδι σας στα μπροστινά πόδια του καθίσματος
για να το μπλοκάρετε και στη συνέχεια και με
τα δύο χέρια σηκώστε την πίσω πλευρά των
μπράτσων μέχρι να το ανοίξετε. Αφού ανοίξετε
το κάθισμα σε όλη του την έκταση, πατήστε
επάνω στα μπράτσα προς τα κάτω μέχρι να
ακουστεί το κλικ, έτσι ώστε να το μπλοκάρετε.
καθίσματος, βγάλτε τη ζώνη από την πλάτη και
κάτω από τη θέση.
πλάτης και αφαιρέστε το
ΚΑΘΑΡΙΣΜΑ ΚΑΙ ΣΥΝΤΗΡΗΣΗ
που κινούνται και εάν χρειάζεται, να τα λιπαίνετε
με ελαφρύ λάδι.
αποφύγετε τη σκουριά.
να
υγρό πανί, μη χρησιμοποιείτε διαλυτικά ή άλλα
παρόμοια προϊόντα.
παράγοντες, βροχή, νερό ή χιόνι. Η συνεχής
έκθεση στον ήλιο για πολύ καιρό θα μπορούσε να
προκαλέσει αλλαγές στο χρώμα πολλών υλικών.
καθαρίζετε με ένα υγρό πανί και με ουδέτερο
απορρυπαντικό.
σε ξηρό χώρο.
σάκο από πάνω.
• ΤΟΠΟΘΕΤΗΣΤΕ ΤΟ ΠΡΟΪΟΝ ΕΤΣΙ ΩΣΤΕ ΤΟ ΠΑΙΔΙ ΝΑ
ΕΙΝΑΙ ΜΑΚΡΙΑ ΑΠΟ ΚΙΝΔΥΝΟΥΣ ΟΠΩΣ ΗΛΕΚΤΡΙΚΑ
ΚΑΛΩΔΙΑ, ΠΗΓΕΣ ΘΕΡΜΟΤΗΤΑΣ Ή ΦΛΟΓΕΣ.
• ΜΗΝ ΕΙΣΑΓΕΤΕ ΤΑ ΔΑΧΤΥΛΑ ΣΤΟΥΣ ΜΗΧΑΝΙΣΜΟΥΣ
ΚΑΙ ΠΡΟΣΕΞΤΕ ΤΗ ΘΕΣΗ ΤΩΝ ΜΕΛΩΝ ΤΟΥ ΣΩΜΑΤΟΣ
ΤΟΥ ΠΑΙΔΙΟΥ ΚΑΤΑ ΤΗ ΔΙΑΡΚΕΙΑ ΤΩΝ ΧΕΙΡΙΣΜΩΝ
ΡΥΘΜΙΣΗΣ.
• ΜΠΟΡΕΙ ΝΑ ΕΙΝΑΙ ΕΠΙΚΙΝΔΥΝΗ Η ΧΡΗΣΗ
ΕΞΑΡΤΗΜΑΤΩΝ ΠΟΥ
ΚΑΤΑΣΚΕΥΑΣΤΗ.
• ΜΗΝ ΧΡΗΣΙΜΟΠΟΙΕΙΤΕ ΤΟ ΠΡΟΪΟΝ ΚΟΝΤΑ ΣΕ
ΣΚΑΛΕΣ Ή ΣΚΑΛΑΚΙΑ.
• ΠΡΟΣΕΞΤΕ ΝΑ ΜΗΝ ΤΟΠΟΘΕΤΕΙΤΕ ΤΟ ΠΡΟΪΟΝ
ΚΟΝΤΑ ΣΕ ΠΗΓΕΣ ΘΕΡΜΟΤΗΤΑΣ Ή ΦΩΤΙΑ ΟΠΩΣ
ΓΚΑΖΙΕΡΕΣ, ΗΛΕΚΤΡΙΚΕΣ ΣΟΜΠΕΣ, ΚΛΠ.
ΔΕΝ ΕΧΟΥΝ ΤΗΝ ΕΓΚΡΙΣΗ ΤΟΥ
ΠΡΟΣΟΧΗ
• ΟΙ ΕΡΓΑΣΙΕΣ ΣΥΝΑΡΜΟΛΟΓΗΣΗΣ ΚΑΙ ΡΥΘΜΙΣΗΣ ΤΟΥ
ΠΡΟΪΟΝΤΟΣ ΠΡΕΠΕΙ ΝΑ ΕΚΤΕΛΟΥΝΤΑΙ ΑΠΟ ΕΝΑΝ
ΕΝΗΛΙΚΑ. ΜΗΝ ΧΡΗΣΙΜΟΠΟΙΕΙΤΕ ΤΟ ΠΡΟΪΟΝ ΕΑΝ
ΔΕΝ ΕΧΕΙ ΟΛΟΚΛΗΡΩΘΕΙ ΣΩΣΤΑ Η ΣΥΝΑΡΜΟΛΟΓΗΣΗ
ΤΟΥ ΚΑΙ ΕΑΝ ΤΟ ΠΡΟΪΟΝ ΠΑΡΟΥΣΙΑΖΕΙ ΡΩΓΜΕΣ Ή
ΤΜΗΜΑΤΑ ΠΟΥ ΛΕΙΠΟΥΝ.
• ΦΡΟΝΤΙΣΤΕ ΝΑ ΜΗΝ ΠΕΣΕΙ Ή ΓΛΙΣΤΡΗΣΕΙ ΤΟ ΠΑΙΔΙ·
ΧΡΗΣΙΜΟΠΟΙΕΙΤΕ ΠΑΝΤΑ ΤΙΣ ΖΩΝΕΣ ΑΣΦΑΛΕΙΑΣ
ΠΕΝΤΕ ΣΗΜΕΙΩΝ·
ΣΤΗΝ ΑΝΑΚΛΙΝΟΜΕΝΗ ΟΣΟ ΚΑΙ ΣΤΗΝ ΟΡΘΙΑ ΘΕΣΗ.
• ΜΗΝ ΑΦΗΝΕΤΕ ΠΟΤΕ ΤΟ ΠΑΙΔΙ ΣΑΣ ΧΩΡΙΣ
ΕΠΙΤΗΡΗΣΗ· ΝΑ ΕΠΙΒΛΕΠΕΤΕ ΠΑΝΤΑ ΤΟ ΠΑΙΔΙ.
• ΜΗΝ ΧΡΗΣΙΜΟΠΟΙΕΙΤΕ ΤΟ ΠΡΟΪΟΝ ΜΕΧΡΙΣ ΟΤΟΥ ΤΟ
ΠΑΙΔΙ ΝΑ ΕΙΝΑΙ ΣΕ ΘΕΣΗ ΝΑ ΠΑΡΑΜΕΙΝΕΙ ΚΑΘΙΣΜΕΝΟ
ΜΟΝΟ ΤΟΥ.
• Ο ΔΙΣΚΟΣ ΚΑΙ ΤΑ ΕΞΑΡΤΗΜΑ ΤΑ ΤΟΥ ΔΕΝ
ΚΑΤΑΣΚΕΥΑΣΤΕΙ ΓΙΑ ΝΑ ΣΗΚΩΝΟΥΝ ΤΟ ΒΑΡΟΣ
ΤΟΥ ΠΑΙΔΙΟΥ· Ο ΔΙΣΚΟΣ ΔΕΝ ΕΧΕΙ ΣΧΕΔΙΑΣΤΕΙ
ΓΙΑ ΝΑ ΚΡΑΤΑ ΤΟ ΠΑΙΔΙ ΣΤΟ ΚΑΘΙΣΜΑ ΚΑΙ ΔΕΝ
ΑΝΤΙΚΑΘΙΣΤΑ ΤΗ ΖΩΝΗ ΑΣΦΑΛΕΙΑΣ.
• ΒΕΒΑΙΩΘΕΙΤΕ ΟΤΙ ΤΟ ΠΡΟΪΟΝ ΕΙΝΑΙ ΕΠΑΝΩ ΣΕ ΜΙΑ
ΟΡΙΖΟΝΤΙΑ ΕΠΙΦΑΝΕΙΑ.
ΧΡΗΣΙΜΟΠΟΙΕΙΤΕ ΤΙΣ ΖΩΝΕΣ ΤΟΣΟ
ΕΧΟΥΝ
Page 26

Page 27

&
PEG PEREGO SpA
Via De Gasperi, 50
20043 Arcore (MI) Italy
www.pegperego.com
ΠΑΙΔΙΚΑ ΕΙΔΗ ΒΡΕΦΑΝΑΠΤΥΞΗΣ ΚΑΙ ΠΑΙΧΝΙΔΙΑ ΕΓΓΥΗΣΗ
Η PEG – PEREGO εγγυάται για τυχόν εργοστασιακά ελαττώματα των προιόντων
της για διάστημα έξι μηνών από την ημερομηνία αγοράς. Η προσκόμιση
της ανάλογης ταμειακής απόδειξης αγοράς είναι απαραίτητη. Εξαιρούνται
της εγγύγησης οι επαναφορτιζόμενες μπαταρίες και οι μετασχη-ματιστές
παιχνιδιών. (βλ. αναλυτικές οδηγίες χρήσεως παιχνιδιών).
Η παρούσα
βάσει των οδηγιών χρήσεως. Ο κατασκευαστής και οι εντεταλμένοι συνεργάτες
του διατηρούν το δικαίωμα τεχνικού ελέγχου.
Ο κατασκευαστής δεν μπορεί να θεωρηθεί υπεύθυνος εφʼ όσον:
• Δεν τηρηθούν οι ανάλογες οδηγίες χρήσεως του κάθε προιόντος.
• Καταστραφεί τυχαία το προιόν ή προκληθούν
• Υπάρξει τεχνική παρέμβαση ξένου προς την εταιρεία μας τεχνικού, πράγμα το
οποίο απαγορεύεται και αποτελεί κίνδυνο για την ασφάλεια του παιδιού.
• Φυσιολογική φθορά του προιόντος.
Διατηρείτε την εγγύηση και τις οδηγίες χρήσεως και για μελλοντική χρήση.
ΟΝΟΜΑΤΕΠΩΝΥΜΟ ΑΓΟΡΑΣΤΟΥ: .................................................................................................
ΔΙΕΥΘΥΝΣΗ: .............................................................................................................................................
ΤΗΛΕΦΩΝΟ: .............................................................................................................................................
ΕΙΔΟΣ ΠΡΟΙΟΝΤΟΣ: ..............................................................................................................................
εγγύηση ισχύει μόνον εφʼ όσον το προιόν χρησιμοποιείται σωστά και
βλάβες από κακή χρήση αυτού.
ΕΓΓΥΗΣΗ
ΚΩΔΙΚΟΣ ΠΡΟΙΟΝΤΟΣ: .......................................................................................................................
ΗΜΕΡΟΜΗΝΙΑ ΑΓΟΡΑΣ
ΣΦΡΑΓΙΔΑ ΚΑΤΑΣΤΗΜΑΤΟ
Προσοχή: Η εγγύηση ισχύει μονο εφʼ όσον εχει συμπληρωθεί και σφραγισθεί
από τον πωλητή η ημερομηνία αγοράς. Ζητείστε το από το κατάστημα τη στιγμή
της αγοράς. Αν χαθεί ή καταστραφεί το απόκομμα της εγγύησης δεν μπορεί να
αντικατασταθεί.
Page 28

Merenda
PEG PEREGO S.p.A.
VIA DE GASPERI 50 20043 ARCORE MI ITALIA
tel. 0039•039•60881 fax 0039•039•615869-616454
Servizio Post Vendita - After Sale:
tel. 0039•039•6088213 fax: 0039•039•3309992
PEG PEREGO U.S.A. Inc.
3625 INDEPENDENCE DRIVE FORT WAYNE INDIANA 46808
phone 260•482•8191 fax 260•484•2940
Call us toll free 1•800•671•1701
PEG PEREGO CANADA Inc.
585 GRANITE COURT PICKERING ONTARIO CANADA L1W3K1
phone 905•839•3371 fax 905•839•9542
Call us toll free 1•800•661•5050
www.pegperego.com
MARTINELLI è prodotta da Peg Perego.
MARTINELLI is produced by Peg Perego.
MARTINELLI est un produit Peg Perego.
MARTINELLI wird von Peg Perego hergestellt.
MARTINELLI es un producto Peg Perego.
MARTINELLI é um produto Peg Perego
MARTINELLI is een productie van Peg Perego.
MARTINELLI egy Peg Perego termék.
MARTINELLI je izdelek Peg Perego.
МАRTINELLI произведена Peg Perego.
MARTİNELLİ PegPerego tarafindan Üretilmektedir.
Tα προιόντα MARTINELLI παράγονται από την Peg – Perego.
01-12-06
 Loading...