

Page 1
WARNING:
• Do not install or use this
booster seat until you read
and understand all the
instructions in this manual
and the labels. To avoid
serious injuries to your
child, follow the instructions
carefully. Keep the instruction
manual in the dedicated
pocket for future reference.
EN Instructions for use
USA
FIUS1205I145
Weight limits:
40 – 120 lbs
(18 – 54 kg)
Height limits:
39 - 57 inches
(99 – 145 cm)
Page 2
Table of Contents
Thank you for choosing a Peg Perego Viaggio HBB 120
booster seat.
As with any other Peg Perego product, your Viaggio HBB
120 has been designed and certied by a dedicated
team of engineers inside Peg Perego Research and
Development Department.
Your Viaggio HBB 120 has been manufactured and
assembled in a Peg Perego plant under certied
quality procedures and using high quality materials
from certied suppliers. As with every booster seat,
Viaggio HBB 120 is used with a child inside a vehicle,
travelling
of today’s cities. This means that you need to use this
booster seat as a concerned parent, driving carefully
when you have a child on board but also, before this,
taking your time to explore the product, knowing
all the features it has, the dierent possible uses, the
proper and best installations. Go through this manual
entirely, keeping your new product in sight, checking
every point and understanding it. Install the product
in your vehicle taking the necessary time and making
tting trials before using it with your child. Once you
have read the manual, store it again in the backrest.
Introduction .....................................................................3
Warning ......................................................................5
Safety information .........................................................7
Registration form ..........................................................8
Your booster seat .............................................................9
Product assembly prior to use .................................10
Product features ............................................................13
Vehicle seatbelts design and compatibility ........15
Vehicle seat design and compatibility .................17
Installing the booster seat in the vehicle ..............18
Securing the child in the booster seat .................. 22
Headrest height adjustment ....................................25
Backrest angle adjustment .......................................26
Using Viaggio HBB 120 without backrest .............27
Cleaning and maintenance ....................................31
Replacement Parts .......................................................38
© 2012 Peg Perego. All rights reserved.
2
Page 3

Introduction
Thank you for choosing a Peg Perego Viaggio HBB 120
booster seat.
As with any other Peg Perego product, your Viaggio HBB
120 has been designed and certied by a dedicated
team of engineers inside Peg Perego Research and
Development Department.
Your Viaggio HBB 120 has been manufactured and
assembled in a Peg Perego plant under certied
quality procedures and using high quality materials
from certied suppliers. As with every booster seat,
Viaggio HBB 120 is used with a child inside a vehicle,
travelling
of today’s cities. This means that you need to use this
booster seat as a concerned parent, driving carefully
when you have a child on board but also, before this,
taking your time to explore the product, knowing
all the features it has, the dierent possible uses, the
proper and best installations. Go through this manual
entirely, keeping your new product in sight, checking
every point and understanding it. Install the product
in your vehicle taking the necessary time and making
tting trials before using it with your child. Once you
have read the manual, store it again in the backrest.
fast on highways or slow in the chaotic trac
3
Page 4

Introduction
• Do not install or use this booster seat until you read
and understand all the instructions in this manual and
the labels on the product. To avoid serious injuries to
your child, follow the instructions carefully. Keep the
instruction manual in the backrest for future reference.
• Your child could be seriously injured if you do not
follow instructions and warning labels correctly.
• Use only the vehicle's lap and shoulder belt system
when restraining the child in this booster seat. Snugly
adjust the belt around child's body making sure that
the belt lies at with no slack.
• This booster seat meets or exceeds all applicable
Federal Motor Vehicle Safety Standard 213
requirements for use in motor vehicles. This restraint
is NOT certied for aircraft use since aircraft seats are
normally equipped with lap belt only.
• Not all available models of seatbelts are approved for
use with this product. Refer to the dedicated section in
this manual for further details.
• Viaggio HBB 120 can be secured to your vehicle by
means of lower universal anchorage system (LATCH)
for added stability. Refer to the dedicated section in
this manual for installation details and check your
vehicle owner’s manual for further details.
• This booster seat is designed to be installed on front
This will make you sure that everybody looking after
your child and using this seat will be able to look for
help in this manual.
Should you see any malfunctioning feature, after taking
the necessary familiarization or if you see broken parts,
do not hesitate to call Peg Perego Customer Service
@ 1-800-671-1701 for help. Now that you know your
new Viaggio HBB 120 , you are ready to enjoy safe and
happy journeys with your family and your children.
4
Page 5

Warning
• Do not install or use this booster seat until you read
and understand all the instructions in this manual and
the labels on the product. To avoid serious injuries to
your child, follow the instructions carefully. Keep the
instruction manual in the backrest for future reference.
• Your child could be seriously injured if you do not
follow instructions and warning labels correctly.
• Use only the vehicle's lap and shoulder belt system
when restraining the child in this booster seat. Snugly
adjust the belt around child's body making sure that
the belt lies at with no slack.
• This booster seat meets or exceeds all applicable
Federal Motor Vehicle Safety Standard 213
requirements for use in motor vehicles. This restraint
is NOT certied for aircraft use since aircraft seats are
normally equipped with lap belt only.
• Not all available models of seatbelts are approved for
use with this product. Refer to the dedicated section in
this manual for further details.
• Viaggio HBB 120 can be secured to your vehicle by
means of lower universal anchorage system (LATCH)
for added stability. Refer to the dedicated section in
this manual for installation details and check your
vehicle owner’s manual for further details.
• This booster seat is designed to be installed on front
5
Page 6

Warning
•
Use Viaggio HBB 120 in forward facing mode with children
weighing in the range
height is between
• When placing your child in the seat, make sure that
bulky jackets or covers are removed. This will make the
use of seatbelts easier and therefore correct.
• Do not leave your child unattended in the vehicle, even
for a short period. He/she could get tangled in the straps
and be seriously injured or could move or tip the seat.
• Do not leave the booster seat under direct sunlight
for a prolonged time. The seat may become very hot
and burn your child’s skin.
• When not in use, store the product in a proper place,
away from light, moisture, excessive heat or cold.
• Do not place this car seat on countertops, tables or
soft surfaces.
• Do not try to remove or add parts unless where
explained in this manual; do not try to repair this
product. In case of damage or defective components,
call customer service @ 1-800-671-1701 for help.
• Do not leave loose objects, bags or luggage in the
vehicle interior. In case of an accident they could
suddenly move causing the occupants to be injured.
• Do not use this unit after seven (7) years from the
date of production labelled on the seat.
facing vehicle seats only equipped with a headrest.
Never use on seats looking sideways or rearward
facing. Do not use in cars with door-mounted or
motorized shoulder belts. Read your vehicle owner’s
manual for additional information.
• According to accident statistics, children are safer
when properly restrained in the rear seating positions
than in the front seating positions.
• Complete and send in the registration form provided
with this product right away. In case of an accident: if
this car seat is involved in a car accident, it may be no
longer safe for use. You may need to get a new unit.
Call Peg Perego Customer Service at 1-800-671-1701
(toll free) for information about repairs or spare parts.
• Seat covers and pads provided in this product are
part of the product and the certication program. The
use of non approved covers or other accessories are
not recommended .
• EPS components (white soft foam located below the
upholstered covers) are integrated in the product as
safety related parts and should never be removed or
damaged.
• Secure this booster seat in the car even when not
occupied. This car seat is a heavy object that could cause
severe damage to other occupants in case of an accident.
• Keep ngers away from moving parts.
6
Page 7

Safety Informations
•
Use Viaggio HBB 120 in forward facing mode with children
weighing in the range
height is between
• When placing your child in the seat, make sure that
bulky jackets or covers are removed. This will make the
use of seatbelts easier and therefore correct.
• Do not leave your child unattended in the vehicle, even
for a short period. He/she could get tangled in the straps
and be seriously injured or could move or tip the seat.
• Do not leave the booster seat under direct sunlight
for a prolonged time. The seat may become very hot
and burn your child’s skin.
• When not in use, store the product in a proper place,
away from light, moisture, excessive heat or cold.
• Do not place this car seat on countertops, tables or
soft surfaces.
• Do not try to remove or add parts unless where
explained in this manual; do not try to repair this
product. In case of damage or defective components,
call customer service @ 1-800-671-1701 for help.
• Do not leave loose objects, bags or luggage in the
vehicle interior. In case of an accident they could
suddenly move causing the occupants to be injured.
• Do not use this unit after seven (7) years from the
date of production labelled on the seat.
40 – 120 lbs (18 – 54 kg)
and whose
39 and 57 inches (99 – 145 cm).
7
Page 8
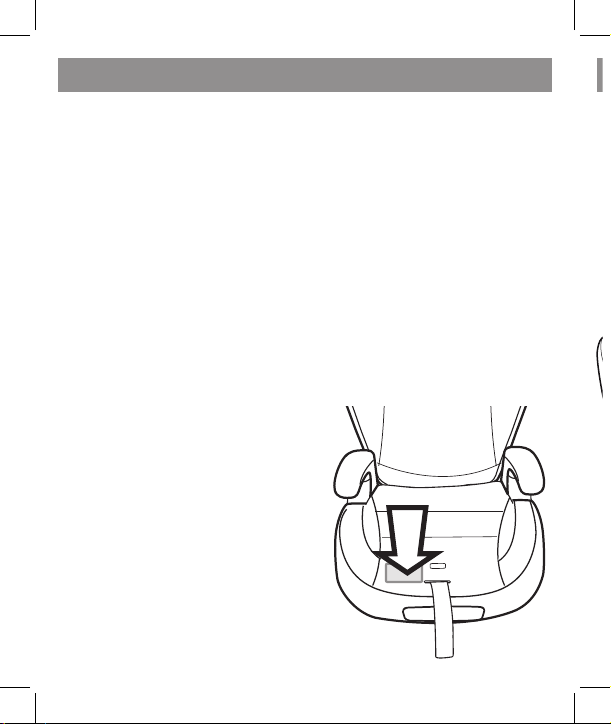
Registration Form
Recline handleCup holder
Seat
Armrest
Lap belt router
Backrest
Instruction
manual
pocket
Shoulder
belt router
Headrest
adjustable
handle
LATCH
connectors
Headrest
LATCH strap
Important! Child restraints could be recalled for safety
reasons. You must register this restraint to be reached
in a recall. Send your name, address and the restraint's
model number and manufacturing date to:
Peg Perego U.S.A., Inc. 3625 Independence Drive
Fort Wayne, IN 46808 Or call 1-800-671-1701 (toll free)
For recall information, call the U.S. Government’s
Vehicle Safety Hotline at 1-888-327-4236
(TTY: 1-800-424-9153) Or go to ttp://www.NHTSA.gov
Model number, model name, date of manufacturing,
etc. are indelibly printed on a label located on the
seat under the upholstery
(as shown here).
Registration form is attached
to the product cover. Detach
the form, ll in and mail to
Peg Perego. No stamp is
needed. We have already
paid for it. Should the
registration form be missing,
please call Customer
Service @ 1-800-671-1701
for a replacement form.
8
Page 9
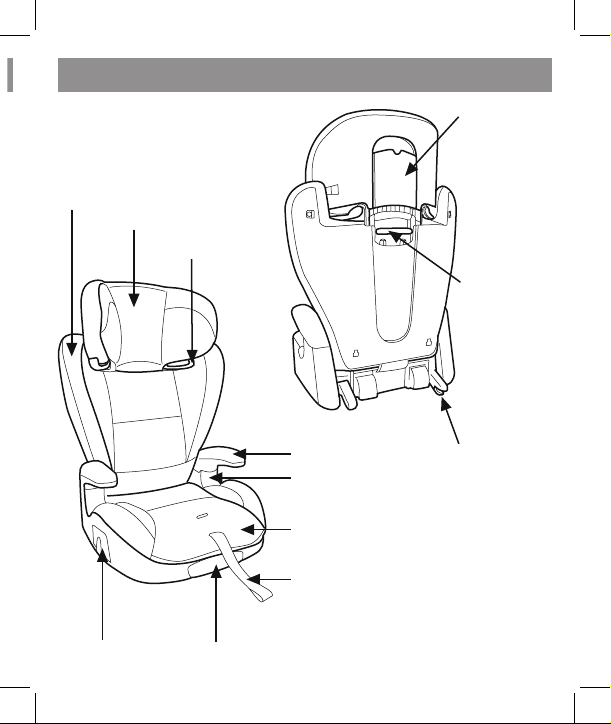
Backrest
Instruction
Headrest
Your booster seat
Shoulder
belt router
Armrest
Lap belt router
Seat
LATCH strap
Recline handleCup holder
manual
pocket
Headrest
adjustable
handle
LATCH
connectors
9
Page 10
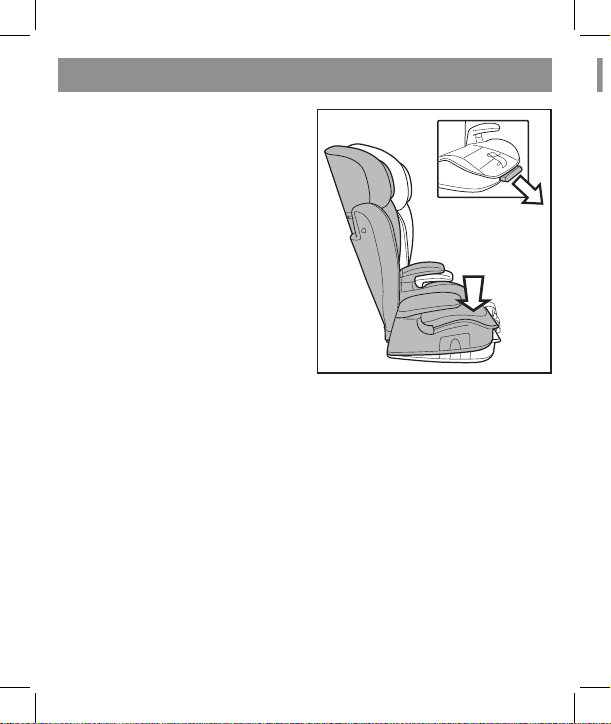
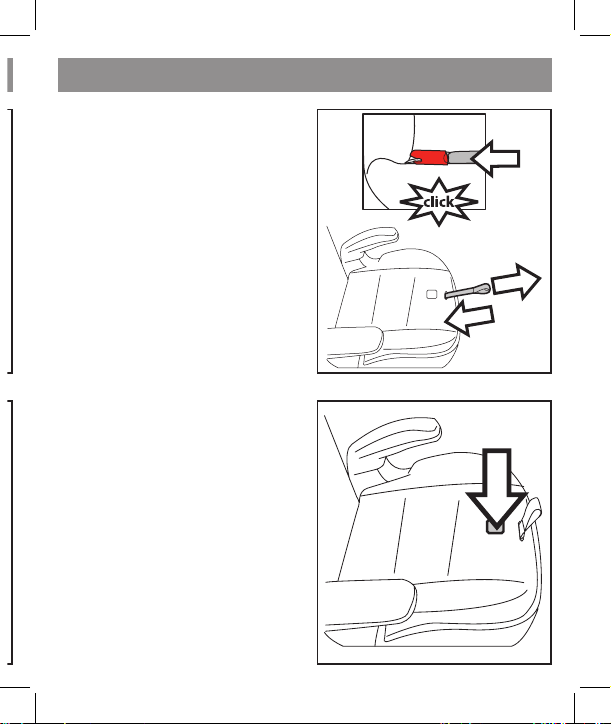
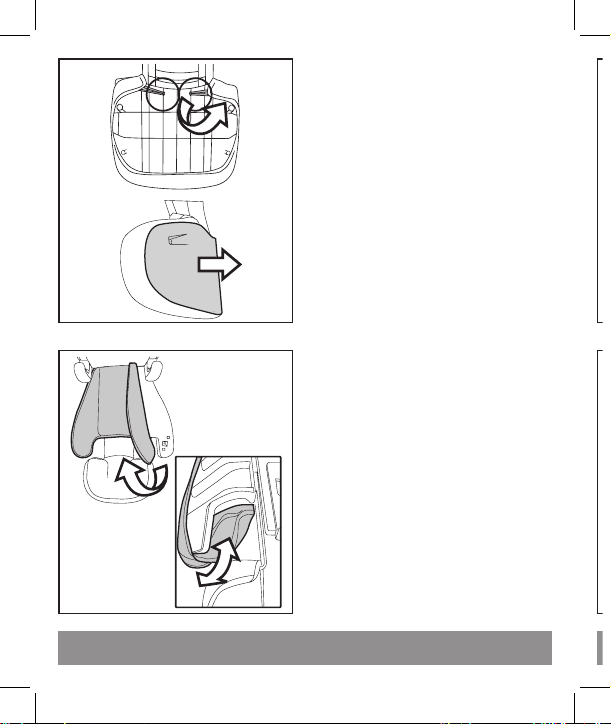
Product assembly prior to use
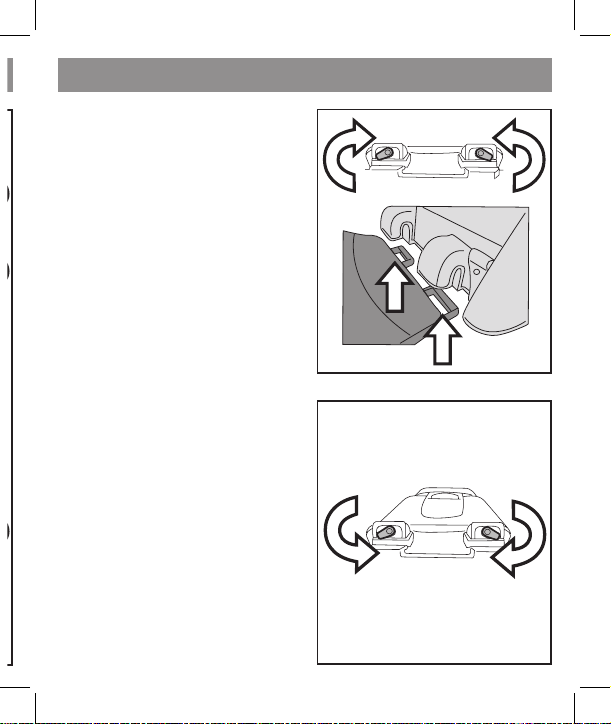
2. Rotate the red stops
in the open position and
slide the backrest in the
housings located behind
the seat as shown in the
picture.
3. Keeping the product
flat, close the red stops
until a click is heard.
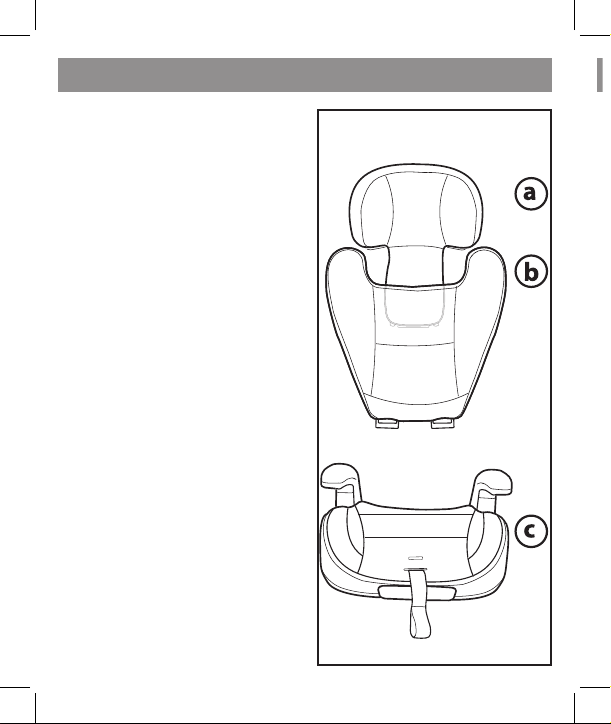
1. Always check the
product prior to assembly.
The product is composed
of an headrest (a) a
backrest (b) and a seat
(c). Backrest and headrest
are factory assembled. To
assemble correctly the
product please follow
the instructions carefully.
In case of missing or
malfunctioning parts,
please contact our
Customer Service @
1-800-671-1701 for help.
10
Page 11
Product assembly prior to use
2. Rotate the red stops
in the open position and
slide the backrest in the
housings located behind
the seat as shown in the
picture.
3. Keeping the product
flat, close the red stops
until a click is heard.
11
Page 12
Product assembly prior to use
1. The product is
equipped with two
integral cup holders,
located at the side of the
seat. To operate the cup
holder, simply pull /push
the part until it stops.
WARNING: never put
hot liquids in the cup
holder. Your child or a
nearby occupant may
become injured in case
of a turn or sudden stop.
2. The booster seat is
equipped with a movable
foot to adjust seat angle.
The foot is spring loaded.
To operate it, pull the
handle located in front
of the seat and rise the
seat at the same time. The
foot will pop out in the
reclined position.
4. Rotate the backrest in
the elevated position (a)
until a loud click is heard.
The backrest will be free
to rotate between the
two stops as shown in the
picture (b). The product is
now ready for use.
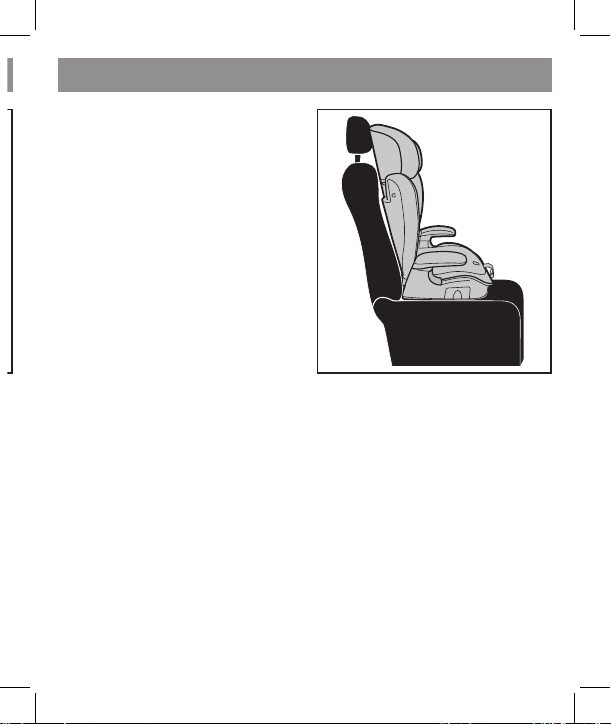
IMPORTANT NOTE:
Viaggio HBB 120 is a
High Back Booster. Its
headrest and backrest
have been designed on
the experience made
in side impact dynamic
testing. Being designed
to elevate the seating
surface of your child,
it becomes extremely
important that your
child’s head, which
would lean close to a
glass vehicle window
in a backless booster,
is protected from
injuries at all times.
We recommend using
the booster seat with
backrest and headrest
to offer maximum
protection.
A
12
Page 13
Product features
1. The product is
equipped with two
integral cup holders,
located at the side of the
seat. To operate the cup
holder, simply pull /push
the part until it stops.
WARNING: never put
hot liquids in the cup
holder. Your child or a
nearby occupant may
become injured in case
of a turn or sudden stop.
2. The booster seat is
equipped with a movable
foot to adjust seat angle.
The foot is spring loaded.
To operate it, pull the
handle located in front
of the seat and rise the
seat at the same time. The
foot will pop out in the
reclined position.
13
Page 14
Product features
Vehicle seatbelts design and compatibility
Viaggio HBB 120 is designed to be installed with lap
and shoulder vehicle belts commonly fitted on most
of the available cars. However, in the market there are
several different types of vehicles manufactured in
different periods.
As a result, there are many different vehicle belt
designs. Unfortunately, some may be unsuitable for
a safe installation of Viaggio HBB 120. Please read
carefully the list below and in case of problems or
doubts, double check your vehicle owner’s manual or
call Peg Perego Customer Service @ 1-800-671-1701
for additional help.
3. To return the foot to
the original position, pull
the lever again and push
the seat downward.
14
Page 15

Vehicle seatbelts design and compatibility
Viaggio HBB 120 is designed to be installed with lap
and shoulder vehicle belts commonly fitted on most
of the available cars. However, in the market there are
several different types of vehicles manufactured in
different periods.
As a result, there are many different vehicle belt
designs. Unfortunately, some may be unsuitable for
a safe installation of Viaggio HBB 120. Please read
carefully the list below and in case of problems or
doubts, double check your vehicle owner’s manual or
call Peg Perego Customer Service @ 1-800-671-1701
for additional help.
15
Page 16
Vehicle seatbelts design and compatibility
NO
NO
NO
NO
WARNING: do not use Viaggio HBB 120 with the
following vehicle seat design:
1. Side facing seats
2. Rear facing seats or seats that rotate in dierent
positions
For your child’s safety, always read your vehicle owner’s
manual for further informations.
NON COMPATIBLE VEHICLE BELT DESIGNS
WARNING: do not use Viaggio HBB 120 with the
following vehicle belt design:
1. Lap/motorized
shoulder belts. Belts
2. Lap belt only of any
kind.
mounted on the door
16
Page 17
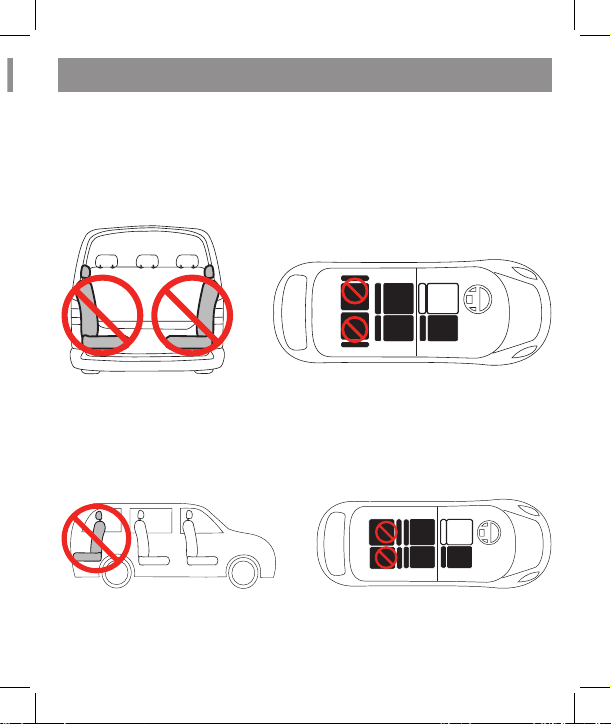
Vehicle seat design and compatibility
WARNING: do not use Viaggio HBB 120 with the
following vehicle seat design:
1. Side facing seats
NO
NO
2. Rear facing seats or seats that rotate in dierent
positions
NO
NO
For your child’s safety, always read your vehicle owner’s
manual for further informations.
17
Page 18
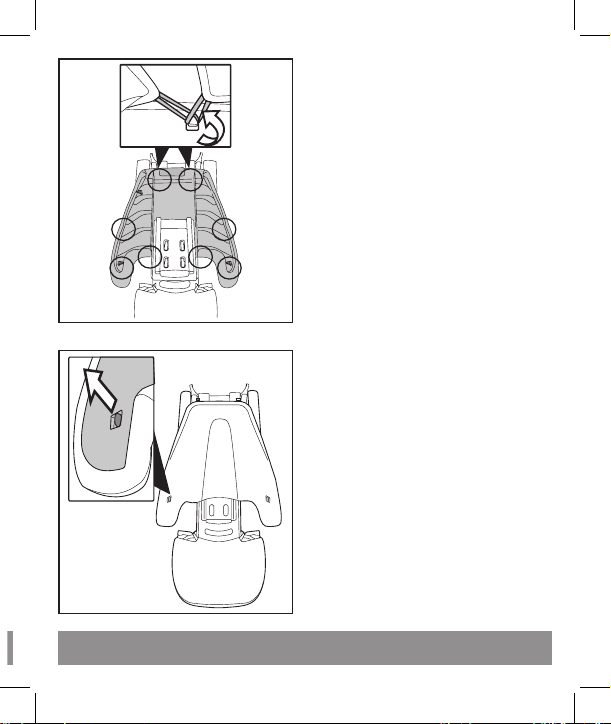
Installing the booster seat in the vehicle
Installing the booster seat in the vehicle
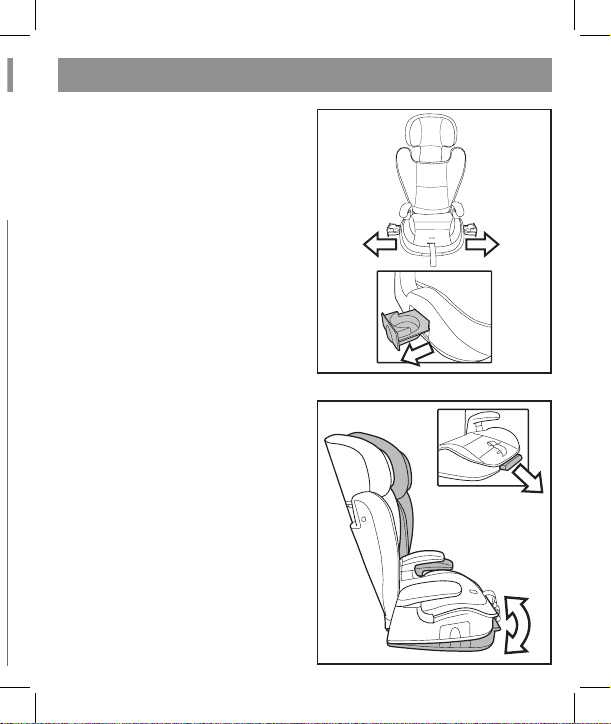
3. Attach the connectors
to the vehicle’s lower
anchors. An audible click
is heard when the product
is attached to the lower
anchors. Pull the central
strap (b) and push the
booster seat against the
seat (c). Check that the
booster seat is attached
by moving it sideways.
Attaching the booster seat
with LATCH connectors to
the vehicle seat means
that it is possible to leave
it in place even when not
occupied.
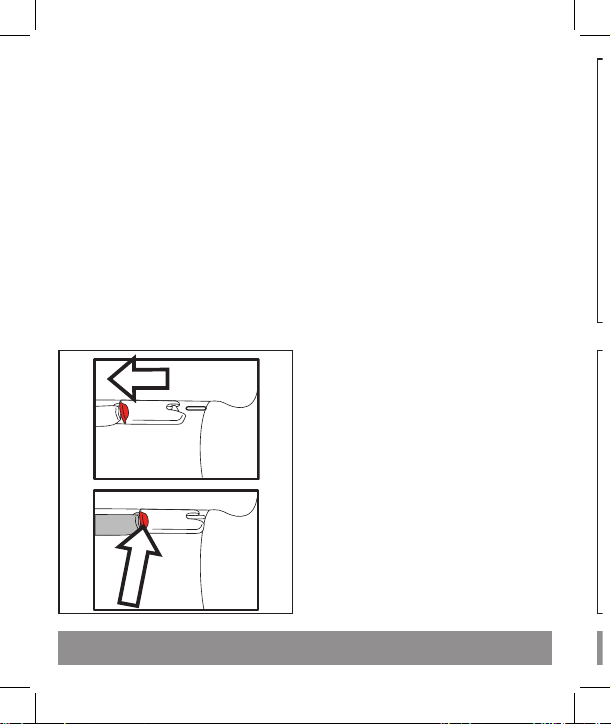
4. To detach the booster
seat, push on the central
adjuster to release the
booster seat and move it
away from the vehicle seat.
Expose the connectors
red button and push the
1. Lean the booster seat
on the selected vehicle
seat in forward facing
mode.
IMPORTANT! For proper
head support, this
booster seat needs
to be installed in a
vehicle seating position
equipped with a
headrest.
2. Primo Viaggio HBB120
is equipped with LATCH
connectors to be used
with your vehicle’s lower
anchors.
Connectors are stored in
the back side of the seat.
To use the connectors,
push the central adjuster
in the front of the seat and
pull the connectors by
hand out of the housing
at the same time.
18
Page 19
Installing the booster seat in the vehicle
3. Attach the connectors
to the vehicle’s lower
anchors. An audible click
is heard when the product
is attached to the lower
anchors. Pull the central
strap (b) and push the
booster seat against the
seat (c). Check that the
booster seat is attached
by moving it sideways.
Attaching the booster seat
with LATCH connectors to
the vehicle seat means
that it is possible to leave
it in place even when not
occupied.
4. To detach the booster
seat, push on the central
adjuster to release the
booster seat and move it
away from the vehicle seat.
Expose the connectors
red button and push the
19
A
B
C
Page 20
5. In case of lower anchors
unavailability and
whenever the booster
seat is used without
LATCH connectors, make
sure that the booster seat
leans firmly on the seat.
IMPORTANT NOTE:
in this case, make
sure that the booster
seat removed from
the vehicle’s interior
whenever it is not
occupied by a child
passenger or restrain the
booster seat with vehicle
seatbelt. The seat is a
heavy object that could
cause severe damage to
other occupants in case
of an accident.
Installing the booster seat in the vehicle
Installing the booster seat in the vehicle
button in order to release
the booster seat.
IMPORTANT NOTE:
use of LATCH connectors
are recommended by
PegPerego to achieve
the best stability of the
product in case of sudden
stops or steep turns.
Also, using the LATCH
will give guarantee that
the product is located in
the correct position with
respect to the vehicle
belt attachment points.
PUSH
20
Page 21
Installing the booster seat in the vehicle
5. In case of lower anchors
unavailability and
whenever the booster
seat is used without
LATCH connectors, make
sure that the booster seat
leans firmly on the seat.
IMPORTANT NOTE:
in this case, make
sure that the booster
seat removed from
the vehicle’s interior
whenever it is not
occupied by a child
passenger or restrain the
booster seat with vehicle
seatbelt. The seat is a
heavy object that could
cause severe damage to
other occupants in case
of an accident.
21
Page 22
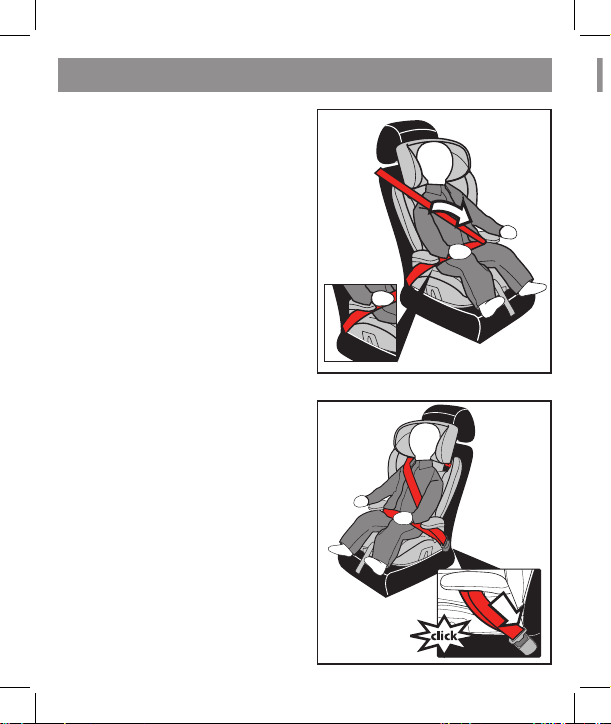
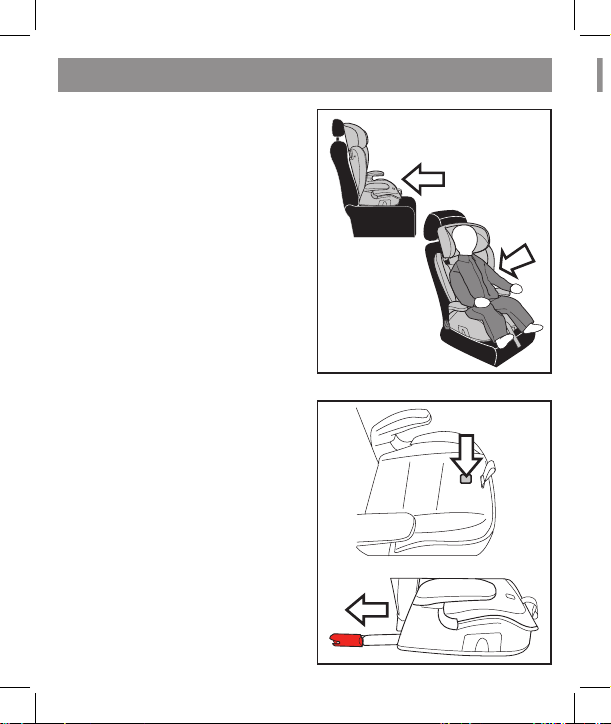
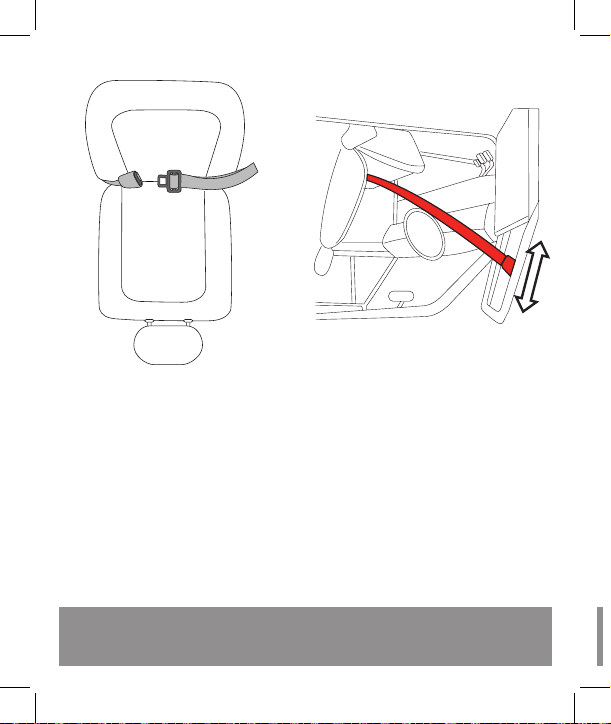
Securing the child in the booster seat
Securing the child in the booster seat
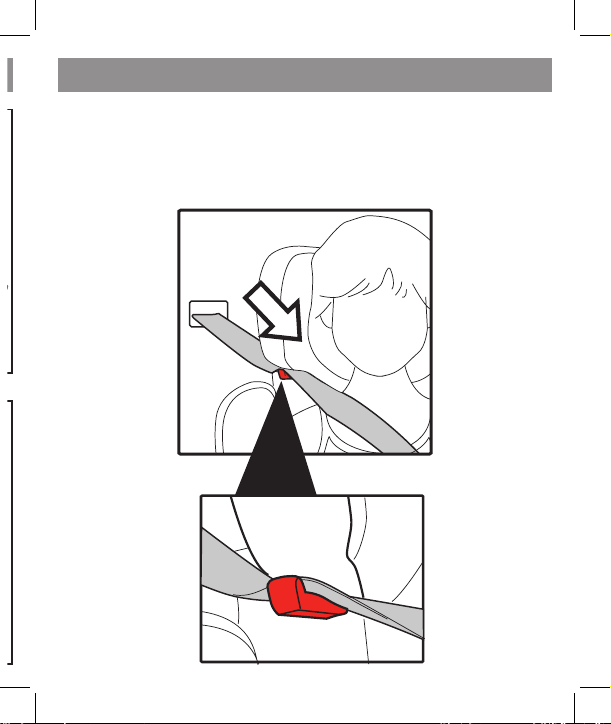
3. Thread the shoulder belt in the red router located
below the headrest. To do this slide the belt from
outside toward the center of the product. Check that
the belt is not twisted when doing this operation.
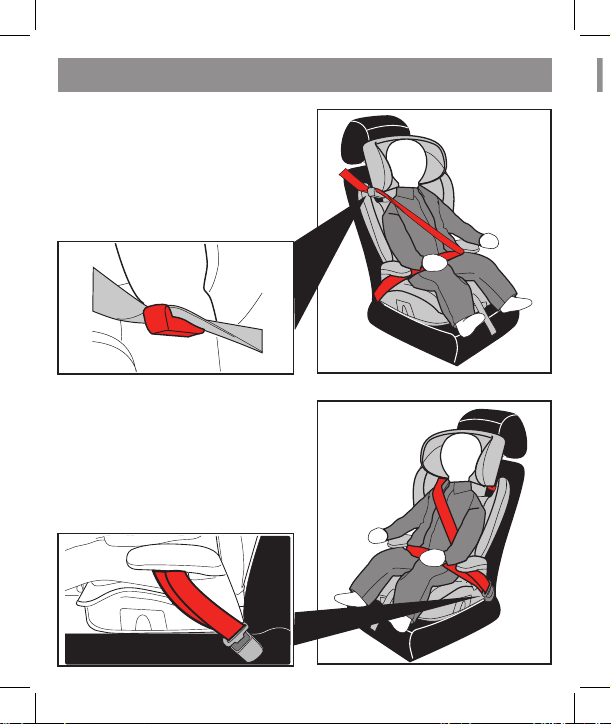
1. Make sure that
your child is sitting
comfortable in the
booster seat, with the
back fully against the
backrest of the booster
seat. Pull the vehicle belt
and make sure that the
lap portion of it passes
below both armrests.
2. Buckle the belt (an
audible click is heard)
and make sure that both
lap and shoulder belts
pass below the armrest
located next to the
seatbelt buckle. Pull on
both lap and shoulder
belts making sure that
they are not tangled
anywhere.
22
Page 23
Securing the child in the booster seat
3. Thread the shoulder belt in the red router located
below the headrest. To do this slide the belt from
outside toward the center of the product. Check that
the belt is not twisted when doing this operation.
23
Page 24
Securing the child in the booster seat
1. Headrest is adjustable
in 6 different positions. To
adjust the backrest, pull
the lever located behind
and move the headrest
up and down to the
desired position. When
the handle is released the
headrest will lock in place.
Move the headrest up and
down to ensure that the
lock is properly engaged.
2. With the child in the
booster seat, adjust
headrest height making
sure that the belt passes
at or above shoulder level.
The headrest is properly
set when the shoulder
belt router is located at
no more than 2 cm above
shoulder level and the
shoulder lies at the center
of child’s chest.
4. Picture shows the
correct belt pattern
around the child in your
Primo Viaggio HBB 120.
24
Page 25

Headrest height adjustment
1. Headrest is adjustable
in 6 different positions. To
adjust the backrest, pull
the lever located behind
and move the headrest
up and down to the
desired position. When
the handle is released the
headrest will lock in place.
Move the headrest up and
down to ensure that the
lock is properly engaged.
2. With the child in the
booster seat, adjust
headrest height making
sure that the belt passes
at or above shoulder level.
The headrest is properly
set when the shoulder
belt router is located at
no more than 2 cm above
shoulder level and the
shoulder lies at the center
of child’s chest.
6
5
4
3
2
1
2 cm
25
1
2
3
4
5
6
Page 26

Backrest angle adjustment
A
B
Using Viaggio HBB 120 without backrest
To remove the backrest:
Rotate the red stops in
the open position and
slide the backrest out of
its housing.
Your Viaggio HBB 120 has been designed with a
removable backrest. The backrest provides protection
to your child’s head and shoulders in a side collision.
We strongly recommend the backrest to be used as
much as possible. This provides the best protection
for your child.
We realize there may be times when it is easier to travel
without the backrest. In this case, it is important that
your child keeps the safety belt in the proper place.
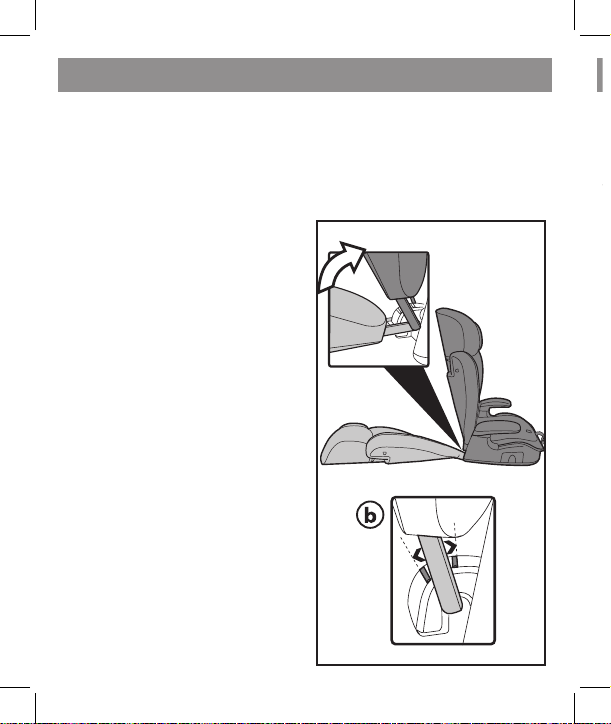
1. For longer journeys, the
booster seat can be used
in a comfort position. This
will guarantee that your
child will sleep keeping
the head gently leaned
on the headrest and
being kept protected by
the side wings in case of
a lateral impact.
To reach the comfort
position recline the seat
as explained at page 13
by pulling the recline
handle (a). Adjust the
backrest of your vehicle’s
seat following your
vehicle owner’s manual
(b). Viaggio HBB 120
backrest will follow the
vehicle backrest thanks
to its free hinge.
26
Page 27

Using Viaggio HBB 120 without backrest
Your Viaggio HBB 120 has been designed with a
removable backrest. The backrest provides protection
to your child’s head and shoulders in a side collision.
We strongly recommend the backrest to be used as
much as possible. This provides the best protection
for your child.
We realize there may be times when it is easier to travel
without the backrest. In this case, it is important that
your child keeps the safety belt in the proper place.
To remove the backrest:
Rotate the red stops in
the open position and
slide the backrest out of
its housing.
27
Page 28

Using Viaggio HBB 120 without backrest
Using Viaggio HBB 120 without backrest
3. Check that the shoulder belt lies on the shoulder,
away from your child's neck and below ear level, as
shown in the picture.
1. Make sure that your
child is sitting comfortably
in the seat, with his back
fully against the vehicle
seat backrest. Pull the belt
and make sure that the
lap portion of it passes
below both armrests.
IMPORTANT! For proper
head support, this booster
seat needs to be installed
in a vehicle seating
position equipped with a
headrest.
2. Buckle the belt (an
audible click is heard) and
make sure that both lap
and shoulder belts pass
below the armrest located
next to the seatbelt
buckle. Pull on both
lap and shoulder belts
making sure that they are
not tangled anywhere.
28
Page 29

Using Viaggio HBB 120 without backrest
3. Check that the shoulder belt lies on the shoulder,
away from your child's neck and below ear level, as
shown in the picture.
29
Page 30

Your booster seat requires a minimum of cleaning
and maintenance. Do not clean with harsh products
or solvents. Keep moving parts clean. In case, clean
plastic parts with a damp cloth. Do not use water
with harness and latching mechanisms. Protect the
booster seat from extreme cold, water, rain and sun
exposure. Prolonged exposures to these elements can
change the colors in the material but also change their
mechanical properties. Store the booster seat in a dry
area if not used for long periods.
The upholstery is likely to be removed and cleaned
frequently. Follow the procedure below to remove the
fabric and reassemble it properly. Check the booster
seat features before disassembly and make sure that
the same features are still working once the booster
seat is set up for use again. Extra care is required when
removing padding to avoid breaking the white EPS
panels on the booster seat.
All the upholstered covers (seat, backrest and headrest)
can be machine washed at 87° F (30° C).
Using Viaggio HBB 120 without backrest
4. Picture shows the
correct belt pattern
around the child in your
Primo Viaggio HBB 120.
30
Page 31

Cleaning and maintenance
Your booster seat requires a minimum of cleaning
and maintenance. Do not clean with harsh products
or solvents. Keep moving parts clean. In case, clean
plastic parts with a damp cloth. Do not use water
with harness and latching mechanisms. Protect the
booster seat from extreme cold, water, rain and sun
exposure. Prolonged exposures to these elements can
change the colors in the material but also change their
mechanical properties. Store the booster seat in a dry
area if not used for long periods.
The upholstery is likely to be removed and cleaned
frequently. Follow the procedure below to remove the
fabric and reassemble it properly. Check the booster
seat features before disassembly and make sure that
the same features are still working once the booster
seat is set up for use again. Extra care is required when
removing padding to avoid breaking the white EPS
panels on the booster seat.
All the upholstered covers (seat, backrest and headrest)
can be machine washed at 87° F (30° C).
31
Page 32

Cleaning and maintenance
3. To remove the
backrest upholstery,
undo the plastic cover
first unsnapping it from
the top, as shown in the
picture.
4. Undo the elastic bands
from the hooks located
in the backrest structure.
Before undoing the hooks
for the first time make
sure that the correct
pattern is understood.
1. To remove the seat
upholstery: recline
backrest until it lies
flat; undo plastic hooks
starting with rear of the
seat (a and b); undo snap
buttons located under
the armrest (c and d;
pay attention to hold
the button properly in
order to avoid ripping the
upholstery apart); undo
plastic hooks in the front
part of the seat cover (e, f
and g).
2. Remove plastic hook
plates from the pocket
located under the seat.
Cleaning and maintenance
32
Page 33

Cleaning and maintenance
3. To remove the
backrest upholstery,
undo the plastic cover
first unsnapping it from
the top, as shown in the
picture.
4. Undo the elastic bands
from the hooks located
in the backrest structure.
Before undoing the hooks
for the first time make
sure that the correct
pattern is understood.
33
Page 34

Cleaning and maintenance
7. Remove headrest
upholstery.
8. To refit the backrest
upholstery in place, first
fit the shoulder cones
and then the bottom part.
5. Remove the backrest
upholstery from bottom
first. Then free the
shoulder cover from its
structure.
6. Remove the headrest
plastic cover unsnapping
it from below as shown
in the picture (a). Undo
elastic hooks from the
headrest structure (b).
A
B
34
Page 35

Cleaning and maintenance
7. Remove headrest
upholstery.
8. To refit the backrest
upholstery in place, first
fit the shoulder cones
and then the bottom part.
35
Page 36

Cleaning and maintenance
11. Put the headrest
plastic cover in place
as shown in the picture
(lower part first, then
upper snaps).
9. Attach the elastic
hooks in the center lower
structure of the backrest.
10. Put the backrest
plastic cover in place
as shown in the picture
(lower part first, then
upper snaps).
36
Page 37
Cleaning and maintenance
11. Put the headrest
plastic cover in place
as shown in the picture
(lower part first, then
upper snaps).
37
Page 38

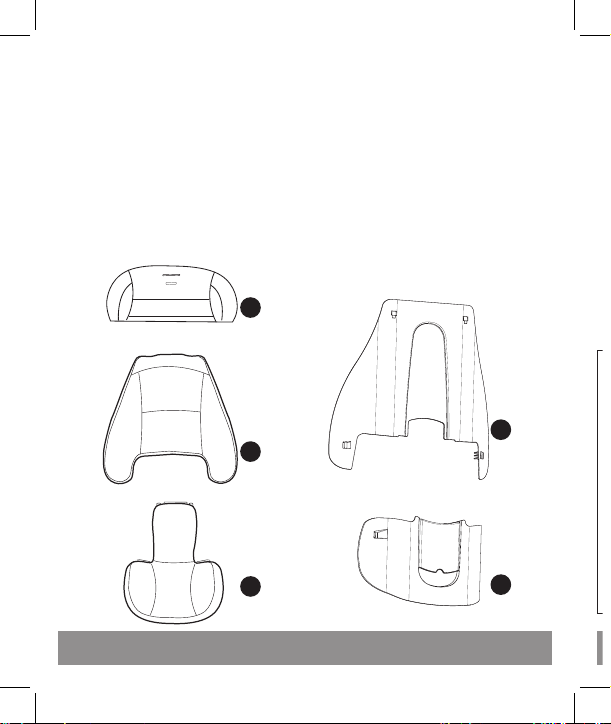
Replacement Parts
1
2
1) ASPI0148NF
2) SPST7164NF
3) BRIVIA•
4) BSCVIA•
5) BSAVIA•
3
4
5
NOTE: Spare parts available in different
colors* to be specified when ordering.
38
Page 39

Page 40

Page 41

Page 42
39
cuando se pidan.
en colores diferentes*, deben especificarse
NOTA: Las piezas de repuesto disponibles
5) BSAVIA•
4) BSCVIA•
3) BRIVIA•
2) SPST7164NF
1) ASPI0148NF
5
2
4
3
1
Piezas de repuesto
Page 43

38
superiores).
inferior, luego los cierres
imagen (primero la parte
como se muestra en la
cabezas en su lugar
de plástico del reposa
11. Ponga la cubierta
Limpieza y mantenimiento
Page 44

37
cierres superiores).
parte inferior, luego los
en la imagen (primero la
su lugar como se muestra
plástico del respaldo en
10. Ponga la cubierta de
respaldo.
inferior central del
elásticos en la estructura
9. Coloque los ganchos
Limpieza y mantenimiento
Page 45

36
9. Coloque los ganchos
elásticos en la estructura
inferior central del
respaldo.
10. Ponga la cubierta de
plástico del respaldo en
su lugar como se muestra
en la imagen (primero la
parte inferior, luego los
cierres superiores).
y luego la parte inferior.
los conos de los hombros
cabezas, primero coloque
la tapicería del reposa
8. Para volver a colocar
reposa cabezas.
7. Extraiga la tapicería del
Limpieza y mantenimiento
Page 46
35
B
cabezas (b).
la estructura del reposa
los ganchos elásticos de
en la imagen (a). Suelte
abajo como se muestra
cabezas soltándolo desde
de plástico del reposa
A
6. Extraiga la cubierta
hombro de su estructura.
suelte la cubierta del
inferior primero. Luego
respaldo desde la parte
5. Extraiga la tapicería del
Limpieza y mantenimiento
Page 47
34
5. Extraiga la tapicería del
respaldo desde la parte
inferior primero. Luego
suelte la cubierta del
hombro de su estructura.
6. Extraiga la cubierta
de plástico del reposa
cabezas soltándolo desde
abajo como se muestra
en la imagen (a). Suelte
los ganchos elásticos de
la estructura del reposa
cabezas (b).
correcto.
que recuerda el recorrido
primera vez, asegúrese de
soltar los ganchos por
del respaldo. Antes de
ubicadas en la estructura
elásticas de los ganchos
4. Suelte las bandas
en la imagen.
arriba, como se muestra
plástico soltándola desde
primero la cubierta de
del respaldo, deshaga
3. Para extraer la tapicería
Limpieza y mantenimiento
Page 48

33
Cleaning and maintenance
asiento.
bolsillo ubicada bajo el
gancho de plástico del
2. Extraiga las placas del
del asiento (e, f y g).
parte frontal de la cubierta
ganchos de plástico de la
la tapicería. Suelte los
botones, para no rasgar
tenga cuidado al abrir los
reposa brazos (c) y (d);
presión ubicados bajo el
b); suelte los botones a
trasera del asiento (a y
comenzando con la parte
enganches de plástico
esté plano; suelte los
respaldo hasta que
del asiento: recline el
1. Para extraer la tapicería
Limpieza y mantenimiento
Page 49

32
1. Para extraer la tapicería
del asiento: recline el
respaldo hasta que
esté plano; suelte los
enganches de plástico
comenzando con la parte
trasera del asiento (a y
b); suelte los botones a
presión ubicados bajo el
reposa brazos (c) y (d);
tenga cuidado al abrir los
botones, para no rasgar
la tapicería. Suelte los
ganchos de plástico de la
parte frontal de la cubierta
del asiento (e, f y g).
2. Extraiga las placas del
gancho de plástico del
bolsillo ubicada bajo el
asiento.
cabezas) pueden lavarse a máquina a 87º F (30 º C).
Todas las cubiertas tapizadas (asiento, respaldo y reposa
del producto.
acolchados para evitar romper los paneles blancos EPS
Debe tener especial cuidado cuando extraiga los
una vez que el producto está instalado de nuevo.
y asegúrese de que las mismas siguen funcionando
las características del producto antes de desmontarlo
extraer la tapicería y volver a colocarla. Compruebe
frecuentemente. Siga el siguiente procedimiento para
La tapicería puede extraerse y limpiarse
lo usa durante largos periodos.
mecánicas. Guarde el producto en una zona seca si no
colores en el material y cambiar sus propiedades
prolongada a estos elementos puede cambiar los
extremo, agua, lluvia y exposición solar. La exposición
mecanismos de enganche. Proteja el producto del frío
con un paño húmedo. No utilice agua en el arnés y
móviles. Si es necesario, limpie las piezas de plástico
irritantes o disolventes. Mantenga limpia las piezas
mantenimiento. No limpie la silla con productos
Este producto requiere un mínimo de limpieza y
Limpieza y mantenimiento
Page 50

31
HBB 120.
niño en su Primo Viaggio
cinturón alrededor del
el recorrido correcto del
4. La imagen muestra
Usar el Viaggio HBB 120 sin el respaldo
Page 51

4. La imagen muestra
el recorrido correcto del
cinturón alrededor del
niño en su Primo Viaggio
HBB 120.
30
del nivel del oído, como se muestra en la imagen.
en el hombro, lejos del cuello de su hijo, y por debajo
3. Compruebe que el cinturón del hombro descansa
Usar el Viaggio HBB 120 sin el respaldo
Page 52

29
en ningún sitio.
que no están enredados
cinturones asegurándose
cinturón. Tire de ambos
al lado del cierre del
del reposa brazos ubicado
hombro pasan por debajo
los cinturones de cadera y
un clic) y asegúrese de que
2. Cierre el cinturón (se oirá
reposacabezas.
vehículo equipado con
instalar en un asiento del
elevador se tiene que
la cabeza, este asiento
sostener adecuadamente
¡IMPORTANTE! Para
de ambos reposa brazos.
de la cadera pase por debajo
y asegúrese de que la parte
del cinturón de seguridad
asiento del vehículo. Tire
apoyada en el respaldo del
con la espalda totalmente
en el asiento elevador,
se sienta cómodamente
1.
Asegúrese de que su hijo
Usar el Viaggio HBB 120 sin el respaldo
Page 53

28
1.
se sienta cómodamente
en el asiento elevador,
con la espalda totalmente
apoyada en el respaldo del
asiento del vehículo. Tire
del cinturón de seguridad
y asegúrese de que la parte
de la cadera pase por debajo
de ambos reposa brazos.
¡IMPORTANTE! Para
sostener adecuadamente
la cabeza, este asiento
elevador se tiene que
instalar en un asiento del
vehículo equipado con
reposacabezas.
2. Cierre el cinturón (se oirá
un clic) y asegúrese de que
los cinturones de cadera y
hombro pasan por debajo
del reposa brazos ubicado
al lado del cierre del
cinturón. Tire de ambos
cinturones asegurándose
que no están enredados
en ningún sitio.
de su carcasa.
deslice el respaldo fuera
la posición de apertura y
Gire los topes rojos hasta
Para extraer el respaldo:
correcto.
hijo mantenga el cinturón de seguridad en el lugar
sin el respaldo. En este caso, es importante que su
Sabemos que hay veces en las que es más fácil viajar
mejor protección para su hijo.
respaldo tanto como sea posible. Esto proporciona la
Recomendamos encarecidamente que se utilice el
lateral.
cabeza de su hijo y a sus hombros en una colisión
extraíble. El respaldo proporciona protección a la
Su Viaggio HBB 120 ha sido diseñado con un respaldo
Usar el Viaggio HBB 120 sin el respaldo
Page 54

27
1
5
4
2
3
6
5
4
6
1
2
3
A
B
gracias a su bisagra libre.
respaldo del vehículo
HBB 120 seguirá el
respaldo del Viaggio
fabricante (b). El
las instrucciones del
de su vehículo siguiendo
el respaldo del asiento
de reclinación (a). Ajuste
14 tirando de la manija
se explica en la página
incline el asiento como
posición de comodidad,
lateral. Para conseguir la
en caso de impacto
por las aletas laterales
que estará protegido
en el reposa cabezas y
suavemente apoyada
manteniendo la cabeza
que su hijo dormirá,
cómoda. Esto garantizará
usarse en una posición más
asiento elevador puede
1. Para viajes largos, el
Ajuste del ángulo del respaldo
Page 55

26
1. Para viajes largos, el
asiento elevador puede
usarse en una posición más
cómoda. Esto garantizará
que su hijo dormirá,
manteniendo la cabeza
suavemente apoyada
en el reposa cabezas y
que estará protegido
por las aletas laterales
en caso de impacto
lateral. Para conseguir la
posición de comodidad,
incline el asiento como
se explica en la página
14 tirando de la manija
de reclinación (a). Ajuste
el respaldo del asiento
de su vehículo siguiendo
las instrucciones del
fabricante (b). El
respaldo del Viaggio
HBB 120 seguirá el
respaldo del vehículo
gracias a su bisagra libre.
2 cm
6
5
4
3
2
1
1
2
3
4
5
6
centro del pecho del niño.
el hombro descanse en el
sobre el nivel del hombro y
ubicado a no más de 2 cm
cinturón del hombro esté
el encaminador del
adecuadamente cuando
reposa cabezas se fijará
el nivel del hombro. El
cinturón pasa por o sobre
asegurándose de que el
altura del reposa cabezas
asiento elevador, ajuste la
2. Con el niño en el
adecuadamente.
que está bloqueado
arriba y abajo para asegurar
Mueva el reposa cabezas
se bloqueará en su sitio.
manija, el reposa cabezas
deseada. Cuando suelte la
y abajo en la posición
reposa cabezas hacia arriba
ubicada detrás y mueva el
respaldo, tire de la palanca
diferentes. Para ajustar el
ajustable en seis posiciones
1.
El reposa cabezas es
Ajuste de la altura del reposa cabezas
Page 56

25
HBB 120.
niño en su Primo Viaggio
cinturón alrededor del
el recorrido correcto del
4. La imagen muestra
Asegurar el niño en el asiento elevador
Page 57

24
4. La imagen muestra
el recorrido correcto del
cinturón alrededor del
niño en su Primo Viaggio
HBB 120.
haga esta operación.
Compruebe que el cinturón no esté girado cuando
cinturón desde fuera hacia el centro del producto.
rojo bajo el reposa cabezas. Para hacerlo, deslice el
3. Guíe el cinturón del hombro en el encaminador
Asegurar el niño en el asiento elevador
Page 58

23
ningún sitio.
están enredados en
asegurándose que no
Tire de ambos cinturones
del cierre del cinturón.
brazos ubicado al lado
por debajo del reposa
cadera y hombro pasan
de que los cinturones de
oirá un clic) y asegúrese
2. Cierre el cinturón (se
reposa brazos.
por debajo de ambos
parte de la cadera pase
y asegúrese de que la
del cinturón de seguridad
del asiento elevador. Tire
apoyada en el respaldo
la espalda totalmente
asiento elevador, con
cómodamente en el
que su hijo se sienta
1. Asegúrese de
Asegurar el niño en el asiento elevador
Page 59
22
1. Asegúrese de
que su hijo se sienta
cómodamente en el
asiento elevador, con
la espalda totalmente
apoyada en el respaldo
del asiento elevador. Tire
del cinturón de seguridad
y asegúrese de que la
parte de la cadera pase
por debajo de ambos
reposa brazos.
2. Cierre el cinturón (se
oirá un clic) y asegúrese
de que los cinturones de
cadera y hombro pasan
por debajo del reposa
brazos ubicado al lado
del cierre del cinturón.
Tire de ambos cinturones
asegurándose que no
están enredados en
ningún sitio.
de accidente.
otros ocupantes en caso
causar daños graves a los
pesado que podría
El asiento es un objeto
seguridad del vehículo.
con el cinturón de
sujete el asiento elevador
ocupado por un niño o
siempre que no esté
del interior del vehículo
elevador sea extraído
de que el asiento
en este caso, asegúrese
NOTA IMPORTANTE:
firmemente en el asiento.
asiento elevador se apoya
asegúrese de que el
conectores LATCH,
elevador se utilice sin
y siempre que el asiento
existan anclajes inferiores,
5. En caso de que no
Instalar el asiento elevador en el vehículo
Page 60
21
anclaje del vehículo.
los mejores puntos de
correcta con respecto a
colocado en la posición
que el producto está
LATCH garantizará
Además, el uso del
o giros inesperados.
detenciones repentinas
producto en caso de
la mejor estabilidad del
Perego para conseguir
recomendado por Peg
LATCH está
EMPUJAR
el uso de conectores
NOTA IMPORTANTE:
soltar el asiento elevador.
Instalar el asiento elevador en el vehículo
Page 61

20
soltar el asiento elevador.
NOTA IMPORTANTE:
el uso de conectores
LATCH está
recomendado por Peg
Perego para conseguir
la mejor estabilidad del
producto en caso de
detenciones repentinas
o giros inesperados.
Además, el uso del
LATCH garantizará
que el producto está
colocado en la posición
correcta con respecto a
los mejores puntos de
anclaje del vehículo.
vehículo. el botón para
y extraerlo del asiento del
soltar el asiento elevador
el ajustador central para
asiento elevador, empuje
4. Para desinstalar el
B
C
A
cuando no esté ocupado.
dejarlo instalado incluso
significa que es posible
al asiento del vehículo
con conectores LATCH
Instalar el asiento elevador
moviéndolo lateralmente.
asiento elevador está fijo
(c). Compruebe que el
elevador contra el asiento
(b) y empuje el asiento
Tire de la correa central
a los anclajes inferiores.
producto esté ajustado
clic audible cuando el
del vehículo. Se oirá un
a los anclajes inferiores
3. Conecte los conectores
Instalar el asiento elevador en el vehículo
Page 62

19
NO
NO
NO
NO
tiempo.
fuera de la carcasa al mismo
y tire de los conectores hacia
de la parte frontal del asiento
empuje el ajustador central
Para usar los conectores,
el lado trasero del asiento.
conectores se almacenan en
inferiores de su vehículo. Los
ser usados con los anclajes
conectores LATCH para
120 está equipado con
2.
Primo Viaggio HBB
reposacabezas.
vehículo equipado con
instalar en un asiento del
elevador se tiene que
la cabeza, este asiento
sostener adecuadamente
¡IMPORTANTE! Para
orientado hacia adelante.
vehículo seleccionado,
elevador en el asiento del
1. Apoye el asiento
Instalar el asiento elevador en el vehículo
Page 63

18
1. Apoye el asiento
elevador en el asiento del
vehículo seleccionado,
orientado hacia adelante.
¡IMPORTANTE! Para
sostener adecuadamente
la cabeza, este asiento
elevador se tiene que
instalar en un asiento del
vehículo equipado con
reposacabezas.
2.
120 está equipado con
conectores LATCH para
ser usados con los anclajes
inferiores de su vehículo. Los
conectores se almacenan en
el lado trasero del asiento.
Para usar los conectores,
empuje el ajustador central
de la parte frontal del asiento
y tire de los conectores hacia
fuera de la carcasa al mismo
tiempo.
su auto para obtener más información.
Para la seguridad de su hijo, siempre lea el manual de
NO
NO
giran en posiciones diferentes
2. Asientos orientados hacia atrás o asientos que
NO
NO
1. Asientos orientados hacia el lateral
siguientes tipos de asiento de auto:
ADVERTENCIA: No utilice Viaggio HBB 120 con los
Diseño y compatibilidad de la silla de auto
Page 64
17
en la puerta.
de seguridad instalados
motorizados. Cinturones
cadera de cualquier tipo.
2. Sólo cinturón de
seguridad de cadera/
1. Cinturones de
siguientes tipos de cinturones de seguridad:
ADVERTENCIA: no utilice Viaggio HBB 120 con los
COMPATIBLES
DISEÑOS DE CINTURONES DE SEGURIDAD NO
de seguridad del vehículo
Diseño y compatibilidad de los cinturones
Page 65

16
DISEÑOS DE CINTURONES DE SEGURIDAD NO
COMPATIBLES
ADVERTENCIA: no utilice Viaggio HBB 120 con los
siguientes tipos de cinturones de seguridad:
1. Cinturones de
seguridad de cadera/
motorizados. Cinturones
de seguridad instalados
en la puerta.
Peg Perego en el 1-800-671-1701 para obtener ayuda.
vehículo o llame al Servicio de atención al cliente de
caso de problemas o dudas, consulte el manual de su
HBB 120. Lea cuidadosamente la siguiente lista y en
adecuados para la instalación segura del Viaggio
de seguridad. Desafortunadamente, algunos no serán
Como resultado, existen muchos tipos de cinturones
tipos de vehículos fabricados en diferentes momentos.
vehículos. Sin embargo, en el mercado, existen varios
y hombro, como los instalados en la mayoría de los
con cinturones de seguridad del vehículo de cadera
El Viaggio HBB 120 está diseñado para ser instalado
de seguridad del vehículo
Diseño y compatibilidad de los cinturones
Page 66

15
abajo.
empuje el asiento hacia
de nuevo de la palanca y
la posición original, tire
3. Para devolver el pie a
Características del producto
Page 67

14
3. Para devolver el pie a
la posición original, tire
de nuevo de la palanca y
empuje el asiento hacia
abajo.
en la posición reclinada.
mismo tiempo. El pie saldrá
al asiento y eleve el asiento al
de la manija ubicada frente
Para hacerlo funcionar, tire
funciona con un muelle.
ángulo del asiento. El pie
movible para ajustar el
está equipado con un pie
2. El asiento elevador
detención repentina.
dañado en caso de giro o
ocupante podría resultar
bebidas. Su hijo u otro
en el soporte para
ponga líquidos calientes
PRECAUCIÓN: nunca
se detenga.
empuje la pieza hasta que
soporte, simplemente tire/
asiento. Para utilizar el
ubicados en el lateral del
para bebidas integrales
equipado con dos soportes
1. El producto está
Características del producto
Page 68

13
cerca de la ventana
que podría inclinarse
la cabeza de su hijo,
es muy importante que
de asiento de su hijo,
para elevar la superficie
Al haber sido diseñado
de impactos laterales.
en pruebas dinámicas
experiencia obtenida
diseñados con la
y respaldo han sido
alto. Su reposa cabezas
elevador de respaldo
Viaggio HBB 120 es un
NOTA IMPORTANTE:
A
máxima protección.
cabezas para ofrecer la
el respaldo y el reposa
el asiento elevador con
Recomendamos usar
en todo momento.
respaldo, esté protegida
en un elevador sin
de cristal del vehículo
está listo para su uso.
dibujo (b). El producto
como se muestra en el
girarlo entre los dos topes
respaldo estará libre para
que oiga un fuerte clic. El
posición elevada (a) hasta
clic. Gire el respaldo en la
rojos hasta que oiga un
plano, cierre los topes
4. Con el producto en
Montaje del producto antes de su uso
Page 69

12
4. Con el producto en
plano, cierre los topes
rojos hasta que oiga un
clic. Gire el respaldo en la
posición elevada (a) hasta
que oiga un fuerte clic. El
respaldo estará libre para
girarlo entre los dos topes
como se muestra en el
dibujo (b). El producto
está listo para su uso.
NOTA IMPORTANTE:
Viaggio HBB 120 es un
elevador de respaldo
alto. Su reposa cabezas
y respaldo han sido
diseñados con la
experiencia obtenida
en pruebas dinámicas
de impactos laterales.
Al haber sido diseñado
para elevar la superficie
de asiento de su hijo,
es muy importante que
la cabeza de su hijo,
que podría inclinarse
cerca de la ventana
en el dibujo.
asiento como se muestra
la carcasa alojada tras el
y deslice el respaldo en
la posición de apertura
3. Gire los topes rojos a
1-800-671-1701.
atención al cliente en el @
con nuestro Servicio de
que falten, contacte
2. Incorrectamente, o
Montaje del producto antes de su uso
Page 70

11
Manija de ajuste de reclinación
Soporte
para bebidas
Asiento
Reposa brazos
Encaminador
del cinturón de la cadera
Respaldo
Bolsillo para
el manual de
instrucciones
Encaminador
del cinturón
del respaldo
Manija del
reposa
cabezas
ajustable
Conectores
LATCH
Reposa cabezas
Correa LATCH
funcionen.
de que existan piezas que
cuidadosamente. En caso
siga las instrucciones
producto correctamente,
de fábrica. Para montar el
cabezas vienen montados
respaldo y el reposa
(b) y un asiento (c). El
cabezas (a) un respaldo
cuenta con un reposa
montaje. El producto
el producto antes de su
1. Compruebe siempre
Montaje del producto antes de su uso
Page 71

10
1. Compruebe siempre
el producto antes de su
montaje. El producto
cuenta con un reposa
cabezas (a) un respaldo
(b) y un asiento (c). El
respaldo y el reposa
cabezas vienen montados
de fábrica. Para montar el
producto correctamente,
siga las instrucciones
cuidadosamente. En caso
de que existan piezas que
funcionen.
LATCH
Conectores
ajustable
cabezas
reposa
Manija del
instrucciones
el manual de
Bolsillo para
Manija de ajuste de reclinación
Correa LATCH
Asiento
del cinturón de la cadera
Encaminador
Reposa brazos
Silla de auto
del respaldo
del cinturón
Encaminador
Reposa cabezas
para bebidas
Soporte
Respaldo
Page 72

9
obtener otro formulario.
al 1-800-671-1701 para
de atención al cliente
de registro, llame al Servicio
Si no estuviera el formulario
sello. Ya lo hemos abonado.
PegPerego. No necesita
complételo y envíelo a
Extraiga el formulario,
en la cubierta del producto.
un formulario de registro
muestra aquí). Se adjunta
ubicada en el asiento bajo la tapicería. (como se
de fabricación, etc, están impresos en una etiqueta
El número de modelo, nombre del modelo, fecha
www.NHTSA.gov
1-888-327-4236 (TTY: 1-800-424-9153) o vaya a ttp://
línea de seguridad en vehículos gubernamental al
Para obtener información sobre retiradas, llame a la
Wayne, IN 46808 Or call 1-800-671-1701 (gratuito).
Peg Perego U.S.A., Inc. 3625 Independence Drive Fort
modelo del dispositivo y la fecha de fabricación a:
llamen. Envíe su nombre, dirección y el número de
Debe registrar este dispositivo para permitir que le
pueden ser reclamados por motivos de seguridad.
¡Importante! Los dispositivos de retención de niños
Formulario de registro
Page 73

8
¡Importante! Los dispositivos de retención de niños
pueden ser reclamados por motivos de seguridad.
Debe registrar este dispositivo para permitir que le
llamen. Envíe su nombre, dirección y el número de
modelo del dispositivo y la fecha de fabricación a:
Peg Perego U.S.A., Inc. 3625 Independence Drive Fort
Wayne, IN 46808 Or call 1-800-671-1701 (gratuito).
Para obtener información sobre retiradas, llame a la
línea de seguridad en vehículos gubernamental al
1-888-327-4236 (TTY: 1-800-424-9153) o vaya a ttp://
www.NHTSA.gov
El número de modelo, nombre del modelo, fecha
de fabricación, etc, están impresos en una etiqueta
ubicada en el asiento bajo la tapicería. (como se
muestra aquí). Se adjunta
un formulario de registro
en la cubierta del producto.
Extraiga el formulario,
complételo y envíelo a
PegPerego. No necesita
sello. Ya lo hemos abonado.
Si no estuviera el formulario
de registro, llame al Servicio
de atención al cliente
al 1-800-671-1701 para
obtener otro formulario.
fecha de producción marcada en la silla.
• No utilice este dispositivo tras siete (7) años desde la
moverse causando daños a sus ocupantes.
interior del vehículo. En caso de accidente, podrían
• No deje objetos sueltos, bolsos o equipaje en el
cliente en el 1-800-671-1701 para obtener ayuda.
de daño o componentes defectuosos, llame al servicio al
en este manual; no intente reparar este producto. En caso
•
No intente extraer o añadir piezas a menos que se indique
o supercies blandas.
• No coloque este asiento de auto en encimeras, mesas
excesivos.
adecuado, lejos de la luz, la humedad, y el calor o frío
• Cuando no lo use, almacene el producto en un lugar
calentarse en exceso y quemar la piel del niño.
un periodo de tiempo prolongado. El asiento podría
• No deje el asiento bajo la luz solar directa durante
tumbar el asiento.
correas y causarse daños graves o podría mover o
siquiera por un momento. Podría enredarse con las
• No deje nunca a su hijo solo en el automóvil, ni
por tanto correcto.
que sea más fácil usar los cinturones de seguridad y
que no lleve chaquetas pesadas o mantas. Esto hará
• Cuando siente a su hijo en el asiento, asegúrese de
pulgadas (99 a 145 cm).
libras (18 a 54 kg) y cuya altura esté entre las 39 y 57
hacia adelante con niños que pesen entre 40 y 120
• Utilice el Viaggio HBB 120 en modo de orientación
Información de seguridad
Page 74

7
• Mantenga los dedos alejados de las piezas móviles.
caso de accidente.
que podría causar daños graves a otros ocupantes en
está ocupada. Esta silla de auto es un objeto pesado
• Asegure este asiento en el automóvil incluso si no
dañadas.
seguridad y no deben ser extraídas o gravemente
en el producto como piezas relacionadas con la
ubicada bajo las cubiertas tapizadas) están integradas
• Los componentes EPS (espuma suave y blanca
cubiertas no aprobadas u otros accesorios .
programa de certicación. No se recomienda el uso de
con este producto son parte del producto y del
Advertencia
Page 75

con este producto son parte del producto y del
programa de certicación. No se recomienda el uso de
cubiertas no aprobadas u otros accesorios .
• Los componentes EPS (espuma suave y blanca
ubicada bajo las cubiertas tapizadas) están integradas
en el producto como piezas relacionadas con la
seguridad y no deben ser extraídas o gravemente
dañadas.
• Asegure este asiento en el automóvil incluso si no
está ocupada. Esta silla de auto es un objeto pesado
que podría causar daños graves a otros ocupantes en
caso de accidente.
• Mantenga los dedos alejados de las piezas móviles.
6
• Las cubiertas del asiento y el acolchado proporcionado
reparaciones y piezas de repuesto.
1701 (gratuito) para obtener más información sobre
de atención al cliente de Peg Perego en el 1-800-671nuevo. Deberá adquirir una nueva. Llame al Servicio
en un accidente de auto, no será segura para usar de
caso de accidente: si la silla de auto está involucrada
proporcionado con el producto de inmediato. En
• Complete y envíe el formulario de registro
delante.
sujetos en posiciones orientadas hacia atrás que hacia
niños están más seguros cuando están adecuadamente
• De acuerdo con las estadísticas sobre accidentes, los
adicional.
el manual de su vehículo para obtener información
seguridad instalados en las puertas o motorizados. Lea
hacia atrás. No lo utilice en coches con cinturones de
la utilice en asientos orientados hacia los lados o
hacia adelante, equipado con reposacabezas. Nunca
instalado sólo en asientos de vehículos orientados
• Este asiento elevador está diseñado para ser
instalación y comprobar el manual de su vehículo.
dedicada de este manual para ver los detalles de
(LATCH) para mayor estabilidad. Consulte la sección
mediante un sistema de anclaje inferior universal
Advertencia
Page 76

5
• El Viaggio HBB 120 puede jarse a su vehículo
para obtener más detalles.
producto. Consulte la sección dedicada en este manual
de seguridad están aprobados para su uso con este
• No todos los modelos disponibles de cinturones
sólo están equipados con cinturones de cadera.
uso en aeronaves, ya que los asientos de una aeronave
dispositivo de sujeción NO está certicado para su
Vehículos a Motor para su uso en vehículos. Este
213 requisitos de la Norma Federal de Seguridad de
• Este asiento elevador cumple o supera todos los
holguras.
niño, asegurándose de que el cinturón está plano, sin
cinturón, cómodamente, alrededor del cuerpo del
sujete al niño en este asiento elevador. Ajuste el
seguridad de cadera y hombro del vehículo cuando
• Utilice solamente el sistema de cinturones de
las instrucciones y las etiquetas de aviso correctamente.
• Su hijo podría resultar seriamente dañado si no sigue
respaldo para futuras referencias.
instrucciones. Guarde el manual de instrucciones en
evitar daños serios a su hijo, siga cuidadosamente las
de este manual y en las etiquetas del producto. Para
haya leído y comprendido todas las instrucciones
• No instale o utilice este asiento elevador hasta que
Advertencia
Page 77

4
• No instale o utilice este asiento elevador hasta que
haya leído y comprendido todas las instrucciones
de este manual y en las etiquetas del producto. Para
evitar daños serios a su hijo, siga cuidadosamente las
instrucciones. Guarde el manual de instrucciones en
respaldo para futuras referencias.
• Su hijo podría resultar seriamente dañado si no sigue
las instrucciones y las etiquetas de aviso correctamente.
• Utilice solamente el sistema de cinturones de
seguridad de cadera y hombro del vehículo cuando
sujete al niño en este asiento elevador. Ajuste el
cinturón, cómodamente, alrededor del cuerpo del
niño, asegurándose de que el cinturón está plano, sin
holguras.
• Este asiento elevador cumple o supera todos los
213 requisitos de la Norma Federal de Seguridad de
Vehículos a Motor para su uso en vehículos. Este
dispositivo de sujeción NO está certicado para su
uso en aeronaves, ya que los asientos de una aeronave
sólo están equipados con cinturones de cadera.
• No todos los modelos disponibles de cinturones
de seguridad están aprobados para su uso con este
producto. Consulte la sección dedicada en este manual
para obtener más detalles.
• El Viaggio HBB 120 puede jarse a su vehículo
seguros y felices con su familia y sus hijos.
Viaggio HBB 120, está listo para disfrutar de viajes
para obtener ayuda. Ahora que conoce su nuevo
Servicio al cliente de Peg Perego en el 1-800-671-1701
producto, o viera partes rotas, no dude en llamar al
Si observara algún fallo, tras familiarizarse con el
manual si fuera necesario.
a su hijo y use esta silla podrá buscar ayuda en este
Esto le garantizará que cualquier persona que cuide
leído este manual, guárdelo en el respaldo.
pruebas antes de usarlo con su hijo. Una vez que haya
Introducción
Page 78

3
vehículo tomándose el tiempo necesario y haciendo
punto y comprendiéndolo. Instale el producto en su
al mismo tiempo el producto, comprobando cada
adecuada. Lea este manual atentamente, observando
los diferentes usos posibles y la forma de instalación
explorar el producto, conociendo sus características,
hijo a bordo y, además, tomándose su tiempo para
conduciendo cuidadosamente cuando lleva a su
necesita usar este asiento de forma responsable,
tráco caótico de las ciudades. Esto signica que
a alta velocidad en autopistas o lentamente en el
se usa con un niño dentro de un vehículo, viajando
cualquier otro asiento elevador, el Viaggio HBB 120
primera calidad de proveedores certicados. Como
de calidad certicados y usando materiales de
en una planta de Peg Perego bajo procedimientos
Su Viaggio HBB 120 ha sido fabricado y montado
investigación y desarrollo de Peg Perego.
equipo de ingenieros expertos del departamento de
Viaggio HBB 120 ha sido diseñado y certicado por un
Al igual que cualquier otro producto Peg Perego, su
Viaggio HBB 120.
Gracias por elegir el asiento elevador Peg Perego
Introducción
Page 79

Gracias por elegir el asiento elevador Peg Perego
Viaggio HBB 120.
Al igual que cualquier otro producto Peg Perego, su
Viaggio HBB 120 ha sido diseñado y certicado por un
equipo de ingenieros expertos del departamento de
investigación y desarrollo de Peg Perego.
Su Viaggio HBB 120 ha sido fabricado y montado
en una planta de Peg Perego bajo procedimientos
de calidad certicados y usando materiales de
primera calidad de proveedores certicados. Como
cualquier otro asiento elevador, el Viaggio HBB 120
se usa con un niño dentro de un vehículo, viajando
a alta velocidad en autopistas o lentamente en el
tráco caótico de las ciudades. Esto signica que
necesita usar este asiento de forma responsable,
conduciendo cuidadosamente cuando lleva a su
hijo a bordo y, además, tomándose su tiempo para
explorar el producto, conociendo sus características,
los diferentes usos posibles y la forma de instalación
adecuada. Lea este manual atentamente, observando
al mismo tiempo el producto, comprobando cada
punto y comprendiéndolo. Instale el producto en su
vehículo tomándose el tiempo necesario y haciendo
2
© 2012 Peg Perego. Todos los derechos reservados.
Piezas de repuesto........................................................39
Limpieza y mantenimiento ......................................32
Usar el Viaggio HBB 120 sin respaldo...............28
Ajuste del ángulo del respaldo...............27
Ajuste de la altura del reposa cabezas.............26
Asegurar a su hijo en el asiento elevador....... 23
Instalar el asiento elevador en el vehículo.......19
Diseño y compatibilidad de la silla de auto...18
de seguridad del vehículo.................................16
Diseño y compatibilidad de los cinturones
Características del producto..................................14
Montaje del producto antes de su uso.............11
Silla de auto .....................................................................10
Formulario de registro...............................................9
Información de seguridad .............................................8
Advertencia .................................................................5
Introducción ......................................................................3
Tablade contenidos
Page 80

(99 – 145 cm)
39 - 57 pulgadas
Límites de altura:
(18 – 54 kg)
40 – 120 libras
Límites de peso:
n para futuras consultas.
en el bolsillo dedicado a tal
el manual de instrucciones
detenidamente. Conserve
siga las instrucciones
daños serios a su hijo
y las etiquetas. Para evitar
instrucciones de este manual
y comprendido todas las
elevador hasta que haya leído
• No instale o utilice este
ADVERTENCIA:
FIUS1205I145
USA
ES Instrucciones de uso
 Loading...