

Page 1
FI990601I44
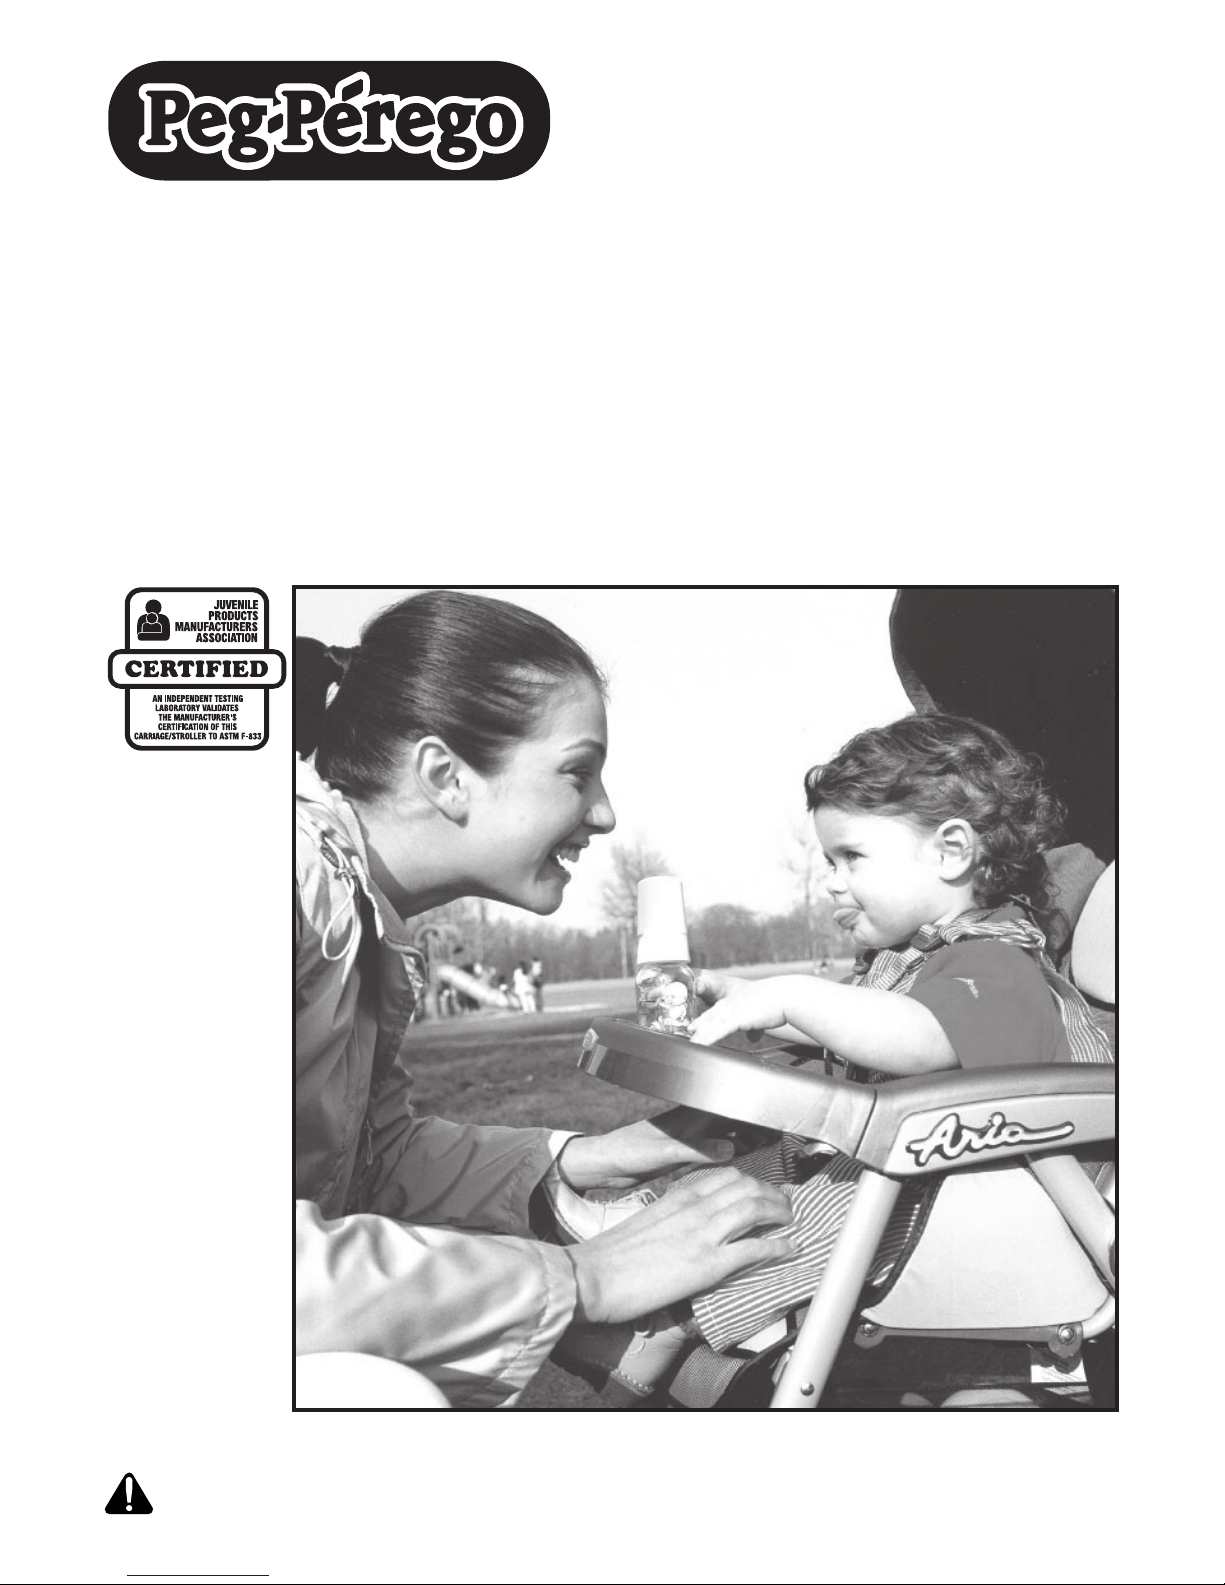
Aria
Istruzioni dʼuso IT
Instructions for use EN
Notice dʼemploi FR
Gebrauchsanleitung DE
Instrucciones de uso ES
Instruções para uso PT
Gebruiksaanwijzing NL
Használati útmutató HU
Navodila za uporab SL
Инструкции по пользованию RU
Kullanim klavuzu TR
ΟΔΗΓΙΕΣ ΧΡΗΣΕΩΣ EL
AVOID SERIOUS INJURY FROM FALLING OR SLIDING
OUT. ALWAYS USE COMPLETE 5 POINT SEAT BELT.
WARNING:
Page 2
A
A
1 2
3 4
65
Page 3
11
87
109
A
B
12
Page 4
18
15 16
13 14
17
Page 5
19 20
21 22
23 24
Page 6
27 28
26
3029
A
B
25
Page 7
Ganciomatic
System
GM
32
Ganciomatic
System
GM
33 Aria + Primo Viaggio
Ganciomatic
System
GM
31
35 Accessory
34 Accessory
Page 8

Aria
MT
1
2
3
4
5
6
7
8
9
10
11
12
13
14
15
16
17
18
19
20
21
22
23
24
25
26
27
28
29
30
31
32
33
34
35
36
37
Page 9
Aria
MT
1 SPST5476•
2 SPST5119GRS
3 SPST5120•
4 IRTR0011GR
5 SPST5149•
6 ARPI0278GR
7 ASPI0049•
8 ARPI0325•
9 SPST5474•
10 SPST5475GL
11 ARPI0289•
12 SPST5110J•
13 SPST5173GR
14 SPST5402•
15 BSAALB•
16 BCAALB•
17 MUCI5P14•
18 ARPI0288•
19 ASPI0028
20 SPST5113•
21 SAPI5115•
22 SONF0025•
23 SPST5117KGR
24 SPST5236XGL
25 SPST5111GR
26 IKTR0006•
27 ARPI0290L65•
28 SPST5198•
29 ARPI0227L65•
30 SPST5101•
31 SPST5112•
32 SAPI5099•
33 SAPI5095K•
34 SAPI5160GRN
35 SPST4774•
36 SPST5096GL
37 IRSHAA00•
• IMPORTANTE: leggere attentamente le
istruzioni prima dellʼuso e conservarle per
riutilizzarle in futuro.
• Peg Perego potrà apportare in qualunque
momento modifi che ai modelli descritti in
questa pubblicazione, per ragioni di natura
tecnica o commerciale.
Peg Perego S.p.A. è certifi cata ISO
9001.
La certifi cazione off re ai clienti e
ai consumatori la garanzia di una
trasparenza e fi ducia nel modo di
lavorare dell'impresa.
SERVIZIO ASSISTENZA
Se fortuitamente parti del modello vengono
perse o danneggiate, usare solo pezzi di
ricambio originali Peg Perego. Per eventuali
riparazioni, sostituzioni, informazioni sui
prodotti, la vendita di ricambi originali e
accessori, contatta il Servizio Assistenza PegPerego:
EUROPA: tel.: 0039-039-60.88.213
fax: 0039-039-33.09.992
e-mail: assistenza@pegperego.it,
USA: tel.: 800.671.1701
fax: 260.471.6332
Call us toll free: 1.800.671.1701
CANADA: tel.: 905.839.3371
fax: 905.839.9542
Call us toll free: 1.800.661.5050
www.pegperego.com
La Peg Perego è a disposizione dei suoi
Consumatori per soddisfare al meglio ogni
loro esigenza. Per questo, conoscere il parere
dei ns. Clienti, è per noi estremamente
importante e prezioso. Le saremo quindi
molto grati se, dopo aver utilizzato un ns.
prodotto, vorrà compilare il QUESTIONARIO
SODDISFAZIONE CONSUMATORE che troverà
in internet al seguente indirizzo: “www.
pegperego.com/SSCo.html.it”,
segnalando eventuali osservazioni o
suggerimenti.
ISTRUZIONI DʼUSO
APERTURA
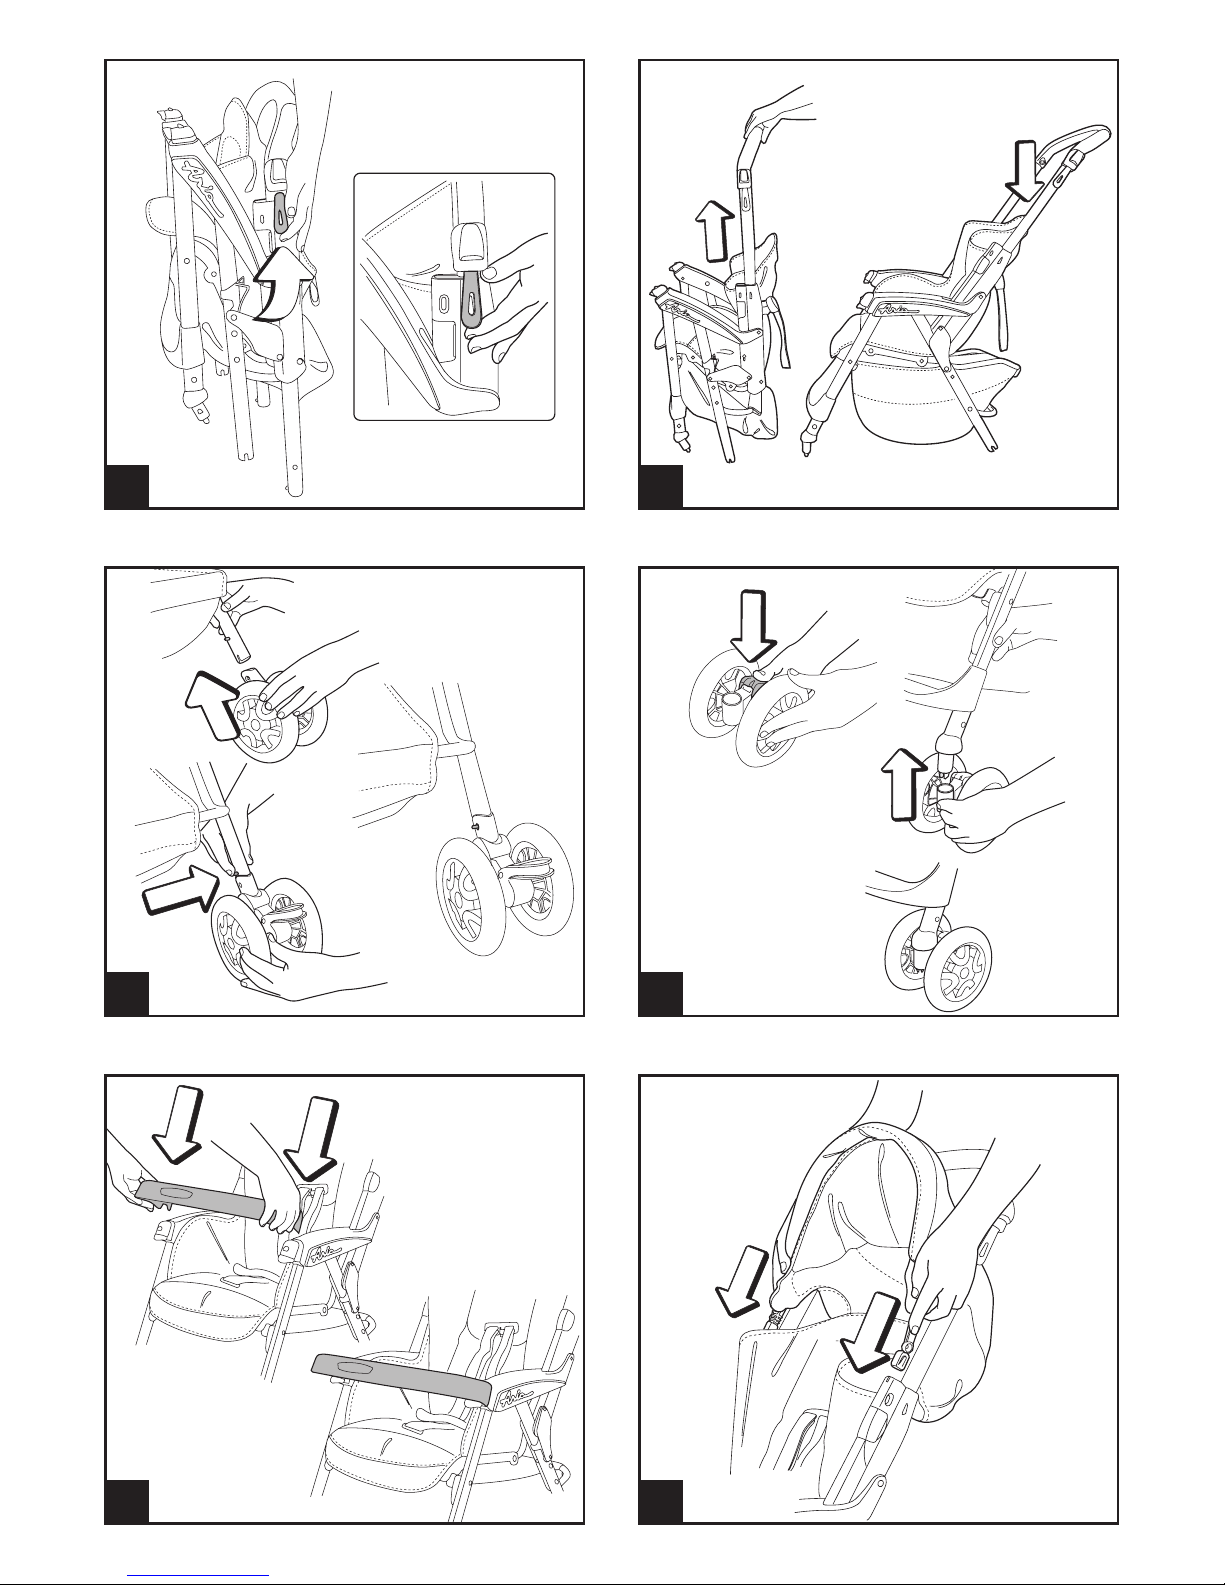
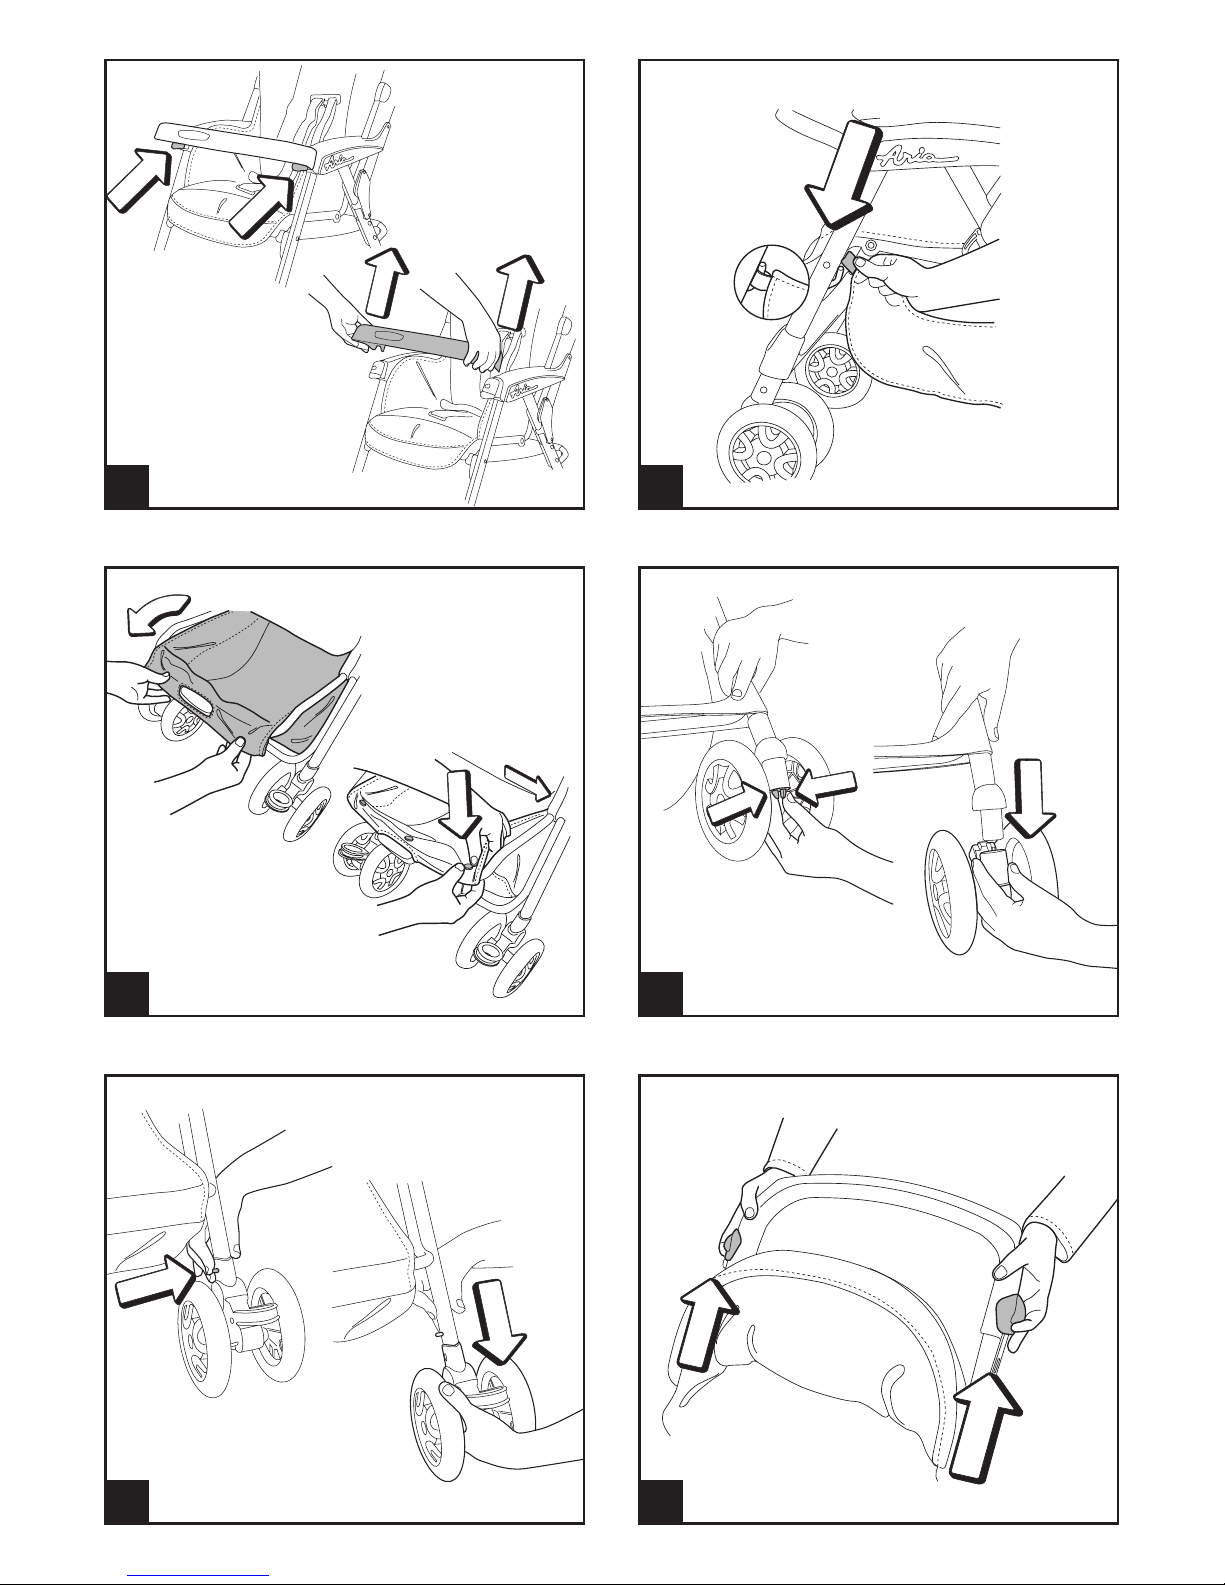
1• Per aprire il passeggino, sganciare
contemporaneamente i due attacchi come
in figura.
2• Alzare con decisione il manubrio verso
lʼalto e successivamente spingerlo verso il
IT•ITALIANO
IT• Ricambi disponibili in piú colori da speci-
ficare nella richiesta.
EN• Spare parts available in different colours
to be specified when ordering.
FR• Pièces de rechange disponibles en
plusieurs couleurs à spécifier dans la
demande.
DE• Ersatzteile in mehr Farben vorhanden, die
in der Anfrage spezifiziert werden müssen.
ES• Repuestos disponibles en otros colores
que se especificarán en el pedido.
PT• Peças de reposição disponíveis em cores
alternativas a serem especificadas no
pedido.
NL• Reserveonderdelen verkrijgbaar in meer-
dere kleuren, bij bestelling te specificeren.
HU• A tartalék alkatrészek különböző színek-
ben elérhetők, melyeket rendeléskor kell
kiválasztani.
SL• Rezervni deli so na voljo v več barvah, ki
jih je treba navesti pri naročilu.
RU• Запчасти имеются различных цветов,
необходимый указать в запросе.
TR• Siparişte belirtilen değişik renklerdeki
yedek parçalari mevcuttur.
EL• Ανταλλακτικά διαθέσιμα σε διάψορα
χρώματα. Προσδιορίστε όταν
παραγγείλετε.
Page 10
REGOLAZIONE SCHIENALE
15• Per reclinare lo schienale abbassare
il pulsante del regola-schienale
e contemporaneamente spingere
qustʼultimo in giù.
16• Per alzare lo schienale spingere in sù il
regola-schienale come in fi gura.
RUOTE PIROETTANTI
17• Per rendere le ruote anteriori piroettanti,
occorre abbassare la leva, come in figura.
Per renderle fisse, alzare la leva.
FRONTALINO-VASSOIO
18• É possibile aprire il frontalino-vassoio
solo da un lato per facilitare lʼentrata
e lʼuscita del bambino quando è più
grande. Per aprire, premere con una
mano il pulsante e contemporaneamente
con l'altra mano ruotare il frontalino
verso l'alto.
19• Per togliere il frontalino-vassoio,
premere i due pulsanti come in figura e
contemporaneamente, tirare verso l'alto.
Non appoggiare sul frontalino-vassoio
bevande bollenti perchè potrebbe essere
pericoloso.
SOSTITUZIONE CESTELLO
20• Nel caso si dovesse sostituire il cestello,
per montare il cestello, agganciarlo
anteriormente ai gancini come in figura.
21• Agganciarlo posteriormente, chiudendo i
bottoni come in figura.
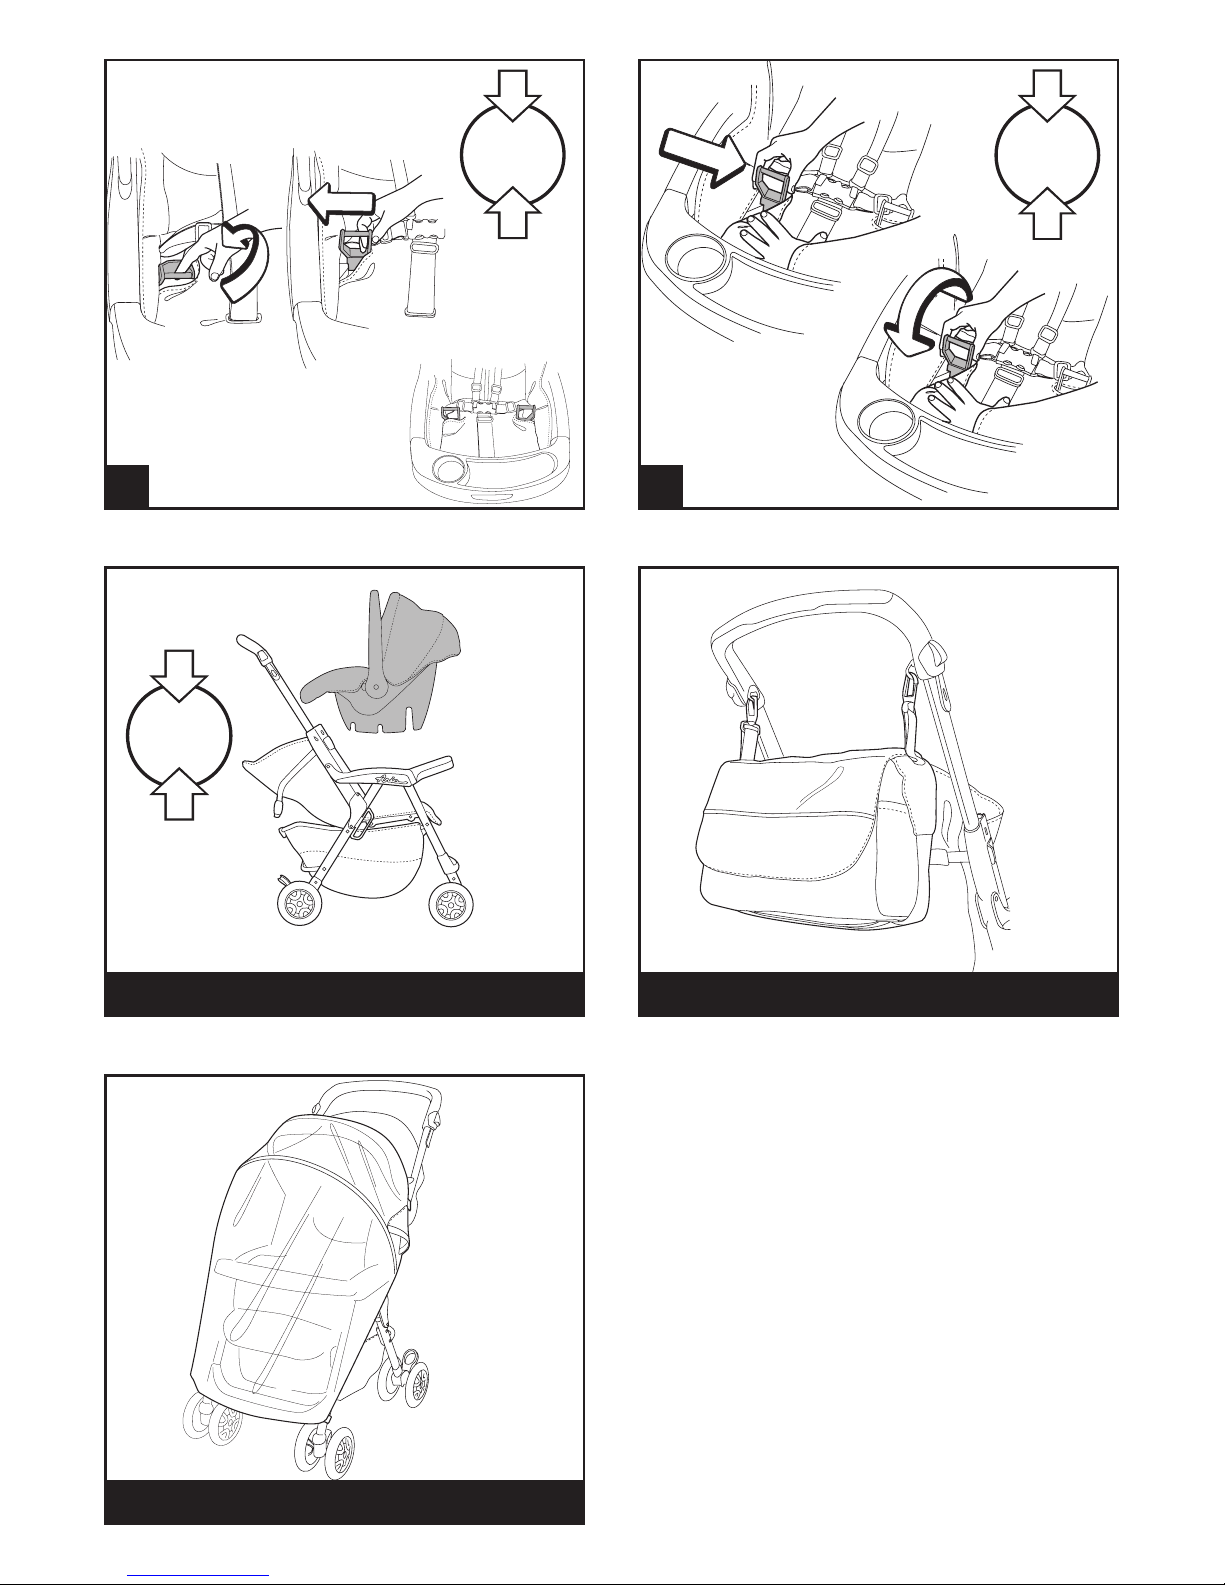
ESTRAZIONE RUOTE
Le ruote del passeggino sono estraibili.
22• Per togliere le ruote anteriori, occorre
rendere le ruote piroettanti, premere le
levette e contemporaneamente spingere
la ruota fino a toglierla come in figura.
23• Per togliere le ruote posteriori, premere
il pulsantino e contemporaneamente
spingere la ruota verso il basso fino a
toglierla come in figura.
CHIUSURA
Prima di chiudere il passeggino, se
é applicata la capottina, allentare i
compassi.
24• Per chiudere il passeggino, alzare i
pulsanti posti ai lati del manubrio e
ruotare il manubrio in avanti fino al click.
25• Successivamente spingere lo schienale
e la capottina verso il passeggino e
abbassare il manubrio fino a farlo
rientrare nella sua sede. Verificare la
corretta chiusura del passeggino dal
gancio di sicurezza. Il passeggino chiuso
rimane in piedi da solo.
TRASPORTO
26• È possibile trasportare comodamente il
passeggino, quando è chiuso grazie alla
maniglia.
basso fino allo scatto finale.
ASSEMBLAGGIO PASSEGGINO
3• Attenzione, montare le due ruote
con il freno nella parte posteriore
del passeggino. Inserire la ruota,
premere il pulsante A fino in fondo
e contemporaneamente spingere
ulteriormente la ruota fino allo scatto
dʼaggancio.
4• Per inserire le ruote anteriori, abbassare
la leva A e successivamente infilare la
ruota fino al click.
5• Agganciare il frontalino come in figura.
CAPOTTINA
6• Per applicare la capottina, inserire gli
attacchi nelle apposite sedi.
7• Abbottonare la capottina sul retro dello
schienale. Abbassare i compassi come in
figura.
8• Per togliere la capottina premere i
pulsanti laterali e contemporaneamente
sfilare la capottina verso lʼalto come in
figura.
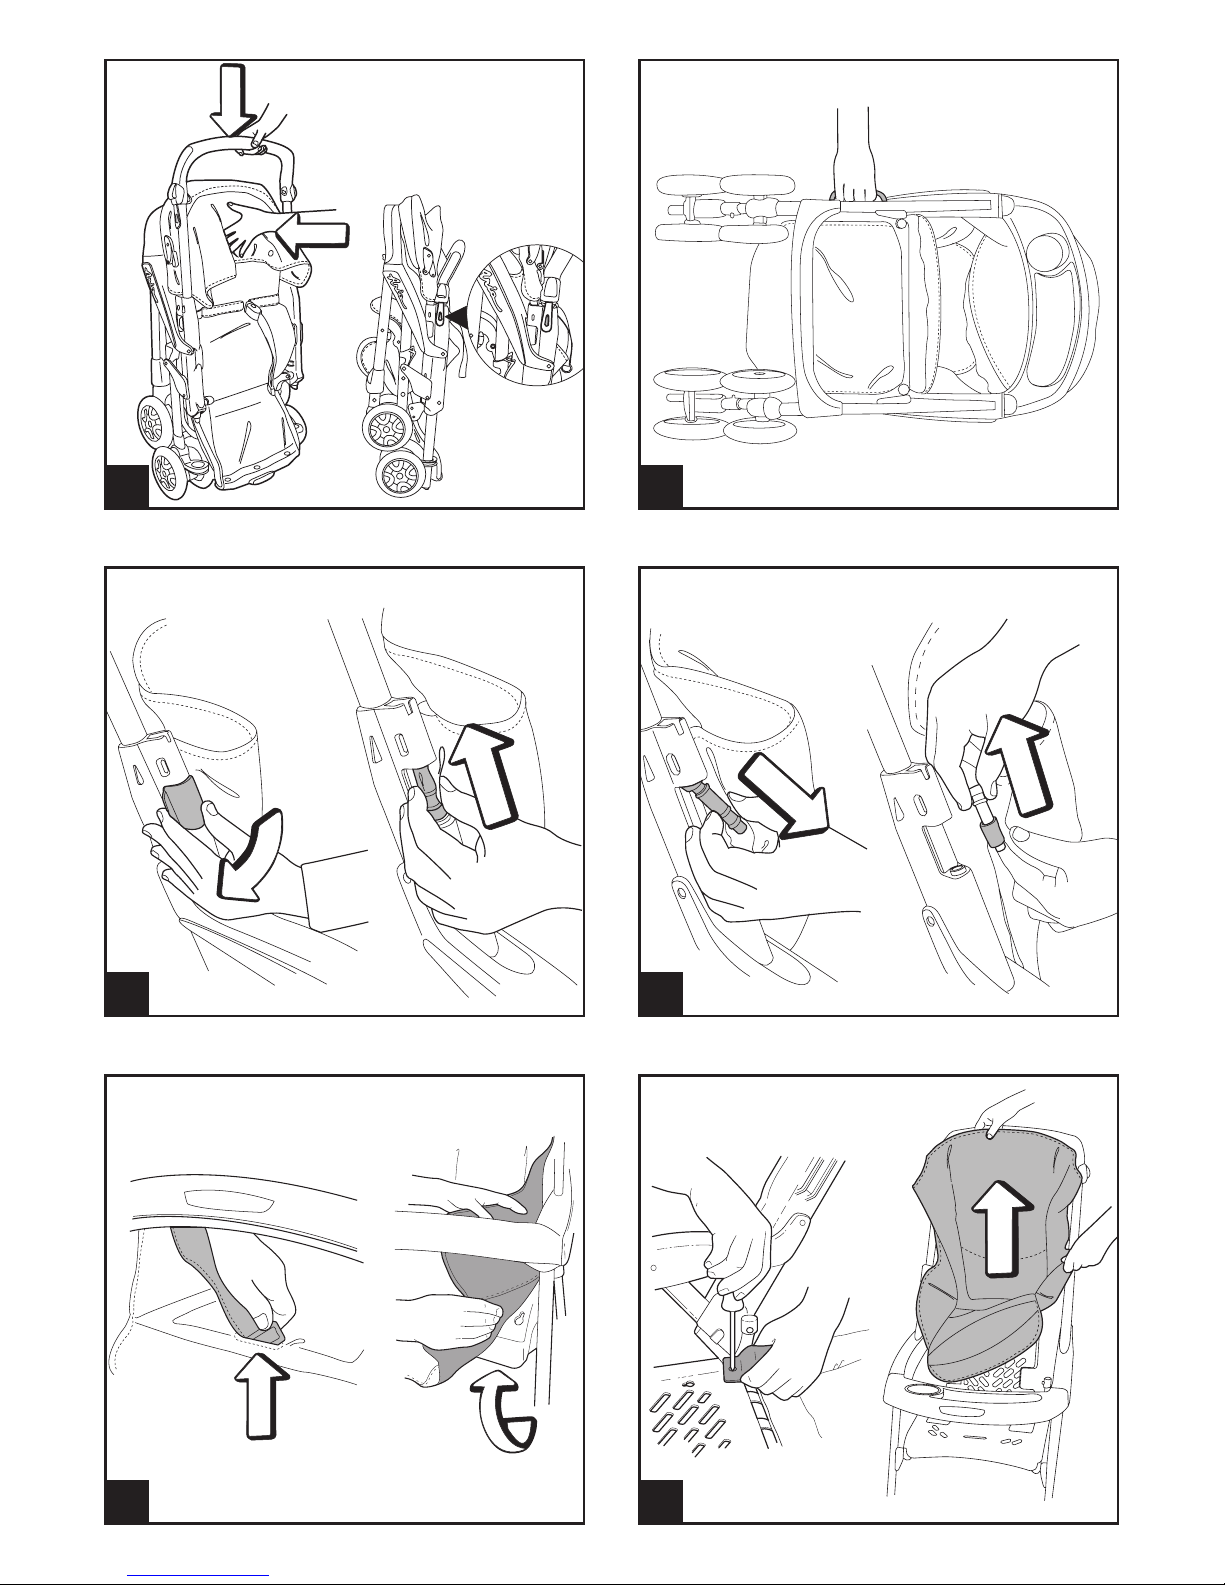
PORTABIBITE
Il portabibite é applicabile al maniglione
solo nel lato destro.
9• Per applicare il portabibite al maniglione,
allargare la fascetta e fissarla come in
figura. Infilare il portabibite nella fascetta
fino al click.
10• Inserire come in figura i due tappi,
facendo attenzione agli incastri. Con
due monete ruotare i tappi per fissare il
portabibite come in figura.
Si consiglia di non inserire nel portabibite
bevande calde e con un peso superiore a
0,5 Kg (1 lbs).
FRENO
11• Per frenare il passeggino, abbassare
col piede le leve posizionate sulle ruote
posteriori. Per sbloccare i freni, alzare le
leve. Da fermi, azionare sempre il freno.
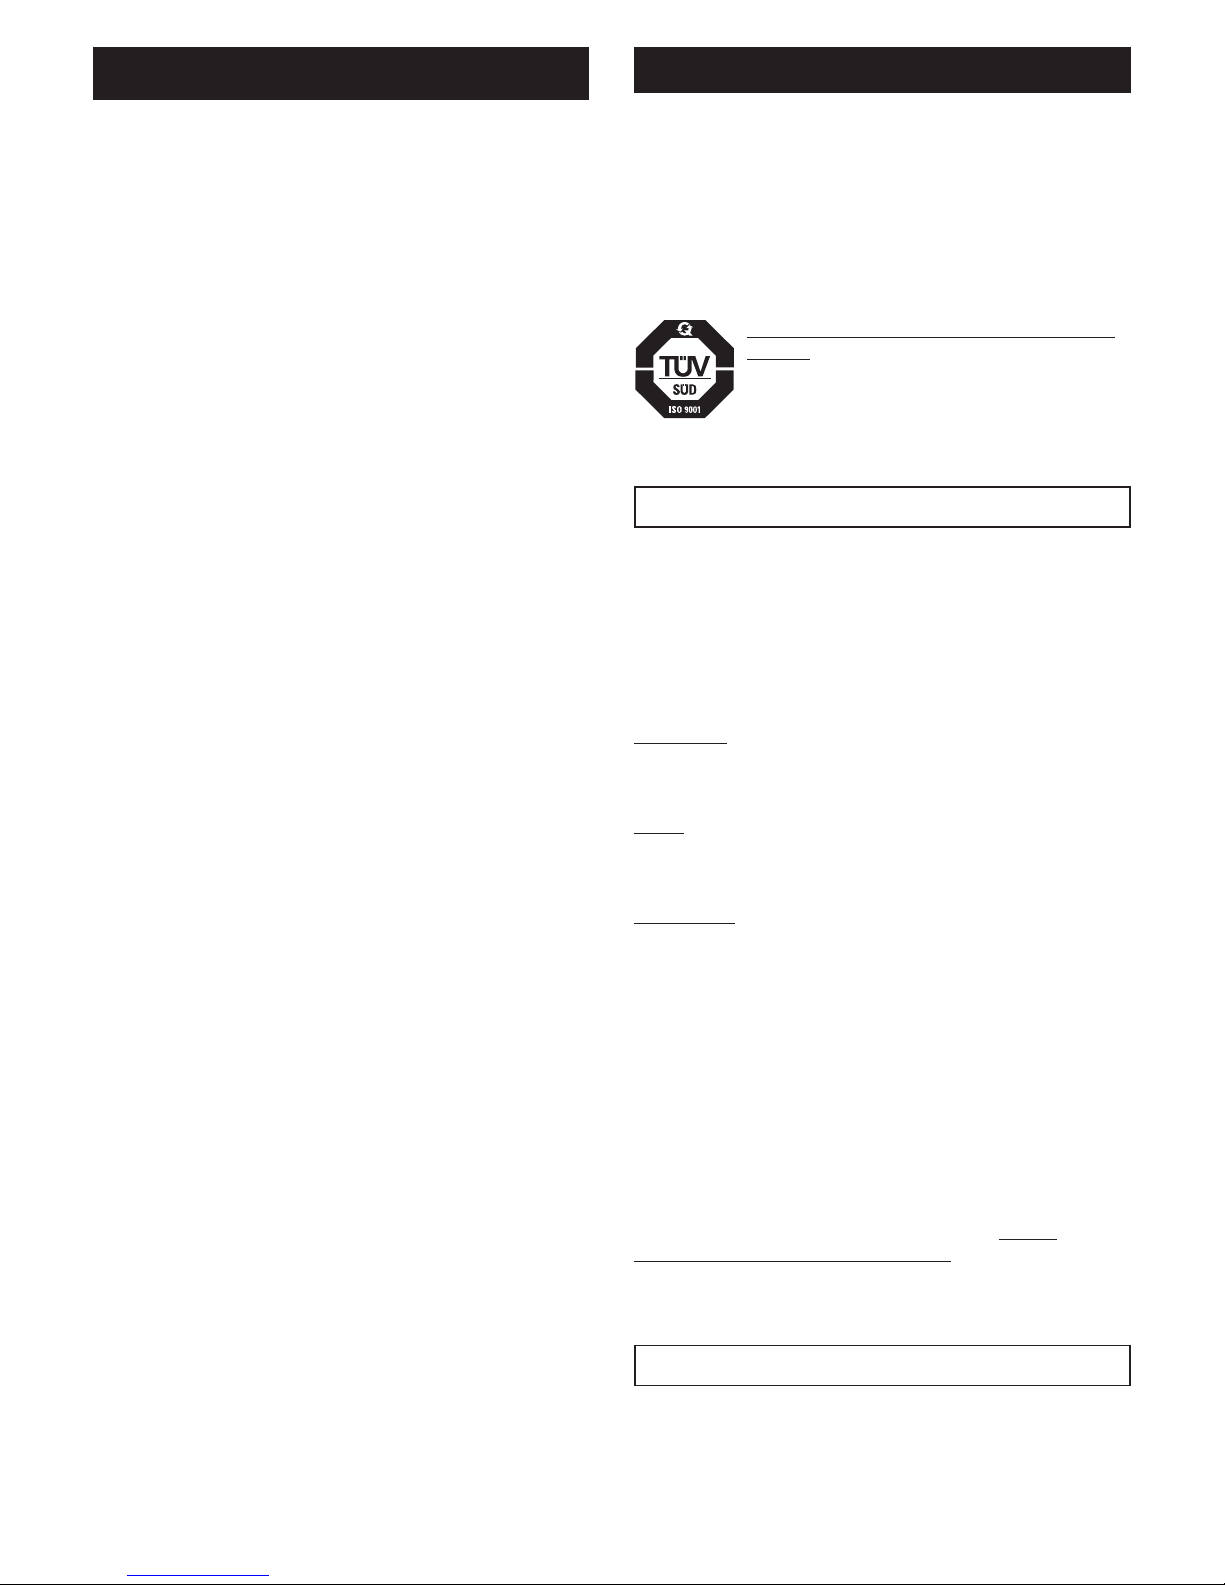
CINTURA DI SICUREZZA
12• A: Assicurarsi che la bretella sia
correttamente inserita spingendo come
in figura. B: Agganciare la cintura agendo
come in figura.
13• Per sganciare la cintura, premere ai lati
della fibbia e contemporaneamente tirare
verso lʼesterno, il cinturino girovita.
14• La nuova cintura di sicurezza da oggi, é
più facile da indossare grazie al sistema
“attacca e stacca”. Infatti prima di
agganciare la cintura, attacca la fibbietta
allo schienale inserendo la linguetta
nellʼapposito passante come in figura;
poi quando hai agganciato la cintura al
tuo bambino staccala dallo schienale
per lasciare il tuo bambino più libero
di muoversi. La fibbietta deve rimanere
sotto le spalle del bambino.
Page 11
garantendo la totale protezione.
PULIZIA E MANUTENZIONE
Il vostro prodotto necessita un minimo di
manutenzione. Le operazioni di pulizia e
manutenzione devono essere effettuate solo
da adulti.
• Si raccomanda di tenere pulite tutte le parti
in movimento e se occorre, lubrificarle con
olio leggero.
• Asciugare le parti in metallo del prodotto
per prevenire la ruggine.
• Periodicamente pulire le parti in plastica
con un panno umido, non usare solventi o
altri prodotti simili.
• Spazzolare le parti in tessuto per
allontanare la polvere.
• Tenere pulite le ruote da polvere e sabbia.
• Proteggere il prodotto da agenti
atmosferici, acqua, pioggia o neve;
lʼesposizione continua e prolungata al sole
potrebbe causare cambiamenti di colore in
molti materiali.
• Conservare il prodotto in un posto asciutto.
• Per il lavaggio della sacca, seguire le
suguenti indicazioni.
SICUREZZA
ATTENZIONE
• QUESTO PRODOTTO È STATO
CONCEPITO PER BAMBINI CON
UN PESO MASSIMO DI 20 KG E
UNʼALTEZZA MASSIMA DI 110 CM.
IL CESTINO È STATO REALIZZATO
PER SOPPORTARE UN PESO
MASSIMO DI 5 KG. EVENTUALI
PORTABIBITE FORNITI CON QUESTA
UNITÀ SONO CONCEPITI PER
SOPPORTARE UN PESO MASSIMO
SPECIFICATO SUL PORTABIBITE
STESSO. QUALSIASI BORSA O
TASCA FORNITE INSIEME AL
PRODOTTO SONO REALIZZATE PER
SOPPORTARE UN PESO MASSIMO DI
0,2 KG.
• UTILIZZATE SEMPRE LE CINTURE DI
SICUREZZA A 5 PUNTI.
• NON LASCIATE MAI INCUSTODITO
IL VOSTRO BAMBINO.
• POTREBBE ESSERE PERICOLOSO
UTILIZZARE ACCESSORI CHE
NON SIANO APPROVATI DAL
SFODERABILITA
27• Per sfoderare il passeggino, togliere il
coperchietto posto lateralmente facendo
leva. Spingere verso lʼalto il perno e
28• successivamente spingerlo verso
lʼesterno. Sfilare poi il perno dallʼasola
della sacca. Procedere su entrambi i lati.
29• Per sganciare la sacca dalla seduta,
estrarre lo spartigambe agendo da sotto e
sbottonarla come in figura.
30• Svitare il cinturino da entrambi i lati e
sfilare la sacca.
GANCIOMATIC SYSTEM
Il Ganciomatic System è il sistema pratico
e veloce che permette di agganciare al
passeggino, grazie agli attacchi Ganciomatic,
il seggiolino auto Primo Viaggio, anchʼesso
dotato di Ganciomatic System acquistabile
separatamente.
ATTACCHI GANCIOMATIC DEL
PASSEGGINO
31• Per alzare gli attacchi Ganciomatic del
passeggino, sollevare la sacca negli
angoli della seduta e alzare i due attacchi
che automaticamente si sposteranno
verso lʼesterno.
32• Per abbassare gli attacchi Ganciomatic
del passeggino, spingere prima gli
attacchi verso lʼinterno e successivamente
abbassarli come in figura.
PASSEGGINO + SEGGIOLINO AUTO
33• Per agganciare il seggiolino auto al
passeggino, occorre:
- frenare il passeggino,
- togliere la capottina del passeggino,
- abbassare completamente lo schienale
del passeggino,
- alzare gli attacchi Ganciomatic del
passeggino.
- Posizionare il seggiolino auto verso la
mamma e spingerlo verso il basso fino al
click.
- Si raccomanda di non rimuovere il
frontalino dal passeggino, quando si
aggancia il seggiolino auto.
• Per sganciare il seggiolino auto dal
passeggino consultare il suo manuale
istruzioni.
LINEA ACCESSORI
34• Borsa Cambio: Borsa con materassino
per il cambio del bebè, agganciabile al
passeggino.
35• Parapioggia: Parapioggia in PVC
trasparente con elastico, applicabile alla
capottina del passeggino Aria. Questo
parapioggia è stato studiato anche nel
caso che sul passeggino ci sia agganciato
il seggiolino auto Primo Viaggio,
Page 12
• IMPORTANT: read the instructions carefully
before use. Save the instructions for future
reference.
• PEG PEREGO reserves the right to make any
necessary changes or improvements to the
products shown at any time without notice.
Peg Perego S.p.A. is an ISO 9001
certifi ed company.
The fact that we are certifi ed
provides a guarantee of our
honesty for our customers, and
fosters trust in the companyʼs way
of working.
CUSTOMER SERVICE
If parts of the model are accidentally lost or
damaged, use only original Peg Perego spare
parts. Contact the Peg Perego Customer
Service for all repair work, replacements,
information about products, and sale of
original spare parts and accessories, at the
following:
EUROPA: tel.: 0039-039-60.88.213
fax: 0039-039-33.09.992
e-mail: assistenza@pegperego.it,
USA: tel.: 800.671.1701
fax: 260.471.6332
Call us toll free: 1.800.671.1701
CANADA: tel.: 905.839.3371
fax: 905.839.9542
Call us toll free: 1.800.661.5050
www.pegperego.com
Peg Perego is at the consumer's service,
meeting every need in the best way possible.
This is why our customers' opinions are so
important and valuable to us. We would be
very grateful if you would kindly fill in the
CUSTOMER SATISFACTION QUESTIONNAIRE
after using one of our products. You will find
the questionnaire on the Internet at "www.
pegperego.com/SSCo.html.en-UK".
Please note any observations or suggestions
you may have on the questionnaire.
INSTRUCTIONS FOR USE
OPENING THE STROLLER
1• To open the stroller, simultaneously
unhook the two catches as shown in the
figure.
2• Firmly lift the handlebar upwards, then
push downwards until it clicks into place.
EN•ENGLISH
COSTRUTTORE.
• EVITARE DI INTRODURRE LE DITA
NEI MECCANISMI.
• LE OPERAZIONI DI MONTAGGIO
DEVONO ESSERE EFFETTUATE DA
ADULTI.
• NON UTILIZZATE IL PRODOTTO
SE PRESENTA ROTTURE O PEZZI
MANCANTI.
• DA FERMI METTERE SEMPRE I FRENI.
• NON UTILIZZATE IL PRODOTTO IN
VICINANZA DI SCALE O GRADINI.
• SI RACCOMANDA DI NON ALZARE
IL PASSEGGINO IMPUGNANDOLO
DAL FRONTALINO PERCHÈ
QUESTO NON É PROGETTATO
PER SOPPORTARE CARICHI. IN
CASO DI NECESSITÀ SOLLEVARE
IL PASSEGGINO AFFERRANDOLO
SOTTO I BRACCIOLI.
• VERIFICARE IL CORRETTO
AGGANCIO DEL SEGGIOLINO AUTO
SUL PASSEGGINO.
NORME DI SICUREZZA
Per agganciare la cintura di sicurezza
infilare le bretelline e inserire le due
estremità del cinturino girovita nella
fibbia. Assicurarsi sempre di aver
effetuato lo scatto di chiusura.
Per sganciare la cintura di sicurezza
premere ai lati della fibbia e
contemporaneamente tirare verso
lʼesterno il cinturino girovita.
Pacchi e/o accessori possono
rendere instabile il prodotto.
Raccomandiamo di non caricare il
cestello con più di 5 kg.
Fate attenzione al rischio
rappresentato dal fuoco e da altre
significative fonti di calore quali
radiatori elettrici, stufe a gas ecc.
nelle immediate vicinanze del
prodotto.
Assicurarsi sempre che il seggiolino
auto, sia ben agganciato ai ganci del
passeggino.
Page 13

STROLLER ASSEMBLY
3• Take care to mount the two wheels fitted
with brakes on the rear of the stroller. Fit
the wheel, push button A while pushing
the wheel further until you hear the final
click: the wheel is securely fastened.
4• To mount the front wheels, push down
lever A, then slide on the wheel till it
clicks.
5• Attach the front bar as shown in the
fi gure.
HOOD
6• To attach the hood, insert the tabs into
the special notches.
7• Fasten the hood to the back of the
backrest, and press down on the side
braces as shown in the figure.
8• To remove the hood, press the side
buttons while lifting the hood off, as
shown in the figure.
DRINK-HOLDER
The drink-holder attaches to the right
side of the handlebar only.
9• To attach the drink-holder to the
handlebar, open the band and fasten it as
shown in the figure. Slip the drink-holder
into the band, and click into place.
10• Insert the two caps, as shown in the
figure, taking care to line them up
correctly. Use two coins to turn the caps
that fasten the drink-holders, as shown
in the figure.
Do not place hot drinks in the drink-
holder. Do not place anything heavier
than 0,5 Kg (1 lbs.) in the drink-holder.
BRAKE
11• To brake the stroller, push the levers on
the rear wheels downwards with your
foot. To release the brakes, lift the levers.
Always set the brake when the stroller is
not moving.
SAFETY BELT
12• A: Make sure that the brace is properly
inserted by pushing as shown in the
figure. B: Fasten the belt as shown in the
figure.
13• To unfasten the belt, press on the buckle
sides and pull out the waist strap.
14• The new safety belt is now easier to
fasten thanks to the "snap-open-andshut" device. Before fastening the safety
belt, attach the buckle to the backrest
by inserting the tab through the special
holder, as shown in the figure. After
fastening the safety belt on your child,
detach it from the backrest to allow the
child more freedom of movement. The
buckle must remain below the child's
shoulders.
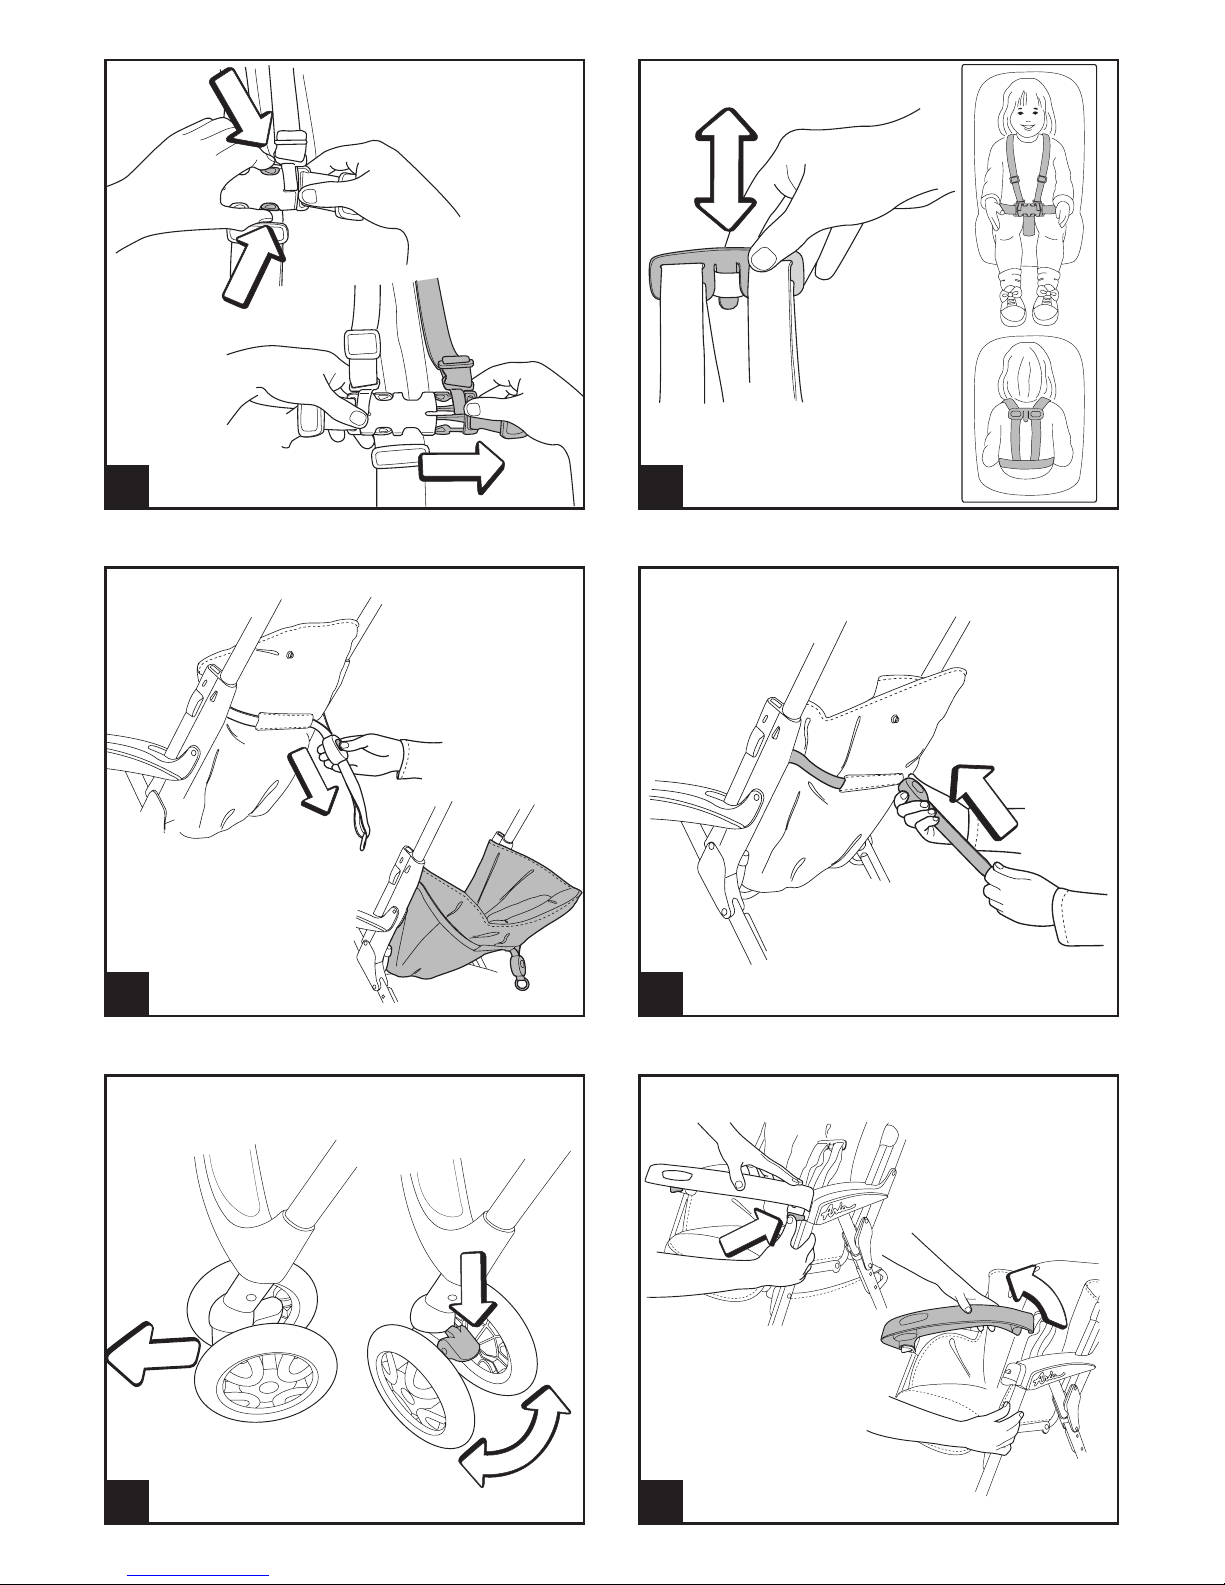
ADJUSTING THE BACKREST
15• To recline the backrest, lower the
backrest adjuster button while pushing
the backrest down.
16• To raise the backrest, push the backrest
adjuster button upwards, as shown in the
fi gure.
SWIVELING WHEELS
17• Lower the lever as shown in the figure to
allow the front wheels to swivel. Lift the
lever for fixed wheels.
FRONT BAR-CHILD TRAY
18• The front bar-child tray can be opened
only from one side, to allow the child to
climb in and out of the stroller when he
or she is old enough. To open, press the
button with one hand, while using the
other hand to swing the tray upwards.
19• To remove the front bar-child tray, press
the two buttons as shown in the figure
while pulling the tray upwards. Do not
place boiling-hot drinks on the child tray;
this could be dangerous.
REPLACING THE BASKET
20• If it is necessary to replace the basket,
fasten the front of the new basket to the
hooks as shown in the figure.
21• Fasten the back of the basket, closing the
buttons as shown in the figure.
REMOVING THE WHEELS
The wheels on the stroller are removable.
22• To remove the front wheels, set them
to swivel, press the levers and push the
wheel until it comes off , as shown in the
fi gure.
23• To remove the rear wheels, press the
button and push the wheel downward
until it comes off , as shown in the fi gure.
FOLDING UP THE STROLLER
Before folding up the stroller, pull the
side braces upwards if the hood is
attached.
24• To fold up the stroller, lift the buttons
on the sides of the handlebar and swing
the handlebar forwards until it clicks into
place.
25• Push the backrest and the hood towards
the stroller, while lowering the handlebar
into its housing. Check to make sure that
the stroller is fastened securely with the
safety hook. The folded-up stroller will
stand upright by itself.
TRANSPORT
26• The stroller can easily be carried by the
handle when it is closed.
REMOVABLE LINING
27• To remove the lining from the stroller,
remove the little cover on the side by
pressing on it. Push the pin upwards and
28• then outwards. Slip the pin out of the
hole in the sack. Repeat on the other side.
Page 14
29• To detach the sack from the seat, remove
the leg divider from under the seat, and
unbutton as shown in the fi gure.
30• Loosen the safety belt from both sides,
and slip the sack off the stroller.
GANCIOMATIC SYSTEM
Ganciomatic is the practical, fast system for
attaching the Primo Viaggio car seat to the
stroller. The car seat comes with its own
Ganciomatic System, and is sold separately.
STROLLER GANCIOMATIC HOOKS
31• To raise the Ganciomatic hooks on the
stroller, pull the sack up in the seat
corners and lift the two hooks. They will
automatically move outwards.
32• To lower the Ganciomatic hooks on the
stroller, push them inwards and then
downward, as shown in the fi gure.
STROLLER + CAR SEAT
33• To fasten the car seat to the stroller:
- set the brake on the stroller,
- remove the hood from the stroller,
- completely lower the backrest on the
stroller,
- raise the Ganciomatic hooks on the
stroller.
- Place the car seat, turned towards the
adult, on the stroller and push downward
until it clicks into place.
- Do not remove the front bar from the
stroller when attaching the car seat.
• See the userʼs manual for instructions
on how to detach the car seat from the
stroller.
ACCESSORY LINE
34• Diaper-Changing Bag: Satchel with pad
for changing babyʼs diaper. Attaches to
the stroller.
35• The rain canopy made of transparent
PVC with elastic around the edge can
be fastened over the hood on the Aria
stroller. This rain canopy has been
designed for use with the "Primo Viaggio"
car seat attached to the stroller as well, to
guarantee total protection.
CLEANING & MAINTENANCE
Your product requires only minimal
maintenance. Cleaning and maintenance
operations must be performed only by adults.
• Be sure to keep all moving parts clean,
lubricating them with light oil if necessary.
• Dry off metal parts to prevent rusting.
• Regularly clean the plastic parts with a
damp cloth. Do not use solvents or similar
products.
• Brush the fabric parts to remove dust.
• Remove any dust and sand from the wheels.
• Protect the product against smog, water,
rain and snow. Continued and extended
exposure to sunlight can change the
colours of many materials.
• Store the product in a dry area.
• To wash the sack, follow the instructions
below.
SAFETY
WARNING
• THIS PRODUCT IS DESIGNED FOR
CHILDREN WHOSE MAXIMUM
WEIGHT IS 44 POUNDS (20 KG)
AND WHOSE MAXIMUM HEIGHT
IS 43 INCHES (110 CM). THIS
SHOPPER BASKET IS DESIGNED TO
CARRY A MAXIMUM WEIGHT OF 11
POUNDS (5 KG). ANY CUPHOLDER
EVENTUALLY PROVIDED WITH
THIS UNIT IS DESIGNED TO CARRY
A MAXIMUM WEIGHT SPECIFIED
ON THE CUPHOLDER ITSELF. ANY
POACH OR POCKET PROVIDED
WITH THIS UNIT IS DESIGNED TO
CARRY A MAXIMUM WEIGHT OF
0.44 POUNDS (0.2 KG).
• AVOID SERIOUS INJURY FROM
FALLING OR SLIDING OUT. ALWAYS
USE COMPLETE 5 POINT SEAT BELT.
• NEVER LEAVE YOUR CHILD
UNATTENDED.
• THE USE OF PARTS OR
ACCESSORIES NOT APPROVED BY
THE MANUFACTURER COULD BE
DANGEROUS.
• DO NOT INTRODUCE FINGERS IN
THE MECHANISMS.
• ALL OPERATING AND ASSEMBLY
PROCEDURES SHOULD BE
PERFORMED BY AN ADULT.
• DO NOT USE THE PRODUCT IF IT
HAS BROKEN OR MISSING PARTS.
• ALWAYS USE BRAKES WHEN
STOPPED.
• DO NOT USE THIS PRODUCT
AROUND STAIRS OR STEPS.
• DO NOT LIFT THE STROLLER BY
GRIPPING THE FRONT BAR. THE
Page 15

FRONT BAR IS NOT DESIGNED TO
WITHSTAND LOADS. TO PICK UP
THE STROLLER, GRIP IT UNDER THE
ARMRESTS.
• CHECK THE CORRECT FIXING OF
THE CAR SEAT TO THE STROLLER.
SAFETY RULES
Use special care when performing
operating procedures to avoid
injurying the child or yourself.
To secure safety harness insert the
two tongues into the crotch strap
until they click into place. Always
make sure that the safety harness is
completely locked into position. To
release the safety belt, press both
sides of the buckle and pull at the
same time the belt outwards.
Parcels and accessory items, or both,
placed on the unit may cause the
unit to become unstable. Maximum
weight for objects placed in basket is
11 lbs. Excessive weight may cause a
hazardous condition to exist.
Stay attentive to the risks provided
by fire and other significant sources
of heat such as electric radiators,
gas heaters, ect. That are in the
immediate vicinity of the product.
Always make sure that the car seat is
properly fi xed to the stroller hooks.
• AVERTISSEMENT: lire attentivement les
instructions avant dʼutiliser le produit et les
conserver pour toute référence ultérieure.
• Pour des raisons techniques et commerciales,
PEG PEREGO pourra apporter à tout moment
des modifications aux modèles décrits dans
ce manuel.
Peg Perego S.p.A. bénéfi cie de la
certifi cation ISO 9001.
La certifi cation assure aux clients et
aux consommateurs une garantie de
transparence et de confi ance dans la
façon dont travaille lʼentreprise.
SERVICE DʼASSISTANCE
En cas de perte ou dommage fortuit de pièces
du modèle, utilisez exclusivement les pièces
de rechange originales Peg Perego. Pour
les éventuelles réparations, substitutions,
informations sur les produits, la vente de
pièces de rechange originales et dʼaccessoires,
contactez le Service dʼassistance Peg-Perego:
EUROPA: tél.: 0039-039-60.88.213
fax: 0039-039-33.09.992
e-mail: assistenza@pegperego.it,
USA: tel.: 800.671.1701
fax: 260.471.6332
Call us toll free: 1.800.671.1701
CANADA: tel.: 905.839.3371
fax: 905.839.9542
Call us toll free: 1.800.661.5050
www.pegperego.com
Peg Perego est à la disposition de ses
consommateurs pour satisfaire au mieux
toutes leurs exigences. À cette fi n,
connaître lʼavis de nos clients est pour
nous extrêmement important et précieux.
Nous vous saurions donc gré, après avoir
utilisé lʼun de nos produits, de bien vouloir
remplir le QUESTIONNAIRE SATISFACTION
DU CONSOMMATEUR que vous trouverez sur
Internet à lʼadresse suivante:
“www.pegperego.com/SSCo.html.en-UK”,
et de nous faire vos éventuelles observations
ou suggestions.
NOTICE DʼEMPLOI
OUVERTURE
1• Pour ouvrir la poussette, détacher
simultanément les deux fi xations, comme
indiqué sur la fi gure.
2• Tirer énergiquement le guidon vers le
FR•FRANÇAIS
Page 16
la ceinture, la détacher du dossier pour
permettre au bébé de bouger en toute
liberté. La boucle doit rester sous les
épaules du bébé.
RÉGLAGE DU DOSSIER
15• Pour incliner le dossier, abaisser le bouton
de réglage du dossier tout en baissant
complètement ce dernier.
16• Pour relever le dossier, relever le bouton
de réglage du dossier comme indiqué sur
la figure.
ROUES PIVOTANTES
17• Pour mettre les roues avant en position
pivotante, abaisser le levier comme indiqué
sur la fi gure. Pour les mettre en position
fi xe, relever le levier.
BARRE FRONTALE-PLATEAU
18• La barre frontale-plateau ne peut être
ouverte que dʼun côté pour faciliter
lʼentrée et la sortie de lʼenfant plus grand.
Pour lʼouvrir, appuyer dʼune main sur le
bouton tout en faisant pivoter la barre
frontale vers le haut de lʼautre main.
19• Pour démonter la barre frontale-plateau,
appuyer sur les deux boutons, comme
indiqué sur la fi gure, tout en la tirant vers
le haut. Il est dangereux de poser des
boissons bouillantes sur la barre frontaleplateau.
REMPLACEMENT DU PANIER
20• Pour monter le panier, le fi xer aux crochets
situés à lʼavant, comme indiqué sur la
fi gure.
21• Le fi xer à lʼarrière en fermant les boutons,
comme indiqué sur la fi gure.
DÉMONTAGE DES ROUES
Les roues de la poussette sont amovibles.
22• Pour démonter les roues avant, les rendre
pivotantes, appuyer sur les doigts tout
en poussant la roue jusquʼà la démonter,
comme indiqué sur la figure.
23• Pour démonter les roues arrière, appuyer
sur le bouton tout poussant la roue vers le
bas jusquʼà la démonter, comme indiqué
sur la figure.
FERMETURE
Avant de fermer la poussette, desserrer les
petits leviers si la capote est appliquée.
24• Pour fermer la poussette, relever les
boutons situés sur le côté du guidon et
faire pivoter le guidon vers lʼavant jusqu
ʼà
entendre le déclic dʼenclenchement.
25• Pousser ensuite le dossier et la capote vers
la poussette et abaisser le guidon jusquʼà
ce quʼil rentre dans son logement. Vérifi er
que la poussette est bien fermée par le
crochet de sécurité. La poussette fermée
tient debout toute seule.
haut, puis le pousser vers le bas jusquʼà
entendre le déclic dʼenclenchement.
ASSEMBLAGE DE LA POUSSETTE
3• ATTENTION: montez les deux roues avec
freins sur la partie arrière de la poussette.
Insérez la roue, appuyez à fond sur le
bouton A, simultanément poussez la roue
jusqu'à entendre le CLIC de fi xation.
4• Pour monter les roues avant, abaissez le
levier A et insérez la roue jusqu'à entendre
le CLIC de fi xation.
5• Accrocher la barre frontale comme indiqué
sur la figure.
CAPOTE
6• Pour appliquer la capote, insérer les
fi xations dans les logements appropriés.
7• Boutonner la capote à lʼarrière du dossier.
Abaisser les petits leviers comme indiqué
sur la fi gure.
8• Pour retirer la capote, appuyer sur les
boutons latéraux tout en tirant la capote
vers le haut, comme indiqué sur la fi gure.
PORTE-BOUTEILLE
Le porte-bouteille ne peut être appliqué
que du côté droit du guidon.
9• Pour appliquer le porte-bouteille au
guidon, élargir le collier et le fi xer comme
indiqué sur la fi gure. Enfi ler le porte-
bouteille dans le collier jusquʼà entendre le
déclic dʼenclenchement.
10• Insérer, comme indiqué sur la fi gure, les
deux bouchons, en faisant attention aux
emboîtements. A lʼaide de deux monnaies,
faire tourner les bouchons pour fixer le
porte-bouteille comme indiqué sur la
figure.
Il est conseillé de ne pas insérer des
boissons chaudes et pesant plus de 0,5 kg
(1 lbs) dans le porte-bouteille.
FREIN
11• Pour enclencher le frein, baisser du pied
le levier fi xé sur les roues arrière. Pour
débloquer les freins, relever le levier.
A lʼarrêt, le frein doit toujours être
enclenché.
CEINTURES DE SECURITE
12• A: Assurez-vous que la bretelle soit
correctement insérée en vérifiant comme
indiqué sur le schéma correspondant. B:
Accrochez la ceinture comme indiqué sur
le schéma.
13• Pour détacher la ceinture, appuyez de
chaque côté de la boucle et tirez pour que
les deux parties se désolidarisent.
14• Grâce à son système de fi xation particulier,
la nouvelle ceinture de sécurité est
désormais plus pratique à attacher. En
eff et, avant dʼattacher la ceinture, fi xer la
boucle au dossier en insérant la languette
dans le passant prévu à cet eff et, comme
indiqué sur la fi gure. Après avoir attaché
Page 17

TRANSPORT
26• Une poignée permet de transporter
commodément la poussette fermée.
POUR RETIRER LE SAC
27• Pour retirer le sac de la poussette, enlever
le bouchon situé sur le côté en faisant
levier. Pousser la tige vers le haut puis
28• vers lʼextérieur. Enlever ensuite lʼaxe par
lʼoeillet du sac. Répéter lʼopération de
lʼautre côté.
29• Pour détacher le sac de lʼassise, retirer la
sangle dʼentre-jambes par le dessous et
déboutonner le sac comme sur la fi gure.
30• Dévisser la ceinture des deux côtés et
retirer le sac.
SYSTEME GANCIOMATIC
Le Système Ganciomatic, pratique et rapide,
permet de monter le siège auto Primo
Viaggio sur la poussette, grâce aux fi xations
Ganciomatic. Le siège auto Primo Viaggio
est lui aussi équipé du Système Ganciomatic,
disponible séparément.
FIXATIONS GANCIOMATIC DE LA
POUSSETTE
31• Pour relever les fi xations Ganciomatic
de la poussette, soulever le sac au
niveau des angles de lʼassise et relever
les deux fi xations qui se déplaceront
automatiquement vers lʼextérieur.
32• Pour abaisser les fi xations Ganciomatic
de la poussette, pousser tout dʼabord les
fi xations vers lʼintérieur puis les abaisser
comme sur la fi gure.
POUSSETTE + SIEGE AUTO
33• Pour monter le siège auto sur la poussette,
il faut:
- bloquer la poussette,
- retirer la capote de la poussette,
- abaisser complètement le dossier de la
poussette,
- soulever les fixations Ganciomatic de la
poussette.
- Positionner le siège auto vers maman et le
pousser vers le bas jusquʼ
au déclic.
- Il est recommandé de ne pas retirer la
barre frontale de la poussette lorsque lʼon
monte le siège auto.
• Pour démonter le siège auto de la
poussette, se reporter au manuel
dʼinstructions correspondant.
LIGNE ACCESSOIRES
34• Sac à langer: Sac muni dʼun petit matelas
pour changer bébé, qui peut être monté
sur la poussette.
35• Bâche: bâche en PVC transparent avec
élastique, applicable à la capote de
la poussette Aria. Cette bâche a été
également conçue en cas de montage du
siège auto Primo Viaggio sur la poussette,
garantissant ainsi une protection totale.
NETTOYAGE ET ENTRETIEN
Votre produit nécessite un minimum
dʼentretien. Les opérations de nettoyage et
dʼentretien doivent être effectuées uniquement
par des adultes.
• Il est recommandé de maintenir toutes les
parties mobiles propres et, au besoin, de les
lubrifier avec une huile légère.
• Essuyer les parties métalliques du produit
pour prévenir la formation de rouille.
• Nettoyer régulièrement les parties en
plastique avec un chiffon humide, ne pas
utiliser de solvants ou dʼautres produits du
même type.
• Brosser les parties en tissu pour les
dépoussiérer.
• Éliminer les dépôts de poussière et de sable
des roues.
• Protéger le produit contre les agents
atmosphériques, lʼeau, la pluie ou la neige ;
lʼexposition continue et prolongée au soleil
pourrait altérer les couleurs de nombreux
matériaux.
• Conserver le produit dans un endroit sec.
• Pour le lavage du sac, suivre les instructions
ci-après.
SECURITE
AVERTISSEMENT
• CE PRODUIT A ETE CONÇU POUR
DES ENFANTS DONT LE POIDS
NʼEXCEDE PAS 20 KG (44 LIVRES)
ET LA TAILLE NE DEPASSE PAS
110 CM (43 POUCES). LE PANIER
A ETE CONÇU POUR SUPPORTER
DES CHARGES MAXIMALES DE 5 KG
(11 LIVRES). LE PORTE-BOISSONS
EVENTUELLEMENT FOURNI
AVEC LE PRODUIT A ETE CONÇU
POUR SUPPORTER DES CHARGES
INDIQUEES SUR LE PORTE-BOISSONS
LUI-MEME. LES POCHETTES OU
SACS FOURNIS AVEC CE PRODUIT
ONT ETE CONÇUS POUR SUPPORTER
DES CHARGES MAXIMALES DE 0,2
KG (0,44 LIVRES).
• TOUJOURS UTILISER LA CEINTURE DE
SECURITE A 5 POINTS.
• NE JAMAIS LAISSER LʼENFANT SANS
Page 18

SURVEILLANCE.
• LʼUTILISATION DʼACCESSOIRES NON
APPROUVES PAR LE CONSTRUCTEUR
POURRAIT ETRE DANGEREUSE.
• NE PAS METTRE LES DOIGTS DANS
LES MECANISMES.
• LES OPERATIONS DE MONTAGE ET
DE DEMONTAGE DOIVENT ETRE
EFFECTUEES PAR DES ADULTES.
• NE PAS UTILISER LE PRODUIT SʼIL
EST ENDOMMAGE OU SI DES PIECES
SONT MANQUANTES.
• A LʼARRET, TOUJOURS ENCLENCHER
LE FREIN.
• NE PAS UTILISER LE PRODUIT À
PROXIMITÉ DʼESCALIERS OU DE
MARCHES.
• IL EST RECOMMANDE DE NE PAS
SOULEVER LA POUSSETTE PAR
LA MAIN COURANTE, CELLECI NʼETANT PAS CONÇUE POUR
SUPPORTER DES CHARGES. EN
CAS DE BESOIN, SOULEVEZ LA
POUSSETTE EN LA PRENANT PAR LES
ACCOUDOIRS.
• VERIFIER LA FIXATION PARFAITE DU
SIEGE AUTO SUR LA POUSSETTE.
NORMES DE SECURITE
Pour boucler la ceinture de sécurité,
enfilez les deux extrémités de la
ceinture dans la boucle de la sangle
entre-jambes et accrochez les deux
ceintures dorsales dans les boucles
prévues à cet effet. Pour ouvrir la
ceinture de sécurité, poussez les
deux extrémités de la ceinture vers
l'intérieur, appuyez sur le milieu de la
boucle et en même temps, tirez vers
l'extérieur.
Des paquets et/ou des accessoires
peuvent rendre instables le produit.
Nous recommandons de ne pas
mettre dans le panier une charge de
plus de 5 kg.
ATTENTION: veillez à ne pas mettre
cette poussette à proximité dʼune
source de chaleur telle quʼun
convecteur électrique, chauffage, etc.
Vérifiez systématiquement que
le siège auto Primo Viaggio est
correctement ancrés sur la poussette.
NOTICE RÉSERVÉE AU MARCHÉ
FRANÇAIS:
• “Conforme aux exigences de
securite”.
• Norme NF S 54-001.
• "Ne pas utiliser pour un enfant de
moins de 6 mois" et dans ce cas
précis, poussette avec groupe 0+
n'a pas lieu d'être.
Page 19

• ACHTUNG: Die Anleitung vor Gebrauch
aufmerksam durchlesen und sorgfältig
aufbewahren.
• Farbliche und technische Änderungen
vorbehalten.
Peg Perego S.p.A. ist gemäß ISO
9001 zertifi ziert.
Die Zertifi zierung garantiert
den Kunden und Verbrauchern
Transparenz und ermöglicht das
Vertrauen in die Arbeitsweise
unseres Unternehmens.
KUNDENDIENST
Bei Verlust oder Beschädigung ausschließlich
Originalersatzteile von Peg Perego
verwenden. Für eventuelle Reparaturen,
Produktinformationen, den Austausch diverser
Teile bzw. den Kauf von Originalersatzteilen
oder Zubehörteilen wenden Sie sich bitte an
den Kundendienst Peg-Perego:
EUROPA: Tel.: 0039-039-60.88.213,
Fax: 0039-039-33.09.992,
E-Mail: assistenza@pegperego.it,
USA: tel.: 800.671.1701
fax: 260.471.6332
Call us toll free: 1.800.671.1701
CANADA: tel.: 905.839.3371
fax: 905.839.9542
Call us toll free: 1.800.661.5050
www.pegperego.com
Als Peg Perego stehen wir unseren Kunden
für jeden Bedarf immer gerne zur Seite.
Deshalb ist es auch extrem wichtig, über
die Meinung unserer Kunden Bescheid zu
wissen. Wir bitten Sie, das FORMULAR ÜBER
DIE KONSUMENTENZUFRIEDENHEIT nachdem
Sie unsere Produkte ausprobiert haben,
auszufüllen. Das Formular ist unter folgender
Internetadresse abrufbar: “www.pegperego.
com/SSCo.html.en-UK”
Wir würden uns über Anmerkungen und
Ratschläge freuen.
GEBRAUCHSANLEITUNG
ÖFFNEN
1• Um den Sportwagen zu öff nen, die beiden
Halterungen laut Abbildung gleichzeitig
aushaken.
2• Den Lenker entschieden hochheben und
danach bis zum Einschnappen nach unten
drücken.
DE•DEUTSCH
ZUSAMMENBAU DES SPORTWAGENS
3• Achten Sie darauf, daß die zwei Räder
mit der Bremse auf der Hinterseite des
Sportwagens angebracht werden. Das
Rad aufsetzen, Knopf A bis zum Anschlag
durchdrücken und dabei das Rad bis zum
Einklinken weiterschieben.
4• Um die Vorderräder einzustecken, Hebel
A nach unten drücken und das Rad dann
bis zum Einklinken hineinschieben.
5• Den Schutzbügel laut Abbildung
festhaken.
VERDECK
6• Zur Montage des Verdecks die Anschlüsse
in die dementsprechenden Löcher
stecken.
7• Das Verdeck an der Rückseite der
Rückenlehne anknöpfen. Die Spreizhebel
laut Abbildung senken.
8• Zur Abnahme des Verdecks die seitlichen
Druckknöpfe drücken und gleichzeitig
das Verdeck laut Abbildung nach oben
ziehen.
FLASCHENHALTER
Der Flaschenhalter kann nur auf der
rechten Seite am Griff befestigt werden.
9• Zur Befestigung des Flaschenhalters
am Griff die Lasche erweitern und laut
Abbildung vorgehen. Den Flaschenhalter
bis zum Einschnappen in die Lasche
stecken.
10• Laut Abbildung die beiden Abdeckungen
einsetzen und auf die Steckvorrichtungen
achten. Die Abdeckungen mit zwei
Münzen drehen, um den Flaschenhalter
laut Abbildung zu fixieren.
Keine heißen Getränke bzw. Gefäße über
0,5 kg (1 Ibs) im Flaschenhalter abstellen.
BREMSE
11• Zum Bremsen des Sportwagens die Hebel
an den Hinterrädern mit dem Fuß nach
unten drücken. Zum Lösen der Bremse,
die Hebel wieder anheben. Den Wagen,
wenn er steht, immer bremsen.
SICHERHEITSGURT
12• A: Stellen Sie sicher, daß der Träger
richtig eingeführt worden ist und
schieben Sie wie in der Abbildung
angezeigt. B:Schnallen Sie den Gurt an,
wie in der Abbildung angezeigt.
13• Zum Abschnallen drücken Sie auf beiden
Seiten der Schnalle und ziehen Sie
gleichzeitig den Leibgurt nach außen.
14• Der neue Sicherheitsgurt ist durch
das „Schnappsystem“ einfacher zu
verwenden. Vor dem Anschnallen des
Gurts die Schnalle laut Abbildung
an der Rückenlehne fi xieren; danach
das Kind festschnallen und für mehr
Bewegungsfreiheit den Gurt von der
Rückenlehne losschnallen. Die Schnalle
muss unter den Schultern des Kindes
Page 20
bleiben.
EINSTELLUNG DER RÜCKENLEHNE
15• Um die Rückenlehne niedriger zu stellen,
den Knopf der Reglervorrichtung und
gleichzeitig auch die Rückenlehne nach
unten drücken.
16• Zum Anheben der Rückenlehne die
Reglervorrichtung laut Abbildung nach
oben schieben.
SCHWENKBARE RÄDER
17• Für die Drehbewegung der Vorderräder
den Hebel laut Abbildung nach unten
drücken. Um die Drehbewegung zu
unterbinden, den Hebel hochheben.
SCHUTZBÜGEL/TABLETT
18• Der Schutzbügel mit dem Tablett kann
für ein bequemes Ein- und Aussteigen
größerer Kinder auch nur auf einer Seite
geöff net werden. Zum Öff nen mit einer
Hand den Druckknopf drücken und
gleichzeitig mit der anderen Hand den
Schutzbügel nach oben drehen.
19• Zum Abnehmen des Schutzbügels mit
dem Tablett die beiden Druckknöpfe
laut Abbildung drücken und gleichzeitig
nach oben ziehen. Gefahr: keine heißen
Getränke auf den Schutzbügel/das
Tablett stellen.
AUSTAUSCH DES KORBS
20• Sollte der Korb ausgetauscht werden,
ist der neue Korb laut Abbildung an den
vorderen Haken einzuhängen.
21• Den Korb hinten laut Abbildung durch
Zuknöpfen befestigen.
ABNAHME DER RÄDER
Die Sitzwagenräder sind abnehmbar.
22• Zum Abnehmen der Vorderräder sind
diese auf "Drehbewegung“ zu stellen, die
Hebel drücken und gleichzeitig das Rad
laut Abbildung ganz heraus drücken.
23• Zur Abnahme der Hinterräder den Knopf
drücken und das Rad laut Abbildung nach
unten drücken.
SCHLIESSEN
Vor dem Schließen des Sportwagens
die Spreizhebel des Verdecks (wenn
vorhanden) schließen.
24• Zum Schließen des Sportwagens die
seitlich am Lenker vorhandenen Knöpfe
nach oben ziehen und den Lenker bis
zum Einschnappen nach vorne drehen.
25• Danach die Rückenlehne und das Verdeck
zum Sitzwagen hin drücken und den
Lenker bis ganz in seinen Sitz nach unten
drücken. Anhand des Sicherheitshakens
sicherstellen, dass der Sitzwagen korrekt
geschlossen wurde. Der geschlossene
Sitzwagen steht von alleine.
TRANSPORT
26• Durch den Griff kann der Sitzwagen
auch geschlossen bequem transportiert
werden.
ABZIEHEN DES BEZUGS
27• Zum Abziehen des Sportwagenbezugs
den Verschluss an der Seite entfernen.
Den Stift nach oben drücken und
28• danach nach außen drücken.
Anschließend den Stift aus der Öff nung
des Bezugs herausziehen. Auf beiden
Seiten so vorgehen.
29• Um den Bezug vom Sitz abzunehmen,
die Durchrutschsicherung von unten aus
herausziehen und den Bezug wie in der
Abbildung abknöpfen.
30• Gurt an beiden Seiten abschrauben und
den Bezug abziehen.
GANCIOMATIC-SYSTEM
Das Ganciomatic-System ist das schnelle und
praktische System, mit dem sich dank der
Ganciomatic-Verbindungsstücke der Autositz
Primo Viaggio am Sportwagen anbringen
lässt. Auch der separat erhältliche Autositz ist
mit dem Ganciomatic-System ausgestattet.
GANCIOMATIC-VERBINDUNGSSTÜCKE AM
SPORTWAGEN
31• Um die Ganciomatic-Verbindungsstücke
des Sportwagens hochzuklappen, den
Bezug an den Ecken des Sitzes anheben
und die beiden Verbindungsstücke, die
sich automatisch nach außen verstellen,
nach oben drücken.
32• Um die Ganciomatic-Verbindungsstücke
des Sportwagens herunterzuklappen,
zuerst die Verbindungsstücke nach innen
drücken und anschließend wie in der
Abbildung nach unten stellen.
SPORTWAGEN + AUTOKINDERSITZ
33• Zum Befestigen ders Autokindersitzes am
Sportwagen wie folgt vorgehen:
- die Feststellbremse des Sportwagens
betätigen,
- das Sportwagenverdeck abnehmen,
- die Rückenlehne des Sportwagens
vollständig herunterklappen,
- die Ganciomatic-Verbindungsstücke des
Sportwagens hochstellen,
- Den Autokindersitz in Richtung der Mama
positionieren und bis zum Einrasten nach
unten drücken.
- Es empfi ehlt sich, den Schutzbügel des
Sportwagens nicht zu entfernen, wenn
der Autokindersitz angebracht wird.
• Zum Abnehmen des Autokindersitzes
vom Sportwagen ist die entsprechende
Bedienungsanleitung hinzuzuziehen.
Page 21
ZUBEHÖR
34• Wickeltasche: Tasche mit Wickelunterlage,
lässt sich am Sportwagen befestigen.
35• Regenschutz: Regenschutz aus
transparentem PVC mit Gummizug, für
Verdeck am Sportwagen Aria. Dieser
Regenschutz wurde auch für den Fall,
dass der Autositz Primo Viaggio im
Sportwagen befestigt wird, geplant und
garantiert auch dahingehend besten
Schutz.
REINIGUNG UND PFLEGE
Ihr Produkt ist nur gering wartungsbedürftig.
Die Reinigung und Instandhaltung darf
ausschließlich von Erwachsenen durchgeführt
werden.
• Alle beweglichen Teile unbedingt sauber
halten und wenn nötig, mit Leichtöl
schmieren.
• Die Metallteile gut trocknen, um die
Rostbildung zu vermeiden.
• Die Kunststoffteile regelmäßig mit
einem feuchten Lappen reinigen - keine
Lösungsmittel oder ähnliche Produkte
verwenden.
• Die Stoffteile abbürsten, um den Staub zu
entfernen.
• Die Räder staub- und sandfrei halten.
• Den Produkt vor Witterungseinflüssen,
wie Wasser, Regen oder Schnee geschützt
aufbewahren; eine längere Bestrahlung
durch die Sonne kann zu Farbänderungen
der verschiedenen Materialien führen.
• Den Produkt an einem trockenen Ort
aufbewahren.
• Für die Reinigung des Bezugs sind die
folgenden Hinweise zu beachten.
SICHERHEIT
WARNUNG
• DIESES PRODUKT WURDE FÜR
KINDER ENTWICKELT, DEREN
MAXIMALGEWICHT 20 KG
UND DEREN MAXIMALGRÖSSE
110 CM BETRÄGT. DIESER
EINKAUFSKORB WURDE FÜR
EIN MAXIMALES LADEGEWICHT
VON 5 KG ENTWICKELT.
EVENTUELL IN DIESER EINHEIT
MITGELIEFERTE GETRÄNKEHALTER
WURDEN FÜR DAS AUF IHNEN
AUFGEDRUCKTE MAXIMALGEWICHT
ENTWICKELT. IN DIESER EINHEIT
MITGELIEFERTE TASCHEN ODER
HALTERUNGEN WURDEN FÜR EIN
MAXIMALGEWICHT VON 0,2 KG
ENTWICKELT.
• DIE SICHERHEITSGURT MIT 5
PUNKTEN IMMER BENUTZEN.
• LASSEN SIE IHR KIND NIEMALS
UNBEAUFSICHTIGT.
• ALS ZUBEHÖR UND ERSATZTEILE
DÜRFEN NUR ORIGINALTEILE
VERWENDET WERDEN.
• FINGER IN DEN MECHANISMEN
NICHT EINSTECKEN.
• DER EINBAU DARF NUR VON
ERWACHSENEN VORGENOMMEN
WERDEN.
• DAS PRODUKT NICHT BENUTZEN,
WENN ES BRÜCHE ODER FEHLENDE
TEILE AUFWEIST.
• WENN SIE NICHT FAHREN, LEGEN
SIE IMMER DIE BREMSE EIN.
• DIE SCHAUKEL NICHT IN DER
NÄHE VON TREPPEN ODER STUFEN
VERWENDEN.
• DEN SPORTWAGEN NICHT AM
VORDEREN SCHUTZBÜGEL
HOCHHEBEN ODER ZIEHEN,
DA DIESER FÜR DERARTIGE
BELASTUNGEN NICHT AUSGELEGT
IST. FALLS NOTWENDIG, DEN
SPORTWAGEN UNTER DEN
ARMSTÜTZEN ANFASSEN UND
DANN ANHEBEN.
• ÜBERPRÜFEN SIE DIE KORREKTE
BEFESTIGUNG DES AUTOSITZES AM
SPORTWAGEN.
SICHERHEITSNORM
Bitte beachten Sie zum
Auf-und Zuklappen des
Sportwagens die Hinweise in der
Gebrauchsanweisung. Hände nicht in
den Klappmechanismus.
Um der Gurtverschluß zu schließen,
die Arme des Kindes durch die
Sicherheitsgurt schlüpfen und die
zwei Gurtenden in den Verschluß
stecken. Versichern sich immer, den
Verschluß klicken zu hören.
Um den Sicherheitsgurt zu öffnen,
an den Seiten der Gurtzunge drücken
Page 22

• IMPORTANTE: leer detenidamente las
instrucciones antes del uso y conservarlas
para poder utilizarlas en el futuro.
• PEG PEREGO podrá modificar los modelos
descritos en este prospecto, por razones
técnicas o comerciales.
Peg Perego S.p.A. cuenta con la
certifi cación ISO 9001.
Dicha certifi cación ofrece
tanto a los clientes como a los
consumidores la garantía de una
transparencia y confi anza por lo
que concierne al modo de trabajar
de la empresa.
SERVICIO DE ASISTENCIA
Si por casualidad alguna parte del modelo
se pierde o se rompe, usar sólo piezas de
repuesto originales Peg Perego. Para todo
lo que concierne las reparaciones, cambios,
informaciones sobre los productos y la venta
de repuestos originales y accesorios, contacte
con el Servicio de Asistencia Peg-Perego:
EUROPA: Tel.: 0039-039-60.88.213
Fax: 0039-039-33.09.992
e-mail: assistenza@pegperego.it
USA: tel.: 800.671.1701
fax: 260.471.6332
Call us toll free: 1.800.671.1701
CANADA: tel.: 905.839.3371
fax: 905.839.9542
Call us toll free: 1.800.661.5050
www.pegperego.com
Peg Perego está a disposición de sus
Consumidores para satisfacer lo mejor
posible todas sus exigencias. Por eso,
conocer lo que piensan nuestros Clientes, es
para nosotros muy importante y fundamental.
Le agradeceremos mucho si, después de
haber utilizado uno de nuestros productos
rellena el FORMULARIO DE SATISFACCIÓN DEL
CONSUMIDOR que encontrará en internet en
la siguiente dirección: “www.pegperego.com/
SSCo.html.en-UK”,
indicando las posibles observaciones o
sugerencias.
INSTRUCCIONES DE USO
APERTURA
1• Para abrir la silla de paseo, desenganchar
al mismo tiempo los dos acoples como
indica la fi gura.
ES•ESPAÑOL
und gleichzeitig den Hüftgurt nach
außen ziehen.
Schwere Gegenstände machen den
Produkt instabil. Es wird empfohlen,
den Korb nicht mit mehr als 5 Kg -
11.0 lbs Gewicht zu beladen.
Denken Sie an das Risiko von
offenem Feuer und anderen starken
Hitzequellen, wie electrische
Heizstrahler, gasbeheitzte Öfen usw.
in der unmittel baren Umgebung der
Wickeleinrichtung.
Stellen Sie sicher, daß der Autositz
an den Sportwagenhaken immer
richtig befestigt ist.
Page 23
el cinturón al niño tiene que soltarla del
respaldo para dejar que el niño tenga
más movilidad. La hebilla pequeña tiene
que quedar debajo de los hombros del
niño.
REGULACIÓN DEL RESPALDO
15• Para reclinar el respaldo bajar el botón
del regula-respaldo y al mismo tiempo
empujar este último hacia abajo.
16• Para subir el respaldo empujar hacia
arriba el regula-respaldo como indica la
fi gura.
RUEDAS GIRATORIAS
17• Para hacer que giren las ruedas
delanteras hay que bajar la palanca como
indica la fi gura. Para que no giren hay
que subir la palanca.
FRONTAL-BANDEJA
18• El frontal-bandeja se puede abrir sólo por
un lado para facilitar que entre o salga
el niño cuando es más mayor. Para abrir,
apretar con una mano el pulsador y al
mismo tiempo con la otra mano girar el
frontal hacia arriba.
19• Para quitar el frontal-bandeja, apretar
los dos pulsadores como indica la fi gura
y al mismo tiempo, tirar hacia arriba. No
apoyar en el frontal-bandeja bebidas
calientes porque puede ser peligroso.
CAMBIO DE LA CESTA
20• Si hubiera que cambiar la cesta, para
montarla, engánchela por delante a los
ganchos como indica la fi gura.
21• Engánchela por detrás, cerrando los
botones como indica la fi gura.
EXTRACCIÓN DE LAS RUEDAS
Las ruedas de la silla de paseo se pueden
quitar.
22• Para quitar las ruedas delanteras hay
que hacer que estén libres (pivotantes),
presionar las palanquitas y al mismo
tiempo empujar la rueda hasta quitarla
como indica la fi gura.
23• Para quitar las ruedas de detrás,
presionar el botoncito y al mismo tiempo
empujar la rueda hacia abajo hasta
quitarla como indica la fi gura.
CIERRE
Antes de cerrar la silla de paseo, si está
puesta la capota, afl ojar los compases.
24• Para cerrar la silla de paseo levantar los
pulsadores colocados a los lados del
manillar y girarlo hacia adelante hasta oír
clic.
25• Luego empujar el respaldo y la capota
hacia la silla de paseo y bajar el manillar
hasta que entre en su alojamiento.
Controlar que la silla de paseo esté bien
cerrada con el gancho de seguridad. La
silla de paseo cerrada se sostiene en pie.
2• Levantar con decisión el manillar hacia
arriba y luego empujarlo hacia abajo
hasta oír el clic.
ENSAMBLAJE DE LA SILLA DE PASEO
3• Poner atención en montar las dos ruedas
con freno en la parte posterior de la silla
de paseo. Introducir la rueda, apretar
el pulsador A hasta el fondo y al mismo
tiempo empujar más la rueda hasta que
salte el mecanismo de enganche.
4• Para introducir las ruedas anteriores,
bajar la palanca A y después introducirla
rueda hasta oír un clic.
5• Enganchar la barra frontal como indica la
fi gura.
CAPOTA
6• Para aplicar la capota, meter los acoples
en sus alojamientos.
7• Abrochar la capota en la parte de detrás
del respaldo. Bajar los compases como
indica la fi gura.
8• Para quitar la capota presionar los
botones laterales y al mismo tiempo
sacarla hacia arriba como indica la fi gura.
PORTABEBIDAS
El portabebidas se puede aplicar al asa
sólo en el lado derecho.
9• Para aplicar el portabebidas al asa,
ensanchar la abrazadera y fi jarla como
indica la fi gura. Insertar el portabebidas
en la abrazadera hasta oír clic.
10• Poner como indica la fi gura los dos
tapones, de manera que encajen bien.
Con dos monedas girar los tapones
para fijar el portabebidas como indica la
figura.
Se aconseja no poner en el portabebidas
bebidas calientes ni con un peso superior
a 0,5 Kg (1 lbs).
FRENO
11• Para frenar la silla de paseo, bajar con
el pie las palancas colocadas en las
ruedas posteriores. Para desbloquear los
frenos, subir las palancas. Cuando se está
parados, poner siempre el freno.
CINTURÓN DE SEGURIDAD
12• A: Asegurarse que los tirantes estén
correctamente introducidos, empujando
tal y como muestra la fi gura. B: Enganchar
el cinturón actuando como muestra la
fi gura.
13• Para desenganchar el cinturón, pulsar en
los lados de la hebilla y al mismo tiempo
tirar hacia fuera, el cinturón.
14• El nuevo cinturón de seguridad desde
hoy es más fácil de poner gracias al
sistema “quita y pon”. De hecho, antes
de enganchar el cinturón, fi je la hebilla
pequeña al respaldo introduciendo la
lengüeta en la presilla como indica la
fi gura; luego, cuando haya enganchado
Page 24

TRANSPORTE
26• La silla de paseo se puede transportar
cómodamente cuando está cerrada
gracias al asa.
DESENFUNDABLE
27• Para quitar la funda de la silla de paseo,
quitar primero la tapita que hay al lado
haciendo presión. Empujar hacia arriba el
pivote y
28• luego empujarlo hacia fuera. Sacar el
pivote por la ranura del saco. Hacer lo
mismo en ambos lados.
29• Para desenganchar el saco del asiento,
sacar la correa para la entrepierna por
debajo y desabrocharlo como indica la
fi gura.
30• Destornillar la correa por ambos lados y
sacar el saco.
GANCIOMATIC SYSTEM
El Ganciomatic System es el sistema práctico
y rápido que permite enganchar a la silla de
paseo, gracias a los acoples Ganciomatic, la
silla de auto Primo Viaggio, dotada también
con Ganciomatic System que se puede
comprar por separado.
ACOPLES GANCIOMATIC DE LA SILLA DE
PASEO
31• Para subir los acoples Ganciomatic
de la silla de paseo, levantar el saco
en los ángulos del asiento y subir los
dos acoples que automáticamente se
desplazarán hacia fuera.
32• Para bajar los acoples de la silla de paseo,
empujar primero los acoples hacia dentro
y luego bajarlos como indica la fi gura.
SILLA DE PASEO + SILLA DE AUTO
33• Para enganchar la silla de auto a la silla
de paseo hay que:
- frenar la silla de paseo,
- quitar la capota de la silla de paseo,
- bajar completamente el respaldo de la
silla de paseo,
- levantar los acoples Ganciomatic de la
silla de paseo.
- Poner la silla de auto hacia la madre y
empujarla hacia abajo hasta oír clic.
- Se aconseja no quitar el frontal de la silla
de paseo cuando se engancha la silla de
auto.
• Para desenganchar la silla de auto de
la silla de paseo consultar el manual de
instrucciones.
LÍNEA DE ACCESORIOS
34• Bolso con cambiador: bolso con
colchoneta para cambiar al bebé, que se
puede enganchar a la silla de paseo.
35• Plástico de lluvia: Plástico de lluvia de
PVC transparente con goma, aplicable a
la capota de la silla de paseo Aria. Este
plástico de lluvia ha sido concebido
también para cuando se monta a la silla
de paseo la silla de auto Primo Viaggio,
garantizando una protección total.
LIMPIEZA & MANTENIMIENTO
Su producto necesita un mínimo
mantenimiento. Las operaciones delimpieza y
mantenimiento tiene que ser efectuadas sólo
por adultos.
• Se aconseja mantener limpias las partes en
movimiento y si hiciera falta, lubricarlas con
aceite ligero.
• Secar las partes de metal del producto para
evitar que se oxiden.
• Limpiar periódicamente las partes de
plástico con un paño húmedo, no usar
disolventes ni otros productos parecidos.
• Cepillar las partes de tejido para quitar el
polvo.
• Mantener limpias las ruedas quitando polvo
y arena.
• Proteger el producto contra los agentes
atmosféricos, agua, lluvia o nieve; la
exposición continua y prolongada al sol
puede causar cambios de color en muchos
materiales.
• Conservar el producto en un sitio seco.
• Para lavar el saco, seguir las instrucciones
siguientes.
SEGURIDAD
CUIDADO
• ESTE PRODUCTO HA SIDO
DISEÑADO PARA NIÑOS CON
UN PESO MÁXIMO DE 20 KG
Y UNA ALTURA MÁXIMA DE
110 CM. LA CESTILLA HA SIDO
REALIZADA PARA SOPORTAR
UN PESO MÁXIMO DE 5 KG. LOS
POSIBLES PORTABEBIDAS QUE
VAN CON ESTE PRODUCTO ESTÁN
CONCEBIDOS PARA SOPORTAR EL
PESO MÁXIMO ESPECIFICADO EN
EL PORTABEBIDAS EN CUESTIÓN.
CUALQUIER BOLSA ENTREGADA
JUNTO AL PRODUCTO ESTÁ
REALIZADA PARA SOPORTAR UN
PESO MÁXIMO DE 0,2 KG.
• UTILICE SIEMPRE CINTURONES DE
SEGURIDAD DE 5 PUNTOS.
Page 25
• NO DEJAR NUNCA VUESTRO NIÑO
SIN CUSTODIA.
• PUEDE SER PERIGROSO UTILIZAR
ACCESSORIOS QUE NON HAYAN
SIDO APROBADOS POR EL
FABRICANTE.
• EVITAR INTRODUCIR LOS DEDOS EN
LOS MECANISMOS.
• LAS OPERACIONES DE MONTAJE
DEBEN SER REALIZADAS
ÚNICAMENTE POR PÉRSONAL
ADULTAS.
• NO UTILIZAR EL PRODUCTO SI
PRESENTA DESPERFECTOS Y/O
PIEZAR FALTANTES.
• CUANDO SE ESTÁ PARADOS PONER
SIEMPRE LOS FRENOS.
• NO UTILIZAR EL PRODUCTO CERCA
DE ESCALERAS O ESCALONES.
• SE ACONSEJA NO LEVANTAR LA
SILLA DE PASEO COGIÉNDOLA
POR LA PARTE FRONTAL PUES NO
ESTÁ CONCEBIDA PARA SOPORTAR
CARGAS. EN CASO DE NECESIDAD,
LEVANTAR LA SILLA DE PASEO
COGIÉNDOLA POR DEBAJO DE LOS
BRAZOS.
• COMPROBAR QUE ESTÉN
CORRECTAMENTE ENGANCHADOS
LA SILLA A LA SILLA DE PASEO.
NORMAS DES SEGURIDAD
Abrir y cerrar con cuidado, evitando
el introducir los dedos dentro el
mecanismo.
Para enganchar el cinturón de
seguridad, introduzca los tirantes
e inserte ambos extremos del
cinturón en la hebilla. Asegúrese
que éste insertado correctamente.
Para desenganchar el cinturón de
seguridad, apretar en los lados de la
hebilla y al mismo tiempo tirar hacia
fuera el cinturón.
Los bultos y/o accessorios pueden
desestabilizar el producto.
Recomendamos no cargarla con màs
de 5 kg - 11.0 lbs de peso.
Presten atención al riesgo que
representa el fuego y otras
importantes fuentes de calor como
son los radiadores eléctricos, estufas
a gas ect., en las proximidades del
producto.
Asegurarse siempre que la silla auto
esté bien enganchado a los ganchos
de la silla de paseo.
Page 26

• IMPORTANTE: leia atentamente as
instruções antes do uso e conserve-as para
reutilizá-las futuramente.
• A Peg Perego poderá efectuar em qualquer
momento modificações aos modelos
descritos nesta publicação, por motivos de
natureza técnica ou comercial.
A Peg Perego S.p.A. é certifi cada
ISO 9001.
A certifi cação oferece aos clientes
e aos consumidores a garantia de
uma trasparência e confi ança no
modo de trabalhar da empresa.
SERVIÇO DE ASSISTÊNCIA
No caso de perda ou dano de partes do
modelo, use somente peças originais Peg
Perego. Caso necessite de reparar, substituir,
informar-se sobre os produtos Perego,
ou também, adquirir peças originais e
acessórios, procure o Serviço de Assistência
Peg-Perego:
EUROPA: tel.:0039-039-60.88.213,
fax: 0039-039-33.09.992,
e-mail: assistenza@pegperego.it,
USA: tel.: 800.671.1701
fax: 260.471.6332
Call us toll free: 1.800.671.1701
CANADA: tel.: 905.839.3371
fax: 905.839.9542
Call us toll free: 1.800.661.5050
www.pegperego.com
A Peg Perego é a disposição de seus
Consumidores para satisfazê-los no
melhor modo possível. Por isto, conhecer
a opinião dos nossos Clientes, para nos
é muito importante e precioso. Portanto
agradecemos muito se logo após ter utilizado
um nosso produto V.Sa. queira preencher,
enviando-nos suas observações ou
sujestões, o QUESTIONÁRIO SATISFAÇÃO DO
CONSUMIDOR que encontrarás em internet
ao seguinte endereço: “www.pegperego.com/
SSCo.html.it”.
INSTRUÇÕES DE USO
ABERTURA
1• Para abrir o carrinho de bebê,
desenganchar simultaneamente as duas
proteções como resulta na fi gura.
2• Levantar com decisão o guidão para cima
e posteriormente empurrá-lo para baixo
PT•PORTUGUÊS
até sentir o impulso fi nal.
MONTAGEM DO CARRINHO DE BEBÊ
3• Atenção, montar as duas rodas com o
freio na parte posterior do carrinho de
bebê. Introduzir a roda, pressionar o
botão A até o fundo e simultaneamente
empurrar ulteriormente a roda até sentir
o impulso de enganche.
4• Para introduzir as rodas anteriores,
abaixar a alavanca A e posteriormente
enfi ar a roda até sentir o click.
5• Enganchar a parte frontal como resulta na
fi gura.
CAPOTA
6• Para aplicar a capota, introduzir os
encaixes na própria sede.
7• Abotoar a capota por de trás do encosto.
Abaixar os compassos como resulta na
fi gura.
8• Para remover a capota pressionar os
botões laterais e simultaneamente
desenfi ar a capota para cima como
resulta na fi gura.
PORTA-BEBIDAS
O porta-bebidas pode ser aplicado na
pega do lado direito.
9• Para aplicar o porta-bebidas, alargue
a abraçadeira e fi xá-la como resulta
na fi gura. Enfi ar o porta-bebidas na
abraçadeira até sentir o click.
10• Introduzir como resulta na fi gura as duas
tampas, prestando atenção aos encaixes.
Com duas moedas rodar as tampas para
fi xar o porta-bebidas como resulta na
fi gura.
Se aconselha de não introduzir no porta-
bebidas bebidas quentes e com um peso
superior a ? Kg (1 lbs).
FREIO
11• Para freiar o carrinho de bebê, abaixar
com o pé as alavancas posicionadas
sobre as rodas posteriores. Para liberar
os freios, levantar as alavancas. Lembrese de colocar sempre o freio quando o
carrinho estiver parado,.
CINTURA DE SEGURANÇA
12• A: Assegure-se que a cinta esteja
corretamente inserida empurrando como
resulta na fi gura. B: Enganchar a cintura
atuando como resulta na fi gura.
13• Para desenganchar a cintura, pressionar
aos lados da fi vela e simultaneamente
puxar o cinto para fora.
14• Agora, o novo cinto de segurança é mais
fácil de usar devido ao sistema “prende
e desprende”. De fato, antes de apertar
o cinto, prenda a fi vela ao encosto,
inserindo a lingueta no próprio orifício,
como resulta na fi gura; depois, quando
tiver ligada à cintura da criança, solte-a
do encosto para a deixar mais livre de
Page 27

se mover. A fi vela deve permanecer por
baixo das costas da criança.
REGULAÇÃO DO ENCOSTO
15• Para reclinar o encosto abaixar o botão de
regulação do encosto e simultaneamente
empurrar este último para baixo.
16• Para levantar o encosto empurrar para
cima o botão de regulação do encosto
como resulta na fi gura.
RODAS PIRUETANTES
17• Para tornar as rodas dianteiras
piruetantes, necessita abaixar a alavanca,
como resulta indicado na fi gura. Para
fazer com que elas fi quem fi xas, levante a
alavanca.
PARTE FRONTAL COM BANDEJA
18• É possível abrir a parte frontal com
bandeja só de um lado para facilitar a
entrada e a saída da criança quando for
maior. Para abrir, pressionar com uma
mão o botão e simultaneamente com
a outra mão rodar a parte frontal para
cima.
19• Para remover a parte frontal com bandeja,
pressionar os dois botões como resulta
na fi gura e simultaneamente, puxar para
cima. Não apoiar na parte frontal com
bandeja, bebidas quentes demais porque
pode tornar-se perigoso.
SUBSTITUIÇÃO DO CESTO
20• No caso em que se deve substituir o
cesto, para montá-lo, enganchá-lo
anteriormente aos ganchinhos como
resulta na fi gura.
21• Enganchá-lo posteriormente, fechando os
botões como resulta na fi gura.
EXTRAÇÃO DAS RODAS
As rodas do carrinho de bebê são
extraíveis.
22• Para remover as rodas anteriores,
necessita que as mesmas estejam
livres, pressionar as alavancas e
simultaneamente empurrar a roda até
removê-la como resulta na fi gura.
23• Para remover as rodas posteriores,
pressionar o botãozinho e
simultaneamente empurrar a roda para
baixo até removê-la como resulta na
fi gura.
FECHO
Antes de fechar o carrinho de bebê,
se for aplicada a capota, afrouxar os
compassos.
24• Para fechar o carrinho de bebê, levantar
os botões situados aos lados do guidão
e rodar o guidão para frente até sentir o
click.
25• Posteriormente empurrar o encosto e a
capota na direção do carrinho de bebê
e abaixar o guidão até fazer com que o
mesmo entre na sua sede. Verifi car que o
carrinho seja fechado corretamente com
o gancho de segurança. O carrinho de
bebê fechado fi ca em pé sózinho.
TRANSPORTE
26• O carrinho pode ser transportado
comodamente quando é fechado graças a
sua pega.
RETIRADA DA VESTIDURA EM TECIDO
27• Para retirar a vestidura da cadeira de
passeio, retire a tampinha existente na
lateral, empurrando-a. Empurre para
cima o pino e
28• sucessivamente empurre-o para fora.
Retire então, o pino do orifício da
vestidura. Faça da mesma maneira em
ambos os lados.
29• Para desenganchar a vestidura do
assento, retire o divisor de pernas por
baixo e desabotoe-a como na fi gura.
30• Solte o cinto de ambos os lados e retire a
vestidura.
GANCIOMATIC SYSTEM
O Ganciomatic System é o sistema prático e
rápido que permite de enganchar a cadeira
para automóvel Primeiro Viagem à cadeira de
passeio, graças aos encaixes Ganciomatic,
também dotado de Ganciomatic System que
pode ser adquirido separadamente.
ENCAIXES GANCIOMATIC DA CADEIRA DE
PASSEIO
31• Para levantar os encaixes Ganciomatic da
cadeira do passeio, levante a vestidura
nos cantos do assento e levante os
dois encaixes que automaticamente se
deslocam para fora.
32• Para baixar os encaixes Ganciomatic da
cadeira de passeio, empurre antes os
encaixes para dentro e sucessivamente
abaixe-os assim como na fi gura.
CADEIRA DE PASSEIO + CADEIRA PARA
AUTOMÓVEL
33• Para enganchar a cadeira para automóvel
àquela para passeio, é preciso:
- travar a cadeira de passeio,
- retirar a capota da cadeira de passeio,
- baixar completamente o encosto da
cadeira de passeio,
- levantar os encaixes Ganciomatic da
cadeira de passeio.
- colocar a cadeira para automóvel em
direcção à mãe e empurrá-la para baixo
até fazer clique.
- É aconselhável que a o pousa mãos da
cadeira de passeio não seja removido,
quando engancha-se a cadeira para
automóvel.
• Para desenganchar a cadeira para
automóvel da cadeira de passeio consulte
Page 28

o seu manual de instruções.
LINHA DE ACESSÓRIOS
34• Bolsa de Troca: Bolsa com colchãozinho
para a troca do bebé, que pode ser
enganchada à cadeira de passeio.
35• Proteção contra a chuva: Plástico para a
chuva realizado em PVC transparente com
elástico aplicável à capota do carrinho
de bebê Aria. Esta solução foi estudada
também no caso em que o carrinho de
bebê deva ser aplicada à cadeirnha de
automóvel “Primo Viaggio”, garantindo
uma total proteção.
LIMPEZA E MANUTENÇÃO
O seu produto necessita de um mínimo de
manutenção. As operações de limpeza e de
manutenção devem ser feitas somente por
pessoas adultas.
• Aconselha-se de manter limpas todas as
partes em movimento e se for necessário,
lubrifi cá-las com óleo leve.
• Enxugar as partes de metal do produto para
prevenir contra a ferrugem.
• Periodicamente limpar as partes de plástica
com um pano húmido, não usar solventes
ou outros produtos semelhantes.
• Passar uma escova nas partes de tecido
para eliminar a poeira.
• Manter as rodas limpas sem poeira e areia.
• Proteger o produto contra os agentes
atmosféricos, água, chuva ou neve; a
exposição continua e prolongada ao sol
pode causar mudanças de cor em muitos
materiais.
• Conservar o produto em um lugar seco.
• Para a lavagem da vestidura, siga as
seguintes indicações.
SEGURANÇA
ATENÇÃO
• ESTE PRODUTO FOI PROJECTADO
PARA CRIANÇAS COM PESO
MÁXIMO DE 20 KG E UMA ALTURA
MÁXIMA DE 110 CM. O CESTO FOI
REALIZADO PARA SUPORTAR UM
PESO MÁXIMO DE 5 KG. EVENTUAIS
PORTA-BEBIDAS FORNECIDOS
COM ESTE PRODUTO FORAM
ESTUDADOS PARA SUPORTAR
O PESO MÁXIMO ESPECIFICADO
NO PORTA-BEBIDAS. QUALQUER
BOLSA OU BOLSO FORNECIDOS
JUNTAMENTE COM O PRODUTO
FORAM REALIZADOS PARA
SUPORTAR UM PESO MÁXIMO DE
0,2 KG.
• UTILIZE SEMPRE OS CINTOS DE
SEGURANÇA A 5 PONTOS.
• JAMAIS DEIXE O SEU BEBÉ SEM
VIGILÂNCIA.
• PODE TORNAR-SE PERIGOSO
UTILIZAR ACESSÓRIOS QUE
NÃO SEJAM APROVADOS PELO
FABRICANTE.
• EVITE INTRODUZIR OS DEDOS NOS
MECANISMOS.
• AS OPERAÇÕES DE MONTAGEM
DEVEM SER REALIZADAS SOMENTE
POR ADULTOS.
• NÃO UTILIZE O ARTIGO, SE O
MESMO APRESENTAR PEÇAS
QUEBRADAS OU INEXISTENTES.
• QUANDO PARADA / O UTILIZE
SEMPRE OS TRAVÕES.
• NÃO UTILIZAR O PRODUTO PERTO
DE ESCADAS E DE DEGRAUS.
• ACONSELHA-SE DE NÃO LEVANTAR
O CARRINHO DE BEBÉ PELA PARTE
FRONTAL POIS ESTE NÃO FOI
PROJECTADO PARA SUPORTAR
PESOS. EM CASO DE NECESSIDADE
LEVANTAR O CARRINHO
AGARRANDO-O POR BAIXO DOS
BRAÇOS.
• VERIFICAR O CORRECTO
ENGANCHE DA CADEIRA PARA
AUTOMÓVEIS SOBRE O CARRINHO
PARA BEBÊS.
NORMAS DE SEGURANÇA
Para enganchar o cinto de segurança
enfiar as cinturinhas e inserir as
duas extremidades do cinto ao redor
da cintura na fivela. Assegurar-se
sempre de ter sentido o impulso de
fechamento.
Para desenganchar o cinto de
segurança pressionar aos lados da
fivela e contemporaneamente puxar
para o externo o cinto ao redor da
cintura.
Pacotes e/ou acessórios podem
tornar instável o produto.
Page 29

• BELANGRIJK: lees vóór het gebruik deze
handleiding met instructies met aandacht.
Bewaar de handleiding voor een toekomstige raadpleging.
• Peg Perego kan op ieder gewenst moment
wijzigingen aanbrengen op de modellen die
in deze publicatie beschreven worden, om
reden van technische of commerciële aard.
Peg Perego S.p.A. heeft een ISO
9001-certificaat.
De certificiëring biedt klanten
en consumenten de garantie van
doorzichtigheid en vertrouwen
in de manier van werken van het
bedrijf.
ASSISTENTIEDIENST
Indien delen van het model per ongeluk
verloren gaan of beschadigd raken dan dient
u alleen originele reserveonderdelen van
Peg Perego te gebruiken. Voor eventuele
reparaties of vervanging van de producten,
alsmede voor informatie over de producten,
de verkoop van originele reserveonderdelen
en accessoires, neemt u contact op met de
Assistentiedienst van Peg-Perego:
EUROPA: tel.: 0039-039-60.88.213,
fax: 0039-039-33.09.992,
e-mail: assistenza@pegperego.it,
USA: tel.: 800.671.1701
fax: 260.471.6332
Call us toll free: 1.800.671.1701
CANADA: tel.: 905.839.3371
fax: 905.839.9542
Call us toll free: 1.800.661.5050
www.pegperego.com
Peg Perego staat ter beschikking van de Consument om zo goed mogelijk aan diens wensen tegemoet te komen. Daarom is het voor
ons uiterst belangrijk om de mening van onze
klanten te kennen. Wij zullen u daarom dankbaar zijn indien u, na het gebruik van één van
ozne producten, de VRAGENLIJST TEVREDEN
KLANTEN wilt invullen die u in het internet
vindt, op het volgende adres: “www.pegperego.com/SSCo.html.it”, waarbij u opmerkingen
kunt plaatsen of suggesties kunt doen.
INSTRUCTIES VOOR HET GEBRUIK
OPENEN
1• Om de wandelwagen te openen koppelt u
tegelijkertijd de twee aansluitpunten los,
NL•NEDERLANDS
Recomendamos de não carregar o
cesto com mais de 5 kg.
Preste atenção ao risco representado
pelo fogo e de outras signifi cativas
fontes de calor, como por exemplo,
radiadores eléctricos, estufas a gás,
etc... na imediatas proximidade do
artigo.
Assegurar-se sempre que a cadeira
para automóvel, esteja bem
enganchado aos ganchos da carrinho
de bebês.
Page 30

daag kan makkelijker gedragen worden
dankzij het “los-vast” systeem. Voordat u de gordel inderdaad vastmaakt,
bevestigt u het gespje aan de rugleuning,
door het lipje in de daarvoor bestemde
doorgaande opening te steken, zoals
de afbeelding toont; wanneer de gordel
vervolgens aan het kind bevestigd is kunt
u de gordel losmaken van de rugleuning
om het kind meer bewegingsvrijheid te
geven. Het gespje moet onder de schouders van het kind blijven.
INSTELLING RUGLEUNING
15• Om de rugleuning naar achteren te
plaatsen duwt u de regelknop van de
rugleuning omlaag en duwt u tevens, op
hetzelfde moment, de rugleuning omlaag.
16• Om de rugleuning omhoog te plaatsen
drukt u de regelknop van de rugleuning
omhoog, zoals de afbeelding toont.
ZWENKWIELEN
17• Om van de voorwielen zwenkwielen te
maken duwt u de hendel omlaag, zoals
de afbeelding toont. De hendel omhoog plaatsen om de wielen weer vast te
zetten.
VOORZETSTUK-VOORZETBLAD
18• Het is mogelijk om het voorzetstuk-
voorzetblad slechts aan één zijde te
openen zodat het kind, wanneer het
iets groter is, makkelijker in en uit de
wandelwagen kan. Om te openen drukt u
met één hand op de knop, terwijl u met
de andere hand op hetzelfde moment het
voorzetstuk omhoog draait.
19• Om het voorzetstuk-voorzetblad te ver-
wijderen, drukt u op de twee knoppen,
zoals de afbeelding toont en trekt u op
het zelfde moment het element omhoog.
Plaats geen kokend hete dranken op het
voorzetstuk-voorzetblad, dit kan gevaarlijk zijn.
VERVANGING MAND
20• Wilt u de mand vervangen dan moet u
hem, om hem te monteren, aan de voorkant vastzetten aan de haakjes, zoals de
afbeelding toont.
21• Haak hem ook aan de achterkant vast
door de knopen te sluiten, zoals de afbeelding toont.
VERWIJDEREN WIELEN
De wielen van de wandelwagen kunnen
worden weggenomen.
22• Om de voorwielen te verwijderen moet
u ze eerst in de zwenkpositie zetten,
vervolgens op de hendeltjes drukken en
tegelijkertijd op het wiel, tot het weggenomen kan worden, zie de afbeelding.
23• Om de achterwielen te verwijderen drukt
u op het knopje en drukt u tegelijkertijd
het wiel omlaag, tot het weggenomen kan
zoals de afbeelding toont.
2• Til het stuur met kracht omhoog en duw
het vervolgens omlaag, tot de eindklik
gehoord wordt.
ASSEMBLAGE WANDELWAGEN
3• Let op, monteer de twee wielen met de
rem aan de achterkant van de wandelwagen. Plaats het wiel, druk knop A tot het
einde toe in en duw op hetzelfde moment
het wiel nog verder in, tot hij vast klikt.
4• Voor de bevestiging van de voorwielen
duwt u hendel A omlaag en steekt u vervolgens het wiel naar binnen tot de klik.
5• Bevestig het voorzetstuk, zoals de af-
beelding toont.
KAP
6• Voor de bevestiging van de kap steekt u
de aansluitpunten in de betreff ende zit-
tingen.
7• Knoop de kap vast op de achterkant van
de rugleuning. Plaats de passers omlaag
zoals de afbeelding toont.
8• Om de kap te verwijderen drukt u geli-
jktijdig op de zijknoppen en trekt u de
kap in opwaartse richting los, zoals de
afbeelding toont.
FLESJESHOUDER
De fl esjeshouder kan aan de handgreep
worden bevestigd, maar alleen aan de
rechterkant.
9• Om de fl esjeshouder aan de handgreep
te bevestigen verbreed u de klemband
en bevestigt u deze zoals de afbeelding
toont. Plaats de fl esjeshouder in de klem-
band tot u de klik hoort.
10• Plaats de twee doppen zoals de afbeeld-
ing toont, let goed op de manier van
vastzetten. Draai de doppen met twee
muntjes en bevestig de fl esjeshouder zo-
als de afbeelding toont.
Het wordt geadviseerd geen warme dran-
ken in de fl esjeshouder te plaatsen, en
met een gewicht van meer dan 0,5 Kg (1
lbs).
REM
11• Om de wandelwagen te remmen duwt u
met uw voet de hendels omlaag die op de
achterwielen zijn geplaatst. Om de remmen te deblokkeren plaatst u de hendels
omhoog. Schakel altijd de rem in wanneer
u stilstaat.
VEILIGHEIDSGORDEL
12• A: Controleer of de riem correct bevestigd
is, door te duwen zoals de afbeelding
toont. B: Bevestig de gordel door te werk
te gaan zoals de afbeelding toont.
13• Om de gordel los te koppelen drukt u aan
de zijkanten van de gesp en trekt u de
tailleriem op hetzelfde moment in buitenwaartse richting.
14• De nieuwe veiligheidsgordel van van-
Page 31

worden, zie de afbeelding.
SLUITEN
Voordat u de wandelwagen sluit moet u
de passers loszetten, indien de kap gemonteerd is.
24• Om de wandelwagen te sluiten plaatst
u de knoppen aan de zijkanten van het
stuur omhoog en draai u het stuur naar
voren, tot de klik gehoord wordt.
25• Vervolgens duwt u de rugleuning en de
kap in de richting van de wandelwagen,
en plaatst u het stuur omlaag tot het
terugkeert in de zitting. Controleer de
correcte sluiting van de wandelwagen
door de veiligheidshaak. De gesloten
wandelwagen blijft los overeind staan.
VERVOER
26• De wandelwagen kan moeiteloos vervoerd
worden wanneer hij gesloten is, dankzij
de handgreep.
VERWIJDEREN VAN DE BEKLEDING
27• Om de bekleding van de wandelwagen
weg te nemen, verwijdert u het dekseltje,
aan de zijkant, door er druk op uit te
oefenen. Duw de pen omhoog en
28• vervolgens in buitenwaartse richting.
Neem de pen weg uit de sleuf van de zak.
Doe dit aan beide zijden.
29• Om de zak los te maken van de zitting,
trekt u de benenscheider los vanaf de
onderkant en knoopt u de zak los, zoals
de afbeelding toont.
30• Schroef het riempje aan beide zijden los
en verwijder de zak.
GANCIOMATIC SYSTEM
Het Ganciomatic System is het praktische
en snelle systeem dat u in staat stelt het los
verkrijgbare autozitje Primo Viaggio, dat ook
over een Ganciomatic System beschikt, aan de
wandelwagen te bevestigen met behulp van
de Ganciomatic aansluitpunten.
GANCIOMATIC AANSLUITPUNTEN VAN DE
WANDELWAGEN
31• Om de Ganciomatig aansluitpunten van
de wandelwagen omhoog te plaatsen, tilt
u de zak op in de hoeken van de zitting
en tilt u de twee aansluipunten op , die
automatisch in buitenwaartse richting
verplaatst zullen worden.
32• Om de Ganciomatic aansluitpunten van
de wandelwagen omlaag te plaatsen,
duwt u de aansluipunten eerst in binnenwaartse richting en plaatst u ze daarna
omlaag, zoals de afbeelding toont.
WANDELWAGEN + AUTOZITJE
33• Om het autozitje op de wandelwagen te
bevestigen gaat u als volgt te werk:
- Rem de wandelwagen,
- Verwijder de kap van de wandelwagen,
- Plaats de rugleuning van de wandelwagen
volledig omlaag,
- Plaats de Ganciomatig aansluitpunten van
de wandelwagen omhoog.
- Breng het autozitje in positie in de
richting van de moeder en druk het
omlaag tot u de klik hoort.
- Het wordt aanbevolen het voorzetstuk
van de wandelwagen niet te verwijderen
wanneer het autozitje bevestigd wordt.
• Om het autozitje los te maken van
de wandelwagen, raadpleegt u de
handleiding met instructies ervan.
ACCESSOIRES
34• Tas Verschoning: Tas met matrasje voor
de verschoning van de baby, kan aan de
wandelwagegn bevestigd worden.
35• Regenkap: Regenkap van transparant
PVC met elastiek, kan aan de kap van
de wandelwagen Aria worden bevestigd.
Deze regenkap is tevens bestudeerd
wanneer het autozitje Primo Viaggio
op de wandelwagen bevestigd is, en
garandeert volledige bescherming.
REINIGING EN ONDERHOUD
Uw product behoeft een minimum aan onderhoud. Reiniging en onderhoud mogen alleen
uitgevoerd worden door volwassenen.
• Het wordt geadviseerd alle bewegende
delen schoon te houden en zonodig te
smeren met lichte olie.
• Droog de metalen delen van het product,
om roestvorming te voorkomen.
• Reinig regelmatig de plastic delen met een
vochtige doek, gebruik geen oplosmiddelen
of gelijkaardige producten.
• Reinig het doek met een borstel om vuil te
verwijderen.
•
Houd de wielen schoon van stof en zand.
• Bescherm het product tegen de weersomstandigheden, water, regen of sneeuw; de
continue en langdurige blootstelling aan
zonlicht kan een kleurverandering van vele
materialen veroorzaken.
• Bewaar het product op een droge plek.
• Om de zak te wassen, volgt u onderstaande
aanwijzingen op.
VEILIGHEID
LET OP
• DIT PRODUCT IS BEDOELD
VOOR KINDEREN MET EEN
Page 32

MAXIMUMGEWICHT VAN 20
KG EN EEN MAXIMUMLENGTE
VAN 110 CM. DE MAND IS TOT
STAND GEBRACHT VOOR EEN
MAXIMUMGEWICHT VAN 5 KG. DE
EVENTUELE FLESJESHOUDERS DIE
BIJ DEZE UNIT GELEVERD WORDEN
KUNNEN HET MAXIMUMGEWICHT
BEVATEEN DAT OP DE
FLESJESHOUDER ZELF VERMELD
WORDT. TASSEN OF ZAKKEN DIE BIJ
HET PRODUCT GELEVERD WORDEN
KUNNEN EEN MAXIMUMGEWICHT
VAN 0,2 KG BEVATTEN.
• GEBRUIK ALTIJD DE
VEILIGHEIDSHORDELS MET 5
BEVESTIGINGSPUNTEN.
• LAAT UW KIND NOOIT ZONDER
TOEZICHT ACHTER.
• HET KAN GEVAARLIJK ZIJN
ACCESSOIRES TE GEBRUIKEN DIE
NIET GOEDGEKEURD ZIJN DOOR DE
FABRIKANT.
• VERMIJD HET UW VINGERS IN DE
MECHANISMEN TE STEKEN.
• DE MONTAGEWERKZAAMHEDEN
MOETEN DOOR VOLWASSENEN
WORDEN UITGEVOERD.
• GEBRUIK HET PRODUCT NIET
INDIEN ER GEBROKEN ONDERDELEN
ZIJN OF INDIEN ER ONDERDELEN
ONTBREKEN.
• BIJ STILSTAND ALTIJD DE REMMEN
INSCHAKELEN.
• GEBRUIK HET PRODUCT NOOIT
NABIJ EEN TRAP OF AFSTAPJES.
• HET WORDT AANGERADEN DE
WANDELWAGEN NIET OP TE TILLEN
DOOR HET AAN DE VOORRAND
BEET TE NEMEN, OMDAT DIT
ONDERDEEL NIET ONTWORPEN IS
OM LASTEN TE VERDRAGEN. TIL
DE WANDELWAGEN IN GEVAL VAN
NOOD OP AAN DE ARMSTEUNEN.
• CONTROLEER DE CORRECTE
VASTKOPPELING VAN HET
AUTOZITJE AAN DE WAGEN.
VEILIGHEIDSNORMEN
Om de veiligheidsgordel vast te
maken steekt u de riemen naar
binnen en steekt u de twee uiteinden
van de tailleriem in de gesp.
Controleer altijd of de klik van de
sluiting plaatsgevonden heeft.
Om de veiligheidsgordel los te
maken drukt u op de zijkanten
van de gesp en trekt u op
hetzelfde moment de tailleriem in
buitenwaartse richting los.
Pakken en/of accessoires maken
het product instabiel. Het wordt
aangeraden de mand met niet meer
dan 5 kg te laden.
Wees bedacht op het risico dat
gevormd wordt door vuur en andere
belangrijke warmtebronnen, zoals
elektrische straalkachels, gaskachels
enz, die zich in de onmiddellijke
nabijheid van het product bevinden.
Controleer altijd of het autozitje
goed vastgekoppeld is aan de haken
van de wandelwagen.
Page 33
• FONTOS: a használat előtt fi gyelmesen
olvassák el az utasításokat és azokat
őrizzék meg a későbbiekben történő
tanulmányozás céljából.
• A Peg Perego az ebben a kiadásban
ismertetett modelleknél műszaki vagy
kereskedelmi jellegű okokból kifolyólag
bármikor végrehajthat módosításokat.
Peg Perego R.t. ISO 9001
tanúsítvánnyal rendelkezik.
A tanúsítvány a vállalati
munkamódszer
rendszerezettségének és az abban
való bizalomnak a garanciáját
kínálja az ügyfeleknek és a
fogyasztóknak.
VEVŐSZOLGÁLAT
Ha véletlenül a modell részei elvesznek vagy
károsodnak, akkor csak eredeti Peg Perego
alkatrészeket használjon! Az esetleges
javítások, cserék, a termékekkel kapcsolatos
információk valamint az eredeti alkatrészek
és tartozékok értékesítése ügyében vegye fel
a kapcsolatot a Peg Perego Vevőszolgálatával:
EUROPA: tel.:0039-039-60.88.213,
fax: 0039-039-33.09.992, a
e-mail: assistenza@pegperego.it,
USA: tel.: 800.671.1701
fax: 260.471.6332
Call us toll free: 1.800.671.1701
CANADA: tel.: 905.839.3371
fax: 905.839.9542
Call us toll free: 1.800.661.5050
www.pegperego.com
A Peg Perego a fogyasztóinak rendelkezésére
áll minden igényük legjobb kielégítése
céljából. Ehhez az ügyfeleink véleményének
megismerése számunkra rendkívül fontos és
értékes. Ezért nagyon hálásak lennénk, ha a
termékünk használatbavétele után kitöltené a
FOGYASZTÓ ÉRTÉKELÉSE KÉRDŐÍVET, amelyet
az alábbi internet címen talál meg: www.
pegperego.com/SSCo.html.it.
Ott feltüntetheti az esetleges észrevételeit
vagy ötleteit.
HASZNÁLATI UTASÍTÁS
SZÉTNYITÁS
1• A sportkocsi szétnyitásához egyidejűleg
kapcsolják le a két illesztőkapcsot az ábra
szerint.
2• Határozottan emeljék felfelé a fogantyút
és ezt követően azt nyomják lefelé az
utolsó kattanásig.
A SPORTKOCSI ÖSSZEÁLLÍTÁSA
3• Figyelem, szereljék fel a két kereket a
fékkel együtt a sportkocsi hátsó részére.
Illesszék be a kereket, teljesen nyomják
be az A gombot és ezzel egyidejűleg
tolják be a kereket a beakadást jelző
kattanásig.
4• Az elülső kerekek beillesztéséhez
engedjék le az A kart és ezt követően
vezessék be a kereket kattanásig.
5• Akasszák be a biztosítópántot az ábra
szerint.
KOCSITETŐ
6• A kocsitető felerősítéséhez vezessék
be az illesztőkapcsokat a megfelelő
mélyedésbe.
7• Gombolják be a kocsitetőt a háttámla
hátulján.Engedjék le a támaszkarokat az
ábra szerint.
8• A kocsitető levételéhez nyomják be az
oldalsó gombokat és egyidejűleg húzzák
felfelé a kocsitetőt az ábra szerint.
ITALTARTÓ
Az italtartó csak a jobb oldalon erősíthető
a fogantyúra.
9• Az italtartónak a fogantyúra történő
erősítéséhez lazítsák meg a tartószíjat és
rögzítsék az ábra szerint. Vezessék be az
italtartót a tartószíjba kattanásig.
10• Az ábra szerint helyezzék be a két dugót,
óvatosan eljárva az illesztékeknél. Két
pénzérmével fordítsák el a dugókat az
italtartó rögzítéséhez az ábra szerint.
0,5 kg-nál (1 lbs) nagyobb súlyú és
meleg italoknak az italtartóba történő
behelyezése nem javasolt.
FÉK
11• A sportkocsi fékezéséhez lábbal engedjék
le a hátsó kerekekre szerelt karokat az
ábra szerint. A fékek kiengedéséhez
emeljék meg a karokat. Álló helyzetben
mindig állítsák be a féket.
BIZTONSÁGI ÖV
12• A: Győződjenek meg arról, hogy a
vállpánt helyesen be van-e vezetve oly
módon, hogy nyomják be az ábra szerint.
B: Kapcsolják be az övet az ábra szerint.
13• Az öv kikapcsolásához nyomják be a csat
oldalait és egyidejűleg húzzák a kültér
irányába a derékövet.
14• Mától kezdve egyszerűbb az új biztonsági
öv viselete a “kattintsd be és kattinsd
ki” rendszernek köszönhetően. Az öv
bekapcsolása előtt kattintsa be a kis
csatot a háttámlához oly módon, hogy
vezesse be a nyelvecskét a megfelelő
nyílásba az ábra szerint; majd miután
bekapcsolta az övet a gyermekén,
HU•MAGYAR
Page 34
kattintsa le azt a háttámláról a gyermek
szabadabb mozgásának lehetővé
tételéhez. A kis csatnak a gyermek vállai
alatt kell maradnia.
HÁTTÁMLA BEÁLLÍTÁSA
15• A háttámla lehajtásához eresszék
le a háttámlaszabályozó gombot és
egyidejűleg ezutóbbit nyomják lefelé.
16• A háttámla felemeléséhez nyomják felfelé
a háttámlaszabályozó gombot az ábra
szerint.
BOLYGÓKEREKEK
17• Az elülső kerekek bolygókerekekké
alakításához a kar leengedése szükséges
az ábra szerint. A rögzítésükhöz emeljék
fel a kart.
BIZTOSÍTÓPÁNT-TÁLCA
18• Kinyitható a biztosítópánt-tálca csak az
egyik oldalról a gyermek beszállásának
és kiszállásának megkönnyítéséhez,
amikor az már nagyobb. A kinyitásához
nyomják meg az egyik kézzel a gombot
és egyidejűleg a másik kézzel fordítsák
felfelé a biztosítópántot.
19• A biztosítópánt-tálca levételéhez nyomják
meg a két gombot az ábra szerint és
egyidejűleg húzzák felfelé. Ne tegyenek a
biztosítópánt-tálcára forró italokat, mert
az veszélyes lehet.
KOSÁR CSERÉJE
20• Abban az esetben, ha le kell cserélni a
kosarat, akkor annak felerősítéséhez
akasszák be az elülső részét a kis
kampókhoz az ábra szerint.
21• A gombokat begombolva akasszák be a
hátsó részét is az ábra szerint.
KEREKEK KIHÚZÁSA
A sportkocsi kerekei kihúzhatók.
22• Az elülső kerekek levételéhez azokat
először bolygókerekekké kell alakítani,
benyomni a kis karokat és ezzel
egyidejűleg tolni a kereket addig, amíg le
nem válik, az ábra szerint.
23• A hátsó kerekek levételéhez nyomják be a
gombot és ezzel egyidejűleg tolják lefelé
a kereket addig, amíg le nem válik, az
ábra szerint.
ÖSSZECSUKÁS
A sportkocsi összecsukása előtt,
amennyiben a kocsitető rá van erősítve,
engedjék ki a támaszkart.
24• A sportkocsi összecsukásához emeljék
meg a fogantyú oldalaira szerelt
gombokat és kattanásig forgassák előre a
fogantyút.
25•
Ezt követően nyomják a háttámlát és
a kocsitetőt a sportkocsi irányába és
eresszék le a fogantyút addig, amíg
az vissza nem tér a mélyedésébe.
Ellenőrizzék a sportkocsi helyes
összecsukását a biztonsági kapocsnál.
Az összecsukott sportkocsi egymagában
megáll.
SZÁLLÍTÁS
26• A sportkocsi összecsukott állapotban
a fogantyú segítségével kényelmesen
szállítható.
HUZAT LEVÉTELE
27• A sportkocsi huzatának levételéhez
felfeszítve válasszák le az oldalsó részen
elhelyezett fedelet. Nyomják felfelé a
pecket és
28• ezt követően azt tolják a kültér irányába.
Ezután húzzák ki a pecket a zsák
nyílásából. Mindkét oldalon hajtsák végre
a műveletet.
29• A zsáknak az ülésről történő
leválasztásához alulról húzzák le a
lábválasztót és gombolják le a zsákot az
ábra szerint.
30• Csavarozzák ki a szíjakat mindkét oldalon
és húzzák le a zsákot.
GANCIOMATIC SYSTEM
A Ganciomatic System egy olyan praktikus
és gyors rendszer, amely a Ganciomatic
kapcsoknak köszönhetően lehetővé teszi
a külön megvásárolható Ganciomatic
System-mel felszerelt Primo Viaggio autós
gyerekülésnek a sportkocsira történő
rákapcsolását.
GANCIOMATIC KAPCSOK A SPORTKOCSIN
31• A sportkocsi Ganciomatic kapcsainak
felemeléséhez húzzák fel a zsákot az ülés
sarkainál és emeljék fel a két kapcsot,
amelyek ekkor automatikusan eltolódnak
a kültér irányába.
32• A sportkocsi Ganciomatic kapcsainak
leengedéséhez először nyomják a
kapcsokat befelé és ezt követően
engedjék le azokat az ábra szerint.
SPORTKOCSI + AUTÓS GYEREKÜLÉS
33• Az autós gyerekülésnek a sportkocsira
történő kapcsolásához szükséges:
- a sportkocsi lefékezése,
- a sportkocsi tetejének levétele,
- a sportkocsi háttámlájának teljes
lehajtása,
- a sportkocsi Ganciomatic kapcsainak
felemelése.
- Az autós gyerekülésnek a mama irányába
történő beállítása és lefelé nyomása
kattanásig.
- Nem ajánlatos a bztosítópánt levétele
akkor, amikor az autós gyerekülést
bekapcsolják.
• Az autós gyerekülés sportkocsiról történő
lekapcsolásához tanulmányozzák az
ahhoz tartozó használati utasítást.
Page 35

KIEGÉSZÍTŐK TERMÉKSKÁLÁJA
34• Pelenkázó Táska: Táska védőhuzattal
együtt a baba pelenkázásához, amely a
sportkocsira akasztható.
35• Esővédő: az Aria sportkocsi tetőjére
illeszthető, átlátszó PVC esővédő
gumiszalaggal. Ezt az esővédőt a teljes
védelem biztosítása érdekében arra
az esetre is tervezték, amikor a Primo
Viaggio autós gyerekülést kapcsolják a
sportkocsira.
TISZTÍTÁS ÉS KARBANTARTÁS
A termék minimális karbantartást igényel.
A tisztító és karbantartó műveleteket csak
felnőttek végezhetik.
• Valamennyi mozgó rész tisztántartása
javasolt, és amennyiben az szükséges,
olajjal vékonyan kenjék be azokat.
• Szárítsák meg a termék fémből készült
részeit a rozsdásodás megelőzése céljából.
• Egy nedves törlőruhával rendszeresen
tisztítsák meg a műanyagból készült
részeket, ne használjanak oldószereket
vagy egyéb hasonló termékeket.
• A szövetrészeket keféljék le a por
eltávolításához.
• Portól és homoktól tartsák tisztán a
kerekeket.
• Óvják a terméket a légköri hatóerőktől,
víztől, esőtől vagy hótól; a folytonos és
hosszadalmas napsütésnek való kitétel sok
alapanyagban színváltozást okozhat.
• Száraz helyen tárolják a terméket.
• A zsák mosásánál tartsák be az alábbi
útmutatást.
BIZTONSÁG
VIGYÁZAT
• EZT A TERMÉKET MAXIMUM 20
KG-OS SÚLYÚ ÉS 110 CM-NÉL
NEM MAGASABB GYERMEKEK
SZÁMÁRA TERVEZTÉK. A BEVÁSÁRLÓ
KOSÁR MAXIMUM 5 KG-OS TEHER
ELBÍRÁSÁRA KÉSZÜLT. AZ EHHEZ
A TERMÉKHEZ ESETLEGESEN
MELLÉKELT ITALTARTÓKAT ÚGY
TERVEZTÉK, HOGY MAGÁN AZ
ITALTARTÓN FELTÜNTETETT
MAXIMÁLIS SÚLYT ELBÍRJÁK. A
TERMÉKKEL EGYÜTT ÁTADOTT
BÁRMILYEN TÁSKA VAGY REKESZ
MAXIMUM 0,2 KG-OS TEHER
ELBÍRÁSÁRA KÉSZÜLT.
• MINDIG 5 PONTOS BIZTONSÁGI
ÖVET HASZNÁLJANAK.
• NE HAGYJA SOHA GYEREKÉT
FELÜGYELET NÉKLÜL.
• VESZÉLYES LEHET OLYAN
ESZKÖZÖK ALKALMAZÁSA, MELYET
A GYÁRTÓ NEM HAGYOTT JÓVÁ.
• AZ UJJÁT SEMMILYEN
KÖRÜLMÉNYEK KÖZT NE TEGYE A
GÉPEZETBE.
• A FELSZERELÉST NAGYKORÚNAK
KELL VÉGEZNIE.
• AMENNYIBEN TÖRÉST ÉSZLEL VAGY
ALKATRÉSZEK HIÁNYOZNAK, NE
HASZNÁLJA A TERMÉKET.
• MEGÁLLÁSKOR MINDIG HÚZZA BE A
FÉKEKET.
• NE HASZNÁLJÁK A TERMÉKET
LÉPCSŐ VAGY LÉPCSŐFOKOK
KÖZELÉBEN.
• NEM AJÁNLATOS A
HOMLOKVÉDŐNÉL MEGMARKOLVA
FELEMELNI A SPORTKOCSIT, MERT
AZT NEM TERHELÉSEK ELBÍRÁSÁRA
TERVEZTÉK. SZÜKSÉG ESETÉN A
KARTÁMLÁK ALATT MEGFOGVA
EMELJÉK FEL A SPORTKOCSIT.
• ELLENŐRIZZÉK AZ AUTÓS
GYEREKÜLÉS HELYES
KAPCSOLÓDÁSÁT A KOCSIVÁZHOZ.
BIZTONSÁGI ELŐÍRÁSOK
A biztonsági öv bekapcsolásához
vezessék be a vállpántot és illesszék
be a deréköv két végződését a
csatba. Mindig győződjenek meg
arról, hogy megtörtént a záró
kattanás.
A biztonsági öv kikapcsolásához
nyomják be a csat oldalait és
egyidejűleg húzzák a kültér irányába
a derékövet.
Csomagok és/vagy tartozékok
instabillá tehetik a terméket.
Javasoljuk, hogy 5 kg-nál nagyobb
súllyal ne rakják meg a kosarat.
Fordítson figyelmet a tűz, vagy
egyébb hőforrások által képviselt
veszélyre, mint radiátorok,
gázkályhák, stb., melyek a termék
Page 36
• POMEMBNO: skrbno preberite navodila pred
uporabo in jih shranite, da jih boste lahko
še kdaj prebrali.
• Peg Perego se lahko kadarkoli odloči, da bo
spremenil modele, objavljene v katalogu,
najsi bo to zaradi tehničnih ali tržnih
razlogov.
Peg Perego S.p.A. ima certifi kat ISO
9001.
Certifi kat za stranke in porabnike
pomeni garancijo transparentnosti
in zaupanja v delo podjetja.
POMOČ UPORABNIKOM
Če izgubite ali poškodujete sestavni del
izdelka, uporabite izključno originalne
rezervne dele Peg Perego. Za morebitna
popravila, zamenjave, podatke o izdelkih,
prodajo originalnih rezervnih delov in
dodatkov, stopite v stik s centrom za pomoč
uporabnikom Peg Perego:
EUROPA: tel.:0039 (039) 60-88-213,
faks: 0039 (039) 33-09-992,
e-pošta: assistenza@pegperego.it,
USA: tel.: 800.671.1701
fax: 260.471.6332
Call us toll free: 1.800.671.1701
CANADA: tel.: 905.839.3371
fax: 905.839.9542
Call us toll free: 1.800.661.5050
www.pegperego.com
Peg Perego je vedno na voljo svojim strankam,
da v kar največji meri izpolni njihove potrebe.
Zato je za nas zelo pomembno, da poznamo
mnenje svojih strank.
Hvaležni vam bomo, če si boste, ko boste
uporabili naš izdelek, vzeli čas in izpolnili
VPRAŠALNIK O ZADOVOLJSTVU STRANK, ki
ga boste našli na naših spletnih straneh, na
naslovu “www.pegperego.com/SSCo.html.
en-UK”, in nam sporočite vaše pripombe in
predloge.
NAVODILA ZA UPORABO
ODPIRANJE
1• Da bi voziček odprli, sočasno odprite
zaponki, kot je prikazano na risbi.
2• Odločno dvignite ročaj navzgor in ga
potisnite navzdol, dokler ne zaslišite
klika.
SL•SLOVENŠČINA
közvetlen közelében vannak.
Győződjenek meg mindig arról, hogy
az autós gyerekülés jól kapcsolódike a sportkocsi kapcsaihoz.
Page 37

SESTAVLJANJE VOZIČKA
3• Pozor, kolesi z zavorami morate namestiti
na zadnjo os vozička. Vstavite kolo,
do konca pritisnite gumb A in sočasno
potisnite kolo, dokler ne zaslišite klika.
4• Da bi vstavili sprednja kolesa, spustite
vzvod A in nato vstavite kolo, dokler ne
klikne.
5• Pripnite sprednjo zaporo, kot prikazuje
risba.
STREHICA
6• Da bi namestili strehico, vstavite
priključke v ustrezna ležišča.
7• Strehico pripnite na zadnji strani
hrbtnega naslona. Spustite napenjala, kot
je prikazano na risbi.
8• Da bi odstranili strehico, pritisnite bočna
gumba in sočasno povlecite strehico
navzgor, kot je prikazano na risbi.
DRŽALO ZA PIJAČO
Držalo za pijačo je mogoče namestiti na
ročaj samo na desni strani.
9• Da bi namestili držalo za pijačo na ročaj,
razpnite nastavek in ga pritrdite, kot je
prikazano na risbi. Vstavite držalo za
pijačo v nastavek, dokler ne zaslišite
klika.
10• Vstavite pokrovčka, kot je prikazano na
risbi, in pri tem pazite na utore. Z dvema
kovancema obrnite pokrovčka, da bi
pritrdili držalo za pijačo, kot je prikazano
na risbi.
Svetujemo vam, da v držalo ne postavljate
toplih pijač ali pijač, težjih od 0,5 kg (1
funta).
ZAVORA
11• Da bi voziček zavrli, z nogo spustite
vzvode, nameščene na zadnjih kolesih.
Da bi sprostili zavore, dvignite vzvoda. Ko
stojite na mestu, vedno zavrite.
VARNOSTNI PAS
12• A: 12•Prepričajte se, da je naramnica
pravilno vstavljena, kot je prikazano na
risbi. B: Zapnite pas okoli pasu, kot je
prikazano na risbi.
13• Da bi odpeli pas, pritisnite ob straneh
sponke in sočasno jermenček okoli pasu
potegnite navzven.
14• Novi varnostni pas je zaradi sistema
"pripni in odpni" še laže uporabljati.
Preden pas zapnete, pripnite sponko na
hrbtni naslon, tako da vstavite jeziček
v ustrezno režo, kot je prikazano na
risbi; ko zapnete pas otroku, ga odpnite
z naslona, da se otrok laže premika.
Sponka mora ostati pod otrokovimi
rameni.
URAVNAVANJE HRBTNEGA NASLONA
15• Da bi spustili hrbtni naslon, spustite
gumb za uravnavanje naslona in ga
sočasno potisnite navzdol.
16• Da bi dvignili hrbtni naslon, navzgor
potisnite naravnavalo za naslon, kot je
prikazano na risbi.
VRTLJIVA KOLESA
17• Da bi se sprednja kolesa vrtela, je treba
spustiti vzvod, kot je prikazano na risbi.
Da bi jih fiksirali, dvignite vzvod.
SPREDNJA ZAPORA-PLADENJ
18• Zaporo-pladenj je mogoče odpreti tudi
samo na eni strani, tako da lahko otrok
laže spleza iz vozička in spet vanj, ko je
večji. Da bi ga odprli, z eno roko pritisnite
gumb in z drugo zavrtite sprednjo zaporo
navzgor.
19• Da bi odstraniili sprednjo zaporo-pladenj,
ob straneh pritisnite gumbe, kot je
prikazano na risbi, in sočasno povlecite
navzgor. Na zaporo ne postavljajte
pladnja z vročo pijačo, saj bi to lahko bilo
nevarno.
ZAMENJAVA NAKUPOVALNE KOŠARE
20• Če bi želeli zamenjati nakupovalno
košaro, jo morate ob namestitvi na
zadnjih obešalih pripeti, kot je prikazano
na risbi.
21• Zapnite jo zadaj z gumbi, kot je
prikazano na risbi.
IZVLAČENJE KOLES
Kolesa vozička je mogoče izvleči.
22• Da bi odstranili sprednja kolesa, jih
morate sprostiti, da se bodo prosto
vrtela, pritisniti vzvode in sočasno
potisniti kolo, da se sname.
23• Da bi odstranili zadnja kolesa, pritisnite
gumb in sočasno potisnite kolo navzdol,
da bi ga sneli, kot prikazuje risba.
ZAPIRANJE
Če je na vozičku strehica, morate sprostiti
napenjala, preden želite voziček zapreti.
24• Da bi ga zaprli, dvignite gumba ob
straneh ročaja in ročaj zavrtite naprej,
dokler ne klikne.
25• Nato potisnite hrbtni naslon in strehico
proti vozičku in spustite ročaj navzdol,
dokler ne bo sedel v svoje ležišče. Z
varnostno zanko preverite, ali je voziček
pravilno zaprt. Zaprt voziček bo stal sam.
PREVOZ
26• Voziček lahko zaradi ročaja preprosto
prenašate.
SNEMLJIVOST PREVLEK
27• Da bi z vozička sneli prevleke, odstranite
pokrovček na levi in pritisnite. Zatič
potisnite navzgor in
28• nato pa ga potisnite navzven. Zatič
izvlecite iz reže na vreči. Tako naredite na
obeh straneh.
29• Da bi vrečo odpeli z ležišča, izvlecite
mednožni pas in ga odpnite, kot
Page 38
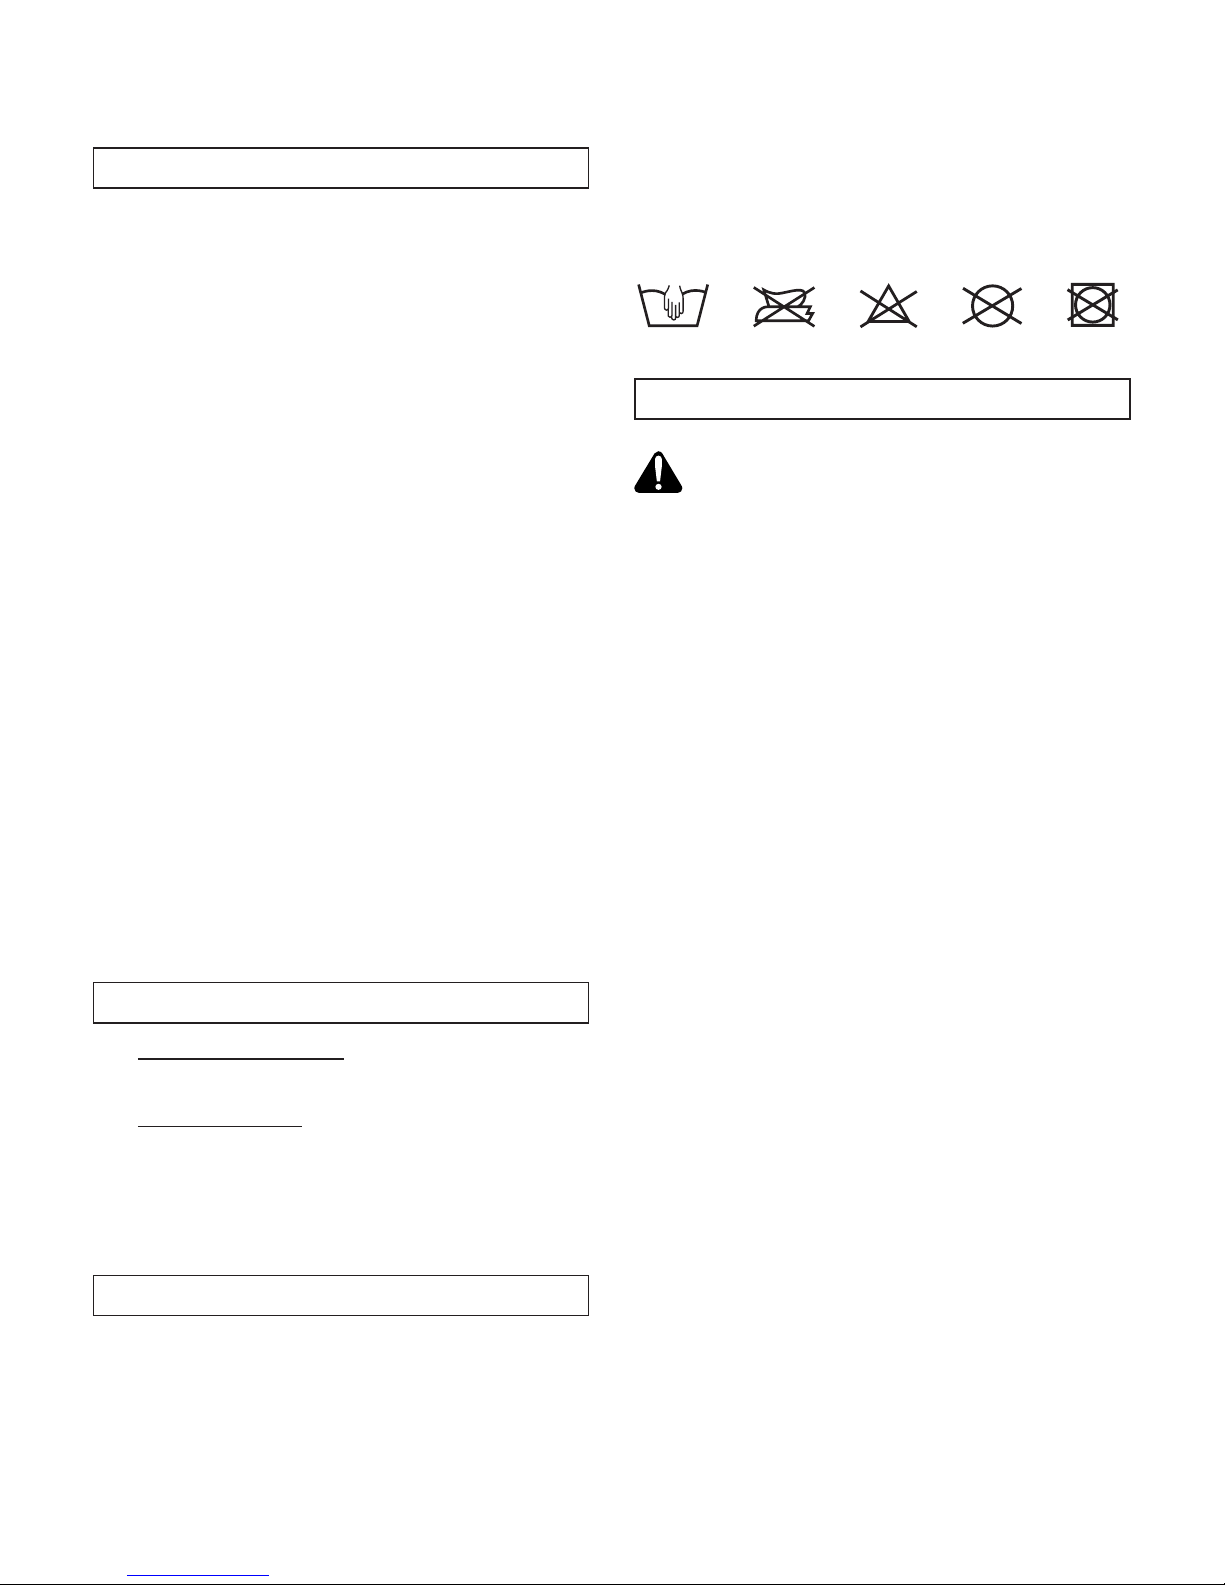
prikazuje risba.
30• Odvijte jermenček z obeh strani in
izvlecite vrečo.
SISTEM GANCIOMATIC
Sistem Ganciomatic je praktični in hitri
sistem, ki omogoča, da na voziček s priključki
Ganciomatic pripnete avtosedež Primo
Viaggio, ki ga je mogoče kupiti ločeno, a je
prav tako opremljen s sistemom Ganciomatic.
PRIKLJUČKI GANCIOMATIC ZA VOZIČEK
31• Da bi dvignili priključke Ganciomatic na
vozičku, na vogalih sedeža dvignite vrečo
in dvignite oba priključka, ki se bosta
samodejno premaknila navzven.
32• Da bi spustili priključke Ganciomatic
na vozičku, priključke najprej potisnite
navznoter in jih nato potisnite navzdol,
kot prikazuje risba.
VOZIČEK + AVTOSEDEŽ
33• Da bi avtosedež pripeli na voziček, je
treba:
- voziček zavreti,
- z vozička odstraniti strehico,
- naslon vozička spustiti v vodoravni
položaj,
- dvigniti priključke Ganciomatic na
vozičku.
- Avtosedež postaviti tako, da je obrnjen
proti staršu in ga potisniti navzdol, dokler
ne klikne.
- Svetujemo vam, da sprednje zapore
vozička ne odstranjujete, ko pripenjate
avtosedež.
• Da bi avtosedež sneli z vozička, preberite
navodila za uporabo avtosedeža.
DODATKI
34• Torba za previjanje: Torba s podlogo za
previjanje otroka, ki jo je mogoče pripeti
na voziček.
35• Dežna prevleka: Plastična dežna prevleka
z elastiko, ki jo je mogoče namestiti na
strehico vozička Aria. Izdelana je tako,
da omogoča popolno zaščito tudi za
avtosedež Primo Viaggio, ki bi bil pripet
na voziček.
ČIŠČENJE IN VZDRŽEVANJE
Izdelek ne potrebuje veliko vzdrževanja.
Čistijo in vzdržujejo ga lahko samo odrasli.
• Svetujemo vam, da redno čistite vse
premikajoče se dele in jih, če je to
potrebno, podmažete z lahkim oljem.
• Kovinske dele obrišite do suhega, da ne bi
zarjaveli.
• Plastične dele redno brišite z vlažno krpo.
Ne uporabljajte topil ali drugih podobnih
izdelkov.
• Blago skrtačite, da z njega odstranite prah.
• Na koleščkih ne sme biti prahu ali peska.
• Izdelek zaščitite pred atmosferskimi
vplivi, vodo, dežjem ali snegom; daljše
izpostavljanje soncu lahko povzroči
spremembo barve veliko materialov.
• Izdelek hranite v suhem prostoru.
• Za čiščenje vreče upoštevajte naslednja
navodila.
VARNOST
POZOR
• TA IZDELEK JE NAČRTOVAN ZA
OTROKE, TEŽKE NAJVEČ 20 KG IN
VISOKE NAJVEČ 110 CM. KOŠARA JE
NAMENJENA BREMENOM DO 5 KG.
MOREBITNO DRŽALO ZA PIJAČO,
DOBAVLJENO Z IZDELKOM, JE
NAMENJENO IZKLJUČNO BREMENU,
VTISNJENEM NA DRŽALU ZA PIJAČO.
MOREBITNE PRILOŽENE TORBE ALI
ŽEPI NA IZDELKU SO NAMENJENI
BREMENU DO NAJVEČ 0,2 KG.
• VEDNO UPORABLJAJTE
PETTOČKOVNE VARNOSTNE
PASOVE.
• OTROKA NIKOLI NE PUŠČAJTE
SAMEGA.
• UPORABLJANJE DODATNE OPREME,
KI JE NI ODOBRIL PROIZVAJALEC, BI
LAHKO BILO NEVARNO.
• V MEHANIZME NE VTIKAJTE
PRSTOV.
• IZDELEK MORAJO SESTAVITI
ODRASLI.
• IZDELKA NE UPORABLJAJTE, ČE JE
KATERI OD DELOV POČEN ALI ČE
DELI MANJKAJO.
• KO STOJITE NA MESTU, VEDNO
ZAVRITE VOZIČEK.
• IZDELKA NE UPORABLJAJTE V
BLIŽINI STOPNIC.
• SVETUJEMO VAM, DA VOZIČKA
NE DVIGATE ZA SPREDNJI DEL,
SAJ TA NI NAČRTOVAN TAKO,
DA BI PRENESEL TOVRSTNE
OBREMENITVE. ČE MORATE
VOZIČEK DVIGNITI, GA PRIMITE
POD NASLONI ZA ROKE.
• PREVERITE, DA JE AVTOSEDEŽ
Page 39
PRAVILNO PRITRJEN NA VOZIČEK.
VARNOSTNI PREDPISI
Da bi pripeli varnostni pas, vstavite
naramnice in konca pasu vtaknite v
sponko. Vedno se prepričajte, da ste
zaslišali klik, s katerim se sponka
zapne.
Da bi varnostni pas odpeli, pritisnite
ob straneh sponke in sočasno pas
potegnite navzven.
Paketi ali dodatki lahko ogrozijo
stabilnost vozička. Svetujemo vam,
da v nakupovalno košaro ne naložite
za več kot 5 kg stvari.
Ob odprtem ognju ali ogrevalnih
telesih (električni radiatorji, plinske
pečice itd.) bodite še posebej
pozorni na nevarnost.
Vedno se prepričajte, da je avtosedež
pravilno pripet zanke vozička.
• ВАЖНО: перед применением изделия
внимательно прочтите инструкции, и
храните их для использования в будущем.
• Пег Перего имеет право внести в любой
момент изменения в модели, описанные в
данном руководстве, по техническим или
коммерческим причинам.
Peg Perego S.p.A.
сертифицирована по норме ISO
9001.
Сертификация гарантирует
заказчикам и потребителям, что
компания работает, соблюдая
принципы гласности
и доверия.
ОБСЛУЖИВАНИЕ
Если вы случайно потеряли или повредили
какие-нибудь детали изделия, заменяйте их
только фирменными запасными частями Пег
Перего. Для ремонта, замены, получения
сведений о продукции, приобретения
фирменных запасных частей и
принадлежностей обращайтесь в Сервисную
службу Пег-Перего:
EUROPA: тел.: 0039-039-60.88.213,
факс: 0039-039-33.09.992,
e-mail: assistenza@pegperego.it,
USA: tel.: 800.671.1701
fax: 260.471.6332
Call us toll free: 1.800.671.1701
CANADA: tel.: 905.839.3371
fax: 905.839.9542
Call us toll free: 1.800.661.5050
www.pegperego.com
Фирма Пег Перего находится в
распоряжении своих потребителей
для того, чтобы наилучшим образом
удовлетворить все их требования. Поэтому,
для нас очень важно и ценно знать мнение
наших заказчиков. Мы будем вам очень
признательны, если, после использования
нашего изделия, вы пожелаете заполнить
АНКЕТУ УДОВЛЕТВОРЕННОСТИ
ПОТРЕБИТЕЛЯ, которую вы найдете в
интернете на сайте:
“www.pegperego.com/SSCo.html.en-UK”,
выразив там свои пожелания или
советы.
ИНСТРУКЦИИ ПО ПОЛЬЗОВАНИЮ
РАСКЛАДЫВАНИЕ
1• Для раскладывания коляски отцепите
одновременно два крепления, как
RU•PУССКИЙ
Page 40

показано на рисунке.
2• Резко потяните рукоятку вверх,
после чего опустите ее вниз до
заключительного щелчка.
СБОРКА ПРОГУЛОЧНОЙ КОЛЯСКИ
3• Внимание: монтаж двух колес с
тормозом производится в задней
части коляски. Вставить колесо, нажать
полностью на кнопку А, одновременно
нажимая на колесо до щелчка
присоединения.
4• Для присоединения передних колес
опустить рычаг
А, а затем вставить
колесо до щелчка.
5• Прикрепите передник, как показано на
рисунке.
КАПОТ
6• Для установки капота вставьте
крепления в соответствующие гнезда.
7• Застегните капот на задней стороне
спинки, и опустите каркас, как
показано на рисунке.
8• Для снятия капота нажмите боковые
кнопки и одновременно с этим
потяните капот вверх, как
показано на
рисунке.
КОЛЬЦО-ПОДСТАВКА ДЛЯ НАПИТКОВ
Кольцо можно установить на ручку
только с правой стороны.
9• Для установки кольца на ручку,
расширьте полосу и прикрепите ее
так, как показано на рисунке. Вставьте
кольцо в полосу до щелчка.
10• Вставьте две заглушки так, как показано
на рисунке, обращая внимание на
вырезы. При помощи двух монеток
поверните заглушки и закрепите
кольцо, как показано на рисунке.
Рекомендуется не ставить в кольцо
горячие напитки и напитки весом более
0,5 кг.
ТОРМОЗ
11• Для торможения прогулочной коляски
нажмите ногой рычаги, находящиеся
на задних колесах. Для разблокировки
тормозов, поднимите рычаги. Когда
коляска стоит, всегда ставьте ее
на
тормоз.
РЕМЕНЬ БЕЗОПАСНОСТИ
12• А: Убедиться в том, что бретель
вставлена правильно, нажимая, как
показано на рисунке. В: Соединить
ремень, действуя по рисунку.
13• Для отсоединения ремня нажать с
боков пряжки и одновременно потянуть
наружу поясной ремешок.
14• Благодаря пристегивающейся системе,
теперь ремень безопасности можно
будет надевать проще. Перед
тем,
как прикрепить ремень, прикрепите
пряжку к спинке, пропустив язычок
через специальную петлю, как показано
на рисунке. Затем, когда ремень был
застегнут на ребенке, открепите его
от спинки, чтобы ваш ребенок мог
свободно двигаться. Пряжка должна
оставаться под плечами ребенка.
РЕГУЛИРОВКА НАКЛОНА СПИНКИ
15• Чтобы опустить спинку сместите
вниз кнопку
устройства регулировки
наклона спинки, и одновременно с этим
сместите ее вниз.
16• Чтобы поднять спинку сместите вверх
устройство регулировки наклона
спинки, как показано на рисунке.
ПОВОРОТНЫЕ КОЛЕСА
17• Для того, чтобы передние колеса
стали поворотными, опустите рычаг,
как показано на рисунке. Для их
блокировки поднимите рычаг.
ПЕРЕДНИК -ЛОТОК
18• Передник-лоток
можно отстегивать
только с одной стороны, облегчая
посадку ребенка в коляску и высадку
из нее, когда он подрастет. Для того
чтобы открыть передник, одной рукой
нажать кнопку, и одновременно с этим
другой рукой повернуть передник
вверх.
19• Для того, чтобы снять пеpедник-лоток,
нажать на две кнопки, как показано
на рисунке, и одновременно потянуть
вверх. Не ставьте горячие напитки
на передник-лоток, это может быть
опасным.
ЗАМЕНА КОРЗИНЫ
20• При замене корзины, для ее установки
прикрепите ее спереди к креплениям,
как показано на рисунке.
21• Прикрепите ее и сзади, пристегнув
кнопки, как показано на рисунке.
СНЯТИЕ КОЛЕС
Колеса прогулочной
коляски - съемные.
22• Для снятия передних колес необходимо
сначала сделать их поворотными,
нажать на лепестки и одновременно
с этим сместить колесо вплоть до его
извлечения, как показано на рисунке.
23• Для снятия задних колес, нажмите
кнопку и одновременно с этим сместите
колесо вниз вплоть до его извлечения,
как показано на рисунке
.
СКЛАДЫВАНИЕ
Перед складыванием прогулочной
коляски, если не нее установлен капот,
ослабьте каркас.
24• Чтобы сложить прогулочную коляску,
поднимите кнопки, расположенные
по сторонам ручки, и поверните ручку
вперед до щелчка.
25• После этого одной рукой сдвиньте
Page 41
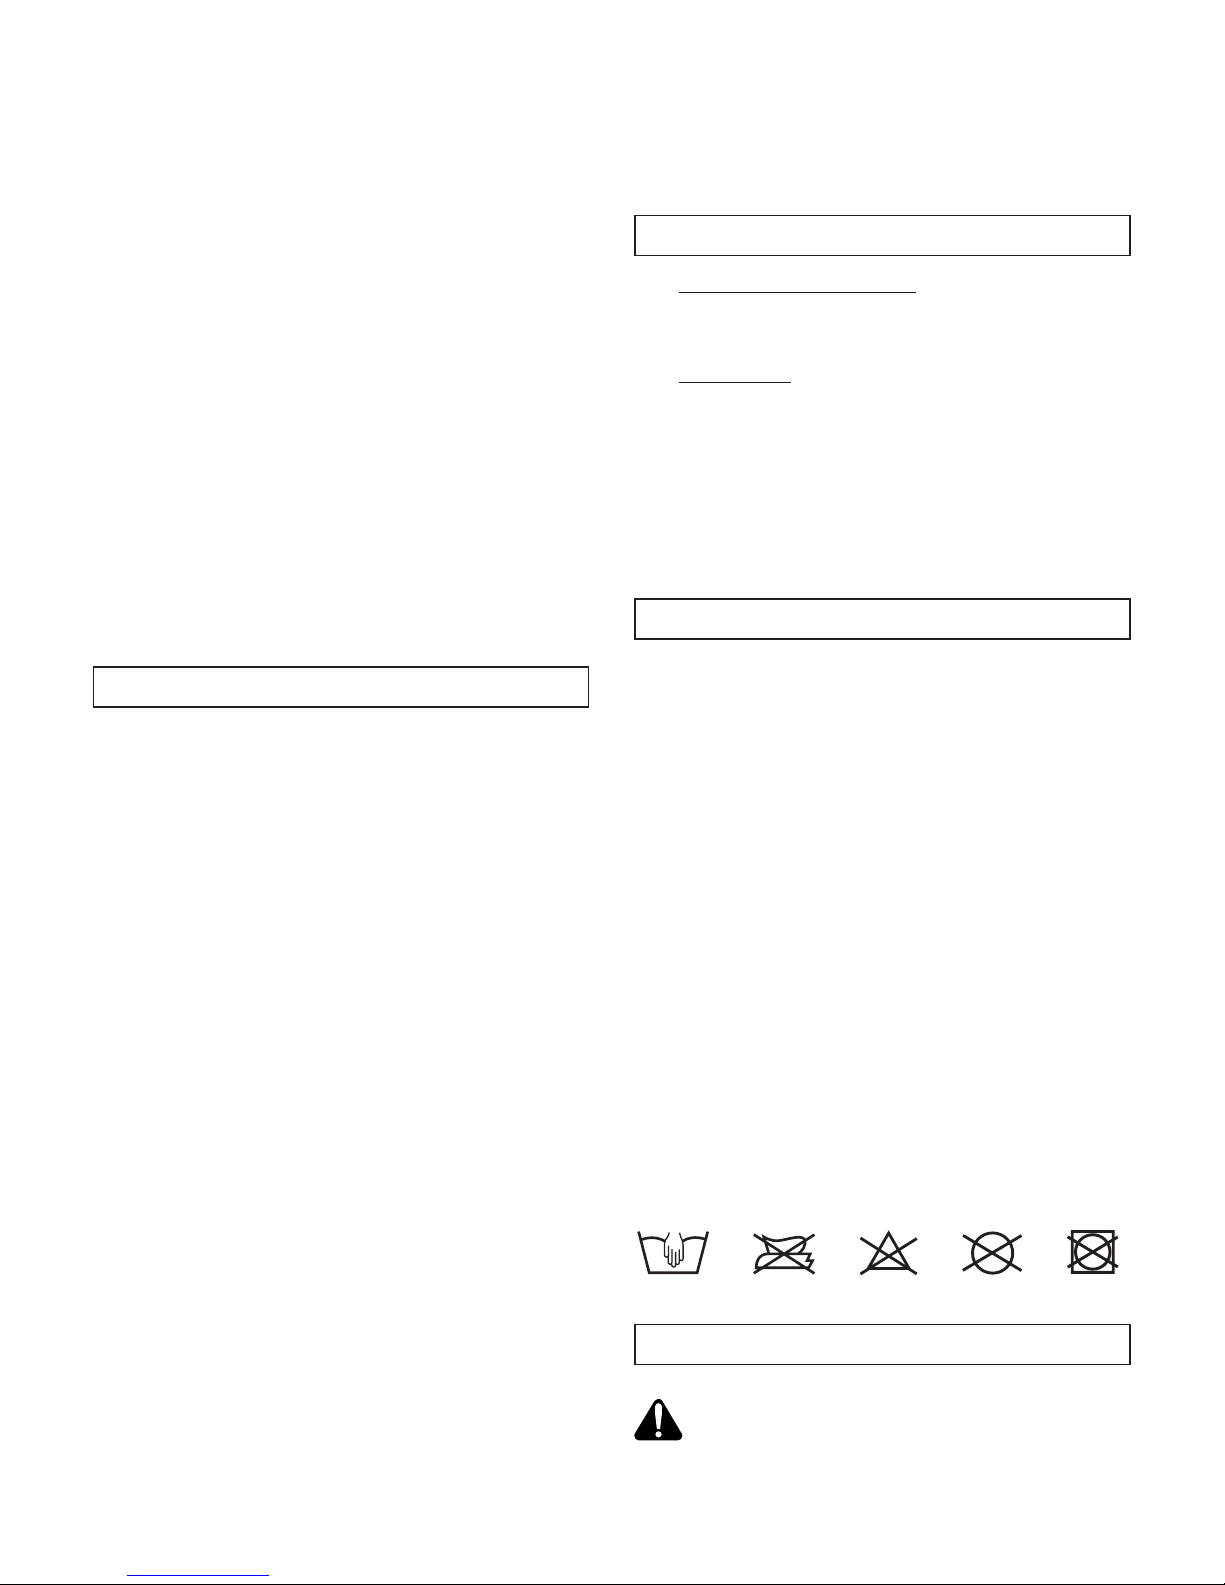
спинку и капот к коляске и опустите
ручку вниз, пока она не войдет в свое
гнездо. Убедитесь, что коляска хорошо
сложена, проверяя предохранительное
крепление. Сложенная коляска будет
стоять самостоятельно.
ПЕРЕНОС
26• Сложенную коляску можно удобно
переносить при помощи ручки.
СНЯТИЕ ТКАНОЙ ОБИВКИ
27• Для снятия тканой обивки
прогулочной коляски снимите
крышку,
расположенную сбоку, поддев ее.
Смесмтите штифт вверх и
28• затем сместите его наружу. Потом
отсоедините штифт от петли тканевой
обивки. Выполните эти операции с
обеих сторон.
29• Для отсоединения тканевой обивки от
сиденья снимите центральный ремень
снизу, и расстегните обивку так, как
показано на рисунке.
30• Отвинтите ремешок с обеих
сторон и
снимите обивку.
GANCIOMATIC SYSTEM
Ganciomatic System - это практичная и
быстрая система, позволяющая вам при
помощи креплений Ganciomatic прикрепить
к прогулочной коляске автомобильное
кресло Primo Viaggiо, которое тоже
оборудовано системой Ganciomatic System
и которое можно купить отдельно.
КРЕПЛЕНИЯ GANCIOMATIC
ПРОГУЛОЧНОЙ КОЛЯСКИ
31• Для поднятия креплений Ganciomatic
прогулочной коляски поднимите
обивку у углов сиденья и поднимите
два крепления, которые
автоматически
сместятся наружу.
32• Для опускания креплений Ganciomatic
прогулочной коляски сместите сначала
крепления внутрь, и затем отпустите их
так, как показано на рисунке.
ПРОГУЛОЧНАЯ КОЛЯСКА +
АВТОМОБИЛЬНОЕ КРЕСЛО
33• Чтобы прикрепить автомобильное
кресло к прогулочной коляске
необходимо:
- поставить прогулочную коляску на
тормоз,
- снять капот прогулочной коляски,
- полностью опустить спинку
прогулочной коляски,
- поднять крепления Ganciomatic
прогулочной коляски.
- Установите автомобильное кресло в
сторону мамы, и сместите его вниз до
щелчка.
- В случае крепления автомобильного
кресла рекомендуем не снимать
передник с прогулочной коляски.
• Для отсоединения автомобильного
кресла от прогулочной коляски
смотрите его руководство по
пользованию.
ЛИНИЯ ПРИНАДЛЕЖНОСТЕЙ
34• Сумка для пеленания: сумка с
матрасиком для пеленания ребенка,
которую можно прикрепить к
прогулочной коляске.
35• Дождевик: дождевик из прозрачного
ПВХ с резинкой, его можно установить
на капот
прогулочной коляски Aria.
Этот дождевик был разработан для
применения также и в том случае, если
на прогулочной коляске установлено
автомобильное сиденье Primo Viaggio,
и он обеспечивает полную защиту от
дождя.
ЧИСТКА И УХОД
Ваше изделие нуждается в несложном
уходе. Операции по чистке и уходу должны
выполнять только взрослые.
• Рекомендуется содержать в чистоте все
движущиеся части, при необходимости
смажьте их легким маслом.
• Вытрите насухо металлические части,
чтобы предотвратить образование
ржавчины.
• Периодически очищайте пластмассовые
части влажной тканью, не пользуйтесь
растворителями или сходными с ними
веществами.
• Чистите щеткой тканые части, чтобы
удалить ею пыль.
• Очищайте от пыли и песка колеса.
• Защитите изделие от атмосферных
осадков - воды, снега или дождя.
Постоянная и продолжительная
подверженность солнечным лучам может
вызвать цветовые изменения многих
материалов.
• Храните изделие в сухом месте.
• Для стирки тканой обивки выполните
следующие указания.
БЕЗОПАСНОСТЬ
BHИMAHИE
• ДАННОЕ ИЗДЕЛИЕ
ПРЕДНАЗНАЧЕНО ДЛЯ ДЕТЕЙ
С МАКСИМАЛЬНЫМ ВЕСОМ
20 КГ И С МАКСИМАЛЬНЫМ
Page 42

РОСТОМ В 110 СМ. КОРЗИНКА
ВЫПОЛНЕНА ТАК, ЧТОБЫ ОНА
ВЫДЕРЖИВАЛА МАКСИМАЛЬНУЮ
НАГРУЗКУ 5 КГ. ВОЗМОЖНЫЕ
ПОДСТАВКИ ДЛЯ НАПИТКОВ,
ПОСТАВЛЯЕМЫЕ ВМЕСТЕ С
ИЗДЕЛИЕМ, ПРЕДНАЗНАЧЕНЫ ДЛЯ
ВЫДЕРЖИВАНИЯ МАКСИМАЛЬНОЙ
НАГРУЗКИ, УКАЗАННОЙ НА
ПОДСТАВКЕ. ЛЮБАЯ СУМКА
ИЛИ КАРМАН, КОТОРЫЕ
ПОСТАВЛЯЮТСЯ ВМЕСТЕ С
ИЗДЕЛИЕМ, ВЫПОЛНЕНЫ ТАК,
ЧТОБЫ ОНИ ВЫДЕРЖИВАЛИ
МАКСИМАЛЬНУЮ НАГРУЗКУ 0,2
КГ.
• ВСЕГДА ИСПОЛЬЗУЙТЕ РЕМНИ
БЕЗОПАСНОСТИ С 5
ТОЧКАМИ
КРЕПЛЕНИЯ.
• НИКОГДА НЕ ОСТАВЛЯЙТЕ
ВАШЕГО РЕБЕНКА БЕЗ
ПРИСМОТРА.
• ИСПОЛЬЗОВАНИЕ
АКСЕССУАРОВ, НЕ ОДОБРЕННЫХ
ИЗГОТОВИТЕЛЕМ, МОЖЕТ БЫТЬ
ОПАСНЫМ.
• ИЗБЕГАЙТЕ ПОПАДАНИЯ ПАЛЬЦЕВ
В МЕХАНИЗМЫ.
• ОПЕРАЦИИ СБОРКИ ДОЛЖНЫ
ВЫПОЛНЯТЬСЯ ВЗРОСЛЫМИ.
• НЕ ИСПОЛЬЗУЙТЕ ИЗДЕЛИЕ,
ЕСЛИ ОНО СЛОМАНО ИЛИ
НЕКОМПЛЕКТНО.
• ВО ВРЕМЯ СТОЯНКИ ВСЕГДА
ИСПОЛЬЗУЙТЕ ТОРМОЗ.
• НЕ ПОЛЬЗУЙТЕСЬ ИЗДЕЛИЕМ
ВБЛИЗИ ЛЕСТНИЦ ИЛИ
СТУПЕНЕК.
• РЕКОМЕНДУЕТСЯ НЕ ПОДНИМАТЬ
ПРОГУЛОЧНУЮ КОЛЯСКУ, ДЕРЖА
ЕЕ ЗА ПЕРЕДНИК, ТАК КАК ОН НЕ
ПРЕДНАЗНАЧЕН ДЛЯ БОЛЬШИХ
НАГРУЗОК. ПРИ НЕОБХОДИМОСТИ
ПОДНИМАЙТЕ КОЛЯСКУ ЗА
ПОДЛОКОТНИКИ.
• ПРОВЕРЬТЕ ПРАВИЛЬНОСТЬ
КРЕПЛЕНИЯ АВТОМОБИЛЬНОГО
КРЕСЛА К КОЛЯСКЕ.
ПРАВИЛА БЕЗОПАСНОСТИ
Чтобы застегнуть ремни
безопасности проденьте лямки
и вставьте два конца брюшного
ремня в пряжку. Всегда проверяйте,
чтобы ремень защелкнулся.
Чтобы отстегнуть ремни
безопасности необходимо нажать
на боковые стороны пряжки и
одновременно с этим потянуть
наружу брюшной ремень.
Сумки или принадлежности могут
сделать коляску неустойчивой.
Рекомендуем не класть в корзину
грузы весом более 5 кг.
Помните об опасности, которую
представляет собой огонь и другие
сильные источники тепла, такие как
электрические отопители, газовые
печи и т.д., расположенные в
непосредственной близости к
изделиям.
Всегда проверяйте, чтобы
автомобильное кресло было
закреплено на коляске.
Page 43

• ÖNEMLİ: Kullanımdan önce talimatları
dikkatlice okuyunuz ve ilerde tekrar
kullanmak üzere muhafaza ediniz.
• Pegperego ihbarsiz olarak herhangi bir
zamanda üründe değişiklik yapmak ve islah
etmek haklarini sakli tutar.
Peg Perego S.p.A. ISO 9001
sertifi kalıdır.
Bu sertifi ka ile müşterilere ve
tüketicilere kurumun şeff af
işleyişinin ve tam bir güven
ortamının garantisi verilmektedir.
MÜŞTERİ SERVİSİ
Şayet kazara ürünün birtakım parçaları
kaybolacak ya da zarar görecek olursa, yedek
parça olarak yalnızca orijinal PegPerego
parçalarını kullanın. Muhtemel tamir,
değiştirme, ürün hakkında bilgi alma, orijinal
yedek parça ve aksesuar satışı işlemleri için
PegPerego Satış Destek hattına başvurun:
EUROPA: tel.: 0039-039-60.88.213,
fax: 0039-039-33.09.992,
e-mail: assistenza@pegperego.it,
USA: tel.: 800.671.1701
fax: 260.471.6332
Call us toll free: 1.800.671.1701
CANADA: tel.: 905.839.3371
fax: 905.839.9542
Call us toll free: 1.800.661.5050
www.pegperego.com
Peg Perego olarak tüketicilerin her türlü
gereksinimini en iyi şekilde karşılamak
üzere daima onlara hizmet etmeye hazırız.
Dolayısıyla, müşterilerimizin görüş ve
önerileri bizim için son derece önemli ve
değerlidir. Bu nedenle, bir ürünümüzü satın
alıp kullandıktan sonra, görüş ve önerilerinizi
bildirmek üzere Internet üzerinde “www.
pegperego.com/SSCo.html.en-UK”
adresinde yer alan MÜŞTERİ MEMNUNİYETİ
FORMUNU dolduracak olursanız size
gerçekten minnettar kalacağız.
KULLANIM KILAVUZU
AÇMA
1• Çocuk arabasını açmak için iki bağlantı
birimini şekildeki gibi aynı anda çözün.
2• Tutma kolunu tek hamlede yukarı doğru
kaldırın ve hemen ardından tutma kolunu
son atım noktasına gelene kadar aşağı
doğru bastırın.
TR•TÜRKÇE
ÇOCUK ARABASININ KURULMASI
3• Frenlı ıkı tekerleğı pusetın arka
tekerleklerı olarak monte edın. Tekerleğı
takin,a düğmesını ıterken tekerleğı de klık
sesı duyuncaya kadar ılerı ıtın; tekerlek
güvenlı şekılde bağlanmiştir.
4• Ön tekerleklerı monte etmek ıçın a
levyesını aşaği ıtın,sonra tekerleğı klık
yapincaya kadar ıtın.
5• Alınlığı şekildeki gibi takı
n.
BAŞLIK
6• Başlığı takmak için bağlantı birimlerini
karşılık gelen yerlere takın.
7• Başlığı, arkalığın sırt tarafına düğmeleyin.
Pergel biçimli bağlantı birimlerini
şekildeki gibi aşağı indirin.
8• Başlığı çıkarmak için yanlardaki
düğmelere basın ve aynı anda başlığı
şekildeki gibi yukarı doğru çekip çıkarın.
BARDAKLIK
Bardaklık çocuk arabasının koluna
yalnızca sa
ğ taraftan takılabilir.
9• Bardaklığı çocuk arabasının koluna
takmak için kolun üzerindeki kelepçeyi
gevşetin ve şekildeki gibi sabitleyin. Tık
sesini duyana kadar bardaklığı iterek
kelepçeden geçirin.
10• İki tıpayı şekilde gösterildiği gibi
yerleştirin; tıpaların yuvalarına iyice
oturmuş olmasına dikkat edin. Bardaklığı
sabitlemek için şekildeki gibi iki adet
demir parayla tıpaları çevirin.
Bardaklığın üzerine sıcak içeceklerin ya
da 0,5 kilogramdan daha ağır bir eşyanın
konması tavsiye edilmez.
FREN
11• Çocuk arabasını sabit konumda
durdurmak için arka tekerleklerin üzerine
yerleştirilmiş olan çubukları ayağ
ınızla
aşağı doğru itin. Frenleri sabit konumdan
çıkarmak için çubukları yukarı doğru
kaldırın. Çocuk arabasını durdurduğunuz
zaman daima frenleri sabit konuma
getirin.
EMNİYET KEMERİ
12• A: resımdekı gıbı bastirarak ucun tam
olarak takildiğindan emın olun. B: kemerı
resımde gösterıldığı gıbı bastirin.ı
13• Kemerı açmak ıçın kenarlardakı
düğmelere basin ve kollardakı askilari
çekın.
14• Günümüzün yeni emniyet kemerlerinin
takılıp çıkarılmas
ı “tak ve çıkar” düzeneği
sayesinde çok daha kolaylaşmıştır.
Emniyet kemerini bağlamadan önce,
kemer tokasını arkalığa takın; işlemi
yaparken dili şekildeki gibi uygun gelen
geçişe oturtun. Daha sonra, emniyet
kemerini çocuğunuza bağladığınızda
kemeri arkalıktan çıkarın; böylece çocuk
daha serbestçe hareket etme imkânı
bulacaktır. Kemer tokasının çocuğun
Page 44

omuzlarının altında kalması gerekir.
ARKALIĞIN AYARLANMASI
15• Arkalığı eğmek için arkalık ayar
düğmesine aşağı indirin ve eş zamanlı
olarak arkalık ayar düğmesini alta doğru
itin.
16• Arkalığı yukarı kaldırmak için arkalık ayar
düğmesini şekildeki gibi üst taraftan itin.
FIRDÖNDÜ TEKERLEKLER
17• Ön tekerlekleri fırdöndü konuma getirmek
için kolu şekildeki gibi aşağı indirmeniz
gerekir. Tekerlekleri sabitlemek için ise
kolu yukarı doğru kaldırmalısınız.
ALINLIK-TEPSİ
18• Alınlık-tepsi birimi yalnı
zca tek taraftan
açılabilecek biçimde tasarlanmıştır. Bu
sayede çocuğunuz büyüyüp geliştikçe
onu yerine oturtmanız ya da oturduğu
yerden almanız daha kolay olacaktır. Bu
birimi açmak için bir elinizle düğmeye
basın ve aynı anda diğer elinizle alınlığı
yukarı doğru kaldırın.
19• Alınlık-tepsi birimini çıkarmak için
şekildeki gibi iki düğmeye birden basın
ve aynı anda alınlığı yukarı doğru çekin.
Alınlık-tepsi biriminin üzerine kaynar
içecekler koymayın, tehlikeli olabilir.
SEPETİN DEĞİŞTİRİLMESİ
20• Sepetin yerine yenisini takmanız
gerekecek olursa, yeni sepeti yerleştirmek
için sepeti şekildeki gibi ön taraftan
kancalara bağlayın.
21• Düğmeleri şekildeki gibi bağlayarak
sepeti arka taraftan da kancalara takın.
TEKERLEKLERİN ÇIKARILMASI
Çocuk arabasının tekerlekleri çıkarılabilir
tekerleklerdir.
22• Ön tekerlekleri çıkarmak için tekerlekleri
fırdöndü konumuna getirmeniz gerekir,
daha sonra dirseklere bastırın ve eş
zamanlı olarak tekerleği şekildeki gibi
yerinden çıkıncaya dek itin.
23• Arka tekerlekleri çıkarmak için küçük
düğmeciğe basın ve eş zamanlı olarak
tekerleği şekildeki gibi yerinden çıkıncaya
dek itin.
KAPATMA
Çocuk arabasını kapatmadan önce, şayet
başlık takılı durumdaysa, pergel biçimli
bağlantı birimlerini gevşetin.
24• Çocuk arabasını kapatmak için tutma
kolunun iki yanına yerleştirilmiş olan
düğmeleri yukarı kaldırın ve tutma kolunu
tık sesini duyana kadar öne doğru itin.
25• Hemen ardından arkalık ile başlığı çocuk
arabasına doğru itin ve tutma kolunu
yerine tam olarak oturana kadar aşağı
doğru indirin. Emniyet kancasını kontrol
ederek çocuk arabasının doğru biçimde
kapandığından emin olun. Çocuk arabası
kapalı konumdayken tek başına ayakta
durur.
TAŞIMA
26• Çocuk arabası kapalı durumdayken yan
tarafındaki koldan tutarak arabayı gayet
rahat bir biçimde taşıyabilirsiniz.
ÇIKARTILABİLİR DÖŞEME
27• Pusetin döşemesini çıkartmak için yan
tarafta yer alan kapakçığı çıkartınız. Mili
yukarı doğru itiniz ve
28• bunu müteakiben dışarıya doğru itiniz.
Daha sonra mili kılıfın iliğinden çıkartınız.
Bu işlemi her iki tarafta da yapınız.
29• Oturma gurubunun kılıfını ç
ıkartmak
için, bacak arası kuşağını, aşağıdan
kuvvet uygulamak suretiyle ve resimde
görüldüğü şekilde düğmelerini açarak
çıkartınız.
30• Kayışı iki tarafından çözünüz ve kılıfı
çıkartınız.
KANCAMATİK SİSTEM
Kancamatik Sistemi, kendisi de Kancamatik
Sistemine sahip ayrı olarak satın alabileceğiniz
İlk Yolculuk araba koltuğunu Kancamatik
kancaları sayesinde çocuk arabasına tek bir
hamlede rahatça takmanızı sağlayacak son
derece pratik ve hızlı bir sistemdir.
PUSETİN KANCAMATİK SİSTEM KANCA
BİRİMLERİ
31• Pusetin Kancamatik sistem kancalarının
kaldırılması için, kılıfı oturma gurubunun
köşelerinden kaldırınız ve otomatik olarak
dışa doğru hareket edecek olan kancaları
yukarı çekiniz.
32• Pusetin Kancamatik sistem kancalarının
aşağıya indirilmesi için, kancalar
ı önce
içeriye doğru itiniz ve daha sonra da,
şekilde görüldüğü gibi, aşağıya itiniz.
PUSET + ARABA KOLTUĞU
33• Otomobil koltuğunu pusete takmak için
yapılacak işlemler:
- puseti frenleyiniz,
- pusetin başlığını çıkartınız,
- pusetin arkalığını tamamen yatık konuma
getiribniz,
- pusetin Kancamatik bağlantı birimlerini
kaldırınız.
- Araba koltuğunu anneye doğru
konumlandırın ve tık sesini duyana kadar
bastırınız.
- Araba koltuğunu takarken pusetin
alınlığın
ı hareket ettirmemeniz tavsiye
olunur.
• Araba koltuğunu takmak için el
kılavuzundaki talimatlara başvurunuz.
Page 45

AKSESUVAR SERİSİ
34• Değiştirme Çantası: Bebeğin altını
değiştirmek için pusete takılabilen yataklı
çanta.
35• Yağmurluk: Aria çocuk arabasının
başlığına geçirilebilen lastikli şeffaf
PVC yağmurluk. Bu yağmurluk çocuk
arabasına İlk Yolculuk araba koltuğunun
takılması durumunda da kullanılmak
üzere, tam bir koruma sağlayacak şekilde
tasarlanmıştır.
TEMİZLEME VE BAKIM
Pusetiniz çok az bir bakım gerektirir.
Temizlik ve bakım işlemleri sadece yetişkinler
tarafından yapılmalıdır.
•
Bütün hareketli kısımların temiz tutulması
ve gerekirse ince yağla yağlanması önerilir.
• Demir kısımlarını, paslanmayı önlemek için
iyicene kurulayın.
• Düzenli olarak plastik kısımları nemli bir
bezle silin, çözücü veya benzeri maddeler
kullanmayın.
• Tozdan arındırmak için kumaş kısımlarını
fırçalayın.
• Tekerlekleri tozdan ve kumdan temiz tutun.
• Ürünü su, yağmur ve kar gibi dış
etkenlerden koruyun, güneşte devamlı
ve uzun kalış birçok malzemede renk
değişimine sebep olabilir.
• Ürünü kuru bir ortamda muhafaza edin.
• Torbanın yıkanması için, aşağıdaki
talimatlara riayet ediniz.
GÜVENLİK
UYARI
• BU ÜRÜN AZAMİ 20 KG VE 110
CM BOYUNDA ÇOCUKLAR İÇİN
TASARLANMIŞTIR. SEPET İSE
AZAMİ 5 KG YÜK TAŞIYABİLECEK
ŞEKİLDE ÜRETİLMİŞTİR. ÜRÜNLE
BİRLİKTE SUNULABİLEN İÇECEK
SEPETİ ÜZERİNDE BELİRTİLEN
AZAMİ AĞIRLIĞI TAŞIYABİLMEK
İÇİN GELİŞTİRİLMİŞTİR. ÜRÜN İLE
BİRLİKTE SUNULAN HAR TÜRLÜ
ÇANTA VE CEP AZAMİ 0,2 KG
AĞIRLIK İÇİN TASARLANMIŞTIR.
• BEŞ KADEMELİ EMNİYET
KEMERLERİNİ DAİMA KULLANIN.
• ÇOCUĞUNUZU HİÇBİR ZAMAN TEK
BAŞINA BIRAKMAYIN.
• ÜRETİCİ TARAFINDAN
ONAYLANMAMIŞ AKSESUARLARI
KULLANMAK TEHLİKELİ OLABİLİR.
• PARMAKLARINIZIN MEKANİK
AKSAMA SIKIŞMAMASINA ÖZEN
GÖSTERİN.
• KURULMA İŞLEMİ YETİŞKİNLER
TARAFINDAN YAPILMALIDIR.
• KIRIK YA DA EKSİK PARÇALI
ÜRÜNLERİ KULLANMAYIN.
• ARABAYI HER DURDUĞUNUZDA
FREN KİLİTLERİNİ KULLANIN.
• ÜRÜNÜ, MERDİVEN YA DA
BASAMAK GİBİ GEÇİŞ YERLERİNİN
YAKINLARINDA KULLANMAYIN.
• ÇOCUK ARABASININ ALINLIKTAN
TUTULARAK KALDIRILMAMASI
TAVSİYE OLUNUR ÇÜNKÜ
ALINLIK YÜK TAŞIMAK ÜZERE
ÜRETİLMEMİŞTİR. İHTİYAÇ
HALİNDE ÇOCUK ARABASINI KOL
KISIMLARININ ALTINDAN TUTARAK
KALDIRIN.
• ARABA KOLTUĞ
UNUN ÇOCUK
ARABASINA DOĞRU ŞEKİLDE
TAKILIP TAKILMADIĞINI KONTROL
EDİN.
GÜVENLİK KURALLARI
Emniyet kemerini takmak için askıları
uzatın ve askıları bel kayışının dış
uçlarından kemer tokasına geçirin.
Kemerin sıkıca kapandığından daima
emin olun.
Emniyet kemerini çözmek için
tokanın kenarlarına basın ve aynı
anda bel kayışını dışarı doğru çekin.
Yükler ve/veya aksesuarlar ürünün
dengesini bozabilir. Sepete 5
kilogramdan daha fazla yük
konulmamasını öneririz.
Ürünün yakınlarında bulunması
muhtemel elektrikli ısıtıcılar, gaz
sobaları v.s gibi ıs
ı kaynaklarının ve
ateşin neden olabileceği tehlikelere
karşı dikkatli olun.
Araba koltuğunun çocuk arabasının
kancalarına sıkıca bağlı olduğundan
emin olun.
Page 46

• ΣΗΜΑΝΤΙΚΟ: διαβάστε με προσοχή τις
οδηγίες χρήσεως πριν από τη χρήση και
φυλάξτε τις για μελλοντική αναφορά.
• Η PEG – PEREGO διατηρεί το δικαίωμα
να κάνει ότι αλλαγές είναι αναγκαίες
ή βελτιώσεις σε αυτά τα προιόντα
οποτεδήποτε χωρίς ειδοποίηση.
Η Peg Perego S.p.A. διαθέτει
πιστοποίηση ISO 9001.
Η πιστοποίηση παρέχει στους
πελάτες και στους καταναλωτές
την εγγύηση
της διαφάνειας και
της εμπιστοσύνης στον τρόπο με
τον οποίο εργάζεται η εταιρία.
ΕΞΥΠΗΡΕΤΗΣΗ ΠΕΛΑΤΩΝ
Εάν τυχόν χαθούν μέρη του μοντέλου ή
υποστούν κάποια βλάβη, χρησιμοποιείτε
μόνο γνήσια ανταλλακτικά Peg Perego.
Για τυχόν επισκευές, αντικαταστάσεις,
πληροφορίες σχετικά με τα προϊόντα,
την πώληση γνήσιων ανταλλακτικών και
αξεσουάρ, επικοινωνήστε με την Υπηρεσία
Εξυπηρέτησης Peg-Perego:
EUROPA: τηλ: 0039-039-60.88.213,
fax: 0039-039-33.09.992,
e-mail: assistenza@pegperego.it,
USA: tel.: 800.671.1701
fax: 260.471.6332
Call us toll free: 1.800.671.1701
CANADA: tel.: 905.839.3371
fax: 905.839.9542
Call us toll free: 1.800.661.5050
www.pegperego.com
Η Peg Perego είναι στη διάθεση των
Καταναλωτών της για την καλύτερη
εξυπηρέτηση των αναγκών τους. Για
το λόγο αυτό είναι για μας εξαιρετικά
σημαντικό και πολύτιμο να γνωρίζουμε
τη γνώμη των Πελατών μας. Θα σας
είμαστε λοιπόν πολύ ευγνώμονες εάν,
αφού χρησιμοποιήσετε ένα προΪφόν μας,
συμπληρώσετε το ΕΡΩΤΗΜΑΤΟΛΟΓΙΟ
ΙΚΑΝΟΠΟΙΗΣΗΣ ΚΑΤΑΝΑΛΩΤΗ που θα βρείτε
στο internet στην ακόλουθη διεύθυνση:
“www.pegperego.com/SSCo.html.en-UK”,
επισημαίνοντας ενδεχόμενες παρατηρήσεις
ή υποδείξεις.
ΟΔΗΓΙΕΣ ΧΡΗΣΕΩΣ
ΑΝΟΙΓΜΑ
1• Για να ανοίξετε το καροτσάκι,
ΕL•EΛΛΗΝΙΚΑ
αποσυνδέστε συγχρόνως τις δύο
συνδέσεις όπως φαίνεται στην εικόνα.
2• Σηκώστε με δύναμη τη χειρολαβή προς
τα πάνω και στη συνέχεια σπρώξτε
την προς τα κάτω μέχρι την τελική
συγκράτηση.
ΣΥΝΑΡΜΟΛΟΓΗΣΗ ΚΑΡΟΤΣΙΟΥ
ΠΕΡΙΠΑΤΟΥ
3• Προσέξτε να συναρμολογήσετε τους δύο
τροχούς με το φρένο στο πίσω μέρος
του καροτσιού. Περάστε τον τροχό,
πιέστε
το κουμπί Α μέχρι το τέλος
και συγχρόνως σπρώξτε περαιτέρω
τον τροχό μέχρι την συγκράτηση της
σύνδεσης.
4• Για να τοποθετήσετε τους μπροστινούς
τροχούς, χαμηλώστε το μοχλό A και
κατόπιν περάστε τον τροχό μέχρι να
ακουσθεί το κλικ.
5• Συνδέστε τη μετωπίδα όπως φαίνεται
στην εικόνα.
ΚΟΥΚΟΥΛΑ
6• Για να τοποθετήσετε την κουκούλα
,
βάλτε τις συνδέσεις στις ειδικές θέσεις.
7• Κουμπώστε την κουκούλα στο πίσω
μέρος της πλάτης. Κατεβάστε τους
στροφείς όπως φαίνεται στην εικόνα.
8• Για να βγάλετε την κουκούλα πατήστε
τα πλαϊνά κουμπιά και συγχρόνως
τραβήξτε την κουκούλα προς τα πάνω
όπως φαίνεται στην εικόνα.
ΔΙΣΚΟΣ-ΧΕΙΡΟΛΑΒΗ
Ο δίσκος αναψυκτικών μπορεί να
εφαρμοστεί στη χειρολαβή μόνο στη
δεξιά πλευρά.
9• Για να εφαρμόσετε το δίσκο
αναψυκτικών στη χειρολαβή,
χαλαρώστε το δακτύλιο και
σταθεροποιήστε τον όπως φαίνεται
στην εικόνα. Περάστε το δίσκο για τα
αναψυκτικά στο δακτύλιο μέχρι να
ακουστεί το κλικ.
10• Τοποθετήστε όπως στην εικόνα τα δύο
πώματα, προσέχοντας τις εγκοπές
σφήνωσης
. Με δύο νομίσματα γυρίστε
τα πώματα για να στερεώσετε το
δίσκο αναψυκτικών όπως φαίνεται
στην εικόνα.
Συμβουλεύουμε να μην τοποθετείτε στο
δίσκο αναψυκτικών ζεστά ροφήματα
και με βάρος μεγαλύτερο του 0,5 Kg (1
lbs).
ΦΡΕΝΟ
11• Για να φρενάρετε το καροτσάκι,
χαμηλώστε με το πόδι τους μοχλούς
που βρίσκονται στους πίσω τροχούς.
Για
να ξεμπλοκάρετε τα φρένα,
σηκώστε τους μοχλούς. Όφταν είστε
σταματημένοι, να βάζετε πάντα το
φρένο.
Page 47

ΖΩΝΗ ΑΣΦΑΛΕΙΑΣ
12• A: Βεβαιωθείτε ότι η τιράντα έχει
τοποθετηθεί σωστά ωθώντας όπως
φαίνεται στην εικόνα. B: Γαντζώστε
τη ζώνη ενεργώντας όπως δείχνει η
εικόνα.
13• Για να απελευθερώσετε τη ζώνη,
πιέστε στα πλαϊνά της αγκράφας και
συγχρόνως τραβήξτε προς τα έξω, τη
ζώνη που περιβάλλει τη μέση.
14• Η νέα ζώνη
ασφαλείας από σήμερα,
είναι πιο εύκολο να φορεθεί χάρη στο
σύστημα “βάλε και βγάλε”. Πράγματι
πριν να γαντζώσετε τη ζώνη, συνδέστε
το λουράκι στην πλάτη βάζοντας
τη γλωσσίτσα στο ειδικό θηλυκάκι
όπως φαίνεται στην εικόνα. Στη
συνέχεια αφού γαντζώσετε τη ζώνη
στο παιδί bγάλτε την από την πλάτη
για να μπορεί
το παιδί να κινείται
πιο ελεύθερα. Το λουράκι πρέπει να
παραμείνει κάτω από τους ώμους του
παιδιού .
ΡΥΘΜΙΣΗ ΠΛΑΤΗΣ
15• Για να δώσετε κλίση στην πλάτη
κατεβάστε το κουμπί του ρυθμιστήπλάτης και συγχρόνως τραβήξτε το
προς τα κάτω.
16• Για να σηκώσετε την πλάτη τραβήξτε
προς τα πάνω το
ρυθμιστή-πλάτης
όπως φαίνεται στην εικόνα.
ΠΕΡΙΣΤΡΕΦΟΜΕΝΟΙ ΤΡΟΧΟΙ
17• Για να γίνουν περιστρεφόμενοι οι
μπροστινοί τροχοί, χρειάζεται να
χαμηλώσετε το μοχλό, όπως φαίνεται
στην εικόνα. Για να σταθεροποιηθούν,
σηκώστε το μοχλό.
ΜΕΤΩΠΙΔΑ-ΔΙΣΚΟΣ
18• Μπορείτε να ανοίξετε τη μετωπίδα-
δίσκο μόνον από τη μία πλευρά για να
διευκολύνετε την είσοδο και
την έξοδο
του παιδιού όταν είναι πιο μεγάλο. Για
να ανοίξετε, πιέστε με το ένα χέρι το
κουμπί και συγχρόνως με το άλλο χέρι
στρέψτε τη μετωπίδα προς τα πάνω.
19• Για να αφαιρέσετε τη μετωπίδα-δίσκο,
πιέστε τα δύο κουμπιά όπως φαίνεται
στην εικόνα και συγχρόνως, τραβήξτε
προς τα
πάνω. Μην ακουμπάτε επανω
στη μετωπίδα-δίσκο καυτά ροφήματα
γιατί μπορεί να είναι επικίνδυνο.
ΑΝΤΙΚΑΤΑΣΤΑΣΗ ΚΑΛΑΘΙΟΥ
20• Σε περίπτωση που χρειαστεί να
αντικαταστήσετε το καλάθι, για την
τοποθέτηση του καλαθιού, συνδέστε το
μπροστά στα γαντζάκια όπως φαίνεται
στην εικόνα.
21• Συνδέστε το πίσω, κλείνοντας τα
κουμπιά όπως φαίνεται στην εικόνα.
ΕΞΑΓΩΓΗ ΤΡΟΧΩΝ
Οι τροχοί του καροτσιού μπορούν να
βγουν.
22• Για να βγάλετε τους μπροστινούς
τροχούς, χρειάζεται να κάνετε τους
τροχούς περιστρεφόμενους, πατήστε
τους μοχλούς και συγχρόνως σπρώξτε
τον τροχό ώσπου να τον βγάλετε όπως
φαίνεται στην εικόνα.
23• Για να βγάλετε τους πίσω τροχούς,
πατήστε το κουμπάκι και συγχρόνως
σπρώξτε τον τροχό προς τα κάτω
ώσπου να τον
βγάλετε όπως φαίνεται
στην εικόνα.
ΚΛΕΙΣΙΜΟ
Πριν να κλείσετε το καροτσάκι, εάν
είναι εφαρμοσμένη η κουκούλα,
χαλαρώστε τους στροφείς.
24• Για να κλείσετε το καροτσάκι
περιπάτου, σηκώστε τα κουμπιά που
βρίσκονται στα πλαϊνά της χειρολαβής
και στρέψτε τη χειρολαβή μπροστά
μέχρι να ακουστεί το κλικ.
25• Στη συνέχεια σπρώξτε την
πλάτη
και την κουκούλα προς το καροτσάκι
περιπάτου και κατεβάστε τη χειρολαβή
μέχρι να τη βάλετε στη θέση της,
Ελέγξτε το σωστό κλείσιμο του
καροτσιού από το γάντζο ασφαλείας.
Το καροτσάκι κλειστό παραμένει όρθιο
μόνο του.
ΜΕΤΑΦΟΡΑ
26• Το καροτσάκι μπορεί να μεταφερθεί με
ευκολία, όταν είναι κλειστό χάρη στη
λαβή του.
ΔΥΝΑΤΟΤΗΤΑ ΑΦΑΙΡΕΣΗΣ ΤΗΣ
ΕΠΕΝΔΥΣΗΣ
27• Για να αφαιρέσετε την επένδυση του
καροτσιού, βγάλτε το καπάκι που
βρίσκεται στο πλάι ασκώντας πίεση.
Σπρώξτε προς τα πάνω τον πείρο και
28• στη συνέχεια σπρώξτε το προς τα έξω.
Βγάλτε στη συνέχεια τον πείρο από την
κουμπότρυπα του σάκου. Ενεργήστε και
στις
δύο πλευρές.
29• Για να αποσυνδέσετε το σάκο από το
κάθισμα, βγάλτε το διαχωριστικό των
ποδιών ενεργώντας από κάτω και
ξεκουμπώστε τον όπως φαίνεται στην
εικόνα.
30• Ξεβιδώστε τη ζωνίτσα και από τις δύο
πλευρές και βγάλτε το σάκο.
ΗΑΞΓΙΟMΑΥΙΓ ΤYΤΥΕM
Το Ganciomatic System είναι το πρακτικό
και γρήγορο σύστημα που
σας επιτρέπει να
συνδέσετε στο καροτσάκι περιπάτου, χάρη
στους συνδέσμους Ganciomatic, το κάθισμα
αυτοκινήτου Primo Viaggio, το οποίο
διαθέτει επίσης Ganciomatic System το
οποίο μπορείτε να αγοράσετε ξεχωριστά.
Page 48

ΣΥΝΔΕΣΜΟΙ GANCIOMATIC ΤΟΥ
ΚΑΡΟΤΣΙΟΥ ΠΕΡΙΠΑΤΟΥ
31• Για να σηκώσετε τους συνδέσμους
Ganciomatic του καροτσιού περιπάτου,
ανυψώστε το σάκο στις γωνίες
του καθίσματος και σηκώστε τους
δύο συνδέσμους που αυτόματα θα
μετακινηθούν προς τα έξω.
32• Για να κατεβάσετε τους συνδέσμους
Ganciomatic του καροτσιού περιπάτου,
σπρώξτε πρώτα τους συνδέσμους προς
τα μέσα και στη
συνέχεια κατεβάστε
τους όπως φαίνεται στην εικόνα.
ΚΑΡΟΤΣΑΚΙ ΠΕΡΙΠΑΤΟΥ + ΚΑΘΙΣΜΑ
ΑΥΤΟΚΙΝΗΤΟΥ
33• Για να συνδέσετε το κάθισμα
αυτοκινήτου στο καροτσάκι περιπάτου,
χρειάζεται:
- να φρενάρετε το καροτσάκι περιπάτου,
- να αφαιρέσετε την κουκούλα από το
καροτσάκι περιπάτου,
- να κατεβάσετε τελείως την πλάτη του
καροτσιού περιπάτου,
- να σηκώσετε τους συνδέσμους Gancio-
matic του
καροτσιού περιπάτου.
- Τοποθετήστε το κάθισμα αυτοκινήτου
προς τη μαμά και ωθήστε το προς τα
κάτω μέχρι να ακουστεί το κλικ.
- Συνιστούμε να μην αφαιρείτε την
προστατευτική μπάρα από το
καροτσάκι περιπάτου, όταν συνδέετε το
κάθισμα αυτοκινήτου.
• Για να αποσυνδέσετε το κάθισμα
αυτοκινήτου από το καροτσάκι
περιπάτου συμβουλευτείτε το
εγχειρίδιο
οδηγιών.
ΣΕΙΡΑ ΑΞΕΣΟΥΑΡ
34• Τσάντα Αλλαξιάς: Τσάντα με
στρωματάκι για την αλλαξιά του
μωρού, συνδεόμενη στο καροτσάκι
περιπάτου.
35• Προστατευτικό κάλυμα για τη βροχή:
Προστατευτικό κάλυμα για τη βροχή
από διαφανές PVC με λάστιχο, το οποίο
μπορεί να τοποθετηθεί στην κουκούλα
του καροτσιού Aria. Το προστατευτικό
αυτό κάλυμα για τη βροχή μελετήθηκε
και
για την περίπτωση που επάνω
στο καροτσάκι είναι συνδεδεμένο το
κάθισμα αυτοκινήτου Primo Viaggio,
εξασφαλίζοντας πλήρη προστασία.
ΚΑΘΑΡΙΣΜΑ ΚΑΙ ΣΥΝΤΗΡΗΣΗ
Το προϊόν σας χρειάζεται μία ελάχιστη
συντήρηση. Οι εργασίες καθαρισμού και
συντήρησης πρέπει να εκτελούνται μόνον
από ενήλικες.
• Συμβουλεύουμε να διατηρείτε καθαρά όλα
τα μέρη που κινούνται και εάν χρειάζεται,
να τα
λιπαίνετε με ελαφρύ λάδι.
• Στεγνώνετε τα μεταλλικά μέρη του
προϊόντος για να αποφύγετε τη σκουριά.
• Περιοδικά καθαρίζετε τα πλαστικά μέρη
με ένα υγρό πανί, μη χρησιμοποιείτε
διαλυτικά ή άλλα παρόμοια προϊόντα.
• Βουρτσίζετε τα μέρη από ύφασμα για να
απομακρυνθεί η σκόνη.
• Διατηρείτε καθαρούς τους τροχούς από
σκόνη και άμμο.
• Προστατεύετε το προϊόν
από
ατμοσφαιρικούς παράγοντες, νερό, βροχή
ή χιόνι, η συνεχής έκθεση στον ήλιο για
πολύ καιρό θα μπορούσε να προκαλέσει
αλλαγές στο χρώμα πολλών υλικών.
• Φυλάξτε το προϊόν σε ξηρό χώρο.
• Για το πλύσιμο του σάκου, ακολουθήστε
τις παρακάτω οδηγίες.
ΑΣΦΑΛΕΙΑ
ΠΡΟΣΟΧΗ
• ΤΟ ΠΡΟΪΟΝ ΑΥΤΟ ΕΧΕΙ ΣΧΕΔΙΑΣΤΕΙ
ΓΙΑ ΠΑΙΔΙΑ ΜΕ ΜΕΓΙΣΤΟ ΒΑΡΟΣ 20
KG ΚΑΙ ΜΕΓΙΣΤΟ ΥΨΟΣ 110 CM.
ΤΟ ΚΑΛΑΘΙ ΕΧΕΙ ΚΑΤΑΣΚΕΥΑΣΤΕΙ
ΓΙΑ ΝΑ ΣΗΚΩΝΕΙ ΜΕΓΙΣΤΟ ΒΑΡΟΣ
5 KG. ΕΝΔΕΧΟΜΕΝΑ ΕΞΑΡΤΗΜΑΤΑ
ΓΙΑ ΤΗΝ ΤΟΠΟΘΕΤΗΣΗ
ΑΝΑΨΥΚΤΙΚΩΝ ΠΟΥ ΠΑΡΕΧΟΝΤΑΙ
ΜΕ ΤΟ ΜΟΝΤΕΛΟ ΑΥΤΟ ΕΧΟΥΝ
ΣΧΕΔΙΑΣΤΕΙ ΓΙΑ ΝΑ ΣΗΚΩΝΟΥΝ
ΕΝΑ ΜΕΓΙΣΤΟ ΒΑΡΟΣ ΤΟ ΟΠΟΙΟ
ΠΡΟΣΔΙΟΡΙΖΕΤΑΙ ΕΠΑΝΩ ΣΤΟ ΙΔΙΟ
ΕΞΑΡΤΗΜΑ
ΓΙΑ ΤΗΝ ΤΟΠΟΘΕΤΗΣΗ
ΑΝΑΨΥΚΤΙΚΩΝ. ΟΠΟΙΑΔΗΠΟΤΕ
ΤΣΑΝΤΑ Η ΤΣΕΠΗ ΠΟΥ ΠΑΡΕΧΕΤΑΙ
ΜΑΖΙ ΜΕ ΤΟ ΠΡΟΪΟΝ ΕΧΟΥΝ
ΚΑΤΑΣΚΕΥΑΣΤΕΙ ΓΙΑ ΝΑ ΣΗΚΩΝΟΥΝ
ΕΝΑ ΜΕΓΙΣΤΟ ΒΑΡΟΣ 0,2 KG.
• ΧΡΗΣΙΜΟΠΟΙΕΙΤΕ ΠΑΝΤΑ ΤΙΣ
ΖΩΝΕΣ ΑΣΦΑΛΕΙΑΣ 5 ΣΗΜΕΙΩΝ.
• ΜΗΝ ΑΦΗΝΕΤΕ ΠΟΤΕ ΤΟ ΠΑΙΔΙ ΣΑΣ
ΧΩΡΙΣ ΕΠΙΒΛΕΨΗ.
• ΜΠΟΡΕΙ ΝΑ ΕΙΝΑΙ ΕΠΙΚΙΝΔΥΝΗ
Η ΧΡΗΣΗ ΕΞΑΡΤΗΜΑΤΩΝ ΠΟΥ
ΔΕΝ ΕΧΟΥΝ ΤΗΝ ΕΓΚΡΙΣΗ ΤΟΥ
ΚΑΤΑΣΚΕΥΑΣΤΗ.
• ΑΠΟΦΕΥΓΕΤΕ ΤΗΝ ΕΙΣΑΓΩΓΗ ΤΩΝ
ΔΑΚΤΥΛΩΝ ΣΤΟΥΣ ΜΗΧΑΝΙΣΜΟΥΣ.
• ΟΙ ΕΡΓΑΣΙΕΣ ΣΥΝΑΡΜΟΛΟΓΗΣΗΣ
ΠΡΕΠΕΙ ΝΑ ΕΚΤΕΛΟΥΝΤΑΙ ΑΠΟ
ΕΝΗΛΙΚΕΣ.
• ΜΗ ΧΡΗΣΙΜΟΠΟΙΕΙΤΕ ΤΟ ΠΡΟρΟΝ
Page 49
ΕΑΝ ΠΑΡΟΥΣΙΑΖΕΙ ΡΩΓΜΕΣ Η
ΤΜΗΜΑΤΑ ΠΟΥ ΛΕΙΠΟΥΝ.
• ΟΤΑΝ ΣΤΑΜΑΤΑΤΕ ΝΑ ΒΑΖΕΤΕ
ΠΑΝΤΑ ΤΑ ΦΡΕΝΑ.
• ΜΗ ΧΡΗΣΙΜΟΠΟΙΕΙΤΕ ΤΟ ΠΡΟΪφΟΝ
ΚΟΝΤΑ ΣΕ ΣΚΑΛΕΣ Η ΣΚΑΛΑΚΙΑ.
• ΣΥΝΙΣΤΑΤΑΙ ΝΑ ΜΗΝ ΣΗΚΩΝΕΤΕ
ΤΟ ΚΑΡΟΤΣΑΚΙ ΠΙΑΝΟΝΤΑΣ ΤΟ
ΑΠΟ ΤΗ ΜΕΤΩΠΙΔΑ ΕΠΕΙΔΗ Η
ΜΕΤΩΠΙΔΑ ΔΕΝ ΕΧΕΙ ΣΧΕΔΙΑΣΘΕΙ
ΓΙΑ ΝΑ ΣΗΚΩΝΕΙ ΦΟΡΤΙΑ. ΣΕ
ΠΕΡΙΠΤΩΣΗ ΑΝΑΓΚΗΣ ΣΗΚΩΣΤΕ ΤΟ
ΚΑΡΟΤΣΑΚΙ ΠΙΑΝΟΝΤΑΣ ΤΟ ΚΑΤΩ
ΑΠΟ ΤΑ ΜΠΡΑΤΣΑ.
• ΕΛΕΓΞΤΕ ΤΗ ΣΩΣΤΗ ΣΥΝΔΕΣΗ ΤΟΥ
ΚΑΘΙΣΜΑΤΟΣ ΑΥΤΟΚΙΝΗΤΟΥ ΣΤΟ
ΚΑΡΟΤΣΑΚΙ.
ΚΑΝΟΝΙΕΣΜΟΙ ΑΣΦΑΛΕΙΑΣ
Για να συνδέσετε τη ζώνη
ασφαλείας περάστε τις
τιραντούλες και μαζί τις δύο άκρες
της ζωνούλας που περιβάλλει
τη μέση μέσα στην αγκράφα.
Να βεβαιώνεστε πάντα ότι
πραγματοποιήθηκε η συγκράτηση
κλεισίματος.
Για να
ελευθερώσετε τη ζώνη
ασφαλείας πιέστε στις πλαϊνά της
αγκράφας και συγχρόνως τραβήξτε
προς τα έξω τη ζωνούλα που
περιβάλλει τη μέση.
Δέματα και/ή εξαρτήματα μπορούν
να προκαλέσουν την αστάθεια
του προϊόντος. Συστήνουμε να
μη φορτώνετε το καλάθι με
περισσότερο από 5 kg.
Προσοχή στον κίνδυνο που
προκαλείται από τη φωτιά και
από άλλες σημαντικές πηγές
θερμότητας όπως ηλεκτρικά
καλοριφές, σόμπες υγραερίου κλπ,
που βρίσκονται κοντά στο προϊόν.
Να βεβαιώνεστε πάντα ότι το
κάθισμα αυτοκινήτου, είναι καλά
συνδεμένο στα άγκιστρα από το
καροτσάκι.
Page 50

Page 51
PEG PEREGO SpA
Via De Gasperi, 50
20043 Arcore (MI) Italy
www.pegperego.com
ΠΑΙΔΙΚΑ ΕΙΔΗ ΒΡΕΦΑΝΑΠΤΥΞΗΣ ΚΑΙ ΠΑΙΧΝΙΔΙΑ ΕΓΓΥΗΣΗ
Η PEG – PEREGO εγγυάται για τυχόν εργοστασιακά ελαττώματα των προιόντων
της για διάστημα έξι μηνών από την ημερομηνία αγοράς. Η προσκόμιση
της ανάλογης ταμειακής απόδειξης αγοράς είναι απαραίτητη. Εξαιρούνται
της εγγύγησης οι επαναφορτιζόμενες μπαταρίες και οι μετασχη-ματιστές
παιχνιδιών. (βλ. αναλυτικές οδηγίες χρήσεως παιχνιδιών).
Η παρούσα
εγγύηση ισχύει μόνον εφʼ όσον το προιόν χρησιμοποιείται σωστά και
βάσει των οδηγιών χρήσεως. Ο κατασκευαστής και οι εντεταλμένοι συνεργάτες
του διατηρούν το δικαίωμα τεχνικού ελέγχου.
Ο κατασκευαστής δεν μπορεί να θεωρηθεί υπεύθυνος εφʼ όσον:
• Δεν τηρηθούν οι ανάλογες οδηγίες χρήσεως του κάθε προιόντος.
• Καταστραφεί τυχαία το προιόν ή προκληθούν
βλάβες από κακή χρήση αυτού.
• Υπάρξει τεχνική παρέμβαση ξένου προς την εταιρεία μας τεχνικού, πράγμα το
οποίο απαγορεύεται και αποτελεί κίνδυνο για την ασφάλεια του παιδιού.
• Φυσιολογική φθορά του προιόντος.
Διατηρείτε την εγγύηση και τις οδηγίες χρήσεως και για μελλοντική χρήση.
ΕΓΓΥΗΣΗ
ΟΝΟΜΑΤΕΠΩΝΥΜΟ ΑΓΟΡΑΣΤΟΥ : .................................................................................................
ΔΙΕΥΘΥΝΣΗ : .............................................................................................................................................
ΤΗΛΕΦΩΝΟ : .............................................................................................................................................
ΕΙΔΟΣ ΠΡΟΙΟΝΤΟΣ : ..............................................................................................................................
ΚΩΔΙΚΟΣ ΠΡΟΙΟΝΤΟΣ : .......................................................................................................................
ΗΜΕΡΟΜΗΝΙΑ ΑΓΟΡΑΣ
ΣΦΡΑΓΙΔΑ ΚΑΤΑΣΤΗΜΑΤΟ
Προσοχή: Η εγγύηση ισχύει μονο εφʼ όσον εχει συμπληρωθεί και σφραγισθεί
από τον πωλητή η ημερομηνία αγοράς. Ζητείστε το από το κατάστημα τη στιγμή
της αγοράς. Αν χαθεί ή καταστραφεί το απόκομμα της εγγύησης δεν μπορεί να
αντικατασταθεί.
&
Page 52

PEG PEREGO S.p.A.
VIA DE GASPERI 50 20043 ARCORE MI ITALIA
tel. 0039•039•60881 fax 0039•039•615869-616454
Servizio Post Vendita - After Sale:
tel. 0039•039•6088213 fax: 0039•039•3309992
PEG PEREGO U.S.A. Inc.
3625 INDEPENDENCE DRIVE FORT WAYNE INDIANA 46808
phone 260•482•8191 fax 260•484•2940
Call us toll free 1•800•671•1701
PEG PEREGO CANADA Inc.
585 GRANITE COURT PICKERING ONTARIO CANADA L1W3K1
phone 905•839•3371 fax 905•839•9542
Call us toll free 1•800•661•5050
www.pegperego.com
MARTINELLI è prodotta da Peg Perego.
MARTINELLI is produced by Peg Perego.
MARTINELLI est un produit Peg Perego.
MARTINELLI wird von Peg Perego hergestellt.
MARTINELLI es un producto Peg Perego.
MARTINELLI é um produto Peg Perego
MARTINELLI is een productie van Peg Perego.
MARTINELLI egy Peg Perego termék.
MARTINELLI je izdelek Peg Perego.
МАRTINELLI произведена Peg Perego.
MARTİNELLİ PegPerego tarafi ndan Üretilmektedir.
Tα προιόντα MARTINELLI παράγονται από την Peg – Perego.
Aria
28-02-06
 Loading...