


Water Conditioning Equipment
1701E. VineSt.,P.O. Box3615, |
Kalamazoo,MI49003-3615 |
||||
Phone: (269) 344-6137 |
Fax: (269)344-2894 |
||||
|
|
|
|
|
|
|
|
|
|
|
|
|
|
|
|
|
|
|
|
|
|
|
|
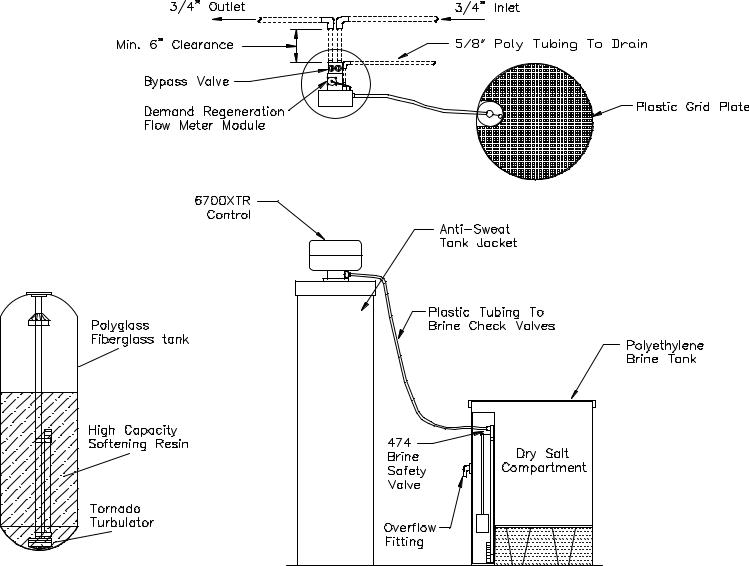
INSTALLATION DIAGRAM
Specifications - 30 FME-XTR and 30 FME-S-XTR
Rough in dimension: From the floor to the center of bypass approximately 50" for 30 FME-XTR, and approximately 36-1/2" for a 30 FME-S-XTR
Maximum distance and size for drain line: 50' horizontal, 10" vertical rise, using 1/2" ID drain line Maximum distance and size for brine line: 15' horizontal (see note) using 1/4" ID poly tubing
NOTE: The horizontal distance for the brine tank can be increasted to 35' if the brine tank is installed above the unit.
EXAMPLE: Softener installed in the basement and brine tank installed on 1st floor. The brine tank CANNOT be installed below the bottom of the unit. The drain and brine lines should NOT be installed with tubing that can collapse. This will cause the unit to malfunction.
CAUTION: Do NOT connect drain line tubing from control valve to overflow fitting/tubing on brine tank.
Page 1

INSTALLATION DIAGRAM
Specifications - 30 FME-C-XTR
Rough in dimension: From the floor to the center of bypass approximately 50"
Maximum distance and size for drain line: 50' horizontal, 10" vertical rise, using 1/2" ID drain line
The drain and brine lines should NOT be installed with tubing that can collapse. This will cause the unit to malfunction.
CAUTION: Do NOT conenct drain line tubing from control valve to overflow fitting/tubing on brine tank.
Page 2

Start-up Procedure
Peerless 30 FME-XTR Series Softeners
1.Pipe ¾” or 1” inlet and outlet service piping, according to the print, and arrows on bypass and control valve..
2.Set brine tank in place on a clean, level surface. This prevents bottom puncture when weight of water and salt are added. Connect brine line (furnished in brine tank) from brine tank to valve. Line must be air tight.
3.Connect 5/8” OD poly tubing (not supplied) from valve to suitable drain. DO NOT use ½” copper male adapter. It WILL crack drain housing on valve.
4.With bypass valve in the bypass position, open a cold water tap nearby and let it run a few minutes. Once free from air, partly open bypass to allow water to slowly fill tank. Once water stops running into tank, rotate bypass valve into the full service position, and close cold water tap.
5.Plug unit into an approved 120V AC outlet. SET TIME OF DAY. Press the Up/Down arrow until the time of day is displayed. Press the Left arrow to select the digit you want to change. Press the Up/Down arrow to adjust the valve. NOTE: Time of day must be set correctly to either AM or PM.
6.A. Test water, and set computed grains of hardness. Do not forget to compensate for iron. To set hardness value press and hold the up AND down arrows for 5 seconds. The display will read Water Hardness. Press the left arrow to select the digit you want to change. Press the Up/Down arrow to adjust the valve. Press the Extra Cycle button, (the button with four (4) arrows).
B.The display will show Regeneration Day override. Factory default (15 days.) Press the Left arrow to select the digit you want to change. Press the Up/Down arrow to adjust the valve. Press the Extra Cycle button; the button with four (4) arrows, to return to normal display.
C.The display will now show regeneration time. Factory default (2:00AM). Press the Left arrow to select the digit you want to change. Press the Up/Down arrow to adjust the valve. Again, press the Extra Cycle button to return to normal display.
7.Manually add water to brine tank until water is 1/2” above the grid.
8.A. Press and hold the extra cycle button for 5 seconds. The display will read “Valve moving to Cycle step 1”. When the display reads backwash, let run 5 minutes
B.Press the Extra Cycle button and release. The display will read “Valve moving to Cycle step 2”. When the display reads brine & slow rinse, press the Extra Cycle button again.
C.The display will read “Valve moving to Cycle step 3”. When the display reads rapid rinse, wait 5 minutes then press the Extra Cycle button again.
D.The display will read “Valve moving to Cycle step 4”. Then the display reads brine tank fill, wait until the air is purged out of the brine line, and press the Extra Cycle button to return the unit to service.
9.Fill brine tank with salt. Peerless recommends Hardi-Cube, Dura-Cube or Mini-Cube or salt substitutes, i.e. Potassium Chloride, (trade names) K-Life or Soft Touch. These are recommended for their high solubility and pureness. The use of softening agents such as ROCK, SOLAR or BLOCK salt will Negate the Warranty on your equipment as they are not pure enough and will cause problems for your equipment.
10.Open cold water valves in house to relieve air. Let water run for 3 minutes and test cold water to make sure it is soft.
11.Hot water from the water heater (unless drained and filled with soft water) will not become soft until the customer has used approximately 3 times the holding capacity of the water heater.
12.Write the installation date (month/year) on the sticker found inside the front cover.
Page 3

6700XTR Powerhead Assembly
Part # 6700-Powerhead
Page 4
 Loading...