

Page 1

EQUINOX
PRO upgrade kit
Installation instructions
Istruzioni per l’installazione
ENGLISH/ITALIANO code: 271232
Page 2
CAUTION
Read these notes before proceeding
These servicing instructions are for use by qualified personnel only. To reduce the risk of electric
shock and device malfunction, do not perform any user-servicing but refer all servicing to the
nearest Service Center Authorized by GENERALMUSIC. Any servicing performed by unqualified
service personnel will forfeit all GUARANTEE rights and will exonerate GENERALMUSIC from
all liabilities for damage to property or persons resulting from device malfunction.
ATTENZIONE
Leggi queste note prima di procedere
Le seguenti istruzioni di servizio sono ad esclusivo uso di personale qualificato. Per evitare il
rischio di scosse elettriche e malfunzionamenti dell’ apparecchio, non tentate di effettuare
personalmente queste operazioni, rivolgetevi al più vicino Centro di Assistenza Autorizzato
GENERALMUSIC. Ogni intervento effettuato da personale non qualificato farà decadere i diritti
di GARANZIA ed esonererà GENERALMUSIC da ogni responsabilità su eventuali danni a
persone o cose conseguenti dal suo malfunzionamento.
ATTENTION
Observe precautions when handling electrostatic sensitive devices.
ATTENZIONE
Maneggiare con cura i dispositivi elettronici sensibili alle cariche elettrostatiche.
IMPORTANT: Part below to be filled in by the service center.
IMPORTANTE: Fate compilare al servizio di assistenza la parte sottostante.
Stamp of Service Center
Authorized by Generalmusic
Timbro Centro Assistenza
Autorizzato da Generalmusic
Device serial number.
Numero di serie apparecchio.
Optional accessory installed.
Accessorio opzionale installato.
Installation Date.
Data di installazione.
Page 3

970333 - EQUINOX PRO Kit Index / Indice
ENGLISH
Index
Opening instructions.........................................4
Part List............................................................5
8Mbyte module installation...............................6
Hard Disk installation........................................7
SCSI installation...............................................9
Operating System upgrading...........................11
SCSI general information................................12
ITALIANO
Indice
Istruzioni apertura............................................4
Lista materiali..................................................5
Installazione modulo 8Mbyte...........................6
Installazione Hard Disk....................................7
Installazione SCSI...........................................9
Aggiornamento Sistema Operativo..................11
Informazioni generali SCSI..............................12
Index - 3
Page 4
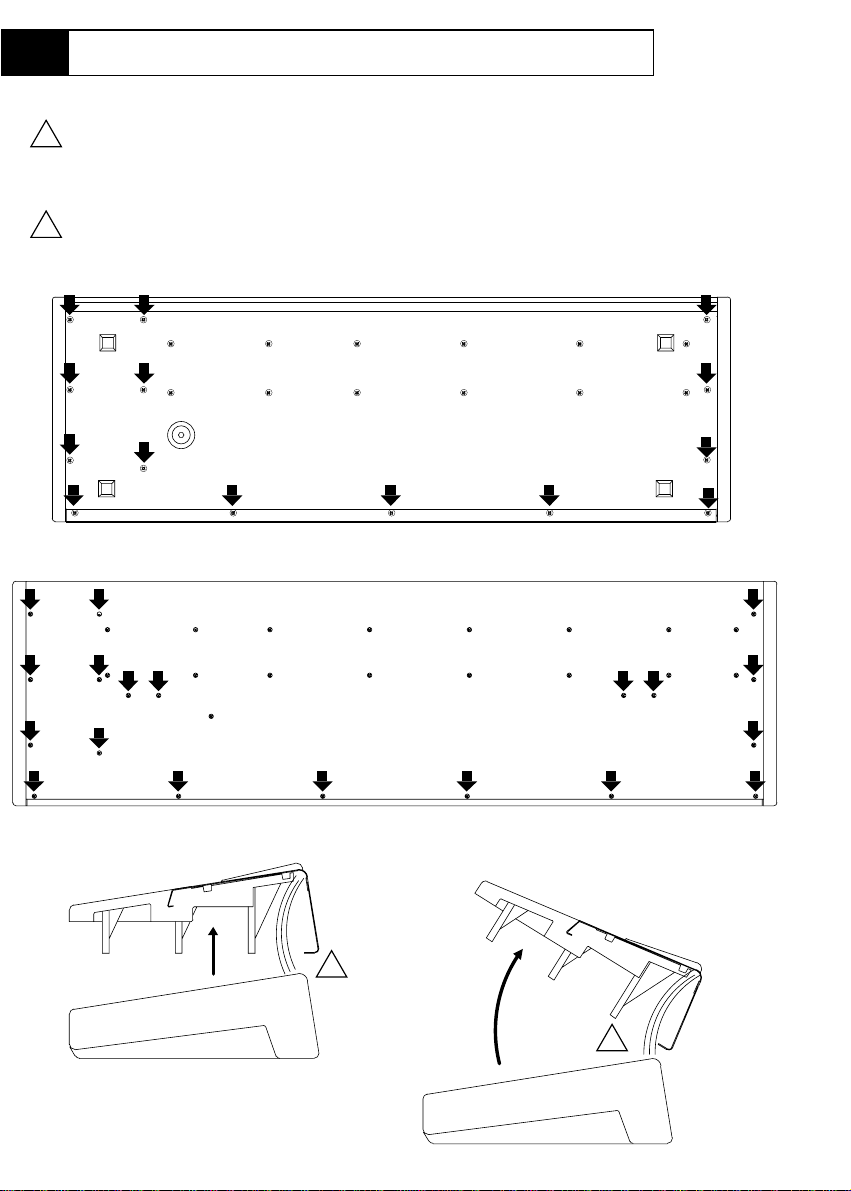
Opening / Apertura
EQUINOX
Instructions / Istruzioni
ENGLISH
Disconnect the instrument from the mains.
!
Carefully turn the instrument over and unscrew the screws marked by the arrows.
Hold the chassis (top & Bottom) tightly and turn the instrument the right way up,
lift off the top chassis as shown in the figure with care without forcing or disconnecting the cables.
ITALIANO
Sconnettere lo strumento dalla presa di corrente.
!
Rovesciare con attenzione lo strumento e rimuovere le viti indicate dalle frecce.
Trattenendo saldamente le parti superiore e inferiore raddrizzare lo strumento,
rimuovere la parte superiore come indicato in figura, attenzione a non forzare o scollegare i cavi.
61 notes
76 notes
Front / Davanti
Rear / Dietro
Front / Davanti
Model - Modello
a) Lift up.
Sollevare.
4 - Mounting Instructions
Rear / Dietro
a) Be careful do not disconnect the cables.
Attenzione a non sconnettere i cavi.
!
!
Page 5

Mounting / Montaggio Part List / Lista Materiali
Instructions / Istruzioni
ENGLISH
Check all the supplied parts listed below:
Part List:
Ref. Qnty. Description
1) 1 8Mb DRAM module
4) 2 HD mounting brackets
5) 12 screws (M3x6)
8) 4 washers 7/3mm 120451
10) 1 44 contacts x 7.5 cm flat cable 840824
11) 1 34 contacts x 25 cm flat cable
12) 1 22 cm plaited cable
13) 1 61N Eq. Operating System Disk 955913
14) 1 76N Eq. Operating System Disk 955922
Code
761168
5610062) 1 hard disk
7611773) 1 SCSI interface board
171471
120029
1205216) 12 grower washers 3mm
3409057) 4 rubber suspension
1714539) 1 SCSI board support
841183
841186
Tools (not supplied):
- Phillips screwdriver
- 5.5mm nut wrench
PERFORM THE INSTRUCTIONS IN THE ORDER
SPECIFIED IN THE FOLLOWING PAGES.
ITALIANO
Controllare tutti i materiali forniti listati qui sotto:
Lista parti:
Rif. Qnt. Descrizione
1) 1 modulo 8Mb DRAM
4) 2 supporti HD
5) 12 viti (M3x6)
8) 4 rondelle 7/3mm 120451
10) 1 cavo piatto 44 vie 7.5 cm 840824
11) 1 cavo piatto 34 vie 25 cm
12) 1 cavo intrecciato 22 cm
13) 1 Disco Sistema Operativo Eq. 61 955913
14) 1 Disco Sistema Operativo Eq. 76 955922
Codice
761168
5610062) 1 hard disk
7611773) 1 scheda interfaccia SCSI
171471
120029
1205216) 12 rondelle grower da 3mm
3409057) 4 sospensioni in gomma
1714539) 1 supporto scheda SCSI
841183
841186
Utensili (non forniti):
- Cacciavite a croce
- Chiave inglese da 5.5mm
ESEGUIRE LE ISTRUZIONI NELL'ORDINE SPECIFICATO NELLE PAGINE SEGUENTI.
Mounting Instructions - 5
Page 6

Mounting / Montaggio
Instructions / Istruzioni
ENGLISH
- Locate the CPU board (A), see figure 1.
- Remove the 2Mb DRAM module (B) from the CPU’s CN5 connector (NOTE: this module will be reused later).
- Insert the 8Mb DRAM module (1) into the CPU’s CN5 connector.
- Set the jumper J2 on "8Mb" position (NOTE: leave the jumper J1 on its position).
ITALIANO
- Individuare la scheda CPU (A), vedi figura 1.
- Rimuovere il modulo 2Mb DRAM (B) dal connettore CN5 della scheda CPU (NOTA: questo modulo sarà riutilizzato
dopo).
- Inserire il modulo 8Mb DRAM (1) nel connettore CN5 della scheda CPU.
- Mettere il ponticello J2 in posizione "8Mb" (NOTA: lasciare il ponticello J1 nella sua posizione).
8Mb Samples DRam
Part / Parte
Fig.1
1
B
A
CN5
6 - Mounting Instructions
Detail magnified of Fig.1.
Particolare ingrandito di Fig.1.
Page 7

Mounting / Montaggio
Hard Disk
Instructions / Istruzioni
ENGLISH ITALIANO
- Assemble the brackets (4) to the hard disk (2) using
the screws (5) and their washers (6).
- Insert the rubber suspensions (7) into slots
of the brackets (4), refer to figure 2.
- Locate the 4 threaded columns (C) on the right of the
CPU (A) which mark the hard disk (2) location.
- Anchor the HD (2) using screws (5) and washers
(6) and (8).
Fig.2
5
8
5
Part - Parte
- Assemblare i supporti (4) all’ hard disk (2) usando
le viti (5) e le loro rondelle (6).
- Inserire le sospensioni in gomma (7) nelle asole
dei supporti (4), riferirsi a figura 2.
- Localizzare le 4 colonnine filettate (C) al lato destro
della scheda CPU (A) dove montare l’hard disk (2).
- Fissarlo usando le viti (5) e le loro rondelle (6) e (8).
6
7
2
6
4
A
C
Mounting Instructions - 7
Page 8

Mounting / Montaggio
Instructions / Istruzioni
ENGLISH
- Connect the HD (2) to CN8 to the CPU board (A)
by means cable (10) as show in figure 3.
Fig.3
Hard disk Connector.
Connettore Hard disk.
A
Hard Disk
Part / Parte
ITALIANO
- Connettere il disco (2) al connettore CN8 sulla scheda
CPU (A) con il cavo (10) come mostrato in figura 3.
NOTA: lasciare liberi gli ultimi 4 pin.NOTE: leave the last 4 pins free.
2
CN8
- Re-insert the 2Mb DRAM module (B) onto the CN9
connector of the CPU board (A).
IMPORTANT: DO NOT FORMAT THE HARD
DISK, it contain new samples and other files.
Fig.4
B
8 - Mounting Instructions
10
- Reinserire il modulo 2Mb DRAM (B) al connettore CN9
sulla scheda CPU (A).
IMPORTANTE: NON FORMATTARE IL DISCO,
esso contiene nuovi campioni e altri files.
CN9
A
Page 9

SCSI Interface
Part/Parte Instructions/Istruzioni
ENGLISH ITALIANO
- Anchor the SCSI board (3) to the support (9) using
the screws (5) and washers (6) as show on figure 5. usando le viti (5) e le rondelle (6) come da figura 5.
- Assemblare la scheda SCSI (3) al supporto (9)
Mounting/Montaggio
Fig.5
5
6
- Locate the SCSI slot cover on the cover right side and - Localizzare il coperchio del vano SCSI sulla destra
remove it unscrewing the 2 nuts as show in figure 6.
del coperchio e rimuoverlo svitando i 2 dadi come
da figura 6.
Fig.6
Mounting Instructions - 9
Page 10

Mounting/Montaggio SCSI Interface
Instructions / Istruzioni
ENGLISH ITALIANO
- Fix the SCSI kit on its location using the two previously
removed nuts. rimossi precedentemente.
- Connect the plaited cable (12) to S1 faston on CPU
board and the other end to S1 faston on SCSI board.
as show in figure 7.
- Fissare il kit SCSI al suo posto usando i due dadi
- Connettere il cavo intrecciato (12) al faston S1 sulla
scheda CPU e l'altro capo al faston S1 sulla scheda
SCSI come da figura 7.
Part/Parte
Fig.7
9
3
+
12
- Connect the flat cable (11) to CN16 connector on CPU - Collegare il cavo piatto (11) al connettore CN16
show in figure 8.
sulla scheda CPU e l'altro capo al connettore board and the other end to CN1 on SCSI board as
CN1 sulla scheda SCSI come da figura 8.
Fig.8
G
- Close the instrument. - Chiudere lo strumento.
10 - Mounting Instructions
Page 11

EQUINOX 61-76
Upgrading/Aggiornamento
ENGLISH
IMPORTANT: THE LAST VERSION OF THE OPERATING SYSTEM IS ALSO DOWNLOADABLE
BY INTERNET, CONNECTING TO THE GENERALMUSIC WEB SITE: http://www.generalmusic.com
ITALIANO
IMPORTANTE: L'ULTIMA VERSIONE DEL SISTEMA OPERATIVO É ANCHE SCARICABILE VIA
INTERNET, COLLEGANDOSI AL SITO WEB GENERALMUSIC: http://www.generalmusic.com
Model Instructions
Before using any SCSI device connected to your instrument you must check the release date
of the last installed operating system of EQUINOX 61 and 76.
Carry out the following instructions:
Turn on the instrument, press SYSTEM, press OTHER (F4), press BATT. & REL. (F2) and
check the release date displayed:
1) If the date displayed is 15/12/98 or later, the operating system is already updated and you
do not need to do anything else. Continue to page 12 for futher information.
2) If the date displayed is before 15/12/98 the operating system must be updated as follow:
3) Turn the instrument OFF.
4) Insert the EQUINOX 61 or 76 Operating System disk supplied with this kit in the disk drive.
5) After inserting the disk, turn the instrument ON. You will see a message in the display that
says: "=== OS-INSTALL === (ENTER/ESCAPE)".
6) Press ENTER to start the OS update and wait for the new Operating System to load.
NOTE: Uploading the operating system will erase all user programmed data in
memory, therefore, before updating save your data to disk or hard-disk. See also the
owner's manual instructions.
7) When the new system has finished loading, you will see the following message in the
display: "Installation successful (Enter to continue)". Press ENTER,
8) The instrument will proceed through the normal operatig system display screens. After
completing this process your instrument can operate with the SCSI option. See page 12 for
additional information on the SCSI interface and how to use it.
Prima di usare qualsiasi dispositivo SCSI collegato al tuo strumento devi controllare la data
della versione dell'ultimo sistema operativo installato su Equinox 61 e 76.
Eseguire le seguenti istruzioni:
Accendere lo strumento, premere SYSTEM, premere OTHER (F4), premere BATT. & REL.
(F2) e controllare sul display la data di rilascio del Sistema Operativo:
1) Se la data visualizzata è il 15/12/98 o successiva il Sistema Operativo è già aggiornato,
non devi fare nient'altro. Continuare a pagina 13 per altre informazioni.
2) Se la data è antecedente il 15/12/98 il Sistema Operativo va aggiornato come segue:
3) Spegnere lo strumento (OFF).
4) Inserire il disco del Sistema Operativo EQUINOX 61 o 76 fornito con questo kit nel drive.
5) Dopo l'inserimento del disco accendere lo strumento (ON), vedrai sul display il messaggio:
"=== OS-INSTALL === (ENTER/ESCAPE)".
6) Premere ENTER per iniziare l'aggiornamento e attendere il caricamento del nuovo SO.
NOTA: Il caricamento del sistema operativo cancellerà tutti i dati programmati
dall'utente, perciò, prima dell'aggiornamento salvare i dati su un dischetto o
sull'hard-disk. Vedi anche le istruzioni sul manuale utente.
7) Quando il nuovo sistema è caricato, comparirà sul display il seguente messaggio:
"Installation successful (Enter to continue)", premere ENTER.
8) Lo strumento procederà con le usuali schermate. Al completamento il tuo strumento può
operare con l'opzione SCSI. Vedi pagina 13 per ulteriori informazioni sull'interfaccia SCSI e
come usarla.
Upgrading Operating System - 11
Page 12

General Information SCSI
ENGLISH
SCSI
stands for SMALL COMPUTER SYSTEM INTERFACE.
SCSI is a data transfer standard that allows large amounts of data to be sent and received.
The EQUINOX instrument is predisposed for the installation of a SCSI connector allowing you to
connect external SCSI and SCSI II devices such as CD Rom and Zip™ removable disk devices.
Note: A new Zip™ removable disk must be pre-initialized in IBM Compatible mode.
Connections
Up to 7 devices can be connected to the SCSI port of the EQUINOX by means of a 50 pin SCSI
cable.
SCSI ID Numbers
Each device connected in a SCSI chain must be distinguished by its SCSI ID number ( 0-7).
This means that when two or more devices are connected, you must set both devices with a different
SCSI ID numbers so that their do not conflict.
If the SCSI ID number is set correctly, the EQUINOX will be able to recognize the SCSI device by the
appropriate ID number.
Warnings:
#1 EQUINOX uses a SCSI type II connector (A type, 50 pin).
#2 Use SCSI cables as short as possible.
#3 Do not allow the total length of all SCSI cables connecting the chain of devices to exceed 6,5mt.
#4 Do not connect or disconnect SCSI cables when the power of any device is turned ON.
#5 The device at the end of a SCSI chain must be TERMINATED.
#6 It is important to turn on the external devices before the keyboard.
#7 It is not possible to connect two devices of the same type such CD Rom as CD Rom and so on.
Features:
EQUINOX connected via the SCSI port allows you to manipulate via the Sample Translator, Sample
files AKAI S 1000/1100/3000, .Wav, .Aiff, SDII, .Krz 2000/2500 or via the Disk Menu operations such
as SONG, MIDI files, Styles, Groove, and relative resources (please refer to the Owner's Manual).
KEYBOARD
A A or B A or B
SCSI CD-ROM OTHER/LAST
SCSI DEVICE
SCSI ID = 0 SCSI ID = 1...7
max=7
HARDWARE TERMINATION
A or B
L max = 6,5mt
A type connector B type connector
High-Density Male 50-pin - Micro or Mini DB50 Low-Density Male - Centronics 50-pin
12 - SCSI Interface Information
TERMINATION
OFF
ON
OR
Page 13

SCSI Informazioni Generali
ITALIANO
SCSI
sta per SMALL COMPUTER SYSTEM INTERFACE (interfaccia per piccoli computer).
SCSI è uno standard di trasferimento dati che consente di spedire e ricevere dati in quantità elevate.
Lo strumento EQUINOX equipaggiato con il connettore SCSI consente di connettere unità SCSI e
SCSI II esterne quali lettori CD Rom e Dischi removibili Zip™.
Nota: Un disco removibile Zip™ nuovo deve essere pre-formattato in modo "IBM Compatible".
Connessioni
Possono essere connesse alla catena SCSI di EQUINOX fino ad un massimo di 7 unità usando cavi
SCSI a 50 pin.
Numero identificazione SCSI ID
Ogni unità connessa nella catena SCSI deve essere distinta con il suo numero ID ( 0-7).
Questo significa che quando due o più unità sono collegate dovrete impostare numeri SCSI ID diversi
per ogni unità onde evitare conflitti.
Se la catena SCSI viene impostata nel modo giusto EQUINOX sarà in grado di riconoscere
correttamente le unità SCSI tramite il numero di ID appropriato.
Avvertenze:
#1 EQUINOX usa un cavo SCSI tipo II (tipo A, 50 pin).
#2 Usare cavi SCSI il più corti possibile.
#3 Non superare la lunghezza totale dei cavi SCSI connessi in catena oltre i 6,5 metri.
#4 Non collegare o sconnettere cavi SCSI quando le unità connesse sono accese.
#5 Ogni unità alla fine della catena SCSI deve essere TERMINATA elettronicamente.
#6 È necessario accendere in sequenza prima le unità SCSI esterne e quindi lo strumento.
#7 Non è possibile collegare 2 dispositivi SCSI dello stesso tipo come CD Rom e CD Rom e così via.
Specifiche:
EQUINOX connesso alla porta SCSI consente di manipolare tramite Sample Translator files come
Campioni (Sample) AKAI S1000/1100/3000, .Wav, .Aiff, .SDII, Krz2000/2500 o tramite Disk Menù
SONG, MIDI files, Styles, Groove, e risorse relative (fare riferimento al Manuale Utente).
TASTIERA
A A o B A o B
SCSI CD-ROM ALTRA/ULTIMA
UNITA' SCSI
SCSI ID = 0 SCSI ID = 1...7
max=7
TERMINATION
TERMINAZIONE HARDWARE
A o B
L max = 6,5mt
Connettore tipo A Connettore tipo B
High-Density Male 50-pin - Micro or Mini DB50 Low-Density Male - Centronics 50-pin
SCSI Interface Information - 13
OFF
ON
O
 Loading...