

Page 1

Messenger™ Series
Pro™ Sub P
Low Frequency Enclosure
OPERATING INSTRUCTIONS
Enceinte Basse Fréquences
INSTRUCTIONS D'UTILISATION
Basslautsprecher
BETRIEBSANTEITUNG
Altavoz de Baja Frecuencia
MANUAL DE INSTRUCCIONES
Page 2

PRO™ Sub P
Thank you for purchasing the Messenger PRO™ Sub P. The PRO™ Sub P is a self contained, compact powered
sub woofer system comprising of a 15” high specification woofer and a 400 watt class “D” power amplifier. The sub
woofer is of mono design capable of accepting stereo or mono line level inputs. There are left and right stereo
unfiltered unity gain line outputs designed to be linked to the line input of two powered satellite enclosures. Such
enclosures would be the Pro™ 12P or the Pro™ 15P. The class “D” amplifier is equipped with both a variable low
pass filter and a level control to optimize the performance of the complete system.
It is very important that you ensure the PRO™ Sub P is the correct AC line voltage for your supply. This is printed
next to the IEC line (power) cord on the rear panel of the unit. Please read this guide carefully to ensure your
personal safety as well as the safety of your equipment.
FEATURES
Satellite pole mounting hole.
Front loaded vented woofer configuration.
Compact design.
Rugged carpet covering.
Steel grille.
High efficiency 400W class “D” amplifier.
High spec. 15” woofer with 3” voice coil for long term reliability.
Frequency response: 45Hz – 160Hz.
Variable low pass control frequency.
Woofer level control.
Intelligent safe amplifier protection mode.
Quiet power up.
Left and right stereo balanced XLR / 6.3mm combi jack inputs.
Left and right unity gain line level unfiltered balance XLR outputs.
Protection “on” warning indicator.
Auto standby mode from power up.
ENGLISH
Page 3

IMPORTANT SAF ETY INSTRUCTIONS
Read these instructions carefully and heed all warnings. Keep these instructions safely for reference.
1. This product has been designed and manufactured to be operated as an active speaker system in the applications
typical of a sound reinforc em en t system or of a sound recording system. Operation for purposes and in applications
other than these are not recommended by the manufacturer, and is therefore to be undertaken at the end user's
and/or installer's sole risk and responsibility.
2. Do not use this apparat us near water.
3. Clean only with a dry cloth.
4. Do not block any of the ventilation openings.
5. Install in accordanc e with manufacturer’s instruct i on s.
6. Do not install near any heat sources such as radiators, heat registers, stoves or other apparatus (including amplifiers)
that produce heat.
7. Before connecting this product to the mains supply, always make sure that the voltage on the mains outlet
corresponds to that stated on the product.
8. Before attempting to move the product after it has been installed, remove all the connections.
9. Protect the power cord from being walked on or pinched, particularly at plugs, convenience receptacles, and the point
they exit from the apparatus.
10. To disconnect the power cable of this product from the mains supply hold the body of the plug firmly and pull it gently
from the mains supply outlet. Never pull the cable directly, instead
11. Always make sure the On/Off switch is in its 'Off' position before any operation on the connections of the product.
12. Power supply cords should always be handled carefully. Periodically check cords for cuts or sign of stress, especially
at the plug and the point where the cord exits the unit.
13. This product must be connected only to a grounded mains outlet, complying to the safety regulations in force, via the
supplied power cable. If the power cable needs to be substituted, use exclusively a cable of the same type and
characteristics shown on the unit adjacent to the power supply cord.
14. Should external fuse needs replacing, substit ut e only with one of the same type and rating, as stated on the product.
15. Do not defeat the safety purpose of the polarized or grounding-type plug. A polarized plug has two blades, one wider
than the other. A grounding type plug has two blades and a third grounding prong. The wide blade or the third prong
are provided for safety. If the provided plug does not fit into your outlet, consult an electrician for replacement of the
obsolete outlet.
16. Never break off the ground pin.
17. Note for UK only: If the colours of the wires in the mains lead of this unit do not correspond with the terminals in your
plug‚ proceed as follows:
a) The wire coloured green and yellow must be connected to the terminal marked with the letter 'E', the earth
symbol‚ coloured green or coloured green and yellow.
b) The wire coloured blue must be connected to the terminal marked with the letter 'N' or the colour black.
c) The wire coloured brown must be connected to the terminal marked with the letter 'L' or the colour red.
18. Only use attachments/accessories provided by the manufacturer.
19. Use only with a cart, stand, tripod or table speci f ie d by the manufacturer, or sold with the apparatus.
20. Before placing the product on a surface of any kind, always make sure that its shape and load ratings will safely
match the product's size and weight.
21. When a cart is used, apply caution when moving the cart/apparatus combination to avoid injury from tip-over. Do not
fly this enclosure in any way.
22. Unplug this apparatus during lightning storms or when unused for long periods of time.
23. Refer all servicing to qualified service personnel. Servicing is required when the apparatus has been damaged in any
way, such as the power-supply cord or plug is damaged, liquid or objects have fallen into the apparatus, the
apparatus has been exposed to rain or moisture, does not operate normally, or has been dropped.
24. To avoid shocks or kicks, always reserve a protected area around the enclosure with no access to unqualified
personnel.
Page 4

25. Exposure to extremely high noise level s may cause a permanent heari ng loss. Individuals vary cons id er a bl y in
susceptibility to noise-induced hearing loss, but nearly everyone will lose some hearing if exposed to sufficiently
intense noise for a sufficient time. The U.S. Government’s Occupational Safety and Health Administration (OSHA)
has specified the following permissible noise level exposures:
According to OSHA, any exposure in excess of the above permis s i ble limits could result in som e hearing loss. Ear plugs or
protectors to the ear canals or over the ears must be worn when operating this amplification syste m in ord er to prevent a
permanent hearing loss, if exposure is in excess of the lim it s as set out above. To ensure aga ins t potentially danger ou s
exposure to high sound pressure levels, it is recommended that all persons exposed to equipment capable of producing high
sound pressure levels such as this amplificatio n system be protected by hearing protectors while this unit is in operation.
SAVE THESE INSTRUCTIONS!
Duration Per Day In Hours
8
6
4
3
2
1 1⁄2
1
1⁄2
1⁄4 or less
Sound Level dBA, Slow Response
90
92
95
97
100
102
105
110
115
Page 5
The Peavey PRO™ Sub P active powered sub woofer can be used with the Pro™ 12P or Pro™ 15P, in sound
reinforcement and public address systems.
A typical signal source for the line-level inputs of the Peavey PRO™ Sub P would be a sound reinforcement mixing
console (mixer).
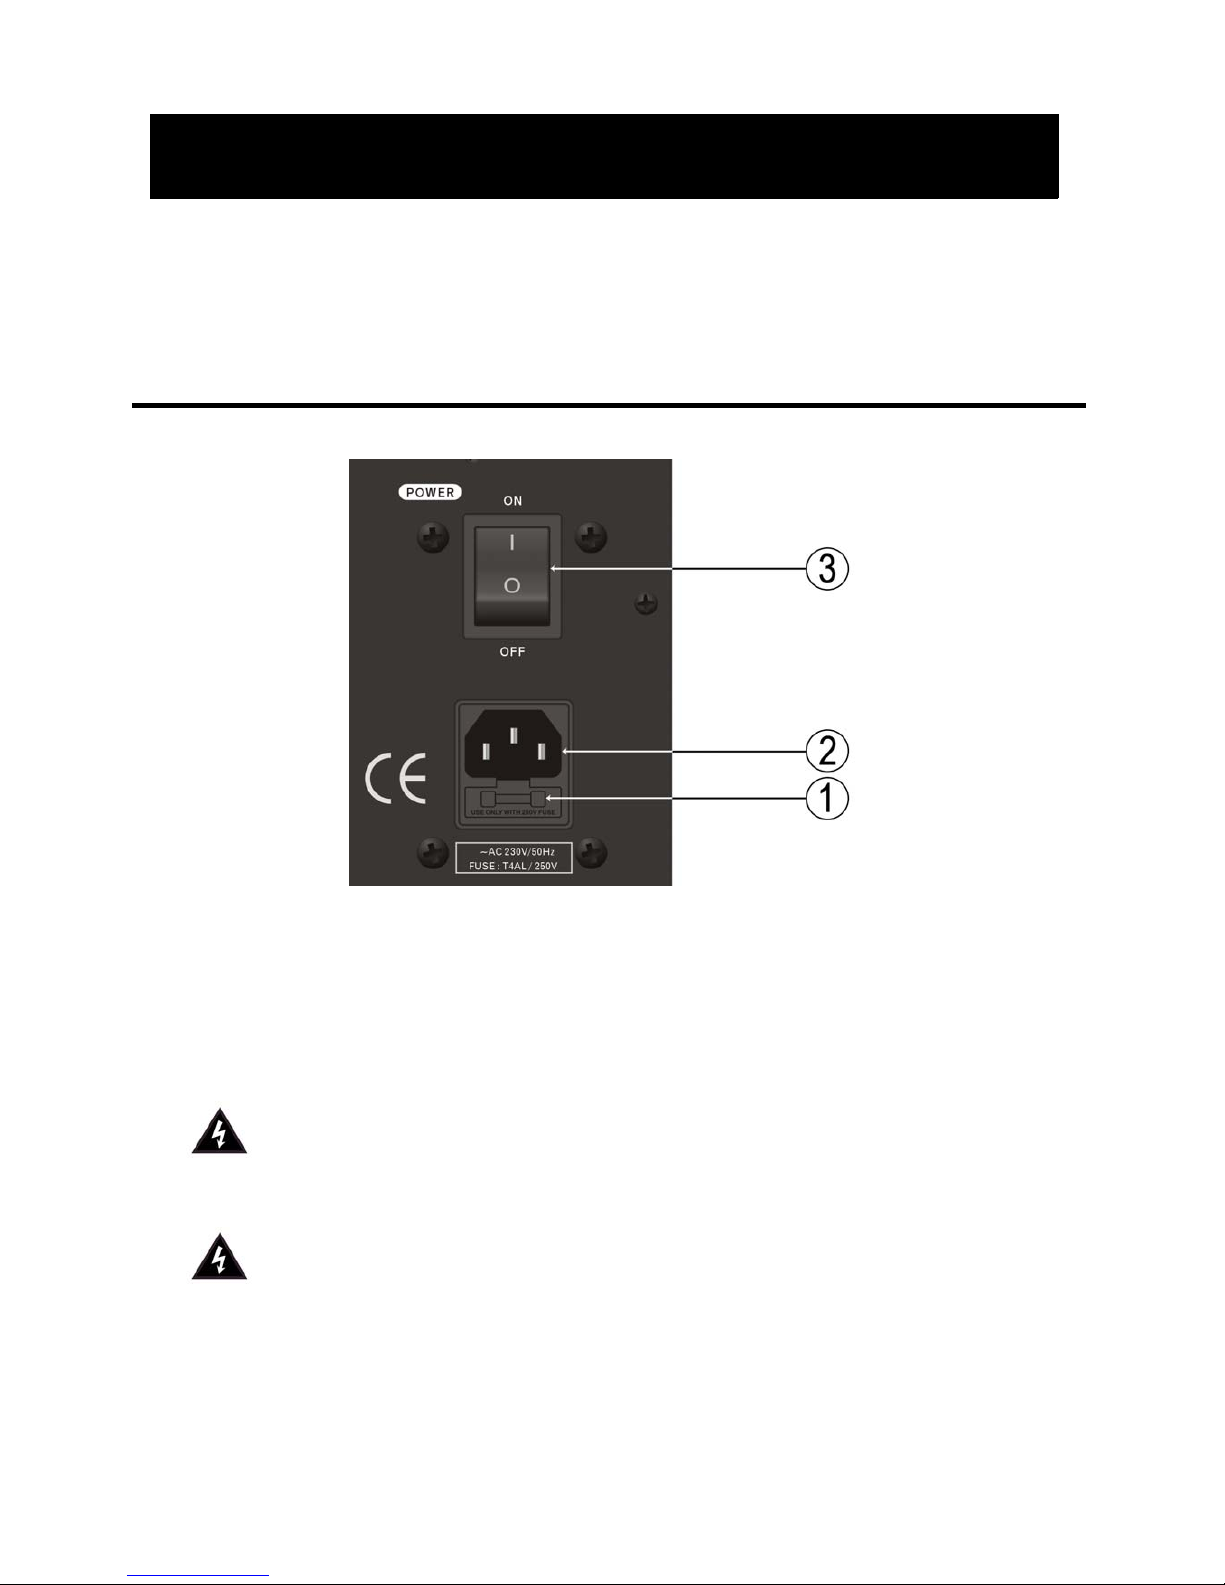
Rear Panel – Power Section
(1) FUSE
The unit is AC power l ine fuse protected from overloads and fault conditions with a T-type
fuse. This fuse is located within the cap of the fuse holder. If the fuse fails, the fuse must
be replaced with the same type and value in order to avoid damage to the
equipment and to prevent voiding the warranty. If the unit repeatedly blows fuses it
should be taken to a qualified service centre for repair.
(2) IEC POWER CORD CONNECTION
This receptacle is for the IEC line cord (supplied) that provides AC power to the unit.
Never break off the ground pin on any equipment. It is provided for your safety. To
prevent the risk of shock or fire hazard, always be sure that the mixer and all other
associated equipment is properly grounded.
(3) ON-OFF SWITCH
This rocker switch supplies AC power to the PRO™ Sub P when switched to the ON
position
APPLICATIONS
Page 6

Rear Panel - Output Section
(4) RIGHT OUTPUT
Full range balanced through output mirroring the input signal.
(5) LEFT OUTPUT
Full range balanced through output mirroring the input signal.
Page 7
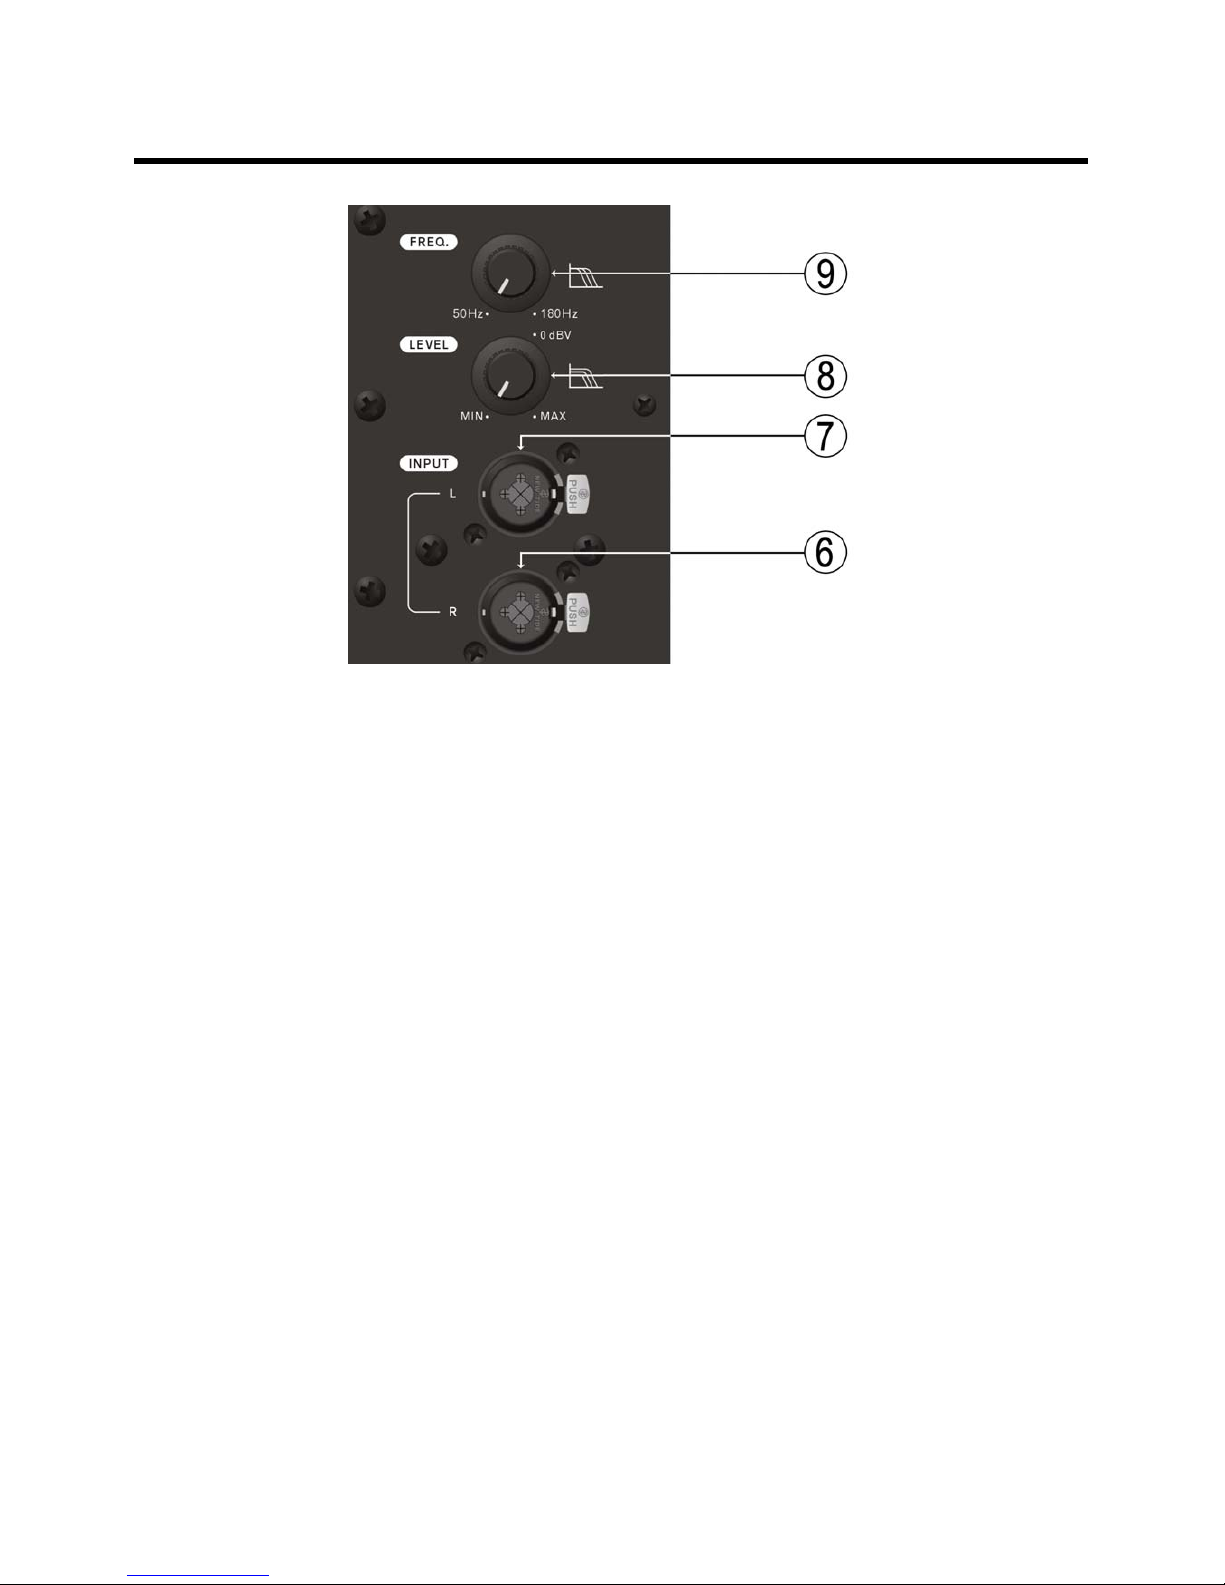
Rear Panel - Input Section
(6) RIGHT INPUT
Stereo balanced 6.3mm XLR combi jack input.
(7) LEFT INPUT
Stereo balanced 6.3mm XLR combi jack input.
(8) WOOFER LEVEL
Overall volume control for the Pro™ Sub P.
(9) WOOFER CROSSOVER FREQUENCY
Sets the frequency of the low pass filter of the Pro™ Sub P
without affecting the response of the outputs.
Page 8

O P E R A T
CAUTIONS
The unit must be disconnected from the AC power source before any work is done on it. Refer all servicing to
qualified service personnel.
The heat sink on the back plate can become hot to the touch. Do not block or cover the heat sink from ventilation.
DO NOT connect the inputs of the PRO™ Sub P to the output of a power amplifier. The inputs are meant to be
driven from a line-level signal.
DO NOT remove the protective metal grille.
Warning! The PRO™ Sub P is very efficient and powerful! This sound system can permanently damage hearing!
Use extreme care when setting the overall maximum loudness!
The sound level of the PRO™ Sub P can be decept ive due to its clear, clean sound output. The lack of distortion or
obvious distress can make the sound l evel seem much lower than it actually is.
GETTING AC POWER TO THE PRO™ SUB P
The PRO™ Sub P comes with an IEC AC power cord. If you are using an extension cord or power strip with this
powered speaker, make sure it is of good quality and of a sufficient current capacity to maintain safety and
maximize the power output capability of the PRO™ Sub P. Do not connect any other device to the same extension
cord.
OPERATING INSTRUCTIONS
Page 9

NO OUTPUT AT ALL
Check that the unit has AC power and is turned ON. Ensure the blue power indicator LED behind the grille is
illuminated. If not, make certain the ON/OFF switch (3) is in the ON position and check the IEC power cord
connection (2) by ensuring it is fully engaged and seated. Make certain the AC line cord is plugged into a working
AC outlet. Finally, check the fuse (1). (See the Rear Panel: Fuse section, for safety instructions.)
Once assured your unit is receiving AC power, check that the PRO™ Sub P is getting a signal. Temporarily
disconnect the cable running to its inputs and connect it to some other device capable of reproducing the signal
(i.e., a power amp and speaker). If this produces a signal, make sure that all Level controls being used have been
turned up to one-third to halfway).
If the PRO™ Sub P has been subjected to direct sunlight or excessive heat, the built-in thermal protection may
have been triggered. The protection LED will be illuminated RED if this is the case. If so, turn off the PRO™ Sub P
and let it cool for a sufficient amount of time.
If there is still no output, contact your authorised Peavey dealer or the Peavey Service Centre.
HUM OR BUZZ
If the PRO™ Sub P is producing a hum or buzz, it could be AC outlet related. Try plugging the PRO™ Sub P into a
different AC outlet. Sometimes, if a different circuit (breaker) is used for the mixer and the PRO™ Sub P, it can
cause hum problems.
Ensure that shielded cables have been used to route the signal to the PRO™ Sub Ps inputs. If speaker cables
with 1/4" plugs are used as input cables instead of shielded cables, it will be prone to hum or buzz.
Hum may be ground loop related. Try lifting the ground connection at the speaker end of the balanced signal cable.
Check any input changes carefully by first turning down the level control, plugging and unplugging cables, or lifting
the shield ground at the speaker end.
Check to make sure light dimmers are not on the same circuit as the PRO™ Sub P, the mixer or any source
devices. If light dimmers are used, it may be necessary to turn them full ON or full OFF to eliminate or
reduce hum. This is a typical AC wiring/light dimmer interference problem and not a design flaw of the Pro Sub P.
The third wire (ground plug) on the AC plug should NEVER be removed or broken off.
TROUBLESHOOTING
Page 10

DISTORTED OR FUZZY SOUND
Ensure the mixer (signal source) is not clipping or being overdriven. Check that the level control (8) on the PRO™
Sub P has not been set too low.
The input plugs should be fully seated in the input jacks (6) and (7) on the rear panel of the PRO™ Sub P. Ensure
that the power amp has not been plugged into one of the input jacks of the PRO™ Sub P.
If excessive additional bass boost has been added externally to the PRO™ Sub P, it could cause premature
overload at high SPL. Reduce the amount of any external (mixer, rack) EQ and see if that eliminates the distortion.
Finally, be aware that even though the PRO™ Sub P is a powerful and high output unit, it does ultimately have
limits and it may need additional powered units to provide enough sound output or coverage. Try turning the mixer
levels down.
If, after checking all the things listed above, the problem still persists contact your Peavey dealer for advice.
CARE AND MAINTENANCE
Your PRO™ Sub P is a sturdy and durable product and will provide years of reliable use if properly cared for.
Use common sense and read the safety warnings to avoid hazardous operating conditions. The unit must be
disconnected from the AC power source before any work is done on it. Refer all servicing to qualified service
personnel.
Sunlight/Heat
Avoid prolonged exposure to direct sunlight as this may cause the unit to overheat and thermally shut
off. Excessively hot operating conditions can also cause a thermal shut-down.
Do not store in extremely hot or col d conditions or extremely high humidity. Always allow unit to come to
room temperature before use.
Cleaning
Never clean the PRO™ Sub P while plugged in or turned ON! Do not allow ANY fluids to drip inside the
PRO™ Sub P.
Page 11
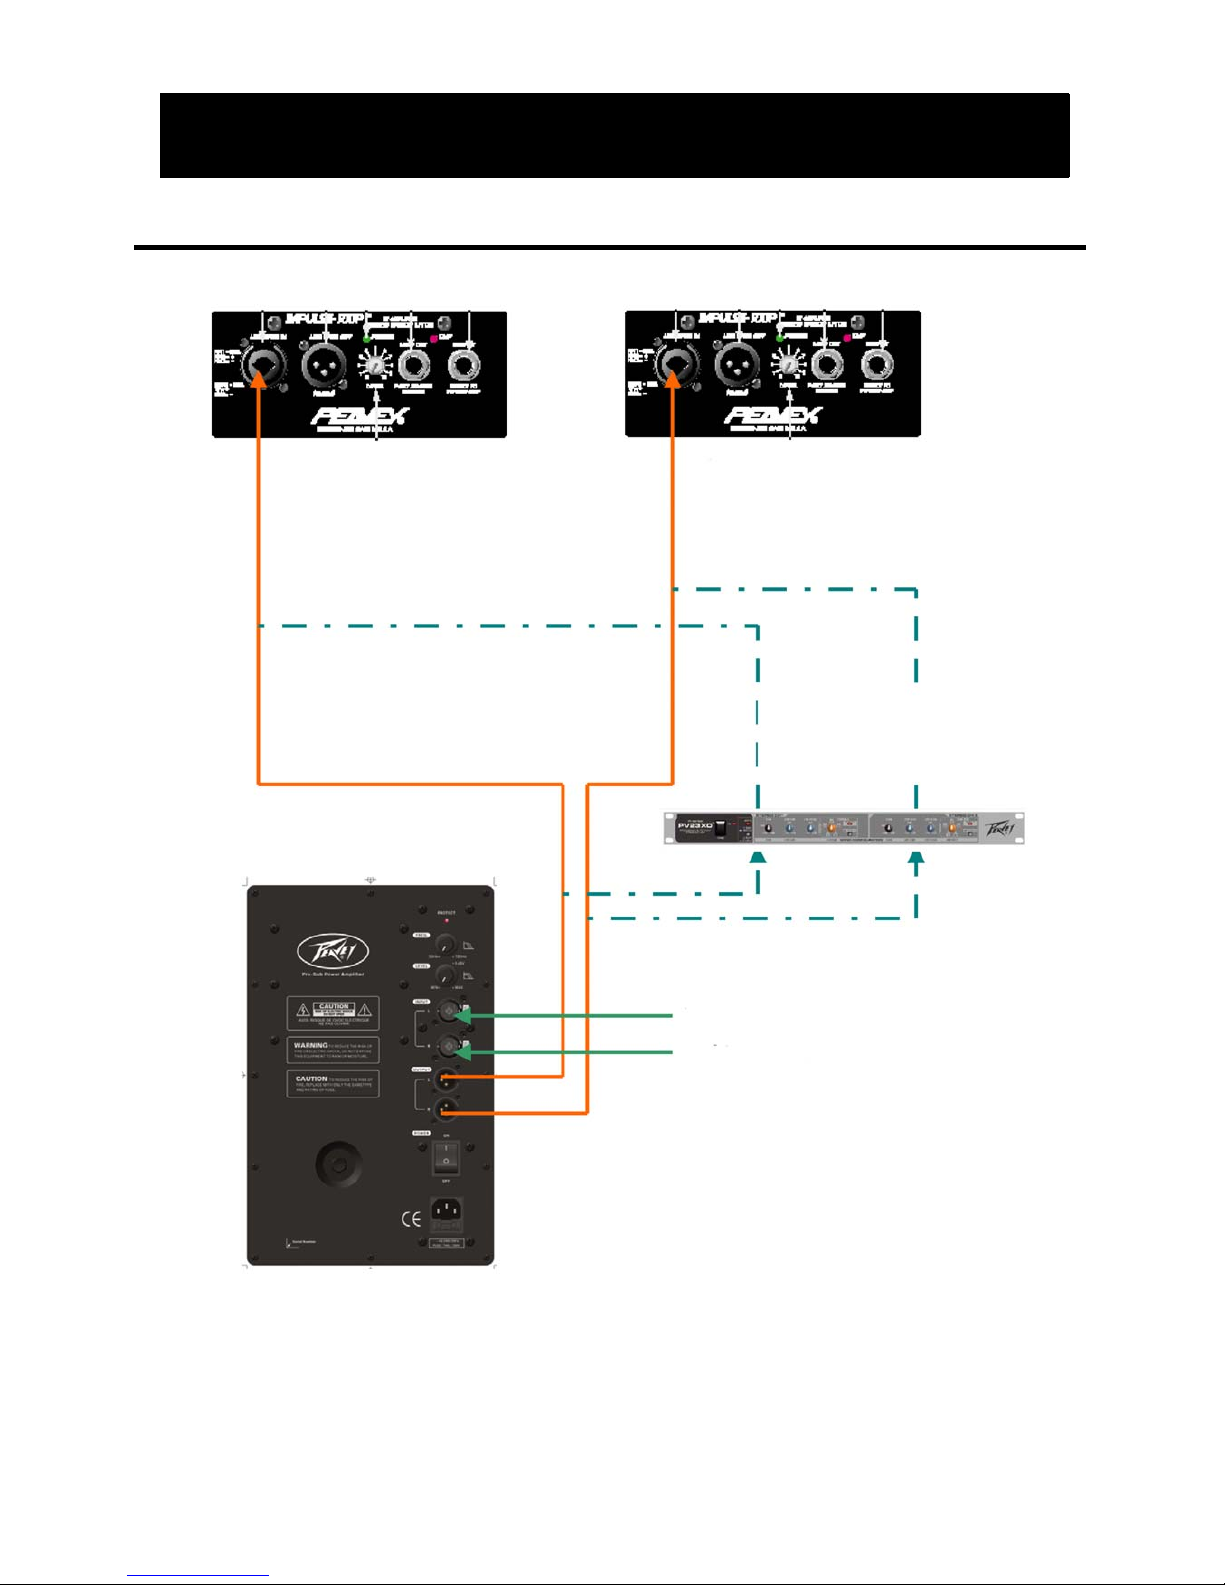
Pro™ Sub P with 2 Active Speakers
Im pulse 1012P
Im pulse 100P
Pro 12P
Im pulse 1012P
Im pulse 100P
Pro 12P
CONFIGURATIONS
Left output from EQ/Desk
Right output from EQ/Des k
Optional 2 way crossover set
@ 150 Hz
Page 12
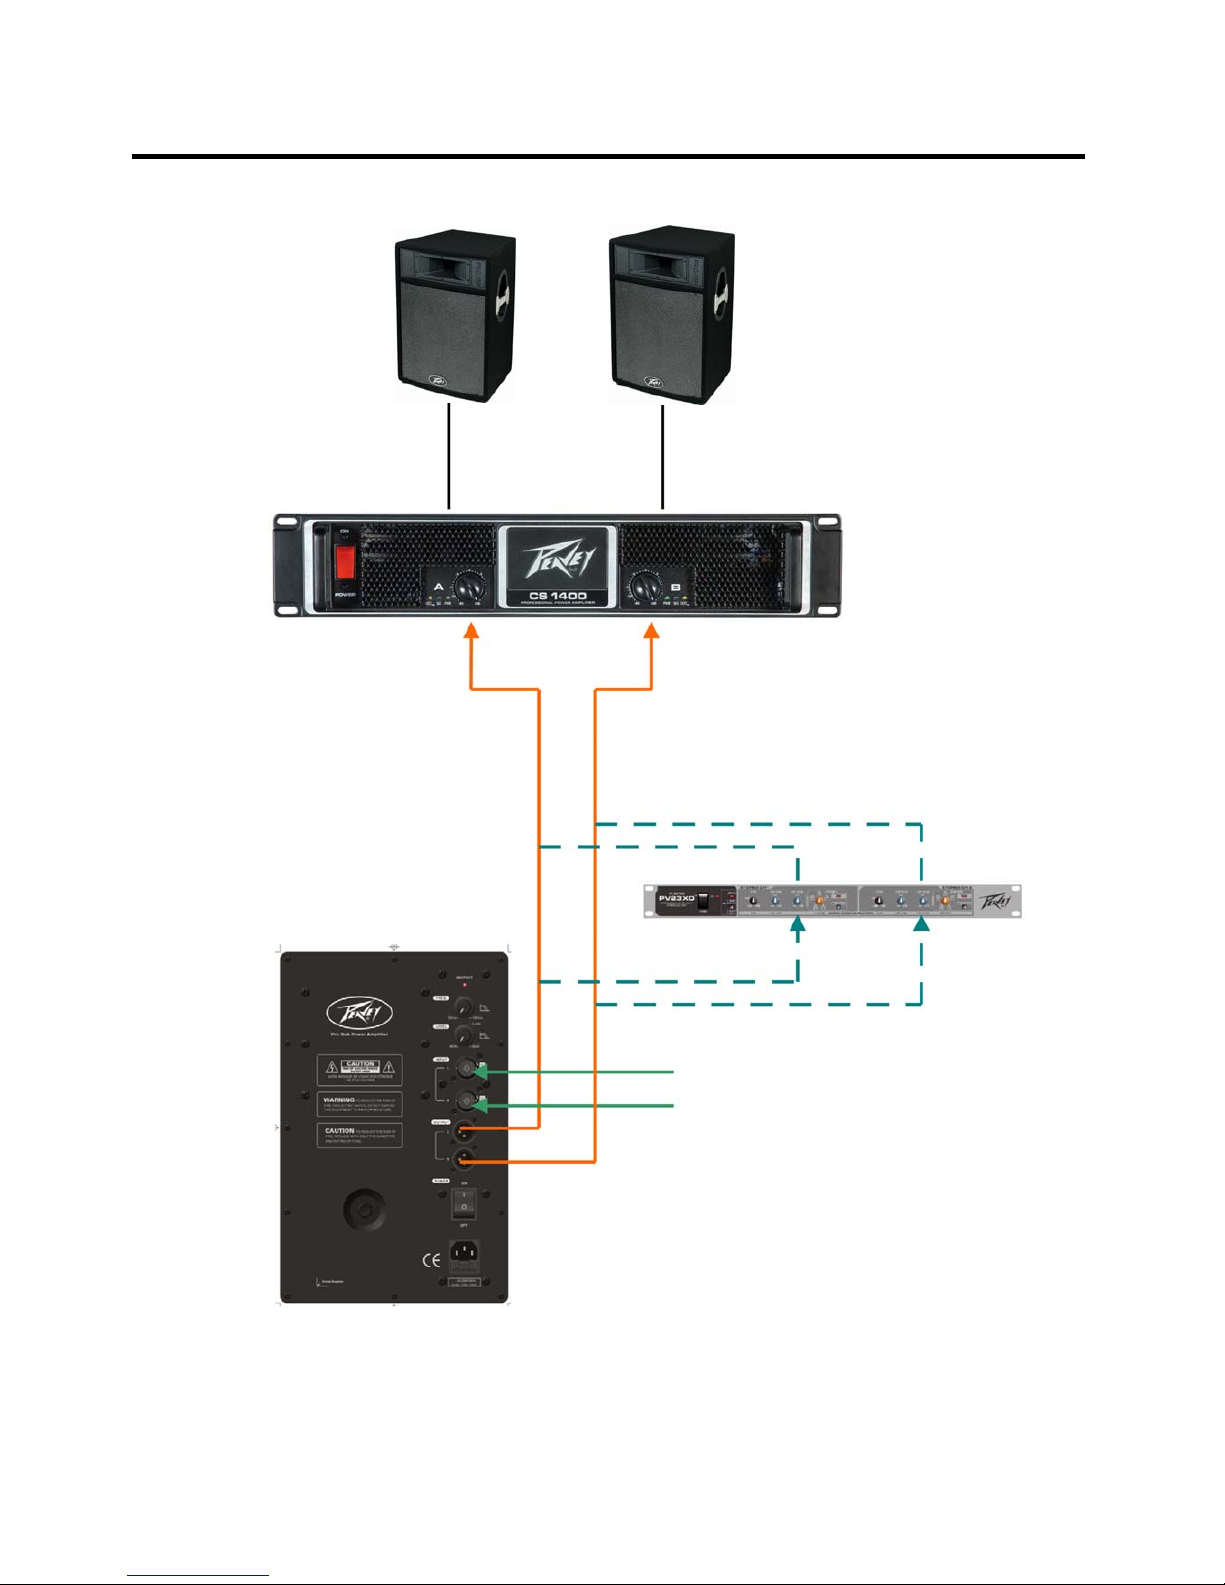
Pro™ Sub P with 2 Passive Speakers Driven by a Slave Amplifier
Pro 15
Pro 15
Stereo Power Amplifier
Optional 2 way crossover set @
150 Hz
Left ouput from EQ/Desk
Right output from EQ/Desk
Page 13
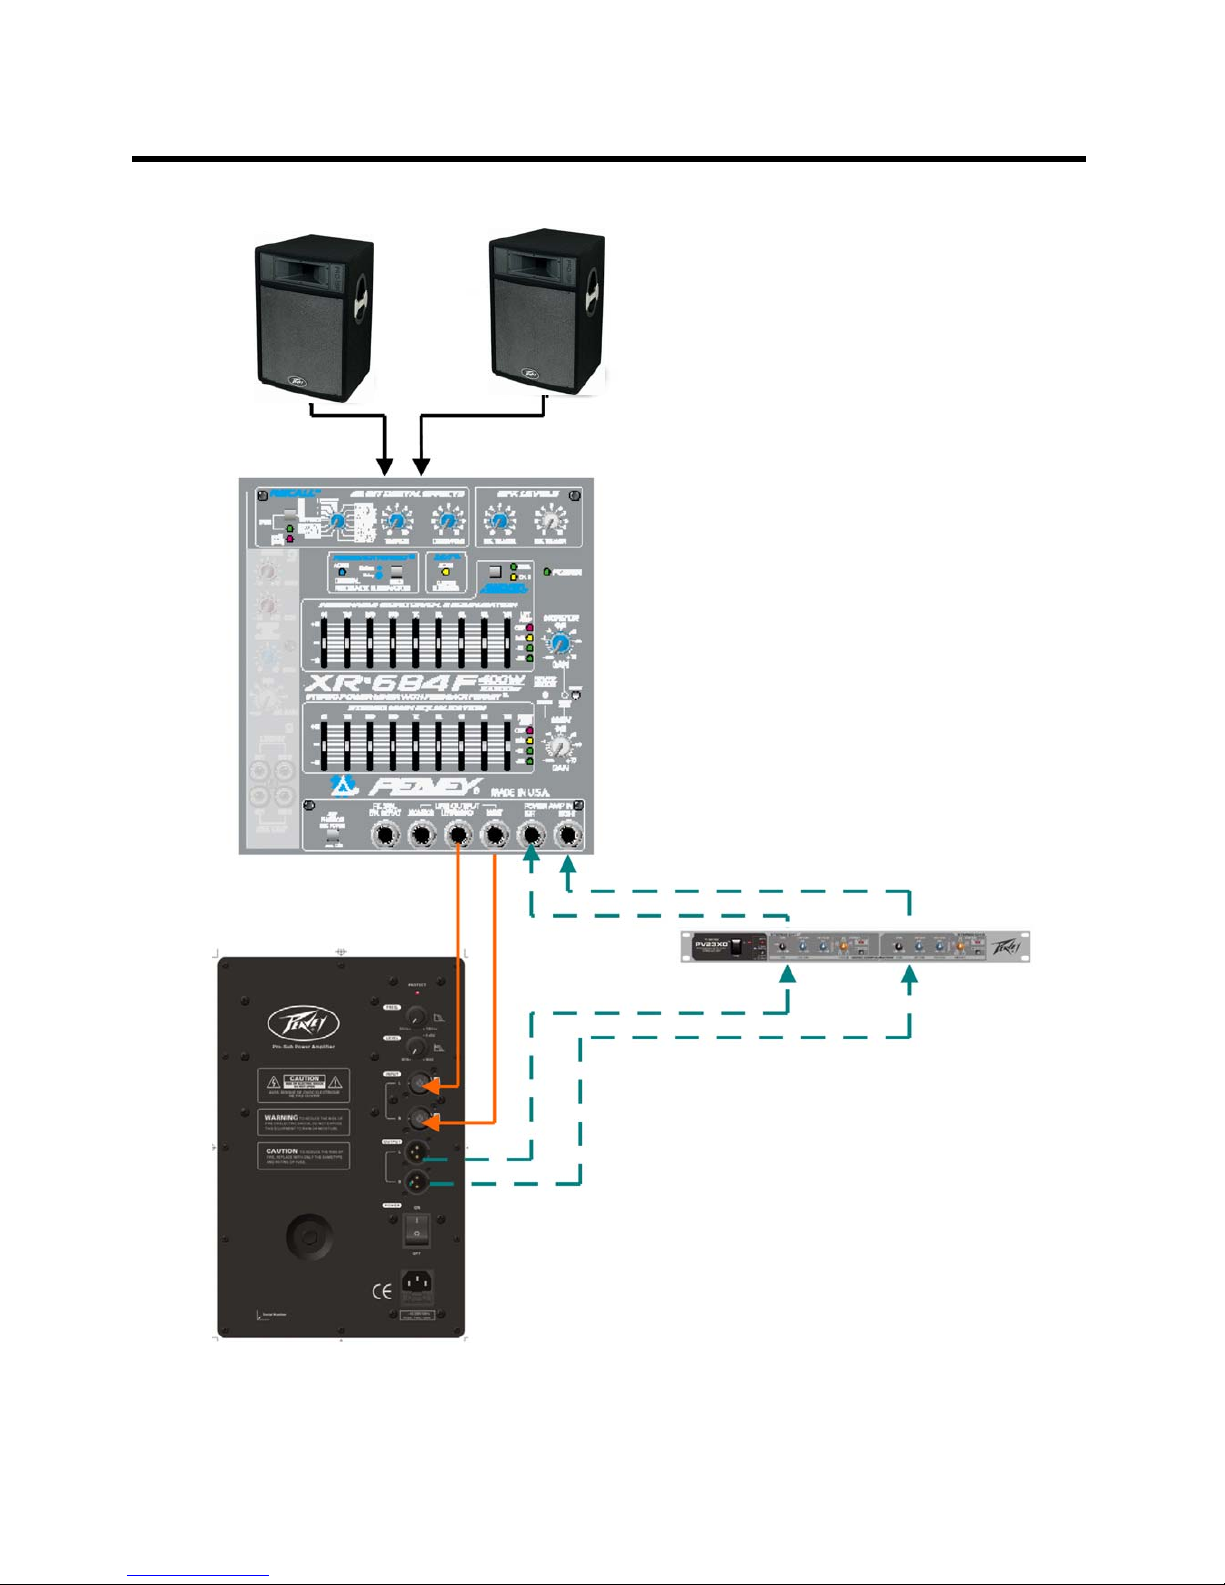
Pro™ Sub P with 2 Passive Speakers Driven by a Powered Mixer
Pro 15
Pro 15
Optional 2 way crossover set @
150 Hz
Left/Right output from EQ/Desk
Page 14

Peavey PRO™ Sub P
SPECIFICATIONS
Enclosure: Peavey PRO™ Sub P
Maximum Ouput:
400 Watts RMS
Frequency Response:
45 Hz to 180 Hz
Sensitivity:
700 mV
S/N ratio:
-90dB reference to rated output, 20kHz filter,
level at maximum
Power Requirements:
230 VAC/50Hz
Consumption:
Standby: 28 Watts
Rated output: 550 Watts
Auto Start-up Level:
200 mV
Weight:
33kg
Size (cm):
50.5 H x 66 W x 48.5 D
Page 15

PRO™ Sub P
Vielen Dank, dass Sie sich für den Kauf des Messenger PRO™ Sub P entschieden haben. Der PRO™ Sub P ist
ein komplett eigenständiges, kompaktes Subwoofer-System und besteht aus einem 15” High-Spec Woofer und
einem 400 Watt Class-D Endverstärker. Der Subwoofer ist für Mono-Betrieb ausgelegt und kann sowohl Stereoals auch Mono-Eingangssignale verarbeiten. Zwei ungefilterte Leistungsverstärkungsausgänge (Stereo, rechts und
links) können mit dem Line-Eingang oder mit zwei aktiven Satellitenboxen vebunden werden, z. B. mit den Boxen
Pro™ 12P oder Pro™ 15P. Zur Leistungoptimierung des Systems wurde der Class-D Endverstärker mit einem
variablen Tiefpassfilter und einem Pegelregler ausgestattet.
Stellen Sie sicher, dass der PRO™ Sub P an der richtigen Spannung betrieben wird. Diese ist neben dem IECNetzkabel (Stromkabel) auf der Rückseite des Geräts aufgedruckt. Lesen Sie sich diese Anleitung bi tte sorgfältig
durch, damit sowohl Ihre Sicherheit als auch die Ihrer Ausrüstung gewährleistet ist.
Merkmale
Flansch für Distanzstange
Von vorne eingebaute belüftete Woofer-Konfiguration.
Kompaktes Design.
Stahlgitter.
Hochleistungs Class-D Endverstärker mit bis zu 400 Watt Ausgangsleistung.
High-Spec 15” Woofer mit 3” Schwingspule für längere Haltbarkeit und große Zuverlässigkeit.
Frequenzbereich: 45Hz bis 160Hz.
Variable Tiefpass-Frequenzregelung.
Woofer-Pegelregler.
Intelligente Safe-Amplifier Schutzschaltung.
Geräuschloses Einschalten.
Zwei symmetrische kombinierte XLR / 6,3 mm-Klinken Eingänge (Stereo, rechts und links).
Links und rechts Unity-Gain, ungefilterte, sysmmetrische XLR-Ausgänge mit Linepegel.
Protection “on” Warnanzeige.
Automatisches Standby beim Einschalten.
DEUTSCH
Page 16

WICHTIGE SICHERHEITSHINWEISE
Lesen Sie sich diese Anweisungen aufmerksam durch und befolgen Sie alle Warnhinweise. Bewahren Sie diese Anweisungen
zu Ihrer Information auf.
1. Dieses Produkt wurde als aktives Lautsprechersystem für den Einsatz als Beschallungsanlage oder im Tonstudio
entwickelt und hergestell t. Jeder andersweitige Einsatz die s es Produktes wurde vom Hersteller bei der Entwicklung
nicht vorgesehen und erfolgt deshalb auf eigenes Risiko und alleinige Verantwortung des Betreibers bzw. Monteurs.
2. Setzen Sie dieses Gerät nicht in der Nähe von Wasser ein.
3. Reinigen Sie es nur mit einem trockenen Tuch.
4. Blockieren Sie keine der Lüftungsöffnungen.
5. Führen Sie die Installation gemäß den Anweisungen des Herstellers durch.
6. Installieren Sie das Gerät nicht neben Wärmequellen wie Heizungen, Heizgeräten, Öfen oder anderen Geräten (auch
Verstärkern), die Wärme erzeugen.
7. Prüfen Sie vor Anschluss dieses Gerätes an das Stromnetz, ob die vorhandenen Netzspannung mit der auf dem
Gerät angegebenen Spann ung übereinstimm t.
8. Entfernen Sie jegliche Kabel, bevor sie das bereits installierte Gerät verschieben oder transportieren.
9. Schützen Sie das Netzkabel, sodass niemand darauf tritt oder es geknickt wird, insbesondere an Steckern,
Steckdosenleisten und der Austrittsstelle am Gerät.
10. Ziehen sie niemals direkt am Netzkabel, wenn sie das Gerät vom Stromnetz trennen wollen. Halten Sie stattdessen
den Stecker selbst und ziehen Sie ihn vorsichtig aus der Steckdose.
11. Stellen Sie sicher, dass sich der On/Off-Schalter auf “Off” befindet, bevor Sie das Gerät ans Strom netz anschließen
oder davon trennen.
12. Netzkabel müssen sorgfältig behandelt werden. Überprüfen Sie die Kabel regelmäßig auf Schäden oder Anzeichen
von Verschleiß, insbesondere am Stecker und am Austritt des Kabels aus dem Gerät.
13. Dieses Gerät darf nur mittels dem beigefügten Netzkabel an geerdete Steckd o s en angeschlossen werden, die den
örtlichen Sicherheitsvors c hrif t en entsprechen. Sollten Sie das Netzkabel ersetzen müssen, achten Sie darauf, ein
Kabel des gleichen Typs und mit den gleichen Eigenschaften zu verwenden, die am Gerät neben dem
Netzkabelstecker angegeben sind.
14. Ersetzen Sie durchgebrannte externe Sicherungen nur durch Sicherungen des gleichen Typs und Nennwerts (wie auf
dem Gerät angegeben).
15. Beeinträchtigen Sie nicht die Sicherheitswirkung des gepolten Steckers bzw. des Erdungssteckers. Ein gepolter
Stecker weist zwei Stifte auf, von denen einer breiter ist als der andere. Ein Erdungsstecker weist zwei Stifte und
einen dritten Erdungsstift bzw. Erdkontakt (Schukostecker) auf. Der breite Stift bzw. der dritte Stift/Erdkontakt dient
Ihrer Sicherheit. Sollte der beiliegende Stecker nicht in Ihre Steckdose passen, wenden Sie sich bitte an einen
Elektriker, um die ungeeignete Steckdose austauschen zu lassen.
16. Der Erdungsstift bzw. Erdkontakt darf nie entfernt werden.
17. Hinweis – Nur für Großbritannien: Sollte die Farbe der Drähte in der Netzleitung dieses Geräts nicht mit den
Klemmen in Ihrem Stecker übereinstimmen, gehen Sie folgendermaßen vor:
a) Der grün-gelbe Draht muss an die mit E (Symbol für Erde) markierte, grüne oder grün-gelbe Klemme
angeschlossen werden.
b) Der blaue Draht muss an die mit N markierte oder schwarze Klemme angeschlossen werden.
c) Der braune Draht muss an die mit L markierte oder rote Klemme angeschlossen werden.
18. Verwenden Sie nur die vom Hersteller erhältlichen Zubehörgeräte oder Zubehörteile.
19. Verwenden Sie nur einen Wagen, Stativ, Dreifuß oder Tisch, der den Angaben des Herstellers entspricht oder der
zusammen mit dem Gerät verkauft wurde.
20. Stellen Sie das Produkt nur auf ebe n en Flächen auf, die der Größe und dem Gewicht des Gerätes gewachsen sin d.
Stellen Sie bei werksseitig mit speziellen Montageteilen ausgestatteten Gerä ten vor der Installation sicher, dass nur
solche Ständer oder Hängevorrichtungen verwendet werden, deren maximale Belastbarkeit eine den geltenden
Vorschriften entsprechende Sicherheitsmarge bietet.
21. Wird ein Wagen verwendet, bewegen Sie den Wagen mit dem darauf befindlichen Gerät besonders vorsichtig, damit
er nicht umkippt und möglicherweise jemand verletzt wird. Diese Box darf auf keinen Fall geflogen werden.
22. Trennen Sie das Gerät während eines Gewitters oder während längerer Zeiträume, in denen es nicht benutzt wird,
von der Stromversorgung.
23. Lassen Sie sämtliche Wartungsarbeiten von qualifizierten Kundendiensttechnikern durchführen. Eine Wartung ist
erforderlich, wenn das Gerät in irgendeiner Art beschädigt wurde, etwa wenn das Netzkabel oder der Netzstecker
beschädigt wurden, Flüss ig ke it oder Gegenstände in das Gerät gelan gt sind, das Gerät Regen oder Feuc htigkeit
ausgesetzt wurde, nicht normal arbeitet oder heruntergefallen ist.
24. Stellen Sie das Gerät stets an einem fü r unqua lif izi erte Personen unzugänglic he n Ort auf, um Erschütterungen oder
Stöße zu vermeiden.
Page 17

25. Belastung durch extrem hoh e Lärmpegel kann zu dauer ha ft e m Gehörverlust führen. Die Anfäll i gkeit für durch Lärm
bedingten Gehörverlust ist von Mensch zu Mensch verschieden, das Gehör wird jedoch bei jedem in gewissem Maße
geschädigt, der über einen bestimmten Zeitraum ausreichend starkem Lärm ausgesetzt ist. Die USArbeitsschutzbehörde (Occupational Safety and Health Administra tion , OSHA) hat die folgenden zulässigen Pegel für
Lärmbelastung festgelegt:
Laut OSHA kann jede Belastung über den obenstehenden zulässigen Grenzwerten zu einem gewissen Beeinträchtigung des
Gehörs führen. Sollte die Belastung die obenstehenden Grenzwerte überst eigen, müssen beim Betrieb dieses
Verstärkungssystems Ohrenstopfen oder Schutzvorrichtungen im Gehörgang oder über den Ohren getragen werden, um
einen dauerhaften Gehörverlust zu verhindern. Um sich vor einer möglicherweise gefährl ic hen Belastung durch hoh e
Schalldruckpegel zu schützen, wird allen Personen empfohlen, die mit Geräten arbeiten, die wie dieses Verstärkungssystem
hohe Schalldruckpegel erzeugen können, beim Betrieb dieses Geräts einen Gehörschutz zu tragen.
BEWAHREN SIE DIESE SICHERHEITSHINWEISE AUF!
Dauer pro Tag in Stunden
8
6
4
3
2
1 1/2
1
1/2
1/4 oder weniger
Geräuschpegel dBA, langsame Reaktion
90
92
95
97
100
102
105
110
115
Page 18

Der Peavey PRO™ Sub P Aktiv-Subwoofer kann zusammen mit der PRO™ 12 P bzw. PRO™ 15 P in
Beschallungs- und Übertragungsanlagen verwendet werden.
Als typische Signalquelle für die Line-Pegeleingänge des Peavey PRO™ Sub P bietet sich das Mischpult einer
Beschallungsanlage an.
Rückseite – Endstufe
(1) SICHERUNG
Das Gerät ist durch eine flinke ABC-Sicherung vor Überlastungen und Störungen
gesichert (Wechselstrom-Netzanschluss). Diese Sicherung befindet sich im Deckel der
Sicherungsfassung. Sollte die Sicherung ausfallen, muss sie durch eine Sicherung des
gleichen Typs und Nennwerts ersetzt werden, um eine Beschädigung der Geräte
und einen Verfall der Garantie zu vermeiden. Sollte die Sicherung des Geräts
wiederholt durchbrennen, muss es zu einem qualifizierten Servicecenter zur Reparatur
gebracht werden.
(2) ANSCHLUSS DES IEC-NETZKABELS
In diese Buchse wird das beiliegende IEC-Netzkabel gesteckt, über das das Gerät mit
Wechselstrom versorgt wird.
Der Erdungsstift bzw. Erdkontakt darf keinesfalls an irgendeinem Gerät entfernt
werden. Er dient Ihrer eigenen Sicherheit. Um die Gefahr eines elektrischen Schlags
oder eines Brands zu verhindern, müssen das Mischpult sowie alle weiteren
zugehörigen Ausrüstungsteile korrekt geerdet werden
(3) EIN/AUS-SCHALTER
Steht dieser Schalter auf der Po sition ON, wird der PRO™ Sub P mit Wechselstrom
versorgt.
EINSATZBEREICHE
Page 19

Rückseite – Ausgänge
(4) RIGHT OUTPUT
Full-Range, symmetriert durch einen das Eingangssignal spiegelnden Ausgang.
(5) LEFT OUTPUT
Full-Range, symmetriert durch einen das Eingangssignal spiegelnden Ausgang.
Page 20

Rückseite – Eingänge
(6) RIGHT INPUT
Symmetrischer kombinierter XLR / 6,3mm Klinke Stereoeingang..
(7) LEFT INPUT
Symmetrischer kombinierter XLR / 6,3mm Klinke Stereoeingang.
(8) WOOFER LEVEL
Gesamtlautstärkeregler des PRO™ Sub P.
(9) WOOFER CROSSOVER FREQUENCY
Regelt die Frequenz des Tiefpassfilters das PRO™ Sub P ohne dabei auf das
Ansprechverhalten der Ausgänge einzuwirken.
Page 21

O P E R A T
WARNHINWEISE
Bevor irgendwelche Arbeiten am Gerät durchgeführt werden, muss es von der Wechselstromquelle getrennt
werden. Lassen Sie sämtliche Wartungsarbeiten von qualifizierten Kundendiensttechnikern durchführen.
Der Kühlkörper an der Rückwand kann heiß werden, daher darf er nicht berührt werden. Der Kühlkörper darf nicht
blockiert oder abgedeckt werden, da ansonsten die Belüftung beeinträchtigt wird.
Schließen Sie die Eingänge des PRO™ Sub P NIEMALS an den Ausgang einer Endstufe an. Die Eingänge
müssen von einem Line-Pegelsignal betrieben werden.
Entfernen Sie NICHT das metallene Schutzgitter.
Achtung! Der PRO™ SubP ist äußerst kraftvoll und leistungsfähig! Der Einsatz dieses Sy stems kann zu
dauerhaften Hörschäden führen! Stellen Sie die maximale Gesamtlautstärke daher mit äußerster Vorsicht ein!
Der Eindruck hinsichtlich des Schallpegels des PRO™ Sub P kann aufgrund seiner klaren, sauberen
Klangwiedergabe täuschen. Da kaum Verzerrung vorhanden ist und die Lautstärke nicht als unangenehm
empfunden wird, scheint der Schallpegel wesentlich geringer zu sein als er tatsächlich ist.
WECHSELSTROMVERSORGUNG des PRO™ SUB P
Der PRO™ Sub P wird mit einem IEC-Netzkabel (Wechselstrom) geliefert. Benutzen Sie nur qualitativ hochwertige
und ausreichend belastbare Verlängerungskabel oder Mehrfachstecker, um den PRO™ Sub P nicht zu
beschädigen und seine maximale Leistungsfähigkeit zu gewährleisten. Schließen Sie keine anderen Geräte an das
Verlängerungskabel an, an dem der PRO™ Sub P hängt.
BEDIENUNGSANLEITUNG
Page 22

Es ist nichts zu hören
Überprüfen Sie zunächst, ob das Gerät mit Wechselstrom versorgt wird und eingeschaltet ist. Stellen Sie fest, ob
die blaue Power-Indicator-LED hinter dem Metallgitter aufleuchtet. Ist dies nicht der Fall, überprüfen Sie, ob der
ON/OFF-Schalter (3) auf ON steht und ob das IEC-Netzanschlusskabel (2) vollständig eingesteckt ist. Das
Wechselstromnetzkabel muss in eine funktionierende Wechselstromsteckdose eingesteckt sein. Überprüfen Sie
zuletzt die Sicherung (1). (Siehe Sicherheitshinweise, Rückseite Endstufe, Abschnitt 1.)
Wenn Sie sichergestellt haben, dass der PRO™ Sub P mit Wechselstrom versorgt wird, überprüfen Sie, ob er ein
Signal empfängt. Ziehen Sie das Kabel ab, das in die Geräteeingänge eingesteckt ist, und schließen Sie es an ein
anderes Gerät an, das das Signal wiedergeben kann, z.B. eine Endstufe mit Lautsprecher. Ist ein Signal
vorhanden, überprüfen Sie, ob alle verwendeten Pegelregler ausreichend hochgedreht sind (um etwa ein Drittel bis
die Hälfte).
Falls der PRO™ Sub P direkter Sonneneinstrahlung oder zu starker Hitze ausgesetzt war, hat womöglich sein
Thermoschutz ausgelöst. In diesem Fall leuchtet die Protection-LED ROT. Schalten Sie dann den PRO™ Sub P
aus, und lassen Sie ihn ausreichend lange abkühlen.
Ist immer noch nichts zu hören, wenden Sie sich an Ihren Peavey-Händler oder an das Peavey Service Center.
Brummen oder Summen
Ist aus dem PRO™ Sub P ein Brummen oder Summen zu hören, könnte dies mit der Steckdose
zusammenhängen. Schließen Sie den PRO™ Sub P versuchsweise an eine andere Steckdose an. Wird für den
Mischpult ein anderer Schaltkreis bzw. Überlastschalter verwendet als für den PRO™ Sub P, kann dies Probleme
durch Brummen verursachen.
Stellen Sie sicher, dass für die Signalleitung an die Eingänge des PRO™ Sub P abgeschirmte Kabel verwendet
werden. Werden anstatt abgeschirmten Kabeln Lautsprecherkabel mit 6,3-mm-Klinkensteckern als Eingangskabel
verwendet, kann dies vermehrt Brummen oder Summen verursachen.
Brummprobleme können durch Brummschleifen verursacht werden. Han de lt es sich um ein symmetriertes
Signalkabel, entkoppeln Sie versuchsweise die Erdung am Lautsprecherende des Signalkabels. Überprüfen Sie
sorgfältig sämtliche Eingangsveränderungen. Drehen Sie dazu zunächst den Pegelregler herunter, stecken Sie die
Kabel ein bzw. ziehen Sie sie ab oder entkoppeln Sie die Erdung am zum Lautsprecher zeigenden Ende.
Stellen Sie sicher, dass keine Licht-Dimmer an denselben Schaltkreis wie der PRO™ Sub P, das Mischpult oder
andere Signalquellen angeschlossen sind. Werden Licht-Dimmer verwendet, müssen diese eventuell vollständig
auf- oder abgedreht werden, um das Brummen zu beseitigen oder zu reduzieren. Dies ist ein typisches Problem
der Interferenz von Dimmern und Wechselstromverkabelung und nicht ein Konstruktionsfehler des PRO™ Sub P.
Das dritte Kabe l (Erdstift bzw. Erdkontakt) des Wechselstromsteckers darf NIEMALS entfernt oder abgeklemmt
werden.
FEHLERSUCHE
Page 23

Verzerrter oder verschwommener Sound
Überprüfen Sie zunächst, dass beim Mischpult (Signalque lle) kein Clipping oder Übersteuern vorliegt. Achten Sie
darauf, dass der Lautstärkeregler (8) am PRO™ TM Sub P nicht zu niedrig eingestellt ist.
Achten Sie darauf, dass die Eingangsstecker fest in die Eingangsbuchsen (6) und (7) auf der Rückseite des
PRO™ Sub P eingesteckt sind. Stellen Sie sicher, dass der Endverstärker nicht mit einer der Eingangsbuchsen
des PRO™ Sub P verbunden ist.
Wurden die Bässe oder Höhen für den PRO™ Sub P extern zusätzlich zu stark angehoben, kann dies bei hohen
Schalldruckpegeln zu einer verfrühten Überlastung führen. Verringern Sie den externen EQ (Mischpult, Rack), um
zu sehen, ob dies die Verzerrung beseitigt.
Schließlich müssen Sie sich bewusst sein, dass der PRO™ Sub P zwar ein äußerst kraftvolles und
hochleistungsfähiges Gerät ist, jedoch auch seine Grenzen hat und möglicherweise weitere Aktivboxen erforderlich
sind, um eine ausreichende Schallleistung oder Schallabstrahlung zu erzielen. Versuchen Sie in diesem Fall, die
Mischpultpegel ein wenig herunterzuregeln, um einen klareren Sound zu erzielen.
Sollten Sie sämtliche aufgeführten Punkte sowie weitere Möglichkeiten im Rahmen der Sicherheit überprüft haben,
und dennoch weitere Probleme mit dem System auftreten, notieren Sie sich bitte sorgfältig sämtliche Bedingungen
und wenden Sie sich an Ihren Peavey-Händler um Unterstützung.
Pflege und Wartung
Ihr PRO™ Sub P ist ein robustes und langlebiges Produkt, das bei sorgfältiger Pflege über lange Jahre zuverlässig
seinen Dienst tut.
Hören Sie auf Ihren gesunden Menschenverstand, und lesen Sie sich die Sicherheitshinweise durch, um
gefährliche Betriebssituationen zu vermeiden. Bevor irgendwelche Arbeiten am Gerät durchgeführt werden, muss
es von der Wechselstromquelle getrennt werden. Lassen Sie sämtliche Wartungsarbeiten von qualifizie rten
Kundendiensttechnikern durchführen.
Sonnenlicht bzw. Hitze
Vermeiden Sie, dass das Gerät länger direktem Sonnenlicht ausgesetzt ist, da dies Überhitzung und Abschaltung
durch den Überhitzungsschutz zur Folge haben kann.
Ein Betrieb bei übermäßiger Hitze kann ebenfalls zur Abschaltung durch den Überhitzungsschutz führen.
Lagern Sie das Gerät nicht bei extremer Hitze oder Kälte oder extrem hoher Feuchtigkeit. Warten Sie vor dem
Einsatz des Geräts immer, bis es Raumtemperatur erreicht hat.
Reinigung
Reinigen Sie den PRO™ Sub P nie, solange er ans Netz angeschlossen oder eingeschaltet ist! Achten Sie darauf,
dass KEINE Flüssigkeiten in den PRO™ Sub P gelangen!
Page 24

Pro™ Sub P mit 2 Aktivlautsprechern
KONFIGURATIONEN
Im pulse 1012P
Im pulse 100P
Pro 12P
Im pulse 1012P
Im pulse 100P
Pro 12P
Optional erhältliche 2-WegFre
q
uenzweiche @ 150 Hz
Linker Ausgeng vom EQ/Pult
Rechter Ausgeng vom EQ/Pult
Page 25

Pro™ Sub P mit 2 Passivlautsprechern und Zusatzverstärker
Optional erhältliche 2-WegFrequenzweiche
@
150 Hz
Linker Ausgeng vom EQ/Pult
Rechter Ausgeng vom EQ/Pult
Stereo Leistungsendstufe
Pro 15Pro 15
Page 26

Pro™ Sub P mit 2 Passivlautsprechern und Power-Mischpult.
Optional erhältliche 2-WegFre
q
uenzweiche @ 150 Hz
Linker / Rechter Ausgeng vom EQ/Pult
Pro 15
Pro 15
Page 27

Peavey PRO™ Sub P
TECHNISCHE DATEN
Box: Peavey PRO™ Sub P
Maximale Ausgangsleistung:
400 Watts RMS
Frequenzverhalten:
45 Hz bis 180 Hz
Empfindichkeit:
700 mV
Rauschabstand:
-90dB, bezogen auf Nennleistung, 20 kHz
Filter und maximalen Pegel.
Stromversorgung:
230 VAC / 50 Hz
Leistungsaufnahme:
Standby – Betrieb: 28 Watt
Nennleistung: 550 Watt
Automatischer Einschaltpegel:
200 mV
Gewicht:
33kg
Abmessungen (cm):
50.5 H x 66 W x 48.5 D
Page 28

PRO™ Sub P
Merci d’avoir choisi la version amplifiée de la PRO™ Sub. La PRO™ Sub est un système complet et compact de
subwoofer amplifié comprenant un haut-parleur à haut rendement de 15” et un amplificateur classe “D” de 400
Watts.
Le Subwoofer conçu en mono est capable d'accepter des signaux de niveau ligne aussi bien mono que stéréo. Il
dispose de sorties droites et gauches non filtrées de niveau ligne pour alimenter les entrées lignes de satellites
amplifiés. Ces derniers pourraient être par exemple les Peavey Pro 12P ou Pro 15P. L'amplificateur de classe D
est équipé d'un filtre passe bas à état variable et d'un contrôle de niveau pour une optimisation des performances
générales du système.
Il est indispensable de s'assurer que le PRO Sub P est connecté à une alimentation élèctrique adéquate. Les
caractéristiques des besoins de votre enceinte sont annotées à côté du connecteur IEC (connecteur pour cordon
d’alimentation). Merci également de lire ce guide attentivement pour votre propre sécurité ainsi que celle de votre
matériel.
CARACTÉRISTIQUES TECHNIQUES
Orifice pour support de satell i te.
Orifice de ventilation du woofer situé à l'avant.
Grande compacité.
Grille en Acier.
Amplificateur de classe “D” de 400W ,hautes performances .
Woofer de 15” avec bobine de 3” pour un rendement optimal.
Réponse en fréquence: 45Hz – 160Hz.
Filtre passe bas à fréquence variable.
Contrôle de volume du Subwoofer.
Système intélligent de sécurité et de protection.
Alimentation silencieuse.
Couple d'entrées symétrisées droite et gauche XLR /jack 6.3mm.
Sorties XLR symétrisées non filtrées droite et gauche de niveau ligne.
Indicateur d'alerte du mode de protection “ON”.
Mode de veille automatique .
FRANCAIS
Page 29

INSTRUCTION IMPORTANTES DE SÉCURITÉ
Nous vous recommendons de lire ces instructions et de préter attention aux messages de précaution de ce manuel. Gardez
ce manuel pour de futures références.
1. Ce Produit à été conçu et manuf ac t ur é pour être utilisé comm e système de haut-parle ur s actifs pour des appli c ations
classiques de sonori sa ti on s ou d'enreg is tr em en t. Toute opération différent e ou no n confor me s ne seront pas
couverte par la garantie et en cas de dom ag es les réparations seront à la charge de l'utilisateur.
2. Ne pas utiliser ce système à proximité de liquide.
3. Nettoyer uniquemen t à l'aide d'un chiffon hum id e .
4. Ne pas bloquer les orifi c es de ventilation.
5. Installer en respectant les consignes de ce manuel.
6. Ne pas installer à proximité de nimporte quelle source de chaleur tel qu'un radiateur, cheminée, ou tout autres
appareils dégagant de la chal eu r (amplificateurs incl u s).
7. Avant de connecter ce produit à l'alimentation vérifier que votre unité est comp at i bl e avec le voltage de la source
d’alimentation électrique.
8. Avant d'essayer de déplacer l'unité si elle est installée déconnecter l'alimentation et les câbles du système.
9. Proteger le câble d'ali m en tat i o n du systè m e pour éviter qu'il soit débranché ou écrasé.
10. Pour déconnecter le câ ble d'alimentation de la pris e tenir fermement l'une des extrémités et tirer doucement pour
l'extraire du receptacle.
11. Toujours vous assurer que l'intérrupteur de mis e sous tension est en posit io n off avant d'effectuer toute manip u la t i on
de connection.
12. Le cordon d'alimentaton doit être manipulé avec précaution. Vérifier régulièrement que celui-ci ne présente aucune
coupures ou marques d'éti r em e nt .
13. Toujours connecter votre unité sur une alim e nt at ion munie de prise de terre utilis an t le cordon d’alimentat io n fourni.
En cas de remplacement de ce dernier n'utiliser qu'un cordon de caract ér i s ti qu es identiques.
14. En cas de remplacement de fusibles externes n'utiliser également que des fusibles similaires répondant aux même
spécifications.
15. Ne pas changer la polarisation et le branchement de la masse qui est conçu à l'origine pour votre propre sécurité. Au
cas où le cordon d'alimentation ne convient pas à la prise consulter un électricier pour toute éventuelle modification.
16. Ne jamais rompre la borne de terre.
17. Note pour les Royaumes-Unis: Si les couleurs de connecteurs du cable d’alimentation ne correspond pas au guide
de la prise secteur, procédez comme
suit:
a) Le connecteur vert et jaune doit être connectrer au terminal noté E, indiquant la prise de terre ou
correspondant
aux couleurs verte ou verte et jaune du guide.
b) Le connecteur Bleu doit être connectrer au terminal noté N, correspondnat à la couleur noire du guide.
c) Le connecteur marron doit être connectrer au terminal noté L, correspondant à la couleur rouge du guide.
18. N'utiliser que les accéssoires ou attaches fournies par le fabricant.
19. Egalement, n'utiliser que les supports, ou systèmes de soutien spécifiés par le fabricant ou livrés avec l'équipement.
20. Avant d'installer le produit sur toute surfaces assurez vous que cette dernière supporte le poids et les dimensions de
votre unité indiquées dans les spécifications de ce manuel. Au cas ou le produit comporterait des facilités de
montage avant toute installation assurez vous que le système de fixation supporte le l'encombrement du système et
vérifiez qu'il réponde aux normes imposées par les autorités de règlementation.
21. En cas d'utilisation d'un chariot de transport ou d'empilement vérifier que le système repose correctement pour éviter
que celui-ci tombe à la renverse. Ne jamais suspendre ce système.
22. Débrancher le système en cas de foudre ou d'inutilisation prolongée.
23. Seul un technicien agréé par le fabriquant est à même de réparer/contrôler votre unité. Celle-ci doit être contrôlée si
ele a subit des dommages de manipulation, d’utilisation ou de stock age (humidité?).
24. Pour éviter les chocs ou risques d'endomagement réserver un périmètre de sécurité dédié uniquement au personnel
qualifié.
Page 30

25. Une exposition à de hauts niveaux sonores peut conduire à des dommages de l’écoute irréversibles. La susceptibilité
au bruit varie considérablement d’un individu à l’autre, mais une large majorité de la population expériencera une
perte de l’écoute après une exposition à une fo rte pui s s a nc e sonore pour une duré e pro lo ng é e. L’organisme de la
santé américaine (OSHA) a produit le guide ci-dessous en rapport à la perte occasionnée:
D’après les études me née s par le OSHA, toute exposition au delà des limites décrites ce-dessus entrainera des pertes de
l’écoute chez la plupart des sujets. Le port de système de protection (casque, oreilette de filtrage,…) doit être observé lors de
l’opération cette unité ou des dommages irréversibles peuvent être occasionnés. Le port de ces systèmes doit être observé
par toutes personnes susc e p t ib l es d’être exposées à des condit i o ns au delà des limites décrites ci-dessus.
GARDEZ CES INSTRUCTIONS!
Durée par Jour (heures)
8
6
4
3
2
1 1⁄2
1
1⁄2
1⁄4 or less
Niveau sonore moyen (dBA)
90
92
95
97
100
102
105
110
115
Page 31

Le système actif de subwoofer Peavey PRO™ Sub P peut être utilisé en association avec les enceintes Peavey
Pro 12P ou Pro pour des applications de sonorisation et manifestations en public.
Un signal source standard pour les entrées lignes du Peavey PRO™ Sub P pourra être une console de mixage
multipistes de sonorisation.
Panneau arrière
(1) FUSIBLE
Votre unité est protégée contr tout problème de surtension/sur-alimentation par un fusible
de type ABC standard de 5 Amp. Ce fusible est localisé dans le support de fusible. Si le
fusible grille, IL DOIT ETRE REMPLACE PAR UN FUSIBLE DE MEME
CARACTERISTIQUES POUR EVITER TOUT DOMMAGE A VOTRE MATERIEL. Si le
fusible grille de facon répétitive, elle devrait être vérifiée par un technicien qualifié
(2) CONNECTEUR IEC
Connectez ici le cordon d’alimentation de l’appareil. Ne jamais déconnecter ou omettre
une bonne connection à la terre pour votre unité. Si l’alimentation électrique n’est
pas équipée de prise de terre, un adaptateur pourra être utilisé et le connecteur de
terre relié à la terre proprement. Assurez-vous que tous les élèments de votre
système sont correctement relié à la terre pour éviter toute décharge électrique.
(3) INTERRUPTEUR ON-OFF
Cette interrupteur met l’appareil sous-tension en position “ON”.
APPLICATIONS
Page 32

Panneau arrière- Section Sorties
(4) SORTIE DROITE
Sortie de plein registre symétrisée renvoyant le signal d'entrée.
(5) SORTIE GAUCHE
Sortie de plein registre symétrisée renvoyant le signal d'entrée.
Page 33

Panneau arrière - Section Entrées
(6) ENTREE DROITE
Entrée symétrisée stéréo combinant jack 6.3mm et XLR
(7) LEFT INPUT
Entrée symétrisée stéréo combinant jack 6.3mm et XLR
(8) NIVEAU WOOFER
Contrôle le volume général du Pro™ Sub P.
(9) FREQUENCE DU CROSSOVER POUR LE WOOF ER
Règle la fréquence du filtre passe-bas du Pro™ Sub P sans affecter la réponse des
sorties.
Page 34

O P E R A T
PRECAUTIONS
Votre unité doit être disconnectée de sa source d’alimentation électrique avant d’entreprendre tout travail de
maintenance sur celle-ci. Référez-vous à un technicien pour l’entretien de votre unité.
Le radiateur de la plaque arrière peut atteindre des températures élevées. Veillez à ne pas obstruer ou couvrir ces
radiateurs.
NE CONNECTEZ PAS LES ENTREES DE VOTRE PRO™ Sub P AUX SORTIES D’UN AMPLI DE PUISSANCE.
Ces entrées sont prévues pour recevoir un signal de niveau ligne.
N’ENLEVEZ PAS LA GRILLE DE PROTECTION METAL.
ATTENTION! La PRO™ Sub P est un système efficace et puissant! Il peut facilement endommager l’oreille
humaine. Soyez prudent pendant les réglages de volume de votre unité.
Si vous êtes décu par les performances de votre PRO™ 15P, n’oubliez pas que le signal très clair et net de votre
enceinte portera par sa dynamique. Prenez du recul ! Ce système est capable d’un rendement important.
ALIMENTER LE PRO™ SUB P
La PRO™ Sub P est livrée avec un cable à la normer IEC. Une rallonge devra probablement être
utilisée en situation. Assurez-vous qu’elle est de longueur adéquate et qu’elle peut supporter l’ampérage que
nécéssite l’enceinte. Pour de meilleurs résultats, ne connectez pas d’autres appareils à la rallonge utilisée pour la
PRO™ Sub P.
INSTRUCTIONS D'UTILISATION
Page 35

AUCUN SIGNAL EN SORTIE
Assurez-vous que l’unité est branchée et sous-tension. La LED d’alimentation (3) doit être illuminée. Dans le cas
contraire, placez l’interrupteur On-Off (3) sur la position “On”. Vérifiez que le cordon IEC (2) est correctement
connecté à l’appareil et à une prise secteur fonctionnant. Vérifiez le fusible (1) (voir la section PANNEAU
ARRIERE/FUSIBLE pour des instructions supplémentaire s).
Assurez-vous que la PRO™ Sub P reçoit un signal en connectant le câble acheminant le signal à l’enceinte à un
autre système amplifié. Si aucun son n’est produit par l’enceinte, assurez-vous que le contrôle de volume est réglé
à un niveau raisonnable (1/3 à 1/2 de sa course).
Si la PRO™ Sub P a été exposée directement au soleil (pendant une longue durée) ou à une chaleur excessive, la
protection thermique a pu être déclenchée. Dans ce cas, éteignez l’enceinte et laissez la refroidir (n’utilisez pas
de liquides!). Si vous n’ob tenez toujours rien en sortie, il peut être utile de relire votre manuel!
Si le problème persiste, consultez votre revendeur Peavey.
SOUFFLE ET BOURDONNEMENT
Essayez de connecter la PRO™ Sub P à une prise secteur différente. L’utilisation de différentes sources pour la
PR15P et la table de mixage peut parfois créer un bourdonnement.
Assurez-vous que des câbles blindés ont été utilisés entre les entrées de la PRO™ Sub P et les sorties de la table
de mixage.
Egalement Vérifier que le système est correctement relié à la masse et comparer éventuellement avec une autre
prise de courant.
Si un système de lumières clignotantes est connecté à la même source d’alimentation que la PRO™ SubP ou que
le mixeur, un souffle induit par le système d’illumination peut être présent en sortie de l’enceinte. Dans ce cas,
connectez le système à une autre prise secteur ou évitez le clignotement des lampes.
PROBLEMES RENCONTRES
Page 36

SON DISTORDU
Assurez-vous d’abord que la table de mixage (ou la source du signal) n’est pas en distorsion ou ne crée aucun
écrêtage. Cela peut se produire si le contrôle de volume de la PRO™ Sub P (8) a été réglé trop bas.
Assurez-vous que les Jacks d’entrée (6) et (7) sont correctement connectés sur le panneau arrière de la PRO™
SubP.
Vérifiez que les entrées utilisées sont les bonnes, et que le positionnement du pad d’atténuation corresponde au
signal recu. Vérifiez qu’aucun ampli de puissance n’est connecté aux entrées de la PRO™ Sub P.
Si vous utilisez une rallonge pour alimenter l’enceinte, vérifiez qu’elle est capable de fournir suffisamment de
courant et qu’elle n’est pas utilisée pour d’autres appareils. Si le signal alimentant l’enceinte a été sur-équalisé
dans les basses, la PRO™ Sub P peut entrer en distorsion lors de hauts niveaux de pression accoustique.
N’équalisez pas excessivement les basses à partir de vos appareils externes (mixeurs, équaliseurs rack).
Enfin, bien que la PRO™ sub P soit trés puissante et produise de trés hauts niveaux de pression accoustique,
vous
avez peut-être atteind ses limites. Essayez de diminuez les niveaux à partir de la table de mixage et voyez si le
son devient plus propre.
Si le problème persiste, consultez votre revendeur Peavey.
MAINTENANCE
Votre PRO™ Sub P vous apportera satisfaction pendant de nombreuses années si elle est utilisée correctement.
Lisez attentivement toutes les instructions de ce manuel afin d’éviter toute erreur de manipulation et d e
connexion. Débrancher le cordon d'alimentation avant d'effectuer toutes opérations de maintenance. En cas de
révision ou d'un éve ntuelle réparation, se référer à un tech nicien qualifié.
EXPOSITION AU SOLEIL/CHALEUR
Evitez l’exp osition prolongée au soleil pouvant provoquer la mise en route de la protection thermiqu e. L’exposition
à des niveaux de chaleur excessifs peut aussi provoquer le déclenchement de cette protection.
N’entreposez pas l’appareil dans des endroits extrêmement froids ou chauds ou présentant des niveaux
d’humidité élevés. Attendez que l’enceinte atteigne la température de la pièce avant utilisation.
NETTOYAGE
Ne nettoyez jamais la PRO™ Sub P lorsqu’elle est branchée ou sous tension! Ne laissez jamais de
liquide couler à l’intérieur de votre PRO™ Sub P!
Page 37

Pro™ Sub P avec 2 enceintes actives
Im pulse 1012P
Im pulse 100P
Pro 12P
CONFIGURATIONS
Im pulse 1012P
Im pulse 100P
Pro 12P
Filtre optionnel de 2 voies réglé @
150 Hz
Sortie gauche du Mixeur/Egaliseur
Sortie droite du Mixeur/Egaliseur
Page 38

Pro™ Sub P avec 2 haut-parleurs passifs alimentés par un amplificateur
Filtre optionnel de 2 voies réglé @
150 Hz
Sortie droite du Mixeur/Egaliseur
Sortie gauche du Mixeur/Egaliseur
Ampli ficateur de puissance
stéréo
Pro 15
Pro 15
Page 39

Pro™ Sub P avec deux enceintes passives alimentées par un mixeur
amplifié
Pro 15
Sortie gauche/droite du Mixeur/Egaliseur
Filtre optionnel de 2 voies réglé @
150 Hz
Pro 15
Page 40

Peavey PRO™ Sub P
SPECIFICATIONS
Enceinte: Peavey PRO™ Sub P
Niveau de sortie maximum:
400 Watts RMS
Réponse en fréquence:
45 Hz to 180 Hz
Sensibilité:
700 mV
Rapport signal bruit:
90dB reference to rated output, 20kHz filter,
level at maximum
Puissance requise:
230 VAC/50Hz
Consomation:
Standby: 28 Watts
Rated output: 550 Watts
Niveau de mise en route:
200 mV
Poids:
33kg
Dimensions (cm):
50.5 H x 66 W x 48.5 D
Page 41

PRO™ Sub P
Gracias por su adquisición del Messenger PRO™ Sub P. El PRO™ Sub P es un sistema sub woofer
autoamplificado completo y autónomo compuesto de un woofer de altas prestaciones de 15” y una etapa de
potencia de clase “D” de 400 vatios. El sub woofer tiene un diseño mono que es capaz de aceptar entradas a nivel
de línea estéreo o mono. Hay disponibles salidas de línea no filtradas de ganancia unitaria izquierda y derecha
diseñadas para ser enviadas a la entrada de línea o a dos pantallas satélites autoamplificadas. Éstas pantallas
serían la Pro™ 12P o la Pro™ 15P. La etapa de potencia de clase “D” está equipada con un filtro paso bajo
variable y un control de nivel para optimizar el comportamiento del sistema completo.
Es muy importante que se aseguren de que el voltaje AC del PRO™ Sub es el apropiado.
Ésto está impreso al
lado de la línea IEC (alimentación) en el panel trasero de la unidad. Por favor, lea este manual cuidad osamente
para asegurar tanto su seguridad personal como la de su equipo.
CARACTERISTICAS
Barras de Satélite orificio para volado.
Configuración de woofer con la carga frontal ventilada.
Diseño compacto.
Rejilla de acero.
Amplificador de clase “D” de gran eficiencia de hasta 400 vatios de capacidad.
Woofer de 15” de altas prestaciones con una bobina de 3” para una fiabilidad a largo plazo.
Respuesta en frecuencia: 45Hz – 160Hz.
Control de variable de b aja frecuencia.
Control de nivel del woofer.
Modo de protección del amplificador inteligente y seguro.
Encendido silencioso.
Entradas balanceadas estéreo izquierda y derecha combi XLR / 6.3mm.
Salidas balanceadas izquierda y derecha XLR sin filtro y con control de ganancia.
Indicador de advertencia de protección “on”.
Modo standby automático al encender.
ESPAÑOL
Page 42

INSTRUCCIONES IMPORTANTES PARA SU SEGURIDAD
Lea estas instrucciones cuidadosamente y tenga en cuenta todas las advertencias. Guarde estas instrucciones
cuidadosamente para su referencia.
1. Este producto ha sido diseñado y manufacturado para ser usado como un sistema de altavoz activo en aplicaciones
típicas de un sistema de refuerzo sonor o o de un sistema de grabació n de sonido. El uso para prop ós it o s y
aplicaciones que no sean éstas no han sido cubi ert a s por el fabricante en el dise ñ o del producto, y es por lo tanto
responsabilidad y riesgo del cliente final o el instalador.
2. No usar este aparato cerca del agua.
3. Limpiar sólo con una tela sec a.
4. No bloquear ninguna de las salidas de ventilación.
5. Instalar de acuerdo a las instrucciones del fabrcante.
6. No instalar cerca de ninguna fuente de calor como radiadores, contadores, hornos u otros aparatos
(incluyendo amplificadores) que produzcan calor.
7. Antes de conectar este prod ucto al suministro de corrien te, asegúrese siempr e de que el voltaje en el enchufe
principal corresponde al establecido en el producto.
8. Antes de intentar mover el producto después de su instalación, retire todas las conexiones.
9. Proteja el cable de alimentación para que no sea pisado o pinchado, particularmente en los enchufes, huecos,
y los puntos que salen del aparato.
10. Para desconectar el cable de alimentación de este producto del enchufe principal nunca tire del cable directamente,
apriete el cuerpo del conec t or firmemente y retírelo suavemente del enchufe de al im e nt ac ió n principal.
11. Asegúrese siempre de que el interruptor On/Off está en la posic i ó n 'Off' ante s de hac er cualquier operación en las
conexiones del producto.
12. Los cables de suministro de alimentación deben ser siempre manejados con cuidado. Compruebe periódicamente si
los cables presentan cortes o signos de esfuerzo, especialmente en el conector y el punto donde el cable sale de la
unidad.
13. Este producto se debe conectar solamente a un enchufe aterrizado, que cumpla con las regulaciones de seguridad
actuales, a través del cable de alimentación que se incluye. En caso de que el cable necesite ser reemplazado, use
exclusivamente un cable del mismo tipo y características marcados en la unidad, al lado del cable de alimentación.
14. En caso de que tenga que reemplazar el fusible, sustitúyalo solamente con uno del mismo tipo y valor, como se
establece en el producto.
15. No anule el dispositivo de seguridad del enchufe de tipo a Tierra o polarizado. Un enchufe polarizado posee dos
patilas con una más ancha que la otra . Un enchufe de ti po a Tierra posee dos patillas y un tercer gancho a Tierra. La
patilla ancha o el tercer gancho se proporcionn para su seguridad. Si el enchufe que se proporciona no encaja en su
enchufe, consulte a un electricista para reemplazar el enchufe obsoleto.
16. Nunca retire la patilla de Tierra.
17. Nota para el Reino Unido solamente: Si los colores de los cables en el enchufe principal de esta unidad no
corresponden con los terminales en su enchufe‚ proceda de la siguiente manera:
a) El cable de color verde y azul debe ser conectado al terminal que está marcado con la letra E‚ el
símbolo de Tierra (earth)‚ coloreado en verde o en verde y amarillo.
b) El cable coloreado en azul debe ser conectado al terminal que está marcado con la letra N o el color
negro.
c) El cable coloreado en marrón debe ser conectado al terminal que está marcado con la letra L o el
color rojo.
18. Usar solamente añadidos/accesorios proporcionados por el fabricante.
19. Usar solamente un carro, pie, trípode, o soporte espec i f i c ado por el fabricante, o vendid o ju nto al apar at o.
20. Antes de poner el producto en una superficie de cualquier tipo, asegúrese siempre de que su forma y capacidad de
carga manejarán de manera segura el tamaño y peso del producto. En caso de que el producto esté provisto de
herrajes de montaje esp ec íf i c os cuando sale de fábric a, verifique siempre antes de la instalación que el sistema de
suspensión y/o volado que intenta usar es de un tipo apropiado y puede sostener el peso del producto con la
suficiente seguridad que las regulaciones actuales requieran.
21. Cuando se use un carro, tenga cuidado al mover el conjunto carro/aparato para evitar que se dañe en un
vuelco. No suspenda esta caja de ninguna manera.
22. Desenchufe este aparato durante tormentas o cuando no sea usado durante largos periodos de tiempo.
23. Para cualquier reparación, acuda a personal de servicio cualificado. Se requieren reparaciones cuando el
aparato ha sido dañado de alguna manera, como cuando el cable de alimentación o el enchufe se han dañado,
algún líquido ha sido derramado u objetos han caí do dentro del aparato, el apar ato ha sido expuesto a la lluvia o la
humedad, no funcion a de manera normal, o ha suf ri do una caída.
24. Para evitar choques o patadas, reserve siempre un área protegida de no acceso a personal no cualificado.
Page 43

25. La exposición a altos niveles de ruido puede causar una pérdida permanente en la audición. La susceptibilidad
a la pérdida de audición provocada por el ruido varía según la persona, pero casi todo el mundo perderá algo
de audición si se expone a un nivel de ruido suficientemante intenso durante un tiempo determinado. El
Departamento para la Salud y para la Seguridad del Gobierno de los Estados Unidos (OSHA) ha especificado
las siguientes exposiciones al ruido permisibles:
De acuerdo al OSHA, cualquier exposición que exceda los límites arriba indicados puede producir algún tipo de pérdida en la
audición. Protectores para los canales auditivos o tapones para los oídos deben ser usados cuando se opere con este
sistema de sonido para prevenir una pérdida permanente en la audición, si la exposición excede los límites indicados más
arriba. Para protegerse de una exposición a altos niveles de sonido potencialmente peligrosa, se recomienda que todas las
personas expuestas a equipamiento capaz de producir altos niveles de presión sonora, tales como este sistema de
amplificación, se encuentren protegidas por protectores auditivos mientras esta unidad esté operando.
GUARDE ESTAS INSTRUCCIONES!
Duración por Día en Horas
8
6
4
3
2
1 1⁄2
1
1⁄2
1⁄4 or less
Nivel de Sonido dBA, Respuesta Lenta
90
92
95
97
100
102
105
110
115
Page 44

El subwoofer activo autoamplificado PRO™ Sub P de Peavey se puede usar con el Pro™ 12p y Pro™ 15p, para
sistemas de sonido industrial y PA.
Una fuente de señal típica para las entradas a nivel de línea del PRO™ Sub P de Peavey sería una consola de
mezclas para refuerzo de sonido (mezcladora).
Panel Trasero – Sección de Alimentación
(1) FUSIBLE
La unidad está protegida de sobrecargas de corriente CA con un fusible de tipo T. Este
fusible está localizado en la tapa del receptáculo para fusible. Si el fusible falla, debe ser
reemplazado por uno del mismo tipo y capacidad para prevenir daños al equipo y
para prevenir la cancelación de la garantía. Si la unidad continúa votando fusibles
repetidamente, debe ser reparada por un técnico de servicio cualificado.
(2) CONEXIÓN PARA CABLE DE ALIMENTACIÓN IEC
El cable de corriente IEC (incluido) se conecta a este receptá c ulo para proveer corriente a
la unidad.
Nunca se debe quitar la aguja de tierra de ningún equipo. Ha sido incluida para su
seguridad. Para prevenir el riesgo de una descarga eléctric a, hay que asegurarse
que la mezcladora y todo el demás equipo asociado está apropiadamente
aterrizado.
(3) INTERRUPTOR ON-OFF
Este conmutador proporciona corriente al PRO™ Sub P cuando está en la posición ON.
APLICACIONES
Page 45

Panel Trasero - Sección de Salida
(4) SALIDA DERECHA
Salida “a través” balanceada todo rango igual a la señal de entrada.
(5)SALIDA IZQUIERDA
Salida “a través” balanceada todo rango igual a la señal de entrada.
Page 46

Panel Trasero - Sección de Entrada
(6) ENTRADA DERECHA
Entrada balanceada Stereo jack XLR combi de 6.3mm.
(7) ENTRADA IZQUIERDA
Entrada balanceada Stereo jack XLR combi de 6.3mm.
(8) NIVEL DEL WOOFER
Control de volumen general para el Pro™ Sub P.
(9) FRECUENCIA DE CROSSOVER DEL WOOFER
Sitúa la frecuencia del filtro paso bajo del Pro™ Sub P
sin afectar a la respuesta de las salidas.
Page 47

O P E R A T
PRECAUCIONES
Esta unidad debe ser desconectada de la toma de corriente CA antes de realizar cualquier trabajo en ella.
Todo servicio debe ser llevado a cabo por personal cualificado.
La trampa de calor en la parte trasera pu ede estar caliente al tacto. Nunca se debe cubrir o bloquearle la
ventilación.
NUNCA se deben conectar las entradas del PRO™ Sub P a la salida de un amplificador. Las entradas han
sido diseñadas para ser alimentadas por señales de nivel de línea.
NUNCA quite la rejilla metálica de protección.
CUIDADO: El PRO™ Sub P es extremadamente potente y eficiente. Este sistema de sonido puede dañar sus
oídos permanentemente. Se debe usar máxima precaución cuando se ajusten los volúmenes máximos.
El nivel de sonido aparente del PRO™ Sub P puede ser engañoso dada su calidad y limpieza en el sonido. La
falta de distorsión puede hacer que el nivel de sonido parezca más bajo de lo que está.
LLEVANDO ALIMENTACIÓN AC AL PRO™ SUB P
El PRO™ Sub P viene con un cable de corriente IEC. Si está usando un cable de extensión asegúrese de
que este sea de la más alta calidad y de suficiente capacidad para mantener la seguridad de su equipo y
maximizar la capacidad de salida del PRO™ Sub P. No se debe conectar ningún otro aparato a la misma
extensión que se use para el PRO™ Sub P.
INSTRUCCIONES DE
Page 48

NO HAY SALIDA
Antes que nada hay que asegurarse de que la unidad cuenta con corriente eléctrica AC y que está encendida.
Asegúrese de que el LED indicador azul de encendido está iluminado. Si no lo está, hay que verificar que el
interruptor de encendido/apagado (3) está en la posición de encendido (ON) y hay que comprobar que el cable IEC
y la conexión de corriente (2) están completamente conectados en ambos lados. Verificar que la fuente de
corriente de la pared está activa. Por último comprobar el fusible (1) (ver la sección del Panel Trasero: Fusible
para
instrucciones de seguridad).
Una vez confirmado que la unidad está recibiendo corriente, hay que verificar que está llegando señal al
PRO™ Sub P. Desconecte temporalmente el cable de las entradas y conéctelo a las entradas de otro aparato
capaz de reproducir la señal (por ejemplo, un amplificador y unos altavoces). Si esto produce señal, verifique
que todos los controles de volumen que se usan están subidos a un nivel satisfactorio (entre un tercio y la
mitad).
Si el PRO™ Sub P ha estado expuesto directamente al sol, o bajo condiciones muy calientes, es posible que
la protección térmica haya sido activada. El LED de protección se encenderá en ROJO si este es
el caso. Hay que apagar la PRO™ Sub P y dejarla enfriar suficiente tiempo.
Si sigue sin haber salida, contacte a su distribuidor autorizado de Peavey o a un Servicio Técnico de Peavey.
ZUMBIDO O “BUZZ”
Si la PRO™ Sub P está produciendo ruidos o zumbidos, puede tener que ver con la fuente de corriente. Se
puede intentar conectar el PRO™ Sub P a otra fuente de corriente. A veces, si se usa un circuito de breaker
diferente
para la mezcladora y la PRO™ Sub P, puede resultar en zumbidos.
Se puede verificar que los cables que se usan para llevar la señal al PRO™ Sub P están apropiadamente
aislados. Los cables de 1/4" pueden ser muy propensos a los zumbidos.
El zumbido puede estar relacionado con bucles de tierra. Trate de levantar la conexión de tierra del
lado del altavoz si es un cable de señal balanceado. Verifique cambios en las entradas bajando el volumen,
conectando y desconectando cables, o levantando la tierra del lado del altavoz.
Es importante comprobar que no hay "dimmers" de luces en el mismo circuito que las PRO™ Sub P, la
mezcladora u otras fuentes. Si se usan dimmers de luces, puede ser necesario que estos se ajusten al máximo o
al mínimo para eliminar o reducir el zumbido. Esto es una interferencia típica de cableado entre el dimmer y el
enchufe, y no un problema del diseño del PRO™ Sub P. La tercera aguja del cable de corriente (tierra) NUNCA
debe ser quitada o arrancada.
GUÍA DE PROBLEMAS
Page 49

SONIDO DISTORSIONADO O S UCI O
Antes que nada, hay que verificar que la consola (fuente de sonido) no está saturando o distorsionando.
Asegúrese de que el control de nivel (8) del PRO™ Sub P no ha sido ajustado demasiado bajo.
Asegúrese de que las conexiones están bien metidas en las entradas (6) y (7) de la parte trasera del PRO™
Sub P. Asegúrese de que la etapa de potencia no está enchufada en los jacks de entrada del PRO™ Sub P.
Si se han añadido un incremento en bajas o alt as frecuencias de manera externa al PRO™ S ub P, se podría
causar una saturación prematura a altos niveles de SPL. Reduzca la cantidad de cualquier EQ externa (mezclador,
rack) y observe si desaparece la distorsión.
Finalmente, hay que aceptar que a pesar de que la PRO™ Sub P es una unidad de una muy alta y potente
capacidad, también tiene sus límites y pueden requerir unidades amplificadas adicionales para brindar suficiente
cobertura en ciertas aplicaciones. Es este caso, trate de bajar los niveles de la consola un poco para aclarar el
sonido.
Si después de verificar todas estas cosas, y cualquier otra que se le ocurra, el sistema sigue teniendo
problemas, cuidadosamente apunte todos los síntomas y verifíquelos con un distribuidor Peavey que le
aconsejará.
CUIDADO Y MANTENIMIENTO
Su PRO™ Sub P es un producto sólido y duradero, que le dará años de uso si se cuida apropiadamente. Hay
que usar sentido común y leer las notas de cuidado para evitar una operación arriesgada. La unidad tiene
que estar desconectada de la corriente eléctrica antes de llevar a cabo cualquier cambio o reparación.
Todos los servicios deben ser llevados a cabo por personal cualificado.
LUZ SOLAR/CALOR
Se debe evitar la exposición prolongada a los rayos del sol, ya que esto puede causar que la unidad se
caliente y cancele su operación temporalmente. Condiciones de uso con temperaturas elevadas también
pueden causar que el sistema térmico apague la unidad.
No almacenar en condiciones de temperatura extrema, baja o alta, o humedad. Siempre hay que darle
tiempo a la unidad para que se ponga a la temperatura del cuarto antes de usarla.
LIMPIEZA
Nunca limpie el PRO™ Sub P mientras esté enchufado o encendido! No permita que cualquier fluido penetre
dentro del PRO™ Sub P.
Page 50

Pro™ Sub P con 2 Altavoces Activos
Im pulse 1012P
Im pulse 100P
Pro 12P
Im pulse 1012P
Im pulse 100P
Pro 12P
CONFIGURACIONES
Crossover de 2 vias opcional
colocado a 150Hz
Salida dere cha del EQ/Mesa de Mezc l a s
Salida izquierda del EQ/Mesa de Mezclas
Page 51

Pro™ Sub P con 2 Altavoces Pasivos Alimentados por una Etapa adicional
Crossover de 2 vias opcional colocado
@ 150 Hz
Salida izquierda del EQ/Mesa de Mezclas
Salida derecha del EQ/Mesa de Mezclas
Pro 15
Pro 15
Etapa de potencia estereo
Page 52

Pro™ Sub P con 2 Altavoces Pasivos Alimentados por una Mesa Autoamplificada
Crosssover de 2 vias opcional colocado
@ 150 Hz
Salida Izquierda/Derecha desde el Mezclador
Pro 15
Pro 15
Page 53

Peavey PRO™ Sub P
ESPECIFICACIONES
Caja: Peavey PRO™ Sub P
Salida Máxima:
400 Watts RMS
Respuesta en frecuencia:
De 45 Hz a 180 Hz
Sensibilidad :
700 mV
Relación señal-ruido:
90dB en referencia a la salida estimada, filtro de
20kHz, nivel al máximo
Requisitos de Alimentación :
230 VAC/50Hz
Consumo:
Standby: 28 vatios
Salida estimada: 550 vatios
Nivel de ence n dido auto má t ico:
200 mV
Peso:
33kg
Tamaño (cm):
50.5 H x 66 W x 48.5 D
Page 54

PEAVEY ELECTRONICS LIMITED
Great Folds Road, Oakley Hay, Corby, Northamptonshire, NN18 9ET, England
Tel: +44 (0)1536 461234 fax: +44 (0)1536 747222
SJP00002 22/09/05
Registered in the UK No. 1249126
 Loading...