


22/01/2013
Ins-30010 Switch2 control unit
 Paxton
Technical Support
01273 811011 |
support@paxton.co.uk |
Technical help is available: Monday - Friday from 07:00 - 19:00 (GMT) Saturday from 09:00 - 13:00 (GMT)
Documentation on all Paxton products can be found on our website - http://www.paxton.co.uk/
Quickstart guide
This supplement is a brief guide to installing a Switch2 system. Further information is available for download at: http://paxton.info/45 or call the communications team on: 01273 811011.
Wiring
Reader
(for Paxton exit buttons GREEN and RED wires go to reader terminals)
Switch2
12V |
|
correct For .only readers c.d 12V For Caution: refer please readers, 5V old ofconnection .instructionsto |
Red LED |
|
|
Amber LED |
Keypad or Reader |
|
Green LED |
||
Data |
||
Clock |
||
Media Detect |
||
|
||
0V |
|
|
Contact |
|
Inputs |
|
|
|
Exit |
|
|
|
Alarm |
Bell |
|
12V |
|
Power |
|
|
|
0V |
|
|
|
|
relay |
|
N.C. |
|
N.O. |
|
Door |
|
|
|
|
|
|
|
COM |
http://paxton.info/107
123456
Exit button Black/0V and Exit (push to make)
Fail closed release
*
To change a reader port voltage to 5V, move the red jumper(s) located beneath the wiring label to the 5V setting.
Fail open locks
For a fail open lock (Maglock), wire 0V to the "N.C." terminal instead of "N.O."
This product is not suitable for retail sale. All warranties are invalid if this product is not installed by a competent person.
Page 1
INITIALISING A NEW SYSTEM
The first time the system is powered up the control unit will beep 3 times a second.
This indicates the unit needs programming. There are 3 programming options:
Using tokens only (CARDLOCK or PROXIMITY) see Section 1
Using codes only (TOUCHLOCK) see Section 2
Using tokens and PIN/codes (CARDLOCK/PROXIMITY with TOUCHLOCK) see Section 3
The reader's default indication has all the LED's on. Access granted is denoted with a single flashing Green LED. Access Denied is a single flashing Red LED.
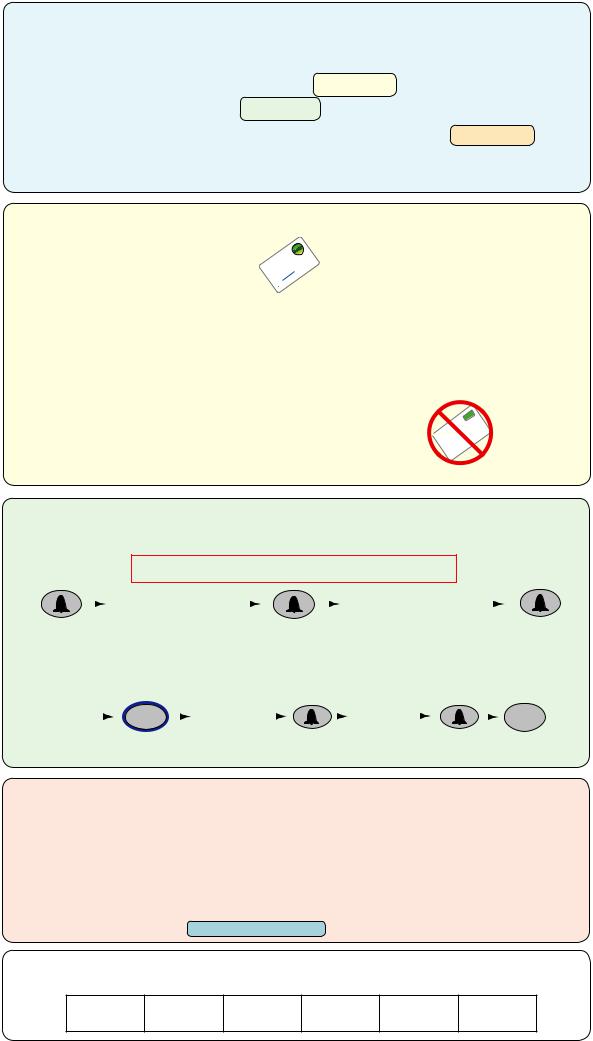
Section 1 - CARDLOCK or PROXIMITY
Enrolling a card pack.
|
|
RD |
|
|
CA |
|
FUNCTIONro |
|
|
|
rd |
|
|
a |
|
c |
|
|
nt |
|
|
e |
|
Present/swipe enrolment card |
lm |
|
en |
|
|
All tokens will now be validated. Tokens can now be issued to users
Adding an additional Proximity card pack. You need to be in possession of a valid enrolment card for this system. Present this enrolment card to the reader and the Amber
LED will flash with the Green & Red LED's off. Present the Enrolment card from the new card pack. The reader will beep and all LED's will be lit. The additional cards will now be valid. Repeat this with each reader and with any additional card packs. Any valid enrolment card can be used to add further packs. If an incorrect enrolment card is used to start the process, the Red LED will be lit and the reader will produce a squeak sound as it rejects the card.
To bar a user: Present/swipe user's shadow card
The user card is now barred
A user can be re-validated by showing the enrolment card followed by the user card or re-entered if used in Card+PIN mode.
Section 2 - TOUCHLOCK
Choose a 6 digit Programming Code and load this into the unit as follows:
DO NOT USE 123456 - The default User Code (1234) will open the door before the Programming Code had been fully entered.
6 digit Programming |
6 digit Programming |
Code |
Code |
The default user code is now set to 1234
You can now set up the user codes and features using the programming chart.
Example: - Setting a user code to unlock the door under Normal conditions.
Enter 6 digit |
8 |
Enter user code |
Re-enter |
|
Programming |
||||
4-8 digits |
user code |
|||
Code |
||||
|
Hold for 3 secs |
|
|
FACTORY RESET
1.Disconnect power
2.Disconnect GREEN and MAUVE wires
3.Insert link wire between GREEN and MAUVE terminals
4.Reconnect power - unit will beep 4 times
5.Disconnect power
6.Remove link wire
7.Reconnect GREEN and MAUVE wires
8.Reconnect power - unit will beep 3 times a second
9.Proceed with Initialising a new system
4
Normal
This box can be used to write down the Programming Code for future reference. Ensure that this information is stored in a secure place.
Page 2
 Loading...