

Page 1

Fixed Formats
Fixed Formats
User Manual
User Manual
SALE
58523
49
$25.00
97896
51
32232
52341
Monarch
Pathfinder Ultra
Silver
Printer
®
®®
MENS SHIRT
SMALL
$26.33
TC6032FFUM Rev. AE 3/08 ©2006 Paxar Americas, Inc. a subsidiary of Avery Dennison Corp.
All rights reserved.
Page 2

Page 3

TABLE OF CONTENTS
INTRODUCTION 1-1
Entering Data.............................................................. 1-2
Using the Keypad ..................................................... 1-2
Using Function with Number Keys.............................. 1-3
Data Entry Modes..................................................... 1-4
Entering Letters ....................................................... 1-5
Correcting Data Entry Errors ..................................... 1-5
About Check Digits ...................................................... 1-5
GETTING STARTED 2-1
Overview .................................................................... 2-1
Using Special Functions............................................... 2-2
Selecting a Print Method........................................... 2-2
Changing Dates ....................................................... 2-3
Turning the Backlight On or Off ................................. 2-3
i
Page 4

USING THE FORMATS 3-1
Format 1: UPCA Price Format....................................... 3-1
Format 2: UPCA + Price CD Format............................... 3-2
Format 3: 2 Line/Price Format....................................... 3-3
Format 4: UPCA Only Format........................................ 3-4
Format 5: 3 Line/Price Format....................................... 3-5
Format 6: UPCA Price Format with Description ............... 3-6
Format 7: UPCA + Price CD (w/Description) Format ........ 3-7
Format 8: EAN8 Price Format ....................................... 3-8
Format 9: UPCE Price Format....................................... 3-9
Format 10: UPCA Sale Price Format............................ 3-10
ii
Page 5

INTRODUCTION
Your Pathfinder® Ultra® Silver 6032™ printer is loaded with 10
fixed formats.
This manual describes each format and the data that will print on your
label/tag.
Information in this document supercedes information in previous versions.
Check our Web site (www.monarch.com) for the latest documentation
and release information.
Note: The fixed formats appear the same no matter what size supplies
you use. However, the positioning of the fields may be different.
There are 10 fixed formats:
♦ UPCA Price Format
♦ UPCA + Price CD Format
♦ 2 Line/Price Format
♦ UPCA Only Format
♦ 3 Line/Price Format
♦ UPCA Price Format with Description
1
♦ UPCA + Price CD (w/Description) Format
♦ EAN8 Price Format
♦ UPCE Price Format
♦ UPCA Sale Price Format
Chapter 3, “Using the Formats,” describes each format in detail.
Introduction 1-1
Page 6
Entering Data
This section describes information you need to know for entering data for
the formats. It describes
♦ the keypad
♦ data entry modes
♦ upper-case letter entry
♦ data entry error correction.
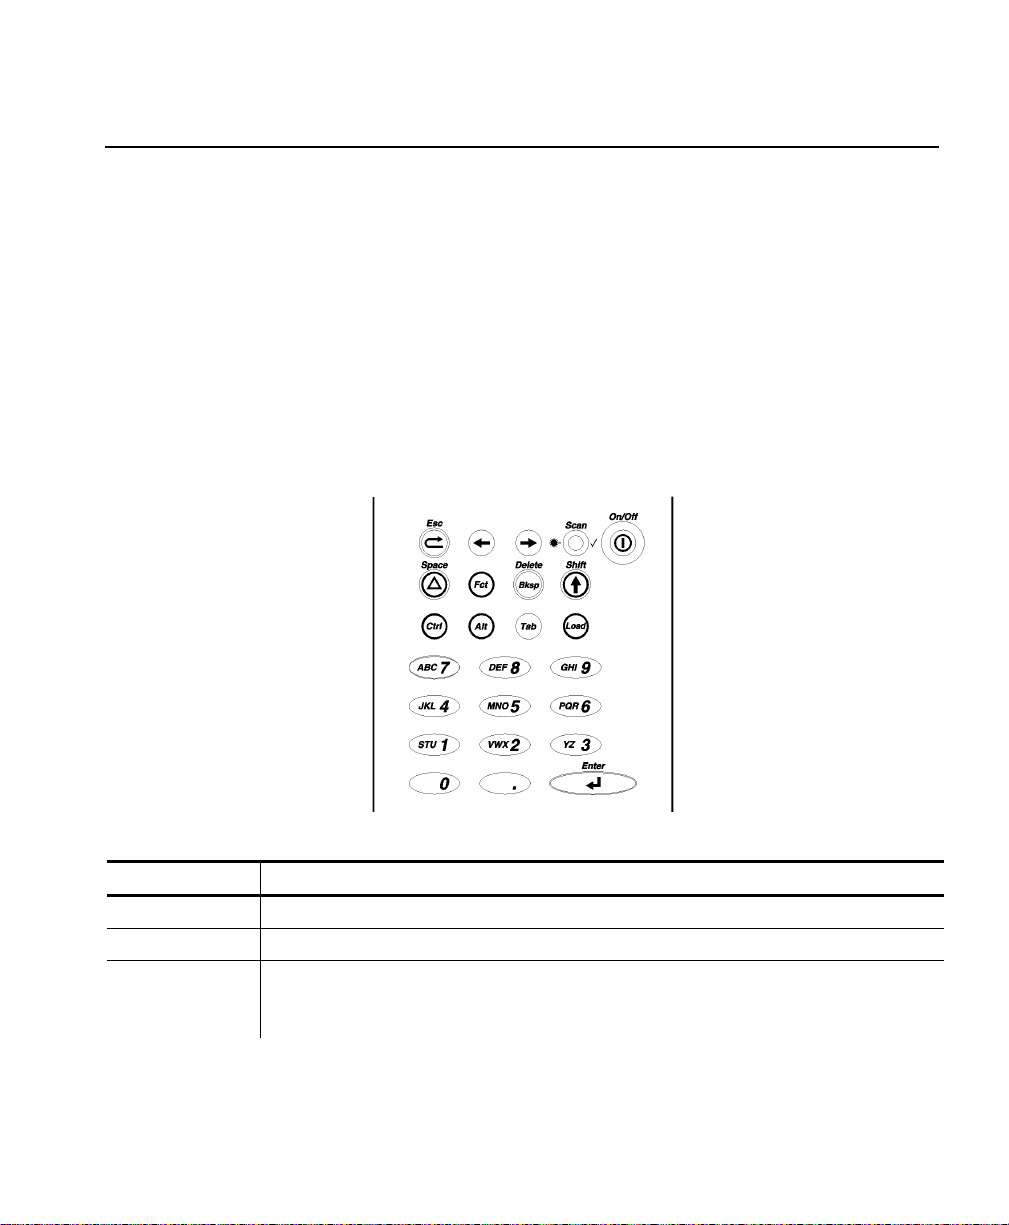
Using the Keypad
The printer keypad appears below.
Key(s) Description
Enter
Ctrl
Alt
1-2 Fixed Formats User Manual
Accepts data or a menu selection.
For future use.
Displays a special character when pressed with a 3-digit
number. Your System Administrator will tell you what number
to use.
Page 7

Key(s) Description
Tab
Load
Fct
Bksp
Shift
Esc
Arrows
On/Off
Space
Numeric/
Alphabetic
. (Decimal
point/period)
For future use.
Begins the supply-loading procedure.
Performs a specially-defined function when pressed with a
single-digit number. See the following table for descriptions.
Moves the cursor one space to the left. Pressing Shift and
Bksp together deletes all data on the current line.
♦ Displays a letter shown on the face of a numeric key. See
“Error! Reference source not found.” for more information.
♦ Deletes all data on the current line when pressed with Bksp.
Moves to the previous menu, or exits the current module or
program.
Moves between items in a menu or characters in a line.
Depending on the situation, the right arrow can act as a down
arrow. The left and up arrows can also be the same.
Turns the printer on and off.
Enters a space character.
Displays a numeric digit or upper-case letter.
Displays a decimal point or period character.
Using Function with Number Keys
Key(s) Description
F1
F2 Get Date
F3 Set Backlight
Set Print Method (On-Demand mode not available for 6032)
Select Print Method to us e
Print 1 Label
Label Strips
Trigger Mode
Enter Date
__/__/__
Press Enter to turn light Off/On (Esc will abort)
Introduction 1-3
Page 8

Key(s) Description (continued)
F4 Set Input Mode
F5
F6 Recall Data
Set Input Mode:
Manual (enter all data)
Rescan (use the lookup file for all but the key field)
Contrast (Use arrow keys to scroll, Enter to set)
ENERGY<STD> or ENERGY<HIGH>
ESC:BCK ENT:FWD
CONTRST:<+0>
ESC:BCK ENT:TST
TEST? 1=YES (Pressing 1 will print a test label)
ESC:BCK ENT:OK
Loads data from previous batch into the prompt entries.
Data Entry Modes
There are three data entry modes:
♦ Normal (Numeric) mode – Default. Press the key to access what
appears on the face of the key (numbers).
♦ Shift (Alpha) mode – Press Shift to enter letters with number keys
or with Bksp to delete the current line. S appears on the status line.
♦ Special Key mode – Press Alt or Fct (with a number) to display a
special character or perform a specially-defined function. A or F
appears on the status line.
1-4 Fixed Formats User Manual
Page 9

Entering Letters
To enter uppercase letters, press one of the numeric keys in Shift mode
(S appears on the status line). For example, the letters “ABC” appear on
the face of the 7 key.
1. Press Shift to enter Shift mode.
2. To enter the letter A, press 7 once; to enter B, press 7 twice; to enter
C, press 7 three times.
Press the keys quickly. If you pause too long between key presses, the
printer assumes you have entered the letter you need and the cursor
moves one space to the right.
Correcting Data Entry Errors
If you make a mistake as you enter data, you can do two things.
♦ If you have already pressed Enter at the prompt you want to correct,
press Esc, and the Format menu will reappear.
♦ If you are still at the prompt (have not pressed Enter), press Shift-
Bksp to clear the entire line and return the cursor to the left-most
position.
About Check Digits
A check digit is a character that verifies the accuracy of the bar code.
With a few exceptions described later, the digit appears in the right-most
position of the example bar codes in Chapter 3. It is not part of the data.
Introduction 1-5
Page 10

1-6 Fixed Formats User Manual
Page 11

GETTING STARTED
This chapter provides an overview of how to print labels/tags and
explains the special functions provided with the Fct key.
Overview
To start printing formats:
1. Turn on the printer.
2. A screen similar to the one below appears briefly.
Standard - 1211
P:124224 V:3.0
3. You see the menu entry for the format last printed. For example:
Fmt 1 – UPCA
DT/DPT/PR
4. Choose a print method. See “Selecting a Print Method” for more
information.
5. Choose a format by using the
a. arrow keys to scroll up ( Í ) or down ( Î ) in the Format
menu until you find the format you want. Press Enter.
b. number key corresponding to a format. For example, enter 5
to choose the fifth format. Use 0 for the tenth format.
2
Getting Started 2-1
Page 12

6. A series of prompts appears, asking you to enter data for the format.
For example:
DESC ?
**************
Chapter 3, “Using the Formats,” describes the prompts you will see
for each format.
7. When you finish entering data, the format prints according to the print
method you selected.
Using Special Functions
At any point other than a data entry prompt, you can use function keys to
♦ select a print method.
♦ change the date.
♦ turn the backlight on or off.
Selecting a Print Method
You must choose a print method so the printer can print the labels in the
manner you want. The choices are
♦ Print 1 Label
♦ Label Strips
♦ Trigger Mode.
When you press Fct-1 (anywhere other than a data entry prompt), you
see the menu entry for the current method. For example:
Print Method 1
Print 1 Label
Use the arrow keys to move up ( Í ) or down ( Î ) in the menu until you
find the method you want. Press Enter. The printer returns to the
Format menu.
2-2 Fixed Formats User Manual
Page 13

Print 1 Label
With Print 1 Label, after you enter all the data, the label prints
automatically and the first data entry prompt reappears on the display.
Press Esc to return to the Format menu.
Label Strips
With Label Strips, after you enter all the data, you are prompted for the
number of labels to print.
Strip Size?
****
The printer automatically prints the number of labels you specified.
The first data entry prompt reappears on the display. Press Esc to return
to the Format menu.
Trigger Mode
With Trigger Mode, after you enter all the data, Ready appears on the
display, and one label prints when you press the trigger. Repeat this for
as many labels as you need. Press Esc once to return to the first data
entry prompt or twice to return to the Format menu.
Changing Dates
You can change the system date at any time while using the printer.
Press Fct-2, and the date entry prompt will appear.
Turning the Backlight On or Off
The backlight enables you to see the display a little better if your lighting
conditions are poor. Press Fct-3 to change it from its current setting.
Getting Started 2-3
Page 14

2-4 Fixed Formats User Manual
Page 15

USING THE FORMATS
This chapter describes the data entry procedures for each format.
Note: All price fields automatically print the dollar sign and decimal
point.
Format 1: UPCA Price Format
UPCA Bar Code
Date
Price
Prompt What You Do
UPC-A?
DEPT ?
PRICE ?
Scan a bar code or enter 11 numeric digits (leaving one
asterisk on the display unused).
Enter up to 4 characters.
Enter up to 5 numeric digits.
Department
3
The printer lists the system date (for example: 04/18/02).
Using the Formats 3-1
Page 16

Format 2: UPCA + Price CD Format
UPCA+Price
Check Digit
(CD) Bar Code
Date
Price
Department
Prompt What You Do
DEPT ?
PRICE ?
Enter up to 5 numeric digits.
Enter up to 4 numeric digits.
Notes
♦ The printer lists the system date (for example: 04/18/02).
♦ The bar code consists of data from two other fields. Note that in the
example above, bar code characters 2-5 (numbered right to left) is the
price (5604) and characters 7-11 is the department (75120). If you
enter less than the maximum number of digits in either field, the
printer zero-pads the data from the left in the bar code.
♦ Character 6 is also a check digit (in addition to character 1).
♦ Character 12 is fixed. It indicates that the bar code is defined to
contain specially-defined data.
♦ If you receive error 571, you have entered too few digits in the
department or price fields.
3-2 Fixed Formats User Manual
Page 17

Format 3: 2 Line/Price Format
Description Line 1
Description Line 2
Price
Prompt What You Do
LINE 1 ?
LINE 2 ?
PRICE ?
Enter up to 10 characters.
Enter up to 10 characters.
Enter up to 5 numeric digits.
Using the Formats 3-3
Page 18

Format 4: UPCA Only Format
Prompt What You Do
UPC-A ?
Scan a bar code or enter 11 numeric digits (leaving one
asterisk on the display unused).
UPCA Bar Code
3-4 Fixed Formats User Manual
Page 19

Format 5: 3 Line/Price Format
Description Line 1
Description Line 2
Description Line 3
Price
Prompt What You Do
LINE 1 ?
LINE 2 ?
LINE 3 ?
PRICE ?
Enter up to 14 characters.
Enter up to 14 characters.
Enter up to 14 characters.
Enter up to 5 numeric digits.
Using the Formats 3-5
Page 20

Format 6: UPCA Price Format with Description
Description
Date
Price
UPCA Bar Code
Department
Prompt What You Do
DESC?
UPC-A?
Enter up to 14 characters.
Scan a bar code or enter 11 numeric digits (leaving one
asterisk on the display unused).
DEPT ?
PRICE ?
Enter up to 4 characters.
Enter up to 5 numeric digits.
The printer lists the system date (for example: 04/18/02).
3-6 Fixed Formats User Manual
Page 21

Format 7: UPCA + Price CD (w/Description) Format
Description
Date
Price
UPCA+Price
Check Digit (CD)
Bar Code
Department
Prompt What You Do
DESC ?
DEPT ?
PRICE ?
Enter up to 14 characters.
Enter up to 5 numeric digits.
Enter up to 4 numeric digits.
Notes
♦ The printer lists the system date (for example: 04/18/02).
♦ The bar code consists of data from two other fields. Note that in the
example above, bar code characters 2-5 (numbered right to left) is the
price (2495) and characters 7-11 is the department (75120). If you
enter less than the maximum number of digits in either field, the
printer zero-pads the data from the left in the bar code.
♦ Character 6 is also a check digit (in addition to character 1).
♦ Character 12 is fixed. It indicates that the bar code is defined to
contain specially-defined data.
♦ If you receive error 571, you have entered too few digits in the
department or price fields.
Using the Formats 3-7
Page 22

Format 8: EAN8 Price Format
Date
Price
EAN-8 Bar Code
Department
Prompt What You Do
EAN-8 ?
Scan a bar code or enter 7 numeric digits (leaving one
asterisk on the display unused).
DEPT ?
PRICE ?
Enter up to 4 characters.
Enter up to 5 numeric digits.
Notes
♦ The printer lists the system date (for example: 04/18/02).
♦ The bar code’s right-most character is the check digit.
3-8 Fixed Formats User Manual
Page 23

Format 9: UPCE Price Format
UPCE Bar Code
Date
Price
Prompt What You Do
UPC-E ?
Scan a bar code or enter 6 numeric digits (leaving one
asterisk on the display unused).
DEPT ?
PRICE ?
Enter up to 4 characters.
Enter up to 5 numeric digits.
Notes
♦ The printer lists the system date (for example: 04/18/02).
♦ The bar code’s check digit does not appear.
Department
Using the Formats 3-9
Page 24

Format 10: UPCA Sale Price Format
Fixed Field
UPCA Bar Code
Price
Prompt What You Do
UPC-A ?
PRICE ?
Scan a bar code or enter 11 numeric digits (leaving one
asterisk on the display unused).
Enter up to 5 numeric digits.
Note: The word SALE is fixed, appearing on all labels/tags with this
format.
3-10 Fixed Formats User Manual
Page 25

Page 26

Visit for sales, service,
supplies, information, and telephone numbers
for our locations throughout the world.
www.monarch.com
TOLL FREE:
1-800-543-6650 (In the U.S.A.)
1-800-363-7525 (In Canada)
 Loading...