

Page 1
Monarch
®
939™ Keyboard
TC0939OI Rev. AD 12/07 ©2003 Paxar Americas, Inc. a subsidiary of Avery Dennison Corp. All rights reserved.
Page 2

Each product and program carries a respective written warranty, the only warranty on
which the customer can rely. Paxar reserves the right to make changes in the product,
the programs, and their availability at any time and without notice. Although Paxar has
made every effort to provide complete and accurate information in this manual, Paxar
shall not be liable for any omissions or inaccuracies. Any update will be incorporated in
a later edition of this manual.
©2003 Paxar Americas, Inc. a subsidiary of Avery Dennison Corp. All rights reserved.
No part of this publication may be reproduced, transmitted, stored in a retrieval system,
or translated into any language in any form by any means, without the prior written
permission of Paxar Americas, Inc.
WARN ING
This equipment has been tested and found to comply with the limits f or a Class A digital
device, pursuant to Part 15 of the FCC Rules. These limits are designed to provide
reasonable protection against harmful interference when the equipment is operated in a
commercial environment. This equipment generates, uses, and can radiate radio frequency
energy and, if not installed and used in accordance with the instruction m anual, may cause
harmful interference to radio communications. Operation of this equipment in a residential
area is likely to cause harmful interference in which case the user will be required to correct
the interference at his own expense.
CANADIAN D.O.C. WARNING
This digital apparatus does not exceed the Class A limits for radio noise emissions from
digital apparatus set out in the Radio Interference Regulations of the Canadian Department
of Communications.
Le présent appareil numérique n’émet pas de bruits radioélectriques dépassant les limites
applicables aux appareils numériques de la classe A prescrites dans le Réglement sur le
brouillage radioélectrique édicte par le ministère des Communications du Canada.
Trademarks
Monarch®, 938, 939, 9855, and 9860 are trademarks of Paxar Americas, Inc.
Paxar
®
is a trademark of Paxar Corporation.
Avery Dennison
®
is a trademark of Avery Dennison Corporation.
UFST, Monotype, the Monotype logo, and CG Triumvirate are trademarks of Monotype Imaging, Inc.
Avery Dennison Printer Systems Division
170 Monarch Lane
Miamisburg, OH 45342
Page 3

TABLE OF CONTENTS
GETTING STARTED . . . . . . . . . . . . . . . . . . . . . . . . . . . . . . . . . . . . . . . . . . . . . . . . . . . . 1-1
Unpacking the Keyboard . . . . . . . . . . . . . . . . . . . . . . . . . . . . . . . . . . . . . . . . . . 1-2
Connecting the Cable . . . . . . . . . . . . . . . . . . . . . . . . . . . . . . . . . . . . . . . . . . . . . 1-3
Using the Keyboard . . . . . . . . . . . . . . . . . . . . . . . . . . . . . . . . . . . . . . . . . . . . . . 1-4
Control Keys. . . . . . . . . . . . . . . . . . . . . . . . . . . . . . . . . . . . . . . . . . . . . 1-5
ETTING BATCH OPTIONS . . . . . . . . . . . . . . . . . . . . . . . . . . . . . . . . . . . . . . . . . . . . . . 2-1
S
Setting Prompts and Defaults. . . . . . . . . . . . . . . . . . . . . . . . . . . . . . . . . . . . . . . 2-2
Non-Knife Setup. . . . . . . . . . . . . . . . . . . . . . . . . . . . . . . . . . . . . . . . . . 2-5
ENTERING BATCH DATA . . . . . . . . . . . . . . . . . . . . . . . . . . . . . . . . . . . . . . . . . . . . . . . . 3-1
Entering a Batch . . . . . . . . . . . . . . . . . . . . . . . . . . . . . . . . . . . . . . . . . . . . . . . . . 3-2
Printing Tags Without Cutting. . . . . . . . . . . . . . . . . . . . . . . . . . . . . . . . 3-7
Using Print Multiple with Inc/Dec Fields . . . . . . . . . . . . . . . . . . . . . . . 3-8
Examples . . . . . . . . . . . . . . . . . . . . . . . . . . . . . . . . . . . . . . . . . . . . . . . 3-8
TROUBLESHOOTING . . . . . . . . . . . . . . . . . . . . . . . . . . . . . . . . . . . . . . . . . . . . . . . . . . . 4-1
SPECIFICATIONS & ACCESSORIES. . . . . . . . . . . . . . . . . . . . . . . . . . . . . . . . . . . . . . . A-1
Accessories . . . . . . . . . . . . . . . . . . . . . . . . . . . . . . . . . . . . . . . . . . . . . . . . . . . . A-1
Flat Surface Mount. . . . . . . . . . . . . . . . . . . . . . . . . . . . . . . . . . . . . . . . A-2
Wall Mount . . . . . . . . . . . . . . . . . . . . . . . . . . . . . . . . . . . . . . . . . . . . . . A-3
CHARACTER SETS. . . . . . . . . . . . . . . . . . . . . . . . . . . . . . . . . . . . . . . . . . . . . . . . . . . . . B-1
Supported Symbol Sets and Code Pages . . . . . . . . . . . . . . . . . . . . . . . . . . . . . B-1
Internal (Standard and Reduced Font) . . . . . . . . . . . . . . . . . . . . . . . . B-2
Bold . . . . . . . . . . . . . . . . . . . . . . . . . . . . . . . . . . . . . . . . . . . . . . . . . . . B-3
ANSI. . . . . . . . . . . . . . . . . . . . . . . . . . . . . . . . . . . . . . . . . . . . . . . . . . . B-4
Code Page 437 . . . . . . . . . . . . . . . . . . . . . . . . . . . . . . . . . . . . . . . . . . B-5
Code Page 850 . . . . . . . . . . . . . . . . . . . . . . . . . . . . . . . . . . . . . . . . . . B-6
Table of Contents
i
Page 4

ii
Table of Contents
Page 5

GETTING STARTED
The Monarch® 939 keyboard allows you to easily configure the
printer and enter batch data. The keyboard works with the
Monarch® 9855 and Monarch® 9860 printers.
This chapter includes information about
N
unpacking the keyboard.
N
connecting the power cable.
N
using the keyboard.
1
Getting Started
1-1
Page 6
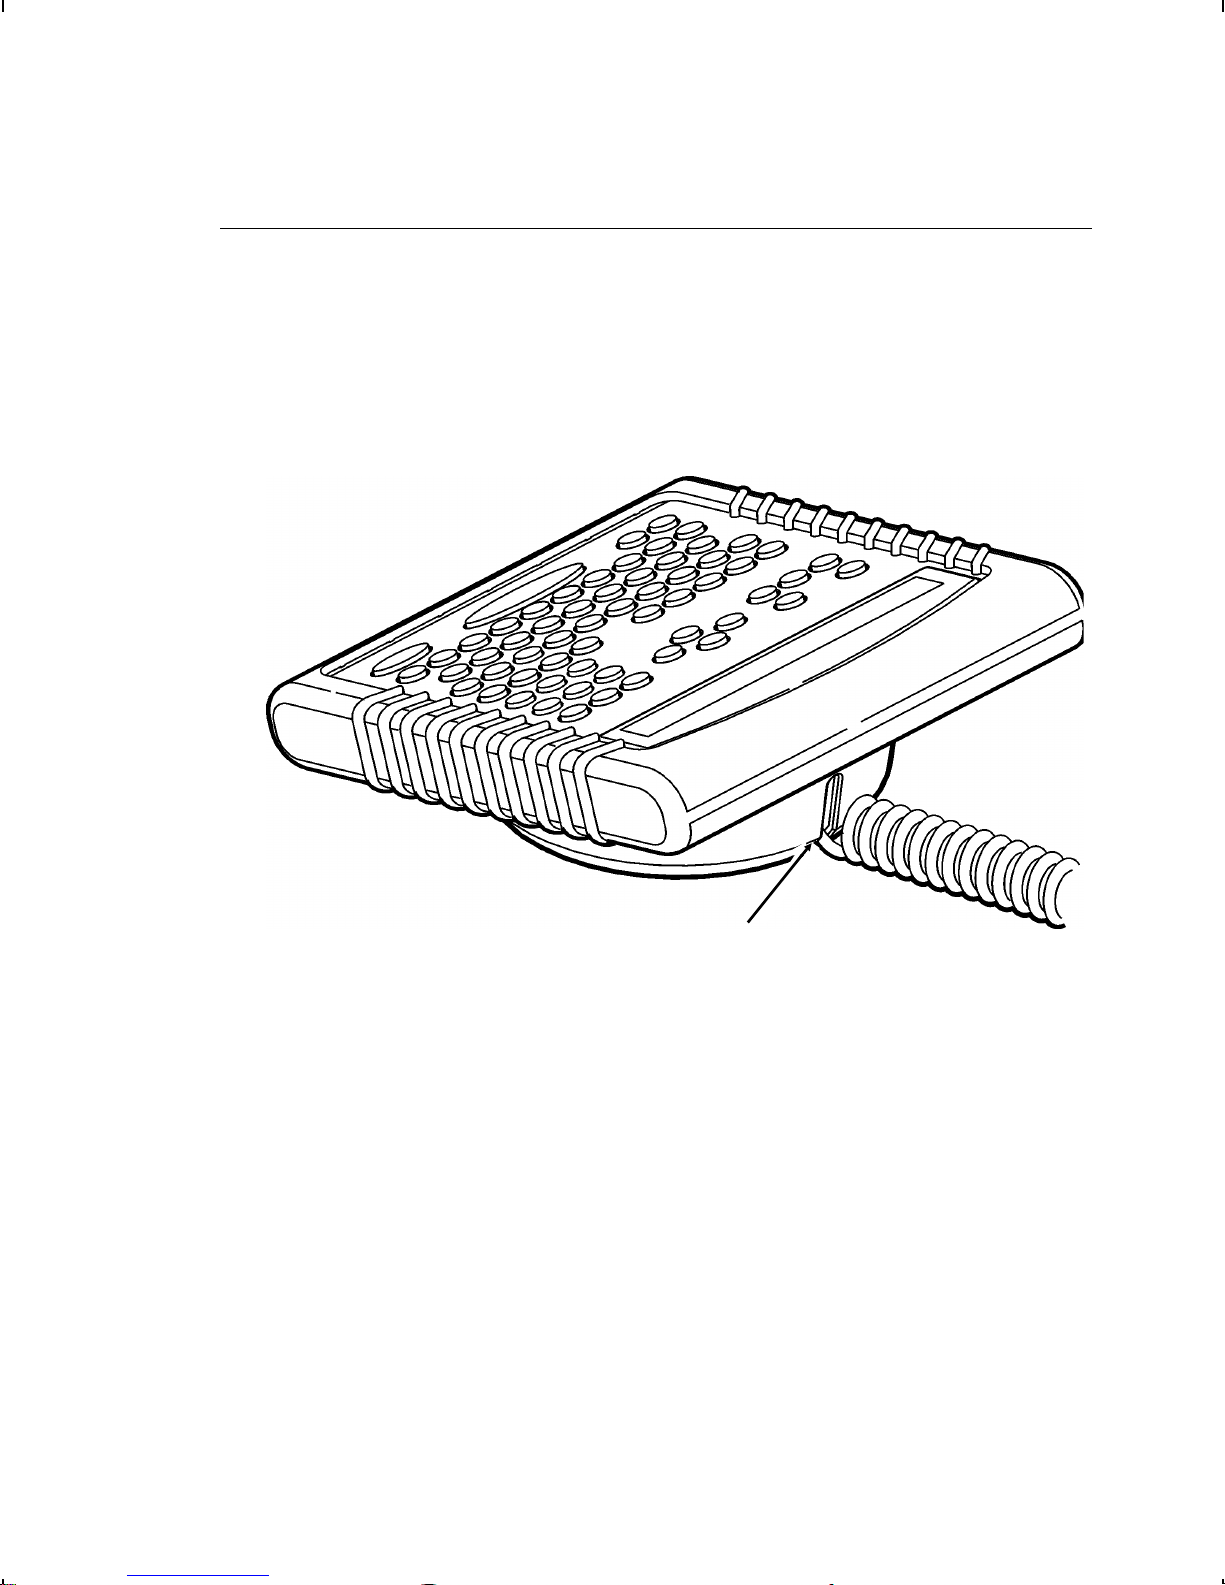
Unpacking the Keyboard
After unpacking the keyboard, look through all packaging material
for parts. Keep the box and packaging material in case the
keyboard ever needs repair.
Pull the cable out from the bottom of the base.
1.
Slide the first loop in the cable slot as shown.
2.
1-2
Getting Started
Cable
Slot
Page 7
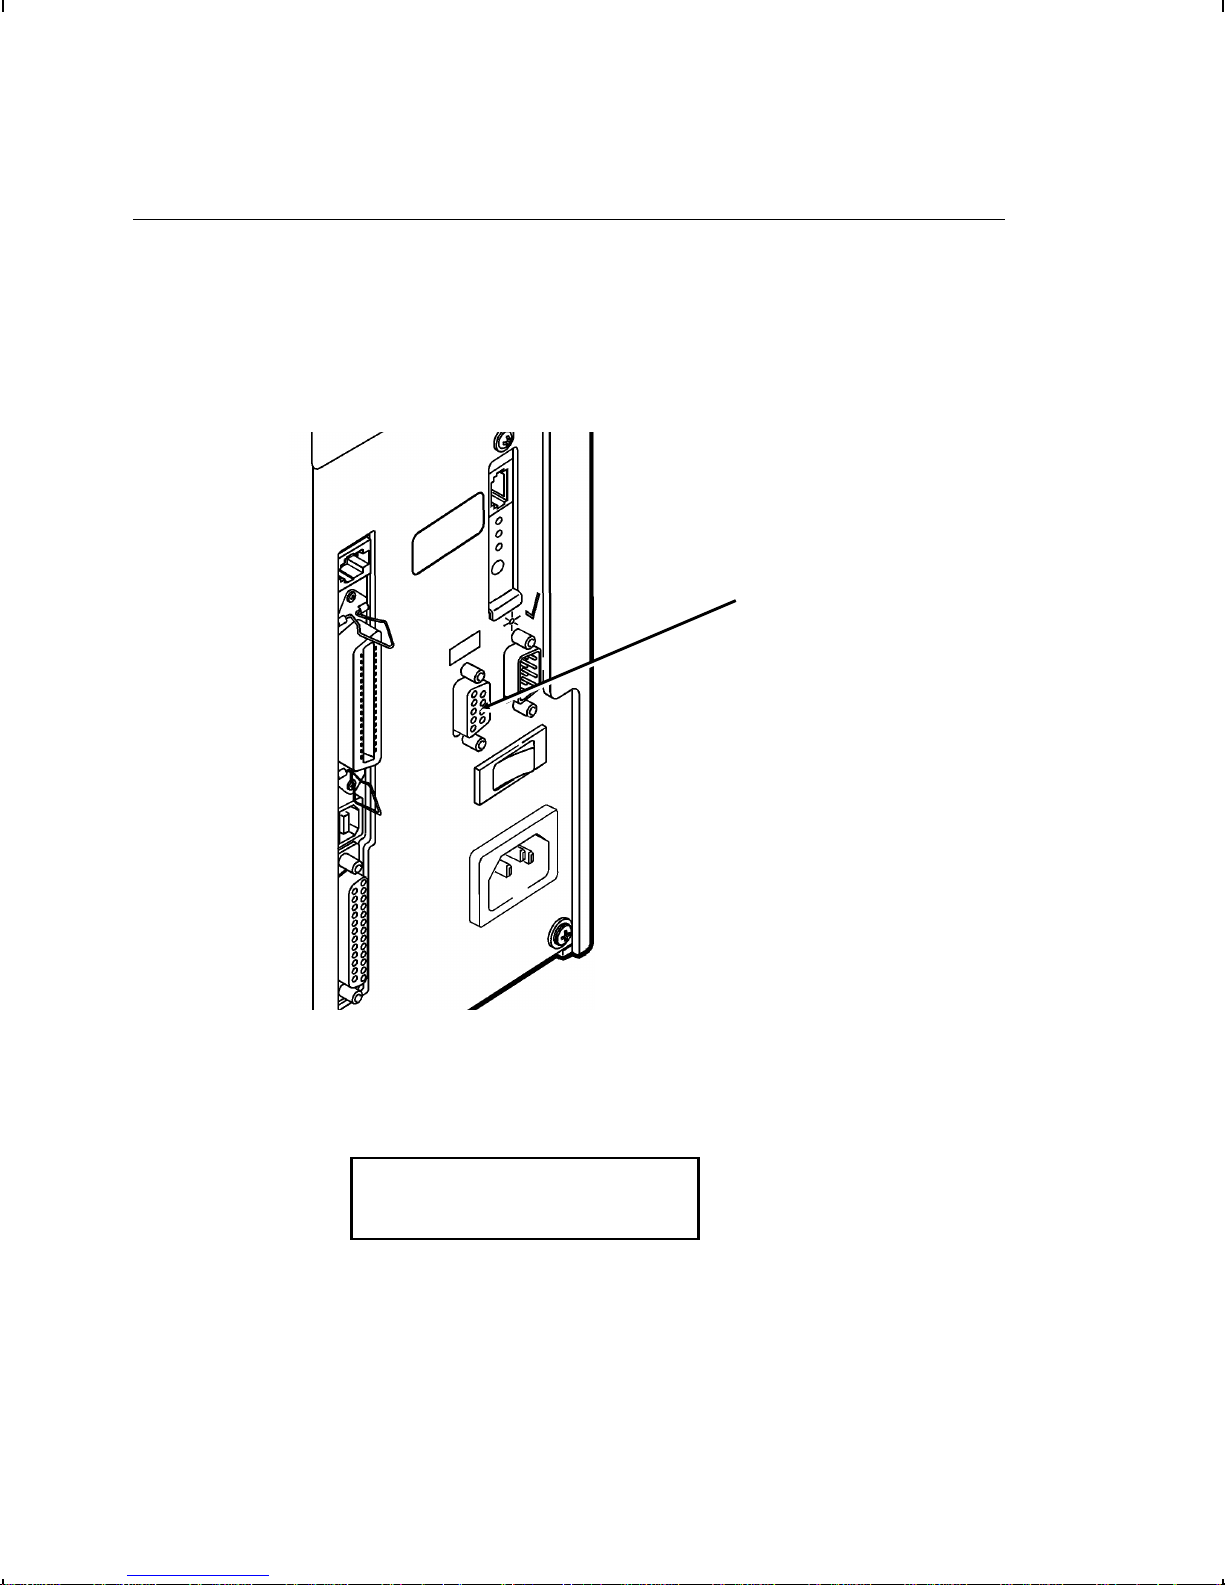
Connecting the Cable
The keyboard receives power from the printer.
Turn off the printer before you connect the keyboard cable.
1.
Plug the 9-pin keyboard cable into the back of the printer.
2.
Keyboard
Cable Goes
Here
Turn on the printer. Press (I) to turn on and (O) to turn off the
3.
printer.
The keyboard displays
PRINT MODE
Ready
Getting Started
1-3
Page 8
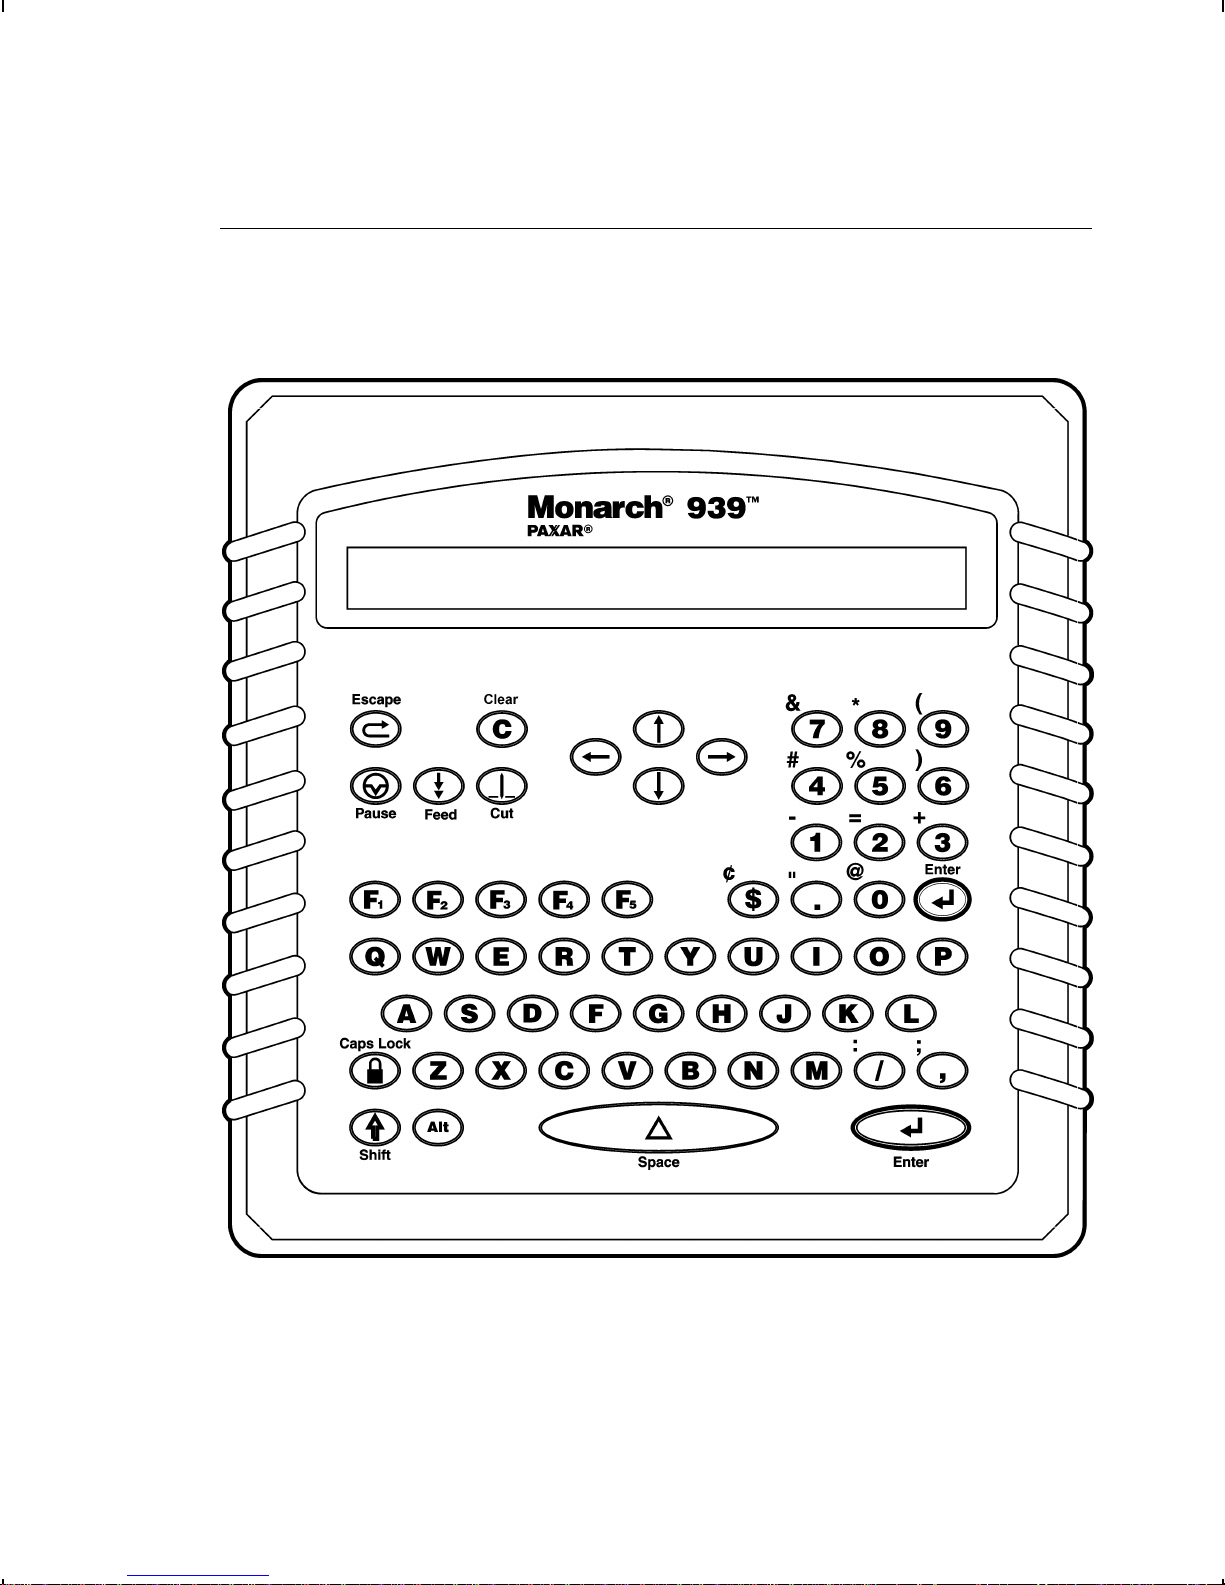
Using the Keyboard
The keyboard has full alphabetic (QWERTY) keys with 10 numeric
keys, 5 function keys, 4 arrow keys, and several special keys.
1-4
Getting Started
Page 9

Control Keys
E
Escape. Returns the display to the next higher menu.
Also clears an error.
C Clear. Clears the entire field.
P
Pause. Interrupts printing. Press Pause again to
resume printing.
F
Feed. Feeds a blank label if there is no print job.
Prints a label in on-demand mode.
Prints a label with error information that is useful to
your System Administrator if an error is displayed.
C
L
R
u
d Moves between fields in Batch Entry.
Cut. Cuts the supply.
Displays menu items and allows you to move the cursor.
N
S
f -
f
c
a
s
Enter. Selects the displayed menu item.
Shift. Toggles between upper and lower-case. Use with
other keys to display ¢, ", @, :, ;, -, =, +, #, %, (, ), &, *.
Functions keys that are reserved for future use:
g
Prints test labels in online mode.
Caps Lock. Allows you to type all upper-case
characters. When the caps lock is on, a padlock
symbol is displayed in the upper right hand corner.
Enters an international character for printing when
pressed and held along with a character code. See
Appendix B, "Character Sets" for the character codes.
Space. Inserts a blank space between characters.
Getting Started
1-5
Page 10

1-6
Getting Started
Page 11
SETTING BATCH OPTIONS
2
You can select Batch Options to change which prompts appear
during Batch Entry mode and set default values for those prompts.
Customizing which prompts appear during batch entry can reduce
the time it takes to enter data for a format.
If a knife is not installed, you can prevent those prompts from appearing
during batch entry mode. If you set a new default value for an option, that
value is used even if the prompt is not displayed. If you do not change a
default value for an option, the system default is used if the prompt is not
displayed.
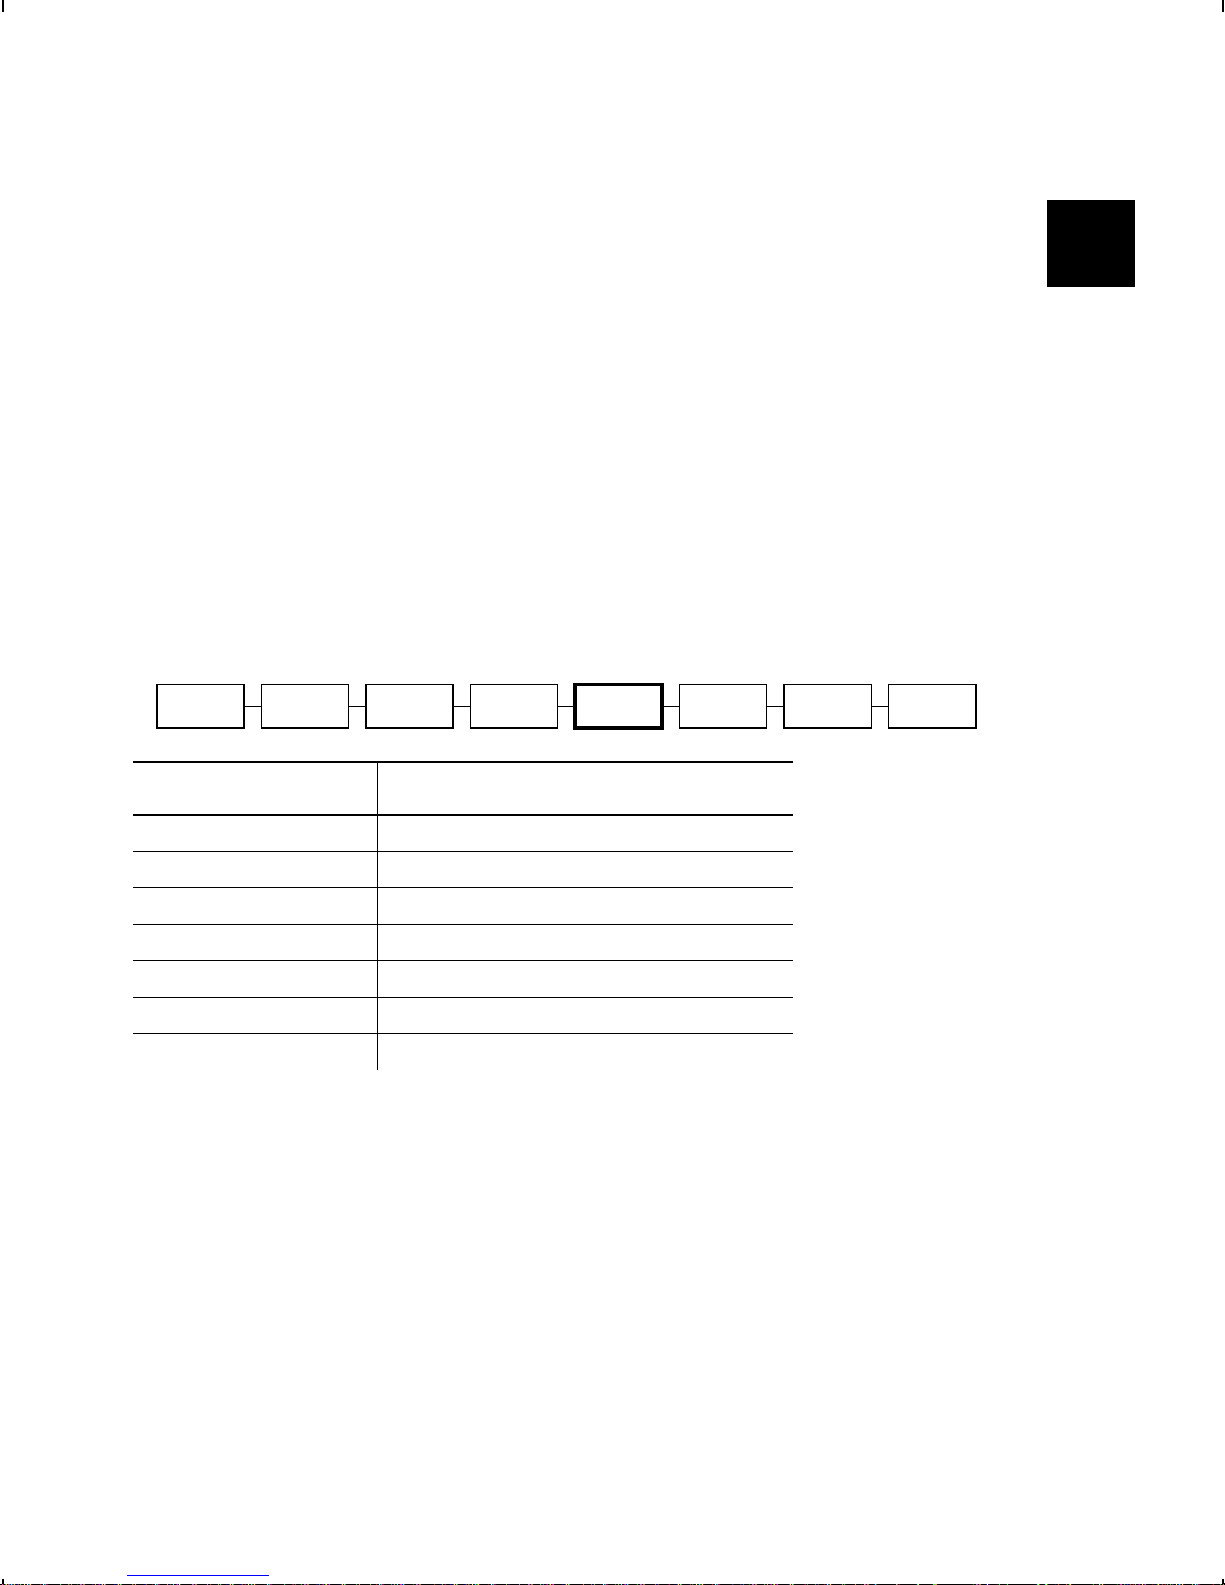
MAIN MENU
CANCEL
ALL
PRINT
MODE
BATCH
ENTRY
Option Default
Clear Fields No
Number of Parts 1
Print Multiple 1
Quantity 1
Cut Option No
Cut Multiple 1
Cut Last Ticket No
REPEAT
BATCH
BATCH
OPTIONS
SETUP DIAG.
SCRIPTS
Setting Batch Options
2-1
Page 12
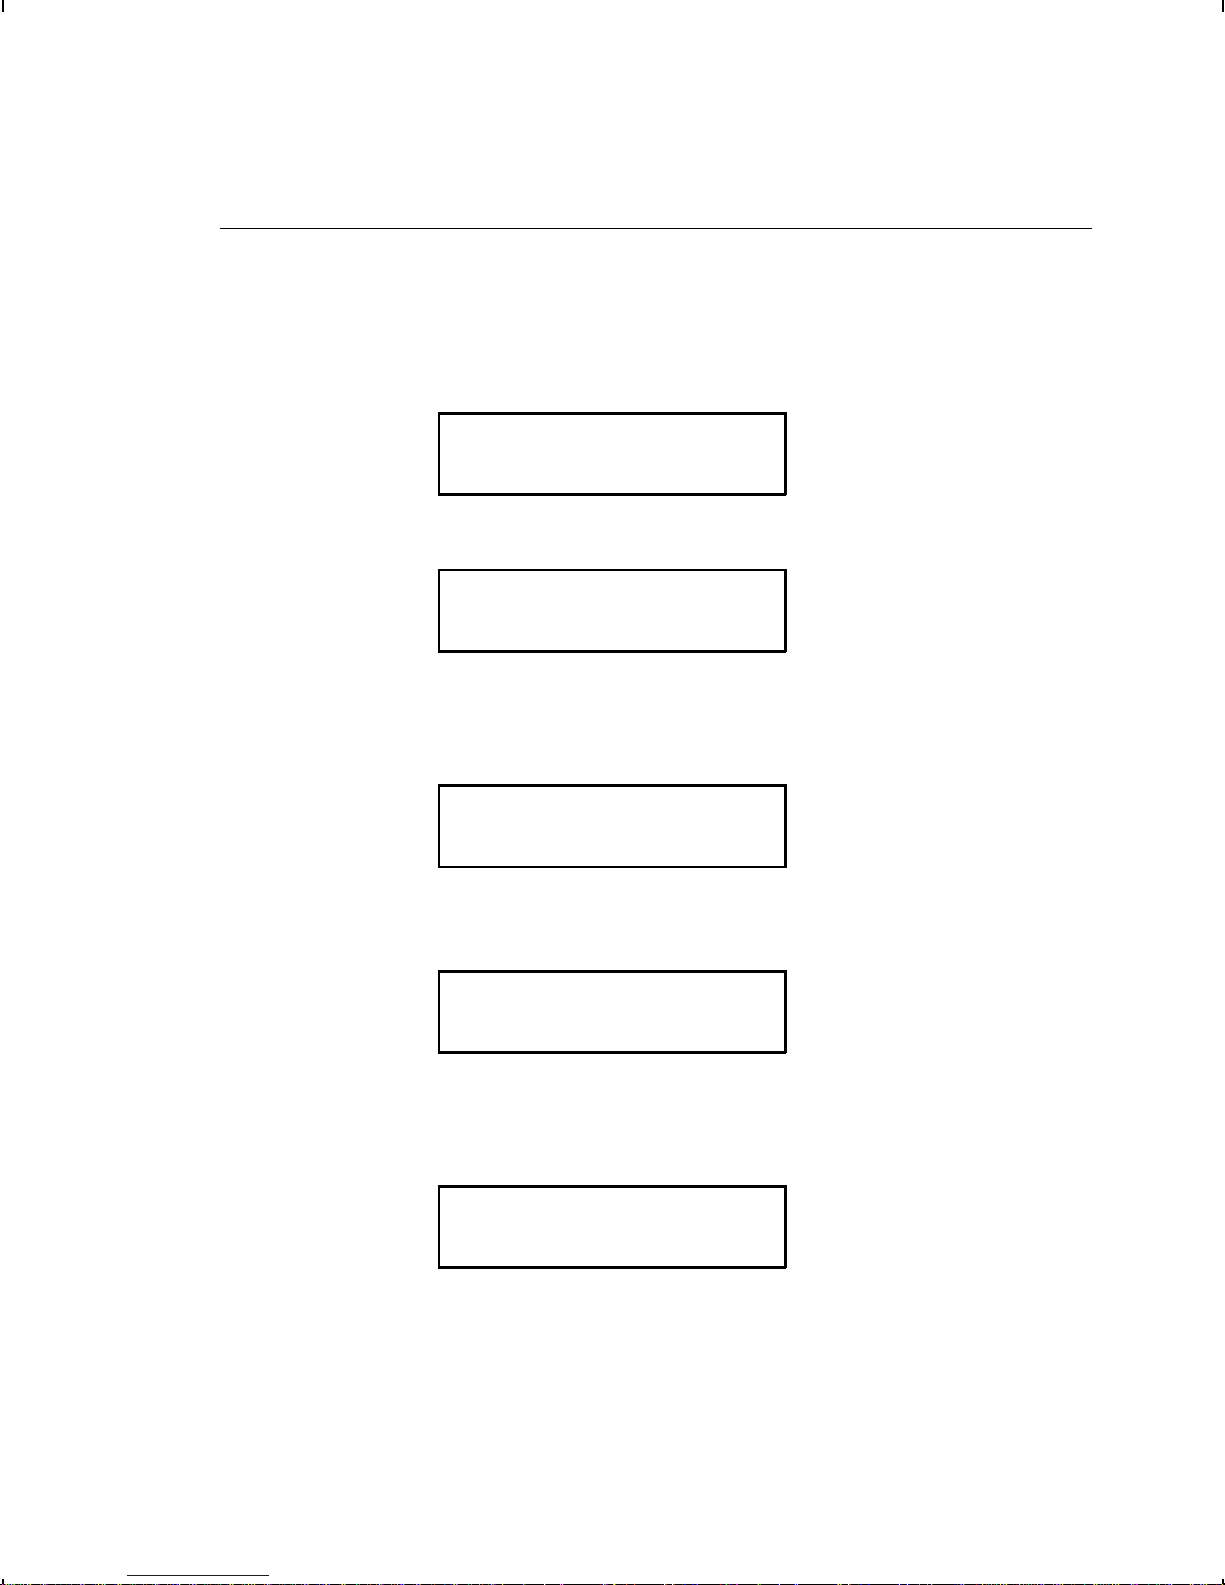
Setting Prompts and Defaults
Use the following steps to customize which prompts appear
during batch entry and to specify defaults for these prompts.
1.
Press
at the Main menu, when you see Batch Options. If
N
you have password protection enabled, you will see
Enter Password:
_ _ _ _ _ _ _
2.
Press
three times and then press N.
F
Clear Fields?
Prompt? Yes
Decide if you want to see this prompt in Batch Entry mode
3.
and press either l or r to display your selection. Press
.
N
Clear Fields?
No
Decide if you want to change the default (No) and press
4.
either l or r to display your selection. Press
r
N
.
Decide if you want to see this prompt in Batch Entry mode
5.
and press either l or r to display your selection. Press
.
N
Decide if you want to change the default (1) part printed
6.
across the supply. Press r to change the number of parts
(1-5). Press N.
Setting Batch Options
2-2
Number of parts
Prompt? Yes
Number of parts
[1/5]: +1
Page 13

Cut Option
Prompt? Yes
Decide if you want to see this prompt in Batch Entry mode
7.
and press either l or r to display your selection. Press
Cut Option
No
Decide if you want to change the default (No) and press
8.
either l or r to display your selection. Press
r
N
.
Cut Multiple
Prompt? Yes
Decide if you want to see this prompt in Batch Entry mode
9.
and press either l or r to display your selection. Press
.
N
N
.
Cut Multiple
1 _ _ _ _ _ _ _ _
Decide if you want to change the default (1) tag printed
10.
before cutting. Enter a quantity (1-32000). Press
Note: To cut between batches, make the Cut Multiple the
same as the print quantity.
Cut Last Ticket?
Prompt? Yes
Decide if you want to see this prompt in Batch Entry mode
11.
and press either l or r to display your selection. Press
.
N
Cut Last Ticket?
No
r
N
.
Setting Batch Options
2-3
Page 14

Decide if you want to change the default (No) and press
12.
either l or r to display your selection. If you select "Yes,"
the last tag in the batch is cut. The printer must feed one or
two tags past the printhead to cut the last tag in the batch.
Press
N
.
Cut After Batch?
Prompt? Yes
Decide if you want to see this prompt in Batch Entry mode
13.
and press either l or r to display your selection. If you
select "Yes," the last tag in the batch is cut. The printer must
feed one or two tags past the printhead to cut the last tag in
the batch. Press
N
.
Cut After Batch?
No
Decide if you want to change the default (No) and press
14.
r
either l or r to display your selection. If you select "Yes,"
the knife cuts before the first tag and cuts after batch, so the
tags are cuts in strips. Press
N
.
15.
16.
Setting Batch Options
2-4
No Cut Before?
Prompt? Yes
Decide if you want to see this prompt in Batch Entry mode
and press either l or r to display your selection. Press
N
No Cut Before?
No
r
Decide if you want to change the default (No) and press
either l or r to display your selection. If you select "Yes,"
the knife does not cut before the first tag in a batch, but does
cut between each tag and after the last tag in a batch. Press
.
N
.
Page 15

Quantity?
Prompt? Yes
Decide if you want to see this prompt in Batch Entry mode
17.
and press either l or r to display your selection. Press
N
Quantity
1 _ _ _ _ _ _ _ _
Decide if you want to change the default (1) for the quantity of
18.
tags to print in a batch. Enter a quantity (1-32000). Press
.
N
After setting the batch options, you are ready to use Batch Entry
mode to enter data for your formats. See Chapter 3, "Entering
Batch Data," for more information.
Non-Knife Setup
.
If you do not have a knife attached, you are prompted for Print
Multiple, instead of Cut Multiple.
Print Multiple
Prompt? Yes
Decide if you want to see this prompt in Batch Entry mode
1.
and press either l or r to display your selection. Press
.
N
Print Multiple
1 _ _ _ _ _ _ _ _
Decide if you want to change the default (No) for the number
2.
of copies of each tag to print as a set within a batch. Enter a
quantity (1-32000). Press N.
Quantity?
Prompt? Yes
Setting Batch Options
2-5
Page 16

Decide if you want to see this prompt in Batch Entry mode
3.
and press either l or r to display your selection. Press
N
Quantity
1 _ _ _ _ _ _ _ _
Decide if you want to change the default (1) for the quantity of
4.
tags to print in a batch. Enter a quantity (1-32000). Press
.
N
After setting the batch options, you are ready to use Batch Entry
mode to enter data for your formats. See Chapter 3, "Entering
Batch Data," for more information.
Keep in mind the following definitions:
Number of Parts Number of times data prints across the tag’s
width. Using one for number of parts prints
data once on the tag. Using three for number
of parts prints data three times across the tag.
.
Cut Multiple Number of tags printed between cuts as a
set. A cut multiple of one cuts after each tag.
To cut after each batch, set the cut multiple
equal to the print quantity.
If the cut multiple is three and the print
quantity is 15, five sets of three tags are
printed and cut (15 tags). If the cut multiple
is three and the print quantity is 16, five sets
of three tags and one set of one tag are
printed and cut (16 tags).
Note: The cut multiple does NOT affect the printed quantity.
Setting Batch Options
2-6
Page 17

Print Multiple Number of copies of each tag to print as a set
within a batch. A print multiple of one prints
one set of one tag. A print multiple of three
prints three copies of each tag as a set.
If the print multiple is three and the print
quantity is 15, then 15 sets of tags with three
tags per set are printed (45 tags). If the print
multiple is two and the print quantity is four,
then four sets of tags with two tags per set
are printed (8 tags).
The most common application for print
multiple is with incrementing or decrementing
fields. See "Using Print Multiple with Inc/Dec
Fields" for more information.
Note: The print multiple DOES affect the printed quantity.
Print Quantity Number of tags or sets of tags printed in a
batch. A print quantity of 30 prints 30 tags
when the print multiple is one.
Set Number of tags to be printed together within a
batch.
Setting Batch Options
2-7
Page 18

Setting Batch Options
2-8
Page 19

ENTERING BATCH DATA
This chapter explains how to enter batch data from the keyboard.
You can enter numbers, letters, and a variety of symbols (including
punctuation and international characters) from the keyboard. See
Appendix B, "Character Sets" for information about international
characters.
Some fields specifically require numeric or alphabetic data. If you
try to enter numeric data for an alpha field, or alphabetic data for a
numeric field, the printer does not accept the data. Enter the
correct data and press
To enter numeric data, press the key that shows the number you want. The
screen displays the number and the cursor moves to the next position in the
field. This is also how you enter a period (.), comma (,), or dollar sign ($).
To enter alpha characters, press the key that shows the letter you want.
The screen displays the character and the cursor moves to the next position
in the field. Here is an example of how to enter the word Red.
N
.
3
Note: Not all fonts support lower-case letters.
Press and hold
1.
appears on the display.
Press the E key. A lower-case e appears on the display.
2.
Press the D key. A lower-case d appears on the display.
3.
When a field has fixed characters, they appear as part of the data
entry prompt. The fixed data stays the same, and prints on every
tag that uses the format. Only the data you enter can be changed.
In the example below, the first six digits are fixed characters.
The printed field contains both the fixed characters and the data you enter.
while pressing the R key. An upper-case R
S
UPCA Barcode:
004156 _ _ _ _ _
Entering Batch Data
3-1
Page 20

Entering a Batch
Batch Entry lets you enter the data to print a batch (or batches) of
supplies. You must first download your formats to the printer.
Depending on your settings in Batch Options,
some of these prompts may or may not
appear. See Chapter 2, "Setting Batch
Options" for more information.
1.
2.
Press
Press
until you see the Main menu.
E
L
or
until you see
R
MAIN MENU
Batch Entry
r
3.
Press
l
. You will see
N
Select Format:
FMT-1
Press
4.
want, then press
L
or
until you see the name of the format you
R
N
r
Note: You can also type the first letter of the format name
and the display jumps to formats beginning with that
letter.
3-2
Entering Batch Data
Page 21

Depending on your settings in Batch Options, you may see
5.
Clear Fields?
No
N
Press
(No) to keep the old data. Each field appears with
N
the previous data. You can press
change it and press
N
Press
then press
R
.
N
(Yes) to erase the old data. Each
N
r
to accept the data, or
N
field appears with blanks (underscores). You have to enter
new data for each field.
You will see the first prompt for the format. For example
6.
Color:
_ _ _ _ _ _ _ _
Ty pe Red and press
7.
N
.
Price:
_ _ _ _ _ _ _ _
Ty pe $99.99 and press
8.
. (Depending on your format, you
N
may not need to type the dollar sign.)
Continue entering data for each prompt and press
9.
N
finished. If you make a mistake, you can clear the entire field
by pressing clear (C) or use
L
or
to move the cursor to
R
the character to change.
Note: You can also use u or d to move between fields.
After you enter data for all the fields, the prompts you see
10.
next varies, because you can choose to display or not to
display certain prompts.
when
Entering Batch Data
3-3
Page 22

You may see
Number of parts?
[1/5]: _
Type the number of times the data prints across the tag width.
11.
Press
.
N
Cut Option
No
N
If your printer has a knife and you want to cut tags, press
display "Yes" and press
N
If your printer does not have a knife, the Cut Option prompt
.
N
r
does not appear. See "Printing Tags Without Cutting" for more
information.
If you answered "Yes" to the cut option, you have several cut
modes to select from.
R
to
Cut Mode Description
Cut after tag
(Cut Mode 1)
Cut after batch
(Cut Mode 2)
Cut last ticket
(Cut Mode 3)
No cut before
(Cut Mode 4)
Cut in Strips
(Cut Mode 5)
Cuts before first tag, cuts each tag, and cuts after
last tag. Printed tags left between knife and
printhead.
Cuts before first tag, cuts after batch. Cuts in
strips, not each tag. Printed tags left between knife
and printhead.
Cuts before first tag, cuts each tag, cuts after the
last tag and feeds one or two tags past the
printhead when it cuts the last tag in the last batch.
Does not cut before the first tag in a batch, but cuts
between each tag and after the last tag in the batch.
Printed tags left between knife and printhead.
Cuts before first tag, cuts after batch. Cuts in
strips, not each tag. Feeds one or two tags past the
printhead when it cuts the last tag in the batch.
Entering Batch Data
3-4
Page 23

If you do not specify a cut mode (cut last ticket, cut after batch, or
no cut before), the knife cuts after each tag. This is the same as
cut mode 1. The knife uses the last selected cut mode. For
example, if you select "Cut Last Ticket" and then select "Yes" to
"Cut After Batch," the knife only cuts after each batch instead of
after the last tag in the batch.
Cut multiple
[1/32000]: 1 _ _ _ _
Type the number of tags to print before cutting and press
12.
or accept the default value of 1 by pressing
N
. A cut
multiple of one cuts after each tag. This is the same as cut
mode 1.
Cut Last Ticket:
No
If you want to cut the last tag in the batch, press
13.
display "Yes" and press
r
R
. The printer feeds one or two
N
tags past the printhead when it cuts the last tag in the last
batch. Depending on the length of your supply, you may lose
up to two tags after the last batch. This is the same as cut
mode 3.
Cut After Batch:
No
If you want to cut after every batch, press
14.
and press
. The knife cuts before the first tag and cuts
N
r
to display "Yes"
R
after batch, so the tags are cuts in strips. This is the same as
cut mode 2.
to
N
,
No Cut Before?
No
r
Entering Batch Data
3-5
Page 24

If you do not want to cut before the first tag in a batch, press
15.
to display "Yes" and press N. The knife does not cut
R
before the first tag in a batch, but does cut between each tag
and after the last tag in a batch. This is the same as cut
mode 4.
Quantity
[1/32000]: 1 _ _ _ _
Type the number of tags or sets of tags you want to print in
16.
this batch and press
. A cut multiple of two with a batch
N
quantity of 30 prints 30 tags (15 sets of two tags).
Print Now?
No
r
Select either "No" or "Yes" and press
17.
. If you select "No,"
N
the batch data is saved to print later and you return to the
format selection prompt in Batch Entry mode. To print the
format later, press
when you see "PRINT MODE Ready."
N
If you select "Yes," the batch begins to print and cut (if cut options
were enabled). The display counts the tags as they print and how
many tags are in the batch. After the batch prints, you return to
the "Select Format" prompt in Batch Entry.
3-6
Entering Batch Data
Page 25

Printing Tags Without Cutting
Depending on your settings in Batch Options, some of these
prompts may or may not appear. See Chapter 2, "Setting Batch
Options" for more information.
If you answered "No" to the cut option, you may see
Print Multiple
[1/32000]: _ _ _ _ _
Type the number of copies of each tag to print as a set within
1.
a batch. If you want three copies of each tag, use a print
multiple of 3. Press
Quantity
[1/32000]: _ _ _ _ _
Type the number of tags or sets of tags you want to print in
2.
this batch and press
quantity of 30 prints 60 tags (30 sets of tags with two tags per
set).
.
N
. A print multiple of two with a batch
N
Print Now?
No
Select either "No" or "Yes" and press
3.
r
. If you select "No,"
N
the batch data is saved to print later and you return to the
format selection prompt in Batch Entry mode. To print the
format later, press
when you see "PRINT MODE Ready."
N
If you select "Yes," the batch begins to print and cut (if cut options
were enabled). The display counts the tags as they print and how
many tags are in the batch. After the batch prints, you return to
the "Select Format" prompt in Batch Entry.
Entering Batch Data
3-7
Page 26

Using Print Multiple with Inc/Dec Fields
If your tag has an incrementing or decrementing field, the print
multiple is the number of tags printed as a set before
incrementing or decrementing. If the incrementing field is set to
10, the print multiple is 2, and the print quantity is 2, then four
tags are printed. Two tags print "10" in the incrementing field, the
other two tags print "11" in the incrementing field.
Examples
N
Number of parts = 1, cut multiple or print multiple = 1, print
quantity = 4, then four sets of one tag are printed (and cut
after each tag if using cut multiple).
N
Number of parts = 3, cut multiple = 2, print quantity = 2, then
two tags are printed and cut after the second tag is printed.
N
Number of parts = 3, print multiple = 2, print quantity = 2, then
four tags are printed as two sets of two tags.
N
Number of parts = 3, print multiple = 2, print quantity = 4, then
eight tags are printed as four sets of two tags.
The following graphic shows the relationship between the number
of parts, cut multiple, and print multiple.
3-8
Entering Batch Data
Page 27

Three-part tag
( n u m b e r o f p a r t s = 3 )
Cut here for a cut multiple of 2
( C u t a f t e r t w o t a g s ) O R
Print multiple = 2 (Prints two
tags as a set)
Cut here for a cut multiple of 1
( C u t a f t e r o n e ta g ) O R
Print multiple = 1 (Prints one tag
as a set)
Entering Batch Data
3-9
Page 28

3-10
Entering Batch Data
Page 29

TROUBLESHOOTING
This chapter provides solutions to keyboard problems and explains
common status code messages you may receive when using the
keyboard.
Problem Action
The keyboard display is blank. Make sure the printer is on. Check to see if the
keyboard cable is securely attached to the
printer. If the keyboard was attached while the
printer was on, turn off the printer and then turn
the printer back on.
4
The data you entered is not
accepted.
Your data was not accepted
and blanks are still showing.
You entered an incorrect check
digit.
You tried to skip a required
field.
Letters are not in the expected
case.
Monetary symbols do not print
as expected.
Refer to your format for acceptable characters
for this field. Some fields accept only letters,
some accept only numbers. Some accept only
specific ranges of letters or numbers.
This field requires data for all underscores
shown. Enter the correct data and press
The data and check digit must be the correct
combination. Enter the correct data and press
N
.
) is not on.
c
the
This field requires data before continuing to the
next field. Enter data and press the N.
Make sure the Caps Lock (
Make sure your font supports the selected code
page (Bold, ANSI, etc.). For more information,
see Appendix B, "Character Sets."
N
.
Troubleshooting
4-1
Page 30

Troubleshooting
4-2
Page 31

SPECIFICATIONS &
ACCESSORIES
Height: 4.0 inches (102 mm)
Width: 8.25 inches (210 mm)
Depth: 8.75 inches (222 mm)
Weight: 2.33 lbs. (1.06 kg)
A
Shipping
Weight:
Power
Source:
Operating
Limits:
3.4 lbs. (1.5 kg)
Supplied by printer
For Thermal Transfer (ribbon) 40° to 95° F
(4° to 35° C)
For Thermal Direct 40° to 104° F
(4° to 40° C)
Accessories
An optional stand is available for the keyboard. It can be used on a flat
surface or mounted on a wall.
Specifications & Accessories
A-1
Page 32

Flat Surface Mount
Make sure all surfaces you apply the dual lock fasteners to are
free from dirt and oil. If necessary, clean with isopropyl alcohol.
Pull the cord through the large hole in the stand.
1.
Set the keyboard into the stand.
2.
Attach either the rubber pads or dual lock fasteners to the
3.
base of the keyboard stand. If using the dual lock fasteners,
attach the other side of the fastener to the tabletop.
To remove the keyboard from the stand, lift the keyboard from
the bottom.
A-2
Specifications & Accessories
Page 33

Wall Mount
Hold the bottom of the stand against the wall (hinge side up).
1.
Mark the mounting holes with a pencil.
Screw the stand onto the wall (screws not included).
2.
Pull the cord through the large hole in the stand.
3.
Set the keyboard into the stand.
4.
To remove the keyboard from the stand, lift the keyboard from
the bottom.
Specifications & Accessories
A-3
Page 34

A-4
Specifications & Accessories
Page 35

CHARACTER SETS
This appendix contains a listing of the symbol sets and code
pages the printer supports.
Supported Symbol Sets and Code Pages
The CG Triumvirate typefaces support only the ANSI and DOS
Code Page 437 and 850 Symbol Sets. These fonts print a slashed
zero when using the ANSI symbol set. However, the scalable font
does not print a slashed zero or support Code Page 1256 (Arabic).
Internal Use this symbol set to print international monetary
symbols, the trademark () symbol, and for
formats that may be used on other MPCLII
printers.
ANSI Use this symbol set with proportionally spaced
fonts.
B
DOS Code
Pages 437 or 850
To enter a character code:
Press and hold
character code. For example, press
Note: The keyboard’s display may not match the character printed.
If you selected monetary signs from the Setup, Defaults menu and
use the Standard, Reduced or Bold font, the monetary symbols
from the selected country print. However, if using the CG
Triumvirate fonts, the monetary symbols may not print as
expected. Make sure your font supports the selected code page.
Use this symbol set for extended and international
characters with proportionally spaced fonts.
. Use the numeric keys to enter a three-digit
a
179 for ¥ .
a
Character Sets
B-1
Page 36

Internal (Standard and Reduced Font)
B-2
Character Sets
Page 37

Bold
Character Sets
B-3
Page 38

ANSI
B-4
Character Sets
Page 39

Code Page 437
Character Sets
B-5
Page 40

Code Page 850
B-6
Character Sets
Page 41

Page 42

Page 43

Page 44

 Loading...