

Paxar HANDIPRINT 6017, Monarch 6017 HandiPrint Operating Instructions Manual
Monarch
6017
HandiPrint
Printer
TC6017OI Rev. AB 4/01 ©2000 Monarch Marking Systems, Inc. All rights reserved.

Each product and program carries a respective written warranty, the only warranty on
which the customer can rely. Monarch reserves the right to make changes in the
product, the programs, and their availability at any time and without notice. Although
Monarch has made every effort to provide complete and accurate information in this
manual, Monarch shall not be liable for any omissions or inaccuracies. Any update
will be incorporated in a later edition of this manual.
©2000 Monarch Marking Systems, Inc. All rights reserved. No part of this publication
may be reproduced, transmitted, stored in a retrieval system, or translated into any
language in any form by any means, without the prior written permission of Monarch
Marking Systems, Inc.
WARNING
This equipment has been tested and found to comply with the
limits for a Class A digital device, pursuant to Part 15 of the
FCC Rules. These limits are designed to provide reasonable
protection against harmful interference when the equipment is
operated in a commercial environment. This equipment
generates, uses, and can radiate radio frequency energy and,
if not installed and used in accordance with the instruction
manual, may cause harmful interference to radio
communications. Operation of this equipment in a residential
area is likely to cause harmful interference in which case the
user will be required to correct the interference at his own
expense.
CANADIAN D.O.C. WARNING
This digital apparatus does not exceed the Class A limits for
radio noise emissions from digital apparatus set out in the
Radio Interference Regulations of the Canadian Department
of Communications.
Le présent appareil numérique n’émet pas de bruits
radioélectriques dépassant les limites applicables aux
appareils numériques de la classe A prescrites dans le
Réglement sur le brouillage radioélectrique édicte par le
ministère des Communications du Canada.
Trademarks
Monarch
Systems, Inc.
Paxar is a trademark of Paxar Corporation.
SYMBOL, SPT and PPT are registered trademarks of Symbol Technologies, Inc.
VELCRO is a registered trademark of Velcro Industries B.V.
Monarch Marking Systems
170 Monarch Lane
Miamisburg, Ohio 45342
,
HandiPrint, 6017, 9461, and 9464 are trademarks of Monarch Marking

i
TABLE OF CONTENTS
GETTING STARTED................................................. 1-1
Unpacking the Printer ............................................ 1-1
Programming Information ....................................... 1-1
Battery and Safety Information................................ 1-2
Installing the Battery.............................................. 1-2
Charging the Battery .............................................. 1-4
Reading the LED ................................................ 1-6
Recycling Your Batteries ..................................... 1-6
Connecting the Printer ........................................... 1-7
Attaching the Printer’s Strap and Button .................. 1-7
LOADING SUPPLIES ...............................................2-1
Tearing Supply ...................................................... 2-2
USING THE PRINTER .............................................. 3-1
Printing................................................................. 3-1
Using the Magnetic Stripe Reader........................... 3-1
Scanning Bar Codes .............................................. 3-3
Scanner Information ........................................... 3-3
Scanning Tips .................................................... 3-4
CLEANING .............................................................. 4-1
TROUBLESHOOTING............................................... 5-1
SPECIFICATIONS ....................................................A-1
Printer Specifications .............................................A-1
Supply Specifications.............................................A-2
Options.................................................................A-2
Using the Optional Stand ....................................A-3

ii

Getting Started 1-1
GETTING STARTED
Use these operating instructions with your Monarch
6017
HandiPrint Printer. The printer works with the
SYMBOL
SPT 1700 or PPT 2700 handheld computer
(“handheld”).
The printer can print text, bar codes, and limited graphics
on thermal direct receipt paper.
Use these instructions to
♦ connect the printer
♦ load supplies
♦ charge the battery
♦ clean the printhead.
Unpacking the Printer
The printer comes packaged with two rolls of supply (one
already loaded in the printer), a battery, an elastic strap,
a mounting button, and an AC power adaptor.
Programming Information
You may need to refer to the Programmer's Manual
available from the Monarch Web site
(www.monarch.com). It provides an explanation of how
to use the printer's command language.
Refer to the Symbol Web site (www.symbol.com) for the
Symbol Application Programming Interface (API)
documentation. Refer to the Monarch Web site for a print
utility that allows users to print data from their handheld
using the Appointment Book, Address Book, Memo, ToDo
List, Clipboard, and print simple receipts. For more
information about using your handheld device, refer to
your handheld owner’s manual.
1

1-2 Getting Started
Battery and Safety Information
The printer is powered by a 7.4V Lithium Ion (LiIon)
battery. There are no memory effects with LiIon batteries
and reconditioning is not required. Lithium ion batteries
do not have to be completely drained before charging.
♦ Charging time is approximately 1.5 to 3 hours.
♦ Take the battery out of the printer when storing the
printer for long periods of time.
♦ The battery storage temperature is 40°F to 104°F
(4
°C to 40°C). Do not store a fully charged battery
at temperatures greater than 104
°F (40°C) for long
periods of time. The battery may permanently lose
charge capacity.
♦ Be sure to use a fully charged battery before long
or battery-intensive printing sessions. Certain
operations (for example, printing receipts with a lot
of bar codes and graphics) drain the battery more
quickly than others.
♦ Disposal information – Do not throw in trash.
Dispose according to your local regulations.
CAUTION
Do not disassemble, short circuit, heat
above 80
°C, or incinerate. The
battery may explode.
♦ The recommended temperature for charging is
68
°F (20°C) to 77°F (25°C).
Installing the Battery
One battery is included with the printer.
Similar to a cordless phone battery,
the printer’s battery must be charged
before using it.
1. Remove the handheld. (This step is optional.)
2. Turn over the printer.

Getting Started 1-3
3. Open the strap at the VELCRO tab and pull the
strap through the slot. You now have access to the
battery door. Move the strap out of the way.
4. Unlock the battery door by sliding down the battery
tab.
5. Open the battery door.
Tab

1-4 Getting Started
6. Insert the battery into the printer as shown.
7. Press the battery into place.
8. Lock the battery door by pushing up the battery tab.
9. Thread the strap through the slot and secure the
strap at the VELCRO tab. Make sure the strap is
adjusted to fit your hand.
10. Charge the battery.
To remove the battery, open the battery door and tip the
battery out of the printer.
Charging the Battery
The battery can be charged
♦ inside the printer using the AC power adapter
provided.
♦ in the optional single station or four-station
charger.
Similar to a cordless phone battery,
the printer’s battery must be charged
before using it.
Getting Started 1-5
You can print while the battery is charging; however, the
battery may not receive a full charge.
You can also charge the handheld while it is connected to
the printer. However, the batteries (printer and
handheld) may not receive a full charge.
To print with the AC power adapter
connected, you must have a battery
inside the printer.
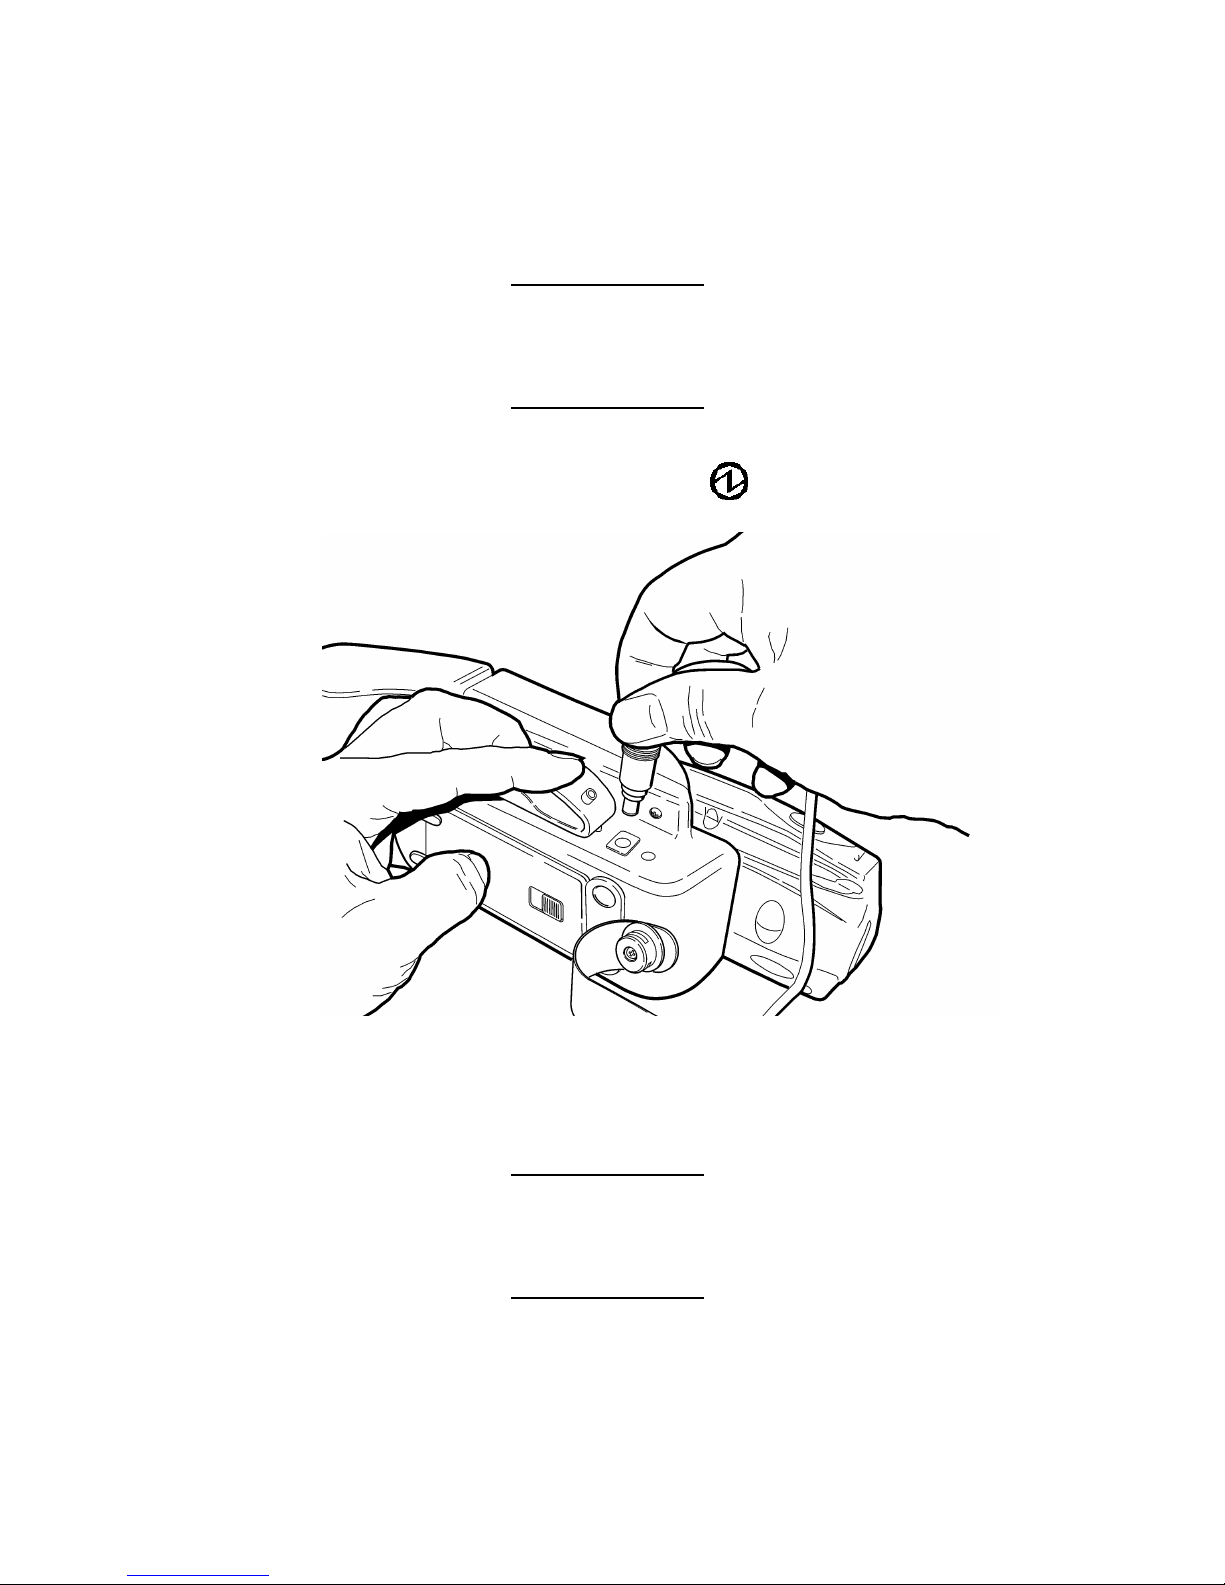
1. Plug the cable into the socket located on the side of
the printer as shown (under the symbol).
2. Connect the angle plug into the AC power adapter.
3. Plug the AC power adapter into an electrical outlet.
Charging time is approximately 1.5 to 3 hours.
It will take longer to charge the
battery if you are printing while
charging.
 Loading...