

Page 1
Monarch® Renegade® 4
Printer
Operator’s Handbook
TC9490OH Rev. CB 3/01 ©1995 Monarch Marking Systems, Inc. All rights reserved.
Page 2

Each product and program carries a respective written warranty, the only
warranty on which the customer can rely. Monarch reserves the right to make
changes in the product and the programs and their availability at any time and
without notice. Although Monarch has made every effort to provide complete
and accurate information in this manual, Monarch shall not be liable for any
omissions or inaccuracies. Any update will be incorporated in a later edition of
this manual.
WARNING
This equipment has been tested and found to comply with the limits for a Class A digital
device, pursuant to Part 15 of the FCC Rules. These limits are designed to provide
reasonable protection against harmful interference when the equipment is operated in a
commercial environment. This equipment generates, uses, and can radiate radio frequency
energy and, if not installed and used in accordance with the instruction manual, may cause
harmful interference to radio communications. Operation of this equipment in a residential
area is likely to cause harmful interference in which case the user will be required to correct
the interference at his own expense.
CANADIAN D.O.C. WARNING
This digital apparatus does not exceed the Class A limits for radio noise emissions from
digital apparatus set out in the Radio Interference Regulations of the Canadian Department of
Communications.
Le présent appareil numérique n’émet pas de bruits radioélectriques dépassant les limites
applicables aux appareils numériques de la classe A prescrites dans le Réglement sur le
brouillage radioélectrique édicte par le ministère des Communications du Canada.
Trademarks
Monarch is a registered trademark of Monarch Marking Systems, Inc.
9490 is a trademark of Monarch Marking Systems, Inc.
Page 3
Page 4

Table of Contents
Chapter 1. Getting Started . . . . . . . . . . . . . . . . . . . . . . . . . . . . . 1-1
Additional Optional Manuals . . . . . . . . . . . . . . . . . . . . . . . . 1-1
Audience. . . . . . . . . . . . . . . . . . . . . . . . . . . . . . . . . . . . . . . 1-2
Charging the Battery. . . . . . . . . . . . . . . . . . . . . . . . . . . . . . 1-2
Loading and Removing the Battery. . . . . . . . . . . . . . . . . . . 1-5
Connecting the AC Power Supply. . . . . . . . . . . . . . . . . . . . 1-6
Connecting the Shoulder Strap . . . . . . . . . . . . . . . . . . . . . . 1-7
Using the Trigger and LED . . . . . . . . . . . . . . . . . . . . . . . . . 1-8
Chapter 2. Loading Supplies . . . . . . . . . . . . . . . . . . . . . . . . . . . 2-1
Opening the Printer. . . . . . . . . . . . . . . . . . . . . . . . . . . . . . . 2-1
Loading Ribbon. . . . . . . . . . . . . . . . . . . . . . . . . . . . . . . . . . 2-4
Reloading a Ribbon Cassette . . . . . . . . . . . . . . . . . . . . . . . 2-5
Loading Supplies . . . . . . . . . . . . . . . . . . . . . . . . . . . . . . . . 2-7
Loading for Peel Mode . . . . . . . . . . . . . . . . . . . . . . 2-7
Loading for Non-Peel Mode . . . . . . . . . . . . . . . . . 2-11
Chapter 3. Printing. . . . . . . . . . . . . . . . . . . . . . . . . . . . . . . . . . . . 3-1
Establishing Communications . . . . . . . . . . . . . . . . . . . . . . . 3-1
Connecting the Communications Cable . . . . . . . . . 3-1
Removing the Communications Cable . . . . . . . . . . 3-2
Communication Values . . . . . . . . . . . . . . . . . . . . . . 3-3
Printing in On-Demand Mode . . . . . . . . . . . . . . . . . . . . . . . 3-3
Printing in Continuous Mode . . . . . . . . . . . . . . . . . . . . . . . . 3-4
Interrupting a Print Job . . . . . . . . . . . . . . . . . . . . . . . . . . . . 3-4
i
Page 5

9490 Operator’s Handbook
Chapter 4. Care and Maintenance . . . . . . . . . . . . . . . . . . . . . . . 4-1
Clearing Label Jams . . . . . . . . . . . . . . . . . . . . . . . . . . . . . . 4-2
Cleaning . . . . . . . . . . . . . . . . . . . . . . . . . . . . . . . . . . . . . . . 4-3
Cleaning the Battery Contacts . . . . . . . . . . . . . . . . . . . . . . 4-4
Chapter 5. Troubleshooting . . . . . . . . . . . . . . . . . . . . . . . . . . . . 5-1
Printing a Test Label . . . . . . . . . . . . . . . . . . . . . . . . . . . . . . 5-1
LED Indicator . . . . . . . . . . . . . . . . . . . . . . . . . . . . . . . . . . . 5-2
Problems and Solutions . . . . . . . . . . . . . . . . . . . . . . . . . . . 5-3
Chapter 6. Using the Boot . . . . . . . . . . . . . . . . . . . . . . . . . . . . . 6-1
Putting the Boot on the Printer . . . . . . . . . . . . . . . . . . . . . . 6-1
Taking the Boot off the Printer. . . . . . . . . . . . . . . . . . . . . . . 6-3
Chapter 7. Using the Cable Cover . . . . . . . . . . . . . . . . . . . . . . . 7-1
Attaching the Cable Cover . . . . . . . . . . . . . . . . . . . . . . . . . 7-1
Removing the Cable Cover. . . . . . . . . . . . . . . . . . . . . . . . . 7-2
Chapter 8. Specifications . . . . . . . . . . . . . . . . . . . . . . . . . . . . . . 8-1
Specifications . . . . . . . . . . . . . . . . . . . . . . . . . . . . . . . . . . . 8-1
Supply Sizes . . . . . . . . . . . . . . . . . . . . . . . . . . . . . . . . . . . . 8-2
Accessories and Options . . . . . . . . . . . . . . . . . . . . . . . . . . 8-2
Cable Pin Outs . . . . . . . . . . . . . . . . . . . . . . . . . . . . . . . . . . 8-3
ii
Page 6

Chapter 1. Getting Started
This printer is a portable, online-only unit used to print labels.
The host must download data to the printer before the printer
can print.
When you first receive the printer:
Charge and load the battery or load the AC power
✦
pack. See "Loading and Removing the Battery" or
"Connecting the AC Power Supply."
Load supplies. See Chapter 2, "Loading Supplies."
✦
Connect the printer to a host to receive print jobs. See
✦
Chapter 3, "Printing."
Make sure communication values at the printer and the
✦
host are the same. Ask yor System Administrator or
see the MPCL II Programmer’s Manual for information
on setting these values.
Additional Optional Manuals ––––––––––––––––––––––––––––––––
MPCL II Programmer’s Manual (TCMPCL2PM):
✦
explains how to design labels, create formats, and use
online commands to control the printer.
MPCL II Optional Fonts Manual (TCMPCL2OF):
✦
explains how to use the optional fonts you can
purchase separately.
TC9490OH Rev. C 3/97
1-1
Page 7

9490 Operator’s Handbook
Audience–––––––––––––––––––––––––––––––––––––––––––––––––––
The Operator’s Handbook is designed for the person printing
and applying labels.
This chapter tells you how to:
charge, load, and remove the battery
✦
connect the AC power supply
✦
attach the shoulder strap
✦
use the printer’s trigger and LED.
✦
Charging the Battery ––––––––––––––––––––––––––––––––––––––––
The printer is shipped with a 13.2VDC NiCd battery and an
8-hour "trickle" battery charger. The battery can be used and
recharged daily for approximately two years. When the
battery is not in use and not recharging, the battery loses
2-3% of its charge per day. Environments with extreme heat
increase the discharge rate.
w
1-2
Before operating the printer, you must charge the battery and
load it into the printer. You can use any of these chargers:
8-hour "trickle" charger
✦
1-hour "fast" charger
✦
4-station charger.
✦
See Chapter 6, "Specifications," for information on charger
options.
Before using the charger, inspect the cord for bare wires.
Do Not use a charger with bare wires. Only chargers
approved for this printer should be used.
TC9490OH Rev. C 3/97
Page 8

Charge the battery:
before using it for the first time
✦
before lengthy printing sessions
✦
as soon as the LED indicates a "low battery" condition
✦
(slow flashing green for a low battery, fast alternating
green/amber flashing for a "too low to operate" battery,
or no LED for a dead battery).
Chapter 1. Getting Started
n
c
If you continue to print with a low battery, your print quality
may deteriorate.
When using or storing the charger:
Do Not wrap the cord around the charger.
✦
Do Not pull or put unusual stress on the cord.
✦
Before loading or removing the battery, turn the printer off.
TC9490OH Rev. C 3/97
1-3
Page 9

9490 Operator’s Handbook
To charge the battery:
1. Turn the printer off. (|) indicates on and (O) indicates off.
2. The battery can be charged on or off the printer. Plug the
connector on the charger cord into the socket on the
battery as shown.
3. Plug the charger into a grounded electrical outlet of the
correct voltage. Allow the battery to charge for a full 8
hours (when using the standard "trickle" charger).
n
If you have a problem with short battery life, clean the battery
contacts. See Chapter 4, "Care and Maintenance."
Battery
Charger
Battery
Contacts
Battery
Connector
1-4
TC9490OH Rev. C 3/97
Page 10

Chapter 1. Getting Started
Loading and Removing the Battery––––––––––––––––––––––––––––
To load a battery:
1. Turn the printer off. (|) indicates on and (O) indicates off.
2. Turn the printer so the back of the printer faces you.
3. Insert the tabs on your battery into the slots of the battery
well in the base of the printer. Push down until the latch
clicks.
Latch
n
Ta b
Finger
Depression
To remove the battery, press down on the latch with your
thumb while inserting your fingers into the depression. Lift the
battery out of the well as shown.
TC9490OH Rev. C 3/97
1-5
Page 11

9490 Operator’s Handbook
Connecting the AC Power Supply –––––––––––––––––––––––––––––
c
Before you plug or unplug the power supply, turn the printer
off. Only AC power supplies approved for this printer should
be used. Using any other AC power supply may damage the
printer.
To load the AC power pack:
1. Turn the printer off. (|) indicates on and (O) indicates off.
2. Turn the printer so the back of the printer faces you.
3. Insert the tabs on the AC power pack into the slots of the
battery well in the base of the printer. Push down until the
latch clicks.
Latch
n
1-6
Ta b
Finger
Depression
To remove the AC power pack, press down on the latch with
your thumb while inserting your fingers into the depression.
Lift the power pack out of the well as shown.
TC9490OH Rev. C 3/97
Page 12

Chapter 1. Getting Started
4. Plug the AC power supply into a grounded electrical outlet
of the correct voltage.
AC Power
Supply
AC Power
Pack
Connecting the Shoulder Strap ––––––––––––––––––––––––––––––––
To connect the shoulder strap:
c
1. Assemble the strap, knob, and washers as shown.
2. Insert the assembly into the printer and tighten it.
Strap
Washers
3. Repeat for the other side of the printer.
Do Not overtighten.
TC9490OH Rev. C 3/97
Knob
1-7
Page 13

9490 Operator’s Handbook
Using the Trigger and LED –––––––––––––––––––––––––––––––––––
The trigger and LED are located on the top of the printer as
shown.
LED
Tr ig ge r
The trigger serves several purposes:
1-8
calibrates the first label or tag after you load supplies
✦
into the printer. See Chapter 2, "Loading Supplies."
prints labels. See Chapter 3, "Printing," for more
✦
information.
clears most error conditions. See Chapter 5,
✦
"Troubleshooting," for more information.
prints a test label. See Chapter 5, "Troubleshooting,"
✦
for more information.
pauses or cancels a print job. See Chapter 3,
✦
"Printing," for more information.
The LED light indicates certain printer conditions or problems.
The LED blinks or displays solid amber, green, or a
combination of these colors. For example, a solid green or
amber LED means the printer is turned on and operational. A
fast-blinking green LED means the printer contains a print job
and is ready to print. See Chapter 5, "Troubleshooting," for a
complete description of LED indications.
TC9490OH Rev. C 3/97
Page 14

Chapter 2. Loading Supplies
The printer can print on labels. We recommend you use
synthetic supplies to print serial or high-density bar codes.
Opening the Printer –––––––––––––––––––––––––––––––––––––––––
Before loading ribbon or supplies, you must open the printer:
1. Insert your fingers into the depression beneath the
faceplate and pull up.
Supply
Guide
Faceplate
TC9490OH Rev. C 3/97
2-1
Page 15
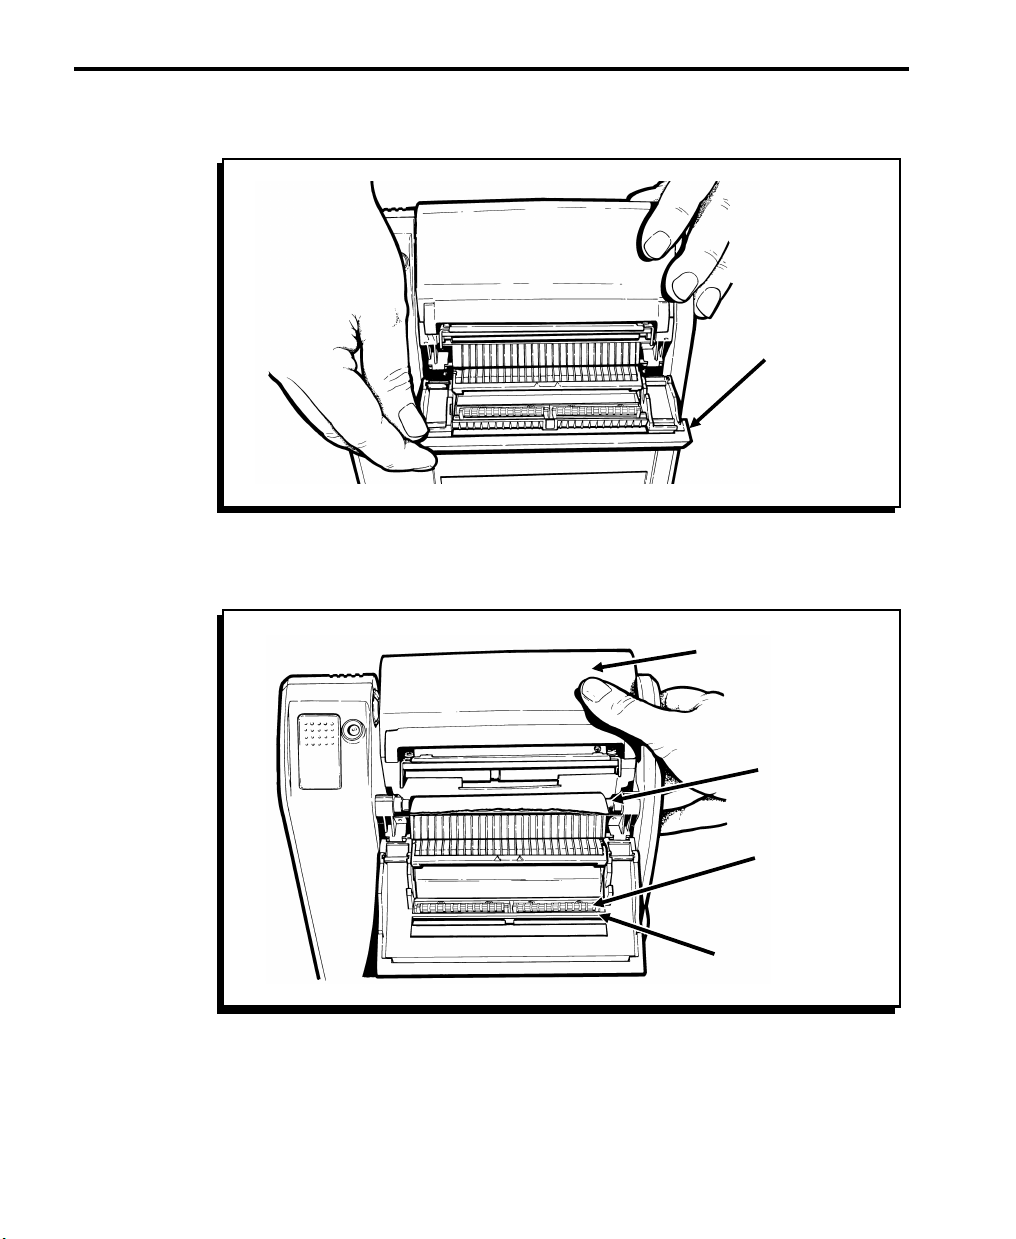
9490 Operator’s Handbook
2. Pull the supply guide forward and down as shown.
3. Tip the printhead assembly up and over the platen roller
as shown.
Supply
Guide
2-2
Printhead
Assembly
Platen
Roller
Pinch
Rollers
Peel
Bar
TC9490OH Rev. C 3/97
Page 16
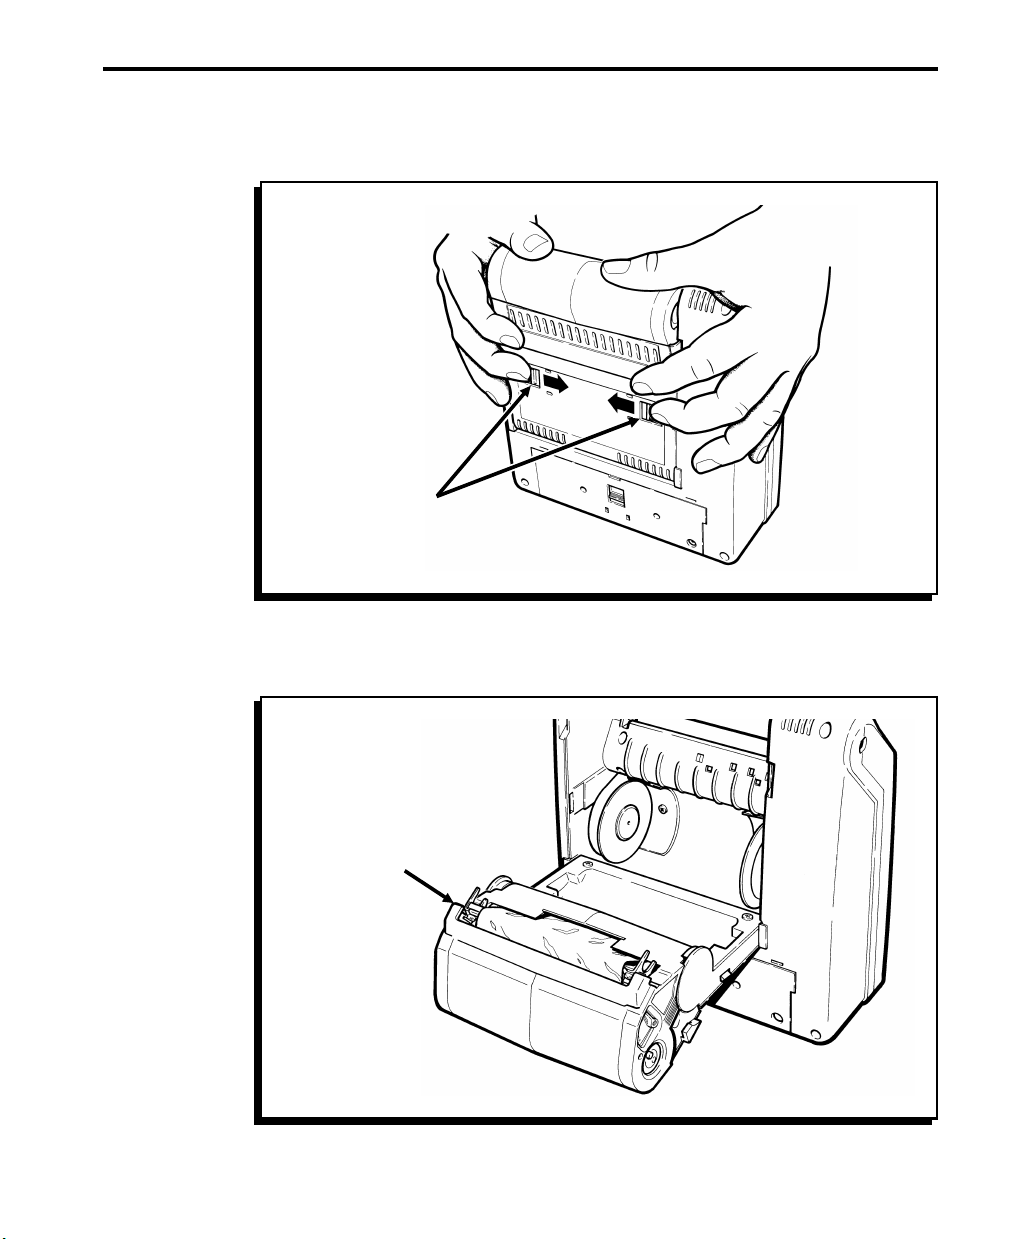
Chapt er 2. Loa ding Supplies
4. Slide the latches on the back of the printer toward the
center.
Latches
5. Continue to push the printhead assembly toward the rear
of the printer until it opens completely.
Printhead
Assembly
TC9490OH Rev. C 3/97
2-3
Page 17

9490 Operator’s Handbook
6. To close the printer, push the printhead assembly toward
the printer, close the supply guide and latch the faceplate
into place.
Loading Ribbon ––––––––––––––––––––––––––––––––––––––––––––
Use ribbon when printing on thermal transfer supplies.
To load the ribbon cassette into the printer:
1. Open the printer and remove the ribbon cassette.
2-4
Ribbon
Cassette
2. Slide a new ribbon cassette onto the printhead assembly
until it slips into place.
3. Close the printer.
TC9490OH Rev. C 3/97
Page 18
Chapt er 2. Loa ding Supplies
Reloading a Ribbon Cassette –––––––––––––––––––––––––––––––––
To reload your ribbon cassette, remove the ribbon cassette
from the printer and follow these steps:
1. Locate the end of the cassette with the two latches.
n
Locate the International Symbols for opening and closing.
( ) indicates the cassette is locked (closed). ( ) indicates
the cassette is unlocked (open).
2. Rotate both latches until they snap into the unlocked
position.
3. Lift off the half of the cassette without the latches and set
it aside.
R i d g e d E n d o f
Take-up Reel
Ribbon
Latch
Gear
TC9490OH Rev. C 3/97
Spool
Foam
Washer
Latch
2-5
Page 19

9490 Operator’s Handbook
4. Remove the used ribbon and take-up reel and discard.
Open a package of new ribbon.
n
n
Do Not wrinkle or crush the ribbon.
5. With the ridged end of the take-up reel facing down, place
the ribbon roll on the spool with the foam washer (on the
half of the cassette with the latches). Do not push the
ribbon roll down onto the spool yet.
6. Feed the ribbon around the guides and place the take-up
reel onto the shorter spool.
7. Twist the ribbon roll back and forth as you firmly push it
down until it is seated on the spool.
Do Not force the ribbon roll down onto the spool; you could
✦
damage the foam washer.
Make sure the preprinted side of the ribbon faces out.
✦
Make sure the latches are still in the unlocked position
✦
( ) before fitting the two halves of the cassette together.
If you are using a 2-inch or 3-inch-wide ribbon, push the
✦
core of the ribbon roll to seat the ribbon roll onto the
cassette’s spool. Do not touch the ribbon because it may
wrinkle and twist.
8. Replace the other half of the cassette. The two halves
should fit together completely. Rotate the latches until
they click into the closed position ( ).
2-6
9. Check to make sure that the ribbon is loaded correctly; the
ribbon should be wound tightly inside the cassette. Turn
the gear counterclockwise with your fingers until the black
portion of the ribbon is exposed.
10. If the ribbon does not advance, or if it is hard to turn the
gear, repeat the loading procedure.
TC9490OH Rev. C 3/97
Page 20

Chapt er 2. Loa ding Supplies
Loading Supplies––––––––––––––––––––––––––––––––––––––––––––
We recommend synthetic supplies when printing serial or
high-density bar codes. Use only paper labels for peel mode.
For label sizes, see Chapter 6, "Specifications."
You can load supplies with the following widths:
2" (51mm)
✦
2.5" (64mm)
✦
3" (76mm)
✦
You can load supplies two ways:
Peel mode peels the label from the backing paper while
✦
it feeds through the printer. This mode requires paper,
black-marked labels. Your printer must be set to
On-demand mode. The LED is solid green.
Non-peel mode feeds without peeling labels from the
✦
backing paper. This method is used primarily for
printing label strips. Your printer must be set to
Continuous mode. The LED is solid amber.
Loa ding for Peel Mode
Peel mode separates labels from the backing paper.
n
Use only paper labels for peel mode. Also, before loading
labels, make sure the label path is clean. Refer to Chapter 4,
"Care and Maintenance."
To load your labels:
3.5" (89mm)
✦
4" (102mm)
✦
1. Open the printer.
TC9490OH Rev. C 3/97
2-7
Page 21

9490 Operator’s Handbook
2. Squeeze the tabs on the supply holders and align the
arrows to the width of your supply. The supply holders
lock at each width.
Supply
Holder
Arrow
Width of
Supply
2-8
Ta b s
TC9490OH Rev. C 3/97
Page 22

Chapt er 2. Loa ding Supplies
3. Insert the roll of labels between the supply holders and
press until the supply holders lock into the label roll. The
label roll should unwind as shown.
Supply
Holder
n
Make sure the labels turn freely in the supply well.
TC9490OH Rev. C 3/97
2-9
Page 23

9490 Operator’s Handbook
4. Feed the labels over the peel bar and through the lower
opening in the supply guide.
Label
Guide
Lower
Opening
5. Close the printer and turn the printer on.
6. Wait until the LED flashes one time (about five seconds)
and then press the trigger. The printer advances the first
label to the correct position for printing. When you print,
labels peel automatically through the top opening in the
supply guide and the backing paper exits out the bottom
opening.
Upper
Opening
n
2-10
The LED slowly alternates flashing amber and green to
indicate the printer is out of labels. When this happens, load a
new roll of labels and press the trigger to clear the error.
TC9490OH Rev. C 3/97
Page 24

Loa ding for Non- Peel Mode
Non-peel mode feeds the supplies through the printer without
peeling them from the backing paper.
Chapt er 2. Loa ding Supplies
n
Before loading supplies, make sure the supply path is clean.
To load your supplies:
1. Open the printer.
2. Squeeze the tabs on the supply holders and align the
arrows to the width of your supply. The supply holders
lock at each width.
Supply
Holder
Arrow
Width of
Supply
TC9490OH Rev. C 3/97
Ta b s
2-11
Page 25

9490 Operator’s Handbook
3. Insert the roll of supplies between the supply holders and
press until the supply holders lock into the supply roll.
The supply roll should unwind as shown.
Supply
Holder
n
2-12
Make sure the supplies turn freely in the supply well.
TC9490OH Rev. C 3/97
Page 26

Chapt er 2. Loa ding Supplies
4. Feed the supplies through the upper opening in the supply
guide.
Supply
Guide
Lower
Opening
Upper
Opening
n
5. Close the printer and turn the printer on.
6. Wait until the LED flashes one time (about five seconds)
and then press the trigger. The printer advances the
supply to the correct position for printing.
The LED slowly alternates flashing amber and green to
indicate the printer is out of supplies. When this happens,
load a new roll of supplies and press the trigger to clear the
error.
TC9490OH Rev. C 3/97
2-13
Page 27

9490 Operator’s Handbook
2-14
TC9490OH Rev. C 3/97
Page 28

Chapter 3. Printing
The host sends online packets containing print jobs to the
printer. This chapter describes how to communicate with the
host and print the jobs the host sends.
Establishing Communications ––––––––––––––––––––––––––––––––
Before the printer can accept print jobs from the host, you
must:
connect the communications cable to the printer and to
✦
the host.
verify that the printer’s communication values match
✦
the values set at the host.
Connect ing t he Communica tions Cable
To connect the communications cable to the printer:
1. Grasp the cable holder and align it with the printer port as
shown.
Printer
Port
TC9490OH Rev. C 3/97
Cable
Holder
3-1
Page 29

9490 Operator’s Handbook
2. Insert the connector into the printer port until the
connector locks into place. You may hear a click as the
cable’s latch snaps into place.
3. Gently pull on the cable holder to make sure it is secure.
4. Plug the other end of the cable into the port on your host.
Removing t he Communica t ions Ca ble
Please follow these instructions carefully. The cable could be
damaged if removed incorrectly. To remove the cable from the
printer:
1. Hold the printer steady with one hand.
2. Grasp the cable holder with your other hand and push it in
to unlock the cable’s latch.
n
3-2
Release
Slide
Cable
Holder
3. Release the cable holder and grasp the release slide.
4. Gently pull the release slide to remove the cable.
Do Not yank the cable from the printer.
TC9490OH Rev. C 3/97
Page 30

Chapter 3. Printing
Communica tion Va lues
In order for your printer to communicate with your host, you
must make sure the communication values are set to the same
values. The default values shipped with the printer are:
Baud: 9600
✦
Word Length: 8-bit data frame
✦
Stop Bits: 1-stop bit
✦
Parity: none
✦
Flow Control: DTR
✦
To change the printer’s communications values, see your
System Administrator or the MPCL II Programmer’s Manual.
Printing in On-Demand Mode ––––––––––––––––––––––––––––––––
In On-demand mode, the printer prints one label at a time.
After the first label prints, the printer waits for you to remove
the label before it prints the next label. For On-demand
printing, your labels must be loaded in peel mode.
n
On-demand mode is the default mode for the printer (the LED
is solid green). If the LED is solid amber, the printer is in
Continuous mode. To switch to On-demand mode, ask your
System Administrator to re-configure the printer.
To print labels on demand:
Use only paper labels in peel mode.
1. Load the labels for peel mode. See Chapter 2, "Loading
Supplies."
2. Make sure the host has downloaded a print job. See the
MPCL II Programmer’s Manual for more information. After
the print job is downloaded, the LED rapidly blinks green
(1/4 sec) to indicate the printer is ready to print.
3. Press the trigger to print the label.
4. After each label prints, remove it.
TC9490OH Rev. C 3/97
3-3
Page 31

9490 Operator’s Handbook
Printing in Continuous Mode ––––––––––––––––––––––––––––––––
In Continuous mode, the printer prints a strip of labels. The
LED should be solid amber. If the LED is solid green, the
printer is in On-demand mode. To switch to Continuous mode,
ask your System Administrator to re-configure the printer.
To print in Continuous Mode:
1. Load the labels for non-peel mode. See Chapter 2,
"Loading Supplies."
2. Make sure the host has downloaded a print job. See the
MPCL II Programmer’s Manual for more information. After
the print job is downloaded, the LED is solid amber to
indicate the printer is ready to print and labels will print
automatically.
3. Remove the strip from the printer.
c
Do Not jerk or pull labels strongly against the printhead. This
may cause a label jam.
Interrupting a Print Job –––––––––––––––––––––––––––––––––––––
You can use the trigger to cancel or pause the current print job:
To pause the current print job (Continuous mode only),
✦
press the trigger once. The current print job stops
temporarily. To resume printing, press the trigger
again. The LED does not indicate when the printer is
paused. The LED remains solid amber.
To cancel the current print job, hold down the trigger
✦
until printing stops. The job is canceled and the data is
lost. The host must download the job again before you
can resume printing.
n
3-4
You cannot cancel a print job when there is an error in the
printer until you acknowledge the error (by pressing the
trigger).
TC9490OH Rev. C 3/97
Page 32

Chapter 4. Care and Maintenance
c
Do Not use sharp objects to clean the printer. This may
damage the printer and void your warranty.
This chapter tells you how to:
clear label jams
✦
clean the printhead, peel blade, pinch rollers, peel bar,
✦
and platen roller
clean the battery contacts.
✦
TC9490OH Rev. C 3/97
4-1
Page 33

9490 Operator’s Handbook
Clearing Label Jams–––––––––––––––––––––––––––––––––––––––––
When you are printing and a jam occurs, the LED flashes
amber and green.
To clear a label jam:
1. Turn the printer off and open the printer.
2. Remove the label roll.
4-2
3. Remove the jammed labels and reload the label roll.
4. Close the printer and turn it on.
5. Wait until the LED flashes one time (about five seconds)
and then press the trigger to resynchronize the supplies.
TC9490OH Rev. C 3/97
Page 34

Chapter 4. Care and Maintenance
Cleaning –––––––––––––––––––––––––––––––––––––––––––––––––––
You may need to clean the printhead, platen roller, pinch
rollers, peel bar, and peel blade:
after 8 rolls of supplies
✦
daily if your printer is in an excessively dirty, hot or
✦
humid environment
when you see voids in the print as shown.
✦
c
Voids
To clean the printhead, platen roller, pinch rollers, peel bar,
and peel blade:
Do Not touch the printhead with your hands. This may
damage the printhead.
1. Turn the power off and open the printer.
2. Remove the label roll and ribbon cassette (when cleaning
the printhead).
Correct Print
TC9490OH Rev. C 3/97
4-3
Page 35

9490 Operator’s Handbook
3. Moisten a cotton swab with alcohol. Rub it back and forth
across the printhead, platen roller, pinch rollers, peel bar,
and peel blade to remove build-up. Make sure the
printhead, platen roller, pinch rollers, peel bar, and peel
blade are clean.
Platen
Roller
Pinch
Rollers
Printhead
Peel
Blade
4. Let the printer dry and reload your supplies.
Cleaning the Battery Contacts –––––––––––––––––––––––––––––––
You may need to clean the battery contacts if your battery has
a short life.
To clean the battery contacts:
1. Turn the printer off.
2. Remove the battery from the printer.
4-4
TC9490OH Rev. C 3/97
Page 36

Chapter 4. Care and Maintenance
3. Rub an eraser back and forth on the battery contacts on
the battery as well as inside the battery well. Make sure
they are clean.
Battery
Contacts
Eraser
4. Reload the battery.
TC9490OH Rev. C 3/97
4-5
Page 37

9490 Operator’s Handbook
4-6
TC9490OH Rev. C 3/97
Page 38

Chapter 5. Troubleshooting
The printer uses a combination of LED lights to display a
variety of printer states. See the "Problems and Solutions"
section for those requiring further actions.
When an error occurs that you cannot clear, print a test label
before calling Service or sending the printer in for repair.
Printing a Test Label ––––––––––––––––––––––––––––––––––––––––
c
Turn the printer off and disconnect the host from the printer
before printing a test label. While printing the test label, the
printer sends a character string to the communications port.
This could cause problems at the host.
Before you call for service, print a test label. The label
contains information to help Service diagnose mechanical and
setup problems. To print a test label, hold the trigger down
and turn the printer on. The LED remains off for 1 second,
turns amber for 2 seconds, and then turns off again. Release
the trigger as soon as the amber LED turns off.
If the printer is in On-demand mode, the LED rapidly blinks
green. Press the trigger to dispense the test label. If the
printer is in Continuous mode, a test label prints automatically.
TC9490OH Rev. C 3/97
5-1
Page 39

9490 Operator’s Handbook
The test label displays the following information:
Model number (Model:)
✦
Software version (Software:)
✦
Number of supplies printed (Stock CNT:)
✦
Communication settings (COM:)
✦
Printhead information (AVG PH RS:)
✦
Test pattern.
✦
Turn the printer off and then back on to return to normal
printing.
For more information on troubleshooting, see your MPCL II
Programmer’s Manual.
LED Indicator ––––––––––––––––––––––––––––––––––––––––––––––
This table explains the meanings of various LED states. Use
the color of the LED and whether it is solid, blinking slowly, or
blinking rapidly to determine the meaning of the indicator.
5-2
LED States Solid Fast Blink
GREEN
AMBER
AMBER/
GREEN
Ready...
On-Demand
Ready...
Continuous
N/A Hardware
1
(
second)
⁄
4
Label Ready Low Battery
Packet Syntax
Error
Error or printer
failure
Slow Blink
(2 seconds)
Printhead
Hot...Wait
Imaging
Error
Your System Administrator can use Status Polling, an online
diagnostic command, to get a more specific description of the
printer error. See your MPCL II Programmer’s Manual for
information about Status Polling.
TC9490OH Rev. C 3/97
Page 40

Chapter 5. Troubleshooting
Problems and Solutions––––––––––––––––––––––––––––––––––––––
This section helps you correct some problems that may occur.
If you cannot fix a problem, please contact Service.
Problem
Light printing or
voids in printing.
Printer does not
start.
Printer does not
print.
Solution
Make sure the supplies are loaded
correctly.
Check the supplies for damage or defects.
Reload supplies or ribbon if necessary.
Check the roller for jammed supplies.
Check the supply type. Download the
correct supply type command.
Check the contrast adjustment.
Download the correct contrast adjustment
command.
Turn the printer off and switch to a fully
charged battery.
Clean the printhead. See "Care and
Maintenance."
Make sure the power supply is connected
and plugged in to the printer. Call Service.
Make sure the power supply is connected
to the printer and plugged into a live outlet.
Make sure the printer is not paused (try
pressing the trigger to resume printing).
Check the battery.
Make sure the correct commands have
been downloaded.
Make sure the supplies are loaded
correctly.
Make sure the communications cable is
connected.
TC9490OH Rev. C 3/97
5-3
Page 41

9490 Operator’s Handbook
Problem Solution
Printer does not
feed.
Slow or sluggish
feeding.
Label Jam. Remove jammed supplies.
Battery won’t
charge.
No LED. Make sure power is on.
Printer does not
respond.
Check battery.
Reload supplies.
Verify that the ribbon is not out and that a
label is not jammed in the label path.
Make sure supplies are loaded correctly.
Check for adhesive build-up in the feed
path and on the peel blade.
Clean the printer.
Make sure battery is connected correctly.
Make sure charger is plugged into a live
outlet.
Check battery.
Make sure the power supply is connected
to the printer and plugged into a live outlet.
Check battery.
Check communication settings.
5-4
Check communications cable.
Print a test label. If you see
your printer has an address assigned.
If you are not using the Mobile Printing
Station, remove the address. See
Addressing a Monarch® 9490 Printer
addendum (TCMPCLIDAD) for more
information or call Technical Support.
TC9490OH Rev. C 3/97
ADDRESS:
Page 42

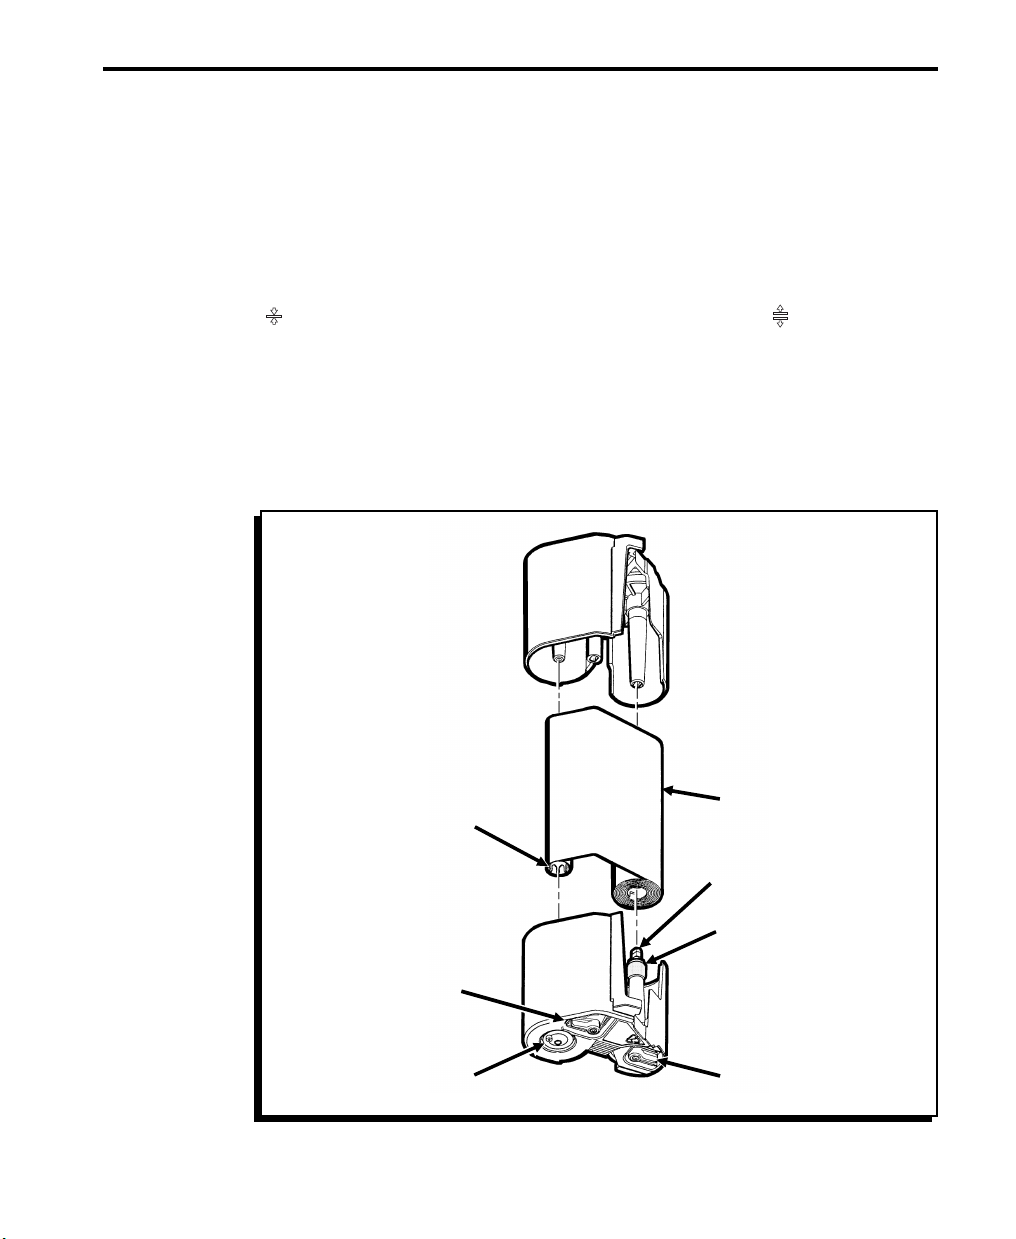
Chapter 6. Using the Boot
The Monarch® Renegade® 4 printer’s boot protects it if you
accidentally drop it, hit it against something, or jar it in some
other manner. Following is an illustration of the boot on the
printer.
Putting the Boot on the Printer –––––––––––––––––––––––––––––––
To put the boot on the printer:
1. Industrial Version Only. Remove the cable from the side
of the printer. Save the cable’s screws for when you want
to use the printer without the boot.
2. Unscrew the screw assemblies at the top of the printer
(either shoulder strap is optional), and take them off.
Save them for when you want to use the printer without
the boot.
3. Pull on the boot and fit it around the printer.
TC9490OH Rev. C 3/97
6-1
Page 43

9490 Operator’s Handbook
4. With Shoulder Strap Only. For both sides of the printer,
put together the knob assembly and screw it into the
threaded insert. Do not over-tighten the assembly.
5. Industrial Version Only. Put together screw assemblies
using the longer screws. Then, replace the cable.
6-2
TC9490OH Rev. C 3/97
Page 44

Chapter 6. Using the Boot
Taking the Boot off the Printer ––––––––––––––––––––––––––––––––
To take the boot off the printer:
1. Industrial Version Only. Remove the cable from the side
of the printer. Save the spacers and longer screws for
when you want to use the printer with the boot.
2. With Shoulder Strap Only. Unscrew the knob assemblies
on both sides of the printer (including the shoulder strap, if
used), and take them off.
3. Pull on the boot and remove it from around the printer.
4. For both sides of the printer (at the top), put the screw
assemblies together (including either shoulder strap, if
preferred), put them into the threaded inserts and screw
them in.
n
Do not over-tighten the assembly.
5. Industrial Version Only. Reattach the cable using the
shorter screws without the spacers.
TC9490OH Rev. C 3/97
6-3
Page 45

9490 Operator’s Handbook
6-4
TC9490OH Rev. C 3/97
Page 46

Chapter 7. Using the Cable Cover
You use the cable cover with the industrial version of the
Monarch® Renegade® 4 printer. The cover holds the cable in
place. You can use the cable cover with or without the
printer’s boot.
Attaching the Cable Cover––––––––––––––––––––––––––––––––––––
To attach the cable cover:
1. Remove the cable from the printer.
2. Boot Only. Insert the spacers into the holes on the lower
right side of the printer. (You can have the boot on or off
the printer.)
TC9490OH Rev. C 3/97
7-1
Page 47

9490 Operator’s Handbook
3. Fit the cable into the groove on the inside of the cable
cover.
4. Insert the cable connector into printer’s serial port and
place the cover against the side of the printer.
5. Insert the screws.
n
Use the long screws with the boot or the shorter screws
without the boot.
Removing the Cable Cover –––––––––––––––––––––––––––––––––––
To remove the cable cover, remove the screws holding the
cover in place and pull it away from the side of the printer.
7-2
TC9490OH Rev. C 3/97
Page 48

Chapter 8. Specifications
Specifications ––––––––––––––––––––––––––––––––––––––––––––––
Height: 8.7 inches (221 mm)
Width: 8.1 inches (206 mm)
Depth: 2.8 inches (71 mm)
Weight: 4 lbs. (1.8 kg.)
Storage Limits: 15°F to 120°F (-9°C to 49°C)
Operating Limits
Thermal Transfer: 40°F to 95°F (4°C to 35°C)
Thermal Direct: 40°F to 110°F (4°C to 43°C)
Optional AC
Power Supply: 110/220 VAC, 50-60 Hz
Battery Power: 13.2 volt NiCd
Battery Chargers: 8-hour "trickle" charger
Optional 1-hour "fast" charger
Printing: Thermal direct
Thermal transfer
Supply Types: Thermal transfer and thermal direct labels.
Memory: 1024K of RAM
512K of ROM
TC9490OH Rev. C 3/97
8-1
Page 49

9490 Operator’s Handbook
Supply Sizes –––––––––––––––––––––––––––––––––––––––––––––––
The printer lets you print supplies 2.0 (51 mm) inches wide
and up to 6.0 inches (152 mm) long.
The standard stocked supply lengths include:
1.0 inch (25 mm)
2.0 inch (51 mm)
4.0 inch (102 mm)
6.0 inch (152 mm)
Accessories and Options–––––––––––––––––––––––––––––––––––––
Cables (to various host devices)
✦
Battery/8-hour "Trickle" Charger
✦
Battery/1-hour "Fast" Charger
✦
8-2
4-Station "Gang" Charger
✦
AC Adapter
✦
Shoulder Harness/Belt
✦
Rain Cover
✦
Vehicle Mount and Powered Vehicle Mount
✦
Optional Fonts (CG Triumvirate and CG Triumvirate
✦
Bold)
Programmer’s Kit (contains Programmer’s Manual,
✦
sample formats, PC cable, Communications Manual,
and terminal instructions for various data collection
devices)
For more information about these products, call your Sales
Representative.
TC9490OH Rev. C 3/97
Page 50

Chapter 8. Specifications
Cable Pin Outs –––––––––––––––––––––––––––––––––––––––––––––
The following table describes the cable pin outs for the printer
connection. The printer uses a male 8-pin mini-DIN connector.
Pin Description Direction
1 CTS Input
2 RTS Output
3 TXD Output
4GND -
5 RXD Input
6 DTR Output
7 DSR Input
8 DTR or +5V Output
TC9490OH Rev. C 3/97
8-3
Page 51

9490 Operator’s Handbook
8-4
TC9490OH Rev. C 3/97
Page 52

Glossary
Continuous mode Print mode in which a format and data with
download (send) Transmission of data from the host to your
format Online data packet that contains the
host Any mainframe, minicomputer, data collect
LED Light on the printer used to indicate printer
print job Online data packet that contains the
a specific quantity are sent to the printer
to be printed in one continuous strip.
printer.
specific label design for printing data. The
format is a template the host may
download together with a print job, or as a
separate packet.
terminal or personal computer.
conditions and problems.
actual data printed on a label or tag. The
host may download the print job together
with the format, or as a separate packet.
The print job is also called a "batch."
non-peel mode Feed mode in which the printer prints and
dispenses labels without peeling them
from the backing paper.
On-demand mode Print mode in which the printer prints and
dispenses one label at a time.
peel mode Feed mode in which the printer prints and
dispenses one peeled label at a time.
TC9490OH Rev. C 3/97
Page 53

online Direct communication between a computer
and the printer.
supplies labels used for printing.
System
Administrator
trigger Button used to feed and print labels, clear
Person responsible for creating and
downloading data streams.
errors, and run diagnostics.
Page 54

For supplies, service, or assistance call:
TOLL FREE:
1-800-543-6650 (In the U.S.A.)
1-800-263-4650 (In Canada)
www.monarch.com
Published by the Technical Communications Department.
Printed in the U.S.A.
 Loading...