

Page 1
Monarch
9856 Printer
88-2229-01 (TC9856OH Rev. B 7/98) ©1998 Monarch Marking Systems, Inc. All rights reserved.
Page 2

Each product and program carries a respective written warranty, the only
warranty on which the customer can rely. Monarch reserves the right to make
changes in the product, the programs, and their availability at any time and
without notice. Although Monarch has made every effort to provide complete
and accurate information in this manual, Monarch shall not be liable for any
omissions or inaccuracies. Any update will be incorporated in a later edition of
this manual.
©1998 Monarch Marking Systems, Inc. All rights reserved. No part of this
publication may be reproduced, transmitted, stored in a retrieval system, or
translated into any language in any form by any means, without the prior written
permission of Monarch Marking Systems, Inc.
WARNING
This equipment has been tested and found to comply with the limits for a Class A digital
device, pursuant to Part 15 of the FCC Rules. These limits are designed to provide
reasonable protection against harmful interference when the equipment is operated in a
commercial environment. This equipment generates, uses, and can radiate radio frequency
energy and, if not installed and used in accordance with the instruction manual, may cause
harmful interference to radio communications. Operation of this equipment in a residential
area is likely to cause harmful interference in which case the user will be required to correct
the interference at his own expense.
CANADIAN D.O.C. WARNING
This digital apparatus does not exceed the Class A limits for radio noise emissions from
digital apparatus set out in the Radio Interference Regulations of the Canadian Department
of Communications.
Le présent appareil numérique n’émet pas de bruits radioélectriques dépassant les limites
applicables aux appareils numériques de la classe A prescrites dans le Réglement sur le
brouillage radioélectrique édicte par le ministère des Communications du Canada.
Trademarks
MONARCH is a registered trademark of Monarch Marking Systems, Inc.
Paxar is a trademark of Paxar Corporation.
9856 is a trademark of Monarch Marking Systems, Inc.
Monarch Marking Systems
P.O. Box 608
Dayton, Ohio 45401
Page 3

TABLE OF CONTENTS
GETTING STARTED ...............................................................................1-1
Audience ............................................................................................1-1
Connecting the Power Cable................................................................1-2
Establishing Communications ..............................................................1-2
Connecting the Communication Cable ..............................................1-3
Using the Control Panel.......................................................................1-3
Buttons and Lights ..............................................................................1-4
Using the Keypad................................................................................1-5
Using the Main Menu...........................................................................1-5
Selecting a Function............................................................................1-6
LOADING SUPPLIES..............................................................................2-1
Loading Non-Peel and Fan-Fold Supply ...............................................2-1
Loading a Ribbon................................................................................2-3
Removing a Ribbon.............................................................................2-4
Tear Bar Installation........................................................................2-5
Using the Internal Rewind Option.....................................................2-5
SETTING SUPPLY OPTIONS ..................................................................3-1
Ribbon................................................................................................3-2
Batch Separators ................................................................................3-2
Feed Mode..........................................................................................3-3
Print Position ......................................................................................3-4
Supply Position...................................................................................3-5
Margin Position...................................................................................3-6
Cut Position........................................................................................3-7
Supply Type........................................................................................3-7
Speed.................................................................................................3-8
i
Page 4

COMMUNICATION VALUES....................................................................4-1
Baud Rate...........................................................................................4-2
Word Length .......................................................................................4-2
Stop Bits.............................................................................................4-3
Parity..................................................................................................4-3
Flow Control .......................................................................................4-4
Reset to Default Values.......................................................................4-4
SETTING CONTRAST.............................................................................5-1
SETTING DEFAULTS .............................................................................6-1
Monetary Sign.....................................................................................6-2
Secondary Sign...................................................................................6-3
Decimal Places ...................................................................................6-4
Slashed Zero ......................................................................................6-4
Power-Up Mode ..................................................................................6-5
Prompt Set..........................................................................................6-6
CARE AND MAINTENANCE....................................................................7-1
Cleaning the Printhead........................................................................7-1
Adjusting the Supply Sensor................................................................7-2
Adjusting the Supply Width..................................................................7-3
DIAGNOSTICS .......................................................................................8-1
Factory Set Password .........................................................................8-1
Checking the Software Version............................................................8-1
Printing Test Labels ............................................................................8-2
Service Diagnostics.............................................................................8-2
TROUBLESHOOTING .............................................................................9-1
Common Errors...................................................................................9-2
SPECIFICATIONS ................................................................................. A-1
Printer ............................................................................................... A-1
ii
Page 5

GETTING STARTED
1
The Monarch
codes on thermal transfer (ribbon) and thermal direct labels. You can print
on die cut, black mark, or continuous supplies. The printer has an
adjustable label edge sensor and a 300 dots per inch (dpi) printhead.
This chapter includes information about
♦ connecting the power cable.
♦ establishing communications.
♦ using the control panel and main menu.
9856
Keep the box and packaging material in case you need to
TM
printer lets you print text, graphics, and bar
return the printer.
Audience
The Operator’s Handbook is for the person who prints and applies labels.
Getting Started 1-1
Page 6
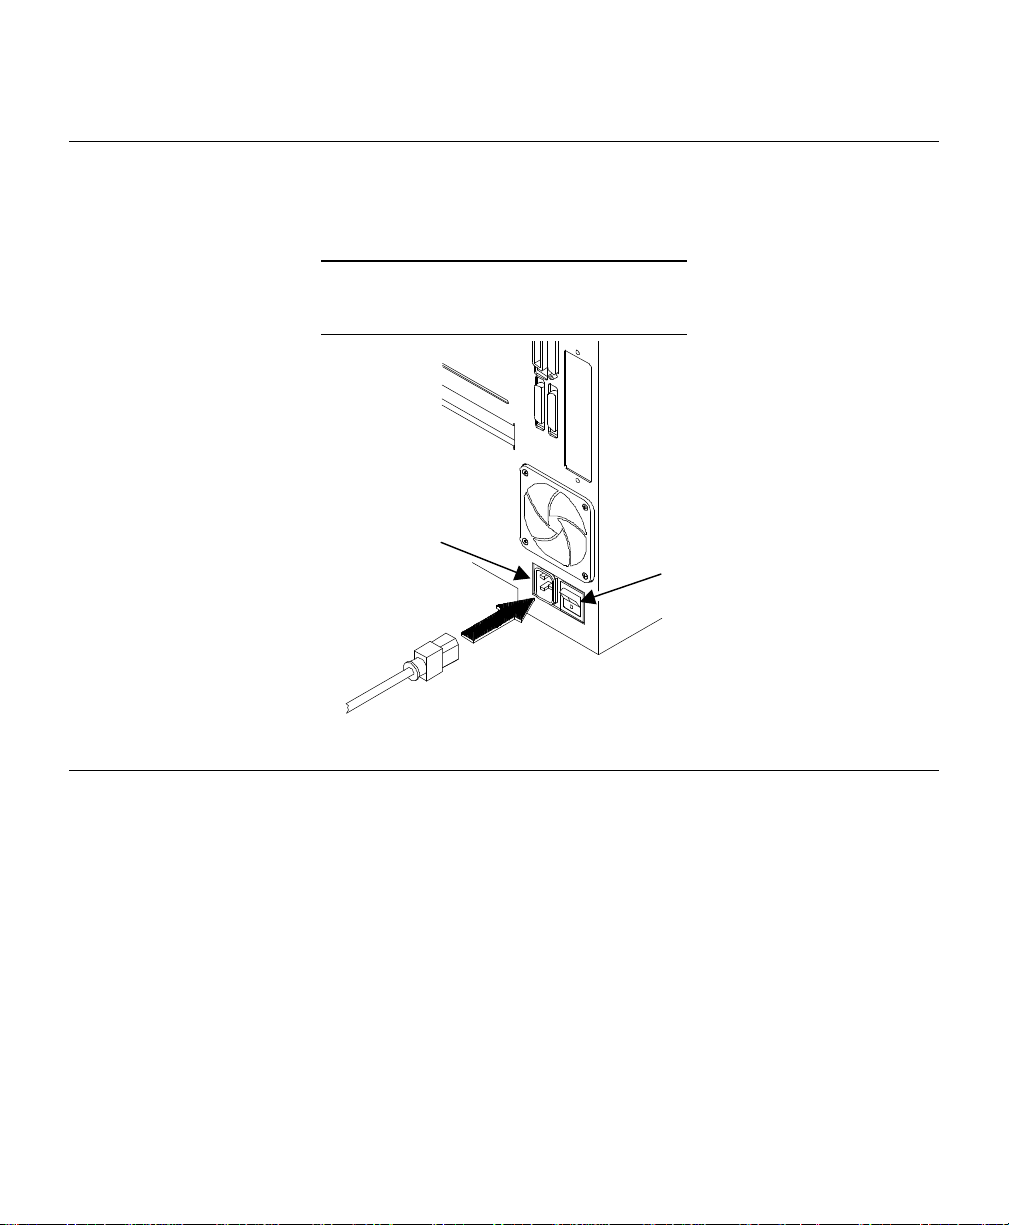
Connecting the Power Cable
Connect the AC power cord to the back of the printer and then plug into the
AC wall outlet. Make sure the printer is off before connecting the power
cord.
There may be a delay when the printer is turned off and
then quickly turned back on.
AC
Connector
Power Switch
Establishing Communications
Before the printer can accept print jobs from the host, you must
♦ connect the communication cable to the printer and to the host.
♦ set the communication values on the printer to match those at the
host (only required if you are using the serial port).
1-2 Getting Started
Page 7
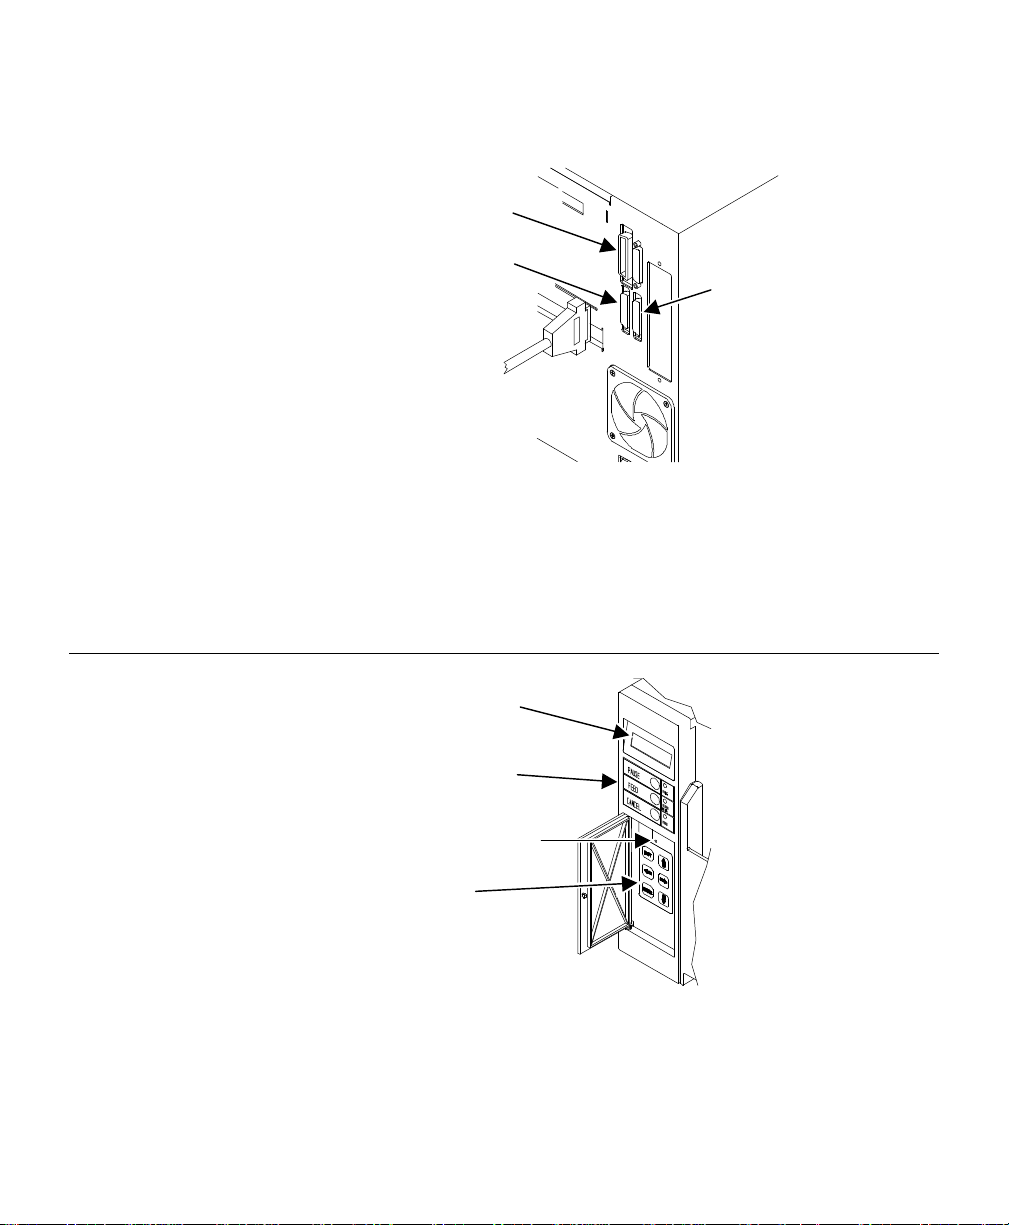
The factory defaults are
Parallel Port
Serial Port B
Serial Port A
LCD Display
and Lights
Contrast Pot
♦ 9600 Baud
♦ 8 bit parity
♦ 1 stop bit
♦ no parity
♦ DTR flow control.
Connecting the Communication Cable
Make sure the printer is off before connecting the cable to the
communication port.
Using the Control Panel
The printer has a control
panel containing a
two-row x 16 character
LCD display, control
buttons, lights, and a
keypad with six buttons
used to access and
change the printer's
configuration settings.
Control Buttons
Keypad
The three buttons and
lights are used to control
and indicate printer
status.
Getting Started 1-3
Page 8
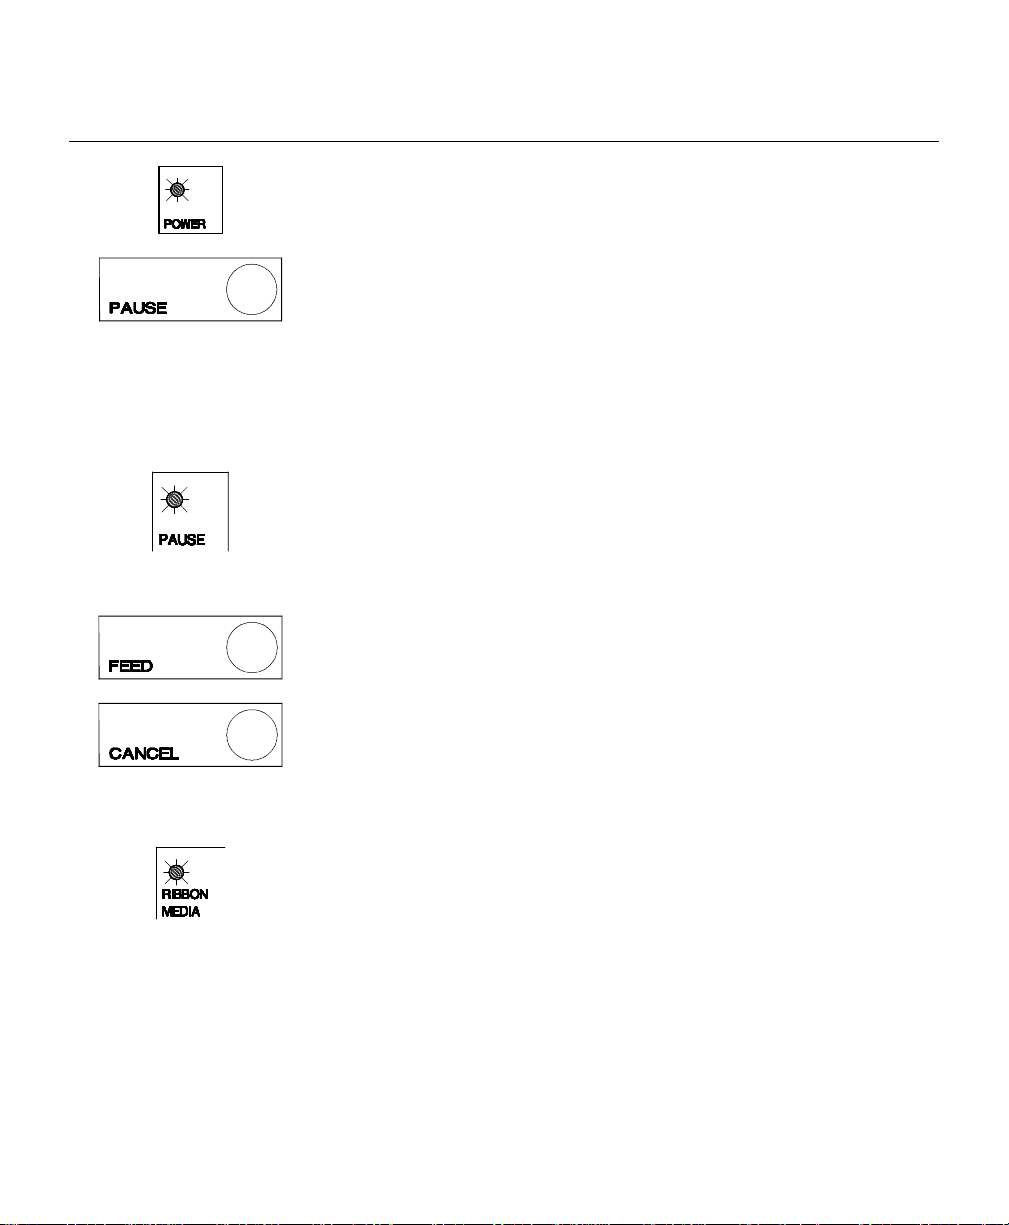
Buttons and Lights
The PAUSE light is on when
is pressed.
The printer shows a steady green light when it
is on.
Pressing PAUSE
♦ pauses the current print job.
♦ displays “PAUSE MENU” on the display.
♦ stops the label counter (but maintains the
The PAUSE light blinks when there is a data,
communication, or data formatting error (errors
below 700).
Pressing FEED feeds a blank label if there is
no print job.
count balance).
PAUSE
1-4 Getting Started
Pressing CANCEL
♦ clears an error.
♦ cancels the current job.
The RIBBON MEDIA light is on when
♦ the sensors do not detect labels or the
presence of a ribbon.
♦ a supply fault (error over 700) occurs.
Page 9
Using the Keypad
MODE
ALL
BATCH
SETTINGS
s
L R
Has no function.
Scrolls through the current menu selections.
Increases and decreases values.
U
D
E
Exits an options without saving changes.
Has no function.
Selects/sets a displayed function or value.
Answers yes to an operator query.
Clears supply errors (over 700).
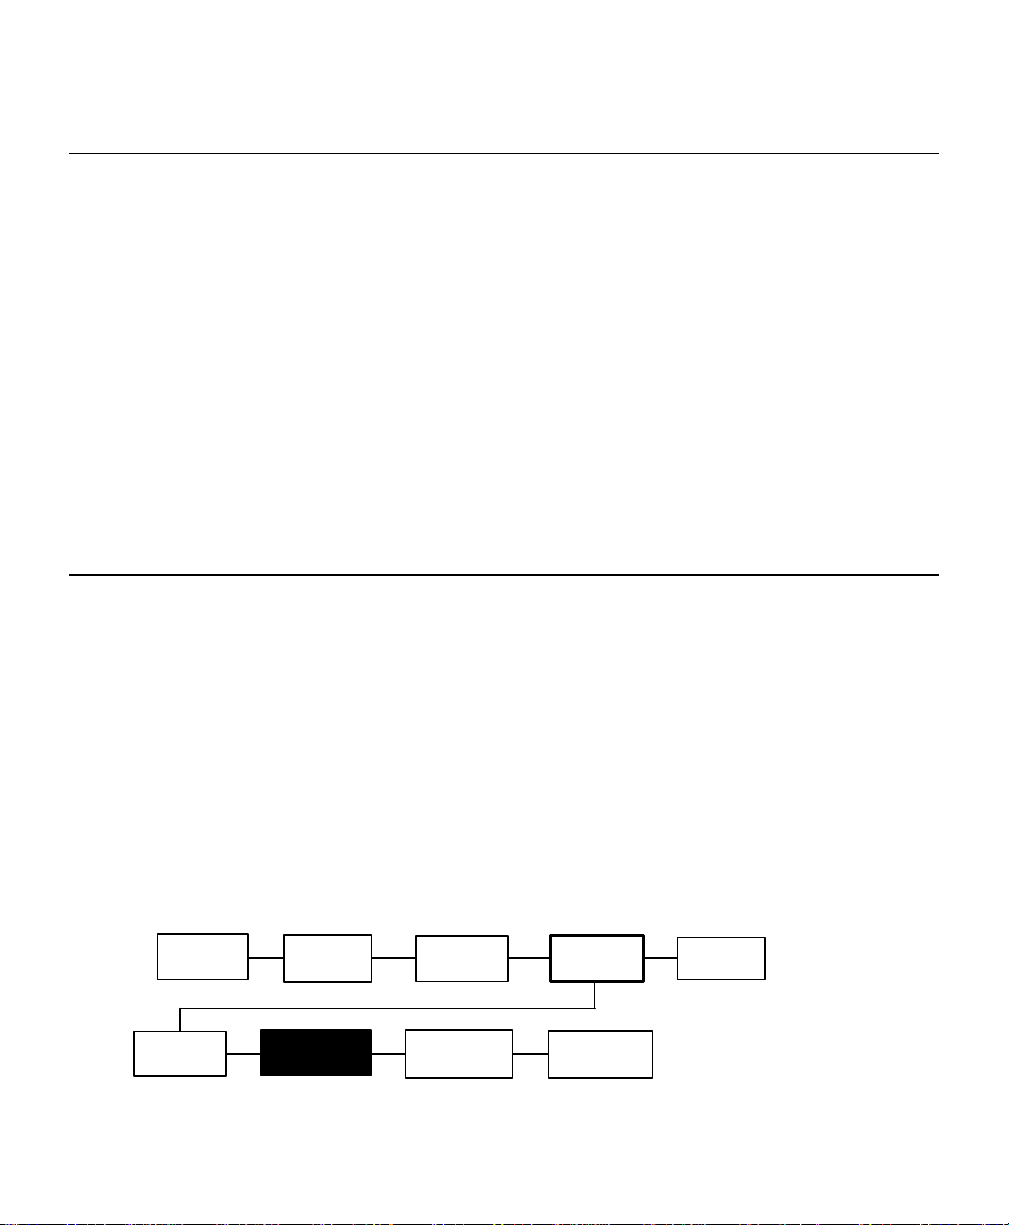
Using the Main Menu
Many chapters in this manual have one or more charts showing the printer’s
menu structure. For example:
♦ Normal border boxes show the menu options.
♦ Heavy border boxes show the selections to get the functions.
♦ Black background boxes show the functions.
♦ The black boxes show where you are; the bordered boxes show how you
got there.
MAIN MENU
CANCEL
SUPPLY
PRINT
CONTRAST DEFAULTS
REPEAT
SETUP
PORT
DIAG.
Getting Started 1-5
Page 10
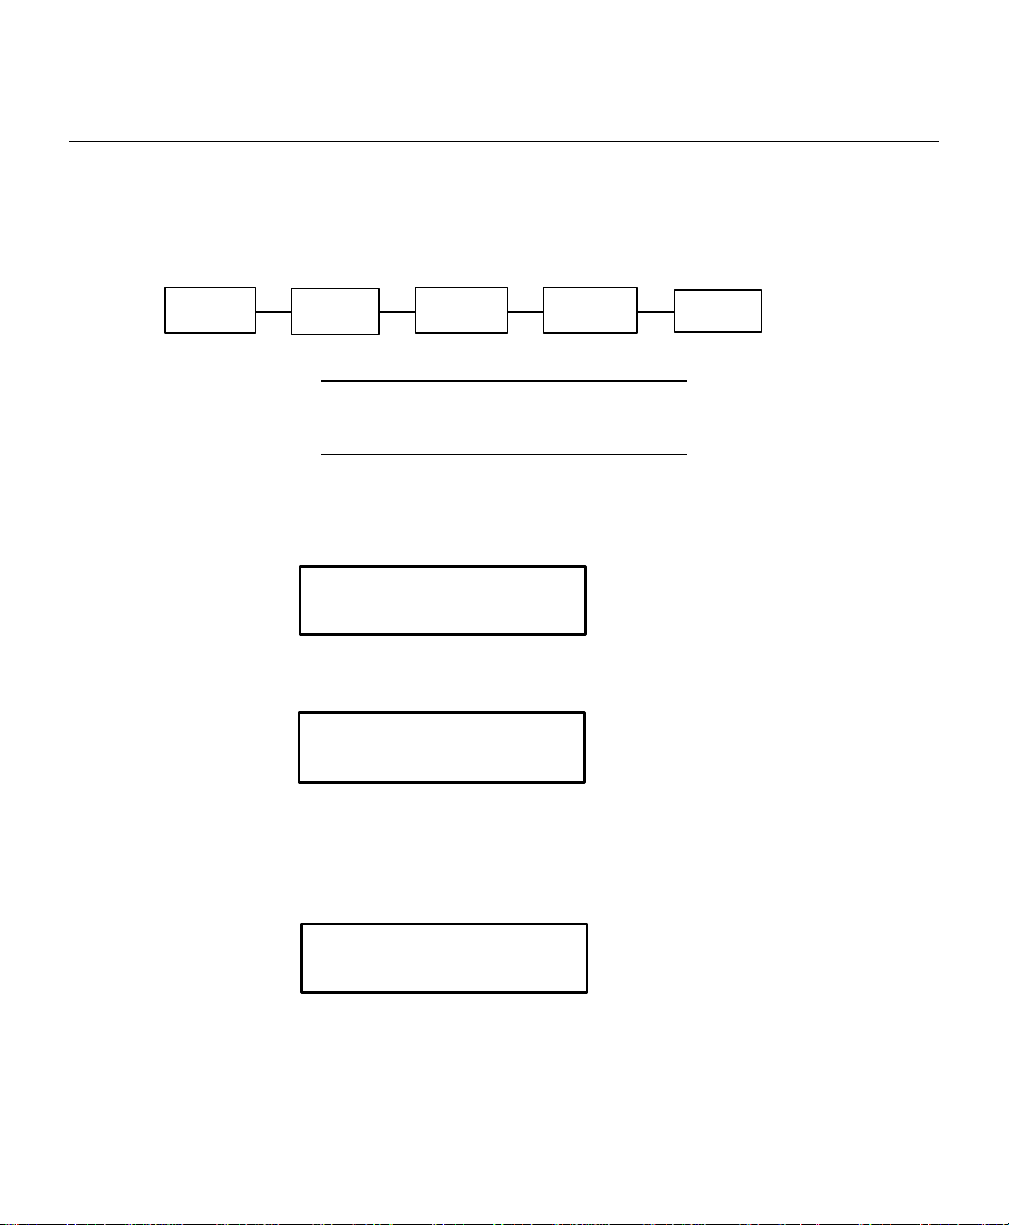
Selecting a Function
l Diagnostics
ALL
MODE
BATCH
Cancel All r
l Print Mode r
The Main Menu has several functions (operating modes). These functions
are shown in the chart below.
MAIN MENU
CANCEL
PRINT
REPEAT
SETUP
DIAG.
If the printer displays PRINT MODE Ready when you turn
it on, press U to display the Main Menu.
To display menu options, press L or R.
♦ When the screen displays a right arrow, press R to display more options.
MAIN MENU
♦ When the screen displays a left arrow, press L to display more options.
MAIN MENU
♦ When the screen displays a left and a right arrow, press either L or R
to display more options.
♦ When you see the menu option you want, press E to select it.
1-6 Getting Started
MAIN MENU
Page 11
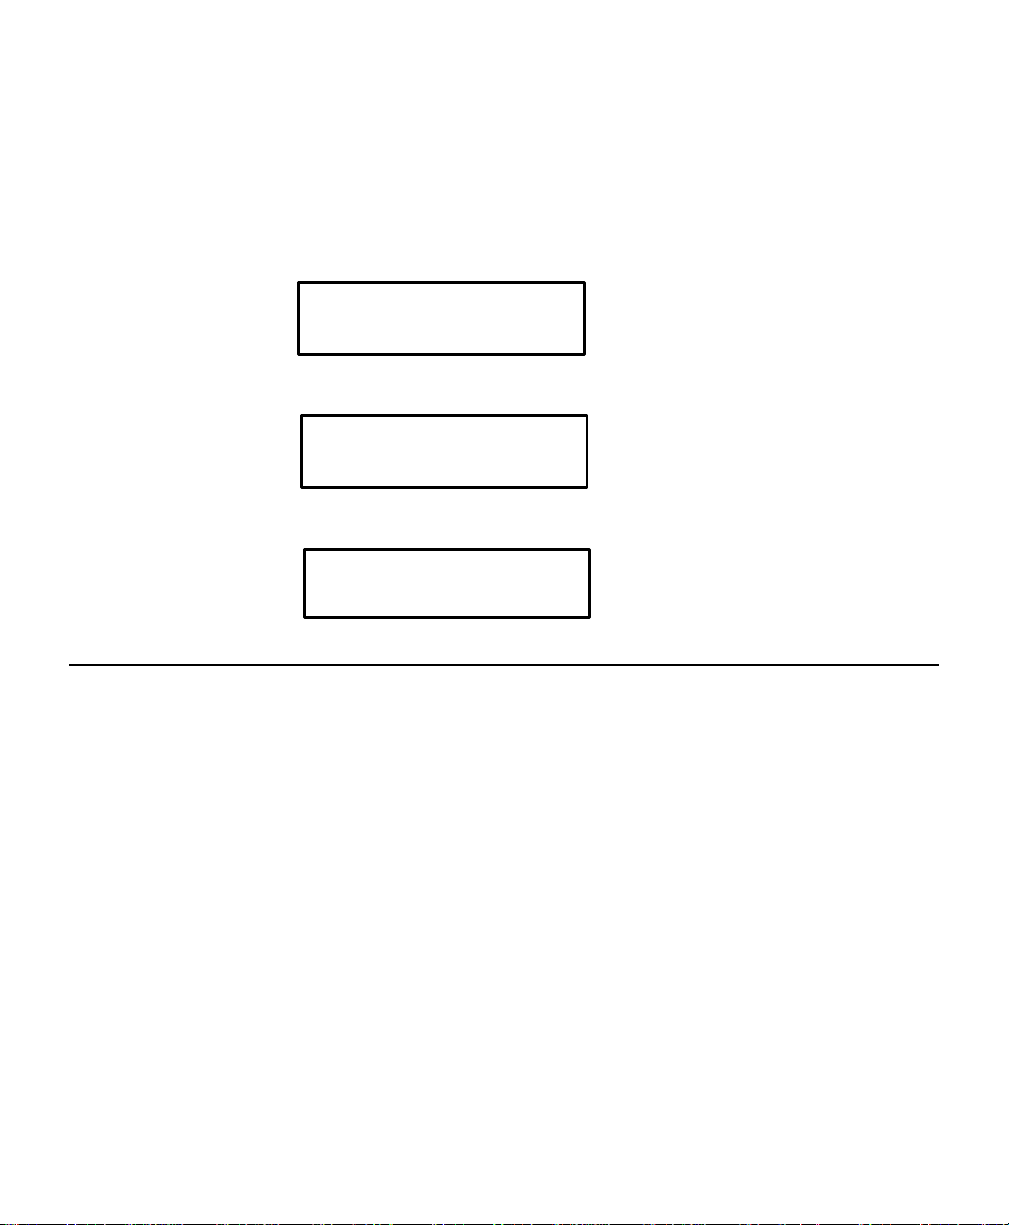
The Main Menu controls the printer’s setup and operation. Through the
l Setup r
Supply r
Ribbon r
Setup Menu, you can select a sub-menu for the supply, contrast, default, or
port settings. Each of those sub-menus have several selections, such as
ribbon, speed, monetary symbols, and baud rate.
1.
From the Main Menu, press L or R until you see
MAIN MENU
2.
Press E. You will see
SETUP
3.
Press E. You will see the following option:
SUPPLY
Exiting an Option
To exit an option, press U once. You will exit to the next higher menu.
If you press U from a menu, your settings are not saved. Your settings are
only saved when you press E from a menu.
Getting Started 1-7
Page 12

1-8 Getting Started
Page 13
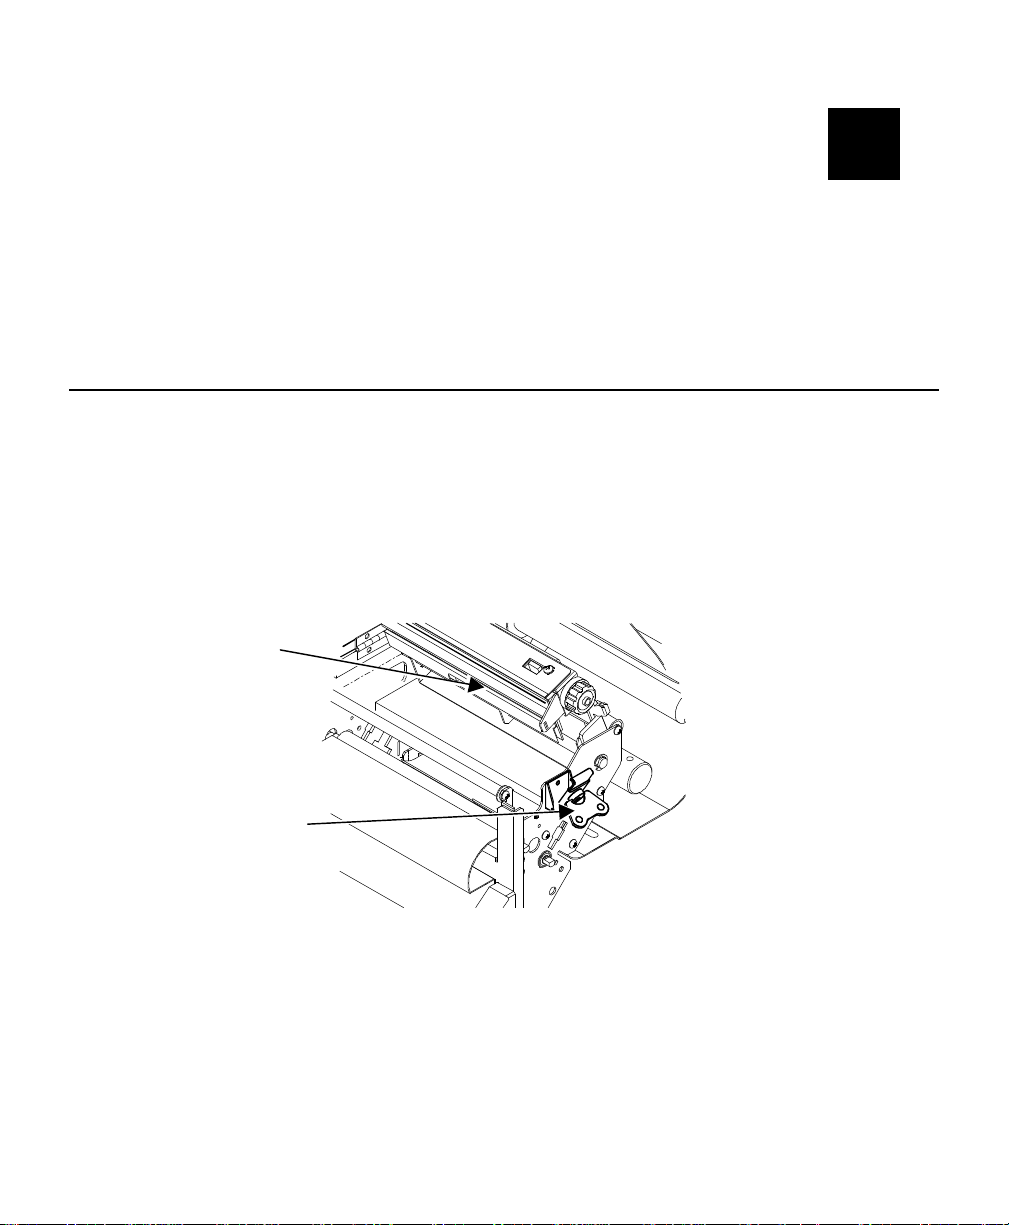
LOADING SUPPLIES
2
Latch Wing
The printer accepts a wide range of supplies. You can use roll,
fan-fold, or die cut continuous supply for thermal transfer or thermal direct.
Using thermal direct supply with a ribbon produces unacceptable print
quality.
Loading Non-Peel and Fan-Fold Supply
To load a roll of labels or fan-fold labels:
1.
Open the side access cover.
2.
Slide a roll of labels onto the supply hub assembly and position it
against the inner guide. If using fan-fold supply, slide an empty supply
core onto the supply hub assembly. Install the fan-fold supply from the
rear or the bottom of the printer.
Printhead
3. Lift and rotate the printhead latch wing counterclockwise one half turn to
Printhead
unlock the printhead. Release the latch and raise the printhead to an
upright position
Loading Supplies 2-1
Page 14
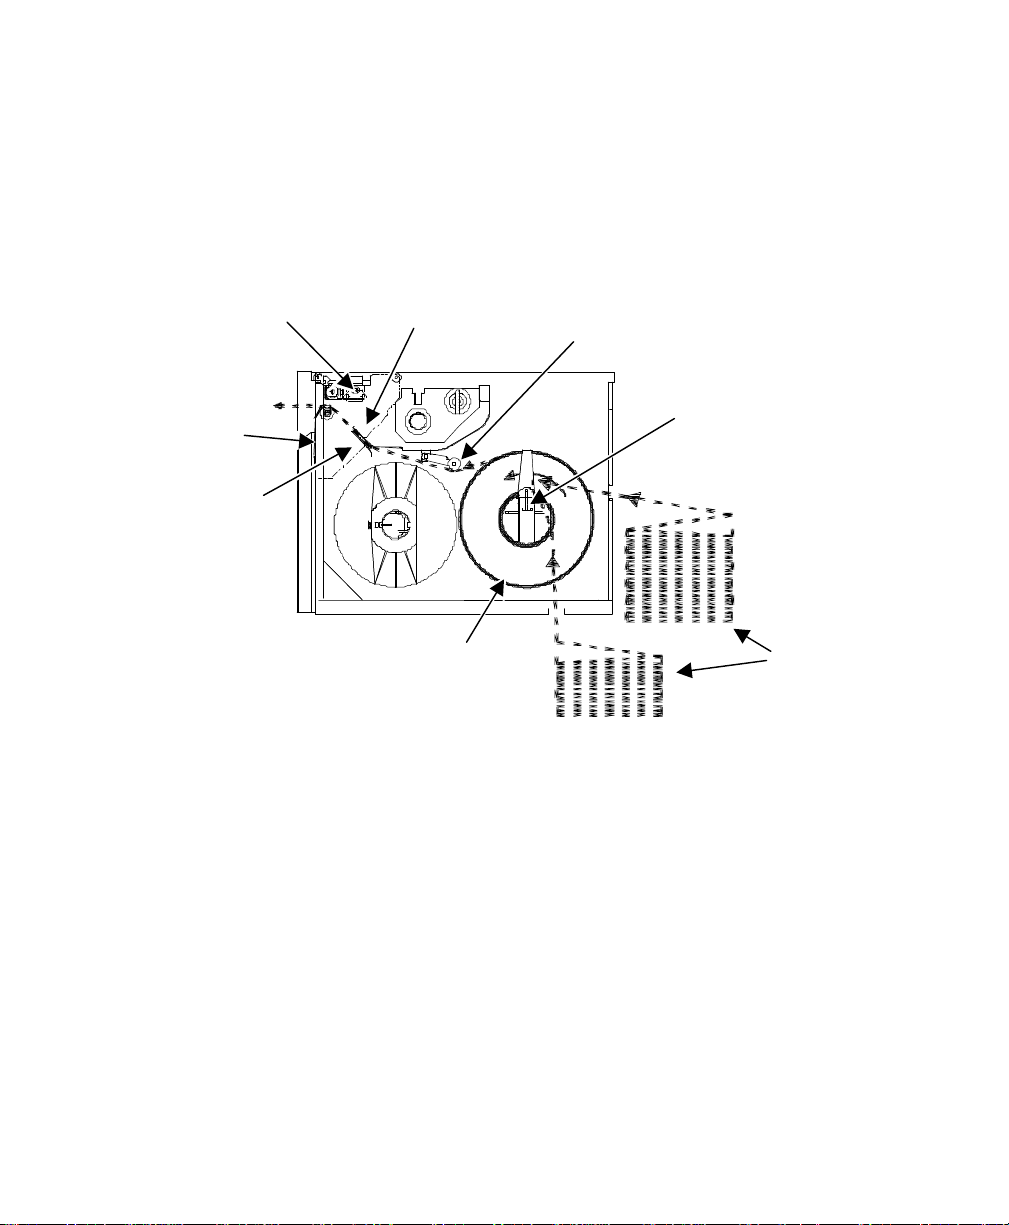
4. Thread the supply under the bouncer assembly and between the upper
Latch
Tear Bar
Roll Supply
Supply Hub
Guide
Guide
Assembly
and lower supply guides. Feed the supply until it exits the printhead
assembly through the front slot.
5.
Lower the printhead and close the printhead latch. Rotate the printhead
latch wing clockwise and snap it down to lock the printhead into position.
Printhead
Lower Supply
Upper Supply
Bouncer
6. Close the side access cover.
You may need to feed several labels to align the supply correctly.
Fan-fold
2-2 Loading Supplies
Page 15
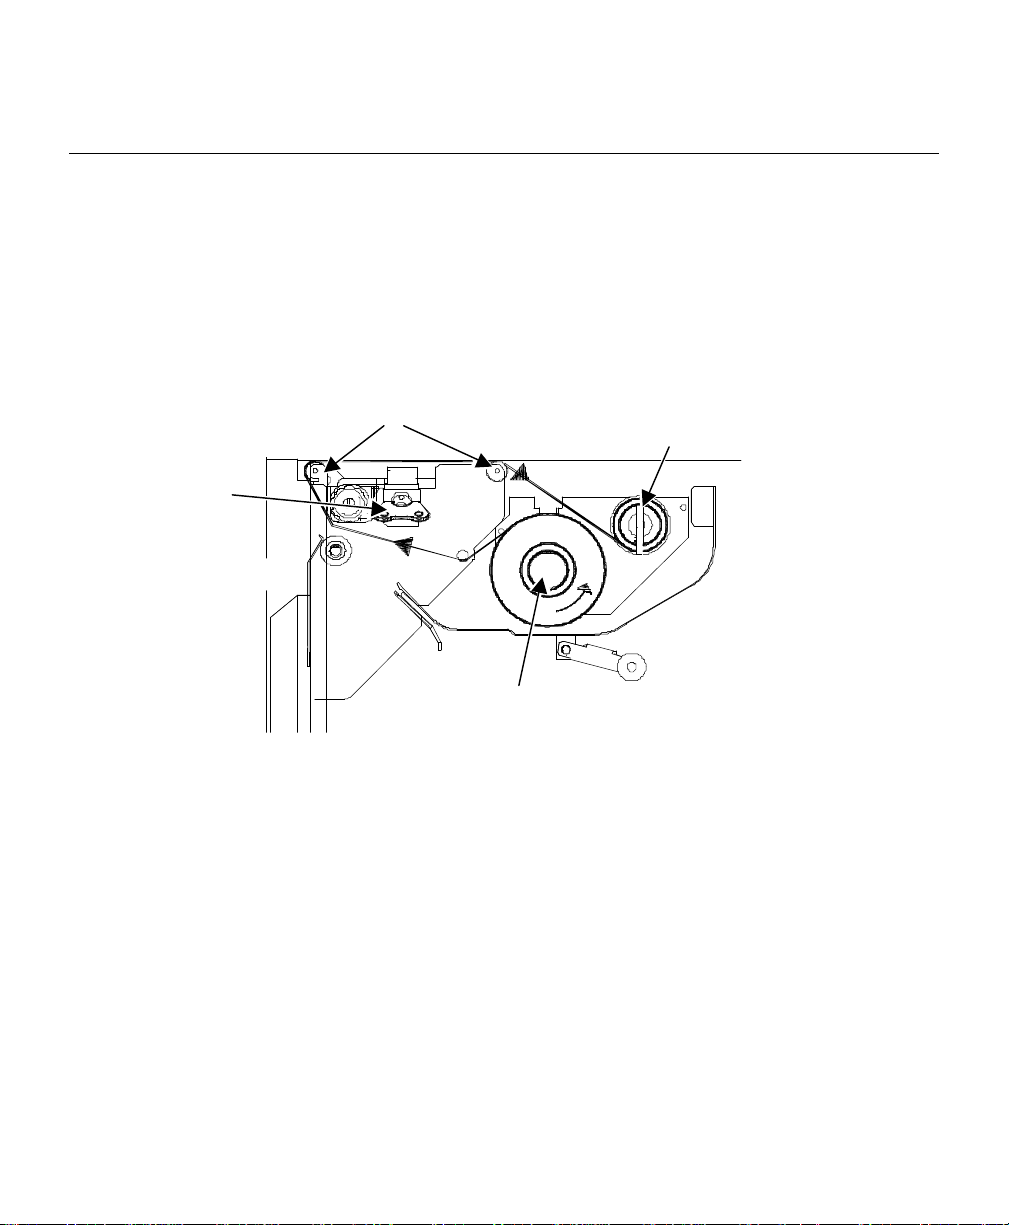
Loading a Ribbon
Ribbon Rollers
Latch Wing
Take-up Hub
To load a new ribbon:
1.
Open the side access cover.
2.
Raise the printhead latch wing and rotate counterclockwise one-half turn
to unlock the printhead. Raise the printhead to an upright position.
3.
Slide the ribbon roll onto the hub, making sure the ribbon roll is up
against the hub flange.
Ribbon
Ribbon Supply
Hub
4. Feed the ribbon as shown.
5.
Lower the printhead, but do not close the latch.
6.
Rotate the J-hook counterclockwise to unlatch it while holding the ribbon
take-up hub.
Loading Supplies 2-3
Page 16
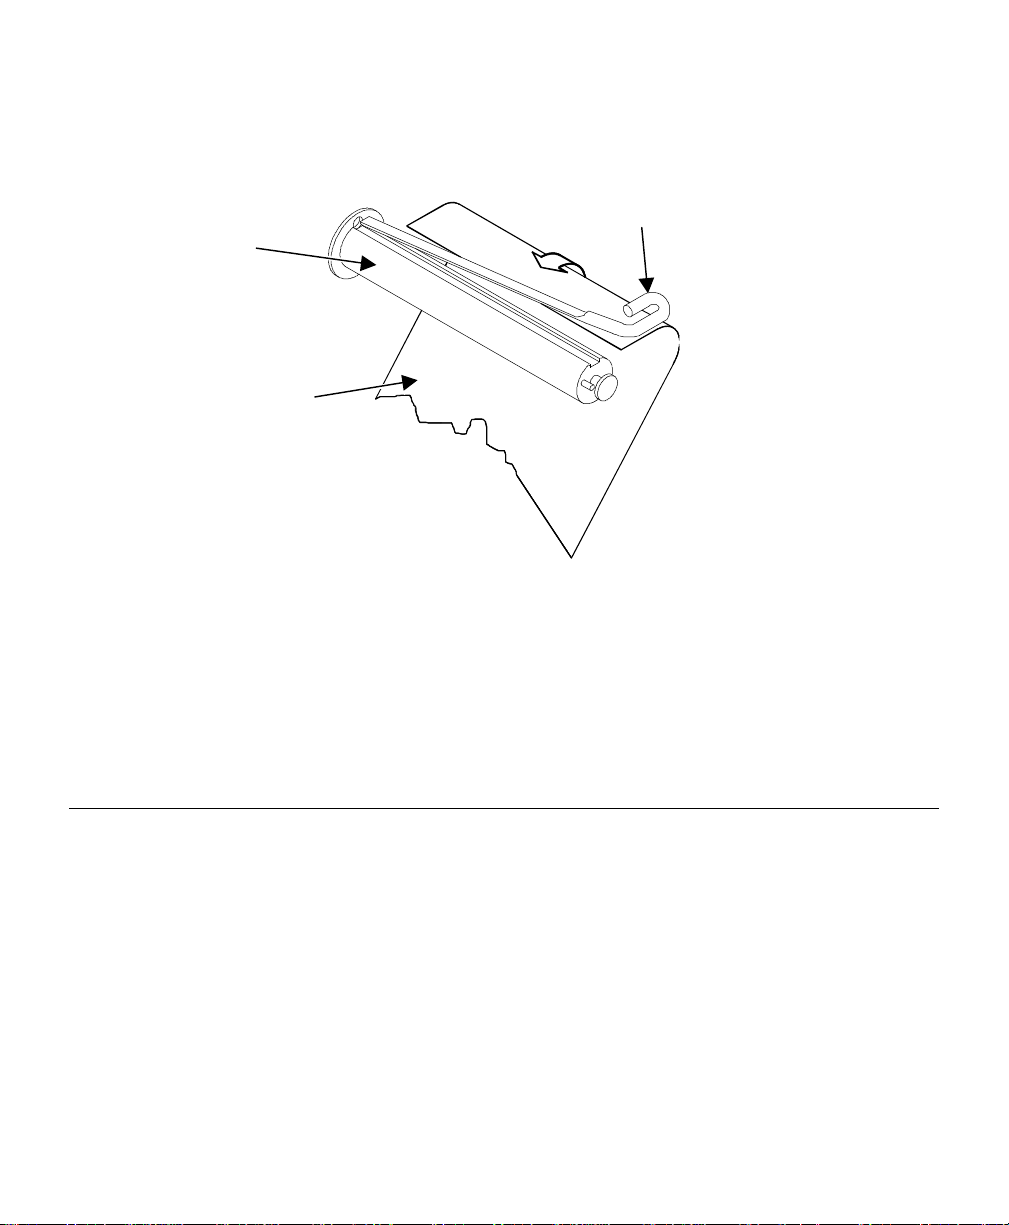
7. Pull the ribbon over the ribbon rollers. Wrap the free end of the ribbon
around the ribbon take-up hub. Slide the J-hook into place. Hold the
ribbon take-up hub and rotate the J-hook clockwise to latch it.
J-hook
Take-up Hub
Ribbon
8. Rotate the hub until you remove all slack from the ribbon. Do not use
the J-hook to rotate the hub.
9.
Close the printhead latch, rotate the latch wing clockwise, and lower the
latch wing.
10.
Close the side access cover.
Removing a Ribbon
1. Cut the ribbon in between the ribbon rollers.
2.
Rotate the ribbon supply hub clockwise to draw the unused portion of
the ribbon back onto the supply hub.
3.
Rotate the ribbon take-up hub counterclockwise to roll up the used
portion of the ribbon, and slide the used ribbon off the hub.
4.
Hold the ribbon take-up hub and rotate the J-hook counterclockwise to
unlatch it. Slide off the used portion of the ribbon.
2-4 Loading Supplies
Page 17

Tear Bar Installation
Tear Bar
Rewind Bracket
The tear bar is already fastened to the printer. To use the tear bar, remove
the rewind bracket and replace the thumbscrews.
Thumbscrews
Using the Internal Rewind Option
The internal rewind option must be purchased separately.
When large quantities of labels are printed as single batches or for later
use, you may use the internal rewind hub to roll up the label supply
automatically for convenient handling.
To use the Supply Rewind Hub:
1.
Open the side access door.
2.
Install a roll of labels, and pull the supply through the printer until
approximately 18 inches is free in front of the unit.
Loading Supplies 2-5
Page 18

3. Loosen the thumbscrew and remove the retainer from the rewind shaft.
Thumbscrew
Retainer
Hub
Take-up Hub
Slot
Rewind Hub
Retainer
Thumbscrew
Supply Hub
4. Insert the free end of the supply through the supply take-up slot in the
front of the printer. Place the leading edge of the supply into the slot on
the internal rewind hub.
Ribbon Supply
Supply
Take-up
Ribbon
5. Rotate the internal rewind hub counterclockwise to take up any slack.
6.
Tighten the thumbscrew and close the side access cover.
2-6 Loading Supplies
Internal
Then slide the retainer onto the internal rewind hub so it is just touching
the supply.
Page 19

SETTING SUPPLY OPTIONS
3
ALL
MODE
BATCH
SETTINGS
TORS
MODE
POS
POS
POS
POS
TYPE
This chapter explains how to select a ribbon, separators, feed
mode, print position, supply position, margin position, supply type, and
speed.
MAIN MENU
CANCEL
RIBBON SEPARA-
SUPPLY
PRINT
FEED
REPEAT
PRINT
SETUP
DEFAULTSCONTRAST
SUPPLY
DIAG.
MARGIN
PORT
CUT
SUPPLY
SPEED
You may need to set supply options when you change supplies. The options
are listed in the table below.
Option Choices Default
Ribbon No/Yes/Hi Energy No
Separators Off/On/Long Off
Feed Mode Continuous/On-Demand Continuous
Print Position -99 to +99 0
Supply Position -300 to +300 0
Margin Position -99 to +99 0
Cut Position -300 to +300 0
Supply Type Die Cut/Black
Die Cut
Mark/Continuous
Speed 2.0/6.0/8.0/Default 8.0 IPS
Setting Supply Options 3-1
Page 20

To exit an option without changing the setting, press U
Ribbon r
l Yes r
Ribbon
You have to tell the printer if your supplies require a ribbon. To change the
setting, from the Main Menu, select Setup, then Supply. Then, follow these
steps.
1.
Press L or R until you see
SUPPLY
2.
Press E to set the ribbon option. You will see the current setting, for
example:
RIBBON
3.
Press L or R to see the other options. After you display the option you
want, press E. Press U twice to exit to the Main menu.
If you set the Ribbon option to Yes, install a ribbon
before printing. Selecting high energy for ribbon does
Batch Separators
A batch separator is an extra label with a
pinstripe pattern. It is printed between
batches to make batches easier to find.
Changing this setting only affects new
formats sent to the printer.
3-2 Setting Supply Options
not affect the printer’s operation.
Page 21

To change the setting, from the Main Menu, select Setup, then Supply.
l Separators r
Off r
l Feed Mode r
Continuous r
Then, follow these steps.
1.
Press L or R until you see
SUPPLY
2.
Press E to set the batch separators option. You will see the current
setting, for example:
SEPARATORS
3.
Press L or R to see the other option. After you display the option you
want, press E. Press U twice to exit to the Main menu.
Feed Mode
You can use continuous or on-demand printing. On-demand printing allows
you to remove a label before printing the next one.
To change the setting, from the Main Menu, select Setup, then Supply.
Then, follow these steps.
1.
Press L or R until you see
2.
Press E to set the supply type option. You will see the current
setting, for example:
SUPPLY
SUPPLY TYPE
Setting Supply Options 3-3
Page 22

3. Press L or R to see the other option. After you display the option you
l Print Pos r
[-99/99]: +0
want, press E. Press U twice to exit to the Main menu.
Print Position
This function adjusts where data prints vertically on the supply. Adjust the
print if it is too close to the top or bottom of the supply, or overtypes the
pre-printed area. One dot is 0.0033 inch.
♦ If the data is too close to the bottom, increase the number.
♦ If the data is too close to the top, decrease the number.
Changing this setting only affects new formats sent to
the printer.
To change the setting, from the Main Menu, select Setup, then Supply.
Then, follow these steps.
1.
Press L or R until you see
2.
Press E. You will see the current setting, for example:
3-4 Setting Supply Options
SUPPLY
Enter print pos
Page 23

3. Press L or R to change the print position. Pressing L decreases the
l Supply Pos r
[-300/300]: +0
value (moves the image down); R increases it (moves the image up).
4.
Press E when the number you need appears. Press U twice to exit
to the Main menu.
Supply Position
This function adjusts how much supply feeds out of the exit chute. You may
need to adjust the supply in or out to allow
♦ labels to be removed.
♦ die cut labels to be removed easily.
The adjustments are in dots (0.0033 inch).
♦ Increase the number to feed more supply out of the chute.
♦ Decrease the number to feed less supply out of the chute.
This option takes effect on the next label printed. Changing supply position
may also affect print position.
To change the setting, from the Main Menu, select Setup, then Supply.
Then, follow these steps.
1.
Press L or R until you see
2.
Press E. You will see the current setting, for example:
3.
Press L or R to change the supply position. Pressing L decreases
the value (feeds less supply); R increases it (feeds more supply).
SUPPLY
Enter supply pos
Setting Supply Options 3-5
Page 24

4. Press E when the number you need appears. Press U twice to exit
l Margin Pos r
to the Main menu.
Margin Position
This function adjusts where the format prints horizontally on the supply. The
adjustments are in dots (0.0033 inch), which is the smallest measurement
the printer recognizes.
The width of the print area depends on your supply size. Maximum width is
six inches. When you move the image to the right or left on the supply,
avoid moving the image too close to either edge, because it may not print.
Print too far to the left. Print too far to the right.
♦ If the data is too close to the left side, increase the number.
♦ If the data is too close to the right side, decrease the number.
Changing this setting only affects new formats sent to
To change the setting, from the Main Menu, select Setup, then Supply.
Then, follow these steps.
1.
Press L or R until you see
3-6 Setting Supply Options
the printer.
SUPPLY
Page 25

2. Press E. You will see the current setting, for example:
[-99/99]: +0
l Supply Type r
l Black Mark r
Enter margin pos
3.
Press L or R to change the margin position. Pressing L decreases
the value (moves the image toward the left side of the supply); R
increases it (moves the image toward the right side of the supply).
4.
Press E when the number you need appears. Press e twice to
exit to the Main menu.
Cut Position
Changing these settings do not affect the printer’s operation.
Supply Type
You can print on black mark, die cut, or continuous supplies. You have to
tell the printer which supplies you are using.
To change the setting, from the Main Menu, select Setup, then Supply.
Then, follow these steps.
1.
Press L or R until you see
2.
Press E to set the supply type option. You will see the current
setting, for example:
3.
Press L or R to see the other options. After you display the option you
want, press E. Press U twice to exit to the Main menu.
SUPPLY
SUPPLY TYPE
Setting Supply Options 3-7
Page 26

Speed
l Speed
l 6.0 IPS r
You can change the print speed for bar codes or graphics. If you select
"Default" for speed, formats with serial bar codes automatically print at 2.0
IPS.
To change the setting, from the Main Menu, select Setup, then Supply.
Then, follow these steps.
1.
Press L or R until you see
SUPPLY
2.
Press E to set the speed option. You will see the current setting, for
example:
SPEED
3.
Press L or R to see the other options. After you display the option you
want, press E. Press U twice to exit to the Main menu.
3-8 Setting Supply Options
Page 27

COMMUNICATION VALUES
Option
Choices
Default
4
ALL
MODE
BATCH
SETTINGS
COMM
This chapter tells you how to set the User Communication
(User Comm) values. These values provide the link for normal online
printing.
MAIN MENU
CANCEL
SUPPLY
PRINT
CONTRAST
REPEAT
DEFAULTS
SETUP
DIAG.
PORT
USER
You need to set your User Comm values to match your computer's online
communications. Before entering the communication values, see your
System Administrator.
The communication values are listed in the table below.
Baud rate 1200/2400/4800/9600/19200/38400 9600
Word length 7/8 8
Stop bits 1/2 1
Parity None/Odd/Even None
Flow Control None/Xon/Xoff/DTR/CTS DTR
Reset No/Yes No
Communication Values 4-1
Page 28

Baud Rate
l 9600 r
l Word Length r
l 8
To change the setting, from the Main Menu, select Setup, Port Settings,
then User Comm. Then, follow these steps.
1.
Press E to set the baud rate. You will see the current setting, for
example:
BAUD RATE
2.
Press L or R to display the baud rate you need, then press E.
Press U three times to exit to the Main menu.
Word Length
To change the setting, from the Main Menu, select Setup, Port Settings,
then User Comm. Then, follow these steps.
1.
Press L or R until you see
USER COMM
2.
Press E. You will see the current setting, for example:
3.
Press L or R to display the word length you need, then press E.
Press U three times to exit to the Main menu.
4-2 Communication Values
WORD LENGTH
Page 29

Stop Bits
l Stopbits r
1 r
l Parity r
None r
To change the setting, from the Main Menu, select Setup, Port Settings,
then User Comm. Then, follow these steps.
1.
Press L or R until you see
USER COMM
2.
Press E . You will see the current setting, for example:
STOPBITS
3.
Press L or R to display the number of stop bits you need, press E.
Press U three times to exit to the Main menu.
Parity
To change the setting, from the Main Menu, select Setup, Port Settings,
then User Comm. Then, follow these steps.
1.
Press L or R until you see
2.
Press E. You will see the current setting, for example:
3.
Press L or R to display the parity you need, press E. Press U
three times to exit to the Main menu.
USER COMM
PARITY
Communication Values 4-3
Page 30

Flow Control
l Flow Control r
l DTR r
l Reset
No r
To change the setting, from the Main Menu, select Setup, Port Settings,
then User Comm. Then, follow these steps.
1.
Press L or R until you see
USER COMM
2.
Press E. You will see the current setting, for example:
FLOW CONTROL
The XON character is 17; XOFF is 19. Set flow control to DTR for PC
computers (unless you have XON/XOFF software).
3.
Press L or R to display the flow control you need, press E. Press
U three times to exit to the Main menu.
Reset to Default Values
To change the setting, from the Main Menu, select Setup, Port Settings,
then User Comm. Then, follow these steps.
1.
Press R until you see
2.
Press E. You will see
3.
Press L or R to make your selection, press E. Press U three times
to exit to the Main Menu.
4-4 Communication Values
USER COMM
Are you sure?
Page 31

SETTING CONTRAST
5
ALL
MODE
SETTINGS
This chapter explains how to set the contrast, which controls
the darkness of the printing on your supply. The range is -390 to
+156, and the default is 0.
MAIN MENU
CANCEL
SUPPLY
PRINT
CONTRAST
REPEAT
DEFAULTS
SETUP
PORT
DIAG.
Setting Contrast 5-1
Page 32

Correct contrast setting is important because it affects how well your bar
l Setup r
l Contrast r
[-390/156]: +0
codes scan and how long your printhead lasts. You can use a verifier to
check bar codes for contrast.
1.
From the Main Menu, press L or R until you see
MAIN MENU
2.
Press E. Press L or R until you see
SETUP
3.
Press E. You will see the current setting, for example:
Enter contrast
4.
Press L or R to change the contrast. Pressing L lightens the print; R
darkens the print.
5.
Press E to select the displayed value. Press U if you want to exit to
the Main Menu.
5-2 Setting Contrast
Page 33

SETTING DEFAULTS
6
ALL
MODE
BATCH
SETTINGS
SIGN
SIGN
PLACES
ZERO
MODE
SET
This chapter explains how to select the monetary sign, secondary
sign, decimal places, slashed zero, power-up mode, and prompt set.
MAIN MENU
MONETARY
CANCEL
SECONDARY
PRINT
CONTRASTSUPPLY
DECIMAL
REPEAT
SETUP
DEFAULTS
SLASHED
DIAG.
POWER-UP
PORT
PROMPT
You can set your printer configurations to fit your daily operation, using
either the offline menus or the online configuration option. After an option is
selected in the online configuration or offline Setup Menu, the option is
saved when the printer is turned off.
The monetary formatting options are listed in the table below.
Option Choices Default
Monetary sign None/USA/UK/Japan/Germany/
France/Spain/Italy/Sweden/
Finland/Austria/India/Russia/
Korea/Thailand/China
Secondary Sign No/Yes No
USA
Decimal Places 0/1/2/3 2
Slashed Zero No/Yes No
Power-up Mode Online/Offline Online
Prompt Set English/French/German/Spanish English
Setting Defaults 6-1
Page 34

The monetary sign, secondary sign, and decimal places options are used in
conjunction with option 42.
The settings for Monetary Sign, Secondary Sign, Slashed Zero, and Decimal
Places are applied when a format is downloaded. Changing the settings
does not affect batches already in the printer.
Monetary Sign
You can also select None if you do not want a monetary sign to print in price
fields. The monetary signs available for 15 countries are shown in the table
below.
Country Currency Description
USA $ dollar
UK £ pound
Japan ¥ yen
Germany
France F franc
Spain P peseta
Italy L. lira
Sweden Kr krona
Finland
Austria
India Rs rupee
Russia
Korea
Thailand
China ¥ yuan
6-2 Setting Defaults
1
2
6
3
4
5
deutsche mark
markka
schilling
ruble
won
baht
Page 35

To change the setting, from the Main Menu, select Setup, then Defaults.
l USA r
l Secondary Sign r
Then, follow these steps. To exit an option without changing the setting,
press U.
1.
Press E. You will see the current setting, for example:
MONETARY SIGN
2.
Press L or R until you see the country's monetary sign you want.
3.
Press E. Press U twice to exit to the Main menu.
Secondary Sign
If you select USA as the monetary sign, you can print amounts less than
$1.00 either by using a dollar sign and decimal ($0.30) or by using a cent
sign (30¢).
If you set the secondary sign option to No, prices under $1.00 will print like
this: $ .45
If you set the secondary sign option to Yes, prices under $1.00 will print like
this: 45¢
The same option applies to the appropriate secondary sign for monetary
signs other than USA.
To change the setting, from the Main Menu, select Setup, then Defaults.
Then, follow these steps.
1.
Press L or R until you see
DEFAULTS
Setting Defaults 6-3
Page 36

2. Press E. You will see the current setting, for example:
No r
l Decimal Places r
l 2 r
SECONDARY SIGN
3.
Press L or R until you see the option you want. Then press E.
Press U twice to exit to the Main menu.
Decimal Places
You can set the printer for 0, 1, 2, or 3 places after the decimal in a price
field. In U.S. currency, you might print prices like this: $24.00 (2 decimal
places) or like this: $24 (0 decimal places).
1.
Press L or R until you see
DEFAULTS
2.
Press E. You will see the current setting, for example:
DECIMAL PLACES
3.
Press L or R until you see the option you want. Then press E
Press U twice to exit to the Main menu.
Slashed Zero
The slashed zero feature lets you select how you want the zero character
printed; either without a slash, 0 or, with a slash,
Standard or reduced fonts print the slashed zero character (
OCR fonts print the standard zero (0) only. The slashed zero selection will
not be in effect until the format is sent to the printer again. If you change
the way zero is printed, you must resend your formats.
6-4 Setting Defaults
∅.
∅). Bold and
Page 37

To change the setting, from the Main Menu, select Setup, then Defaults.
l Slashed Zero r
l Yes
lPowerup Mode r
l Offline
Then, follow these steps.
1.
Press L or R until you see
DEFAULTS
2.
Press E. You will see the current setting, for example:
SLASHED ZERO
3.
Press L or R until you see the option you want. Then press E.
Press U twice to exit to the Main menu.
Power-Up Mode
Power-up mode lets you decide how your printer starts each time you turn it
on. If you want the printer to be ready to start printing when it is turned on,
use the Online power-up mode. If you want the operator to perform some
other task first, use the Offline power-up mode.
To change the setting, from the Main Menu, select Setup, then Defaults.
Then, follow these steps.
1.
Press L or R until you see
2.
Press E. You will see the current setting, for example:
DEFAULTS
POWER UP
Setting Defaults 6-5
Page 38

3. Press L or R until you see the option you want. Then press E.
l Prompt Set
English r
Press U twice to exit to the Main menu.
Prompt Set
Prompt set determines which language displays on the printer's menu. You
can select English, French, German, or Spanish.
To change the setting, from the Main Menu, select Setup, then Defaults.
Then, follow these steps.
1.
Press R until you see
DEFAULTS
2.
Press E. You will see the current setting, for example:
PROMPT SET
3.
Press L or R until you see the option you want. Then press E.
Press U twice to exit to the Main menu.
4.
This option only affects the displayed prompts. It does not change what
is printed by the printer.
6-6 Setting Defaults
Page 39

CARE AND MAINTENANCE
7
Cotton Swab
This chapter tells you how to clean and adjust your printer.
WARNING
Turn OFF the printer and unplug the unit from the outlet
before cleaning or adjusting the printer.
Cleaning the Printhead
Regular cleaning of the printhead maintains print quality. Use a cotton swab
moistened with isopropyl alcohol to clean the printhead.
Printhead
Care and Maintenance 7-1
Page 40

Adjusting the Supply Sensor
Adjustment Knob
To detect the label edge and/or black mark for all supply sizes, the supply
sensor is adjustable across half of the supply path. Adjust the position of
the supply sensor when changing from a wider to a narrower supply size.
This keeps the supply sensor positioned to detect the label edge.
Rotating the adjustment knob clockwise sets the sensor for wider supply. In
general, if you keep the knob in the full counterclockwise position, it
correctly senses supply. However, if you have a problem sensing Top Of
Form, try rotating this knob clockwise one-half turn at a time until the error
is eliminated.
CAUTION
Do not force or over-tighten this adjustment knob.
7-2 Care and Maintenance
Sensor
Page 41

Adjusting the Supply Width
Printhead Knob
The printer uses a variety of supply widths and thicknesses. The printer is
factory set using a standard full-width supply. The printhead has a leveling
knob adjustment to ensure even print quality. The knob raises and lowers
the right side of the printhead to keep the printhead level across the supply.
When out of alignment, print along one side of the label is missing. The
print drops off suddenly, rather than gradually fading out.
If you are experiencing ribbon wrinkling problems, make
sure the printhead knob is properly adjusted.
The knob is numbered for convenience and does not relate to specific
supply sizes. Turn the knob one click at a time until the desired print quality
is achieved.
The printhead must be open in order for you to turn the
printhead knob.
Care and Maintenance 7-3
Page 42

7-4 Care and Maintenance
Page 43

DIAGNOSTICS
8
ALL
MODE
BATCH
DIAG.
DIAG
QUALITY
LABEL
Version r
Version 1.0
This chapter explains how to perform simple diagnostic functions
such as checking the software version and printing test labels. This
information is needed if you have to call Technical Support.
MAIN MENU
CANCEL
PRINT
VERSION
SUPPLY
REPEAT
USER
TEST
SETUP
SERVICE
DIAG.
The supply quality option is not available.
Factory Set Password
You need a password to access diagnostic functions. The permanent
factory-set password is: P P P E.
Checking the Software Version
1. From the Diagnostics menu, press L or R until you see
DIAGNOSTICS
2.
Press E. You will see
Model M9856
Diagnostics 8-1
Page 44

Line one lists the printer model number (M9856). Line two is the version of
l User Diag r
l Test Label
software in the printer.
Printing Test Labels
1. From the Diagnostics menu, press L or R until you see
DIAGNOSTICS
2.
Press E and R until you see
USER DIAG
3.
Press E. The following test labels print.
The test labels display the printer model number, software version number,
number of inches printed to date, user COM port settings, and a test
pattern.
Service Diagnostics
The Service Diagnostics menu can only be accessed by a Monarch
Representative, because it requires a separate password. If you have any
problems, print a test label and call Technical Support.
8-2 Diagnostics
Page 45

TROUBLESHOOTING
9
This chapter lists possible problems and solutions. After you take
the corrective action, press FEED or CANCEL to clear the error. Contact
Technical Support for problems not covered in this chapter.
Problem Description/Action
Poor Print Quality Clean printhead.
Adjust printhead temperature. Check with your
System Administrator.
Use the correct ribbon/paper combination.
Skips Every Other Label
(print quality good, but
skips every other label)
Unable to Print Rotated
Characters
Printer Fails to Turn On Blown fuse, faulty AC cord, bad printer power
Printer Does Not Print
(advances several labels
when FEED is pressed)
Erratic Printing
(prints strange characters
instead of label format)
Ribbon Does Not Advance
(printer advances paper,
but ribbon does not
advance)
No Display
(power light on but nothing
in display)
Label formatted too close to top edge of form. Leave
approximately 0.02” (.5mm) of white space (equal to
8 dot rows) at top of label.
Format defined larger than label size.
Characters formatted outside label dimensions. Be
sure row/column values provide room for character
height or bar code printed.
switch, or faulty AC wall outlet.
Labels loaded incorrectly. See Chapter 2.
Supply sensor is possibly out of adjustment,
defective, or is defective.
Printer set for 8 data bits but transmitting device set
for 7 data bits (or vice versa). Check data bits
setting from the control panel.
Ribbon installed incorrectly. Make sure inked side of
ribbon faces paper.
Use correct ribbon type.
Faulty display.
Troubleshooting 9-1
Page 46

Common Errors
This section lists the most common errors you may see. Call Technical
Support if you receive any error not listed here.
Error Description/Action
025 String length is outside the range 0 to 2710.
101 The format referenced by batch is not in memory.
409 The printer memory is full. Delete unnecessary formats or
graphics from memory.
410 Parity mismatch.
411 Framing error (baud rate mismatch).
412 Flow control mismatch.
413 Online receive queue is full. Check for a flow control problem.
611 Font, bar code, or density in the batch does not exist.
612 The data in this line of the batch is either missing or does not
match the format.
613 Reference point off supply.
614 Portion of field off supply or there may be an invalid character in
the packet.
703 The printer sensed a calibration of different-sized black marks.
Make sure the correct supply is loaded.
704 Printer has not sensed a supply mark within the specified number
of inches or out of supplies. Check the supply tracking, supply
marks, black mark sensor position, and supply roll for binding.
Press CANCEL. Change supply.
750 Printhead is overheated. Turn off the printer.
9-2 Troubleshooting
Page 47

751 Printer did not sense a black mark when expected. For errors
supply length differs by plus or minus .25 inches from the format.
751-753, Check the supply tracking, supply marks, black mark
sensor position, and supply roll for binding. Press CANCEL and
try to continue printing. Change supply.
752 Printer sensed a mark in the wrong place.
753
Printer sensed a mark that is too long.
754 Check for a ribbon jam or remove any slack by turning the take-
up reel clockwise.
755 Printhead is open. Close the printhead before continuing.
756 Load supplies.
757 Load supplies (supply length mismatch),, because the calibrated
Press FEED.
758 Either the supply is not seen or the on-demand sensor is broken.
Check for a label jam, clear the supply path, or reload supplies.
This error may occur if you remove a label too quickly in on-
demand mode. The printer does not recalibrate after this error.
763 Waiting to dispense label. Press FEED.
765 Printhead failure. Order a new printhead.
768 Printhead has more than 10 bad dots or is not connected.
Connect the printhead.
791 The printer has an error pending. Turn off the printer. Wait 15
seconds and turn it back on. Resend the packets.
Troubleshooting 9-3
Page 48

9-4 Troubleshooting
Page 49

SPECIFICATIONS
A
Printer
Height: 13.5 inches (343mm)
Width: 12.5 inches (317.5mm)
Depth: 18 inches (457mm)
Weight: 55 lb. (25 kg)
Shipping Weight: 60 lb. (27kg)
Power: 115/230 VAC 50/60Hz Auto-ranging power supply
Operating Limits: 40ºF to 100ºF (4ºC to 38ºC)
Printhead: 300 dots per inch (11.8 dots/mm)
Printing Method: Thermal direct or thermal transfer
Supply Types: Roll-fed, die-cut continuous or fan-fold labels.
Supply Widths: 2.0" (51mm) minimum
6.125" (156mm) maximum
Supply Lengths: .75" (19mm) minimum
12.0" (304mm) maximum
Specifications A-1
Page 50

Ribbon Widths: 2.0” (51mm)
2.5” (64mm)
3.0” (76mm)
3.5” (89mm)
4.0” (102mm)
4.5” (114mm)
5.0” (127mm)
6.0” (152mm)
6.5” (165mm)
Ribbon Storage: Do not leave ribbon in direct sunlight, high
temperatures, or high humidity.
Print Speed: 2.0 IPS (51mm), 6.0 IPS (152mm), or 8.0 IPS
(203.2mm)
A-2 Specifications
Page 51

www.monarch-marking.com
 Loading...