

Paxar 9830-CL Operator's Handbook Manual

Paxar
9830-CL Printer
TC9830CLOH Rev. C 12/98 ©1998 PAXAR Corporation. All rights reserved.

Each product and program carries a respective written warranty, the only
warranty on which the customer can rely. Paxar reserves the right to make
changes in the product, the programs, and their availability at any time and
without notice. Although Paxar has made every effort to provide complete and
accurate information in this manual, Paxar shall not be liable for any omissions
or inaccuracies. Any update will be incorporated in a later edition of this
manual.
©1998 Monarch Marking Systems, Inc. All rights reserved. No part of this
publication may be reproduced, transmitted, stored in a retrieval system, or
translated into any language in any form by any means, without the prior
written permission of Monarch Marking Systems, Inc.
WARNING
This equipment has been tested and found to comply with the limits for a Class A digital
device, pursuant to Part 15 of the FCC Rules. These limits are designed to provide
reasonable protection against harmful interference when the equipment is operated in a
commercial environment. This equipment generates, uses, and can radiate radio frequency
energy and, if not installed and used in accordance with the instruction manual, may cause
harmful interference to radio communications. Operation of this equipment in a residential
area is likely to cause harmful interference in which case the user will be required to correct
the interference at his own expense.
CANADIAN D.O.C. WARNING
This digital apparatus does not exceed the Class A limits for radio noise emissions from
digital apparatus set out in the Radio Interference Regulations of the Canadian Department
of Communications.
Le présent appareil numérique n’émet pas de bruits radioélectriques dépassant les limites
applicables aux appareils numériques de la classe A prescrites dans le Réglement sur le
brouillage radioélectrique édicte par le ministère des Communications du Canada.
Trademarks
MONARCH is a registered trademark of Monarch Marking Systems, Inc.
9830CL is a trademark of Paxar Corporation.
Centronics is a registered trademark of Centronics Data Computer Corporation.
Paxar is a trademark of Paxar Corporation.
Paxar Corporation Systems Group
1 Wilcox Street
Sayre, PA 18840

Warranty Information
Limited Warranty
PAXAR Systems Group, Division of PAXAR Corporation, extends the following
warranties to the original purchaser of a PAXAR 9830CL which has been
installed and operated using recommended procedures and operating
conditions.
Parts
Parts found defective in material or workmanship will be replaced at no charge
for a period of six months following the machine’s shipment date. Parts
damaged by negligence, abuse, or normal wear are not covered. PAXAR
9830CL parts classed as normal wear items include print heads, feed rollers,
and platen rollers.
Service
Service to replace defective parts, as defined above, shall be provided at no
charge for a period of six months following the machine’s shipment date.
When ordering replacement parts and supplies in the U.S.A., reference all
correspondence to the following address:
PAXAR Corp.
1 Wilcox Street
Sayre, PA 18840
Tel: (570) 888-6641
Fax: (570) 888-6406
For additional information, visit www.paxar.com.
For Parts in the U.S.A. Call: 1-800-96PAXAR or (570) 888-6641,
Fax: (570) 888-5230
For Service in the U.S.A. Call: (570) 888-9116 or (570) 888-7416.
For parts and service in countries other than the U.S.A., please contact your
local PAXAR supplier.
PAXAR Systems Group reserves the right to incorporate any modifications or
improvements in the machines and machine specifications which it considers
necessary and does not assume any obligation to make said changes in
equipment previously sold.

TABLE OF CONTENTS
GETTING STARTED. . . . . . . . . . . . . . . . . . . . . . . . . . . . . . . . . . . . . . . . . . . . . . . . . . . . . 1-1
Audience. . . . . . . . . . . . . . . . . . . . . . . . . . . . . . . . . . . . . . . . . . . . . . . . . . . . . . . 1-2
Unpacking the Printer. . . . . . . . . . . . . . . . . . . . . . . . . . . . . . . . . . . . . . . . . . . . . 1-2
Connecting the Power Cable . . . . . . . . . . . . . . . . . . . . . . . . . . . . . . . . . . . . . . . 1-2
Establishing Communications . . . . . . . . . . . . . . . . . . . . . . . . . . . . . . . . . . . . . . 1-3
Connecting the Communication Cable . . . . . . . . . . . . . . . . . . . . . . . . 1-3
Default Serial Port Communication Values . . . . . . . . . . . . . . . . . . . . . 1-4
Using the Control Panel . . . . . . . . . . . . . . . . . . . . . . . . . . . . . . . . . . . . . . . . . . . 1-4
Printer Status Lights. . . . . . . . . . . . . . . . . . . . . . . . . . . . . . . . . . . . . . . 1-4
Button Functions . . . . . . . . . . . . . . . . . . . . . . . . . . . . . . . . . . . . . . . . . 1-5
Status Code Box . . . . . . . . . . . . . . . . . . . . . . . . . . . . . . . . . . . . . . . . . 1-6
Setting Dip Switches. . . . . . . . . . . . . . . . . . . . . . . . . . . . . . . . . . . . . . . . . . . . . . 1-6
DIP Switches . . . . . . . . . . . . . . . . . . . . . . . . . . . . . . . . . . . . . . . . . . . . 1-7
LOADING SUPPLIES . . . . . . . . . . . . . . . . . . . . . . . . . . . . . . . . . . . . . . . . . . . . . . . . . . . . 2-1
Loading Labels . . . . . . . . . . . . . . . . . . . . . . . . . . . . . . . . . . . . . . . . . . . . . . . . . . 2-2
Loading Ribbon . . . . . . . . . . . . . . . . . . . . . . . . . . . . . . . . . . . . . . . . . . . . . . . . . 2-7
PRINTING. . . . . . . . . . . . . . . . . . . . . . . . . . . . . . . . . . . . . . . . . . . . . . . . . . . . . . . . . . . . . 3-1
Printing . . . . . . . . . . . . . . . . . . . . . . . . . . . . . . . . . . . . . . . . . . . . . . . . . . . . . . . . 3-1
On-Demand Mode Printing . . . . . . . . . . . . . . . . . . . . . . . . . . . . . . . . . 3-1
Printing an Error Label. . . . . . . . . . . . . . . . . . . . . . . . . . . . . . . . . . . . . 3-2
Using Batch Separators . . . . . . . . . . . . . . . . . . . . . . . . . . . . . . . . . . . . . . . . . . . 3-2
Adjusting Print Positions. . . . . . . . . . . . . . . . . . . . . . . . . . . . . . . . . . . . . . . . . . . 3-3
Printing the Euro-Dollar Symbol. . . . . . . . . . . . . . . . . . . . . . . . . . . . . . . . . . . . . 3-4
Entering Care Symbols and Special Characters . . . . . . . . . . . . . . . . . . . . . . . . 3-4
Font Samples . . . . . . . . . . . . . . . . . . . . . . . . . . . . . . . . . . . . . . . . . . . . . . . 3-5
CARE AND MAINTENANCE . . . . . . . . . . . . . . . . . . . . . . . . . . . . . . . . . . . . . . . . . . . . . . 4-1

Clearing Label Jams . . . . . . . . . . . . . . . . . . . . . . . . . . . . . . . . . . . . . . . . . . . . . 4-2
Cleaning. . . . . . . . . . . . . . . . . . . . . . . . . . . . . . . . . . . . . . . . . . . . . . . . . . . . . . . 4-2
Replacing the Printhead . . . . . . . . . . . . . . . . . . . . . . . . . . . . . . . . . . . . . . . . . . 4-6
Adjusting the Wide/Narrow Knobs. . . . . . . . . . . . . . . . . . . . . . . . . . . . . . . . . . . 4-9
Adjusting the Print Contrast. . . . . . . . . . . . . . . . . . . . . . . . . . . . . . . . . . . . . . . 4-10
Replacing the Fuse . . . . . . . . . . . . . . . . . . . . . . . . . . . . . . . . . . . . . . . . . . . . . 4-11
TROUBLESHOOTING. . . . . . . . . . . . . . . . . . . . . . . . . . . . . . . . . . . . . . . . . . . . . . . . . . . 5-1
Printing a Test Label. . . . . . . . . . . . . . . . . . . . . . . . . . . . . . . . . . . . . . . . . . . . . . 5-2
Troubleshooting . . . . . . . . . . . . . . . . . . . . . . . . . . . . . . . . . . . . . . . . . . . . . . . . . 5-3
Error Messages . . . . . . . . . . . . . . . . . . . . . . . . . . . . . . . . . . . . . . . . . . . . . . . . . 5-3
Data Errors . . . . . . . . . . . . . . . . . . . . . . . . . . . . . . . . . . . . . . . . . . . . . 5-4
Communication Failures . . . . . . . . . . . . . . . . . . . . . . . . . . . . . . . . . . 5-11
Data Formatting Errors . . . . . . . . . . . . . . . . . . . . . . . . . . . . . . . . . . . 5-12
Machine Faults . . . . . . . . . . . . . . . . . . . . . . . . . . . . . . . . . . . . . . . . . 5-13
SPECIFICATIONS & ACCESSORIES . . . . . . . . . . . . . . . . . . . . . . . . . . . . . . . . . . . . . . . A-1
Printer. . . . . . . . . . . . . . . . . . . . . . . . . . . . . . . . . . . . . . . . . . . . . . . . . . . . . . . . . A-1
Supply Specifications. . . . . . . . . . . . . . . . . . . . . . . . . . . . . . . . . . . . . . . . . . . . . A-2
Ribbon Specifications . . . . . . . . . . . . . . . . . . . . . . . . . . . . . . . . . . . . . . . . . . . . A-3
Accessories . . . . . . . . . . . . . . . . . . . . . . . . . . . . . . . . . . . . . . . . . . . . . . . . . . . . A-4
USING ADVANCED FEATURES . . . . . . . . . . . . . . . . . . . . . . . . . . . . . . . . . . . . . . . . . . . B-1
Adjusting Print Contrast . . . . . . . . . . . . . . . . . . . . . . . . . . . . . . . . . . . . . . . . . . . B-1
Defining the Print Control Packet . . . . . . . . . . . . . . . . . . . . . . . . . . . . B-1
Defining the Monetary Formatting Packet . . . . . . . . . . . . . . . . . . . . . . . . . . . . . B-2
Using Immediate Commands . . . . . . . . . . . . . . . . . . . . . . . . . . . . . . . . . . . . . . B-3
Resetting Control Characters . . . . . . . . . . . . . . . . . . . . . . . . . . . . . . . B-5
Enabling Immediate Commands. . . . . . . . . . . . . . . . . . . . . . . . . . . . . B-5
Sending Immediate Commands . . . . . . . . . . . . . . . . . . . . . . . . . . . . . B-6

GETTING STARTED 1
The Paxar
®
9830CL Care Label printer lets you print text,
graphics, and bar codes on thermal transfer (ribbon) fabric labels.
This chapter includes information about
u
unpacking the printer.
u
connecting the power cord.
u
connecting the communications cable.
u
using the printer’s control panel.
Getting Started 1-1
Audience
The Operator’s Handbook is for the person who prints and applies
labels.
Unpacking the Printer
After you unpack the printer, you should have: a 9830CL printer,
power cord, and a ribbon take-up core (may already be on
take-up reel).
Keep the box and packaging material in case the printer ever
needs repair.
Power cords are not supplied with 230-volt printers. You need to
purchase a power cord separately. The power cord requires IEC
320 STD C13 end finish for the printer interface and it must meet
requirements for 1.6 Amps at 115VAC and 1 Amp at 230VAC.
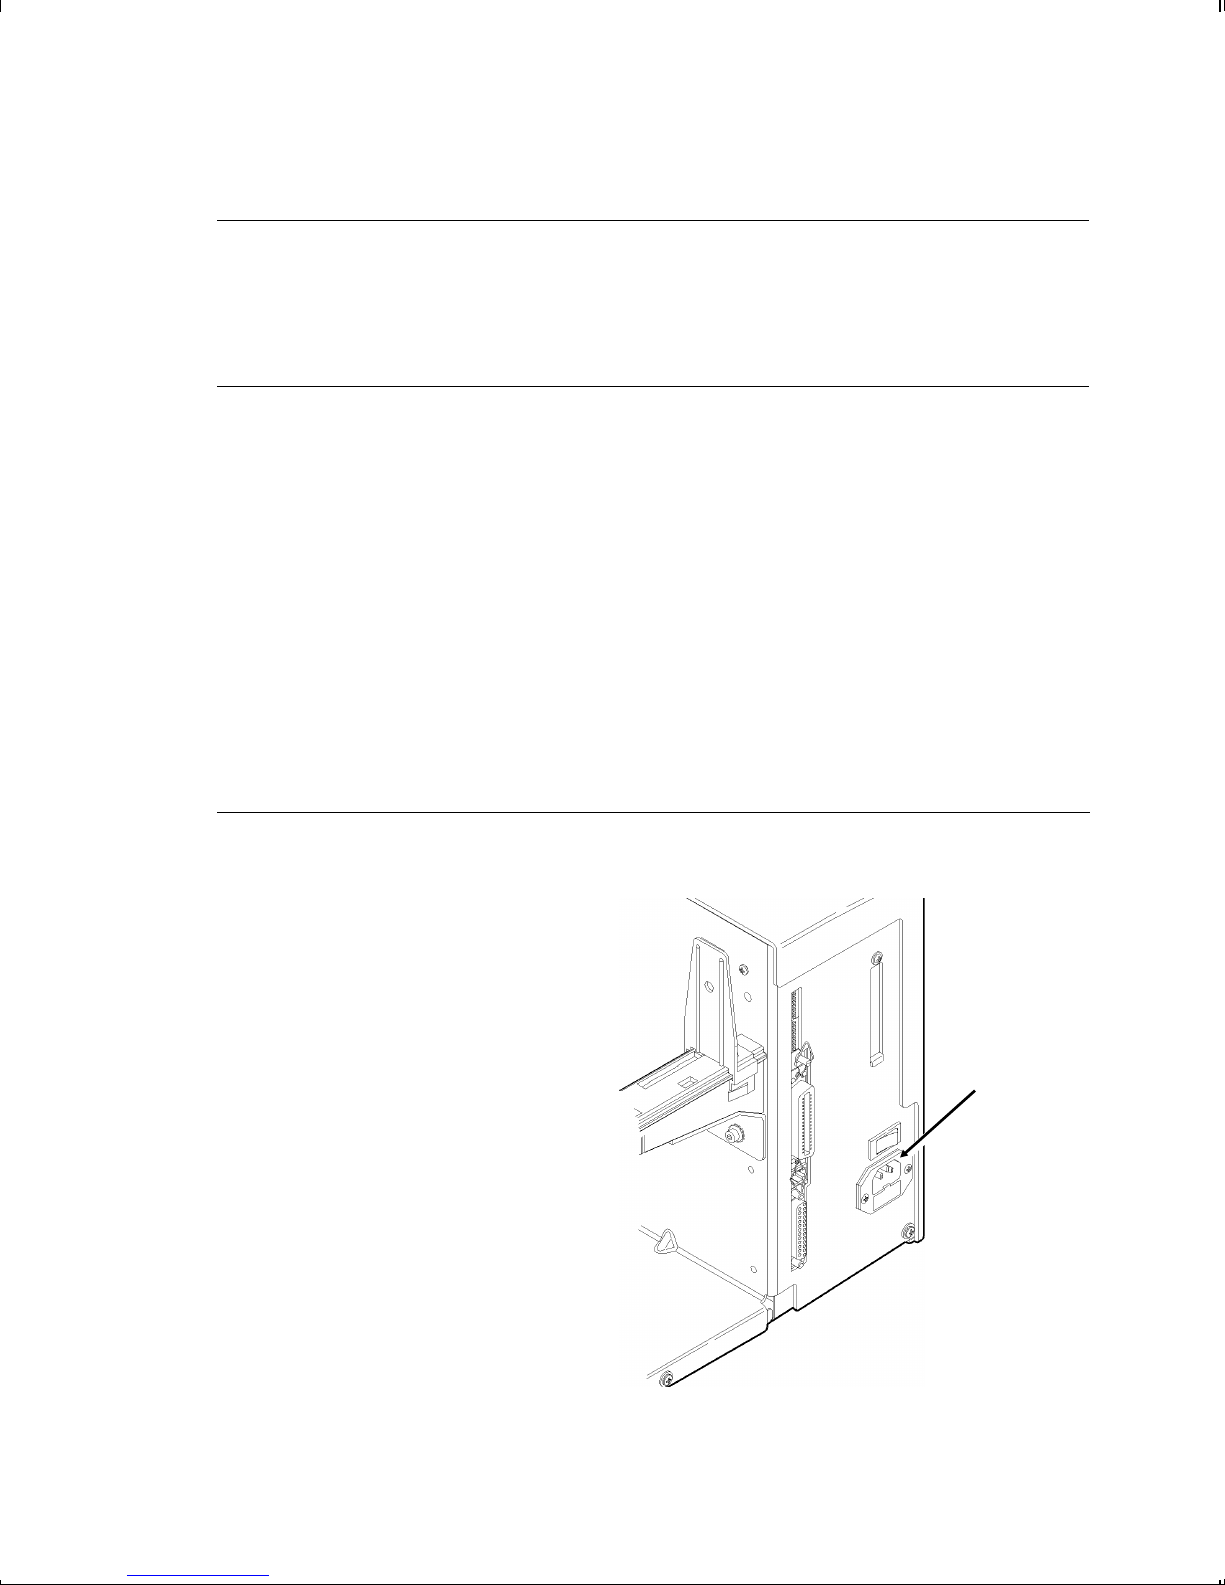
Connecting the Power Cable
To connect the power cable:
1. Plug the power cable
into the socket. Plug
the other end of the
cable into a grounded
electrical outlet.
2. Turn on the printer.
Press ( I ) to turn on
and ( O ) to turn off the
printer.
For information about
replacing the fuse, see
Chapter 4, "Care and
Maintenance."
Power Cable
goes here
1-2 Getting Started
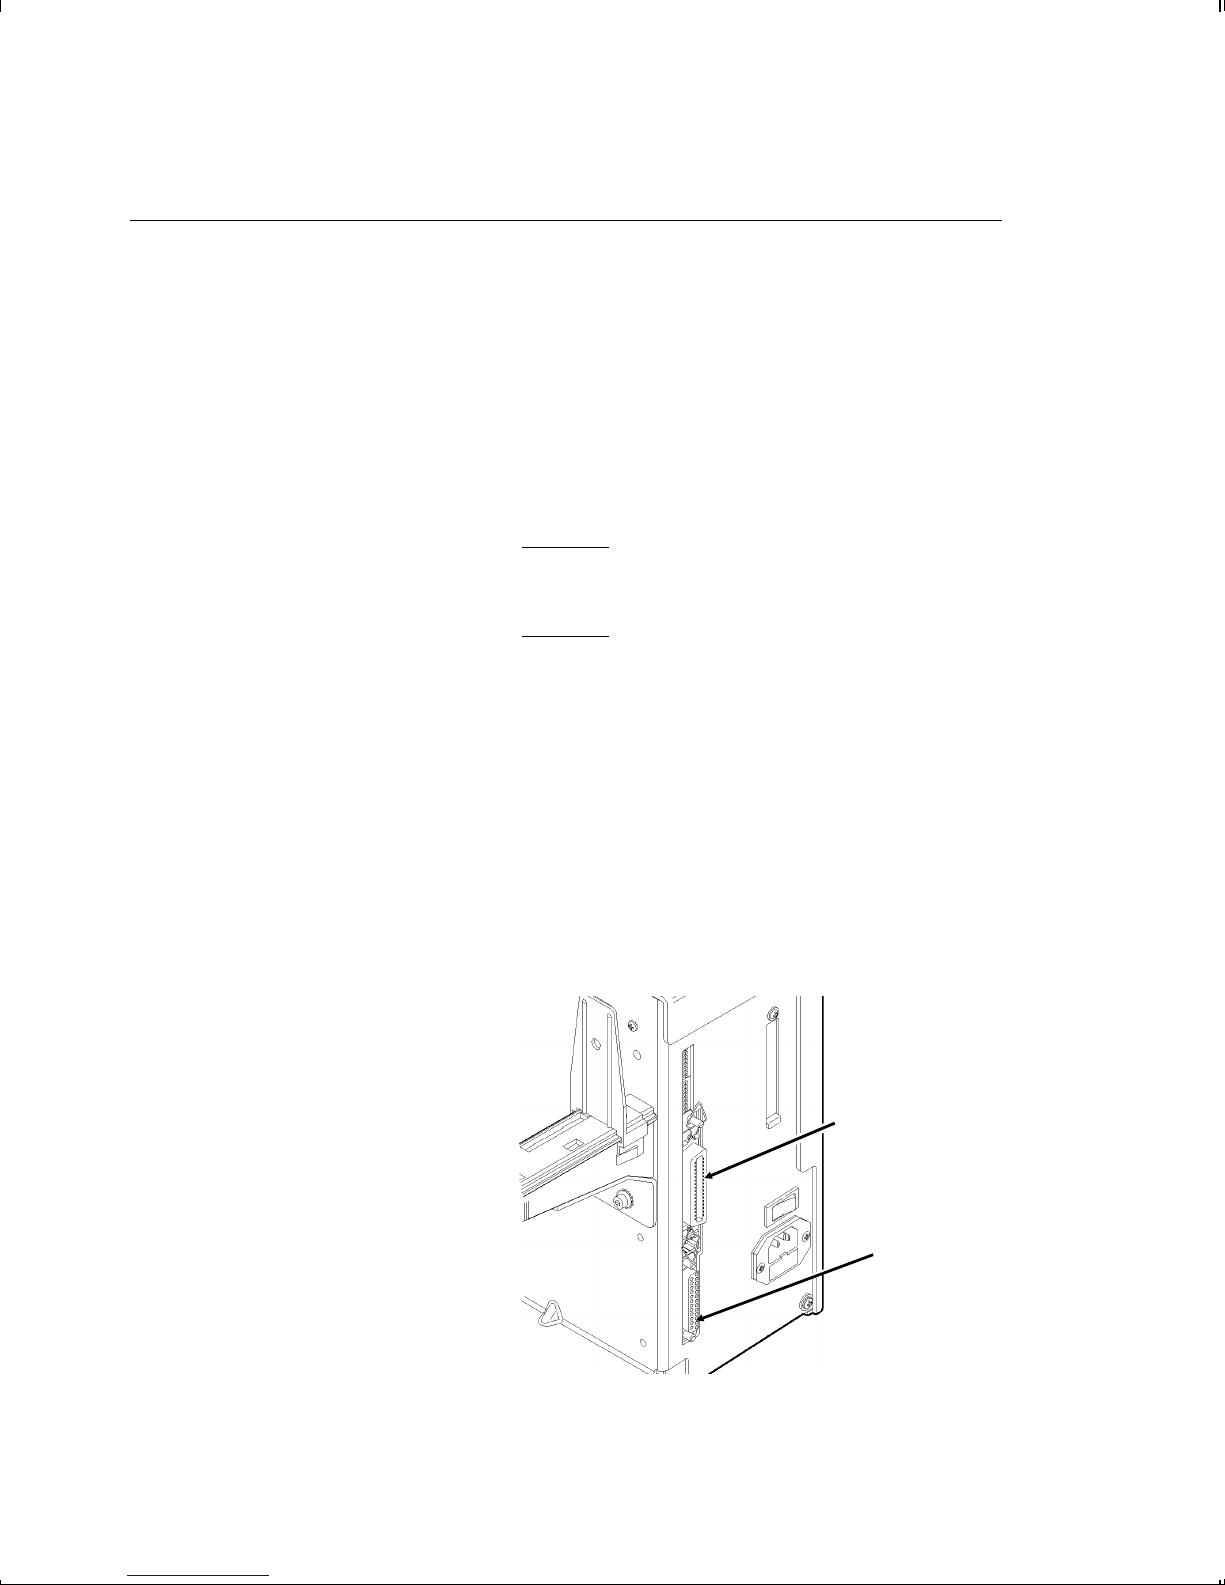
Establishing Communications
Parallel Port
Before the printer can accept print jobs from the host, you must:
u
Connect the communication cable to the printer and to the
host.
u
Set the communication values on the printer to match those at
the host. (Only required if you are using the serial port.)
Connecting the Communication Cable
Make sure the printer is off before connecting
the cable to the communication port.
Ask your System Administrator which method to use to
communicate with the host:
u
Serial Communication
(required for use with Paxar PCMate software)
9 to 25 pin cable
25 to 25 pin cable
u
Parallel Communication
IEEE-1284 or Centronics® mode cable
See "Setting DIP
Switches," for more
information.
Connect the
communication cable
into the appropriate port.
Secure the cable with
the connecting screws
(serial) or spring clips
(parallel).
Serial Port
Getting Started 1-3

Default Serial Port Communication Values
If you are communicating with the host through the serial port,
make sure the printer’s communication values match those at the
host. The factory default values are: 9600 Baud, 8 bit data frame
Word Length, 1 Stop Bit, no Parity, and RTS/CTS Flow Control.
To change the printer’s communication values, ask your System
Administrator or see "Setting DIP Switches" to change the DIP
switch settings.
Using the Control Panel
The control panel helps you check printer status, displays error
codes, and allows you to perform some basic printer functions.
Printhead
Release
Power
Status Code
Supplies
Paused
Feed
1 2 3
Pause Clear
Printer Status Lights
Power: The printer shows a steady green light when
it is on.
Supplies: The printer shows a blinking amber light when
it is out of labels or ribbon, or when you have
a supply jam.
1-4 Getting Started

Paused: The printer shows a steady amber light when
paused.
The printer shows a blinking amber light when
there is a data, communication, or data
formatting error. See the status code box for
the error code.
The printer also shows a blinking amber light
when it’s ready to print a label in the
On-Demand mode. See Chapter 3, "Printing"
for more information.
Button Functions
Feed:
u
Prints a label in the On-Demand mode.
u
Feeds a blank label if there is no print job.
u
Prints a label with error information that is
useful to your System Administrator if an
error is displayed.
Pause: Pauses the current print job or resumes a
paused print job. When the Paused light is
on, the job is paused.
Feed and Pause: Prints a test label when you press the buttons
at the same time.
Feed and Clear: Allows you to adjust print positions from
paused mode. See Chapter 3, "Printing" for
more information.
Getting Started 1-5
Clear:
u
Clears an error.
u
Cancels the current print job.
u
Cancels all queued print jobs if pressed
for two seconds. Also clears the
communication queue and cancels any
packet being received.
To cancel a single or all queued print jobs, the printer must be in
paused mode before Clear is pressed.
Status Code Box
The status code box displays a three-digit error code to identify
any problem the printer may have. For a description of the
problem, look up the error code in Chapter 5, "Troubleshooting."
If there is no error, the display will be blank.
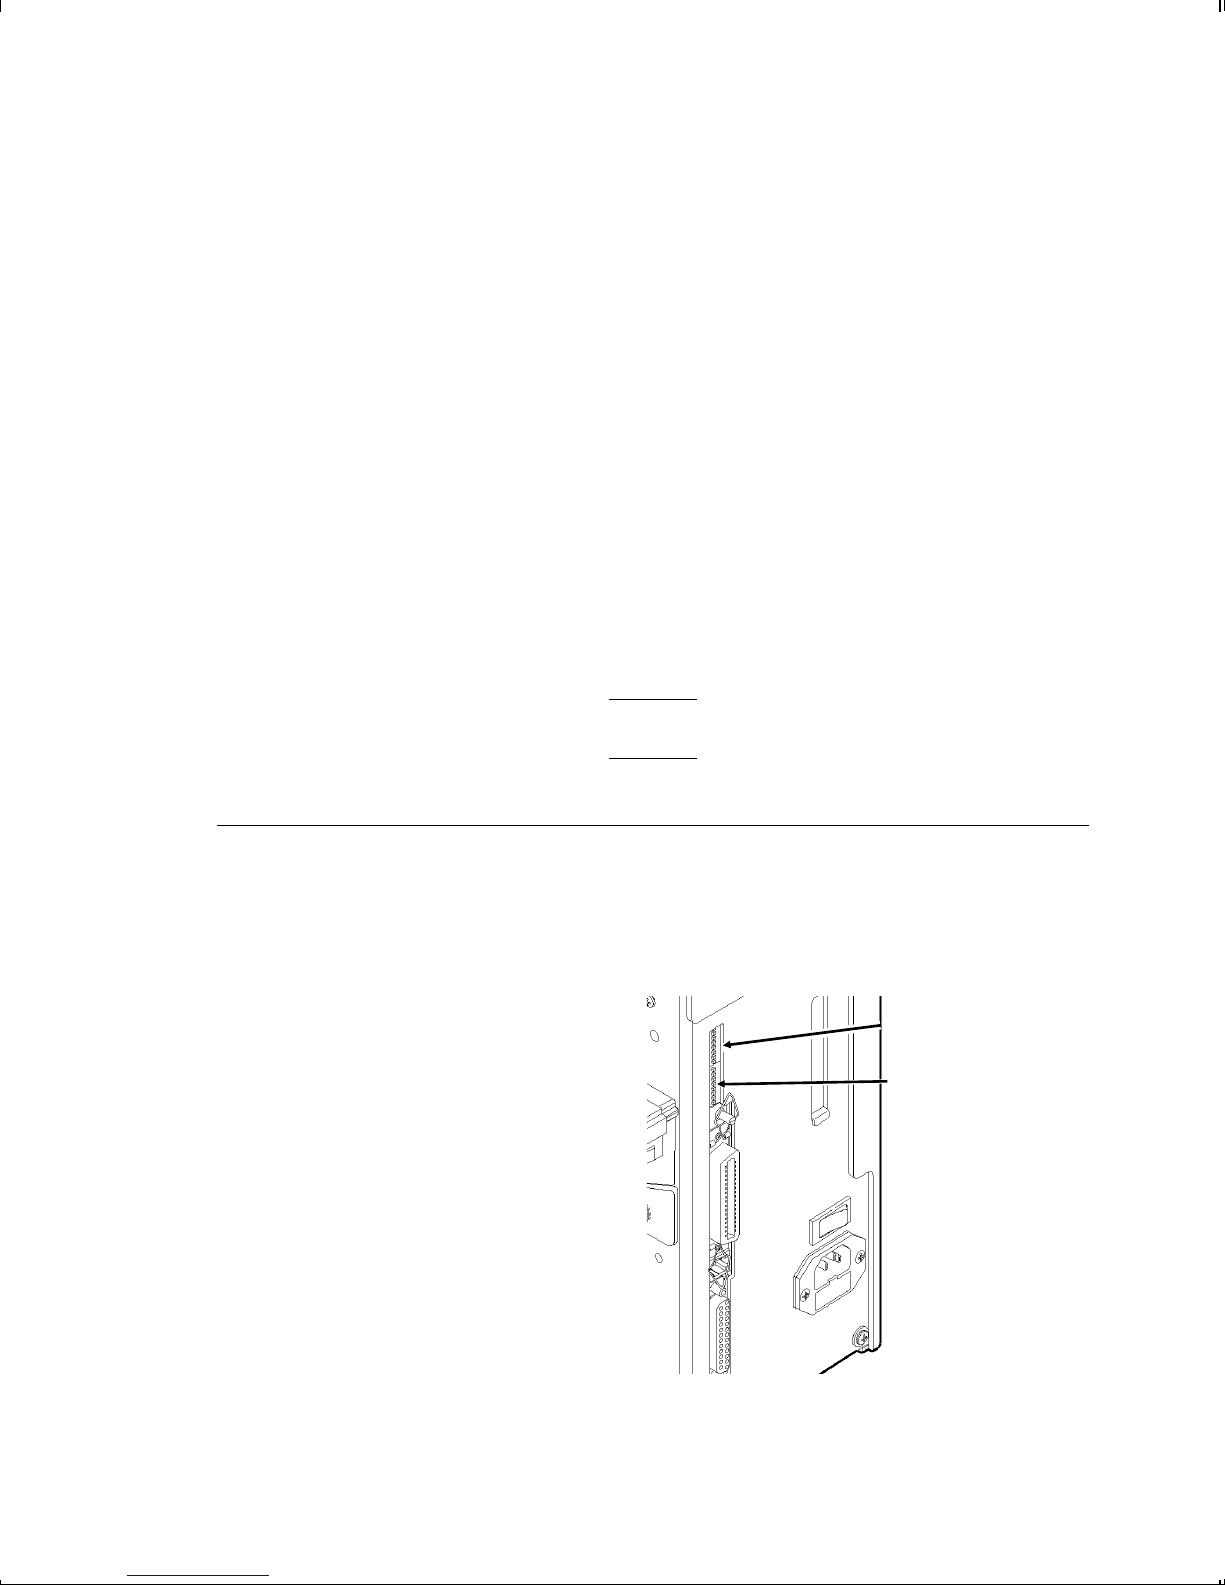
Setting Dip Switches
To change the DIP switch settings, move the switches to the
desired position and then turn on the printer. If you select
Software Controlled, the parameters in Packet F will override the
communication settings.
Software Controlled uses
the last sent Packet F
settings or the defaults.
Turning on the printer
activates the DIP switch
settings. Make sure the
DIP switch settings match
the printer’s setup for
ribbon or supply type.
Upper DIP Switches
Lower DIP Switches
1-6 Getting Started
DIP Switches
Upper DIP Switches
12345678
Baud Rate
38400
19200
9600
4800
2400
1200
Software Control
ON
ON
ON
OFF
OFF
OFF
OFF
ON
OFF
OFF
ON
ON
OFF
OFF
Data Bits
7 Data Bits
8 Data Bits
Stop Bits
2 Stop Bits
1 Stop Bit
Parity
Even
Odd
None
Parallel Port
Centronics Mode
IEEE-1284
Values in bold indicate the default setting (9600 Baud; 8 Data Bits; 1
Stop Bit; No Parity; and Centronics Mode).
Communication settings at the printer must match those at the host.
Make sure your host is capable of communicating at the speed you
select for the printer.
OFF
ON
OFF
ON
OFF
ON
OFF
ON
OFF
ON
OFF
ON
OFF
OFF
OFF
ON
OFF
OFF
ON
Getting Started 1-7
Lower DIP Switches
12345678
Flow Control
XON/XOFF
RTS/CTS*
DTR
ON
OFF
OFF
OFF
ON
OFF
Diagnostics
Normal
Diagnostics Mode
OFF
ON
Verifier
No Verifier
Verifier Installed
OFF
ON
Supply Type
Die Cut or Edge Aperture
Black Mark
Continuous
Center Aperture
OFF
OFF
ON
ON
OFF
ON
OFF
ON
Ribbon
Transfer
Direct
OFF
ON
Feed Mode
Disable On-Demand
Enable On-Demand
Values in bold indicate the default setting (RTS/CTS Flow Control;
Normal Mode; No Verifier; Continuous Supply; Transfer; and
Continuous Mode).
* Requires a special cable.
OFF
ON
1-8 Getting Started

LOADING SUPPLIES 2
This chapter describes how to load a roll of supply and a ribbon
roll.
You can use Paxar’s 9830CL fabric label kits containing perforated
fabric labels and ribbon. If you switch from black mark to
continuous supplies make sure the DIP switches are set correctly.
Make sure you use only approved Paxar supplies. See
Appendix A, "Specifications and Accessories" for a list of Paxar
supplies or contact your Paxar Representative for more
information.
CAUTION
The width of the ribbon must be greater than the supply
width. Since some supplies are more abrasive to
printheads than others, using a ribbon wider than your
supply helps protect the printhead. Replacement
printheads are expensive.
Loading Supplies 2-1
Loading Labels
Make sure the printer is configured for the correct supply type.
To load a roll of labels:
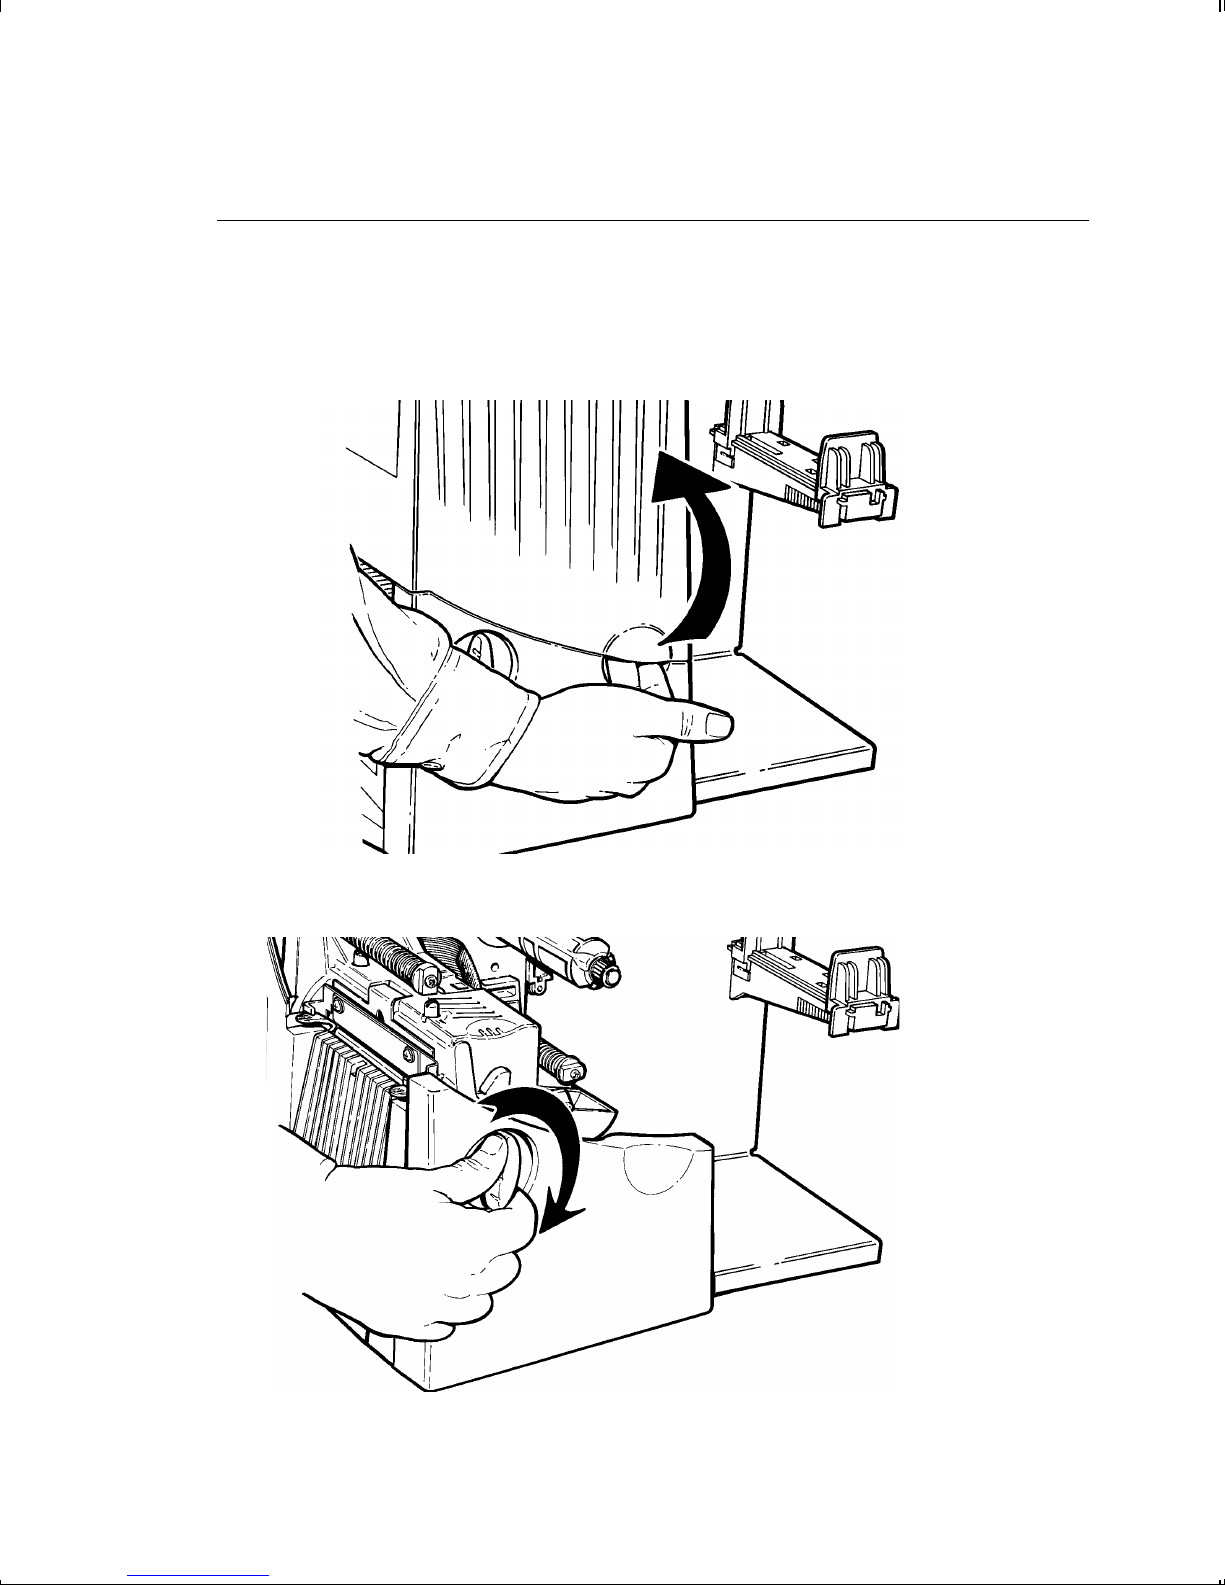
1. Open the cover.
2. Unlock the printhead by turning the retaining latch.
2-2 Loading Supplies
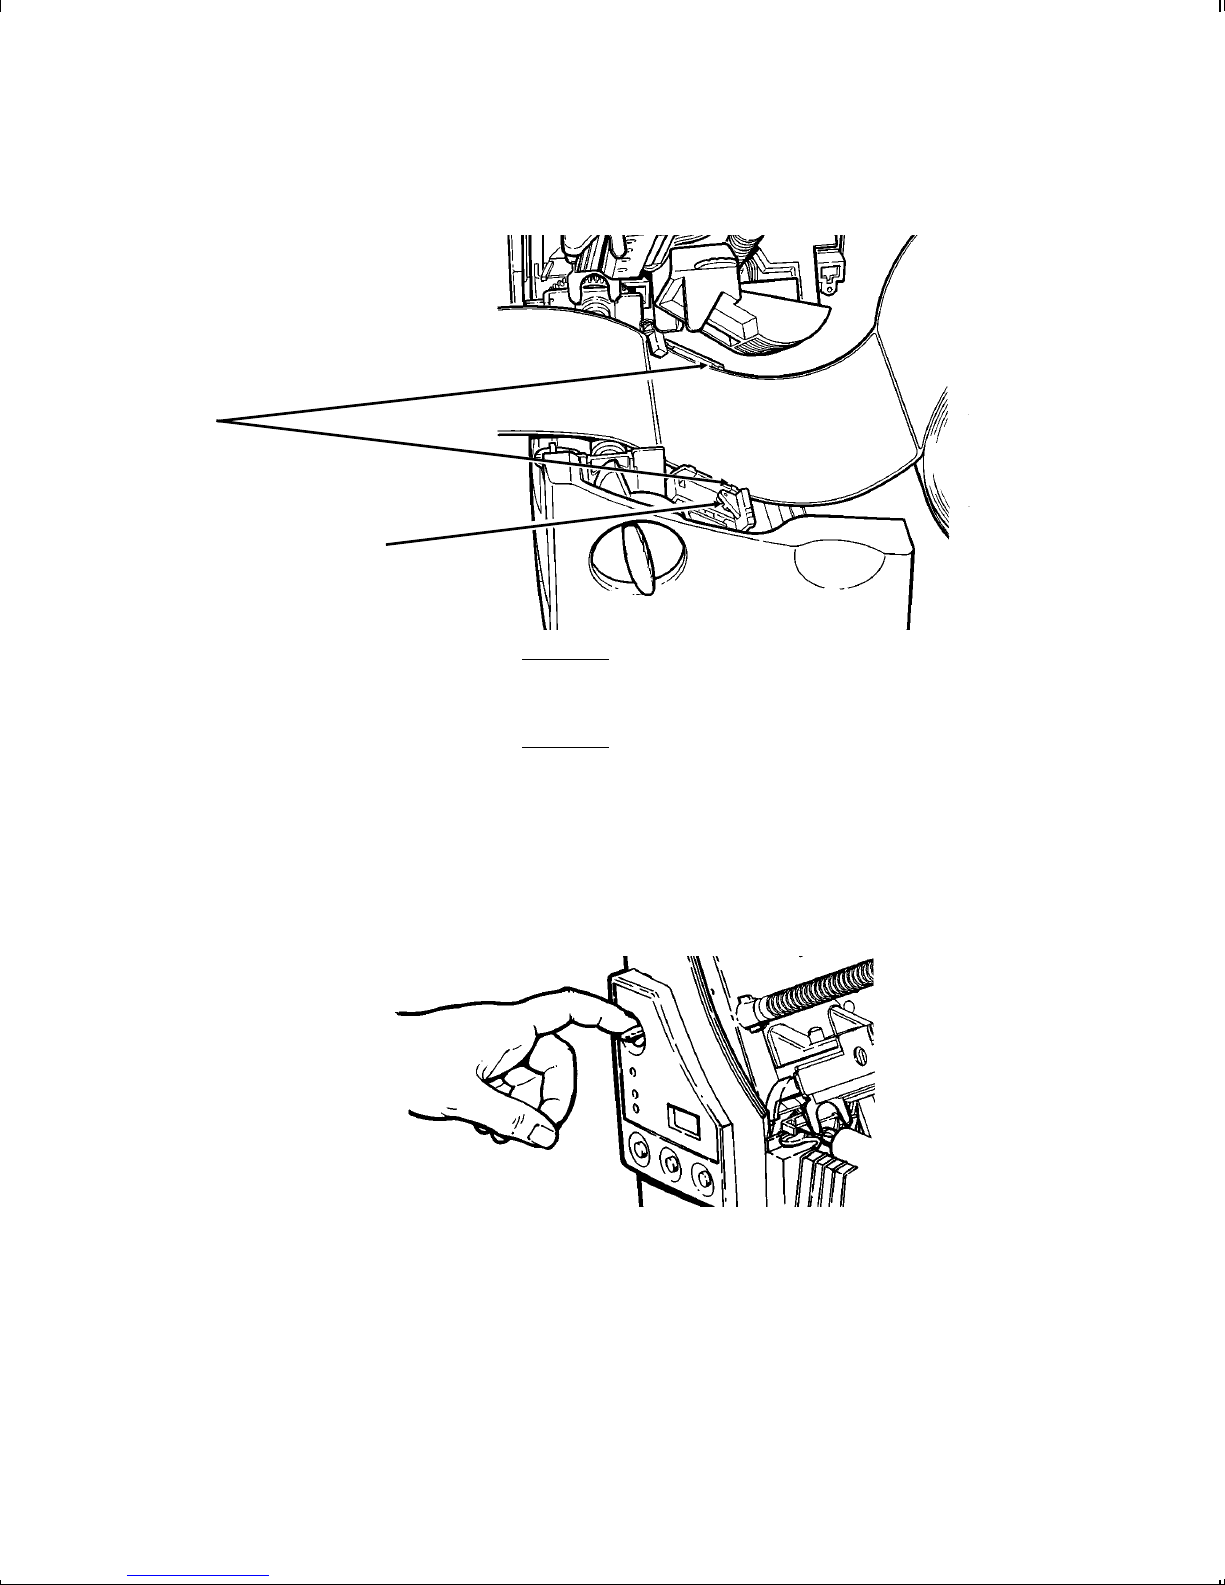
3. Lift printhead assembly using the printhead tab until the
Printhead Tab
Deflector Tab
Supply Holder
Guides
assembly locks into place.
CAUTION
Make sure you use only approved Paxar
supplies. See Appendix A, "Specifications
and Accessories" for a list of Paxar supplies
or contact your Paxar Representative for
more information.
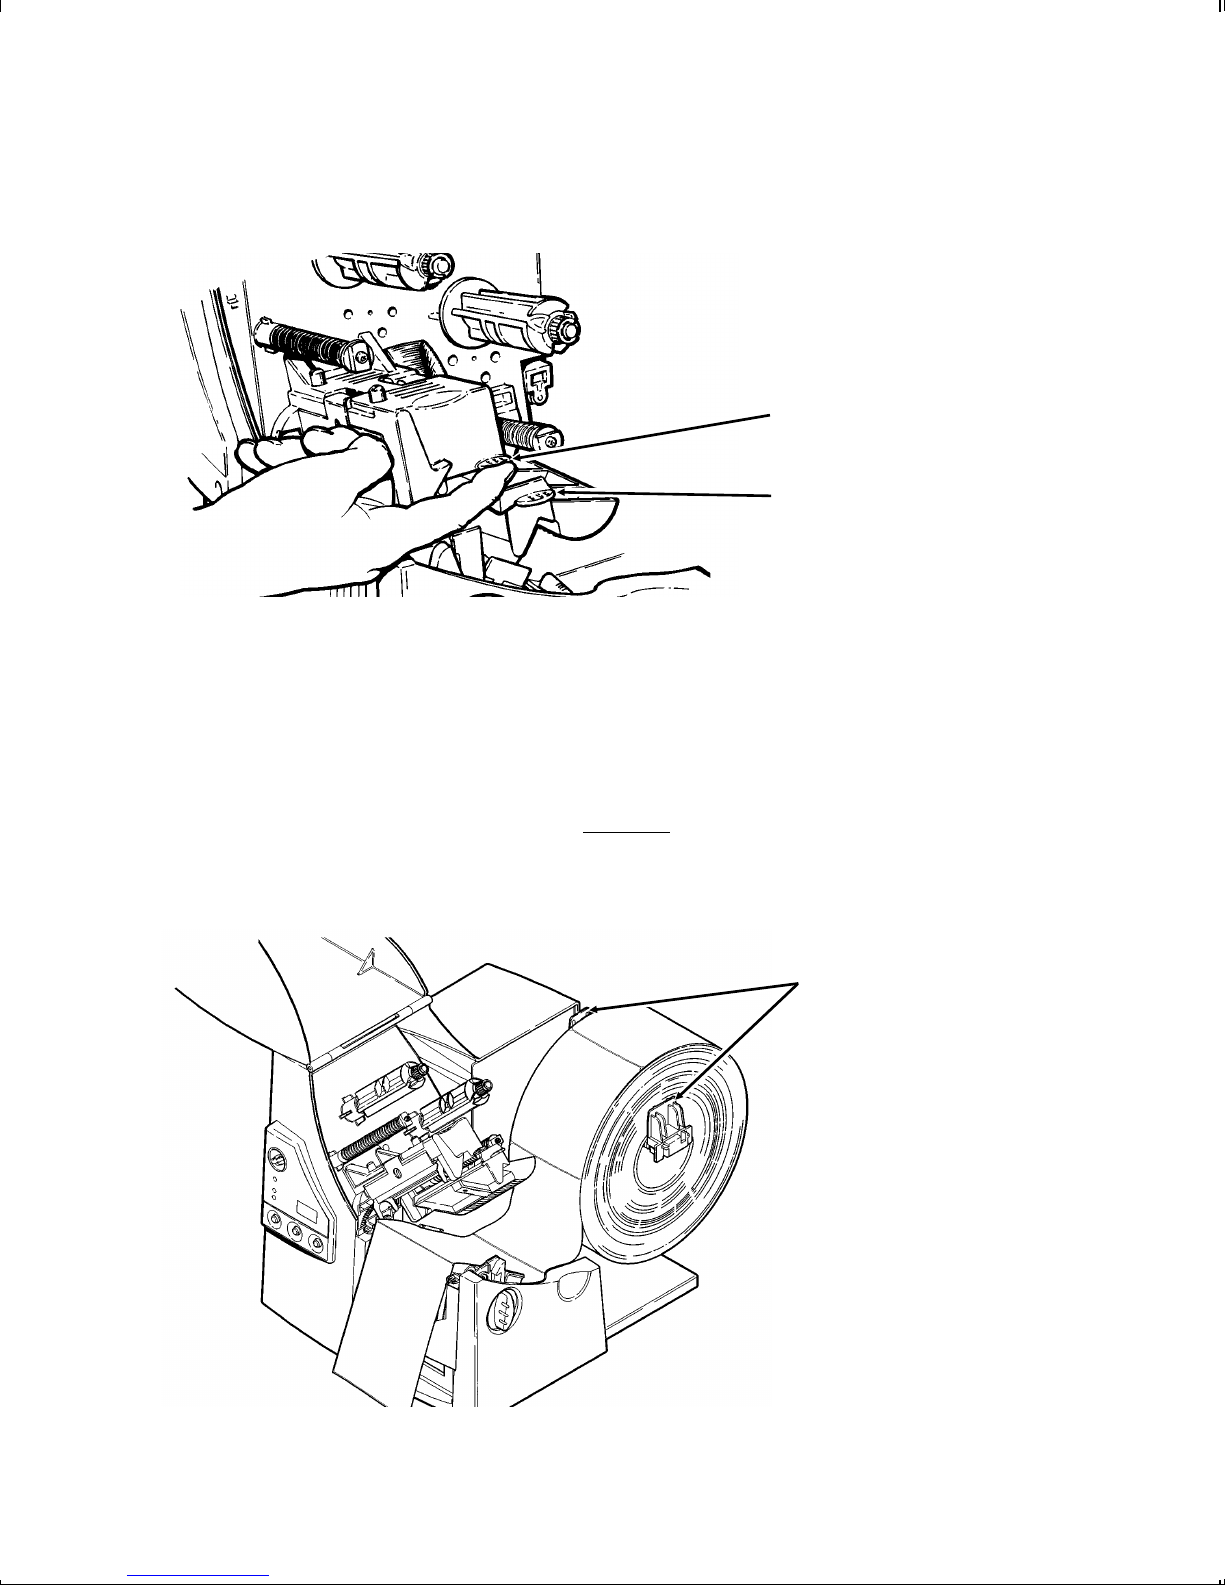
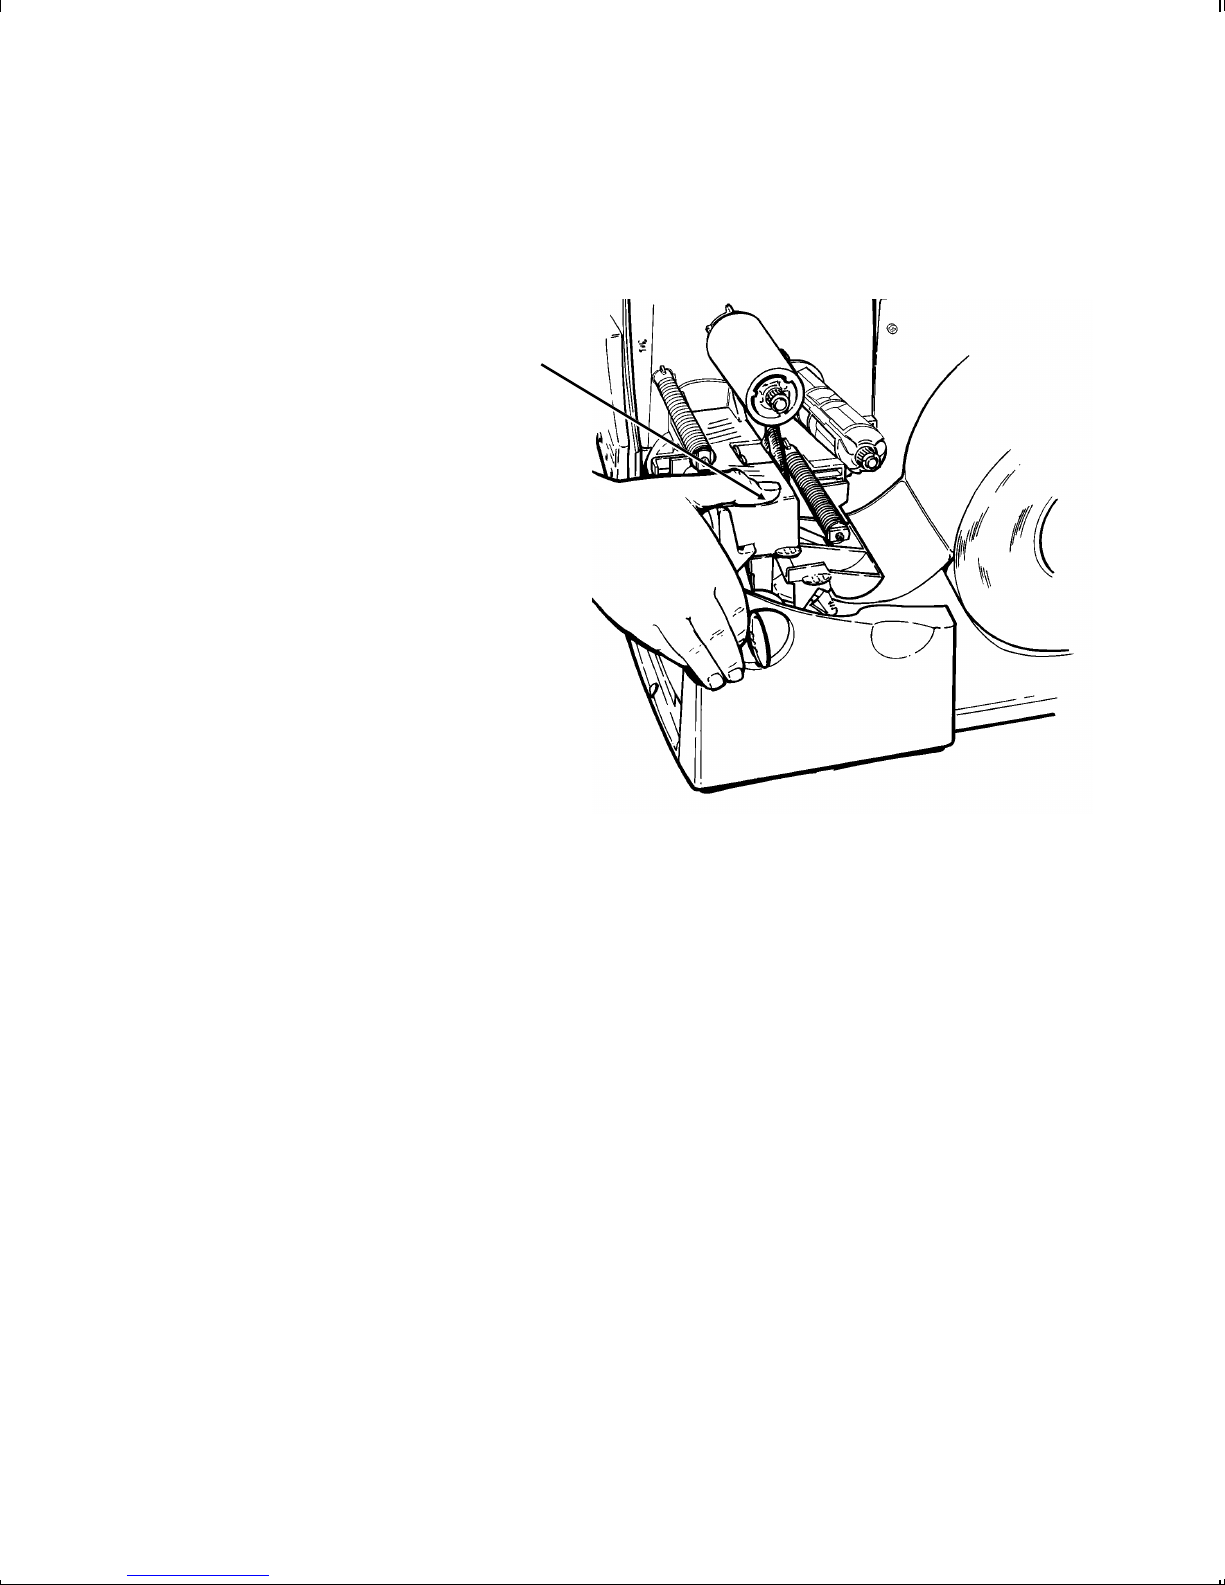
4. Place the roll of supply on the supply holder. Make sure the
supply unrolls from the top as shown.
Loading Supplies 2-3
Do not pick up the printer
by the supply holder.
5. Adjust the supply holder guides so the sides barely touch the
roll. Make sure the supply roll turns freely.
6. Push down on the supply lever to unlock the supply guides.
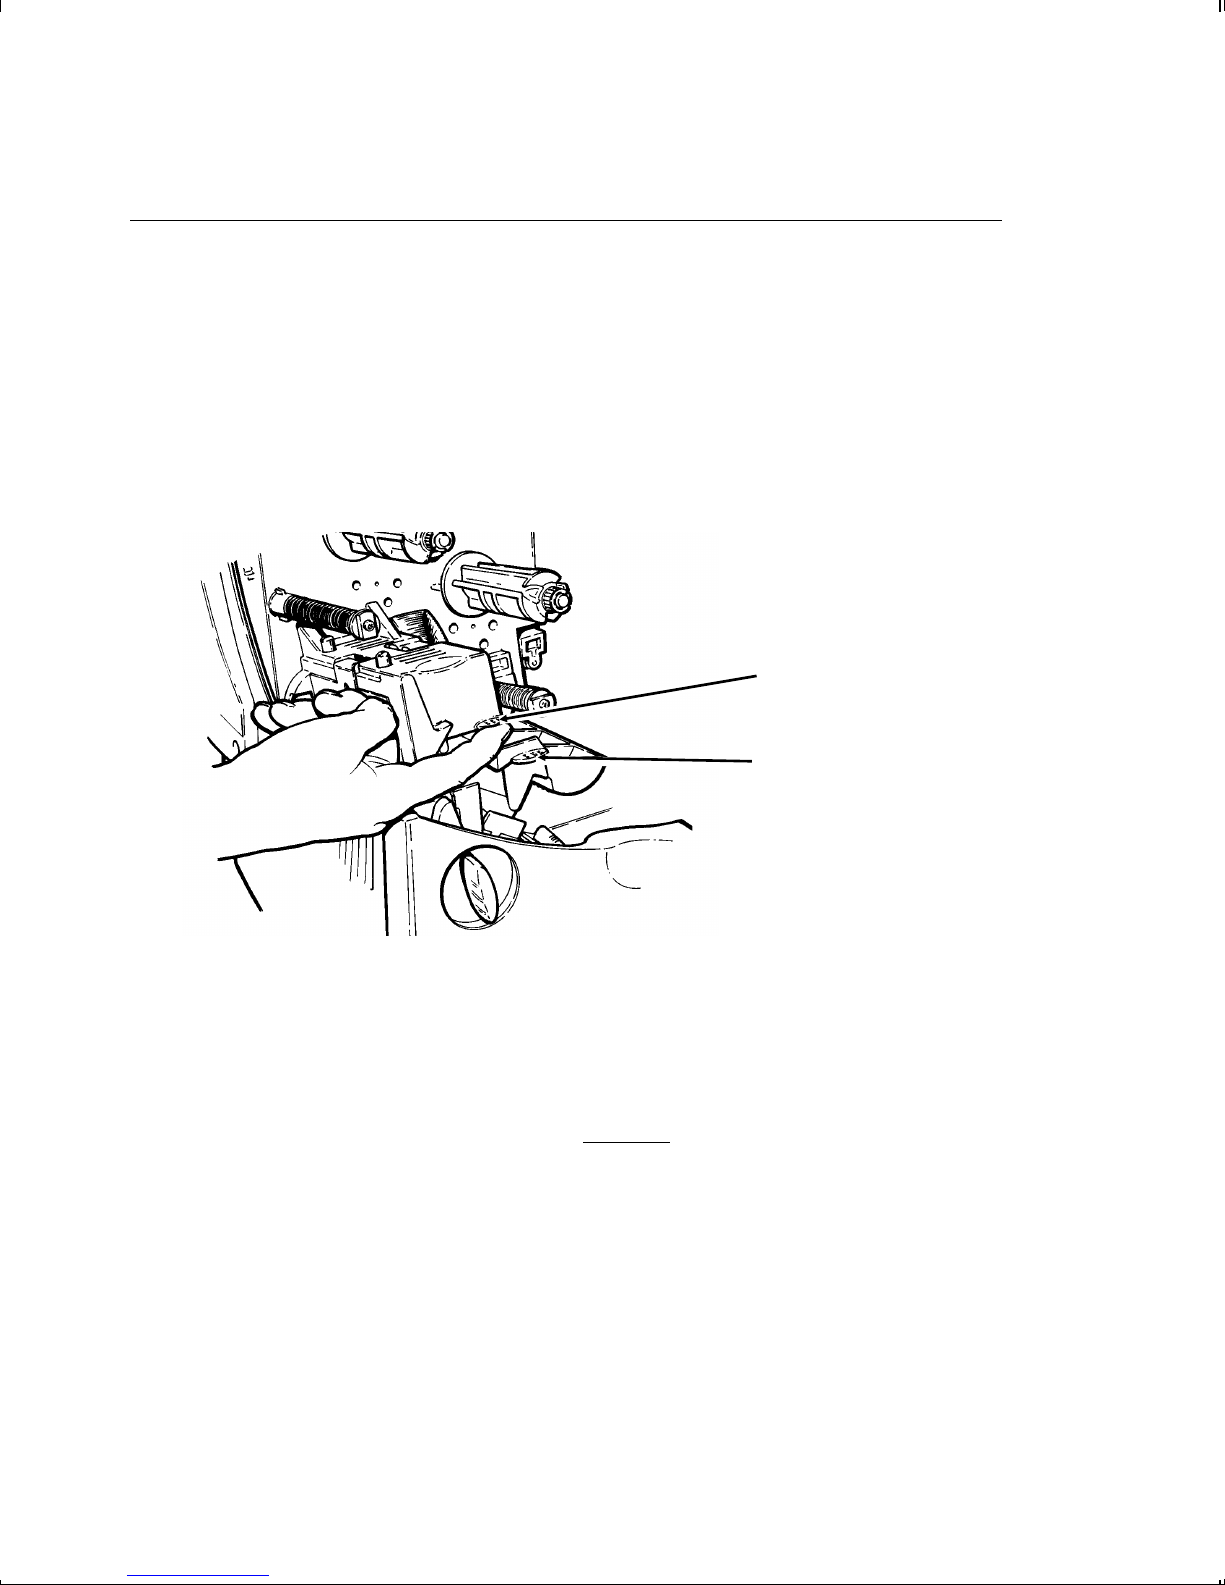
7. Lay the label strip across the supply guide and thread the
supply between the ribbon bar and peel bar.
Peel Bar
Ribbon Bar
CAUTION
Make sure the supply is straight in the supply path
and aligned with the printhead.
2-4 Loading Supplies
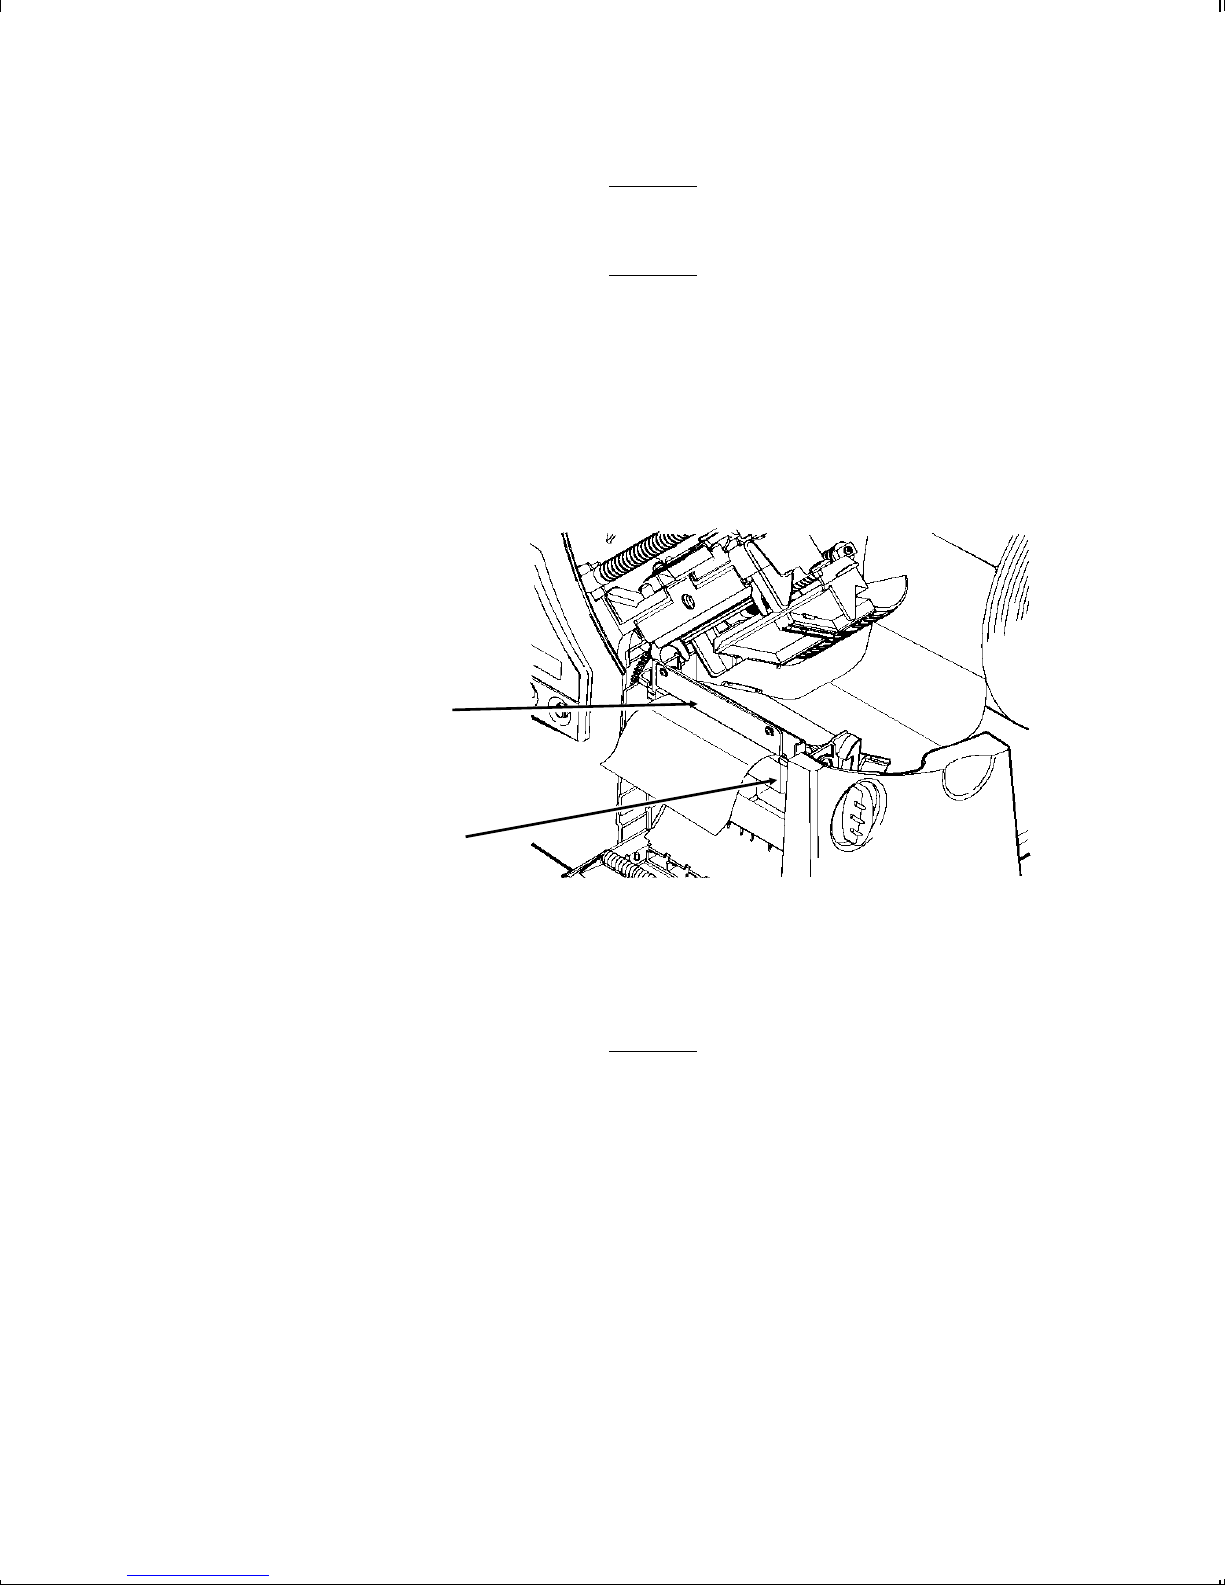
8. Tuck the supply under the nibs.
Nibs
Supply Lever
Make sure a few inches of supply are past the
front end of the printer.
9. Adjust the supply guides so they touch the supply. Push up
on the supply lever to lock the supply guides into place.
10. Hold the printhead assembly by the printhead tab while
pressing down on the printhead release.
Loading Supplies 2-5
11. Close the printhead by pressing down on the thumb well until
you hear it click into place.
Thumb Well
12. Close the cover.
13. Press Feed to position the supply under the printhead.
You may need to adjust the wide/narrow knobs depending on
the width of your supply. See Chapter 4, "Care and
Maintenance" for more information.
2-6 Loading Supplies
Loading Ribbon
Printhead Tab
Deflector Tab
Make sure the printer is configured to use a ribbon.
To load ribbon:
1. Open the cover.
2. Unlock the printhead by turning the retaining latch.
3. Lift printhead assembly using the printhead tab until the
assembly locks into place.
CAUTION
Make sure you use only approved Paxar
supplies. See Appendix A, "Specifications
and Accessories" for a list of Paxar supplies
or contact your Paxar Representative for
more information.
Loading Supplies 2-7
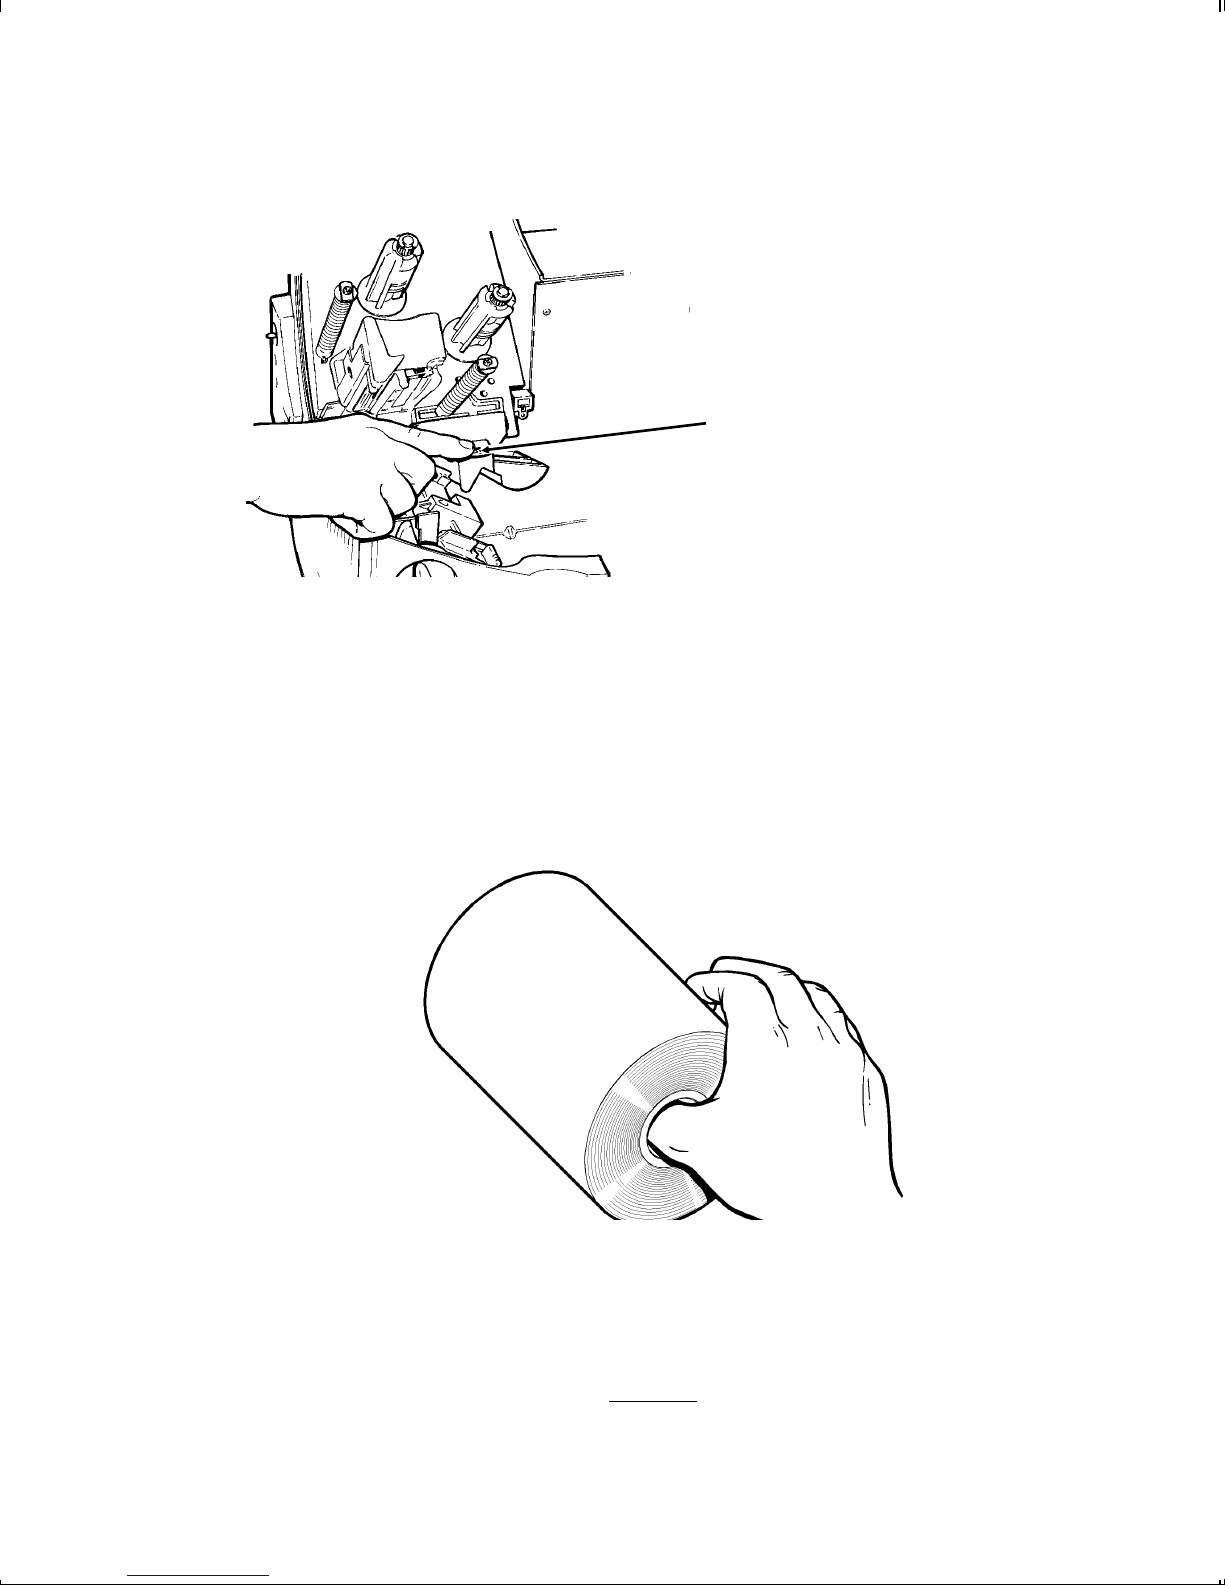
4. Push the deflector tab down.
Deflector Tab
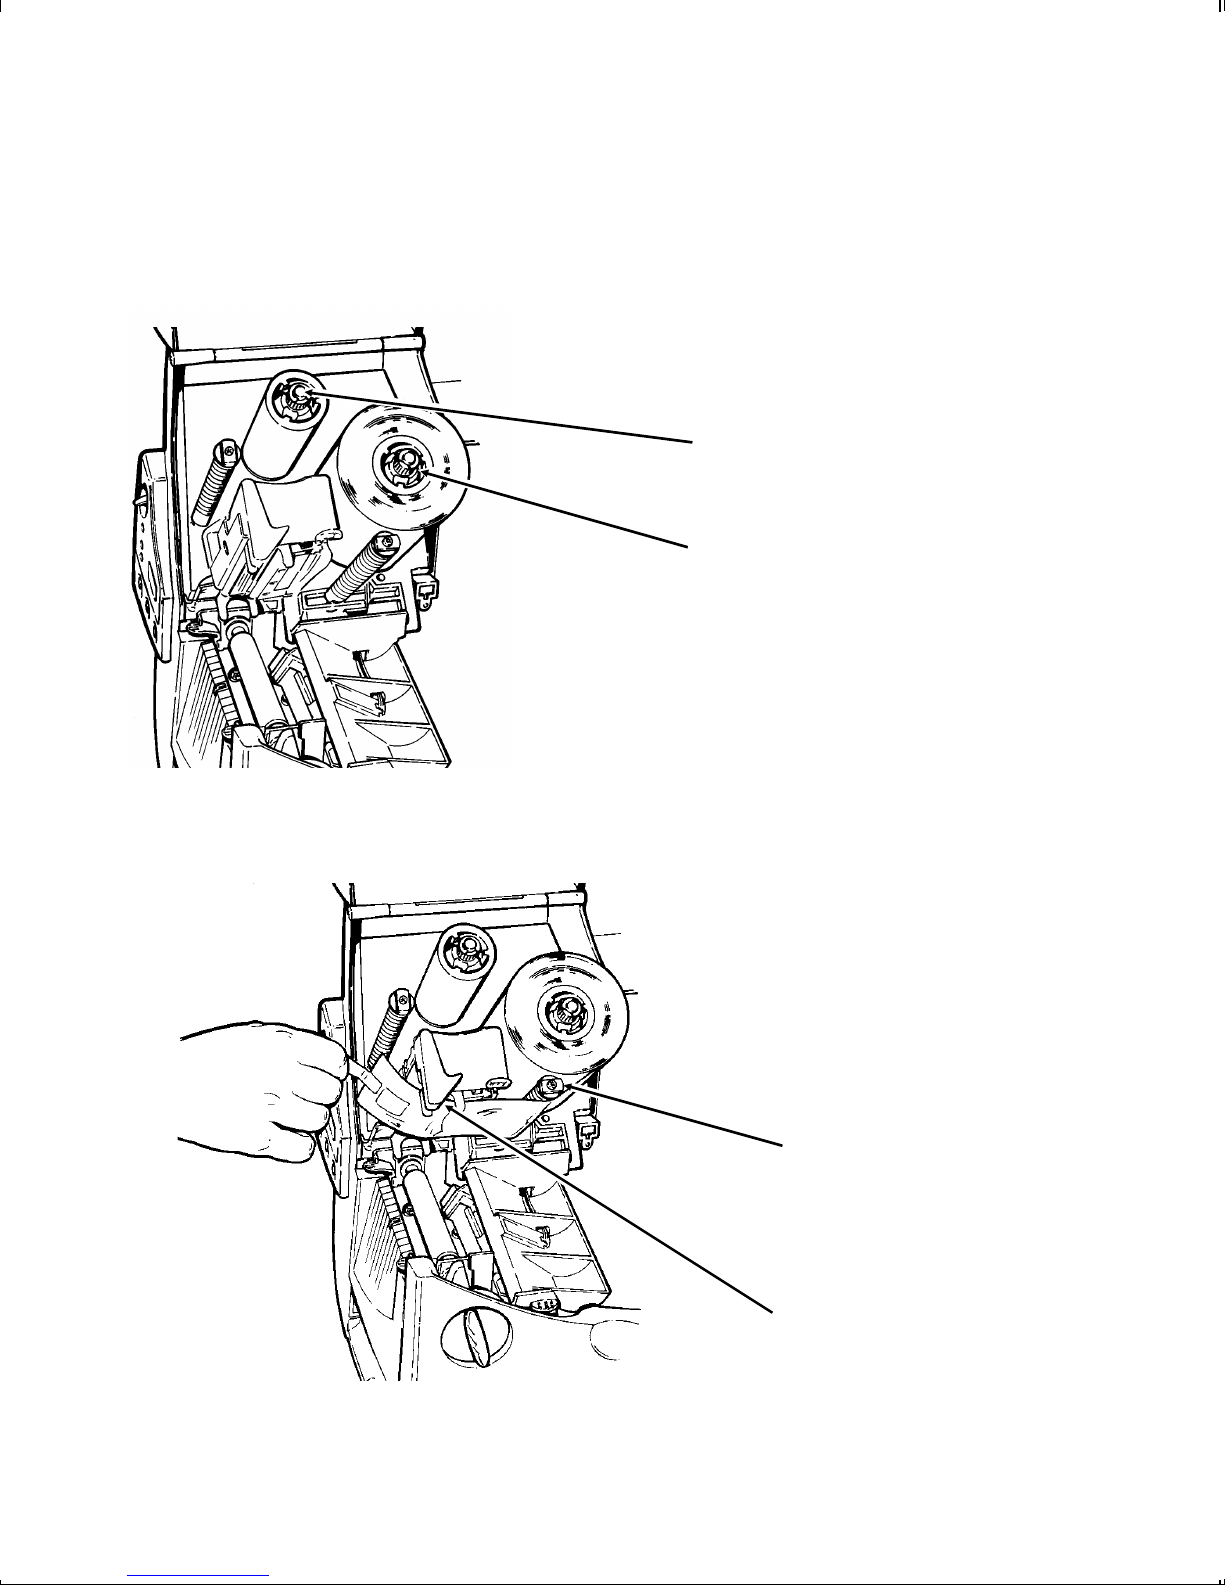
5. Slide the extra ribbon core on the take-up reel as far as it will
go with the writing on the end of the core facing out. Use
your empty ribbon core as the take-up core. The take-up core
only fits on the take-up reel one way. (An extra take-up core
is available. See "Accessories" in Appendix A for more
information.)
6. Remove the new ribbon from the package as shown. Do not
wrinkle or crush the new ribbon.
CAUTION
Since some supplies are more abrasive to
printheads than others, using a ribbon wider than
your supply helps protect the printhead.
2-8 Loading Supplies
7. Slide the ribbon onto the back reel as far as it will go with the
writing on the end of the core facing out. The ribbon roll only
fits on the reel one way. Carefully unwind a few inches of
ribbon from the bottom of the roll.
Take-up Reel
Back Reel
8. Carefully feed the ribbon under both ribbon rollers and
printhead as shown.
Ribbon Roller
Printhead
Loading Supplies 2-9
 Loading...