

Paxar 9800 User Manual
Monarch
9800 Series
Printers
TC9840ENTR Rev. AA 1/00 ©2000 Monarch Marking Systems, Inc. All rights reserved.

Each product and program carries a respective written warranty, the only
warranty on which the customer can rely. Monarch reserves the right to make
changes in the product, the programs, and their availability at any time and
without notice. Although Monarch has made every effort to provide complete
and accurate information in this manual, Monarch shall not be liable for any
omissions or inaccuracies. Any update will be incorporated in a later edition of
this manual.
©2000 Monarch Marking Systems, Inc. All rights reserved. No part of this
publication may be reproduced, transmitted, stored in a retrieval system, or
translated into any language in any form by any means, without the prior
written permission of Monarch Marking Systems, Inc.
WARNING
This equipment has been tested and found to comply with the limits for a Class A digital
device, pursuant to Part 15 of the FCC Rules. These limits are designed to provide
reasonable protection against harmful interference when the equipment is operated in a
commercial environment. This equipment generates, uses, and can radiate radio frequency
energy and, if not installed and used in accordance with the instruction manual, may cause
harmful interference to radio communications. Operation of this equipment in a residential
area is likely to cause harmful interference in which case the user will be required to correct
the interference at his own expense.
CANADIAN D.O.C. WARNING
This digital apparatus does not exceed the Class A limits for radio noise emissions from
digital apparatus set out in the Radio Interference Regulations of the Canadian Department
of Communications.
Le présent appareil numérique n’émet pas de bruits radioélectriques dépassant les limites
applicables aux appareils numériques de la classe A prescrites dans le Réglement sur le
brouillage radioélectrique édicte par le ministère des Communications du Canada.
Trademarks
MONARCH is a registered trademark of Monarch Marking Systems, Inc.
Monarch®, 9800 and 9840 are trademarks of Monarch Marking Systems, Inc.
Paxar is a trademark of Paxar Corporation.
Microsoft and MS-DOS are registered trademarks of Microsoft Corporation.
Windows is a registered trademark of Microsoft in the U.S. and other countries.
Hewlett-Packard is a registered trademark of Hewlett-Packard Company.
HP Jet Admin, HP JetDirect, and HP Web Jet Admin are trademarks of Hewlett-Packard Company.
UNIX is a registered trademark of the Open Group.
Novell and NetWare are registered trademarks of Novell, Inc., in the United States and other countries.
IBM, RS/6000, OS/2, and OS/2 Warp are registered trademarks of the IBM Corporation in the United States.
Sun is a registered trademark of Sun Microsystems, Inc.
SCO UNIX is a product of The Santa Cruz Operation, Inc.
XCD XAdmin and XCD Web XAdmin are products of TROY XCD, a subsidiary of the TROY Group, Inc.
Sun Solaris is a product of Sun Microsystems, Inc.
Other products are trademarks or registered trademarks of their respective holders and should be noted as
such.
Monarch Marking Systems
P. O . B o x 6 0 8
Dayton, Ohio 45401

TABLE OF CONTENTS
INTRODUCTION.............................................................................................. 1-1
VERVIEW..................................................................................................... 1-1
O
EATURES ..................................................................................................... 1-2
F
INSTALLING THE HARDWARE........................................................................ 2-1
VERVIEW..................................................................................................... 2-1
O
RINT SERVER INSTALLATION ........................................................................... 2-1
P
ETTING UP THE PRINT SERVER .......................................................................2-1
S
THERNET INSTALLATION................................................................................. 2-2
E
ESTORING FACTORY DEFAULTS....................................................................... 2-2
R
MANAGEMENT METHODS .............................................................................. 3-1
VERVIEW..................................................................................................... 3-1
O
DMIN32..................................................................................................... 3-1
XA
EBXADMIN .................................................................................................. 3-3
W
RINT SERVER CONSOLE ................................................................................. 3-3
P
ETADMIN ................................................................................................ 3-4
HP J
EB JETADMIN......................................................................................... 3-5
HP W
TCP/IP NETWORK CONFIGURATION .............................................................. 4-1
VERVIEW..................................................................................................... 4-1
O
TCP/IP C
TCP/IP UNIX H
HP/UX C
IBM RS/6000 AIX C
UN SOLARIS 2.X CONFIGURATION .................................................................... 4-5
S
SCO UNIX C
THER NON-STANDARD CONFIGURATIONS.......................................................... 4-6
O
SING DHCP TO CONFIGURE THE PRINT SERVER IP ADDRESS.............................. 4-8
U
ONCEPTS......................................................................................... 4-1
OST CONFIGURATION ................................................................ 4-1
ONFIGURATION .................................................................................. 4-3
ONFIGURATION .................................................................. 4-4
ONFIGURATION ............................................................................ 4-6
Table of Contents
i

USING RARP TO CONFIGURE THE MONARCH PRINT SERVER IP ADDRESS ................. 4-9
SING BOOTP TO CONFIGURE THE PRINT SERVER IP ADDRESS .......................... 4-10
U
ERIFYING COMMUNICATIONS WITH THE PRINT SERVER ...................................... 4-11
V
ECURITY ............................................................................................... 4-11
IP S
AW TCP PORTS ......................................................................................... 4-11
R
NOVELL NETWORK CONFIGURATION ............................................................ 5-1
VERVIEW..................................................................................................... 5-1
O
ETWARE CONCEPTS...................................................................................... 5-1
N
ENERAL INFORMATION ................................................................................... 5-2
G
EFORE YOU BEGIN........................................................................................ 5-2
B
EFAULT PRINT SERVER NAMES (SERVICE NAMES) ............................................. 5-2
D
ONFIGURING THE PRINT SERVER AND ADDING THE PRINT QUEUE IN
C
QUEUE SERVER MODE..................................................................................... 5-3
ONFIGURING THE PRINT SERVER AND PRINT QUEUE WITH XADMIN32
C
UEUE SERVER MODE) .................................................................................. 5-3
(Q
ONFIGURING THE PRINT SERVER AND PRINT QUEUE WITH HP JETADMIN 3.XX
C
UEUE SERVER MODE) .................................................................................. 5-5
(Q
ONFIGURING THE PRINT SERVER USING XADMIN VERSION 2.0 OR WEBXADMIN
C
(QUEUE SERVER MODE): ................................................................................. 5-6
DDING NETWARE PRINT QUEUES USING NWADMIN (QUEUE SERVER MODE).......... 5-7
A
ONFIGURING THE PRINT SERVER AND PRINT QUEUE USING PCONSOLE AND
C
XCONFIG (QUEUE SERVER MODE)................................................................... 5-9
ONFIGURING THE PRINT SERVER AND ADDING THE PRINT QUEUE IN
C
REMOTE PRINTER MODE................................................................................ 5-10
ONFIGURING THE PRINT SERVER AND PRINT QUEUE USING NWADMIN AND
C
XADMIN32, XADMIN, WEBXADMIN, OR JETADMIN (NDS REMOTE PRINTER MODE): 5-10
ONFIGURING THE PRINT SERVER AND PRINT QUEUE USING PCONSOLE
C
AND XCONFIG (REMOTE PRINTER MODE)........................................................ 5-12
ONFIGURING THE WORKSTATION ................................................................... 5-14
C
Configuring the Workstation (Windows 95/98) ........................................... 5-14
Configuring the Workstation (Windows NT 4.xx) ........................................ 5-15
Configuring the Workstation (Windows 3.xx) ............................................. 5-15
ESTING THE PRINT QUEUE............................................................................ 5-16
T
ii Table of Contents

WINDOWS NT/LAN/WARP SERVER NETWORK CONFIGURATION ................... 6-1
VERVIEW..................................................................................................... 6-1
O
INDOWS NT IP CONFIGURATION..................................................................... 6-1
W
INDOWS NT V4.XX CONFIGURATION................................................................ 6-3
W
INDOWS NT V3.5X CONFIGURATION................................................................ 6-3
W
LAN S
ERVER/WARP SERVER CONFIGURATION .................................................... 6-4
WINDOWS 95/98 PEER-TO-PEER CONFIGURATION......................................... 71
VERVIEW..................................................................................................... 7-1
O
ONFIGURING THE WINDOWS 95/98 PC ............................................................. 7-1
C
ONFIGURING WINDOWS 95/98 PEER-TO-PEER (JETADMIN V3.0 AND ABOVE) .........7-2
C
ONFIGURING WINDOWS 95 PEER-TO-PEER (JETADMIN V2.33 TO 2.53)................. 7-3
C
MICROSOFT NETWORK CONFIGURATION (NETBEUI OR NETBIOS IP
W/WINDOWS 95/98, WINDOWS NT, OS/2 WARP/LAN SERVER)....................... 8-1
VERVIEW..................................................................................................... 8-1
O
RINT SERVER CONFIGURATION........................................................................ 8-1
P
LAN SERVER/WARP SERVER CONFIGURATION .......................................... 8-2
OS/2 File Server Configuration:.................................................................. 8-2
OS/2 Workstation Configuration:................................................................. 8-2
DLC/LLC CONFIGURATION ............................................................................ 9-1
VERVIEW..................................................................................................... 9-1
O
ONFIGURING DLC/LLC ON WINDOWS NT ......................................................... 9-1
C
Windows NT 4.xx Printer Setup .................................................................. 9-1
Windows NT 3.xx Printer Setup .................................................................. 9-2
ONFIGURING DLC/LLC ON OTHER SYSTEMS ..................................................... 9-3
C
TROUBLESHOOTING .................................................................................... 10-1
VERVIEW................................................................................................... 10-1
O
NSTALLATION PROBLEMS (PRINTER DOES NOT COME UP READY)........................ 10-1
I
NSTALLATION PROBLEMS (PRINTER COMES UP READY BUT YOU CANNOT PRINT) ... 10-1
I
HECKING THE INTERFACE BETWEEN PRINT SERVER AND PRINTER....................... 10-1
C
Table of Contents iii

CHECKING THE NETWORK CONNECTION AND CABLING ........................................ 10-2
NTERMITTENT PROBLEMS .............................................................................. 10-2
I
TCP/IP T
ETWARE TROUBLESHOOTING........................................................................ 10-4
N
INDOWS NT/LAN SERVER TROUBLESHOOTING................................................ 10-6
W
INDOWS 95/98 PEER-TO-PEER TROUBLESHOOTING ......................................... 10-6
W
ROUBLESHOOTING ........................................................................... 10-3
COMMAND SUMMARY....................................................................................A-1
ENERAL COMMANDS......................................................................................A-1
G
TELNET .......................................................................................................A-1
XCONFIG.....................................................................................................A-1
GENERAL SERVER COMMANDS ..................................................................A-2
ETBEUI/NETBIOS IP COMMANDS ..................................................................A-4
N
ETWARE COMMANDS.....................................................................................A-4
N
TCP/IP C
OMMANDS ........................................................................................A-5
RELOADING THE FIRMWARE ......................................................................... B-1
ENERAL ......................................................................................................B-1
G
OWNLOADING FROM WINDOWS NT/UNIX HOST COMPUTER USING
D
MASTER MODE TFTP .......................................................................................B-1
OWNLOADING FROM A UNIX HOST COMPUTER USING SLAVE MODE TFTP ...............B-2
D
OWNLOADING FROM A UNIX HOST COMPUTER USING BOOTP .............................B-2
D
OWNLOADING FROM A NETWARE SERVER .........................................................B-3
D
iv Table of Contents
INTRODUCTION
1
Overview
Monarch Print Servers allow multiple host computers to share the
Monarch
Any user can print jobs to the printer as if it were directly attached to his computer.
No special software is required on the host computers, and application programs
run without any modification. Because the Monarch Print Server provides
multiprotocol capabilities, users on UNIX
Microsoft
simultaneously access the same printer. Figure 1-1 shows how the print server is
used in a typical network.
9800 series printers on a local area network.
, Novell, AppleTalk, LAN Server,
Windows NT, Windows 95, and LAN Manager computers can
LocalTalk
Printer with an XCD
external print server
Apple Macintosh Computers
NetWarePCWindows NT
PC
DEC
Figure 1
UNIX Host
Banyan VINESPCApple
Macintosh
Introduction 1-1

Features
The Monarch Print Server offers a wide range of features, including:
♦ TCP/IP, NetWare, DLC/LLC, and NetBEUI protocols
♦ Network Operating System compatibility:
UNIX systems that support either the Berkeley lpr/lpd printing protocol, the
HP JetDirect
Novell NetWare V2.15 or above, V3.xx, or V4.xx, including support for bindery
mode and Novell Directory Services (NDS)
Windows NT and NTAS V3.5 or above
Windows 95 (Peer-to-Peer or client mode)
Windows for Workgroups (Peer-to-Peer or client mode; Peer-to-Peer requires
DLC/LLC support on print server)
OS/2, LAN Server, Warp Server
IBM
♦ Superior network and printer management
Compatible with Hewlett-Packard
management software
XAdmin Windows-based management utility (NetWare or TCP/IP)
Web XAdmin browser-based management
Remote console management via TELNET or NetWare
♦ Flash memory for easy updating of firmware via NetWare, BOOTP, tftp (master
or slave mode)
♦ IP address configuration via DHCP, BOOTP, rarp, arp, serial port, XAdmin, or
remote console.
IP security to restrict printing based on IP address
card, or printing to a raw TCP port
JetAdmin and Web JetAdmin printer
1-2 Introduction
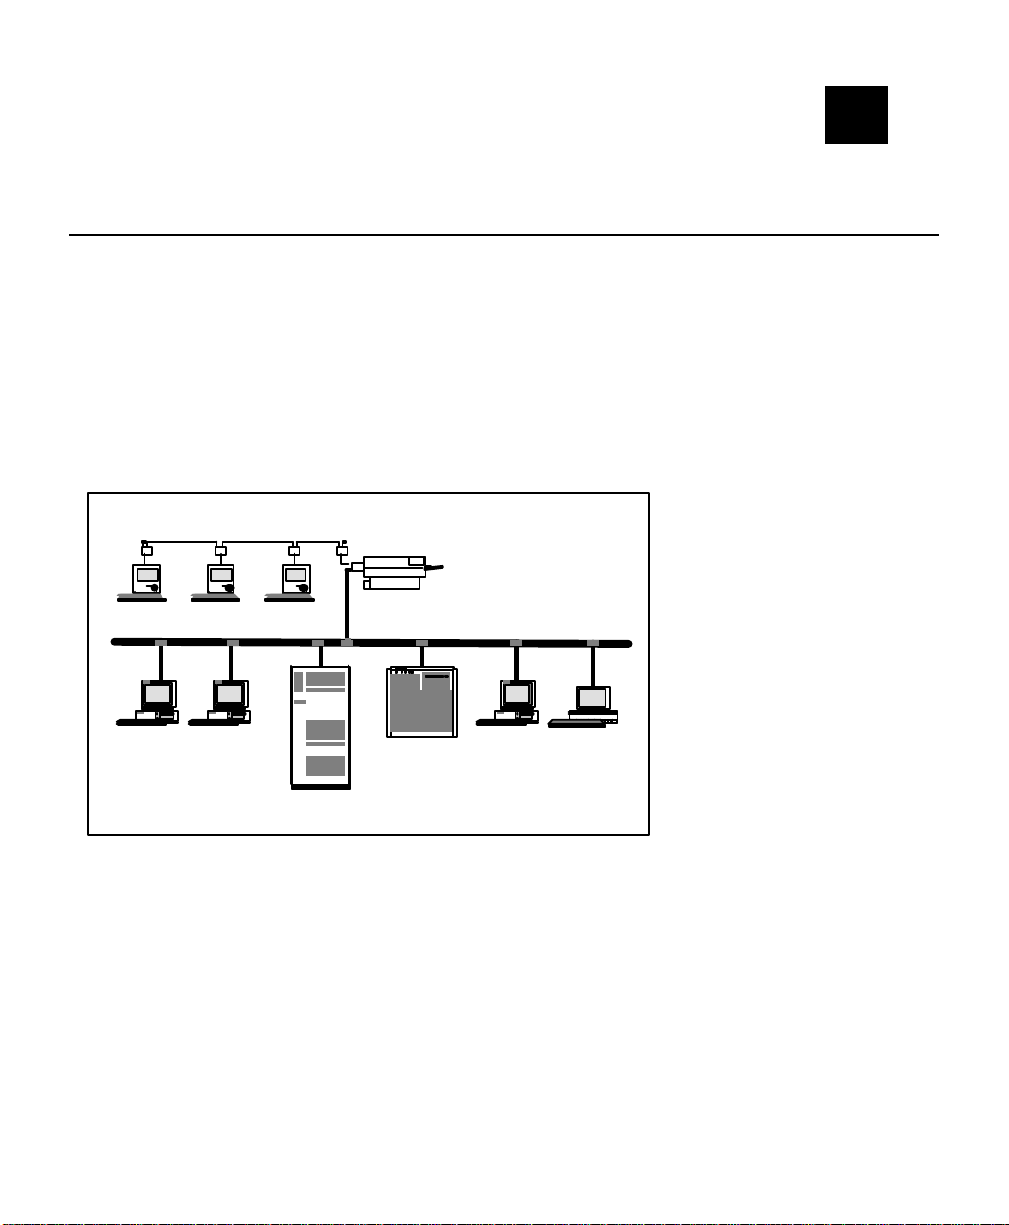
INSTALLING THE HARDWARE
Upper DIP Switches
Ethernet Port
Parallel Port
Serial Port
2
Overview
This chapter describes:
♦ how to install a Monarch Print Server in your printer
♦ how to connect a Monarch Print Server to the Ethernet cable
♦ how to restore factory defaults to the print server.
Print Server Installation
You must use version 6.5 or greater of the Monarch 9840 printer. The Ethernet
print server is an internal option and should be ordered at the time the printer is
ordered.
Setting Up the Print Server
The Monarch Print Server (Ethernet) is extremely easy to set up. To use the
Ethernet print server, upper DIP switch 8 must be turned ON. This enables the bidirectional communication.
Do not plug any cables into the parallel port when using the
Ethernet port.
Installing the Hardware 2-1

A printer with an Ethernet port cannot use the parallel port. However, the serial
port is still active.
Ethernet Installation
The Monarch Print Server Plus can connect to a 10baseT Ethernet. You will need
an unshielded twisted pair Ethernet hub with at least one unused port installed on
your network, plus an appropriate length of RJ45 modular cable.
Connect one end of the RJ45 cable to the print server and the other end to a
1.
port on the twisted pair Ethernet hub.
On power-up, the print server will run through a set of power-up diagnostics for
2.
a few seconds. If the print server is operating properly, the TEST LED will
blink momentarily and then go out. If the TEST LED blinks continuously in a
regular pattern, there is a problem. If this is the case, first verify that you have
a good Ethernet connection and then try powering the unit off and then on
again. If the problem persists, refer to the Troubleshooting chapter in this
manual.
After the LED goes out, it will blink randomly during normal operation.
3.
Restoring Factory Defaults
The Print Server has a single pushbutton switch test switch. This switch does not
need to be used during the configuration process. It has the following function:
♦ To reset the unit back to factory default settings, press the switch
and hold it in for at least 5 seconds.
2-2 Installing the Hardware

MANAGEMENT METHODS
3
Overview
The print server is compatible with both XCD and HP network management utilities,
including:
♦ XCD XAdmin Windows-based utility
♦ XCD WebXAdmin Web-browser utility
♦ XCD print server console
♦ HP JetAdmin Windows-based utility
♦ HP Web JetAdmin Web-browser utility
This chapter discusses the installation and the basic usage of these utilities. Refer
to the various chapters of this manual for specific details on configuring the print
server.
XAdmin32
XAdmin32 is a graphical utility for configuration and management of the print
server:
♦ XAdmin32. This 32-bit version works on either Windows NT 4.xx or Windows
95/98 using the TCP/IP or IPX/SPX protocols. To take full advantage of the
capabilities of XAdmin32, you should use the Novell 32-bit client software on
the PC workstation that is used for configuring the print queues.
XAdmin32 is available on the XCD web site
http://www.troyxcd.com) if you did not receive it on disk.
(
1. Follow the instructions on the screen to complete the installation.
Double click on the XAdmin icon or use the Windows 95/NT 4.x Start button to
2.
select XAdmin in the XCD folder in the list of Programs.
Management Methods 3-1

3. A list of configured print servers will appear. If you are running TCP/IP, then
you must enter an IP address into the print server as follows (refer to Chapters
4 or 7 for alternate methods for configuring the IP address):
Make sure that your computer is configured for TCP/IP with a valid IP address
configured for LAN operation (not PPP dial-up; refer to your system
documentation for additional information).
NOTE: Consult your system manager before assigning IP addresses to
your computer or to the print server in order to avoid duplications.
If your network does not have an officially assigned block of IP
addresses, you may use any unique address between
192.168.254.1 and 192.168.254.254 (this is a reserved range of
Class C addresses for private networks that are not connected to
the Internet per RFC 1918; note that you must also assign the
print server an IP address in this range). You may also use a
subnet mask of 255.255.255.0 with no gateway address. If you
have more than one LAN adapter card, select the one you want to
use for TCP/IP.
♦ Click on the TCP/IP folder icon under "Filter" on the left side of the
XAdmin screen.
♦ Click on the Search button (the leftmost button) or select Devices and
then Search Active Devices from the menu bar.
♦ If you have a DHCP, BOOTP, or rarp server (or if the print server
already has an IP address from some other source), the print server
should appear in the list of configured print servers. If this is the
case, skip to step 4.
♦ If the print server does not have an IP address, then click on the
Setup Unconfigured Devices button (the third from the left) or select
Devices and then Setup Unconfigured Devices from the menu bar.
This will display the unconfigured print servers listed by their
Ethernet address (MAC Address). Double click on the desired print
server to configure it.
♦ Enter the IP address, subnet mask, and gateway and click OK.
♦ The list of unconfigured print servers will again be displayed. Click
on Close to return to the main screen.
♦ The print server should show up on the main XAdmin32 screen (the
default name will be XCD_xxxxxx, where "xxxxxx" is the last six digits
of the Ethernet address). If the print server does not appear on the
main screen, click on the Search button to find new print servers.
3-2 Management Methods

4. To configure a print server, double click on its name and enter the password
ACCESS is the default password). A series of "index cards" will be displayed.
(
Each of these "cards" represents a protocol or other configurable item. Click
on the appropriate tab to configure the item.
WebXAdmin
WebXAdmin allows the user to configure the print server with a standard web
browser like Netscape Navigator or Microsoft Internet Explorer. It can therefore be
used on any operating system that supports web browser capabilities. To use
WebXAdmin, you must first make sure that you have a web browser installed on
your computer and that you have configured an IP address in both the computer
and the print server (refer to the previous XAdmin section if you do not know how
to put an IP address in the print server). Also make sure that you have configured
your TCP/IP stack to communicate over the local area network (rather than via a
PPP dial-up connection).
To use WebXAdmin, start your web browser and enter the IP address of the print
server as the destination web site. Once you are connected, enter the password
ACCESS is the default password) and select the protocol or other item that you
(
wish to configure. You will then be connected to the appropriate web page for
configuration of that item. You may use the normal browser buttons to move
forward and back through the web pages.
Print Server Console
The print server supports a sophisticated command-line oriented console for
configuration and management. This console contains features that are not
available through XAdmin or WebXAdmin, including sophisticated diagnostic
capabilities. The XCD print server console can be accessed via TELNET, the
XCONFIG NetWare utility, and is also available through one of the web pages using
the WebXAdmin facility. The general configuration procedure is the same
regardless of which method is used.
In all cases, you will get a message like
Reserved when you are connected. When you are connected, push RETURN or
ENTER to get the "
anything in response to the
prompt, you are ready to enter commands.
TELNET
To connect to the print server using TELNET on UNIX, Windows NT, or most other
TCP/IP systems, type:
#" prompt, enter the password ACCESS (it will not print), and type
Enter Username> prompt. When you get the Local>
Console Connected or Remote Console
Management Methods 3-3

TELNET ipaddress
at the UNIX system prompt, where ipaddress is the IP address of the print server.
When you are connected, push RETURN or ENTER to get the "
password
Username> prompt. When you get the Local> prompt, you are ready to enter
ACCESS (it will not print), and type anything in response to the Enter
#" prompt, enter the
commands.
XCONFIG. To connect to the print server using the XCD XCONFIG NetWare
utility, insert the XCD Print Server Software diskette in Drive A and type:
A:XCONFIG
at the DOS system prompt (or choose the appropriate path if you are running
XCONFIG from your CD-ROM or hard drive). If you have only one print server, you
will be immediately connected. If you have more than one print server, you will be
given a list of available print servers. Type the number of the print server to which
you want to connect. When you are connected, enter the password
not print) at the "
#" prompt, and type anything in response to the Enter Username>
ACCESS (it will
prompt. When you get the Local> prompt, you are ready to enter commands.
HP JetAdmin
The Monarch Print Server works transparently with the HP JetAdmin utility. You
can download JetAdmin from the HP web site
Windows Run command to expand the downloaded file. Then use the Run
command again to execute the
selected (this file is generally in the
SETUP.EXE file in the destination directory that you
DISK1 subdirectory) and begin the installation.
Follow the instructions on the screen to complete the installation.
(http://www.hp.com). Use the
NOTE:
Windows 98 requires either JetAdmin V2.54 (this version can be installed
from the Microsoft Windows 98 CD by running the
SETUP.EXE file in the
DRIVERS/PRINTERS/JETADMIN/DISK1/ directory) or V3.30 or later
(available on the HP web site).
The print server will appear in the list of configured print servers unless IPX is not
running on the computer and the print server is not configured with a valid IP
address. If this is the case, then select Device from the menu bar and click on
New. Select the desired print server from the list of unconfigured devices and then
press Configure. Enter the requested information, including the IP address, subnet
mask, and gateway. Then click Close to return to the list of configured print
servers.
You may now select the print server from the list and click on the Modify button (or
select Device and then Modify from the menu bar) to change the print server
configuration.
3-4 Management Methods

HP Web JetAdmin
The print server works transparently with the HP Web JetAdmin utility for Windows
NT Advanced Server. You can download this program at no charge from the HP
web site (
the downloaded file. The files will be expanded and the installation program will be
automatically run. Follow the instructions on the screen to complete the
installation.
After you have completed the installation, you may use a web browser on any
computer that has access to the Windows NT server to access the print server.
Start the browser and connect to the file server. Once you are connected and are
at Web JetAdmin home page, click on the Find Device tab. Then click on Find All
Devices to get a list of all Web JetAdmin-compatible print servers (or you may limit
your search by using the Advanced Search method). Click on the desired print
server name, and the Properties page will be displayed for that print server. Then
click on the Config tab to configure the print server.
http://www.hp.com). Use the Windows NT Run command to expand
Management Methods 3-5

3-6 Management Methods

TCP/IP NETWORK CONFIGURATION
4
Overview
Monarch print servers include the Transmission Control Protocol/Internet Protocol
(TCP/IP) protocol suite. Since virtually all UNIX host computers support TCP/IP,
this capability allows a printer to be shared on a UNIX Ethernet network. TCP/IP
communications can proceed concurrently with other protocols, which means that
UNIX, NetWare, Apple, and other computers can share the same printer over an
Ethernet network using the print server.
TCP/IP Concepts
The print server appears to the network as a UNIX host computer with a unique IP
address running the lpd (line printer daemon) protocol. As a result, any host
computer that supports the Berkeley remote-LPR command can spool jobs to the
print server without the need for any special software on the host computer.
Application programs run transparently and users do not need to learn new
procedures in order to use the printer. Print servers also support gateways for
communications with hosts on remote networks. In addition, raw TCP ports are
available for special applications/compatibility with the HP JetDirect print server.
The print server comes preconfigured to run on a TCP/IP network with a minimum
of setup. The only mandatory configuration in the print server is the entering of an
IP address. The default IP address is 192.0.0.192, but this should be changed to
meet the addressing requirements of your network.
TCP/IP UNIX Host Configuration
The configuration process for most UNIX systems is described in the following
steps. Unfortunately, this process is not very standardized, so refer to your system
documentation (or man pages) for additional information.
Configure the /etc/hosts file (or equivalent local host table) on each UNIX
1.
host that needs to communicate with the print server, or provide similar
information to a name server on the network. Use your favorite editor to add
an entry to the
the print server. For example:
192.189.207.3 XCD_00C351
The actual format of the entry may vary depending on your system, so check
your system documentation and also note the format of other entries in the
etc/hosts file.
/etc/hosts file containing the IP address and node name of
Novell Network Configuration 4-1

NOTE: The node name in this file does not necessarily need to be the
same as the one that is actually configured into the print server
(the name that appears on the printer self-test), but it is good
practice to make the names the same (however, some operating
systems, such as HP/UX, do not accept the "_" character in the
default name, so for these systems you must use a different
name). In any case, the node name in the /etc/hosts file must
match the node name in the /etc/printcap file.
Some systems, such as HP/UX and AIX allow you to enter the IP
address as the host name when setting up the print queue. If this
is the case, you do not need to configure the hosts file.
Choose the binary service on the print server, since it passes data through
2.
unmodified.
BINARY_P1 Binary (parallel port)
3. This step applies to the majority of UNIX systems, including Sun OS (but not
Solaris 2.xx), Silicon Graphics (lpr/lpd option required), DEC ULTRIX, DEC
OSF/1, and Digital UNIX. SCO UNIX users should follow these steps, but
should also refer to the SCO UNIX Configuration section in section 3-A. Users
of RS/6000 AIX, HP/UX, Sun Solaris 2.xx, and other systems that do not use
the printcap file should skip to section 3-A.
Configure the
/etc/printcap file on each host computer to specify the local
print queue, the print server name (also called remote machine or rm), and the
print server service name (also called remote printer, remote queue, or rp), and
the spool directory.
An example of a typical
Monarch1|Printer on Floor 1:\
:lp=:\
:rm=XCD_003C51:\
:rp=BINARY_P1:\
:sd=/usr/spool/lpd/Monarch1:
printcap file is as follows:
This will create a queue named Monarch1 on the host computer that
communicates to the print server with a node name (rm) of XCD_003C51
and a service name (rp) of
printer through the spool directory
BINARY_P1 for printing binary files to the
/usr/spool/lpd/Monarch1.
NOTE: The rm and rp options are not available on all UNIX systems, so if
necessary check your documentation (or man pages) to determine
the equivalent options.
Users of Berkeley-compatible UNIX systems can use the lpc
command to obtain the printer status:
%lpc status
Monarch1:
queuing is enabled
4-2 TCP/IP Network Configuration

printing is enabled
no entries
no daemon present
Users of AT&T-compatible UNIX systems can generally use the lpstat or
rlpstat commands to obtain similar status information. Because this
procedure varies from system to system, refer to your system
documentation for the exact usage.
Skip this section if you have completed Step 3, unless you have an SCO UNIX
4.
system.
If you have an HP/UX system, IBM RS/6000 AIX computer, or Sun Solaris 2.xx,
there is no printcap file. This is also true for some other AT&T-based UNIX
systems, as well as many VMS-based TCP/IP software packages (for example,
UCX, TGV Multinet, etc.). Such systems generally use a printer setup program
to define the service name (remote printer), the print server name (remote
machine) or IP address, and the local queue name (spool directory).
HP/UX Configuration
In the case of HP/UX 10.xx, the sam program is used to set up the remote printer.
The steps are as follows:
Execute the sam program. When you get a list of options, select Printers and
1.
Plotters.
Select LP Spooler.
2.
Select Printers and Plotters.
3.
Select Actions and then Add Remote Printer/Plotter.
4.
Enter any name as the Printer Name (this will be the name of the print queue)
5.
Enter the IP address of the print server as the Remote System Name
6.
Enter the desired print server service name as the Remote Printer Name.
7.
Check the box next to Remote Printer is on BSD System.
8.
You may accept the default values for the remaining items.
9.
Click OK to configure the printer.
10.
Novell Network Configuration 4-3

11. You should now be able to print using the lp -d command with the printer
name.
If you are using the HP Distributed Print Service, the configuration procedure is
slightly different because you are sending the print jobs to a file server, which in
turn spools the jobs to the print server. You must therefore know the name of the
file server (spooler host) in addition to the above information. You will add a
physical printer and a remote printer, and then assign a logical printer name to the
remote printer (a unique name that does not match any other name). To print, use
lp -d command with the logical printer name.
the
Earlier versions of HP/UX use similar procedures to 10.xx:
Enter sam and select "Peripheral Devices."
1.
Select "Add Remote Printer" (not "networked printer").
2.
Enter the following remote printer settings (the other settings do not matter):
3.
Line printer name (user-selectable), Remote system name (the print server
name; must match what is in hosts file or use XCD print server IP address),
Remote printer queue (print server binary service name), and Remote Printer is
on a BSD System (Yes).
IBM RS/6000 AIX Configuration
The RS/6000 AIX operating system uses the smit program to set up the remote
printer. The procedure is as follows for AIX 4.0 and later:
Enter SMIT and select “devices.”
1.
Select “Printer/Plotter.”
2.
Select “Print Spooling.”
3.
Select “Add a Print Queue.”
4.
Select “Remote.”
5.
Enter the following Remote Printer Settings:
6.
Name of queue (user selectable)
Host Name of Remote Printer (Print server name; must match name /etc/hosts
file or use print server IP address)
Name of queue on remote server (print server binary or text service name)
Type of print spooler: BSD (press the list button and choose BSD).
4-4 TCP/IP Network Configuration

The procedure for pre-V4.0 systems is as follows:
Enter smit and select "Devices."
1.
Select "Printer/plotter."
2.
Select "Manage remote printer subsystem."
3.
Select "Client services."
4.
Select "Remote printer queues."
5.
Select "Add a remote queue."
6.
Enter the following remote queue settings:
7.
Name of queue to add (user selectable)
Activate the queue (Yes)
Destination host (print server name; must match name in /etc/hosts file or use
the print server IP address)
Name of queue on remote printer (print server binary service name)
Name of device to add (user selectable; for example
lp0)
Sun Solaris 2.x Configuration
Sun Solaris 2.x uses the lpsystem and lpadmin programs for remote printer
configuration:
lpsystem -t bsd xcdname
lpadmin -p queue -s xcdname!\xcdservice
accept queue
enable queue
where
(must match the entry in the /etc/hosts file) or IP address and
print server binary service. If this is the first printer configured, you must also use
the
As an alternative, you may use Printer Manager in the admintool utility under
OpenWindows. Select Edit, Add, and Add Access to Remote Printer. Then enter
the print server name in the format
Make sure that the Printer Server OS is set to BSD (the default setting), and then
click Add.
queue is the name of the local print queue, xcdname is the print server name
xcdservice is the
lpsched command immediately prior to the accept command.
xcdname!\xcdservice as described above.
Novell Network Configuration 4-5

We recommend that use the /etc/hosts file for the printer name rather than NIS
or other name services. Also note that due to a bug in the Sun lpd implementation
on Solaris 2.4 and earlier releases, you may experience problems printing very long
print jobs. If this is the case, a workaround is to use the raw TCP port with the HP
JetDirect software as described later in this chapter.
SCO UNIX Configuration
SCO UNIX requires TCP/IP V1.2 or later to work with XCD print servers. You must
first configure the
Then run the sysadmsh program as follows:
Select Printers.
1.
Select Configure.
2.
Select Add.
3.
Enter the name of the print queue you entered in the /etc/printcap file as the
4.
Printer name,
Enter anything as the Comment, and Class name.
5.
For the Use printer interface select "Existing".
6.
Press the F3 key to get a list of available interfaces, and select the desired one
7.
as the Name of interface using the arrow keys and Enter key ("Dumb” is a
good choice).
/etc/hosts and /etc/printcap files as described in step 2.
Select "Direct" as the Connection.
8.
Enter the desired Device name (/dev/lp generally works).
9.
Select "Hardwired" as the Device.
10.
Select "No" for the Require banner field.
11.
Other Non-Standard Configurations
To use a Monarch print server with an IBM AS/400 running IBM’s TCP/IP Gateway
Services for OS/400 (the OS/400 system must be v3.1 or later):
Assign a TCP/IP address to the AS/400 and the print server.
1.
Use the CFGTCP command at your OS/400 prompt to add the print server’s
2.
TCP/IP address to the AS/400 host table.
4-6 TCP/IP Network Configuration

3. Use the following one-line OS/400 command to create the LPD queue:
CRTOUTQ OUTQ(<queuename> RMSTSYS (*INTNETADR)
RMTPRTO(<service>) AUTOSTRWTR(1) CNNTYPE(*IP) DESTTYPE (*OTHER)
MFRTYPMDL (<driver>) INTNETADR(‘<ipaddress>’) TEXT (‘<description>’)
where
print server service name,
<queuename> is the new AS/400 print queue name, <service> is the
<driver> is the OS/400 printer driver name, and
<ipaddress> is the IP address of the print server. Note that the IP address
and description must be enclosed in single quotes.
Other systems use similar procedures to set up the print server. These
programs will generally ask for the following information:
Requested information: You should use:
remote printer print server binary
service name
remote host computer name Any name (must match name in printcap file, if
any) or in some cases, you may enter the
print server IP address here
remote host IP address print server IP address
Tech support specialists for these companies can usually answer configuration
questions if you provide them with the equivalent UNIX configuration information
(tell them that the print server looks like a remote UNIX host computer running the
lpd line printer daemon).
If you have not created a spool directory for the print server on your UNIX host
4.
computer, you will need to do so now (the printer setup utilities in HP/UX, AIX,
Solaris 2.xx, and other systems will automatically create the spool directory).
The lpd spool directory is usually located in the
/usr/spool directory (check
with your system manager to see if the location is different for your system).
To create a new spool directory, use the mkdir command. For example, to
create a spool directory for the queue monarch1, you would enter:
mkdir /usr/spool/lpd/monarch1
On some systems it is also necessary to start the daemon. This is done on
Berkeley-compatible UNIX systems with the lpc start command as shown in
the following example:
lpc start monarch1
5. The final step before printing is to add the IP address to the print server.
Consult with your system administrator before assigning an IP address to avoid
conflicts with other devices. If your network does not have an officially
assigned block of IP addresses, you may use any unique address between
192.168.254.1 and 192.168.254.254 (this is a reserved range of Class C
addresses for private networks that are not connected to the Internet per RFC
1918; note that you must also assign your host computer an IP address in this
Novell Network Configuration 4-7

range). The IP address can be set in his can be done in any of the following
ways:
♦ XAdmin32
♦ HP JetAdmin
♦ DHCP
♦ The UNIX arp and ping commands
♦ Reverse Arp (rarp)
♦ BOOTP
♦ XCD XCONFIG NetWare utility
The easiest way to configure the IP address is using either XAdmin32 or JetAdmin
as described in Chapter 3. The remaining configuration methods are described in
the following paragraphs.
NOTE: The IP address you assign to the print server must be on the same logical
network as your host computers (e.g., if your host has an IP address of
192.189.207.3, the print server should have an IP of 192.189.207.x, where
x is an integer between 1 and 254), or you must properly configure your
router to work with the XCD print server.
Using DHCP to Configure the Print Server IP Address
Monarch print servers support the DHCP protocol for automatically loading the IP
address from a host computer that supports DHCP. By default, the print server
will automatically try DHCP, BOOTP, and rarp before using the IP address
configured in the server.
NOTE: This procedure may take about a minute, so the print server cannot be
accessed via TCP/IP during that time. If a faster IP address load is
required, select the desired IP configuration method (AUTO, DHCP,
BOOTP, RARP, STATIC) via XAdmin, WebXAdmin, or the print server
console
is manually entered).
Using arp and ping to Configure the Print Server IP Address
The arp and ping method is one of the simplest ways of configuring the print server
IP address (this method requires V3.27 or later firmware). To use arp and ping,
enter the following commands at the operating system prompt::
arp -s ipaddress ethernetaddress [temp]
4-8 TCP/IP Network Configuration
SET IP METHOD command (STATIC is used when the IP address
 Loading...