

Page 1
MONARCH 9433™
VEHICLE MOUNT INSTRUCTIONS
Using the Vehicle Mount, you can attach your Monarch 9433 printer to a
forklift or other vehicle.
This document describes how to install and use the vehicle mount with the
printer.
Note: The information in this document supersedes information in
previous versions. Check our Web site (www.monarch.com) for any
updates.
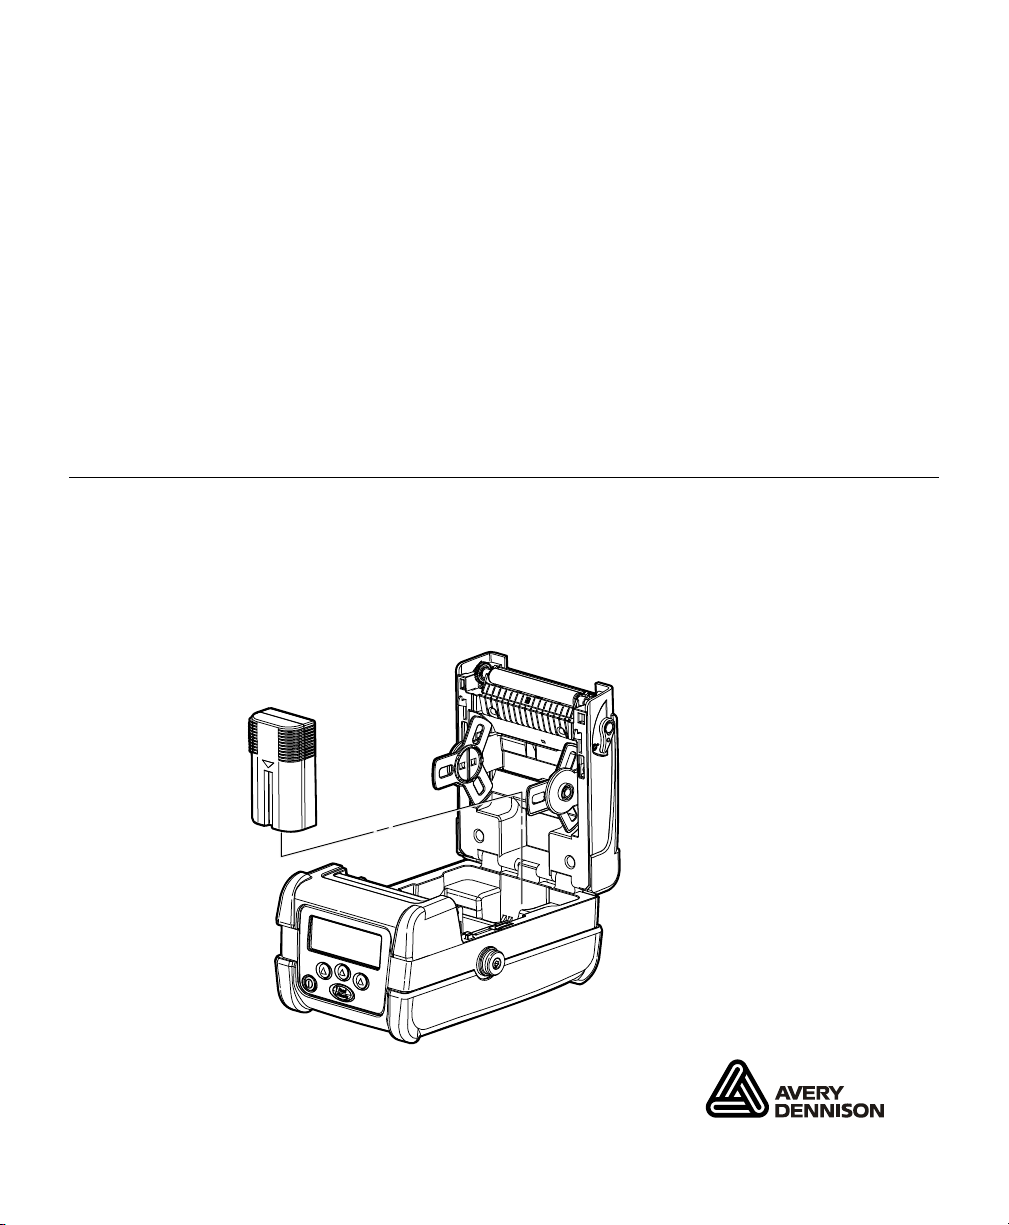
Installing the Battery Pack
1. Pull the release levers on both sides of the printer to open the supply
door.
2. Insert the connector end of the battery pack into the printer and close
the supply door until the levers click into place.
TC9433VMOI Rev AB 8/08 ©2006 Paxar Americas, Inc. a subsidiary of Avery Dennison Corporation.
All Rights Reserved.
Page 2
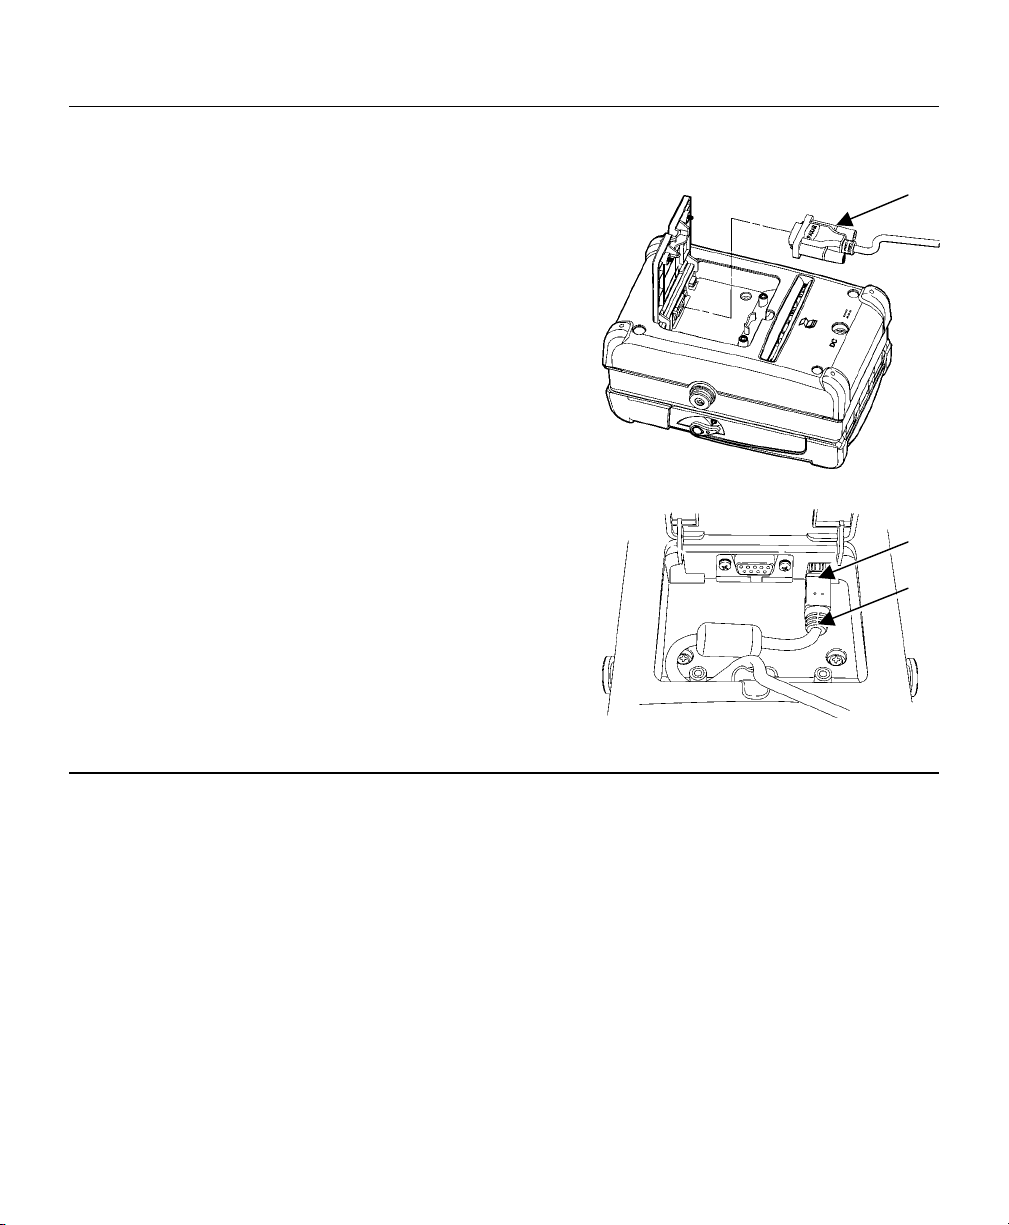
Connecting the Communications Cables
The printer uses either 9-pin serial communications or USB communications.
For best results, use only Monarch® cables.
Open the hinged cable door by loosening the
two Phillips screws and lifting up on the
door.
Serial Cable
1. Plug the DB9 connector into the DB9
port.
2. Place the cable in the cable cavity.
3. Close the hinged cable door and tighten
the screws.
DB9 Connector
USB Cable
1. Plug the USB cable into the USB port.
2. Lock the cable in place by placing it
behind the left screw post and into the
cable cavity as shown.
3. Closed the hinged cable door and tighten
the screws.
Installing the Mount
Following is a list of the mounting hardware. This hardware is not provided
for vertical mounting.
♦ four screws (¼-20 x 2¼ socket head cap)
♦ four ¼-inch flat washers
♦ four dampening washers
♦ one clamping plate
♦ four M5x0.8 screws (not included)
USB
Port
USB
Cable
2
Page 3

Installing on a Tabletop
1. Select a suitable location for the mount on your vehicle.
2. Align the four outside holes on the vehicle mount with the corresponding
holes in your vehicle.
3. Place the four dampening washers between the vehicle and the bottom
of the vehicle mount. The washers should be aligned with the nuts on
the vehicle mount and the holes on your vehicle.
4. Attach the vehicle mount to your vehicle using four M5x0.8 screws.
Nut
Dampening
Washer
. 3
Page 4

Installing Overhead (Upside Down)
1. Select a suitable location for the mount on your vehicle.
2. Center the clamping plate on two of your vehicle’s overhead rails.
3. Align the four inside nuts in the vehicle mount with the holes in the
clamping plate.
4. Use the four ¼-20x2¼ screws and flat washers to
attach the vehicle mount to your vehicle.
¼-20x2¼” Screw
Flat Washer
Clamping Plate
4
Page 5

Installing Vertically
No screws or mounting hardware are provided for vertical installation.
1. Select a suitable location for the mount on your vehicle.
2. Align the nuts in the vehicle mount with the corresponding holes in your
vehicle.
3. Use appropriate screws to attach the vehicle mount to your vehicle, or to
the appropriate hardware for vertical mounting.
. 5
Page 6

Attaching the Printer
To attach the printer on the vehicle mount:
1. Make sure the printer’s battery and communication cable are installed.
2. Insert the printer into the brackets of the vehicle mount using the knobs
as a guide.
3. Push down firmly on the brackets so the printer locks completely in
place.
Brackets
6
Knob
Page 7

Securing the Cables
Use the cable guides located on the inside and front of the vehicle mount to
secure any cables.
1. Attach the printer to the vehicle mount.
2. Thread the cable through the first opening and out the second opening
of the cable guide on the inside of the mount, then through the cable
guide in the front of the mount.
Cable Guides
3. Connect the cable to the printer.
. 7
Page 8

Loading Supplies
To load supplies into the printer:
1. Turn off the printer.
2. Attach the printer to the vehicle mount.
3. Squeeze the supply bracket and the spring-loaded supply holder. Pull
the hook end of the supply holder and turn it to the left to release the
supply bracket. Pull the bracket up.
Supply Bracket
Spring
Supply Holder
Note: The supply holder cannot be removed.
4. Load the supply so it unrolls from the bottom.
5. Lower the bracket so the supply turns freely, then squeeze the supply
bracket and pull and turn the supply holder to the right to lock the supply
roll in place.
8
Page 9

6. Pull the release levers located on both sides of the printer to open the
supply door.
Release Lever
7. Insert an empty 3-inch core in between the supply holder tabs to open
them to their widest position.
8. Slide the supply guides, located inside the printer on each side of the
external supply slot, out to their widest position.
9. Feed the supply under the opening in the mounting plate and into the
supply slot on the bottom of the printer.
. 9
Page 10

10. Center-adjust the supply guides so that they barely touch the edge of
the supply.
11. Pull out enough supply to lay across the exit chute.
12. Close the supply door until the release levers click into place.
13. Turn on the printer.
14. Press F to advance the supply.
Refer to your Operator’s Handbook for information on printing with your
Monarch® 9433™ printer.
10
 Loading...