

Page 1
Paxar
Monarch
Sierra Sport3R
9430R
Printer
! "
Page 2

Each product and program carries a respective written warranty, the
only warranty on which the customer can rely. Paxar reserves the
right to make changes in the product, the programs, and their
availability at any time and without notice. Although Paxar has
made every effort to provide complete and accurate information in
this manual, Paxar shall not be liable for any omissions or
inaccuracies. Any update will be incorporated in a later edition of
this manual.
2003 Paxar Americas, Inc. All rights reserved. No part of this
publication may be reproduced, transmitted, stored in a retrieval
system, or translated into any language in any form by any means,
without the prior written permission of Paxar Americas, Inc.
Regulatory Compliance
Paxar products are designed to be compliant with the rules and
regulations in the locations into which they are sold and will be
labeled as required. The majority of RF devices are type approved
and do not require the user to obtain license or authorization before
using the equipment. Any changes or modifications to Paxar
equipment not expressly approved by Paxar could void the user
authority to operate the equipment.
Radio Frequency Interference Requirements
This device complies with Part 15 of the FCC Rules. Operation is
subject to the following two conditions: 1) this device may not cause
harmful interference, and 2) this device must accept any
interference that may cause undesired operations.
Radio Frequency Interference Requirements - Canada
This digital apparatus does not exceed the Class B limits for radio
noise emissions from digital apparatus set out in the Radio
Interference Regulations of the Canadian Department of
Communications.
Le présent appareil numérique n’émet pas de bruits radioélectriques
dépassant les limites applicables aux appareils numériques de la
classe B prescrites dans le Réglement sur le brouillage
radioélectrique édicte par le ministère des Communications du
Canada.
To comply with FCC and Industry Canada exposure requirements, if
this device is a
operation in a user’s hand when there is 2.5 cm or more between
the antenna and the user’s body; if this device is a
it is approved for operation when there is 25 cm or more between
the antenna and the user’s body.
hand-held portable
device, it is approved for
table-top
device,
Page 3

European Economic Area
The European variant is intended for use throughout the European
Economic Area, and is compliant with the R&TTE directives;
however, authorization for use restricted as follows:
European standards dictate maximums radiated transmit power of
100 mW EIRP and frequency range 2.400 –2.4835 GHz.
France, the equipment is to be restricted to the 2.4465 – 2.4835
GHz frequency range.
Belgium outside, the equipment is to be restricted to the 2.460 –
2.4835 GHz frequency range.
Operation in Italy requires a user license.
Trademarks
Paxar is a trademark of Paxar Corporation.
Monarch is a registered trademark of Paxar Americas, Inc.
9430R and Paxar Monarch Sierra Sport are trademarks of Paxar
Americas, Inc.
Paxar Americas, Inc.
170 Monarch Lane
Miamisburg, OH 45342
Page 4

Page 5

TABLE OF CONTENTS
GETTING STARTED ................................................ 1-1
Unpacking the Printer ............................................ 1-1
Programming Information....................................... 1-1
Duty Cycle............................................................ 1-1
Battery and Safety Information ............................... 1-2
Installing the Battery ............................................. 1-3
Charging the Battery ............................................. 1-4
Using the AC Adapter ............................................ 1-4
Reading the LED................................................ 1-5
Setting the DIP Switches ....................................... 1-6
Connecting the Printer........................................... 1-7
Attaching the Belt Clip ........................................... 1-8
LOADING SUPPLIES ............................................... 2-1
Tearing Supply...................................................... 2-2
Using Different Size Supply Rolls ........................... 2-3
USING THE PRINTER .............................................. 3-1
Printing ................................................................ 3-1
Using the Magnetic Stripe Reader .......................... 3-1
CLEANING.............................................................. 4-1
TROUBLESHOOTING .............................................. 5-1
Printing a Test Receipt .......................................... 5-3
SPECIFICATIONS.................................................... A-1
Printer Specifications ............................................ A-1
Supply Specifications ............................................ A-2
Ordering Supplies .............................................. A-2
Options and Accessories ....................................... A-3
i
Page 6

ii
Page 7

GETTING STARTED
Use this
Paxar Monarch Sierra Sport™ 3R 9430R Printer.
This three-inch printer works with various hosts using the
RS232 communications port. It also supports IrDA and
optional Bluetooth communications. See Appendix A,
“Specifications” for more information about IrDA and
Bluetooth. The 9430R printer can print text, bar codes,
and limited graphics on thermal direct receipt paper.
Use this manual to
♦ charge the battery
♦ load supplies
♦ clean the printer
♦ troubleshoot the printer.
Operator’s Handbook
with your
1
Unpacking the Printer
The printer comes packaged with two rolls of supply (one
already loaded in the printer), a battery (included with
select printers), a belt clip, and a plug-in charger
(included with select printers).
Programming Information
You may need to refer to the
included on the CD-ROM. It provides an explanation of
how to use the printer's command language.
Programmer's Manual
Duty Cycle
The 9430R printer is designed to print up to 1000 inches
per day. The average print rate is 1 inch every 10
seconds at a text character print density of 25% (i.e., one
character printed out of every four positions). Bar codes
and graphics are more dense (print with more dots) than
text and may need a lower duty cycle. In high
temperature environments, pause the printer for one
minute after every four (4) inches printed. If the duty
cycle is exceeded, the printer may not print all of the
information that was sent to it.
Getting Started 1-1
Page 8

Battery and Safety Information
The printer is powered by a 6.0V Nickel Metal Hydride
(NiMH) battery.
♦ Charging time in the printer is approximately
1.5 hours.
♦ Take the battery out of the printer when storing the
printer for long periods of time.
♦ The battery storage temperature is 40°F to 104°F
(4°C to 40°C). Do not store a fully charged battery
at temperatures greater than 104°F (40°C) for long
periods of time. The battery may permanently lose
charge capacity.
♦ Be sure to use a fully charged battery before long
or battery-intensive printing sessions. Certain
operations (for example, printing receipts with a lot
of bar codes and graphics or using Bluetooth) drain
the battery more quickly than others.
♦ Disposal information – Do not throw in trash.
Dispose according to your local regulations or
recycle the battery. Batteries can also be returned
postage-paid to: ERC; 200 Monarch Lane Door
#39; Miamisburg, OH 45342.
CAUTION
Do not disassemble, short circuit, heat
above 80°C, or incinerate. The
battery may explode.
♦ The recommended temperature for charging is
68°F (20°C) to 77°F (25°C).
NOTE: Optimal battery performance is achieved after
using the battery until it is completely drained
and recharged five times.
1-2 Getting Started
Page 9
Installing the Battery
One battery may be included with the printer. The
printer’s battery must be charged before using it.
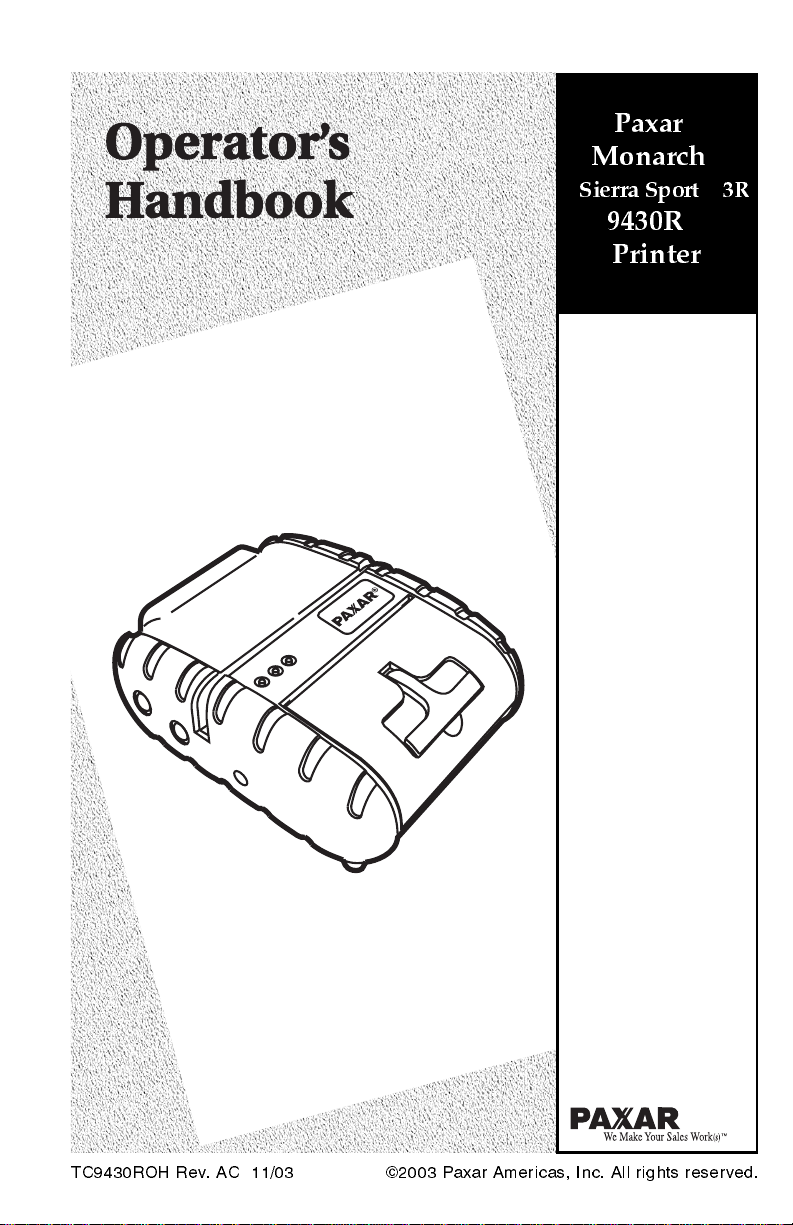
1. Unlock the battery door by sliding down the tabs
using your thumbs.
Tab
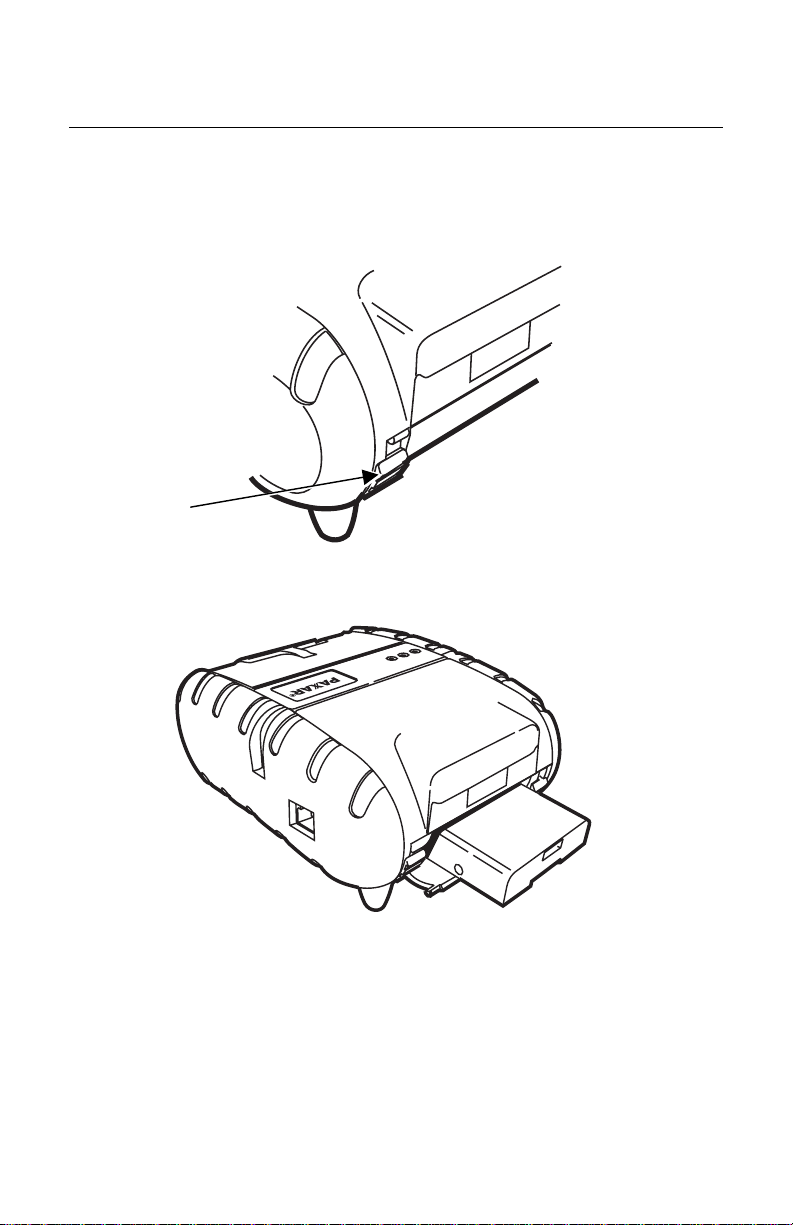
2. Open the battery door.
3. Insert the battery with contact end first as shown.
4. Close the battery door.
5. Lock the battery door by sliding up the tabs. See
“Charging the Battery” for more information.
To remove the battery, partially open the battery door
and tip out the battery. If the battery door is completely
open, the hinge prevents the battery from falling out.
Getting Started 1-3
Page 10

(
P
)
Charging the Battery
The printer’s battery must be charged before using it.
The battery can be charged
♦ using the single or four-station charger. See
Appendix A, “Specifications” for part numbers.
♦ inside the printer using the plug-in charger for
select printers. However, not all printers allow the
battery to be charged inside the printer – see
Appendix A, “Specifications” for more information.
Power
Button
Feed Button
1. Plug the cable
into the socket
located on the
side of the
printer as
shown.
2. Insert the plugin charger into
an electrical
outlet.
Charging time is approximately 1.5 hours.
Using the AC Adapter
Some printers use an AC adapter, which
allows you to use the printer while it is
plugged into a wall outlet. Using the AC
adapter eliminates the need to charge the
battery, since the printer operates on AC
current instead.
1. Connect the plug to the AC adapter.
2. Plug the cable into the socket located
on the side of the printer.
3. Plug the AC adapter into an electrical
outlet.
Connects to printer
1-4 Getting Started
Page 11

Reading the LED
This table explains the LED
indicators.
LED Indicators Status
Red or
Orange
Amber
Green On The printer is on and ready to accept
LED Indicators
On The printer has an error and is not ready
On The battery is charging at a fast rate. If
Off The battery is fully charged.
to accept data.
the battery voltage is below 5.0V, the
battery is “trickle” charged until the
battery reaches 5.0V.
data.
If there is no activity for longer than
20-30 seconds, the printer goes into
sleep mode to conserve the battery.
Refer to the
change this time interval. The printer
“wakes up” when it receives any
information from the host or you press
the power (P) button.
With Bluetooth printers, the printer has
a mode where it can stay on all the time.
Programmer’s Manual
to
Getting Started 1-5
Page 12

Setting the DIP Switches
Use the DIP switches
to set the RS232
communication, IrDA,
and optional RF
values. Turn the
printer upside down
to easily read the DIP
switches.
To activate the DIP
switches, turn the
printer off and then
back on. Gently use a
plastic-tipped object to
set the DIP switches. Do not use any metal object!
1 2 3 4 5 6 7* 8
Communication
Interface
RS232 OFF
IrDA ON
Baud Rate
38400 OFF OFF
19200 OFF ON
9600 ON OFF
2400 ON ON
Parity
None OFF OFF
Odd ON OFF
Even ON ON
Hardware Reset
Enable Reset ON
Disable Reset OFF
Printer Power
Continuous
Power On**
Auto Power Off OFF
* Switch 7 is not used.
** The printer stays on all the time - pressing the power (P) button
has no effect.
1-6 Getting Started
ON
Page 13

Connecting the Printer
1. Plug your host into the printer’s RS232 port using a
modular connector.
RS232 Port
2. Turn on the printer.
3. Make sure the DIP switches are set to match the
communication values on your host.
Getting Started 1-7
Page 14

Attaching the Belt Clip
1. The printer comes with a belt clip.
2. Turn the printer over.
3. Attach the belt clip as shown. Insert the printer’s
round knob into the latch and pull up until it “clicks”
into place.
Strap
4. Attach the belt clip to your belt by looping the strap
around your belt and snapping it into place.
To remove:
1. Remove the belt
clip from your belt.
2. Remove the printer
from the belt clip
by squeezing the
tabs and pulling
the clip down.
Tab
1-8 Getting Started
Page 15

LOADING SUPPLIES
The printer can print text, bar codes, and some limited
graphics on thermal direct receipt paper. See Appendix
A, “Specifications” for the width and thickness
requirements.
1. Lift up the “T” lever on the supply door and wrap your
fingers around it.
“T” Lever
2. Pull up firmly on the supply door to open it.
2
Supply Door
Printhead Guide
Loading Supplies 2-1
Page 16

3. Drop the supply into the well. Make sure the supply
unwinds from the bottom as shown.
4. Position the supply between the printhead guides.
5. Make sure 2-3 inches of supply extends past the
printhead.
6. Close the supply door.
7. Turn on the printer.
Tearing Supply
The printer’s supply door acts as a tear bar. Tear down
against the tear bar to remove receipts.
NOTE: Do not tear supply up against the printhead or
sideways, because the supply door may open.
Tear Bar
2-2 Loading Supplies
Page 17

Using Different Size Supply Rolls
The printer can use one, two, or three-inch wide supply
rolls. However, you need to order the supply guide
adapter if you are using one or two-inch wide supply.
Make sure the supply is left-justified inside the printer.
For one-inch wide supply:
Insert the adapter into the left slot as shown.
Supply
Sensor
For two-inch wide supply:
Insert the adapter into the right slot as shown.
Supply
Sensor
NOTE: The supply sensor is located on the left side by
the printhead.
Loading Supplies 2-3
Page 18

2-4 Loading Supplies
Page 19

USING THE PRINTER
This chapter includes information about printing and
using the magnetic stripe reader.
3
Printing
Before you print, make sure your printer’s battery is
charged and the printer’s communication values match
those of your host.
1. Connect the communication cable. See “Connecting
the Printer” in Chapter 1.
2. Turn on the printer.
3. Send a data stream to the printer. Refer to the
Programmer’s Manual
4. Remove the printed receipts.
for more information.
Using the Magnetic Stripe Reader
Read the following if your printer has the optional
magnetic stripe reader, which is factory installed.
The reader processes cards with a magnetic stripe, such
as a credit card or driver’s license and it requires special
software to be installed.
Using the Printer 3-1
Page 20

Quickly swipe the card through the reader either left-toright or right-to-left with the magnetic stripe in the reader.
The magnetic stripe must be facing toward the supply
door while it is passed through the reader.
Stripe is facing toward
supply door.
The green/orange LED on the printer indicates the
following:
LED Indicator Status
Green On Ready/waiting for card.
Red or
Orange
Green Off Good swipe (card’s data read). OR
On Error reading card’s data.
Not ready for card.
3-2 Using the Printer
Page 21

V
g
CLEANING
The rate and frequency at which you
print determines how often you must
clean the printer. We recommend
cleaning the printhead and platen
roller weekly or as needed when you
see voids in the print.
CAUTION
Do not use sharp objects to clean the
printhead. This may damage the
printer and require a service charge.
1. Turn off the printer.
2. Lift up the “T” lever on the supply door and wrap your
fingers around it.
3. Pull up firmly on the supply door to open it.
4. Remove the supply roll (when cleaning the
printhead).
5. Moisten a cotton swab with isopropyl alcohol and
clean the printhead as shown. You can also use the
printhead cleaning pen (114226).
oids in printin
4
Printhead
Cleaning 4-1
Page 22

6. Clean the platen roller with a dry cloth or small brush.
You can also use another cotton swab moistened with
isopropyl alcohol. Turn the platen roller with your
finger and run the cotton swab or dry cloth across it.
Make sure the platen roller is clean all the way
around.
Supply
sensor
Platen Roller
Tear Bar
7. Moisten another cotton swab with isopropyl alcohol.
Rub the cotton swab across the supply sensor to
remove any build-up.
8. Moisten another cotton swab with isopropyl alcohol.
Rub the cotton swab across the tear bar to remove
any build-up.
9. Use a can of compressed air to remove any debris
from the supply well.
10. Reload the supply roll.
11. Turn on the printer.
4-2 Cleaning
Page 23

TROUBLESHOOTING
If you cannot fix a problem, call Technical Support.
Problem Action
5
Does not feed or
has a paper jam.
Does not print.
Remove any jammed supplies.
Reload supplies.
♦ Check or replace the
printer’s battery.
♦ Your data stream may
include a query for the
battery voltage. Refer to the
Programmer's Manual
more information.
♦ Make sure the supplies are
loaded correctly and not
upside down.
♦ Open and then close the
supply door evenly. If both
sides of the supply door are
not completely closed,
uneven printing may occur.
♦ Verify communications
between the host and printer.
See your System
Administrator.
♦ The printer’s duty cycle may
be exceeded. In high
temperature environments,
pause the printer for one
minute after every four
inches printed. If the duty
cycle is exceeded, the
printer may not print all of
the information that was sent
to it.
NOTE: This is not a continuous
batch printer.
for
Troubleshooting 5-1
Page 24

Problem Action
Light/heavy
printing or voids in
printing.
Red or Orange
(Error) LED is on.
♦ Clean the printhead.
♦ Check or recharge the
battery. See “Charging the
Battery” in Chapter 1 for
more information.
♦ Your System Administrator
may need to adjust the print
contrast. Refer to the
Programmer's Manual
for
more information.
♦ Open and then close the
supply door evenly. If both
sides of the supply door are
not completely closed,
uneven printing may occur.
♦ Check or load supply.
♦ Error reading magnetic
card’s data.
♦ The printer’s duty cycle may
be exceeded. In high
temperature environments,
pause the printer for one
minute after every four
inches printed. If the duty
cycle is exceeded, the
printer may not print all of
the information that was sent
to it.
NOTE: This is not a continuous
batch printer.
5-2 Troubleshooting
Page 25

Printing a Test Receipt
Before calling technical support, print a test receipt. The
test receipt has the printer’s firmware version and other
information on it.
To print a test receipt, press firmly and hold the FEED
button while turning on the printer. Then, release both
buttons.
A test receipt similar to the one shown below prints:
COURIER FONT – 72 COLUMNS
COURIER FONT – 64 COLUMNS
COURIER FONT – 57 COLUMNS
COURIER FONT – 48 COLUMNS
COURIER FONT – 36 COL
Troubleshooting 5-3
Page 26

5-4 Troubleshooting
Page 27

SPECIFICATIONS
Printer Specifications
Height: 2.25 inches (57 mm)
Width: 4.25 inches (108 mm)
Length: 6.0 inches (152 mm)
Weight:
w/ battery & supply
Shipping Weight: 3 lbs. (1.4 kg)
Power: 6.0V NiMH battery
1.41 lbs. (0.64 kg)
A
Operating Limits:
Storage:
Operating Humidity:
Storage:
Printhead: 3 inches (76 mm) wide
Printing
Method:
Print
Speed:
Supported Fonts
(Bitmap):
Supported
Bar codes:
Memory: 32K SRAM
32° to 104°F (0° to 40°C)
-4° to 104°F (-20° to 40°C)
20% to 85% non-condensing
5% to 95% non-condensing
203 dpi (8 dots per mm)
Thermal Direct
Up to 2.0 inches per second (for
standard receipts)
NOTE: The speed is dependent
on the application.
Standard (normal and bold),
Large (normal), Reduced (normal
and bold), and Large Rotated.
Codabar, Code 39,
UCC/EAN – 128, UPC/EAN/JAN,
Interleaved 2 of 5, Code 128.
128K Flash
Specifications A-1
Page 28

Charging Time: Approximately 1.5 hours
Communications: RS-232 port, IrDA, Bluetooth
Print Ratio 25% black maximum per square
inch
Supply Specifications
Supplies: Thermal direct receipt paper
Supply
Thickness:
Supply Width: 3.125 inches (79 mm)
Supply Length: 1.0 inch (25.4 mm) minimum feed
Roll Diameters: Inside: .25 inches (6 mm)
Maximum Print
Area:
2.2 to 3.5 mils (receipt paper)
8.0 inch (203 mm)
1 roll of receipt paper is
approximately 600 inches
(15,240 mm)
Outside: 1.5 inches (38 mm)
2.85 inches (72 mm) by 8.0 inches
(203 mm)
NOTE: Maximum length depends
on format.
Ordering Supplies
900148 2.2-inch wide supply, 10 roll case
900149 2.2-inch wide supply, 50 roll case
900295 3.125-inch wide supply, 10 roll case
900294 3.125-inch wide supply, 50 roll case
A-2 Specifications
Page 29

Options and Accessories
♦ Magnetic Card Reader (factory-installed)
♦ Extra Battery (125237)
♦ Shoulder Strap (125239) or Belt Clip (125238)
♦ Printhead Cleaning Pen (114226)
♦ Coiled Cable (125240)
♦ AC Adapter (125234) – Plugs into a wall outlet so
the printer operates on AC current. Only for use
with printers M09430R03, M09430R04,
M09430R09, and M09430R10.
♦ Plug-in Charger (125225) – Plugs into an electrical
outlet for charging the battery.
printers M09430R03, M09430R04, M09430R09,
and M09430R10.
These printers require the single
station or four-station battery charger to charge the
battery.
♦ Single Station Battery Charger (125228)
♦ Four Station Battery Charger (125231)
♦ IrDA Version 1.1 (all printers have IrDA included)
Infrared Data Association - A wireless solution that
uses light energy to transfer signals to and from
the printer and a host. This system has narrow
transmitting/ receiving signals and works best
when stationed next to the host with no objects in
the way. The maximum operating range is 3 feet.
Use the DIP switches to set up the system.
♦ Bluetooth - A wireless solution that uses radio
waves to transfer signals to and from the printer
and a host. The operating range is up to10 meters
(32.8 feet). Bluetooth radio waves can pass
through walls and floors, so the hosts do not have
to be next to each other.
NOTE: Microwave ovens, 2.4 GHz cordless phones, and
certain wireless LAN products operate on the
same frequency as Bluetooth and may cause
interference.
Not for use with
Specifications A-3
Page 30

A-4 Specifications
Page 31

Page 32

 Loading...