

Page 1
Monarch
9414 Printer
TC9414PHX Rev. AG 4/05 ©1999 Paxar Americas, Inc. All rights reserved.
Page 2

Each product and program carries a respective written warranty, the
only warranty on which the customer can rely. Paxar reserves the
right to make changes in the product, the programs, and their
availability at any time and without notice. Although Paxar has made
every effort to provide complete and accurate information in this
manual, Paxar shall not be liable for any omissions or inaccuracies.
Any update will be incorporated in a later edition of this manual.
©1999 Paxar Americas, Inc. All rights reserved. No part of this
publication may be reproduced, transmitted, stored in a retrieval
system, or translated into any language in any form by any means,
without the prior written permission of Paxar Americas, Inc.
WARNING
This equipment has been tested and found to comply with the
limits for a Class A digital device, pursuant to Part 15 of the
FCC Rules. These limits are designed to provide reasonable
protection against harmful interference when the equipment is
operated in a commercial environment. This equipment
generates, uses, and can radiate radio frequency energy and,
if not installed and used in accordance with the instruction
manual, may cause harmful interference to radio
communications. Operation of this equipment in a residential
area is likely to cause harmful interference in which case the
user will be required to correct the interference at his own
expense.
CANADIAN D.O.C. WARNING
This digital apparatus does not exceed the Class A limits for
radio noise emissions from digital apparatus set out in the
Radio Interference Regulations of the Canadian Department
of Communications.
Le présent appareil numérique n’émet pas de bruits
radioélectriques dépassant les limites applicables aux
appareils numériques de la classe A prescrites dans le
Réglement sur le brouillage radioélectrique édicte par le
ministère des Communications du Canada.
Trademarks
9414 and Monarch
Paxar
Pizza Hut is a registered trademark of Pizza Hut, Inc.
Personal Pan, Meat Lover’s, Panwich and Supreme are registered trademarks of
Pizza Hut, Inc.
Velcro is a registered trademark of Velcro Companies.
Paxar Americas, Inc.
170 Monarch Lane
Miamisburg, OH 35342
is a trademark of Paxar Corporation.
are trademarks of Paxar Americas, Inc.
Page 3

TABLE OF CONTENTS
GETTING STARTED.......................................................... 1-1
Unpacking the MRD System .......................................... 1-1
Setting Up the System.................................................. 1-2
Reading the Indicator Light........................................... 1-8
Clearing the Buffer....................................................... 1-9
Switching Print Modes.................................................. 1-9
USING THE PIZZA HUT APPLICATION ............................ 2-1
Setting the Date/Time/Hot-Hold Time............................. 2-2
Selecting a Language................................................... 2-4
Loading Labels ............................................................2-5
Loading Labels for MRD and Dough Staging.............. 2-5
Loading Labels for Hot-Hold Items ........................... 2-9
Using the Keypad/Terminal Buttons ............................. 2-11
Reading the Scan Sheet ............................................. 2-12
Processing the Product .............................................. 2-13
Hot-Hold Labeling ................................................ 2-14
Inventory Labeling................................................ 2-14
From Frozen to Pre-Top........................................ 2-16
Future Downloads...................................................... 2-17
Table of Contents i
Page 4

CARE AND MAINTENANCE................................................3-1
Clearing Label Jams.....................................................3-1
Cleaning the Printhead .................................................3-2
Checking the Software Version ......................................3-2
Clearing the Buffer .......................................................3-3
TROUBLESHOOTING ....................................................... A-1
Table of Contents ii
Page 5

GETTING STARTED
The MRD (Made Ready Discard) system is a
product freshness and inventory control labeling
system that helps decrease product waste. The
system uses the Monarch 9414 printer with the
keypad/terminal and the Pizza Hut Application.
This chapter includes information about
♦ unpacking the MRD system (for new systems only)
♦ setting up the MRD system
♦ reading the indicator light.
1
Unpacking the MRD System
For new systems only:
After you unpack the MRD system, you should have
♦ 9414 Printer and power supply
♦ keypad/terminal with rubber cover (may already be
on the keypad/terminal) and power supply
♦ scanner
♦ communications cable
♦ Equipment Manual (Keep this manual in a safe
place), Maintenance Quick Reference Sheet (Job
Aid) and System Setup Sheet
♦ product/quantity scan sheet
♦ Velcro strips (four extra), cable ties (four), bolts
(two), and wood screws (two)
♦ Tray
If you need help, please call 1-888-666-9414. If you
need more paper labels, call one of the following:
Prime Source: 800-397-4737 (order item #85221)
Wasserstrom: 800-999-9277 (order item #374014)
Unified Food Co-Op: 800-444-4144 (order item
#374014)
Getting Started 1-1
Page 6

Keep all packaging material in case you need to move
or return the MRD system.
Setting Up the System
CAUTION
Do not touch the electrical connectors while setting up
the printer. Electrostatic discharge can damage or
destroy the printhead or electronic components.
1. Remove the tray from its packaging. Check inside
the packaging for the adhesive feet. Remove the
feet from their adhesive backing and apply one to
each corner.
2. Place the tray on the cut table near an electrical
outlet.
Adhesive
Feet
Tray design may vary from the one
shown in this manual.
3. Make sure the power on the printer is turned off
before setting up any cables. The power switch
on the back of the printer should be in the OFF
(O) position.
1-2 Getting Started
Page 7
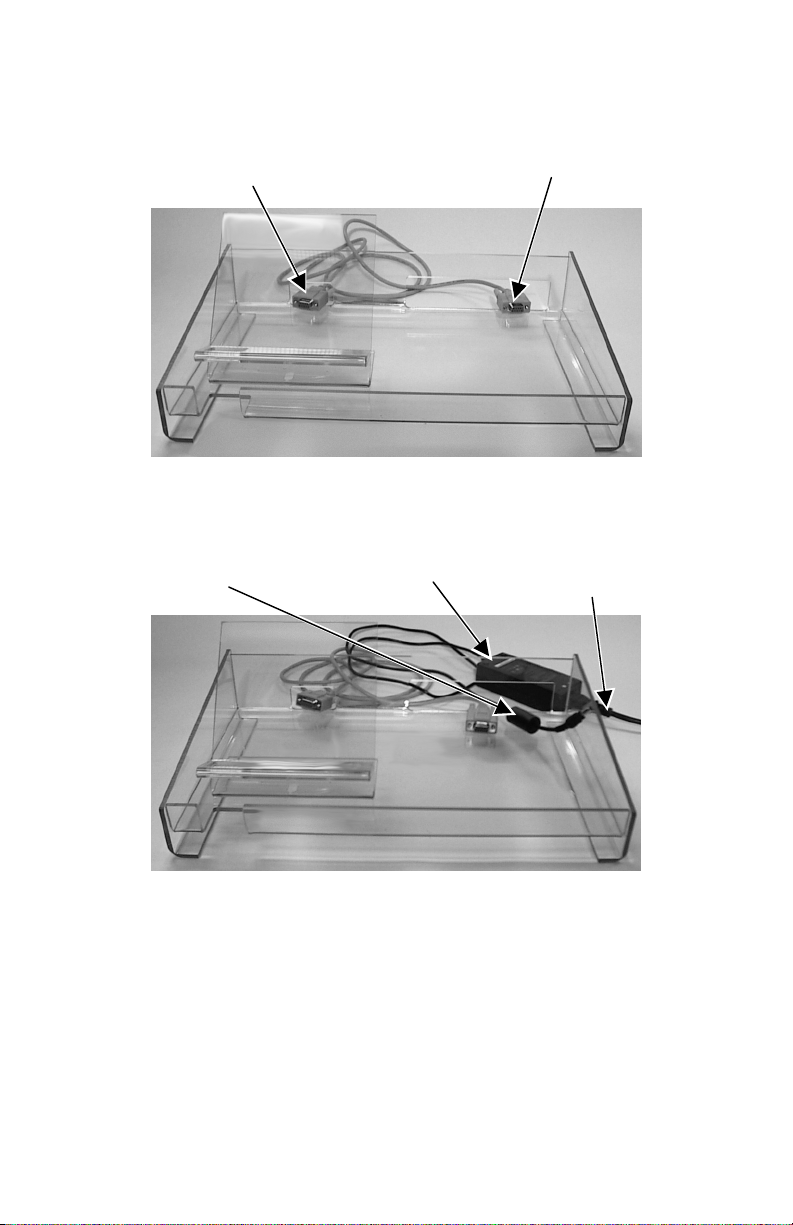
4. Facing the front of the tray, lay the serial cable
(part number 125802) behind the tray.
To keypad/terminal
To printer
5. Plug the three-hole end of the printer’s power
supply cable into the three-pronged outlet in the
printer’s power supply.
Power cable to
printer
Printer’s Power
Supply
Power cable to
wall outlet
6. Place the printer’s power supply behind the tray
with the printer’s connector on the right side.
Getting Started 1-3
Page 8
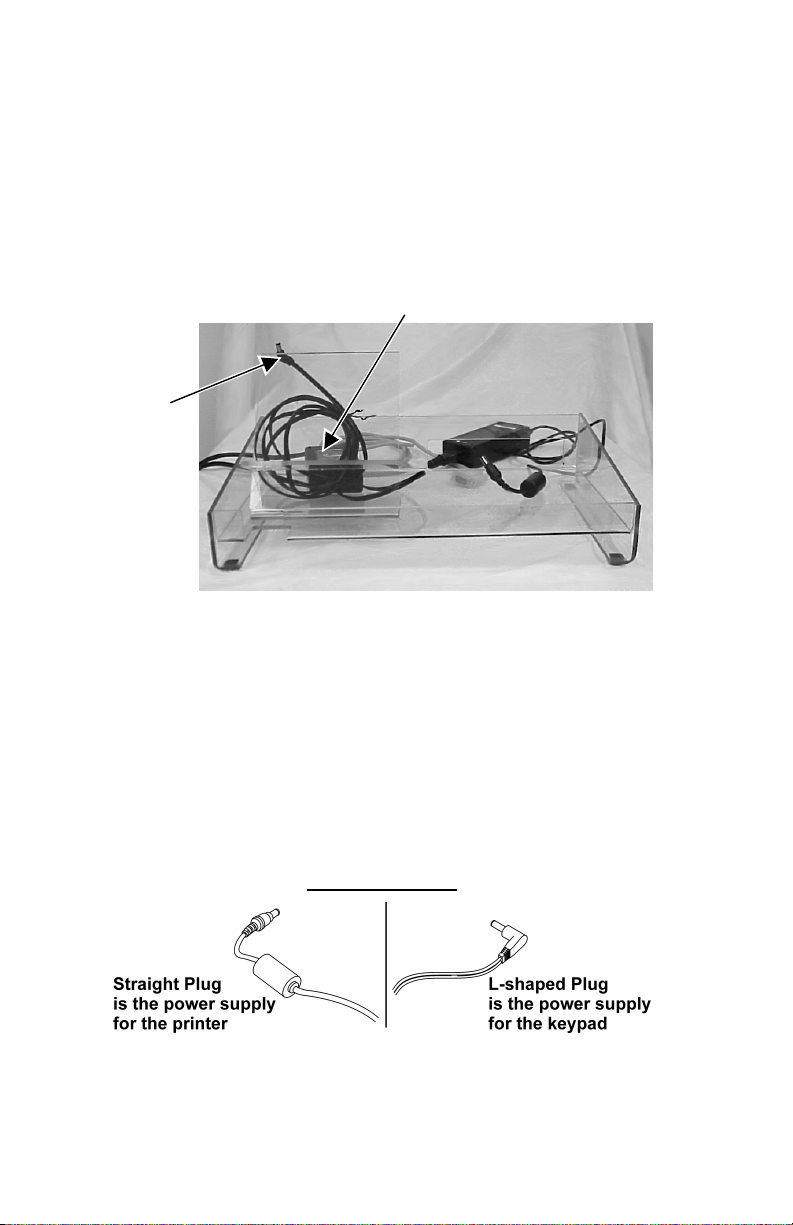
7. Place the keypad/terminal’s power supply into the
tray under the shelf with the three-pronged end
facing the cut-out in the back of the tray.
8. Through the back of the tray, plug the three-hole
end of the keypad/terminal’s cable into the threepronged outlet in the keypad/terminal’s power
supply (18-24V).
Keypad/Terminal’s Power Supply
Keypad/
Terminal’s
power
cable with
L-shaped
connector
9. Lay the keypad/terminal’s cable with the L-shaped
connector on the shelf.
10. Place the keypad/terminal on the shelf, but do not
remove the tape from the Velcro at this point.
WARNING
The printer’s power supply uses a different
voltage than the keypad. To connect the wrong
power supply could permanently damage the
keypad or the printer.
1-4 Getting Started
Page 9
The keypad/terminal should not be
operated in a location that has
room temperatures above 158° F
or below -4° F for extended
periods of time. This could
permanently damage the display.
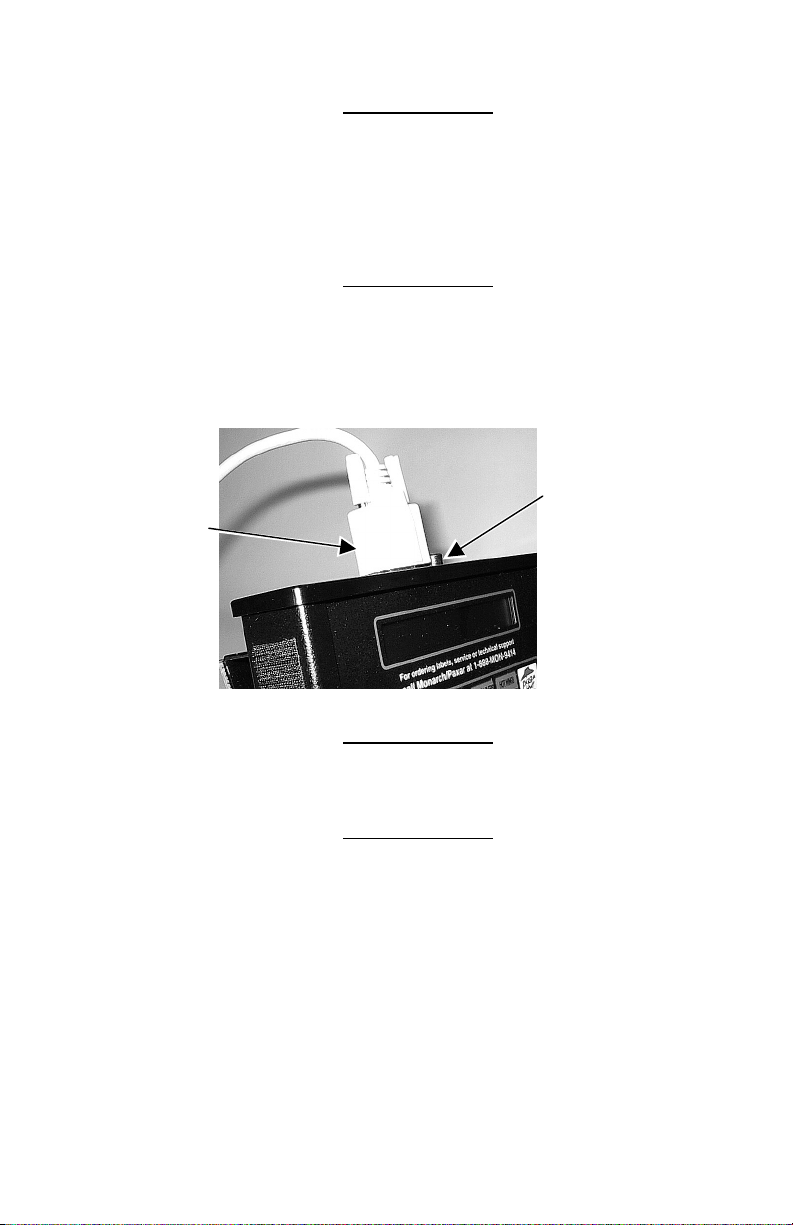
11. Plug the L-shaped connector into the socket
located on the top of the keypad/terminal (12V).
12. Connect the serial cable to the top of the
keypad/terminal.
L-shaped
Connector
Serial
Cable
13. Place the printer in the tray.
The printer should never be
operated while resting on its side
or upside down.
ALWAYS PLUG THE PRINTER INTO THE
ELECTRICAL WALL OUTLET FIRST AND
THEN TURN ON THE PRINTER - NEVER
TURN ON THE PRINTER AND THEN PLUG IT
INTO THE WALL OUTLET.
Getting Started 1-5
Page 10

14. Plug the printer’s power supply cable (with the
straight end) into the socket on the back of the
printer.
Power Cable
Serial Cable
15. Connect the serial cable to the printer’s serial
port.
16. If necessary, adjust the cables. Make sure all the
cables move freely through the openings in the
back of the tray. Use a cable tie to secure them.
17. Lift up the keypad/terminal with one hand and feed
the scanner cable connector through the notch as
shown.
Scanner
Cable
1-6 Getting Started
Page 11

18. Plug the scanner cable connector into the socket
and then turn the connector to lock the cable in
place.
19. Remove the tape from the Velcro on the
keypad/terminal and put the keypad/terminal onto
the shelf.
20. Plug the printer's power supply cable into a
GROUNDED
electrical outlet. ALWAYS PLUG
THE PRINTER INTO THE ELECTRICAL WALL
OUTLET FIRST, AND THEN TURN ON THE
PRINTER.
21. Plug the keypad/terminal's power cable into a
GROUNDED
electrical outlet.
WARNING
The printer and power supply should
never be operated in a location where
either one can get wet. Personal injury
could result.
22. Press the power switch on the back of the printer
to the ON position (I) to turn on the printer.
Getting Started 1-7
Page 12

Reading the Indicator Light
The indicator light monitors the printer's status.
Indicator Light
(around the
Feed Button)
Indicator Light Description
GREEN Printer is on and ready to use.
RED
Supply has run out or is not loaded.
Load supply. See Chapter 2, "Using
the Pizza Hut Application," for more
information. Or, clear the buffer.
Follow the steps below.
ORANGE
Error has occurred. See Appendix A,
"Troubleshooting," for more
information. To clear the error, press
the FEED button. Or, clear the
buffer. Follow the steps below.
No light
Printer is off. Make sure the power
supply is connected properly. See
"Setting up the System" earlier in this
chapter.
Feed Button
1-8 Getting Started
Page 13

Clearing the Buffer
To clear the buffer:
1. Turn off the printer.
2. Load labels for non-peel mode. See Chapter 2,
"Using the Pizza Hut Application."
3. Press and hold the FEED button while turning on
the printer.
4. Release the FEED button when the indicator light
starts flashing red.
Several labels advance including the status
label.
5. Press the FEED button.
Switching Print Modes
To switch the printer to print labels for Hot Hold Items:
1. Open the peel bar cover by pushing down.
2. Change print modes to peel by switching the print
mode switch to the (1) position.
1=Peel Mode
O=Non-peel Mode
Peel Bar
Cover
Print Mode
Switch
3. Load supplies for Hot Hold Items, See Chapter 2,
"Using the Pizza Hut Application," for more
information.
Getting Started 1-9
Page 14

1-10 Getting Started
Page 15

USING THE PIZZA
HUT APPLICATION
This chapter describes how to
♦ set the date/time/hot-hold time
♦ select a language
♦ load labels
♦ process the product.
2
Using the Pizza Hut Application 2-1
Page 16

Setting the Date/Time/Hot-Hold Time
Keep this manual in a safe place; otherwise, changing
the settings would require a service call.
To set the Date:
1. Scan this barcode to start the program.
2. The display shows the current date setting. If this
is correct, press the Pizza Hut button.
To change the setting, use the top row buttons
on the keypad/terminal:
♦ Cheese button changes the month.
♦ Supreme button changes the day.
♦ Pepperoni button adds a year.
♦ Meat Lover's button subtracts a
year.
3. Press the Pizza Hut button to exit.
2-2 Using the Pizza Hut Application
Page 17

To set the Time:
1. Scan this barcode to start the program.
2. The display shows the current time setting. If this
is correct, press the Pizza Hut button.
To change the setting, use the top row buttons
on the keypad/terminal:
♦ Cheese button changes the hours.
♦ Supreme button changes the minutes.
♦ Pepperoni button changes AM/PM.
3. Press the Pizza Hut button to exit.
To set the Humidified Hot-Hold Time:
1. Scan this barcode to set the Humidified Hot-Hold
Time.
The display shows "Set to (Winston, Bevilis or
Henny Penny) Hot Hold". The time will be set
depending on the product.
Using the Pizza Hut Application 2-3
Page 18

To set the Dry Hot-Hold Time:
1. Scan this barcode to set the Dry Hot-Hold time.
The display shows "Set to Dry Hot Hold" (i.e.
Hatco, JR2000). The time will be set
depending on the product.
Selecting a Language
The language selection is only for hot-hold
(freshness) labels. If Spanish is selected, pressing a
dough button prints a dough label in Spanish.
The keypad/terminal display is
always in English.
To select a language:
1. Press the English/Spanish button once. The
current language setting displays.
2. Continue pressing the English/Spanish button
until you see the option you need:
♦ English
♦ Spanish
♦ English/Spanish
3. Press the Pizza Hut button to save the setting.
2-4 Using the Pizza Hut Application
Page 19

Loading Labels
If you run out of labels while
printing, do not turn off the printer
when reloading the labels. You
may lose your data. The printer
resumes printing when reloaded.
Loading Labels for MRD and Dough Staging
1. Remove and discard the tape from a new roll of
labels.
2. Press the cover release levers (on both sides of
the printer) towards the front of the printer to
release the cover. Lift open the cover.
Remember to clean the printhead every
time you load a new label roll into the
printer. Turn the printer OFF to clean it. See
"Cleaning the Printhead" in Chapter 3 for more
information.
Using the Pizza Hut Application 2-5
Page 20
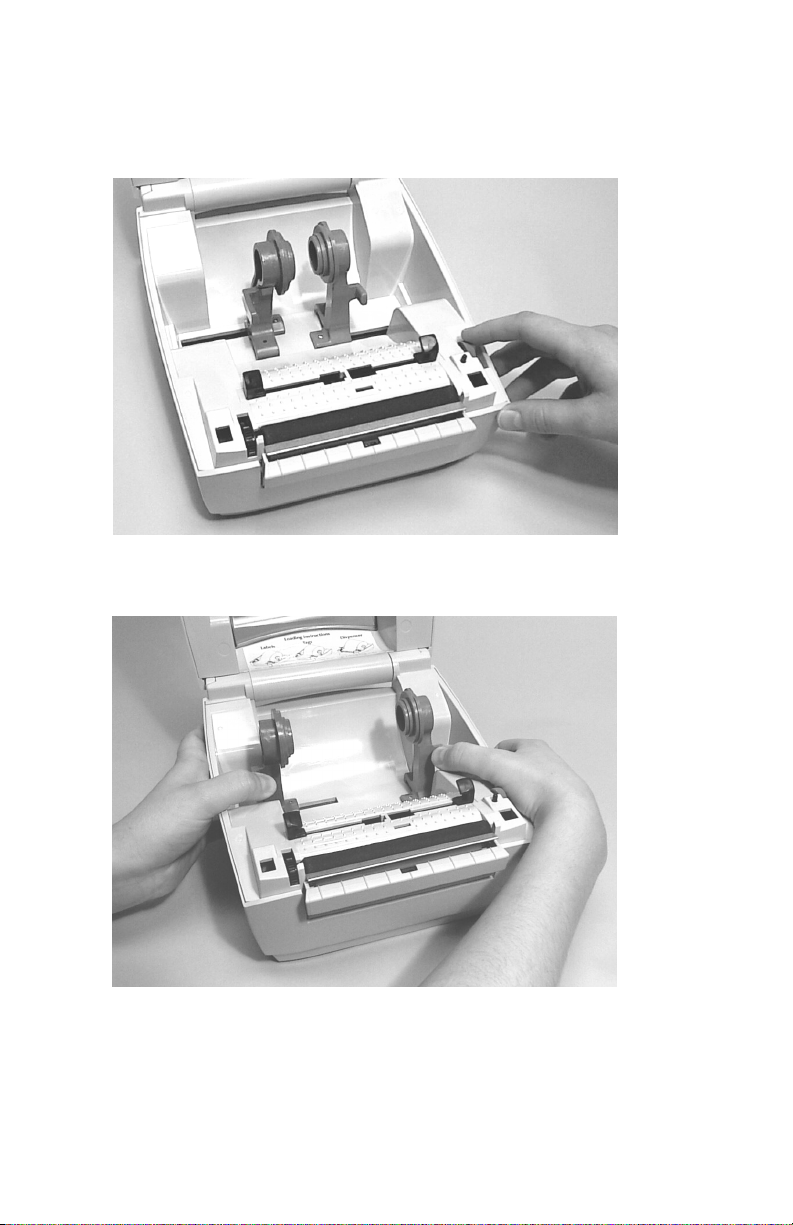
3. Adjust the supply guides to their widest position
by turning the dial.
4. Open the supply holders to their widest position by
pushing out the supply holder tabs.
2-6 Using the Pizza Hut Application
Page 21

5. Load the supply roll.
6. Press the supply under the supply guides and
adjust the supply guides so they just touch the
edges of the backing paper.
Using the Pizza Hut Application 2-7
Page 22
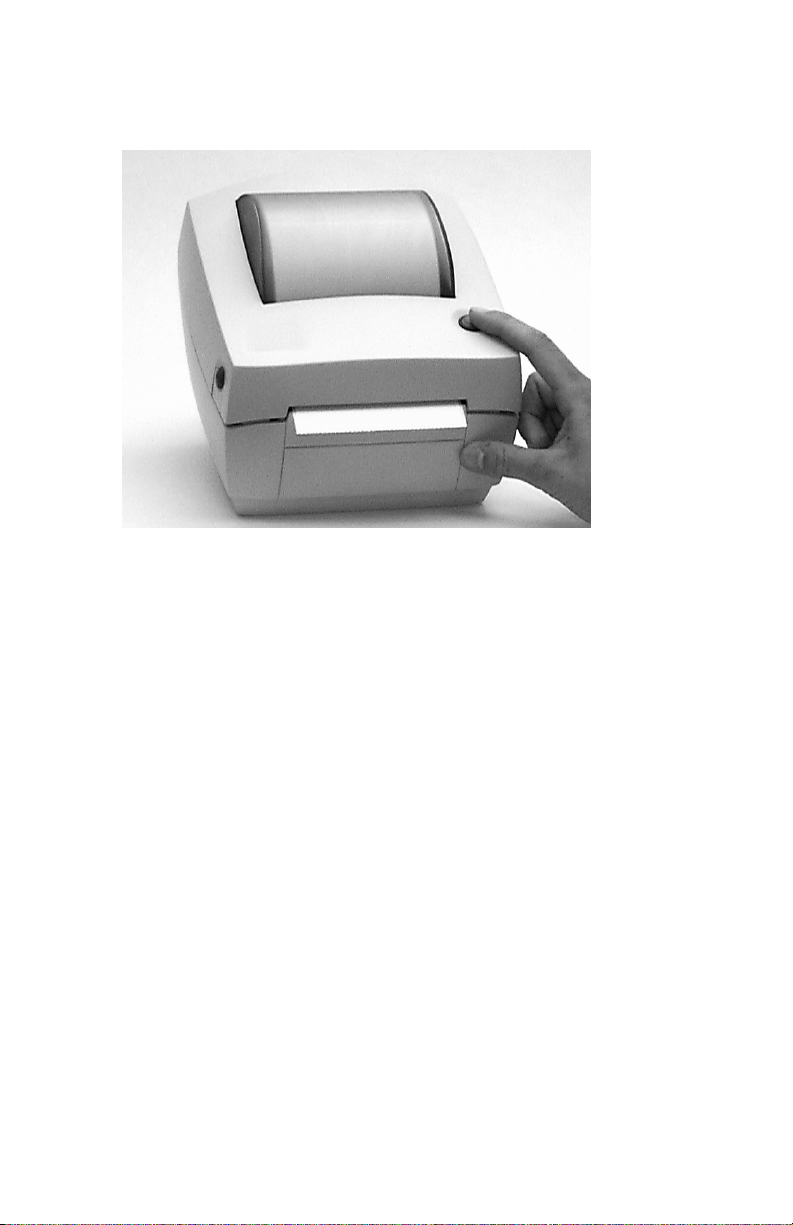
7. Close the cover until the cover locks in place.
8. Press the FEED button. The indicator light should
be GREEN.
2-8 Using the Pizza Hut Application
Page 23

Loading Labels for Hot-Hold Items
1. Remove and discard the tape from a new roll of
labels.
2. Press the cover release buttons (on both sides of
the printer) towards the front of the printer. Lift
open the cover.
3. Adjust the supply guides to their widest position
by turning the dial.
4. Open the supply holders to their widest position by
pushing out the supply holder tabs.
5. Load the supply roll.
6. Press the supply under the supply guides and
adjust the supply guides so they just touch the
edges of the backing paper.
7. Open the peel bar cover by pushing down.
Peel Bar
Cover
Print Mode
Switch
8. Change print modes to peel by switching the print
mode switch to the (1) position.
1=Peel Mode
O=Non-peel Mode
9. Remove the first two labels from the backing
paper.
Using the Pizza Hut Application 2-9
Page 24

10. Feed the backing paper over the peel bar and
under the peel roller.
Peel Bar
Peel Roller
11. Press the supply under the supply guides and
adjust the supply guides so they just touch the
edges of the backing paper.
12. Close the peel bar cover by pushing up until it
locks.
13. Close the cover until the cover locks in place.
14. Press the FEED button. The indicator light should
be GREEN.
2-10 Using the Pizza Hut Application
Page 25
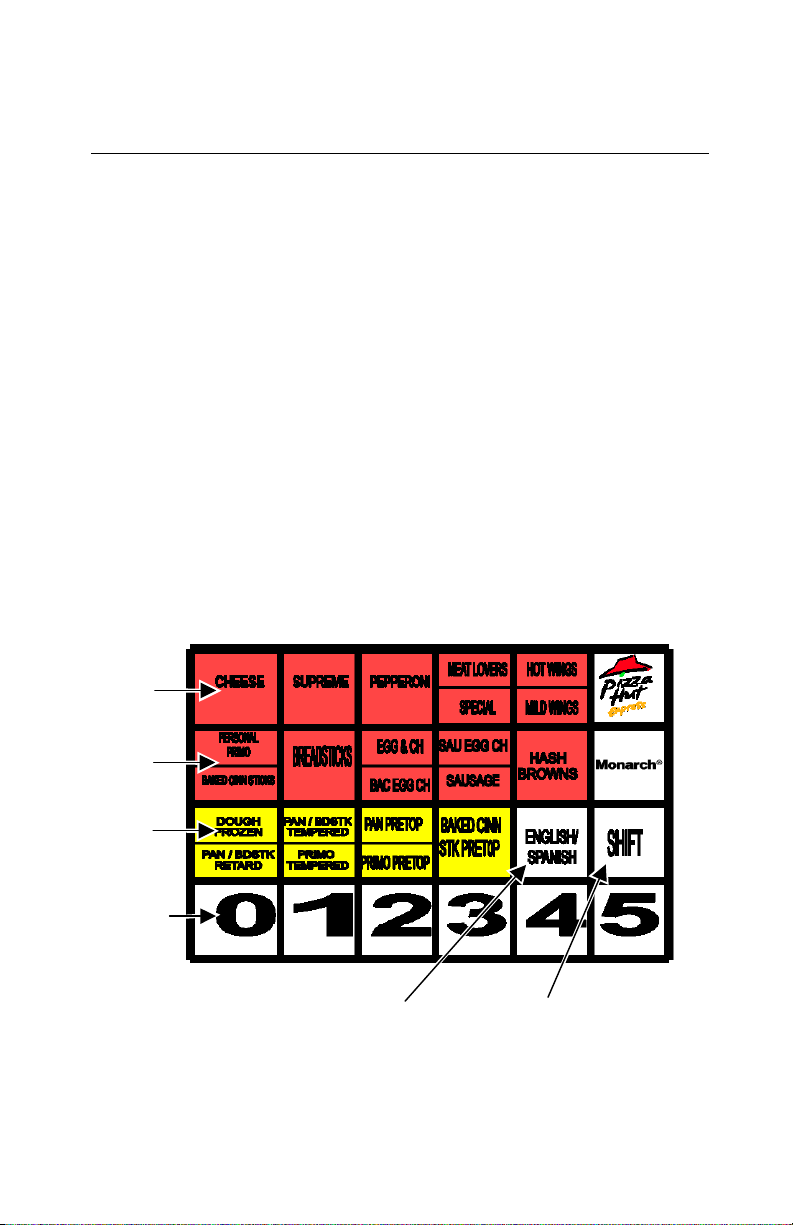
Using the Keypad/Terminal Buttons
♦ Hot Hold Items (Red buttons: Personal Pan
Pizza, Primo, Breadsticks, Wings, and Breakfast
items ) - prints a label with the product name and
the freshness time.
♦ Dough Products - prints labels with the time/date
for each preparation process. For more
information about dough products, see "From
Frozen to Pre-Top."
♦ Shift - Press Shift to get products listed at the top
of certain buttons. For Mild Wings, press the Hot
Wings/Mild Wings button. For Hot Wings, press
and release Shift, then press the Hot Wings/Mild
Wings button. Do not press Shift and a product
button at the same time. Press and release the
Shift button, then press a product button.
♦ Print Quantity - use the numeric buttons to enter a
quantity of labels that you want printed. The
numeric buttons should be pressed first, before
pressing a product button.
Hot-Hold
Items
Other
Products
Dough
Items
Numeric
Buttons
Language
Button
Using the Pizza Hut Application 2-11
Shift
Button
Page 26

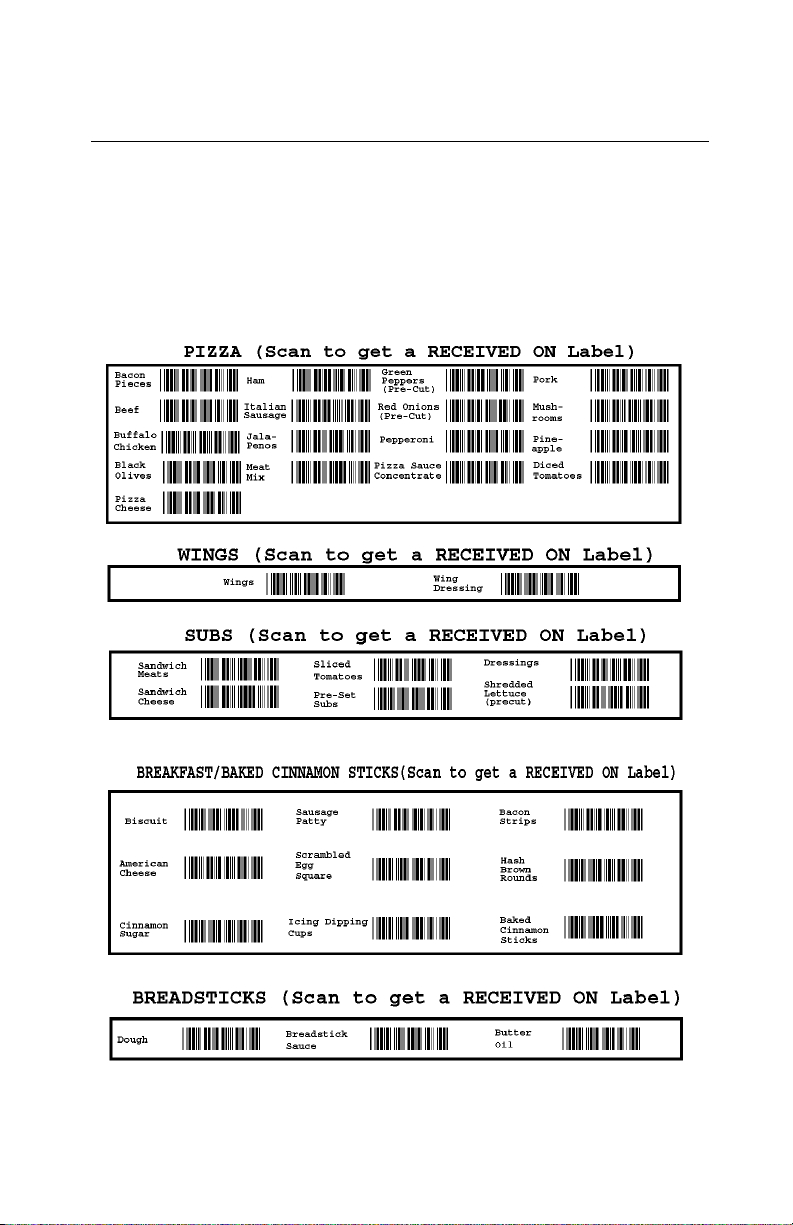
Reading the Scan Sheet
The scan sheet helps you quickly process your
inventory by scanning the barcodes at various stages
of food preparation. There are three stages:
Stage 1 Creates a received on label.
Stage 2 Creates a thaw stage label. Not all products
require a thaw label. For example, black
olives go from a received on label directly to
the maketable.
Stage 3 Creates a maketable stage label.
You can by-pass Stage 1 or Stage 2 labels
when you take a product directly from the
distributor into the thaw stage or preparation
stage (maketable). To by-pass Stage 1
labels, scan "Thaw" from the process box at
the top of the scan sheet. To by-pass Stage
2 labels, scan "Maketable" from the process
box at the top of the scan sheet. See
"Inventory Labeling" for more information.
Below is the PROCESS box from the scan sheet:
Below is the QUANTITY box from the scan sheet:
The PRODUCT sections from the scan sheet are
shown on the following page. The scan sheet can be
found posted near the MRD system.
2-12 Using the Pizza Hut Application
Page 27
Processing the Product
Use the Pizza Hut application to label the Hot-Hold
items and inventory products. You can find the
products either on the product/quantity scan sheet or
on the keypad/terminal.
NOTE: One side of the scan sheet is in English; the
other side is in Spanish.
Using the Pizza Hut Application 2-13
Page 28
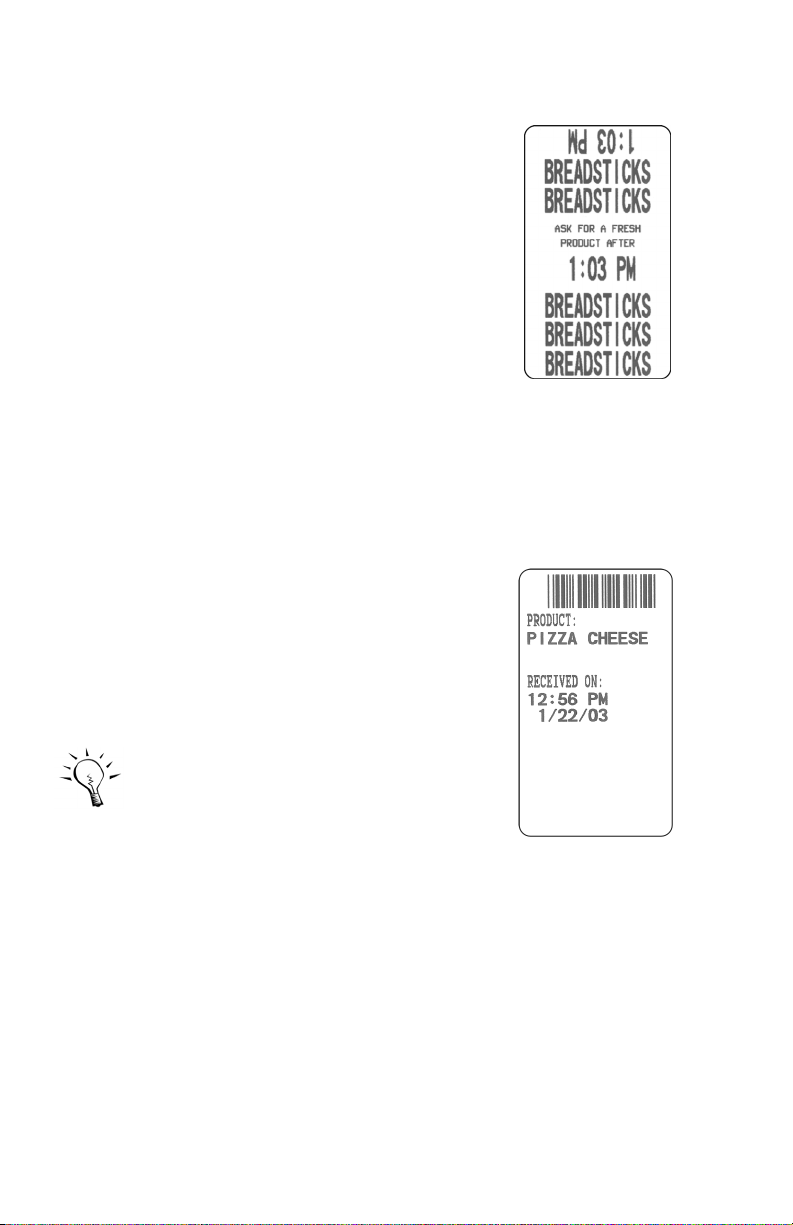
Hot-Hold Labeling
To print one label, press a product
button on the keypad/terminal one time.
To print several Hot-Hold Labels:
1. Press the numeric buttons to enter
a quantity.
The display prompts you for a
product.
2. Press a product button.
Hot Hold Sample
Inventory Labeling
The inventory management process starts when the
Stage 1 label prints with the date/time information and
is applied either to a product label or is applied
somewhere on the product bag or box.
Stage 1
1. Scan a product barcode from the
scan sheet to print a Stage 1 label.
2. Scan a quantity barcode from the
scan sheet. The Stage 1 label
prints.
To by-pass a Stage 1 label and
go directly to a Stage 2 label,
scan "Thaw" from the process
box on the top of the scan sheet
and then scan the product.
3. Go to Stage 2.
Stage 1 Label
2-14 Using the Pizza Hut Application
Page 29
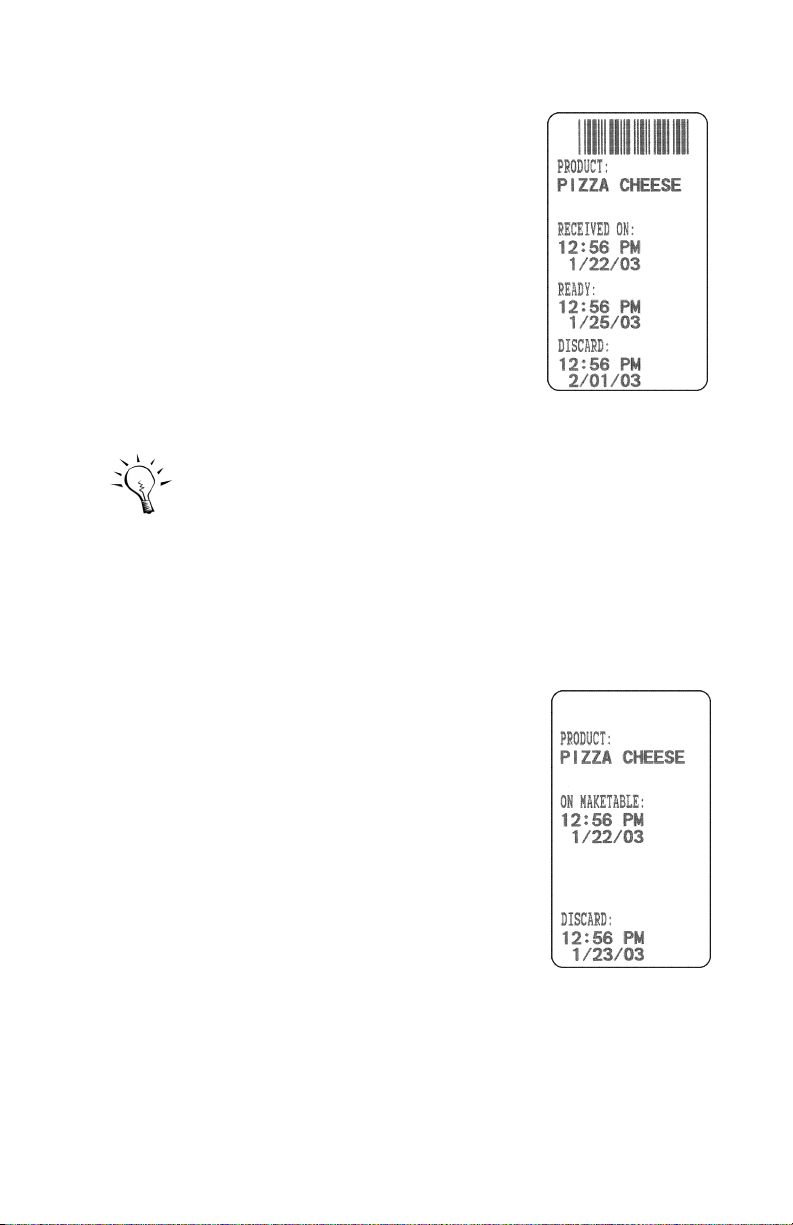
Stage 2
1. When the product is ready for the
next process (Stage 2), scan the
barcode from the Stage 1 label or
scan "Thaw" from the process box
on the top of the scan sheet and
then scan the product.
2. Scan a quantity barcode from the
scan sheet. The Stage 2 label
prints with the new date/time
information. Apply the Stage 2
label on top of the Stage 1 label.
To by-pass a Stage 2 label and
go directly to a Stage 3 label,
scan "Maketable" from the
process box on the top of the
scan sheet and then scan the
product.
3. Go to Stage 3.
Stage 3
1. When the product is ready for the
next process (Stage 3), scan the
barcode from the Stage 2 label or
scan "Maketable" from the process
box on the top of the scan sheet
and then scan the product.
Stage 2 Label
The process is done (all stages
complete) when a label prints
without a barcode.
2. Scan a quantity barcode from the
scan sheet. The Stage 3 label
prints with the new date and time
information. Apply the Stage 3 label
on top of the Stage 2 label.
Using the Pizza Hut Application 2-15
Stage 3 Label
Page 30

From Frozen to Pre-Top
This section explains how to take
frozen dough to the pre-top stage:
1. When you receive frozen dough,
press the Dough Frozen/
Pan/BDSTK Retard button on the
keypad/terminal. The Stage 1
label prints with date and time
information. Apply the Stage 1
label to the product.
2. Scan the barcode from the Stage
1 label when the dough is ready for
the next process.
3. Scan a quantity barcode from the
scan sheet. The Stage 2 label
(TEMPERED) prints with new
date/time information. Apply the
Stage 2 label on top of the Stage
1 label.
4. Scan the barcode from the Stage
2 label (TEMPERED) when the
dough is ready for the next
process.
Stage 1 Label
Stage 2 Label
2-16 Using the Pizza Hut Application
Page 31
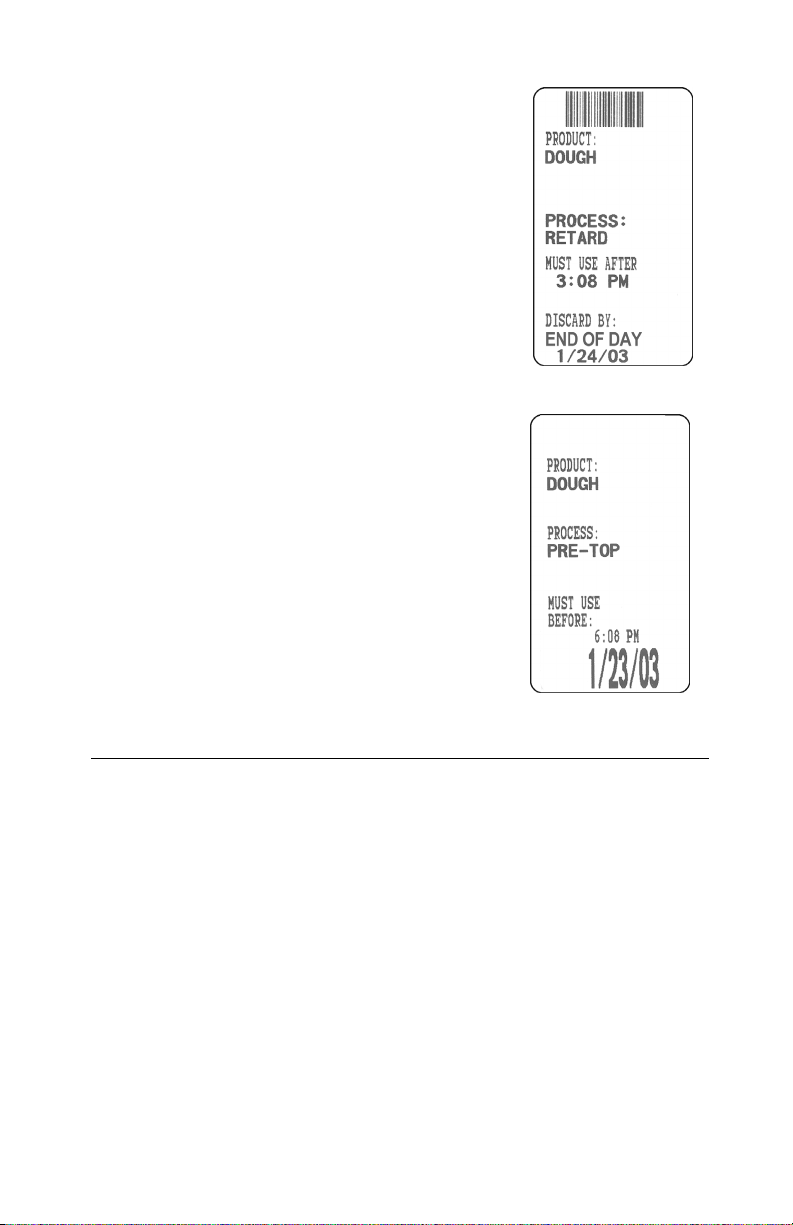
5. Scan a quantity barcode from the
scan sheet. The Stage 3 label
(PROCESS: RETARD) prints with
the new date/time information.
Apply the Stage 3 label on top of
the Stage 2 label.
6. Scan the barcode from the Stage
3 label (PROCESS: RETARD)
when the dough is ready for the
next process.
7. Scan a quantity barcode from the
scan sheet. The Stage 4 label
(PRE-TOP) prints with the new
date/time information. The PRETOP label indicates the dough is
ready to be topped.
If any errors occur when printing,
see Appendix A,
"Troubleshooting" for more
information.
Stage 3 Label
Stage 4 Label
Future Downloads
Updates will be released by Pizza Hut.
Using the Pizza Hut Application 2-17
Page 32

2-18 Using the Pizza Hut Application
Page 33

CARE AND
3
MAINTENANCE
This chapter tells you how to
♦ clear label jams
♦ clean the printhead
♦ check the software version
♦ clear the buffer.
Clearing Label Jams
When you are printing and a jam occurs, the indicator
light turns ORANGE.
To clear the jam:
1. MAKE SURE THE POWER IS OFF. Press (O) to
turn off and (I) to turn on.
2. Press the cover release buttons (on both sides of
the printer) towards the front of the printer. Lift
open the cover.
3. If necessary, remove any supply that has been
previously loaded by pushing out the supply
holder tabs. The supply should lift out of the
printer.
4. Remove the jammed labels. Do not use sharp or
pointed objects to remove labels or damage to
the printhead may occur.
5. Reload the supply. Chapter 2, "Using the Pizza
Hut Application," for more information.
6. Close the cover until the cover locks in place.
7. Press the FEED button to clear the error. The
indicator light should turn GREEN.
Care and Maintenance 3-1
Page 34
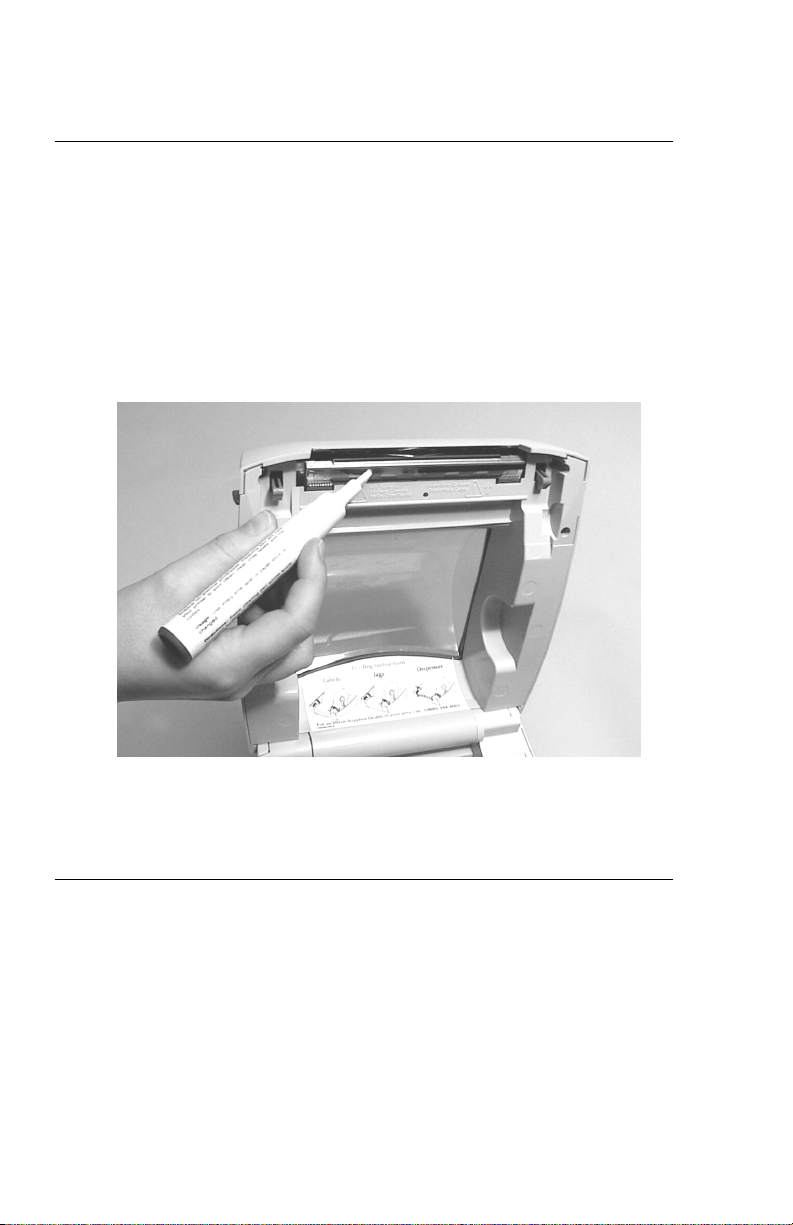
Cleaning the Printhead
Clean the printhead every time you load a new label
roll into the printer.
1. MAKE SURE THE POWER IS OFF. Press (O) to
turn off and (I) to turn on.
2. Press the cover release buttons (on both sides of
the printer) towards the front of the printer. Lift
open the cover.
3. Gently rub the cleaning pen across the printhead.
4. Allow the printhead to dry for one minute before
closing the cover and resume printing.
Checking the Software Version
Your keypad/terminal displays the software version
when it is turned off and then turned back on.
3-2 Care and Maintenance
Page 35

Clearing the Buffer
To clear the buffer:
1. MAKE SURE THE POWER IS OFF.
2. Load labels for non-peel mode. See Chapter 2,
"Using the Pizza Hut Application."
3. Press and hold the FEED button while turning on
the printer.
4. Release the FEED button when the indicator light
starts flashing red.
5. Several labels advance including the status label.
6. Press the FEED button.
Care and Maintenance 3-3
Page 36

3-4 Care and Maintenance
Page 37

TROUBLESHOOTING
Problem Action
Indicator light is off
when the printer is
turned on.
Indicator light is
GREEN, but the
printer will not
print.
Printing is faded or
poor quality.
Label exits partially
out of the printer or
skips a label.
Check the power connections from
the power supply to printer and AC
outlet. See "Setting Up the System,”
in Chapter 1.
Check the interface cable
connections from the computer to
printer See "Setting Up the System,”
in Chapter 1.
Verify that the labels are the correct
type (thermal direct not thermal
transfer) and supply is loaded
correctly. See Chapter 2, "Using the
Pizza Hut Application."
Clean the printhead. See "Cleaning
the Printhead," in Chapter 3.
Make sure the cover is closed.
Verify that the labels are the correct
type (thermal direct not thermal
transfer) and supply is loaded
correctly. See Chapter 2, "Using the
Pizza Hut Application."
Clean the printhead with a cleaning
pen. See "Cleaning the Printhead,"
in Chapter 3.
Adjust the print speed/darkness.
See your System Administrator.
A label might be caught in the
printer. See "Clearing Label Jams,"
in Chapter 3.
Load the supply correctly. See
Chapter 2, "Using the Pizza Hut
Application."
Check printer's memory
configuration. See your System
Administrator.
A
Troubleshooting A-1
Page 38

Problem Action
Printing stops and
indicator light turns
ORANGE.
Adjust the label gap sensor.
1. Turn off the printer.
2. Load labels for non-peel mode.
See Chapter 2, "Using the Pizza
Hut Application."
3. Press and hold the FEED button
while turning the printer on.
4. Release the FEED button when
the indicator light starts flashing
red. Several labels advance
including the status label.
5. Press the FEED button.
Problem with the supply. Load
different supply. See Chapter 2,
"Using the Pizza Hut Application."
Clear a label jam. See "Clearing
Label Jams," in Chapter 3.
Software problem. Check the printer
memory configuration. See your
System Administrator.
The printer does
not detect the gap
between each
label.
Adjust the label gap sensor.
1. Turn off the printer.
2. Load labels for non-peel mode.
See Chapter 2, "Using the Pizza
Hut Application."
3. Press and hold the FEED button
while turning on the printer.
4. Release the FEED button when
the printer starts advancing
lines. Several labels advance
including two Diagnostic labels.
5. Press the FEED button.
The
keypad/terminal
displays an error.
Clear the error, turn off the printer
and then back on.
A-2 Troubleshooting
Page 39

Paxar® Barcode Product Limited
Warranty
Thank you for purchasing a Paxar® (or Monarch®-brand)
barcode product. Paxar warrants that your product will be
free from defects in material and workmanship for a period of
one (1) year from the date of shipment by Paxar. Please
read this warranty very carefully. THIS WARRANTY IS A
LIMITED WARRANTY AND IS IN LIEU OF AND EXCLUDES
ALL OTHER WARRANTIES, EITHER EXPRESS OR
IMPLIED, INCLUDING MERCHANTABILITY AND FITNESS
FOR A PARTICULAR PURPOSE.
Warranty Period - The limited warranty starts on the day the
product is shipped from Paxar and ends after a period of one
(1) year or when the product’s life has been exceeded,
whichever occurs first.
Parts and Labor - Paxar will provide new or remanufactured
parts and labor, free of charge, to correct defects in material
and workmanship for the product(s) covered by the limited
warranty during the warranty period. This limited warranty is
a depot warranty only.
Shipping - The customer is responsible for inbound
transportation charges and Paxar is responsible for return
transportation charges (via ground) to correct defects in
material and workmanship during the limited warranty period.
Packaging - Products returned shall be packaged in the
original packaging and shipping container or comparable
container. In the event the product is not packaged properly
or if shipping damage is evident, Paxar will not accept the
printer for service under warranty. Products received in
unsuitable containers will be returned in Paxar-approved
packaging at the customer’s expense.
Thermal Printhead Warranty - The thermal printhead is
covered by a prorated limited warranty of six (6) months or
one million (1,000,000) inches of use, whichever occurs first.
Physical damage to the printhead is not covered by the
limited warranty.
Battery and Cable Warranty - Batteries and cables are
covered by a prorated limited warranty of three (3) months
from the date of shipment. Physical damage to the
battery(ies) or cable(s) is (are) not covered by the limited
warranty.
Troubleshooting
A-3
Page 40

Consumables - The product limited warranty does not
include or cover consumables or sundry items such as
ribbons, tags, labels, knives, batteries, cables or thermal
printheads (see above battery, cable, and thermal printhead
warranty).
Use of Supplies - Only genuine Paxar® or Monarch®
supplies are recommended for use in Paxar products. This
limited warranty does not cover service required as a result
of the use of non-Paxar supplies.
Host Communication - Service required to develop or
correct on-line host communications, including the use of
non-Paxar communications cables, is not covered by the
product warranty.
Operating Instructions - Proper operation of the product
requires the user to read and follow the operating
instructions. The limited warranty does not cover service
that is required as a result of operator error and or failure to
read and follow the documentation included with the product.
Installation and Training - Installation and training of the
operators is a professional service that is available on a time
and material basis. Installation and training is not covered by
the limited warranty.
Exclusions - This limited warranty covers defects in material
and workmanship only and does not cover damage to
batteries and cables or caused by accident, abuse, violence,
acts of God or use of non-Paxar or non-Monarch supplies, or
those not meeting the Paxar specifications.
Paxar shall not be liable for direct, indirect, or consequential
damages, costs, expenses, lost profits, or lost savings
resulting from the use, operation, or malfunction of the
verifier.
This limited warranty is valid only in the United States of
America.
This limited warranty is the only warranty on which the
customer can rely. Paxar reserves the right to make changes
in the products, programs and their availability at any time
and without notice.
This warranty is void if the product is altered or repaired by
anyone except a Paxar service representative or contrary to
the instructions provided by Paxar.
Troubleshooting
A-4
Page 41

To Initiate a Warranty Claim - The customer must follow
the steps below in order to make a warranty claim
under the limited warranty:
1. Call (800) 543-6650 in order to report your problem
to our technical support center.
2. A Paxar technical support specialist will work with
you to attempt to resolve the problem by telephone.
3. If telephone resolution of your problem is
unsuccessful, the technical specialist will issue an
incident # for you to return your product prepaid, for
warranty repair, subject to the terms of the limited
warranty above.
Troubleshooting
A-5
Page 42

Troubleshooting
A-6
Page 43

Page 44
 Loading...