

Page 1

Monarch Marking Systems
Monarch 9401®/9402
Options
Memory Card
Operator’s Handbook
®
TC9401MC Rev. A 9/94 ©1990-1994 Monarch Marking S ystems, Inc. All ri ghts reserved.
Page 2

Each product and program carries a respective w r i tten
warranty, the only warranty on which the c ustomer can rely.
Monarch reserves the right to make changes in the product
and the programs and their availability at any time and without
notice. Although Monarch has made every effort to provide
complete and accurate information in this manual, Monarch
shall not be liable for any omi ssions or inaccuracies. Any
update will be incorporated in a later edition of this manual.
WARNING
This equipment has been tested and found to comply with the lim its for
a Class A di gi tal device, pursuant to Part 15 of the FCC R ul es. These
limits are des ig ned t o provide reasonabl e pr otection against harmful
interfere nce w hen the equipment is op er ated in a commercial
environment . This equi pm ent generates, use s, and can radiate radio
frequency energy and, if not instal l ed and used in accordan ce with the
instructi on m anual, may cause harm ful interference to r adi o
communicat i ons. O peration of this equipm ent in a residential ar ea i s
likely to cause harmf ul interfe ren c e in whic h case the user will be
required to cor rect the interfe re nce at his own expense.
CANADIAN D.O.C. WARNING
This digital apparatus does not exceed the Class A limits for r adio
noise emissi ons f rom digital apparat us set out in the Radio Int erference
Regulations of the Canadian Department of Communications.
Le présent appa reil numérique n’ém et pas de bruits radioéle ct riques
dépassant les lim i tes applicables aux appareils numérique s de l a
classe A prescrites da ns le Réglement sur l e brouillage radi oél ectrique
édicte par le mi nistère des Communi cations du Canada.
WARNING
The power cord is intended to serve as the disconnect devi ce. The
socket-outl et shall be near the equipment and shall be easi l y accessible
WARNUG
Der Stromver sorgungskabel dient al s abschaltvorrichtung. Die
Steckdose soll i n der Nahe der Einheit und liecht zunganglich lieg en.
Trademarks
Monarch, 9401, and 9402 are registered trademarks of Monarch Marking Systems,
Inc.
Page 3

Table of Contents
Using the Memory Card..........................................................1
Write-protect Swit ch......................................................1
Inserting a Memory Card................................................3
Copying a Memory Card...............................................4
Deleting from a Memory Card.......................................6
Deleting All the Formats on a Memory Card..... 6
Deleting One Format at a T ime.........................7
Battery...........................................................................9
Removing the Insulatin g Tab.............................9
Changing the Battery.......................................11
i
Page 4

9401/9402 Memory Card Operator’s Handbook
ii
Page 5

Using the Memory Card
A memory card is a device used to store formats, check digit
algorithms, and MPCL packets. Y ou can copy information
from a computer to a memory card. For information about
• check digit algorithms
• MPCL packets
• copying a format from a computer to a memory card
refer to your System Administrator’s Guide.
To use a format from a memory card, inse rt th e card in the
printer. Y ou can insert the card before you turn on the printer,
or when you want to use a format. You’ll see a message as
the printer loads the formats stored on the card.
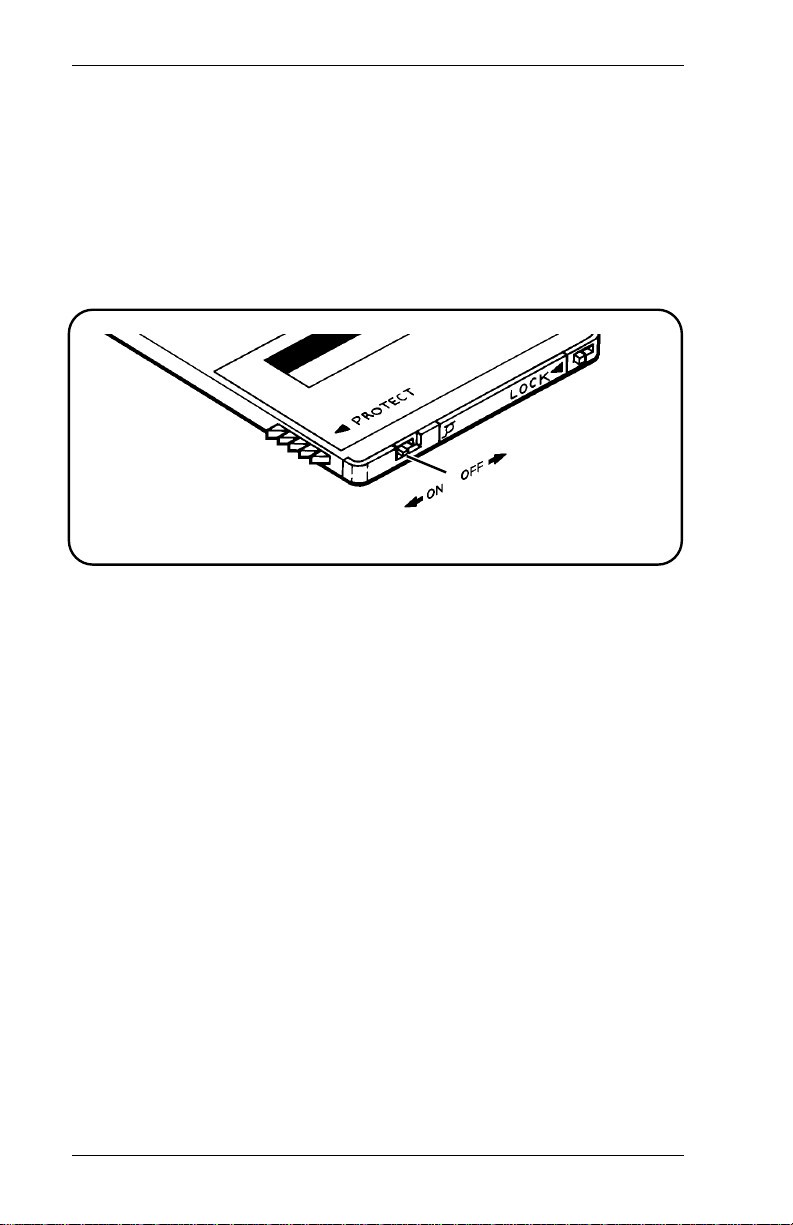
Write-protect Switch
The write-protect switch prevents the printer from
• copy i n g i n f o r m ation fro m t h e m e m or y card
• writing information to the memory card
• deleting information from the memory card.
The printer can still read information from a memory card
when the write-protect switch is on.
1
Page 6
9401/9402 Memory Card Operator’s Handbook
The switch is located on the edge of the card next to the
battery cove r.
• The write-protect switch should be On for storing the
memory card or printing with it.
• The write-protect switch must be Off to copy or delete
information on the me m ory card.
Figure 1
2
Page 7

Using the Memory Card
Inserting a Memory Card
1. Be sure the write-protect switch is in the correct position.
2. Position the card with the Monarch® logo facing up, and
the arrows pointing away from you.
Figure 2
3. Insert the card i nto the memory card slot in the front of the
printer , below the key pad.
4. Push the card forward until it won’t go any farther.
3
Page 8
9401/9402 Memory Card Operator’s Handbook
Copying a Memory Card
You can copy formats from one memory card to another.
To copy a memory card, you need
• the source card (the memory card with the formats you
want to copy), and
• the target card (a memory card you want to copy the
formats to).
CAUTION
The Card Copy function erases any formats on the target
card.
To copy a memory card, perform the following procedure:
1. Turn the write-protect switch Off on both cards.
2. Select Memory Card from the Main menu. You’ll see
Enter password:
_ _ _ _ _ _ _ _
3. Type the password and press
6
(refer to your System
Administrator’s Guide for information about passwords).
You’ll see
MEMORY CARD
< Card Delete
4. Press 1 until you see
MEMORY CARD
Card Copy >
4
Page 9
Using the Memory Card
5. Press
6
. You’ll see
Load Source Card
Press ENTER._
6. If you have not already done so, insert the source card in
the printer.
7. Press
6
. You’ll see
Reading Card
Please Wait ..._
When the printer finishes reading formats, it displays
Load Target Card
Press ENTER._
8. Remove the so urce card from the printer.
9. Insert the target card.
10. Press
6
. You’ll see
Writing Card
Please Wait ..._
A memory card can hold more data than the printer can
process at one tim e. If the memory card you are copying
holds a large volume of data, the printer prompts you to
repeat steps 6-10 again. When the Card Copy function is
complete, you’ll see
Copy Complete
Press ENTER._
5
Page 10

9401/9402 Memory Card Operator’s Handbook
11. Remove the target card and press
MEMORY CARD
Card Copy >
6
. You’ll see
12. Turn the write-prot ect switch on both cards On to protect
the formats.
13. Press
8
to exit to the Main menu.
Deleting from a Memory Card
You can delete forma ts from a m emory card one at a time or
all at once.
NOTE: Be sure you are using the correct memory card
before deleting any formats.
Deleting All th e Format s on a Memor y Ca rd
1. Turn the write-protect switch Off and insert the memory
card in the printer.
2. Select Memory Card from the Main menu. You’ll see
Enter password:
_ _ _ _ _ _ _ _
3. Type the password and press
6
(refer to your System
Administrator’s Guide for information about passwords).
You’ll see
MEMORY CARD
< Card Delete
6
Page 11

Using the Memory Card
4. Press
5. Press
6
. You’ll see
6
. You’ll see
CARD DELETE
All >
Are you sure?
< Yes
Do one of the following:
• To exit without deleting any formats, press
6
.
• To delete all the formats on the ca rd, press
1
6
and
6. When the printer finishes deleting formats, it displays
MEMORY CARD
< Card Delete
NOTE: If the printer does not display this messa ge, the
formats were not deleted. Be sure the
write-protect switch is Off.
.
7. Remove the memory card.
8. To exit to the Main menu, pr ess
8
.
Deleting One Format at a Time
1. Turn the write-protect switch Off and insert the memory
card in the printer.
2. Select Memory Card from the Main menu. You’ll see
Enter password:
_ _ _ _ _ _ _ _
7
Page 12

9401/9402 Memory Card Operator’s Handbook
3. Type the password and press
6
(refer to your System
Administrator’s Guide for information about passwords).
You’ll see
MEMORY CARD
< Card Delete
4. Press
6
. You’ll see
CARD DELETE
All >
5. Press 2 until you see the name of the format you want to
delete. Then press
< Yes
6
. Y ou ’ll see
Are you sure?
You can
• press
1
and
6
to exit without deleting any formats
• press
6
to delete th e form a t.
6. When the printer finishes deleting the format, it displays
MEMORY CARD
< Card Delete
NOTE: If the printer does not display this messa ge, the
format was not deleted. Be sure the write-protec t
switch is Off.
7. Remove the memory card.
8. Push the write-protect switch to On to protect any formats
still on the card.
9. Press
8
to exit to the Main menu.
8
Page 13

Using the Memory Card
Battery
The memory card uses a 3-volt lithium battery, type BR2325.
Battery shelf life is approximately five years, with an active life
of six months. The battery cover is located on the edge of the
card.
CAUTION
If you remove the battery cover from a memory card the
formats will be erased.
NOTE: To avoid losing form ats, it is a good idea to keep
copies of your memory cards. Refer to "Copying
a Memory Card."
Removing the Insulatin g Tab
New memory cards have an insulating tab to prevent drain on
the battery before you use the card. You must remove this tab
before using the card.
Tab
Figure 3
9
Page 14

9401/9402 Memory Card Operator’s Handbook
To rem ove the insulating tab from the batt ery, perform the
following procedure:
1. Hold the memory card with the Monarch logo facing up
and the arrows pointing away from you.
2. Push the battery lock to the left (opposite the direction of
the arrow on the batter y cover) to unlock it.
3. Slide the batt ery and cover out of the memory card.
4. Remove the insulating tab from the battery cover.
Unlocked
Battery
Figure 4
Battery
Cover
5. Replace the battery in the cover with the battery brand
name facing up and sli de the battery and cover into the
memory card as shown.
NOTE: You cannot insert the battery cover in the memory
card unless it is in the correct position.
6. Push the batte ry lock to the right (the direction the arrow i s
pointing) to lock it.
10
Page 15

Using the Memory Card
Changing the Battery
CAUTION
If any of the following conditions occur, the battery may
explode:
• a 3-volt lithium battery, type BR2325 i s not used
• the battery is incorrectly replaced
1. Hold the memory card with the Monarch logo facing up
and the arrows pointing away from you.
2. Push the battery lock to the left (opposite the direction of
the arrow on the batter y cover) to unlock it.
3. Slide the batt ery and cover out of the memory card.
4. Place a new battery in the cover with the battery brand
name facing up and sli de the battery and cover into the
memory card.
5. Push the batte ry lock to the right (the direction the arrow i s
pointing) to lock it.
11
Page 16

9401/9402 Memory Card Operator’s Handbook
12
Page 17

Page 18

For supplies, service, or assistance call:
TOLL FREE:
1-800-543-6650 (In the U.S.A.)
1-800-263-4650 (In Canada)
Published by the Technical Communications Department.
Printed in U.S.A.
Page 19

Monarch Marking Systems
A Pitn ey Bow es Company
Monarch 9401™/9402™
Using a Scanner with
9401/9402 Printers
Options
TC9401SC 6/90 ©1990 Monarch Marking Systems, Inc. All rights reserved.
Page 20

Each product and program carries a respective w r i tten
warranty, the only warranty on which the c ustomer can rely.
Monarch reserves the right to make changes in the product
and the programs and their availability at any time and without
notice. Although Monarch has made every effort to provide
complete and accurate information in this manual, Monarch
shall not be liable for any omi ssions or inaccuracies. Any
update will be incorporated in a later edition of this manual.
CAUTION
This equipment can interfere with radio communication. The
equipment com pl ies with limits f or a C l ass A computing device
pursuant to F CC Rule s, Subpart J, Part 15, which pr ovide reasonable
protection against such interf er ence when operated in a com m er ci al
environment . Operation in a reside ntial area can cause int erference
which the user mu st cor rect at their own expense.
Trademarks
HP Smartwand i s a trademark of Hewlett-Packard Compa ny.
Nippondenso is a trademark of Nippondenso Co. LTD.
Photographic S ciences is a trad em ark of Photographic Sciences Corporation.
M5763, M 5764, M6097, M6098, M9401, and M9402 are trademarks of Monarc h
Marking Systems, Inc.
Page 21

Table of Contents
Using a Scanner........................................................................1
Connecting the Scanne r................................................1
Selecting the Scanner...................................................2
Selecting Auto Enter......................................................4
i
Page 22

9401/9402 Operator’s Handbook
ii
Page 23

Overview
Y ou can attach a scanner to a 9401 or 9402 printer. Using the
scanner, you can automatically enter bar code information in
your formats.
Here is the list of sc anners you can attach to the 9401/9402.
• Monarch M6098
• Monarch M5763
• Monarch M5764
• Nippondenso Scanner
For information about using the scanner, refer to the
instructi ons th a t cam e wit h it.
Connecting the Scanner
Connect the scanner cable to the connector on the back of the
printer as shown.
Figure 1
Connect Scanner
Cable Here
1
Page 24

9401/9402 Scanner Operator’s Handbook
Setting the Printer
1. From the Main Menu, press 1 or 2 until you see
MAIN MENU
< Setup >
2. Press
6
. You’ll see
3. Press 2 until you see
< Port Settings >
4. Press
6
. You’ll see
PORT SETTINGS
User Comm >
5. Press 2 until you see
PORT SETTINGS
< Scanner
6. Press
6
. You’ll see the last selection, for example
SETUP
Supply >
SETUP
SCANNER
< Auto Enter
2
Page 25

7. Press 1 until you see
< Scanner Type
Setting Up the Scanner
SCANNER
8. Press
6
. You’ll see the last selection, for example
SCANNER TYPE
< HP Smartwand >
The options for Scanner Type are listed below.
If you have this type Select this scanner model
No Scanner None
M6098 HP Smartwand
Nippondenso Nippondenso
M5763 Photo Scienc es
M5764 Photo Scienc es
9. Press 1 or 2 to display the correct scanner type,
then press
6
. Y ou ’ll see
SCANNER
< Scanner Type
10. Press
8
twice if you want to return to the Setup menu.
3
Page 26

9401/9402 Scanner Operator’s Handbook
Selecting the Data Entry Mode
There are two ways to enter data on the 9401/9402 with a
scanner.
• In Auto Enter mode, the printer reads a successful scan,
then immediately goes to the next prompt.
• When not in Auto Enter mode, the operator must press
6
to proceed to the next prompt after sca nni ng.
1. From the Main Menu, press 1 or 2 until you see
MAIN MENU
< Setup >
2. Press
6
. You’ll see
3. Press 2 until you see
< Port Settings >
4. Press
6
. You’ll see
PORT SETTINGS
User Comm >
5. Press 2 until you see
PORT SETTINGS
< Scanner
SETUP
Supply >
SETUP
4
Page 27

Setting Up the Scanner
6. Press
6
. You’ll see the last selection, for example
SCANNER
Scanner Type >
7. Press 2 until you see
SCANNER
Auto Enter >
8. Press
6
. You’ll see the last selection, for example
AUTO ENTER
< Yes
The options for Auto Enter are
Yes At data entry, the printer displays the prompt fo r the
next field immediately after a successful scan.
No At data entry , the operator must press
6
scanning the data. Then the printer displays a
prompt for the next field.
after
9. Press 1 or 2 to display the option you want, then
press
10. Press
6
. You’ll see
SCANNER
< Auto Enter
8
twice if you want to return to the Setup menu.
5
Page 28

9401/9402 Scanner Operator’s Handbook
Setting the M5763/M5764 Scanner
The M5763 and M5764 scanners require specific settings to
work with the 9401/9402 printer.
Before you begin us i ng this scanner, scan the three bar codes
below in the order shown.
1. This bar code resets the scanner to
defau lt settings (ZA).
2. This bar code set s inv erse polarity on
the scanner (CD).
3. This bar code enables full continuou s
power on the scanner (@A).
Refer to your scanner manual for details on these and other
settings and tests.
Models 5763/5764: TC5763OI
TC5764AD
Model 6098: TC6098AD
6
Page 29

Page 30

For supplies, service, or assistance call:
TOLL FREE:
1-800-231-7700 (Service)
1-800-543-6650 (Retail Sales)
1-800-243-4015 (Industrial Sales)
Printed in U.S.A.
Page 31

Monarch Marking Systems
A Pitn ey Bow es Company
Monarch 921™
Supply Dereeler
Operating Instructions
TC0921OI 6/91 ©1991 Monarch Marking Systems, Inc. All rights reserved.
Page 32

Page 33

Overview
The 921 Supply Dereeler holds large diameter supply rolls for
9401/9402 printers. You can use up to 9.5" diameter rolls with
4.0" diameter cores.
Installing the Dereeler is simple:
• position it beh ind the printer
• install a new print er back cover
• place the supply roll on the supply reel
• feed the supply through the back cover and into the
printhead.
Complete installation and operating i nstructions are given on
the followi ng pages.
1
Page 34

921 Operating Instructions
2
Page 35

Installation
1. Turn off the printer power switch and unplug the power
cord.
2. Open the printer top cover.
3. Remove the standard supply roll.
4. Unsnap the back cover from the printer housing as shown.
Back
Cover
5. Snap the new back cover (with feed slot) it into place on
the printer.
3
Page 36

921 Operating Instructions
6. Position the Dereeler in back of the printer. Lift up the
back of the printer and place the printer rear feet in the
Dereeler mounting holes as shown.
Feed Slot
Supply
Guide
Mounting
Holes
Supply
7. Route any cables on the back of the printer to the right or
left below the Dereeler base.
4
Page 37

Loading Supplies
1. Place the s uppl y roll on the supply reel.
NOTE: Maxim um supply width is 2.5 inches.
2. Feed the supply around the outside of the Dereeler supply
guide and into the feed slot of the printer back cover as
shown.
Feed Slot
3. Continue feeding the supply throug h the printhead and out
the exit chute (Refer to your Equipment Manual if
necessary).
4. Close the pri nter cover.
5. Plug in the power cord.
6. Turn on the power switch.
5
Page 38

921 Operating Instructions
6
Page 39

Operation
When using large diameter supply rolls, operate the printer as
you normally would with the following exceptions:
1. For ribbon operation, it may be necessary to replace the
ribbon before the supply runs out.
2. For backing paper take-up operation, it may be necessary
to shut off the printer and remove the accumulated backing
paper.
7
Page 40

921 Operating Instructions
8
Page 41

Each product and program carries a respective w r i tten
warranty, the only warranty on which the c ustomer can rely.
Monarch reserves the right to make changes in the product
and the programs and their availability at any time and without
notice. Although Monarch has made every effort to provide
complete and accurate information in this manual, Monarch
shall not be liable for any omi ssions or inaccuracies. Any
update will be incorporated in a later edition of this manual.
Page 42

For supplies, service, or assistance call:
TOLL FREE:
1-800-231-7700 (Service)
1-800-543-6650 (Retail Sales)
1-800-243-4015 (Industrial Sales)
Printed in U.S.A.
 Loading...