


BINDING MACHINE
English............................................................................................................................ |
3 |
Français.......................................................................................................................... |
5 |
Deutsch........................................................................................................................... |
7 |
Polski .............................................................................................................................. |
9 |
Español......................................................................................................................... |
11 |
Nederlands ................................................................................................................... |
13 |
1
2
BINDING MACHINE
SAFETY NOTICE
Read all instructions before use. Do not attempt to open casing.
Do not put any items through the holes. Do not bind more paper than advised.
OPERATING INSTRUCTIONS
Before binding it is advisable to carry out a test to familiarise yourself and to make sure that your machine is working correctly.
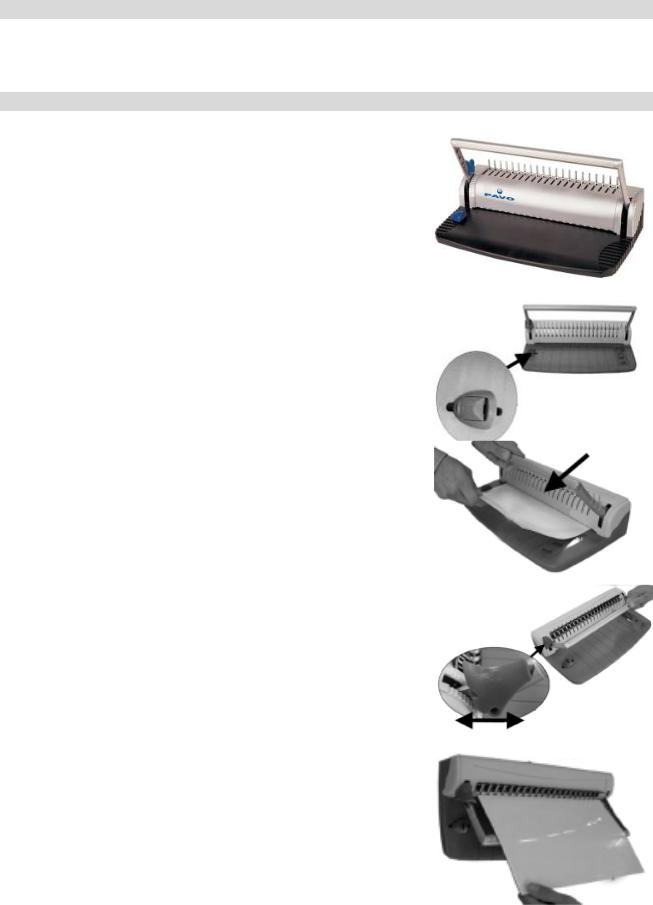
1.Remove all packaging.
2.Use the side guide to select the size of the paper you will punch.
3.Introduce the correct amount of pages (max 8 sheets 80gr/m2 or max 1 PVC cover) inside the machine and lower the handle to punch the pages.
4.Once all your pages are punched. Place the comb over the teeth on top of the machine and shift comb to the left so that the upside down L is covered by the comb. To open the comb press down the handle “slowly” As you do this the “L’s” pull forward and open the comb. When sufficiently open secure the handle with the ratchet while you load your paper.
5.Load all of your punched pages in the comb (by starting with the front side of your report). When finished, release the ratchet and remove your document.
3

IMPORTANT ADVICE
Be Careful: The waste paper tray should be regularly emptied.
TROUBLESHOOTING
•Can’t punch through: Too much paper / Chip tray full / Material is too thick
•Can’t remove paper: Machine has been overloaded and not all holes are punched through. Lift arm and firmly press lever using bodyweight / The material being punched is too flexible, common with soft plastics.
•Can’t align paper: Debris is trapped in the Paper Slot / Side guide is not correctly set
•Can’t Open Comb: Fronds should be facing upward and curling away.
WARRANTY
The machine has a warranty of 2 years (the warranty is not applicable if the machine has been used for an inappropriate purpose).
|
TECHNICAL DATA |
Max binding length................................................................................................. |
300mm/11’’ |
Max punching capacity (80gr/m2 sheets)................................................................ |
8 |
Max binding capacity (80gr/m2 sheets) .................................................................. |
150 |
Max binding combs diameter.................................................................................. |
20mm/3/4” |
Dimension............................................................................................................... |
38 x 20 x 10 cm |
Weight..................................................................................................................... |
1 KGS |
4
PERFORELIEUR
CONSIGNES DE SECURITE
Lisez attentivement ce manuel avant |
N’insérez pas d’objets dans les trous. |
utilisation. |
Ne reliez pas plus de papier que la quantité conseillée. |
N’essayez pas d’ouvrir le boîtier. |
|
CONSIGNES D’UTILISATION
Avant de perforer ou/et de relier, il est recommandé de faire un essai pour se familiariser avec la machine et pour s’assurer que celle-ci fonctionne correctement.
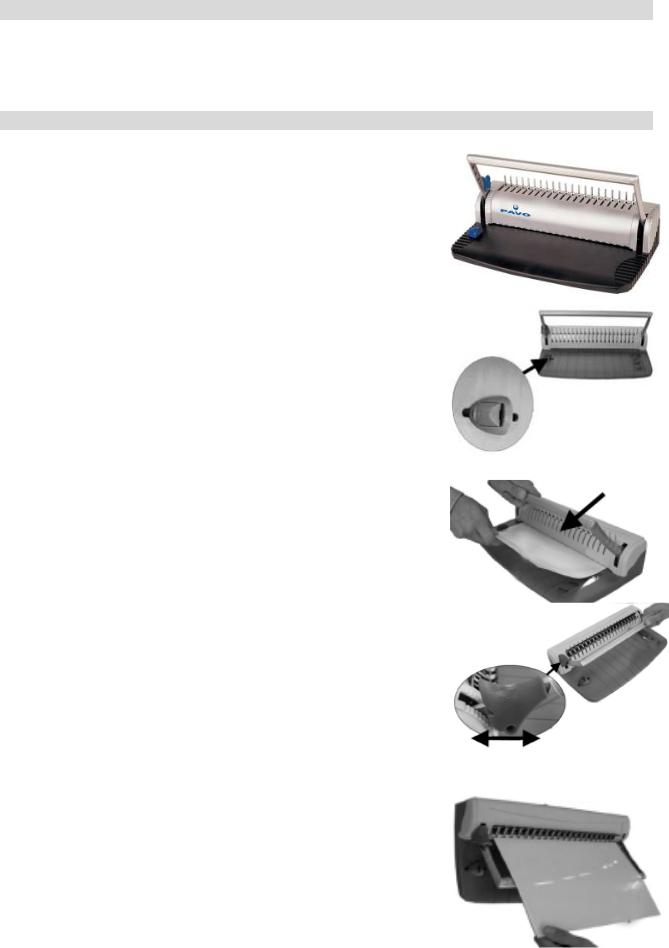
1.Retirez l’emballage.
2.Utilisez le guide latéral pour ajuster la taille du papier que vous allez perforer.
3.Introduisez le nombre de pages souhaité (attention : max. 8 feuilles 80gr/m2 ou max. 1 couverture PVC) dans la machine et abaissez le levier afin de perforer vos pages.
4.Une fois que toutes vos pages sont perforées, introduisez l’anneau de reliure dans les dents métalliques se trouvant au-dessus de la machine, et décalez-le légèrement sur la gauche, de sorte qu’il recouvre la languette métallique (en forme de « L » à l’envers). Pour écarter les anneaux de reliure, appuyez lentement sur le levier. Le « L » est ainsi tiré vers l’avant et permet d’ouvrir les anneaux. Bloquez ensuite le levier avec la petite manette, afin de charger vos feuilles.
5.Chargez toutes vos pages perforées dans l’anneau (en commençant par la dernière page de votre rapport).Lorsque vous avez fini d’introduire toutes vos pages, libérez la manette bloquant votre levier. Vous pouvez retirer votre document.
5
 Loading...