


LAMINATING MACHINE
English............................................................................................................................ |
3 |
Français.......................................................................................................................... |
5 |
Deutsch........................................................................................................................... |
7 |
Polski .............................................................................................................................. |
9 |
Español......................................................................................................................... |
11 |
Nederlands ................................................................................................................... |
13 |
1
2
LAMINATING MACHINE
|
SAFETY NOTICE |
Read all instructions before use |
Do not touch the heat vents when the machine is |
Do not leave cable where other may trip |
working, |
Do not attempt to open casing |
Do not put any items through the heat vents. |
Do not use if wet |
Do not use if machine, cable, or socket is damaged |
Switch off and unplug when not in use |
Wait for pouches to cool before handling, they may be |
Do not cover the heat vents when in use |
hot. |
OPERATING INSTRUCTIONS
Before laminating it is advisable to carry out a test lamination to familiarise yourself and to make sure that your machine is working correctly.
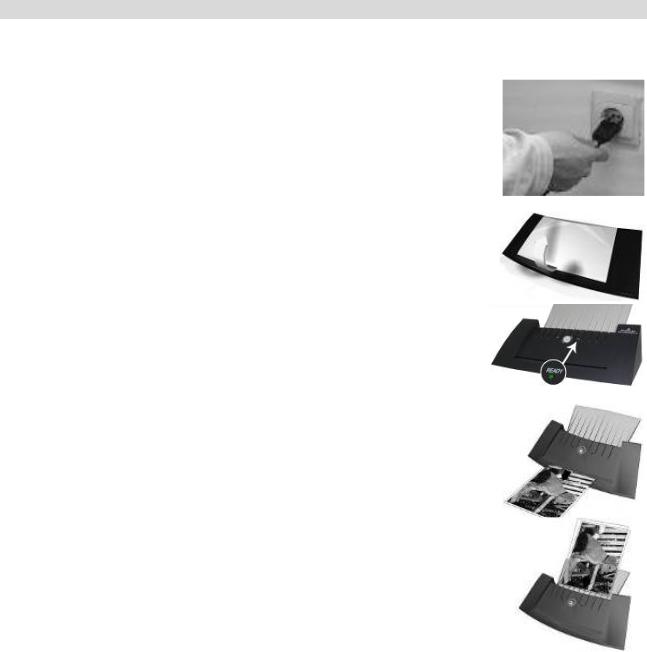
1.Remove all packaging and plug the machine into an appropriate socket.
2.Open the flap of the machine (the machine will automatically turn on).
3.With the dial, adjust the temperature to the right position according to the laminating pouch thickness. The machine will reach the correct temperature in approx 3mins.
4.When the ready light is on, insert the laminating pouch squarely and centrally (with the sealed side first) into the back of the laminator.
You do not need to use a pouch carrier.
5.The pouch will automatically pass through the machine. Remove pouch only when lamination is complete (pouch completely out).
6.To turn off close the flap and unplug the machine.
BE CAREFUL: If changing to a thinner pouch type allow time for the machine to cool to the correct temperature. If changing from hot to cold lamination make sure machine is completely cooled.
3

COLD LAMINATION
Open pouch and place contents face-up toward the non adhesive side. Insert the sealed edge first into the machine. For best results remove the edge of the protective sheet that is closest to the machine entrance, as the machine draws the pouch through pull back the sheet at the same rate.
You can entirely remove the protective sheet before placing in the machine; this technique increases the probability of air bubbles.
OTHER INFORMATION
If for some reason your pouch jams you can either use the Reverse Switch (A3 / 15” Machine) or press down on the Lever at the back of the machine (A4/9” Machine), this separates the rollers allowing the pouch to be pulled free.
Laminating:
When laminating both hot and cold pouches we recommend that you leave minimum margin of 3mm / ⅛ inch around the edge. If Laminating several object leave a space of 6mm / ¼ inch between objects.
If you need to cut a pouch do so after laminating. Cut pouches can leak glue in to your machine. Pouches are also easier to cut accurately when laminated.
TROUBLESHOOTING
A.If your pouch is not sealed, temperature is either too cold or there is not a big enough margin.
B.If your pouch is cloudy the temperature is too low or the pouch to full.
C.If your pouch is wavy the temperature is too hot.
D.If there are spots on the pouch. Glue has seeped from pouches on to rollers. Run a sheet of paper through…..continue until clear.
E.If your pouch has wrapped around rollers…..Remove using Jam Release / Rev. Clean rollers with a plain sheet of paper (preferably 120gsm or thicker).
WARRANTY
The machine has a warranty of 2 years (the warranty is not applicable if the pouches has been inserted in the wrong position/direction, or the machines has been used for an inappropriate purpose).
|
TECHNICAL DATA |
Voltage.................................................................................................................... |
220-240V |
Power consumption................................................................................................. |
350W |
Max width laminating............................................................................................. |
230mm/9’’ |
Max thickness laminating ....................................................................................... |
2x125mic |
Dimension............................................................................................................... |
39 x 11 x 19 cm |
Weight..................................................................................................................... |
1,5 KGS |
4
PLASTIFIEUSE
CONSIGNES DE SECURITE
Lire attentivement les consignes avant |
Ne pas couvrir la ventilation lorsque la machine |
utilisation. |
fonctionne. |
Ne pas brancher avec plusieurs fils |
Ne pas toucher la ventilation en cours de |
électriques. |
fonctionnement. |
Ne pas essayer d’ouvrir le boîtier. |
Ne mettre aucun objet dans la ventilation . |
Ne pas utiliser dans un environnement |
Ne pas utiliser la machine, le fil électrique ou la prise |
humide. |
de courant si ceux-ci sont endommagés. |
Eteindre et débrancher la machine |
Attendre que les documents plastifiés refroidissent |
lorsqu’elle n’est pas utilisée. |
avant de les manipuler, ils peuvent être chauds. |
CONSIGNES D’UTILISATION
Avant de plastifier, il est recommandé de faire un essai pour se familiariser avec la machine et pour s’assurer que celle-ci fonctionne correctement.
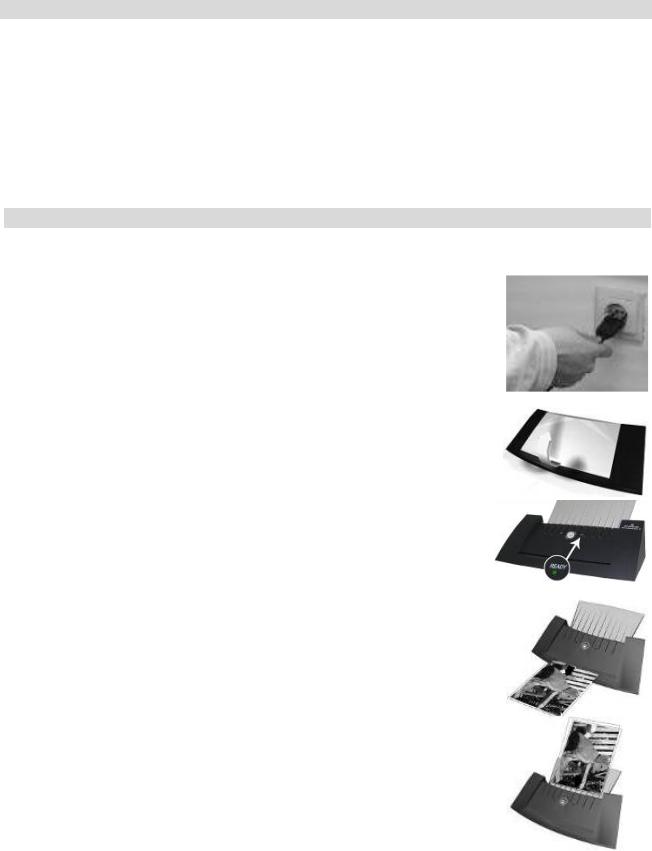
1.Retirer l’emballage et brancher la machine sur une prise de courant adéquate.
2.Ouvrir le capot de machine (la machine va s’allumer automatiquement).
3.A l’aide du cadran, régler la température appropriée à l’épaisseur de la pochette à plastifier. La machine atteindra la correcte température en 3 minutes environ.
4.Lorsque le témoin lumineux d’utilisation s’allume, insérer la pochette à plastifier (le côté collé en premier) à l’arrière de la plastifieuse.
Il n’est pas nécessaire d’utiliser un transporteur de pochettes.
5.La pochette passera automatiquement à travers la machine. Retirer la pochette seulement lorsque la plastification est totalemnt terminée (la pochette sort complétement).
6.Pour éteindre la machine, fermer le capot et débrancher la machine.
ATTENTION: Si vous changez d’épaisseur de pochette pour la remplacer par une plus fine, cela prend quelque temps à la machine pour refroidir. Si vous passez d’une plastification à chaud à une plastification à froid, assurez-vous que la machine soit complètement refroidie.
5
 Loading...