

Page 1
SmartNode™ Branch eXchange Series
SIP 3CX Based Private
Branch Exchange
Quick Start Guide
Important—This is a Class B device and is intended for use in a light industrial
or residential environment. It is not intended nor approved for use in an
Part Number: 07MSNBX-QS, Rev. B
Revised: June 25, 2014
industrial environment.
Sales Office: +1 (301) 975-1000
Technical Support: +1 (301) 975-1007
E-mail: support@patton.com
Web: www.patton.com
Page 2
• Do not open the device when the power cord is connected.
WARNING
For systems without a power switch and without an external
power adapter, line voltages are present within the device
when the power cord is connected.
• For devices with an external power adapter, the power
adapter shall be a listed Limited Power Source The mains
outlet that is utilized to power the device shall be within 10
feet (3 meters) of the device, shall be easily accessible, and
protected by a circuit breaker in compliance with local regulatory requirements.
• For AC powered devices, ensure that the power cable used
meets all applicable standards for the country in which it is to
be installed.
• For AC powered devices which have 3 conductor power plugs
(L1, L2 & GND or Hot, Neutral & Safety/Protective Ground),
the wall outlet (or socket) must have an earth ground.
• For DC powered devices, ensure that the interconnecting
cables are rated for proper voltage, current, anticipated temperature, flammability, and mechanical serviceability.
• WAN, LAN & PSTN ports (connections) may have hazardous
voltages present regardless of whether the device is powered
ON or OFF. PSTN relates to interfaces such as telephone
lines, FXS, FXO, DSL, xDSL, T1, E1, ISDN, Voice, etc. These
are known as “hazardous network voltages” and to avoid
electric shock use caution when working near these ports.
When disconnecting cables for these ports, detach the far
end connection first.
• Do not work on the device or connect or disconnect cables
during periods of lightning activity.
• This device contains no user serviceable parts. This device
can only be repaired by qualified service personnel.
• If one has reason to open the chassis or case, then the precautions mentioned above shall be followed. This includes
both the warnings relating to disconnection of the input
power, and the warnings relating to the disconnection of
WAN, LAN & PSTN ports.
In accordance with the requirements of council directive 2002/
96/EC on Waste of Electrical and Electronic Equipment (WEEE),
ensure that at end-of-life you separate this product from other
waste and scrap and deliver to the WEEE collection system in
your country for recycling.
2 SmartNode Branch eXchange Quick Start Guide
Page 3

1.0 Before you begin
In the box, you will find:
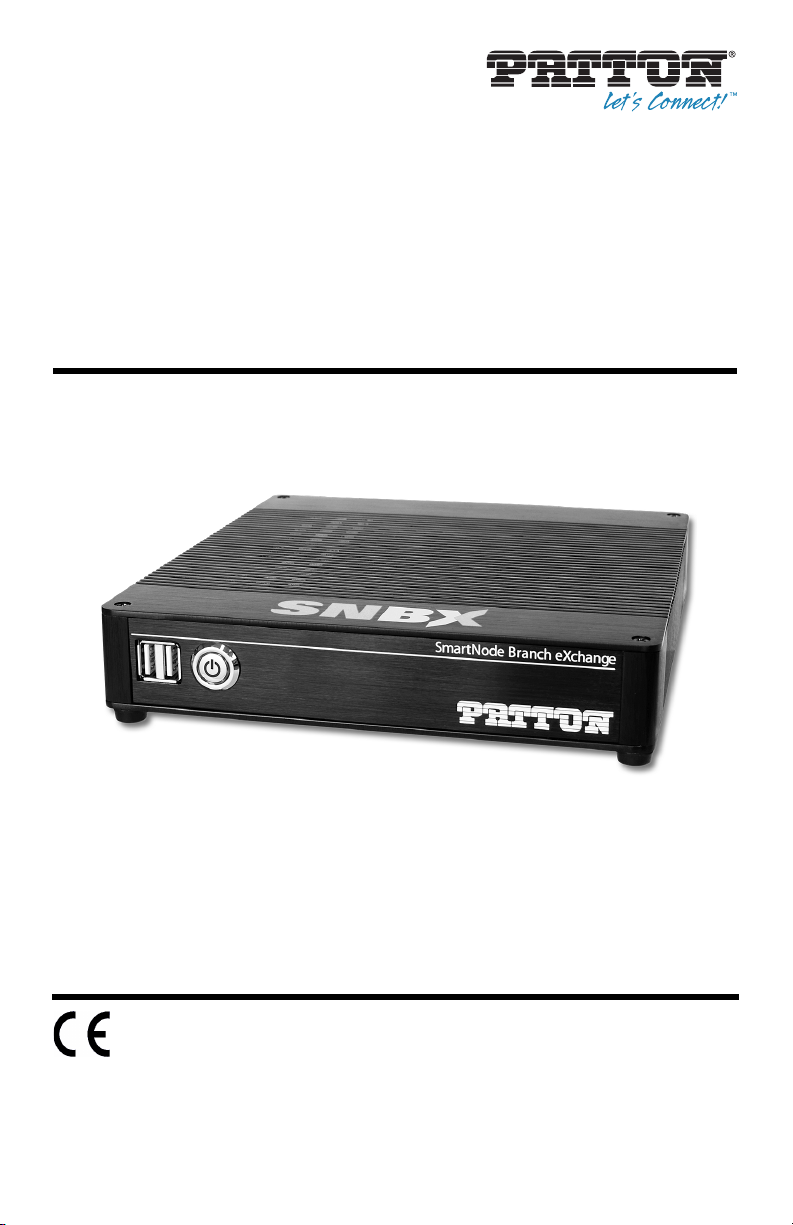
• One SmartNode Branch eXchange (SNBX)
• One External Power Supply
• One RJ45 Ethernet Straight Cable (male-to-male)
• One warranty sheet
• One packing slip
• One SmartNode Branch eXchange Quick Start Guide
To install the SNBX, you will need (not included):
• KVM, keyboard, and mouse
or
• One External PC
2.0 Connecting to the Power Source
1. Connect the external power supply to the SNBX by inserting the barrel connector
into the DC-IN port, and connect the power adapter to mains power.
2. Verify that the Power button on the front panel is lit (solid green). If the power
button is not lit, press the Power button on the front of the SNBX.
3.0 Connecting the SNBX via KVM
1. Plug a keyboard and mouse into the USB ports on the front panel of the SNBX.
2. Connect a video monitor display into the port labeled DVI/VGA on the rear panel
of the SNBX.
SmartNode Branch eXchange Quick Start Guide 3
Page 4

4.0 Installing the SNBX via a Remote Host
1. Connect using the Microsoft Terminal Server Connection (MSTSC) (Remote
Desktop Connection-RDP) to IP Address 192.168.200.10/24.
2. Connect directly to the 3CX Server as described in section 5.1 “Connecting the
Ethernet management interface” on page 4.
5.0 Connecting to the Windows host
1. Connect to the Windows host through the console (KVM) (see 3.0 “Connecting
the SNBX via KVM” on page 3) OR through remote means (see 4.0 “Installing
the SNBX via a Remote Host” on page 4). The IP address of the management
port is set to 192.168.200.10/24 with a default route to 192.168.200.1.
2. The default HOSTNAME is PATTON-SNBX in a workgroup labeled WORKGROUP.
3. The Windows Administrator account is patton/patton
5.1 Connecting the Ethernet management interface
1. Connect the supplied (or other) CAT5 Ethernet cable to the LAN port on the rear
panel of the SNBX.
2. Log into the SmartNode remotely via MSTSC or RDP.
6.0 Logging into the Web Interface
This section describes how to login to the SmartNode Branch eXchange (SNBX)
Web Portal.
The first step involved in initially configuring any 3CX-based system involves logging
on to the Web Portal. This can be divided into two distinct tasks: Connecting to the
SNBX via IP (Refer to 4.0 “Installing the SNBX via a Remote Host” on page 4), and
log on to the Web Portal.
6.1 Connecting to the web server
Using a web browser, connect to the Web Portal by typing the following in your
browser address bar:
– http://[DEVICE HOST NAME]:5000
or, alternately,
– http://[DEVICE IP ADDRESS]:5000
4 SmartNode Branch eXchange Quick Start Guide
Page 5

Note The default IP address of the SNBX is 192.168.200.10/24.
6.2 Logging on to the Web Portal
In order to log on to the Web Portal/3CX Management, enter the default user ID and
password:
– User ID: admin
– Default password: admin
7.0 Additional Information
Refer to the following document for detailed information about installing, configuring,
and operating the SNBX models, along with warranty, trademark, and compliance information.
• 3CX Systems Manual: www.3cx.com/manual/3CXPhoneSystemManual11.pdf
Note Contact Patton Tech Support below for questions or concerns installing,
configuring, or troubleshooting the Patton SmartNode Branch
eXchange device.
A.0 Customer and Technical Support
Toll-Free VoIP support: call sip:support@patton.com with a VoIP SIP client
Online support: www.patton.com
E-mail support: support@patton.com—answered within 1 business day
Telephone support:
• Standard: +1 (301) 975-1007 (USA), Monday–Friday: 8:00 am to 5:00 pm EST
(1300 to 2200 UTC/GMT)
• Alternate: +41 (0)31 985 25 55 (Switzerland), Monday–Friday: 9:00 am to 5:30 pm
CET (08:00 to 16:30 UTC/GMT)
Fax: +1 (253) 663-5693 (USA) or +41 (0)31 985 25 26 (Switzerland)
SmartNode Branch eXchange Quick Start Guide 5
Page 6

B.0 Compliance Information
B.1 Compliance
EMC Directive:
• FCC Part 15, Class B
• EN55022, Class B
• EN55024
Low-Voltage Directive (Safety):
• IEC/EN60950-1 2nd Edition
B.2 CE Declaration of Conformity
Patton Electronics, Inc declares that this device is in compliance with the essential
requirements and other relevant provisions of Directive 2004/108/EC relating to electromagnetic compatibility, Directive 2006/95/EC relating to electrical equipment
designed for use within certain voltage limits and Directive 2011/65/EU relating to
RoHS compliance. The Declaration of Conformity may be obtained from Patton Electronics, Inc at www.patton.com/certifications.
The safety advice in the documentation accompanying this device shall be obeyed. The
conformity to the above directive is indicated by CE mark on the device.
B.3 Authorized European Representative
D R M Green, European Compliance Services Limited.
Greyfriars Court, Paradise Square, Oxford, OX1 1BE, UK
B.4 FCC Part 15
This device generates and uses radio frequency energy, and if not installed and used
properly-that is, in strict accordance with the manufacturer’s instructions-may cause
interference to radio and television reception. The device has been tested and found to
comply with the limits for a Class B computing device in accordance with specifications
in Subpart B of Part 15 of FCC rules, which are designed to provide reasonable protection from such interference in a commercial installation. However, there is no guarantee
that interference will not occur in a particular installation. If the device does cause interference to radio or television reception, which can be determined by disconnecting the
unit, the user is encouraged to try to correct the interference by one or more of the following measures: moving the computing equipment away from the receiver, re-orienting the receiving antenna and/or plugging the receiving equipment into a different AC
outlet (such that the computing equipment and receiver are on different branches).
6 SmartNode Branch eXchange Quick Start Guide
Page 7

Copyright © 2013, Patton Electronics Company. All rights reserved.
The information in this document is subject to change without notice. Patton Electron-
ics assumes no liability for errors that may appear in this document.
Trademarks statement
The term SmartNode is a trademark of Patton Electronics Company. All other trademarks presented in this document are the property of their respective owners.
Warranty
For warranty information, please contact Tech Support.
SmartNode Branch eXchange Quick Start Guide 7
Page 8

NOTES
____________________________________________________________________
____________________________________________________________________
____________________________________________________________________
____________________________________________________________________
____________________________________________________________________
____________________________________________________________________
____________________________________________________________________
____________________________________________________________________
____________________________________________________________________
____________________________________________________________________
____________________________________________________________________
____________________________________________________________________
____________________________________________________________________
____________________________________________________________________
____________________________________________________________________
____________________________________________________________________
8 SmartNode Branch eXchange Quick Start Guide
 Loading...