

Page 1

®
Instruction Manual and
Experiment Guide
012-09956A
WA-9896 Ripple Generator and
Light Source
WA-9899 Ripple Tank System
Page 2

Contents
Introduction . . . . . . . . . . . . . . . . . . . . . . . . . . . . . . . . . . . . . . . . . . . . . . . . . . . . . . . . . . . 3
About the Equipment . . . . . . . . . . . . . . . . . . . . . . . . . . . . . . . . . . . . . . . . . . . . . . . . . . . . 5
About the Experiments. . . . . . . . . . . . . . . . . . . . . . . . . . . . . . . . . . . . . . . . . . . . . . . . . . 10
Experiment 1: Reflection . . . . . . . . . . . . . . . . . . . . . . . . . . . . . . . . . . . . . . . . . . . . . . . . 11
Experiment 2: Refraction . . . . . . . . . . . . . . . . . . . . . . . . . . . . . . . . . . . . . . . . . . . . . . . . 15
Experiment 3: Diffraction . . . . . . . . . . . . . . . . . . . . . . . . . . . . . . . . . . . . . . . . . . . . . . . . 19
Experiment 4: Interference. . . . . . . . . . . . . . . . . . . . . . . . . . . . . . . . . . . . . . . . . . . . . . . 21
Experiment 5: Image Formed by a Plane Mirror . . . . . . . . . . . . . . . . . . . . . . . . . . . . . . 25
Experiment 6: Wave Speed. . . . . . . . . . . . . . . . . . . . . . . . . . . . . . . . . . . . . . . . . . . . . . 27
Doppler Effect Demonstration . . . . . . . . . . . . . . . . . . . . . . . . . . . . . . . . . . . . . . . . . . . . 29
Sample Results . . . . . . . . . . . . . . . . . . . . . . . . . . . . . . . . . . . . . . . . . . . . . . . . . . . . . . . 30
Technical Support . . . . . . . . . . . . . . . . . . . . . . . . . . . . . . . . . . . . . . . . . . . . . . . . . . . . . 31
Page 3
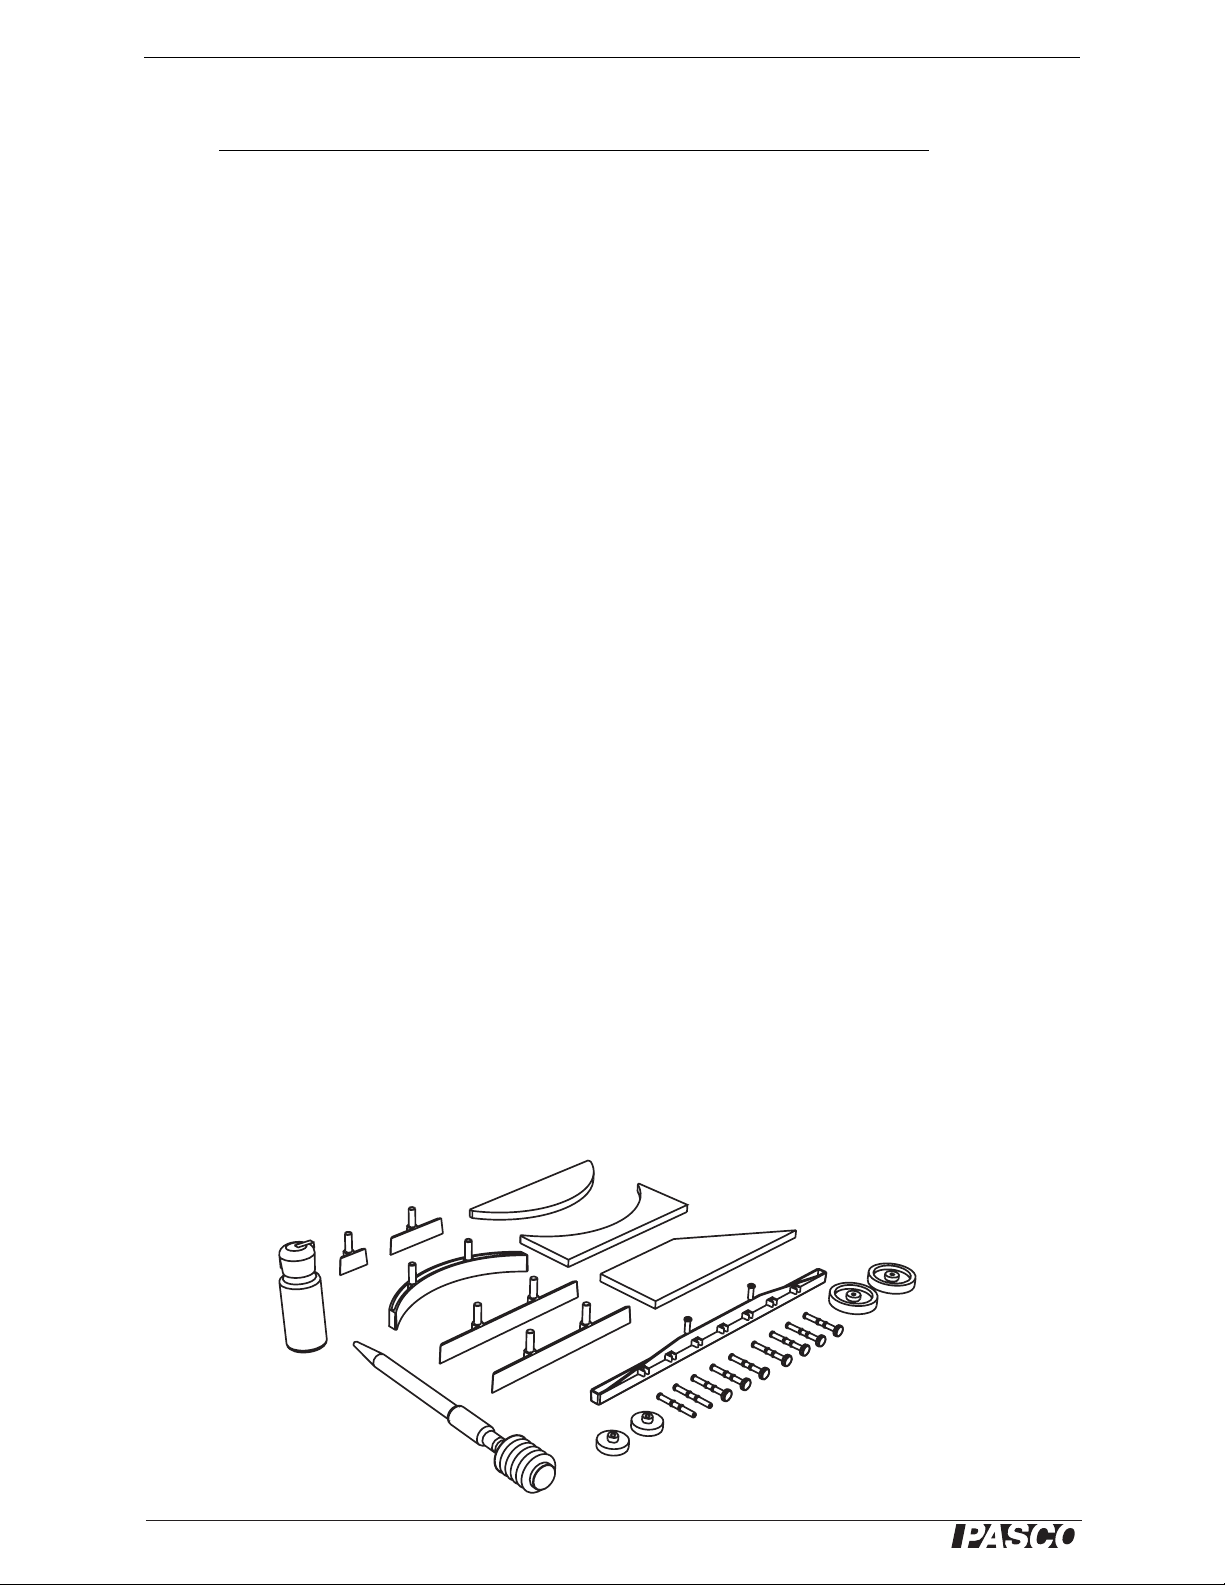
90-cm Rod,
ME-8738
(not included)
Ripple Tank System
WA-9899
Light Source
Rod
Ripple Generator
Ripple Tank Assembly
Reflector
Large Rod Stand,
ME-8735
(not included)
Dippers, Adapters,
and Actuators
Barriers
(Included but not shown: Plastic bottle of surfactant, 5 mL pipette, ruler, plastic storage box, beaker, AC adapter)
Leg
Projection
Screen
Refractors
Introduction
The Ripple T ank System consists of the WA-9896 Ripple Tank and the WA-9897 Ripple Generator and Light Source.
The table below lists the included equipment. Note: The ME-8735 Large Rod Stand and the ME-8738 90-cm Rod
shown above are recommended but not included.
This manual contains descriptions and instructions for six experiments and suggestions for an additional demonstration.
®
3
Page 4
Ripple Tank System Introduction
Included Equipment WA-9896 WA-9897 Part Number
1. Light Source 1 003-09709
2. Rod 1 648-09713
3. Ripple Generator 1 003-09724
4. Ripple Tank Assembly 1 003-09703
5. Screen Assembly 1 003-09736
6. Leg 3 648-09707
7. Standard Dipper 7 648-09712
8. Large Actuator 2 648-05471
9. Small Actuator 2 648-05470
10. Dipper Adapter 2 648-09711
11. Plane Dipper 1 003-09737
12. Curved Reflector 1 648-09820
13. Long Diffraction Barrier 2 648-09718
14. Short Diffraction Barrier 1 648-09719
15. Mini Diffraction Barrier 1 648-09717
16. Concave Refractor 1 648-09720
17. Convex Refractor 1 648-09721
18. Trapezoidal Refractor 1 648-09714
19. Bottle of surfactant
1
1650-072
20. Pipette, 5 mL 1 699-154
21. Ruler 1 699-081
22. Plastic Storage Box 1 740-177
23. Beaker, 1000 mL 1 699-197
24. AC Adapter, 15 VDC, 1.6 A 1 540-057
1
Note: The Tergitol L-62 surfactant is part number 699-023
17
14
19
15
16
18
12
20
13
11
7
8
10
9
4
®
Page 5
Model No. WA-9899 About the Equipment
About the Equipment
WA-9897 Ripple Tank
The Ripple Tank is designed to be used with the PASCO model WA-9896 Ripple Generator and Light Source. The tank is 42.5 cm by 42.5 cm by 2.5 cm with four foam “beaches”
and a 0.3 cm thick glass plate. The viewing area is 33 cm by 33 cm. The tank has an
easy-to-use drain pipe consisting of a piece of flexible vinyl plastic tubing and a tube
clamp. The tank is supported by three detachable legs with adjustable feet and comes with
a reflector and projection screen.
The ripple tank also comes with the following: ruler,
pipette, surfactant bottle, storage box, barriers (5 pieces),
refractors (3 pieces), a beaker, and a rod for supporting the
Screen
assembly
light source.
The box in which the Ripple Tank is stored has two layers.
The screen assembly, plastic storage box, rod, and beaker
Plastic
storage
box
are in the top layer; the ruler, legs, and Ripple Tank assembly are in the bottom layer. The top layer has areas for storing the WA-9896 Ripple Generator and Light Source,
Legs and
ruler
including the power adapter and cord.
Screen Assembly The screen assembly is a
reflector and a projection screen joined at one edge by a strip of flexible tape. Note:
Remove any protective coating from the reflector and the screen before using. The
reflector is aluminized acrylic. The projection screen is translucent plastic.
There are three holes along the top edge of the reflector and two strips of Velcro®
‘loop’ material along the top edge of the projection screen.
Ripple Tank Assembly The ripple tank assembly has an impact resistant
plastic frame. Below the front edge of the frame is a strip of Velcro® ‘hook’ material
that will hold the ‘loop’ material on the top edge of the projector screen. Below the
back edge of the frame are three pegs that fit into the holes in the top edge of the
reflector. The threaded hole on the top side of the back edge is for the rod that can
support the Light Source that is included in the
WA-9896 Ri pple Generator and Light Source. When
Drain hole
the ripple tank is in use, the four foam ‘beaches’
dampen the waves that would otherwise reflect and
disturb the primary wave and interference patterns.
The foam beaches are replaceable. (A variety of
replacement parts are available in the WA-9898 Ripple Tank Replacement Set.)
Projection
screen
Pegs
Rod
Ripple Tank
assembly
Velcro®
‘loop’
material
Holes
Reflector
Threaded hole
The ripple tank’s drain pipe is a piece of flexible
vinyl tubing attached below the drain hole at the back
corner of the tank. Squeeze the sides ot the tube
clamp on the drain pipe to tighten the clamp on the
tubing. Pull downward on the lip of the tube clamp to
loosen the clamp.
Strip of Velcro® ‘hook’
material (not shown)
Setup
To setup the ripple tank, screw the legs into the threaded holes on the underside near the
two front corners of the tank, and under the midpoint of the back edge. Place the ripple
®
5
Page 6

Ripple Tank System About the Equipment
tank on a smooth, level surface. If you are going to use the light source, screw the rod into
the threaded hole near the midpoint of the top of the back edge.
To attach the reflector and projection screen to the tank, unfold the screen assembly and
put the reflector between the two front legs. Angle the reflector upwards and guide the top
edge so that the three holes fit over the pegs that are at the back edge of the tank. Next,
raise the projection screen to the vertical position and attach its Velcro® ‘loop’ material to
the strip of ‘hook’ material under the front edge of the tank.
Apply Surfactant Before putting water into the ripple tank for the first time, pre-
pare the foam beaches, barriers, and refractors with a drop of surfactant (a nonionic wetting agent). The surfactant helps to avoid problems with the surface tension of the water.
Put a single drop of surfactant from the small plastic bottle onto the end of one finger, and
lightly rub your finger along the foam beaches. Use a single drop of surfactant to very
sparingly coat the large flat surfaces of the three refractors and the front surfaces of the
straight and curved barriers.
Tip: Note that you only need to
apply the surfactant to the
beaches, barriers, and refractors
before using the ripple tank for
the first time, or it has been
unused for a long time.
Level the Ripple Tank When you are ready to add water to the tank, squeeze the
sides of the tube clamp to close the clamp. Use the beaker to add a small amount of water
to the middle of the tank so that the water forms a circle about 10 cm in diameter. Adjust
the feet on the legs until the circle of water stays in the middle of the tank and does not
move toward any side. (An alternate method for leveling the tank is to add about 800 milliliters of water to the tank. Measure the water depth at three of the four corners of the tank
and adjust the feet on the legs until the depths are the same.)
Dampen the Foam Beaches To reduce the problem of surface tension, let the
foam beaches soak up some of the water. After putting about 800 milliliters of water in the
tank, press down on the foam and then release the pressure so that water enters the pores
of the foam rubber.
Cleanup
Before emptying the tank, remove the projection screen and reflector. Fold the screen
assembly so the projection screen protects the reflector.
To empty the tank, place a container under the drain pipe and open the tube clamp. When
the water stops flowing, raise the corner of the tank opposite to the drain hole so the rest of
the water will drain out. Leave the tube clamp in the open position.
Be careful to remove as much water from the foam beaches as possible. Press with your
thumbs against the foam to squeeze the water out. Next, press a rolled-up towel onto the
foam beaches to soak up any remaining water.
Completely dry the glass plate so that water spots won’t form on it. To clean the glass
plate or the reflector, use a soft cloth moistened with water and then dry with a clean
towel. Do not use soap or chemical cleaners.
Tip: Leave the tube clamp in the
open position after draining the tank
to avoid crimping the plastic tubing.
6
®
Page 7
Model No. WA-9899 About the Equipment
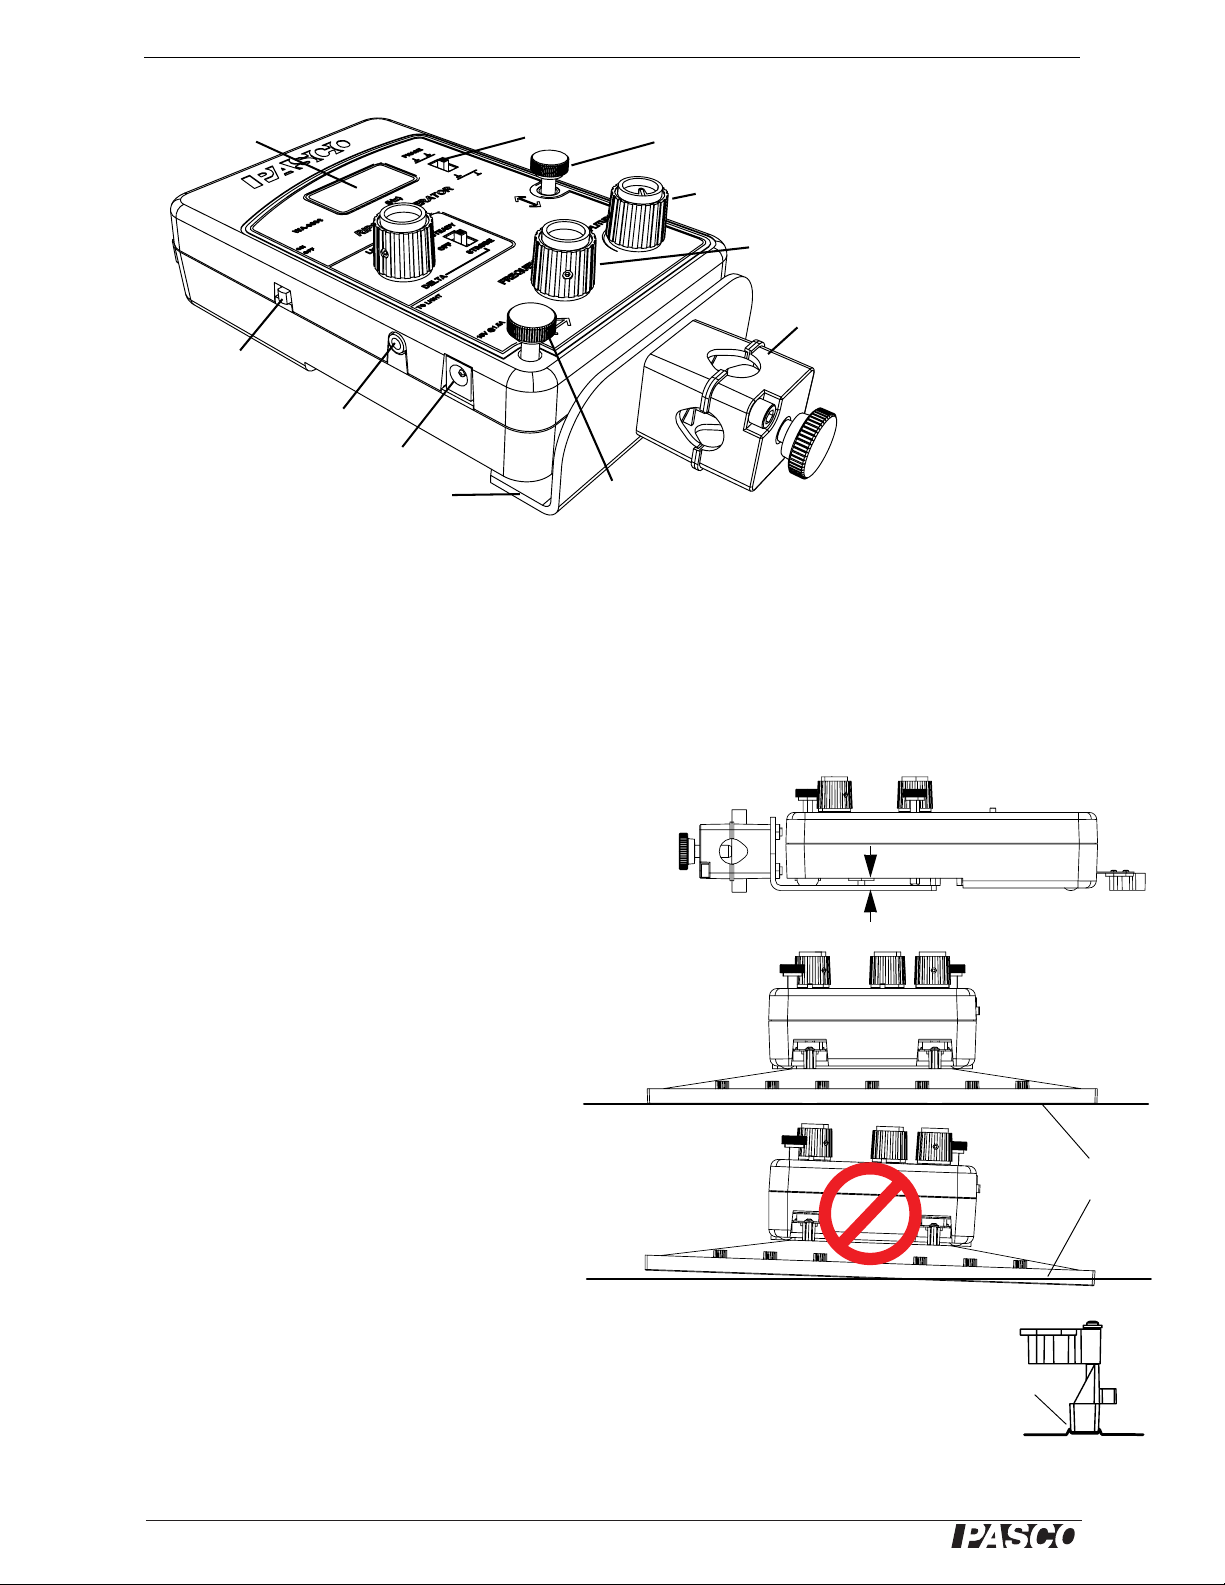
WA-9896 Ripple Generator and Light Source
The Ripple Generator is designed to be used with the WA-9897
Ripple Tank. The generator controls the included Light Source.
The Light Source uses a white light-emitting diode (LED) that
remains cool during operation and produces a bright, clear
image of the wave patterns in the ripple tank. The light can be
used as a steady source or as a strobe to ‘freeze’ the motion of
the wave patterns. The ripple generator frequency range is
from 1.0 to 50 Hz adjustable in 0.1 Hz increments, and the
generator has a digital frequency readout window that is easy
to see in dim light. The generator uses voice coil actuators to
produce the precise and quiet up-and-down motion of the rippler arms. The ripple generator has knobs for adjusting the dipper depth and amplitude and a switch for changing the phase of
the two rippler arms from zero (in phase) to 180 degrees (out
of phase).
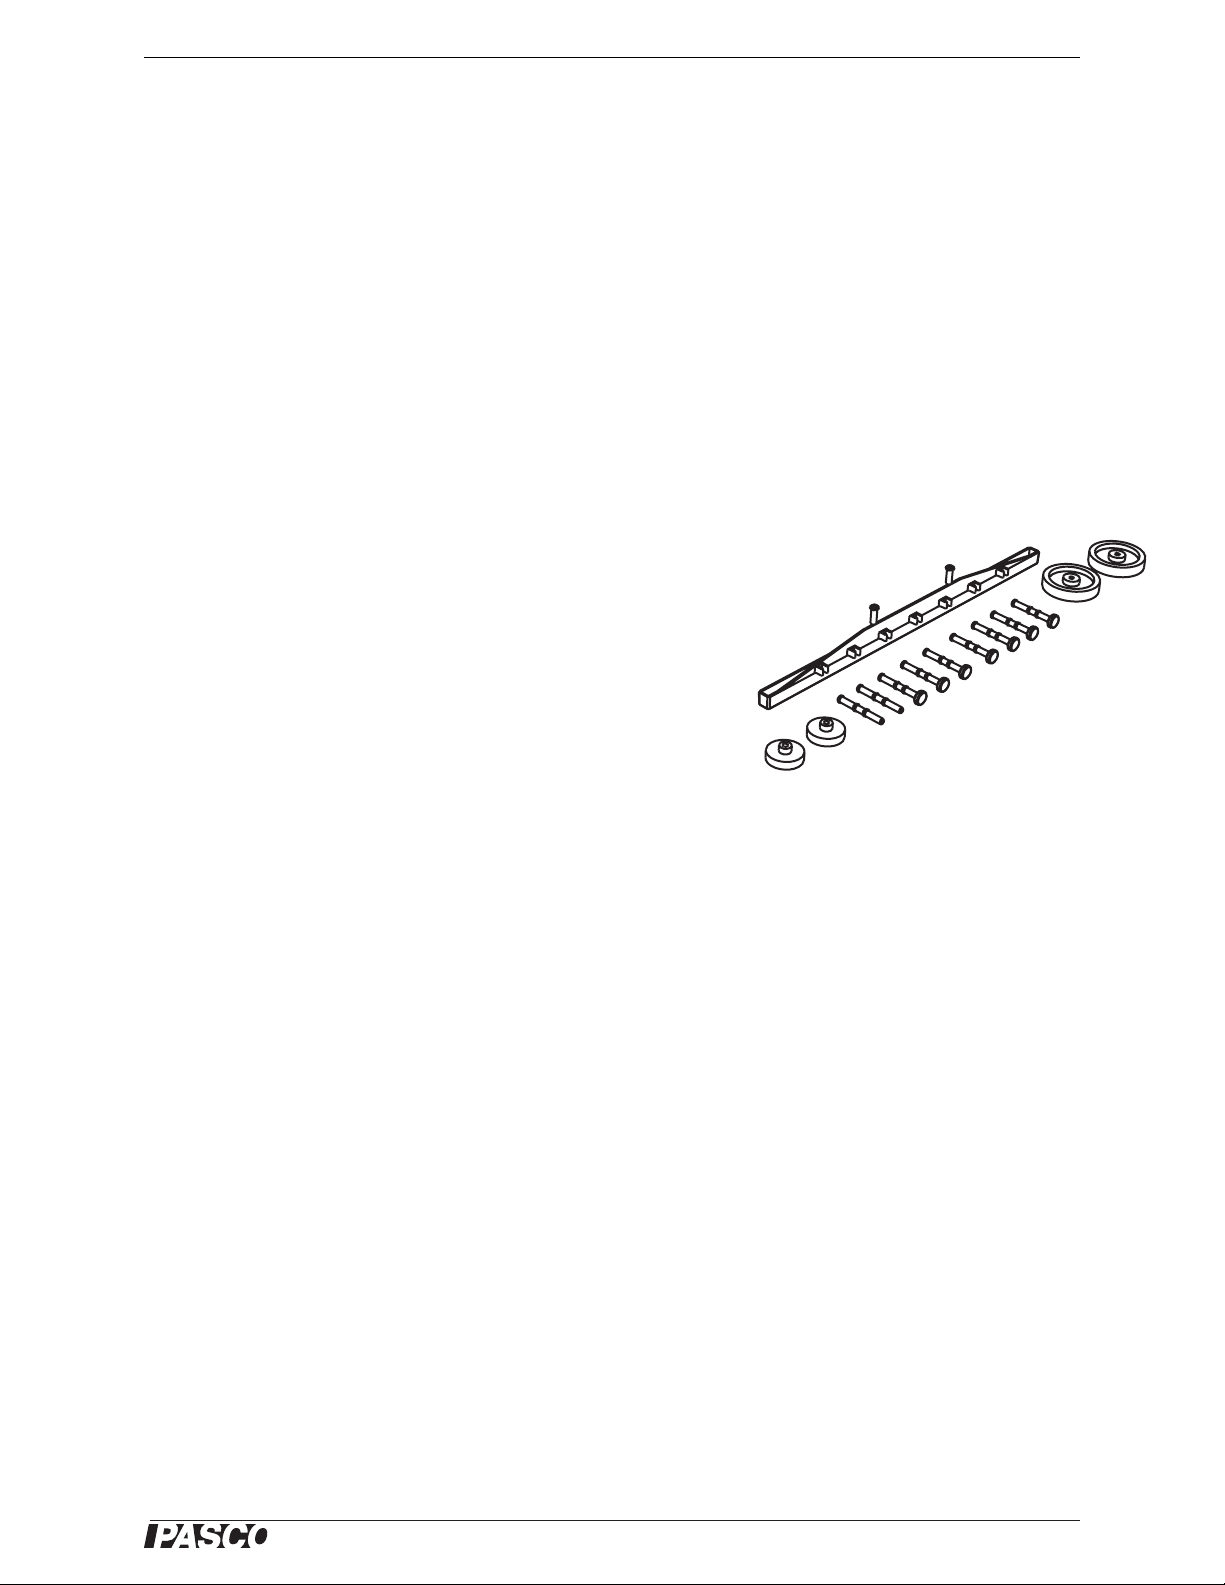
Generator Attachments The ripple generator includes a
plane wave dipper (1), small actuators (2), dipper adapters (3), standard dippers (4), and large actuators (5). The plane wave dipper and
the standard dippers attach to the clips at the end of each rippler arm.
Use the dipper adapters to attach the small or large actuators to the
rippler arms, or to the clips on one side of the plane wave dipper. The
standard dippers can be attached to the clips at the end of each rippler
arm or to the clips on the plane wave dipper.
The standard dippers and dipper adapters are designed so that the top
‘third’ of the part fits securely into the clips on the rippler arms. The
parts fit into the clips in one way; do not force them into the clips.
The dippers and adapters are designed so that the ‘middle third’ of
the part fits into the clips on the plane wave dipper.
WA-9896 Ripple Generator (right) and Light Source (left)
with power adapter and cord
1
4
3
2
Generator Attachments
5
The standard dippers and dipper adapters can be used as ‘point sources’ when attached to
the ripple generator. In general, the higher the frequency of the ripple generator, the
smaller the point source attachment should be in order to produce the sharpest looking circular waves.
Mounting the Light Source The light source has a built-in rod clamp for
mounting the light on the rod that comes with the ripple tank assembly. Mount the light
source near the top of the rod so that the light source is at right angles to the rod and the
opening of the light source is above the center of the ripple tank.
Mounting the Ripple Generator Use the built-in rod clamp on the end of the
ripple generator to mount the generator on a 90-cm rod (ME-8738, not included) that is
supported by a large rod base (ME-8735, not included). Position the ripple generator so
that it is slightly above the midpoint of one side of the ripple tank but does not touch the
tank. Arrange the generator so that it is at right angles to the side of the ripple tank, and the
midpoint of the generator is approximately in line with the inner edge of the ripple tank.
Connecting the Power Adapter The ripple generator comes with an AC
adapter that provides 15 V DC (at up to 1.6 A). Connect the included power cord between
an electrical outlet and the AC adapter, and then connect the plug from the adapter into the
power input port on the side of the ripple generator.
Connecting the Light Source Connect the power cord from the light source
into the jack on the side of the ripple generator that is beneath ‘TO LIGHT’ on the label.
Tip: Before using the plane
wave dipper or the other dippers or the actuators for the first
time (or after a long period of
non-use), lightly coat the bottom surfaces with a very small
amount of surfactant.
Tip: Before connecting the
power adapter to the ripple generator, be sure that the
‘ON-OFF’ switch on the left side
of the generator is in the ‘OFF’
position.
Also, turn the ‘AMPLITUDE’
knob on the top of the generator
fully counter-clockwise.
®
7
Page 8
Ripple Tank System About the Equipment
Frequency
display
ON-OFF switch
Light Source jack
Power input port
Bracket
Phase switch
Ripple Generator
Dipper adjustment
knob
Amplitude knob
Frequency
knob
Rod
clamp
Dipper
adjustment knob
Dipper Adjustment The ripple generator has two dipper adjustment knobs for
making small changes to the height and orientation of the generator. You can make fine
adjustments with these two knobs to position the dippers, plane wave dipper, or actuators
in the water without moving the entire ripple generator up or down on its rod. Use the
knob on the right side of the generator to move the front end of the generator up or down.
Use the knob at the back corner of the generator to tilt the front end of the generator right
or left (clockwise or counter-clockwise).
Before making adjustments, check that the ripple generator is
parallel to the bracket when the ripple generator is mounted on
the rod. This will allow for the widest range of adjustments
when you use the plane wave dipper, standard dippers, or actuators.
It is very important that the dippers barely touch
the surface of the water in the tank. For the plane
wave dipper, it is also important that the dipper has
equal contact with the surface of the water over the
entire length of the dipper.
One way to adjust the ripple generator when it is
on the rod is to grip the rod below the rod clamp,
loosen the thumbscrew of the rod clamp, and support the rod clamp with your thumb. Gradually
nudge the rod clamp up or down on the rod until
the dippers attached to the rippler arms are in contact with the water, then tighten the thumbscrew of
the rod clamp to secure the ripple generator on the
rod.
Next, use the two dipper adjustment knobs to raise, lower, or tilt the ripple generator so the
dippers barely touch the surface of the water. When everything is adjusted, the water will
appear to ‘curve upwards’ on the sides of the dipper.
Generator parallel to bracket
Water level
Water appears to
curve upward on the
sides of the dipper
8
®
Page 9
Model No. WA-9899 About the Equipment
Amplitude Adjustment The Amplitude knob adjusts the ripple arm amplitude.
As you turn the knob clockwise, the amplitude increases. Turning the knob counter-clockwise (right-to-left) decreases the amplitude.
As a general rule, adjust the amplitude in all experiments to get a clear wave patter without
distortions.
Frequency Adjustment The Frequency knob adjusts the ripple arm frequency.
The Frequency display shows the frequency in 0.1 Hz increments. The range is from 1.0 to
50.0 Hz. When the ripple generator is first turned on, the default frequency is 20.0 Hz, a
good starting frequency for the experiments described later. Turn the knob clockwise to
increase the frequency or counter-clockwise to decrease the frequency.
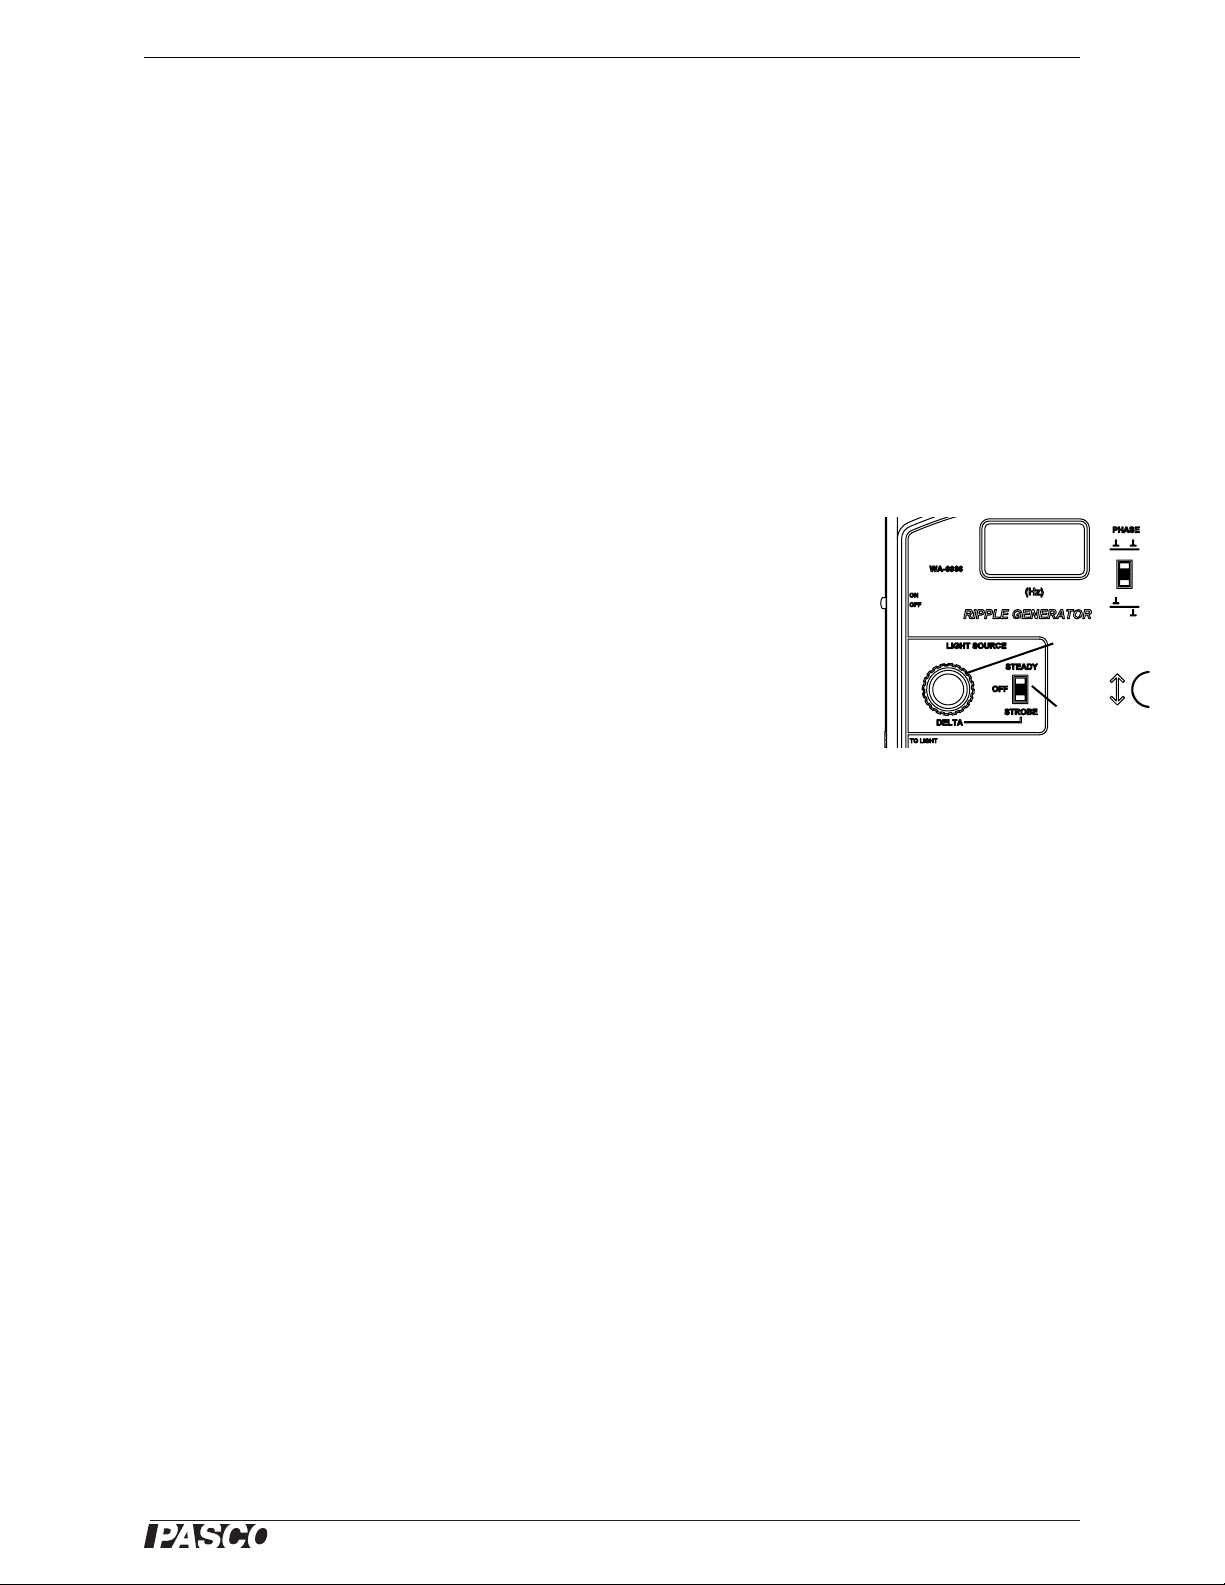
Phase Switch The Phase switch at the upper right of the ripple generator changes
the phase of the two rippler arms from zero degrees (‘in phase’) to 180 degrees (‘out of
phase’). The switch can be used while the ripple generator is in operation.
Light Source Control The Light Source can be used as a strobe or as a steady
source. The controls for the light source consist of a three-position Mode switch for selecting ‘STEADY’, ‘OFF’, and ‘STROBE’, and a ‘DELTA ’ knob that adjusts the frequency of
Frequency
display
the light source when it is in the strobe mode.
DELTA Feature Normally the frequency of the light source in the strobe mode is
the same as the frequency of the ripple generator. When the frequency of the light source
is 5.0 Hz or more, you can use the ‘DELTA’ knob to increase or decrease the frequency of
the light independently of the frequency of the ripple arms. (When the generator frequency
is less than 5.0 Hz, the ‘DELTA’ knob will not change the light source frequency.) Turn the
‘DELTA’ knob clockwise to increase the light source frequency or counter-clockwise
(right-to-left) to decrease the frequency. Each ‘click’ of the ‘DELTA’ knob changes the
frequency of the light source by 0.8 Hz. The Frequency display on the top of the ripple
generator will show the ‘DELTA’ increment (e.g., 1.0, 2.0, 3.0, 4.0, or 5.0 if the ‘DELTA’
knob is turned clockwise, or -1.0, -2.0, etc., if the knob is turned counter-clockwise) for a
few moments and then change back to show the ripple generator frequency. For example,
if the Frequency display shows ‘20.0’ Hz, and you turn the ‘DELTA’ knob one ‘click’
clockwise, the Frequency display sho ws ‘1.0’ momentarily, and the light source frequency
becomes 20.8 Hz. Note that the ripple generator will continue to oscillate at 20.0 Hz.
This feature of the light source allows the wave pattern to ‘appear to move’ at a constant,
predictable speed when the light source is in the strobe mode and the light source frequency is slightly higher or lower than the ripple generator frequency.
DELTA
knob
Mode
switch
®
9
Page 10

Ripple Tank System About the Experiments
About the Experiments
These experiments can be done with the equipment included in the system and other items
such as a protractor, drawing compass, and paper. See each experiment for a specific
equipment list.
1. Reflection: Study the reflection of plane waves from straight and curved barriers.
2. Refraction: Study how plane waves bend when they pass from one medium to
another where the wave speed is different.
3. Diffraction: Determine how a diffraction pattern of plane waves changes as the
slit width of the barriers changes and the wavelength changes.
4. Interference: For a double-slit interference pattern, determine how the interfer-
ence pattern changes as the slit width separation and the wavelength are varied.
5. Image Formed by a Plane Mirror: Determine the position of the image formed
by a plane mirror relative to the image distance from the mirror.
6. Wave Speed: Determine how wave speed depends on frequency and on water
depth.
7. Doppler Effect Demonstration: Demonstrate the Doppler Effect by moving the
ripple generator at a constant speed in a straight line.
10
®
Page 11

Model No. WA-9899 Experiment 1: Reflection
y
Experiment 1: Reflection
Equipment from Ripple Tank System
Ripple Tank Ripple Generator and Light Source
Long Barrier Plane Wave Dipper
Curved Barrier Ruler
Other Equipment and Materials
Large Rod Stand (ME-8735) Protractor
90-cm Rod (ME-8738) Drawing compass
Paper (about 40 cm by 40 cm)
Purpose
The purpose of this activity is to study the reflection of a plane wave from different
shaped barriers: a long straight barrier and a curved barrier.
Theory
A ray is a line that indicates the direction of motion of a plane
wave. Wave fronts are perpendicular to the ray. When a wave
reflects from a surface, the angle of incidence is the angle
incident ray
between the incoming (or incident) ray and the normal (a line
perpendicular to the surface). The angle of reflection is the angle
between the outgoing (reflected) ray and the normal.
Setup
1. Mount the light source onto its rod at the back edge of the
ripple tank.
2. Pour a small amount of water into the tank and adjust the feet on the legs of the
tank to level the tank.
3. Place the long straight barrier in the middle of the tank and add about 800 mL of
water to the tank (or enough water so that the water level is about halfway up the
long straight barrier.)
4. Use a rod and base to support the ripple generator and position the generator over
the midpoint of one side of the ripple tank. Plug the light source into the ripple
generator and connect the ripple generator to its power adapter.
5. Connect the plane wave dipper to the ripple arms. Adjust the ripple generator
until the bottom of the plane wave dipper is barely in contact with the surface of
the water.
wave front
normal
θ
θ
i
r
Figure 1.1: Definition of Angles
Tip: Make sure that
the plane wave dipper is in contact
with the water
evenly over its
length.
reflected ra
6. Place a sheet of paper directly under the ripple tank so you will be able to sketch
the images of the waves that are projected onto the sheet by the light source.
®
Water appears to
curve upward on the
sides of the plane
wave dipper
11
Page 12

Ripple Tank System Experiment 1: Reflection
Part 1: Reflection Using a Straight Barrier
Procedure
1. Arrange the long barrier in the middle of the tank so the barrier is at an angle to
the plane wave dipper (see Figure 1.2).
2. Turn on the ripple generator and
the light source. Set the light
source to ‘STROBE’. Set the ripple generator frequency to 20 Hz.
Set the amplitude to slightly less
than half of maximum.
3. On the paper below the tank, place
the ruler parallel to the plane
waves that are incoming to the
barrier. Make a line to show the
incoming wave front.
4. Place the ruler parallel with a
reflected wave and again make a
line to show the outgoing
Figure 1.2: Position of Straight Barrier
(reflected) wave front.
Tip: Adjust the
5. Trace the position of the straight barrier.
6. Turn off the ripple generator and light source.
amplitude as
necessary to
make a clear
pattern of plane
waves.
Data Analysis
1. Draw a line that is perpendicular to the incoming wave front and extend the line
to the outline of the straight barrier. This represents the incoming ray, so draw an
arrow on it pointing to the barrier.
2. Draw a line from the point where the incoming ray intersects the straight barrier
so it crosses the reflected wave front at a right angle. This represents the reflected
ray, so draw an arrow on it pointing away from the barrier.
3. Draw the normal (perpendicular) line at the point of reflection on the outline of
the straight barrier.
4. Measure the angle of incidence and the angle of reflection and record the mea-
surements in the table.
5. Repeat the procedure with the barrier at a different angle.
Table 1.1: Reflection Results
Trial #1 Trial #2
Angle of Incidence
Angle of Reflection
Question
1. What is the relationship of the angle of incidence and the angle of reflection?
12
®
Page 13

Model No. WA-9899 Experiment 1: Reflection
Part 2: Reflection Using a Curved Barrier
Procedure
1. Replace the straight barrier with
the curved barrier and position
the curved barrier so it is aligned
‘parallel’ to the plane wave dipper as shown in Figure 1.3.
2. Turn on the light source. Trace
the position of the curved barrier
on the paper below the ripple
tank.
3. Turn on the ripple generator.
4. Mark the position on the paper
where the waves that reflect from
the curved barrier appear to converge. Turn off the ripple generator.
Figure 1.3: Position of Curved Barrier
5. Use the pipette to drop a single droplet of water at the position in the ripple tank
where the waves converged. Describe the shape of the waves that reflect from the
curved barrier.
Data Analysis
1. Use a drawing compass to complete the traced circular shape of the curved bar-
rier. Mark the center of the circle and measure the radius.
Question
1. What is the shape of the wave fronts that reflect from the curved barrier when
you dropped the droplet of water into the ripple tank?
2. How is the radius of the circle related to the distance between the curved barrier
and the point where the reflected plane waves from the plane wave dipper
appeared to converge?
Extension
Turn the curved barrier around by 180 degrees so that it
‘curves away’ from the plane wave barrier as shown in
Figure 1.4. Repeat the procedure as before, but trace
the shape of the reflected waves as well as the outline
of the curved barrier.
After sketching the reflected waves, draw at least three
rays perpendicular to the reflected waves. Extend the
rays until they intersect and mark the point of intersection. Measure the distance from the outline of the
curved barrier to the point of intersection, and compare
this distance to the radius of the traced circular shape of
the curved barrier.
®
Figure 1.4: Reverse the Curved Barrier
13
Page 14

Ripple Tank System Experiment 1: Reflection
14
®
Page 15

Model No. WA-9899 Experiment 2: Refraction
Experiment 2: Refraction
Equipment from Ripple Tank System
Ripple Tank Ripple Generator and Light Source
Trapezoidal Refractor Plane Wave Dipper
Concave Refractor Ruler
Convex Refractor
Other Equipment and Materials
Large Rod Stand (ME-8735) Paper (about 40 cm by 40 cm)
90-cm Rod (ME-8738)
Purpose
The purpose of this activity is to show how waves change direction as they pass from
one region to another where the wave speed is different.
Theory
As a wave travels from one medium to another where the wave
speed is different, the wave bends to a new direction. If the wave
medium #1
interface
slows down, the wave will bend toward the normal of the interface
between one medium and the other as shown in Figure 2.1. This
bending is called refraction.
Setup
1. Mount the light source onto its rod at the back edge of the rip-
ple tank.
2. Pour a small amount of water into the tank and adjust the feet on the legs of the
tank to level the tank.
3. Place the trapezoidal refractor in the middle of the tank and add about 700 mL of
water, or enough water so that the water level is at the top edge of the refractor.
4. Use a rod and base to support the ripple generator and position the generator over
the midpoint of one side of the ripple tank. Plug the light source into the ripple
generator and connect the ripple generator to its power adapter.
5. Connect the plane wave dipper to the ripple arms. Adjust the ripple generator
until the bottom of the plane wave dipper is barely in contact with the surface of
the water.
medium #2
Figure 2.1: Refraction
Tip: Make sure that
the plane wave dipper is in contact
with the water
evenly over its
length.
6. Place a sheet of paper directly under the ripple tank so you will be able to sketch
the images of the waves that are projected onto the sheet by the light source.
®
Water appears to
curve upward on the
sides of the plane
wave dipper
15
Page 16

Ripple Tank System Experiment 2: Refraction
Part 1: Refraction Using a Straight Barrier
Procedure
1. Arrange the trapezoidal refractor in the water in the middle of the tank so the
rectangular end of the refractor is parallel to the plane wave dipper and about 5
cm from the dipper (see Figure 2.2).
2. Add just enough water to the tank so that the refractor is evenly covered by less
than 1 mm of water.
3. Turn on the ripple generator and
the light source. Set the light
source to ‘STROBE’. Set the ripple generator frequency to 15 Hz
or less. Set the amplitude to
slightly less than half of maximum
and adjust it as necessary to make
a clear pattern of plane waves.
4. On the paper below the tank, trace
the outline of the trapezoidal
refractor.
5. Place the ruler parallel to the plane
waves that are incoming to the
refractor. Sketch lines to show the
Figure 2.2: Position of Trapezoidal Refractor
incoming wave fronts.
6. On the outline of the refractor, trace the shapes of the refracted waves to show the
bending of the refracted waves as they travel over the refractor.
7. After sketching the waves, reverse the trapezoidal refractor so that the triangular
end of the refractor points toward the plane wave dipper and repeat the procedure.
8. Turn off the ripple generator and light source.
Data Analysis
1. Draw a line that is perpendicular to the incoming wave front and extend the line
to the outline of the trapezoidal refractor. This represents the incoming ray, so
draw an arrow on it pointing to the refractor.
2. At the point where the line representing the incoming ray meets the outline of the
refractor, draw a new line that is perpendicular to the wave fronts of the refracted
waves as they pass over the trapezoidal refractor.
Tip: Adjust the frequency
as needed to make a clear
wave pattern as the wave s
move over the refractor.
The lower the frequency,
the more pronounced the
refraction.
Questions
1. What happens to the direction of the wave fronts as they move over the trapezoi-
dal refractor?
2. As the plane wave from the deep water moves through the shallower water over
the refractor, does the plane wave speed up or slow down?
16
®
Page 17

Model No. WA-9899 Experiment 2: Refraction
Part 2: Refraction Using Curved Refractors
Procedure
1. Replace the trapezoidal refractor
with the convex refractor, placing
it in the middle of the tank with
the straight side parallel to the
plane wave dipper and about 5 cm
from the dipper as shown in Figure 2.3.
2. Turn on the ripple generator and
light source. Trace the position of
the convex refractor on the paper
below the ripple tank.
3. Trace the pattern of plane waves
as they move from the plane wave
dipper over the convex refractor.
4. Use the ruler to measure the focal length of the convex ‘lens’. This is the distance
from the center of the lens to the point where the refracted plane waves appear to
converge (come to a focus).
Figure 2.3: Position of Convex Refractor
5. Replace the convex refractor with the concave refractor and trace the new pattern
of the plane waves as they move from the dipper over the refractor.
Data Analysis
1. Use the ruler to sketch three rays that represents the direction of motion for three
sections of the plane waves from the dipper as they pass over the convex refractor. Draw one ray for the wave fronts that move over the upper third of the convex refractor; draw a second ray for the wave fronts that move over the center
third of the refractor, and draw a third ray for the wave fronts that move over the
lower third of the refractor.
2. Repeat the sketching of rays for the wave pattern of the waves moving over the
concave refractor. Draw one ray for the wave fronts that move over the upper
third of the concave refractor; draw a second ray for the wave fronts that move
over the center third of the refractor, and draw a third ray for the wave fronts that
move over the lower third of the refractor.
Questions
1. What happens to the direction of the rays for the wave fronts of the plane waves
as they move over the concave refractor?
2. Do the refracted waves from the concave refractor appear to converge or
diverge?
®
17
Page 18

Ripple Tank System Experiment 2: Refraction
18
®
Page 19

Model No. WA-9899 Experiment 3: Diffraction
Experiment 3: Diffraction
Equipment from Ripple Tank System
Ripple Tank Ripple Generator and Light Source
Long Barrier (2) Plane Wave Dipper
Mini Barrier Ruler
Other Equipment and Materials
Large Rod Stand (ME-8735) Paper (about 40 cm by 40 cm)
90-cm Rod (ME-8738)
Purpose
The purpose of this activity is to determine how the diffraction pattern of plane waves
changes as the slit width (gap between barriers) changes and the wavelength changes.
Theory
wave fronts
As a plane wave front passes through a gap or slit in a barrier,
each point on the wave front that moves through the slit generates a new circular wave front. If the gap or slit is large re lative
to the wavelength, the circular wave fronts combine to form a
new plane wave front. If the gap or slit is small relative to the
wavelength, the part of the wave front that moves through the
slit is less like a plane wave and more like a circular wave. The
spreading of a circular wave created as a wave front moves
through a slit as shown in Figure 3.1 is called diffraction.
Setup
1. Mount the light source onto its rod at the back edge of the ripple tank.
2. Pour a small amount of water into the tank and adjust the feet on the legs of the
tank to level the tank.
3. Place the long straight barriers in the middle of the tank and add about 800 mL of
water to the tank (or enough water so that the water level is about halfway up the
long straight barrier.)
4. Use a rod and base to support the ripple generator and position the generator over
the midpoint of one side of the ripple tank. Plug the light source into the ripple
generator and connect the ripple generator to its power adapter.
5. Connect the plane wave dipper to the ripple arms. Adjust the ripple generator
until the bottom of the plane wave dipper is barely in contact with the surface of
the water.
barrier
Figure 3.1: Diffraction
Tip: Make sure that
the plane wave dipper is in contact
with the water
evenly over its
length.
6. Set the light source to ‘STROBE’. Set the ripple generator to 20 Hz and the
amplitude to slightly less than half of maximum.
7. Place a sheet of paper directly under the ripple tank so you will be able to sketch
the images of the waves that are projected onto the sheet by the light source.
®
Water appears to
curve upward on the
sides of the plane
wave dipper
19
Page 20

Ripple Tank System Experiment 3: Diffraction
Procedure: Straight Barriers
1. Arrange the two long barriers in the water so that they are about 3 cm apart and
parallel to the plane wave dipper as shown in Figure 3.2. Set them so that they are
about 5 cm from the plane wave dipper.
2. Turn on the ripple generator and the
light source. Adjust the amplitude as
needed to make a clear wave pattern.
3. On the paper below the tank, trace the
outline of the two long barriers.
4. Sketch the wave fronts and the rays that
represent the waves as they spread out
when they pass through the slit between
the barriers.
5. Change the slit width to about 1.5 cm
by sliding the two barriers closer
together.
Figure 3.2: Position of Long Barriers
6. Sketch the new rays that represent the waves as they spread out when they pass
through the slit.
7. Keep the same slit width of 1.5 cm, but increase the frequency of the ripple gen-
erator and observe what happens to the wavelength and to the angle of spreading.
Questions
1. Is the angle of diffraction (spreading) for the narrower slit (1.5 cm) more or less
than the angle for the wider slit (3.0 cm)?
2. How does the increase in frequency affect the wavelength?
3. How does the increase in frequency affect the angle of spreading (amount of dif-
fraction) as the wave fronts move through the slit?
Procedure: Solid Object
1. Return the frequency of the ripple generator to 20 Hz.
2. Place the mini barrier in the gap between the long barriers and then remove the
long barriers.
3. Sketch the resulting wave pattern as the wave fronts go around the mini barrier.
4. Increase the frequency of the ripple generator as before and observe what hap-
pens to the wave pattern.
Questions
1. What happens to the plane wave fronts as they pass by the mini barrier?
2. How does the increase in frequency affect what happens to the plane wave fronts
as they pass by the mini barrier?
20
®
Page 21

Model No. WA-9899 Experiment 4: Interference
Experiment 4: Interference
Equipment from Ripple Tank System
Ripple Tank Ripple Generator and Light Source
Long Barrier (2) Plane Wave Dipper
Short Barrier Standard Dipper (2)
Mini Barrier
Other Equipment and Materials
Large Rod Stand (ME-8735) Paper (about 40 cm by 40 cm)
90-cm Rod (ME-8738)
Purpose
The purpose of this activity is to determine how the interference pattern formed by
two slits or two point sources changes as the slit width changes and the wavelength
changes.
Theory
When a wave front passes through two slits, the wave front acts like
two point sources. The circular wave patterns that spread from the
slits interfere constructively and destructively. The positions of
d
maximum intensity (constructive interference) are given by the fo llowing formula:
d θsin mλ=
θ
In the formula, ‘d’ is the slit separation,
tions of maximum intensity (the ‘maxima’),
is the angle between posi-
λ
is the wavelength,
and ‘m’ is the order where ‘m’ = 0, 1, 2, etc. See Figure 4.1.
Setup: Straight Barriers
1. Mount the light source onto its rod at the back edge of the ripple tank.
2. Pour a small amount of water into the tank and adjust the feet on the legs of the
tank to level the tank.
3. Place the long straight barriers in the middle of the tank and add about 800 mL of
water to the tank (or enough water so that the water level is about halfway up the
long straight barrier.)
4. Use a rod and base to support the ripple generator and position the generator over
the midpoint of one side of the ripple tank. Plug the light source into the ripple
generator and connect the ripple generator to its power adapter.
5. Connect the plane wave dipper to the ripple arms. Adjust the ripple generator
until the bottom of the plane wave dipper is barely in contact with the surface of
the water.
6. Place a sheet of paper directly under the ripple tank so you will be able to sketch
the images of the waves that are projected onto the sheet by the light source.
barriers
maximum
θ
maximum
Figure 4.1: Diffraction
Tip: Make sure that
the plane wave dipper is in contact
with the water
evenly over its
length.
Water appears to
curve upward on the
sides of the plane
wave dipper
®
21
Page 22

Ripple Tank System Experiment 4: Interference
Procedure: Straight Barriers
1. Place the short barrier between the two long barriers in the water to form two
openings that are 2 cm long. Put the barriers parallel to the plane wave dipper as
shown in Figure 4.2. Set the barriers about 5 cm from the plane wave dipper
2. Turn on the ripple generator and the
light source. Set the light source to
‘STROBE’. Set the frequency to 20 Hz
and the amplitude to slightly less than
half of maximum.
3. On the paper below the tank, trace the
outline of the barriers.
4. Sketch the wave fronts and the rays that
represent the waves as they spread out
and interfere after they pass through the
slits between the barriers.
5. Find and label the regions where the
Figure 4.2: Position of Barriers
waves from the two slits tend to cancel
each other and find and label the regions where the waves add together to make
waves with higher peaks.
6. Decrease the slit separation. Replace the short barrier with the mini barrier but
keep the slit width at 2 cm.
7. Vary the frequency. Keep the slip separation and slit width the same, but increase
the frequency to decrease the wavelength.
Questions
1. When the slit separation is decreased, does the spread angle of the waves increase
or decrease?
2. When the frequency increases and the wavelength decreases, does the spread
angle of the waves increase or decrease?
Setup: Two Point Sources
1. Temporarily turn off the ripple generator.
Tip: Adjust the amplitude to make a clear
pattern of plane waves.
2. Remove the straight barriers from the tank and replace
the plane wave dipper in the ripple arms with two standard dippers (see Figure 4.3). Adjust the ripple generator
so that the two standard dippers barely touch the surface
of the water.
Procedure: Two Point Sources
1. Turn on the generator and return the frequency to 20 Hz.
Adjust the amplitude as needed to make a clear pattern.
2. Sketch the wave pattern formed as the wave fronts from the two point sources
interfere with each other.
22
Figure 4.3: Standard Dippers
®
Page 23

Model No. WA-9899 Experiment 4: Interference
Question
1. How does the pattern of interference from two point sources compare to the pat-
tern of interference from the two slits?
Extensions
Three Point Sources Raise the ripple generator, remove the two standard dip-
pers, and attach the plane wave dipper to the ripple arms. Put three standard dippers
into the clips on the plane wave dipper so that the three dippers are evenly spaced.
Adjust the ripple generator so that the three standard dippers barely touch the surface
of the water.
Set the ripple generator frequency to 20 Hz, and repeat the procedure as you did for
two point sources. Adjust the amplitude as needed to make a clear pattern.
Sketch the wave pattern formed as the wave fronts from the three point sources interfere with each other.
Five Point Sources Put two more standard dippers
into the clips on the plane wave dipper so that all five dippers are evenly spaced (see Figure 4.4). Repeat the procedure as for three point sources.
Sketch the wave pattern formed as the wave fronts from
the five point sources interfere with each other.
Actuators Raise the ripple generator and remove the
plane wave dipper. Attach a dipper adapter to each of the
Figure 4.4: Multiple Dippers
two small actuators, and put the dipper adapters into the
clips on the ripple arms (see Figure 4.5). Adjust the ripple generator so that the two
small actuators barely touch the surface of the water. Repeat the procedure as for the
two point sources. Adjust the amplitude as needed to make a clear pattern.
Sketch the wave pattern formed as the wave fronts from
the two small actuators interfere with each other.
Replace the two small actuators with the two large actuators and repeat the procedure.
Figure 4.5: Small Actuators
®
23
Page 24

Ripple Tank System Experiment 4: Interference
Notes
24
®
Page 25

Model No. WA-9899 Experiment 5: Image Formed by a Plane Mirror
Experiment 5: Image Formed by a Plane Mirror
Equipment from Ripple Tank System
Ripple Tank Ripple Generator and Light Source
Long Barrier Standard Dipper
Ruler
Other Equipment and Materials
Large Rod Stand (ME-8735) Paper (about 40 cm by 40 cm)
90-cm Rod (ME-8738)
Purpose
The purpose of this activity is to show how the position of the image formed by a
plane mirror relates to the position of the object.
Theory
When wave fronts reflect from a plane mirror’s surface, the angle of incidence of the ray equals the angle of reflection of the ray. The image formed
by a plane mirror appears to be a certain distance behind the mirror. This distance is called the ‘image distance’. The distance of the object in front of the
mirror is called the ‘object distance’. The relationship of the angles of incident rays and reflected rays can be used to find the relationship of the ‘image
distance’ to the object distance. See Figure 5.1.
Setup
1. Mount the light source onto its rod at the back edge of the ripple tank.
2. Pour a small amount of water into the tank and adjust the feet on the legs
of the tank to level the tank.
3. Place the long straight barrier in the middle of the tank and add about 800 mL of
water to the tank (or enough water so that the water level is about halfway up the
long straight barrier.)
4. Use a rod and base to support the ripple generator and position the generator over
the midpoint of one side of the ripple tank. Adjust the generator so that one ripple
arm is in line with the center of the tank.
object
incident rays
Figure 5.1: Plane Mirror
reflected rays
image
mirror
5. Plug the light source into the ripple generator and connect the ripple generator to
its power adapter.
6. Connect a single standard dipper to one of the ripple arms. Adjust the ripple gen-
erator until the bottom of the standard dipper is barely in contact with the surface
of the water.
7. Place a sheet of paper directly under the ripple tank so you will be able to sketch
the images of the waves that are projected onto the sheet by the light source.
®
25
Page 26

Ripple Tank System Experiment 5: Image Formed by a Plane Mirror
8. Arrange the long barrier near the middle of the tank so that the midpoint of the
barrier is aligned with the ripple arm that holds the standard dipper. Adjust the
barrier so it is parallel to the front of the ripple generator as in Figure 5.2.
Procedure
1. Turn on the ripple generator and the
light source. Set the light source to
‘STROBE’. Set the frequency to 20 Hz
and the amplitude to slightly less than
half of maximum. Adjust the amplitude
to make a clear wave pattern.
2. On the paper below the tank, trace the
outline of the standard dipper and the
long barrier.
3. Sketch the wave fronts and the rays that
represent the waves as they move from
the dipper and reflect from the long barrier.
Figure 5.2: Position of Barrier
standard dipper
4. Measure and record the distance from the outline of the standard dipper to the
outline of the long barrier.
5. Place the ruler on the paper with one end of the ruler at any point on the line that
indicates the side of the long barrier that faces the standard dipper. Orient the
ruler so that it crosses the reflected circular wave fronts at a right angle. Draw a
line along the ruler to indicate the ray for the reflected wave fronts.
6. Move the end of the ruler to a new point on the outline of the long barrier. Orient
it again so it crosses the reflected circular wave fronts at a right angle. Draw a
new line along the ruler to indicate the ray for the reflected wave fronts from this
point.
7. Turn off the ripple generator.
8. Extend the two ruler lines until they cross. The point where they cross is the cen-
ter of the reflected circular wave fronts. This center represents the position of the
image.
9. Measure and record the perpendicular distance from the front side of the barrier
to the position of the image.
Questions
1. Where is the position of the image located relative to the long barrier and the
standard dipper?
2. How does the distance to the position of the image compare to the distance from
the standard dipper to the long barrier?
26
®
Page 27

Model No. WA-9899 Experiment 6: Wave Speed
Experiment 6: Wave Speed
Equipment from Ripple Tank System
Ripple Tank Ripple Generator and Light Source
Plane Wave Dipper Ruler
Other Equipment and Materials
Large Rod Stand (ME-8735) Paper (about 40 cm by 40 cm)
90-cm Rod (ME-8738)
Purpose
The purpose of this activity is to demonstrate the relationship of wave speed to frequency (v = f λ where v is the speed of propagation of the wave, f is the frequency,
and λ is the wavelength) and wave speed to water depth.
Theory
For transverse waves, the wavelength is the distance from
one point on a wave to an identical point on the next wave,
such as the distance from one crest to the next crest. Frequency is the number of waves per unit of time. Period, the
amount of time for one wave, is the reciprocal of frequency.
Since average speed is distance divided by time, wave speed
is wavelength divided by period, or wavelength multiplied
by frequency (the reciprocal of the period). See Figure 6.1.
Setup: Wave Speed
1. Mount the light source onto its rod at the back edge of the ripple tank.
2. Fill the ripple tank with a small amount to water and adjust the feet on the legs to
level the tank. Then add between 600 and 800 mL of water.
3. Use a rod and base to support the ripple generator and position the generator over
the midpoint of one side of the ripple tank.
4. Plug the light source into the ripple gen-
erator and connect the ripple generator
to its power adapter.
5. Connect the plane wave dipper to the
ripple arms. Adjust the ripple generator
until the bottom of the plane wave dipper is barely in contact with the surface
of the water. See Figure 6.2.
wavelength
Figure 6.1: Wavelength
plane wave dipper
6. Place a sheet of paper directly under the
ripple tank so you will be able to measure the distances between wave fronts.
®
Figure 6.2: Plane Wave Dipper
27
Page 28

Ripple Tank System Experiment 6: Wave Speed
Procedure: Wave Speed and Frequency
1. Turn on the ripple generator and the light source. Set the light source to
‘STROBE’. Set the frequency to 5 Hz and the amplitude slightly less than half of
maximum. Adjust the amplitude if needed to make a clear wave pattern.
2. The waves fronts appear as light and dark stripes that are formed as light travels
through wave crests and troughs. Measure and record the distance of five wavelengths.
3. Choose a new frequency and repeat the measurement of the distance for five
wavelengths. Do this for five different frequencies.
4. Calculate the wavelength that corresponds to each different frequency.
5. Based on the wavelength and frequency, calculate the wave speeds.
6. Calculate the average wave speed.
Table 6.1:
Frequency (Hz) 5 Hz
Five λ (m)
λ (m)
v (m/s)
Question
1. Is the wave speed roughly constant for the frequencies you chose?
Procedure: Wave Speed and Water Depth
1. Set the ripple generator frequency to 5 Hz. Measure and record the distance of
five wavelengths as in the previous procedure.
2. Drain or add water so the depth is 7 mm. Adjust the ripple generator so the plane
wave dipper is barely in contact with the surface of the water. Measure and
record the distance of five wavelengths as before.
3. Repeat the procedure for depths of 5 mm and 2 mm.
4. Calculate the wavelength and wave speed for each water depth.
Table 6.2:
Depth of Water (mm) Five λ (m) λ (m) Wave Speed (m/s)
10
7
5
2
Question
1. How does the speed of the wave depend on the depth of the water?
28
®
Page 29

Model No. WA-9899 Doppler Effect Demonstration
Doppler Effect Demonstration
The Doppler effect occurs when a wave source moves relative to an observer in such
a way that the distance between the wave source and the observer changes. If the distance between the wave source and the observer decreases, the wavelength becomes
shorter. If the distance between the wave source and the observer increases, the wavelength becomes longer.
The Doppler effect can be demonstrated using
the Ripple Tank System. Arrange the ripple
generator and ripple tank as for the previous
experiments. Mount the light source on its rod
and connect the light source to the generator.
Put a standard dipper into one of the ripple
arms of the ripple generator. Turn on the generator. S tart with the ripple generator’s default
frequency of 20Hz. Set the amplitude to about
half-maximum and the light source to
‘STROBE’. See the figure.
By moving the ripple generator at a constant
speed, the Doppler phenomenon can be
observed as shown in the illustration. It will
require some experimenting to determine the
right speed to use for a given frequency.
One way to move the ripple generator is to simply pivot the generator on its support rod.To do this, grip the rod with one hand
just below the generator’s rod clamp. Slightly loosen the rod
clamp and use your thumb to support the clamp so that the generator stays at the same vertical position on the rod. Use the other
hand to rotate the generator one way and then the other. Wavelengths in front of the moving dipper will decrease, and wavelengths behind the moving dipper will increase.
Figure: Doppler Demonstration
Direction of motion
®
29
Page 30

Ripple Tank System Sample Results
Sample Results
These illustrations show sample results for
the refraction experiments.
Refraction with Trapezoid
Refraction with Convex Refractor
This illustration shows a sample result for
the two-slit diffraction experiment,
This illustration shows a sample result for the two-point source interference experiment.
30
®
Page 31

Model No. WA-9899 Technical Support
Technical Support
For assistance with any PASCO product, contact PASCO at:
Address: PASCO scientific
10101 Foothills Blvd.
Roseville, CA 95747-7100
Phone: 916-786-3800 (worldwide)
800-772-8700 (U.S.)
Fax: (916) 786-7565
Web: www.pasco.com
Email: support@pasco.com
Limited Warranty
For a description of the product warranty, see the PASCO catalog.
Copyright
The PASCO scientific 012-09956A Ripple Tank System Instruction Manual and Experiment Guide is copyrighted with all rights
reserved. Permission is granted to non-profit educational institutions for reproduction of any part of this manual, providing the reproductions are used only in their laboratories and classrooms, and are not sold for profit. Reproduction under any other circumstances,
without the written consent of PASCO scientific, is prohibited.
Trademarks
PASCO and PASCO scientific are trademarks or registered trademarks of PASCO scientific, in the United States and/or in other countries. All other brands, products, or service names are or may be trademarks or service marks of, and are used to identify , products or
services of, their respective owners. For more information visit www.pasco.com/legal.
Authors: Ann Hanks
Jon Hanks
Dave Griffith
®
31
 Loading...