

Page 1

®
Venturi Apparatus
ME-8598
Instruction Manual
012-09486B
*012-09486*
Page 2

®
Venturi Apparatus
Table of Contents
Equipment . . . . . . . . . . . . . . . . . . . . . . . . . . . . . . . . . . . . . . . . . . . . . . . . . . . . . . . . . . . .3
Introduction . . . . . . . . . . . . . . . . . . . . . . . . . . . . . . . . . . . . . . . . . . . . . . . . . . . . . . . . . . . 4
Theory . . . . . . . . . . . . . . . . . . . . . . . . . . . . . . . . . . . . . . . . . . . . . . . . . . . . . . . . . . . . . . . 4
Experiment. . . . . . . . . . . . . . . . . . . . . . . . . . . . . . . . . . . . . . . . . . . . . . . . . . . . . . . . . . . .4
Pre-Setup Measurements 4
Setup 5
Procedure 5
Analysis 5
Further Analysis 6
Clean-up 6
Storage 6
Appendix A: Quad Pressure Calibration . . . . . . . . . . . . . . . . . . . . . . . . . . . . . . . . . . . . . 7
DataStudio 7
Xplorer GLX (Standalone Mode) 7
Appendix B: Fluid Supply and Flow Rate Measurement Options . . . . . . . . . . . . . . . . . . 8
Air 8
Water 10
Appendix C: Constants . . . . . . . . . . . . . . . . . . . . . . . . . . . . . . . . . . . . . . . . . . . . . . . . . 13
Technical Support . . . . . . . . . . . . . . . . . . . . . . . . . . . . . . . . . . . . . . . . . . . . . . . . . . . . . 14
Material Safety Data Sheet . . . . . . . . . . . . . . . . . . . . . . . . . . . . . . . . . . . . . . . . . . . . . . 15
2
Page 3
Venturi Apparatus
®
1
2
34 5
6
ME-8598
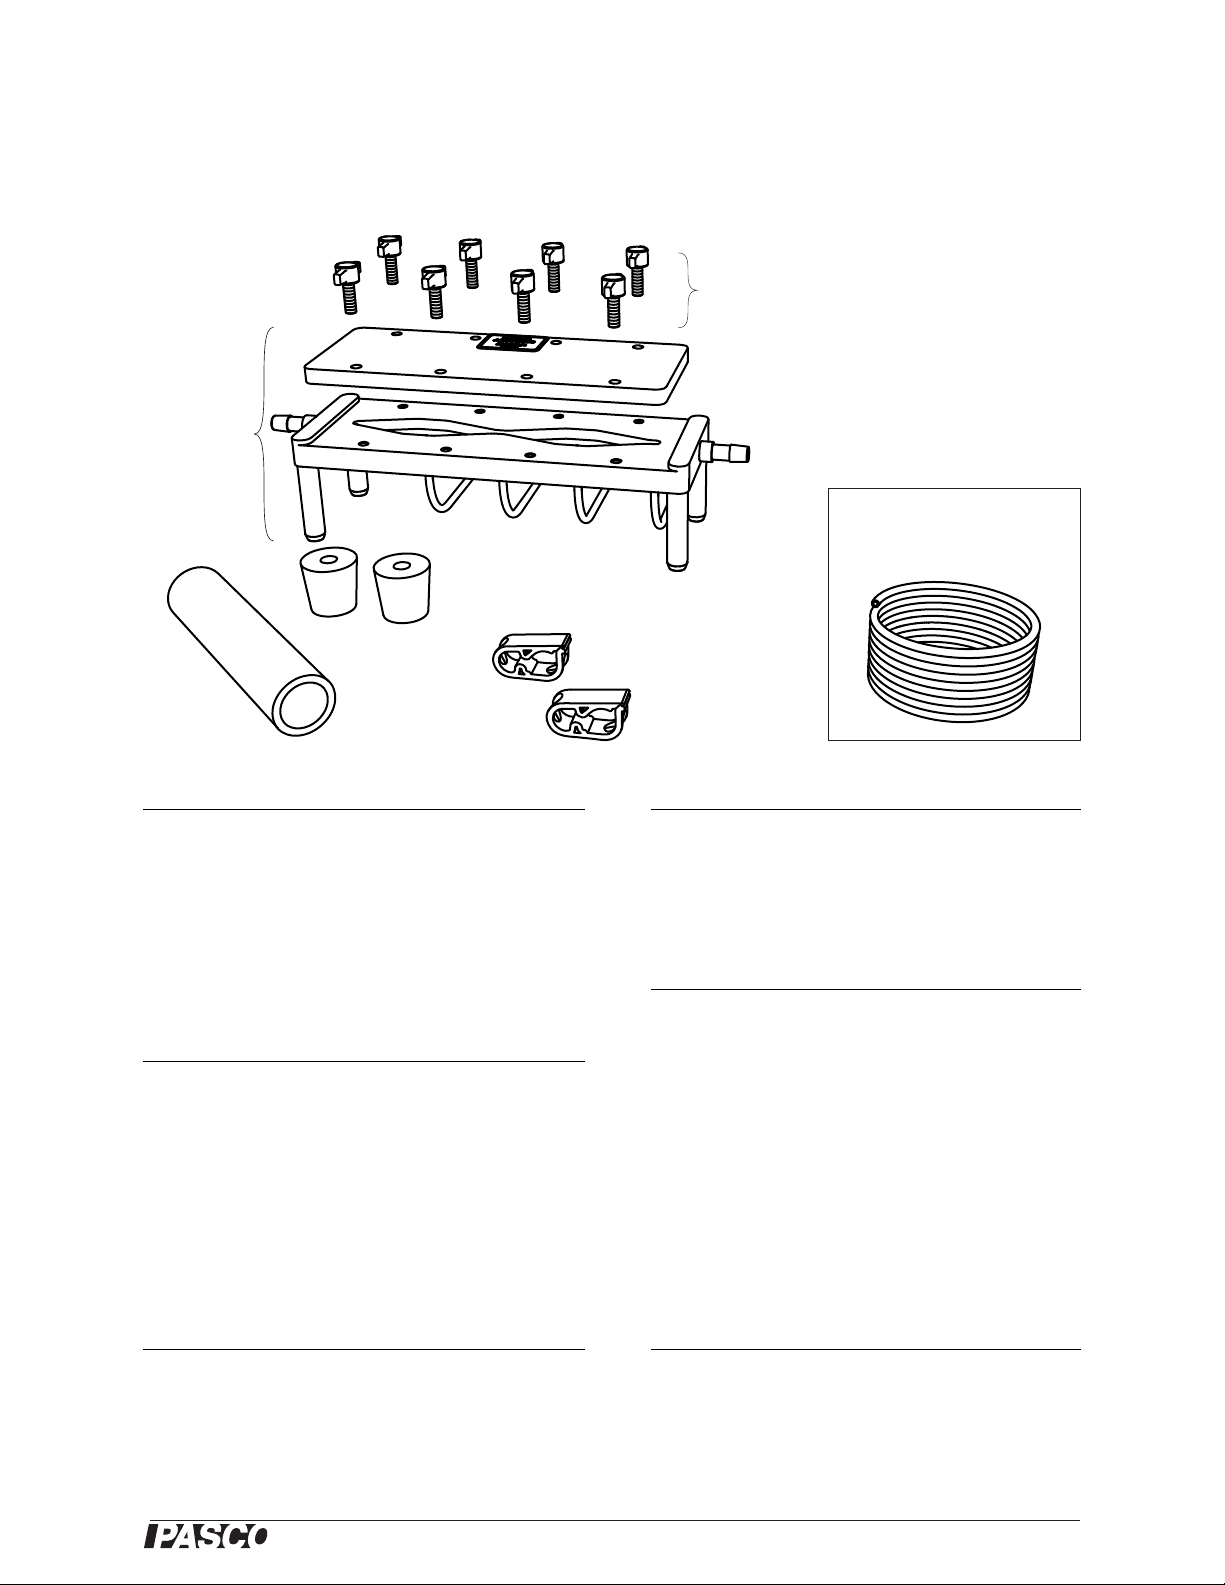
Included Equipment Part Number Air Method: Recommended Equipment 1Part Number
1. Venturi Apparatus base and top plate ME-8598 Spirometer Sensor
2. T-knob Screws (qty. 8) 617-024 One of the following:
3. Spirometer Tubing, 2.5 cm ID, 15 cm long 640-053 Shop Vacuum (or similar air supply)
4. Rubber Stoppers, 1-hole (qty. 2) 648-09597 Balloon and balloon pump
5. Restriction Clamps (qty. 2) 640-052 Water Method: Recommended Equipment
6. Fluid Tubing, 6 mm ID, 6 m long 640-012 Water Reservoir (or similar container) ME-8594
Required Equipment Container to catch water
Quad Pressure Sensor PS-2164 Table Clamp ME-9472
PASPORT Interface
5
See PASCO
catalog or
www.pasco.com
1
See page 8 for more information.
2
The use of this sensor and the Quad Pressure Sensor simultaneously requires a multi-port PASPORT Interface (such as Xplorer
GLX or PowerLink) or two single-port interfaces.
3
See pages 8–10 for more information.
4
See pages 10–13 for more information.
5
PASPORT interfaces include Xplorer GLX (PS-2002), PowerLink (PS-2001), AirLink (PS-2005), Xplorer (PS-2000), and USB Link
(PS-2100)
2
PS-2152
3
4
120 cm rod ME-8741
2 Three-finger clamps SE-9445
One of the following:
Motion Sensor
Rotary Motion Sensor
Force Sensor
2
2
2
PS-2103
PS-2120
PS-2104
Stopwatch SE-8702B
3
Page 4

®
Venturi Apparatus 012-09486B Introduction
P
A
u
P
0
A
0
u
0
Figure 1: Fluid flow through a pipe of varying
diameter
PP
0
1
2
-- -
ρυ
2
υ
0
2
–()–=
Introduction
In the Venturi Apparatus, air or water flows through a channel of varying width. As
the cross-sectional area changes, volumetric flow rate remains constant, but the velocity and pressure of the fluid vary. With a Quad Pressure Sensor connected to the
built-in Pitot tubes, the Venturi Apparatus allows the quantitative study and verification of the Continuity Equation, Bernoulli’s principle, and the Venturi effect.
The model ME-8598 Venturi Apparatus includes the connectors and tubing needed
for doing the experiment with either air or water. This manual contains complete
experiment instructions, i ncludi n g sev eral op tio ns for flu id su pply and fl ow-rate measurement.
Theory
An incompressible fluid of density ρ flows through a pipe of varying diameter (see Figure 1). As the cross-sectional area decreas es
from A
υ
(large) to A (small), the speed of the fluid increases from
0
to υ.
0
The flow rate, R, (volume/time) of the fluid through the tube is
related to the speed of the fluid (distance/time) and the cross-sectional area of the pipe. The flow rate must be constant over the
length of the pipe. This relationship is known as the Continuity
Equation, and can be expressed as
(eq. 1) R = A
0υ0
= Aυ
As the fluid travels from the wide part of the pipe to the constriction, the speed
increases from υ
to υ, and the pressure decreases from P0 to P. If the pressure
0
change is due only to the velocity change, Bernoulli's Equation can be simplified to:
(eq. 2)
Experiment
This experiment can be conducted with either air or water. Appendix B contains
equipment lists and instructions specific to each method.
Note: You can use a PASPORT interface (or interfaces) connected to a computer running
DataStudio software or on an Xplorer GLX interface in standalone mode (without a computer).
For instructions on collecting, graphing, and analyzing data, press F1 to open DataStudio on-line
help, or see the Xplorer GLX Users’ Guide.
Pre-Setup Measurements
Remove the top plate from the apparatus. Measure the depth of the channel and the
widths of the wide and narrow sections. Calculate the largest cross-sectional area (A
and the smallest cross-sectional area (A
4
)
).
S
L
Page 5
®
Model No. ME-8598 Experiment
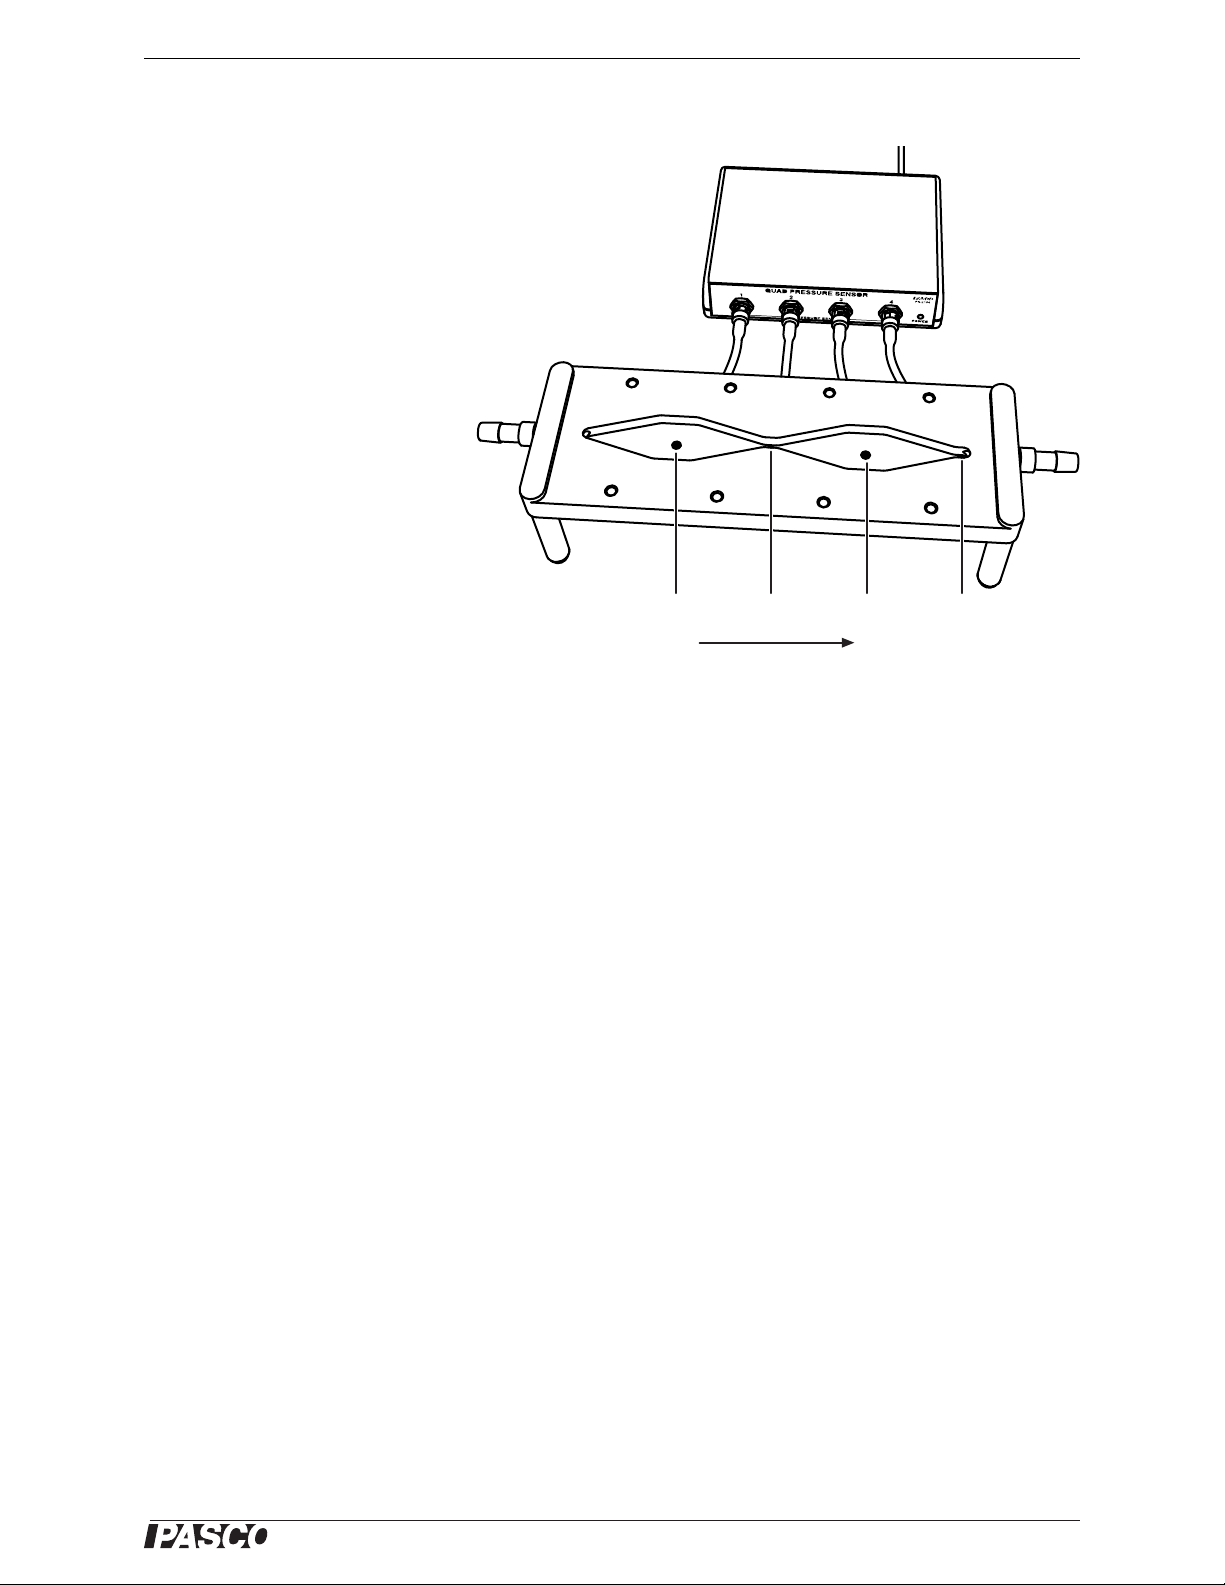
Figure 2: Quad Pressure Sensor connected to apparatus
Quad Pressure Sensor
To Quad Pressure
channels: 2 3 4
Fluid flow
1
Setup
1. Connect the Quad Pressure
Sensor to your PASPORT
interface (but do not connect
tubing to the pressure ports
yet). If you are using a computer, start DataStudio.
2. Calibrate the Quad Pressure
Sensor (see Appendix A).
3. Connect each of the four pres-
sure tubes extending from the
underside of the apparatus to
the ports of the Quad Pressure
Sensor as indicated in Figure
2.
Important: Do not allow water to enter
the sensor. Ensure that there is no
water near the sensor end of the pressure tubes.
4. Place the top plate on the
apparatus and secure it with
eight T-knob screws. Tighten
the screws no more than necessary to prevent leaking.
5. Set up the fluid supply and flow-rate measurement as described in Appendix B.
Procedure
1. Start fluid flow.
2. Start data collection on the computer or interface.
3. Continue data collection while observing the pressure measurements on a graph
display . Obtain a few seconds’ worth of goo d data before stopping dat a collection
and fluid fl ow.
Analysis
1. View your data on a graph of pressure versus time.
2. Select a time interval of about 2 seconds in which all off the pressure measure-
ments are relatively clean (though not necessarily constant or noise-free).
3. Within this time interval, determine the average of each pressure measurement:
P
, P2, P3 (and P4 if you will do the Further Analysis below).
1
4. Over the same 2-second interval, determine the average flow rate, R.
5. If there were no friction or turbulence in the channel, the pressures in both wide
sections (P
and P3) would be equal; however, you will find that this is not the
1
case. Because the channel is symmetrical about Point 2, you can estimate the
pressure lost at Point 2 due to friction and turbulence by assuming that it is half
of the pressure lost between Point 1 and Point 3. In other words, if the tube were
5
Page 6

®
Venturi Apparatus 012-09486B Experiment
P
0
P1P2+
2
------------------
=
straight, the pressure at Point 2 would be the average of P1 and P3. Calculate this
theoretical pressure:
(eq. 3)
6. Use the measured flow rate, R, and Equation 1 to calculate the fluid speed in the
wide parts of the tube (υ
), and the speed in the venturi constriction (υ).
0
7. Use these values of υ
and υ and Equation 2 to calculate the theoretical pressure
0
(P) in the venturi constr ictio n. Compare this to the actual pressure measured by
the sensor (P
).
2
Further Analysis
Repeat the analysis above for Points 2, 3, and 4.
Clean-up
1. Allow the water reservoir to run empty. T ilt the apparatus to empty water from it.
2. With the apparatus empty of wat er , dis connect the p ressure tub es from th e sensor.
(Leave the tubes connected to the underside of the apparatus.)
3. Remove the top plate from the apparatus. Allow the apparatus and tubing to dry
completely.
Storage
Store the apparatus with the top plate loose to avoid permanently deforming the seal.
6
Page 7

®
Model No. ME-8598 Appendix A: Quad Pressure Calibration
Figure 3: DataStudio calibration window
F4
F4
F3F2
F1
Figure 4: GLX calibration window
F4
F3
F1
Appendix A: Quad Pressure Calibration
The purpose of this calibration is to fine-tune all four pressure measurements so they
read the same when exposed to the atmosphere. This will allow the small pressure differences that occur in the apparatus to be measured more accurately.
Conduct this procedure with all four pressure ports exposed to the same pressure.
DataStudio
1. Click the Setup button to open the Experiment Setup win-
dow.
2. Click the Calibrate Sensors b ut ton to ope n the calib ration
window (see Figure 3).
3. At the top of th e Calibrate Sensors window, select Quad
Pressure Sensor.
4. Select the Calibrate all similar measurements simultaneously option.
5. Select the 1 Point (Adjust Offset Only) option.
6. Click Read From Sensor (in the Calibration Point 1 section
of the window).
7. Click OK.
Xplorer GLX (Standalone Mode)
1. Press + to open the Sensors Screen.
2. Press again to open the Sensors menu.
3. From the menu, select Calibrate to open the Calibrate Sensors win-
dow (see Figure 4).
4. In the first box of the window, select Quad Pressure Sensor.
5. In the third box of the window, select Calibrate All Similar Mea-
surements.
6. In the Calibration Type box, select 1 Point Offset.
7. Press (Read Pt 1).
8. Press (OK).
7
Page 8

®
Venturi Apparatus 012-09486B Appendix B: Fluid Supply and Flow Rate
Rubber
stopper
Rubber
stopper
Spirometer tubing
Spirometer
Airflow
Shop vacuum hose
To Quad Pressure channels: 1 2 3 4
Appendix B: Fluid Supply and Flow Rate
Measurement Options
You can conduct the experiment using air or water as the fluid. In either case, you
have a range of options for how to handle the fluid and how to measure the flow rate.
Some of the possibilities are described in this appendix.
In many of these setups, a PASPORT sen sor is used to measur e the flow rate. You can
connect this sensor and the Quad Pressure Sensor to a single multi-port interface
(such as the Xplorer GLX or PowerLink) or use two single-port interfaces connected
to your computer. If you have only one single-port interface, measure the flow rate
and pressures in two separate data runs.
Air
Air Supply Method 1: Shop Vacuum
Included Parts Required
Rubber stopper with hole
Other Parts Required
Shop vacuum or similar air supply
This method will typically produce a flow rate of 2 L/s or more.
Use a shop vacuum cleaner (Shop-Vac
®
brand or similar) as an air supply. Almost any
model will work, but one that has a hose connection for blowing air out may be preferable since it can push (as well as suck) air through the apparatus. Air supplies
designed for airtracks will work, but they may produce less air flow than a shop vacuum.
The Venturi Apparatus includes two rubber stoppers with holes. Use one of them to
connect the hose of the shop vacuum to the inflow port of the apparatus (see Figure
5). Connect the hose to the air-blowing port of the shop vacuum.
To measure airflow, connect a spirometer sensor as described on page 9.
Note: Observe the correct direction of airflow through the apparatus indicated in Figure 5. If you
will be using the shop vacuum to suck air through the apparatus, connect it to the outflow port,
and connect the spirometer to the inflow port.
8
Figure 5: Setup for air with a shop vacuum
Page 9

®
Model No. ME-8598 Appendix B: Fluid Supply and Flow Rate Measurement Options
Figure 6: Balloon
pump
Spirometer tubing
Rubber
stopper
Rubber
stopper
Spirometer
Airflow
Balloon
To Quad Pressure
channels:
234
Clamp
1
Fluid
tubing
1
The tubing isolates the
spirometer from turbulence occurring at the
apparatus’s outflow port.
Air Supply Method 2: Balloon
Included Parts Required
Rubber stopper with hole
Short piece of fluid tubing (about 10 cm)
Restriction Clamp
Other Parts Required
Rubber balloon
Balloon pump (available at party supply stores)
This method will produce a flow rate of about 0.5 L/s.
Stretch the mouth of the balloon around the rubber stopper. Insert the piece of fluid
tubing into the hole in the stopper. Place the restriction clamp on the tubing. Use a
pump to inflate the balloon through the tubing. Close the clamp to hold the air in the
balloon. Remove the pump, and connect the tubing to the inflow port of t he apparatu s
(see Figure 7). Open the clamp to start the flow of ai r.
To measure airflow, connect a spirometer sensor as described below.
Note: Using a pump to inflate the balloon ensures that the air will be relatively dry. A balloon
inflated by mouth will introduce moisture into the apparatus.
Figure 7: Setup for air with a balloon
Airflow Measurement
In this method, a Spirometer sensor measures the airflow rate.
Included Parts Required
Rubber stopper with hole
Spirometer tubing (15 cm long, 2.5 cm inside diameter)
Other Parts Required Part Number
Spirometer Sensor PS-2152
Use the P ASCO Spirometer sensor to measure airflow rate. The Spiro meter is primary
designed for measuring airflow in and out of a person ’s lungs, but works well to measure the airflow through t he Vent uri Apparatu s.
Insert the rubber stopper into the rubber spirometer tubing,
1
and connect the stopper
to the outflow port of the apparatus. In sert the mouthpiece of the spirometer into the
9
Page 10

®
Venturi Apparatus 012-09486B Appendix B: Fluid Supply and Flow Rate
2
For more information on
the spirometer, see the
instructions included with
it (PASCO instruction
sheet 012-08856).
Figure 8: Setup for water
Reservoir
Quad Pressure
Sensor
Clamp
other end of the spirometer tubing (see F igure 5 or 7). Assemble the mouthpiece and
spirometer handle, and connect the spirometer to your PASPORT interface.
The spirometer automatically calibrates itself every time you start data collection.
During the first few seconds of data collection, it must remain still and away from air
currents. A red WAIT light and green READY light illuminate to indicate when the
sensor is calibrating and when it is ready to m easure air flow. Start data collection (by
pressing or clicking the Start button) with the air supply off, and wait until the spirometer is ready before turning the air supply on.
2
Water
Water Supply
Included Parts Required
Fluid tubing (at least 1.5 m)
2 restriction clamps
Other Parts Required or Recommended Part Number
Water Reservoir (or other container of at least 1 liter) ME-8594
Container to catch water
Equipment to elevate and secure reservoir:
Table Clamp ME-9472
120 cm rod ME-8741
2 Three-finger clamps SE-9445
Set up the apparatus with at least 1.5 m of vertical drop from
the top surface of the water reservoir to the bottom of the drain
tube. Elevate the reservoir above your lab bench and put the
catch basin on the floor (see Figure 8) .
Cut the water tubing into two pieces of suitable length. Connect one piece of tubing to the outflow port of the apparatus
and run it over the side of the lab bench into the catch basin.
Secure the tubing so water will not spill onto the floor. Place
both hose clamps on the outfl ow tubing. Close on e of the cl ams
partially to regulate the flow rate. Close the other clamp completely; you will open and close this clamp to start and stop
water flow.
Run the other piece of tubing from the reservoir to the inflow
port of the apparatus. Connect the tubing to the bottom hose
fitting of the model ME-8594 Water Reservoir, or (if you are
using a container without a hose fitting) set up the tubing as a
siphon.
Note: Observe the correct direction of water flow through the apparatus indicated in Figure 2.
Connect the Quad Pressure Sensor if it is not already conn ected (see page 5).
Important: Do not allow water to enter the sensor’s pressure ports. Connect the quad pressure
sensor to the apparatus before filling it with water. Once water is in the apparatus, do not disconnect the sensor; otherwise water will flow through the pressure tubes.
Fill the reservoir with water. (If you are using the tubing as a siphon, fill it and the
apparatus with water as well, or use suction to draw water into them.)
10
Page 11

®
Model No. ME-8598 Appendix B: Fluid Supply and Flow Rate Measurement Options
Figure 9: Motion
sensor and water
reservoir
Rotary
motion
sensor
Float
Weight
Figure 10: Rotary
motion sensor and
water reservoir
Open the clamp to let some water through the apparatus; then close it. Initially, there
will be air in the apparatus; tilt it so that the air moves to the outflow port. Let some
more water through to flush out the air. Repeat this process until all air has been
removed from the apparatus and inflow tubing. Do not let the reservoir run empty, or
new bubbles will enter. Close the clamp. Refill the reservoir.
Water-flow Measurement Method 1: Motion Sensor
In this method a motion sensor measures the velocity of the descending water surface in the reservoir.
Parts Required or Recommended Part Number
Motion Sensor PS-2103
Water Reservoir (or other narrow, straight-sided container) ME-8594
Equipment for mounting sensor:
Multi clamp SE-9492
Mounting rod SA-9242
1. Set the switch on the motion sensor to the near-range setting.
2. Clamp the motion sensor above the reservoir. Position the sensor very close to
the top of the reservoir so it will measure the distance to the surface of the water
(see Figure 9). The water surface should be at least 15 cm from the sensor.
3. Test the setup: Start data collection and start the water flow. Look at velocity ver-
sus time data on a graph display. Adjust the position and angle of the sensor so
that you get good velocity data as the water drains. (It is not necessary to get
good data over the entire range of water level, since you will only need about 2
seconds’ worth of data.) Stop water flow and refill the reservoir. Delete your test
data.
4. Create a flow-rate calculation: In the DataStudio Calculator window (or GLX
Calculator screen) enter the following definition:
R = v * A
Define the variable v as the velocity measurement. Define A as a constant equal
to the horizontal cross-sectional area of the inside of the reservoir. Measure the
area in units of m
2
. In this way, R is calculated in units of m3/s.
Water-flow Measurement Method 2: Rotary Motion Sensor
In this method a rotary motion sensor measures the velocity of the descending water surface in
the reservoir.
Parts Required or Recommended Part Number
Rotary Motion Sensor PS-2120
Water Reservoir (or other narrow, straight-sided container) ME-8594
Float (such as a piece of wood)
Small weight (weighing less than the float)
Equipment for mounting sensor:
Multi clamp SE-9492
Mounting rod SA-9242
11
Page 12

®
Venturi Apparatus 012-09486B Appendix B: Fluid Supply and Flow Rate
3
In DataStudio, click the
Setup button to open the
Experiment Setup win-
dow. Enable Linear
Velocity under the Measurements tab. Set the
Linear Scale under the
Rotary Motion Sensor
tab.
On the GLX (in standalone mode), go to the
Setting Screen by pressing + .
F4
Force sensor
Outflow
tubing
Container
Figure 11: Force
sensor and container
Figure 12: Balance
Stand and Pan
4
If you are using a GLX
in standalone mode, calculate
R
manually after
data collection using the
slope of the force versus
time graph.
1. Install the three-step pulley on the rotary motion sensor.
2. Clamp the rotary motion sensor above the reservoir (see Figure 10).
3. Tie the float to one end of the string and the weight to the other end. Place the
float in the reservoir, run the string over the large step of the pulley, and let the
weight hang freely. Ensure that the weight will be free to move up as the water
drains.
4. In DataStudio (or on the GLX) enable the Linear Velocity measurement of the
rotary moti on sensor and set the Linear Scale value to Large Pulley.
3
5. Create a flow-rate calculation: In the DataStudio Calculator window (or GLX
Calculator screen) enter the following definition:
R = v * A
Define the variable v as the velocity measurement. Define A as a constant equal
to the horizontal cross-sectional area of the inside of the reservoir. Measure the
area in units of m
2
. In this way, R is calculated in units of m3/s.
Water-flow Measurement Method 3: Force Sensor
In this method, a force sensor measures the increasing weight of the water in the catch basin.
Other Parts Required or Recommended Part Number
Force Sensor PS-2104
Equipment for mounting sensor:
Multi clamp SE-9492
Mounting rod SA-9242
or
Force Sensor Balance Stand and Pan CI-6460
12
Container for catching water (with a handle if it is to be hung
from the force sensor)
1. Clamp the force sensor under the lab benc h with the hoo k pointed down and hang
the container from the sensor’s hook (see Figure 11).
or
Setup the force sensor on the floor with the Balance Stand and Pan and place the
container on the pan.
2. Po sition and secure the end of the outflow tubing so it will drain water into the
container but not interfere with the weight measurement.
3. Create a flow-rate calculation: In the DataStudio Calculator window enter the
following definition:
4
R = -derivative(2,F)/(9.81*1000)
Define the variable F as the Force (push p ositiv e) measurement. In this way , R is
calculated in units of m
3
/s.
The calculator definition above can be express in standard notation as
Page 13

®
Model No. ME-8598 Appendix C: Constants
R
dF
dt
------ -
1
gρ
------
=
R ΔV Δt⁄=
(eq. 4)
where dF/dt is the rate of increasing force, g = 9.81 N/kg, and ρ = 1000 kg/m
3
Water-flow Measurement Method 4: Stopwatch
In this method, you measure a volume and elapsed time to determine the average flow. Do this
before collecting pressure data.
Other Parts Required or Recommended
Stopwatch SE-8702B
Water Reservoir (or other graduated cylinder) ME-8594
If are using the model ME-8594 Water Reservoir, or similar container, a separate
graduated cylinder is not necessary; simply note the initial and final volumes in the
reservoir.
1. Start with the catch basin empty.
2. Start the stopwatch and open the clamp to start water flow.
3. After a measurable amount of water has flowed through, stop the stopwatch and
close the clamp.
4. Measure the volume of water that flowed out of (or into) the apparatus.
.
5. Calculate the average flow rate:
(eq. 5)
where ΔV is the volume of water and Δt is the elapsed time.
T ypically the flow rate varies with the level of water in the reservoir. T o keep the flow
rate close to constant, make the pressure measurements with the water level approximately the same as it was for the flow rate measurement.
Appendix C: Constants
Density of dry air at 20 °C and 1 atm: 1.2 kg/m
Density of water: 1000 kg/m
Wide cross-sectional area of channel: 1.99 cm
Narrow cross-sectional area of channel: 0.452 cm
3
3
2
2
13
Page 14

®
Venturi Apparatus 012-09486B Technical Support
Technical Support
For assistance with any PASCO product, contact PASCO at:
Address: PASCO scientific
10101 Foothills Blvd.
Roseville, CA 95747-7100
Phone: 916-786-3800 (worldwide)
800-772-8700 (U.S.)
Fax: (916) 786-3292
Web: www.pasco.com
Email: techsupp@pasco.com
For more information about the ME-85 98 Venturi A ppar atu s and the lat es t ve rs ion of
this manual, go to the PASCO web site and enter ME-8598 in the Search wind ow.
Limited Warranty
For a description of the product warranty, see the PASCO catalog.
Copyright
The PASCO scientific 012-09486B
to non-profit educational institutions for reproduction of any part of this manual, providing the reproductions are used only in their laboratories and classrooms, and are not sold for profit. Reproduction under any other circumstances, without the written consent of
PASCO scientific, is prohibited.
Venturi Apparatus Instruction Manual
is copyrighted with all rights reserved. Permission is granted
Trademarks
PASCO, PASCO scientific, DataStudio, PASPORT, Xplorer, and Xplorer GLX are trademarks or registered trademarks of PASCO scientific, in the United States and/or in other countries. All other brands, products, or service names are or may be trademarks or service marks of, and are used to identify, products or services of, their respective owners. For more information visit
www.pasco.com/legal. Shop-Vac is a registered trademark of Shop-Vac Corporation.
Authors: Jon Hanks
Alec Ogston
14
Page 15

®
Model No. ME-8598 Technical Support
POLYSI TECHNOLOGIES, INC. Issued 4/7/95
5108 REX MCLEOD DR. Revision 3 4/1/2005
SANFORD, NC 27330
Phone: (919) 775-4989
Material Safety Data Sheet
Page 1 of 2
I. Product
Product Name: Barium Grease
Product Type: Petroleum Grease
II. OSHA Components
CAS # WT % Range Component
64742-52-5 70-75 Petroleum Nephthenic Oil
68201-19-4 25-30 Barium Soap- Insoluble
III. Effects of Overexposure
Eyes: Contact with eyes may cause redness. Flush eyes with copious amounts of water for 15.
minutes. If irritation persists contact a physician.
Skin: Contact with skin causes a slight irritation. Wash contacted areas with soap and water.
Ingestion: If ingested drink 2 glasses of water, seek prompt medical attention and Induce vomiting.
IV.
Protective Equipment For Handling
Eyes: Safety Goggles or Glasses
Skin: Gloves
Ventilation: Not Required
V.
Handling and Storage
Handling: No special requirements
Storage: Normal storage
VI. Transport Information
Class or Type: DOT and IATA: Non-Hazardous
VII.
Spill and Disposal Procedures
Cleaning up Spills: Use absorbent material to collect and contain material for disposal
Recommendation of Disposal Dispose in accordance with Federal, State and Local regulations
VIII.
Reactivity Data
Stability: Stable
Hazardous Polymerization: Will Not Occur
Incompatibilities: Strong oxidizing materials
Hazardous Decomposition: Carbon Monoxide and various hydrocarbons
15
Page 16

®
Venturi Apparatus 012-09486B Technical Support
Material Safety Data Sheet
Page 2-2
Chemical and Physical Properties
16
 Loading...