

Page 1
®
Instruction Manual and
PAStrack Systems
Models ME-6961 and ME-6962
Experiment Guide
012-10393B
*012-10393*
Page 2

PAStrack Systems Table of Contents
Introduction . . . . . . . . . . . . . . . . . . . . . . . . . . . . . . . . . . . . . . . . . . . . . . . . . . . . . . . . . . . 3
About the Equipment . . . . . . . . . . . . . . . . . . . . . . . . . . . . . . . . . . . . . . . . . . . . . . . . . . . . 4
Spare Parts . . . . . . . . . . . . . . . . . . . . . . . . . . . . . . . . . . . . . . . . . . . . . . . . . . . . . . . . . . .6
About the Experiments. . . . . . . . . . . . . . . . . . . . . . . . . . . . . . . . . . . . . . . . . . . . . . . . . . . 7
Experiment 1: Conservation of Momentum in Explosions . . . . . . . . . . . . . . . . . . . . . . . . 8
Experiment 2: Conservation of Momentum in Collisions . . . . . . . . . . . . . . . . . . . . . . . . 10
Experiment 3: Simple Harmonic Oscillator . . . . . . . . . . . . . . . . . . . . . . . . . . . . . . . . . . 12
Experiment 4: Oscillations on an Incline . . . . . . . . . . . . . . . . . . . . . . . . . . . . . . . . . . . . 15
Experiment 5: Springs in Series and Parallel. . . . . . . . . . . . . . . . . . . . . . . . . . . . . . . . . 18
Experiment 6: Launch Speed. . . . . . . . . . . . . . . . . . . . . . . . . . . . . . . . . . . . . . . . . . . . . 20
Experiment 7: Newton’s Second Law . . . . . . . . . . . . . . . . . . . . . . . . . . . . . . . . . . . . . . 21
Experiment 8: Acceleration Down an Incline . . . . . . . . . . . . . . . . . . . . . . . . . . . . . . . . . 23
Additional Experiment Suggestions . . . . . . . . . . . . . . . . . . . . . . . . . . . . . . . . . . . . . . . . 26
Technical Support . . . . . . . . . . . . . . . . . . . . . . . . . . . . . . . . . . . . . . . . . . . . . . . . . . . . . 28
Page 3
PAStrack Systems
®
2
3
4
5
6
7
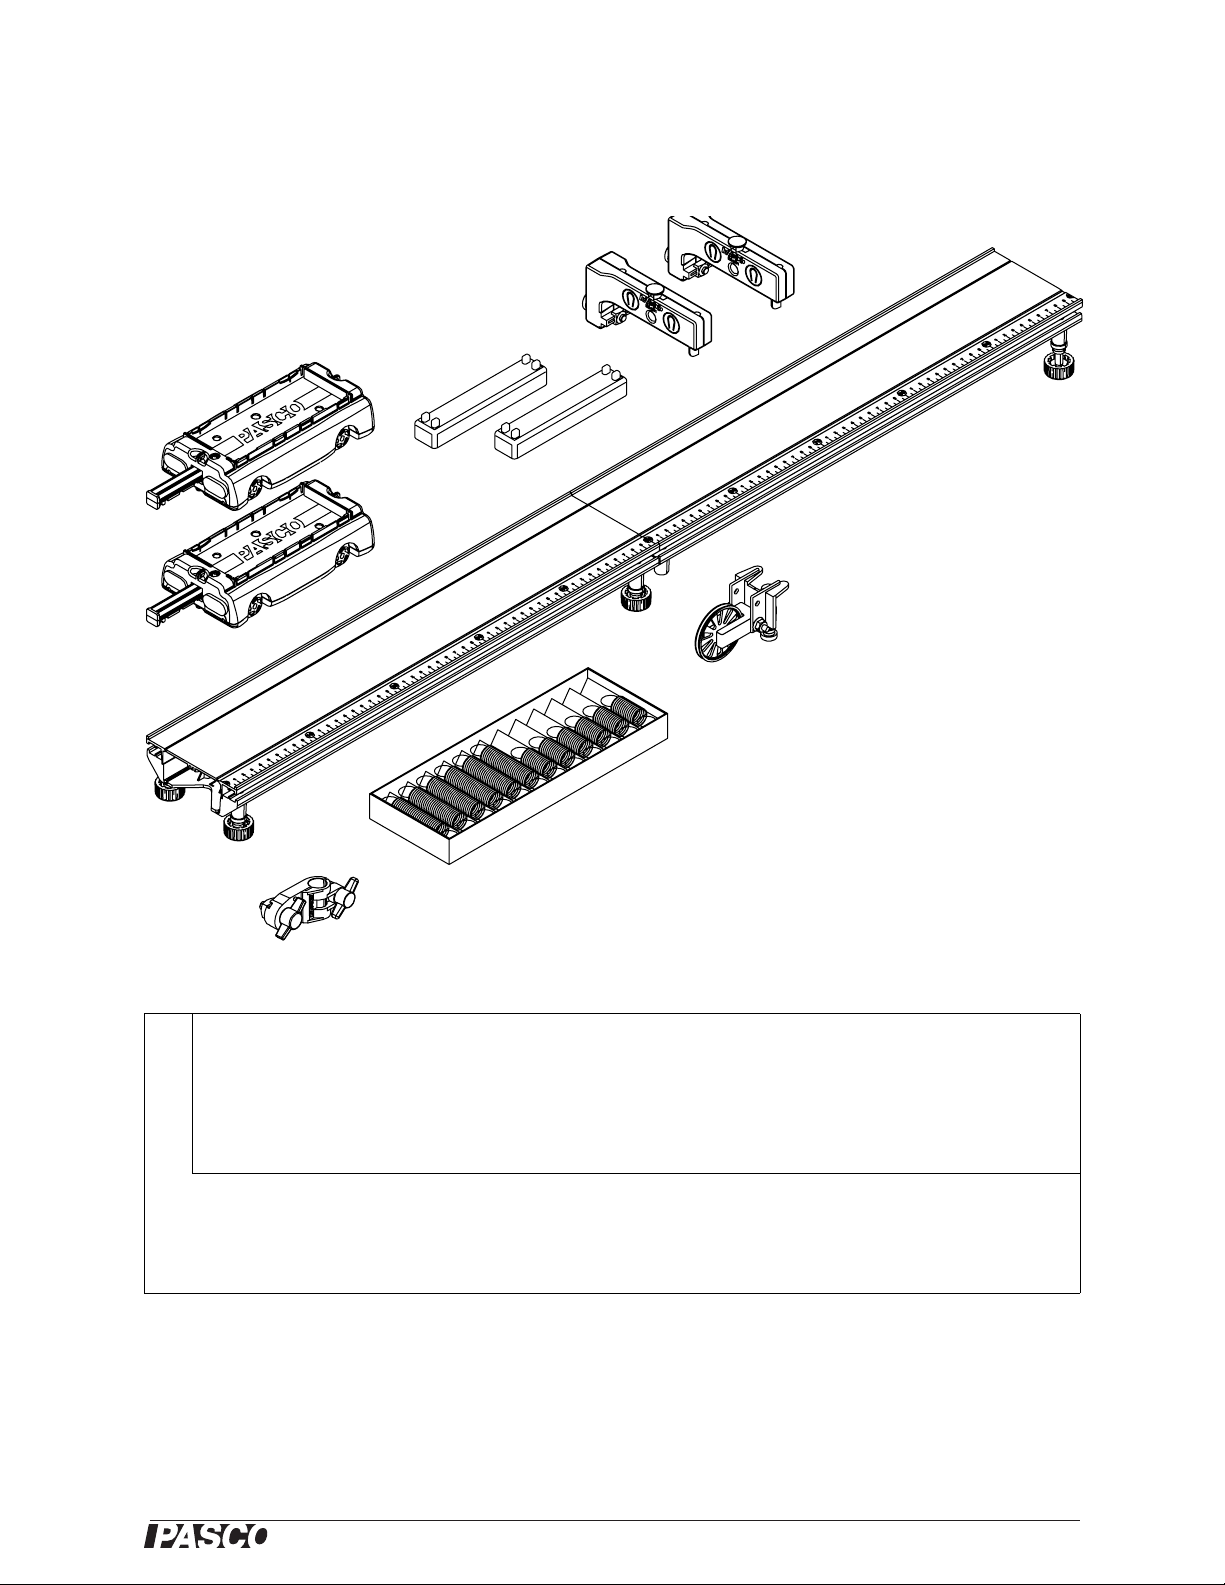
1
Included Equipment Quantity Replacement Part Number
1. PAScars 2 ME-6950 (set of 2 with masses)
2. 250 g Stackable Cart Masses 2 ME-6756
3. Adjustable End Stops 2 ME-8971 (2-pack)
ME-6962
4. PAStrack 1 ME-6960
ME-6961
5. Pivot Clamp 1 ME-9810
6. Spring Set 1 set of 12 ME-8999
7. Super Pulley with Clamp 1 ME-9448A
Introduction
PASCO PAStrack Systems include equipment for a variety of experiments and demonstrations. You can expand
your system with other PASCO products—both traditional and computer-based—for a greater range of uses.
3
Page 4
®
PAStrack Systems About the Equipment
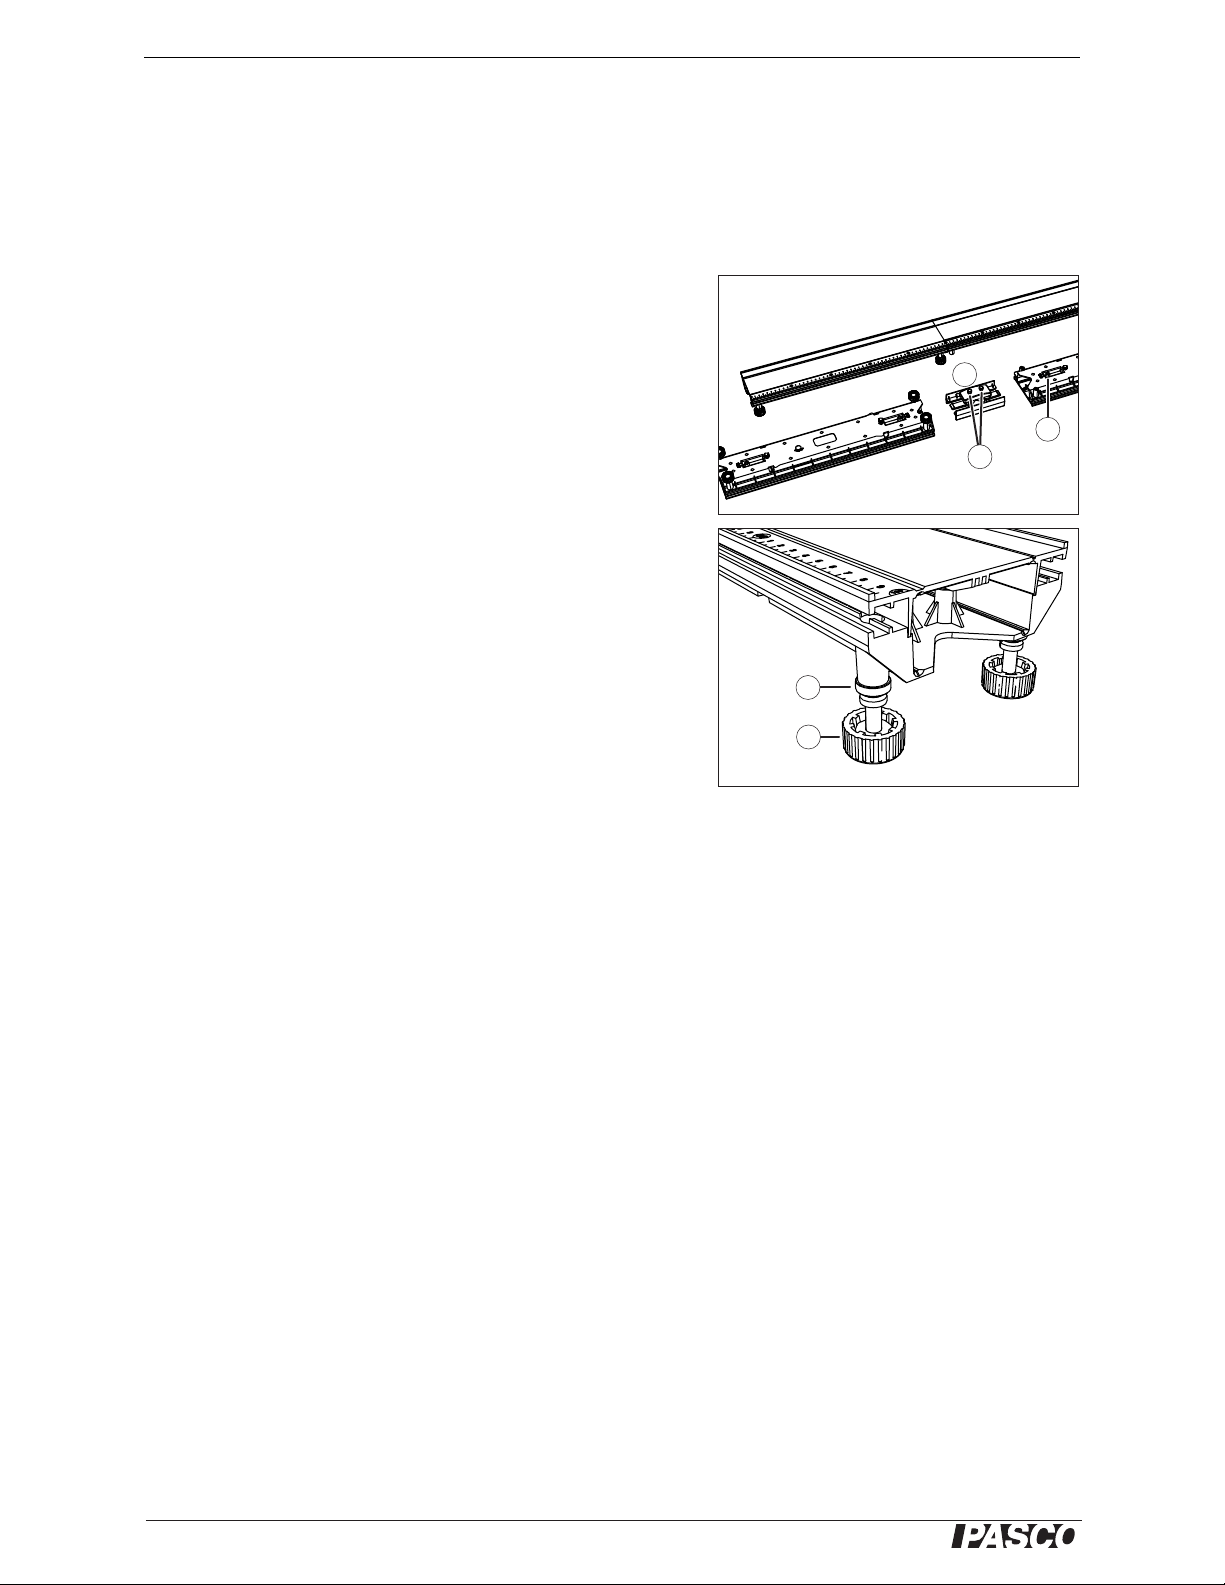
PAS t r a ck Pa r t s
1: Connector 2: Connector screws 3: Release tabs
4: Lock nut 3: Foot
This manual contains descriptions of the equipment included in the various systems,
complete instructions for nine experiments, and ten additional experiment suggestions.
About the Equipment
PAS tr ack The PAStrack consists of two sections that can be
joined together with the included connector and split apart for
storage. Together the two sections form a 1 m track. An extra connector is included, allowing any number of tracks to be joined
together.
1
To assemble the track:
1. Slide a connector piece into the “50 cm” end of one track section. Push it hard until you hear it snap.
2. Slide the other track section onto the connector piece. Push it
until it snaps.
3. Turn the track upside down and tighten the screws on the connector.
To level the track:
1. Set the track upright on a level surface.
2. Place a cart on the track to test it for level.
3. Adjust the feet to make the track straight and level.
4. Tighten the locknut of each foot.
To disassemble the track:
1. Loosen the connector screws.
3
2
4
5
2. Press and hold the release tabs on the bottom of the track.
3. Pull the track sections apart.
For more information, see the instruction sheet packaged with the track.
4
Page 5
®
PAStrack Systems About the Equipment
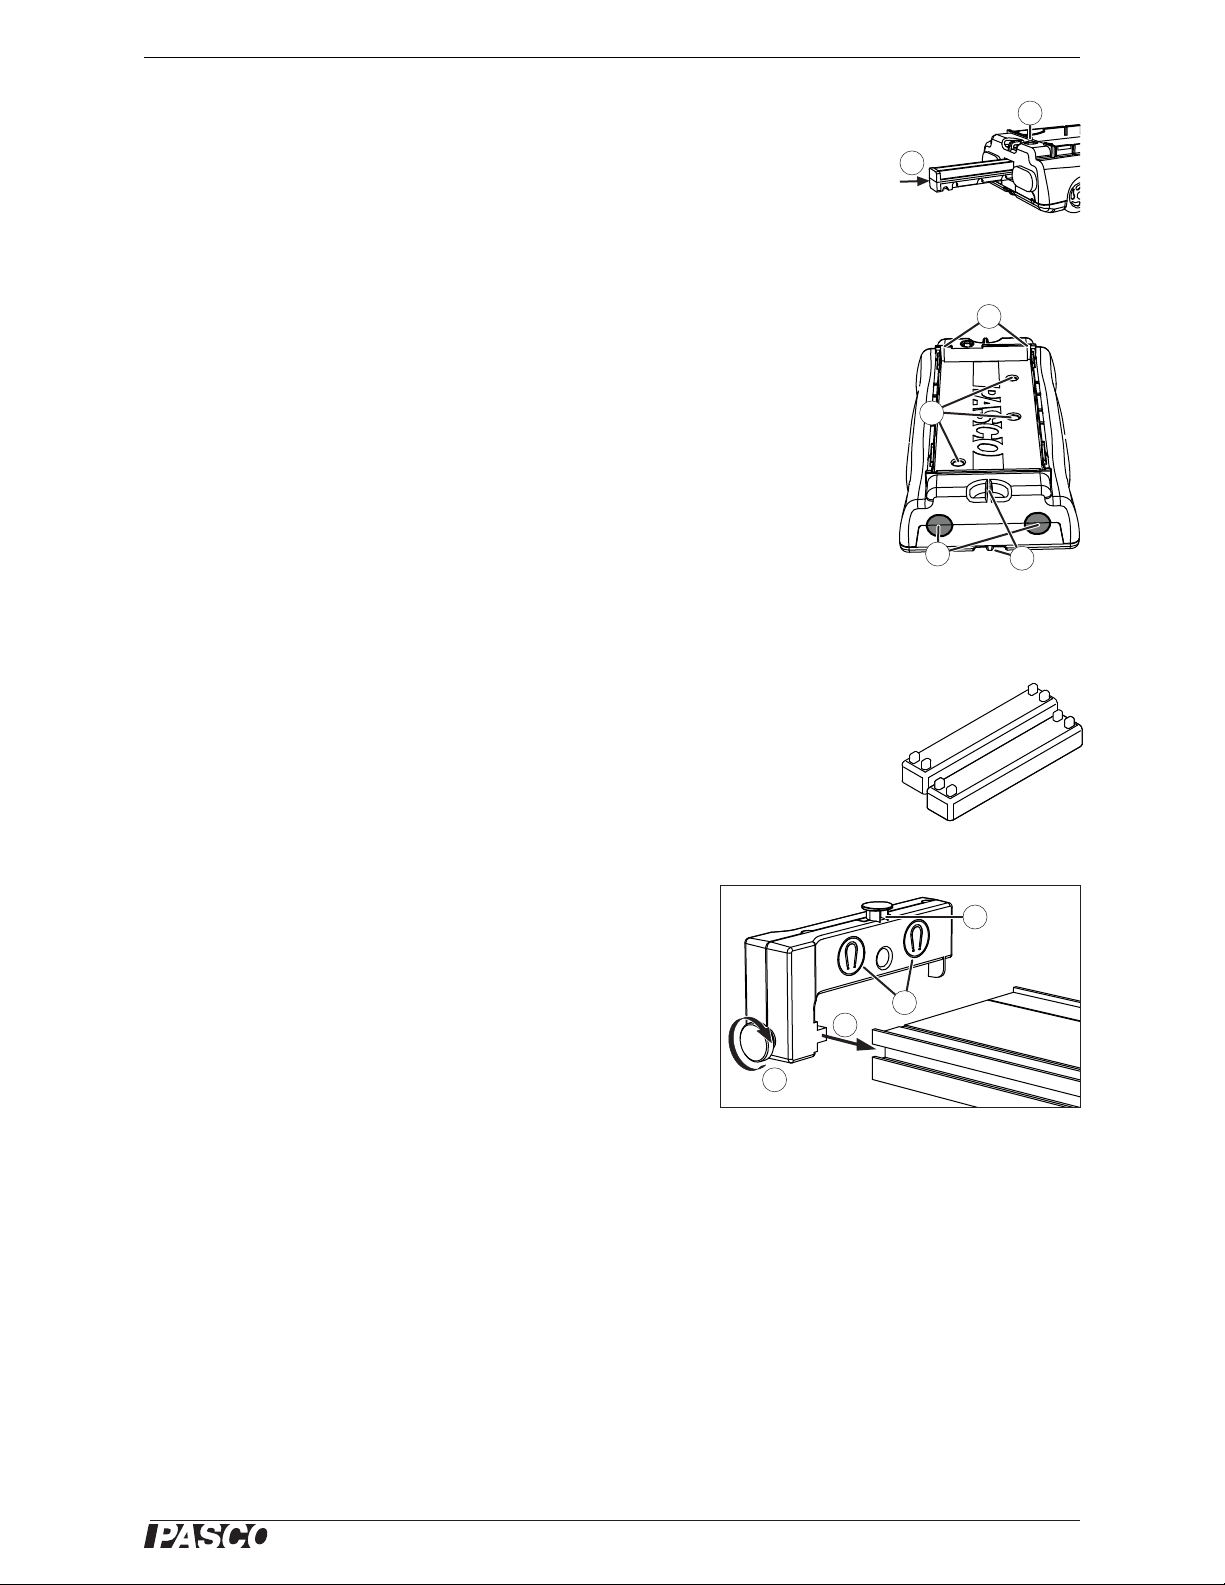
1
2
Plunger Cart
1: Push plunger in.
2: Press button to trigger.
1
3
2
4
Cart Features
1: Slots 2: Threaded
inserts 3: Bumpers
4: Attachment points
Cart Masses
1
2
3
4
Adjustable End Stop
1: Slide tab into T-slot on side of track. 2: Tighten
thumbscrew to secure end stop. 3: Magnets repel
cart’s magnetic bumper 4: Spring attachment stud
PAS ca rs These carts run along the track on low-friction wheels.
Each cart includes a spring-loaded plunger that launches the cart off of an end stop or
another cart. Push the plunger in to the first, second, or third “click” (for a slow,
medium, or fast launch). To make the plunger pop out, press the trigger button. When
the plunger is not in use, push it all the way in to the fourth position for storage.
For elastic and inelastic collisions, both carts have hook-and-loop bumpers on one
end and magnetic bumpers on the other end. When the hook-and-loop bumpers collide, the carts stick to each other. When the magnetic bumpers collide, the carts repel
each other without touching. The magnetic bumpers also repel the magnets in the end
stops.
The top or each cart forms a tray designed to hold the included masses. The carts also
feature threaded inserts for attaching accessories and sensors, and slots for holding a
picket fence (such as PASCO part ME-9804) or the included angle indicator.
At each end are two attachment points for connecting a string or spring.
For more information, see the manual packaged with the PAScars.
Cart Masses These masses are designed to be placed on the upper tray of a cart.
Adjustable End Stops Attach the end stops to the track
as illustrated. The end stops contain magnets to repel the magnetic bumper of a cart. A stud is provided as an attachment
point for a spring.
5
Page 6
®
PAStrack Systems Spare Parts
Harmonic Spring
Pivot Clamp
T- s lo t
Harmonic Springs (Part of ME-6961.) Ideal for studying
harmonic oscillation of carts on a flat or inclined track, these
springs hook onto holes at the ends of the carts and to studs on
top of the end stops.
The spring set includes 12 springs with approximate spring
constants of 3.4 N/m (three long springs and three shorts
springs) and 6.8 N/m (three long springs and three shorts
springs).
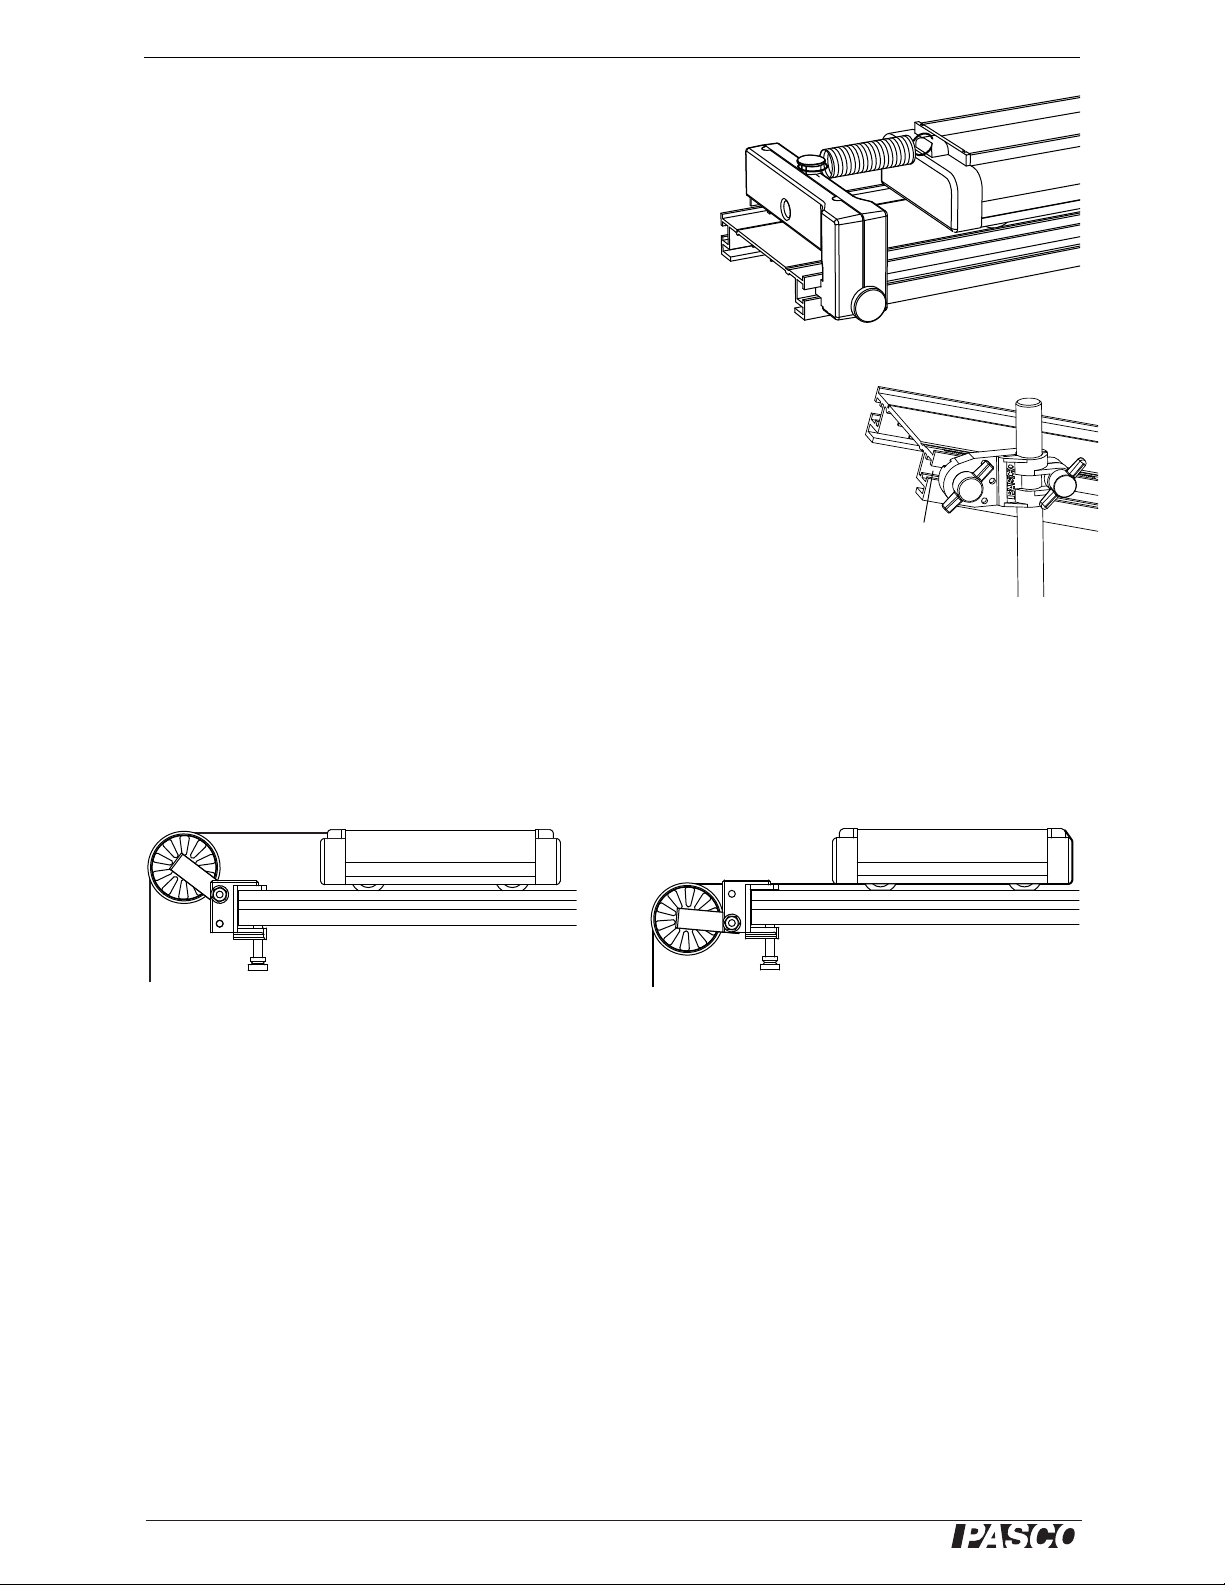
Pivot Clamp (Part of ME-6961.) Attach the pivot clamp to the T-slot of the track
(as illustrated) to elevate one end of the track on a vertical rod.
Super Pulley with Clamp (Part of ME-6961.) This low-friction, low-inertia pulley is designed for clamping onto the end of the track. Tie a string to the hole in the
end of the cart an run it over the pulley. Adjust the height of the pulley to make the
string parallel to the track.
The pulley can also be mounted in the lower position as illustrated. Tie the string to
the opposite end of the cart and wrap it underneath the cart. In the lower position, the
string can be run under an end stop, another cart, or a motion sensor.
Super Pulley with string in normal position (left) and lower position (right)
Spare Parts
You can order any of the major components of the system using the part numbers
listed in the table on page 3. For an assortment of smaller parts, the following kits are
available.
IDS Spares Kit (ME-9823) This kit includes assorted thumbscrews, square nuts,
and harmonic springs.
For help identifying a part, contact PASCO technical support (see page 28).
6
Page 7

®
PAStrack Systems About the Experiments
About the Experiments
These eight experiments can be done with the equipment included in the system and
other equipment commonly found in introductory physics labs. See each experiment
for a specific equipment list.
1. Conservation of Momentum in Explosions (page 8): Demonstrate conservation
of momentum when two carts push off from each other.
2. Conservation of Momentum in Collisions (page 10): Demonstrate conservation of momentum in elastic and inelastic collisions.
3. Simple Harmonic Oscillator (page 12): Study how the period of oscillation of a
system varies with its mass.
4. Oscillations on an Incline (page 15): Study the oscillation of a cart attached to a
spring on an inclined track.
5. Springs in Series and Parallel (page 18): Examine how springs combined in
different ways affect the period of oscillation of a cart.
6. Launch Speed (page 20): Show qualitatively how the final speed of the plunger
cart depends on its mass and the initial compression of the plunger spring.
7. Newton’s Second Law (page 21): Show quantitatively how the acceleration of a
cart is related its mass and net force.
8. Acceleration Down an Incline (page 23): Determine the strength of earth’s
gravity (g) by measuring the acceleration of a cart on an inclined track.
Additional Experiment Suggestions (page 26): Many of these suggestions are variations on the above experiments. Some require additional carts.
7
Page 8

®
PAStrack Systems Experiment 1: Conservation of Momentum in Explosions
pm1v1m2v
2
–0==
v
1
v
2
-----
m
1
m
2
------
=
v
1
v
2
-----
x
1
t
---------
x
2
t
---------
---------------
x
1
x
2
---------
==
x
1
x
2
---------
m
1
m
2
------
=
Experiment 1: Conservation of Momentum in Explosions
Required Equipment from PAStrack System
PA St r a ck
(2) End Stops
(2) PAScars
Cart Masses
Other Required Equipment Suggested Model Number
Mass set ME-9348
Purpose
The purpose of this experiment is to demonstrate conservation of momentum with
two carts pushing away from each other.
Theory
When two carts push away from each other (and there is no net force on the system),
the total momentum is conserved. If the system is initially at rest, the final momentum
of the two carts must be equal in magnitude and opposite in direction to each other so
the resulting total momentum of the system is zero:
Therefore, the ratio of the final speeds of the carts is equal to the ratio of the masses of
the carts.
To simplify this experiment, the starting point for the carts at rest is chosen so that the
two carts will reach the ends of the track simultaneously. The speed, which is the distance divided by the time, can be determined by measuring the distance traveled since
the time traveled by each cart is the same.
Thus the ratio of the distances is equal to the ratio of the masses:
Procedure
1. Level the track. Install one end stop at each end with the magnetic sides facing
away from the carts.
8
Page 9

®
PAStrack Systems Experiment 1: Conservation of Momentum in Explosions
Figure 1.1
2. For each of the cases in Table 1.1, place the two carts against each other with the
plunger of one cart pushed completely in and latched in its maximum position
(see Figure 1.1).
3. Tap the plunger release button with a short stick and watch the two carts move to
the ends of the track. Experiment with different starting positions until the two
carts reach the ends of the track at the same time. Measure the masses of the
carts. Record the masses and the starting position in Table 1.1.
Table 1.1: Results
Additional
Mass on
Cart 1
00
500 g 0
1000 g 0
500 250
Additional
Mass on
Cart 2
m
1
m
2
Starting
Position
x
1
Data Analysis
1. For each of the cases, calculate the distances traveled from the starting position to
the end of the track. Record the result in Table 1.1.
2. Calculate the ratio of the distances traveled and record in the table.
3. Calculate the ratio of the masses and record in the table.
Questions
1. Does the ratio of the distances equal the ratio of the masses in each of the cases?
In other words, is momentum conserved?
x
2
x1/x
2
m2/m
1
2. When carts of unequal masses push away from each other, which cart has more
momentum?
3. When the carts of unequal masses push away from each other, which cart has
more kinetic energy?
4. Is the starting position dependent on which cart has the plunger? Why?
9
Page 10

®
PAStrack Systems Experiment 2: Conservation of Momentum in Collisions
Experiment 2: Conservation of Momentum in Collisions
Required Equipment from PAStrack System
PAStrack
(2) PAScars
Other Required Equipment
Paper (for drawing diagrams)
Purpose
The purpose of this experiment is to qualitatively explore conservation of momentum
for elastic and inelastic collisions.
Theory
When two carts collide with each other, the total momentum of both carts is conserved regardless of the type of collision.
An elastic collision is one in which the carts bounce off each other with no loss of
kinetic energy. In this experiment, magnetic bumpers are used to minimize the energy
losses due to friction during the collision. In reality, this “elastic” collision is slightly
inelastic.
A completely inelastic collision is one in which the carts hit and stick to each other. In
this experiment, this is accomplished with the hook-and-loop bumpers on the carts.
Part I: Elastic Collisions
Figure 2.1
1. Level the track.
2. Orient the two carts on the track so their magnetic bumpers are toward each
other.
3. Test cases A1 through A3 and B1 through B3 described below. Draw two diagrams (one for before the collision and one for after the collision) for each case.
In every diagram, show a velocity vector for each cart with a length that approximately represents the relative speed of the cart.
A. Carts with Equal Mass
Case A1: Place one cart at rest in the middle of the track. Give the other cart an initial
velocity toward the cart at rest.
Case A2: Start the carts with one at each end of the track. Give each cart approximately the same velocity toward each other.
10
Page 11

®
PAStrack Systems Experiment 2: Conservation of Momentum in Collisions
Case A3: Start both carts at one end of the track. Give the first cart a slow velocity
and the second cart a faster velocity so that the second cart catches the first cart.
B. Carts with Unequal Mass
Put two mass bars in one of the carts so that the mass of one cart is approximately
three times the mass (3M) of the other cart (1M).
Case B1: Place the 3M cart at rest in the middle of the track. Give the other cart an
initial velocity toward the cart at rest.
Case B2: Place the 1M cart at rest in the middle of the track. Give the 3M cart an initial velocity toward the cart at rest.
Case B3: Start the carts with one at each end of the track. Give each cart approximately the same velocity toward each other.
Case B4: Start both carts at one end of the track. Give the first cart a slow velocity
and the second cart a faster velocity so that the second cart catches the first cart. Do
this for both cases: with the 1M cart first and then for the 3M cart first.
Part II: Completely Inelastic Collisions
1. Orient the two carts so their hook-and-loop bumpers are toward each other. Push
the plunger in all the way so it will not interfere with the collision.
2. Repeat test cases A1 through A3 and B1 through B3 and draw diagrams for each
case.
Questions
1. When two carts having the same mass and the same speed collide and stick
together, they stop. Is momentum conserved?
2. When two carts having the same mass and the same speed collide and bounce off
of each other elastically, what is the final total momentum of the carts?
11
Page 12

®
PAStrack Systems Experiment 3: Simple Harmonic Oscillator
T 2
m
k
----=
Experiment 3: Simple Harmonic Oscillator
Required Equipment from PAStrack System
PAStrack
(2) End Stops
PAScar
Super Pulley with Clamp
Harmonic Springs (2)
(2) 250 g Cart Masses
Other Required Equipment Suggested Model Number
Mass hanger and mass set ME-9348
Stopwatch ME-1234
Mass balance SE-8723
String (about 2 m)
Graph paper
Purpose
The purpose is to measure the period of oscillation of a spring and mass system and
compare it to the theoretical value.
Theory
For a mass attached to a spring, the theoretical period of oscillation is given by
where T is the time for one complete back-and-forth motion, m is the mass that is
oscillating, and k is the spring constant.
According to Hooke’s Law, the force, F, exerted by the spring is proportional to the
distance, x, by which the spring is compressed or stretched: F = kx, where k is the
spring constant. Thus the spring constant can be experimentally determined by applying different forces to stretch the spring different distances. If force is plotted versus
distance, the slope of the resulting straight line is equal to k.
Procedure
Measurements to Find the Spring Constant and Theoretical Period
1. Measure the mass of the cart and record it in Table 3.1.
2. Level the track.
3. Instal the end stops about 1 m apart.
4. Clamp the pulley at one end of the track.
12
Page 13

®
PAStrack Systems Experiment 3: Simple Harmonic Oscillator
Figure 3.1
5. Set the cart on the track and attach a spring to each end. Attach the other ends of
the springs to the end stops (see Figure 3.1).
6. Tie a string to the end of the cart farther from the pulley. Wrap the string under
the cart; then run it under one end stop and over the pulley as shown in Figure
3.1. Attach the mass hanger to the other end of the string. Adjust the pulley so
that the string runs parallel to the track.
7. Let the mass hang freely and wait for the cart to come to rest. Record the mass of
the hanger and the resting equilibrium position of the cart in Table 3.1.
8. Add mass to the hanger. Record the hanging mass and the new equilibrium position of the cart in Table 3.1. Repeat this for a total of 5 different masses, being
careful not to over-stretch the springs.
Table 3.1: Data and Analysis
Mass of cart = __________
Hanging Mass Position Force
Measuring the Experimental Period
9. Displace the cart from equilibrium and let it go. Time 5 oscillations and record
the time in Table 3.2.
10. Repeat this measurement at 5 times, using the same initial displacement.
11. Add a 500 g mass to the cart and repeat steps 9 and 10.
Calculations
Spring Constant and Theoretical Period
1. Calculate the forces applied by the hanging mass and write them in Table 3.1.
13
Page 14

®
PAStrack Systems Experiment 3: Simple Harmonic Oscillator
2. Using the data in Table 3.1, plot force versus position. Draw the best-fit straight
line through the data points and determine the slope of the line. The slope is equal
to the effective spring constant, k.
k = ______________
3. Using the mass of the cart and the spring constant, calculate the theoretical period
of the cart alone and with added mass.
theoretical period of cart alone ________________
theoretical period of cart with added mass ________________
Experimental Period
1. Using the data in Table 3.2, calculate the average time for 5 oscillations with and
without 500 g of mass added to the cart.
2. Calculate the period by dividing these average times by 5 and record the periods
in Table 3.2.
Table 3.2: Experimental Data
Trial Time for 5
Oscillations
1 period of cart without added mass
2
3
4
5
Average
1 period of cart with 500 g added mass
2
3
4
5
Average
Period
Comparison
Calculate the percent difference between the measured and theoretical values:
cart alone percent difference = ________________
cart with added mass percent difference = ________________
Questions
1. Does the period of oscillation increase or decrease as the mass is increases? Does
a more massive cart oscillate faster or slower?
2. If the initial displacement from equilibrium (the amplitude) is changed, does the
period of oscillation change? Try it.
14
Page 15

®
PAStrack Systems Experiment 4: Oscillations on an Incline
T 2
m
k
----=
q
Figure 4.1: Equipment Setup
Experiment 4: Oscillations on an Incline
Required Equipment from PAStrack System
PA St r a ck
End Stop
PA Sc a r
Pivot Clamp
Harmonic Spring
Other Required Equipment Suggested Model Number
Base and support rod ME-9355
Mass hanger and mass set ME-9348
Stopwatch ME-1234
Mass balance SE-8723
Purpose
In this experiment, you will measure the period of oscillation of a spring and mass
system on an incline at different angles and compare it to the theoretical value.
Theory
For a mass attached to a spring, the theoretical period of oscillation is given by
where T is the time for one complete back-and-forth cycle, m is the mass that is oscillating, and k is the spring constant.
According to Hooke’s Law, the force exerted by the spring is proportional to the distance, x, by which the spring is compressed or stretched, F = kx, where k is the proportionality constant. The spring constant can be experimentally determined by
applying different forces to stretch the spring different distances. When the force is
plotted versus distance, the slope of the resulting straight line is equal to k.
Procedure
Measurements to Find the Spring Constant and Theoretical Period
1. Measure the mass of the cart and record it in Table
4.1.
2. Instal the end stop on the track near one end.
3. Set the cart on the track and attach a spring to one
end. Attach the other end of the spring to an the end
stop (see Figure 4.1).
4. Incline the track by raising the end of the track where the spring attached. As the
end of the track is raised the spring will stretch. Keep the angle of inclination of
the track small enough so the spring is not stretched more than about 50 cm. Use
15
Page 16

®
PAStrack Systems Experiment 4: Oscillations on an Incline
the pivot clamp and support stand to hold the track at this angle. Measure this
angle and record it in Table 4.1.
5. Let the cart hang freely and come to rest. Record the equilibrium position in
Table 4.1.
6. Add mass to the cart and record the new resting position. Repeat this for a total of
5 different masses, being careful not to over-stretch the spring.
Table 4.1: Measurements to Find Theoretical Period
Original Position (without added mass) = __________
Mass of Cart = __________
Angle of Incline = __________
Added Mass Position Force
Measuring the Experimental Period
7. Remove all of the added mass from the cart.
8. Displace the cart from equilibrium a specific distance and let it go. Time 3 oscil-
lations and record the time in Table 4.2.
9. Repeat this measurement at least 5 times, using the same initial displacement.
10. Change the angle of the incline and repeat steps 8 and 9. Follow steps 8 and 9 for
a total of three different angles.
Calculations
Spring Constant and Theoretical Period
1. Using the data in Table 4.1, calculate the force caused by the mass of the cart:
F = mg sin , where is the angle of incline.
2. Plot force versus position. Draw the best-fit straight line through the data points
and determine the slope of the line. The slope is equal to the effective spring constant, k.
k = ______________
3. Using the mass of the cart and the spring constant, calculate the period using the
theoretical formula.
T = ______________
Experimental Period
1. Using the data in Table 4.2, calculate the average time for 3 oscillations.
16
Page 17

®
PAStrack Systems Experiment 4: Oscillations on an Incline
2. Calculate the period by dividing these average values by 3 and record the periods
in Table 4.2.
Table 4.2: Experimental Period
Time for 3 Oscillations
Angle
Questions
1. Does the period vary as the angle is changed?
2. How do the experimental values compare with the theoretical values?
3. Does the equilibrium position change as the angle is changed?
4. What would be the period if the angle was 90°?
Average PeriodTrial 1 Trial 2 Trial 3 Trial 4 Trial 5
17
Page 18

®
PAStrack Systems Experiment 5: Springs in Series and Parallel
T 2
m
k
----=
k
4
2
m
T
2
-------------
=
Experiment 5: Springs in Series and Parallel
Required Equipment from PAStrack System
PA St r a ck
(2) End Stops
PA Sc a r
Pivot Clamp
Harmonic Springs (2)
Other Required Equipment Suggested Model Number
Base and support rod ME-9355
Stopwatch ME-1234
Mass balance SE-8723
Purpose
In this experiment, you will measure and compare the periods of oscillation of a cart
attached to various combinations of springs.
Theory
For a mass attached to a spring, the theoretical period of oscillation is given by
where T is the time for one complete back-and-forth cycle, m is the mass that is oscillating, and k is the spring constant. If the period of oscillation is measured, the spring
constant can be determined by
You will determine spring constant of a spring by measuring the period of oscillation
and mass of a cart attached to the spring. You will use the same method to determine
the effective spring constant of two identical springs combined in series and in parallel. For each type of combination, you will discover the relationship between the
spring constant of the single spring and the effective spring constant of the combination.
Procedure
Measuring the Spring Constant of a Single Spring
1. Measure the mass of the cart. Record this value at the top of Table 5.1.
2. Install the end stop on the track near one end.
3. Set the cart on the track and attach a spring to one end. Attach the other end of the
spring to the end stop (see Figure 5.1).
18
Page 19

®
PAStrack Systems Experiment 5: Springs in Series and Parallel
Figure 5.1: Single spring
Figure 5.2: Springs in series
Figure 5.3: Springs in parallel
Figure 5.4: Springs on opposite ends
4.Incline the track by raising the end where the
spring is attached. As the end of the track is
raised the spring will stretch. Incline the track
by raising the end of the track where the spring
attached. As the end of the track is raised the
spring will stretch. Keep the angle of inclination of the track small enough so the spring is
not stretched more than about 50 cm. Use the
pivot clamp and support stand to hold the track
at this angle.
5.Displace the cart from equilibrium and let it
go. Time 2 oscillations and record the time in
Table 5.1. Repeat this measurement at least 5
times, using the same initial displacement.
Measuring the Effective Spring Constant of Spring Combinations
6.Add a second spring in series as shown in
Figure 5.2 and repeat step 5.
7.Put the two springs in parallel as shown in
Figure 5.3 and repeat step 5.
8.Arrange the springs as shown in Figure 5.4
and repeat step 5.
Calculations
1.Using the data in Table 5.1, calculate the
average time for 2 oscillations.
2.Calculate the period by dividing these times
3. Using the periods and the mass of the cart, calculate the effective spring constants.
Table 5.1: Experimental Period
Time for 2 Oscillations
Springs
Single
Series
Parallel
by 2 and record the periods in Table 5.1.
Average Perio dTrial 1Trial 2Trial 3Trial 4Trial 5
Opposite ends
Questions
1. For which type of combination (series of parallel) is the effective spring constant equal to 2k?
2. For which type of combination (series of parallel) is the effective spring constant equal to k/2?
3. Is the arrangement with springs at opposite ends a series or parallel combination?
19
Page 20

®
PAStrack Systems Experiment 6: Launch Speed
Experiment 6: Launch Speed
Required Equipment from PAStrack System
PA St r a ck
(2) End Stops
PA Sc a r
Pivot Clamp
Cart Masses
Other Required Equipment Suggested Model Number
Mass set ME-9348
Purpose
In this experiment, you will qualitatively demonstrate how the final speed of the
plunger cart depends on its mass and the initial compression of the plunger spring.
Procedure
1. Level the track.
2. Install and end stop at each end of the track.
3. Push the plunger of the cart into the first, second, or third position. Place the cart
on the track with the plunger against one end stop. Tap the trigger button to
launch the cart.
4. Varying Spring Compression: Repeat step 3 three times. Perform the first trial
with the spring plunger cocked to the first possible position (the least compression) and then do two more trials increasing the force applied to the cart by
increasing the compression of the spring plunger.
5. Varying Mass: For these trials, always cock the spring plunger to the maximum.
Observe the relative accelerations of the cart alone and with 250 g, 500g, 750 g,
and 1000 g of added mass.
Questions
1. When does the spring apply force to the cart? When is the net force on the cart
(ignoring friction) zero?
2. Does the final speed of the cart increase or decrease with increasing initial spring
compression?
3. Does the final speed of the cart increase or decrease with increasing cart mass?
20
Page 21

®
PAStrack Systems Experiment 7: Newton’s Second Law
Figure 7.1
a 2dt2=
Experiment 7: Newton’s Second Law
Required Equipment from PAStrack System
PA St r a ck
End Stop
PA Sc a r
Super Pulley with Clamp
(2) 250 g Cart Masses
Other Required Equipment Suggested Model Number
Stopwatch ME-1234
Mass hanger and mass set ME-9348
Mass balance SE-8723
String (about 2 m)
Purpose
In this experiment, you will verify
Newton’s Second Law, F = ma.
Theory
According to Newton’s Second Law, F = ma, where F is the net force acting on the
object of mass m, and a is the resulting acceleration of the object.
For a cart of mass m
hanging mass m
ing mass) is the weight of hanging mass, F = m
on a horizontal track with a string attached over a pulley to a
1
(see Figure 7.1), the net force F on the entire system (cart and hang-
2
g, (assuming that friction is negligi-
2
ble).
According to Newton’s Second Law, this net force should be equal to ma, where m is
the total mass that is being accelerated, which in this case is m
to see if m
g = (m1 + m2)a as predicted by theory.
1
To determine the acceleration, you will release the cart from rest and measure the time
(t) for it to travel a certain distance (d). Since d = (1/2)at
+ m2. You will check
1
2
, the acceleration can be cal-
culated using .
Procedure
1. Level the track.
2. Install the end stop on the track near one end with the magnets facing away from
the track.
3. Measure the mass of the cart and record it in Table 7.1.
4. Attach the pulley and end stop to the track as shown in Figure 7.1. Place the cart
on the track. Tie a string to the end of the cart farther from the pulley. Wrap the
string under the cart. Tie a mass hanger on the other end of the string. Run the
string under the end stop and over the pulley. Adjust the pulley so that the string
runs parallel to the track. The string must be just long enough so the cart reaches
the end stop before the mass hanger reaches the floor.
21
Page 22

®
PAStrack Systems Experiment 7: Newton’s Second Law
5. Pull the cart back until the mass hanger reaches the pulley. Record this initial
release position in Table 7.1. This will be the release position for all the trials.
Make a test run to determine how much mass is required on the mass hanger so
that the cart takes about 2 seconds to complete the run. Because of reaction time,
too short of a total time will cause too much error. However, if the cart moves too
slowly, friction causes too much error. Record the hanging mass in Table 7.1.
6. Place the cart against the end stop on the pulley end of the track and record the
final position of the cart in Table 7.1.
7. Pull the cart back to the initial release position. Release it and time how long it
takes to reach the end stop. Record the time in Table 7.1.
8. Measure the time at least 5 times with the same mass and record these values in
Table 7.1.
Table 7.1: Experimental Period
Initial release position = __________
Final position = __________
Distance traveled (
d) = __________
Cart
Mass
Hanging
Mass
Time
9. Add 500 g of mass to the cart and repeat the procedure.
Data Analysis
1. Calculate the average times and record them in Table 7.1.
2. Record the distance traveled (from initial to final position) in Table 7.1.
3. Calculate the accelerations and record them Table 7.2.
4. For each case, calculate (m
5. For each case, calculate the net force, F
6. For each case, calculate the percent difference between F
record in Table 7.2.
+ m2)a and record in Table 7.2.
1
, and record in Table 7.2.
NET
Table 7.2:
and (m1 + m2)a and
NET
Average
TimeTrial 1 Trial 2 Trial 3 Trial 4 Trial 5
Cart Mass Acceleration
(m1 + m2)aF
= m2g % Difference
NET
Questions
1. Did the results of this experiment verify that F = ma?
2. Why must the mass in F = ma include the hanging mass as well as the mass of
the cart?
22
Page 23

®
PAStrack Systems Experiment 8: Acceleration Down an Incline
mg sin q
mg
q
Figure 8.1
a 2dt2=
q
Experiment 8: Acceleration Down an Incline
Required Equipment from PAStrack System
PA St r a ck
End Stop
PA Sc a r
Pivot Clamp
Other Required Equipment Suggested Model Number
Base and support rod ME-9355
Stopwatch ME-1234
Graph paper
Purpose
In this experiment, you will investigate how the acceleration of a cart rolling down an
inclined track depends on the angle of incline. From you data, you will calculate the
acceleration of an object in free-fall.
Theory
A cart of mass m on an incline will roll down the incline as it is pulled by gravity. The
force of gravity (mg) is straight down as shown in Figure 8.1. The component of that
is parallel to the inclined surface is mg sin .
To determine the acceleration, you will release the cart from rest and measure the time
(t) for it to travel a certain distance (d). Since d = (1/2)at
2
, the acceleration can be cal-
culated using .
A plot of a versus sin will be a straight line with a slope equal to the acceleration of
an object in free-fall, g.
Figure 8.2
Procedure
1. Set up the track as shown in Figure 8.2 with a pivot clamp and support stand. Elevate the end of the track by about 10 cm.
2. Set the cart on the track against the end stop and record this final position in
Table 8.1. (Use the non-magnetic end of the cart so it touches the end stop.)
3. Pull the cart up to the top of the track and record the initial position where the
cart will be released from rest.
23
Page 24

®
PAStrack Systems Experiment 8: Acceleration Down an Incline
4. Release the cart from rest and use the stopwatch to time how long it takes the cart
to reach the end stop. The person who releases the cart should also operate the
stopwatch. Repeat this measurement 10 times (with different people doing the
timing). Record all the values in Table 8.1.
5. Lower the end of the track by 1 cm and repeat step 4. Use the same release position.
6. Repeat step 4 for a total of 7 angles, lowering the end of the track by 1 cm for
each new angle.
Table 8.1: Data
Initial release position = __________
Final position = __________
Distance traveled (
10 cm 9 cm 8 cm 7 cm 6 cm 5 cm 4 cm
Trial 1
Trial 2
Trial 3
d) = __________
Height of Track
Trial 4
Trial 5
Trial 6
Time
Trial 7
Trial 8
Trial 9
Trial 10
Average
Data Analysis
1. Calculate the average time for each angle and record it in Table 8.1.
2. Calculate the distance traveled, d, from the initial to the final position.
3. Use the distance traveled and average time to calculate the acceleration for each
angle and record it in in Table 8.2.
Table 8.2: Analysis
Height Acceleration
sin
24
10 cm
9 cm
8 cm
7 cm
6 cm
5 cm
4 cm
Page 25

®
PAStrack Systems Experiment 8: Acceleration Down an Incline
4. Measure the hypotenuse of the triangle formed by the track and use this to calculate sin for each angle.
Hypotenuse = __________
5. Plot acceleration versus sin . Draw the best-fit straight line and calculate its
slope. Calculate the percent difference between the slope and g = 9.8 m/s
slope = ______________________
% difference = _______________
Questions
1. Does your reaction time in operating the stopwatch cause a greater percentage
error at higher or lower track angles?
2. How will doubling the mass of the cart affect the results? Try it.
2
.
25
Page 26

®
PAStrack Systems Additional Experiment Suggestions
Additional Experiment Suggestions
Oscillation Modes of Two Carts and Three Springs
Place two carts of equal mass on the track. Attach a spring between the carts and connect each cart to their respective ends of the track with springs. Pull the carts away
from each other and release and observe the mode of oscillation. Then displace both
carts in the same direction initially and observe. Add a mass bar to one cart and
repeat.
Newton’s Second Law: Uphill Acceleration
Repeat Experiment 7 with the track inclined so the pulley is on the high end and the
cart accelerates up the incline.
Damped Motion
Incline the track with the end stop at the bottom. Release the cart from a measured
distance up the track. Use the magnetic bumpers in the cart and end stop so the cart
rebounds. On each rebound, when the cart reaches its peak, record the time and position. Make a graph of amplitude versus time.
Rocket Cart with Balloon
Attach an untied inflated balloon to the cart with the neck of the balloon directed out
the back of the cart. Let the air propel the cart.
Oscillation modes of Three Carts and Four Springs
Place three carts of equal mass on the track. Attach springs between the carts and connect the end carts to the ends of the track with springs. Displace the two end carts
away from the middle cart and release and observe the mode of oscillation. Displace
the two carts on the left away from the cart on the right and release and observe the
mode of oscillation. Displace the middle cart and release and observe the mode of
oscillation.
Multiple Elastic Collisions
Use three PAScars. Install a magnetic bumper accessory (from PASCO part
ME-6952) on the middle PAScar so that it can collide elastically with the PAScars on
both sides. Try this experiment with carts of the same mass and then with carts of different masses. Push the left cart into the middle cart, which in turn will collide with
the right cart. Note the resulting final velocities of each cart.
Rocket Staging
Use three or more PAScars to simulate a rocket expelling fuel. Push the plungers in on
each cart and attach the carts together in a line. Use tape to lightly attach the carts to
each other. Position the carts at one end of the track. The lead cart represents the
rocket and the rest of the carts are fuel. Use a meter stick to release the plungers in
succession by striking the plunger-release of each cart, beginning with the last fuel
cart (furthest from the rocket cart). As each plunger is released, each cart will separate
from the rest, one at a time. Note the final speed of the rocket cart compared to its
speed when all the fuel is dumped at once.
26
Page 27

®
PAStrack Systems Additional Experiment Suggestions
Longitudinal Wave
Install magnetic bumper accessories (from PASCO part ME-6952) on six or more
PAScars. Install end stops on the track with the magnetic side toward the center of the
track. Start a longitudinal pulse by displacing one of the carts. The carts will rebound
off each other and the end stops. Oscillate the end cart to keep a longitudinal wave
going down the track.
27
Page 28

®
PAStrack Systems Technical Support
Technical Support
For assistance with any PASCO product, contact PASCO at:
Address: PASCO scientific
10101 Foothills Blvd.
Roseville, CA 95747-7100
Phone: 916-786-3800 (worldwide)
800-772-8700 (U.S.)
Fax: (916) 786-7565
Web: www.pasco.com
Email: support@pasco.com
Limited Warranty
For a description of the product warranty, see the PASCO catalog.
Copyright
The PASCO scientific 012-10393B PAStrack Systems Instruction Manual is copyrighted with all rights reserved. Permission is granted
to non-profit educational institutions for reproduction of any part of this manual, providing the reproductions are used only in their laboratories and classrooms, and are not sold for profit. Reproduction under any other circumstances, without the written consent of
PASCO scientific, is prohibited.
Trademarks
PASCO and PASCO scientific are trademarks or registered trademarks of PASCO scientific, in the United States and/or in other countries. All other brands, products, or service names are or may be trademarks or service marks of, and are used to identify, products or
services of, their respective owners. For more information visit www.pasco.com/legal.
Authors: Ann Hanks
Jon Hanks
Eric Ayars
Alec Ogston
28
 Loading...