

Page 1
USER GUIDE
GUIDE UTILISATEUR
GEBRAUCHSANLEITUNG
GUIDA PER L’UTENTE
GUIA DO USUÁRIO
MANUAL DE USUARIO
GEBRUIKSHANDLEIDING
V1.0 10/2017
B
A
Page 2

Page 3

English ..................................................................... 4
Français .................................................................46
Deutsch .................................................................89
Italiano ................................................................ 132
Español................................................................ 174
Português ............................................................ 216
Nederlands .......................................................... 258
Page 4

4
Your Parrot Bluegrass ™ contains the following elements:
1. A Parrot Bluegrass™ drone;
2. A Parrot Skycontroller 2™ controller. You can y your Parrot
Bluegrass with the Parrot Skycontroller 2 by downloading
the FreeFlight Pro™ app to your smartphone or tablet.
This app is free of charge but might contain In-App
Purchase. It also allows you to calibrate your Parrot
Bluegrass;
3. A Sequoia™ sensor containing:
(a) A multispectral sensor that captures the light reected
by plants; and
(b) A sunshine sunlight sensor that records the intensity of
light emanating from the sun
4. Access to Airinov First+™ services allowing you to obtain
your NDVI and zoning maps from the images captured
by the free Pix4Dcapture™ app to download to your
smartphone or tablet.
Page 5

5
ENGLISH
WARNING
1. Parrot Bluegrass IS NOT A TOY. It should therefore not be used
or handled by children under the age of 14.
2. BEFORE USING Parrot Bluegrass:
(A) CAREFULLY READ this User Guide and all information
and documentation available at www.parrot.com, which may
be updated at any time and without prior notice (hereinafter,
“Parrot Documentation"). SPECIAL ATTENTION should be
given to the paragraphs containing the symbol ;
(B)
ENSURE YOU ARE AWARE OF THE APPLICABLE
REGULATIONS FOR THE USE OF DRONES AND THEIR
ACCESSORIES (hereinafter, referred to as "Applicable
Regulations"); and
(c) KEEP IN MIND that Parrot Bluegrass is prone to expose
others and yourself to PROPERTY DAMAGE AND/OR BODILY
HARM and may even lead to severe, or even fatal injuries.
3. Please note that the videos and photos used in publicity
and advertising campaigns by Parrot Drones SAS and its
subsidiaries have been created by and with professionals and
experienced pilots. PLEASE CONTINUOUSLY REFER TO THE
LATEST UPDATES TO PARROT DOCUMENTATION IN CASE
OF DOUBT CONCERNING THE USE OF YOUR PARROT
BLUEGRASS AND ITS ACCESSORIES.
4. WITHIN THE LIMITS OF APPLICABLE LAW, PARROT DRONES
SAS, ITS SUBSIDIARIES AND THEIR DISTRIBUTORS AND
RESPECTIVE RETAILERS WILL NOT BE HELD RESPONSIBLE
FOR ANY INJURY RESULTING FROM OR IN RELATION TO
THE NON-RESPECT OF PARROT DOCUMENTATION OR
APPLICABLE REGULATIONS BY YOURSELF OR BY ANY
PERSON USING YOUR PARROT BLUEGRASS.
Page 6
6
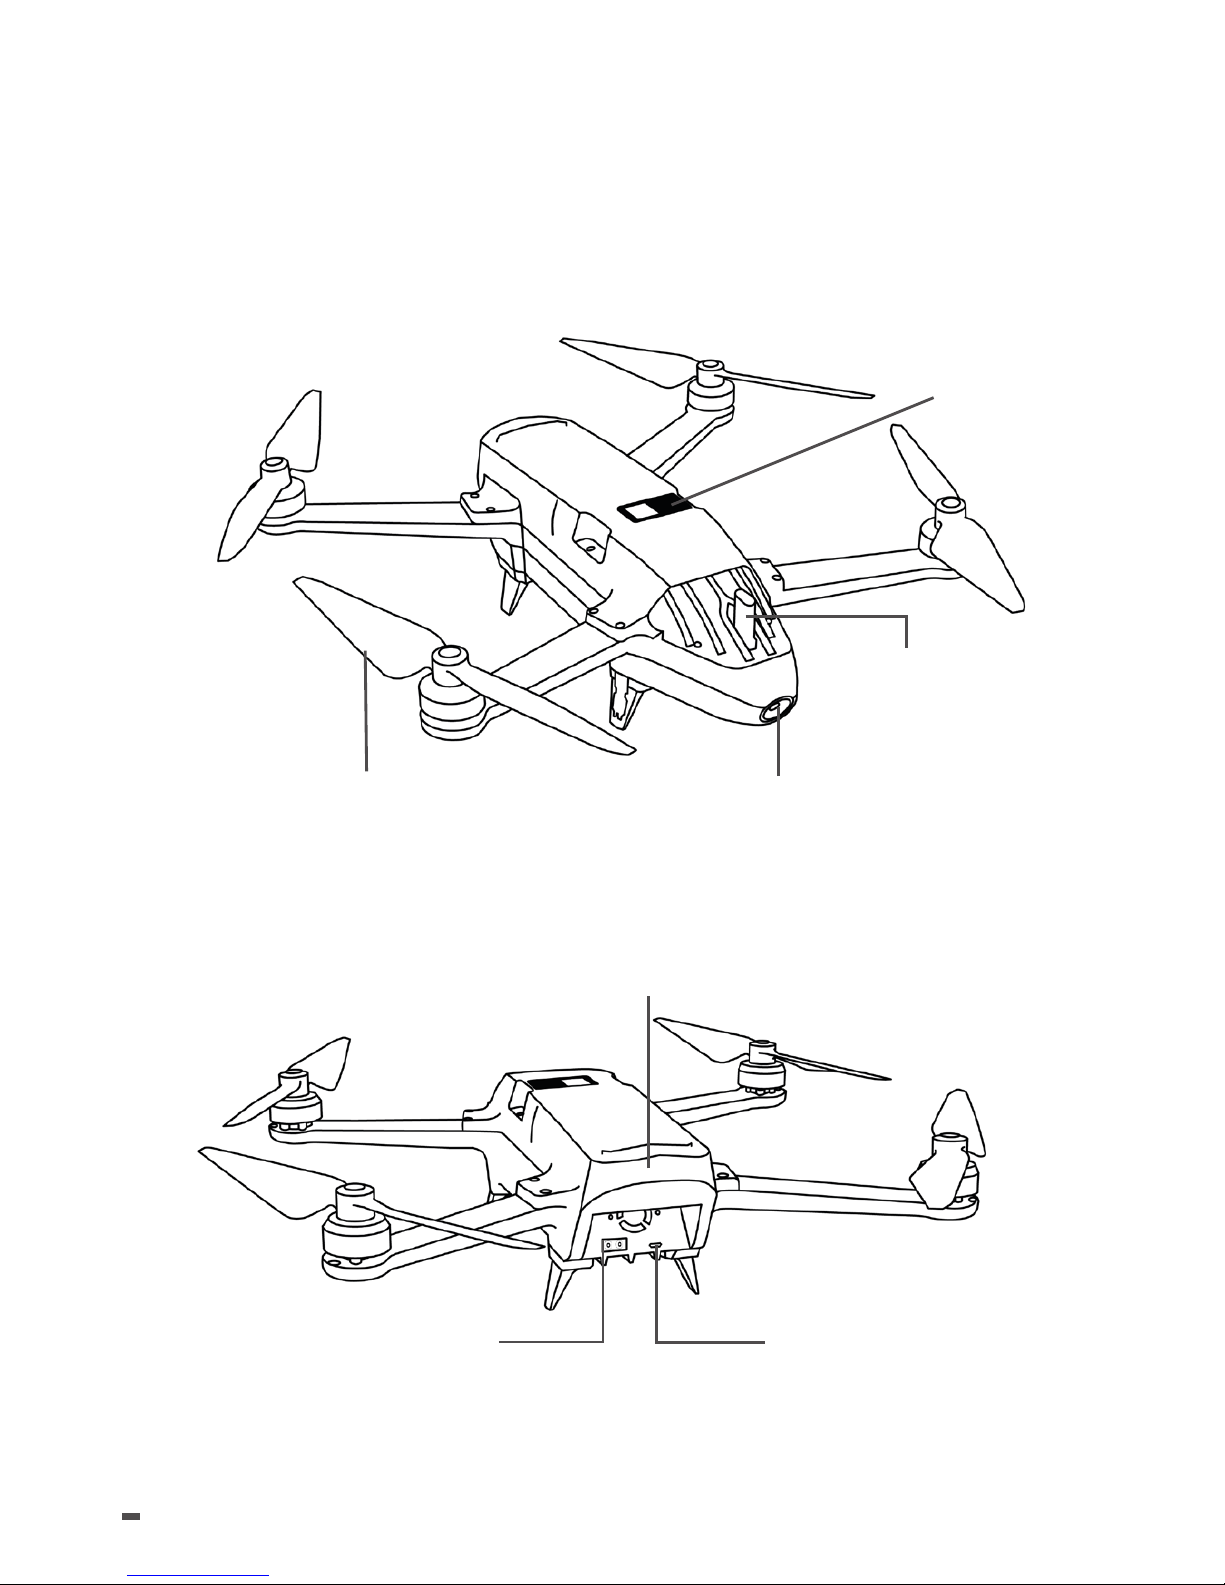
PARROT BLUEGRASS
PRESENTATION
Threaded propeller
Fisheye Camera
ON/OFF button
and
indicator light
Sunshine
Sensor
Battery Compartment
Battery Connector
Micro-USB Port
Page 7
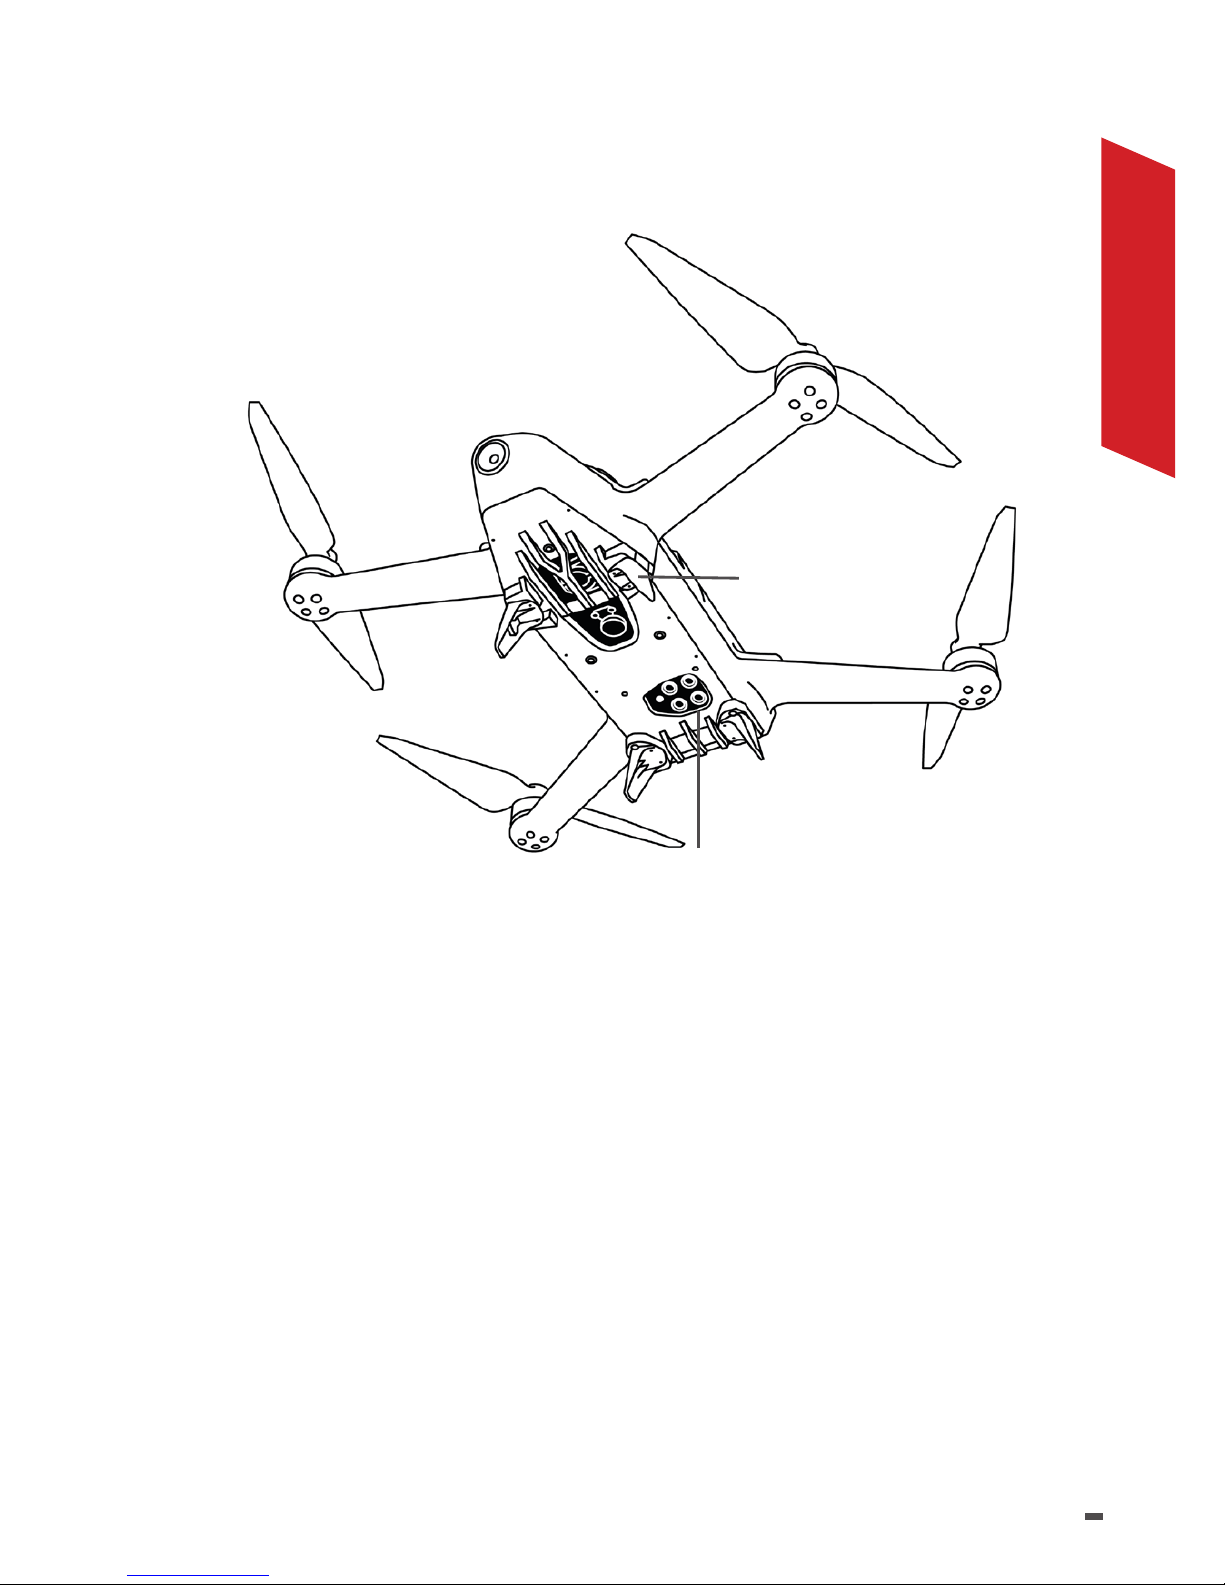
7
ENGLISH
Base and
Antenna
Multispectral
Sensor
Page 8
8
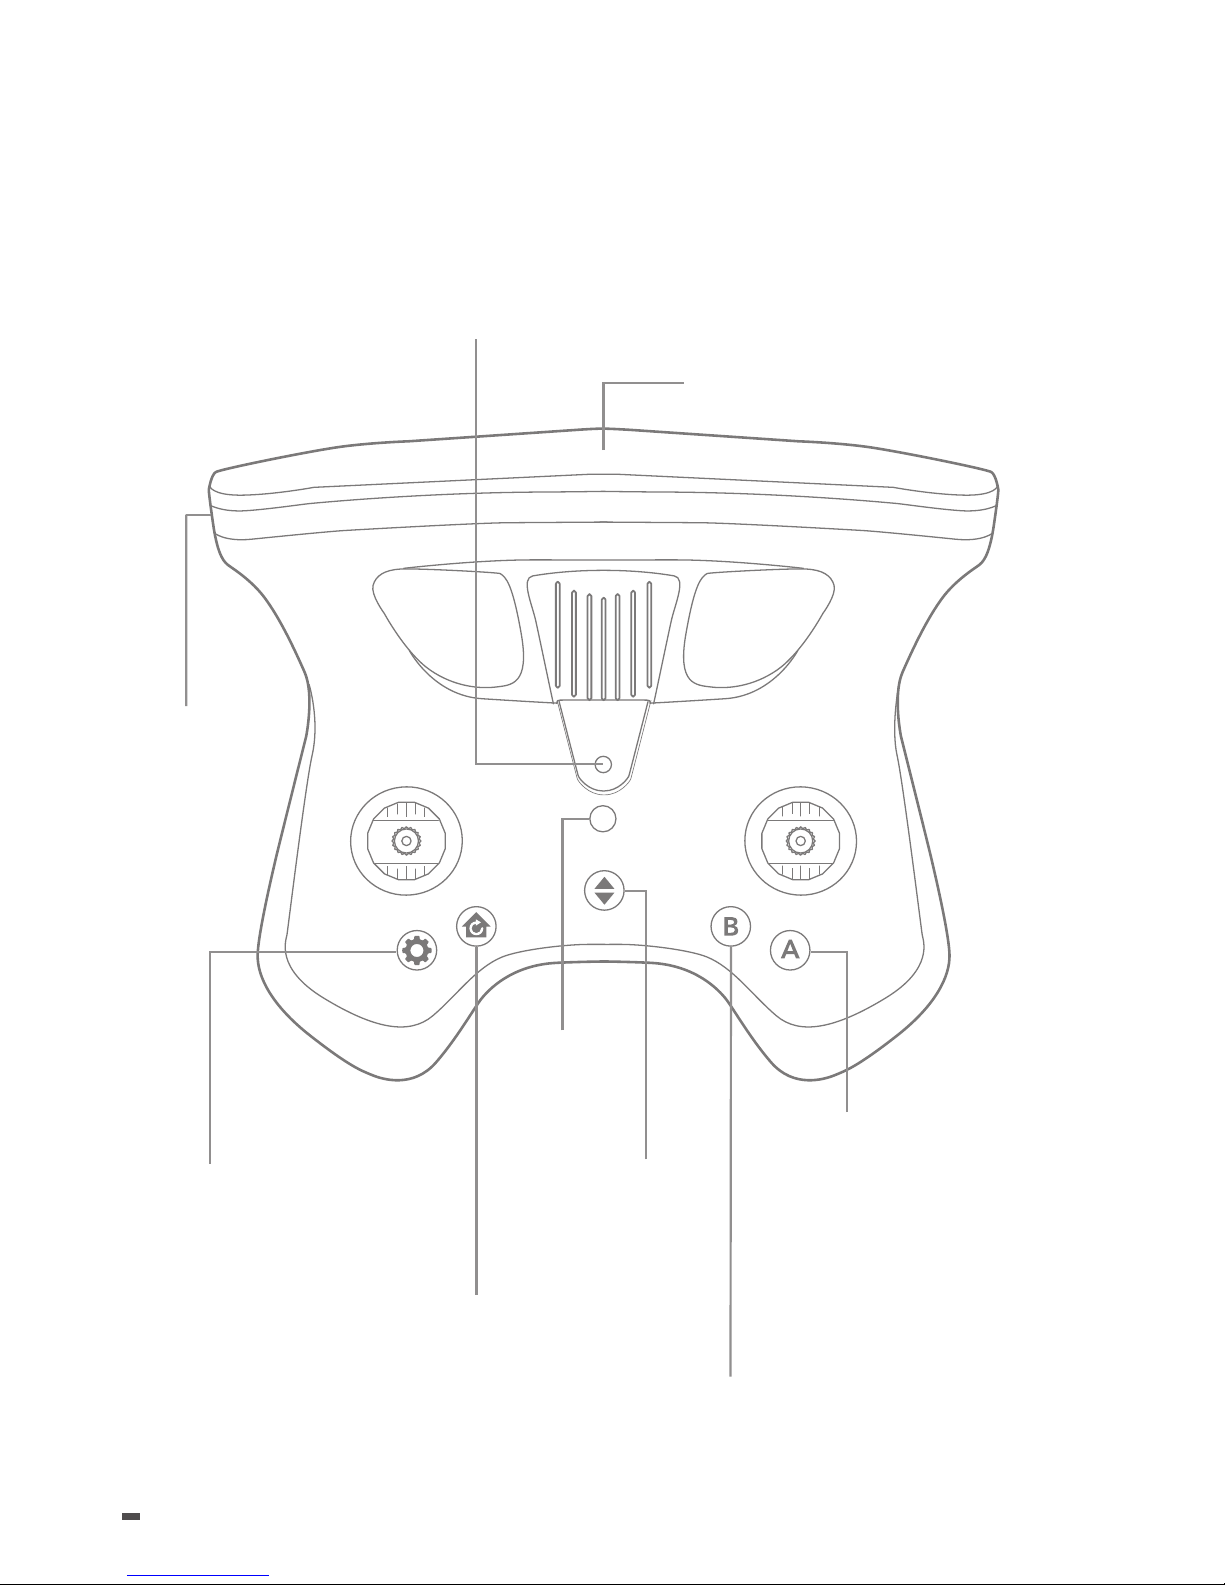
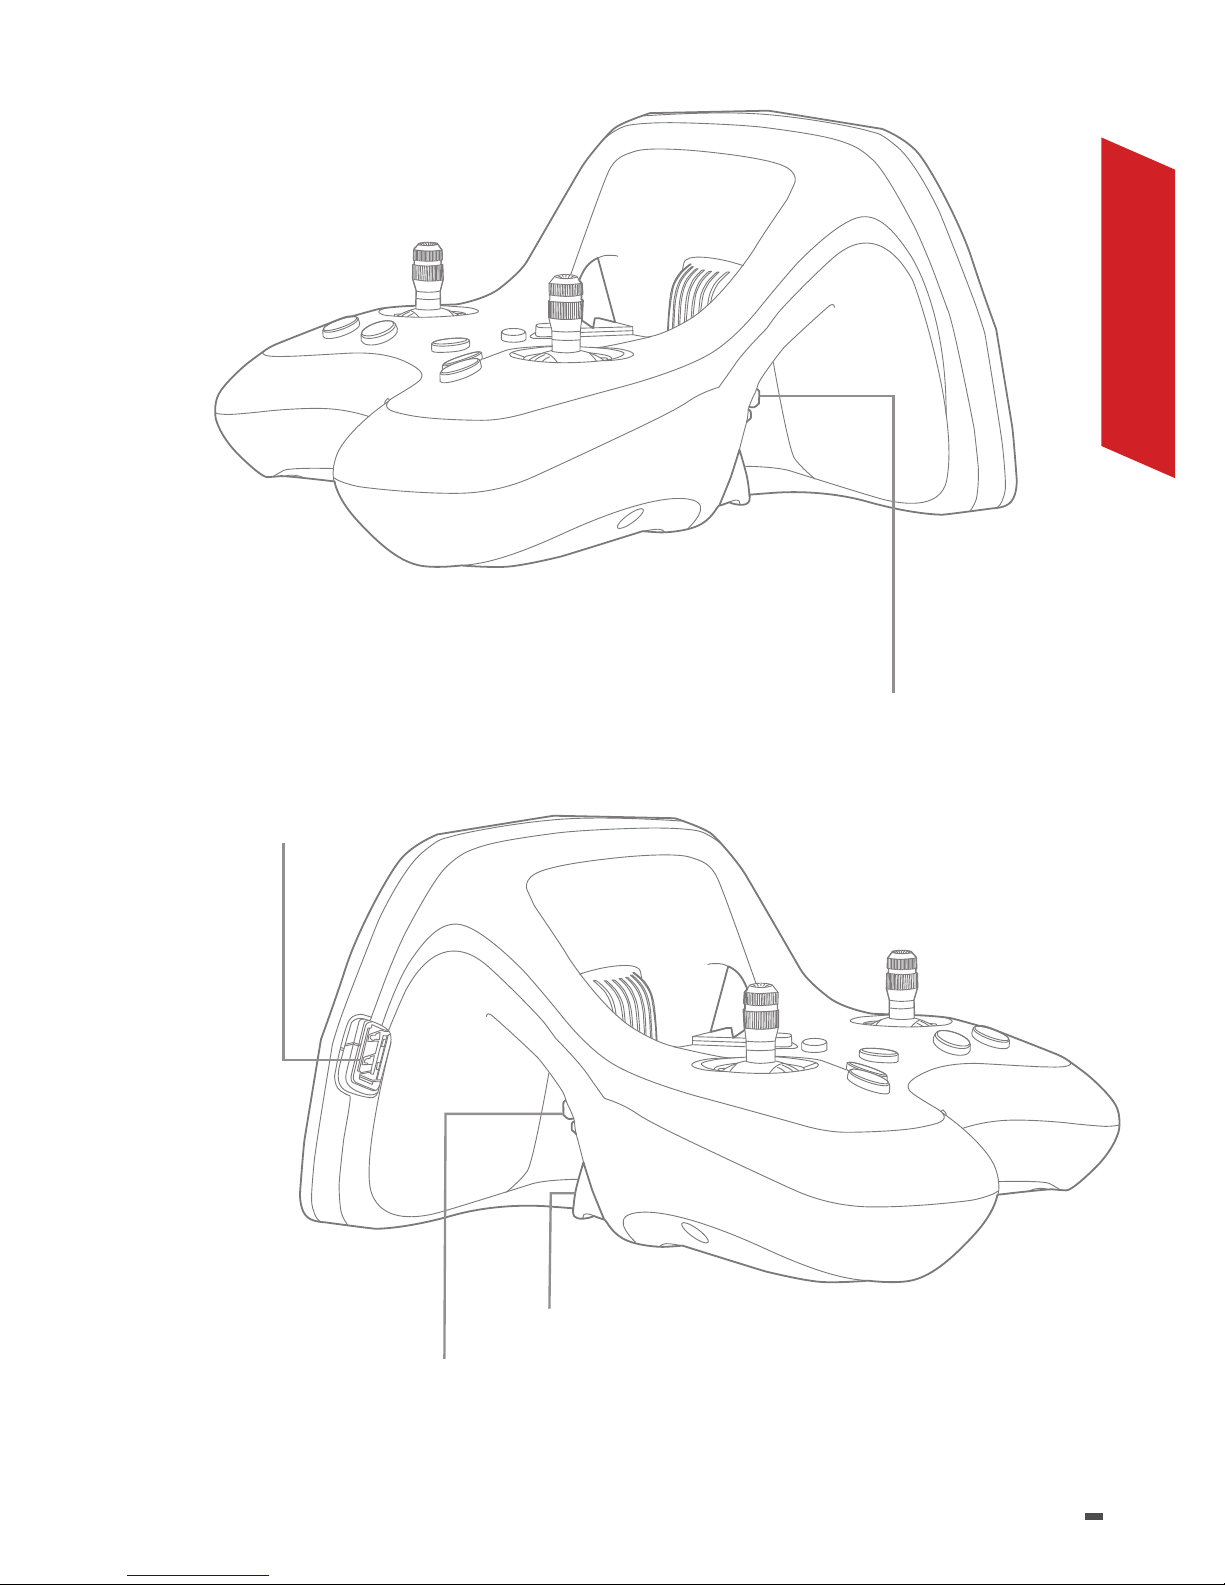
PARROT SKYCONTROLLER 2
PRESENTATION
Antenna
Position of mobile device holder
On/Off
Button
Return to take-off point
Take off/Land
In ight: start/stop video recording
Settings menu: return
In ight:take a photo
Settings
menu:validate
Settings
USB Port
Page 9
9
ENGLISH
Camera Exposure
Display mode
Vertical orientation of the camera
USB Port
Page 10

10
SEQUOIA PRESENTATION
Sequoia is made up of a multispectral sensor and a
sunshine irradiance integrated into Parrot Bluegrass.
Sequoia is a multispectral sensor specically for farming.
Its design was created according to three principal
criteria: excellent precision, minimal size and weight,
optimal ease of use. The Sequoia sensor is designed to
be suitable for all types of drones, those with xed wings
and multi-rotors and mounted on gimbals or not. Its
use allows the capture of images of agricultural plots in
several spectral bands measuring the state of vegetation:
green (550 nm wavelength, 40 nm bandwidth), red (660
nm wavelength, 40 nm bandwidth), red-edge (735 nm
wavelength, 10 nm bandwidth) and near InfraRed (790 nm
wavelength, 40 nm bandwidth).
The photos taken can then be analysed using various
software. They can be used to make indexed maps (NDVI,
NDRE, etc.) and make recommendations regarding
nitrogen fertilisation.
Page 11
11
ENGLISH
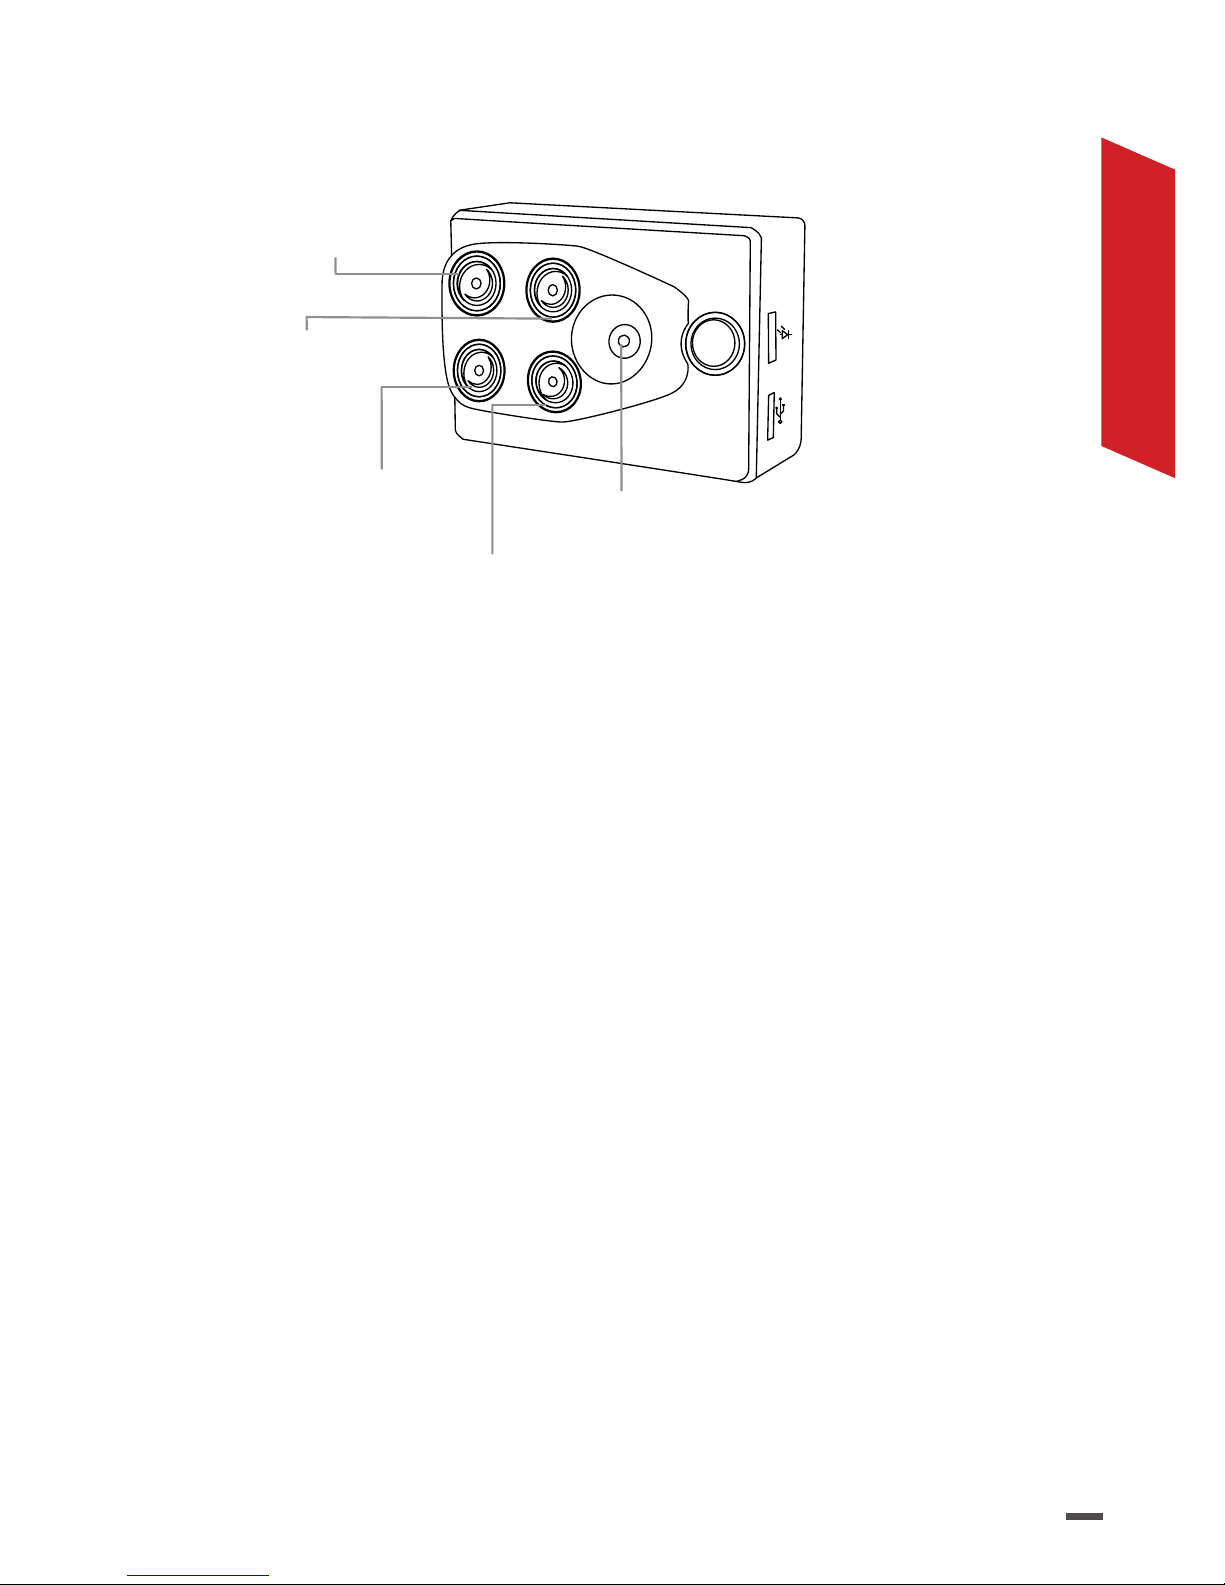
MULTISPECTRAL SENSOR
Near InfraRed
Sensor
Red Sensor
Red-Edge
Sensor
Green
Sensor
RGB Sensor
1.2 megapixel monochrome sensors collect data in
discrete spectral bands.
16 megapixel RGB photo sensor rolling shutter.
Other multispectral sensor features:
• Inertial measurement unit.
• 64 GB internal memory.
• Magnetometer.
Page 12
12
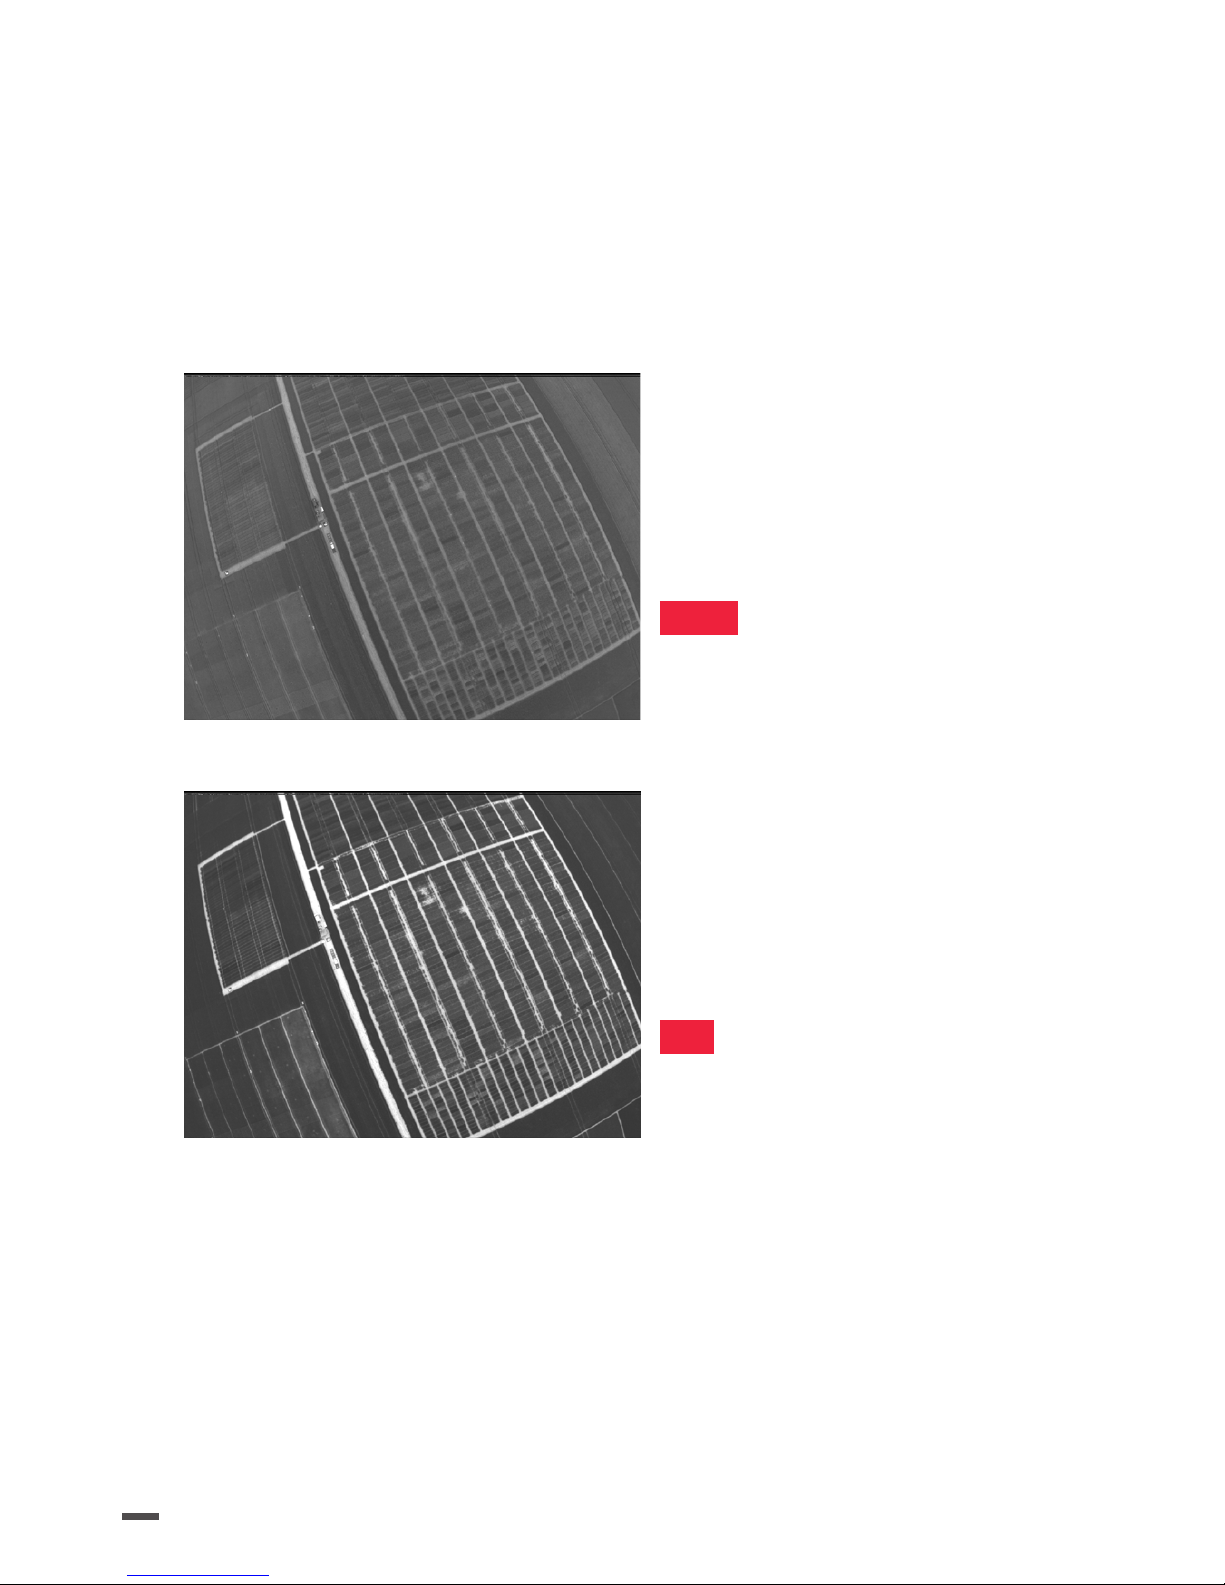
Green
550 nm wavelength, 40
nm bandwidth
Denition: 1.2 Mpx
Red
660 nm wavelength, 40
nm bandwidth
Denition: 1.2 Mpx
Page 13
13
ENGLISH
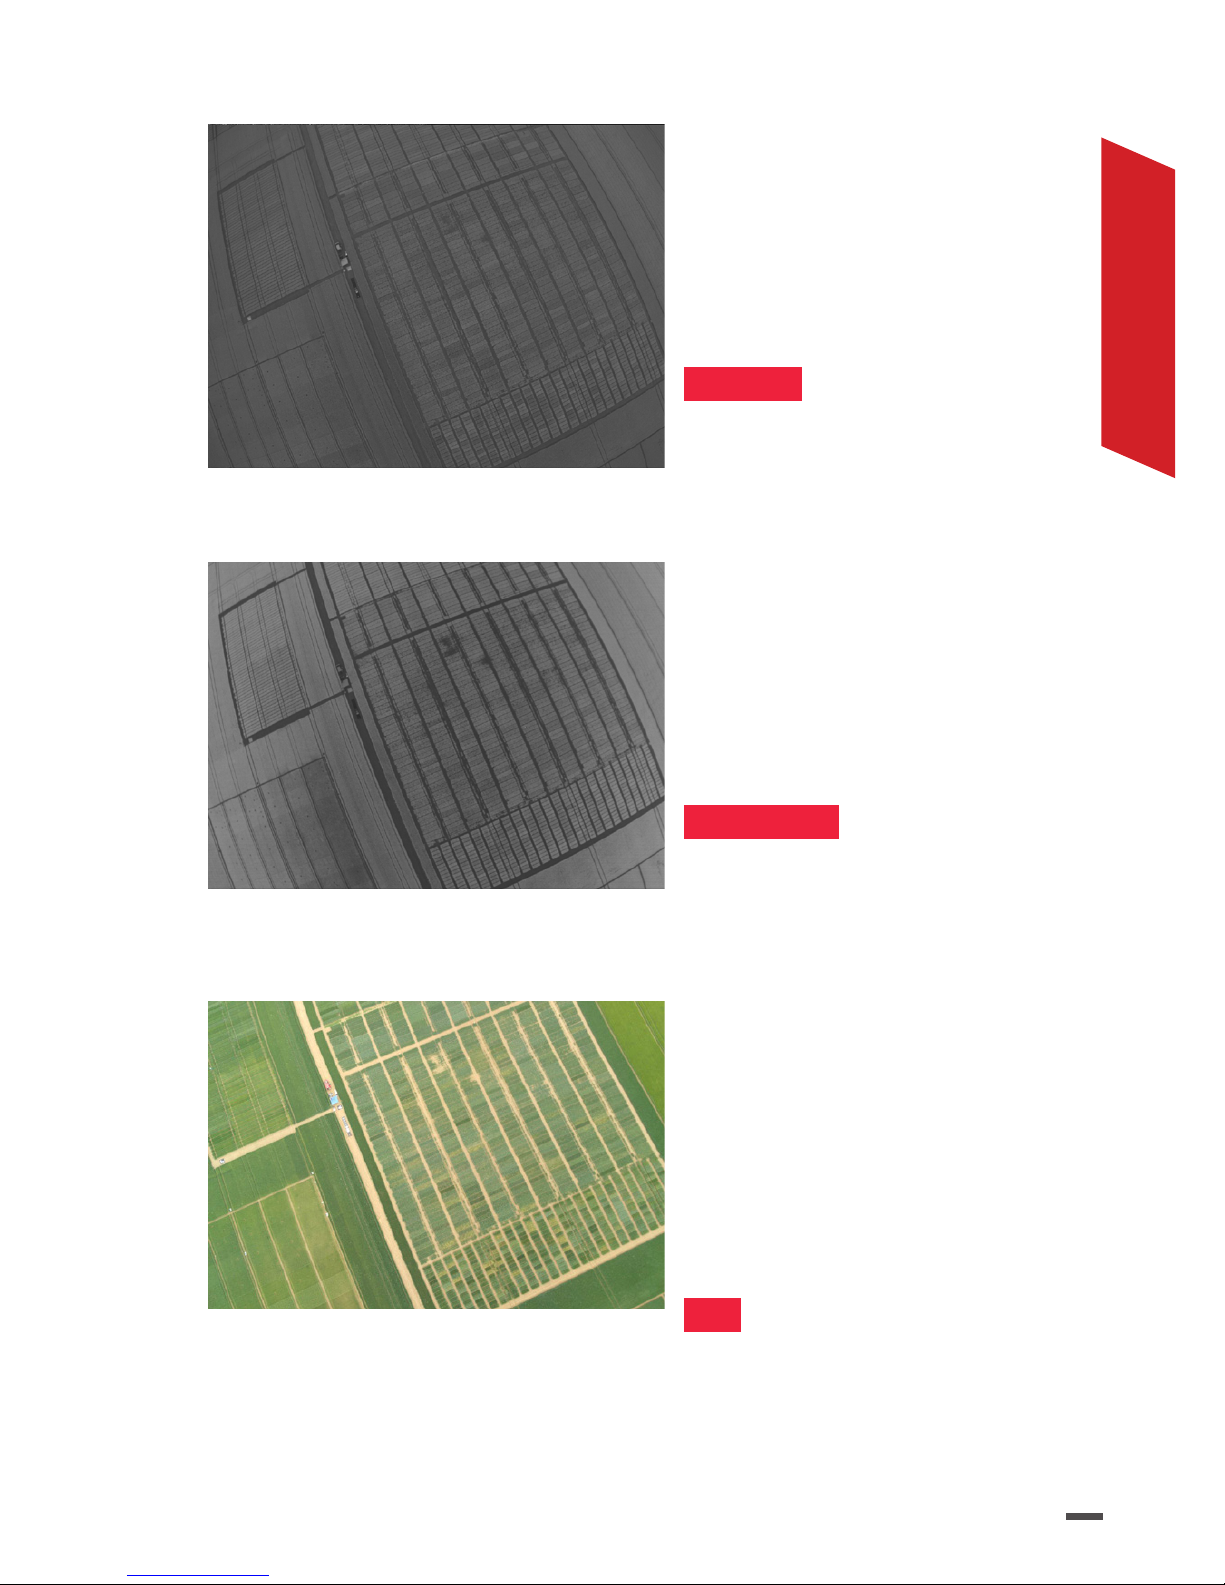
Red-edge
735 nm wavelength, 10
nm bandwidth
Denition: 1.2 Mpx
Near infrared
790 nm wavelength, 40
nm bandwidth
Denition: 1.2 Mpx
RGB
Denition: 16Mpx
Page 14
14
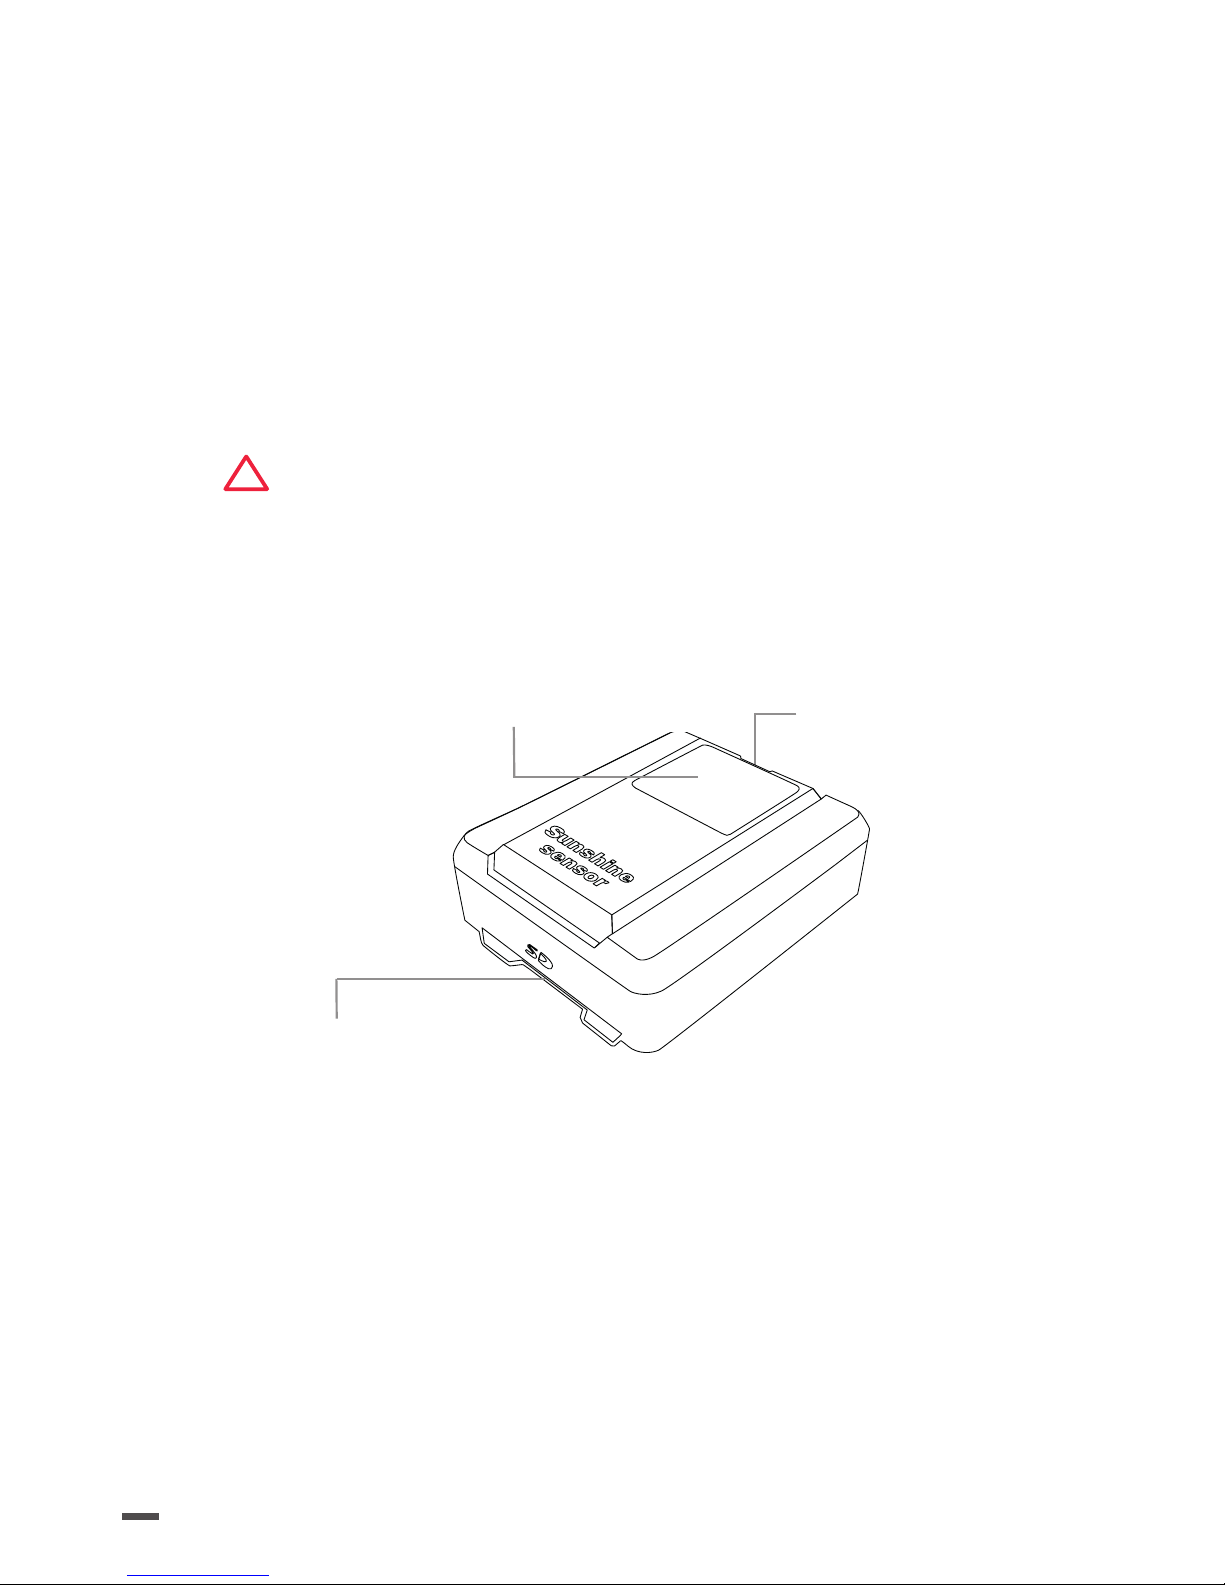
SUNSHINE SENSOR
The sunshine sensor is used to calibrate the images
depending on the sunlight. This makes it possible to
compare photos over time, despite variations in light
during shoots. The sunshine sensor is attached to the
upper part of the drone, facing the sky. During ights the
sunshine sensor is powered by the multispectral sensor.
!
It is recommended to use the SD card provided
with Sequoia. Technical performances are not
guaranteed with other SD cards.Refer to the list
of compatible SD cards on www.parrot.com/support.
Indicator light:
reference for
calibration
Position of the SD
card
Ambient light sensors
4 ambient light sensors. These sensors are tted with
band-pass lters identical to those on the multispectral
sensor.
Other sunshine sensor features:
• Inertial measurement unit.
• Magnetometer.
Page 15

15
ENGLISH
PREFLIGHT CHECKS
REGULATIONS
• Parrot Bluegrass must be used strictly in compliance
with current local regulations. The places where it is
used must be suitable for manoeuvring in order to
ensure the continuous safety of people, animals and
property.
• It may not be permitted to use Parrot Bluegrass in
certain public places (e.g. train stations, airports,
etc.) or on public roads.
• The pilot must, at all times, maintain visual contact
with Parrot Bluegrass and control its trajectory.
• Before you y your Parrot Bluegrass, check the
restrictions regarding the use of Wi-Fi frequencies
in the place where you are going to y it. Certain
frequencies may be restricted or prohibited. For
instance, in some countries the use of the 5 GHz
band for your Wi-Fi may be prohibited for outdoor
locations.
FLIGHT CONDITIONS
• Do not y Parrot Bluegrass at night.
• Check the weather conditions to ensure good ight
and visual conditions. Do not use Parrot Bluegrass
if it is raining/snowing, if there is fog, or winds in
excess of 8 meters per second or 30 km/hr.
• Do not y the drone over water.
• Make sure you have at least 10 meters in diameter of
clear space for your Parrot Bluegrass to take o and
Page 16

16
land. Check that the ight area has no obstacle that
might interfere with ight phases or prevent visual
contact.
• Make sure the ight altitude programmed in
Pix4Dcapture (entered in relation to take o point)
is sucient to avoid obstacles in the surrounding
area.
PARROT BLUEGRASS
• Make sure that Parrot Bluegrass has detected the
GPS signal in FreeFlight Pro or Pix4Dcapture.
• Make sure the Parrot Bluegrass propellers are
properly mounted and secured.
• Make sure the Parrot Bluegrass battery is charged.
• Make sure you are in a wide, open space.
• Make sure that the selected geobarrier distance
is sucient for the execution of the ight plan on
Pix4Dcapture.
SEQUOIA
• Make sure that the lenses are clean. Use the
microbre cloth (supplied) to clean them.
• Free up enough memory (on the SD card or in the
multispectral sensor internal memory) so you can
save all the photos taken during the ight.
• Make sure that the two sensors are calibrated. For
more information, see the Calibrating Sequoia
section.
Page 17

17
ENGLISH
DOWNLOADING THE
APPS
Connect to App Store® or Google Play
TM
and download
the free Pix4Dcapture and FreeFlight Pro apps.
FreeFlight Pro is Parrot’s ocial app enabling free drone
ying and drone calibration.
Pix4Dcapture is the free app for generating ight plans to
capture photos over an area o nterest.
CHARGING THE BATTERY OF
PARROT BLUEGRASS
The battery must be disconnected from Parrot
Bluegrass.
1. Select the plug provided for your country and insert
it into the charger.
2. Connect the cable to the charger.
3. Connect the battery to the charger's cable, and
then plug the charger into the mains.
The warning light is red while charging and then turns
green when the battery is charged.
The charge time is about 2 hours and 30 minutes for a
ight time of about 25 minutes.
Page 18

18
CHARGING THE PARROT
SKYCONTROLLER 2 BATTERY
1. Select the adapter appropriate for your country and
attach it to the charger.
2. Connect the charger cable to Parrot Skycontroller
2, then plug the charger into the mains.
Page 19
19
ENGLISH
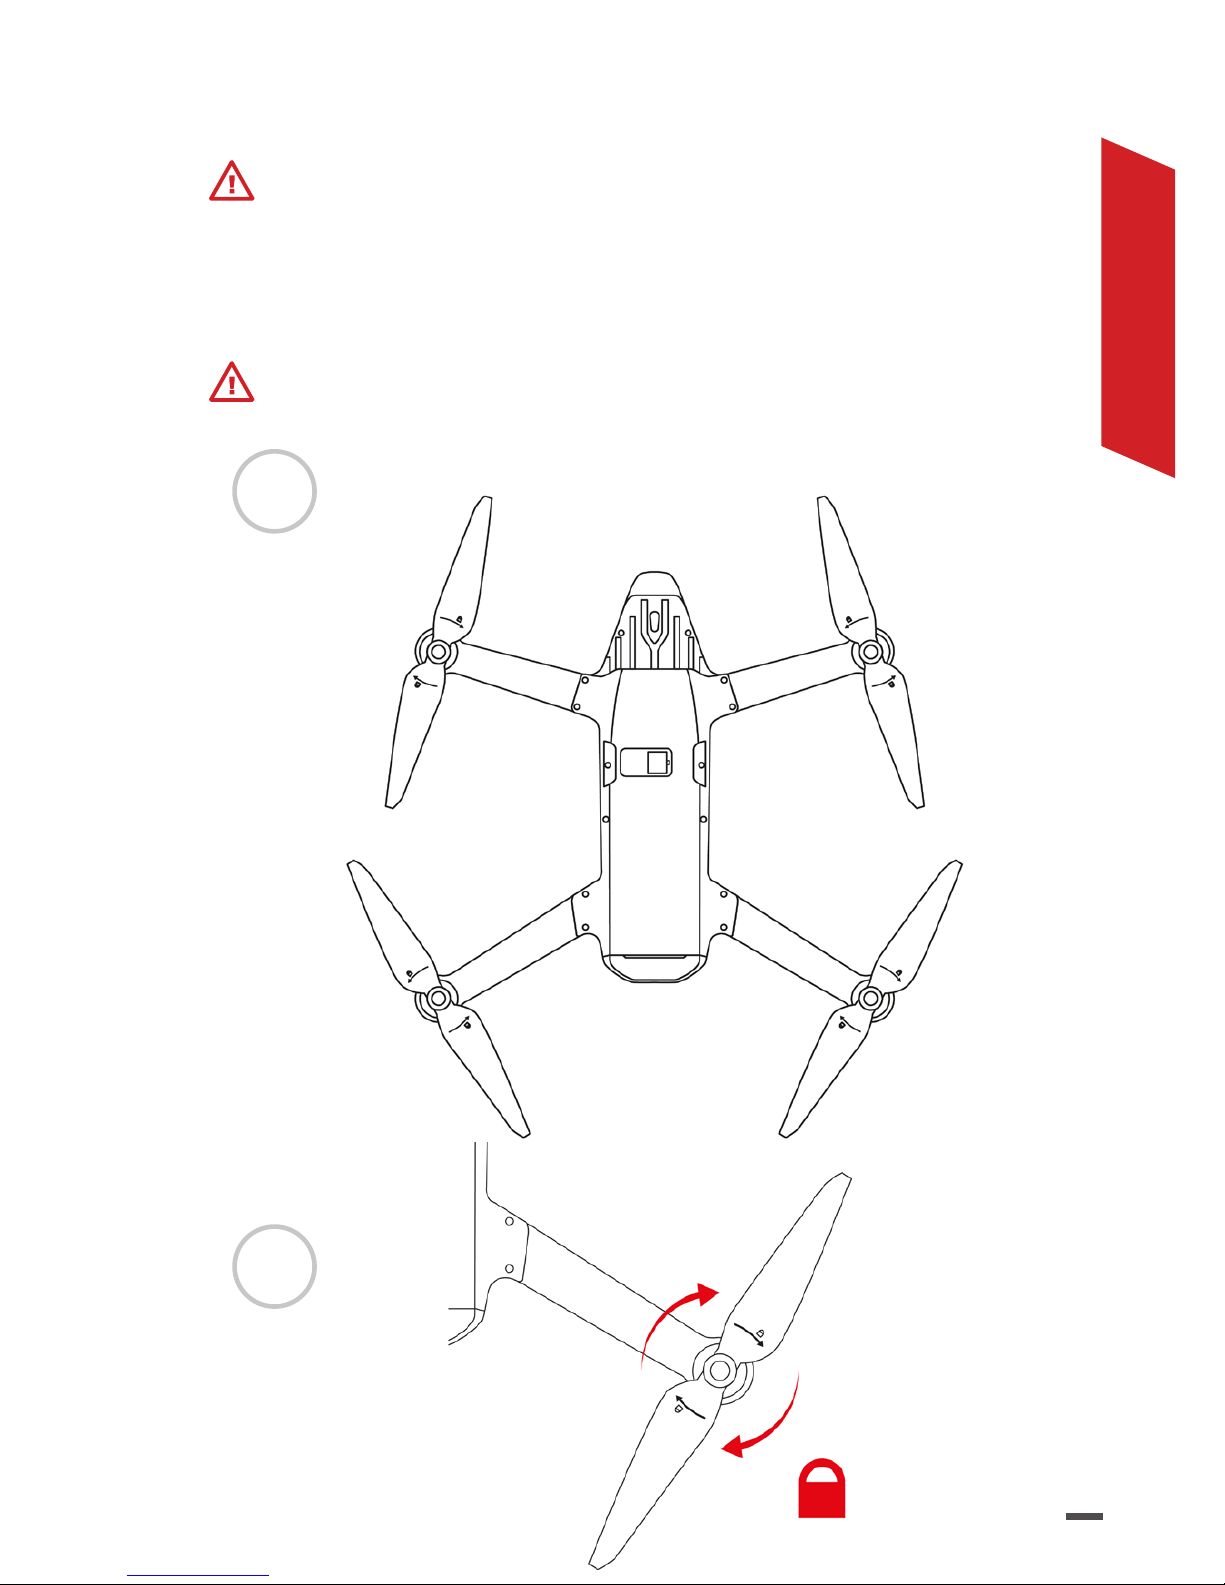
INSTALLING THE PROPELLERS
When the drone is turned o, screw the threaded
propellers onto the Parrot Bluegrass motors, holding
still the base of the engine. The threading serves as
coding for the positioning of the propellers on the arms
of the drone (scheme B).
Ensure that the propellers are correctly screwed on
before take o.
A
B
Page 20
20
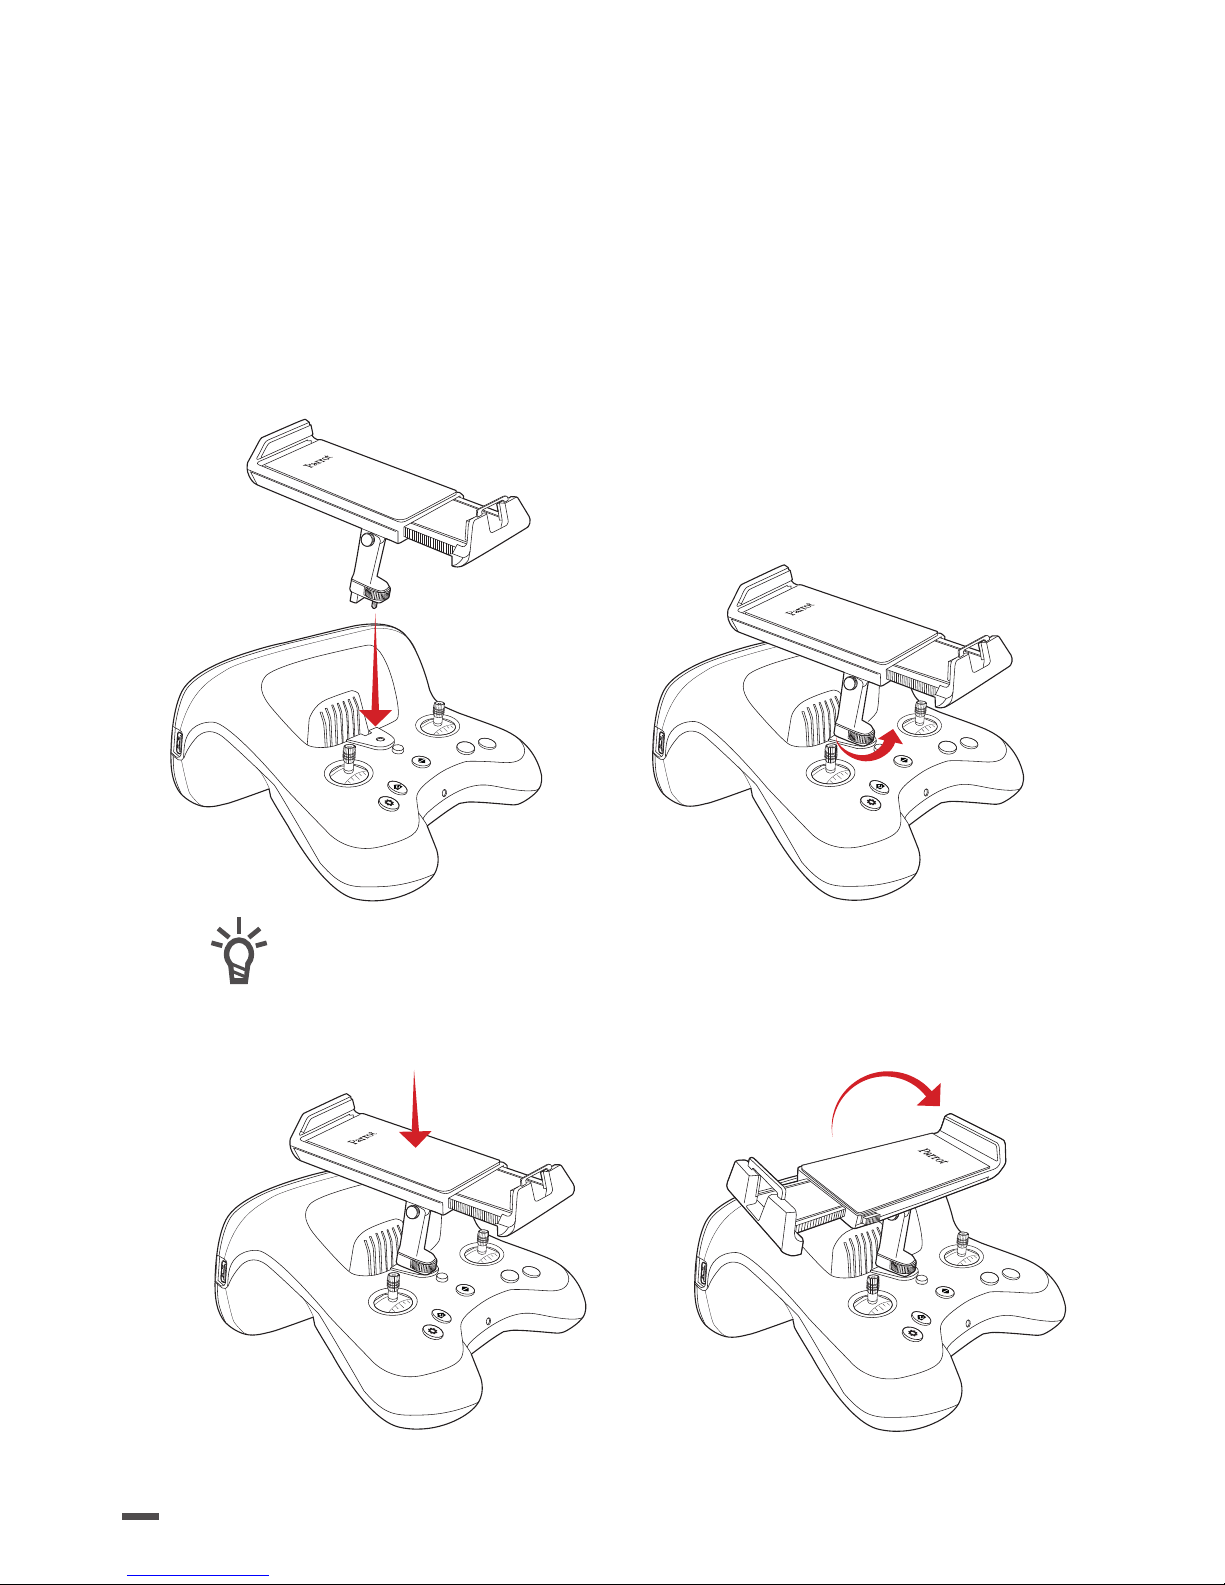
CONNECT YOUR SMARTPHONE
OR TABLET TO PARROT
SKYCONTROLLER 2
1. Screw the mobile device holder onto Parrot
Skycontroller 2.
B
A
B
A
You can rotate the holder to t your
smartphone's dimensions. To do this, press
on it and rotate it to the right.
B
A
B
A
Page 21
21
ENGLISH
2. Press the right side of the holder to fully open it.
3. Position your smartphone or tablet on the holder.
B
A
B
A
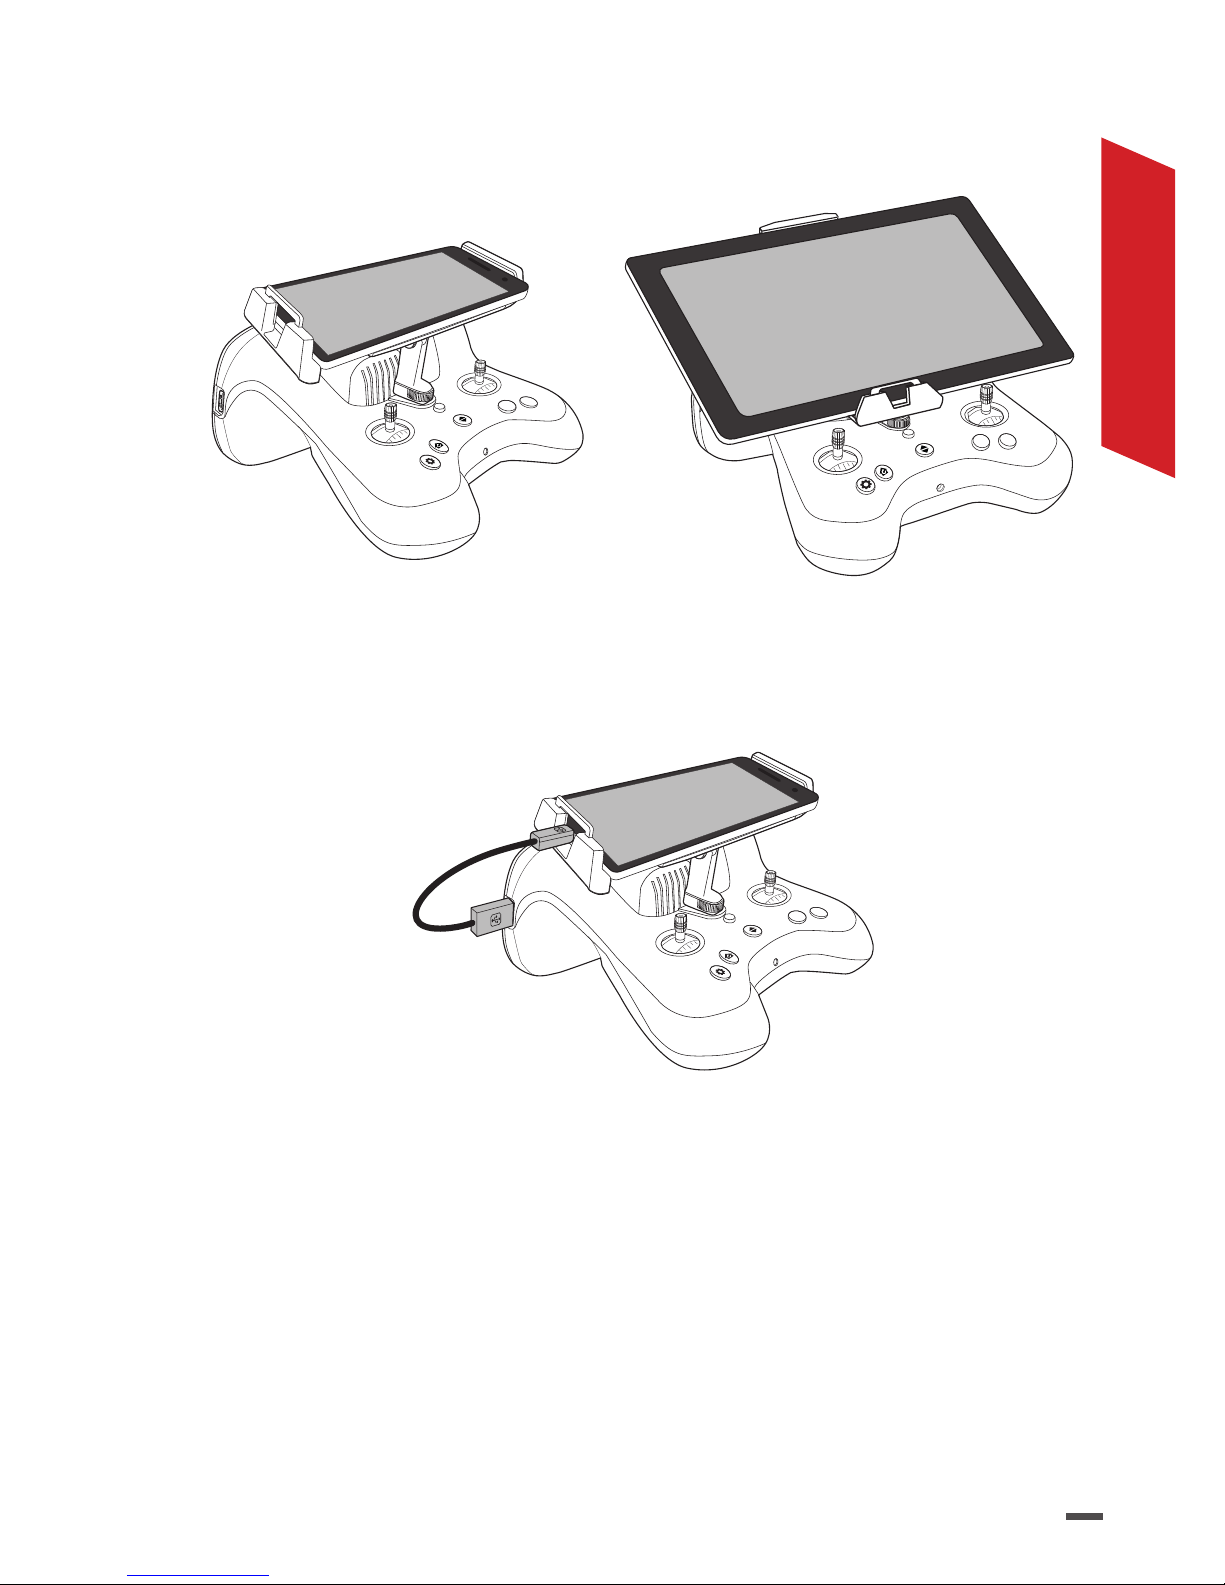
4. Tighten the holder on your smartphone or tablet.
5. Using your smartphone or tablet's USB cable, connect
your device to the Parrot Skycontroller 2's USB port.
B
A
Page 22

22
CONNECT THE
DRONE TO PARROT
SKYCONTROLLER 2
1. Place Parrot Bluegrass on a at surface.
2. Turn on your Parrot Bluegrass.
3. Press the Parrot Skycontroller 2 ON/OFF button to
turn it on.
4. Wait patiently until the Parrot Skycontroller 2 indicator
light is steady green.
> You are connected to Parrot Bluegrass, advance to
drone calibration and Wi-Fi® settings.
> Warning the geobarrier on FreeFlight Pro limits the
distancing of the drone when this option is activated:
set a geobarrier distance slightly larger than the ight
zone.
CALIBRATE THE DRONE
It is recommended to calibrate the drone before each
ight using the FreeFlight Pro app.
If the app displays a window requesting drone
calibration, follow the steps shown on the screen.
You can also calibrate the drone manually:
1. Select Parrot Bluegrass in the Freeight Pro app.
2. Press the Calibration button on the information page
on the drone.
3. Follow the on-screen animation.
> The animation disappears when calibration is com-
pleted; you can then start the ight plan on Pix4Dcapture.
Page 23

23
ENGLISH
WIFI SETTINGS
1. Connect the drone using FreeFlight Pro.
2. Select Fly & Film.
3. Tap the Settings button.
4. Selection Country and press the Exterior button.
The settings are complete. It will be unnecessary to
repeat this step.
CALIBRATING SEQUOIA
Calibration of the magnetometer
The multispectral sensor ashes purple when a
calibration is required.
1. Turn the drone on the Z axis (yaw - green on the
scheme) until the multispectral sensor indicator light
ashes green.
2. Turn the drone on the Y axis (pitch - red on the
scheme) until the multispectral sensor indicator light
ashes blue.
3. Turn the drone on the X axis (roll - blue on the
scheme) until the multispectral sensor indicator light
changes colour.
> NB: Once the calibration is complete the colour of
the multispectral sensor light varies depending on
Sequoia's status. For example, if the multispectral
sensor memory is full, the indicator light will ash
yellow.
Page 24

24
USE THE INTERNAL SEQUOIA
MEMORY
If Sequoia detects an SD card, the shots are saved on this
SD card. If no SD card is detected, Sequoia automatically
saves the shots in its internal memory of the multispectral
sensor.
Page 25
25
ENGLISH
CREATING A FLIGHT
PLAN
It is recommended to create a ight plan on Pix4Dcapture
before arriving at the ight site.
> At the rst launch of the Pix4Dcapture app, choose
the Parrot Bluegrass from the list of drones,
and then proceed to editing the ight plan.
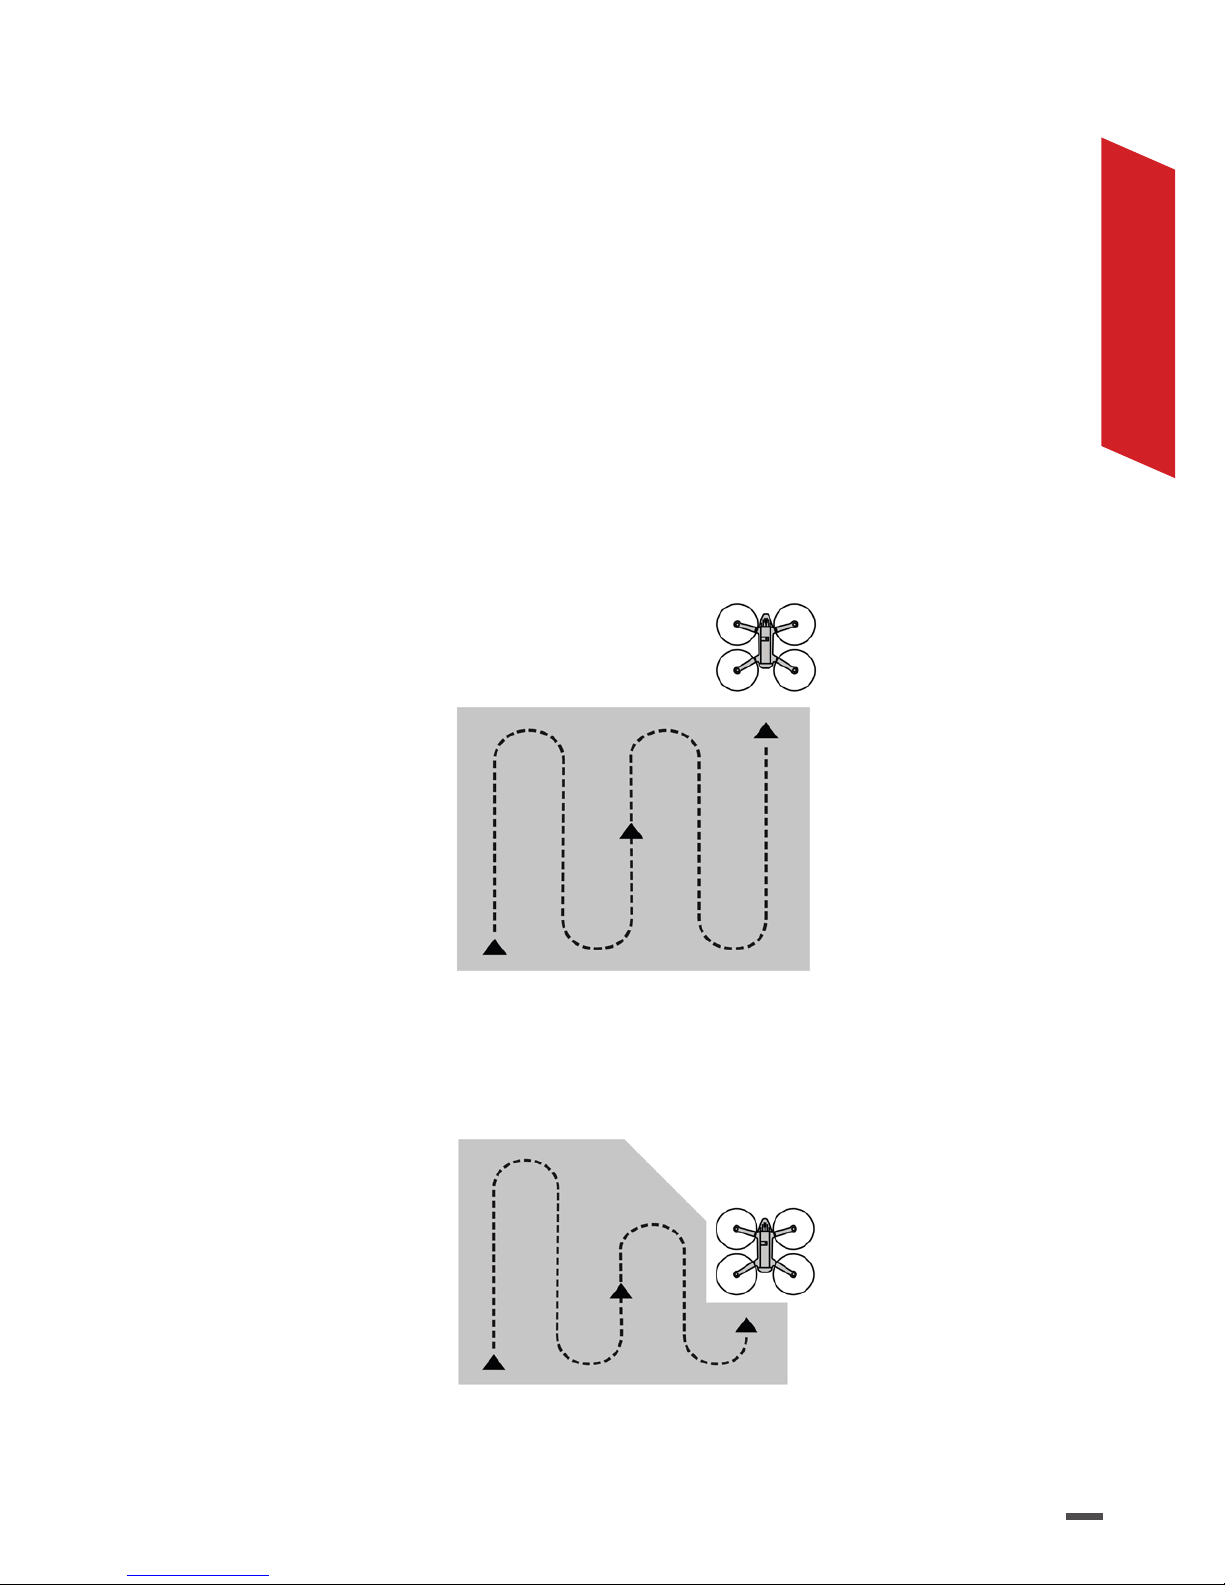
You can create two types of ight plan for Parrot Bluegrass:
Grid: the drone performs a grid ight of the dened area
according to the itinerary displayed on the screen.
Polygon:the drone performs a grid ight of the area
Page 26

26
drawn on the screen according to the itinerary displayed.
For more detailed information on ight plans and their
creation go to the Pix4Dcapture support page:
Android:https://www.parrot.com/uk/pix4dcaptureandroid
iOS:
https://www.parrot.com/uk/pix4dcapture-ios
START THE FLIGHT PLAN
1. Ensure that Parrot Bluegrass is connected to Parrot
Skycontroller 2. For more information, consult
the section: Connecting the drone to Parrot
Skycontroller2.
2. Connect your smartphone or tablet to the USB port
of Parrot Skycontroller 2.
3. Launch the Pix4Dcapture app.
4. Open Mission Manager.
5. Select the ight plan to perform.
6. Press START in Pix4Dcapture.
> The app connects to the drone, a checklist appears. If
the settings are valid, the START button will allow you
to launch the mission.
> Parrot Bluegrass takes o and begins the ight plan.
> The drone returns to its starting point and lands once
the ight plan has nished.
> You can take back control at any moment using Parrot
Skycontroller 2 or by pressing on Abort on Pix4Dcapture.
Ensure that there is sucient charge in the battery
to complete the ight plan in its entirety.
Page 27
27
ENGLISH
PILOTMODES
PARROT SKYCONTROLLER 2
At any time during the execution of the flight plan on
Pix4Dcapture you can resume control of the drone by
pressing one of the controls on Parrot Skycontroller 2.
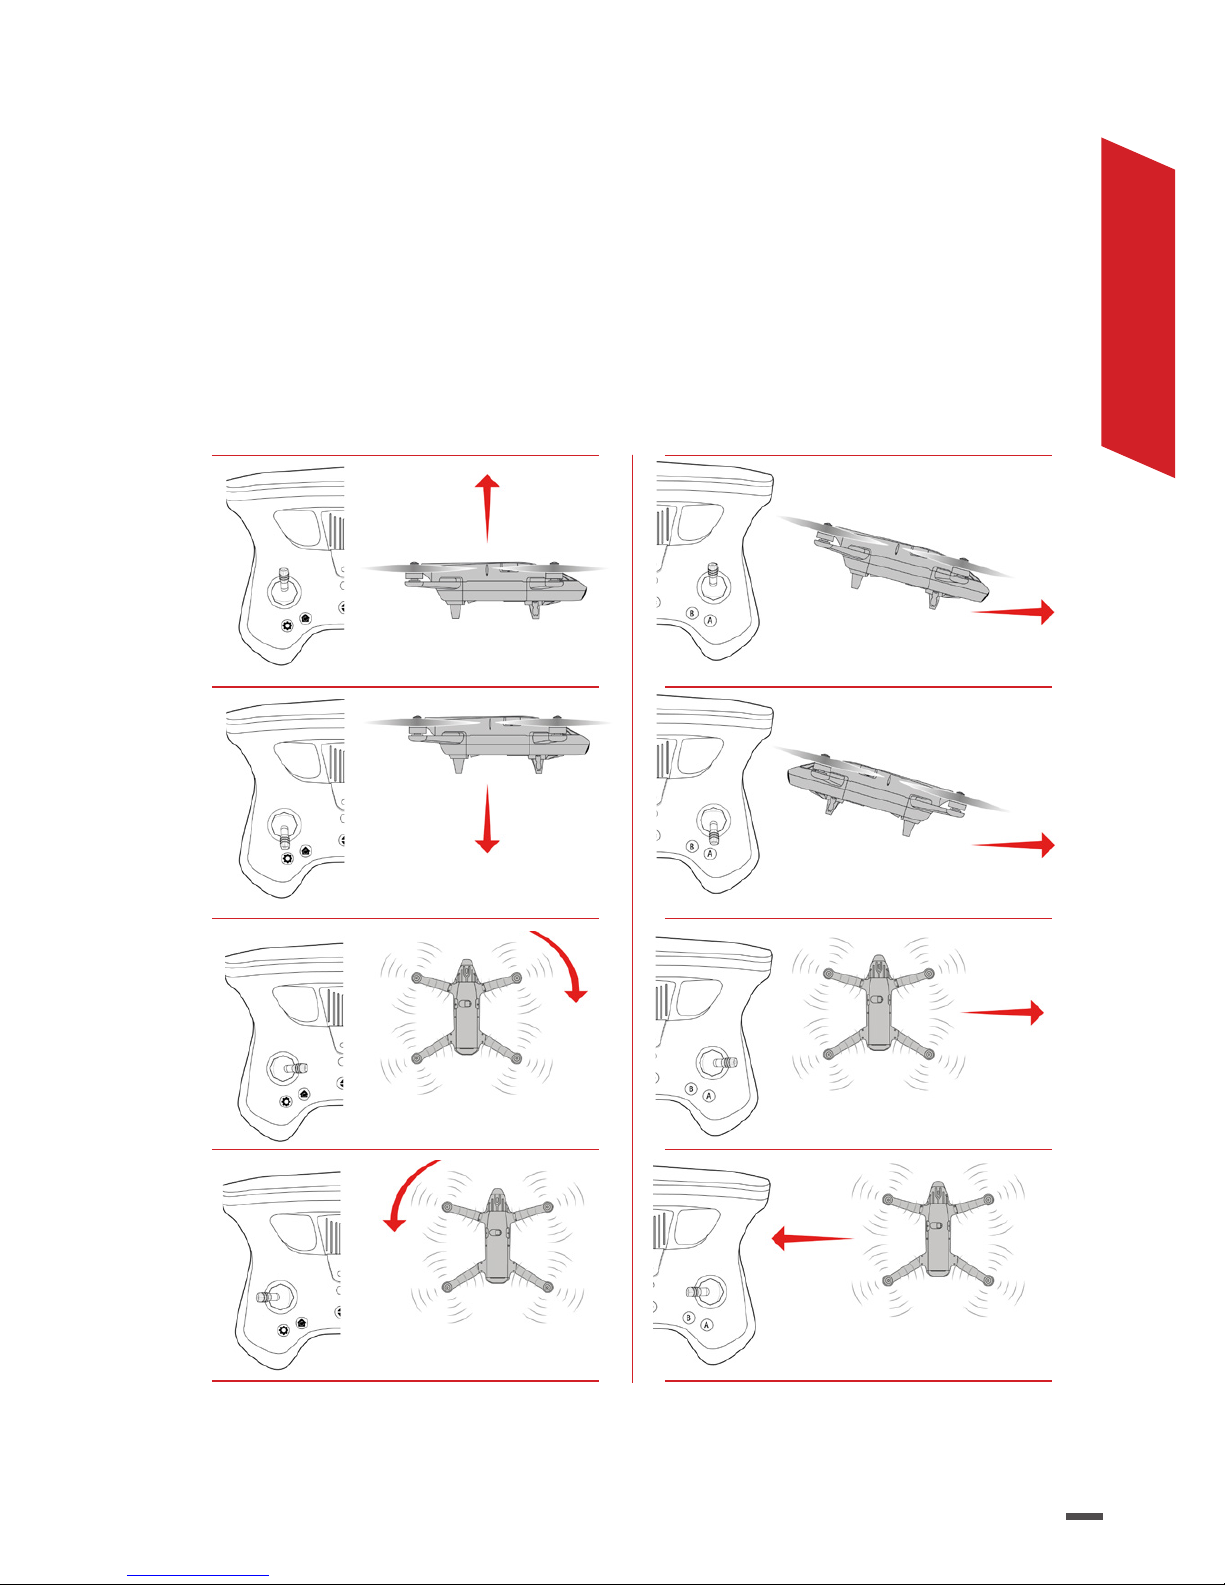
LEFT CONTROL RIGHT CONTROL
Forward
Reverse
Move to the right
Move to the left
Rise
Descend
Turn right
Turn left
> The buttons may be recongured using the FreeFlight Pro app.
Page 28
28
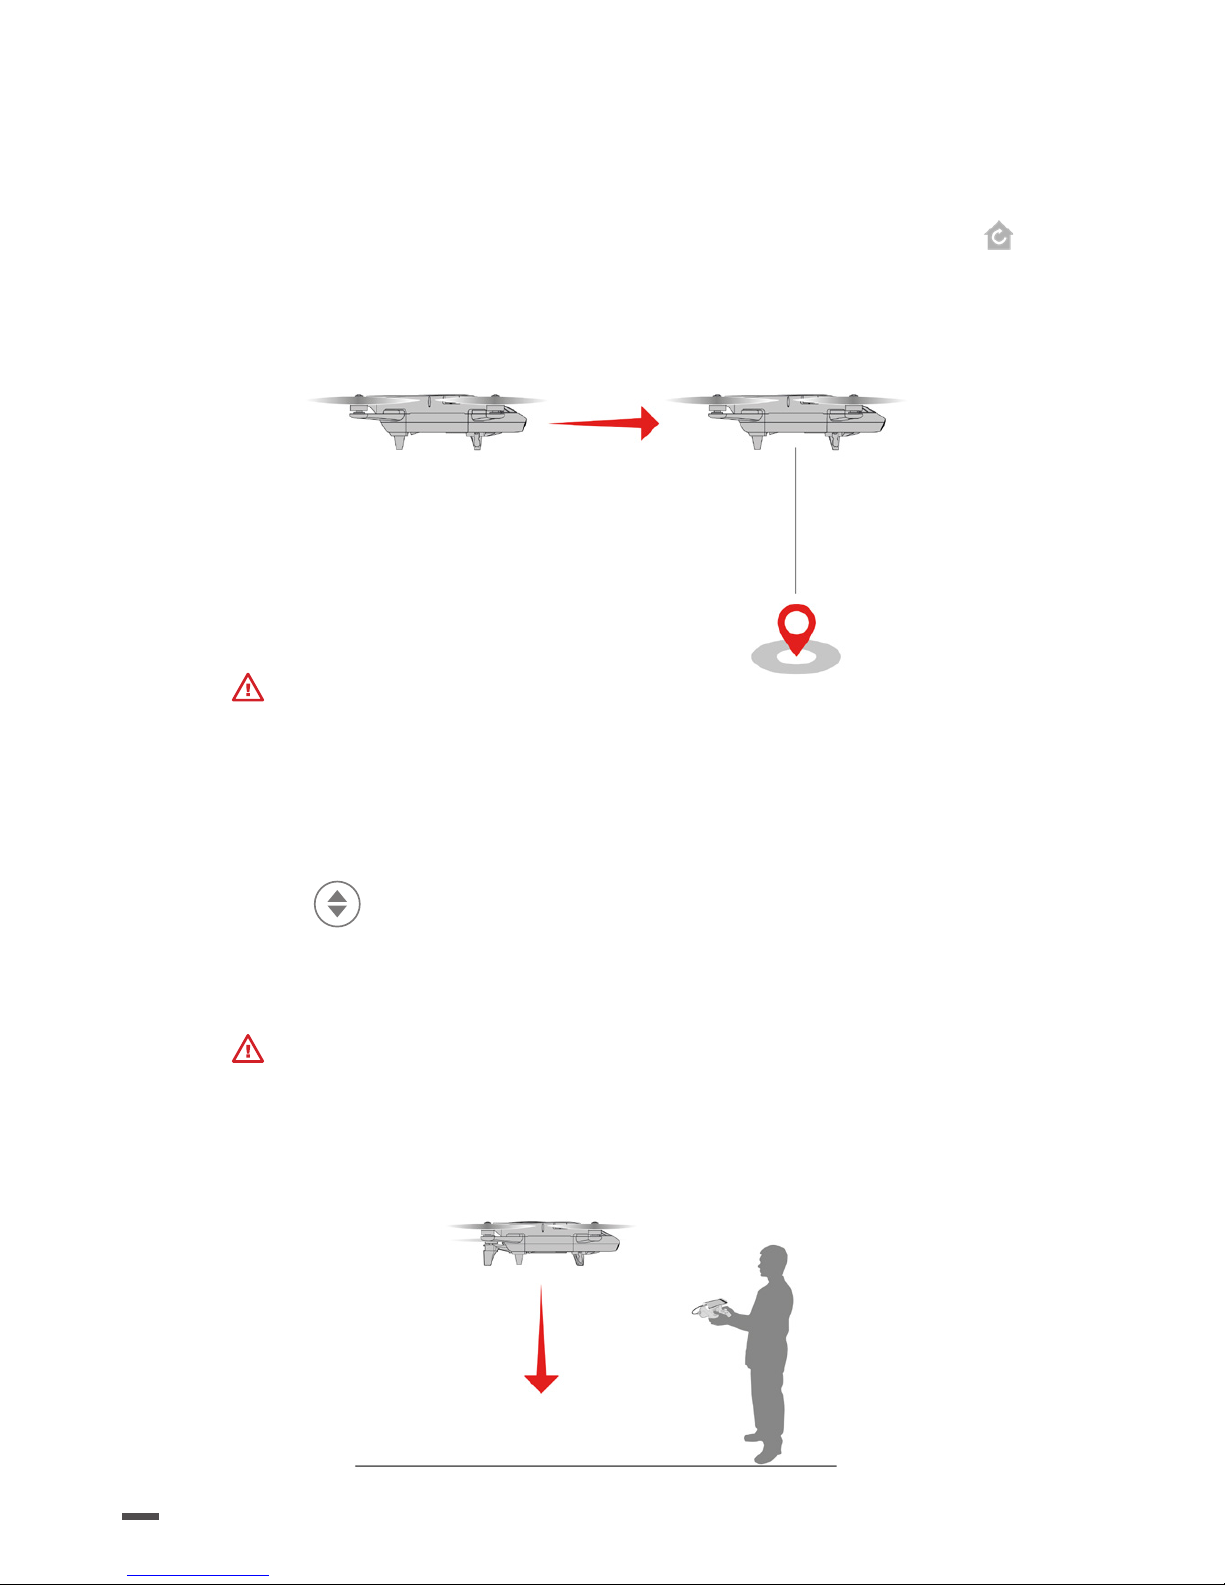
RETURN TO STARTING POINT
To bring Parrot Bluegrass back to its starting point
outside of a ight plan on Pix4Dcapture, press the
button on Parrot Skycontroller 2.
> Parrot Bluegrass returns to its starting position.
Make sure you are in a wide, open environment,
free of any obstacle.
LAND
Press the
button on Parrot Skycontroller 2.
> Parrot Bluegrass lands.
In order to avoid damaging Parrot Bluegrass, land
on a suitable surface, free of obstacles.
Page 29
29
ENGLISH
BEHAVIOUR OF SEQUOIA
INDICATOR LIGHTS
For more information on Sequoia settings, download
the Sequoia user guide available on Parrot.com.
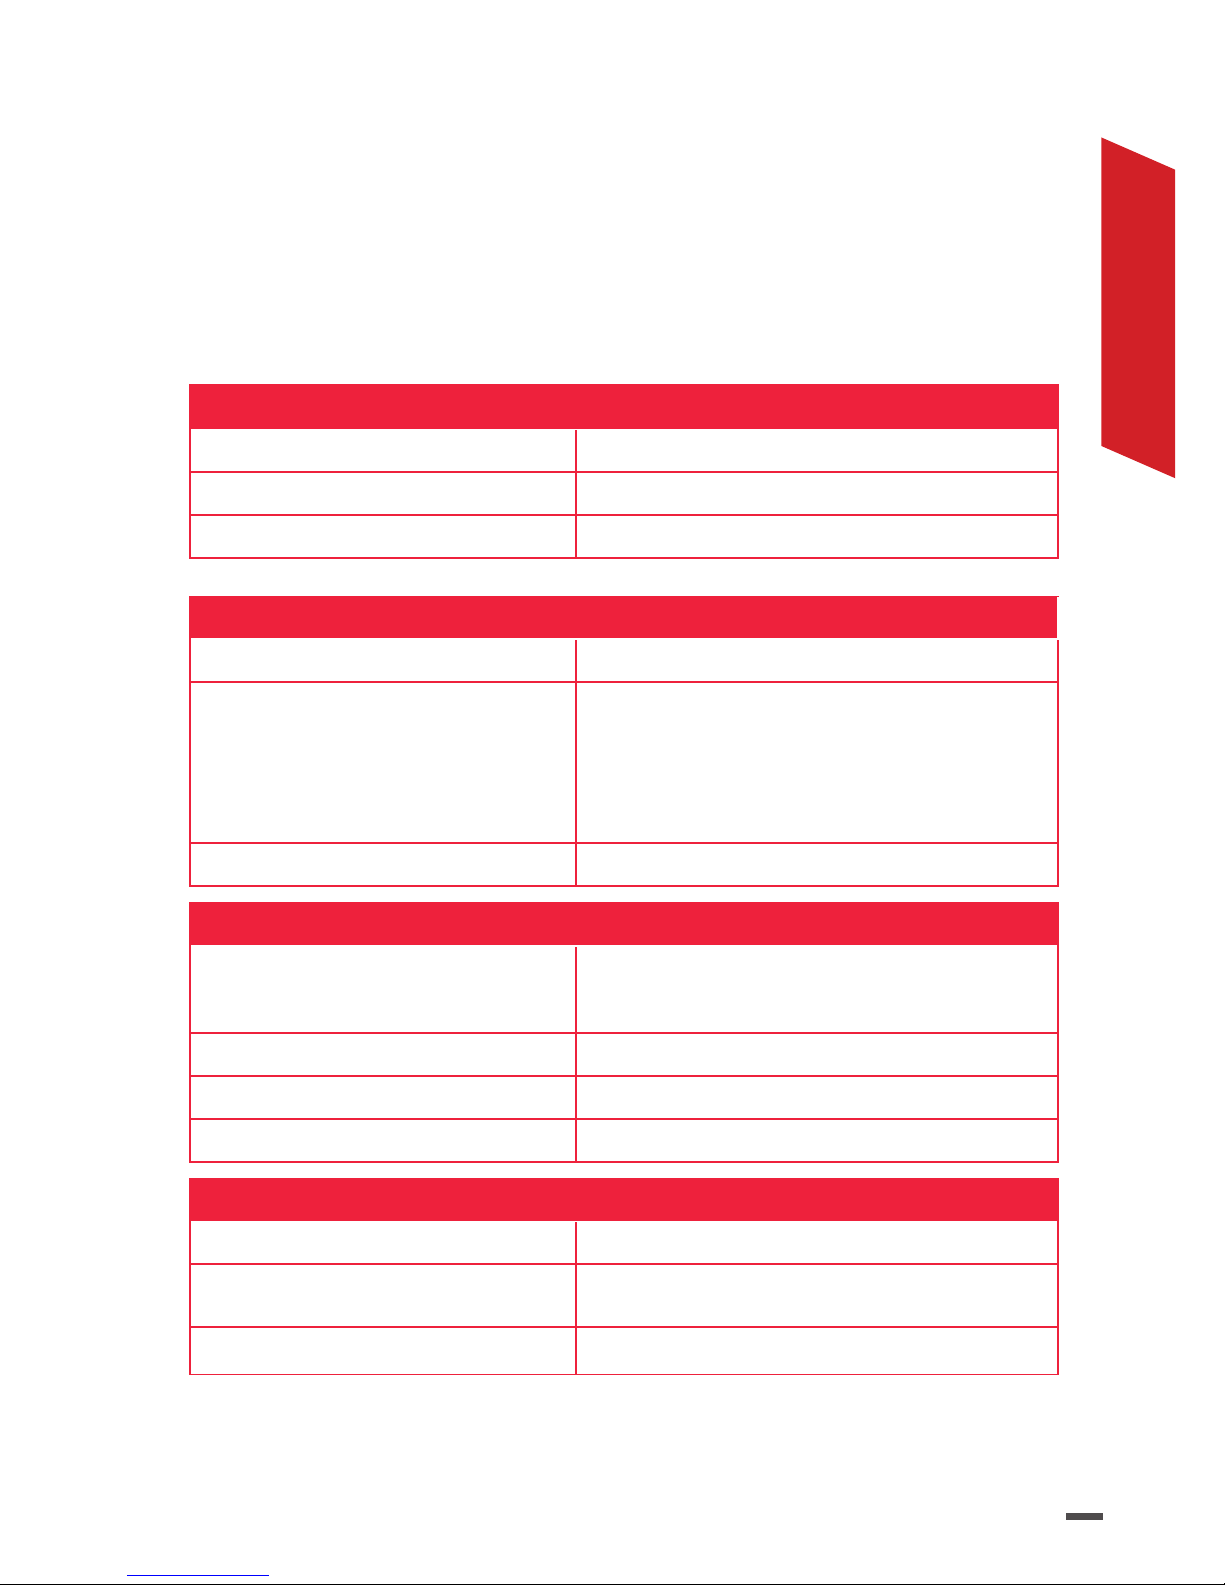
General
Quick ashing orange Shutting down
Slow ashing orange Update in progress
Flashing blue Enabling/Disabling Wi-Fi
Problem
Continuous red Hardware malfunction
Flashing red
Corrupted memory. Repair in progress.
Once the repair is complete the LED
returns to green. This operation may take
several seconds depending on the space
available on your SD card.
Flashing yellow Memory full
Calibration of the magnetometer
Steady purple The sensor must be stationary for 1 second
Flashing purple The sensor needs to be calibrated
Flashing green Calibration in progress (pitch axis)
Flashing cyan Calibration in progress (roll axis)
Photo shoot
Continuous blue Shot being taken
Continuous light green At least one of the four sensors is enabled
Flashing light green Writing les is underway
Page 30

30
SUNSHINE SENSOR
Problem
Continuous red Hardware malfunction
Flashing yellow SD Card full
Calibration of the magnetometer
Steady purple
The sensor must be stationary for 1
second
Flashing purple The sensor needs to be calibrated
Flashing green Calibration in progress (pitch axis)
Flashing cyan Calibration in progress (roll axis)
Page 31

31
ENGLISH
UPDATING SEQUOIA
VIA AN SD CARD
1. Insert your SD card in a computer and make sure that
it contains no les in .plf format.
2. Visit the Sequoia support page: www.parrot.com/fr/
support/
3. Download the update le available in .plf format.
4. Copy the le to the root directory on your SD card
without putting it in a folder or renaming it.
5. Insert the SD card in the sunshine sensor.
6. Turn on the drone.
>The update launches automatically. During the up-
date the multispectral sensor indicator light flashes
orange. Once the update is complete the light
turns green.
Page 32

32
VIA THE SEQUOIA WEB
INTERFACE
Connect to the drone’s Wi-Fi network then enter
the IP address 192.168.42.2 into the Web browser.
1. Visit the Sequoia support page:www.parrot.com/
support/
2. Download the update le available in .plf format.
3. Connect to the Sequoia Web interface.
4. Go to Settings.
5. Click on Update Sequoia.
6. An explorer window will open.
7. Select your update le and click Open.
8. A Send button appears in the Settings page.
9. Click the Send button.
>The update will automatically launch, the multis-
pectral sensor’s indicator light will turn orange.
Page 33

33
ENGLISH
RETRIEVE PHOTOS
During the ight, if no SD card is inserted, photos are
stored on the internal memory of the multispectral sensor.
VIA AN SD CARD
1. Insert your SD card into an adapter which is
compatible with your computer.
2. Retrieve the photos taken during the ight.
Do not remove the SD card when the drone is turned
on.
VIA WIFI
1. Connect to the Bluegrass_XXXX Wi-Fi and
enter the IP address 192.148.42.2 into the Web
browser Sequoia automatically turns on.
2. Go to the Gallery tab and retrieve the photos taken
during the ight.
DATA PROCESSING WITH
AIRINOV FIRST+
Go to http://parrot.airinov.com and follow the on-screen
steps for processing your data.
For more information go to www.parrot.com/support.
However, the images retrieved by Sequoia can be
processed in several ways.
Page 34

34
WITH THE DATA MANAGEMENT
SOFTWARE MICASENSE ATLAS
You can analyse the photos taken by Sequoia with the
MicaSense ATLAS software. For more information, go to
www.micasense.com.
WITH THE PIX4DMAPPER
MAPPING SOFTWARE
You can analyse the photos taken by Sequoia with the
Pix4DMapper software. For more information, go to
www.pix4d.com.
AGRONOMIC
RECOMMENDATIONS FROM
AIRINOV
Airinov oers a nitrogen fertiliser recommendation
service for rapeseed and wheat. For more detailed
information visit www.airinov.fr.
Page 35

35
ENGLISH
PRECAUTIONS
DO NOT TOUCH THE
PROPELLERS
Do not touch
the propellers of the drone while the motors are
functioning. Take all precautions necessary
concerning property and persons.
Remove the propellers from Parrot Bluegrass
before connecting it to a computer.
Page 36

36
BEHAVIOUR OF THE
INDICATOR LIGHT
PARROT SKYCONTROLLER 2
Flashing red
Parrot Skycontroller 2
is trying to connect to a
drone.
> Make sure your drone
is turned on.
Or
The battery of Parrot
Skycontroller 2 or your
drone is low.
> Recharge the battery.
Or
Parrot Skycontroller 2
has detected a problem
with the drone.
> Go to the Support
section on www.parrot.
com.
Continuous green
Parrot Skycontroller 2 is
connected to the drone.
> You can y the drone.
Page 37

37
ENGLISH
PARROT BLUEGRASS
Flashing
blue
Parrot Bluegrass has detected the
GPS signal and is ready to take o.
Flashing
green
Parrot Bluegrass is in ight.
Flashing
yellow
The update of Parrot Bluegrass is
underway. Do not turn o Parrot
Bluegrass
Flashing red
and blue
Parrot Bluegrass has detected a
problem with the battery. Contact
your retailer or go to the Parrot
Bluegrass support page on www.
parrot.com.
Flashing red
Parrot Bluegrass has detected an
error.
> An error message appears on
the FreeFlight Pro app. Go to the
table of error codes available on the
Parrot Bluegrass support page.
Page 38

38
SENSORS
• Ultrasound
• Altimeter
• Hi-speed vertical camera
INERTIAL NAVIGATION SYSTEM
• Three-axis gyroscope
• Three-axis accelerometer
• Three-axis magnetometer
AUTOPILOT
• Dual-core ARM 9 CPU
• Internal ash memory for HD video from the
front-facing camera: 32 GB
WI-FI AND TRANSMISSIONS
• Network access point
• AC Wi-Fi, 2 dual band antennae (2.4 and 5
GHz), multiple inputs and outputs
TECHNICAL
SPECIFICATIONS
Page 39

39
ENGLISH
REMOVABLE BATTERY
• 4 cell 99 Wh battery
• Battery life: 25 minutes
• Rated voltage: 14.8 V
• 20 A continuous discharge
• Charge at 1 C max.
• Operating range: 0 °C-40 °C
DIMENSIONS
• Weight: 1.850 kg
• Size: 1150 mm x 580 mm x 120 mm
GPS
• Integrated GPS
• GPS + GLONASS
PERFORMANCE
• Engine:700 kv
VIDEO & PHOTOS
• Full HD 1080p front-facing camera
• With FreeFlight Pro ux video: 360 p/720 p
Page 40

40
PARROT SKYCONTROLLER 2 CHARGER
• Input: 100-240 V, 50h-60 Hz, 1.2A
• Output: Max. 12.6 Vdc, 3.5 A
• Operating range: 0 °C-40 °C
SEQUOIA MAINTENANCE
CLEANING THE SENSORS
If dust or dirt gets on the lens and/or sensors:
1. Use the microbre cloth (supplied) to clean the lens.
2. Remove any remaining traces with a cotton bud
soaked in lens cleaner.
OBTAINING SPARE PARTS
Go to the website www.parrot.com to nd the spare parts
available.
Page 41

41
ENGLISH
GENERAL INFORMATION
ACCESSORIES AND SPARE PARTS
Accessories and spare parts are available from your Parrot retailer or on www.
parrot.com.
PRECAUTIONS FOR USE AND MAINTENANCE
PARROT SKYCONTROLLER 2
Parrot Skycontroller 2 is intended to y Parrot Bebop, Parrot Bebop 2, Parrot
Disco and Parrot Bluegrass, and is not suitable for children under 14 years of
age.
Check the list of drones that are compatible with Parrot Skycontroller 2 in the
Support section on www.parrot.com.
Only use accessories specied by Parrot Drones SAS.
If sand or dust gets into Parrot Skycontroller 2, it may be irreparably damaged
and no longer function correctly.
Do not expose Parrot Skycontroller 2 to rain or sun for an extended period.
Do not use this device near liquids.
Risk of ingestion of small objects. The packaging is not part of the product and
must be discarded as a safety measure.
PARROT BLUEGRASS
The maximum video recording time is 29 minutes.
Parrot Bluegrass is not suitable for children under 14 years of age.
The pilot must, at all times, maintain visual contact with Parrot Bluegrass and
control its trajectory. Parrot Bluegrass must be used according to the rules of
civil aviation in your country. The places where it is used must be suitable for manoeuvring in order to ensure the continuous safety of people, animals and property. It may not be permitted to use Parrot Bluegrass in certain public places
(e.g. train stations, airports, etc.) or on public roads.
The Parrot Bluegrass’s propellers in ight can cause damage to persons or objects. Do not touch Parrot Bluegrass when in ight. Wait until the propellers
stop completely before handling Parrot Bluegrass.
Only use accessories specied by Parrot Drones SAS.
If sand or dust gets into Parrot Bluegrass, it may be irreparably damaged and
no longer function properly.
Do not use Parrot Bluegrass in adverse weather conditions (rain, strong wind or
snow) or when visibility is poor (at night or in fog).
Keep Parrot Bluegrass away from high-voltage power lines, buildings or any
other potentially hazardous areas.
Do not land or y Parrot Bluegrass over water or a wet surface as this could
cause irreparable damage. Do not place Parrot Bluegrass on snow.
Avoid making Parrot Bluegrass undergo drastic changes in altitude.
Do not leave Parrot Bluegrass in the sun.
Risk of ingestion of small objects. The packaging is not part of the product and
must be discarded as a safety measure.
Page 42

42
SEQUOIA
Only use accessories specied by the manufacturer.
If sand or dust gets into Sequoia it may be irreparably damaged and no longer
function correctly.
Do not use Sequoia in adverse weather conditions (rain, strong winds, snow) or
when visibility is poor (at night or in fog).
Keep Sequoia away from high voltage power lines, buildings or any other
potentially hazardous areas.
Do not use this device near liquids. Do not place Sequoia on water or on a wet
surface as this could cause irreparable damage.
Avoid making Sequoia undergo drastic changes in altitude.
Do not leave Sequoia in the sun.
Risk of ingestion of small objects. The packaging is not part of the product and
must be discarded as a safety measure.
If you use Sequoia with a drone refer to the general information for your drone.
WARNING REGARDING PRIVACY AND RESPECT FOR
IMAGES OF PROPERTY
Recording and broadcasting an individual's image without their permission may
constitute an invasion of privacy and you may be held liable. Ask permission
before lming people, especially if you intend to keep your recordings and/
or broadcast them. Do not broadcast degrading images which may aect an
individual's reputation or dignity.
Recording and broadcasting the image of property without permission from its
owner and or any third party holding intellectual property rights on the property
may constitute a violation of the property's image rights and you may be held
liable. Ask permission from its owner and/or any third party with ownership
rights.
MODIFICATIONS
The explanations and specications contained in this user guide are provided
for information purposes only and may be amended without prior notication.
This information is correct at the time of printing and the utmost care has been
taken in preparing it to provide you with the most accurate information possible. However, Parrot Drones SAS cannot be held responsible or liable, directly
or indirectly, for any damages or unintentional loss of data resulting from an
error or omission in this document. Parrot Drones SAS reserves the right to
amend or improve the product as well as the user guide without any restrictions or any obligation to inform the user. As part of Parrot Drones SAS' focus
on improving our products, it is possible that the product you have purchased
diers slightly from the one described in this document. In this case you may
be able to nd a new version of the user guide in electronic format on the www.
parrot.com website.
GUARANTEE
For the warranty conditions, please read the Terms and Conditions of sale of the
retailer where you purchased the Parrot Bluegrass.
Page 43

43
ENGLISH
WIFI
Before you y your Parrot Bluegrass, check the restrictions regarding the
use of Wi-Fi frequencies in the place where you are going to y it. Certain
frequencies may be restricted or prohibited. For instance, in some countries
the use of the 5 GHz band for your Wi-Fi may be prohibited for outdoor
locations.
HOW TO RECYCLE THIS PRODUCT
PARROT SKYCONTROLLER2 AND PARROT BLUEGRASS
This symbol on the product or its documentation indicates that it must
not be disposed of with household waste. Uncontrolled waste disposal
may harm the environment or human health. Please separate your device
from other types of waste to recycle it responsibly. This will help to foster
the sustainable recycling of material resources. Please contact your retailer or
your local council to seek information about ways to recycle Parrot Skycontroller
2 and Parrot Bluegrass.
EU DECLARATION OF CONFORMITY \PARROT
SKYCONTROLLER2
Parrot Skycontroller 2 can be used in: DE, AT, BE, BG, CY, HR, DK, ES, EE, FI, FR,
GR, HU, IR, IT, LV, LT, LU, MT, NL, PL, PT, CZ, RO, GB, SK, SI, SE.
Parrot DRONES, 174 quai de Jemmapes, 75010 Paris, France, hereby declares
that it is solely responsible for the compliance of the product described in this
user guide with technical standards, EN 301489-17, EN300328, EN71-1, EN71-2,
EN71-3, EN62115, EN 50566: 2013 (SAR) under the provisions of the RED directive 2014/53/EU and the General Product Safety Directive 2014/35/EU.
http://www.parrot.com/ce/?skycontroller-2
EU DECLARATION OF CONFORMITY PARROT BLUEGRASS
This device can be used in: DE, AT, BE, BG, CY, HR, DK, ES, EE, FI, FR, GR, HU,
IE, IT, LV, LT, LU, MT, NL, PL, PT, CZ, RO, GB, SK, SI, SE.
The outdoor use restriction in member states of the European Union relates
only to the rst in the 5GHz band (5150-5250MHz).
PARROT DRONES SAS, 174 quai de Jemmapes, 75010 Paris, France, declares
on its sole responsibility that the product described in the present guide complies with technical standards EN 301489-1, EN 301489-3, EN 301489-17, EN
62311, EN300328, EN301893, EN300 440-2, EN60950-1, EN50581 in compliance
with the provisions of R&TTE directive 1999/5/EC, the general product security
directive 2001/95/EC and the RED directive 2014/53/EU.
http://www.parrot.com/fr/ce/?bluegrass
CANADA DECLARATION OF CONFORMITY \PARROT
SKYCONTROLLER2
Parrot Skycontroller 2 complies with the Industry Canada RSS applicable to license-exempt radio apparatus. Operation is permitted subject to the two following conditions: (1) the apparatus must not produce interference, and (2) the
apparatus user must accept any radio interference subjected to even if the said
interference is likely to compromise its operation.
Page 44

44
CANADA DECLARATION OF CONFORMITY
PARROT BLUEGRASS
This device complies with the Industry Canada RSS applicable to license-exempt
radio apparatus. Operation is permitted subject to the two following conditions: (1) the apparatus must not produce interference, and (2) the apparatus
user must accept any radio interference subjected to even if the said interference is likely to compromise its operation. This category B digital device is
compliant with the NMB-003 standard of Canada.
FCC
To comply with the FCC/IC RF exposure guidelines for transmission equipment,
a distance of at least 20 cm must be maintained between the product antenna
and individuals. To remain compliant it is not recommended to use the product
at any distance less than this.
This device complies with part 15 of the Industry Canada RSS applicable to
license-exempt radio apparatus.
Operation is permitted subject to the two following conditions:
1. The device must not cause interference;
2. The user of the equipment must accept any interference suered, even if the
interference is likely to aect the operation of the equipment.
This mobile device with an antenna meets the FCC limits for radiation exposure
established for an uncontrolled environment. This device meets the limits of the
specic absorption rate (SAR) of the FCC. To ensure compliance, follow these
instructions: this transmitter must not be co-used or operated at the same time
as another antenna or transmitter.
BATTERY PARROT SKYCONTROLLER 2 AND PARROT
BLUEGRASS
WARNING: Failure to follow all the instructions may result in serious injury, irreparable damage to the battery and may cause a re, smoke or explosion.
Before long-term storage, ensure that the battery is charged to at least 50%
capacity. It is recommended to charge your battery every 3 months and to
proceed to an addition charge if necessary.
Always check the battery's condition before charging or using it. Replace the
battery if it has been dropped, or in case of odour, overheating, discolouration,
deformation or leakage. It is recommended that you do not to use any other
charger than the one provided with the product. The temperature of the battery should never exceed 60 °C (140 °F) otherwise the battery may become
damaged or ignited. Never charge on a ammable surface, near ammable
products or inside a vehicle (preferably place the battery in a non-ammable
and non-conductive container). Never leave the battery unattended during
the charging process. Never disassemble or modify the housing's wiring, or
puncture the cells. Do not short circuit the batteries. Never expose the LiPo
battery to moisture or direct sunlight, or store it in a place where temperatures
could exceed 60 °C (car in the sun, for example). If the battery is not used for a
long time, it will gradually discharge. Always keep it out of reach of children.
Page 45

45
ENGLISH
WARNING
RISK OF EXPLOSION IF THE PARROT BLUEGRASS BATTERY IS
REPLACED WITH AN INCOMPATIBLE BATTERY.
DISPOSE OF USED BATTERIES ACCORDING TO INSTRUCTIONS.
For more information about batteries, visit the website
http://www.parrot.com/support
TRADEMARKS
Parrot and the Parrot logo are trademarks of Parrot SA, used under licence.
Parrot Bebop drone, Parrot Bebop, Parrot Bebop 2, Parrot Disco, Parrot Bluegrass, Parrot Skycontroller, Parrot C.H.U.C.K. and Sequoia, the FreeFlight Pro
app as well as their respective logos are trademarks of Parrot Drones SAS.
iPhone is a trademark of Apple Inc., registered in the United States and in
other countries.
ARM and Cortex are trademarks registered to ARM Limited (or its subsidiaries) in the European Union and/or elsewhere. All rights reserved.
Wi-Fi(R) is a registered trademark of Wi-Fi Alliance(R).
Pix4D and Pix4Dcapture and Pix4Dmapper are registered trademarks of
Pix4D SA.
Airinov and Airinov First+ are tradenames or registered trademarks of Airinov
SAS.
App Store is a trademark of Apple Inc.
Google Play are trademarks of Google Inc.
All other trademarks mentioned in this guide are the property of their respective owners.
MANUFACTURER INFORMATION
Parrot Bluegrass, Sequoia and Parrot Skycontroller 2 are manufactured by:
Parrot Drones SAS - 174 Quai de Jemmapes - 75010 Paris (France) - Corporate
and Trade Register of Paris 808 408 074 - www.parrot.com
Page 46

46
Votre Parrot Bluegrass ™ contient les éléments suivants :
1. Un drone Parrot Bluegrass ™ ;
2. Une manette Parrot Skycontroller 2™. Vous pouvez
piloter votre Parrot Bluegrass avec Parrot Skycontroller
2 en téléchargeant sur votre smartphone ou tablette
l’application FreeFlight Pro™. Cette application est
gratuite mais peut contenir des In-App Purchase. Elle
permet également de procéder à la calibration de votre
Parrot Bluegrass;
3. Un capteur Sequoia ™ contenant :
(a) Un capteur multispectral qui capture la lumière que les
plantes rééchissent; et
(b) Un capteur d'ensoleillement Sunshine qui enregistre
l’intensité de la lumière émanant du soleil ; et
4. Un accès aux services Airinov First+™ vous permettant
d’obtenir vos cartes NDVI et de zonage à partir des
captures d’images réalisées par l’application gratuite
Pix4Dcapture™ à télécharger sur votre smartphone ou
tablette.
Page 47

47
FRANÇAIS
AVERTISSEMENT
1. Parrot Bluegrass N’EST PAS UN JOUET. Il ne doit donc pas être
utilisé ou manipulé par un enfant âgé de moins de 14 ans.
2. AVANT TOUTE UTILISATION du Parrot Bluegrass:
(a) LISEZ ATTENTIVEMENT ce Guide Utilisateur ainsi que
toutes les informations et documentations disponibles sur
www.parrot.com, qui peuvent être mises à jour à tout moment
et sans avertissement préalable (ci-après « Documentation de
Parrot »). Une ATTENTION PARTICULIERE doit être prêtée
aux paragraphes contenant le symbole ;
(b)
INFORMEZ-VOUS SUR LES REGLEMENTATIONS
APPLICABLES CONCERNANT L’UTILISATION DES DRONES
ET DE LEURS ACCESSOIRES (ci-après « Réglementations
Applicables ») ; et
(c) AYEZ A L’ESPRIT que Parrot Bluegrass est susceptible
d’exposer les autres et vous-même à DES DOMMAGES
MATERIELS ET/OU CORPORELS, pouvant notamment
entrainer des blessures graves voire mortelles.
3. Veuillez noter que les vidéos et photos qui font l’objet de
promotions et campagnes publicitaires par Parrot Drones SAS
et ses liales ont été réalisées par et avec des professionnels
et des pilotes expérimentés. MERCI DE TOUJOURS
VOUS REFERER AUX DERNIERES MISES A JOUR DE LA
DOCUMENTATION DE PARROT EN CAS DE DOUTE RELATIF
A L’UTILISATION DE VOTRE PARROT BLUEGRASS ET DE SES
ACCESSOIRES.
4. DANS LES LIMITES DU DROIT APPLICABLE, PARROT
DRONES SAS, SES FILIALES, ET LEURS DISTRIBUTEURS ET
DETAILLANTS RESPECTIFS NE SAURAIENT ETRE TENUS
RESPONSABLES POUR TOUT PREJUDICE RESULTANT OU
EN LIEN AVEC LE NON RESPECT DE LA DOCUMENTATION
DE PARROT OU DES REGLEMENTATIONS APPLICABLES
PAR VOUS-MEME OU PAR TOUTE PERSONNE UTILISANT
VOTRE PARROT BLUEGRASS.
Page 48

48
PRÉSENTATION DE
PARROT BLUEGRASS
Hélice letée
Caméra Fisheye
Bouton on/off et
voyant lumineux
Capteur
Sunshine
Logement batterie
Connecteur batterie
Port micro-USB
Page 49

49
FRANÇAIS
Pied et
antenne
Capteur
multispectral
Page 50

50
PRÉSENTATION DE
PARROT SKYCONTROLLER 2
Antenne
Emplacement du support pour appareil mobile
Bouton
On/Off
Retour au point de décollage
Décoller/
Atterrir
En vol : démarrer /arrêter l’enregistrement vidéo
Menu Paramètres : retour
En vol :
prendre une photo
Menu Paramètres :
valider
Paramètres
Port USB
Page 51

51
FRANÇAIS
Exposition de la caméra
Mode d’afchage
Orientation verticale de la caméra
Port USB
Page 52

52
PRÉSENTATION
DE SEQUOIA
Sequoia se compose d’un capteur multispectral et d’un
capteur d’irradiance sunshine intégré au Parrot Bluegrass.
Sequoia est un capteur multispectral dédié à l’agriculture.
Sa conception a été réalisée selon trois critères principaux
: une excellente précision, une taille et un poids réduits
au maximum, et une grande facilité d’usage. Le capteur
Sequoia est prévu pour s’adapter à tous les types de
drones, ailes volantes et multi-rotors, embarqué dans
des nacelles stabilisées ou non. Son utilisation permet
d’obtenir des images de parcelles agricoles dans plusieurs
bandes spectrales mesurant l’état de la végétation : vert
(longueur d’onde 550nm bande passante 40nm), rouge
(longueur d’onde 660nm bande passante 40 nm), rededge (longueur d’onde 735nm bande passante 10nm)
et proche infrarouge (longueur d’onde 790nm bande
passante 40nm).
Les photos prises peuvent ensuite être analysées par
diérents logiciels. Elles permettent la réalisation de
cartes indexées (NDVI, NDRE, etc.) et la réalisation de
prescriptions pour fertilisation azotée.
Page 53

53
FRANÇAIS
CAPTEUR MULTISPECTRAL
Capteur Proche
Infra-Rouge
Capteur
Rouge
Capteur
Red-Edge
Capteur
Vert
Capteur RGB
Capteurs photos monochromes 1.2 mégapixels global
shutter collectent les données dans les bandes spectrales
discrètes.
Capteur photos RGB 16 mégapixels rolling shutter.
Autres éléments du capteur multispectral :
• Centrale inertielle.
• Mémoire interne de 64 Go.
• Magnétomètre.
Page 54

54
Vert
Longueur d’onde 550nm
Bande passante 40nm
Dénition : 1.2 Mpx
Rouge
Longueur d’onde 660nm
Bande passante 40 nm
Dénition : 1.2 Mpx
Page 55

55
FRANÇAIS
Red-edge
Longueur d’onde 735nm
Bande passante 10nm
Dénition : 1.2 Mpx
Proche infrarouge
Longueur d’onde 790nm
Bande Passante 40nm
Dénition : 1.2 Mpx
RGB
Dénition : 16Mpx
Page 56

56
CAPTEUR SUNSHINE
Le capteur sunshine permet de calibrer les images
en fonction de l’ensoleillement. Grâce à lui, il est
possible de comparer des photos dans le temps
malgré les variations de lumière lors de la prise de vue.
Le capteur sunshine est xé sur la partie supérieure
du drone, face au ciel. Pendant le vol, le capteur
Sunshine est alimenté par le capteur multispectral.
!
Il est conseillé d’utiliser la carte SD fournie avec
Sequoia. Les performances techniques ne sont
pas garanties pour les autres cartes SD.
Référez-vous à la liste des cartes SD compatibles
sur www.parrot.com/support.
Voyant
lumineux :
référence pour
la calibration
Emplacement de la
carte SD
Capteurs de lumière
ambiante
4 capteurs de lumière ambiante. Ces capteurs sont
munis d’un ltre passe-bande identique aux ltres du
capteur multispectral.
Autres éléments du capteur sunshine:
• Centrale inertielle.
• Magnétomètre.
Page 57

57
FRANÇAIS
VÉRIFICATIONS AVANT VOL
RÉGULATIONS
• Parrot Bluegrass doit être utilisé conformément
à la réglementation locale en vigueur. Les lieux
d’utilisation doivent être adaptés à son évolution
pour assurer en permanence la sécurité des
personnes, des animaux et des biens.
• L’utilisation de Parrot Bluegrass dans certains lieux
du domaine public (par ex: gare, aéroport,…) ou sur
la voie publique peut ne pas être autorisée.
• Le pilote doit, à tout instant, conserver un contact
visuel avec Parrot Bluegrass et contrôler sa
trajectoire.
• Avant de piloter votre Parrot Bluegrass, renseignezvous sur les restrictions d’utilisation des fréquences
Wi-Fi de votre lieu de vol. Certaines fréquences
peuvent être restreintes ou interdites. Dans certains
pays, par exemple, l’utilisation de la bande Wi-Fi 5
GHz peut être interdite en extérieur.
CONDITIONS DE VOL
• Ne pilotez pas Parrot Bluegrass de nuit.
• Vériez les conditions météorologiques an de
garantir de bonnes conditions de vol et de prise de
vue. N’utilisez pas Parrot Bluegrass par temps de
pluie, de brouillard, de neige ou de vent de plus de
8 mètres par seconde ou 30 km/h.
• Ne volez pas au-dessus de l’eau.
• Assurez-vous que vous disposez d’un espace
Page 58

58
dégagé d’au moins 10 mètres de diamètre pour
le décollage et l’atterrissage du Parrot Bluegrass.
Vériez que le terrain de vol ne comporte pas
d’obstacle qui pourrait gêner le bon déroulement
du vol ou empêcher de garder le drone à vue.
• Veillez à ce que l’altitude de vol programmé
sur Pix4Dcapture (prise par rapport au point de
décollage) soit susante pour éviter les obstacles
aux alentours.
PARROT BLUEGRASS
• Assurez-vous que Parrot Bluegrass a détecté le
signal GPS sur FreeFlight Pro ou Pix4Dcapture.
• Assurez-vous que les hélices du Parrot Bluegrass
sont correctement montées et xées.
• Assurez-vous que la batterie du Parrot Bluegrass est
chargée.
• Assurez-vous que vous vous trouvez dans un lieu
dégagé.
• Assurez-vous que la distance de géobarière réglée
soit susante pour l'éxécution du plan de vol sur
Pix4Dcapture.
SEQUOIA
• Assurez-vous que les objectifs sont propres. Utilisez
le chion microbre (fourni) pour les nettoyer.
• Libérez assez de mémoire (sur la carte SD ou sur
la mémoire interne du capteur multispectral) an
d’enregistrer toutes les photos prises pendant le vol.
• Assurez-vous que les deux capteurs sont calibrés.
Pour plus d’informations, voir la section Calibrer
Sequoia.
Page 59

59
FRANÇAIS
TÉLÉCHARGER LES
APPLICATIONS
Connectez-vous sur l’App Store® ou sur Google Play
TM
et
téléchargez les applications Pix4Dcapture et FreeFlight
Pro.
FreeFlight Pro est l’application ocielle de Parrot
permettant le pilotage libre et la calibration du drone.
Pix4Dcapture est l’application gratuite permettant de
générer un plan de vol pour capturer des photos au
dessus d’une zone d’intérêt.
CHARGER LA BATTERIE DU
PARROT BLUEGRASS
La batterie doit être déconnectée au
Parrot Bluegrass.
1. Sélectionnez la prise fournie correspondante à
votre pays et insérez-la sur le chargeur.
2. Connectez le câble au chargeur.
3. Branchez la batterie au câble du chargeur puis
branchez le chargeur sur le secteur.
Le voyant lumineux est rouge pendant la charge puis
passe au vert lorsque la batterie est chargée.
Le temps de charge est de 2h30 environ pour un
temps de vol de 25 minutes environ.
Page 60

60
CHARGER LA BATTERIE DE
PARROT SKYCONTROLLER 2
1. Sélectionnez l’adaptateur correspondant à votre
pays et xez-le sur le chargeur.
2. Connectez le câble du chargeur au Parrot
Skycontroller 2, puis branchez le chargeur au
secteur.
Page 61

61
FRANÇAIS
INSTALLER LES HÉLICES
Lorsque le drone est éteint, vissez les hélices letées
sur les moteurs de Parrot Bluegrass en maintenant la
base du moteur. Le letage sert de détrompeur pour le
placement des hélices sur les bras du drone (schéma B).
Assurez-vous que les hélices sont bien vissées avant de
décoller.
A
B
Page 62

62
CONNECTER VOTRE
SMARTPHONE OU TABLETTE AU
PARROT SKYCONTROLLER 2
1. Vissez le support pour appareil mobile sur Parrot
Skycontroller 2.
B
A
B
A
Vous pouvez faire pivoter le support
pour l’adapter aux dimensions de votre
smartphone. Pour cela, appuyez dessus et
faites-le pivoter à droite.
B
A
B
A
Page 63

63
FRANÇAIS
2. Appuyez sur le switch à droite du support pour l’ouvrir
complètement.
3. Positionnez votre smartphone ou tablette sur le
support.
B
A
B
A
4. Resserrez le support sur votre smartphone ou
tablette.
5. A l’aide du câble USB de votre smartphone ou
tablette, connectez votre appareil au port USB du
Parrot Skycontroller 2.
B
A
Page 64

64
CONNECTER LE
DRONE AU PARROT
SKYCONTROLLER 2
1. Posez Parrot Bluegrass sur une surface plane.
2. Allumez votre Parrot Bluegrass.
3. Appuyez sur le bouton d’allumage du Parrot
Skycontroller 2 pour l’allumer.
4. Patientez jusqu’à ce que le voyant lumineux du Parrot
Skycontroller 2 soit vert xe.
> Vous êtes connectés au Parrot Bluegrass, vous passer
à la calibration du drone et au réglage Wi-Fi®.
> Attention la géobarrière sur FreeFlight Pro limite
l'éloignement du drone lorsque l'option est activée :
régler une distance de géobarrière un peu plus large
que la zone à survoler.
CALIBRER LE DRONE
Il est recommandé de faire la calibration du drone avant
chaque session de vol avec l’application FreeFlight Pro.
Si l’application ache une fenêtre demandant la
calibration du drone, suivez les étapes à l’écran.
Vous pouvez aussi lancer manuellement la calibration
du drone :
1. Sélectionnez Parrot Bluegrass dans l’application
Freeight Pro.
2. Appuyez sur le bouton Calibration dans la page
d'information sur le drone.
3. Suivez l’animation à l’écran.
Page 65

65
FRANÇAIS
> L’animation disparait lorsque la calibration est termi-
née, vous pouvez démarrer le plan de vol sur Pix4Dcapture.
RÉGLAGE WIFI
1. Connectez le drone avec FreeFlight Pro.
2. Sélectionnez Fly & Film.
3. Appuyez sur le bouton Réglages.
4. Sélectionnez le «Pays» et appuyez sur le bouton
«Extérieur».
Les réglages sont eectués. Il ne sera pas nécessaire de
répéter cette étape.
CALIBRER SEQUOIA
Calibration du magnétomètre
Le capteur multispectral clignote violet lorsque la
calibration est nécessaire.
1. Tournez le drone sur l’axe Z (yaw/lacet - en vert sur
le schéma) jusqu’à ce que le voyant lumineux du
capteur multispectral clignote vert.
2. Tournez le drone sur l’axe Y (pitch/tangage - en rouge
sur le schéma) jusqu’à ce que le voyant lumineux du
capteur multispectral clignote cyan.
3. Tournez le drone sur l’axe X (roll/roulis - en bleu sur
le schéma) jusqu’à ce que le voyant lumineux du
capteur multispectral change de couleur.
Page 66

66
> Note : Une fois la calibration terminée, la couleur du
voyant du capteur multispectral varie en fonction
de l’état de Sequoia. Par exemple, si la mémoire du
capteur multispectral est pleine, le voyant clignotera
jaune.
UTILISER LA MÉMOIRE DE
SEQUOIA
Si Sequoia détecte une carte SD, les captures sont
enregistrées sur cette carte SD. Si aucune carte SD
n’est détectée, Sequoia enregistre automatiquement
les captures dans la mémoire interne du capteur
multispectral.
Page 67

67
FRANÇAIS
CRÉER UN PLAN DE VOL
Il est recommandé de créer un plan de vol sur
Pix4Dcapture avant de vous rendre sur le lieu du vol.
> Au premier lancement de l'application Pix4D-
capture, choisir Parrot Bluegrass dans la liste des
drones, puis passez à l’édition du plan de vol.
Vous pouvez créer deux types de plan de vol pour Parrot
Bluegrass :
Grid : le drone quadrille la zone dénie selon le parcours
aché à l’écran.
Polygon : le drone quadrille la zone dessinée à l’écran
selon le parcours aché.
Page 68

68
Pour plus d’informations sur les plans de vol et savoir
comment les créer, consultez la page support de
Pix4Dcapture :
Android :
https://www.parrot.com/uk/pix4dcapture-android
iOS :
https://www.parrot.com/uk/pix4dcapture-ios
DÉMARRER LE PLAN DE
VOL
1. Assurez-vous que Parrot Bluegrass est connecté au
Parrot Skycontroller 2. Pour plus d'information, voir la
section Connecter le drone au Parrot Skycontroller2.
2. Connectez votre smartphone ou tablette au port USB
de Parrot Skycontroller 2.
3. Lancez l’application Pix4Dcapture.
4. Allez dans Mission Manager.
5. Sélectionnez le plan de vol à eectuer.
6. Appuyez sur START dans Pix4Dcapture.
> L'application se connecte au drone, une checklist ap-
parait. Si les paramètres sont valides, alors le bouton
START permet le lancement de la mission.
> Parrot Bluegrass décolle et démarre le plan de vol.
> Le drone revient au point de départ et atterrit une fois
le plan de vol terminé.
> A tout moment vous pouvez reprendre le contrôle à
l'aide de Parrot Skycontroller 2 ou en appuyant sur
Abort sur Pix4Dcapture.
Assurez-vous d'avoir assez de charge batterie
pour eectuer le plan de vol dans son intégralité.
Page 69

69
FRANÇAIS
MODES DE PILOTAGE
PARROT SKYCONTROLLER 2
A tout moment lors de l’exécution du plan de vol sur
Pix4Dcapture vous pouvez reprendre le contrôle du
drone en appuyant sur une des commandes de Parrot
Skycontroller 2.
COMMANDE GAUCHE COMMANDE DROITE
Avancer
Reculer
Déplacement à droite
Déplacement à gauche
Monter
Descendre
Tourner à droite
Tourner à gauche
> Les boutons sont recongurables avec l'application FreeFlight Pro.
Page 70

70
RETOUR AU POINT DE DÉPART
Pour faire revenir Parrot Bluegrass à son point de
départ en dehors d’un plan de vol sur Pix4Dcapture,
appuyez sur le bouton de Parrot Skycontroller 2.
> Parrot Bluegrass revient vers sa position de dé-
part.
Assurez-vous que vous vous trouvez dans un
environnement dégagé de tout obstacle.
ATTERRIR
Appuyez sur le bouton
de Parrot Skycontroller 2.
> Parrot Bluegrass atterrit.
An de ne pas endommager Parrot Bluegrass, atterrissez sur une surface adaptée et dégagée de
tout obstacle.
Page 71

71
FRANÇAIS
COMPORTEMENT DES
VOYANTS LUMINEUX
SEQUOIA
Pour plus d'informations sur les paramètrages du
Sequoia, téléchargez le guide d'utilisateur Sequoia
disponible sur Parrot.com.
Général
Orange clignotant rapidement Arrêt en cours
Orange clignotant lentement Mise à jour en cours
Bleu clignotant Activation/désactivation du Wi-Fi
Problème
Rouge xe Dysfonctionnement matériel
Rouge clignotant
Mémoire corrompue. La réparation est en
cours. Une fois la réparation terminée, la
LED repasse au vert. Cette opération peut
prendre plusieurs secondes en fonction de
l’espace disponible sur votre carte SD.
Jaune clignotant Mémoire pleine
Calibration du magnétomètre
Violet xe
Le capteur doit être immobile pendant 1
seconde
Violet clignotant Le capteur doit être calibré
Vert clignotant Calibration en cours (pitch/tangage)
Cyan clignotant Calibration en cours (roll/roulis)
Page 72

72
Prise de vue
Bleu xe Capture en cours
Vert clair xe
Au moins un des quatre capteurs est
activé
Vert clair clignotant L'écriture des chiers est en cours
CAPTEUR SUNSHINE
Problème
Rouge xe Dysfonctionnement matériel
Jaune clignotant Carte SD pleine
Calibration du magnétomètre
Violet xe
Le capteur doit être immobile pendant 1
seconde
Violet clignotant Le capteur doit être calibré
Vert clignotant Calibration en cours (pitch/tangage)
Cyan clignotant Calibration en cours (roll/roulis)
Page 73

73
FRANÇAIS
METTRE À JOUR
SEQUOIA
VIA UNE CARTE SD
1. Insérez votre carte SD dans un ordinateur et assurezvous qu’elle ne contient pas de chiers en format .plf.
2. Rendez-vous sur la page support de Sequoia : www.
parrot.com/fr/support/
3. Téléchargez le chier de mise à jour disponible au
format .plf.
4. Copiez le chier à la racine de votre carte SD, sans le
mettre dans un dossier et sans le renommer.
5. Insérez la carte SD dans le capteur sunshine.
6. Allumez le drone.
>La mise à jour se fait automatiquement. Pendant
la mise à jour, le voyant du capteur multispectral
clignote orange. Une fois la mise à jour terminée,
le voyant devient vert.
Page 74

74
VIA L’INTERFACE WEB DE
SEQUOIA
Se connecter au réseau Wi-Fi du drone puis
entrer l'adresse IP 192.168.42.2 dans le navigateur
web.
1. Rendez-vous sur la page support de Sequoia :
www.parrot.com/support/
2. Téléchargez le chier de mise à jour disponible au
format .plf.
3. Connectez-vous à l’interface web de Sequoia.
4. Allez dans Paramètres.
5. Cliquez sur Mettre à jour Sequoia.
6. Une fenêtre d’exploration s’ouvre.
7. Sélectionnez votre chier de mise à jour et cliquez
sur Ouvrir.
8. Un bouton Envoyer s’ache dans la page Paramètres.
9. Cliquez sur le bouton Envoyer.
>La mise à jour se lance automatiquement, le
voyant du capteur multispectral devient orange.
Page 75

75
FRANÇAIS
RÉCUPÉRER LES PHOTOS
Pendant le vol, sans carte SD installée, les photos
sont enregistrées sur la mémoire interne du capteur
multispectral.
VIA UNE CARTE SD
1. Insérez votre carte SD dans un adaptateur compatible
avec votre ordinateur.
2. Récupérez les photos prises lors de la session de vol.
Ne pas retirer la carte SD lorsque le drone est allumé.
VIA WIFI
1. Connectez-vous au Wi-Fi du Bluegrass_
XXXX, et entrez l'adresse IP 192.148.42.2
dans le navigateur Web Sequoia s’allume
automatiquement.
2. Allez dans l’onglet Gallery et récupérez les photos
prises lors de la session de vol.
TRAITEMENT DES
DONNÉES AVEC AIRINOV
FIRST+
Rendez-vous sur http://parrot.airinov.com et suivez les
étapes à l’écran pour le traitement de vos données.
Pour plus d’informations rendez-vous sur www.parrot.
com/support .
Page 76

76
Toutefois, les images récupérées par Sequoia peuvent
être traitées de plusieurs façons.
AVEC LE LOGICIEL DE GESTION
DE DONNÉES MICASENSE ATLAS
Vous pouvez analyser les photos prises par
Sequoia avec le logiciel MicaSense ATLAS.
Pour plus d’informations, rendez-vous sur le site
www.micasense.com.
AVEC LE LOGICIEL DE
CARTOGRAPHIE PIX4DMAPPER
Vous pouvez analyser les photos prises par
Sequoia avec le logiciel Pix4Dmapper. Pour
plus d’informations, rendez-vous sur le site
www.pix4d.com.
LES PRESCRIPTIONS
AGRONOMIQUES D'AIRINOV
La société Airinov propose un service de prescriptions
pour fertilisation azotée pour le colza et le blé. Pour plus
d’informations, rendez-vous sur www.airinov.fr.
Page 77

77
FRANÇAIS
PRECAUTIONS
NE TOUCHEZ PAS
LES HÉLICES
Ne touchez pas les hélices du drone lorsque les
moteurs sont en marche. Prenez des précautions
concernant les biens et les personnes.
Démontez les hélices du Parrot Bluegrass avant
de le connecter au PC.
Page 78

78
COMPORTEMENT
DU VOYANT LUMINEUX
PARROT SKYCONTROLLER 2
Clignote rouge
Parrot Skycontroller 2
tente de se connecter
à un drone.
> Assurez-vous que
votre drone est allumé.
Ou
La batterie du Parrot
Skycontroller 2 ou du
drone est faible.
> Rechargez la batterie.
Ou
Parrot Skycontroller 2
a détecté un problème
avec le drone.
> Rendez-vous dans
la section Support sur
www.parrot.com.
Vert xe
Parrot Skycontroller 2
est connecté au drone.
> Vous pouvez piloter
le drone.
Page 79

79
FRANÇAIS
PARROT BLUEGRASS
Clignote
bleu
Parrot Bluegrass a détecté le signal
GPS et est prêt à décoller.
Clignote
vert
Parrot Bluegrass est en vol.
Clignote
jaune
La mise à jour de Parrot Bluegrass
est en cours.
Ne pas éteindre Parrot Bluegrass
Clignote
rouge et
bleu
Parrot Bluegrass a détecté un
problème au niveau de la batterie.
> Contactez votre revendeur ou
rendez-vous sur la page support de
Parrot Bluegrass sur www.parrot.
com.
Clignote
rouge
Parrot Bluegrass a détecté une
erreur.
> Un message d’erreur apparaît
sur l’application FreeFlight Pro.
Rendez-vous sur le tableau des
codes erreur disponible sur la page
support de Parrot Bluegrass.
Page 80

80
CAPTEURS
• Ultrason
• Altimètre
• Caméra verticale hi-speed
SYSTÈME DE NAVIGATION INERTIELLE
• Gyroscope à trois axes
• Accéléromètre à trois axes
• Magnétomètre à trois axes
AUTO PILOTE
• CPU Dual core ARM 9
• Mémoire ash interne pour la vidéo HD de la
caméra frontale: 32 Go
WI-FI ET TRANSMISSIONS
• Point d’accès de réseau
• Type Wi-Fi ac, 2 antennes bi-bande (2,4 et
5GHz), entrées et sorties multiples
SPÉCIFICATIONS
TECHNIQUES
Page 81

81
FRANÇAIS
BATTERIE AMOVIBLE
• Batterie 4 cellules 99 Wh
• Autonomie de la batterie : 25 minutes
• Tension nominale : 14,8V
• 20 A en décharge continue
• Charge à 1 C max
• Plage de fonctionnement : 0°C-40°C
DIMENSIONS
• Poids : 1,850 Kg
• Taille : 1150 mm x 580 mm x 120 mm
GPS
• GPS intégré
• GPS + GLONASS
PERFORMANCE
• Moteur : 700kv
VIDEO & PHOTOS
• Caméra frontale Full HD de 1080p
• Avec FreeFlight Pro ux vidéo : 360p / 720p
Page 82

82
CHARGEUR PARROT SKYCONTROLLER 2
• Input : 100-240V, 50h-60Hz, 1.2A
• Output : Max 12,6Vdc, 3.5A
• Plage de fonctionnement : 0°C-40°C
ENTRETIEN DE SEQUOIA
NETTOYER LES CAPTEURS
En cas de poussière ou de terre sur la lentille et/ou les
capteurs :
1. Utilisez le chion microbres (fourni) pour nettoyer la
lentille.
2. Retirez les traces restantes avec un coton-tige imbibé
de produit pour nettoyer les lentilles.
OBTENIR DES PIÈCES
DÉTACHÉES
Rendez-vous sur le site web www.parrot.com pour trouver
les pièces détachées disponibles.
Page 83

83
FRANÇAIS
INFORMATIONS
GÉNÉRALES
ACCESSOIRES ET PIÈCES DE RECHANGE
Des accessoires et pièces de rechange sont disponibles auprès de votre revendeur Parrot ou depuis le site www.parrot.com.
PRÉCAUTIONS D’UTILISATION ET ENTRETIEN
PARROT SKYCONTROLLER 2
Parrot Skycontroller 2 est destiné à piloter Parrot Bebop, Parrot Bebop 2, Parrot
Disco et Parrot Bluegrass, et ne convient pas aux enfants de moins de 14 ans.
Consultez la liste des drones compatibles avec Parrot Skycontroller 2 dans la
section Support sur www.parrot.com.
Utilisez uniquement les accessoires spéciés par Parrot Drones SAS.
Si du sable ou de la poussière pénètre dans Parrot Skycontroller 2, celui-ci peut
ne plus fonctionner correctement, de manière irréversible.
N’exposez pas Parrot Skycontroller 2 sous la pluie ou de façon prolongée au
soleil.
N’utilisez pas cet appareil à proximité de substances liquides.
Risque d’ingestion de petits éléments. Les emballages ne font pas partie du
produit et doivent être jetés par mesure de sécurité.
PARROT BLUEGRASS
La durée maximale de l’enregistrement vidéo est de 29 minutes.
Parrot Bluegrass ne convient pas aux enfants de moins de 14 ans.
Le pilote doit, à tout instant, conserver un contact visuel avec Parrot Bluegrass
et contrôler sa trajectoire. Parrot Bluegrass doit être utilisé conformément aux
règles de l’aviation civile de votre pays. Les lieux d’utilisation doivent être adaptés à son évolution pour assurer en permanence la sécurité des personnes, des
animaux et des biens. L’utilisation de Parrot Bluegrass dans certains lieux du
domaine public (par ex: gare, aéroport,…) ou sur la voie publique peut ne pas
être autorisée.
Les hélices de Parrot Bluegrass en vol peuvent causer des dommages à des
personnes ou des objets. Ne touchez pas Parrot Bluegrass en vol. Patientez
jusqu’à l’arrêt total des hélices avant de manipuler Parrot Bluegrass.
Utilisez uniquement les accessoires spéciés par Parrot Drones SAS.
Si du sable ou de la poussière pénètre dans Parrot Bluegrass, celui-ci peut ne
plus fonctionner correctement, de manière irréversible.
N’utilisez pas Parrot Bluegrass dans des conditions météorologiques défavorables (pluie, vent fort, neige) ou lorsque les conditions de visibilité sont insufsantes (nuit, brouillard).
Maintenez Parrot Bluegrass à l’écart de lignes de haute tension, bâtiments ou
toute autre zone potentiellement dangereuse.
Ne volez pas et ne posez pas Parrot Bluegrass sur l'eau ou sur une surface humide, cela pourrait causer des dommages irréversibles. Ne posez pas le
Page 84

84
Parrot Bluegrass sur la neige.
Evitez de faire subir à Parrot Bluegrass des changements d’altitude trop importants.
Ne laissez pas Parrot Bluegrass au soleil.
Risque d’ingestion de petits éléments. Les emballages ne font pas partie du
produit et doivent être jetés par mesure de sécurité.
SEQUOIA
Utilisez uniquement les accessoires spéciés par le constructeur.
Si du sable ou de la poussière pénètre dans Sequoia, celui-ci peut ne plus
fonctionner correctement, de manière irréversible.
N’utilisez pas Sequoia dans des conditions météorologiques défavorables
(pluie, vent fort, neige) ou lorsque les conditions de visibilité sont insusantes
(nuit, brouillard).
Maintenez Sequoia à l’écart de lignes de haute tension, bâtiments ou toute
autre zone potentiellement dangereuse.
N’utilisez pas cet appareil à proximité de substances liquides. Ne posez
pas Sequoia sur l’eau ou sur une surface humide, cela pourrait causer des
dommages irréversibles.
Evitez de faire subir au Sequoia des changements d’altitude trop importants.
Ne laissez pas Sequoia au soleil.
Risque d’ingestion de petits éléments. Les emballages ne font pas partie du
produit et doivent être jetés par mesure de sécurité.
Si vous utilisez Sequoia avec un drone, référez-vous aux informations générales
de votre drone.
MISE EN GARDE CONCERNANT LE RESPECT DE LA VIE
PRIVÉE ET RESPECT DE L’IMAGE DES BIENS
Enregistrer et diuser l’image d’une personne sans son autorisation peut
constituer une atteinte à sa vie privée et être susceptible d’engager votre
responsabilité. Demandez l’autorisation avant de lmer des personnes,
notamment, si vous souhaitez conserver vos enregistrements et/ou les
diuser. Ne diusez pas d’images dégradantes ou pouvant porter atteinte à la
réputation ou à la dignité d’une personne.
Enregistrer et diuser l’image d’un bien sans l’autorisation de son propriétaire
et/ou de tout tiers disposant de droits de propriété intellectuelle sur le bien
peut constituer une atteinte au droit à l’image du bien et être susceptible
d’engager votre responsabilité. Demandez l’autorisation à son propriétaire et/
ou de tout tiers disposant de droit de propriété.
MODIFICATIONS
Les explications et spécications contenues dans ce guide utilisateur ne sont
fournies qu’à titre d’information et peuvent être modiées sans notication préalable. Ces informations sont correctes au moment de l’impression et le plus
grand soin est apporté lors de leur rédaction an de vous fournir des informations les plus précises possible. Cependant, Parrot Drones SAS ne saurait être
tenu responsable, directement ou indirectement, des éventuels préjudices ou
pertes de données accidentelles résultant d’une erreur ou omission au sein du
présent document. Parrot Drones SAS se réserve le droit d’amender ou amé-
Page 85

85
FRANÇAIS
liorer le produit ainsi que son guide utilisateur sans aucune restriction ou obligation de prévenir l’utilisateur. Dans le cadre de l’attention portée par Parrot
Drones SAS sur l’amélioration de nos produits, il est possible que le produit
que vous avez acheté dière légèrement de celui décrit au sein du présent document. Dans ce cas, vous pourrez éventuellement trouver une nouvelle version
du guide utilisateur au format électronique sur le site www.parrot.com.
GARANTIE
Pour connaître les conditions de garantie, merci de vous référer aux conditions générales de vente du revendeur auprès de qui vous avez acheté
le Parrot Bluegrass.
WIFI
Avant de piloter votre Parrot Bluegrass, renseignez-vous sur les restrictions
d’utilisation des fréquences Wi-FI de votre lieu de vol. Certaines fréquences
peuvent être restreintes ou interdites. Dans certains pays, par exemple,
l’utilisation de la bande Wi-FI 5 GHz peut être interdite en extérieur.
COMMENT RECYCLER CE PRODUIT
PARROT SKYCONTROLLER 2 ET PARROT BLUEGRASS
Ce symbole sur le produit ou sa documentation indique qu’il ne doit pas
être éliminé en n de vie avec les autres déchets ménagers. L’élimination
incontrôlée des déchets pouvant porter préjudice à l’environnement ou à
la santé humaine, veillez à les séparer des autres types de déchets et les
recycler de façon responsable. Vous favoriserez ainsi la réutilisation durable des
ressources matérielles. Nous vous invitons à contacter votre revendeur ou à
vous renseigner auprès de votre mairie an de savoir où et comment le Parrot
Skycontroller 2 et Parrot Bluegrass peuvent être recyclés.
DÉCLARATION DE CONFORMITÉ UE
PARROT SKYCONTROLLER 2
Parrot Skycontroller 2 peut être utilisé en : DE, AT, BE, BG, CY, HR, DK, ES, EE,
FI, FR, GR, HU, IR, IT, LV, LT, LU, MT, NL, PL, PT, CZ, RO, GB, SK, SI, SE.
Parrot DRONES, 174 quai de Jemmapes, 75010 Paris, France, déclare sous son
unique responsabilité que le produit décrit dans le présent guide utilisateur est
en conformité avec les normes techniques, EN 301489-17, EN300328, EN71-1,
EN71-2, EN71-3, EN62115, EN 50566 : 2013 (SAR) suivant les dispositions de
la directive RED 2014/53/UE et la directive de sécurité générale de produits
2014/35/EU.
http://www.parrot.com/ce/?skycontroller-2
DÉCLARATION DE CONFORMITÉ UE PARROT BLUEGRASS
Cet appareil peut être utilisé en : DE, AT, BE, BG, CY, HR, DK, ES, EE, FI, FR, GR,
HU, IE, IT, LV, LT, LU, MT, NL, PL, PT, CZ, RO, GB, SK, SI, SE.
La restriction de l’utilisation en extérieur dans les pays membres de l’Union
Européenne ne concerne que la première sous bande de la bande 5Ghz (51505250MHz).
Parrot Drones SAS, 174 quai de Jemmapes, 75010 Paris, France, déclare sous
son unique responsabilité que le produit décrit dans le présent guide utilisa-
Page 86

86
teur est en conformité avec les normes techniques, EN 301489-1, EN 3014893, EN 301489-17, EN 62311, EN300328, EN301893, EN300 440-2, EN60950-1,
EN50581 suivant les dispositions de la directive R&TTE 1999/5/CE , la directive
de sécurité générale de produits 2001/95/CE et la directive RED 2014/53/UE.
http://www.parrot.com/fr/ce/?bluegrass
DÉCLARATION DE CONFORMITÉ CANADA
PARROT SKYCONTROLLER 2
Parrot Skycontroller 2 est conforme aux CNR d’Industrie Canada applicables
aux appareils radio exempts de licence. L’exploitation est autorisée aux deux
conditions suivantes : (1) l’appareil ne doit pas produire de brouillage, et (2)
l’utilisateur de l’appareil doit accepter tout brouillage radioélectrique subi,
même si le brouillage est susceptible d’en compromettre le fonctionnement.
DÉCLARATION DE CONFORMITÉ CANADA
PARROT BLUEGRASS
Le présent appareil est conforme aux CNR d’Industrie Canada applicables aux
appareils radio exempts de licence. L’exploitation est autorisée aux deux conditions suivantes : (1) l’appareil ne doit pas produire de brouillage, et (2) l’utilisateur de l’appareil doit accepter tout brouillage radioélectrique subi, même si le
brouillage est susceptible d’en compromettre le fonctionnement. Cet appareil
numérique de la classe B est conforme à la norme NMB-003 du Canada.
FCC
Pour répondre aux exigences relatives à l’exposition RF de la FCC/IC pour les
appareils de transmission, une distance d’au moins 20cm doit être maintenue
entre l’antenne du produit et les personnes. Pour assurer la conformité, l’utilisation à une distance inférieure n’est pas recommandée.
Le présent appareil est conforme à la partie 15 du CNR d’Industrie Canada
applicables aux appareils radio exempts de licence.
L’exploitation est autorisée aux deux conditions suivantes :
1. L’appareil ne doit pas produire de brouillage ;
2. L’utilisateur de l’appareil doit accepter tout brouillage radioélectrique subi,
même si le brouillage est susceptible d’en compromettre le fonctionnement.
Ce dispositif mobile muni d’une antenne répond aux limite de la FCC sur l’exposition aux rayonnements établies pour un environnement non-contrôlé. Ce
dispositif répond aux limites du débit d’absorption spécique (DAS) de la FCC.
Pour en garantir la conformité, respectez les instructions suivantes : cet émetteur ne doit pas être co-utilisé ou fonctionner en même temps qu’une autre
antenne ou qu’un émetteur.
BATTERIE PARROT SKYCONTROLLER 2 ET
PARROT BLUEGRASS
ATTENTION : Le non-respect de l’ensemble des instructions peut provoquer
des blessures graves, endommager de façon irréversible la batterie et provoquer un incendie, un dégagement de fumée ou une explosion.
Avant tout stockage de longue durée, assurez-vous que votre batterie soit chargée à environ 50% de sa capacité. Il est recommandé de vérier la charge de
votre batterie tous le 3 mois et de procéder à une charge supplémentaire si
Page 87

87
FRANÇAIS
nécessaire.
Toujours vérier l’état de la batterie avant de la charger ou de l’utiliser. Remplacer la batterie si elle a subi un choc, ou en cas d’odeur, de surchaue,
de décoloration, de déformation ou de fuite. Il est recommandé de ne pas
utiliser un autre chargeur que celui fourni avec le produit. La température de la batterie ne doit jamais excéder les 60 °C (140 °F) sinon la batterie
pourrait être endommagée ou s’enammer. Ne jamais eectuer de charge
sur un support inammable, à proximité de produits inammables ou à l’intérieur d’un véhicule (placer de préférence la batterie dans un récipient non
inammable et non conducteur). Ne jamais laisser la batterie sans surveillance durant le processus de charge. Ne jamais désassembler ou modier
le câblage du boîtier, ou percer les cellules. Ne pas mettre de batteries en
court-circuit. Ne jamais exposer la batterie LiPo à l’humidité ou directement
au soleil, ou dans un endroit où la température peut dépasser 60°C (voiture
en plein soleil par exemple). En cas de non utilisation prolongée, la batterie
se déchargera progressivement. Toujours tenir hors de portée des enfants.
ATTENTION
RISQUE D’EXPLOSION SI LA BATTERIE DU PARROT BLUEGRASS EST
REMPLACÉE PAR UNE BATTERIE NON COMPATIBLE.
ELIMINEZ LES BATTERIES USAGÉES SELON LES INSTRUCTIONS.
Pour plus d’informations sur les batteries, visitez le site
http://www.parrot.com/support
MARQUES
Parrot et le logo Parrot sont des marques de Parrot SA utilisées sous licence.
Parrot Bebop drone, Parrot Bebop, Parrot Bebop 2, Parrot Disco, Parrot Bluegrass, Parrot Skycontroller, Parrot
C.H.U.C.K. et Sequoia, l’application FreeFlight Pro ainsi que leurs logos respectifs sont des marques de Parrot Drones SAS.
iPhone est une marque d’Apple Inc., enregistrée aux Etats-Unis et dans
d’autres pays.
ARM et Cortex sont des marques enregistrées de ARM Limited (ou de ses
liales) en Union Européenne et/ou ailleurs. Tous droits réservés.”
"Wi-Fi(R) est une marque enregistrée par Wi-Fi Alliance(R).
Pix4D et Pix4Dcapture et Pix4Dmapper sont des marques déposées par
Pix4D SA.
Airinov et Airinov First+ sont des marques de commerce ou des marques déposées par Airinov SAS.
App Store est une marque de service d’Apple Inc.
Google Play sont des marques de Google Inc.
Toutes autres marques mentionnées dans ce guide sont la propriété de leurs
titulaires respectifs.
Page 88

88
INFORMATIONS FABRIQUANT
Parrot Bluegrass, Sequoia et Parrot Skycontroller 2 sont fabriqués par : PARROT DRONES SAS - 174 Quai de Jemmapes - 75010 Paris (France) - RCS Paris
808 408 074 - www.parrot.com
Page 89

89
DEUTSCH
Ihre Parrot Bluegrass ™ enthält folgende Elemente :
1. Eine Drohne „Parrot Bluegrass“™;
2. Ein Joypad „Parrot Skycontroller 2 “™. Indem Sie die
App FreeFlight Pro™ auf Ihr Smartphone oder Tablett
herunterladen, können Sie Ihre Parrot Bluegrass mit dem
Parrot Skycontroller 2 steuern. Diese App ist gratis, kann
jedoch In-App Purchases enthalten. Mit ihr können Sie
auch Ihre Parrot Bluegrass kalibrieren;
3. Ein Sensor « Sequoia »™ enthält :
(a) Einen Multispektralsensor, der das von den Panzen
reektierte Licht einfängt; und
(b) Einen Sonnensensor, der die Intensität des
Sonnenlichts speichert; und
4. Einen Zugang zu den Diensten Airinov First+™, mit
denen Sie Ihre NDVI- und Gebietskarten ausgehend von
den Bildaufzeichnungen, die mit der kostenlosen und auf
Ihr Smartphone oder Tablet herunterzuladenden App
Pix4Dcapture™ gemacht wurden, erhalten können.
Page 90

90
WARNUNG
1. Die Parrot Bluegrass IST KEIN SPIELZEUG. Sie darf von Kindern
unter 14 Jahren weder benutzt noch gehandhabt werden.
2. VOR JEDER BENUTZUNG der Parrot Bluegrass :
(a) Dieses Benutzerhandbuch und alle auf www.parrot.com
erhältlichen Informationen und Produktdokumentationen
AUFMERKSAM DURCHLESEN, diese können jederzeit und
ohne vorherige Ankündigung aktualisiert werden (nachfolgend
als „Dokumentation von Parrot“ bezeichnet). BESONDERE
AUFMERKSAMKEIT erfordern die Abschnitte mit dem Symbol
;
(b) INFORMIEREN SIE SICH ÜBER DIE GELTENDEN GESETZE
BEZÜGLICH DER BENUTZUNG VON DROHNEN UND IHREM
ZUBEHÖR (nachfolgend als „Geltende Gesetze“ bezeichnet);
und
(c) DENKEN SIE DARAN, dass die Parrot Bluegrass für
andere und für Sie selbst zum Risiko für SACH-UND/ODER
KÖRPERSCHÄDEN führen kann, die schwerwiegende und
sogar tödliche Verletzungen nach sich ziehen können.
3. Bedenken Sie bitte, dass die in der Werbung und in den
Werbekampagnen von Parrot Drones SAS und seinen Filialen
verwendeten Videos und Fotos von und mit Pros und
erfahrenen Piloten hergestellt wurden. BEZIEHEN SIE SICH
BEI JEGLICHEM ZWEIFEL HINSICHTLICH DER BENUTZUNG
IHRER PARROT BLUEGRASS UND IHRES ZUBEHÖRS BITTE
IMMER AUF DIE LETZTEN AKTUALISIERUNGEN DER
DOKUMENTATION VON PARROT.
4. IM RAHMEN DES GELTENDEN RECHTS ÜBERNEHMEN
PARROT DRONES SAS, IHRE FILIALEN UND IHRE
JEWEILIGEN VERTREIBER UND EINZELHÄNDLER
KEINERLEI HAFTUNG FÜR SCHÄDEN, DIE DURCH ODER
IM ZUSAMMENHANG MIT DER NICHTBEACHTUNG DER
DOKUMENTATION VON PARROT ODER DER GELTENDEN
GESETZE DURCH SIE SELBST ODER JEGLICHE ANDERE
PERSONEN, DIE IHRE PARROT BLUEGRASSBENUTZEN,
VERURSACHT WERDEN.
Page 91

91
DEUTSCH
ÜBERSICHT ÜBER DIE
PARROT BLUEGRASS
Propeller mit Gewinde
Fisheye-Kamera
On/Off-Schalter
und
Leuchtanzeige
Sonnensensor
Akkufach
Akku-Anschluss
Micro-USB-
Anschluss
Page 92

92
Antennenfuß
Multispektralsensor
Page 93

93
DEUTSCH
ÜBERSICHT ÜBER DEN
PARROT SKYCONTROLLER 2
Antenne
Stelle der Halterung für Mobilgeräte
On/Off-
Knopf
Rückkehr zum Startpunkt
Starten/ Landen
Während des Fluges: Videoaufnahme
starten/ stoppen
Menü Einstellungen: Rückkehr
Während des Fluges:Foto
aufnehmen
Menü
Einstellungen:bestätigen
Einstellungen
USB-
Anschluss
Page 94

94
Kameraausrichtung
Anzeigemodus
Vertikale Ausrichtung der Kamera
USB-
Anschluss
Page 95

95
DEUTSCH
ÜBERSICHT ÜBER DIE
SEQUOIA
Sequoia besteht aus einem Multispektralsensor
und einen in die Parrot Bluegrass integrierten
Sonneneinstrahlungssensor.
Sequoia ist ein Multispektralsensor für den Einsatz
in der Landwirtschaft. Ihre Konstruktion erfolgte
nach 3 Hauptkriterien: ausgezeichnete Präzision,
äußerst reduzierte Größe und geringes Gewicht,
hohe Nutzerfreundlichkeit. Der Sensor Sequoia ist an
alle Drohnen, Starrügler und Multirotoren mit oder
ohne stabiliserten Gimbal anpassbar. Sie ermöglicht
Aufnahmen von landwirtschaftlichen Flächen in
mehreren Spektralbändern und bemisst den Zustand der
Panzen: grün (Wellenlänge 550nm Bandbreite 40 nm),
rot (Wellenlänge 660nm Bandbreite 40 nm), red-edge
(Wellenlänge 735nm Bandbreite 10 nm) und Nahinfrarot
(Wellenlänge 790nm Bandbreite 40 nm).
Die Fotos können dann mit verschiedener Software
analysiert werden. Sie ermöglichen die Erstellung
indizierter Karten (NDVI, NDRE, etc.) und von
Empfehlungen für die Stickstodüngung.
Page 96

96
MULTISPEKTRALSENSOR
NIR-Sensor
Roter
Sensor
Red-Edge-
Sensor
Grüner
Sensor
RGB-Sensor
Monochrome Fotosensoren mit 1.2 Megapixel Global
Shutter sammeln die Daten in diskreten Spektralbändern.
RGB Fotosensor 16 Megapixel Rolling Shutter.
Weitere Elemente des Multispetralsensors:
• Inertialsystem.
• Interner Speicher von 64GB.
• Magnetometer.
Page 97

97
DEUTSCH
Grün
Wellenlänge 550nm
Bandbreite 40 nm
Auösung: 1.2 Mpx
Rot
Wellenlänge 660nm
Bandbreite 40 nm
Auösung: 1.2 Mpx
Page 98

98
Red-edge
Wellenlänge 735nm
Bandbreite 10 nm
Auösung: 1.2 Mpx
Nahinfrarot
Wellenlänge 790nm
Bandbreite 40 nm
Auösung: 1.2 Mpx
RGB
Auösung: 16Mpx
Page 99

99
DEUTSCH
SONNENSENSOR
Der Sonnensensor ermöglicht das Kalibrieren der Bilder je
nach Sonneneinstrahlung. Er ermöglicht das Vergleichen
der Fotos im Zeitverlauf trotz Lichtschwankungen bei
der Aufnahme. Der Sonnensensor ist auf dem oberen
Teil der Drohne befestigt und zeigt Richtung Himmel.
Während des Flugs wird der Sonnensensor von dem
Multispektralsensor versorgt.
!
Es wird empfohlen, die mit Sequoia gelieferte
SD-Karte zu verwenden. Die technischen Leistungen anderer SD-Karten können nicht garantiert
werden.Konsultieren Sie die Liste der kompatiblen SD-Karten auf www.parrot.com/support.
Leuchtanzeige :
Referenz für die
Kalibrierung
Steckplatz der SD-
Karte
Umgebungslichtsensoren
4 Umgebungslichtsensoren. Diese Sensoren sind mit
einem Bandpasslter ausgestattet, der mit den Filtern
des Multispektralsensors identisch sind.
Weitere Elemente des Sonnensensors:
• Inertialsystem.
• Magnetometer.
Page 100

100
CHECKLISTE VOR DEM
START
VORSCHRIFTEN
• Die Parrot Bluegrass ist gemäß der geltenden
lokalen Gesetzgebung zu benutzen. Sie darf nur in
dafür geeigneten Bereichen eingesetzt werden, um
jederzeit die Sicherheit von Personen, Tieren und
Gegenständen zu gewährleisten.
• Die Verwendung der Parrot Bluegrass ist an
bestimmten öentlichen Orten (z.B. Bahnhof,
Flughafen, ...) oder auf der Straße möglicherweise
nicht erlaubt.
• Die Person, die sie steuert, muss die Parrot Bluegrass
zu jedem Zeitpunkt im Auge behalten und ihre
Flugbahn überwachen.
• Erkundigen Sie sich vor dem Start Ihrer Parrot
Bluegrass über die Nutzungsbeschränkungen der
WLAN-(Wi-Fi-)Frequenzen an Ihrem Flugstandort.
Bestimmte Frequenzen können Einschränkungen
unterliegen oder verboten sein. In einigen Ländern
kann zum Beispiel die Nutzung des Wi-5-GHzBands im Freien verboten sein.
FLUGBEDINGUNGEN
• Steuern Sie die Parrot Bluegrass nicht im Dunkeln.
• Überprüfen Sie die Wetterbedingungen, um
gute Flugbedingungen und eine gute Sicht zu
gewährleisten. Benutzen Sie die Parrot Bluegrass
 Loading...