

Page 1
USER GUIDE
Page 2

TABLE OF CONTENTS
.......................................................................................................1Compatibility
Drones
..........................................................................................................1
Smartphones
..........................................................................................................1
Follow Me GPS & Visual tracking
..........................................................................................................1
.......................................................................................................2Getting started
Connecting a drone and a smartphone
..........................................................................................................2
Connecting a drone and a Parrot Skycontroller
..........................................................................................................3
Parrot Skycontroller
Parrot Skycontroller 2
.......................................................................................................5Flying
Flying a Parrot Bebop Drone or a Parrot Bebop 2
..........................................................................................................5
With a smartphone
With a Parrot Skycontroller alone
With a Parrot Skycontroller and a smartphone
Flying a Parrot Disco
..........................................................................................................13
With a Parrot Skycontroller 2 alone
With a Parrot Skycontroller 2 and a smartphone
.......................................................................................................18Settings
General settings
..........................................................................................................18
Accessing the general settings
Piloting settings
Position, Distances and Limits
Return home
Network settings
..............................................................................3
..............................................................................4
..............................................................................5
..............................................................................8
..............................................................................10
..............................................................................13
..............................................................................15
..............................................................................18
..............................................................................19
..............................................................................20
..............................................................................21
..............................................................................22
Video settings
..........................................................................................................24
Accessing video settings
Presentation of modes
Managing video settings
FPV settings
..........................................................................................................33
..............................................................................24
..............................................................................24
..............................................................................29
Page 3

Auto launch
Eye spacing
.......................................................................................................35Updating your products
Updating your drone and your Parrot Skycontroller 2
..........................................................................................................35
Updating your drone
..........................................................................................................36
Updating your Parrot Skycontroller 2
..........................................................................................................38
.......................................................................................................39Customising the controls of the Parrot Skycontroller 1 and 2
.......................................................................................................40Viewing flights
.......................................................................................................41Transferring flights to a smartphone
.......................................................................................................43Follow Me GPS & Visual tracking
Auto Follow
..........................................................................................................43
..............................................................................33
..............................................................................34
Switching to Auto Follow mode
Presentation of the flight screen
Meaning of the colours of the auto follow frame
Default viewing angle and Perfect Side
Magic Dronies
Locking the screen
Exiting auto follow mode
Auto Framing
..........................................................................................................53
Switching to auto framing mode
Presentation of the flight screen
Meaning of the colours of the auto framing frame
Locking the screen
Exiting auto framing mode
.......................................................................................................59Flight Plan
Before getting started
..........................................................................................................59
..............................................................................44
..............................................................................46
..............................................................................47
..............................................................................48
..............................................................................50
..............................................................................52
..............................................................................52
..............................................................................54
..............................................................................56
..............................................................................56
..............................................................................57
..............................................................................57
Install Flight Plan
Pre-flight checks
Accessing Flight Plan
Presentation of Flight Plan
..........................................................................................................61
Main screen
..............................................................................59
..............................................................................59
..............................................................................60
..............................................................................62
Page 4

Changing the map mode
Creating a flight plan
..........................................................................................................63
Changing the drone's settings
..........................................................................................................65
..............................................................................63
Changing the speed of the drone
Changing the direction of the drone's camera
Managing waypoints
..........................................................................................................66
Moving a waypoint
Inserting a waypoint on a connecting line
Changing the altitude of a waypoint
Deleting a waypoint
Point of interest
..........................................................................................................69
Creating a POI
Changing a POI
Progressive course
..........................................................................................................72
Managing events
..........................................................................................................73
Presentation of the timeline
Presentation of events
Adding/Deleting an event
Event settings
..............................................................................65
..............................................................................66
..............................................................................66
..............................................................................67
..............................................................................67
..............................................................................69
..............................................................................70
..............................................................................71
..............................................................................74
..............................................................................75
..............................................................................76
..............................................................................76
Managing flight plans
..........................................................................................................78
Opening a flight plan
Saving a flight plan
Deleting a flight plan
Launching a flight plan
..........................................................................................................80
Display modes
Interrupting the flight plan
Regaining control of the drone
..............................................................................78
..............................................................................80
..............................................................................80
..............................................................................81
..............................................................................82
..............................................................................82
Page 5

Compatibility
Drones
The FreeFlight Pro app is compatible with the following drones:
· Parrot Bebop Drone v3.3.0 and later
· Parrot Bebop 2 v3.9.0 and later
· Parrot Discov1.0.5 and later
The FreeFlight Pro app is compatible with Parrot Skycontroller v1.7.4 and later, and Parrot
Skycontroller 2 v1.0.2 and later.
NB: Before each use, make sure your drone and your controller are up-to-date. For more
information, go to the Update section.
Smartphones
The FreeFlight Pro app is compatible with the following versions:
· Android 4.3 and up
· iOS 8 and up
Follow Me GPS & Visual tracking
Follow Me GPS & Visual tracking is compatible with Parrot Bebop 2 v4.0 and higher.
Before using this option, ensure that your smartphone has a working GPS.
1
Page 6

Getting started
Connecting a drone and a smartphone
If you are connecting to your drone for the first time:
1. In the FreeFlight Pro app, tap .
> The list of drones detected by the app appears.
2. Select your drone.
> The live return video feed is displayed in the app's FLY&FILM window. You are connected
to your drone.
If the app does not detect any drones:
1. Go into your smartphone's Wi-Fi settings.
> A list of the Wi-Fi devices around you appears.
2. Select your drone.
3. Open the FreeFlight Pro app.
> You are connected to your drone.
If you are already connected to the drone:
1. On your smartphone, turn on the Wi-Fi function.
2. Open the FreeFlight Pro app.
3. Place your Parrot drone on a flat surface.
4. Turn on your Parrot drone.
> The app recognises the drone and automatically connects to it.
2
Page 7
Once connected to your drone you can:
· Adjust the flight settings
· Adjust the image settings
· Updating your drone
· Updating your Parrot Skycontroller 2
· View your flights
· Download your photos and videos onto your smartphone
· Fly (NB: you cannot fly the Parrot Disco with a smartphone. To do this, we recommend you
use a Parrot Skycontroller 2.)
· Launch a Flight Plan
· Launch Follow Me
Connecting a drone and a Parrot Skycontroller
Parrot Skycontroller
You cannot use the Parrot Skycontroller to fly the Parrot Disco.
1. Place your Parrot drone on a flat surface.
2. Turn on your Parrot drone.
3. Turn on the Parrot Skycontroller.
4. Wait until the Parrot Skycontroller beeps.
> The Parrot Skycontroller is connected to the drone.
5. On your smartphone, turn on the Wi-Fi function and open the FreeFlight Pro app.
6. Tap .
> The list of detected devices appears.
7. Select your Parrot Skycontroller.
You are connected.
3
Page 8
Parrot Skycontroller 2
1. Place your Parrot drone on a flat surface.
2. Turn on your Parrot drone.
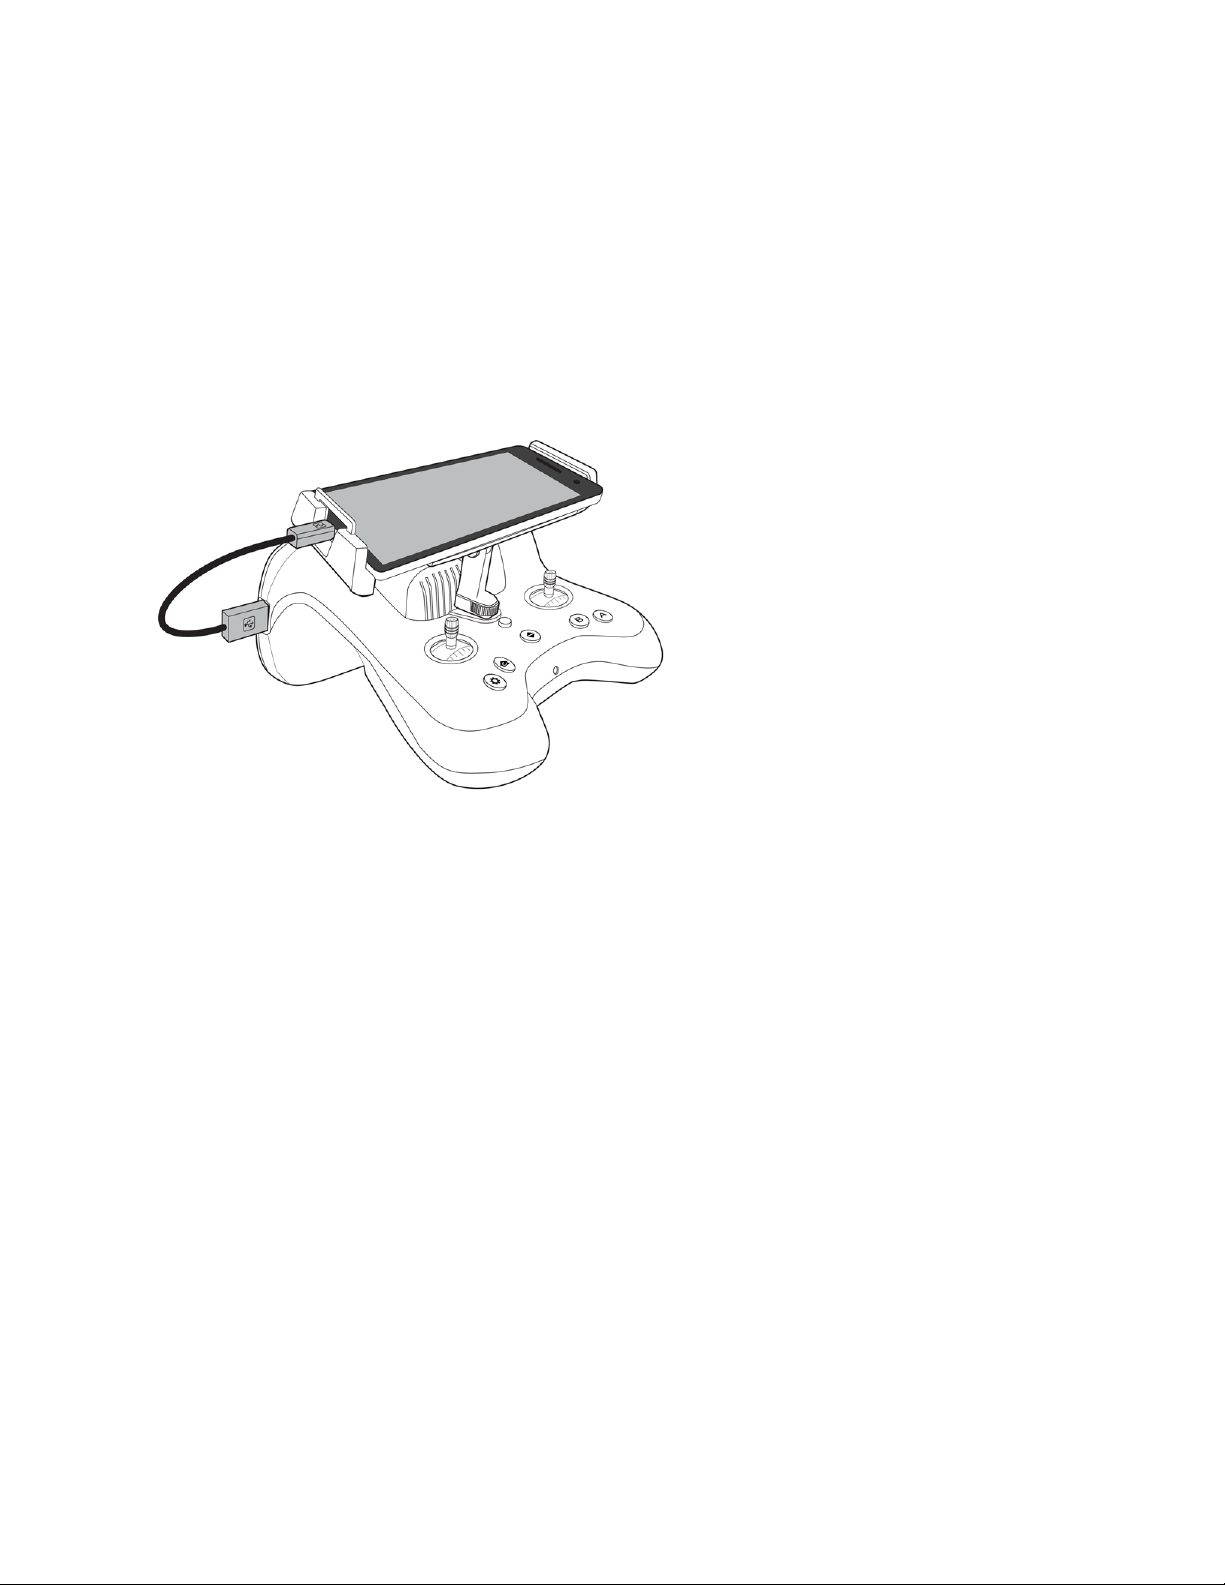
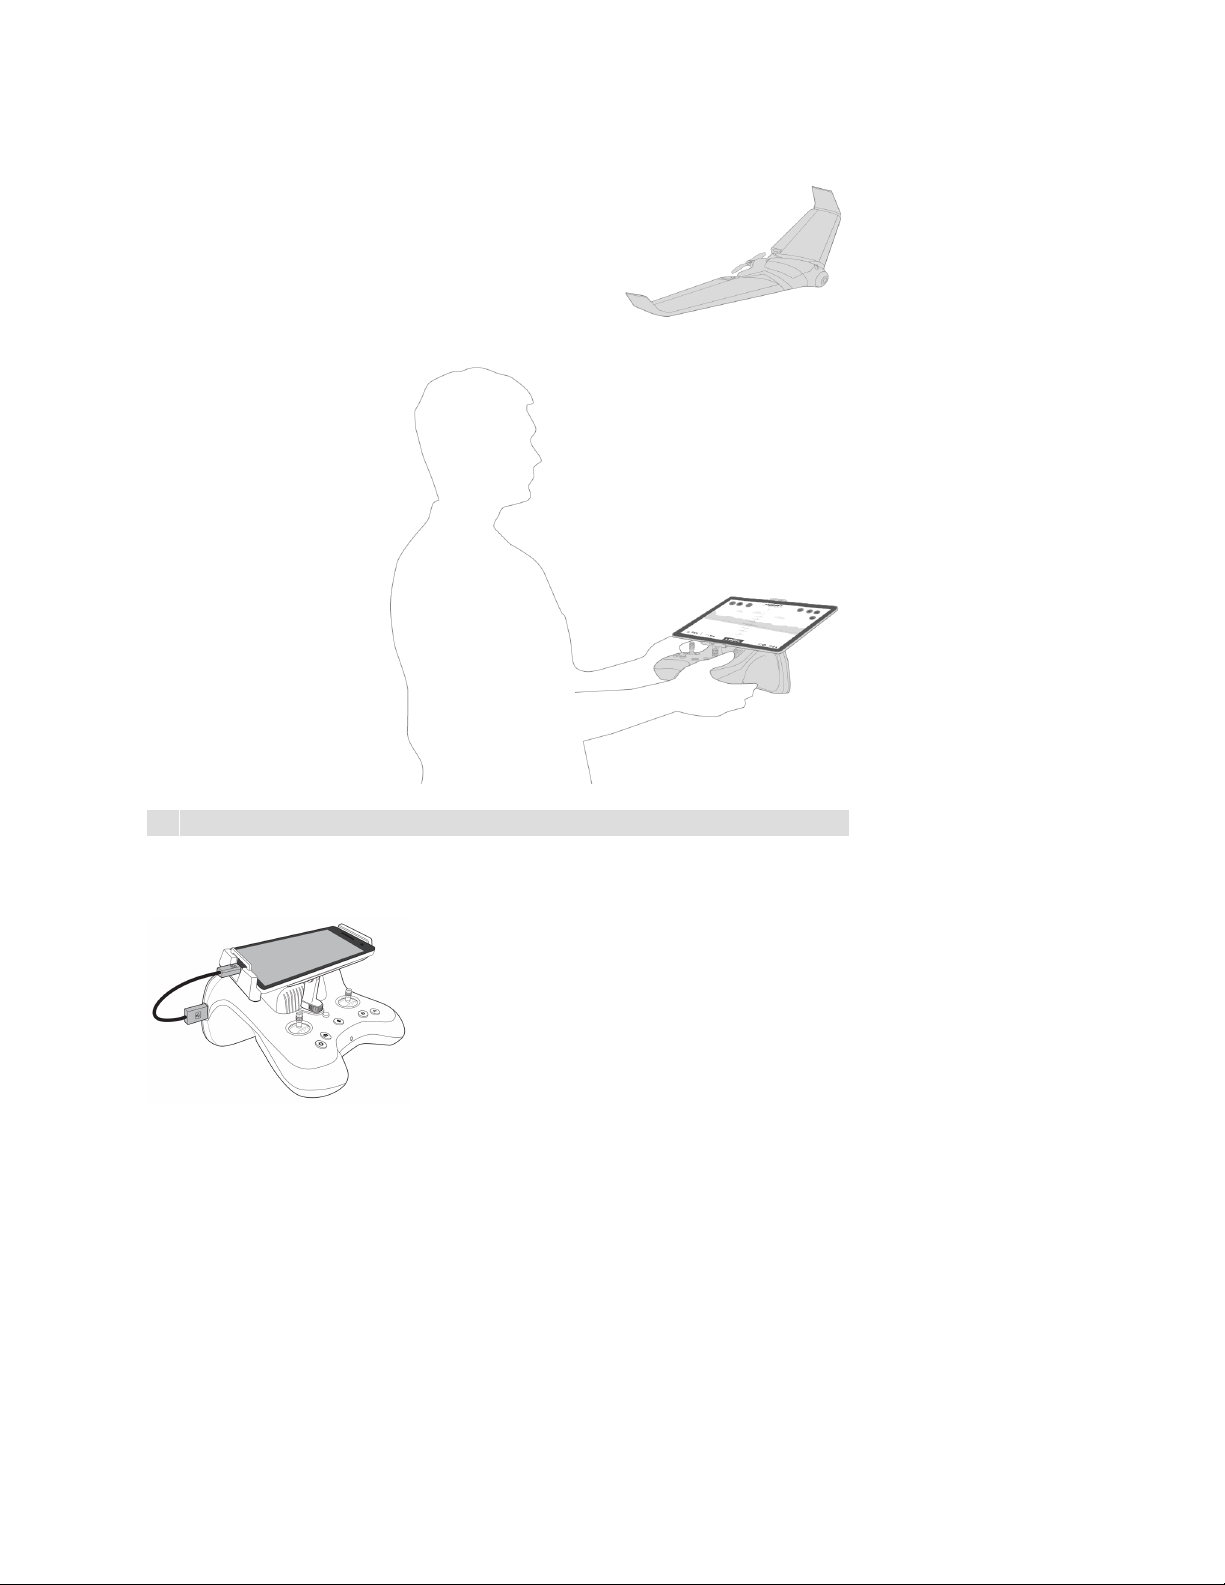
3. Attach your smartphone to the Parrot Skycontroller 2's holder.
4. Turn on your Parrot Skycontroller 2.
5. Use a USB cable to connect your Parrot Skycontroller 2 to your smartphone.
> The FreeFlight Pro application launches automatically.
6. Wait until the light on the controller turns green.
7. The Parrot Skycontroller 2 is connected to the drone.
4
Page 9
Flying
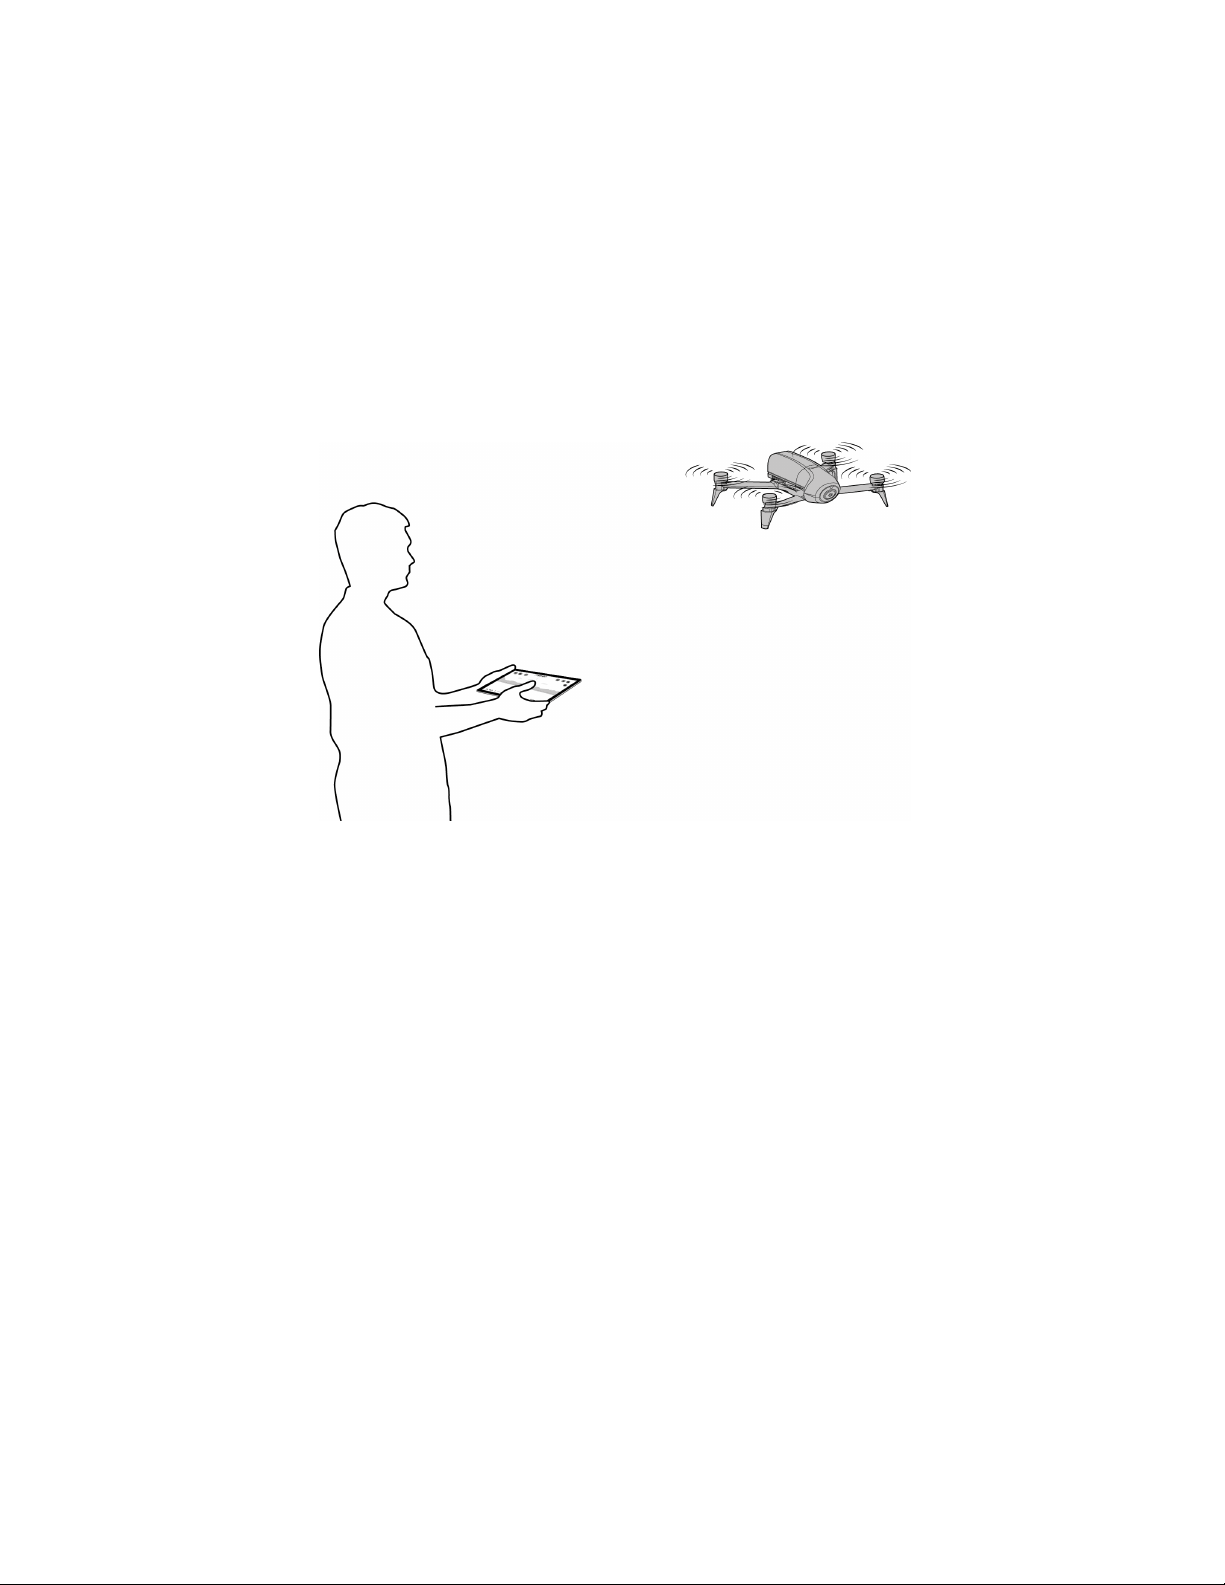
Flying a Parrot Bebop Drone or a Parrot Bebop 2
With a smartphone
5
Page 10
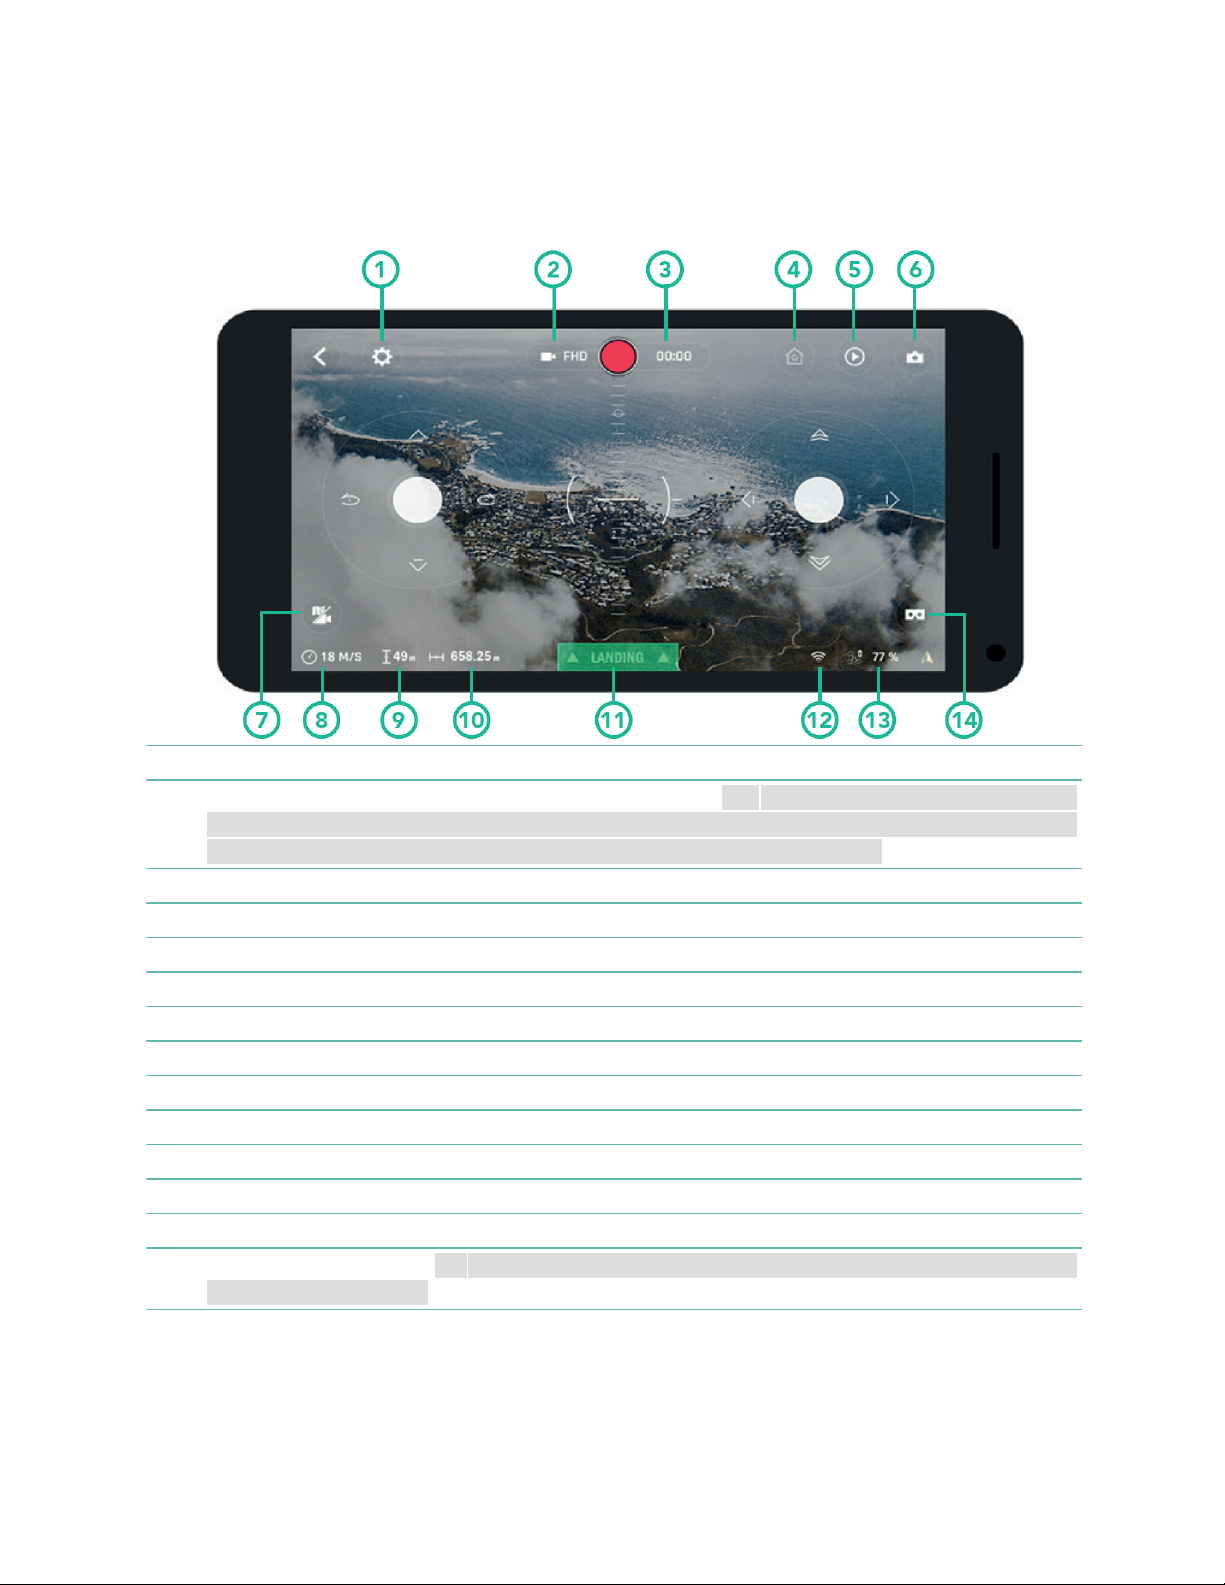
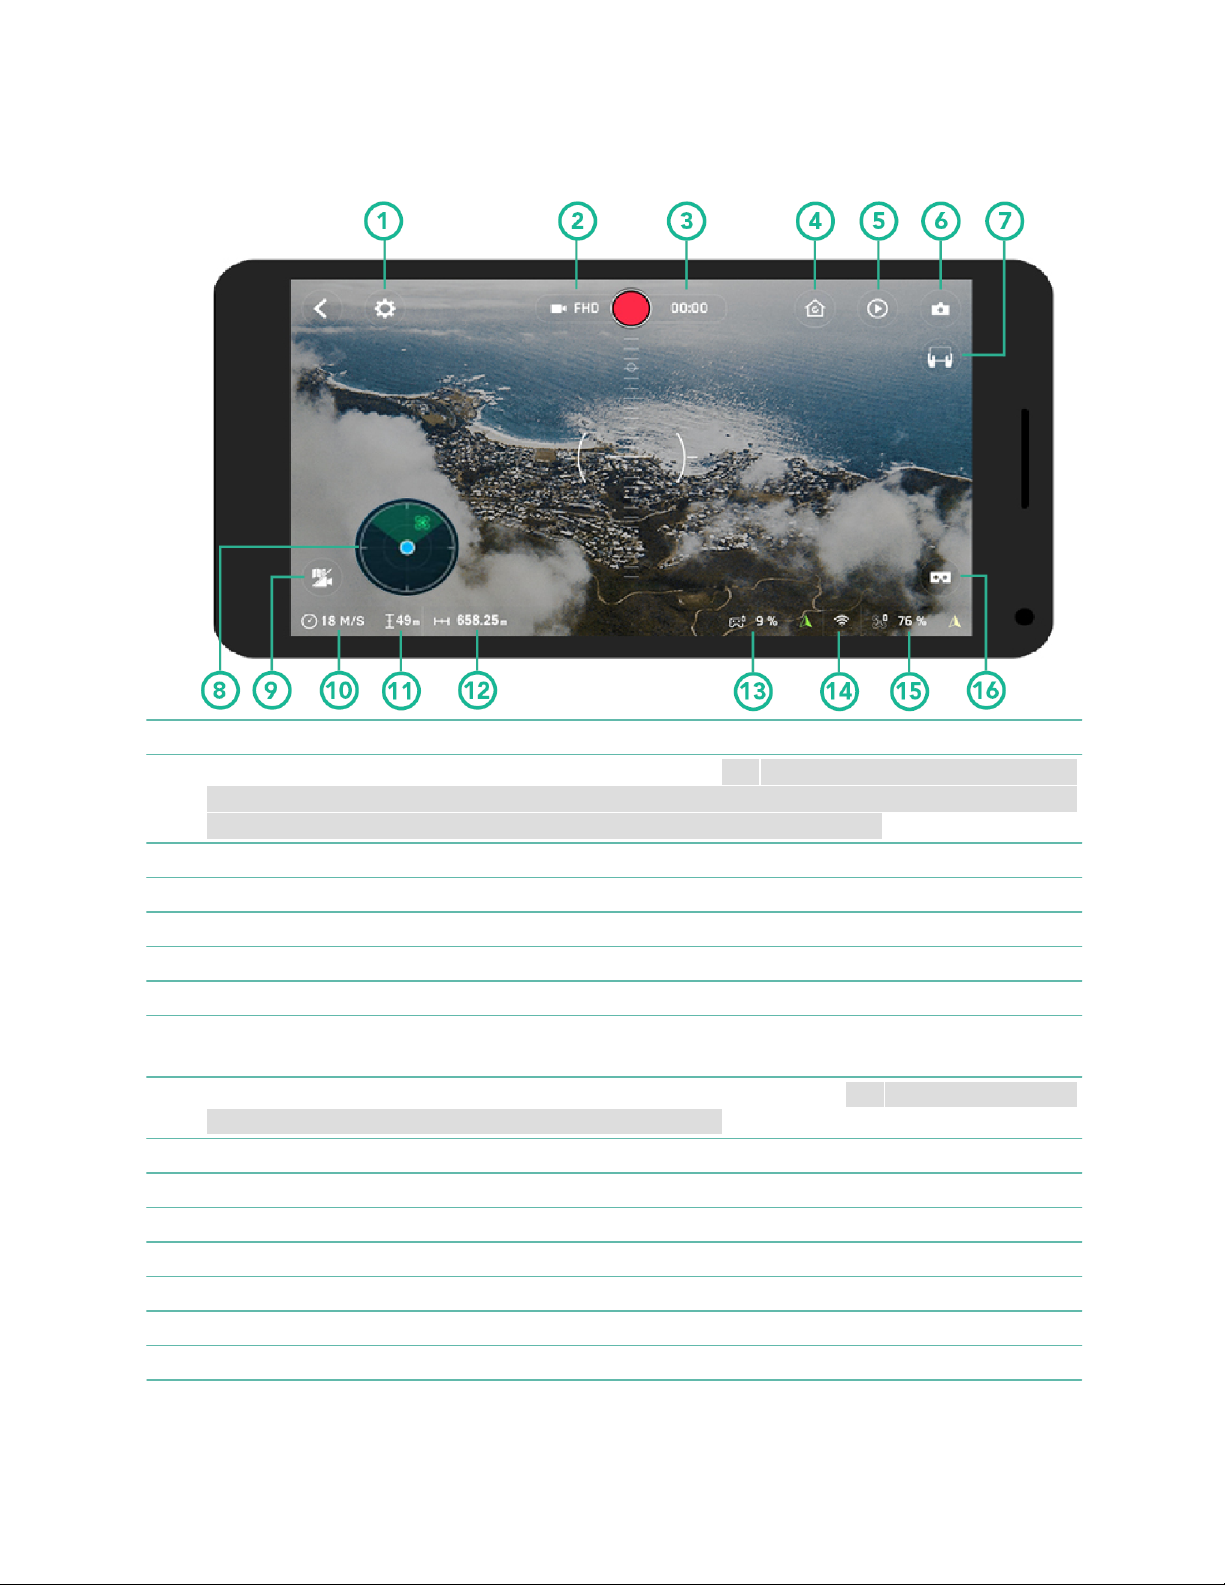
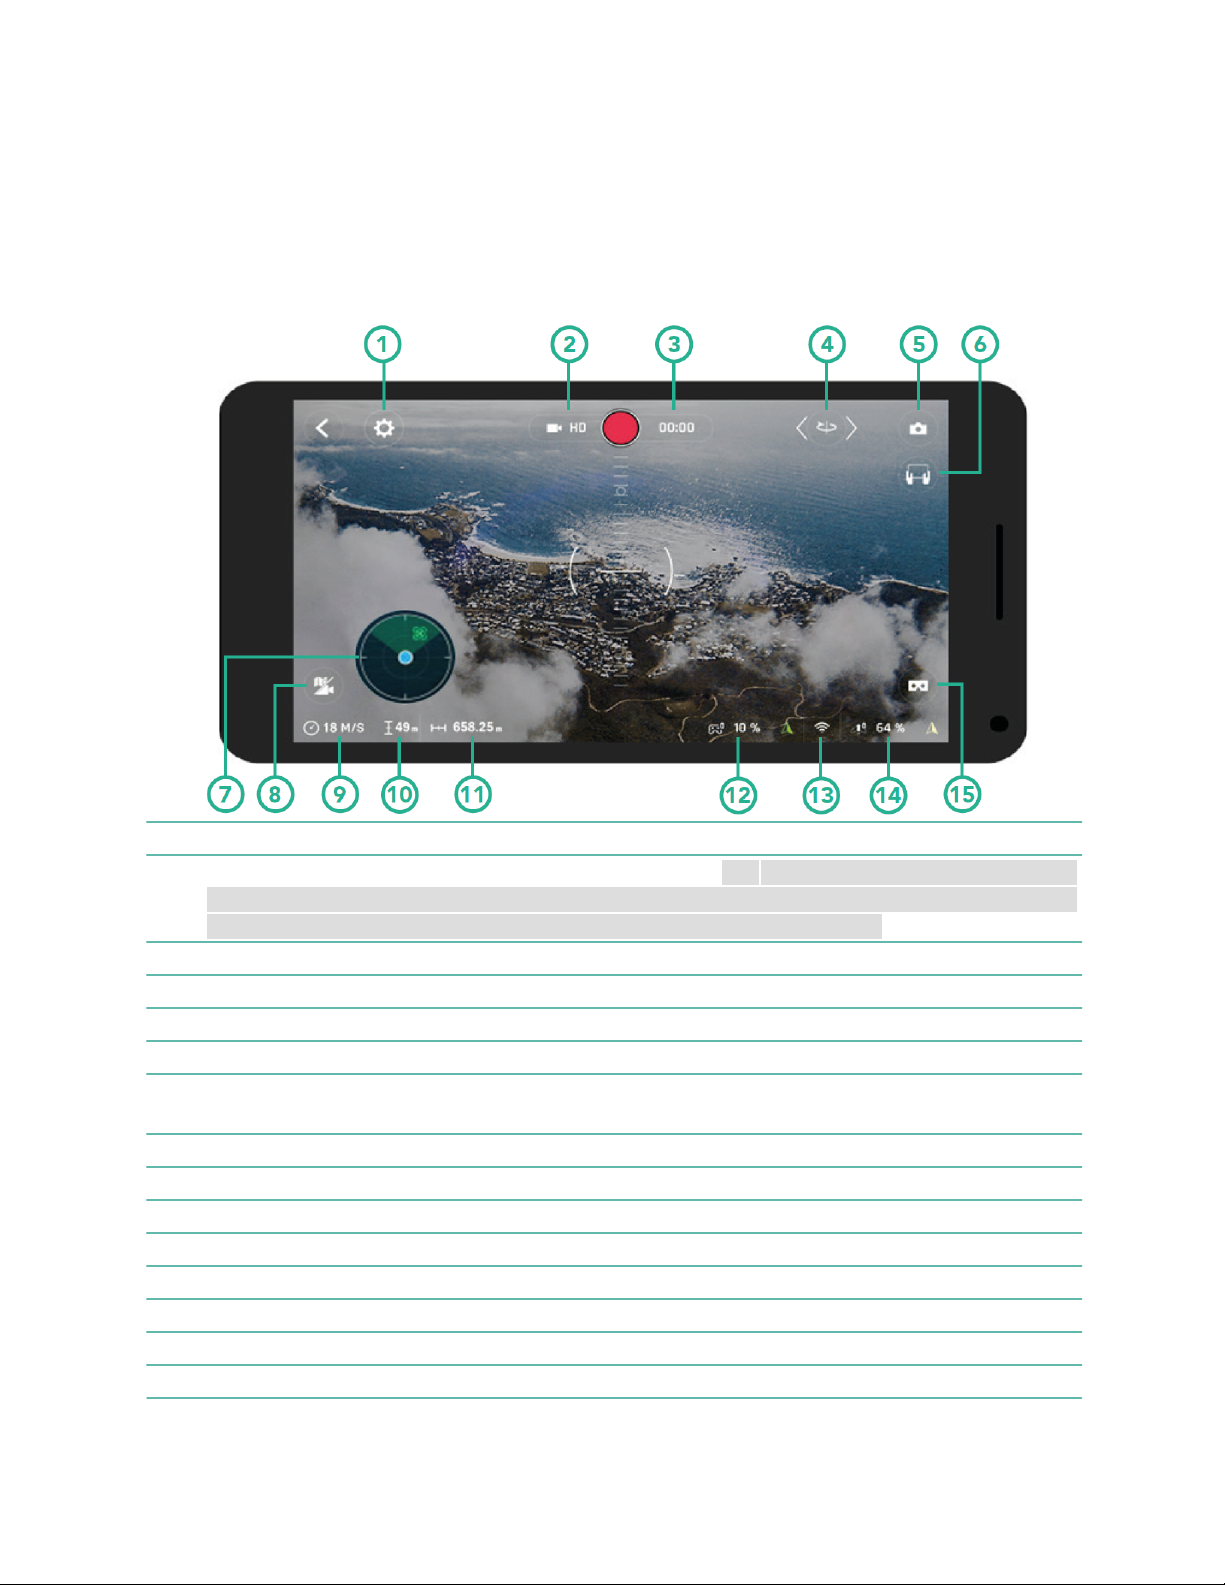
Piloting screen
1
Access the settings
2
Recording resolution: Full HD (1080p) or HD (720p) NB: define the recording resolution
in the settings. When you record a video in 1080p, the live return video feed is 480p.
When you record a video in 720p, the live return video feed is 720p.
3
Video recording time
4
Return home
5
Pre-programmed manoeuvre
6
Take a photo
7
Switch to map mode to see the position of the drone on a map
8
Drone speed
9
Drone altitude
10
Distance of the drone relative to its take off point
11
Land
12
Wi-Fi signal strength
13
Drone battery level
14
Switch to FPV mode NB: when you switch to FPV mode, the video automatically
switches to HD (720p).
If you're flying a Parrot Bebop Drone or a Parrot Bebop 2 (default mode):
6
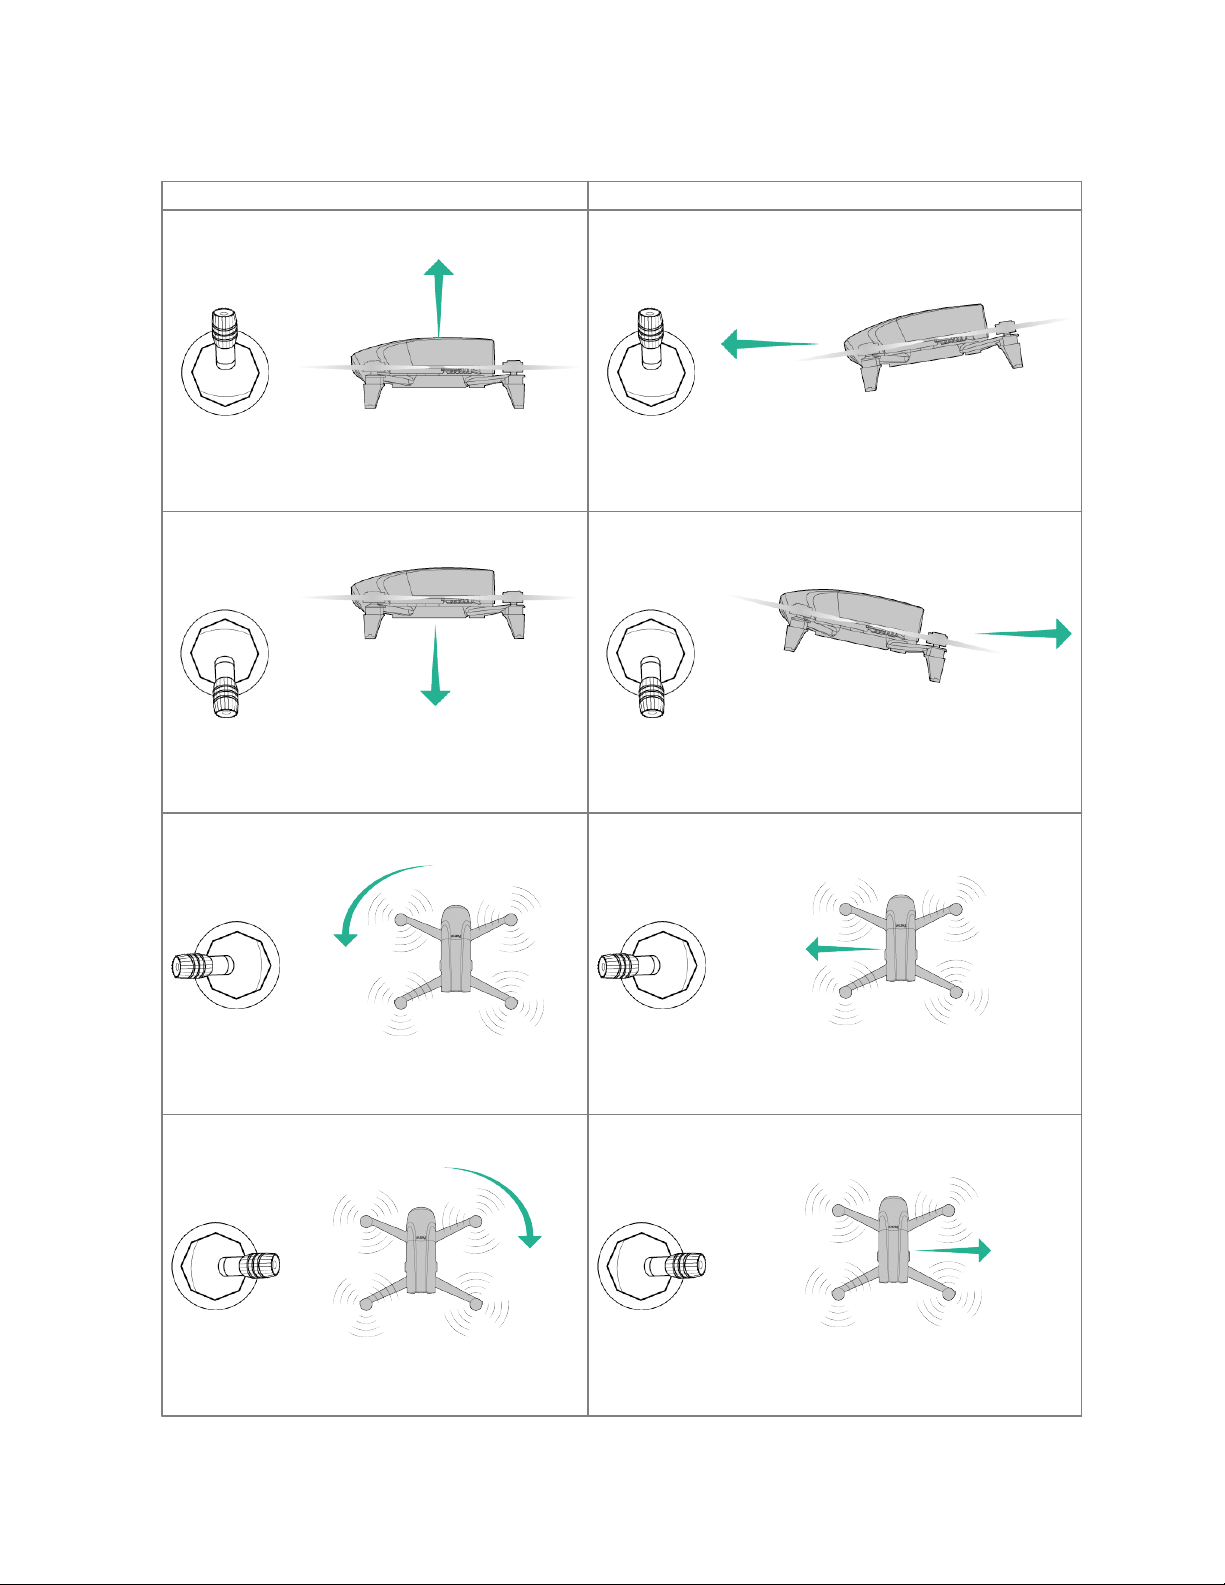
Page 11
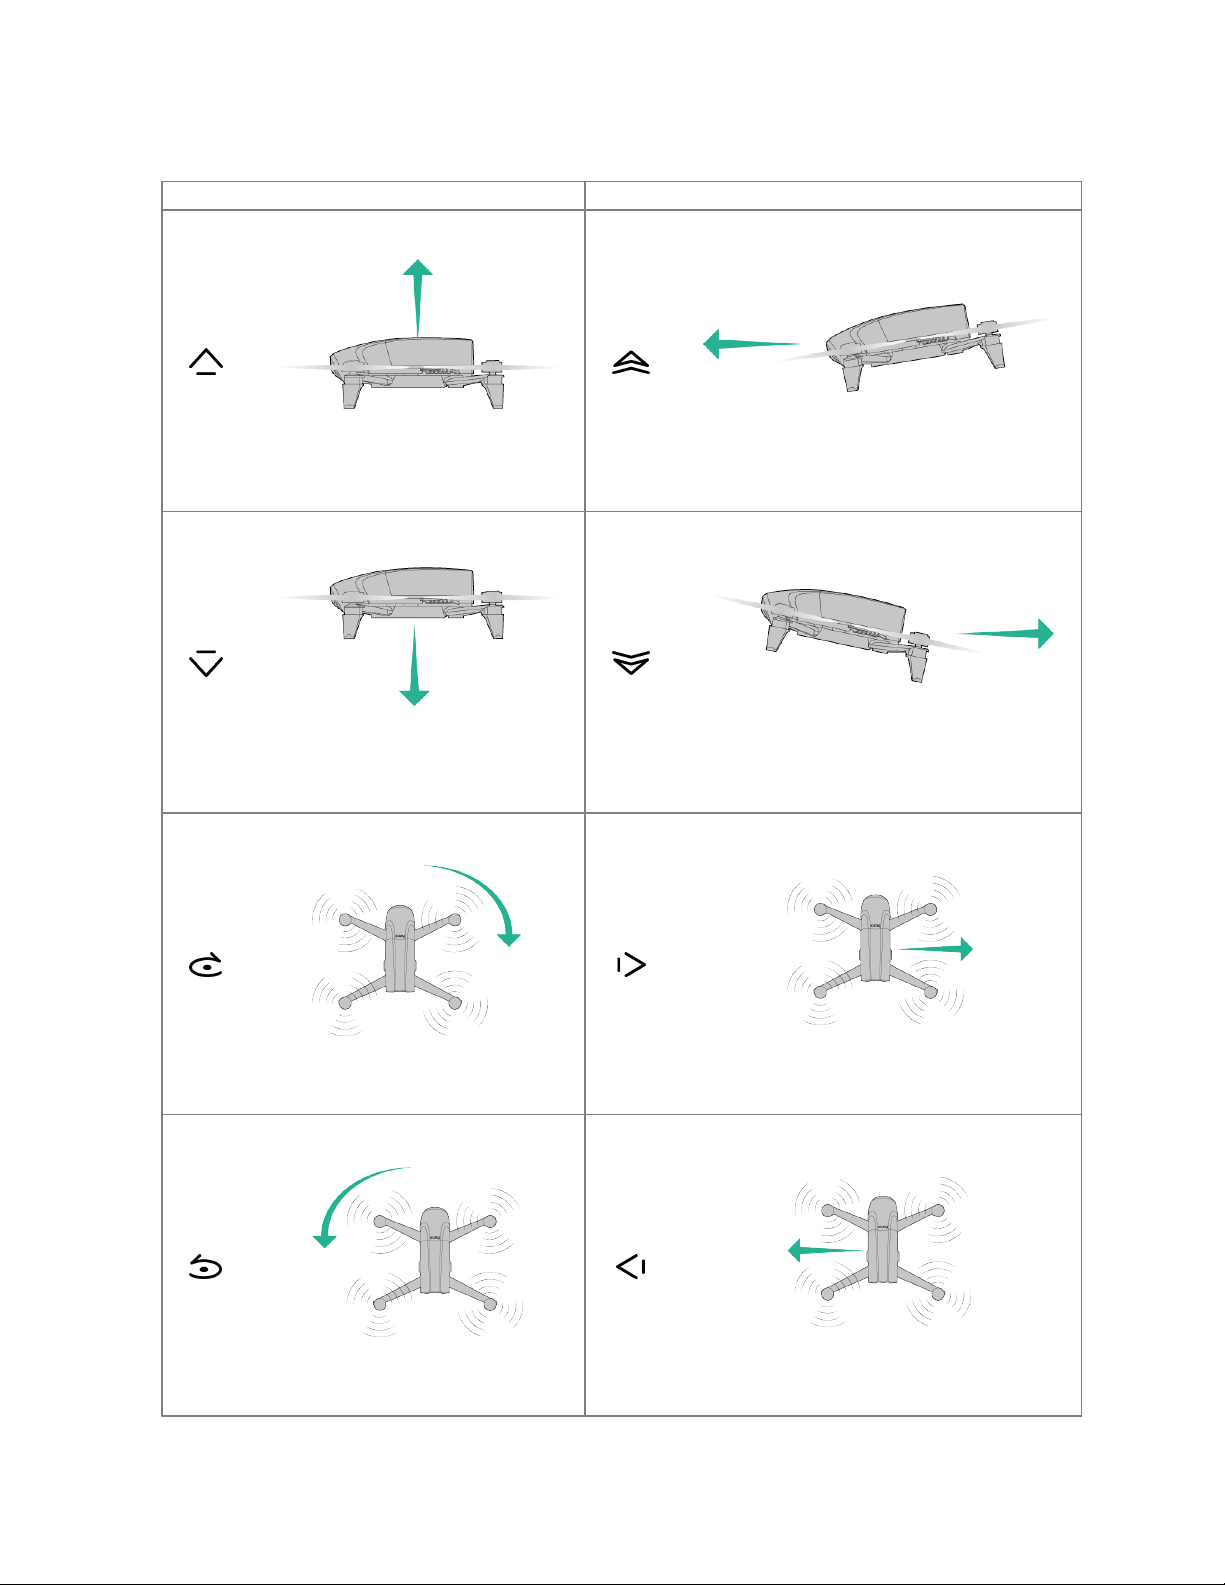
Default piloting mode
Left joystic k
Right joystick
Go up
Go forward
Go down
Go bac kward
Rotate right
Move right
Rotate left
Move left
7
Page 12
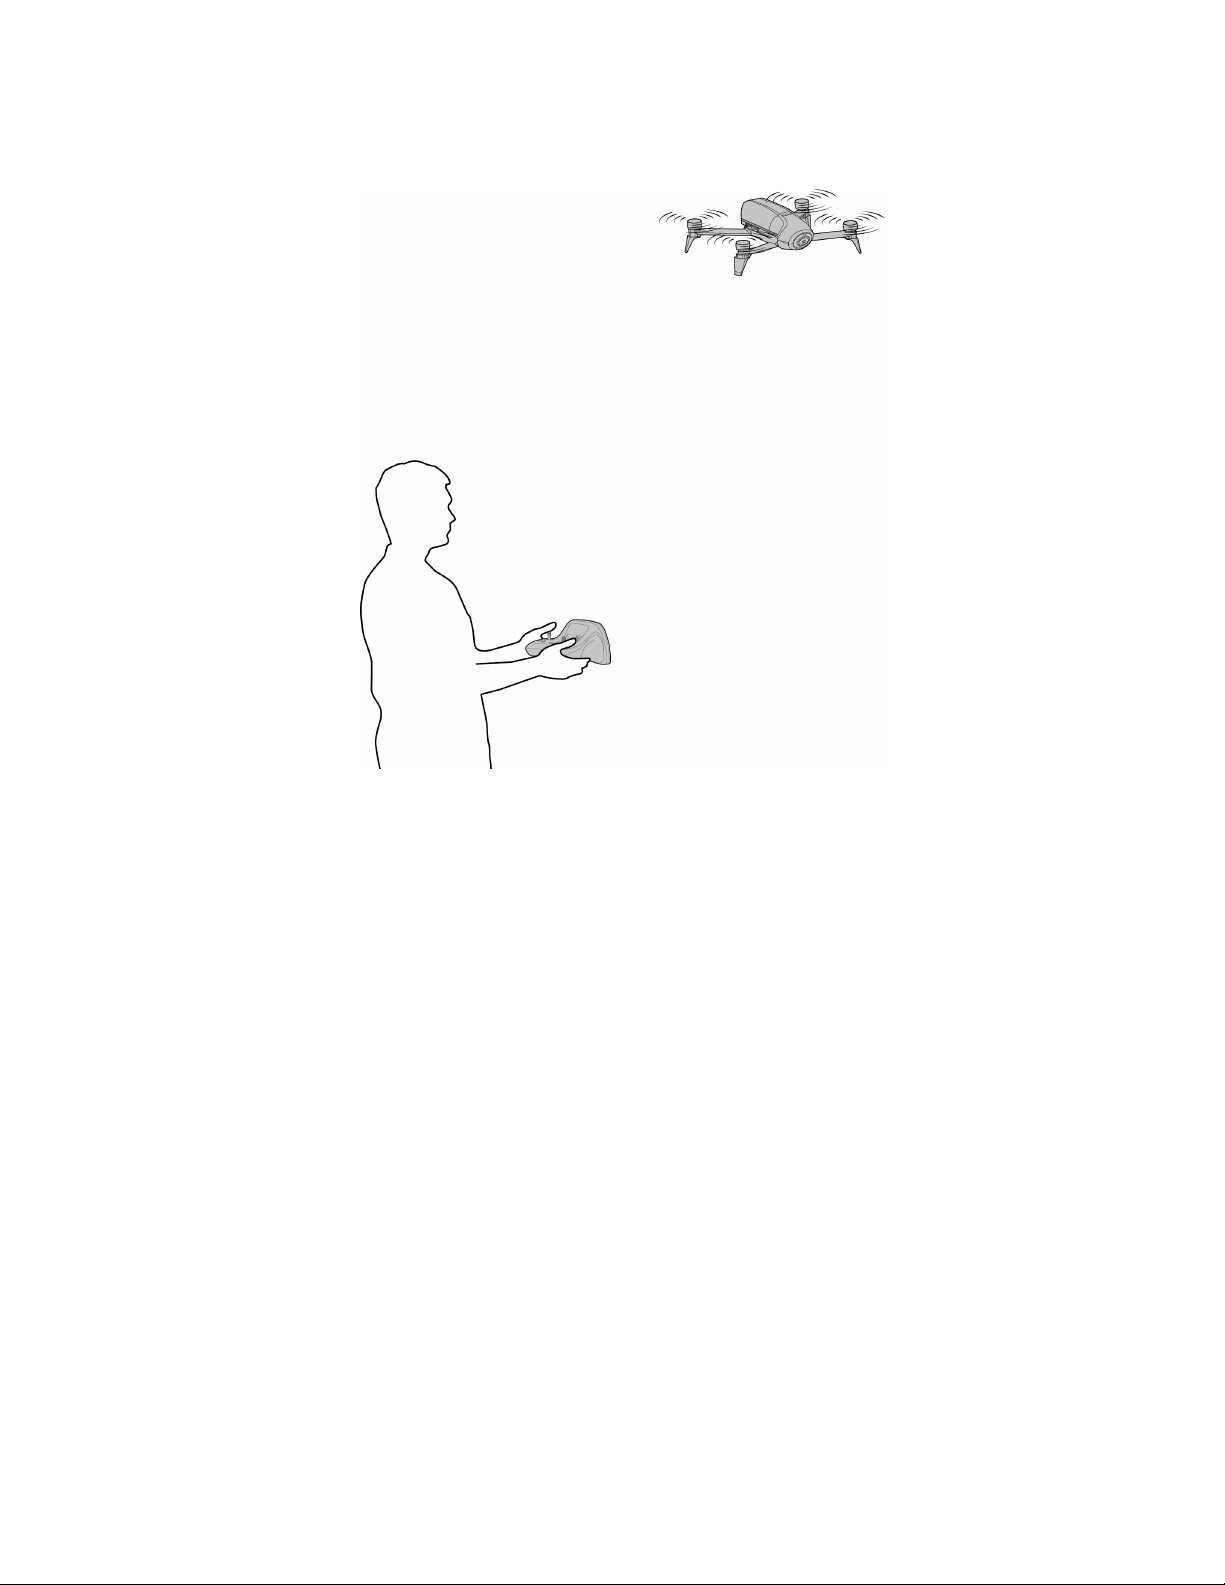
With a Parrot Skycontroller alone
You can use a Parrot Skycontroller or a Parrot Skycontroller 2 to fly the Parrot Bebop Drone
and the Parrot Bebop 2.
8
Page 13
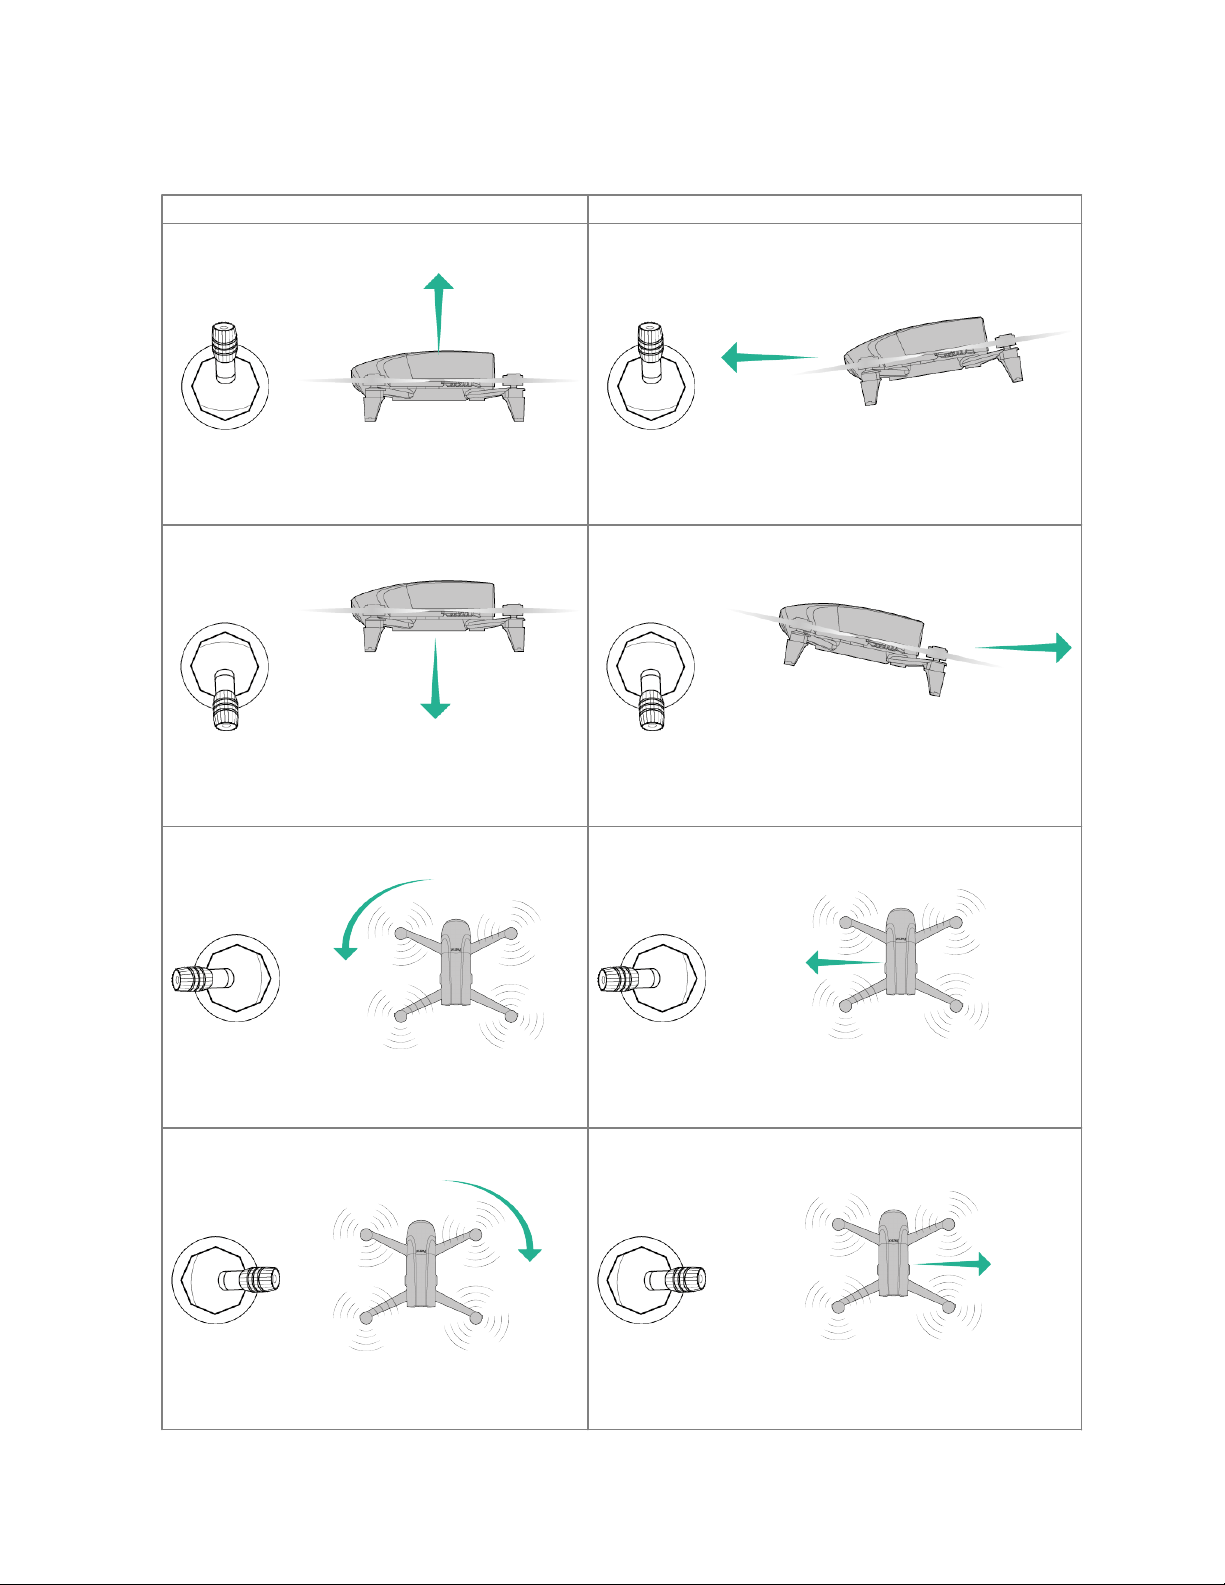
The default commands are as follows:
Left joystic k
Right joystick
Go up
Go forward
Go down
Go bac kward
Rotate left
Move left
Rotate right
Move right
9
Page 14

With a Parrot Skycontroller and a smartphone
You can use a Parrot Skycontroller or a Parrot Skycontroller 2 and a smartphone to fly the
Parrot Bebop Drone and the Parrot Bebop 2.
10
Page 15
Piloting screen
1
Access the settings
2
Recording resolution: Full HD (1080p) or HD (720p) NB: define the recording resolution
in the settings. When you record a video in 1080p, the live return video feed is 480p.
When you record a video in 720p, the live return video feed is 720p.
3
Video recording time
4
Return home
5
Pre-programmed manoeuvres
6
Take a photo
7
Switch to smartphone piloting
8
Radar. The radar shows the position of the drone relative to the Parrot Skycontroller.
Point your Parrot Skycontroller towards the drone for a better Wi-Fi connection.
9
Switch to map mode to see the position of the drone on a map. NB: to use this feature,
your smartphone must be connected to the internet.
10
Drone speed
11
Drone altitude
12
Distance of the drone relative to its take off point
13
Battery level of Parrot Skycontroller 2
14
Wi-Fi signal strength
15
Drone battery level
16
Switch to FPV mode
11
Page 16
Default piloting mode
Left joystic k
Right joystick
Go up
Go forward
Go down
Go bac kward
Rotate left
Move left
Rotate right
Move right
12
Page 17
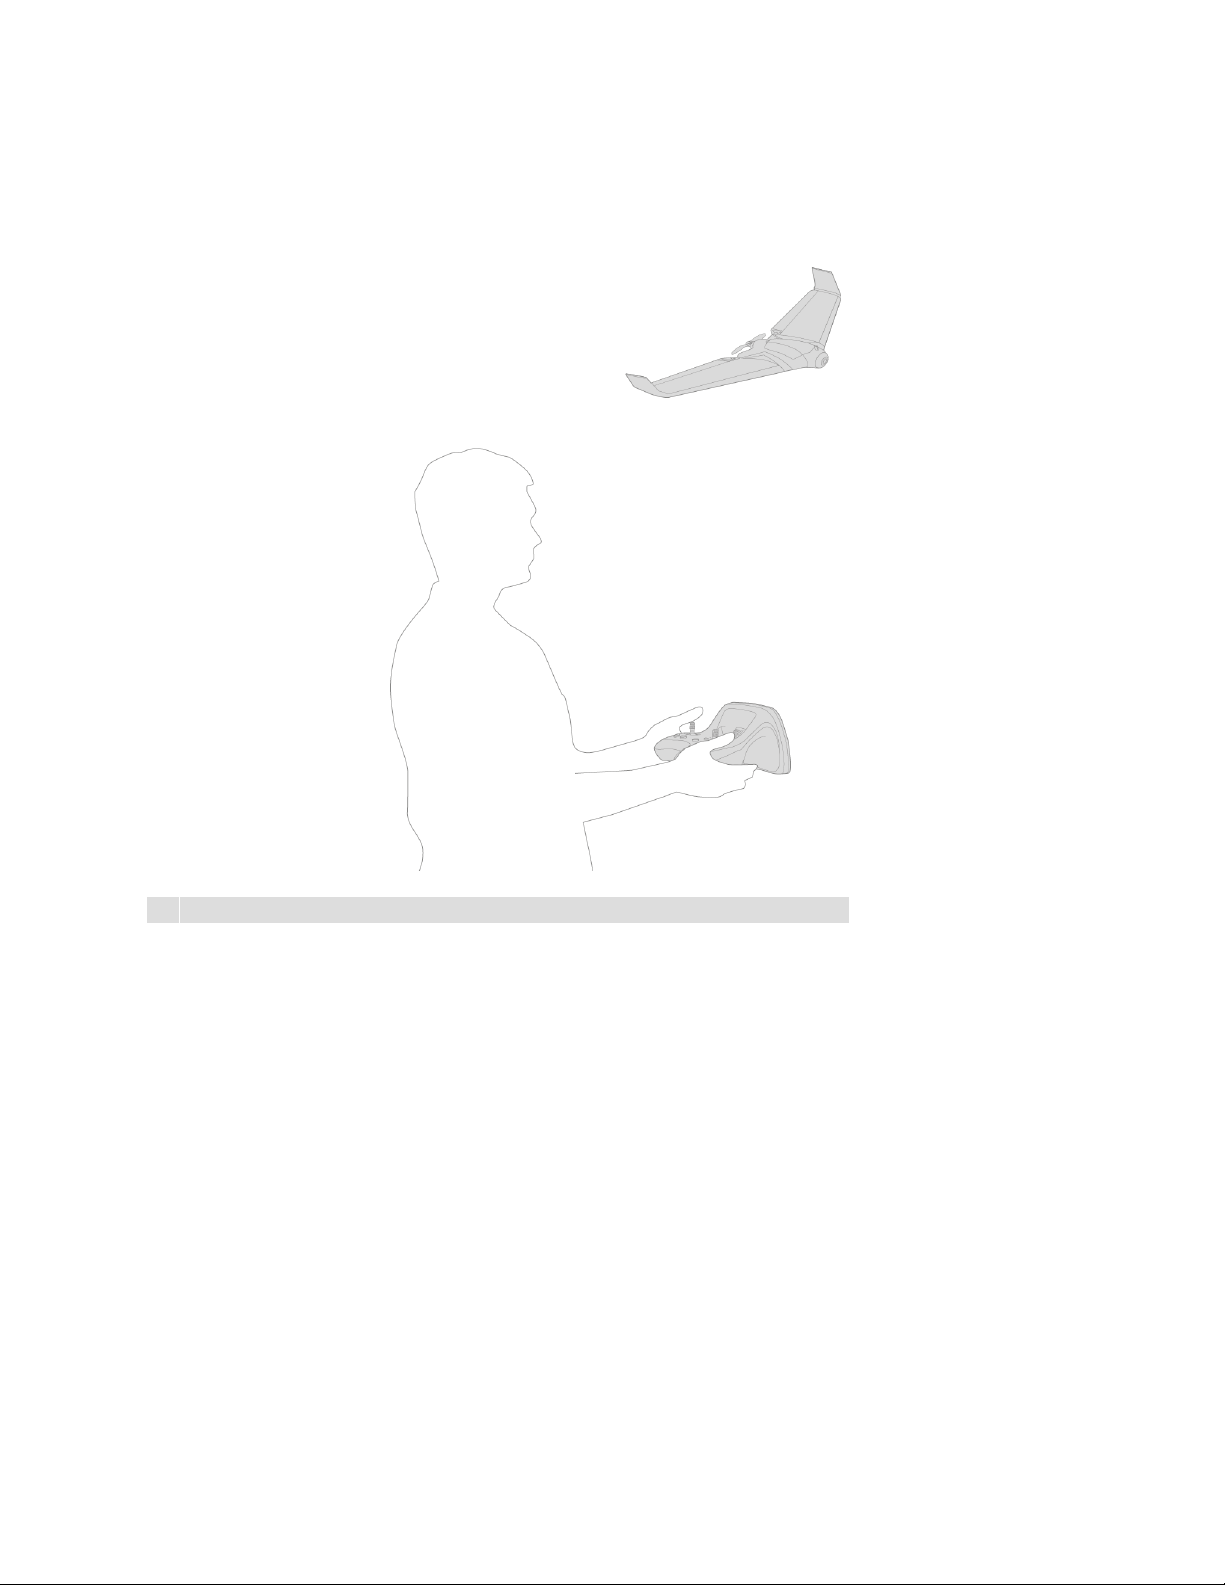
Flying a Parrot Disco
With a Parrot Skycontroller 2 alone
NB: The Parrot Disco is not compatible with the Parrot Skycontroller 1.
13
Page 18
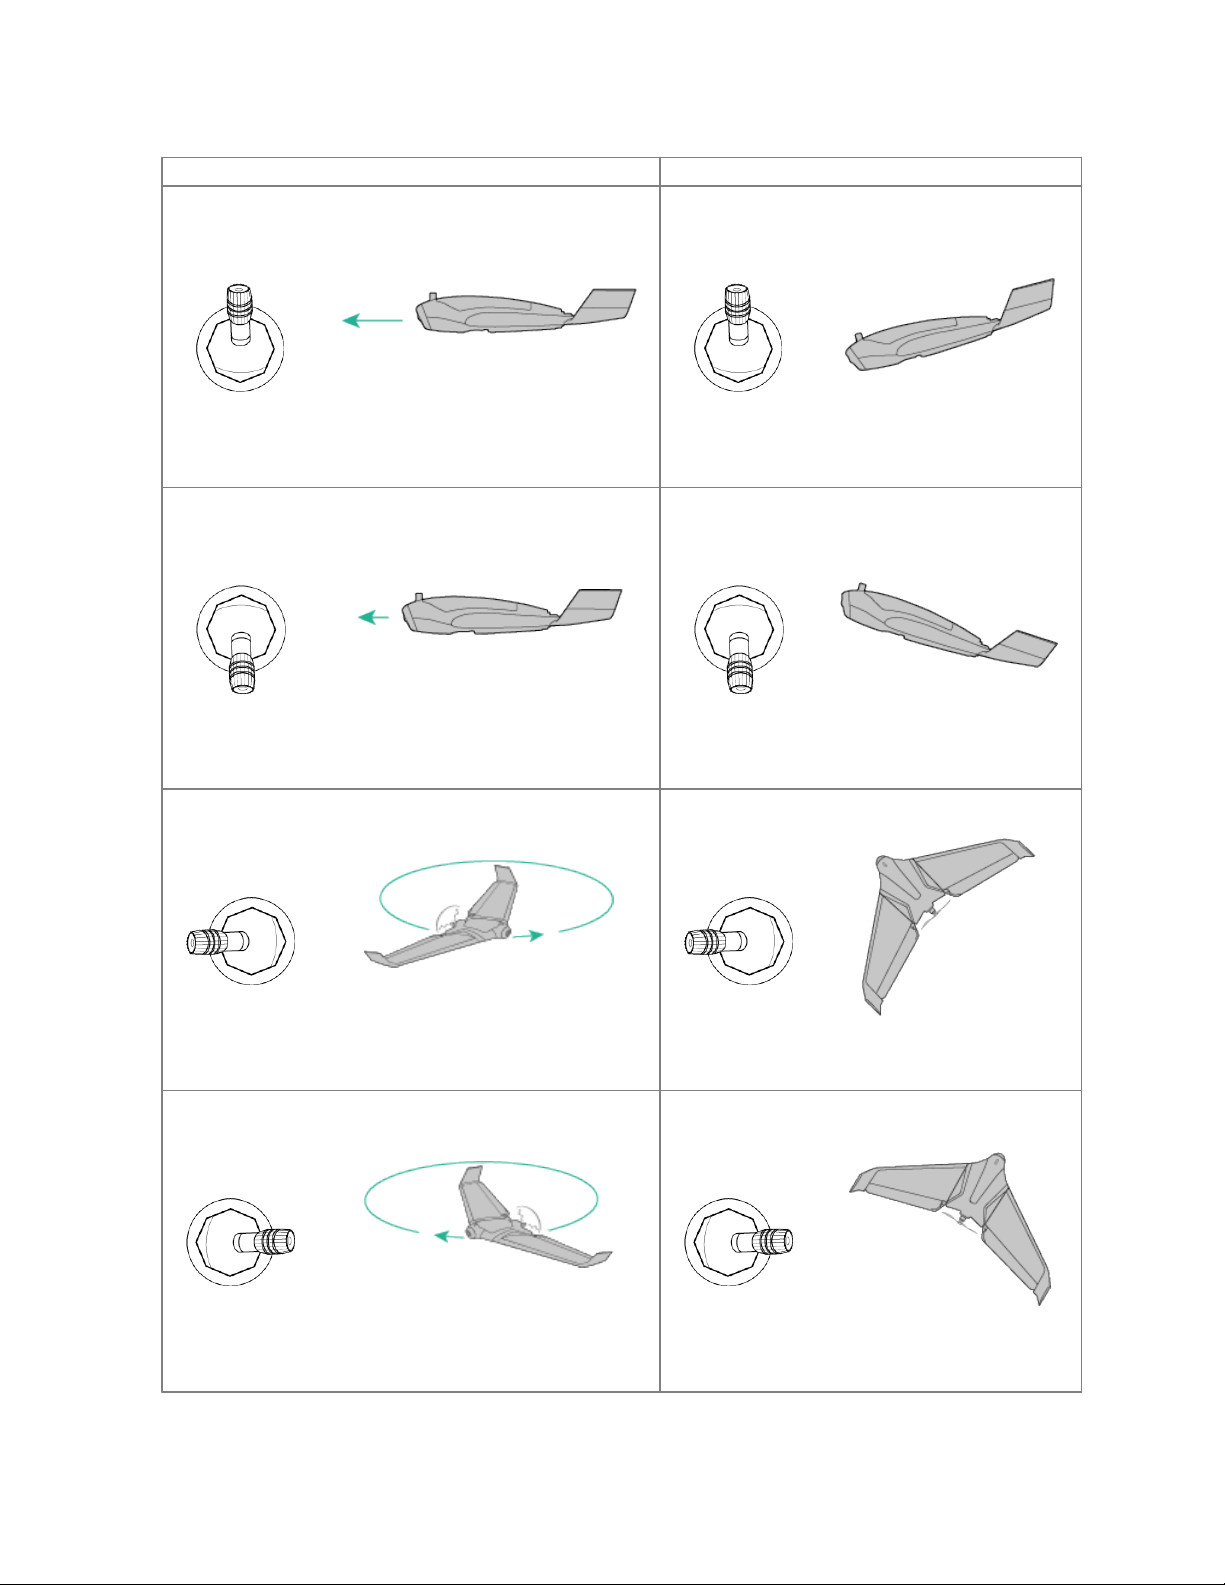
Left joystic k
Right joystick
Accelerate
Go down
Slow down
Go up
Left orbital standb y mode
Turn left
Right orbital standby mode
Turn right
14
Page 19
With a Parrot Skycontroller 2 and a smartphone
NB: The Parrot Disco is not compatible with the Parrot Skycontroller 1.
To control the Parrot Disco with a Parrot Skycontroller 2 and a smartphone, the smartphone
must be connected to the Parrot Skycontroller 2 via a USB cable.
15
Page 20
Piloting screen
1
Access the settings
2
Recording resolution: Full HD (1080p) or HD (720p) NB: define the recording resolution
in the settings. When you record a video in 1080p, the live return video feed is 480p.
When you record a video in 720p, the live return video feed is 720p.
3
Video recording time
4
Switch to right or left stationary flight
5
Take a photo
6
Switch to smartphone piloting
7
Radar. The radar shows the position of the drone relative to the Parrot Skycontroller 2.
Point your Parrot Skycontroller 2 towards the drone for a better Wi-Fi connection.
8
Switch to map mode to see the position of the drone on a map
9
Drone speed
10
Drone altitude
11
Distance of the drone relative to its take off point
12
Battery level of Parrot Skycontroller 2
13
Wi-Fi signal strength
14
Battery level of the Parrot Disco
15
Switch to FPV mode
Use the Parrot Skycontroller 2's smartphone holder to attach your smartphone to the
controller.
Use the Parrot Skycontroller 2's controls to take off, land and direct your drone.
16
Page 21
Default piloting mode
Left joystic k
Right joystick
Accelerate
Go down
Slow down
Go up
Left orbital standb y mode
Turn left
Right orbital standby mode
Turn right
17
Page 22
Settings
General settings
Use your smartphone to directly define your drone's settings.
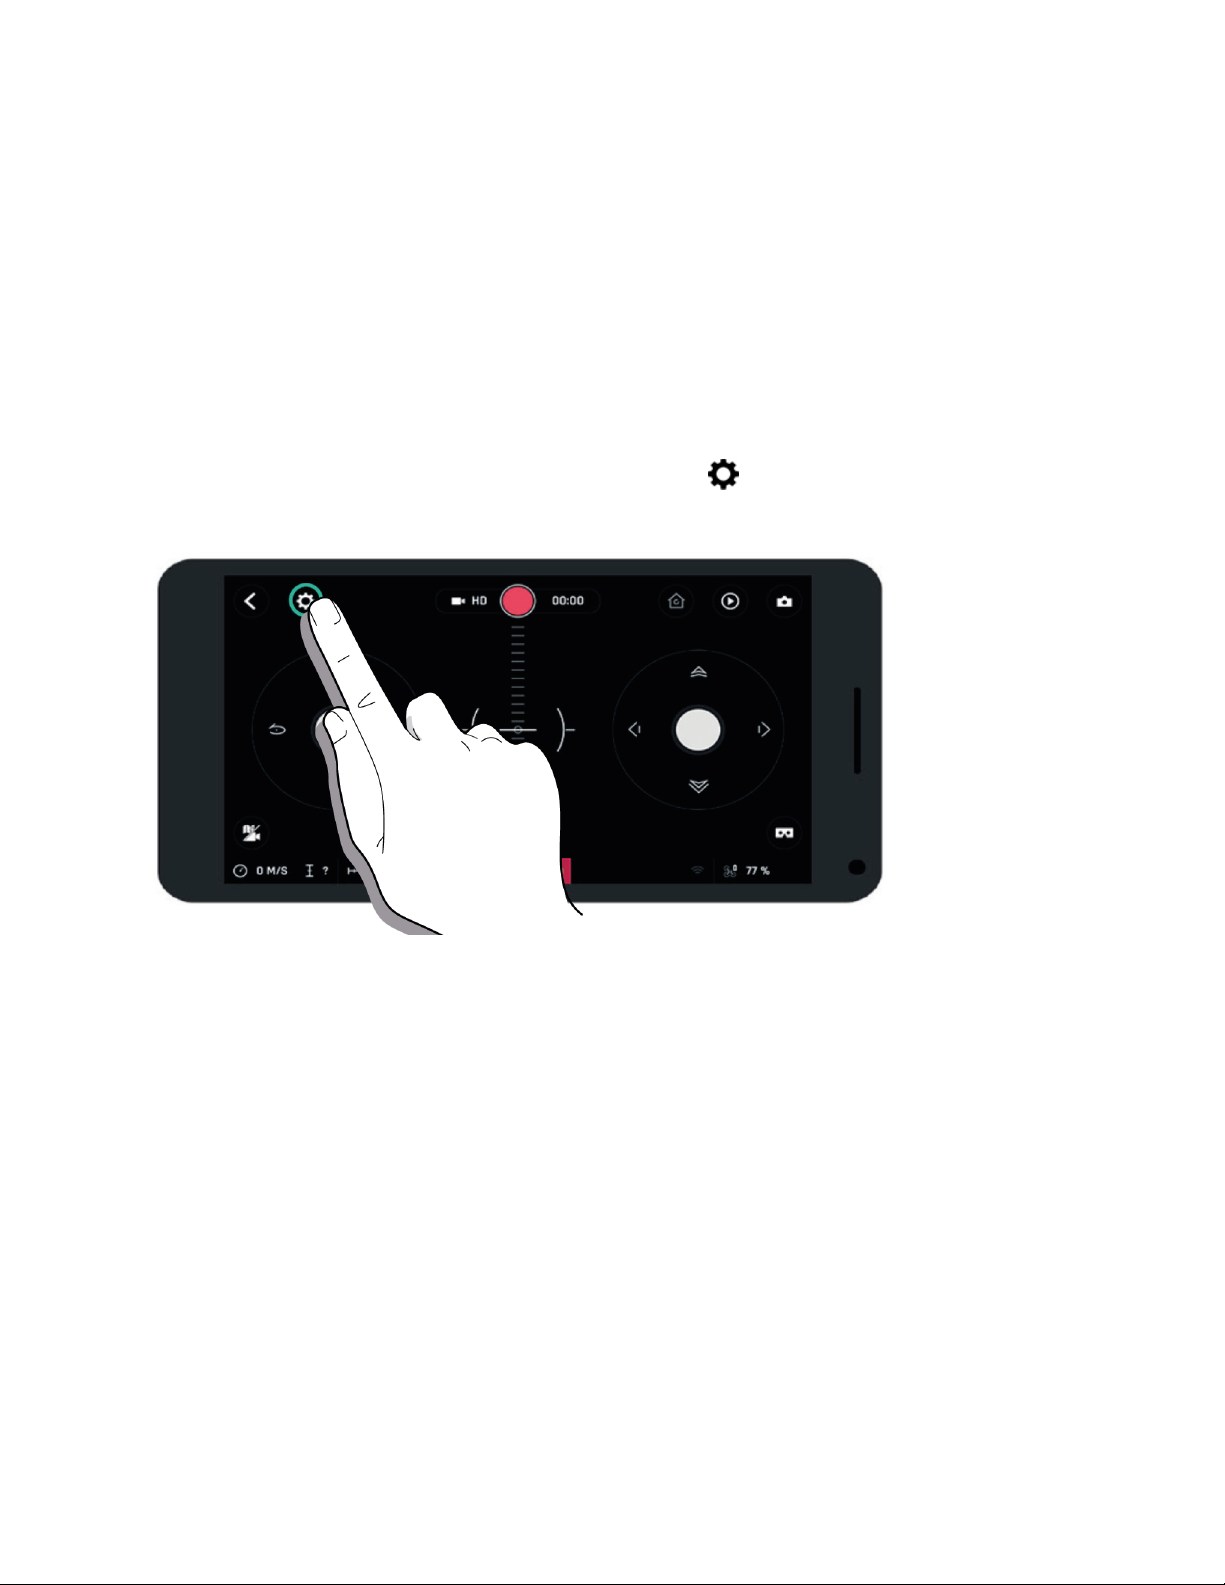
Accessing the general settings
In the FreeFlight Pro app, go to FLY & FILM and tap the icon (Settings) in the upper left of
your screen.
The settings are displayed.
For each of these settings, tap Reset in the upper right of the screen to return to the default
configuration.
18
Page 23

Piloting settings
Pitch mode
Change the direction of the pitch of the Parrot Disco (by default, right joystick on the Parrot
Skycontroller 2).
Normal: when you press the right joystick on the Parrot Skycontroller 2 upwards, the Parrot
Disco goes down, and when you press downwards, the Parrot Disco goes up.
Reversed: when you press the right joystick on the Parrot Skycontroller 2 upwards, the Parrot
Disco goes up, and when you press downwards, the Parrot Disco goes down.
Loiter direction
Determine the direction of circles made by the Parrot Disco while hovering.
19
Page 24
Loiter altitude
Determine the hovering altitude of the Parrot Disco.
NB: you cannot change the hovering altitude after take off (50 meters).
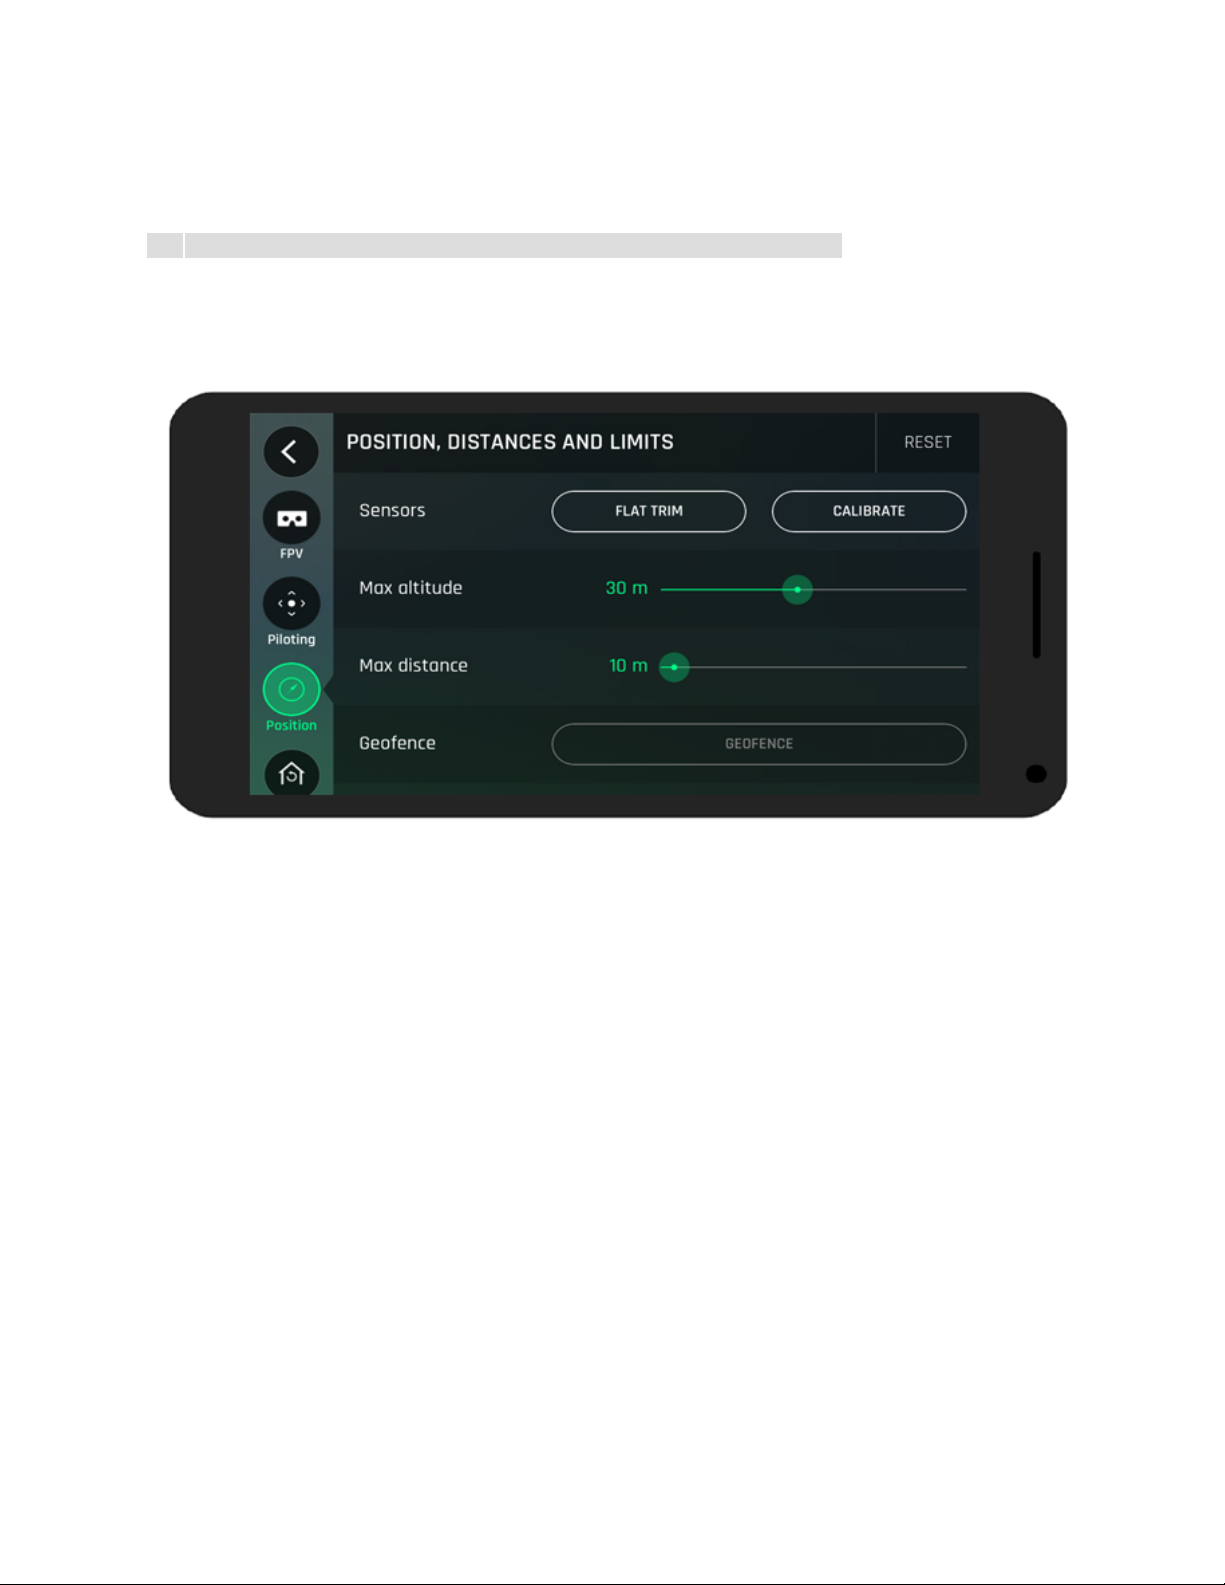
Position, Distances and Limits
Sensors
Flat Trim resets the accelerometer and indicates the horizontal position to it. Make a Flat trim
before each flight. To do this, connect to your drone, lay it on a flat surface and tap Flat Trim.
Calibration
Tap Calibrate to calibrate your drone. Follow the instructions on your smartphone screen to
calibrate your drone.
20
Page 25
Max altitude
Set the maximum altitude of your drone in flight.
Min altitude
Set the minimum altitude of your drone in flight. This feature is only available for the Parrot
Disco.
Max distance
Define the maximum distance between the drone and Parrot Skycontroller 2.
Geo-Fence
Enable or disable the geo-fence. If the geo-fence is on, the drone will turn around once it's
boundary (Max distance) is reached.
If the geo-fence is off and your drone exceeds the maximum distance, the distance on the
screen of your smartphone is displayed in red and the Parrot Skycontroller 2 vibrates.
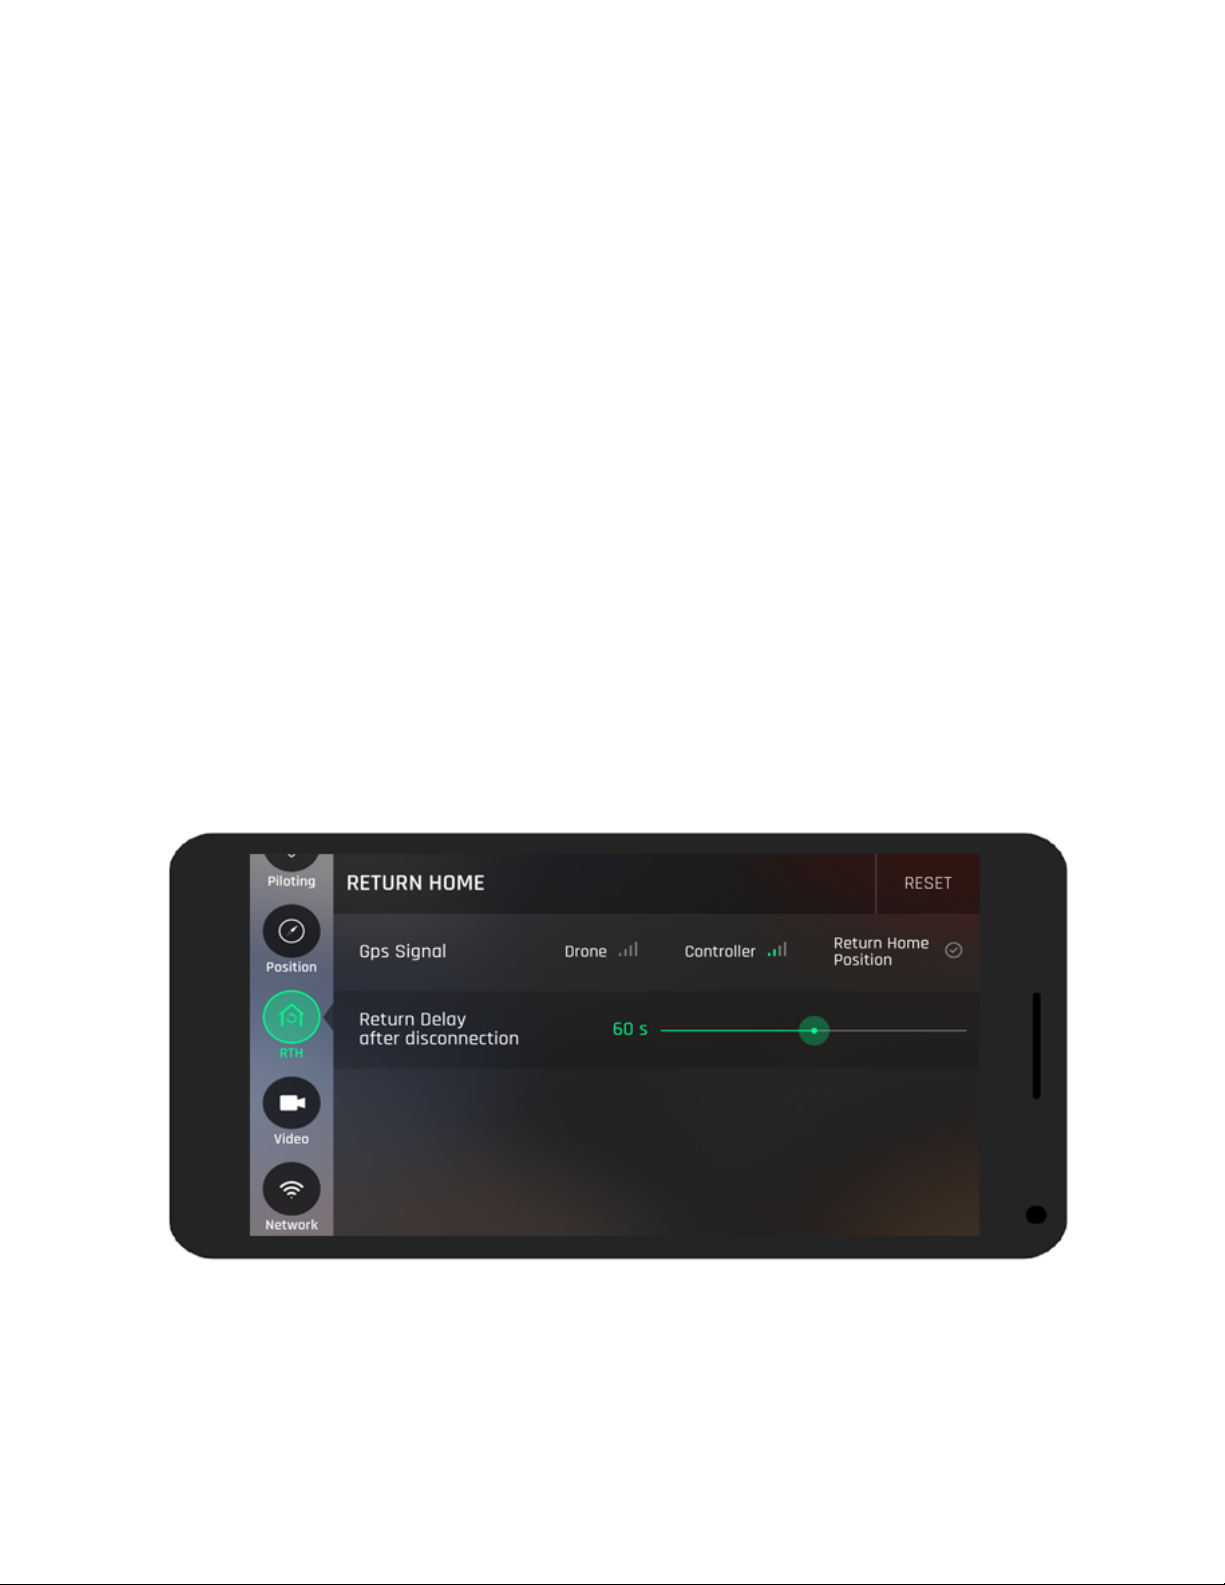
Return home
21
Page 26
GPS signal
This section shows the quality of the GPS signal of the drone, the Parrot Skycontroller 2 and
whether or not the return home point is stored.
NB: Do not fly your drone if the Return Home position is not set. Your drone will not be able
to automatically return to its starting point.
Return time after disconnection
During the flight, in case of connection loss, the drone automatically returns to its starting
position after a certain time period (10 seconds by default). Set this time in this section. If
you're fly a Parrot Disco, it is recommended that you set this delay to 0 seconds.
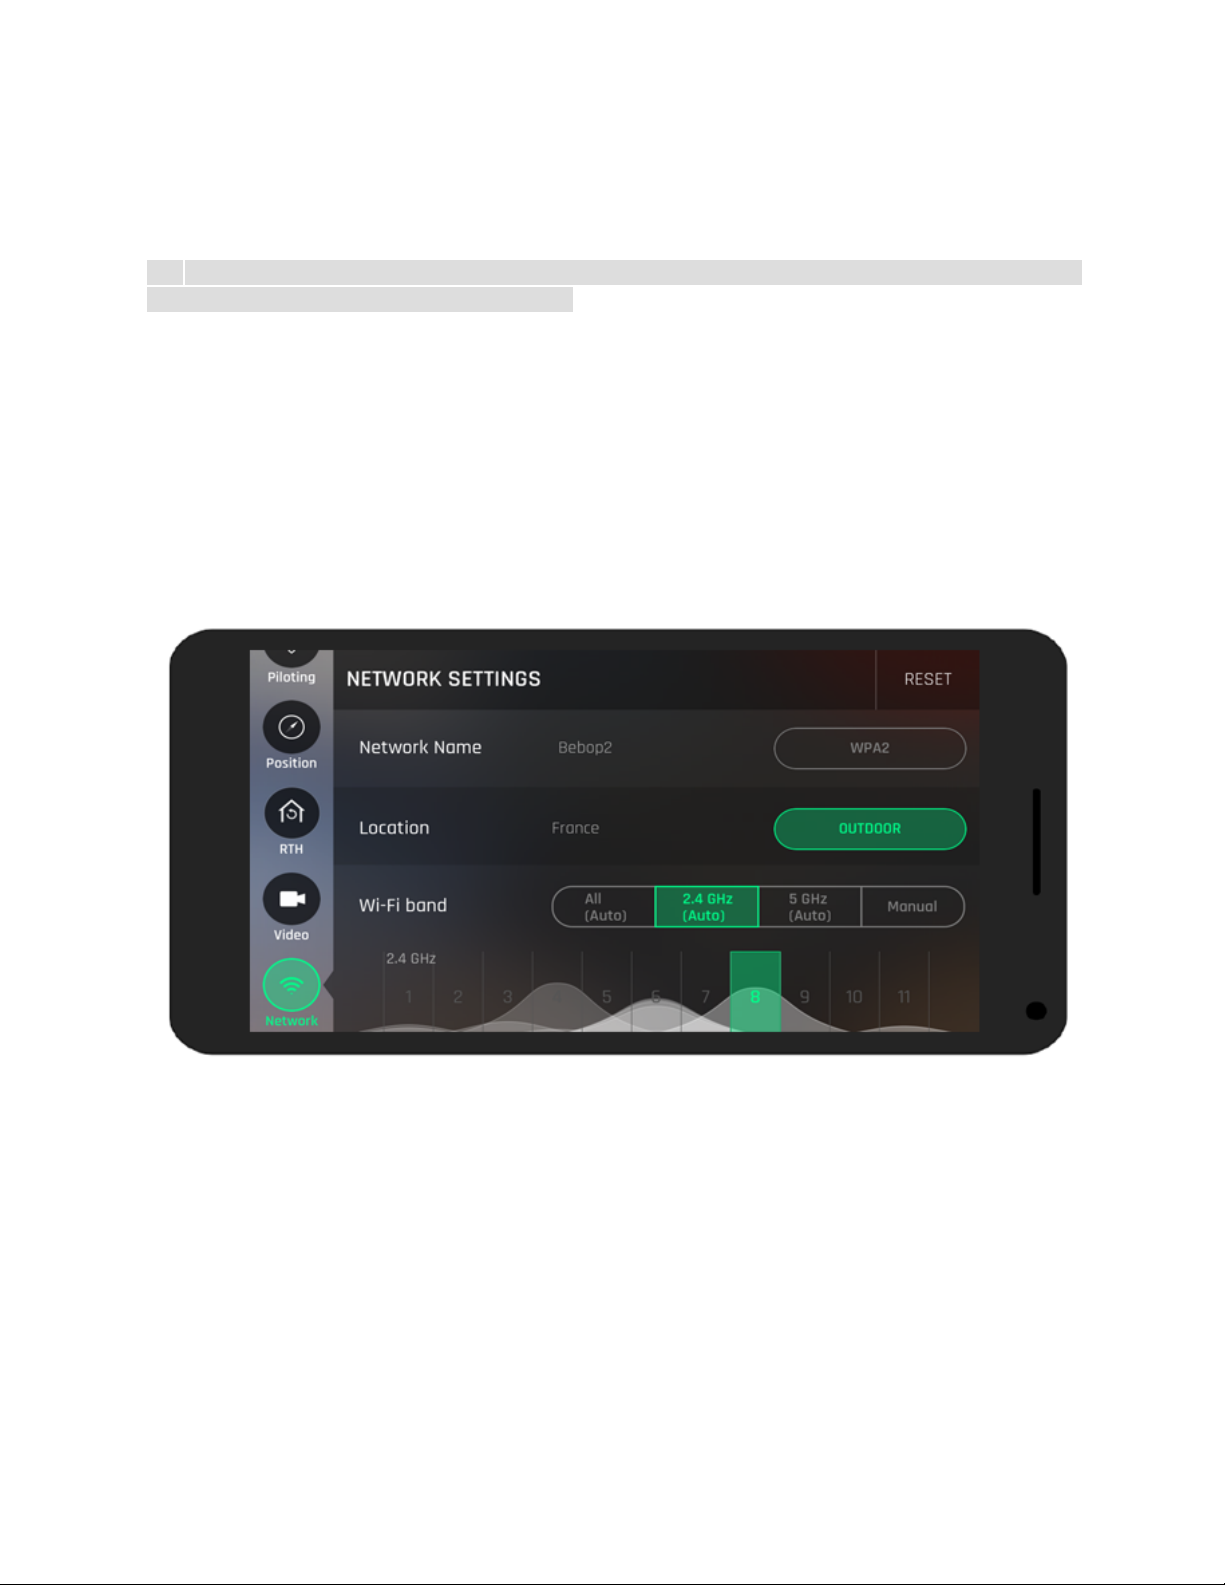
Network settings
Network
Change the name of your drone's Wi-Fi network. Tap WPA2 to set a password for your drone's
Wi-Fi network.
22
Page 27

Location
Select the country you're in to fly the Parrot drone.
For the Parrot Disco, Outdoor mode must always be enabled.
Wi-Fi band
Connect the drone to 2.4 GHz or 5 GHz Wi-Fi bands.
The 2.4 GHz Wi-Fi band allows you to expand the range of the Wi-Fi signal. It is usually more
crowded than the 5 GHz Wi-Fi band, especially in urban areas.
The 5 GHz Wi-Fi band provides a more reliable connection between the drone and your
smartphone. Check the user guide or the technical specifications of your smartphone to see if
it supports connection to the 5 GHz Wi-Fi band. If this is not the case, only use the 2.4 GHz WiFi band.
*NB: the graph at the bottom of the screen shows the traffic on Wi-Fi bands.
Before you fly your drone, check for restrictions regarding the use of Wi-Fi frequencies in the
place where you are going to fly it. Certain frequencies may be restricted or prohibited.
Country selection and activation of the Outdoor option makes it possible to adapt the Wi-Fi
settings according to the legislation of the country selected. Based on these settings, all
channels may not be allowed. In some countries, for example, the use of the 5 GHz Wi-Fi band
may be prohibited outdoors.
If you notice a problem with the quality of the Wi-Fi connection:
1. Select Manual mode.
2. Select a channel from the drop-down menu or tap an access point directly on the graph.
Give priority to a channel that's not very crowded (transparent) or free (no curve).
3. Make sure your Parrot Skycontroller is directed towards you drone. For this, refer to the
radar on the flight screen:
23
Page 28

Video settings
Accessing video settings
1. On your smartphone, launch the FreeFlight Pro app.
2. Go to FLY & FILM.
3. Tap the icon to the left of the save button.
The image settings appear.
Presentation of modes
There are three modes:
· Video
· Photo
· Burst
Switching from one mode to another:
1. Go to image settings.
2. Tap the icon of the mode highlighted in red, in the upper left of your screen.
24
Page 29

> A dropdown list appears.
3. Tap the icon of the mode to apply. The new mode is applied.
25
Page 30

Video mode
1
Mode
2
Number of images per second
3
Number of megabits per second
4
Anti-flicker settings
5
White Balance
6
Take a photo
7
Lens aperture
8
Recording resolution: Full HD (1080p) or HD (720p)
9
Camera exposure
10
Start recording a video
11
Recording time
26
Page 31

Photo mode
1
Mode
2
Anti-flicker settings
3
White Balance
4
Take a photo
5
Lens aperture
6
Image resolution
7
Image exposure
8
Photo mode status
27
Page 32

Burst mode
1
Mode
2
Anti-flicker settings
3
White Balance
4
Interval between each photo
5
Lens aperture
6
Image resolution
7
Image exposure
8
Start burst mode
9
Burst mode status
28
Page 33

Managing video settings
Number of frames per second
You can change the number of frames per second of your videos. The more frames per
second, the smoother the video.
1. Tap the icon corresponding to the number of frames per second.
> A dropdown list appears.
2. Tap the number of frames per second to apply to your videos.
> The number of frames per second is applied.
Number of megabits per second
Change the number of megabits per second (Mbps) of your videos. The greater the number of
Mbps, the higher the quality of the video. A 30 Mbps video takes more space in the drone's
memory than a 20 Mbps video.
1. Tap the icon corresponding to the number of Mbps.
> A dropdown list appears.
29
Page 34

2. Tap the number of Mbps to apply to your videos.
> The number of Mbps is applied.
Anti-flicker
Remove the flicker effect on the video. Select the frequency that corresponds to the electrical
frequency of your country.
If you select Auto, the frequency band will be selected based on the country specified in the
Wi-Fi settings.
To set the frequency:
1. Tap the anti-flicker settings icon.
> A dropdown list appears.
2. Tap the frequency for your country or tap Auto.
> The new frequency is applied.
White Balance
Adjust the white balance as per your environment:
Automatic
Outdoor sunny
Outdoors cloudy
Indoor neon lighting
Indoor bulb lighting
30
Page 35

1. Tap the white balance icon.
> A dropdown list appears.
2. Tap the matching environment.
> The white balance is set.
Image exposure
Adjust the exposure of the image. To do this, drag slider at the bottom of your screen to the
left or right.
Photo format
You can select from the following three formats:
· DNG: select this image format to take high resolution photos.
· JPEG: select this image format to take medium resolution photos.
· JPEG 180°: select this image format to keep the Fish-eye effect from the camera in your
photos. This format does not store the image's metadata.
To set a format:
31
Page 36

1. Tap the format icon.
> A dropdown list appears.
2. Tap the format you want to apply.
> The format is set.
Interval between each photo
When you're in burst mode, you can set the interval between each photo. For example, if you
select 10 seconds, your Parrot drone will take a picture every 10 seconds.
To set the interval between each photo:
1. Tap the icon corresponding to the interval between each photo.
> A slider appears on the right of the screen.
2. Move the slider up or down to determine the interval.
The interval is set.
32
Page 37

FPV settings
When wearing Parrot Cockpitglasses:
· Use the Parrot Skycontroller 2's left joystick to navigate in the settings
· Confirm the settings with the Parrot Skycontroller 2's A button
· For parameters such as maximum altitude, move the Parrot Skycontroller 2's left joystick to
the right or left to set them. Press the A button to validate your selection, and then press
the B button to exit.
· To cancel a setting, press the B button to cancel the setting, and then press the B button
again to exit.
Auto launch
Enable or disable auto-start for FPV mode when you connect your smartphone to the Parrot
Skycontroller 2.
33
Page 38

Eye spacing
Use the Parrot Skycontroller 2 to set the eye spacing while wearing Parrot Cockpitglasses.
Before starting, connect your Parrot Skycontroller 2 to your Parrot drone, insert your
smartphone into your Parrot Cockpitglasses, and connect your smartphone to the Parrot
Skycontroller 2's USB port.
1. Adjust the Parrot Cockpitglasses on your head.
2. Tap the Settings button of the Parrot Skycontroller 2.
> The Settings window opens.
3. Using Parrot Skycontroller 2's joysticks, go to the FPV section.
4. In Eye spacing, select the Configure button and press the A button on the Parrot
Skycontroller 2.
> A cross appears on your screen.
5. Move the right joystick from left to right, and the left joystick from top to bottom to adjust
the eye spacing.
6. Use the Parrot Skycontroller's left joystick to zoom in and move the screen left or right.
7. When the image is clear and the lines of the cross are aligned, press the A button on the
Parrot Skycontroller 2 to confirm the settings.
> The distance between the eyes is configured.
34
Page 39

Updating your products
Use the FreeFlight Pro app to update the following products:
· Parrot Bebop Drone
· Parrot Bebop 2
· Parrot Disco
· Parrot Skycontroller 2
NB: you cannot update the Parrot Skycontroller 1 via the app. This controller only updates via
USB. For more information, see the Update procedure for the Parrot Skycontroller 1 article.
Before updating your products, make sure that your smartphone is connected to the internet.
Updating your drone and your Parrot Skycontroller 2
NB: The FreeFlight Pro app must have been connected at least once to the drone to scan for
updates.
1. Connect your Parrot Skycontroller 2 to your drone.
2. Connect your smartphone to your Parrot Skycontroller 2 via USB.
> The FreeFlight Pro app starts automatically.
3. Make sure the FreeFlight Pro app has detected the drone and the Parrot Skycontroller 2.
4. In the FreeFlight Pro app, tap Update.
> The app searches for updates for the Parrot Skycontroller 2 and the drone.
5. If the app finds one or several update files, select the new version and tap OK.
35
Page 40

> The app downloads the update file.
NB: you cannot select both updates at the same time.
A pop-up window appears informing you that the drone or the controller will restart.
6. Tap Exit.
> The drone or the Parrot Skycontroller 2 automatically restarts during installation of the
update. It may take several minutes.
Once the update is complete, the FreeFlight Pro app automatically restarts.
7. Once the update is complete, launch the update for the second product.
Updating your drone
NB: The FreeFlight Pro app must have been connected at least once to the drone to scan for
updates.
Use this update procedure for the Parrot Bebop Drone, the Parrot Bebop 2 and the Parrot
Disco.
1. Connect your drone to your smartphone.
2. On your smartphone, open the FreeFlight Pro app.
3. Make sure the FreeFlight Pro app has detected the drone. For more information, go to the
Connect a drone to a smartphone section.
4. In the FreeFlight Pro app, tap Update.
36
Page 41

> The app searches for updates for the drone.
5. If the app finds an update file, select the new version of the firmware and tap OK.
6. The app downloads the update file.
7. A pop-up window appears informing you that the drone will restart.
8. Tap Exit.
> The drone automatically restarts during installation of the update. It may take several
minutes.
Once the update is complete, the FreeFlight Pro app automatically restarts.
37
Page 42

Updating your Parrot Skycontroller 2
1. Connect your smartphone to the Parrot Skycontroller 2 with a micro-USB cable (for iOS, use
the phone cable).
2. Turn on the Parrot Skycontroller 2.
> The FreeFlight Pro app starts automatically.
3. In the FreeFlight Pro app, go to FLY & FILM.
4. Go to Settings
5. Scroll down, tap
6. In the Firmware section, tap Check for updates.
> A pop-up window prompts you to install the update.
7. Tap OK to start the update.
8. Tap OK again to continue the update.
> The FreeFlight Pro app downloads the update and installs it automatically.
38
Page 43

Customising the controls of the Parrot Skycontroller 1 and 2
Use the FreeFlight Pro app to customise the flight controls for the Parrot Skycontroller 1 and
the Parrot Skycontroller 2.
1. Turn on the Parrot Skycontroller and connect it to your smartphone.
2. On your smartphone, open the FreeFlight Pro app.
3. In the FreeFlight Pro app, tap in the upper right of the screen.
> The list of functions associated with the Parrot Skycontroller appears.
4. In the app, tap the function to be changed to select it.
5. On your Parrot Skycontroller, tap the button you want to assign the function to.
> The function is associated with the button.
To return to the default configuration, tap Reset in the upper right of your screen.
39
Page 44

Viewing flights
1. Open the FreeFlight Pro app.
2. Connect to your drone.
If flights are saved in the drone's memory, a red notification will appear next to the drone's
memory: .
3. Tap the drone's memory to access your flights.
> The files stored in the drone's memory will appear.
40
Page 45

Transferring flights to a smartphone
1. Connect your drone to your smartphone.
2. Open the FreeFlight Pro application and go to the drone's memory.
3. Select the files you want to transfer or delete.
4. Tap Transfer in the lower left of your screen.
> The transfer of files from the drone's memory to your smartphone launches.
NB: you can cancel the transfer during the operation. To do this, tap Cancel, in the upper
right of the screen.
Once the transfer is complete, a window asks you if you want to keep or delete the files
transferred to your smartphone from your drone's memory.
5. Select DELETE or KEEP.
41
Page 46

NB: it is recommended that you transfer videos from your drone directly to your computer.
For more information, see the Retrieving photos and videos article.
42
Page 47

Follow Me GPS & Visual tracking
N.B. : Follow Me GPS & Visual tracking is compatible with the Parrot Bebop 2.
Before using the tracking modes, ensure that your smartphone has a working GPS.
To make the most out of using auto follow, your smartphone must have a barometer,
especially for Climb Mode (altimetric tracking).
Follow Me GPS & Visual tracking is available to purchase directly within the FreeFlight Pro
app. You have 15 days for free to test the Follow Me GPS & Visual tracking option.
Before using the auto follow option, ensure that you are in an open space.
N.B.: if you use two smartphones with two different OSs, you must buy the option twice
so that it works on both smartphones.
Auto follow and auto framing work thanks to a visual recognition algorithm on the
smartphone. This algorithm is demanding in terms of hardware resources for the
smartphone. It it therefore possible that these options may not be entirely functional on
certain less powerful smartphones.
Auto Follow
In auto follow mode, your drone uses visual recognition coupled with GPS tracking
technology and the barometer, which allows it to accurately adapt its position in real time to
keep you in the frame.
N.B.: if your phone is not equipped with a barometer, the drone maintains its altitude during
auto follow.
When you are in auto follow mode, you can use your smartphone to over-correct your drone.
The drone will respond to the commands received (ascend, descend, move forward, etc.),
while continuing to follow the subject.
43
Page 48

N.B.: for safety reasons, the drone always maintains a distance of at least 5 metres from its
subject.
Switching to Auto Follow mode
1. With the help of the FreeFlight Pro app, connect to your drone.
2. Go into FOLLOW ME GPS & VISUAL TRACKING.
> The following screen is displayed:
44
Page 49

3. Select AUTO FOLLOW .
> The following screen is displayed:
4. Press GOT IT!
> The flight screen is displayed and a blue frame appears in the centre of your screen.
5. Make your drone take off.
> The drone takes off and stabilises at approximately 1 metre from the ground.
6. Stabilise the drone at the desired altitude.
7. Position the subject within the field of view of your drone's camera. In auto follow mode,
the subject must keep hold of the smartphone which is connected to the drone.
45
Page 50

8. Use the dots either side of the blue frame to adjust it around the subject to be followed,
1
Back to manual piloting
2
Pre-programmed manoeuvres
3
Take a photo
4
Controls to over-correct the drone during auto follow mode
5
Direction of the drone in relation to its subject
6
Lock or unlock the viewing angle of the drone in relation to its subject
7
Stop auto follow and go back to manual piloting.
8
Subject to be followed N.B.: the green frame around the subject means that auto follow
is confirmed
9
Lock the auto follow screen Use this option when you are putting your smartphone in
your pocket during auto follow.
then press on GO. N.B: for quality auto following, close in the frame as much as possible
around the subject.
> The frame turns green and the radar is displayed. The drone is in auto follow mode. It
follows the selected subject and the GPS signal of the smartphone to which it is connected.
You can also launch auto follow from the flight screen. To do this press the (FOLLOW) icon
in the top left of your screen then select AUTO FOLLOW.
Presentation of the flight screen
46
Page 51

Meaning of the colours of the auto follow frame
Blue
There is currently no auto follow. Select the subject to be followed.
Green
The subject to be followed is selected. The drone can use visual
recognition to follow its subject.
Dotted g reen
The drone is looking for the subject. Once the subject is found, the frame
turns green and the drone activates visual tracking. The drone continues
to follow the smartphone's GPS, but no longer uses visual recognition.
Red
The drone has lost sight of its subject. The drone continues to follow the
smartphone's GPS, but no longer uses visual recognition.
47
Page 52

Default viewing angle and Perfect Side
The FreeFlight Pro app offers two viewing angles during auto follow: the default viewing
angle and Perfect Side.
Default viewing angle
The drone follows its subject but does not change its course.
48
Page 53

Perfect Side
Lock the drone's orientation with the help of the lock icon located on the bottom left of your
screen. Once the orientation of the drone is locked, the drone films and constantly follows the
subject keeping the same viewing angle. The drone changes its course according to the
subject's position.
49
Page 54

Magic Dronies
When you are in auto follow mode, you can carry out Magic Dronies (pre-programmed
manoeuvres).
1. Press the icon when you are in auto follow mode.
> The Magic Dronies list appears:
· Parabola: the drone flies over its subject.
50
Page 55

· Boomerang: the drone flies away from its target and then comes back.
· Zenith: the drone flies towards its subject, pulls up then makes the reverse journey.
· Orbit: the drone flies in a 360° circle around its target.
2. Press the manoeuvre that you want to undertake to carry it out.
N.B.: you can stop a manoeuvre at any time. To do this, press STOP.
51
Page 56

Locking the screen
If you lock your smartphone manually the auto follow mode stops.
However, you can lock the screen of the auto follow mode directly from the FreeFlight Pro
app. Use this option to put your smartphone in your pocket during auto follow.
To lock the screen, slide the (LOCK SCREEN) icon to the right.
The following screen is displayed:
To unlock the screen, slide the (UNLOCK SCREEN) icon to the left.
To unlock the screen and stop the auto follow mode, slide the (STOP FOLLOW) icon
to the right.
Exiting auto follow mode
You can exit auto follow mode in several ways:
· Press . The drone goes back to manual piloting.
· Press (Piloting) in the top left of your screen. The app goes back to manual
piloting.
· If you have locked the auto follow mode, unlock it by sliding the (STOP FOLLOW)
icon to the right.
52
Page 57

The drone goes back to manual piloting.
Auto Framing
In auto framing mode, the drone remains at a fixed point, but changes the direction of its
camera continuously in order to film its subject. This mode uses visual recognition to keep
your subject centred in the frame while you fly without requiring the GPS from your
smartphone. Therefore, a second person must be able to fly the drone in order to follow
the subject to be filmed.
53
Page 58

Switching to auto framing mode
1. With the help of the FreeFlight Pro app, connect to your drone.
2. Go into FOLLOW ME GPS & VISUAL TRACKING.
> The following screen is displayed:
3. Select AUTO FRAMING .
> The flight screen is displayed and a blue frame appears in the centre of your screen.
4. Make your drone take off.
> The drone takes off and stabilises at approximately 1 metre from the ground.
5. Stabilise the drone at the desired altitude.
6. Position the subject within the field of view of your drone's camera.
54
Page 59

7. Use the dots either side of the blue frame to adjust it around the subject to be followed,
then press on GO. N.B: for quality auto framing, close in the frame as much as possible
around the subject.
> the frame turns green and the radar is displayed. The drone is in auto framing mode. It
constantly films the selected subject.
You can also launch auto framing from the flight screen. To do this press the (FOLLOW) icon
in the top left of your screen then select AUTO FRAMING.
55
Page 60

Presentation of the flight screen
1
Back to manual piloting
2
Take a photo
3
Controls to over-correct the drone during auto framing mode
4
Stop auto framing and go back to manual piloting mode.
5
Subject to be filmed N.B.: the green frame around the subject means that auto framing
is confirmed
6
Lock the auto framing screen.
Blue
There is currently no auto framing. Select the subject to be filmed.
Green
The subject to be filmed is selected. The drone can use visual recognition
to film its subject.
Dotted g reen
The drone is looking for the subject.
Red
The drone has lost sight of its subject. Select the subject to be filmed
again.
Meaning of the colours of the auto framing frame
56
Page 61

Locking the screen
If you lock your smartphone manually the auto framing mode stops.
However, you can lock the screen of the auto framing mode directly from the FreeFlight Pro
app. Use this option to put your smartphone in your pocket during auto framing.
To lock the screen, slide the (LOCK SCREEN) icon to the right.
The following screen is displayed:
To unlock the screen, slide the (UNLOCK SCREEN) icon to the left.
To unlock the screen and stop the auto follow mode, slide the (STOP) icon
to the right.
Exiting auto framing mode
You can exit auto framing mode in several ways:
· Press . The drone goes back to manual piloting.
· Press (Piloting) in the top left of your screen. The app goes back to manual
piloting.
· If you have locked the auto framing mode, unlock it by sliding the (STOP)
icon to the right.
57
Page 62

The drone goes back to manual piloting.
58
Page 63

Flight Plan
Before getting started
Flight Plan is available for iOS® and AndroidTM smartphones.
Flight Plan is compatible with:
· The Parrot Bebop Drone, firmware version 2.0.57 and later.
· The Parrot Bebop 2
· The Parrot Disco
For the version of drone and FreeFlight Pro:
1. Connect the drone to your smartphone. For more information, see the Parrot Bebop Drone,
Parrot Bebop 2, or Parrot Disco user guide.
2. Launch FreeFlight Pro.
3. Tap FLY & FILM, and then (settings).
4. Select the Information screen.
To update your drone, see the Updating article on its support page on our website.
NB: if you use two smartphones running two different OSs, you must buy the option
twice so that it works on both smartphones.
Install Flight Plan
Flight Plan is available in the App Store® or Google PlayTM as a FreeFlight Pro in-app
purchase.
You can download Flight Plan:
· When downloading FreeFlight Pro
· From FreeFlight Pro. To do this, launch FreeFlight Pro, then go to Menu > Flight Plan.
Pre-flight checks
Before flying your drone, you must check the following:
Regulations
· Check for any applicable limitations and prohibitions. Certain areas are no-fly zones (e.g.:
military sites, nature reserves, cities, airports, etc.).
· If visual flight is required, make sure that your entire flight plan is in your visual field.
· Check for restrictions regarding the use of Wi-Fi frequencies in the place where you are
going to fly.
· Check for restrictions regarding recording, keeping and using images.
59
Page 64

· Local regulations may require certification or special authorisation for the pilot of the drone.
Checking flight conditions
· Do not fly the drone at night.
· Check weather conditions. Do not fly the drone in rain, fog or snow.
· Do not fly the drone if the wind speed exceeds 40 km/h.
Checking the condition of the drone
NB: For more information on the following procedures, see the user guide for the drone.
· Make sure the propellers are properly fitted and tightened.
· Make sure the battery is properly attached to the drone.
· Make sure the batteries of the drone and your smartphone are charged.
· Check the quality of the connection between the drone and your smartphone.
· Calibrate the drone. For more information, see the drone's user guide.
Accessing Flight Plan
To open and use Flight Plan, you must be connected to the internet.
1. Launch FreeFlight Pro.
2. Tap FLIGHT PLAN.
> The following screen appears.
60
Page 65

3. Select the drone that you want to create a flight plan for (Parrot Bebop Drone, Parrot
Bebop 2 or Parrot Disco).
> The map appears.
NB: To open Flight Plan, you can also go to FreeFlight Pro > > Flight Plan.
Presentation of Flight Plan
An internet connection is required to display the map.
NB: If the total duration of your flight plan exceeds the battery life of the drone, the
drone will automatically land before its completion.
The approximate duration of your flight plan is shown at the top of the flight plan scenario
screen.
The battery life of the drone is approximately:
· Parrot Bebop Drone: 11 minutes
· Parrot Bebop 2: 25 minutes
· Parrot Disco: 45 minutes
61
Page 66

Main screen
No.
Description
No.
Description
1
Go back to the previous screen
8
Open the flight plan directory
2
Lock/Unlock flight plan editing
9
Compass
3
Add events (take a picture, landing,
etc.)
10
Undo the last action
4
Name of the flight plan being created
11
Redo the last undone action
5
Drone model used
12
Change the speed of a connection
6
Centre the map on your GPS position
13
Start the current flight plan
7
Change the map mode
14
Edit the altitude of a waypoint
62
Page 67

Changing the map mode
Satellite
The satellite image of the area appears.
Map
The map of the area appears.
Hybrid
The satellite image of the area appears with place names.
To change the map mode, tap the button in the upper right of your screen. A dropdown
list appears.
The following modes are available:
Creating a flight plan
An internet connection is required to display the map. If your flight plan is in an area without
internet access, define and save your flight plan beforehand. To save the map's data, do not
clear the cache on your smartphone.
NB: Ensure your entire route is in an unobstructed area.
· To zoom in and out, pinch the display with two fingers.
· To move the map, drag a finger across the screen.
· To display a 3D view of the flight plan, drag two fingers up the screen. The buttons
disappear. To display them again, drag two fingers down to straighten the map.
63
Page 68

To centre the map on your location, tap .
A flight plan consists of several waypoints. To create a flight plan, you must determine several
waypoints for your drone.
1. Tap on the map.
ØA waypoint appears on the map.
· The number in the centre of the waypoint represents the drone's altitude.
· The white arrow represents the orientation of the drone's camera.
2. Tap the screen again to create other waypoints.
· The order of waypoints appears in small numbers on each waypoint.
· A line is automatically created between each waypoint.
3. Once you've finished your flight plan, tap and hold the last waypoint.
64
Page 69

> A pop-up menu appears.
4. Select CLOSE.
> Your flight plan is created.
· To undo the last action, tap .
· To reopen the flight plan, tap and hold OPEN.
NB: For smooth video quality, keep a distance of at least 5 minutes between each waypoint.
Changing the drone's settings
Changing the speed of the drone
You can assign one speed per connecting line (in meters per second). This speed will remain
constant for the entire connecting line.
NB: For smooth video quality, a lower speed is preferable if there are significant changes in
direction.
Changing the speed with the horizontal slider
1. Tap the connecting line.
> The speed appears.
2. Drag the slider left or right to decrease or increase
the speed.
65
Page 70

Changing the speed with the context menu
The context menu allows you to control the speed of the drone with precision.
1. Tap and hold the connecting line.
> A pop-up menu appears.
2. Tap EDIT.
> A pop-up window appears.
3. Enter the new speed value.
4. Tap OK.
> The speed is changed.
Changing the direction of the drone's camera
By default, the drone directs its camera along the axis of the
connecting line.
Tap the tip of the waypoint's arrow and rotate it in the desired
direction.
> Once it reaches the waypoint, the drone will turn its camera
in this direction. It will keep this direction until it reaches the
next waypoint.
Managing waypoints
Moving a waypoint
Select the waypoint and then drag it to the desired location.
66
Page 71

Inserting a waypoint on a connecting line
1. Tap and hold the connecting line at the point where you want to insert the waypoint.
> A list of options appears.
2. Tap INSERT.
> A waypoint appears on the connecting line.
The altitude of the inserted point will be the average of the other two points.
Changing the altitude of a waypoint
The altitude is shown in the middle of the waypoint (in meters). The default altitude of a
waypoint is 3 metres above the ground. The maximum altitude of a waypoint is 150 meters.
NB: The higher the waypoint is, the redder it becomes. The lower the waypoint is, the greener
it becomes.
67
Page 72

With the vertical slider
1. Tap the waypoint.
2. Drag the slider on the right of your screen up or down to increase
or decrease the altitude.
With the context menu
The context menu allows you to control the altitude of the waypoint with precision.
1. Tap and hold the waypoint.
> A pop-up menu appears.
2. Tap EDIT.
68
Page 73

3. Enter the desired altitude for the waypoint.
4. Tap OK.
Deleting a waypoint
1. Tap and hold the waypoint.
2. Tap DELETE.
Point of interest
This option allows the drone to carry out its flight plan while filming a precise point. For this,
you must create one or more points of interests (POI) and associate them with one or more
segments of your flight plan.
69
Page 74

Creating a POI
Define one or more POIs when creating your flight plan.
1. Tap and hold the map to bring up a list of options.
2. Select Point of interest.
> The POI appears on your flight plan.
3. Tap to lock the POI.
4. Tap the POI to select it.
5. Select the segment (line between two waypoints) on the flight plan that you want to assign
it to. This makes it possible to orient the drone's camera towards this POI on the segment.
NB: you cannot associate two consecutive flight segments to two different POIs. However, you
can change the orientation of the last waypoint associated with the POI.
6. Tap .
> Arrows in the colour of the POI appear on the segment. They indicate the orientation of the
drone's camera on the segment.
70
Page 75

NB: You can create as many POIs as needed for the flight plan.
Changing a POI
To change a POI, you must be in edit or unlock mode .
You can:
· Move the POI on your flight plan. To do this, press the POI you want to move and
reposition it on your flight plan.
· Change the altitude of the POI. To do this, select your POI, change its altitude on the right
of your screen and tap .
71
Page 76

Progressive course
The progressive course allows the drone to move more smoothly towards the next waypoint.
Defining a progressive course:
1. Tap and hold the flight segment concerned. Here the selected segment is on the right of the
screen.
> A list of options appears.
2. Select Progressive course.
> The progressive course is defined. Arrows show the progressive orientation of the drone's
course between the two waypoints.
Green arrows indicate the direction of the drone during the progressive course
72
Page 77

Managing events
You can add occasional actions (events) in the flight plan.
To do this, tap in the upper left of your screen.
> The current flight plan's scenario mode is displayed.
73
Page 78

Presentation of the timeline
No.
Description
1
Previous screen
2
Lock/Unlock the flight plan's events
3
Estimated time of the flight plan
4
Types of events. For more information on the various events, go to
the Add/Delete an event section.
5
Actions of the drone during the flight plan (photo, video or burst)
6
Drone manoeuvres during the flight plan
7
Drone orientation
8
Tim eline of w aypoints and connections
To zoom in and out on the timeline, pinch the display with two fingers.
NB: The timeline allows you to know the length of each connecting line in the flight plan (in
seconds). This time is shown under each connecting line.
74
Page 79

Presentation of events
Icon
Description
Comments
Video recording
Filming the flight plan.
At the launch of a flight plan, video mode is enabled by default.
Photos
Taking photos during the flight plan.
You cannot take a video and photos simultaneously.
Pause
Pause recording during the flight.
This event can only be programmed on a waypoint.
Take off
Taking off.
This event is present by default in each flight plan.
Landing
Landing.
You can program a Landing event at any time during the flight
plan. To make the drone take off again, program a Take off
event.
A Landing an event is programmed by default at the end of
each flight plan. If you delete this event, the drone will hover at
the height of the last waypoint.
Panorama
Make the drone turn around towards the left or right.
This event can only be programmed on a waypoint.
Orientation
Adjust the angle of the drone's camera.
This event can only be programmed on a waypoint.
The drone's camera retains the orientation angle throughout
the flight plan. To straighten the camera, program an
Orientation event again at the desired angle.
75
Page 80

Adding/Deleting an event
Format
Minimum interval
RAW/DNG
8 seconds
JPEG
6.2 seconds
JPEG 180°
6.2 seconds
Snapshot
1 second
You can schedule an event on a connecting line or a waypoint.
You can program multiple events simultaneously.
To add an event, select the icon for the event and drag it to the timeline.
The event appears on the timeline.
To remove an event, drag it off the timeline.
The event disappears from the timeline.
Event settings
You can change the settings for:
· photos,
· pause,
· panorama,
· camera direction.
To edit an event's settings, tap the event in the timeline.
> A dialog box appears.
You can set the settings needed.
Photos
Select the image format:
· RAW/DNG (wide angle high resolution photos),
· JPEG,
· JPEG 180° (wide angle photo),
· Snapshot (screenshot).
By default, the DNG format is enabled.
Tap the interval value to change it (in seconds).
The default interval is 10 seconds.
76
Page 81

Pause
Tap the pause value to change its length (in seconds).
The default length is 10 seconds. The maximum length is 600 seconds.
You can program several consecutive Pause events.
Panorama
Tap the value of the angle to change it (in degrees). To make the drone rotate to the right,
enter a negative value.
The default angle of rotation is 360°. The rotation angle value can be between -3600° (10
rotations to the right) and 3600° (10 rotations to the left).
Press the rotation speed value to change it (in degrees per second).
The default rotation speed is 30° per second. The minimum rotation speed is 5° per second.
The maximum rotation speed is 180° per second.
NB: For smooth video quality, a low rotation speed is preferable.
Orientation
Tap the camera angle value to change it (in degrees).
Parrot Bebop Drone
The default orientation angle is zero. The minimum angle is -60°. The maximum angle is 60°.
Press the camera orientation speed value to change it (in degrees per second).
The default orientation speed is 30° per second. The minimum orientation speed is 5° per
second. The maximum orientation speed is 180° per second.
Parrot Bebop 2
By default, the angle of rotation is 33°. The zero orientation angle corresponds to the horizon
and not the centre of the camera.
The maximum angle of upward orientation is -17°.
The maximum angle of downward orientation is 83°.
77
Page 82

Changing the default settings
1. Tap the event icon.
> A dialog box appears.
2. Enter the default values you want to assign to the event.
Managing flight plans
Opening a flight plan
Opening a new flight plan
Open Flight Plan.
> The map appears.
If you are using Flight Plan for the first time, directly create your new flight plan.
If you have already used Flight Plan, the last flight plan you used appears.
To open a new flight plan, press the icon in the upper right of your screen.
The Flight plan menu appears.
Tap NEW, in the lower left of the screen, to create a new flight plan.
78
Page 83

Opening a saved flight plan
1. Open Flight Plan.
2. Tap the icon in the upper right of your screen.
> A list of saved plans appears.
3. Tap the plan that you want to use.
4. Tap OPEN.
5. The plan opens in protected mode, represented by the icon in the upper left of your
screen.
6. To change it, tap the icon.
> The icon changes to: . You can change your flight plan.
79
Page 84

Saving a flight plan
To save changes to a previously saved flight plan, go to and tap Save.
To save a new flight plan:
1. Tap the icon in the upper right of your screen.
2. Tap Save as.
> A dialog box appears.
3. Name your flight plan.
4. Tap Save.
Your new flight plan is saved.
Deleting a flight plan
1. Tap the icon in the upper right of your screen.
2. Tap the flight plan that you want to delete.
3. Tap Delete.
> A dialog box appears.
4. Tap OK to confirm the deletion, or Cancel.
Launching a flight plan
NB: Before starting a flight plan, make sure there are no obstacles in the flight plan's route.
The flight parameters defined in FreeFlight Pro (speed, distances, default modes) do not apply
in Flight Plan.
1. Connect the drone to FreeFlight Pro.
2. Wait until the drone's GPS icon at the bottom of the screen turns green. This means that the
GPS is connected.
3. In the FreeFlight Pro app, go to Flight Plan and tap the icon in the upper right of your
screen.
> Your flight plans appear.
4. Select the flight plan that you want to start. You can launch:
· a saved flight plan. For more information, see Managing flight plans > Opening a flight
plan,
· a flight plan under construction.
4. Tap the icon in the lower left of your screen.
80
Page 85

· Parrot Bebop Drone and Parrot Bebop 2: If the drone is already flying, it goes towards the
first waypoint. If the drone is on the ground, it automatically takes off and goes towards the
first waypoint.
· Parrot Disco: If the drone is already flying, it goes towards the first waypoint. If not, make
the Parrot Disco take off. Once in the air, the Parrot Disco starts the flight plan.
NB: If the Wi-Fi connection between the drone and your smartphone is lost, the drone
continues its route. If the GPS signal of the drone is lost, the drone switches to stationary
mode until it receives a valid GPS signal.
Display modes
When the drone follows the flight plan, on your smartphone you can view:
· flight plan display: the drone icon follows its evolution on the flight plan,
· camera display: the camera feed of the drone is displayed.
To change the display mode, tap the minimized window of the return video feed or flight
plan.
NB: In case of an alert, when the flight plan is displayed, a red box appears around the
minimized window of the return video feed. Tap the minimized window to enter the flying
interface and display the alert box.
81
Page 86

Interrupting the flight plan
To pause the drone, tap . To resume the flight plan, tap . The drone will go towards the
next waypoint in the flight plan.
To stop the current flight plan, tap . To restart the flight plan, tap . The drone will go
towards the first waypoint in the flight plan and then resume the route.
Regaining control of the drone
At any time during the flight plan, you can regain control of the drone, activate the emergency
stop, make it return home, or make it land.
If you use a Parrot Skycontroller:
Directly use the joysticks or the navigation buttons of the Parrot Skycontroller to regain control
of the drone.
If you do not use a Parrot Skycontroller:
1. Display the return video feed from the camera of the drone.
> The flying screen appears.
2. Use the screen's controls to fly the drone.
> The flight plan will pause.
To resume the flight plan:
1. Tap on the flight plan's minimized window.
2. Tap .
> The drone goes towards the next waypoint in the flight plan.
82
 Loading...