

Quick start guide
Guide d'utilisation rapide
Quick start guide
快速入门指南
Guía de utilización rápida
Guía de utilización rápida
Bedienungsanleitung
Guida all'uso
Gebruikershandleiding
Manual do utilizador


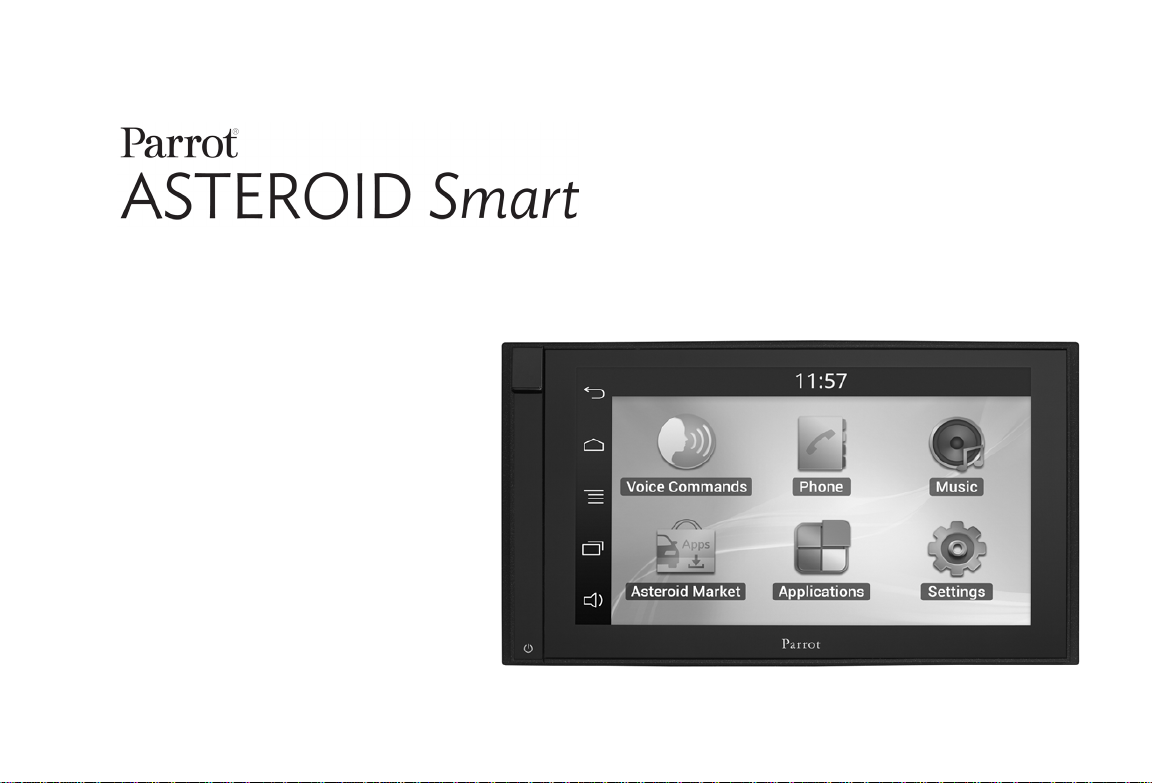
Parrot ASTEROID Smart
English ..................................................................... 11
简体中文
Español ................................................................... 39
..................................................................... 27
4
x4
x2
x3
5
7891011English


Quick start
guide
Content
Before you begin
Installation
Getting started
Phone
Music
Internet
Video
Troubleshooting
General information
p.11
p.12
p.15
p.17
p.18
p.20
p.22
p.23
p.24
Before you begin
About this guide
In order to limit our paper consumption and as
part of our environmentally friendly and
responsible approach, Parrot prefers to put
user documents online rather than print them
out. This simplified guide to the Parrot
ASTEROID Smart is therefore limited to
providing you with the main instructions that
will make it easy for you to use the device.
More information can be found on the support
section of our website, www.parrot.com: the
full manual, FAQs, tutorials, and more.
Note: iPod®, iPhone® (in iPod mode) and iPad®
will be referred to as an "iPod" in this manual.
Softw are updates
Download the latest update for free (and
consult the update procedure) on the Parrot
ASTEROID Smart support page on our website
www.parrot.com. These updates will enable
you to receive new features and improve the
product’s compatibility.
Note: You can also download the Parrot
ASTEROID Smart's updates while connected to
the Internet. The availability of an update is
indicated on the notification bar.
Warnings
All functions requiring an increased attention
should only be used while the vehicle is
stationary. Your safety and the one of the other
road users prevails over phone calls, music and
driving assistance applications. Be responsible:
drive carefully and pay full attention to your
surrounding. Parrot denies any liability should
you choose not to respect this warning.
Use the Parrot ASTEROID Smart with a
reasonable volume level so that you can hear all
external noises while driving.
The Parrot ASTEROID Smart includes NdFeB
magnets which can damage objects sensitive to
magnetic fields (pacemakers, credit cards,
mechanical clocks…).
The Parking Brake wire of Parrot ASTEROID
Smart's ISO cable detects whether or not the
parking brake is on. It must be connected
following the installation instructions provided
in this document. Incorrect installation or
connection may be dangerous and illegal in
many states / countries. Under no
circumstances should the screen within the

driver's field of vision broadcast any videos
while the vehicle is moving. The same applies
to any applications other than those for driving
or navigation assistance.
If you attempt to use an application that is not
intended for navigation or driving assistance
when you are driving, an on-screen warning will
be displayed. To watch a video on the Parrot
ASTEROID Smart's screen, make sure that the
vehicle is stopped in a safe area and that the
parking brake is on.
Steering wheel control interface
A steering wheel control interface can be used
to connect your vehicle’s steering wheel
controls to your Parrot car stereo. With this
interface, you will be able to make phone calls
via the steering wheel controls while keeping
your hands on the wheel. Refer to our website
www.parrot.com for more information.
Installation
Note: We advise our customers to have the
Parrot ASTEROID Smart fitted by a professional.
Safety instructions
Turn the ignition off before installing the
Parrot ASTEROID Smart.
Do not install the Parrot ASTEROID Smart
where it may injure the driver or a passenger if
the vehicle stops suddenly.
Do not install the Parrot ASTEROID Smart
where it may interfere with the driver
operation of the vehicle.
Do not drill holes in the dashboard or any panel
without first making sure there is nothing
behind it. Do not damage any fuel line,
electronic component or cable.
If you need to use screws, do not allow them to
come into contact with any power cable.
Install the Parrot ASTEROID Smart only on
vehicles with a 12 V battery.
Place all cables away from hot places (heater
outlet) and moving parts (gear shift, seat
rails...). Make sure they will never wind around
the steering column or gearstick.
Confirm the proper function of your vehicle's
other equipment after installing the Parrot
ASTEROID Smart.
Do not install the Parrot ASTEROID Smart or
one of its components where the airbag may
deploy.
Do not install the Parrot ASTEROID Smart in
places subject to high temperatures or
humidity.
Make sure you leave enough space behind the
Parrot ASTEROID Smart once installed so that
proper heat dispersal is ensured.
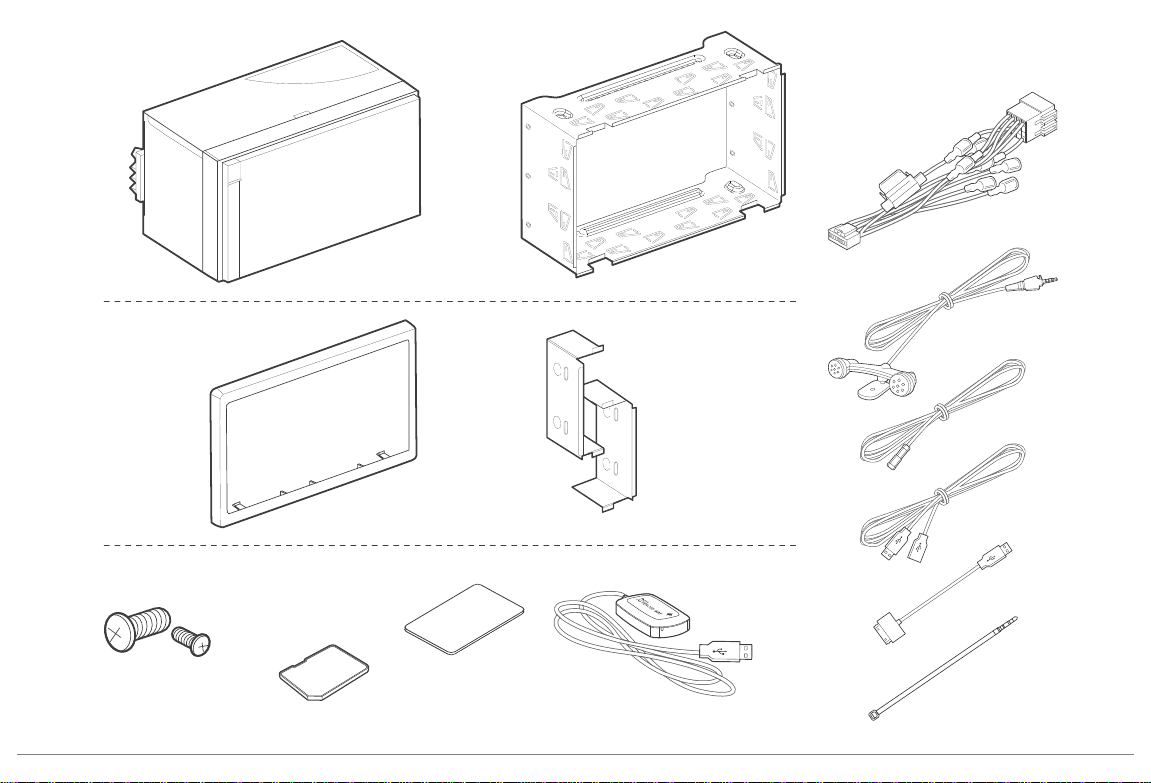
Before you begin
Remove your car stereo from your vehicle. You
may need release keys to do so.
Try to connect the audio and power connectors
of the Parrot ASTEROID Smart to the
connectors of your vehicle. If this connection is
impossible, you have to obtain an ISO adapter
before installing the Parrot ASTEROID Smart.
Refer to the Vehicle compatibility section on
the Parrot ASTEROID Smart support page for
more information.
Compare the Parrot ASTEROID Smart antenna
connector to the antenna connector of your
vehicle. If an adapter is necessary, contact your
12 English
local car audio specialist.
The GPS receiver antenna is located
on the side where "Parrot
ASTEROID GPS" is written and
where the star-shaped logo is. This
logo must always be directed
towards the sky.
Note : Make sure you also supply power to your
antenna if it is amplified. Power to the antenna
can be supplied using the Parrot ASTEROID
Smart ISO cable.
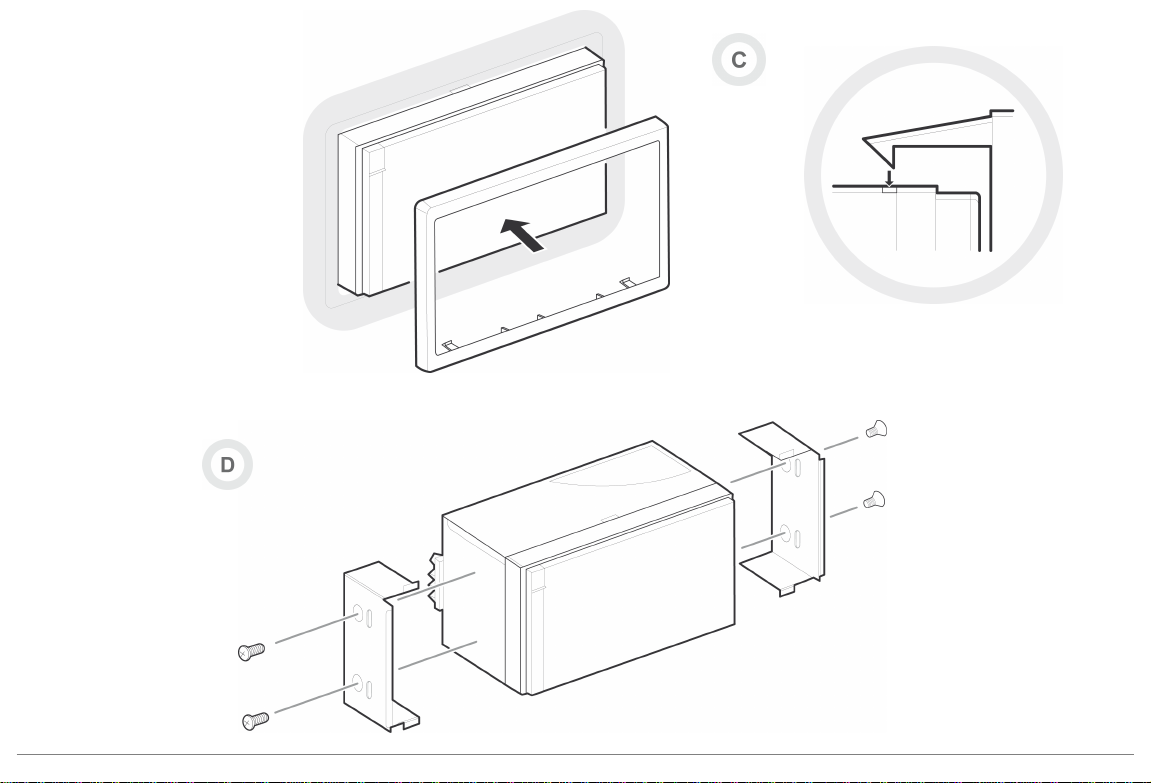
Installation using the holder
Loosen the 4 screws to remove the Parrot
1.
ASTEROID Smart holder.
Insert the holder into the dashboard. To do
2.
so, bend the tabs 90 degrees (diagram A p.7)
Install the Parrot ASTEROID Smart and
3.
fasten the screws (diagram B p.7).
Attach the trim ring (diagram C p.8).
4.
Installation using the side screw holes
Loosen the 4 screws to remove the Parrot
1.
ASTEROID Smart holder.
Remove the two side brackets (diagram D
2.
p.8).
Position the Parrot ASTEROID Smart so
3.
that its screw holes are aligned with the
screw holes of the bracket.
Tighten as many screws as necessary
4.
depending on the model of your vehicle.
Only use the provided screws.
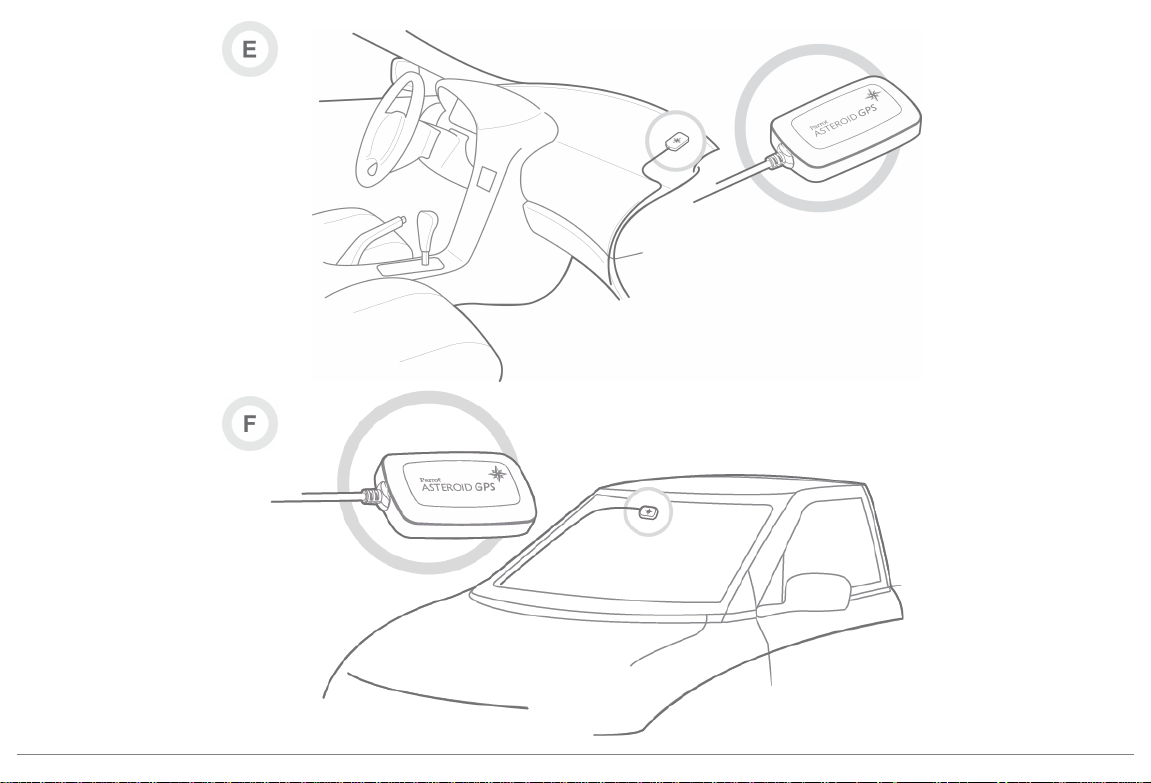
Installing the GPS receiver
Stick the GPS receiver in an unobstructed area
inside the car.
Athermic windshields and windows with a
built-in antenna can interfere with GPS
reception and reduce the reliability of
information from navigation applications.
If your vehicle has an athermic windshield, stick
the GPS receiver on the windshield on the non
athermic area. The side where the star-shaped
logo is must be stuck on the windshield
(diagram F p.9).
Note : The non athermic area of the windshield
depends on the model of your vehicle. It is
usually located near the rear view mirror.
If your vehicle does not have an athermic
windshield, stick the GPS receiver on the
dashboard. The side where the star-shaped
logo is must be visible (diagram E p.9).
To make sure the adhesive tape adheres well :
use the provided adhesive tape ;
clean the area with an appropriate cleaning
product before sticking the support ;
once you have stuck the support on the
dashboard, wait for approximately 2 hours
without handling it.
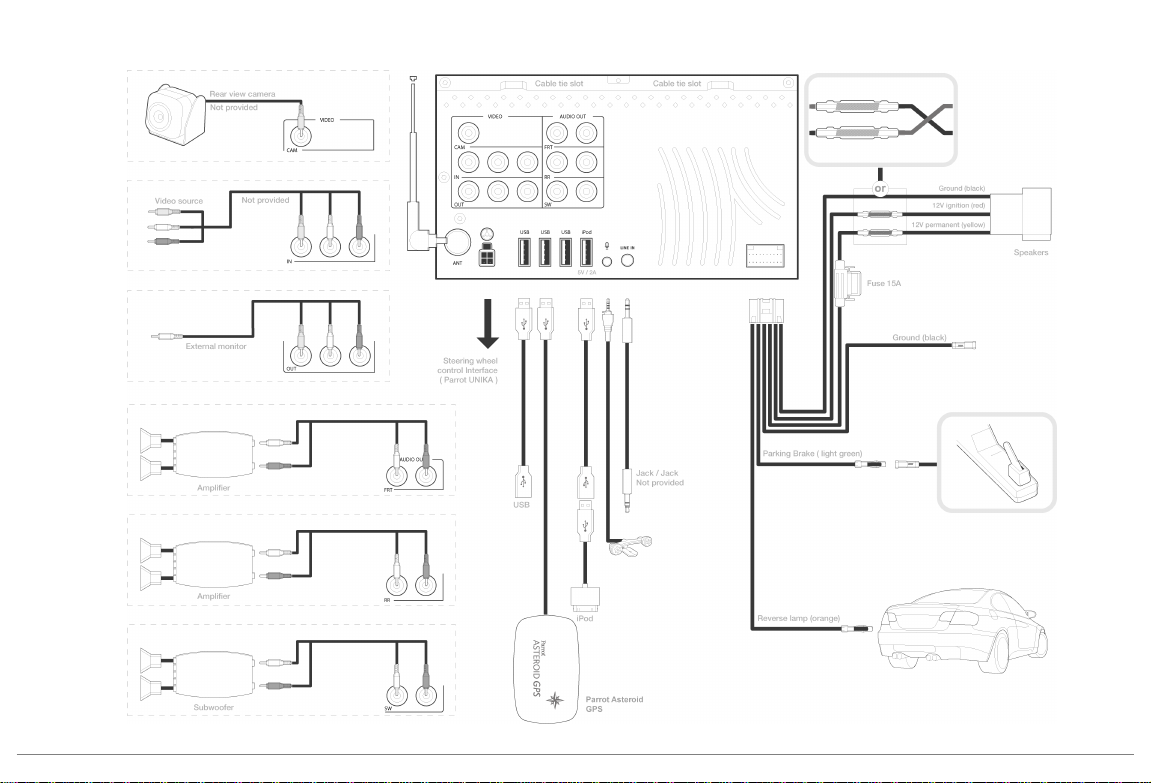
Connecting the parking brake lead
The parking brake lead allows you to use the
Parrot ASTEROID Smart video function or
applications only when the parking brake is set.
If this cable is not connected to your vehicle
parking brake system, the video function will
not be available.
Connect the parking brake extension lead
1.
to the Parrot ASTEROID Smart green
cable.
Locate and test the parking brake signal
2.
cable in the vehicle. This cable connects
your parking brake to the parking brake
signal on your dashboard.
Route the Parrot ASTEROID Smart parking
3.
brake extension lead (green) safely and
securely from the Parrot ASTEROID Smart
and connect this to the parking brake signal
cable using a suitable method.
13English

Warning: An improper connection or use of this
cable is dangerous and illegal in many states.
Installing a rear view camera
If you are to use the Parrot ASTEROID Smart
with a rear view camera (not provided), the
orange cable on the Parrot ASTEROID Smart
ISO cable will detect when the gearstick is
moved to "reverse". Connect this cable to the
one providing power to the reverse lamp of
your vehicle in order to display the rear view
camera image when backing your vehicle.
Connect the rear view camera video cable to
the Video CAM connector located at the back
of the Parrot ASTEROID Smart.
Installing the microphone
The optimum location for the microphone is in
the centre of the vehicles roof near the rear
view mirror. The microphone ideally needs to
be less than 60cm’s from the users mouth
pointing directly towards them with no
obstructions.
Please take care when routing the microphone
cable through the vehicle to the desired
location, we recommend routing alongside
existing manufacture’s wiring looms securing as
you go making sure the microphone cable is not
pinched or trapped.
Warning: Do not run the microphone cable in
such a way as to obstruct or interfere with the
vehicles operation or cause injury to its
occupants. In particular vehicle safety device
such as airbags and other SRS systems.
ISO cable connection
Connect the audio and power connectors of the
Parrot ASTEROID Smart to the ones of your
vehicle.
Note: Use the provided cable ties to make sure
the cables are well fixed to the car stereo. Insert
one of the cable ties into the slots in the top of
the back of the car stereo (refer to the diagram
p.4).
Once the connections are made, check your
installation. To do so, turn the ignition on then
off. The "Goodbye" message must be
displayed. If it is not the case, it is necessary to
swap the positions of the red and yellow wires.
Indeed, the red wire of the power cable must
be connected to the 12V ignition, the yellow
wire to the permanent 12V and the black wire to
the ground. This can be done simply by
reversing both bullet connectors located on the
Parrot wiring.
Installing the USB cables
Connect the USB cables to the Parrot
ASTEROID Smart. We recommend you
connect all audio cables to the Parrot
ASTEROID Smart even if you do not plan on
using them. Route the audio cables to a
suitable location in your vehicle such as the
glove box or arm rest compartment. It may be
necessary to drill a hole in your dashboard to do
so. Avoid using USB extension cables.
The USB cable (1.2m - 2A) to which you will
connect the USB / iPod cable extension must
be connected to its specific white USB port.
"iPod" is written above it.
To guarantee an optimal reception quality we
recommend you do not connect your internet
USB key 3G on the Parrot ASTEROID Smart
directly : use the USB cable to install your
device on the dashboard (or any other open
area).
Basic operations
The Parrot ASTEROID Smart faceplate can be
removed to protect your unit from theft. The
Parrot ASTEROID Smart cannot work without
its faceplate.
14 English
Handle the faceplate with care. Do not force
while installing or removing it. Keep it away
from sunlight, humidity or high temperatures.
To remove the faceplate, hold down the button
on the top left and slide it downwards (diagram
G p.10).
To replace the faceplate, insert its magneted
inferior part then press the superior part until
you hear a click.
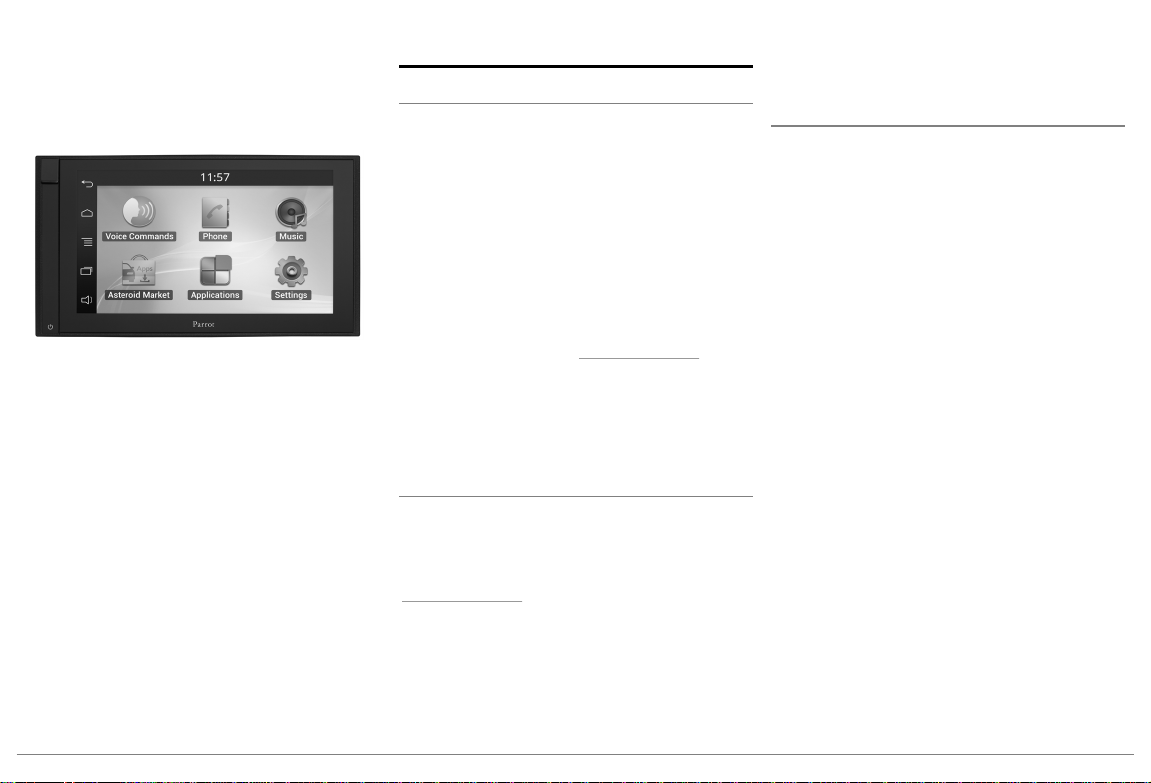
Getting started
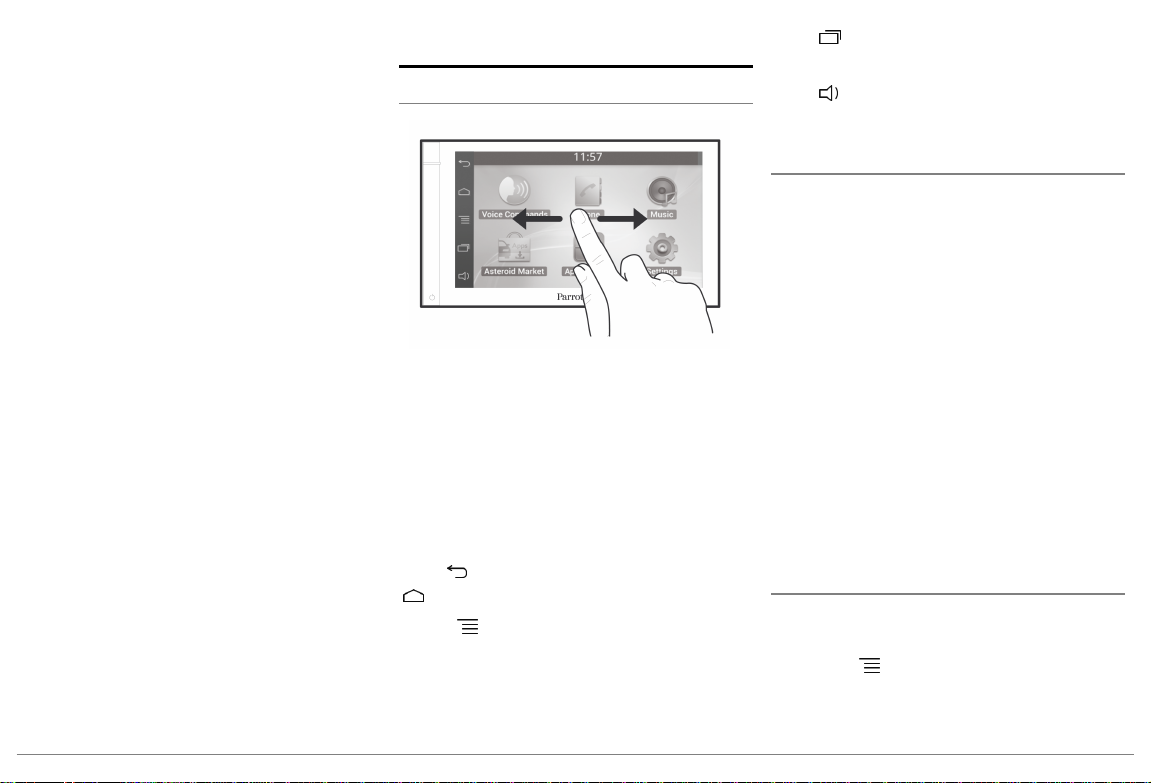
Home screen
Slide your finger horizontally to the left. You
will discover more space for adding functions
shortcuts.
Touch an icon to get to the corresponding
function. Touch the Applications icon for
instance. The list of the available applications
is displayed. Slide your finger downward to
browse through the applications list.
Press to get back to previous menu. Press
to get to the home screen.
Press to access the pop-up menu
corresponding to the current application. The
pop-up menu allows you to change several
settings or to access more functions.
Press to display the last applications used
or currently in use.
Press to adjust the volume. Then slide the
cursor to the left or to the right.
Personalizing the home screen
To add an application shortcut on your home
screen:
Tap Applications.
1.
Press and hold the application icon you are
2.
interested in.
Drag the icon to the home screen where
3.
you want to add it.
To remove an application shortcut:
Press and hold the shortcut you want to
1.
remove.
Drag the icon upwards to the Remove
2.
indication. When the icon turns red, lift
your finger.
Changing settings
To change the Parrot ASTEROID Smart
settings, tap Applications, then Settings. You
can also tap , then Settings.
15English

Connecting a phone via Bluetooth
Note : Refer to the compatibility page of our
website to check if your phone is compatible
with the Parrot ASTEROID Smart and to consult
the specific pairing procedures for the most
common phones : www.parrot.com/uk/
compatibility.
If you are using the Parrot ASTEROID Smart
with your phone for the very first time, you
must initially pair both devices. Once your
telephone is paired with the Parrot ASTEROID
Smart, the 2 devices will automatically connect
when they are turned on (as well as
Blu etooth®
features) and in proximity of each other.
In the Settings menu, press Wireless &
1.
networks > Bluetooth.
If necessary, activate the
2.
Blu etooth
and
Discoverable options.
From your phone, search for
3.
Blu etooth
peripherals and select «Parrot ASTEROID
Smart».
The pairing procedure depends on which
4.
telephone model you have:
If the phone asks you to enter the
Blu etooth
PIN code, enter “0000”.
If the Parrot ASTEROID Smart and
your telephone display two codes,
verify that the codes are identical,
then either confirm or invalidate.
Note: Depending on the model of your phone,
you may need to authorize the connection to the
Parrot ASTEROID Smart to allow further
automatic connections. Refer to the user guide
of your phone for more information.
Connecting two phones
To activate multipoint telephony and connect
two phones :
Tap Phone.
1.
Tap , then Bluetooth > Options.
2.
Activate the Multipoint Telephony option.
3.
When the Parrot ASTEROID Smart is switched
on, it attempts to connect to all paired phones
in the vehicle. If there are more than two paired
phones in the vehicle, the device connects to
the two phones with the oldest pairing.
When two phones are connected to the Parrot
ASTEROID Smart, one of them becomes the
main phone and the other is the secondary
phone. By default, the main phone is the one
with the oldest pairing to the Parrot ASTEROID
Smart.
You can receive calls to the main or secondary
phones.
Only the phonebook for your main phone may
be accessed through the Parrot ASTEROID
Smart. You can only make calls using the main
phone. However, you can easily switch
between the connected phones. To do so :
Tap Phone.
1.
Tap , then Phone.
2.
Select the main phone.
3.
Synchronising the phonebook
With most of the
Blu etooth
phones, the
phonebook is automatically synchronized in the
system’s memory. Each time you change your
directory, synchronisation will start
automatically the next time it is connected.
Warning: Only the contacts stored in the phone
memory are synchronized. If your contacts are
stored in your SIM card memory, transfer them
onto your phone memory.
The automatic synchronization is limited to
5000 contacts (or phone numbers) for each
paired phone.
16 English

Phone
Receiving a call
An incoming call is indicated by a ringtone. The
name of the caller is announced if his number is
recorded in the phonebook of the phone
connected to the Parrot ASTEROID Smart.
If you want to answer the call, tap the
green button on the Parrot ASTEROID
Smart screen. Then tap the red button to
end the call.
If you want to refuse this call, tap the red
button.
Making a call via voice recognition
You can make a call using voice recognition
directly after automatic synchronization. The
Parrot ASTEROID Smart will automatically
recognize the contact you wish to call.
Tap Voice Command > Contacts to launch
1.
the voice recognition feature.
> The Parrot ASTEROID Smart asks you the
name of the contact you want to call.
Say the name of the contact and the type of
2.
number («WORK», «CELLPHONE»...) if
there are several numbers associated to your
contact.
> The call is automatically launched if the
voice tag is correctly understood. If it is not
the case, a confirmation message is asked.
Confirm by saying «YES» or «CALL».
Note: At any time, press the the button to exit
voice recognition mode.
Music
Note: Several minutes of loading may be
necessary when connecting your audio
peripheral (USB / SD / iPod) to the Parrot
ASTEROID Smart for the first time, particularly if
you are using audio peripheral with a large
capacity or containing many audio files. This
loading time will allow your audio files to be
accessible via voice recognition.
Using vocal music search
The voice recognition function allows you to
select the artist / album you want to hear via
voice recognition. This function is only
available if you are using the Parrot ASTEROID
Smart with a USB / SD / iPod peripheral or
music applications compatible with this
feature.
Tap Voice Commands > Music.
1.
Say the name of the artist / album when
2.
asked to do so.
> The list of audio sources connected to
the Parrot ASTEROID Smart and
applications compatible with the vocal
music search function which contain the
artist / album that you selected will
17English

appear.
Note: Check the albums and artists names in the
metadatas of your music files. These names may
be different from the ones displayed on your
music files titles.
Radio
Tap Music >Tuner.
1.
Slide the slider to the left / right to change
2.
the radio station.
To get the list of all available stations:
Tap Music >Tuner.
1.
Press the button and select New scan
2.
> OK.
Tap Music > Tuner.
1.
Select the frequency manually or in
2.
Fullscan mode.
Press the button then select Add to
3.
presets.
> To select a stored station, select the
Presets mode.
Note: You can store as many stations as you
want.
iPod
1. Connect the USB / iPod extension lead to
the USB cable connected to the white USB
port and connect your iPod to it.
2. Tap Music > iPod. You can also tap Browse
to browse through the content of your iPod.
3. Tap a track to start playback.
USB storage device
The Parrot ASTEROID Smart is compatible
with the majority of USB keys / MP3 audio
player / external hard drive. There is no
restriction in terms of capacity of USB keys.
Only MP3, AAC or WMA formats are
supported.
Connect your USB storage device to the
1.
Parrot ASTEROID Smart using the USB
cable or the USB connectors on the back of
the car stereo
Tap Music > USB. You can also tap Browse
2.
to browse through the content of your
USB device.
Tap a track to start playback.
3.
SD card
The SD card capacity must not exceed 32Gb.
Only MP3, AAC, WAV, OGG or WMA formats
are supported.
Note : To remove the SD card, put a fingernail
into the ridge on the exposed end of the SD card.
Remove the Parrot ASTEROID Smart
1.
faceplate.
Insert the SD card into the appropriate slot
2.
with the contact surface facing left
(diagram H p.10).
Reattach the faceplate.
3.
Tap Music > SD. You can also tap Browse
4.
to browse through the content of your SD
card.
Tap a track to start playback.
5.
Audio player connected via Bluetooth
Note : The Parrot ASTEROID Smart allows you to
use the telephone and audio streaming
functions from 2 different phones without
having to disconnect one of them.
You can use the Parrot ASTEROID Smart to
listen to songs stored on your mobile phone or
Blu etooth
audio device. To do so, your phone /
18 English

audio device must support the
profile (Advanced Audio Distribution Profile).
If you are using a
first time, you have to pair both devices.
If both devices are already paired:
Tap Music > Bluetooth Audio.
1.
Start playing a song on your audio player.
2.
Screen commands
Blu etooth
Blu etooth
audio player for the
A2DP
While playing a music track or the radio:
tap the screen to pause / resume playback
or mute the radio ;
slide your finger upwards to increase the
volume ;
slide your finger downwards to decrease
the volume.
While playing a music track (except audio
players connected using a jack / jack cable):
slide your finger to the right to skip to the
next track ;
slide your finger to the left to get back to
the previous track.
Note : If you are using the Parrot ASTEROID
Smart with an audio player connected via
Bluetooth, these commands are only available if
your audio player supports the AVRCP profile
(Audio/Video Remote Control Profile).
Internet
Warning: Internet connection via a 3G key
requires a subscription offer with a telephone
operator. Using this service can result in
significant roaming charges. Check the
conditions of your subscription and
consumption tracking with your operator.
Parrot disclaims any liability for associated
costs.
Connection with a 3G/4G key
Note : Refer to the compatibility section of our
website to see the list of 3G / 4G keys that are
compatible with the Parrot ASTEROID Smart.
Connect a 3G key to the Parrot ASTEROID
1.
Smart with a USB cable.
> A pop-up will appear.
Note : To ensure optimum reception quality, do
not connect your 3G/4G key to the back of the
Parrot ASTEROID Smart: use a USB cable to
install the accessory on the dashboard (or any
other unobstructed area).
Enter your PIN code using the knob, then
2.
select ENTER. Check the Memorise PIN
code option if you would like your PIN
19English

code to be stored each time you turn on
the Parrot ASTEROID Smart.
Note: You will be able to change this setting by
selecting Settings > Wireless and network
settings > Mobile data networks. Among the
mobile access devices, select your 3G / 4G key,
tap Forget PIN code > Forget.
Select your APN (Access Point Name)
3.
from the suggested list. This information
is available in the documentation provided
with your 3G / 4G key. If your APN is not in
the list, you can add it by selecting Settings
> Wireless and network settings > Mobile
data networks.
Among the mobile access devices, select
4.
your 3G / 4G key.
Select Access point > Other > Preset
5.
access points.
Wait approximately 30 seconds until the
6.
connection is established. You can also
press the button and browse the
menus while the connection is being
established.
Connection via Bluetooth
If you have a telephone that supports the
Blu etooth®
profile, DUN (Dial-Up Networking)
or PAN (Personal Area Network), the
Blu etooth
connecting your telephone to the
Parrot ASTEROID Smart will allow for sharing
of the telephone's 3G connection.
Note : Refer to the compatibility section of our
website to check if your phone allows the 3G
connection sharing via Bluetooth® and to
consult the corresponding procedure :
www.parrot.com/uk/compatibility.
Connect your telephone to the Parrot
1.
ASTEROID Smart via
On the Parrot ASTEROID Smart, select
2.
Blu etooth
.
Settings > Wireless and network settings >
Mobile networks settings > Mobile access
devices.
Select your APN (Access Point Name)
3.
from the suggested list, then check Select.
Press the button and select Connect.
4.
Allow connection sharing on your
5.
telephone. This procedure will vary
according to your telephone model.
Connection via USB
Note : Refer to the compatibility section of our
website to check if your phone supports 3G
connection sharing via USB and to consult the
corresponding procedure for the most common
phones : www.parrot.com/uk/compatibility.
Make sure that your phone’s keypad is
1.
unlocked, then connect the phone to the
Parrot ASTEROID Smart using the USB
cable/micro-USB provided with your
phone. You can also connect the phone
using the USB extension cable provided
with the Parrot ASTEROID Smart. This
connection also enables you to recharge
your phone’s battery.
Note: Do not use the white iPod USB port to
connect your phone to the Parrot ASTEROID
Smart.
Select your APN (Access Point Name)
2.
from the suggested list, then check the
option Select. You can then modify this
setting by selecting Settings > Wireless
and networks > Mobile data networks.
> A pop-up window indicating that USB
connection sharing has been activated will
appear.
20 English

Connection to a Wi-Fi network
If your smartphone can be used as a wireless
router or if a Wi-Fi® network is available next to
your vehicle:
Activate the hotspot function on your
1.
smartphone.
In the Parrot ASTEROID Smart Settings
2.
menu, tap Wireless & networks >Wi-Fi.
Activate the Wi-Fi option.
3.
> The list of available Wi-Fi networks is
displayed.
Select the Wi-Fi network generated by
4.
your smartphone.
Enter the password if necessary.
5.
Using the applications
Several types of applications are available with
the Parrot ASTEROID Smart : music,
geolocation, driver assistance...
All applications may not be available in all
countries. The use of some applications may
need prior subscription.
The Parrot ASTEROID Smart is a multitasking
device: several applications can run
simultaneously. For example, you can listen to
a Webradio station and use a driver assistance
application at the same time.
For more information about installing and using
the available applications, refer to the
ASTEROID Market web page :
www.parrotasteroid.com.
Video
Warning : The Parrot ASTEROID Smart video
function (besides the video stream from the rear
view camera) is dangerous and illegal in most
countries if it is used while driving. Consequently
this function is only available when the vehicle is
stationary. To watch a video on the Parrot
ASTEROID Smart, park your vehicle in a safe
place and set your parking brake.
Rear view camera
If your vehicle is equipped with a rear view
camera, you can use the Parrot ASTEROID
Smart screen to view the video stream of this
camera in order to ease your reverse parkings.
Consult the installation diagram p.4 and the
section "Installing a rear view camera" for more
information about the connection of the rear
view camera to the Parrot ASTEROID Smart.
The video stream of the rear view camera
appears automatically while backing up. The
image from the rear view camera may appear
reversed.
Note : At any time, tap Video switch to toggle
between the video from the rear view camera
and the video from an iPod connected with an
21English

AV / iPod cable.
Playback of a video via an external source
You can display on the Parrot ASTEROID Smart
the video output from an external video source.
Connect your video source to the Parrot
ASTEROID Smart using an AV / iPod cable
(which is not provided) (diagram p. 4).
Tap Applications > Video IN.
1.
Start the playback of a video on your
2.
source.
Note : At any time, tap Video switch to toggle
between the video from the rear view camera
and the video from an external source connected
with an AV / iPod cable.
corresponding icon.
Screen connected to video output terminals
Video output terminals allow you to connect a
screen for rear seat passengers to view the
videos recorded on your SD card. Consult the
installation diagram p.4 for more information
about the connection of the screen for rear
seat passengers to the Parrot ASTEROID
Smart.
Warning : Never locate the screen where the
driver could see the videos while driving.
Troubleshooting
Before you begin
Make sure the “Goodbye” message is displayed
on the Parrot ASTEROID Smart screen when
you turn the ignition off. Refer to the Checking
the wiring section for more information.
Reset the Parrot ASTEROID Smart. To do so,
remove the faceplate then use a paper clip to
press the Reset button. Hold down the Reset
button for 3 seconds (diagram G p.10).
Make sure you have the latest software update
on your Parrot ASTEROID Smart. To do so,
select Settings > About > Version. Compare
this number with the one on the Parrot
ASTEROID Smart support page on our website.
Playback of a video via a SD card
The Parrot ASTEROID Smart allows you to
watch videos stored on a SD card. Only the
MP2, MP4, H263, H264, WMV and SPARK
formats are supported.
Insert the SD card into the appropriate slot
1.
(diagram H p.10).
Tap Applications > Gallery.
2.
Select the video by tapping the
3.
22 English
Problems while using the phone function
Make sure your phone is compatible with the
Parrot ASTEROID Smart. To do so, refer to the
compatibility list of the Parrot ASTEROID
Smart available on our website
www.parrot.com, in the Support section.
If your phone is compatible with the Parrot
ASTEROID Smart and if you already have the
latest software update:

Erase the memory of the Parrot
1.
ASTEROID Smart. To do so, select
Settings > Advanced settings > Factory
settings.
On your telephone, erase the Parrot
2.
system from the list of
peripherals (or reboot your iPod).
Repeat the pairing procedure for the 2
3.
devices.
Problems while using the music function
Several minutes of loading may be necessary
when connecting your audio peripheral (USB /
SD / iPod) to the Parrot ASTEROID Smart for
the first time, particularly if you are using audio
peripheral with a large capacity or containing
many audio files. This loading time will allow
your audio files to be accessible via voice
recognition.
Reboot your iPod / iPhone before connecting it
to the Parrot ASTEROID Smart. To reboot your
iPod / iPhone (this procedure will not erase any
of your data) :
iPod: press Menu and the centre button
simultaneously until the iPod reboots.
iPhone / iPad / iPod touch®: Press the On/
Blu etooth
Off button and the Home button
simultaneously until the iPhone reboots.
Do not touch the screen when the
message “Slide to shutdown” appears.
Some problems may occur if the iPod / SD
card / USB device is already connected to the
Parrot ASTEROID Smart before you turn on the
ignition. Connect the iPod / SD card / USB
device once the ignition is turned on.
For more information
Refer to the Parrot ASTEROID Smart support
page on our website.
General information
Warranty
Without prejudice of legal warranty, Parrot
contractually warrants during 12 months from
the date of initial purchase by the consumer
(except wearing parts guaranteed for 6
months) that the product is free from defects
in materials and workmanship, upon
presentation of proof of purchase (date, place
of purchase, serial number of the product) to
the retailer or Parrot. During the contractual
warranty period, the defective product must be
returned in its original packaging to the aftersales service of the retailer. After inspection of
the product, Parrot will proceed, at its option,
to the replacement or the issue a credit note to
the exclusion of any other remedy.
Warranty does not cover: upgrading of the
software items of the Parrot products with
Bluetooth cell phones for compatibility
purpose, data recovery, deterioration of the
external aspect due to normal wear of the
product, any damage caused by accident,
misuse, misapplication, or non-Parrot
products.
Parrot is not responsible for storage, loss or
damaged to data during transit or repair. Any
23English

product wrongfully declared to be defective
will be returned to sender and inspection,
process and carriage costs will be invoiced to
him.
Correct disposal of This Product (Waste
Electrical & Electronic Equipment)
This marking shown on the product or its
literature, indicates that it should not be
disposed with other household wastes at the
end of its working life. To prevent possible
harm to the environment or human health from
uncontrolled waste disposal, please separate
this from other types of wastes and recycle it
responsibly to promote the sustainable reuse
of material resources.
Household users should contact either the
retailer where they purchased this product, or
their local government office, for details of
where and how they can take this item for
environmentally safe recycling. Business users
should contact their supplier and the terms and
conditions of the purchase contract. This
product should not be mixed with other
commercial wastes for disposal.
Modifications
The explanations and specifications in this
guide are given for information purposes only
and may be modified without prior notice. They
are deemed to be correct at time of going to
press. The utmost care has been taken when
writing this guide,as part of the aim to provide
you with accurate information. However,
Parrot shall not be held responsible for any
consequences arising from any errors or
omissions in the guide, nor for any damage or
accidental loss of data resulting directly or
indirectly from the use of the information
herein. Parrot reserves the right to amend or
improve the product design or user guide
without any restrictions and without any
obligation to notify users. As part of our
ongoing concern to upgrade and improve our
products, the product that you have purchased
may differ slightly from the model described in
this guide. If so, a later version of this guide
might be available in electronic format at
Parrot’s website at www.parrot.com.
FCC Compliance Statement
This device complies with part 15 of the FCC
rules. Operation is subject to the following two
conditions:
(1). this device may not cause harmful
interference, and
(2). this device must accept any interference
received, including interference that may cause
undesired operation.
Note: The manufacturer is not responsible for
any radio or tv interference caused by
unauthorized modifications to this equipment.
Such modifications could void the user’s
authority to operate the equipment.
Canada Class B statement: This Class B digital
apparatus complies with Canadian ICES-003.
Copyrights
Identification N. 394 149 496 R.C.S. PARIS
Parrot S.A.
Copyright © 2012 Parrot. All Rights Reserved.
Declaration of Conformity
We, Parrot S.A. 174 quai de Jemmapes, 75010
Paris, France, declare under our sole
responsibility that our product, the Parrot
ASTEROID Smart to which this declaration
relates is in conformity with appropriate
standards IEC/EN 60065: 2002 / A1:2006 / A11:
2008 / A2: 2010 / A12: 2011, EN 300328 v1.8.1,
EN 301 489-1 (2008:V1.8.1) and EN 301 489-17
24 English

v1.3.2 following the provision of
Radio&Telecommunication equipment
directive 1999/5/EC R&TTE, Safety directive
2006/95/EC and EMC directive Automotive
2009/19/CE.
http://www.parrot.com/fr/support/parrotasteroid-smart/asteroidsmart_ce_conformity_declaration.pdf
Registered Trademarks
Parrot and the Parrot logo are registered
trademarks of PARROT SA.
The Bluetooth word mark is are registered
trademarks owned by Bluetooth SIG, Inc. and
any use of such marks by Parrot S.A. is under
license. Bluetooth QDID : B013841, B013839,
[-]
"Made for iPod / iPhone / iPad" means that an
electronic accessory has been designed to
connect specifically to iPod, iPhone or iPad,
respectively, and has been certified by the
developer to meet Apple performance
standards. Apple is not responsible for the
operation of this device or its compliance with
safety and regulatory standards.
iPad, iPod, iPod Touch and iPhone are
trademarks of Apple Inc, registered in the US
and others countries
iPad is a trademark of Apple Inc.
Wi-Fi is a registered trademark of the Wi-Fi
Alliance.
Gracenote, the Gracenote logo and logotype
and "Powered by Gracenote" are either
registered trademarks or trademarks of
Gracenote Inc. in the United States and/or
other countries.
All other trademarks mentioned in this guide
are protected and are the property of their
respective owners.
25English

26

快速入门指南
开始之前
安装
启动
手机
音乐
互联网
视频
故障排除
一般信息
.............27
.............28
.............30
.............31
.............32
.............33
.............36
.............36
.............37
开始之前
关于本指南
为限制我们的纸张消耗,派诺特倾向于把
用户文件放在网上而非打印出来,以此作
为我们环保和负责任态度的一部分。因此
这部精简的Parrot ASTEROID Smart用户
指南仅限于向您提供主要的操作说明,方
便您使用此设备。您可以在我们网站的支
持页面找到更多信息,www.parrot.com:完
整使用手册、常见问题、教程以及其他信
息。
注意:iPod®和iPhone®(在iPod模式下)
在本指南中称为“iPod”。
软件更新
在我们网站www.parrot.com的Parrot
ASTEROID Smart支持页面免费下载最新的更
新(并查阅升级步骤)。这些更新能让您
获取产品的新功能,提高产品的兼容性。
注意:您可以联网下载 Parrot ASTEROID
Smart 的更新。更新的可用性会显示在通
知栏。
警告
所有需要集中注意力的功能仅应在汽车静
止时使用。您在车上打电话、听音乐和使
用驾驶辅助应用程序时,请将您和其他道
路使用者的安全放在第一位。有责任感:
请小心驾驶,把注意力全部集中到您的周
围环境上。如果您不遵守警告,派诺特不
会承担任何责任。
开车时,以适当音量使用 Parrot ASTEROID
Smart,以便您能听到所有的外部噪音。
Parrot ASTEROID Smart 含有钕铁硼磁体,
可能会损害对磁场敏感的物体(心脏起搏
器、信用卡、机械钟表……)。
Parrot ASTEROID Smart 的ISO线缆中的驻
车制动线能检测手刹是否已经拉上。驻车
制动线必须按照本文件中的安装说明正确
连接。错误的安装或连接在许多国家可能
是危险和违法的。驾车时,任何情况下严
禁在司机视线范围内的屏幕上播放任何视
频。上述事项同样适用于任何应用程序。
如果您驾车时试图使用导航或者驾驶辅助
以外的应用程序,屏幕上会显示一个警
告。要使用 Parrot ASTEROID Smart 的屏
幕观看视频,请确保汽车已经停下,手刹
已经拉好。
SD卡
Parrot ASTEROID Smart 包含一个SD卡。你
可以用SD卡储存音乐曲目或者储存未事先
安装在 Parrot ASTEROID Smart 上的应用
程序。您必须把SD卡插入 Parrot ASTEROID
Smart 才能使用音频点播和导航应用程序。
简体中文
27

安装
备注:我们建议客户由专业人士安装
Parrot ASTEROID Smart。
安全须知
安装 Parrot ASTEROID Smart 前请关闭点
火开关。请勿将 Parrot ASTEROID Smart
安装在汽车急刹车时司机和乘客可能受伤
的地方。请勿将 Parrot ASTEROID Smart
安装在可能干扰司机驾驶的地方。如无法
先确定仪表盘或其他面板后有无物体,请
勿在其上钻孔。请勿损坏燃油管路、电子
元件或电缆。如果您需要使用螺丝,请勿
使其接触到任何电源线。只能将 Parrot
ASTEROID Smart 安装在装有12伏电池的汽
车上。使所有电缆远离热的地方(加热器
出口)和运动部件(换档,座椅滑轨……
)。请确保它们决不会缠绕转向柱或排档
杆。在安装 Parrot ASTEROID Smart 后
请确保您车辆其他设备的功能正常。请勿
将 Parrot ASTEROID Smart 或其组件之一
放置于安全气囊可能开启的地方。请勿将
Parrot ASTEROID Smart 放置于高温或潮湿
的地方。一旦将 Parrot ASTEROID Smart
安装好,请确保其后方留有足够空间以确
保适当的散热。
在您开始之前
请挪走您车上的汽车音响。您可能需要
正式版本来进行此项操作。请试着将
Parrot ASTEROID Smart 的音频和电源接
头连接至您车辆的接头。如果无法连接,
在 Parrot ASTEROID Smart 的安装之前您
必须找到一个ISO适配器。请您参阅 Parrot ASTEROID Smart 支持页面上的车辆兼
容性部分,以获取更多信息。比较 Parrot
ASTEROID Smart 天线连接器和您车辆的天
线连接器.如果需要适配器,请联系您当地
的汽车音响专家。
注释:请确保天线在被放大时您也能够为
其供电。在使用 Parrot ASTEROID Smart
ISO电缆的同时可以为天线供电.
支托物的安装
1. 松开4个螺丝以取下 Parrot
ASTEROID Smart 支托物。
2. 将支托物嵌入仪表盘。要做到这
一点,请垂直弯曲调整片(第7页图A)
。
3. 安装 Parrot ASTEROID Smart 并
拧紧螺丝(第7页图B)。
4. 装上装饰环(第8页图C)
侧面螺丝孔的安装
1. 松开4个螺丝以取下 Parrot
ASTEROID Smart 支托物。
2. 卸下两个侧托架(第8页图D)
3. 安放 Parrot ASTEROID Smart ,
使其螺丝孔与托架螺丝孔对齐。
4. 根据您的车型尽可能地将螺丝拧
紧。仅使用提供的螺丝。
安装GPS天线
将GPS卫星固定在车内无阻碍
的地方。绝热挡风玻璃和内
置天线的窗户可能干扰GPS
接收并降低来自导航程序信息的可靠性。
将GPS加密狗天线安装在标有“Parrot
ASTEROID GPS”字样和心形标志的一面。
该标志必须始终朝上。如果您的车辆有绝
热挡风玻璃,请将GPS加密狗固定在挡风玻
璃的非绝热部分上。 标有心形的一面必须
固定在挡风玻璃上(第9页图F)。
注释:挡风玻璃的非绝热部分面积取决于
您的车型。通常它位于后视镜上。
如果您的车辆没有绝热挡风玻璃,请将GPS
加密狗固定在仪表盘上。标有心形的一面
必须能让人看到。(第9页图E)。
确保胶粘带粘牢:
• 在固定支架前用合适的清洁工具将此区
域清除干净;
• 将支架固定在仪表盘上,然后等待约2个
小时,在此期间不要触摸它
28
简体中文

连接驻车制动拉索线
只有在安装了驻车制动后,驻车制动拉索
线才会让您使用 Parrot ASTEROID Smart
视频功能或应用程序。如果该拉索线未连
接至您汽车的驻车制动系统,视频功能将
不能启用。
1. 将驻车制动延长线连接至 Parrot
ASTEROID Smart 绿色导线。
2. 找到并测试车内的驻车制动信号
线。该拉索线将您的驻车制动与仪表盘
上的驻车制动信号连接起来。
3. 将 Parrot ASTEROID Smart 驻车
制动延长线(绿色)从 Parrot
ASTEROID Smart 里小心地抽出来,并
采用恰当办法将其连接至驻车制动信号
线。
警告:不正确地连接或使用该电缆在许多
国家是危险且非法的。
安装后视摄像头
如果您要使用带后视摄像头(未提供)的
Parrot ASTEROID Smart ,当排挡杆被拉
到“反向”时。 Parrot ASTEROID Smart
ISO电缆上的橙色电缆将可以检测出来。将
该电缆连接至您车辆尾灯的供给电源,以
便于在您倒车时能显示后视摄像头画面。
将后视摄像头视频电缆连接至 Parrot ASTEROID Smart 背部的CAM视频连接器。
安装麦克风
安装麦克风的最佳位置在靠近后视镜的车
顶中心区域。麦克风距离使用者嘴部最好
不要超过60厘米,且应正对使用者,两者
之间无障碍物。 将麦克风线从车辆连接至
指定位置时须格外小心。我们建议您在确
保安全的前提下将其沿现有厂商的穿线软
管移动,并保证麦克风线不受挤压或被卡
住。
警告:请勿用此种方法移动麦克风线,以
免妨碍车辆运行或伤害乘客。尤其是车辆
安全设备,如安全气囊和其他SRS系统。
ISO电缆连接
将 Parrot ASTEROID Smart 的音频和电源
接头连接至您车辆的接头。
备注:使用电缆扎带以确保电缆被牢牢固
定在汽车音响上。将其中的一个扎带插入
汽车音响背部顶端的槽中(参阅第4页的图
解)。
连接成功后,请检查您的安装。要做到这
一点,请先打开点火开关再关闭。此时一
定会显示“再见”的信息。如果情况异
常,有必要交换红色和黄色导线的位置。
事实上,电源线中的红色导线必须连接至
12V点火开关,黄色导线至12V长明点火开
关,黑色导线接地。只需翻转Parrot导线
上的两个子弹连接器便可完成这一步。
安装USB连接线
将USB连接线接入 Parrot ASTEROID Smart
。我们建议您将所有音频电缆连接至
Parrot ASTEROID Smart ,即时您并不打
算使用它们。将音频线牵至您汽车内的合
适位置,比如手套箱或中央扶手。为这一
步操作,在仪表盘上钻一个孔可能是必要
的。避免使用USB延长线。确保您将iPod连
接线连接至其特定的USB端口。»iPod»字样
标注在其上。为保证最佳的接收质量,我
们建议您不要直接把互联网USB3G密钥插入
Parrot ASTEROID Smart :用USB连接线在
仪表盘上安装您的设备(或任何其他开放
区域)。
基本操作
Parrot ASTEROID Smart 面板可以移走
以防您的设备被窃。没有面板, Parrot
ASTEROID Smart 无法工作。
移动 Parrot ASTEROID Smart 时须格外小
心。在安装和移除面板时不要过分用力。
使其远离阳光、潮湿和高温。要移除面
板,请按住按钮左上角并向下滑动(第10
页图G)要更换面板,请插入其下端磁性部
分以后按下上端部分,这时您会听到咔哒
声。
简体中文
29

启动
主屏幕
Parrot ASTEROID Smart 启动后显示主屏
幕。导航键位于屏幕的左边。
用程序。
按 调节音量。然后向左或者向右滑动
光标。
个性化主屏幕
在主屏幕添加应用程序快捷方式:
1. 点击 Applications 。
2. 按住您想要的应用程序的图标。
3. 把图标拉到主屏幕上您想要添加
的位置。
通过蓝牙连接手机
注意:请参考我们网站的兼容性页面以
查看您的手机是否与 Parrot ASTEROID
Smart 兼容,并参阅常见手机的具体配对
步骤:www.parrot.com/uk/compatibility。
如果您是第一次通过 Parrot ASTEROID
Smart 使用手机,您必须首先将这两部
设备进行配对。一旦您的手机与 Parrot
ASTEROID Smart 配对成功,当它们(以及
Bluetooth®蓝牙功能)启动并且彼此靠近
时,这两部设备会自动连接。
向左水平滑动您的手指。您会发现更多添
加功能快捷方式的空间。
触摸图标以进入相应的功能。例如触摸 Applications 图标。可用的应用程序列表会
被显示出来。滑动手指以浏览应用程序列
表。
按 返回上一级菜单。按 返回主屏
幕。
按 进入与当前应用程序对应的弹出式
菜单。弹出式菜单让您可以改变若干设置
或者访问更多功能。
按 显示最近使用过或者当前使用的应
简体中文
30
移除应用程序快捷方式:
1. 按住您想要移除的快捷方式。
2. 向上拖动图标至 Remove 指示。
图标变红时,松开手指。
改变设置
要改变 Parrot ASTEROID Smart 的设置,
点击 Applications,再点 Settings 。您
也可以点击 ,再点 Settings。
1. 在 Settings 菜单里,点击
Wireless & networks > Bluetooth。
2. 如有必要,激活 Bluetooth和
Discoverable选项。
3. 在手机上搜寻蓝牙周边设备,选
择 « Parrot ASTEROID Smart ».
4. 配对步骤取决于您的手机型号:
• 如果手机要求您输入蓝牙PIN码,
请输入“0000”。
• 如果 Parrot ASTEROID Smart 和
您的手机显示两组PIN码,请确认两组
PIN码一致,然后确定或者取消。
> Parrot ASTEROID Smart 的屏幕将
会显示“Pairing successful”。

注意:视您手机的型号而定,您可能需要
对与 Parrot ASTEROID Smart 的连接进
行授权,以允许进一步的自动连接。如要
了解更多信息,请参考您的手机的用户指
南。
通过蓝牙连接两部手机
要启用多点电话通讯并连接两部手机:
1. 点击 Phone。
2. 点击 ,再点 Bluetooth >
Options。
3. 启用 Multipoint Telephony选
项。
Parrot ASTEROID Smart 开启后,会尝试连
接车上所有的配对手机。如果车内有两部
以上已配对手机,Parrot ASTEROID Smart
会通过最早的配对来连接这两部手机。两
部手机连接到 Parrot ASTEROID Smart
时,其中的一部会成为活跃手机,另一部
成为次要手机。默认状态下,活跃手机是
最早与 Parrot ASTEROID Smart 进行配对
的手机。您可以收到活跃手机或者次要手
机的来电。只有活跃手机的电话簿才能通
过 Parrot ASTEROID Smart 访问。您只能
使用活跃手机拨打电话。但是,您可以轻
松切换所连接的手机。切换步骤如下:
1. 点击 Phone。
2. 点击 ,然后点击 Phone。
3. 选择活跃手机。
同步电话簿
大部分的手机都兼容蓝牙,因此电话簿会
自动与 Parrot ASTEROID Smart 的内存同
步。每次您改变您的姓名地址录,同步会
在下一次 Parrot ASTEROID Smart 和您的
手机连接的时候自动开始。
警告:只有储存在手机内存的联系人信息
才会被同步。如果您的联系人信息储存在
您的SIM卡内存上,请将其转移到手机内
存。
注意:视您手机的型号而定,您可能需要
授权 Parrot ASTEROID Smart 访问您的联
系人信息。如要了解更多信息,请参考您
的手机的用户指南。
每一部已配对手机的自动同步限制在5000
个联系人信息(或电话号码)以内。
手机
接听电话
来电会以铃声提示。如果呼叫者的号码已
经记录在与 Parrot ASTEROID Smart 连接
的手机的电话簿上,其姓名将会被读出。
• 要接听电话,按遥控器的 键或者屏
幕上的绿色键。按遥控器的 键或屏
幕上的红色键结束通话。
• 要拒接来电,按遥控器的 键或屏幕
上的红色键。
通过语音识别拨打电话
自动同步完成后,你可以直接使用语音识
别拨打电话。Parrot ASTEROID Smart 会自
动识别您想要呼叫的联系人。
1. 按 键启动语音识别功能。
> Parrot ASTEROID Smart 会询问您想
要呼叫的联系人的姓名。
2. 如果您的联系人有数个关联号
码,请说出联系人姓名与号码类型
(«WORK», «MOBILE» ……)。
>如果语音标签被正确识别,呼叫会自动
启动。如果上述情形没有出现,Parrot
ASTEROID Smart 会发出询问确认信息。
确认请说 «YES» or «CALL»。
简体中文
31

注意:您随时可以按遥控器的 键或者
屏幕上的 键退出语音识别模式。
拨打电话
1. 点击 Phone > Contacts。
2. 点击联系人以呼叫,或者在该联
系人的不同号码之间选择号码( «OFFICE», «MOBILE» ……)。
音乐
注意:第一次将您的音频外围设备与
Parrot ASTEROID Smart 连接时,可能需
要几分钟的加载时间,尤其是当您使用的
是大容量或者包含大量音频文件的音频外
围设备。加载时,您可通过语音识别访问
您的音频文件。
收音机
选择一个频率
1. 点选音乐>调谐器
2. 将滑块移动至左/右来更换电台。
3. 按下 按钮后选择添加到预设
内容。
>要选择一个储存电台,选择预设模式。
备注:您可以随心所欲储存电台,没有数
量限制。
使用语音音乐搜索
语音识别功能使您可以通过语音识别选择
您想要聆听的艺术家/专辑。此功能仅在
您通过USB/SD/iPod外围设备使用 Parrot
ASTEROID Smart 时可用。
1. 按遥控器的 键或在屏幕上点
击Voice Commands 。
32
简体中文
要获取所有可用的可用电台列表。
1. 点选音乐>调谐器。
2. 按下 按钮后选择新建扫
>OK。
记住电台
1. 点选音乐>调谐器。
2. 手动扫描频率或选择全扫描模
式。
2. 当 Parrot ASTEROID Smart 请您
说出艺术家/专辑的名字时,照做即可。
> 连接到 Parrot ASTEROID Smart 的音
频源文件列表和与包含您所选择的艺术
家/专辑的语音音乐搜索功能相互兼容的
应用程序将会出现。
注意:检查您的音乐文件元数据中专辑和
艺术家的名字。这些名字可能会与所显示
的音乐文件名称不一致。

iPod
1. 将您的iPod连接到iPod数据线。
2. 按遥控器的 SOURCE 键(或在屏
幕上点击 Player )并选择 iPod 。
您也可以点击 Browse 以浏览iPod的内
容。
3. 点击曲目开始播放。
注意:点击 调整若干设置(音频,重
复,随机播放)。
SD卡
您可以在 Parrot ASTEROID Smart 上使
用下列SD卡(可能需要适配器):SD卡(
安全数码卡)、mini SD卡(迷你安全数
码卡)、SDHC卡(安全数字高容量卡)
、mini SDHC卡(迷你安全数字高容量卡)
、micro SDHC卡(微型安全数字高容量卡)
。SD卡的容量不得超过32Gb。
仅支持MP3(Mpeg 1 Layer3)、AAC或WMA格
式。
1. 将SD卡插入屏幕右边的适合的卡
槽,卡的接触面面对着您(第11页图
G)。
2. 按遥控器的 SOURCE键(或在屏幕
上点击 Player)并选择 SD。您也可以
点击 Browse浏览SD卡的内容。
3. 点击曲目开始播放。
注意:点击 调整若干设置(音频,重
复,随机播放)。
USB存储设备
Parrot ASTEROID Smart 可以和大部分
的USB key/MP3音频播放器/外接硬盘兼
容。USB key的容量没有限制。
仅支持MP3(Mpeg 1 Layer3)、AAC或WMA格
式。
1. 将您的USB设备连接到USB数据
线。
2. 按遥控器的 SOURCE 键(或在屏
幕上点击 Player )并选择 USB 。您
也可以点击 Browse 浏览USB存储设备
的内容。
3. 点击曲目开始播放。
注意:点击 调整若干设置(音频,重
复,随机播放)。
通过蓝牙连接音频播放器
注意:Parrot ASTEROID Smart 允许您使
用来自两部手机的电话和音频流功能,无
需断开其中一部手机的连接。
您可以使用 Parrot ASTEROID Smart 聆
听存储在您的移动电话或者蓝牙音频设备
上的歌曲。为此,您的手机/音频设备必须
支持蓝牙A2DP协定(蓝牙音频传输模型协
定)。如果您是第一次使用蓝牙音频播放
器,您必须将播放器和 Parrot ASTEROID
Smart 进行配对。如果两个设备已配对:
1. 按遥控器的 SOURCE 键(或在屏幕上点击
Player )并选择 Bluetooth Audio 。
2. 在您的蓝牙音频播放器上开始播放。
车载收音机
要返回您的车载收音机音频输出,按遥控
器的 SOURCE 键(或在屏幕上点击 Music
)并选择 Car radio 。
屏幕命令
在播放音乐曲目或收音机的同时:
• 点击屏幕以暂停或继续播放或使收音机
静音;
• 向上滑动您的手指以增大音量;
简体中文
33

• 向下滑动您的手指以减小音量;
在播放音乐曲目的同时(用接头/缆线接头
连接的音频播放器除外):
• 向右滑动您的手指,跳至下一曲目;
• 向左滑动您的手指,返回上一曲目。
注释:如果您正在使用 Parrot ASTEROID
Smart ,其带有通过蓝牙连接的音频播放
器,那么这些指令只有在您音频播放器支
持AVRCP协议(音频/视频远程控制配置文
件)的情况下是有效的。
互联网
警告:使用3G/4G key连接互联网,需要向
话务员提供申请。使用此服务可能会产生
大量的漫游费用。通过话务员检查您的订
购情况和流量消耗。Parrot对于相关费用
不承担任何责任。
使用3G/4G key
注意:请参考我们网站的 Parrot ASTEROID Smart 兼容章节,获取与
Parrot ASTEROID Smart 兼容的3G/4G key
表单。
的APN(接入点名称)。此信息可在您的
3G/4G key提供的文件中获取。如果您的
APN不在列表中,您可以选择 Settings
> Wireless & networks > Mobile networks settings 以添加您的APN。
4. 在移动访问设备中,选择您的
3G/4G key。
5. 选择 Access point > Other >
Preset access points 。
6. 等待大约30秒直到连接建立。连
接正在建立时,您也可以按 键并浏
览菜单。
34
简体中文
1. 用USB数据线把3G/4G key连接到
Parrot ASTEROID Smart。
>会出现一个弹出窗口。
2. 输入您的PIN码,点击 ENTER 。
如果您不希望每次通过3G/4G key使用
Parrot ASTEROID Smart 都要输入PIN
码,请勾选 Memorise 选项。
注意:您可以通过选择 Settings > Wireless & networks > Mobile networks
settings 以改变上述设置。在移动访问
设备中选择您的3G/4G key,点击 Forget
PIN code > Forget。
3. 如有必要,从建议列表中选择您
通过蓝牙共享手机3G连接
如果您的手机支持DUN(拨号联网)或者
PAN(个人局域网)蓝牙协定,将您的手机
通过蓝牙连接到 Parrot ASTEROID Smart
可以实现手机3G连接的共享。
注意:要检查您的手机是否允许通过蓝牙
共享3G连接,请参阅我们网站关于兼容性
的页面并查阅相应步骤:www.parrot.com/
uk/compatibility。
1. 在您的手机上开启连接共享。根
据您的手机型号,此步骤可能会有所变
动。要了解更多信息,请参考 Parrot
ASTEROID Smart 网页的 compatibility
page 。

2. 通过蓝牙将您的手机连接到
Parrot ASTEROID Smart。
3. 在 Parrot ASTEROID Smart 上,
选择 Settings > Wireless & network
settings > Mobile Networks settings
> Mobile Access devices 。
Settings > Mobile Networks settings
> Mobile Access device 更改此设置。
> 将会出现一个表明USB连接共享已经激
活的弹出窗口。
注意:如要了解更多信息,请参考您的手
机的用户指南。
设备:可同时运行数个应用程序。例如,
您可以同时收听网络电台并使用驾驶辅助
程序。
如要了解更多关于可用应用程序的安装和
使用信息,请参阅 Parrot ASTEROID Smart
Market网页:www.parrotasteroid.com 。
4. 从建议列表上选择您的APN(接入
点名称),然后勾选 Select 。
通过USB共享手机3G连接
如果您的手机支持通过USB共享3G连接,使
用USB/微型USB数据线(不提供)将您的手
机连接到 Parrot ASTEROID Smart 可实现
手机3G连接的共享。
注意:要检查您的手机是否允许通过USB共
享3G连接,请参阅我们网站上关于兼容性
的页面并查阅相关的步骤:www.parrot.
com/uk/compatibility。
1. 确保您的手机键盘未被锁定,然
后使用USB数据线/微型USB连接器将手机
连接到 Parrot ASTEROID Smart 。您也
可以使用配备的USB延伸线缆将手机连接
到 Parrot ASTEROID Smart。此连接还
能让您给手机重新充电。
2. 如有必要,请从建议列表上选
择您的APN(接入点名称),然后勾选
Select 选项。然后您也可以通过选择
接入无线保真网络
如果您的手机可以用作无线路由器,或者
您的汽车旁边有可用的无线保真网络:
1. 在 Parrot ASTEROID Smart 的
Settings 菜单里,点击 Wireless &
networks >
Wi-Fi®. 。
2. 启用 Wi-Fi 选项。
3. 点击 Wi-Fi settings 。
>将会显示可用的无线保真网络列表。
4. 选择无线保真网络。
5. 如有必要,请输入密码。
使用应用程序
Parrot ASTEROID Smart 上可用的应用程序
有数种:音乐、定位、驾驶辅助……可用
的应用程序展示在产品包装上。
应用程序在所有的国家不一定全部可用。
某些应用程序的使用可能需要事先申请。
Parrot ASTEROID Smart 是一个多任务处理
简体中文
35

视频
警告:驾驶过程中使用 Parrot ASTEROID
Smart 视频功能(除了后视摄像头的视频流
以外)在大多数国家是危险且非法的。因
此,只有车辆在静止时该功能是可用的。
如需在 Parrot ASTEROID Smart 上观看视
频,请您停车并设置驻车制动。
后视摄像头
如果您的车辆配备后视摄像头,您可以使
用 Parrot ASTEROID Smart 屏幕以查看该
摄像头上的视频流,这样可以使倒车变得更
加轻松。请参阅第4页安装图和“安装后视
摄像头”部分以获取有关连接后视摄像头至
Parrot ASTEROID Smart 的更多信息。在倒
车时后视摄像头的视频流会自动显示。后视
摄像头中的图像可能出现颠倒的情况。
注释:无论何时,如需在后视摄像头的 频
和用AV/iPod电缆连接的iPod视频之间 换,
请您轻按视频开关。
通过外部源回放视频
您可以将来自外部视频源的视频输出显示在
Parrot ASTEROID Smart 上。
使用AV/iPod电缆(未提供)将您的视频源
连接至 Parrot ASTEROID Smart (第4页
图)。
1. 点选应用程序>导入视频。
2. 开始回放您视频源中的视频。
注释:无论何时,如需在后视摄像头的视频
和用AV/iPod电缆连接的外部源视频之间切
换,请您轻按视频开关。
通过SD卡回放视频
Parrot ASTEROID Smart 允许您观看储存
在SD卡上的视频。仅支持MP2、MP4、H263
、H264、WMV和SPARK格式。
1. 将SD卡插入相应的卡槽(第10页
图H)。
2. 点选应用程序>多媒体资料。
3. 通过点选相应图标选择视频。
视频连接至视频输出端子
视频输出端子使您能够连接后座屏幕,使后
座乘客观看到您SD卡上录制的视频。请参
阅第4页安装图以获取有关连接后座屏幕至
Parrot ASTEROID Smart 的更多信息。
警告:切勿将屏幕置于司机在驾驶过程中可
看到视频的地方。
故障排除
在您开始之前
请确认在您关闭点火开关时Parrot
ASTEROID Smart 屏幕上显示“再见”信
息。参阅“检查接线”部分以获取更多信
息。重设 Parrot ASTEROID Smart 。要
做到这一点,请移除面板后用一个回形针
按下“重设”按钮。按下“重设”按钮保
持3秒(第10页图G)。请确保您 Parrot
ASTEROID Smart 上已获取最新的软件更
新。要做到这一点,请选择设置>关于>
版本。将此数字与我们网站上 Parrot
ASTEROID Smart 支持页面的数字对照。
使用电话功能时的问题
确保您的手机与 Parrot ASTEROID Smart
兼容。为此,请您参考我们网站上有关兼容
性的页面:www.parrot.com/uk/compatibility。
如果您的手机与 Parrot ASTEROID Smart兼
容,并且您已经安装了最新的软件更新:
1. 删除 Parrot ASTEROID Smart上的
配对。要删除配对,请您点击 Settings
> Wireless & networks > Bluetooth
settings。然后点击
Parrot ASTEROID Smart 上的箭头,再
点击 Disconnect & unpair。
36
简体中文

2. 在您的手机上从蓝牙周边设备列
表中移除派诺特系统(或者重启您的
iPhone)。
3. 将这两部设备重新配对。
使用音乐功能时的问题
连接您的iPod/iPhone到 Parrot ASTEROID
Smart 之前,请将其重启。要重启您的
iPod/iPhone:
• iPod:同时按住菜单键和中间的按键直至
iPod重启。
• iPhone:同时按下开机/关机键和主界
面键直至iPhone重启。当屏幕出现信息
Slide to shutdown时,请勿触摸屏幕。
注意:此步骤不会清除您的任何数据。
如果您在启动点火开关之前已经把iPod/
SD卡/USB设备连接到 Parrot ASTEROID
Smart,可能会发生一些问题。请在点火开
关启动后再连接iPod/SD卡/USB设备。
了解更多信息
请参阅我们网站 www.parrot.com 的
Parrot ASTEROID Smart 支持页面。
一般信息
注册商标
派诺特和派诺特商标是PARROT SA的注册商
标。
Bluetooth ® 文字商标和徽标是 Bluetooth SIG Inc. 持有的注册商标。Parrot
S.A对任何此类标志的使用都已获得许可。
蓝牙QDID:B013841, B013839, [-]
“Made for iPod/iPhone”意指一个电子
配件的设计目的在于特定连接到iPod或者
iPhone,并已获得开发者的许可,以符合苹
果公司的性能标准。对于此设备的运行和设
备是否符合安全和监管标准,苹果公司不承
担责任。
iPhone和iPod是苹果公司的商标,注册于美
国和其他国家。
Wi-Fi ®是Wi-Fi联盟的注册商标。
本指南提到的其他所有商标都属于受保护商
标,是各商标拥有者的财产。
符合性声明
Parrot SA, 174 quai de Jemmapes,
75010 Paris, France以其为唯一负责人
声明此用户指南所描述的产品符合技术
标准 EN300328 (v1.8.0), EN3014891/-17(v2.1.1), EN300220-2 (V2.3.1),
EN300440, EN60950-1:04/2006 / A11
:2009 / A1:2010 / A2:2011, EN 60065
:05/2002 / A1:05/2006 / A11:2008
/ A2:2010,遵循无线电设备和电信设备
指令1999/5/EC R&TTE的规定,并符合EMC
2004/108/CE、关于低电压设备的2006/95/
CE以及由2009/19/CE指令修改的72/245/CEE
自动化指令的要求。
Parrot S.A.
Copyright © 2012 Parrot。版权所有。
简体中文
37

38

Guía de
u
tilización
r
Antes de comenzar
I
P
T
M
I
V
E
I
p.43
p
p
p
p
p
p
p
p
ápida
Índice
nstalación
rimera utilización
eléfono
úsica
nternet
ideo
n caso de problema
nformación general
.44
.48
.50
.51
.53
.54
.55
.56
39
40
44
46
47
49
50
51
52
Antes de comenzar
A propósito de este manual
Con el fin de limitar nuestro consumo de papel
y como parte de nuestra actuación lo más
responsable y respetuosa posible con el medio
ambiente, Parrot prefiere poner en línea los
documentos para los usuarios en lugar de
imprimirlos.
Este manual simplificado del Parrot ASTEROID
Smart se limita por tanto a aportarle las
principales instrucciones que le permitirán
utilizar el aparato con facilidad. Podrá enco
más información en la sección Apoyo al cliente
de nuestra página web www.parrot. com
manual completo, preguntas frecuentes,
softwares didácticos...
Nota: En este manual, se utiliza el término "iPod"
para denominar tanto a iPod como a iPhone.
Advertencias
Las funciones que requieran una atención
prolongada se deben utilizar únicamente
cuando detenido. Su seguridad y la de las
demás personas que circulan por la carretera es
más importante que las llamadas telefónicas, la
música o que las instrucciones del GPS. Sea
ntrar
responsable: conduzca con prudencia y preste
atención a su entorno. Parrot no asumirá
ninguna responsabilidad si usted opta por
ignorar esta adver
Utilice el Parrot ASTEROID Smart con un nivel
de volumen razonable, que deje oír en todo
momento los ruidos exteriores mientras
conduce.
El Parrot ASTEROID Smart contiene imanes de
tipo NdFeB que podrían dañar objetos
sensibles a los campos magnéticos
(marcapasos, tarjetas de crédito, relojes
mecánicos...).
El Parrot ASTEROID Smart dispone de un cable
para conectar con el cable ISO, con el fin de
:
ctar si el freno de mano está puesto o no.
dete
Este debe conectarse siguiendo las
instrucciones de instalación que se describen
en el presente documento. Cualquier
instalación o conexión incorrecta puede ser
peligrosa e ilegal en muchos estados/países. La
pantalla situada en el campo de visión del
conductor en ningún caso debe reproducir
vídeos mientras el vehículo esté en marcha.
Esta norma es válida también
aplicación que no sea de ayuda a la conducción
o a la navegación.
Si intenta utilizar una aplicación no específica
tencia.
para cualquier
Español 39

de navegación o de ayuda a la conducción
mientras conduce, aparecerá un aviso en la
pantalla. Para ver un vídeo en la pantalla del
Parrot ASTEROID Smart, asegúrese de que el
vehículo está detenido en un lugar seguro y de
que el freno de mano está puesto.
Actualización del s of tw are
Descargue gratis la última actualización del
producto en nuestra página web
www.parrot.com
actualizaciones le permitirán disfrutar de
nuevas funciones y mejorar la compatibilidad
del producto.
Nota: También puede descargar las
actual izaciones del Parrot ASTEROID Smart
cuando se conecta a Internet. La disponi bi li dad
de una actuali zaci ón se indica en la barra de
notificación.
Tarjeta SD
Se incluye una tarjeta SD con el Parrot
ASTEROID Smart. Esta permite grabar música y
ciertas aplicaciones que no se encuentran
directamente en el Parrot ASTEROID Smart. Es
necesario insertar la tarjeta SD en el Parrot
ASTEROID Smart para utilizar las aplicaciones
, sección Apoyo al cliente. Las
de música a demanda y de navegación.
Interfaz de mando de control al volante
Pronto estará disponible una interfaz de mando
de control al volante que le permitirá conectar
el kit manos libres Parrot al volante de su
vehículo. Con esta interfaz, podrá realizar
llamadas telefónicas utilizando los botones de
control del mando sin quitar las manos del
volante. Consulte nuestro sitio web
www.parrot.com
para más información.
Instalación
Nota: Le recomendamos que acuda a un
profesional para realizar esta instalación,
especial mente a alguno de nuestra red de
instaladores certificados.
Instrucciones de seguridad
Apague el motor antes de realizar las
conexiones.
Nunca instale el Parrot ASTEROID Smart en un
lugar con riesgo de causar lesiones al conductor
o a alguno de los pasajeros en caso de parada
brusca.
Nunca instale el Parrot ASTEROID Smart en un
lugar susceptible de interferir con la
conducción.
Nunca taladre un panel o el cuadro de mandos
sin comprobar antes lo que hay detrás.
Asegúrese de no dañar ningún comp
electrónico ni ningún cable.
Si utiliza tornillos, asegúrese de que los
mismos no entren en contacto con un cable de
alimentación eléctrica.
El Parrot ASTEROID Smart está diseñado
exclusivamente para funcionar en un vehículo
onente
Español40

con una batería de 12 V. Si su vehículo (p. e.:
camión) dispone de una batería de 24 V, es
necesario utilizar un adaptador de corriente.
Asegúrese de que los cables están alejados de
zonas calientes (salidas de calefacción, etc.),
de partes móviles (palanca de cambios, etc.) y
que no corren el riesgo de enrollarse en la
columna de dirección o en la palanca de
cambios.
Verifique el buen funcionamiento de l
equipamientos del vehículo tras instalar el
Parrot ASTEROID Smart.
No instale el Parrot ASTEROID Smart ni
ninguno de sus componentes en un lugar donde
pueda desplegarse alguno de los airbags del
vehículo.
No instale el Parrot ASTEROID Smart en un
lugar húmedo o sometido a temperaturas
elevadas.
Deje detrás del Parrot ASTEROID Smart un
espacio suficiente para permitir la disipación
del calor.
Antes de comenzar
Quite la radio de origen del vehículo. Se
pueden necesitar llaves de extracción para
realizar esta operación.
Compruebe que la conexión entre los
conectores de audio, la alimentación del Parrot
ASTEROID Smart y las conexiones del vehículo
es posible comparando los dos conectores. Si
no fuera posible conectarlos, necesitará utilizar
un adaptador ISO para adaptar el Parrot
ASTEROID Smart a las conexiones esp
de su vehículo. Consulte la sección
Compatibilidad de vehículos en la página de
soporte del Parrot ASTEROID Smart para
os
comprobar la necesidad de un cable adaptador.
Compare el conector de la antena del Parrot
ASTEROID Smart con el del vehículo. Si se
necesita utilizar un adaptador de antena,
consulte a un profesional del automóvil para
más información.
Nota: Si su antena está amplificada, tiene la
posibil idad de alimentarla con el cabl e ISO
inc luido con el Parrot ASTEROID Smart.
Instalación con los soportes
Afloje los 4 tornillos para retirar el soporte
1.
del Parrot ASTEROID Smart.
Inserte el soporte de montaje y fíjelo en el
2.
habitáculo. Para ello, separe las lengüetas
hacia el exterior doblándolas a 90° (esquema
A p.7).
ecíficas
Instale el Parrot ASTEROID Smart y fije los 4
3.
tornillos (esquema B p.7).
Encaje el marco de plástico (esquema C p.8).
4.
Instalación con los tornillos laterales
Afloje los 4 tornillos para retirar el soporte
1.
del Parrot ASTEROID Smart.
Retire los 2 soportes laterales (esquema D
2.
p.8).
Posicione el Parrot ASTEROID Smart de
3.
modo que los dos orificios para los tornillos
queden alineados con los orificios para los
tornillos del vehículo.
Atornille el número de tornillos que
4.
requiera su modelo de vehículo. Utilice
únicamente los tornillos facilitados.
Instalación de
l dongle GPS
Instale la mochila GPS en una superficie plana,
en una zona libre de obstáculos en el interior
del habitáculo.
Los parabrisas térmicos y las lunas con antena
integrada pueden interferir con la recepción
GPS y reducir la fiabilidad de los datos
relacionados con las aplicaciones de
navegación.
Español 41

La antena GPS de la mochila se
e
ncuentra del lado en el que s
e
p
D
G
a
d
e
q
uede leer "Parrot ASTEROI
PS" y donde figura el logo en form
e estrella. Este logo siempre deb
uedar orientado hacia el cielo.
Si su vehículo dispone de parabrisas atérmico,
instale la mochila GPS en el parabrisas, a la
altura de la zona no atérmica. El lado en el que
figura el logo en forma de estrella debe pegarse
en el parabrisas (esquema F p.9).
Nota: La zona no atérmi ca del parabrisas puede
variar según el modelo de vehícul o.
Normalmente suele estar a la altura del
retrovisor.
Si su vehículo no
dispone de parabrisas
atérmico, instale la mochila GPS en el cuadro
de mandos. El lado en el que figura el logo en
forma de estrella debe quedar visible
(esquema E p.9).
Para garantizar una buena fijación del soporte:
Utilice el adhesivo suministrado ;
limpie la superficie de montaje antes de
pegar el soporte;
tras la fijación del soporte, espere unas
dos horas sin manipularlo.
Español42
Conexión del cable de freno de mano
El cable de freno de mano permite utilizar la
función de vídeo del Parrot ASTEROID Smart
cuando el freno de mano está puesto. Si este
cable no está conectado al cable de señal del
freno de mano del vehículo, la función de vídeo
no estará disponible en ningún caso.
Conecte el alargador del cable de freno de
1.
mano incluido con el cable verde del Parrot
ASTEROID Smart (con la indicación de
freno de estaciona
miento “Parking
Brake”)
Localice y pruebe el cable de señal de
2.
freno de mano del vehículo. Este cable
conecta el freno de mano con el testigo de
freno de mano del cuadro de mandos.
Pase el alargador del cable de freno de
3.
mano (verde) de forma segura desde el
Parrot ASTEROID Smart y conéctelo al
cable de señal del freno de mano a través
de un método adecuado.
Instalación de una cámara de retroceso
Si utiliza el Parrot ASTEROID Smart con una
cámara de retroceso (no incluida), el hilo
naranja del cable ISO del Parrot ASTEROID
Smart permite detectar si su vehículo avanza o
retrocede. Conecte este cable con el cable
cuya tensión permite encender las luces
traseras para visualizar la señal de vídeo de la
cámara de retroceso cuando maniobra marcha
atrás.
Conecte también el cable de vídeo de la cámara
etroceso a los conectores Video CAM
de r
situados detrás del Parrot ASTEROID Smart.
Instalación del doble micrófono
Se aconseja pasar el cable por la canaleta que
está por detrás de la junta de la puerta.
Si el cable pasa por encima de los pedales,
asegúrese de que quede bien sujeto.
Advertencia : No pase el cable del micrófono por
los sistemas de calefacc ión, ventilaci ón o
climatización o por delante de los airbags
laterales.
Asegúrese de que el micrófono quede
colocado lo más cerca posible de la cabeza del
usuario. L
a distancia ideal es de 60 cm. Instale
el micrófono preferentemente cerca del
retrovisor interior.
Oriente el micrófono hacia la boca del usuario.

Conexión del cable ISO
Conecte los conectores de audio y
alimentación del vehículo a los conectores del
Parrot ASTEROID Smart.
Nota: Utilice los sujetacables suministrados
para garantizar la sujeci ón de los cables a la
radio. Introduzca uno de los sujetacables en el
lugar previsto para ello, en la parte superior
izqui erda de la trasera de la radio (ver esquema)
p.4).
Compruebe la instalación. Para ello, encienda y
apague el conta
cto de su vehículo una vez
instalado el Parrot ASTEROID Smart: el
mensaje “Adiós” debe aparecer en la pantalla.
Si no es así, deberá invertir las posiciones de
los hilos rojo y amarillo. El hilo amarillo de la
alimentación debe estar conectado a los 12 V
permanentes, el hilo rojo a los 12 V después de
contacto y el hilo negro a masa. Esta operación
se realiza fácilmente invirtiendo los dos
terminales del c
ableado Parrot.
Instalación de los cables USB
Conecte los cables USB al Parrot ASTEROID
Smart. Le recomendamos que conecte todos
los cables del Parrot ASTEROID Smart, aunque
no tenga previsto utilizarlos. Haga salir los
conectores correspondientes de la bandeja o
de la guantera. Para ello, puede ser necesario
hacer un agujero dentro del salpicadero. Evite
utilizar alargadores USB siempre que sea
posible.
El cable USB (1.2m - 2A) al que conecta el
gador del iPod debe conectarse
alar
obligatoriamente al puerto USB blanco previsto
para tal fin. Encontrará la indicación "iPod" en la
parte superior del mismo.
Para garantizar una calidad de recepción
óptima, no conecte su pendrive 3G
directamente al Parrot ASTEROID Smart,
utilice un cable USB para instalar el accesorio
en el salpicadero (u otra zona despejada).
Protección antirrobo
El frontal extraíble puede separarse del Parrot
ASTEROID Smart para disuadir los robos. El
Parrot ASTEROID Smart no puede funcionar si
se ha retirado el frontal.
Manipule el frontal extraíble con precaución.
No lo fuerce ni al instalarlo ni al retirarlo.
Guarde el frontal en un lugar seguro y protegido
de la luz solar, de temperaturas elevadas y de la
humedad.
Para retirar el frontal, deslice hacia abajo
parte superior del frontal y tire de él
suavemente hacia fuera (esquema G p. 10).
Para volver a colocar el frontal en su sitio,
coloque primero el lado inferior imantado y
presione la parte superior hasta oír un clic.
la
Español 43

Primera utilización
Pantalla de inicio
Cuando el Parrot ASTEROID Smart se
enciende, accederá a la pantalla de inicio. Los
botones de navegación se encuentran en el
lado izquierdo de la pantalla.
Desplace el dedo por la pantalla hacia la
izquierda. Descubrirá más espacio para añadir
accesos directos a sus aplicaciones o funciones
favoritas.
Toque un icono para acceder a su función
correspondiente. Toque por ejemplo el icono
Aplicaciones. Accederá a la lista de
aplicaciones disponibles en el Parrot
ASTEROID Smart. Deslice el dedo por la
pantalla hacia arriba para desplazarse por la lista
de aplicacio
nes.
Para volver al menú anterior, pulse . Para
volver directamente a la pantalla de inicio,
pulse .
Pulse
correspondiente a la aplicación que se está
utilizando. El menú de contexto le permite
sobre todo acceder a las funciones
suplementarias de la aplicación o modificar
determinados ajustes.
Pulse el botón
aplicaciones utilizadas o que están en uso.
Pulse el botón
continuación, desplace el cursor a la izquierda o
a la derecha.
Personalización de la pantalla de inicio
Para añadir un acceso directo a una aplicación/
función en la pantalla de inicio:
Para eliminar un acceso directo:
para acceder al menú de contexto
para ver las últimas
para modificar el volumen. A
Pulse Aplicaciones.
1.
Pulse durante 2 segundos el icono de la
2.
aplicación que le interese.
Desplace el icono hasta la posición
3.
deseada.
Pulse durante 2 segundos el icono que
1.
desea quitar.
Desplácelo hacia arriba, hasta el nivel de la
2.
indicación Suprimir. Cuando el icono
aparezca en rojo,
Modificar los parámetros
Para modificar los parámetros del Parrot
ASTEROID Smart, pulse en Aplicaciones y
luego en Ajustes. También puede pulsar
luego en Ajustes.
Conectar un teléfono vía Bluetooth
Nota: Consulte la página de compatibilidad de
nuestra página web para verificar si su teléfono
es compatible con el Parrot ASTEROID Smart y
consultar el procedimiento de emparejamiento
correspondiente: www.parrot.com/es/
compatibility.
Si es la primera vez que utiliza el teléfono con
el Parrot ASTEROID Smart, primero deberá
emparejar ambos aparatos. Una vez
emparejado el teléfono con el Parrot
ASTEROID Smart, la conexión entre los dos
aparatos será automática en cuanto los dos
aparatos estén encendidos y a proximidad con
la función
Blu etooth
En el menú Ajustes, pulse Conexiones
1.
ya puede retirar el dedo.
activada.
y
Español44

inalámbricas y redes > Ajustes de
Bluetooth.
En caso necesario, active las opciones
2.
Bluetooth e Identificable.
Active desde su teléfono una búsqueda de
3.
periféricos
Blu etooth ®
y a continuación
seleccione “Parrot ASTEROID Smart”.
El procedimiento de emparejamiento
4.
depende del modelo de teléfono:
Si el teléfono le solicita el código PIN
Blu etooth
, introduzca "0000".
Si el Parrot ASTEROID Smart y el
teléfono muestran dos códigos,
compruebe si los códigos son
idénticos y confirme o invalide.
> La pantalla del Parrot ASTEROID
Smart indica "Emparejamiento
correcto".
Nota: En algunos teléfonos, deberá autorizar la
conexión al Parrot ASTEROID Smart para
permitir la conexión automática.
Consulte la guía de usuario de su teléfono para
más información.
Conectar dos teléfonos
Para activar el modo que permite la conexión de
dos teléfonos:
Pulse Teléfono.
1.
Pulse
2.
Pulse Opciones.
3.
Active la opción Telefonía multipuntos.
4.
, y luego en Bluetooth.
Cuando el Parrot ASTEROID Smart se
enciende, éste intenta establecer la conexión
con todos los teléfonos emparejados y
presentes en el vehículo. Si hay más de 2
teléfonos emparejados presentes en el
vehículo, se establece la conexión con los 2
teléfonos cuyo emparejamiento sea más
antiguo.
Cuando hay 2 teléfonos conectados al
Parrot
ASTEROID Smart, uno se considera como
teléfono activo y el otro como teléfono
secundario. Por defecto, el teléfono activo se
corresponde con el teléfono cuyo
emparejamiento con el Parrot ASTEROID
Smart sea más antiguo.
Tiene la posibilidad de recibir llamadas
procedentes del teléfono activo y del teléfono
secundario.
La agenda del teléfono activo es la única que
estará disponible en el Parrot ASTEROI
Smart. Sólo se pueden realizar llamadas desde
el teléfono activo. No obstante, podrá cambiar
fácilmente de un teléfono conectado a otro.
Para ello:
Pulse Teléfono.
1.
Pulse
2.
Seleccione el teléfono activo.
3.
, y luego en Teléfono.
Sincronización de la agenda del teléfono
En la mayoría de teléfonos
Blu etooth
, la agenda
se sincroniza automáticamente con la memoria
del sistema. Cada vez que modifique la agenda,
la sincronización se reiniciará automáticamente
en la próxima conexión.
Advertencia : Los contactos guardados en la
memoria del teléfono son los únic os que se
sincronizan con el Parrot ASTEROID Smart. Si sus
contac tos están guardados en la memoria de la
tarjeta SIM, deb
erá pasarlos a la memoria del
teléfono. Consulte el manual del usuari o de su
teléfono para más información.
Nota: En algunos teléfonos, deberá autorizar el
acceso del Parrot ASTEROID Smart a sus
contac tos para permi tir la sincronizac ión.
D
Español 45

Consulte el manual del usuario de su teléfono
para más información.
La sincronización automática está limitada a
5.000 contactos (o números de teléfono) por
cada teléfono emparejado.
Teléfono
Recibir una llamada
Las llamadas entrantes se anuncian con un
mensaje de voz. El nombre del contacto será
anunciado si su número está memorizado en la
agenda del teléfono conectado al Parrot
ASTEROID Smart.
Si desea aceptar esa llamada, pulse el
botón verde que aparece en la pantalla.
Después, pulse el botón rojo de la pantalla
para acabar la comunicación.
Si desea rechazar esa llamada, pulse el
botón rojo que aparece en la pantalla.
Hacer una llamada por reconocimiento de voz
Puede hacer una llamada por reconocimiento
de voz directamente después de sincronizar la
agenda del teléfono. El Parrot ASTEROID
Smart reconocerá automáticamente el contacto
de su agenda al que desea llamar.
Seleccione Comandos Vocales >
1.
Contactos para iniciar el proceso de
reconocimiento de voz.
> El Parrot ASTEROID Smart le pedirá el
nombre del contacto al que desea llamar.
Diga el nombre del contacto
2.
tipo de número (“OFICINA”,
“MÓVIL”…) si el contacto tiene varios
números.
> La llamada a ese contacto se hará
automáticamente si la instrucción de voz
ha sido comprendida.
> En caso contrario, el sistema manos
libres emitirá un mensaje de confirmación.
Confirme diciendo “SÍ”, “LLAMA” o
“LLAMAR”.
Nota: En cualqui er momento, puede pulsar el
botón
procedimiento de llamada.
de la pantalla para anular el
seguido del
Español46

Música
Nota: Es posible que tarde unos minutos en
cargar la primera vez que conecte un dispositivo
de audio (iPod/ USB/SD) al Parrot ASTEROID
Smart, particularmente en caso de dispositi vos
con gran capacidad y que contienen una
cantidad impo rtante de archivos de música. Este
tiempo de carga permite que las canciones estén
accesibles con el reconocimiento de voz.
Utilización del reconocimiento de voz musical
El reconocimiento de voz y la función de
reconocimiento de voz musical le permite
seleccionar los artistas o los álbumes que
desea escuchar. Esta función se encuentra
disponible cuando utiliza el Parrot ASTEROID
Smart con un dispositivo tipo iPod/USB/SD, o
si utiliza una aplicación musical compatible con
esta función.
Seleccione Comandos Vocales > Música.
1.
Pronuncie el nombre del artista o del
2.
álbum que
Parrot ASTEROID Smart se lo indique.
> La lista de fuentes de audio conectadas al
Parrot ASTEROID Smart y de aplicaciones de
música compatibles con la función de
desea escuchar cuando el
reconocimiento de voz que contienen el
artista/álbum elegido se muestran en
pantalla.
Nota: Compruebe los nombre de artistas y
álbumes en los tags (metadatos) de sus archivos
music ales. Estos pueden diferir de los mostrados
en el títul o de su canción.
Radio
Para seleccionar una frecuencia:
Pulse Música > Radio.
1.
Mueva el cursor hacia la izquierda o hacia
2.
la derecha para seleccionar una frecuencia.
Para obtener la lista de todas las emisoras
disponibles, pulse el botón
escaneado > OK.
Para memorizar una emisora, pulse el botón
y seleccione la opción Añadir a favoritos.
Para acceder a las emisoras memorizadas, pulse
el botón
Nota: El número de emisoras memorizables es
ilimi tado.
y pulse Modo > Favoritos.
y pulse Nuevo
Utilización con un iPod
Conecte el iPod al cable iPod.
1.
Seleccione Música > iPod. También puede
2.
pulsar en Explorar para navegar por el
contenido de su iPod.
Pulse sobre la canción para iniciar la
3.
reproducción.
Nota: Pulse el botón
determinados ajustes (audio, repeti ci ón,
aleatoria).
Memoria USB
El Parrot ASTEROID Smart es compatible con
la mayoría de memorias USB/reproductores de
MP3/discos duros externos. No existe ninguna
restricción sobre la capacidad de los
dispositivos de memoria USB. Los archivos de
música de su memoria SD pueden estar en
formato MP3, AAC, WAV, OGG o WMA.
Conecte su dispositivo USB al cable USB.
1.
Seleccione Música > USB. También puede
2.
pulsar en Explorar para navegar por
contenido de su dispositivo USB.
Pulse sobre la canción para iniciar la
3.
reproducción.
para modificar
el
Español 47

Tarjeta SD
La capacidad de la tarjeta SD no debe superar
los 32 Gb. Los archivos de música de su tarjeta
SD pueden estar en formato MP3, AAC, WAV,
OGG o WMA.
Nota: Extraiga la tarjeta SD introduciendo la
uña en la ranura.
Inserte la tarjeta SD en el alojamiento
1.
previsto para ello situado en el lado
derecho de la pantalla (esquema H p.10).
Seleccione Música > SD. También puede
2.
pulsar en Explorar para navegar por
contenido de su tarjeta SD.
Pulse sobre la canción para iniciar la
3.
reproducción.
Utilización con un lector de audio Bluetooth
Nota: El Parrot ASTEROID Smart le permite
utilizar la función de telefonía y streaming audio
a través de Bluetooth con 2 teléfonos diferentes,
sin que sea necesario desconectar alguno de los
2 aparatos.
Puede utilizar el Parrot ASTEROID Smart para
escuchar archivos de música almacenados en
un reproductor de audio
Blu etooth
, si éste
soporta el perfil A2DP (Advanced Audio
Distribution Profile). Si utiliza el
de audio por primera vez, primero tendrá que
emparejarlo con el Parrot ASTEROID Smart. Si
el reproductor de audio ya está emparejado con
el Parrot ASTEROID Smart :
Seleccione Música > Audio Bluetooth.
1.
Active la reproducción de una canción en
2.
su reproductor de audio.
Mandos
el
Mientras se está reproduciendo un archivo de
música o de radio:
toque la pantalla para poner la canción en
pausa o para interrumpir el sonido de la
radio;
deslice el dedo hacia arriba para subir el
volumen;
deslice el dedo hacia abajo para bajar el
volumen.
reproductor
Mientras se está reproduciendo un archivo de
música (a excepción de las fuentes de audio
conectadas por cable jack/jack):
deslice el dedo hacia la derecha para pasar
a la canción siguiente;
deslice el dedo hacia la izquierda para
pasar a la canción anterior.
Nota: Si instal a el Parrot Parrot ASTEROID Smart
con un reproductor de audio conectado por
Bluetooth, estos mandos estarán disponibles
únicamente si este soporta el perfil AVRCP
(Audio/Video Remote Control Profile).
Español48

Internet
Advertencia : La conexión a Internet a través de
un dispositivo 3G/4G requiere un contrato con
un operador de telefonía. La utili zaci ón de este
servicio puede generar costes de roaming
importantes. Compruebe las condiciones de su
contrato y haga un seguimiento de su consumo
con su operador. Parrot decl ina cualquier
responsabilidad derivada de los costes
asoci ados.
Conexión con un dispositivo 3G/4G
Nota: Consulte la sección de compati bi li dad del
Parrot ASTEROID Smart en nuestra página web
para ver la lista de dispositi vos 3G compati bl es
con el Parrot ASTEROID Smart.
Conecte un dispositivo 3G/4G al Parrot
1.
ASTEROID Smart a través del cable USB.
> Aparecerá una ventana emergente (popup).
Introduzca su código PIN y pulse
2.
VALIDAR. Marque la opción Memorizar si
prefiere que no se le pida el código PIN
cada vez que se encienda el Parrot
ASTEROID Smart.
Nota: Más adelante, podrá modificar este ajuste
seleccionando Ajustes > Inalámbrico y redes >
Ajustes de redes móviles. En los dispositi vos de
conexión, selecci one su dispositi vo 3G/4G,
seleccione Ignorar código PIN y después Ignorar.
Seleccione su APN (Access Point Name)
3.
en la lista que aparece. Esta información se
encuentra disponible en la documentaci
facilitada con su dispositivo 3G/4G. Si su
APN no figura en la lista, puede añadirlo
seleccionando Ajustes > Conexiones
inalámbricas y redes > Mobile data
networks.
En los dispositivos de conexión,
4.
seleccione su dispositivo 3G/4G.
Seleccione Puntos de acceso > Otro >
5.
Puntos de acceso predefinidos.
Espere a que se haya establecido la
6.
conexión. También puede pulsar el botón
y navegar por los menús mientras se
establece la conexión.
Conexión vía Bluetooth
Si su teléfono soporta el perfil
(Dial-Up Networking) o PAN (Personal Area
Network), la conexión vía
Blu etooth
Blu etooth
DUN
del
teléfono con el Parrot ASTEROID Smart le
permitirá compartir la conexión 3G del
teléfono.
Nota: Consulte la sección de compati bi li dad del
Parrot ASTEROID Smart en nuestra página web
para ver la lista de dispositi vos 3G compati bl es
con el Parrot ASTEROID Smart.
ón
Autorice comparti
1.
teléfono. Este procedimiento puede
diferir según el modelo de móvil.
Conecte el teléfono al Parrot ASTEROID
2.
Smart vía
En el Parrot ASTEROID Smart, seleccione
3.
Ajustes > Conexiones inalámbricas y redes
> Mobile data networks.
Seleccione su APN (Access Point Name)
4.
en la lista que aparece y marque la opción
Seleccionar.
Compartir una conexión 3G v ía USB
Nota: Consulte la página de compatibilidad en
nuestra web para comprobar si su teléfono
permite comparti r la conexión 3G vía USB y
consultar el procedimiento correspondiente:
www.parrot.c om/es/compatibility
Asegúrese de que el teclado de su
1.
Blu etooth
r la conexión en su
.
.
Español 49

teléfono está desbloqueado y después
conéctelo al Parrot ASTEROID Smart
utilizando un cable USB/micro-USB. Esta
conexión también permite recargar la
batería del teléfono.
Seleccione su APN (Access Point Name)
2.
en la lista que aparece y marque la opción
Seleccionar. Más adelante, podrá
modificar este ajuste seleccionando
Ajustes > Conexiones inalámbricas y redes
> Mobile data networks.
> Aparecerá una ventan
up) indicando la activación de la conexión
compartida vía USB.
Nota: Consul te la guía de usuari o de su teléfono
para más información.
Conexión a una red Wi-Fi
Si su teléfono permite compartir su conexión
3G vía Wi-Fi® o si hay una red Wi-Fi disponible
a proximidad de su vehículo:
Active esta función en el teléfono.
1.
En el menú Ajustes del Parrot ASTEROID
2.
Smart, pulse Conexiones inalámbricas y
redes > Wi-Fi.
Active la opción Wi-Fi.
3.
a emergente (pop-
Pulse Ajustes de Wi-Fi.
4.
> Aparecerá la lista de las redes Wi-Fi.
Seleccione la red Wi-Fi generada por su
5.
smartphone.
Introduz
6.
necesario.
Utilizar las aplicaciones
Puede utilizar varios tipos de aplicaciones con
el Parrot ASTEROID Smart : música,
geolocalización, ayuda a la conducción,
navegación embarcada y puntos de interés
conectados. Las aplicaciones disponibles son
diferentes según el país de utilización.
Algunas aplicaciones pueden necesitar una
suscripción.
El Parrot ASTEROID Smart es multitarea: se
pueden utilizar varias aplicaciones a la vez. Por
ejemplo, pue
internet mientras utiliza una aplicación de
ayuda a la conducción.
Para más información sobre la utilización y la
instalación de las aplicaciones disponibles,
consulte la página web del soporte del
ASTEROID Market : www.parrotasteroid.com
ca la contraseña en caso
de escuchar una Radio por
Video
Advertenci a : La funci ón video del Parrot
ASTEROID Smart es peli grosa e ilegal en la
mayoría de los paises si la utiliza durante la
conducci ón. Por lo tanto, esta función solo está
disponible cuando el vehículo esté parado. Para
ver un video en el Parrot ASTEROID Smart,
estacione su vehículo y ponga su freno de mano.
Cámara de retroceso
Si su vehículo está equipado con cámara de
retroceso, puede utilizar la pantalla del Parrot
ASTEROID Smart para visualizar el flujo de
vídeo de esta cámara y facilitar así los
estacionamientos marcha atrás. Consulte el
esquema de instalación p.4 y la sección
"Instalación de una cámara de retroceso" para
más información sobre la conexión de la cámara
de retroceso al Parrot ASTEROID Smart.
El flujo de vídeo
aparece automáticamente cuando se maniobra
marcha atrás. La imagen procedente de la
cámara de retroceso puede aparecer invertida.
Nota: En todo momento puede pulsar en Video
switch para cambiar del vídeo procedente de la
cámara de retroceso al vídeo procedente de un
de la cámara de retroceso
Español50

iPod conectado a través de un cable AV/iPod.
Lectura de vídeos desde una fuente externa
El Parrot ASTEROID Smart permite la
visualización de vídeo procedente de una
fuente de vídeo externa.
Conecte su fuente de vídeo al Parrot
ASTEROID Smart utilizando un cable AV (no
incluido) (esquema p. 4).
Pulse en Aplicaciones > Entrada de vídeo.
1.
Reproduzca el vídeo en su fuente.
2.
Nota: En todo momento puede pulsar en Video
switch para cambiar del vídeo procedente de la
cámara de retroceso al vídeo pro
fuente externa conectada a través de un cable
AV/iPod.
Lectura de vídeos desde una tarjeta SD
Puede leer en el Parrot ASTEROID Smart los
archivos de vídeo grabados en una tarjeta SD.
Los archivos de vídeo de la tarjeta SD pueden
estar en formato MP2, MP4, H263, H264, WMV
y SPARK.
cedente de una
Pulse en Aplicaciones > Galería.
2.
Seleccione el vídeo pulsando sobre el
3.
icono correspondiente.
Pantalla conectada a la salida de vídeo
Las conexiones de salida de vídeo permiten
conectar una pantalla para los pasajeros de las
plazas traseras y que estos vean vídeos
grabados en su tarjeta SD. Consulte el esquema
de instalación p.4 para más información sobre
la conexión de la pantalla para los pasajeros de
las plazas traseras al Parrot ASTEROID Smart.
Advertencia : Nunca instal e la pantalla en un
lugar donde el conductor pueda ver los vídeo
mientras conduce.
En caso de problema
Antes de comenzar
Asegúrese de que aparece el mensaje “Adiós”
en la pantalla del Parrot ASTEROID Smart al
quitar el contacto del vehículo. Consulte la
sección Comprobar la instalación para más
información.
Reinicie el equipo. Para ello, saque el frontal y
utilice un bolígrafo u otro objeto puntiagudo
para presionar el botón Reset. Presione el
botón Reset durante 3 segundos (esquema p.5)
. También puede restaurar los parámet
iniciales seleccionando Ajustes > Parámetros
s
avanzados > Privacidad > Restablecer datos de
fábrica.
Compruebe que tiene instalada la última
actualización en el Parrot ASTEROID Smart.
Para ello, seleccione Ajustes > Acerca de >
Versión de software. Compare este número de
versión con el indicado en la página de soporte
del Parrot ASTEROID Smart en nuestra página
web www.parrot.com
.
ros
Introduzca la tarjeta SD en el alojamiento
1.
previsto para ello (esquema H p.10).
Español 51

Problemas relacionados con la función de telefonía
Compruebe la compatibilidad de su teléfono
con el Parrot ASTEROID Smart. Encontrará la
lista de compatibilidad del Parrot ASTEROID
Smart en nuestra página web www.parrot.com
sección Soporte y Descarga.
Si su teléfono aparece como compatible, es
posible que tenga que actualizar su Parrot
ASTEROID Smart. Encontrará el
procedimiento de actualización del Parrot
ASTEROID Smart en nuestra página web
www.parrot.com
Si su teléfono aparece como compatible y el
Parrot ASTEROID Smart ya cuenta con la última
actualización, elimine, en el Parrot ASTEROID
Smart y en el teléfono, el emparejamiento
entre los 2 aparatos y vuelva después a
establecer la conexión entre ambos.
Problemas relacionados con la función de música
La primera vez que conecte su periférico de
audio (USB / SD / iPod) al Parrot ASTEROID
Smart el proceso puede tardar varios minutos,
sobre todo si se trata de periféricos con gran
capacidad y que contengan una cantidad
importante de archivos de música. Este tiempo
de carga permitirá después que las canciones
, sección Soporte y Descarga.
,
estén accesibles por reconocimiento de voz.
Reinicie el iPod / iPhone® antes de volverlo a
conectar
reiniciar un iPod / iPhone (el proceso no
borrará ningún dato):
Pueden surgir algunos problemas si el
dispositivo ya está conectado al Parrot
ASTEROID Smart cuando se pone el contacto.
Pruebe de nuevo conectando el dispositivo una
vez puesto el contacto.
Para más información
Consulte la página de soporte del Parrot
ASTEROID Smart en nuestra página web
www.parrot.com
al Parrot ASTEROID Smart. Para
iPod: pulse simultáneamente Menu y el
botón central hasta que el iPod se reinicie.
iPhone / iPad / iPod touch®: pulse
simultáneamente el botón On/Off y el
botón Home hasta que el iPhone se
reinicie. No toque la pantalla cuando
aparezca el mensaje "Slide to shutdown”.
.
Información general
Garantía
Sin perjuicio de la garantía legal, el producto
tienen una garantía contractual de 12 meses
desde la fecha de compra inicial efectuada por
el usuario, que cubre cualquier defecto de
materiales y de fabricación presentando la
prueba de compra (ticket de caja, factura) al
distribuidor. Mientras esté vigente la garantía
contractual, el producto defectuoso deberá ser
devuelto en su embalaje original a
posventa del distribuidor. PARROT procederá,
a su elección, a la sustitución o la emisión de un
abono con exclusión de cualquier otra
compensación. La garantía no cubre la pérdida
de datos, los daños causados por accidente, un
uso anormal o no autorizado del producto o un
producto que no sea Parrot. Parrot no se
responsabiliza del almacenaje, pérdida o
deterioro de los datos durante el transport
la reparación. Cualquier producto considerado
no defectuoso será devuelto al remitente y le
serán facturados los gastos de gestión, de
comprobación y de transporte.
Modificaciones
l servicio
e o
Español52

Las explicaciones y especificaciones
contenidas en este manual son meramente
informativas y pueden ser modificadas sin
previo aviso. Se consideran correctas en el
momento de enviar la publicación a imprenta.
Este manual se ha redactado con el máximo
cuidado, con el fin de proporcionarle una
información precisa. Sin embargo, Parrot no
asume responsabilidad alguna por las
consecuencias derivadas de los error
es u
omisiones que pueda haber en el manual, ni por
los daños o pérdidas accidentales de datos que
se produzcan como consecuencia directa o
indirecta del uso de la información aquí
contenida. Parrot se reserva el derecho a
modificar o mejorar el diseño del producto o el
manual de usuario sin restricciones y sin la
obligación de notificárselo a los usuarios. En
aras de actualizar y mejorar nuestros
productos
, es posible que el producto que
usted haya adquirido sea ligeramente distinto
al modelo que se describe en este manual. En
tal caso, tiene a su disposición una versión más
reciente de este manual en formato
electrónico en la página web de Parrot:
www.parrot.com
.
Eliminación correcta de este producto
(material eléctrico y electrónico de descarte)
La presencia de esta marca en el producto o en
el material informativo que lo acompaña, indica
que al finalizar su vida útil no deberá eliminarse
junto con otros residuos domésticos. Para
evitar los posibles daños al medio ambiente o a
la salud humana que representa la eliminación
incontrolada de residuos, separe este pr
oducto
de otros tipos de residuos y recíclelo
correctamente para promover la reutilización
sostenible de recursos materiales. Los
usuarios particulares pueden contactar con el
establecimiento donde adquirieron el
producto, o con las autoridades locales
pertinentes, para informarse sobre cómo y
dónde pueden llevarlo para que sea sometido a
un reciclaje ecológico y seguro. Los usuarios
comerciales pueden cont
actar con su
proveedor y consultar las condiciones del
contrato de compra. Este producto no debe
eliminarse mezclado con otros residuos
comerciales.
Marcas registradas
Parrot y los logos Parrot son marcas registradas
de PARROT SA en Francia y en otros países.
El nombre y el logo Bluetooth son marcas
registradas de Bluetooth ® SIG, Inc. que Parrot
S.A. utiliza bajo licencia.
“Made for iPod / iPhone / iPad” si
gnifica que un
aparato electrónico fue especialmente
diseñado para conectarse a un iPod, un iPhone
o un iPad, respectivamente, y fue certificado
por un desarrollador con el fin de satisfacer los
resultados estándares de Apple. Apple no es
responsable del funcionamiento de este
dispositivo o de su conformidad con las normas
de seguridad y regulatorios.
iPad, iPod, iPod Touch e iPhone son marcas de
Apple, Inc
. registradas en Estados Unidos y en
otros países.
iPad es una marca de Apple Inc.
Wi-Fi es una marca registrada de Wi-Fi
Alliance.
Gracenote®, el logo y el logotipo de Gracenote,
y el logo "Powered by Gracenote" son marcas
registradas o marcas comerciales de
Gracenote, Inc. en Estados Unidos y/o en otros
países.
El resto de marcas comerciales y marcas
registradas citadas en el presente documento
están proteg
idas por Copyright y pertenecen a
sus propietarios respectivos.
Español 53

Declaración de conformidad
Parrot SA, 174 quai de Jemmapes, 75010 Paris,
France, declara bajo su única responsabilidad
que el producto Parrot ASTEROID Smart
descrito en la presente guía del usuario cumple
las normas técnicas IEC/EN 60065: 2002 /
A1:2006 / A11: 2008 / A2: 2010 / A12: 2011, EN
300328 v1.8.1, EN 301 489-1 (2008:V1.8.1) y EN
301 489-17 v1.3.2 según las disposiciones de la
directiva sobre equi
pos de radio y
telecomunicaciones 1999/5/EC R&TTE, así
como con las exigencias de la directiva relativa a
la seguridad 2006/95/EC y de la directiva sobre
automóviles 72/245/CEE modificada por la
directiva 2009/19/CE.
Copyrights
Identification N. 394 149 496 R.C.S. PARIS
Parrot S.A.
Copyright © 2012 Parrot.
Español54

Technical support
If you have any questions regarding your Parrot product, contact our hotline by phone or using our technical contact form
available on our website (support section).
China : [+86] 755 8203 3307
Europe : [+33] 1 48 03 60 69 (Spoken languages : French, English and Spanish)
France : 01 48 03 60 69
Germany : 0900 1727768
Hong Kong : [+852] 2736
Italy : [+39] 02 59 90 15 97
Spain : [+34] 902 404 202
UK : [+44] (0)844 472 2360
USA : [+1] (877) 9 Parrot (toll free)
Our hotline is at your disposal from Monday to Friday. Refer to our website for more information about the service hours.
1169
FCC ID: RKXRNB5

 Loading...