

Page 1

Quick start guide
Guide d'utilisation rapide
Guía de utilización rápida
Bedienungsanleitung
Guida all'uso
Gebruikershandleiding
Manual do utilizador
Page 2

Page 3

.......................................................................................................................................................................13English
.......................................................................................................................................................................33Français
.......................................................................................................................................................................55Español
.......................................................................................................................................................................75Deutsch
.......................................................................................................................................................................97Italiano
.......................................................................................................................................................................117Dutch
.......................................................................................................................................................................137Português
Parrot ASTEROID Mini
www.parrot.com
Page 4
4
Page 5

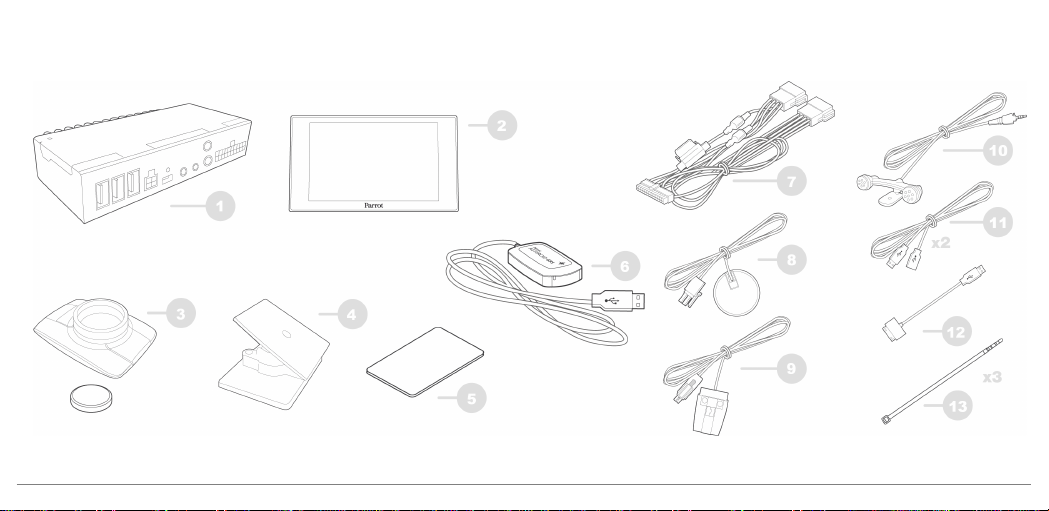
Boîtier électronique / Electronic box / Caja electrónica / Elektronikgehäuse / Centralina elettronica / Caixa electrónica / Elektronicakastje
Ecran / Screen / Pantalla / Display / Display / Ecrã / Scherm
Télécomm ande (pile 3 V - CR2032) / Remote control (3 V - CR2032 battery) / Mando a distancia (pila 3 V - CR2032) / Fernbedienung (Batterie 3 V CR2032) / Telecomando (Pila 3V – CR2032) / Telecomando (Pilha de 3V – CR2032) / Afstandsbediening (Batterij 3V – CR2032)
Support de fixation de l’écran / Craddle / Soporte de fijación de la pantalla / B ildschirmhalterung / Supporto di fissaggio display / Suporte de fixação do
ecrã / Schermsteun
Adhésif / Adhesive tape / Adhesivo / Klebstoff / Adesivo / Adesivo / Plakband
Dongle GPS / GPS dongle / Dongle GPS / GPS-Em pf ängers / Antenna GPS / GPS-D ongle / Dongle GPS
Câble ISO / ISO cable / Ca ble ISO / ISO-Kabe l / Cavo ISO / Cabo ISO / ISO-kabel
Câble télécomm ande / Remote control cable / Cable mando a distancia / Fe rnbedienungkabel / Cav o telecomando / Cabo do telecomando /
Afstandsbedieningkabel
Câble écran / Screen cable / Cable pantalla / Displaykabel / Cavo display / Cabo do ecrã / Schermkabel
Microphone / Microphone / Micrófono / Mikrofon / Microfono / Microfone / Microfoon
Câble USB / USB cable / Cable USB / USB-Ka bel / Cav o USB / Cabo USB / USB-kabel
Rallonge USB-iPod / USB-iPod cable extension / Alargador cable USB-iPod / Verlängerungskabel USB-iPod / Prolunga USB- iPod / Extensão
USB-iPod / Verlengkabel USB-iPod
Serre câble / Cable fastener / Sujetacable / Kabelklemme / Fascetta serracav i / Kabelklem / Braçadeira de cabo
5
Page 6
ISO installation
6
Page 7
Audio system
with amplifier
7
Page 8

89101112
Page 9
Page 10
Page 11

Page 12
Page 13

Quick start
guide
Before you begin
Installation
Getting started
Phone
Music
Internet
Troubleshooting
General information
p.13
p.14
p.20
p.21
p.22
p.25
p.27
p.28
Before you begin
Content
About this guide
In order to limit our paper consumption
and as part of our environmentally friendly
and responsible approach, Parrot prefers
to put user documents online rather than
print them out. This simplified guide to
the Parrot ASTEROID Mini is therefore
limited to providing you with the main
instructions that will make it easy for you
to use the device. More information can
be found on the support section of our
website, www.parrot.com: the full
manual, FAQs, tutorials, and more.
Note: iPod® and iPhone® (in iPod mode)
will be referred to as an "iPod" in this
13English
Page 14

manual.
Software updates
Download the latest update for free (and
consult the update procedure) on the
Parrot ASTEROID Mini support page on
our website www.pa rrot.com. These
updates will enable you to receive new
features and improve the product’s
compatibility.
Warnings
All functions requiring an increased
attention should only be used while the
vehicle is stationary. Your safety and the
one of the other road users prevails over
phone calls, music and driving assistance
14 English
applications. Be responsible: drive
carefully and pay full attention to your
surrounding. Parrot denies any liability
should you choose not to respect this
warning.
Use the Parrot ASTEROID Mini with a
reasonable volume level so that you can
hear all external noises while driving.
The Parrot ASTEROID Mini includes
NdFeB magnets which can damage objects
sensitive to magnetic fields (pacemakers,
credit cards, mechanical clocks…).
Installation
Note: We advise our customers to have the
Parrot ASTEROID Mini fitted by a certified
Parrot installer.
Before you begin
Installing the Parrot ASTEROID Mini is
done by inserting it between the car
stereo and the vehicle.
Note: If your car stereo is not fitted with ISO
connectors, you need to purchase an ISO
adapter cable to simplify the wiring
procedure. Refer to the Vehicle
compatibility section on the Parrot
ASTEROID Mini support page to check
whether an ISO adapter is necessary on your
Page 15

vehicle.
Start by removing the car stereo from your
vehicle. You may need release keys to do
so.
Refer to your car stereo’s wiring diagram.
Before you install the individual
components, check that the installation
locations have been selected in such a way
that the cable length is sufficient to
connect every element. Once the
installation is complete, make sure that no
cables are pinched or trapped.
Use only the ISO cable provided with the
Parrot ASTEROID Mini.
The connection number indications in the
next sections correspond to the
connections represented on the diagrams
p.6 / 7.
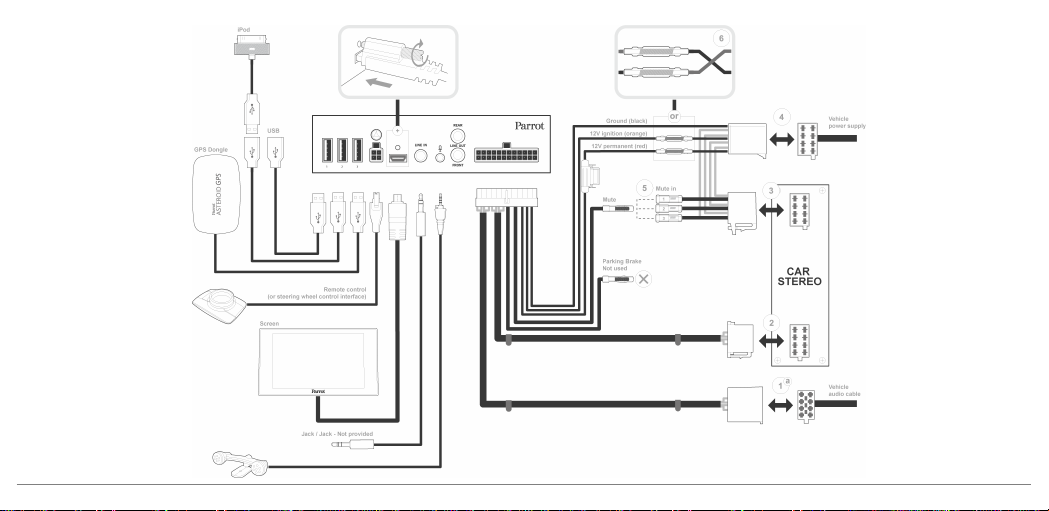
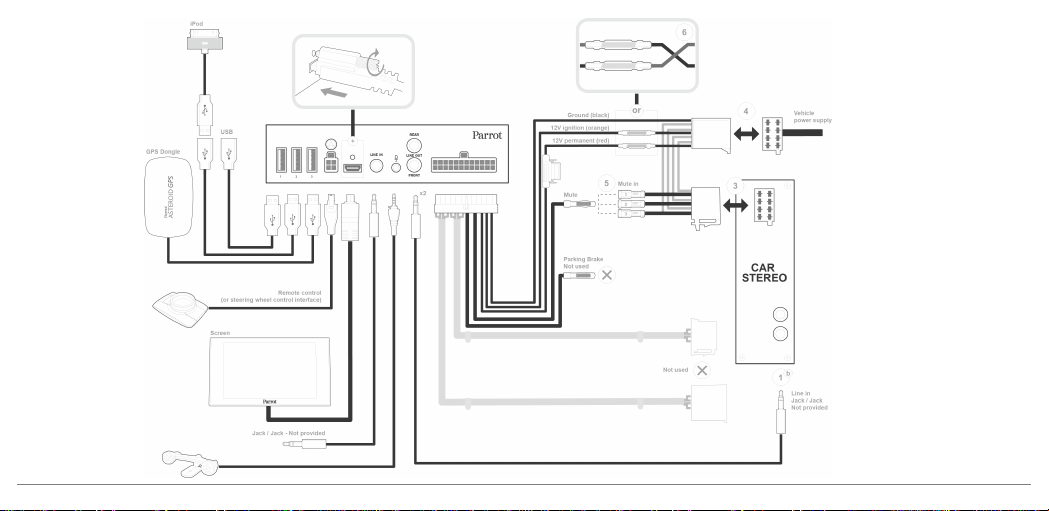
Connecting the audio cable
Join the vehicle audio cable to the
connector of the Parrot ASTEROID Mini
(Connections 1A and 2).
If your vehicle is equipped with an
amplifier, use the Front and Rear Line Out
outputs on the electronic box to avoid
saturation problems such as popping in the
speakers, background noise etc. Use one
or two jack cable(s) to connect the Parrot
ASTEROID Mini Line out outputs to your
vehicle audio system (Connection 1B on
the diagram p. 7).
Connecting the power cable
Unplug the battery before installing
1.
the power cable.
Connect the ISO male connectors of
2.
the Parrot ASTEROID Mini to the car
stereo (Connection 3).
Join the vehicle’s power supply cable
3.
to the ISO female connector of the
Parrot ASTEROID Mini (Connection
4).
The red wire of the Parrot ASTEROID
Mini cable must correspond to the
constant +12V supply, the orange wire to
the ignition +12V and the black wire to
ground. Check that the orange wire is not
connected to the constant +12V supply, as
15English
Page 16

you could run down the vehicle’s battery.
Note: In order to check the wiring, connect
the screen before placing it on the
dashboard. Refer to the Checking the wiring
section for more information.
On some vehicles, there is no
ignition +12V on the vehicle’s connectors.
You must therefore connect the orange
power supply wire to the fuse box or
another ignition power source.
Connecting the mute cable
The mute function is used to cut the
sound of your car stereo to enable the
sound of the Parrot ASTEROID Mini
(music, phone calls etc.). Mute in 1, mute
16 English
in 2 and mute in 3 are only suggested mute
locations : the choice of the mute-in jack
depends on your car stereo’s
configuration. Test and verify the mute on
the vehicle then connect the free yellow
wire on the ISO cable to the audio
system’s corresponding mute-in jack
(connection 5).
Installing the electronic box
Avoid installing the electronic box near
heating or air-conditioning system or on a
spot directly exposed to sunlight.
Make sure the electronic box stays fixed
once it is installed and that it will not move
while you are driving.
Carefully reinstall the car stereo. Do not
force. If you are short of space behind the
car stereo to install the electronic box,
consider installing it in the glove box.
Checking the wiring
To perform the installation check, turn the
ignition on then off once the Parrot
ASTEROID Mini is installed: the message
“Goodbye!” must be displayed.
If it is not the case, it is necessary to
inverse the positions of the red and orange
wires. Indeed, the red wire of the power
cable must be connected to the
permanent 12V, the orange wire to the 12V
ignition and the black wire to the ground.
This can be done simply by reversing both
fuse holders located on the Parrot wiring
Page 17

(connection 7).
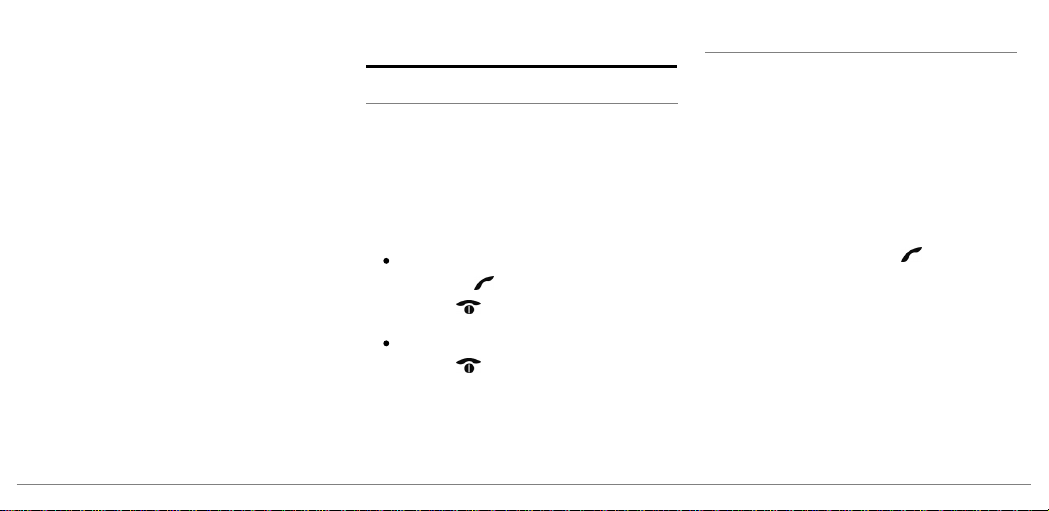
The GPS antenna is located on
the side where "Parrot
ASTEROID GPS" is written and
where the star-shaped logo is.
This logo must always be
directed towards the sky.
Installing the microphone
The optimum location for the microphone
is in the centre of the vehicles roof near
the rear view mirror. The microphone
ideally needs to be less than 60cm’s from
the users mouth pointing directly towards
them with no obstructions.
Please take care when routing the
microphone cable through the vehicle to
the desired location, we recommend
routing alongside existing manufacture’s
wiring looms securing as you go making
sure the microphone cable is not pinched
or trapped.
Warning: Do not run the microphone cable
in such a way as to obstruct or interfere
with the vehicles operation or cause injury
to its occupants. In particular vehicle safety
device such as airbags and other SRS
systems.
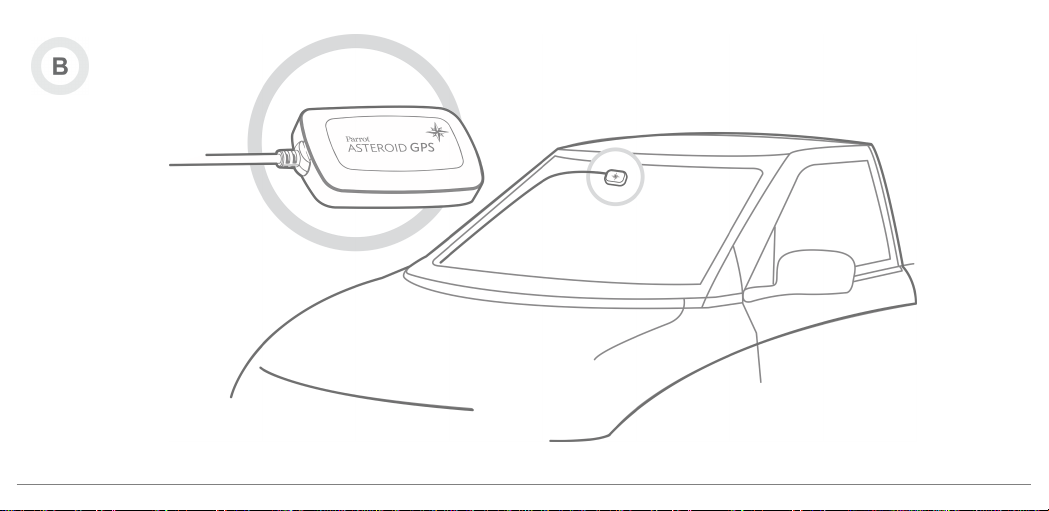
Installing the GPS receiver
Stick the GPS Receiver in an unobstructed
area inside the car.
Athermic windshields and windows with a
built-in antenna can interfere with GPS
reception and reduce the reliability of
information from navigation applications.
If your vehicle has an athermic windshield,
stick the GPS Receiver on the windshield
on the non athermic area. The side where
the star-shaped logo is must be stuck on
the windshield (diagram B p.9).
Note : The non athermic area of the
windshield depends on the model of your
vehicle. It is usually located near the rear
view mirror.
If your vehicle does not have an athermic
17English
Page 18

windshield, stick the GPS Receiver on the
dashboard. The side where the starshaped logo is must be visible (diagram A
p.8).
To make sure the adhesive tape adheres
well :
clean the area with an appropriate
cleaning product before sticking the
support ;
once you have stuck the support on
the dashboard, wait for approximately
2 hours without handling it.
18 English
Installing the USB cables
Connect the USB cables to the Parrot
ASTEROID Mini. We recommend you
connect all audio cables to the Parrot
ASTEROID Mini even if you do not plan on
using them. Route the audio cables to a
suitable location in your vehicle such as
the glove box or arm rest compartment. It
may be necessary to drill a hole in your
dashboard to do so. Avoid using USB
extension cables.
Make sure you connect the iPod cable to
its specific USB port. "iPod" is written
above it.
To guarantee an optimal reception quality
we recommend you do not connect your
internet USB key 3G on the Parrot
ASTEROID Mini directly : use the USB
cable to install your device on the
dashboard (or any other open area).
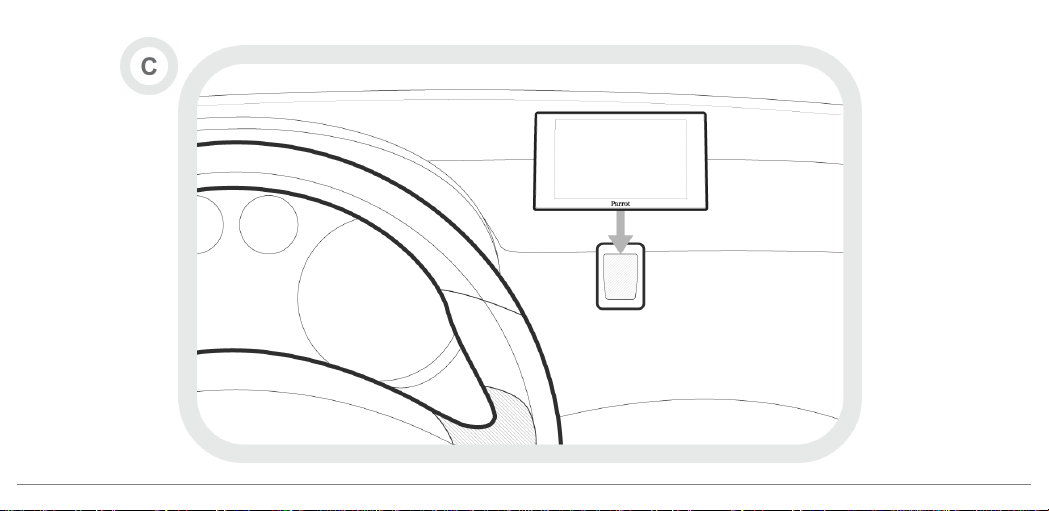
Installing the screen
Warning: Avoid any installation which
could hinder the use of any important
command or hinder the driver's visibility.
Do not install the Parrot ASTEROID Mini in
the airbag deployment area or in a possible
head impact area. Make sure it is not
exposed to the air stream from air vents.
Stick the support on the dashboard
(diagram C p.10).
To make sure the adhesive tape adheres
well :
Page 19

clean the area with an appropriate
cleaning product before sticking the
support ;
once you have stuck the support on
the dashboard, wait for approximately
2 hours without handling it.
Remember to remove your screen when
leaving the vehicle to avoid tempting any
would-be thieves and to prevent
prolonged exposure to sunlight.
Installing the remote control
Stick the remote control support on your
dashboard. To do so, use the adhesive
tape located under the support.
To make sure the adhesive tape adheres
well :
clean the area with an appropriate
cleaning product before sticking the
support ;
once you have stuck the support on
the dashboard, wait for approximately
2 hours without handling it.
There are two ways to supply power to the
remote control : with a battery or by
connecting it to the electronic box.
To supply power with a battery (diagram D
p.11) :
Remove the circular plastic part on
1.
the back of the remote by turning it
clockwise.
Insert a 3V CR2032 battery into the
2.
remote control. Make sure the
battery is correctly positioned.
Put the circular plastic part back by
3.
turning it counterclockwise.
To connect the remote control to the
electronic box (diagram D p.11) :
Remove the circular plastic part on
1.
the back of the remote by turning it
clockwise.
Connect the remote control cable
2.
into the battery compartment and
turn it counterclockwise.
Connect the remote control cable to
3.
the electronic box, next to the USB
connectors (diagram p.6).
19English
Page 20
Getting started
Navigating through the menus
Press the button to access the main
menu.
Browse through the menus by turning the
jogwheel and confirm by pressing the
jogwheel.
Press the button to get back to previous
menu.
Press the button to access the pop-up
menu corresponding to the current
application. The pop-up menu allows you
to change several settings or browse more
easily through the content of your audio
source or phonebook.
20 English
Press the button to get to the track list if
a song is currently being played. While
navigating through the menus, press the
SRC button to get to the Now Playing
screen.
Connecting a phone via Bluetooth
Note : Refer to the compatibility page of our
website to check if your phone is
compatible with the Parrot ASTEROID Mini
and to consult the specific pairing
procedures for the most common phones :
www.parrot.com/uk/compatibility.
If you are using the Parrot ASTEROID Mini
with your phone for the very first time, you
must initially pair both devices. Once your
telephone is paired with the Parrot
ASTEROID Mini, the 2 devices will
automatically connect when they are
turned on (as well as
and in proximity of each other.
From your phone, start a
1.
peripheral search and select «Parrot
ASTEROID Mini».
The pairing procedure depends on
2.
your phone model:
If the phone asks you to enter
the
“0000”.
If the Parrot ASTEROID Mini
and your phone display two
codes, verify that the codes are
identical, then either confirm
Bluetooth®
Bluetooth
features)
Bluetooth
PIN code, enter
Page 21

or invalidate.
> The Parrot ASTEROID Mini
screen will display “Pairing
successful”.
Note: Depending on the model of your
phone, you may need to authorize the
connection to the Parrot ASTEROID Mini to
allow further automatic connections. Refer
to the user guide of your phone for more
information.
Synchronising the phonebook
With most of the phones supporting
Bluetooth technology, the phonebook is
automatically synchronized in the system’s
memory. Each time you change your
directory, synchronisation will start
automatically the next time the Parrot
ASTEROID Mini and your phone are
connected.
Warning: Only the contacts stored in the
phone memory are synchronized. If your
contacts are stored in your SIM card
memory, transfer them onto your phone
memory.
Note: Depending on the model of your
phone, you may need to authorize the
access to your contacts to the Parrot
ASTEROID Mini. Refer to the user guide of
your phone for more information.
The automatic synchronization is limited
to 5000 contacts (or phone numbers) for
each paired phone.
Phone
Receiving a call
An incoming call is indicated by a ringtone.
The name of the caller is announced if his
number is recorded in the phonebook of
the phone connected to the Parrot
ASTEROID Mini.
To answer the call, press the
button. Press the button to end
the call.
To refuse the call, press the
button.
21English
Page 22
Making a call via voice recognition
You can make a call using voice recognition
directly after automatic synchronization.
The Parrot ASTEROID Mini will
automatically recognize the contact you
wish to call.
Press the button to launch the
1.
voice recognition feature.
> The Parrot ASTEROID Mini asks
you the name of the contact you want
to call.
Say the name of the contact and the
2.
type of number («WORK»,
«MOBILE»...) if there are several
numbers associated to your contact.
> The call is automatically launched if
22 English
the voice tag is correctly understood.
If it is not the case, a confirmation
message is asked. Confirm by saying
«YES» or «CALL».
Note: At any time, press the button to
exit voice recognition mode.
Music
Using vocal music search
The voice recognition function allows you
to select the artist / album you want to
hear via voice recognition. This function is
only available if you are using the Parrot
ASTEROID Mini with a USB / SD / iPod
peripheral.
Press the button.
1.
Say the name of the artist / album
2.
when asked to do so.
> The list of audio sources connected
to the Parrot ASTEROID Mini and
applications compatible with the
vocal music search function which
Page 23

contain the artist / album that you
selected will appear.
Note: Check the albums and artists names
in the metadatas of your music files. These
names may be different from the ones
displayed on your music files titles.
iPod
Connect your iPod to the Parrot
1.
ASTEROID Mini USB cable with the
USB / iPod extension lead.
Press the SRC button until the iPod
2.
source is selected.
Select one of the classification
3.
criteria (artist, album, songs, genres,
playlist) and press the jogwheel.
Select the track and press the
4.
jogwheel.
Note: To browse more easily through the
content of your iPod, press the button
and select the first letter of your track /
album / artist.
USB storage device
The Parrot ASTEROID Mini is compatible
with the majority of USB keys / MP3 audio
player / external hard drive. There is no
restriction in terms of capacity of USB
keys.
MP3 (mpeg1 layer3), AAC, WAV, OGG
and WMA formats are supported.
Connect your USB device to the USB
1.
cable.
Press the SRC button until the USB
2.
source is selected.
Select one of the classification
3.
criteria (artist, album, songs, genres,
playlist) and press the jogwheel.
Select the track and press the
4.
jogwheel.
Note: To browse more easily through the
content of your USB storage device, press
the button and select the first letter of
your track / album / artist.
23English
Page 24

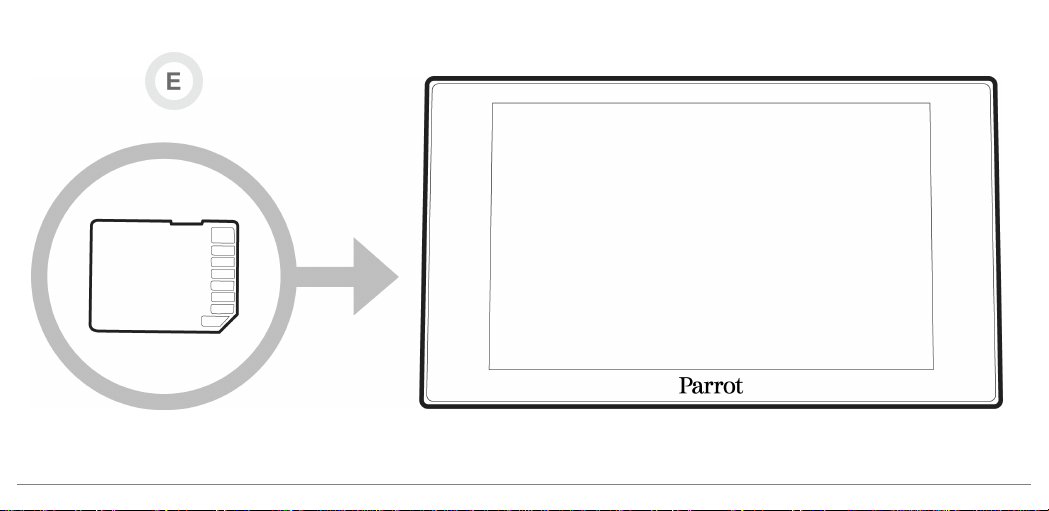
SD card
You can use the following SD cards (with
adapter if necessary) with the Parrot
ASTEROID Mini : SD, micro SD , mini SD,
SDHC, mini SDHC, micro SDHC. The SD
card capacity must not exceed 32Gb.
MP3 (Mpeg 1 Layer3), AAC, WAV, OGG
and WMA formats are supported.
Insert the SD card into the
1.
appropriate slot located on the right
of the screen, with the contact
surface facing you (diagram E p.12).
Press the SRC button until the SD
2.
source is selected.
Select one of the classification
3.
24 English
criteria (artist, album, songs, genres,
playlist) and press the jogwheel.
Select the track and press the
4.
jogwheel.
Note: To browse more easily through the
content of your USB storage device, press
the button and select the first letter of
your track / album / artist.
Audio player connected via Bluetooth
Note: The Parrot ASTEROID Mini allows you
to use the phone and audio streaming
functions from 2 different phones without
having to disconnect one of them.
You can use the Parrot ASTEROID Mini to
listen to songs stored on your mobile
phone or
Bluetooth
audio device. To do so,
your phone / audio device must support
the
Bluetooth
A2DP profile (Advanced
Audio Distribution Profile).
If you are using a
Bluetooth
audio player
for the first time, you have to pair both
devices. If both devices are already paired:
Press the SRC button until the
1.
Bluetooth Audio source is selected.
Start playback on your
2.
Bluetooth
audio
player.
Page 25

Internet
Connecting a 3G / 4G key
Note: Refer to the compatibility section of
the Parrot ASTEROID Mini on our website to
get the list of 3G / 4G keys compatible with
the Parrot ASTEROID Mini.
Connect a 3G key to the Parrot
1.
ASTEROID Mini using a USB cable.
> A pop-up will appear.
Select OK to activate the 3G
2.
connection.
> A Status of 3G connection pop-up
appears, followed by another pop-up
which asks for your PIN code.
Enter your PIN code using the
3.
jogwheel, then select OK. Check the
Memorise PIN code option if you
would like your PIN code to be stored
each time you turn on the Parrot
ASTEROID Mini.
Note: You will be able to change this setting
by selecting
4.
Settings > Netw ork > 3G Key
Select your APN (Access Point
Name) from the suggested list. This
information is available in the
documentation provided with your 3G
key. If your APN is not in the list, you
can add it by selecting Settings >
Network > 3G Key > Configuration >
New access point.
.
> The message "3G key configured"
appears.
Wait approximately 30 seconds until
5.
the connection is established. You
can also press the button and
browse the menus while the
connection is being established.
Sharing a phone 3G connection via Bluetooth
Note: Refer to the compatibility page of our
website to check if your phone allows 3G
connection sharing via Bluetooth and to
consult the corresponding procedure :
www.parrot.com/uk/compatibility.
If you have a phone that supports the DUN
(Dial-Up Networking) or PAN (Personal
25English
Page 26

Area Network)
Bluetooth
Bluetooth
profiles, the
connecting your phone to the
Parrot ASTEROID Mini will allow for
sharing of the phone's 3G connection.
Connect your phone to the Parrot
1.
ASTEROID Mini via
On the Parrot ASTEROID Mini,
2.
Bluetooth
.
select Settings > Network >
Bluetooth > Configuration.
Select your APN (Access Point
3.
Name) from the suggested list, then
check Select .
Press the button and select
4.
Connect.
Allow connection sharing on your
5.
26 English
phone. This procedure will vary
according to your phone model.
Sharing a phone 3G connection via USB
Note: Refer to the compatibility page of our
website to check if your phone allows 3G
connection sharing via USB and to consult
the corresponding procedure :
www.parrot.com/uk/compatibility.
Make sure that your phone’s keypad is
1.
unlocked.
Connect the phone to the Parrot
2.
ASTEROID Mini using a USB cable/
micro-USB and the USB extension
cable provided with the Parrot
ASTEROID Mini. This connection
also enables you to recharge your
phone’s battery.
Select your APN (Access Point
3.
Name) from the suggested list, then
check the Select option. You can then
modify this setting by selecting
Settings > Mobile Networks settings
> Mobile Access device.
> A pop-up indicating that USB
connection sharing has been activated
will appear.
ASTEROID Market : Using the applications
Several types of applications are available
with the ASTEROID Market : music,
geolocation, driver assistance...
Page 27

All applications may not be available in all
countries. The use of some applications
may need prior subscription.
The Parrot ASTEROID Mini is a
multitasking device: several applications
can run simultaneously. For example, you
can listen to a Webradio station and use a
driver assistance application at the same
time.
For more information about installing and
using the available applications, refer to
the ASTEROID Market web page :
www.parrotasteroid.com/
asteroidmarket.
Troubleshooting
Before you begin
Make sure the “Goodbye” message is
displayed on the Parrot ASTEROID Mini
screen when you turn the ignition off.
Refer to the Checking the wiring section
for more information.
Reset the Parrot ASTEROID Mini. To do
so, select Settings > Advanced settings >
Restore factory settings.
Make sure you have the latest software
update on your Parrot ASTEROID Mini. To
do so, select Settings > About > Device
Version. Compare this number with the
one on the Parrot ASTEROID Mini support
page on our website www.parrot.com.
Problems while using the phone function
Make sure your phone is compatible with
the Parrot ASTEROID Mini. To do so,
refer to the compatibility page on our
website : www.parrot.com/uk/
compatibility.
If your phone is compatible with the
Parrot ASTEROID Mini and if you
already have the latest software update:
Delete the pairing on the Parrot
1.
ASTEROID Mini. To do so, tap
Settings > Advanced settings >
Factory settings.
On your phone, erase the Parrot
2.
27English
Page 28

system from the list of
peripherals (or reboot your iPhone).
Repeat the pairing procedure for the 2
3.
devices.
Problems while using the music function
Reboot your iPod / iPhone before
connecting it to the Parrot ASTEROID
Mini. To reboot your iPhone / iPod:
iPod: press Menu and the centre
button simultaneously until the iPod
reboots.
iPhone: Press the On/Off button and
the Home button simultaneously
until the iPhone reboots. Do not
touch the screen when the message
28 English
Bluetooth
“Slide to shutdown” appears.
Note: this procedure will not erase any of
your data.
Some problems may occur if the iPod / SD
card / USB device is already connected to
the Parrot ASTEROID Mini before you
turn on the ignition. Connect the iPod / SD
card / USB device once the ignition is
turned on.
For more information
Refer to the Parrot ASTEROID Mini
support page on our website
www.parrot.com.
General information
Warranty
Without prejudice of legal warranty, Parrot
contractually warrants during 12 months
from the date of initial purchase by the
consumer (except wearing parts
guaranteed for 6 months) that the product
is free from defects in materials and
workmanship, upon presentation of proof
of purchase (date, place of purchase,
serial number of the product) to the
retailer or Parrot. During the contractual
warranty period, the defective product
must be returned in its original packaging
to the after-sales service of the retailer.
Page 29

After inspection of the product, Parrot will
proceed, at its option, to the replacement
or the issue a credit note to the exclusion
of any other remedy.
Warranty does not cover: upgrading of the
software items of the Parrot products with
Bluetooth cell phones for compatibility
purpose, data recovery, deterioration of
the external aspect due to normal wear of
the product, any damage caused by
accident, misuse, misapplication, or nonParrot products.
Parrot is not responsible for storage, loss
or damaged to data during transit or repair.
Any product wrongfully declared to be
defective will be returned to sender and
inspection, process and carriage costs will
be invoiced to him.
Modifications
The explanations and specifications in this
guide are given for information purposes
only and may be modified without prior
notice. They are deemed to be correct at
time of going to press. The utmost care
has been taken when writing this guide,as
part of the aim to provide you with
accurate information. However, Parrot
shall not be held responsible for any
consequences arising from any errors or
omissions in the guide, nor for any damage
or accidental loss of data resulting directly
or indirectly from the use of the
information herein. Parrot reserves the
right to amend or improve the product
design or user guide without any
restrictions and without any obligation to
notify users. As part of our ongoing
concern to upgrade and improve our
products, the product that you have
purchased may differ slightly from the
model described in this guide. If so, a later
version of this guide might be available in
electronic format at Parrot’s website at
www.parrot.com.
Correct disposal of This Product (Waste
Electrical & Electronic Equipment)
This marking shown on the product or
its literature, indicates that it should not
be disposed with other household wastes
at the end of its working life. To prevent
possible harm to the environment or
29English
Page 30

human health from uncontrolled waste
disposal, please separate this from other
types of wastes and recycle it responsibly
to promote the sustainable reuse of
material resources.
Household users should contact either
the retailer where they purchased this
product, or their local government office,
for details of where and how they can take
this item for environmentally safe
recycling. Business users should contact
their supplier and the terms and
conditions of the purchase contract. This
product should not be mixed with other
commercial wastes for disposal.
Registered Trademarks
Parrot and the Parrot logo are registered
30 English
trademarks of PARROT SA.
The Bluetooth word mark and logos are
registered trademarks owned by
Bluetooth SIG, Inc. and any use of such
marks by Parrot S.A. is under license.
Bluetooth QDID : B013841, B013839, [-]
"Made for iPod / iPhone" means that an
electronic accessory has been designed to
connect specifically to iPod or iPhone
respectively, and has been certified by the
developer to meet Apple performance
standards. Apple is not responsible for the
operation of this device or its compliance
with safety and regulatory standards.
iPod and iPhone are trademarks of Apple
Inc, registered in the US and others
countries
All other trademarks mentioned in this
guide are protected and are the property
of their respective owners.
Gracenote, the Gracenote logo and
logotype and "Powered by Gracenote" are
either registered trademarks or
trademarks of Gracenote Inc. in the United
States and/or other countries.
Identification N. 394 149 496 R.C.S. PARIS
Parrot S.A.
Copyright © 2012 Parrot. All Rights
Reserved.
This device complies with Industry Canada
Page 31

licence-exempt RSS standard(s).
Operation is subject to the following two
conditions: (1) this device may not cause
interference, and (2) this device must
accept any interference, including
interference that may cause undesired
operation of the device.
This equipment complies with FCC’s and
IC’s RF radiation exposure limits set forth
for an uncontrolled environment.. The
antenna(s) used for this transmitter must
be installed and operated to provide a
separation distance of at least 20 cm from
all persons and must not be collocated or
operating in conjunction with.
31English
Page 32

32
Page 33

Guide d'utilisation
rapide
Avant de commencer
Installation
Première utilisation
Téléphone
Musique
Internet
En cas de problème
Informations générales
p.33
p.34
p.40
p.42
p.43
p.46
p.48
p.50
Sommaire
Avant de commencer
A propos de ce guide
Afin de limiter notre consommation de
papier et dans le cadre de notre démarche
aussi responsable et respectueuse que
possible de l’environnement, Parrot
privilégie la mise en ligne des documents
utilisateurs plutôt que leur impression. Ce
guide simplifié du Parrot ASTEROID Mini
se limite donc à vous fournir les
principales instructions qui vous
permettront d’utiliser facilement cet
appareil. Vous trouverez plus
d’informations sur la section Support de
notre site web www.parrot.com : notice
complète, FAQ, didacticiels...
33Français
Page 34

Note : Pour une meilleure lisibilité, l’iPod®
et l’iPhone® seront désignés par le terme
"iPod" dans ce manuel.
Avertissements
Les fonctions requérant une attention
prolongée doivent uniquement être
utilisées lorsque le véhicule est à l’arrêt.
Votre sécurité et celle des autres usagers
de la route prime sur les appels
téléphoniques, la musique ou les
applications d'aide à la conduite. Soyez
responsable : conduisez prudemment et
prêtez attention à votre environnement.
Parrot dégage toute responsabilité si vous
choisissez d’ignorer cette mise en garde.
34 Français
Mise à jour
Téléchargez gratuitement la dernière mise
à jour de votre produit sur notre site web
www.parrot.com section Support. Ces
mises à jour vous permettront de
bénéficier de nouvelles fonctionnalités et
d’améliorer la compatibilité de votre
produit.
Installation
Note: Nous vous recommandons de faire
appel à un professionnel pour cette
installation, notamment à l'un de notre
réseau d'installateurs agréés.
Avant de commencer
L'installation du Parrot ASTEROID Mini
consiste à l'insérer entre l'autoradio et le
véhicule.
Note : Les câbles fournis avec le Parrot
ASTEROID Mini sont équipés de connecteurs
ISO. Si votre autoradio n’est pas équipé de
connecteurs ISO, vous devez vous procurer
un câble adaptateur ISO afin de permettre
le montage. Consultez la section
Page 35

Compatibilité véhicules sur la page support
du Parrot ASTEROID Mini pour vérifier la
nécessité d'un câble adaptateur.
Commencez par retirer l’autoradio
d’origine de votre véhicule. Cette
opération peut nécessiter des clés
d’extraction.
Consultez le schéma électrique de votre
autoradio.
Avant de fixer les différents éléments du
Parrot ASTEROID Mini dans l’habitacle,
connectez les différents câbles sur le
boîtier électronique. Avant de fixer
durablement les composants, contrôlez
les longueurs de câbles et vérifiez que les
emplacements soient choisis de sorte que
les longueurs de câbles suffisent pour
relier les pièces détachées les unes aux
autres. Assurez-vous que les câbles du
Parrot ASTEROID Mini ne se retrouvent
pas pliés ou coincés à l’issue de
l’installation.
Utilisez impérativement le câble ISO
fourni avec le Parrot ASTEROID Mini.
Les indications "Connexion #" dans les
prochaines sections correspondent aux
connexions représentées sur les schémas
p.6 / 7.
Connecter le câble audio
Reliez les faisceaux audio du véhicule aux
connecteurs du Parrot ASTEROID Mini
(Connexions 1A et 2 sur le schéma p.6).
Si votre véhicule est équipé d’un système
audio avec amplificateur, utilisez les
sorties jack Line Out Front et Line Out
Rear sur le boitier électronique pour
éviter tout problème de saturation
(claquement dans les haut parleurs,
souffle permanent, etc.). Reliez ces
sorties Line Out à votre système audio en
utilisant un ou deux câbles jack pour relier
le Parrot ASTEROID Mini à votre système
audio (Connexion 1B sur le schéma p.7).
Connecter le câble d'alimentation
Débranchez la batterie avant
1.
l’installation du câble d’alimentation.
Branchez le connecteur ISO mâle du
2.
Parrot ASTEROID Mini à l’autoradio
35Français
Page 36

(connexion 3).
Reliez les faisceaux alimentation du
3.
véhicule au connecteur ISO femelle du
Parrot ASTEROID Mini (connexion 4).
Le fil rouge du câble doit correspondre
au +12V permanent, le fil orange au 12V
après-contact et le fil noir à la masse.
Vérifiez que votre fil orange n’est pas
connecté au 12V permanent, vous
risqueriez de décharger la batterie du
véhicule.
Note : Afin de procéder à la vérification de
l’installation, connectez d’abord l’écran
sans le placer sur le tableau de bord.
Consultez la section Vérifier l’installation
pour plus d’informations.
36 Français
Sur certains véhicules, il n’y a pas de +12V
après contact sur les connecteurs du
véhicule. Il est alors nécessaire de
brancher le fil d’alimentation orange sur la
boite à fusible ou sur une autre source
d’alimentation après contact.
Connecter le câble Mute
La fonction Mute permet d’interrompre le
son de votre autoradio pour laisser place
au son du Parrot ASTEROID Mini
(musique, communications etc.). Le choix
de l’entrée Mute (Mute in 1, mute in 2 ou
mute in 3) dépend de la configuration de
votre autoradio. Identifiez l'entrée Mute
puis connectez la au fil jaune libre sur le
câble ISO (connexion 5).
Installer le boitier électronique
Evitez d’installer le boîtier près du
chauffage ou de la climatisation ou à un
endroit exposé au soleil.
Assurez-vous que le boitier reste
immobile après son installation.
Une fois le boitier installé, ne forcez pas
lors de la remise en place de l’autoradio. Si
la place derrière l’autoradio est
insuffisante, envisagez par exemple le
démontage de la boite à gants.
Vérifier l'installation
Allumez puis coupez le contact de votre
véhicule une fois le Parrot ASTEROID
Mini installé : le message « Au revoir »
Page 37

doit alors s’afficher à l’écran.
L'antenne GPS du dongle se
trouve sur le côté où est écrit
"Parrot ASTEROID GPS" et où
se trouve le logo en forme
Note : Certains véhicules disposent d’une
temporisation : le Parrot ASTEROID Mini ne
s’éteindra qu’au bout d’un certain temps
après avoir coupé le contact ou retiré la clé,
sans ouvrir ni fermer les portes du véhicule.
Si ce n’est pas le cas, vous devez inverser
les positions des fils rouge et orange. En
effet, le fil rouge du câble d’alimentation
doit être connecté au 12V permanent, le fil
orange au 12V après-contact et le fil noir à
la masse. Cette opération s’effectue
simplement en inversant les deux cosses
situées sur le câblage Parrot (connexion 7)
.
Installer le microphone
Nous vous recommandons de faire glisser
le câble dans la gouttière derrière le joint
de la portière.
Si le câble passe au dessus des pédales,
assurez-vous qu’il est bien fixé.
Avertissement: Ne faites pas passer le câble
du microphone dans les systèmes de
chauffage, de ventilation, de climatisation
ou devant les airbags latéraux.
Assurez-vous que le microphone est
installé le plus près possible de la tête de
l’utilisateur. La distance idéale est de 60
cm. Installez de préférence le microphone
près du rétroviseur intérieur.
Orientez le microphone vers la bouche de
l’utilisateur.
Installation du dongle GPS
Fixez le dongle GPS sur une surface plane,
dans une zone sans obstacle à l'intérieur
de l'habitacle.
Les pare-brises athermiques et les vitres
avec antenne incrustée peuvent interférer
avec la réception GPS et réduire la fiabilité
des informations liées aux applications de
navigation.
37Français
Page 38

d'étoile. Ce logo doit toujours
être orienté vers le ciel.
Si votre véhicule dispose d'un pare-brise
athermique, fixez le dongle GPS sur le
pare-brise au niveau de la zone non
athermique. Le côté sur lequel se trouve
le logo en forme d'étoile doit être collé sur
le pare-brise (schéma B p.9).
Note : La zone non athermique du parebrise dépend du modèle de votre véhicule.
Elle se trouve généralement au niveau du
rétroviseur.
Si votre véhicule ne dispose pas d'un parebrise athermique, fixez le dongle GPS sur
le tableau de bord. Le côté sur lequel se
38 Français
trouve le logo en forme d'étoile doit être
visible (schéma A p.8).
Pour assurer une bonne fixation du
support :
nettoyez la surface de montage avant
de coller le support ;
après fixation du support, patientez
environ 2 heures sans le manipuler.
Installation des câbles USB
Connectez les câbles USB au Parrot
ASTEROID Mini. Nous vous
recommandons de connecter tous les
câbles du Parrot ASTEROID Mini, même si
vous ne prévoyez pas forcément de les
utiliser. Faites ressortir les connecteurs
correspondants de votre vide poche ou
boîte à gant. Pour cela, il peut être
nécessaire de percer un trou à l’intérieur
de votre tableau de bord. Dans la mesure
du possible, évitez l'utilisation de
rallonges USB de plusieurs mètres.
Le câble USB sur lequel vous connecterez
la rallonge iPod doit impérativement être
connecté au port USB blanc prévu à cet
effet. Vous trouverez l’indication "iPod" au
dessus de celui-ci.
Afin de garantir une qualité de réception
optimale, ne connectez pas votre clé 3G
directement sur le Parrot ASTEROID
Mini : utilisez un câble USB afin de
l'installer sur le tableau de bord (ou toute
autre zone dégagée).
Page 39

Installer l'écran
Avertissement : Evitez toute installation
pouvant entraver l’utilisation de
commandes importantes ou pouvant
réduire la visibilité du conducteur.
N’installez pas l'écran là où il pourrait être
propulsé par l’ouverture d’un airbag ou à
proximité d’une bouche d’aération ou d’air
conditionné du véhicule.
Collez le support en plastique sur votre
tableau de bord (schéma C p.10).
Pour assurer une bonne fixation du
support :
nettoyez la surface de montage avant
de coller le support ;
après fixation du support, patientez
environ 2 heures sans le manipuler.
Afin d’éviter les risques de vol et
d’exposition prolongée au soleil, pensez à
retirer votre écran lorsque vous quittez
votre véhicule.
Installer la télécommande
Collez le support de la télécommande sur
votre tableau de bord en utilisant l'adhésif
situé en dessous de celui-ci.
Pour assurer une bonne fixation du
support :
nettoyez la surface de montage avant
de coller le support ;
après fixation du support, patientez
environ 2 heures sans le manipuler.
La télécommande peut être alimentée de
2 manières : avec une pile ou en la
connectant au boitier électronique.
Pour alimenter la télécommande par pile
(schéma D p.11) :
Retirez la pièce en plastique
1.
circulaire au dos de la télécommande
en la faisant pivoter dans le sens des
aiguilles d'une montre.
Insérez une pile de type 3V CR2032
2.
dans l'emplacement prévu à cet effet.
Assurez-vous que la pile est
correctement orientée.
Remettez en place la pièce en
3.
plastique circulaire en la faisant
39Français
Page 40

pivoter dans le sens inverse des
aiguilles d'une montre.
Pour connecter la télécommande au
boitier électronique (schéma D p.11) :
Retirez la pièce en plastique
1.
circulaire au dos de la télécommande
en la faisant pivoter dans le sens des
aiguilles d'une montre.
Connectez le câble au niveau de
2.
l'emplacement prévu pour la pile et
faites-le pivoter dans le sens inverse
des aiguilles d'une montre.
Connectez l'autre extrémité du câble
3.
sur le boitier électronique, à côté des
connecteurs USB (schéma p.6).
40 Français
Première utilisation
Naviguer dans les menus
Appuyez sur la touche pour accéder au
menu principal.
Naviguez dans les menus en tournant la
molette, et validez en appuyant sur la
molette.
Pour revenir au menu précédent, appuyez
sur la touche .
Appuyez sur la touche pour accéder au
menu contextuel, correspondant à
l’application en cours d’utilisation. Le
menu contextuel vous permet notamment
d'avoir accès aux fonctions
supplémentaires de l'application, de
modifier certains réglages, ou de parcourir
plus rapidement le contenu de votre
répertoire ou de votre source audio.
Pendant la lecture d’un fichier musical,
appuyez sur la touche pour revenir au
menu. A l’inverse, lorsque vous naviguez
dans les menus, appuyez sur la touche SRC
pour revenir au lecteur.
Connecter un téléphone via Bluetooth
Note : Consultez la page compatibilité de
notre site web pour vérifier si votre
téléphone est compatible avec le Parrot
ASTEROID Mini et consulter la procédure
d'appairage correspondante :
www.parrot.com/fr/compatibility.
Si c’est la 1ère fois que vous utilisez un
Page 41

téléphone avec le Parrot ASTEROID Mini,
vous devez tout d’abord appairer les deux
appareils. Une fois votre téléphone
appairé avec le Parrot ASTEROID Mini, la
connexion entre les 2 appareils sera
automatique dès que les 2 appareils seront
allumés à proximité, avec la fonction
Bluetooth®
activée.
Depuis votre téléphone, lancez une
1.
recherche de périphériques
Bluetooth®
puis sélectionnez «Parrot
ASTEROID Mini».
La procédure d'appairage dépend
2.
alors du modèle de votre téléphone :
Si le téléphone vous invite à
entrer le code PIN
Bluetooth
entrez «0000».
Si le Parrot ASTEROID Mini et
votre téléphone affichent deux
codes, vérifiez si ces codes sont
identiques puis confirmez ou
infirmez.
> L’écran du Parrot ASTEROID Mini
affiche « Appairage réussi».
Note : Sur certains téléphones, vous devrez
autoriser la connexion au Parrot ASTEROID
Mini pour permettre la connexion
automatique. Consultez le guide utilisateur
de votre téléphone pour plus
d'informations.
,
Synchroniser le répertoire du téléphone
Avec la plupart des téléphones
Bluetooth
le répertoire est automatiquement
synchronisé avec la mémoire du système.
Chaque fois que vous modifierez votre
répertoire, la synchronisation se relancera
automatiquement à la connexion suivante.
Avertissement: Seuls les contacts
enregistrés dans la mémoire du téléphone
se synchronisent avec le Parrot ASTEROID
Mini. Si vos contacts sont enregistrés dans
la mémoire de la carte SIM, transférez-les
dans la mémoire du téléphone. Consultez le
guide utilisateur de votre téléphone pour
plus d'informations.
Note : Sur certains téléphones, vous devrez
,
41Français
Page 42
autoriser l'accès du Parrot ASTEROID Mini à
vos contacts pour permettre la
synchronisation. Consultez le guide
utilisateur de votre téléphone pour plus
d'informations.
La synchronisation automatique est
limitée à 5000 contacts (ou numéros de
téléphone) par téléphone appairé.
42 Français
Téléphone
Recevoir un appel
Un appel entrant est indiqué par une
sonnerie. Le nom du contact est énoncé si
le numéro de ce contact est enregistré
dans le répertoire du téléphone connecté
au Parrot ASTEROID Mini.
Pour accepter cet appel, appuyez sur
la touche . Appuyez ensuite sur la
touche pour raccrocher.
Pour refuser cet appel, appuyez sur la
touche .
Emettre un appel via reconnaissance vocale
Vous pouvez initier un appel par
reconnaissance vocale directement après
la synchronisation du répertoire de votre
téléphone. Le Parrot ASTEROID Mini
reconnaitra automatiquement le contact
de votre répertoire que vous souhaitez
appeler.
Appuyez sur la touche pour initier
1.
le processus de reconnaissance
vocale.
> Le Parrot ASTEROID Mini vous
demande le nom du contact que vous
souhaitez appeler.
Prononcez le nom du contact suivi du
2.
type de numéro («BUREAU»,
Page 43

«PORTABLE»...) si ce contact
dispose de plusieurs numéros.
> L’appel vers ce contact est
automatiquement initié si la
commande vocale a été bien
comprise.
> Dans le cas contraire, le Parrot
ASTEROID Mini diffuse un message
de confirmation. Confirmez en
prononçant «OUI», «APPELLE» ou
«APPELER».
Note: A tout moment, appuyez sur la
touche pour annuler la procédure
d'appel.
Musique
Utiliser la reconnaissance vocale musicale
La fonction reconnaissance vocale
musicale vous permet de sélectionner via
reconnaissance vocale les artistes ou
albums que vous souhaitez écouter. Cette
fonction est disponible si vous utilisez le
Parrot ASTEROID Mini avec un
périphérique de type iPod / USB / SD, ou si
vous utilisez une application musicale
compatible avec cette fonction.
Appuyez sur la touche sur la
1.
télécommande.
Enoncez le nom de l'artiste ou de
2.
l'album que vous souhaitez écouter
lorsque le Parrot ASTEROID Mini
vous y invite.
> La liste des sources audio
connectées au Parrot ASTEROID
Mini et des applications musique
compatibles avec la fonction
reconnaissance vocale contenant
l'artiste / album que vous avez choisi
apparait.
Note : Vérifiez les noms des artistes et
albums dans les tags (métadonnées) de vos
fichiers musicaux. Ceux-ci peuvent être
différents de ceux affichés dans le titre de
votre morceau.
43Français
Page 44

Utilisation avec un iPod
Connectez votre iPod au câble USB
1.
auquel la rallonge iPod est connectée.
Appuyez sur la touche SRC jusqu'à
2.
sélectionner iPod.
Sélectionnez un des critères de
3.
classement (artiste, album,
morceaux, playlist) et appuyez sur la
molette.
Sélectionnez un morceau et appuyez
4.
sur la molette.
Note : Appuyez sur la touche et
sélectionnez la première lettre de votre
artiste, album ou morceau pour naviguer
plus facilement dans le contenu de votre
44 Français
iPod.
Utilisation avec une clé USB
Le Parrot ASTEROID Mini est compatible
avec la majorité des clés USB / baladeurs
MP3 / disques dur externes. Il n’existe
aucune restriction au niveau de la capacité
des clés USB.
Les fichiers musicaux sur votre clé USB
peuvent être au format MP3 (mpeg1
layer3), AAC, WAV, OGG ou WMA.
Connectez votre périphérique USB
1.
sur le câble USB.
Appuyez sur la touche SRC jusqu'à
2.
sélectionner USB.
Sélectionnez un des critères de
3.
classement (artiste, album,
morceaux, playlist) et appuyez sur la
molette.
Sélectionnez un morceau et appuyez
4.
sur la molette.
Note : Appuyez sur la touche et
sélectionnez la première lettre de votre
artiste, album ou morceau pour naviguer
plus facilement dans le contenu de votre clé
USB.
Utilisation avec une carte SD
Vous pouvez utiliser les cartes SD
suivantes (avec adaptateur si nécessaire)
avec le Parrot ASTEROID Mini : SD, micro
Page 45

SD , mini SD, SDHC, mini SDHC, micro
SDHC. La capacité de la carte SD ne doit
pas dépasser 32Go.
Les fichiers musicaux sur votre carte SD
peuvent être au format MP3 (mpeg1
layer3), AAC, WAV, OGG ou WMA.
Insérez la carte SD dans
1.
l’emplacement prévu à cet effet, situé
sur le côté droit de l'écran (schéma E
p.12).
Appuyez sur la touche SRC jusqu'à
2.
sélectionner SD.
Sélectionnez un des critères de
3.
classement (artiste, album,
morceaux, playlist) et appuyez sur la
molette.
Sélectionnez un morceau et appuyez
4.
sur la molette.
Note : Appuyez sur la touche et
sélectionnez la première lettre de votre
artiste, album ou morceau pour naviguer
plus facilement dans le contenu de votre
carte SD.
Utilisation avec un lecteur audio Bluetooth
Note : Le Parrot ASTEROID Mini vous permet
d’utiliser la fonction téléphonie et
streaming audio via Bluetooth avec 2
téléphones différents, sans avoir à
déconnecter l’un des 2 appareils.
Vous pouvez utiliser le Parrot ASTEROID
Mini pour écouter des fichiers musicaux
stockés sur un lecteur audio Bluetooth, si
celui-ci supporte le profil A2DP
(Advanced Audio Distribution Profile).
Si vous utilisez le lecteur audio pour la
1ère fois, vous devez tout d’abord
l'appairer au Parrot ASTEROID Mini. Si le
lecteur audio est déjà appairé au Parrot
ASTEROID Mini :
Appuyez sur la touche SRC jusqu’à
1.
sélectionner Bluetooth Audio.
Lancez la lecture d’un morceau sur
2.
votre lecteur audio.
45Français
Page 46

Internet
Connexion avec une clé 3G / 4G
Note : Consultez la section compatibilité du
Parrot ASTEROID Mini sur notre site web
pour afficher la liste des clés 3G / 4G
compatibles avec le Parrot ASTEROID Mini.
Connectez une clé 3G au Parrot
1.
ASTEROID Mini par l’intermédiaire
d’un câble USB.
> Un pop-up apparait.
Sélectionnez OK pour activer la
2.
connexion 3G.
> Un pop-up Etat de la connexion 3G
apparait, suivie d'une autre pop-up
vous demandant votre code PIN.
46 Français
Entrez votre code PIN en utilisant la
3.
molette puis sélectionnez OK.
Cochez l'option Mémoriser le code
PIN si vous préférez que le code PIN
ne vous soit pas demandé à chaque
redémarrage du Parrot ASTEROID
Mini.
Note: Vous pourrez par la suite modifier ce
réglage en sélectionnant
Résea u > Clé 3G
Sélectionnez votre APN (Access
4.
Point Name) dans la liste proposée.
Cette information est disponible dans
la documentation fournie avec votre
clé 3G. Si votre APN ne figure pas
dans la liste, vous pouvez l'ajouter en
sélectionnant Paramètres > Réseau >
.
Pa ra mètres >
Clé 3G > Configuration > Nouveau
point d'accès.
> Le message "Clé 3G configurée"
apparait.
Patientez environ 30 secondes
5.
jusqu'à ce que la connexion soit
établie. Vous pouvez également
appuyer sur la touche et naviguer
dans les menus pendant que la
connexion s'établit.
Partage de connexion 3G via Bluetooth
Si vous disposez d’un téléphone
supportant le profil
Up Networking) ou PAN (Personal Area
Network), la connexion via
votre téléphone au Parrot ASTEROID Mini
Bluetooth
DUN (Dial-
Bluetooth
de
Page 47

vous permettra de partager la connexion
3G du téléphone.
Note : Consultez la page compatibilité sur
notre site web pour vérifier si votre
téléphone permet le partage de connexion
3G via Bluetooth et consulter la procédure
correspondante : www.parrot.com/fr/
compatibility.
Connectez votre téléphone au Parrot
1.
ASTEROID Mini via Bluetooth.
Sur le Parrot ASTEROID Mini,
2.
sélectionnez Paramètres > Réseau >
Bluetooth > Configuration.
Sélectionnez votre APN (Access
3.
Point Name) dans la liste proposée
puis cochez l'option Sélectionner.
Appuyez sur la touche et
4.
sélectionnez Connecter.
Autorisez le partage de connexion sur
5.
votre téléphone. Cette procédure
diffère selon le modèle de votre
téléphone.
Partage de connexion 3G via USB
Note : Consultez la page compatibilité sur
notre site web pour vérifier si votre
téléphone permet le partage de connexion
3G via USB et consulter la procédure
correspondante : www.parrot.com/fr/
compatibility.
Assurez-vous que le clavier de votre
1.
téléphone est déverrouillé.
Connectez le téléphone au Parrot
2.
ASTEROID Mini en utilisant le câble
USB / micro-USB fourni avec votre
téléphone. Vous pouvez également
le connecter en utilisant la rallonge
USB fournie avec le Parrot
ASTEROID Mini. Cette connexion
permet également de recharger la
batterie de votre téléphone.
Sélectionnez votre APN (Access
3.
Point Name) dans la liste proposée
puis cochez l’option Sélectionner.
Vous pourrez par la suite modifier ce
réglage en sélectionnant Paramètres
> Réseau > USB.
> Un pop-up indiquant l’activation du
partage de connexion USB apparait.
47Français
Page 48

ASTEROID Market : Utiliser les applications
Vous avez la possibilité d'utiliser plusieurs
types d'applications avec le ASTEROID
Market : musique, géolocalisation, aide à la
conduite.
Les applications disponibles sont
différentes selon le pays d'utilisation.
Certaines applications peuvent nécessiter
un abonnement.
Le Parrot ASTEROID Mini est
multitâches : plusieurs applications
peuvent être utilisées en même temps.
Vous pouvez par exemple écouter une
Webradio et utiliser une application d'aide
à la conduite en même temps.
Pour plus d'informations sur l'utilisation
48 Français
des applications disponibles, consultez la
page web de l'ASTEROID Market :
www.parrotasteroid.com/
asteroidmarket.
En cas de problème
Avant de commencer
Assurez-vous que le message “Au revoir”
apparait bien sur l’écran du Parrot
ASTEROID Mini lorsque vous coupez le
contact du véhicule. Consultez la section
Vérifier l’i nsta lla ti on
d’informations.
Réinitialisez l’appareil. Pour cela,
sélectionnez Paramètres > Paramètres
avancés > Réinitialiser.
Vérifiez que vous avez la dernière mise à
jour sur le Parrot ASTEROID Mini. Pour
cela, sélectionnez Paramètres > A propos
> Version. Comparez ce numéro de
pour plus
Page 49

version avec celui indiqué sur la page
support du Parrot ASTEROID Mini sur
notre site web www.parrot.com.
Problème liés à la fonction téléphonie
Consultez la page compatibilité de notre
site web pour vérifier si votre téléphone
est compatible avec le Parrot ASTEROID
Mini.
Si votre téléphone est indiqué compatible,
et si votre Parrot ASTEROID Mini dispose
déjà de la dernière mise à jour, supprimez
l'appairage entre les 2 appareils sur le
Parrot ASTEROID Mini et sur votre
téléphone, redémarrez les 2 appareils puis
réétablissez la connexion entre les 2
appareils.
Problèmes liés à la fonction musique
Réinitialisez votre iPod / iPhone avant de
le reconnecter au Parrot ASTEROID Mini.
Pour réinitialiser un iPod / iPhone (cette
procédure n’effacera aucune donnée):
iPod : appuyer simultanément sur
Menu et sur le bouton central jusqu’à
ce que l’iPod redémarre.
iPhone / iPod touch : appuyer
simultanément sur le bouton On/Off
et le bouton Home jusqu’à ce que
l’iPhone redémarre. Ne touchez pas
l’écran quand le message “Slide to
shutdown“ apparaît.
Certains problèmes peuvent apparaitre si
le périphérique est déjà connecté au
Parrot ASTEROID Mini lorsque vous
mettez le contact. Réessayez en
connectant le périphérique après avoir mis
le contact.
Pour plus d'informations
Consultez la FAQ disponible sur la page
support du Parrot ASTEROID Mini.
49Français
Page 50

Informations générales
Garantie
Sans préjudice de la garantie légale et de
l’application des articles L.211-4, L.211-5 et
L.211-12 du code de la consommation et
des articles 1641 à 1646 du code civil
français, PARROT garantit
contractuellement pendant une durée de
12 mois à compter de la date d’achat initial
effectué par le consommateur (sauf
pièces d’usure garanties 6 mois), que le
produit est exempt de défaut de matériaux
et de fabrication, sur présentation de la
preuve d’achat (date, lieu d’achat, n° de
série du produit) au revendeur ou à Parrot.
Pendant la durée de garantie
50 Français
contractuelle, le produit défectueux devra
être retourné dans son emballage d’origine
auprès du service après-vente du
revendeur. Après inspection du produit,
Parrot procèdera, à son choix, au
remplacement ou à l’émission d’un avoir à
l’exclusion de tout autre
dédommagement.
La garantie ne couvre pas la mise à jour des
logiciels inclus dans les produits Parrot
avec des téléphones mobiles Bluetooth à
des fins de compatibilité, la récupération
de données, la détérioration extérieure
due à une usure normale du produit, tout
dommage causé par accident, une
utilisation anormale ou non autorisée du
produit, un produit non Parrot.
Parrot n’est pas responsable du stockage,
de la perte ou de l’endommagement des
données durant le transport ou la
réparation. Tout produit s’avérant non
défectueux sera retourné à l’expéditeur et
les frais de traitement, de vérification et
de transport lui seront facturé.
Modifications
Les explications et spécifications
contenues dans ce guide utilisateur ne
sont fournies qu’à titre d’information et
peuvent être modifiées sans notification
préalable. Ces informations sont correctes
au moment de l’impression et le plus grand
soin est apporté lors de leur rédaction afin
de vous fournir des informations les plus
Page 51

précises possible.
Cependant, Parrot S.A. ne saurait être
tenu responsable, directement ou indi
rectement, des éventuels préjudices ou
pertes de données accidentelles résultant
d’une erreur ou omission au sein du
présent document. Parrot S.A. se réserve
le droit d’amender ou améliorer le produit
ainsi que son guide utilisateur sans aucune
restriction ou obligation de prévenir
l’utilisateur. Dans le cadre de l’attention
portée par Parrot S.A. sur l’amélioration de
nos produits, il est possible que le produit
que vous avez acheté diffère légèrement
de celui décrit au sein du présent
document. Dans ce cas, vous pourrez
éventuellement trouver une nouvelle
version du guide utilisateur au format
électronique sur le site www.parrot.com.
Comment recycler ce produit - Déchets
d’équipements électriques et
électroniques
Le symbole sur le produit ou sa
documentation indique qu’il ne doit pas
être éliminé en fin de vie avec les autres
déchets ménagers. L’élimination
incontrôlée des déchets pouvant porter
préjudice à l’environnement ou à la santé
humaine, veuillez le séparer des autres
types de déchets et le recycler de façon
responsable. Vous favoriserez ainsi la
réutilisation durable des ressources
matérielles. Les particuliers sont invités à
contacter le distributeur leur ayant vendu
le produit ou à se renseigner auprès de
leur mairie pour savoir où et comment ils
peuvent se débarrasser de ce produit afin
qu’il soit recyclé en respectant
l’environnement. Les entreprises sont
invitées à contacter leurs fournisseurs et à
consulter les conditions de leur contrat de
vente. Ce produit ne doit pas être éliminé
avec les autres déchets commerciaux.
Marques déposées
Parrot, les logos Parrot sont des marques
enregistrées de PARROT SA en France et
dans d’autres pays.
51Français
Page 52

Le nom et le logo Bluetooth sont des
marques déposées de Bluetooth SIG, Inc.
et toute utilisation de ces derniers par
Parrot S.A. est faite sous licence.
iPod et iPhone sont des marques d’Apple,
Inc. déposées aux États-Unis et dans
d’autres pays.
"Made for iPod / iPhone" signifie qu'un
accessoire électronique a été
spécialement conçu pour se connecter,
respectivement, avec un iPod ou un
iPhone et est certifié par le concepteur
comme répondant aux normes de
performance d'Apple. Apple décline toute
responsabilité relative au fonctionnement
de ces accessoires ou à leur conformité
aux normes réglementaires et de sécurité.
52 Français
Le nom « Gracenote », le logo Gracenote,
le graphisme Gracenote, la mention
« Powered by Gracenote » sont des
marques ou des marques déposées de
Gracenote aux États-Unis et/ou dans
d’autres pays.
Toutes les autres marques de commerce
et marques déposées mentionnées dans
le présent document sont protégées par
Copyright et sont la propriété de leurs
propriétaires respectifs.
Déclaration de conformité pour le CE
Parrot SA, 174 quai de Jemmapes, 75010
Paris, France, déclare sous son unique
responsabilité que le produit décrit dans
le présent guide utilisateur est en
conformité avec les normes techniques
EN300328 (v1.8.0), EN301489-1/-17
(v2.1.1), EN300220-2 (V2.3.1), EN609501: 04/2006 / A11: 2009 / A1 : 2010 / A2 :
2011, suivant les dispositions de la
directive R&TTE 1999/5/EC, ainsi qu’avec
les exigences de la directive EMC
2004/108/CE, de la directive 2006/95/CE
relative aux appareils à basse tension et de
la directive Automobile 72/245/CEE
amendée par la directive 2009/19/CE.
Le présent appareil est conforme aux CNR
d'Industrie Canada applicables aux
appareils radio exempts de licence.
L'exploitation est autorisée aux deux
Page 53

conditions suivantes : (1) l'appareil ne doit
pas produire de brouillage, et (2)
l'utilisateur de l'appareil doit accepter tout
brouillage radioélectrique subi, même si le
brouillage est susceptible d'en
compromettre le fonctionnement.
Cet appareil est conforme aux limites
d’exposition au rayonnement RF stipulées
par la FCC et l’IC pour une utilisation dans
un environnement non contrôlé. Les
antennes utilisées pour cet émetteur
doivent être installées et doivent
fonctionner à au moins 20 cm de distance
des utilisateurs et ne doivent pas être
placées près d’autres antennes ou
émetteurs ou fonctionner avec ceux-ci.
Les installateurs doivent s’assurer qu’une
distance de 20 cm sépare l’appareil (à
l’exception du combiné) des utilisateurs.
Parrot S.A.
RCS Paris 394 149 496
Copyright © 2012 Parrot. Tous droits
réservés
53Français
Page 54

54
Page 55

Guía de utilización
rápida
Antes de comenzar
Instalación
Primera utilización
Teléfono
Música
Internet
En caso de problema
Información general
p.55
p.56
p.62
p.64
p.65
p.68
p.70
p.72
Antes de comenzar
Índice
A propósito de este manual
Con el fin de limitar nuestro consumo de
papel y como parte de nuestra actuación lo
más responsable y respetuosa posible con
el medio ambiente, Parrot prefiere poner
en línea los documentos para los usuarios
en lugar de imprimirlos.
Este manual simplificado del Parrot
ASTEROID Mini se limita por tanto a
aportarle las principales instrucciones que
le permitirán utilizar el aparato con
facilidad. Podrá encontrar más información
en la sección Apoyo al cliente de nuestra
página web www.parrot.com: manual
55Español
Page 56

completo, preguntas frecuentes,
softwares didácticos...
Nota: En este manual, se utiliza el término
"iPod" para denominar tanto a iPod® como
a iPhone®.
Advertencia
Las funciones que requieran una atención
prolongada se deben utilizar únicamente
cuando detenido. Su seguridad y la de las
demás personas que circulan por la
carretera es más importante que las
llamadas telefónicas, la música o que las
instrucciones del GPS. Sea responsable:
conduzca con prudencia y preste atención
a su entorno. Parrot no asumirá ninguna
responsabilidad si usted opta por ignorar
56 Español
esta advertencia.
Actualización
Descargue gratis la última actualización del
producto en nuestra página web
www.parrot.com, sección Apoyo al
cliente. Las actualizaciones le permitirán
disfrutar de nuevas funciones y mejorar la
compatibilidad del producto.
Instalación
Nota: Le recomendamos que acuda a un
profesional para realizar esta instalación,
especialmente a alguno de nuestra red de
instaladores certificados.
Antes de comenzar
La instalación del Parrot ASTEROID Mini
consiste en su instalación entre la radio y
el vehículo.
Nota: Los cables incluidos con el Parrot
ASTEROID Mini van equipados con
conectores ISO. Si la radio no viniera
equipada con conectores ISO, deberá
comprar un cable adaptador ISO para
facilitar el montaje. Consulte la sección
Page 57

Compatibilidad de vehículos en la página
de soporte del Parrot ASTEROID Mini para
comprobar si necesita un cable adaptador.
Empiece retirando la radio del vehículo. Se
pueden necesitar llaves de extracción para
realizar esta operación.
Consulte el esquema eléctrico de
cableado de la radio del vehículo.
Antes de instalar los distintos elementos
del Parrot ASTEROID Mini, revise la
longitudes de los cables para comprobar
que se han elegido de manera que las
longitudes de los cables sean suficientes
para conectar las distintas piezas entre sí.
Cerciórese de que los cables del Parrot
ASTEROID Mini no quedan doblados o
pinzados tras la instalación.
Utilice obligatoriamente el cable ISO
suministrado con el Parrot ASTEROID
Mini.
Las indicaciones "Conexión #" en las
secciones siguientes corresponden a las
conexiones representadas en los
esquemas de la p.6 / 7.
Conexión del cable de audio
Conecte el mazo de cables de audio del
vehículo a los conectores del Parrot
ASTEROID Mini (Conexiones 1A y 2).
Si el vehículo tiene un sistema de audio
con amplificador, utilice las salidas Jack
Line Out Front y Line Out Rear de la caja
electrónica para evitar problemas de
saturación (chasquido en los altavoces,
soplo permanente, etc.). Conecte estas
salidas Line Out a su sistema de audio
utilizando uno o dos cables jack para
conectar el Parrot ASTEROID Mini a su
sistema de audio (Conexión 1B en el
esquema de la p.7).
Conexión del cable de alimentación
Desconecte la batería antes de instalar
1.
el cable de alimentación.
Conecte el conector ISO macho del
2.
Parrot ASTEROID Mini a la radio
(conexión 3).
Conecte el mazo de cables de
3.
57Español
Page 58

alimentación del vehículo al conector
ISO hembra del Parrot ASTEROID Mini
(conexión 4).
El cable rojo del cable debe estar
conectado a los +12V permanentes, el
cable naranja a los 12V después del
contacto y el cable negro a masa.
Compruebe que el cable naranja esté
conectado a bajo contacto/llave. De lo
contrario, podría descargar la batería del
coche.
Nota: Para proceder a la verificación de la
instalación, conecte primero la pantalla sin
insertarla en el salpicadero. Consulte la
sección Comprobar la instalación para más
información.
58 Español
Algunos vehículos no tienen toma de +12V
después de contacto en los conectores del
vehículo. En estos casos, se debe conectar
el cable de alimentación naranja a la caja de
fusibles o a otra fuente de alimentación
después de contacto.
Conexión del cable Mute
La función Mute permite interrumpir el
sonido de la radio para dejar paso al sonido
del Parrot ASTEROID Mini (música,
comunicaciones, etc.). La elección de la
entrada Mute (Mute in 1, mute in 2 o mute
in 3) depende de la configuración de la
radio. Localice la entrada Mute y conéctela
al cable amarillo libre en el cable ISO
(conexión 5).
Instalación de la caja electrónica
Evite instalar la caja cerca de la calefacción
o de la climatización o en un lugar
expuesto al sol.
Asegúrese de que la caja queda inmóvil
tras su instalación. Procure dejar espacio
libre alrededor del disipador del producto
para facilitar la evacuación del calor.
Una vez instalada la caja electrónica, no
ejerza fuerza al volver a montar la radio en
su sitio. Si no hay suficiente espacio detrás
de la radio, la alternativa puede ser
desmontar la guantera.
Atención: No toque la centralita mientras
se encuentra en funcionamiento. La
temperatura de la superficie puede ser alta.
Page 59

Comprobar la instalación
La antena GPS de la mochila se
encuentra del lado en el que se
puede leer "Parrot ASTEROID
GPS" y donde figura el logo en
Encienda y corte el contacto del vehículo
una vez que el Parrot ASTEROID Mini esté
instalado: el mensaje "Adiós" debe
aparecer en la pantalla.
Si no ocurre esto, deberá invertir las
posiciones del cable rojo y el naranja. El
cable rojo de la alimentación debe estar
conectado a los 12V permanentes, el cable
naranja a los 12V después del contacto y el
cable negro a masa. Esta operación se
realiza fácilmente invirtiendo los dos
terminales del cableado Parrot (conexión
7).
Instalación del micrófono
Se aconseja pasar el cable por la canaleta
que está por detrás de la junta de la
puerta.
Si el cable pasa por encima de los pedales,
asegúrese de que quede bien sujeto.
Advertencia: No pase el cable del micrófono
por los sistemas de calefacción, ventilación
o climatización o por delante de los airbags
laterales.
Asegúrese de que el micrófono quede
colocado lo más cerca posible de la cabeza
del usuario. La distancia ideal es de 60 cm.
Instale el micrófono preferentemente
cerca del retrovisor interior.
Oriente el micrófono hacia la boca del
usuario.
Instalación del dongle GPS
Instale la mochila GPS en una superficie
plana, en una zona libre de obstáculos en
el interior del habitáculo.
Los parabrisas térmicos y las lunas con
antena integrada pueden interferir con la
recepción GPS y reducir la fiabilidad de los
datos relacionados con las aplicaciones de
navegación.
59Español
Page 60

forma de estrella. Este logo
siempre debe quedar
orientado hacia el cielo.
Si su vehículo dispone de parabrisas
atérmico, instale la mochila GPS en el
parabrisas, a la altura de la zona no
atérmica. El lado en el que figura el logo en
forma de estrella debe pegarse en el
parabrisas (esquema B p.9).
Nota: La zona no atérmica del parabrisas
puede variar según el modelo de vehículo.
Normalmente suele estar a la altura del
retrovisor.
Si su vehículo no dispone de parabrisas
atérmico, instale la mochila GPS en el
cuadro de mandos. El lado en el que figura
60 Español
el logo en forma de estrella debe quedar
visible (esquema A p.8).
Para garantizar una buena fijación del
soporte:
limpie la superficie de montaje antes
de pegar el soporte;
tras la fijación del soporte, espere
unas dos horas sin manipularlo.
Installation de los cables USB
Conecte los cables USB al Parrot
ASTEROID Mini. Le recomendamos que
conecte todos los cables del Parrot
ASTEROID Mini, aunque no haya previsto
utilizarlos. Haga salir los conectores
correspondientes de la bandeja o de la
guantera. Para ello, puede ser necesario
hacer un agujero dentro del salpicadero.
Evite utilizar alargadores USB siempre que
sea posible.
Para garantizar una calidad de recepción
óptima, no conecte su pendrive 3G
directamente al Parrot ASTEROID Mini,
utilice un cable USB para instalar el
accesorio en el salpicadero (u otra zona
despejada).
Instalación de la pantalla
Advertencia: Evite realizar una instalación
que pueda obstaculizar el uso de los
mandos importantes o pueda reducir la
visibilidad del conductor. No instale la
pantalla donde pueda ser propulsada por
Page 61

la apertura de un airbag o cerca de una
boca de aireación o de aire acondicionado
del vehículo.
Pegue el soporte de plástico en el cuadro
de mandos (esquema C p.10).
Para garantizar una buena fijación del
soporte:
limpie la superficie de montaje antes
de pegar el soporte;
tras la fijación del soporte, espere
unas dos horas sin manipularlo.
Para evitar riesgos de robo y de exposición
prolongada al sol, no olvide retirar la
pantalla al abandonar el vehículo.
Instalación del mando a distancia
Pegue el soporte del mando a distancia en
el cuadro de mandos utilizando el adhesivo
situado en la cara inferior del mismo.
Para garantizar una buena fijación del
soporte:
limpie la superficie de montaje antes
de pegar el soporte;
tras la fijación del soporte, espere
unas dos horas sin manipularlo.
El mando a distancia puede funcionar con
dos tipos de alimentación: con una pila o
conectándolo a la caja electrónica.
Para hacer funcionar el mando con pila
(esquema D p.11) :
Retire la pieza de plástico circular en
1.
la cara posterior del mando a distancia
girándola en sentido de las agujas de
un reloj.
Introduzca una pila de tipo 3V CR2032
2.
en el alojamiento previsto para ello.
Asegúrese de que la pila está
correctamente orientada.
Vuelva a colocar la pieza de plástico
3.
circular haciéndola girar en sentido
contrario al de las agujas de un reloj.
Para conectar el mando a distancia a la caja
electrónica (esquema D p.11) :
Retire la pieza de plástico circular en
1.
la cara posterior del mando a distancia
girándola en sentido de las agujas de
61Español
Page 62

un reloj.
Conecte el cable en la zona prevista
2.
para el alojamiento de la pila y gírelo
en sentido contrario al de las agujas
de un reloj.
Conecte el otro extremo del cable a la
3.
caja electrónica, junto a los
conectores USB (esquema p.6).
62 Español
Primera utilización
Navegar en los menús
Pulse el botón para acceder al menú
principal.
Navegue en los menús girando la rueda y
valide pulsando el botón central del Parrot.
Para volver al menú anterior, pulse el
botón .
Pulse el botón para acceder al menú de
contexto, correspondiente a la aplicación
que se está utilizando.
Mientras se está leyendo un archivo de
música, pulse el botón para volver al
menú. Al contrario, cuando esté
navegando en los menús, pulse el botón
SRC para volver al lector.
Pulse el botón durante 2 segundos para
visualizar las últimas 6 aplicaciones
utilizadas o en uso actual.
Pulse el botón SRC para seleccionar la
fuente de procedencia de los archivos de
audio.
Conectar un teléfono móvil
Nota: Consulte la página de
compatibilidad de nuestra página web
para verificar si su teléfono es compatible
con el Parrot ASTEROID Mini y consultar el
procedimiento de emparejamiento
correspondiente: www.parrot.com/es/
compatibility.
Page 63

Si es la primera vez que utiliza el teléfono
con el Parrot ASTEROID Mini, primero
deberá emparejar ambos aparatos. Una vez
emparejado el teléfono con el Parrot
ASTEROID Mini, la conexión entre los dos
aparatos será automática en cuanto los dos
aparatos estén encendidos y a proximidad
con la función
Desde su teléfono, inicie una
1.
búsqueda de periféricos
Bluetooth
activada.
Bluetooth®
continuación, seleccione "Parrot
ASTEROID Mini".
El procedimiento de enlace depende
2.
del modelo de teléfono:
- Si el teléfono le solicita el código
PIN
Bluetooth
, introduzca «0000».
- Si el Parrot ASTEROID Mini y el
teléfono muestran dos códigos,
compruebe si los códigos son
idénticos y confirme o invalide.
> La pantalla del Parrot ASTEROID
Mini indicará “teléfono enlazado".
Nota: En algunos teléfonos, deberá
autorizar la conexión al Parrot ASTEROID
Mini para permitir la conexión automática.
a
Consulte la guía de usuario de su teléfono
para más información.
Sincronizar la agenda del teléfono
Con la mayoría de teléfonos Bluetooth, la
agenda se sincroniza automáticamente en
la memoria del sistema. Cada vez que
modifique su agenda, la sincronización se
reiniciará automáticamente en la siguiente
conexión.
Advertencia: Sólo se sincronizan los
contactos guardados en la memoria del
teléfono. Si los contactos están guardados
en la memoria de la tarjeta SIM, deberá
transferirlos a la memoria del teléfono.
Consulte la guía de usuario de su teléfono
para más información.
Nota: En algunos teléfonos, deberá
autorizar la conexión al Parrot ASTEROID
Mini para permitir la conexión automática.
Consulte la guía de usuario de su teléfono
para más información.
La sincronización automática está limitada
a 5.000 contactos (o números de
63Español
Page 64
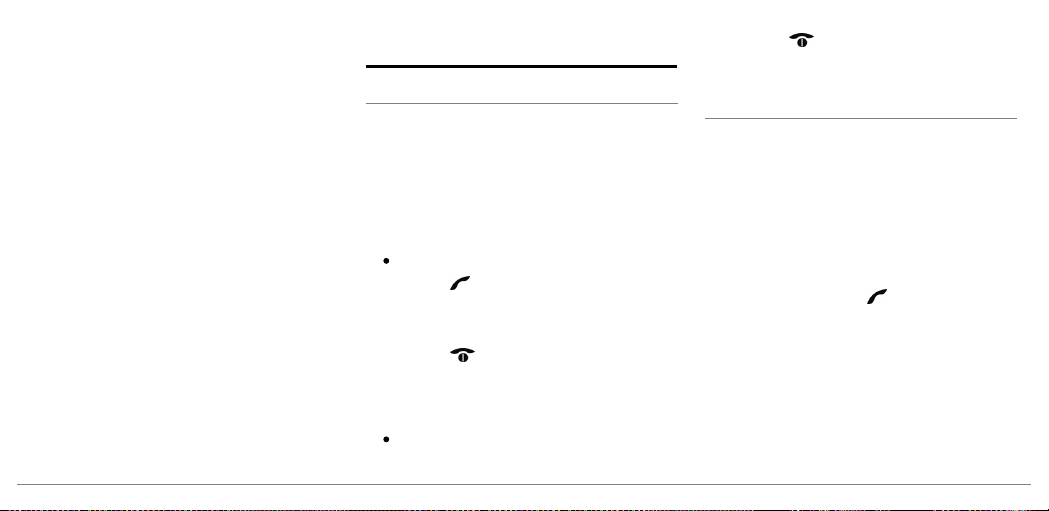
teléfono) por cada teléfono emparejado.
64 Español
Teléfono
Recibir una llamada
La llamada entrante se anuncia con una
melodía. Se anuncia el nombre del
contacto si el número de ese contacto está
guardado en la agenda del teléfono
conectado al Parrot ASTEROID Mini.
Para aceptar la llamada, pulse el
botón del mando a distancia o el
botón verde que aparece en la
pantalla. A continuación, pulse el
botón del mando a distancia o el
botón rojo de la pantalla para finalizar
la llamada.
Para rechazar la llamada, pulse el
botón del mando a distancia o el
botón rojo que aparece en la pantalla.
Hacer una llamada por reconocimiento de voz
Puede hacer una llamada por
reconocimiento de voz directamente
después de sincronizar la agenda del
teléfono. El Parrot ASTEROID Mini
reconocerá automáticamente el contacto
de su agenda al que desea llamar.
Pulse el botón para iniciar el
1.
proceso de reconocimiento de voz.
> El Parrot ASTEROID Mini le pedirá
el nombre del contacto al que desea
llamar.
Diga el nombre del contacto seguido
2.
Page 65

del tipo de número (“OFICINA”,
“MÓVIL”…) si el contacto tiene
varios números.
> La llamada a ese contacto se hará
automáticamente si la instrucción de
voz ha sido comprendida.
> En caso contrario, el sistema manos
libres emitirá un mensaje de
confirmación. Confirme diciendo
“SÍ”, “LLAMA” o “LLAMAR”.
Nota: En cualquier momento, puede pulsar
el botón del mando a distancia para
anular el procedimiento de llamada.
Música
Utilización del reconocimiento de voz
El reconocimiento de voz y la función de
reconocimiento de voz musical le permite
seleccionar los artistas o los álbumes que
desea escuchar. Esta función se encuentra
disponible cuando utiliza el Parrot
ASTEROID Mini con un periférico tipo
iPod/USB/SD, o si utiliza una aplicación
musical compatible con esta función.
Pulse el botón del mando a
1.
distancia.
Pronuncie el nombre del artista o del
2.
álbum que desea escuchar cuando el
Parrot ASTEROID Mini se lo indique.
> La lista de fuentes de audio
conectadas al Parrot ASTEROID Mini
y de aplicaciones de música
compatibles con la función de
reconocimiento de voz que contienen
el artista/álbum elegido se muestran
en pantalla.
Nota : Compruebe los nombres de los
artistas y álbumes en las etiquetas
(metadatos) de sus archivos de música. Ésta
puede diferir de lo que se muestra en el
título de la canción.
iPod
Coecte el iPod al cable iPod.
1.
pulse la tecla SRC hasta seleccionar
2.
65Español
Page 66

iPod.
Seleccione uno de los criterios de
3.
ordenación (artista, álbum, canción,
género, lista de reproducción) y pulse
la rueda de selección.
Seleccione la canción y pulse la rueda
4.
de selección.
Nota: Pulse el botón y seleccione la
primera letra de su artista, álbum o
canción para navegar más fácilmente por
el contenido de su iPod.
USB
El Parrot ASTEROID Mini es compatible
con la mayoría de memorias USB/
reproductores de MP3/discos duros
66 Español
externos.
No existe ninguna restricción de capacidad
de las memorias USB.
Los archivos de música de la memoria USB
pueden estar en formato MP3 (mpeg1
layer3), AAC, WAV, OGG o WMA.
Conecte su dispositivo USB al cable
1.
USB.
Pulse el botón SRC del mando a
2.
distancia y seleccione USB.
Pulse sobre la canción para iniciar la
3.
reproducción.
Seleccione uno de los criterios de
4.
ordenación (artista, álbum, canción,
género, lista de reproducción) y pulse
la rueda de selección.
Nota: Pulse el botón y seleccione la
primera letra del artista, álbum o canción
para navegar más fácilmente por el
contenido del periférico USB.
Tarjeta SD
Se pueden utilizar las siguientes tarjetas
SD (con adaptador según los casos) con el
Parrot ASTEROID Mini : SD, micro SD,
mini SD, SDHC, mini SDHC, micro SDHC.
La capacidad de la tarjeta SD no debe
superar los 32 Gb.
Los archivos de música de su tarjeta SD
pueden estar en formato MP3 (mpeg1
layer3), AAC, WAV, OGG o WMA.
Page 67

Inserte la tarjeta SD en el alojamiento
1.
previsto para ello situado (esquema E
p.12).
Pulse el botón SRC y seleccione SD.
2.
También puede pulsar en Explorar
para navegar por el contenido de su
tarjeta SD.
Seleccione uno de los criterios de
3.
ordenación (artista, álbum, canción,
género, lista de reproducción) y pulse
la rueda de selección.
Pulse sobre la canción para iniciar la
4.
reproducción.
Nota: Pulse el botón y seleccione la
primera letra del artista, álbum o canción
para navegar más fácilmente por el
contenido de su tarjeta SD.
Utilización con un lector de audio Bluetooth
Nota: El Parrot ASTEROID Mini le permite
utilizar la función de telefonía y flujo de
audio vía Bluetooth con dos teléfonos
distintos, sin tener que desconectar uno de
los dos aparatos.
Puede utilizar el Parrot ASTEROID Mini
para escuchar archivos de música
guardados en un lector de audio Bluetooth
si éste soporta el perfil A2DP (Advanced
Audio Distribution Profile).
Si utiliza el lector de audio por primera
vez, primero deberá vincularlo al Parrot
ASTEROID Mini. Si el lector de audio ya
está acoplado al Parrot ASTEROID Mini:
Pulse el botón SRC hasta seleccionar
1.
Bluetooth Audio.
Inicie la lectura de una canción en su
2.
lector de audio.
67Español
Page 68

Internet
Conexión con un dispositivo 3G / 4G
Nota: Consulte la sección de
compatibilidad del Parrot ASTEROID Mini
en nuestra página web para ver la lista de
dispositivos 3G compatibles con el Parrot
ASTEROID Mini.
Conecte un dispositivo 3G/4G al
1.
Parrot ASTEROID Mini a través del
cable USB.
>Aparecerá una ventana emergente
(pop-up).
Active la conexión 3G seleccionando
2.
OK.
Utilice la rueda para introducir su
3.
68 Español
código PIN y seleccione OK. Marque
la opción Memorizar si prefiere que
no se le pida el código PIN cada vez
que se encienda el Parrot ASTEROID
Mini.
Nota: Más adelante, podrá modificar este
ajuste seleccionando Ajustes > Inalámbrico
y redes > Ajustes de redes móviles.
Seleccione su APN (Access Point
4.
Name) en la lista que aparece. Esta
información se encuentra disponible
en la documentación facilitada con su
dispositivo 3G. Si su APN no figura en
la lista, puede añadirlo seleccionando
Parámetros > Red > Dispositivo 3G >
Configuración > Punto de acceso
personalizado > Nuevo punto de
acceso.
> Aparece el mensaje "Dispositivo 3G
configurado".
Espere unos 30 segundos mientras se
5.
establece la conexión. También
puede pulsar el botón y navegar por
los menús mientras se establece la
conexión.
Conexión vía Bluetooth
Si su teléfono soporta el perfil
DUN (Dial-Up Networking) o PAN
(Personal Area Network), la conexión vía
Bluetooth
ASTEROID Mini le permitirá compartir la
conexión 3G del teléfono.
del teléfono con el Parrot
Bluetooth
Page 69

Nota: Consulte la sección de
compatibilidad del Parrot ASTEROID Mini
en nuestra página web para ver la lista de
dispositivos 3G compatibles con el Parrot
ASTEROID Mini.
Autorice compartir la conexión en su
1.
teléfono. Este procedimiento puede
diferir según el modelo de móvil.
Conecte el teléfono al Parrot
2.
ASTEROID Mini vía
En el Parrot ASTEROID Mini,
3.
Bluetooth
.
seleccione Parámetros > Red >
Bluetooth > Configuración.
Seleccione su APN (Access Point
4.
Name) en la lista que aparece y
marque la opción Seleccionar.
Pulse el botón y seleccione
5.
Conectar.
Autorice la conexión compartida en
6.
su teléfono. Este procedimiento
puede variar según el modelo de
teléfono.
Compartir una conexión 3G vía USB
Nota: Consulte la página de
compatibilidad en nuestra web para
comprobar si su teléfono permite compartir
la conexión 3G vía USB y consultar el
procedimiento correspondiente:
www.parrot.com/es/compatibility.
Asegúrese de que el teclado de su
1.
teléfono está desbloqueado y
después conéctelo al Parrot
ASTEROID Mini utilizando un cable
USB/micro-USB. Esta conexión
también permite recargar la batería
del teléfono.
Seleccione su APN (Access Point
2.
Name) en la lista que aparece y
marque la opción Seleccionar. Más
adelante, podrá modificar este ajuste
seleccionando Parámetros > Red >
USB.
> Aparecerá una ventana emergente
(pop-up) indicando la activación de la
conexión compartida vía USB.
69Español
Page 70

ASTEROID Market:Utilizar las aplicaciones
Puede utilizar varios tipos de aplicaciones
con el ASTEROID Market : música,
geolocalización, ayuda a la conducción,
navegación embarcada y puntos de interés
conectados. Las aplicaciones disponibles
son diferentes según el país de utilización.
Algunas aplicaciones pueden necesitar
una suscripción.
El Parrot ASTEROID Mini es multitarea: se
pueden utilizar varias aplicaciones a la vez.
Por ejemplo, puede escuchar una Radio
por internet mientras utiliza una aplicación
de ayuda a la conducción.
Para más información sobre la utilización y
la instalación de las aplicaciones
70 Español
disponibles, consulte la página web del
soporte del ASTEROID Market :
www.parrotasteroid.com/asteroidmarket
En caso de problema
Antes de comenzar
Asegúrese de que, al cortar el contacto de
su vehículo, aparece en la pantalla del
Parrot ASTEROID Mini el mensaje
"Adiós". Consulte la sección Comprobar la
instalación para más información.
Reinicie el aparato. Para ello, seleccione
Preferencias > Preferencias Avanzadas >
Configuración Fábrica.
Compruebe que tiene instalada en el
Parrot ASTEROID Mini la última
actualización. Para ello, seleccione
Parámetros > Acerca de > Versión.
Compare este número de versión con el
Page 71

indicado en la página de soporte del Parrot
ASTEROID Mini en nuestra página web
www.parrot.com.
Función de telefonía
Compruebe la compatibilidad del teléfono
con el Parrot ASTEROID Mini. Para ello,
consulte la página de compatibilidad en
nuestra web: www.parrot.com/es/
compatibility.
Si su teléfono aparece como compatible y
si el Parrot ASTEROID Mini ya tiene la
última actualización, elimine el
emparejamiento entre los 2 aparatos en el
Parrot ASTEROID Mini y en su teléfono,
apague y vuelva a encender los 2 aparatos y
restablezca la conexión entre los mismos.
Función música
Reinicie el iPod/iPhone antes de volverlo a
conectar al Parrot ASTEROID Mini. Para
reiniciar un iPod/iPhone (el proceso no
borrará ningún dato):
iPod: pulse simultáneamente el
Menú y el botón central hasta que se
inicie de nuevo el iPod.
iPhone/iPod touch: pulse
simultáneamente el botón On/Off y
el botón Home hasta que el iPhone se
reinicie. No toque la pantalla cuando
aparezca el mensaje "Slide to
shutdown”.
Puede producirse algún problema si el
dispositivo ya está conectado al Parrot
ASTEROID Mini en el momento de poner
el contacto. Pruebe de nuevo conectando
el dispositivo una vez puesto el contacto.
Para más información
Consulte la página de soporte del Parrot
ASTEROID Mini en nuestra página web
www.parrot.com.
71Español
Page 72

Información general
Garantía
Sin perjuicio de la garantía legal, el
producto tienen una garantía contractual
de 12 meses desde la fecha de compra
inicial efectuada por el usuario, que cubre
cualquier defecto de materiales y de
fabricación presentando la prueba de
compra (ticket de caja, factura) al
distribuidor. Mientras esté vigente la
garantía contractual, el producto
defectuoso deberá ser devuelto en su
embalaje original al servicio posventa del
distribuidor. PARROT procederá, a su
elección, a la sustitución o la emisión de
un abono con exclusión de cualquier otra
72 Español
compensación. La garantía no cubre la
pérdida de datos, los daños causados por
accidente, un uso anormal o no autorizado
del producto o un producto que no sea
Parrot. Parrot no se responsabiliza del
almacenaje, pérdida o deterioro de los
datos durante el transporte o la
reparación. Cualquier producto
considerado no defectuoso será devuelto
al remitente y le serán facturados los
gastos de gestión, de comprobación y de
transporte.
Modificaciones
Las explicaciones y especificaciones
contenidas en este manual son
meramente informativas y pueden ser
modificadas sin previo aviso. Se
consideran correctas en el momento de
enviar la publicación a imprenta. Este
manual se ha redactado con el máximo
cuidado, con el fin de proporcionarle una
información precisa. Sin embargo, Parrot
no asume responsabilidad alguna por las
consecuencias derivadas de los errores u
omisiones que pueda haber en el manual,
ni por los daños o pérdidas accidentales de
datos que se produzcan como
consecuencia directa o indirecta del uso
de la información aquí contenida. Parrot se
reserva el derecho a modificar o mejorar el
diseño del producto o el manual de usuario
sin restricciones y sin la obligación de
notificárselo a los usuarios. En aras de
Page 73

actualizar y mejorar nuestros productos,
es posible que el producto que usted haya
adquirido sea ligeramente distinto al
modelo que se describe en este manual.
En tal caso, tiene a su disposición una
versión más reciente de este manual en
formato electrónico en la página web de
Parrot: www.parrot.com.
Eliminación correcta de este producto
(material eléctrico y electrónico de
descarte)
La presencia de esta marca en el producto
o en el material informativo que lo
acompaña, indica que al finalizar su vida
útil no deberá eliminarse junto con otros
residuos domésticos. Para evitar los
posibles daños al medio ambiente o a la
salud humana que representa la
eliminación incontrolada de residuos,
separe este producto de otros tipos de
residuos y recíclelo correctamente para
promover la reutilización sostenible de
recursos materiales. Los usuarios
particulares pueden contactar con el
establecimiento donde adquirieron el
producto, o con las autoridades locales
pertinentes, para informarse sobre cómo y
dónde pueden llevarlo para que sea
sometido a un reciclaje ecológico y seguro.
Los usuarios comerciales pueden
contactar con su proveedor y consultar las
condiciones del contrato de compra. Este
producto no debe eliminarse mezclado
con otros residuos comerciales.
Marcas registradas
Parrot y el logotipo Parrot son marcas
registradas de PARROT SA en Francia y en
otros países.
El nombre y el logo
Bluetooth
son marcas
registradas de Bluetooth ® SIG, Inc. y
Parrot S.A. utiliza estos últimos bajo
licencia.
“Made for iPod / iPhone” significa que un
aparato electrónico fue especialmente
diseñado para conectarse a un iPod o un
iPhone, respectivamente, y fue certificado
por un desarrollador con el fin de
satisfacer los resultados estándares de
73Español
Page 74

Apple. Apple no es responsable del
funcionamiento de este dispositivo o de
su conformidad con las normas de
seguridad y regulatorios.
iPod y iPhone son marcas de Apple, Inc.
registradas en Estados Unidos y en otros
países.
Gracenote®, el logo y el logotipo de
Gracenote, y el logo "Powered by
Gracenote" son marcas registradas o
marcas comerciales de Gracenote, Inc. en
Estados Unidos y/o en otros países.
Todas las demás marcas comerciales y
marcas registradas citadas en el presente
documento están protegidas por Copyright
y son propiedad de sus respectivos
propietarios.
74 Español
Copyrights
Identification N. 394 149 496 R.C.S. PARIS
Parrot S.A.
Copyright © 2012 Parrot.
Page 75

Bedienungsanleitung
Bevor Sie beginnen
Installation
Erste Nutzung
Telefon
Musik
Internet
Bei Problemen
Allgemeine Hinweise
p.75
p.77
p.83
p.85
p.86
p.88
p.91
p.93
Inhalt
Bevor Sie beginnen
Zu diesem Leitfaden
Wir wollen unseren Papierverbrauch
einschränken und so
verantwortungsbewusst und
umweltfreundlich wie möglich handeln.
Daher zieht Parrot es vor, Dokumente für
die Benutzer im Internet zu
veröffentlichen,anstatt sie auszudrucken.
Diese vereinfachte Anleitung des Parrot
ASTEROID Mini beschränkt sich daher auf
die wichtigsten Anweisungen, damit Sie
dieses Gerät leicht benutzen können.
Weitere Angaben finden Sie im Bereich
Support auf unserer Website
www.parrot.com: Vollständige Anleitung,
75Deutsch
Page 76

häufige Fragen, Lernsoftware...
Hinweis: Aus Gründen der besseren
Leserlichkeit werden der iPod® und das
iPhone® (im Musikmodus) in dieser
Anleitung als „iPod“ bezeichnet.
Kompatible Telefone oder Tablet-Computer
werden als „Smartphone“ bezeichnet.
Warnhinweise
Funktionen, die Ihre Aufmerksamkeit für
längere Zeit in Anspruch nehmen, dürfen
nur bei stehendem Fahrzeug ausgeführt
werden. Ihre eigene Sicherheit und die der
anderen Verkehrsteilnehmer hat Vorrang
vor Telefonanrufen, Musik oder
Anwendungen zur Fahrhilfe. Seien Sie
verantwortungsvoll: Fahren Sie vorsichtig
76 Deutsch
und achten Sie auf Ihre Umgebung. Parrot
übernimmt keinerlei Haftung, falls Sie
beschließen, diese Warnung zu
ignorieren.
Nutzen Sie den Parrot ASTEROID Mini in
einer vernünftigen Lautstärke, so dass Sie
jederzeit während der Fahrt auch noch
Außengeräusche wahrnehmen können.
Update der Software
Das letzte Update Ihres Parrot ASTEROID
Mini können Sie kostenlos von unserer
Website www.parrot.com aus dem
Bereich Support herunter laden (und sich
gleichzeitig über das Update-Verfahren
informieren). Dank dieser Updates
können Sie neue Funktionen nutzen und
die Kompatibilität des Parrot ASTEROID
Mini verbessern.
Sie können Aktualisierungen auch
herunterladen wenn das Parrot
ASTEROID Mini mit dem Internet
verbunden ist. Die Verfügbarkeit wird in
der Informationsleiste angezeigt.
Page 77

Installation
Hinweis: Wir empfehlen, sich für die
Installation an einen Fachmann zu wenden,
insbesondere an eine Person aus dem Netz
der zugelassenen Installateure.
Vorbemerkung
Bei der Installation des Parrot ASTEROID
Mini muss das Gerät zwischen dem
Autoradio und dem Fahrzeug
angeschlossen werden.
Hinweis: Die mit dem Parrot ASTEROID Mini
mitgelieferten Kabel sind mit ISO-Steckern
versehen. Sollte Ihr Autoradio über keine
ISO-Stecker verfügen, müssen Sie sich für die
Montage ein ISO-Adapterkabel besorgen.
Schauen Sie auf der Support-Seite unter
"Kompatibilität Fahrzeuge" des Parrot
ASTEROID Mini , um die Notwendigkeit eines
Adapterkabels zu überprüfen.
Entfernen Sie zuerst das OriginalAutoradio aus Ihrem Fahrzeug. Dieser
Vorgang kann die Verwendung von
Ausbauschlüsseln erfordern.
Ziehen Sie den Schaltplan Ihres
Autoradios zu Rate.
Vor dem Befestigen der verschiedenen
Bauteile des Parrot ASTEROID Mini im
Fahrgastraum, schließen Sie die
verschiedenen Kabel an das
Elektronikgehäuse an. Vor dem
endgültigen Anschluss der Bauteile bitte
die Kabellänge kontrollieren und
überprüfen, dass die Einbauorte so
gewählt wurden, dass die Kabellänge zur
Verbindung der Einzelteile untereinander
ausreichend ist. Überprüfen Sie, dass die
Kabel des Parrot ASTEROID Mini nach der
Montage weder geknickt noch gequetscht
werden.
Verwenden Sie unbedingt das mit dem
Parrot ASTEROID Mini mitgelieferte ISOKabel.
Die Angaben "Verbindung #" in den
nächsten Abschnitten entsprechen den
abgebildeten Verbindungen in der
Abbildung auf S.6 / 7.
77Deutsch
Page 78

Anschluss des Audio-Kabels
Die Audio-Kabelbündel des Fahrzeugs an
die Stecker des Parrot ASTEROID Mini
anschließen (Verbindungen 1A und 2).
Wenn Ihr Fahrzeug mit einem AudioSystem mit Verstärker ausgestattet ist,
verwenden Sie die Jack Line Out Front
und Line Out Rear-Ausgänge des
Elektronikgehäuses, um
Sättigungsprobleme (Knacken der
Lautsprecher, permanentes Rauschen) zu
vermeiden. Verbinden Sie diese Line OutAusgänge mit Ihrem Audio-System mit
einem oder zwei Jack-Kabeln, um den
Parrot ASTEROID Mini mit Ihrem AudioSystem (Verbindung 1B in der Abbildung
S.7) zu verbinden.
78 Deutsch
Anschließen des Netzkabels
Die Batterie vor der Installation des
1.
Stromkabels abklemmen.
Den ISO-Stecker des Parrot
2.
ASTEROID Mini an das Autoradio
anschließen (Verbindung 3).
Die Kabelbündel für die
3.
Spannungsversorgung des Fahrzeugs
mit der ISO Buchse des Parrot
ASTEROID Mini verbinden
(Verbindung 4).
Die rote Kabelader muss der +12VDauerstromversorgung, die
orangenfarbige Ader der 12V-Versorgung
über Zündung und die schwarze Ader der
Masse entsprechen. Überprüfen Sie, dass
die orangenfarbige Kabelader nicht an die
12V Dauerstromversorgung angeschlossen
ist. Sonst besteht die Gefahr, die
Fahrzeugbatterie zu entladen.
Hinweis: Zur Überprüfung des Einbaus
zunächst das Display anschließen, ohne es
auf dem Armaturenbrett zu befestigen.
Weitere Angaben enthält der Abschnitt
"Prüfung der Installation".
An bestimmten Fahrzeugen gibt es an den
Steckern des Fahrzeugs keinen +12 VAnschluss über Zündung. In diesem Fall
muss die orangenfarbige Ader an den
Sicherungskasten oder an eine andere
Spannungsquelle über Zündung
angeschlossen werden.
Page 79

Anschluss des Mute-Kabels
Mit der Mute-Funktion können Sie den
Ton Ihres Autoradios für den Ton des
Parrot ASTEROID Mini unterbrechen
(Musik, Gespräche usw.). Die Wahl des
Mute-Eingangs (Mute in 1, Mute in 2 oder
Mute in 3) hängt von der Konfiguration
Ihres Autoradios ab. Suchen Sie den
Mute-Eingang und schließen Sie ihn an die
freie gelbe Kabelader des ISO-Kabels an
(Verbindung 5).
Montage des Elektronikgehäuses
Vermeiden Sie es, das Gehäuse neben der
Heizung, der Klimaanlage oder an einem
der Sonne ausgesetzten Ort zu
installieren.
Überprüfen Sie, ob das Gehäuse nach
dem Einbau fest sitzt. Achten Sie darauf,
dass um den Kühlkörper herum genügend
Platz ist, damit die Wärme besser
abgeleitet werden kann.
Bitte vorsichtig den Wiedereinbau des
Autoradios durchführen und nicht
gewaltsam vorgehen. Wenn hinter dem
Autoradio nicht genügend Platz für die
Elektronikbox vorhanden sein sollten,
dann kann auch ein Einbau in das
Handschuhfach in Betracht gezogen
werden.
Prüfung der Anlage
Dazu nach dem Einbau des Parrot
ASTEROID Mini die Zündung des
Fahrzeugs einschalten und anschließend
ausschalten: Die Mitteilung " Auf
Wiedersehen " muss im Display
erscheinen.
Ist das nicht der Fall, müssen die
Anschlüsse der roten und der
orangefarbenen Kabelader vertauscht
werden. Die rote Ader des Stromkabels
muss mit dem 12 V Dauerstrom, die
orangefarbene mit den 12 V über die
Zündung und die schwarze mit der Masse
verbunden werden. Dazu brauchen nur die
beiden Kabelschuhe der ParrotVerkabelung vertauscht zu werden
79Deutsch
Page 80

(Verbindung 7).
Die GPS-Antenne des
Empfängers befindet sich auf
der Seite, wo "Parrot
ASTEROID GPS" steht und
sich das sternförmige Logo
befindet. Dieses Logo muss
immer zum Himmel zeigen.
Installation des Doppel-Mikrofons
Wir empfehlen, das Kabel entlang der
Vertiefung der Türdichtung zu führen.
Wenn das Kabel oberhalb der Pedalen
verläuft, darauf achten, dass es richtig
befestigt ist.
Hinweis: Das Mikrofonkabel darf nicht in
der Heizungs-, Belüftungs- oder
Klimaanlage oder vor den seitlichen
Airbags verlaufen.
Achten Sie darauf, dass das Mikrofon so
nah wie möglich in der Nähe des Kopfes
des Benutzers installiert ist. Die ideale
Entfernung beträgt 60 cm. Das Mikrofon
80 Deutsch
wird am Besten in der Nähe des
Rückspiegels im Innenraum angebracht.
Das Mikrofon auf den Mund des
Benutzers ausrichten.
Installation des GPS-Dongle
Befestigen Sie den GPS-Dongle im
Inneren der Fahrgastzelle auf einer
ebenen Oberfläche in einem Bereich ohne
Hindernisse.
Die athermischen Windschutzscheiben
und Fensterscheiben, mit integrierter
Antenne, können mit dem GPS-Empfang
interferieren und die Zuverlässigkeit, der
mit den Navigationsanwendungen
verbundenen Informationen,
beeinträchtigen.
Wenn Ihr Fahrzeug eine athermische
Windschutzscheibe hat, befestigen Sie
den GPS-Dongle auf der Höhe des nichtathermischen Bereichs an der
Windschutzscheibe. Die Seite, auf der
sich das sternförmige Logo befindet, muss
auf die Windschutzscheibe geklebt
werden (Abbildung B S.9).
Hinweis: Wo sich der nicht-athermische
Page 81

Bereich der Windschutzscheibe befindet,
hängt vom Modell Ihres Fahrzeugs ab. Er
befindet sich im Allgemeinen auf der Höhe
des Rückspiegels.
Wenn Ihr Fahrzeug keine athermische
Windschutzscheibe hat, befestigen Sie
den GPS-Dongle am Armaturenbrett. Die
Seite, auf der sich das sternförmige Logo
befindet, muss sichtbar sein (Abbildung A
S.8).
Für die ordnungsgemäße Befestigung der
Halterung wie folgt vorgehen:
Die Montagefläche vor dem
Aufkleben der Halterung reinigen.
Nach der Befestigung der Halterung
ca. 2 Stunden warten.
Anbrigen die USB-Kabel
Schließen Sie die iPod®- und USB-Kabel
den Parrot ASTEROID Mini an. Wir
empfehlen, alle Kabel des Parrot
ASTEROID Mini anzuschließen, auch
wenn Sie nicht unbedingt planen, sie zu
verwenden. Führen Sie die
entsprechenden Steckverbindungen über
das Ablage- oder Handschuhfach heraus.
Um eine optimale Empfangsqualität zu
gewährleisten, schließen Sie Ihren 3GStick oder GPS-Dongle nicht direkt an den
Parrot ASTEROID Mini an: Verbinden Sie
das Zubehör mit einem USB-Kabel am
Armaturenbrett (oder einer anderen
übersichtlichen Stelle).
Montage des Displays
Achtung: Installieren Sie das Gerät nicht so,
dass die Nutzung wichtiger Befehle oder die
Sicht des Fahrers beeinträchtigt werden.
Installieren Sie das Display nicht dort, wo es
beim Auslösen eines Airbags
weggeschleudert werden könnte, und auch
nicht in der Nähe eines Lüftungsausgangs
des Fahrzeugs.
Kleben Sie die Kunststoffhalterung auf Ihr
Armaturenbrett (Schema C S.10).
Für die ordnungsgemäße Befestigung der
Halterung wie folgt vorgehen:
Die Montagefläche vor dem
Aufkleben der Halterung reinigen.
81Deutsch
Page 82

Nach der Befestigung der Halterung
ca. 2 Stunden warten.
Um Diebstahl und längerer
Sonnenexposition vorzubeugen,
empfehlen wir, das Display abzunehmen,
wenn Sie das Fahrzeug verlassen.
Installation der Fernbedienung
Kleben Sie die Halterung für die
Fernbedienung mithilfe des auf der
Rückseite der Halterung angebrachten
Klebebands auf Ihr Armaturenbrett.
Für die ordnungsgemäße Befestigung der
Halterung wie folgt vorgehen:
Die Montagefläche vor dem
Aufkleben der Halterung reinigen.
82 Deutsch
Nach der Befestigung der Halterung
ca. 2 Stunden warten.
Die Fernbedienung kann entweder mit
Batterien betrieben oder mit dem
Elektronikgehäuse verbunden werden.
Batteriebetrieb (Schema D S.11) :
Drehen Sie den runden
1.
Kunststoffverschluss auf der
Hinterseite der Fernbedienung im
Uhrzeigersinn, um ihn zu lösen.
Legen Sie eine Batterie 3V CR2032 in
2.
das dafür vorgesehene Fach ein.
Vergewissern Sie sich, dass die
Batterie richtig eingelegt ist.
Setzen Sie den runden
3.
Kunststoffverschluss wieder an
seinen Platz und drehen Sie ihn gegen
den Uhrzeigersinn, um das
Batteriefach zu verschließen.
Anschluss an das Elektronikgehäuse
(Schema D S.11) :
Drehen Sie den runden
1.
Kunststoffverschluss auf der
Hinterseite der Fernbedienung im
Uhrzeigersinn, um ihn zu lösen.
Schließen Sie das Kabel im
2.
Batteriefach an und drehen Sie es
gegen den Uhrzeigersinn.
Schließen Sie das andere Ende des
3.
Kabels an das Elektronikgehäuse
neben den USB-Anschlüssen an
(Schema S.6).
Page 83

Erste Nutzung
Menü-Navigation
Drücken Sie die Taste , um ins
Hauptmenü zu gelangen.
Drehen Sie zur Menü-Navigation am
Reglerrad und bestätigen Sie durch
Drücken der mittleren Parrot-Taste.
Um zum vorherigen Menü
zurückzukehren, drücken Sie die Taste .
Drücken Sie die Taste , um ins
Kontextmenü zu gelangen (je nach der
gerade benutzten Anwendung).
Drücken Sie während des Abspielens
einer Musikdatei die Taste , um zu Menü
zurückzukehren. Umgekehrt gelangen Sie
bei der Menü-Navigation durch Drücken
der Taste „SOURCE“ zurück zum AbspielLaufwerk.
Drücken Sie 2 Sekunden lang die Taste ,
um die letzten 6 Anwendungen, die Sie
genutzt haben oder nutzen, anzuzeigen.
Drücken Sie die Taste SRC, um die Quelle
Ihrer Audio-Dateien auszuwählen.
Kopplung Ihres Bluetooth-Mobiltelefons
Hinweis: Prüfen Sie auf unserer Website
unter dem Thema „Kompatibilität“, ob Ihr
Telefon mit dem Parrot ASTEROID Mini
kompatibel ist, und beachten Sie die
jeweilige Zuordnungsmethode:
www.parrot.com/de/compatibility.
Wenn Sie zum ersten Mal ein Telefon mit
dem Parrot ASTEROID Mini nutzen, dann
müssen Sie zunächst die beiden Gerät
zuordnen. Wenn Ihr Telefon dem Parrot
ASTEROID Mini zugeordnet ist, dann
erfolgt die Verbindung beider Geräte
automatisch, sobald die beiden Geräte
nicht weit voneinander entfernt
eingeschaltet werden und die
Funktion aktiviert ist.
Von Ihrem Telefon aus starten Sie
1.
eine Suche nach
Peripheriegeräten und wählen dann
"Parrot ASTEROID Mini" aus.
Das Kopplungsverfahren hängt vom
2.
Modell Ihres Telefons ab:
Bluetooth®-
Bluetooth®
83Deutsch
Page 84

Wenn Ihr Telefon Sie auffordert,
den Bluetooth-Pincode
einzugeben, geben Sie „0000“
ein.
Wenn der Parrot ASTEROID
Mini und Ihr Telefon zwei Codes
anzeigen, prüfen Sie, ob diese
Codes identisch sind und
bestätigen Sie dies oder brechen
ab.
> Das Display des Parrot
ASTEROID Mini zeigt an:
"Kopplung erfolgreich".
Hinweis: Bei bestimmten Telefonen müssen
Sie die Herstellung der Verbindung mit dem
Parrot ASTEROID Mini für die automatische
84 Deutsch
Verbindungsherstellung gestatten. Nähere
Informationen entnehmen Sie bitte dem
Benutzerhandbuch Ihres Telefons.
Verwendung des Adressbuchs
Bei den meisten
Bluetooth
-Telefonen
werden die Kontakte im Speicher des
System automatisch synchronisiert. Nach
jeder Änderung Ihres Verzeichnisses wird
die Synchronisation bei der nächsten
Verbindung automatisch neu gestartet.
Achtung: Nur die im Speicher Ihres Telefons
erfassten Kontakte werden synchronisiert.
Wenn Ihre Kontakte im Speicher der SIMKarte abgelegt sind, müssen Sie sie in den
Speicher des Telefons transferieren. Nähere
Informationen entnehmen Sie bitte dem
Benutzerhandbuch Ihres Telefons.
Anmerkung: Je nach Modell Ihres
Telefongeräts werden Sie auf dem Telefon
gegebenenfalls aufgefordert, die
Übertragung des Verzeichnisses zu
bestätigen.
Die automatische Synchronisation ist auf
5000 Kontakte (oder Telefonnummern)
pro zugeordnetem Telefon begrenzt.
Page 85

Telefon
Anrufannahme
Ein eingehender Anruf wird durch einen
Klingelton angezeigt. Der Name des
Kontakts wird angesagt, wenn die
Nummer dieses Kontakts in dem mit dem
Parrot ASTEROID Mini verbundenen
Telefonverzeichnis aufgeführt ist.
Wenn Sie den Anruf annehmen
möchten, drücken Sie die Taste.
Wenn Sie den Anruf ablehnen
möchten, drücken Sie die Taste.
Einen Anruf über Spracherkennung tätigen
Sie können einen Anruf direkt nach der
Synchronisation Ihres
Telefonverzeichnisses durch
Spracherkennung initiieren. Der Parrot
ASTEROID Mini erkennt automatisch den
Kontakt Ihres Verzeichnisses, den Sie
anrufen wollen.
Drücken Sie die Taste , um die
1.
Spracherkennung zu initiieren.
> Der Parrot ASTEROID Mini fragt Sie
nach dem Namen des Kontakts, den
Sie anrufen wollen.
Sagen Sie den Kontaktnamen und
2.
anschließend die Art der Nummer
("BÜRO", "HANDY"...), sofern
diesem Kontakt mehrere Nummern
zugeordnet sind.
> Der Kontakt wird automatisch
angerufen, wenn die
Sprachanweisung richtig verstanden
wurde.
> Ansonsten kommt vom
Freisprechsystem eine
Bestätigsmeldung. Bestätigen Sie mit
"JA", "RUF AN" oder "ANRUFEN".
Hinweis: Durch Drücken der Taste den
Spracherkennungsbetrieb wieder verlassen.
85Deutsch
Page 86

Musik
Musik-Spracherkennungsfunktion
Mit der Musik-Spracherkennungsfunktion
können Sie über die Spracherkennung
Künstler oder Alben auswählen, die Sie
sich gern anhören möchten. Diese
Funktion ist verfügbar, wenn Sie den
Parrot ASTEROID Mini mit einem
Anschlussgerät vom Typ iPod/USB/SD
verwenden oder wenn Sie eine mit dieser
Funktion kompatible Musikanwendung
nutzen.
Drücken Sie die Taste .
1.
Sagen Sie den Namen des Künstlers
2.
oder des Albums, den/das Sie gerne
86 Deutsch
hören möchten, wenn der Parrot
ASTEROID Mini Sie dazu auffordert.
> Es erscheint die Liste mit den an
den Parrot ASTEROID Mini
angeschlossenen Audioquellen sowie
die mit dem
Spracherkennungsfunktion
kompatiblen Musikanwendungen mit
den ausgewählten Künstler/Album.
Hinweis: Prüfen Sie die Namen der Artisten
und Alben in den Tags (Metadaten) Ihrer
Musikstücke. Die Namen können anders als
der im Titel des Stücks angezeigte sein.
iPod
Schließen Sie Ihren iPod an das iPod-
1.
Kabel an.
Drücken Sie die Taste SRC und
2.
wählen Sie iPod.
Wählen Sie eines der
3.
Klassierungskriterien aus (Artist,
Album, Titel, Typ, Playlist) und
drücken Sie auf das Reglerrad.
Wählen Sie den Titel aus und drücken
4.
Sie auf das Reglerrad.
Hinweis: Drücken Sie die Taste und
wählen Sie den ersten Buchstaben Ihres
Künstlers, Albums oder Titels aus, um
leichter durch den Inhalt Ihres iPod zu
Page 87

browsen.
SD-Karte
Folgende SD-Karten (gegebenenfalls mit
Adapter) können Sie mit dem Parrot
ASTEROID Mini nutzen: SD, micro SD,
mini SD, SDHC, mini SDHC, micro SDHC.
Die maximale Speicherkapazität der SDKarte beträgt 32 GByte.
Die Musikdateien auf Ihrer SD-Karte
können im Format MP3 (mpeg1 layer3),
AAC, WAV, OGG oder WMA
abgespeichert sein.
Setzen Sie die SD-Karte am hierfür
1.
vorgesehenen Platz an der rechten
Seite des Displays ein (Abbildung E
S.12).
Drücken Sie die Taste SRC und
2.
wählen Sie SD.
Wählen Sie eines der
3.
Klassierungskriterien aus (Artist,
Album, Titel, Typ, Playlist) und
drücken Sie auf das Reglerrad.
Drücken Sie auf den Titel, um die
4.
Wiedergabe zu starten.
Hinweis: Drücken Sie die Taste und
wählen Sie den ersten Buchstaben Ihres
Künstlers, Albums oder Titels aus, um
leichter durch den Inhalt Ihrer SD-Karte zu
browsen.
USB-Stick
Der Parrot ASTEROID Mini ist mit den
meisten USB-Sticks/MP3-Playern/
externen Festplatten kompatibel.
Hinsichtlich der Kapazität der USB-Sticks
bestehen keine Beschränkungen. Die
Musikdateien auf Ihrem USB-Stick können
im Format MP3 (mpeg1 layer3), AAC,
WAV, OGG oder WMA abgespeichert
sein.
Schließen Sie Ihr USB-
1.
Anschlussgerät an das USB-Kabel an.
Drücken Sie die Taste SRC und
2.
wählen Sie USB.
Wählen Sie eines der
3.
Klassierungskriterien aus (Artist,
87Deutsch
Page 88

Album, Titel, Typ, Playlist) und
bestätigen Sie mit dem Reglerrad.
Drücken Sie auf den Titel, um die
4.
Wiedergabe zu starten.
Hinweis: Drücken Sie die Taste und
wählen Sie den ersten Buchstaben Ihres
Künstlers, Albums oder Titels aus, um
leichter durch den Inhalt Ihres USBPeripheriegeräts zu browsen.
Bluetooth-Audio-Laufwerk
Hinweis: Der Parrot ASTEROID Mini erlaubt
den Gebrauch der Telefoniefunktion und des
Audio-Streaming über Bluetooth mit 2
verschiedenen Telefonen, ohne Abstecken
eines der 2 Geräte.
88 Deutsch
Sie können den Parrot ASTEROID Mini
zum Wiedergeben von Musikdateien
verwenden, die auf einem
Audio-Laufwerk gespeichert sind, wenn
dieses das Profil A2DP (Advanced Audio
Distribution Profile) unterstützt.
Vor der ersten Verwendung des AudioLaufwerks müssen Sie dieses zunächst mit
dem Parrot ASTEROID Mini koppeln.
Wenn das Audio-Laufwerk bereits mit
dem Parrot ASTEROID Mini verkoppelt
ist:
Drücken Sie die Taste SRC und
1.
wählen Sie Bluetooth-Audio.
Starten Sie die Wiedergabe eines
2.
Titels auf Ihrem Audio-Laufwerk.
Bluetooth
Internet
-
Verbindung mit einem 3G/4G-Stick
Hinweis: Auf unserer Website, unter
Kompatibilität des Parrot ASTEROID Mini,
können Sie die Liste mit den 3G/4G-Sticks
einsehen, die mit dem Parrot ASTEROID Mini
kompatibel sind.
Schließen Sie über das USB-Kabel
1.
einen 3G/4G-Stick an das Parrot
ASTEROID Mini an.
> Es erscheint ein Popup-Fenster.
Aktiveren Sie die 3G-Verbindung
2.
durch Auswählen OK.
Der Status der 3G-Verbindung wird
angezeigt, gefolgt von einem
Page 89

weiteren Popup-Fenster, in welchem
Sie aufgefordert werden, Ihren PINCode einzugeben.
Geben Sie anhand des Einstellrads
3.
Ihren PIN-Code ein, und wählen Sie
anschließend OK. Haken Sie die
Option PIN-Code speichern an, wenn
Sie vermeiden möchten, dass Sie bei
jedem Neustart des Parrot
ASTEROID Mini nach dem PIN-Code
gefragt werden
Hinweis: Sie können diese Einstellung später
ändern, indem Sie Parameter > Wireless und
ohne Netz > Mobiles Datennetz auswählen.
Wählen Sie aus den Anschlussgeräten Ihren
3G/4G-Stick, wählen Sie PIN vergessen,
anschließend Vergessen.
Wählen Sie Ihren APN (Access Point
4.
Name) in der angezeigten Liste aus.
Diese Information ist in der mit Ihrem
3G-Stick mitgelieferten
Dokumentation verfügbar. Wenn Ihr
APN nicht in der Liste enthalten ist,
können Sie diesen hinzufügen, indem
Sie Parameter > Netzwerk > 3G-Stick
> Konfiguration > Neuer
Zugangspunkt auswählen.
Es erscheint die Meldung "3G-Stick
konfiguriert".
Warten Sie ca. 30 Sekunden, bis die
5.
Verbindung aufgebaut ist. Sie können
ebenfalls die Taste drücken und
während des Aufbaus der Verbindung
in den Menüs blättern.
Anschluss über Bluetooth
Wenn Sie ein Telefon besitzen, welches
das Profil
Bluetooth®
DUN (Dial-Up
Networking) oder PAN (Personal Area
Network) unterstützt, haben Sie anhand
der Verbindung über
Bluetooth
Ihres
Telefons an das Parrot ASTEROID Mini
die Möglichkeit der gemeinsamen
Nutzung einer 3G-Verbindung des
Telefons.
Hinweis: Überprüfen Sie auf unserer
Website, unter Kompatibilität, ob Ihr
Telefon für die gemeinsame Nutzung von
3G-Verbindungen über Bluetooth geeignet
ist und beachten Sie die entsprechende
Vorgehensweise: www.parrot.com/de/
compatibility.
89Deutsch
Page 90

Schließen Sie Ihr Telefon über
1.
Bluetooth
an den Parrot ASTEROID
Mini an.
Wählen Sie auf dem Parrot
2.
ASTEROID Mini Präferenzen >
Netzwerk > Bluetooth >
Konfiguration.
Wählen Sie Ihren APN (Access Point
3.
Name) in der angezeigten Liste aus.
Auswählen.
Drücken Sie die Taste und wählen
4.
Sie Anschließen.
Lassen Sie die gemeinsame Nutzung
5.
der Verbindung auf Ihrem Telefon zu.
Dieser Vorgang ist je nach dem
90 Deutsch
Modell Ihres Telefons
unterschiedlich.
Anschluss über USB
Falls Ihr Telefon die gemeinsame Nutzung
einer 3G-Verbindung über USB
unterstützt, schließen Sie Ihr Telefon mit
einem USB-Kabel/USB-Mikrokabel (nicht
mitgeliefert) an den Parrot ASTEROID
Mini an, um somit die gemeinsame
Nutzung der 3G-Verbindung des Telefons
nutzen zu können.
Hinweis: Überprüfen Sie auf unserer Website
unter Kompatibilität ob Ihr Telefon für die
gemeinsame Nutzung von 3GVerbindungen über USB geeignet ist und
beachten Sie die entsprechende
Vorgehensweise: www.parrot.com/de/
compatibility.
Überprüfen Sie, dass die Tastatur
1.
Ihres Telefons gesperrt ist und
schließen Sie es mit dem USB-Kabel/
USB-Mikrokabel an den Parrot
ASTEROID Mini an. Diese
Verbindung erlaubt auch den
Austausch der Batterien Ihres
Telefons.
Wählen Sie Ihren APN (Access Point
2.
Name) in der angezeigten Liste und
haken Sie die Option Auswählen an.
Sie können diese Einstellung später
ändern, indem Sie Parameter > Netz >
USB wählen.
Page 91

> Ein Popup-Fenster zeigt die
Aktivierung der Funktion
„Persönlicher Hotspot USB“ an.
Hinweis: Nähere Informationen entnehmen
Sie bitte der Bedienerführung Ihres Telefons.
Gebrauch der Anwendungen
Sie können mit dem ASTEROID Market
mehrere Anwendungstypen nutzen:
Musik, Geolokalisierung, Fahrhilfe. Die
verfügbaren Anwendungen hängen vom
Land ab, in dem sie angewendet werden.
Für bestimmte Anwendungen ist ein
Abonnement erforderlich.
Der Parrot ASTEROID Mini kann für
mehrere Anwendungen gleichzeitig
genutzt werden. Sie können z. B. ein
Webradio hören und gleichzeitig eine
Anwendung zur Fahrhilfe nutzen.
Weitere Informationen über die Nutzung
der verfügbaren Anwendungen sind der
Website von ASTEROID Market zu
entnehmen: www.parrotasteroid.com/
asteroidmarket.
Bei Problemen
Vorbemerkung
Überprüfen Sie, dass die Mitteilung "Auf
Wiedersehen" richtig auf dem Display des
Parrot ASTEROID Mini angezeigt wird,
wenn Sie die Zündung des Fahrzeugs
ausschalten. Weitere Angaben enthält der
Abschnitt "Prüfung der Installation".
Reinitialisieren Sie das Gerät. Wählen Sie
Einstellungen > erweiterte Einstellungen
> Werkseinstell.
Stellen Sie sicher, dass Sie über die
neueste Aktualisierung des Parrot
ASTEROID Mini verfügen. Wählen Sie
dafür Einstellungen > Allgemeines >
91Deutsch
Page 92

Version. Vergleichen Sie diese
Versionsnummer mit der Nummer auf der
Supportseite des Parrot ASTEROID Mini
auf unserer Website www.parrot.com.
Sie können Aktualisierungen auch
herunterladen wenn das Parrot
ASTEROID Mini mit dem Internet
verbunden ist. Die Verfügbarkeit wird in
der Informationsleiste angezeigt.
Telefonie-Funktion
Prüfen Sie, ob Ihr Telefon mit dem Parrot
ASTEROID Mini kompatibel ist. Gehen
Sie hierzu auf unsere Website auf
Kompatibilität: www.parrot.com/de/
compatibility.
Wenn Ihr Telefon als kompatibel
92 Deutsch
angegeben wird und wenn Ihr Parrot
ASTEROID Mini bereits über die letzte
Aktualisierung verfügt, dann löschen Sie
die Zuordnung zwischen den 2 Geräten am
Parrot ASTEROID Mini und an Ihrem
Telefon. Starten Sie die 2 Geräte erneut
und stellen Sie die Verbindung zwischen
den 2 Geräten wieder her.
Musik-Funktion
Reinitialisieren Sie Ihren iPod/Ihr iPhone,
bevor das Gerät wieder mit dem Parrot
ASTEROID Mini verbunden wird.
Vorgehensweise zur Reinitialisierung des
iPod/iPhone (hierdurch werden keine
Daten gelöscht):
iPod: Gleichzeitig auf Menü und die
mittlere Taste drücken, bis der iPod
sich wieder einschaltet.
iPhone/iPod touch: Gleichzeitig die
Taste On/Off und die Taste Home
drücken, bis sich das iPhone wieder
einschaltet. Das Display nicht
berühren, wenn die Meldung „Zum
Ausschalten schieben“ erscheint.
Manche Probleme können entstehen,
wenn das Anschlussgerät beim
Einschalten der Zündung bereits mit dem
Parrot ASTEROID Mini verbunden ist.
Wiederholen Sie den Vorgang und
verbinden Sie dabei das Gerät erst nach
dem Einschalten der Zündung.
Page 93

Weitere Informationen
Weitere Informationen finden Sie auf der
Support-Seite des Parrot ASTEROID Mini
auf unserer Website www.parrot.com.
Allgemeine Hinweise
Garantie
Unbeschadet der gesetzlichen Garantie
sichert PARROT für eine Dauer von 12
Monaten ab dem ursprünglichen Datum
des Kaufs durch den Konsumenten bei
Vorlage eines Kaufnachweises (mit
Datum, Ort des Kaufs und Seriennummer
des Artikels) an den Händler oder an
Parrot (Verschleißteile haben eine
Garantie von 6 Monaten) vertraglich zu,
dass das Produkt keine Material- oder
Herstellungsfehler aufweist. Während
des Garantiezeitraums muss das
fehlerhafte Produkt in seiner
ursprünglichen Verpackung dem
Kundenservice des Händlers retourniert
werden. Nach Inspektion des Produkts
kann Parrot dieses nach eigenem
Ermessen ersetzen oder erstatten, jede
weitere Entschädigung ist ausgeschlossen.
Änderungen
Die in dieser Anleitung enthaltenen
Beschreibungen und technischen
Spezifikationen dienen ausschließlich der
Information und können Änderungen ohne
vorhergehende Ankündigung unterliegen.
Zum Zeitpunkt des Drucks galten die
enthaltenen Angaben als zutreffend. Bei
der Verfassung dieser Anleitung wurde
93Deutsch
Page 94

größte Sorgfalt auf deren Inhalt
angewendet, damit Ihnen möglichst
präzise Informationen bereitgestellt
werden können. Parrot haftet jedoch
weder für Folgen, die sich aus ggf. in
dieser Anleitung enthaltenen Fehlern
oder Unterlassungen ergeben, noch für
Schäden oder den versehentlichen Verlust
von Daten als direkte oder indirekte Folge
der Verwendung der enthaltenen
Informationen. Parrot behält sich das
Recht vor, das Produktdesign oder die
Bedienungsanleitung zu ändern bzw. zu
verbessern, ohne dass diesbezüglich
Beschränkung vorliegen und ohne jede
Verpflichtung, die Benutzer hiervon in
Kenntnis zu setzen. Wir sind stets bemüht
94 Deutsch
Aktualisierungen und Verbesserungen an
unseren Produkten vorzunehmen. So kann
es sein, dass das Produkt das Sie gekauft
haben, sich leicht unterscheidet vom in
dieser Anleitung beschriebenen Modell.
Sollte das der Fall sein, steht eine neuere
Version dieses Handbuchs in
elektronischer Form auf der Parrot
Website www.parrot.com zur Verfügung.
Korrekte Entsorgung dieses Produkts
(Elektromüll)
Die Kennzeichnung auf dem Produkt bzw.
auf der dazugehörigen Literatur gibt an,
dass es nach seiner Lebensdauer nicht
zusammen mit dem normalen
Haushaltsmüll entsorgt werden darf.
Entsorgen Sie dieses Gerät bitte getrennt
von anderen Abfällen, um der Umwelt
bzw. der menschlichen Gesundheit nicht
durch unkontrollierte Müllbeseitigung zu
schaden. Recyceln Sie das Gerät, um die
nachhaltige Wiederverwertung von
stofflichen Ressourcen zu fördern. Private
Nutzer sollten den Händler, bei dem das
Produkt gekauft wurde, oder die
zuständigen Behörden kontaktieren, um in
Erfahrung zu bringen, wie sie das Gerät auf
umweltfreundliche Weise recyceln
können. Gewerbliche Nutzer sollten sich
an Ihren Lieferanten wenden und die
Bedingungen des Verkaufsvertrags
konsultieren. Dieses Produkt darf nicht
zusammen mit anderem Gewerbemüll
Page 95

entsorgt werden.
Eingetragene Marken
Parrot und die Parrot-Logos sind in
Frankreich und in anderen Ländern
eingetragene Marken der Firma PARROT
SA.
Der Name „Bluetooth“ und das
Bluetooth
Logo sind eingetragene Marken der Firma
Bluetooth® SIG, Inc., und jegliche Nutzung
dieses Namens und dieses Logos durch
die Parrot SA erfolgt im Rahmen einer
Lizenz.
iPod, iPhone und Apple sind in den USA
und in anderen Ländern eingetragene
Marken der Firma Apple, Inc.
"Made for iPod / iPhone" bedeutet, dass
ein elektronisches Zusatzgerät für den
Anschluss an iPod und iPhone-Modelle
konstruiert ist und vom Entwickler
dahingehend zertifiziert wurde, dass es
den Apple-Leistungsnormen entspricht.
Apple übernimmt keine Verantwortung
für den Betrieb dieses Geräts oder die
Einhaltung von Sicherheits- und
gesetzlichen Standards.
Gracenote®, das Gracenote-Logo und die
Logoschriftart sowie das Logo „Powered
by Gracenote“ sind eingetragene Marken
oder Marken von Gracenote in den
Vereinigten Staaten von Amerika und/
oder anderen Ländern.
Alle anderen Handelsmarken und
eingetragenen Marken, die in diesem
Dokument vorkommen, sind
urheberrechtlich geschützt und das
Eigentum ihrer jeweiligen Eigentümer.
Copyright
Copyright © 2012 Parrot. Alle Rechte
vorbehalten.
95Deutsch
Page 96

96
Page 97

Guida all'uso
Prima di iniziare
Installazione
Primo utilizzo
Telefono
Musica
Internet
Problemi frequenti
Informazioni generali
p.97
p.98
p.104
p.106
p.107
p.110
p.113
p.114
Indice
Prima di iniziare
A proposito di questa guida
Per limitare il nostro consumo di carta e
nell’ambito della nostra azione
responsabile volta alla tutela
dell’ambiente, abbiamo scelto
l’immissione on line dei documenti
destinati agli utenti, che quindi non
saranno più stampati. La presente guida
semplificata del Parrot ASTEROID Mini si
limita quindi a dare le principali istruzioni
che vi consentiranno di utilizzare
facilmente questo apparecchio. Troverete
maggiori informazioni nella sezione
Supporto del nostro sito web
www.parrot.com.
97Itali ano
Page 98

Nota: In questo manuale, il termine "iPod"
verrà utilizzato per indicare iPod e iPhone.
Avvertenza
Le funzioni che richiedono un'attenzione
prolungata devono essere utilizzate solo a
veicolo fermo. La propria sicurezza e
quella degli altri utenti della strada sono
più importanti delle telefonate, della
musica o delle applicazioni di assistenza
alla guida. Mantenere un comportamento
responsabile: guidare con prudenza e
prestare attenzione al proprio ambiente.
Parrot declina ogni responsabilità nel caso
in cui si decida di ignorare tali avvertenze.
Utilizzare il Parrot ASTEROID Mini con un
livello di volume ragionevole, in maniera
98 Itali ano
da poter sentire in qualsiasi momento i
rumori esterni durante la guida.
Aggiornamento del software
Scaricate gratuitamente l’ultimo
aggiornamento del Parrot ASTEROID Mini
nel nostro sito web www.parrot.com, alla
sezione Supporto. Questi aggiornamenti vi
permetteranno di utilizzare le nuove
funzionalità e di migliorare la compatibilità
del Parrot ASTEROID Mini.
Installazione
Nota: Per eseguire l'installazione, si
raccomanda di ricorrere ad un
professionista esperto, rivolgendosi in
particolar modo alla nostra rete di
installatori autorizzati.
Prima di iniziare
L'installazione del Parrot ASTEROID Mini
consiste nell'inserirlo tra l'autoradio e il
veicolo.
Nota: I cavi forniti in dotazione con il
Parrot ASTEROID Mini sono provvisti di
connettori ISO. Se l'autoradio non è dotata
di connettori ISO, occorre procurarsi un
cavo adattatore ISO per consentire il
Page 99

montaggio. Consultare la sezione
Compatibilità veicolo alla pagina di
assistenza di Parrot ASTEROID Mini per
verificare l'eventuale necessità di un cavo
adattatore.
Incominciare rimuovendo l'autoradio
originale dal veicolo. Questa operazione
potrebbe richiedere l'uso di chiavi di
estrazione.
Consultare lo schema elettrico
dell'autoradio.
Prima di fissare i vari elementi del Parrot
ASTEROID Mini nell'abitacolo, collegare i
diversi cavi alla centralina elettronica.
Prima di fissare definitivamente i
componenti, controllare le lunghezze dei
cavi assicurandosi che le varie posizioni
vengano scelte in modo tale che i cavi
siano sufficientemente lunghi da collegare
i vari elementi l'uno all'altro. Accertarsi
che, al termine dell'installazione, i cavi del
Parrot ASTEROID Mini non risultino
piegati o incastrati.
Si raccomanda di utilizzare il cavo ISO
fornito con il Parrot ASTEROID Mini.
Le indicazioni "Connessione #" nelle
prossime sezioni corrispondono alle
connessioni rappresentate negli schemi a
pag. 6 / 7.
Collegamento del cavo audio
Collegare i fasci di cavi audio del veicolo ai
connettori del Parrot ASTEROID Mini
(connessioni 1A e 2).
Se il veicolo è dotato di un impianto audio
con amplificatore, utilizzare le uscite Jack
Line Out Front e Line Out Rear presenti
sulla centralina elettronica per evitare
problemi di saturazione (colpi negli
altoparlanti, soffio permanente, ecc.).
Collegare le uscite Line Out all'impianto
audio utilizzando uno o due cavi Jack per
collegare il Parrot ASTEROID Mini
all'impianto audio (connessione 1B sullo
schema a pag.7).
99Itali ano
Page 100

Collegamento del cavo di alimentazione
Scollegare la batteria prima di installare
1.
il cavo di alimentazione.
Collegare il connettore ISO maschio del
2.
Parrot ASTEROID Mini all'autoradio
(connessione 3).
Collegare i fasci di cavi di alimentazione
3.
del veicolo al connettore ISO femmina
del Parrot ASTEROID Mini
(connessione 4).
Il filo rosso del cavo deve corrispondere
al +12V permanente, il filo arancione al 12V
post-contatto e il filo nero alla massa.
Verificare che il filo arancione non sia
collegato al 12V permanente: si
rischierebbe di scaricare la batteria del
100 Ita liano
veicolo.
Nota: Per procedere alla verifica
dell'installazione, collegare innanzitutto il
display senza sistemarlo sul quadro
comandi. Per maggiori informazioni
consultare la sezione Verifica
dell'installazione.
Su alcuni veicoli il +12V post-contatto non
è presente sui connettori dell'automezzo.
In tal caso, è necessario collegare il filo di
alimentazione arancione alla scatola dei
fusibili o ad un'altra sorgente di
alimentazione post-contatto.
Collegamento del cavo Mute
La funzione Mute permette di
interrompere l'audio dell'autoradio per
lasciare spazio a quello del Parrot
ASTEROID Mini (musica, conversazioni,
ecc.). La scelta dell'ingresso Mute (mute
in 1, mute in 2 o mute in 3) dipende dalla
configurazione dell'autoradio. Individuare
l'ingresso Mute e quindi collegarlo al filo
giallo libero sul cavo ISO (connessione 5).
Installazione della centralina elettronica
Non installare la centralina vicino al
riscaldamento o al climatizzatore né in un
punto esposto al sole.
Dopo l'installazione, assicurarsi che la
 Loading...