

Page 1
Page 2

Page 3

User Guide v3.6 –
published on October 16, 2019
3
With Thermal, you have chosen the finest, quietest, and most portable flying 4K HDR
and thermography camera, you can use everywhere on the go, anytime.
We strongly recommend you read the following information and instructions thoroughly
before you get Thermal in the air, to make the most of your first 26-minute flight.
The indispensable prerequisites, on the next pages, will not occupy more than 5 minutes of
your time: Thermal requires the FreeFlight 6 v6.5 (or a more recent release) app to fly,
and to make sure your drone and controller are fully up-to-date with the latest features.
As you discover the world of possibilities that Thermal opens to you, you will fully
understand the importance of mission planning in your workflow.
Have a great read, and many productive hours flying Thermal.
- Read entirely at least once: it answers most questions that most users encounter
when they discover Thermal.
- Keep it for reference and stay alert for updates: they will be advertised on all Parrot
websites and social media.
- The Table of contents, on page 7, is active. Click a title to access the corresponding
section.
- This online user guide has no index: use [ctrl]-F (Windows) or [command]-F (Mac) to
browse all occurrences of any keyword (
flight, preferences, gimbal, thermography
photo, EV, ISO
, and so on).
Page 4

4
You want Thermal up in the air as soon as possible, so do we. Refer to the enclosed
Super Quick Start Guide (SQSG) if you need illustrated guidance to get these quick
prerequisites out of the way.
1. Wake your Thermal’s smart battery up. Charge the battery using the enclosed
USB-A to USB-C cable and a USB-A power adapter. The battery’s LEDs start flashing:
it is awake. Let it charge while you read. Parrot recommends you always run a full
charge of your smart battery before flying Thermal
2. Download FreeFlight 6 on your iOS or Android smartphone: Thermal requires
FreeFlight 6 to fly. The app will enable you to update your Parrot Skycontroller 3 and
Thermal when you power them on for the first time.
Android FreeFlight 6 QR code iOS FreeFlight 6 QR code
When you have downloaded and installed FreeFlight 6, unfold the central arm of
Parrot Skycontroller 3 to power it on.
Use your device’s USB cable to connect it to Parrot Skycontroller 3 USB-A port, and
install it on the device holder, as shown in the enclosed SQSG.
A prompt appears on your screen, which invites you to allow the communication
between your device and the controller.
Tap “Allow” (iOS) or “OK” (Android): FreeFlight 6 runs. After your device displays the
app’s splash screen, you get to FreeFlight 6 homepage.
Page 5
User Guide v3.6 –
published on October 16, 2019
5
If the prompt does not appear on your screen when you connect your device to your Parrot
Skycontroller 3, launch FreeFlight 6 manually, as any other app.
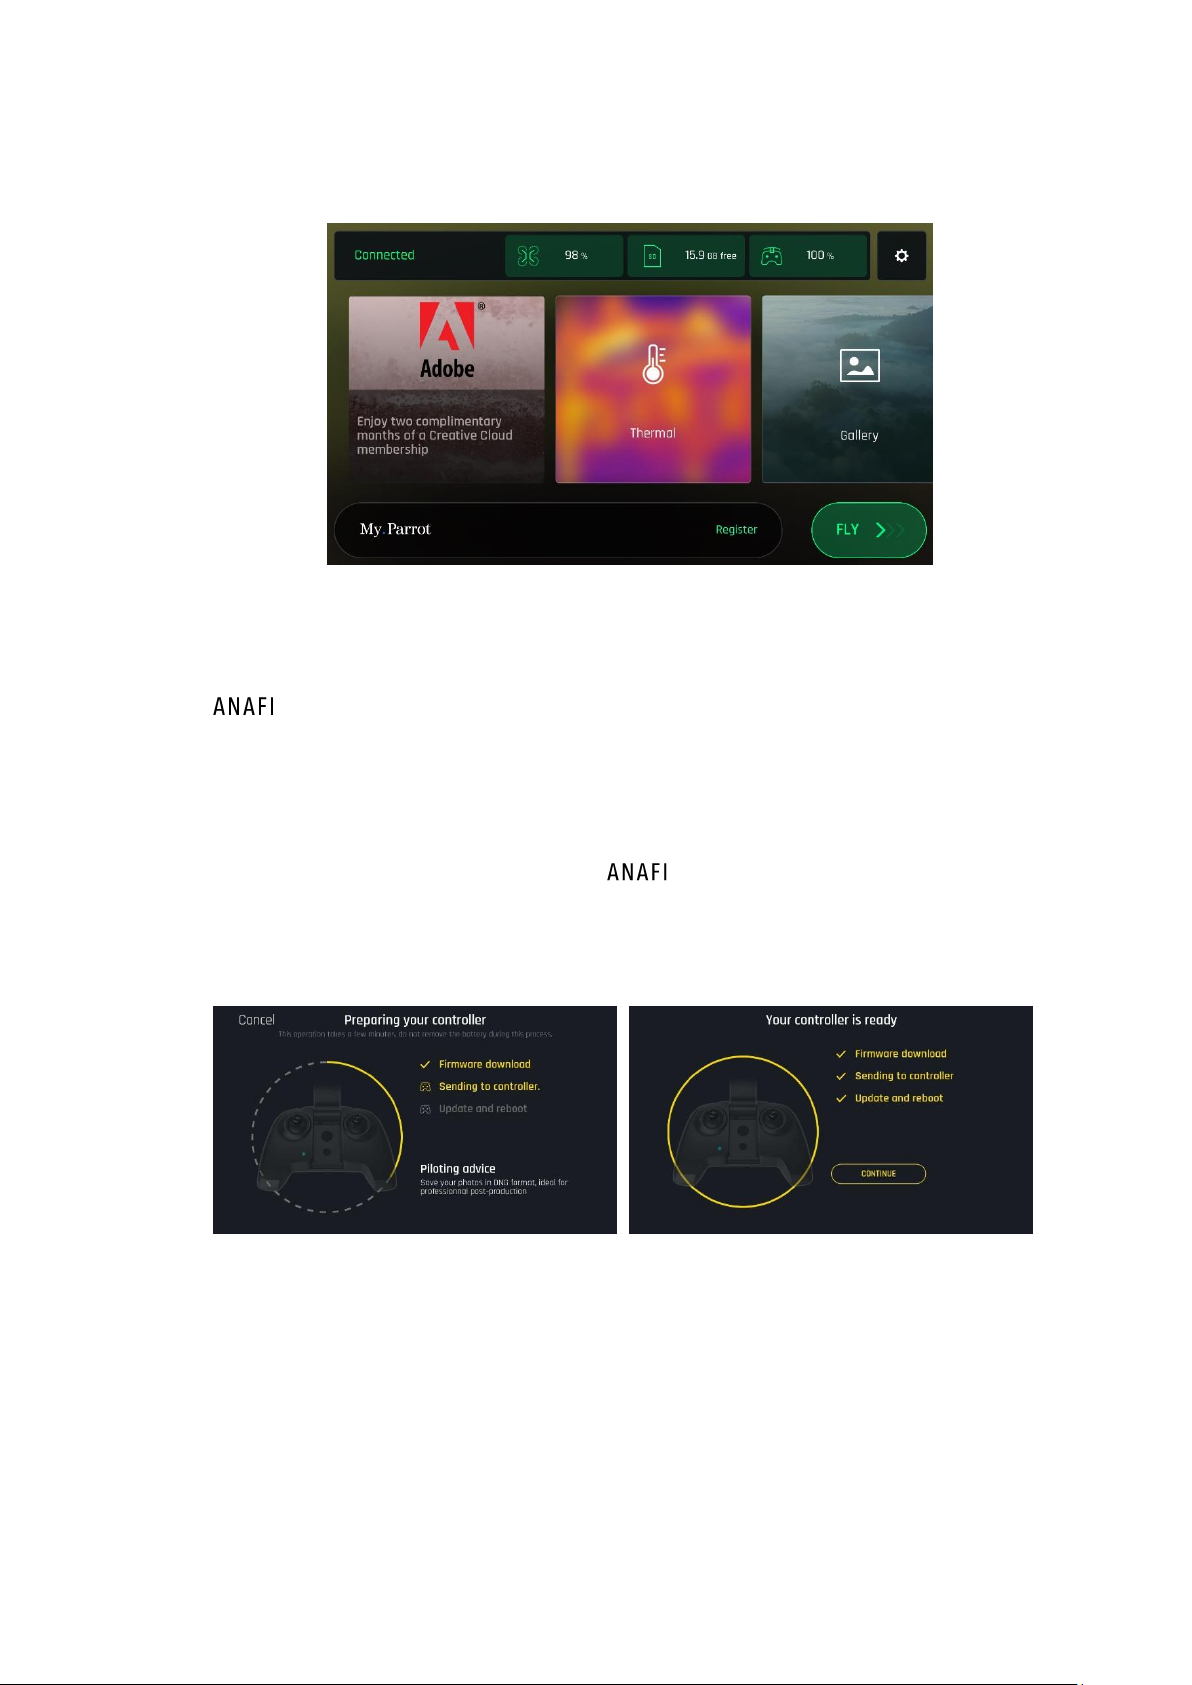
iOS FreeFlight 6 homepage
3. Tap the green “FLY” box on the homepage of FreeFlight 6 to launch the initial
updates. FreeFlight 6 automatically updates the Parrot Skycontroller 3 first, and
Thermal second.
4. Parrot Skycontroller 3 update: tap the green “CONTINUE” box to proceed. FreeFlight 6
displays an animation and a progress circle on a screen labelled “Preparing your
controller”. When the update is finished, the screen displays “Your controller is ready”.
Tap “CONTINUE” to access the update of Thermal (screenshots below are
Android).
Page 6

6
5. Thermal update: tap the green “CONTINUE” box to proceed. FreeFlight 6
displays an animation and a progress circle on a screen labelled “Preparing your
drone”. When the update is finished, the screen displays “Your drone is ready” and a
“CONTINUE” box. Tap this “CONTINUE” box to come back to FreeFlight 6 homepage
(screenshots below are iOS).
6. All systems are ready for flight.
Page 7
User Guide v3.6 –
published on October 16, 2019
7
............................................................................................................. 3
........................................................................................................................................... 3
.............................................................................................................................................. 4
......................................................................................................................................... 7
................................................................................................................................................. 11
About Thermal ........................................................................................................................ 11
About lens cap and camera calibration ............................................................................................. 11
About Wi-Fi ........................................................................................................................................ 11
About 4K video formats ..................................................................................................................... 11
About the smart battery ................................................................................................................... 11
About auto-RTH (return home) .......................................................................................................... 12
About devices .................................................................................................................................... 12
About My.Parrot accounts.................................................................................................................. 12
................................................................................................................................................ 13
.............................................................................................................................. 14
...................................................................................................................................... 15
................................................................................................................... 16
Ready to store or carry ...................................................................................................................... 16
Ready to fly ....................................................................................................................................... 16
....................................................................................................... 17
Ready to store or carry ...................................................................................................................... 17
Ready to pilot .................................................................................................................................... 17
Camera and gimbal controls .............................................................................................................. 18
LED status indicator color codes........................................................................................................ 18
Page 8
8
.................................................................................................................................... 19
Equipment .......................................................................................................................................... 19
Regulations ........................................................................................................................................ 19
Flight conditions ................................................................................................................................ 19
.......................................................................................................................................... 20
................................................................................................................................................. 21
Ground take-off .................................................................................................................................. 21
Hand launch ....................................................................................................................................... 21
...................................................................................................................................................... 22
........................................................................................................................................ 23
Precise Home Setting ........................................................................................................................ 23
................................................................................................................................................ 23
.................................................................................................................................................... 24
Hand landing ...................................................................................................................................... 24
..................................................................................................................................... 25
Battery removal ................................................................................................................................. 25
Battery installation ............................................................................................................................ 26
Battery charging ................................................................................................................................ 26
Battery care and safety ..................................................................................................................... 27
......................................................................................................................................... 29
Extracting the microSD card .............................................................................................................. 29
Retrieving photos and videos ............................................................................................................ 29
Installing the microSD card ................................................................................................................ 29
Compatible microSD cards ................................................................................................................. 30
Direct media retrieval (drone to computer) ....................................................................................... 30
FreeFlight 6 Gallery ............................................................................................................................ 30
............................................................................................................................ 31
Presentation of the iOS HUD (video mode view) ............................................................................... 32
Presentation of the Android HUD (photo mode view) ....................................................................... 34
Page 9

User Guide v3.6 –
published on October 16, 2019
9
.............................................................................................................................................. 35
Controls ............................................................................................................................................. 35
Presets ............................................................................................................................................... 35
Thermal .............................................................................................................................................. 36
Interface............................................................................................................................................. 37
Safety ................................................................................................................................................ 37
Camera .............................................................................................................................................. 38
Network ............................................................................................................................................. 38
............................................................................................................. 39
Making videos .................................................................................................................................... 39
Taking photos .................................................................................................................................... 41
Creating Panoramas .......................................................................................................................... 44
..................................................................................................................... 48
Gimbal tilt control .............................................................................................................................. 48
Zoom control ...................................................................................................................................... 48
Camera Calibration: Correct horizon (exceptional procedure) ........................................................... 51
Camera Calibration: Gimbal calibration ............................................................................................. 53
Camera Calibration: Cameras alignment (exceptional procedure) .................................................... 53
.................................................................................................................................. 55
Exposure value (EV) ........................................................................................................................... 55
Shutter speed (s) ............................................................................................................................... 55
ISO value (ISO) ................................................................................................................................... 56
White balance (WB) ........................................................................................................................... 56
HDR .................................................................................................................................................... 58
NATURAL Style ................................................................................................................................... 58
P-LOG Style ........................................................................................................................................ 58
INTENSE Style .................................................................................................................................... 58
PASTEL Style ...................................................................................................................................... 59
ADJUSTMENT ...................................................................................................................................... 59
Lock AE ............................................................................................................................................... 60
Lock AE Touch .................................................................................................................................... 61
Page 10

10
........................................................................................................................................ 62
About Thermal Imaging ..................................................................................................................... 62
Presentation of the Thermal HUD ...................................................................................................... 62
Relative Thermal mode ...................................................................................................................... 63
Spot Thermal mode ........................................................................................................................... 65
Absolute Thermal mode ..................................................................................................................... 66
..................................................................................................... 68
................................................................................................................. 71
360° .................................................................................................................................................... 71
Reveal ................................................................................................................................................ 71
Spiral .................................................................................................................................................. 72
Epic .................................................................................................................................................... 72
.......................................................................................................................................... 73
Manual flight ...................................................................................................................................... 73
Cameraman (visible spectrum only) .................................................................................................. 73
Follow Me (visible spectrum only) ...................................................................................................... 74
Smartdronies (visible spectrum only) ................................................................................................ 76
FPV (visible spectrum only) ................................................................................................................ 76
Flight Plan .......................................................................................................................................... 77
Touch & Fly: Waypoint ....................................................................................................................... 83
Touch & Fly: POI ................................................................................................................................. 83
Page 11

User Guide v3.6 –
published on October 16, 2019
11
About Thermal
Thermal was designed and optimized to fly as is. Parrot therefore strongly
discourages the use of any add-on or accessory which could be mounted on, or attached to
Thermal (motor covers, feet extensions, buoys, hulls, etc.). In addition to the
overweight they carry for the drone and its motors, they can indeed magnetically disturb
Thermal and impair its communications.
About lens cap and camera calibration
Always remove Thermal’s lens cap before you power the drone on. The calibration of
the camera cannot be achieved with the lens cap on, and furthermore, leaving the lens cap
on the camera for the calibration can damage the mechanism of the gimbal.
About Wi-Fi
Parrot asks you to switch off your smartphone’s Wi-Fi connection when flying Thermal
with both the Parrot Skycontroller 3 and your phone: with this configuration, the drone and
the controller communicate through Thermal’s Wi-Fi network and activating your
phone’s Wi-Fi can only result in interferences.
Therefore, your phone’s Wi-Fi should only be activated – and connected to Thermal’s
Wi-Fi network – when you want to fly the drone using your smartphone as its sole controller.
About 4K video formats
4K video formats are professional grade media which may not be read natively by slower
computers. Shoot in 1080p or use a video converter to turn your Thermal’s 4K videos
into a more manageable format (like 1080p) if they do not read properly on your equipment.
This is especially true for Parrot’s 4K Cinema format, which can only be handled by
professional editing equipment.
About the smart battery
Thermal’s smart battery is preinstalled on your drone. Always install it the same way
and never attempt to install it upside down as it could expose your battery and your drone
to irrecoverable electrical damage. As you will find out by reading this guide, Thermal’s
battery is smart enough to enter a wintering mode when you are not using it for ten days in
a row. This also means you need to wake it up and charge it completely before you fly
Thermal for the first time.
Page 12

12
About auto-RTH (return home)
By design, when synchronized to GPS and Glonass satellites and when short on power,
Thermal will always attempt to come back to its most recent take-off point, at
minimal height over this take-off point, which is configurable through FreeFlight 6 (between
20 meters and 100 meters) and is set by default at 30 meters.
For this reason, Parrot recommends Thermal pilots to take extra care when moving
away from the take-off location of their drone (for example to follow Thermal). In such
cases, pilots must cancel the auto-RTH from the orange 1-minute alert which appears on the
screen of their device, and keep piloting Thermal while monitoring closely its battery
level, until it runs out of power and lands.
About devices
In the following pages, the word
"device"
refers to the smartphone or tablet, either iOS or
Android-based, on which FreeFlight 6 is installed.
About My.Parrot accounts
Parrot strongly recommends that you use your My.Parrot account (or create one if
Thermal is your first Parrot drone) to let Parrot store your Thermal flight data. Sharing
your data, even anonymously, benefits the community, as it enables us to improve our
products. It also directly benefits all identifiable users in case they need to contact Parrot
support teams.
Page 13

User Guide v3.6 –
published on October 16, 2019
13
1. Thermal IS NOT A TOY and should not be used or handled by a person under
the age of 18 years.
2. BEFORE USING Thermal:
(A) CAREFULLY READ the user manual and all information and documentation
available on www.parrot.com, which is susceptible to be updated at any time and
without prior notice (hereinafter referred to as "Parrot Documentation"). SPECIAL
ATTENTION must be given to the paragraphs marked with the symbol ;
(B) ENSURE YOU ARE AWARE OF THE REGULATIONS APPLICABLE TO THE USE OF DRONES
AND THEIR ACCESSORIES (hereinafter referred to as "Applicable Regulations");
(C) REMEMBER that Thermal may expose others and yourself to EQUIPMENT
DAMAGE, PERSONAL INJURY, OR BOTH, which could result in serious harm or death.
3. Be aware that videos and photos that are promoted and advertised by Parrot Drones
SAS and its affiliates have been made by and with experienced professionals and
drone pilots. IN CASE OF DOUBT RELATING TO THE USE OF YOUR Thermal DRONE
AND ITS ACCESSORIES, ALWAYS REFER TO THE MOST RECENT VERSION OF THE PARROT
DOCUMENTATION.
4. TO THE EXTENT PERMITTED BY APPLICABLE LAW, PARROT DRONES SAS, ITS
SUBSIDIARIES, AND THEIR RESPECTIVE DISTRIBUTORS AND RETAILERS SHALL NOT BE
LIABLE FOR ANY DAMAGES ARISING FROM, OR IN CONNECTION WITH THE NONCOMPLIANCE OF PARROT WITH THE DOCUMENTATION OR THE APPLICABLE REGULATIONS
BY YOURSELF OR ANY PERSON USING YOUR Thermal.
Page 14

14
DRONE
• Size folded: 218x69x64mm
• Size unfolded (propellers unfolded):
242x315x64mm
• Weight: 315g
• Max transmission range: 4km with
Parrot Skycontroller 3
• Max flight time: 26min
• Max speed: 55km/h
• Max vertical speed: 4m/s
• Max wind resistance: 50km/h
• Service ceiling: 4.500m above sea level
• Operating temperature: -10°C to 40°C
SENSORS:
• GNSS: GPS + GLONASS
• Barometer and magnetometer
• Vertical camera and ultra-sound sensor
• 2x6-axis IMU
• 2x3-axis accelerometers
• 2x3-axis gyroscopes
CONTROLLER
• Size folded: 94x152x72mm
• Size unfolded: 153x152x116mm
• Weight: 386g
• Transmission system: Wi-Fi 802.11a/b/g/n
• Operating frequencies: 2.4GHz – 5.8GHz
• Max transmission range: 4km
• Live streaming resolution: 720p (HD)
1280x720
• Battery capacity: 2,500mAh 3.6V
• Supported mobile devices:
- Without tablet holder: screen size up to 6.2’’
- With tablet holder: screen size up to 10”
• USB ports: USB-C (charge), USB-A
(connection)
RGB CAMERA
• Sensor: CMOS 1/2.4", 21MP
• LD-ASPH lens:
- Aperture: f/2.4
- Focal length: 26mm (equivalent 35mm)
• Depth of field: 1.5m to infinity
• Video format: MP4 (H264)
• Video resolution:
- 4K Cinema (4096x2160 24fps)
- 4K UHD (3840x2160 24/25/30fps)
- FHD (1920x1080 24/25/30/48/50/60fps)
- HD (1280x720 96/100/120fps)
• Video HFOV: 69°
• HDR: 4K UHD, 2.7K and 1080p videos, JPEG
photos
• Digital zoom:
- Lossless: up to x2.8 (FHD), up to x1.9
(2.7K), up to x1.4 (4K UHD)
- Standard: up to 3x (all resolutions)
• Photo formats: JPEG, DNG (RAW)
• Photo modes: single, burst, bracketing, timer,
panorama, timelapse and GPS lapse
• Photo resolution:
- Wide: 21MP (5344x4016) / 4:3 / 84° HFOV
- Rectilinear: 12MP (4000x3000) / 4:3 / 75.5°
HFOV
• Shutter speed: 1 to 1/10000s
• ISO: 100 to 3200
• EV compensation: [-3, +3]
• Max video bitrate: 100Mbps
IMAGE STABILIZATION
• 3-axis hybrid stabilization:
- Mechanical: 2-axis (roll & pitch)
- Electronic (EIS): 3-axis (roll, pitch & yaw)
- Controllable tilt range: -90° to +90°
(nadir to zenith)
THERMAL CAMERA
• Sensor: microbolometer FLIR Lepton® 3.5 (radiometric)
• Resolution: 160x120
• HFOV: 57°
• Pixel pitch: 12μm
• Spectral band: 8-14μm
• Photo format: JPEG
• Photo resolution: 3264x2448 (4/3)
• Photo modes: Single / Timelapse / GPS Lapse
• Video format: MP4 (H264)
• Video recording resolution: 1440x1080, 9fps
• Precision: ±5% max. (High-gain) or ±10%
max. (Low-gain)
• Scene Dynamic Range: -10° à +140°C
(High-gain) or -10° à +400°C (Low-gain)
• Video: MP4
SMART BATTERY
• Type: LiPo 2S
• Capacity: 2700mAh
• Voltage: 7.6V
• Weight: 124 g
• Temperature range: -20°C / 60°C
• Charging time: 1h15
• Max charging power: 26.1W (3A * 8.7V)
CHARGER
• Power: 52 W
• Input AC: 100–240 V, 50–60 Hz, 1,5A (Max)
• Output:
- 4x USB: DC 5V/6.8A (each 2.4A Max)
- USB quick charge 3.0: DC 3.6V-6.5V/3A,
6.5V-9V/2A, 9V-12V/1.5A
• Energy efficiency: Level VI
• Dimensions: 95x28.8x61mm
• Weight: 200g
• AC Power Cords: US, EU, UK
Page 15

User Guide v3.6 –
published on October 16, 2019
15
Your Thermal package contains:
- an Thermal drone
- 3 smart batteries, one of which preinstalled on Thermal
- a shoulder bag
- a lens cap, preinstalled on the gimbal
- 4 USB-A to USB-C charging cables
- A multi-port USB charger
- a 16GB microSD card, preinstalled in Thermal
- a microSD to SD card adapter
- a Parrot Skycontroller 3
- a tablet holder
- 8 spare propeller blades
- a mounting tool
- a Flight Safety Guide
- a Super Quick Start Guide (SQSG)
- a Wi-Fi settings card
Page 16

16
Ready to store or carry
Foldable arms
and propellers
Ready to fly
Smart battery Battery extraction button
Charge level LED indicators 180° tilt 4K HDR &
thermography double camera
gimbal
Power button
Page 17

User Guide v3.6 –
published on October 16, 2019
17
Ready to store or carry
Left control stick Right control stick
Power-on foldable arm and device holder
Ready to pilot
LED status indicator Wi-Fi antenna
RTH (return home) button Take-off/landing button
Page 18

18
Camera and gimbal controls
Shutter button
(take photo or
start/stop
filming)
Zoom trigger
(down: zoom in;
up: zoom out)
Optics reset
button
(back to no tilt
and x1 zoom)
Tilt trigger
(down: tilt
down;
up: tilt up)
Charging light USB-C charging port
(red: charging; green: charged) USB-A device port
LED status indicator color codes
When the Parrot Skycontroller 3 is powered on, its LED status indicator gives you an instant
visual indication:
- flashing green: Skycontroller 3 update in progress;
- alternating light blue and dark blue: connecting to Thermal;
- flashing light blue: no drone configured or wrong WPA key;
- steady dark blue: connected to Thermal;
- alternating purple and dark blue: autonomous flight in progress;
- alternating red and any other color: low battery alert ( Thermal,
Skycontroller 3, or both) or RTH alert.
Page 19

User Guide v3.6 –
published on October 16, 2019
19
Equipment
Make sure you have downloaded the latest version of FreeFlight 6 and that both your
Parrot Skycontroller 3 and your Thermal have been updated with the latest
versions of firmware.
For the ultimate Thermal experience, make sure you have the right USB-A
cable to connect your Parrot Skycontroller 3 and your device.
Make sure Thermal is fitted with a microSD card with enough free memory
space.
Make sure all four foldable arms of Thermal are unfolded.
Make sure its propellers are clean, intact and unobstructed.
Make sure both Thermal’s and Parrot Skycontroller 3’s batteries are fully
charged.
Make sure Thermal’s battery is securely installed on the drone’s body.
Make sure the lens cap has been removed from Thermal’s gimbal.
Make sure Thermal’s lenses are clean – if you need to clean them, hold the
gimbal between two fingers so that you do not pressure its mechanism when you
clean the lenses, and gently wipe the lenses with a microfiber cloth.
Regulations
Make sure the use of Thermal is allowed where you are intending to fly.
Check for potential restrictions regarding the use of Wi-Fi frequencies in the area
where you are intending to fly.
Flight conditions
Check that your flying zone is safe and clear.
Do not fly Thermal at night.
Do not fly Thermal over urban areas or over restricted airspaces such as
airports, train stations, power plants, national reserves, and so on.
Check the weather: do not fly Thermal in the rain, fog, snow, or in a wind
exceeding 14 meters per second or 50 km/h.
Due to the operating mode of its vertical camera and ultrasound sensor, Parrot
recommends you do not fly Thermal over water and other reflective surfaces
(mirrors, glass, and so on).
Page 20
20
1. Charge the battery using the enclosed USB-A to USB-C cable and a USB-A power
adapter. Charging times depend on the supply capacity of the adapter. Refer to
the
“Battery charging”
section of this guide for additional information. Parrot
recommends you always run a full charge of your smart battery before flying
Thermal
2. If you want to use the controller and enjoy the full Thermal experience,
charge Parrot Skycontroller 3.
3. Check that your flying zone is safe and clear.
4. To start the drone, place it on a flat horizontal surface and press the power
button.
5. a) If you use Parrot Skycontroller 3, unfold the central part of the controller to
power it on, wait for the steady dark blue light, then plug your device to the
controller using a USB cable. Parrot recommends you always fly Thermal
with Parrot Skycontroller 3 and a device, for the best flight experience.
b) If you do not wish to use the controller, connect your device to the Wi-Fi
network of Thermal, using the Wi-Fi settings card located inside the
drone’s shoulder bag - SSID format: AnafiThermal-xxxxx.
6. FreeFlight 6 runs automatically on your device and connects to Thermal
and to Parrot Skycontroller 3.
7. Check for controller and drone software updates.
8. Calibrate your Thermal, your Parrot Skycontroller 3, or both, if required,
following the instructions on the screen of your device.
9. Check that your flying zone is still safe and clear, and that no one (people, animal)
has approached or is approaching Thermal.
10. Stay at least 2m (6ft) clear from the drone, press the button and enjoy the
flight!
Page 21

User Guide v3.6 –
published on October 16, 2019
21
Ground take-off
Position Thermal on a flat, even, and clear surface.
Power it on, move at least 2m (6ft) away from Thermal and check that the
surroundings of the drone are absolutely clear.
Press the button on your Parrot Skycontroller 3, or tap the green “TAKE-OFF” box,
on the screen of your device.
Thermal takes off and stabilizes at 1m (3ft) from the ground, waiting for
commands from the pilot.
Hand launch
Be especially careful when you hand launch Thermal. This procedure is safe
provided you are not distracted or startled by an outside event with a live drone in
your hand: concentrate on what you are doing, but always stay aware of your
surroundings. Upon first opening of FreeFlight 6, from version 6.2, a hand launch
tutorial reminds you the following procedure. You can activate hand launch from this
tutorial page.
You can also activate the hand launch option from the
“Interface”
menu of
FreeFlight 6
“PREFERENCES”
(refer to the
“PREFERENCES – Interface”
section of this
guide for further information).
Power Thermal on and position the drone on your flat, open hand. On the
screen of your device, the green “TAKE-OFF” box is replaced by a blue “HAND LAUNCH”
box.
Android “Hand Launch” Screen
Press the button on your Parrot Skycontroller 3, or tap the blue “HAND LAUNCH”
box on the screen of your device. The drone’s blades start rotating slowly and the
screen of your device displays a hand-launch animation.
Briefly and briskly lift Thermal up and forward with your open hand: the drone
is airborne. It stabilizes, waiting for commands from the pilot.
Page 22

22
Left control stick (default mode)
Right control stick (default mode)
Rise
Forward
Descend
Reverse
Turn right
Move to the right
Turn left
Move to the left
Note that you can modify Thermal’s controls through the PREFERENCES menu
of FreeFlight 6. Refer to the “
PREFERENCES / Controls
” section of this guide for
additional information.
As any drone of the series, Thermal’s controls can also be set in Arcade
mode. Refer to the latest general user guide for additional information on
Arcade mode control.
Page 23

User Guide v3.6 –
published on October 16, 2019
23
To bring Thermal back to its take-off position, press the button on your
Parrot Skycontroller 3, or tap the icon on the screen of your device.
Thermal rises to 30 meters over its take-off point – or to the altitude you have
set, through FreeFlight 6, between 20 and 100 meters – and flies back over its takeoff position.
Refer to the
“PREFERENCES – Safety”
section of this guide for instructions on RTH
height configuration.
In the Follow Me mode, when the button or icon is activated, Thermal flies
back to the position of the pilot.
Precise Home Setting
When flight conditions are optimal at take-off, Thermal can set a “precise home” for
itself, through its vertical camera. In that case, a pop-up on the screen of FreeFlight 6
confirms a precise home has been set, and the home icon of the mini-map turns green.
Android “Precise Home Set” pop-up
Thermal features a Smart RTH capability: considering its altitude and its distance from
its take-off point, the drone computes in real time the power it needs to return home. When
short on battery power, FreeFlight 6 alerts you that it will enter automatic RTH mode.
If you feel confident you can bring Thermal back to its take-off point or if you wish to
land it at a different location, you can cancel the auto-RTH directly from the alert pop-up.
Page 24

24
Fly Thermal directly over a flat, even, and clear surface, then press the
button, or tap the orange “LAND” box on the screen of your device.
Thermal lands.
Hand landing
Be especially careful when you hand land Thermal. This procedure is safe
provided you are not distracted or startled by an outside event with a live drone
approaching your hand: concentrate on what you are doing, but always stay aware of
your surroundings.
Fly Thermal at least 50 cm directly over your open hand then press the
button, or tap the orange “LAND” box on the screen of your device.
Thermal lands on your hand.
Page 25
User Guide v3.6 –
published on October 16, 2019
25
Thermal’s smart LiPo battery is preinstalled on the drone and should always be
reinstalled in the same way, with the LEDs and power button facing up, to avoid
irrecoverable electric damage to the battery, to the drone, or to both.
The smart battery can be charged whether it is installed on Thermal or not. However,
you will need to remove the battery from the drone to access your microSD card. Refer to
the
“Retrieving media”
section of this guide for further information.
When handling Thermal, you should never apply pressure and generally avoid
touching the drone’s camera and gimbal – its most sensitive parts. The following
directions will help you handle your drone and battery safely.
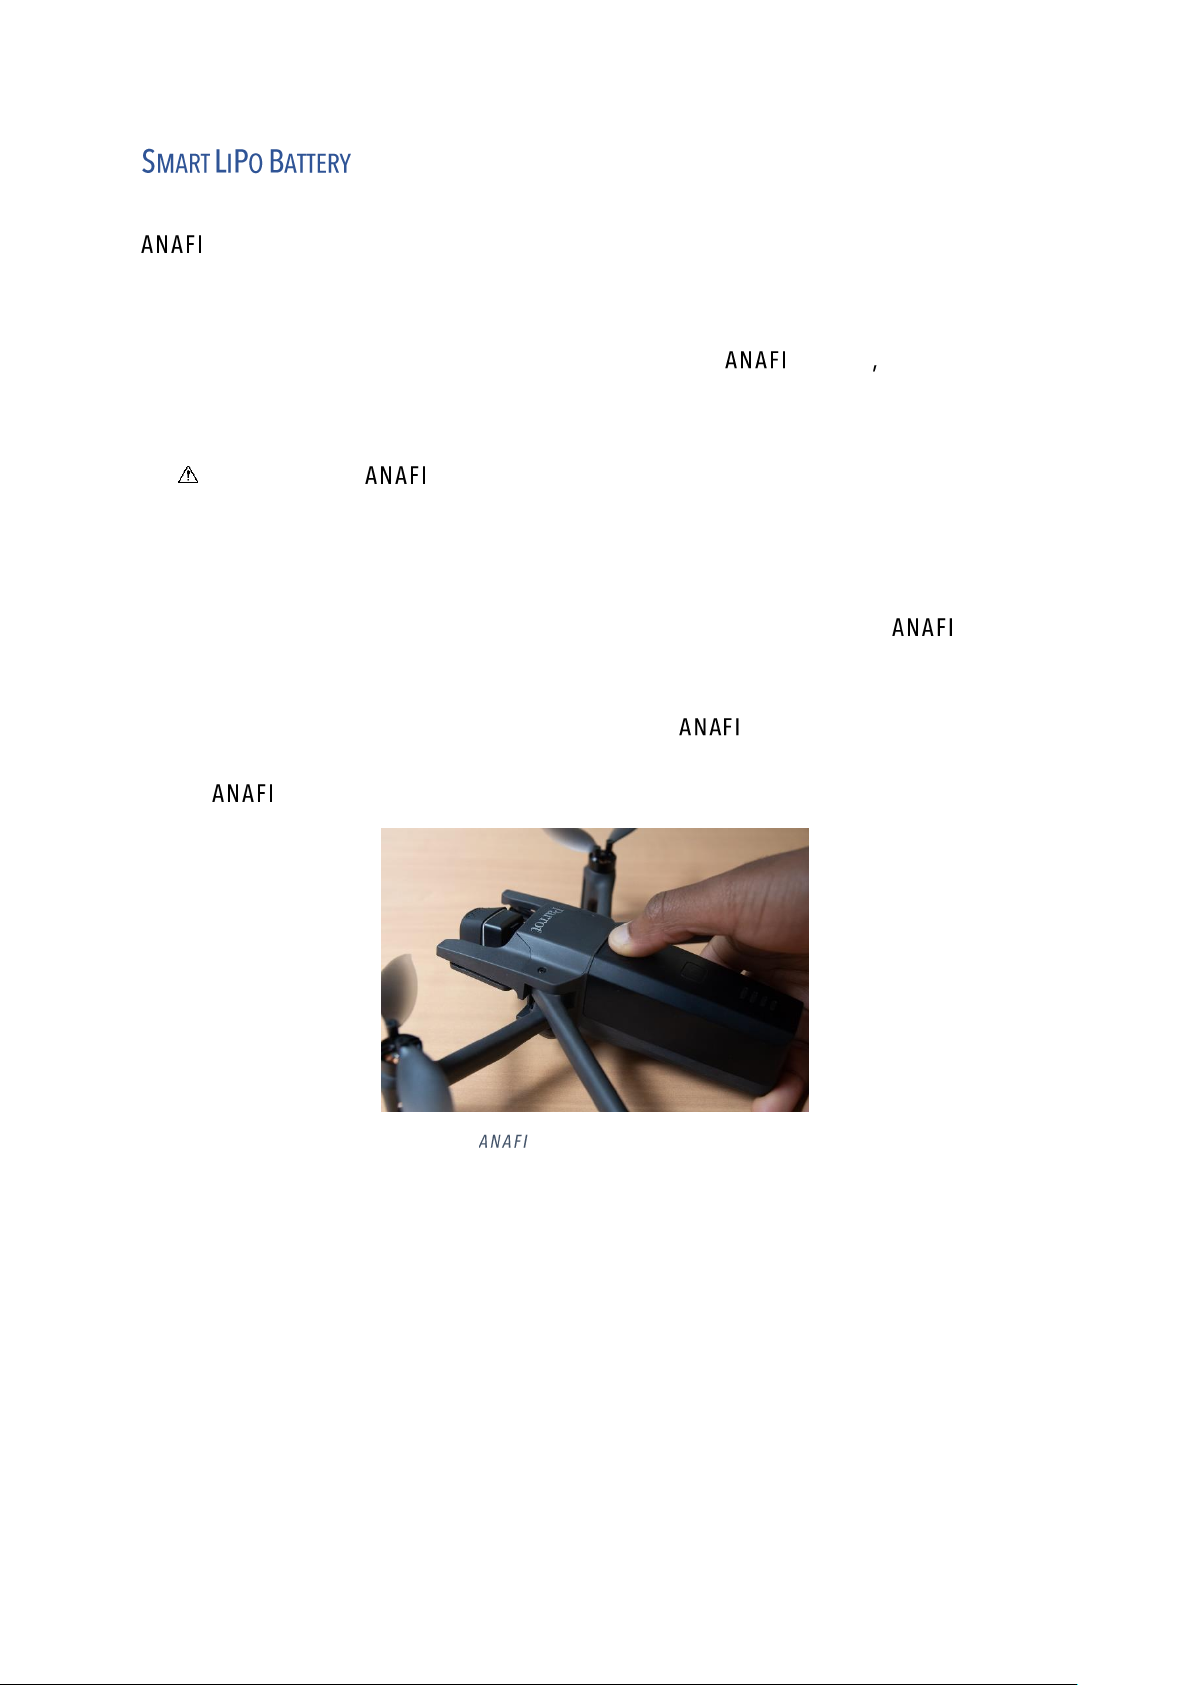
Battery removal
To remove the smart battery from the drone, unfold the back arms of Thermal.
Set the drone on a flat and even surface (such as a table), and press the push-button
which connects the battery to the body of the drone with your thumb. Gently slide
your thumb and the battery toward the back of Thermal. When the hook of
the push-button is disengaged from the body of the drone, lift the battery away from
Thermal.
Thermal: battery removal
Page 26

26
Battery installation
To install the smart battery back on the drone, unfold the back arms of
Thermal. Set the drone on a flat and even surface (such as a table), and position the
battery’s three hooks into the drone’s corresponding slots. Place your middle finger on
the Parrot logo of Thermal and your thumb on the back of the smart battery.
Squeeze your fingers together until you feel and hear the battery clicking into the
body of the drone. You are set!
Thermal: battery installation
Battery charging
To charge Thermal’s smart LiPo battery, use the enclosed USB-A to USB-C
cable to plug the battery to a power source. This convenient cable enables you to
charge your battery from:
o a wall socket, through an AC adapter;
o a tabletop or laptop computer’s USB-A port;
o a power bank’s USB-A port.
Indicative full charging times depending on power sources are as follows (at 20°C):
- AC adapter (5V - 3A): between 150 and 210 minutes;
- a computer’s or power bank’s USB-A port: between 270 and 320 minutes.
Thermal’s smart battery can also be recharged through a Power Delivery adapter or
charger (USB-PD standard), using a USB-C to USB-C cable (not included in the box). In that
configuration, full charging time of the battery can be reduced to 105 minutes.
About USB-PD power banks: Parrot does not recommend Thermal users to
invest in a USB-PD power bank, as not all of them support USB-C to USB-C charging
of Thermal’s battery. Indeed, due to the nature of the USB-C technology, some
USB-PD power banks recharge on Thermal’s smart battery, rather than the
other way around.
Page 27

User Guide v3.6 –
published on October 16, 2019
27
When Thermal’s smart LiPo battery is plugged to a power source and charging, its
4 LEDs indicate in real time its level of charge:
- LED 1 flashing: battery is between 0 and 25% charged;
- LED 1 steady & LED 2 flashing: battery is between 25 and 50% charged;
- LEDs 1 and 2 steady & LED 3 flashing: battery is between 50 and 75% charged;
- LEDs 1, 2 and 3 steady & LED 4 flashing: battery is between 75 and 100% charged;
- battery is plugged and all LEDs are off: battery is full.
Similarly, when your battery is not installed on Thermal, you can check its charge level
at any time by pressing its power button:
- 1 steady LED lights up: battery is between 0 and 25% charged;
- 2 steady LEDs light up: battery is between 25 and 50% charged;
- 3 steady LEDs light up: battery is between 50 and 75% charged;
- 4 steady LEDs light up: battery is between 75 and 100% charged.
Finally, the same logic applies when the smart LiPo battery is installed on the drone and
when Thermal is powered on. The number of steady LEDs enables you to estimate
your remaining flying time:
- 1 steady LED is lit up: less than 6 minutes flying time remaining;
- 2 steady LEDs are lit up: between 6 and 12 minutes flying time remaining;
- 3 steady LEDs are lit up: between 12 and 18 minutes flying time remaining;
- 4 steady LEDs are lit up: between 18 and 25 minutes flying time remaining.
Battery care and safety
As you can see, Thermal’s smart LiPo battery is as high-tech as any other element of
your flying 4K HDR camera.
Its firmware can be updated, like that of the drone and that of the controller, and it even
features a wintering mode, designed to increase its durability and facilitate its care. Ideally,
when not in use for a prolonged period, batteries should be stored half-charged. When not in
use for 10 days, Thermal’s smart battery discharges itself, if required, to 65% charge,
over a 48h period. In other words, after a maximum of 12 days without use, this smart
battery enters hibernation with a charge level which never exceeds 65%. If you leave your
Thermal battery for 12 days, you will find out its power button does not activate the
charge level LED indicators. The battery needs to be charged to exit the wintering mode and
start operating as described in the earlier paragraphs: this behavior preserves the battery
over time. Parrot recommends you always run a full charge of your smart battery before
flying Thermal.
Page 28

28
Like all other LiPo batteries, Thermal’s smart battery must be handled, transported
and stored with care:
- never leave a battery unattended while charging;
- never expose a battery to extreme temperatures, neither hot, nor cold;
- never charge a battery which is still warm from use (wait for at least 20 minutes);
- never use or recharge a damaged or swollen battery;
- always store your battery in a dry, ventilated place, at a temperature close to 20°C;
- always carry your battery in a fire-retardant bag or case (unless it is installed on
Thermal: it can then be transported with the drone, inside its carrying case).
Finally, note that Thermal’s smart battery will only allow charge in ambient
temperatures between +10°C and +45°C, and that using Thermal in temperatures
approaching 0°C will reduce its flying time. To minimize this slight drop in the smart battery’s
capacity, keep your battery as warm as possible before starting a flight in a cold
environment.
If the behavior of your battery is not consistent with the elements contained in this
section, and if you cannot get it to power your Thermal, you must hard reset
your battery: plug it to a power source with the enclosed cable, then keep the
battery’s power button pressed for 15 seconds (regardless of the behavior of the
LEDs), and release the button.
The battery’s LEDs flash quickly, one after the other, alternating green and red: the
hard reset is successful!
Page 29

User Guide v3.6 –
published on October 16, 2019
29
Your Thermal is equipped with a 16GB microSD card which enables you to record
videos and photos, and to transfer them easily to your computer, your device, or both. This
section explains how to extract the microSD card from Thermal, how to retrieve your
media from the microSD card, and how to reinstall it in the drone.
Extracting the microSD card
To extract the microSD card from Thermal, the battery must be removed from
the drone. Refer to the
“Battery removal”
section of this guide for details.
When you remove the battery from the body of the drone, you uncover the microSD
slot, which is protected by a small metal lock.
Slide this metal lock with a finger toward the back of Thermal to open it – you
will feel a slight click. Lift the front part of the lock to open the slot. Reach the
microSD card and extract it. An open lock icon and an arrow, located on the left of the
microSD slot, confirm to you the way you must slide the lock to open it.
Retrieving photos and videos
Use the enclosed microSD to SD card adapter to transfer videos and photos you have
taken with Thermal to your computer. Slide the microSD card into the adapter
and use the adapter how you would use any other SD card: access your videos and
photos through a card reader or the SD card slot of your computer. Copy your videos
and photos to the hard drive of your computer to edit, store, and manage your media.
The enclosed 16GB microSD card enables you to record just over 20 minutes of 4K
video. For this reason, Parrot recommends you backup your photos and videos, and
you empty your 16GB microSD card after each flight, to ensure you always have
available memory space to capture new still or moving images.
Installing the microSD card
To install the microSD card back into its slot, open the metal lock as you did when you
extracted the card from Thermal. Position the microSD card into its keyed slot:
make sure the metal contacts of the card are facing down and set on the contacts of
the drone. The shortest side of the microSD card should be facing toward the back of
the drone.
Tilt the metal lock over the microSD card. Press a finger gently on the lock and slide it
toward the front of Thermal to close and lock it – you will feel a slight click. A
closed lock icon and an arrow, located on the right of the microSD slot, confirm to you
the way you must slide the lock to close it.
Page 30

30
Compatible microSD cards
Refer to Parrot online documentation for an updated list of Thermal compatible
microSD cards.
Direct media retrieval (drone to computer)
You can also retrieve your media directly from Thermal, without extracting the
microSD card.
Use the enclosed USB-A to USB-C cable to connect the drone (USB-C) to a USB-A port
of your computer. Power Thermal on.
Thermal mounts as any other external drive: copy your media from the
DCIM/100MEDIA directory to your computer’s hard drive.
When you are done managing your media, eject Thermal as any other external
drive.
When plugged in to a computer and powered on, Thermal’s battery discharges
itself. This means you must recharge your smart battery after you have retrieved
your media, even if it was fully charged when you began the procedure.
FreeFlight 6 Gallery
Finally, you can manage your media and download them directly from Thermal to your
device with the Gallery of FreeFlight 6.
The Gallery also lets you:
- preview visible and thermography videos, without downloading them to your device;
- create panoramas (refer to the “
Creating panoramas
” section of this guide for
additional details);
- analyze thermography videos and photos [refer to the
“Thermal analyzer mode
(display or replay)”
of this guide for additional details].
To access the Gallery from the homepage of FreeFlight 6, either by tap the “microSD
card” box, on the top bar of the interface, or tap the “Gallery” box, at the center of the
interface.
If Thermal is powered on and connected to the device (directly or through the
Parrot Skycontroller 3), the FreeFlight 6 Gallery displays the microSD card media, by
default.
Tap any media to preview it.
Tap any green media download box to transfer the corresponding media to
your device.
Access the media you have downloaded to your device by tapping the “Local” box, at
the top of the interface.
Page 31

User Guide v3.6 –
published on October 16, 2019
31
The HUD (head-up display) interface of FreeFlight 6 is the ultimate companion to
Thermal. It enables you to access all the outstanding features of Thermal, from the
screen of your device, at the touch of your thumbs.
This section explores FreeFlight 6 functions, starting with a presentation of the top and
bottom bars of the Visible Spectrum HUD.
Access the Visible Spectrum HUD by taping “FLY” on the bottom right of the
homepage of FreeFlight 6.
iOS FreeFlight 6 homepage
Android FreeFlight 6 homepage
Page 32

32
Presentation of the iOS HUD (video mode view)
Drone’s horizontal distance from pilot Next available action
Drone’s height relative to take-off point Controller box (charge and GPS synch)
Drone’s ground speed Drone’s box (charge and GPS synch)
Back to homepage Preferences
Presets (Film, Sport, Spectrum Photo/video Soft shutter
Cinematic or Racing) & Toggle toggle button and timer
Control mode box
Piloting mode box Video settings box
Cineshots box Video mode box
Thermal and FreeFlight 6 are packed with features which are accessible from the HUD.
Before we present the
“PREFERENCES
” menu of FreeFlight 6, here is an overview of your
drone’s current piloting, Cineshots, Dronies, and visible video modes.
Piloting modes: Manual flight Cineshots: 360° (left & right)
Cameraman Reveal (30 & 60m)
Follow Me Spiral (30 & 60m)
Smartdronies Epic (30 & 60m)
FPV
Flight Plan Smartdronies Orbit
Touch & Fly: Waypoint & POI & Parabola
POI Dronies Dolly Zoom
Video modes: Standard Boomerang
Cinema
Hyperlapse Follow Me Orbit
High-Framerate Dronies Parabola
Slow Motion Tornado
Boomerang
Page 33

User Guide v3.6 –
published on October 16, 2019
33
The Android HUD of FreeFlight 6 displays strictly the same information, buttons, toggles, and
menus as the iOS HUD, in the same way – despite slight cosmetic differences.
Note that both GPS icons are green, on both screen captures (iOS and Android screen
presentations). This means that the drone’s controller (Skycontroller 3 or device) and
Thermal are both synchronized to enough GPS and Glonass satellites to
optimize the stability of the drone, especially at higher altitudes.
Parrot therefore recommends you always check both your FreeFlight 6 HUD’s GPS
icons are green (and not red), before you make your Thermal take off.
Page 34

34
Presentation of the Android HUD (photo mode view)
Drone’s horizontal distance from pilot Next available action
Drone’s height relative to take-off point Controller box (charge and GPS synch)
Drone’s ground speed Drone’s box (charge and GPS synch)
Back to homepage Preferences
Piloting mode box Soft shutter button
and shots count
Additional menus* Photo/ Photo settings box
(Presets & Control box, Spectrum video toggle
toggle & Cineshots box) Photo mode box
Thermal’s photo modes include a Single shot mode, a Burst mode, a Bracketing mode,
a Timer mode, a five-format Panorama mode, a Timelapse mode and a GPS Lapse mode.
* Note that depending on the size of Android devices, some may directly display the same
information as iOS devices, despite slight cosmetic differences.
Note that both GPS icons are green, on both screen captures (iOS and Android screen
presentations). This means that the drone’s controller (Skycontroller 3 or device) and
Thermal are both synchronized to enough GPS and Glonass satellites to
optimize the stability of the drone, especially at higher altitudes.
Parrot therefore recommends you always check both your FreeFlight 6 HUD’s GPS
icons are green (and not red), before you make your Thermal take off.
Page 35

User Guide v3.6 –
published on October 16, 2019
35
Access FreeFlight 6 preferences through the icon on the extreme right of the top bar of the
homepage, or that of the HUD. Preferences enable you to fine-tune Thermal to your
hand – to customize it, to fit your piloting and filming styles.
Access Preferences submenus from the boxes on the left of the screen. Tap a box to select it
and access its items.
For all items, default values (DV) are marked in bold characters.
Controls
The Controls preferences set the way your controller behaves. It also enables you to activate
the “Hand-launch” option.
Tap an item option to select it.
- Control mode: CLASSIC / ARCADE (only available in flight)
- Inverse joys OFF (white) / ON (green)
- Special OFF (white) / ON (green)
- EV Trigger OFF (white) / ON (green)
- Hand-launch NO / YES
About EV Trigger: when activated, the EV Trigger enables you to control the EV (exposure
value) directly from the zoom (right) trigger of the Parrot Skycontroller 3. (refer to the
“
PARROT SKYCONTROLLER 3 PRESENTATION
” section of this guide for additional information).
With this setting, you can therefore manually modify your EV from -3.0 to +3.0, by increments
of 0.3, which automatically impacts the shutter speed (“s” value) of the camera.
Tap “RESET ALL CONTROL PREFERENCES” on the bottom of the page to reset preferences.
Presets
The Presets preferences allow you to adapt the flight behavior of Thermal for each of
four modes (“Film”, “Sport”, “Cinematic” and “Racing”).
Tap an item option to select it.
- Global reactivity: 1% to 100% (DV: 15% for FILM & CINEMATIC;
20% for SPORT; 30% for RACING)
- Horizon FIXED / DYNAMIC (DV: FIXED for FILM & SPORT;
DYNAMIC for CINEMATIC & RACING)
- Camera tilt speed 1°/s to 180°/s (DV: 10°/s for FILM & CINEMATIC;
20°/s for SPORT & RACING)
- Banked turn NO / YES (DV: YES for FILM, CINEMATIC & RACING;
NO for SPORT)
- Inclination 1°/s to 40°/s (DV: 10°/s for FILM; 20°/s for CINEMATIC;
25°/s for SPORT & RACING)
Page 36

36
- Vertical speed 0.1m/s to 4m/s (DV: 1m/s for FILM; 2m/s for SPORT;
2.5m/s for CINEMATIC; 3m/s for RACING)
- Rotation speed 3°/s to 200°/s (DV: 10°/s for FILM; 20°/s for SPORT &
CINEMATIC; 40°/s for RACING)
About Horizon and Banked turn: refer to in-app information for details about these features.
Note that “Global reactivity”, “Inclination” and “Vertical speed” values are the ones
which carry the biggest impact on Thermal’s acceleration and general flying
behavior. Corresponding sliders turn to orange instead of green to warn users the
settings they have selected require extreme care, superior piloting skills, or both,
when flying Thermal. Your drone will always remain outstandingly responsive,
but with extreme settings, it will accelerate much more rapidly than you can imagine:
you have been warned!
Tap “RESET ALL PRESETS PREFERENCES” on the bottom of the page to reset the
corresponding Mode to its default values. In other words, you must tap “RESET ALL PRESETS
PREFERENCES” in each Mode to revert all Modes to their default values.
Thermal
The Thermal preferences deal with specific thermography settings.
Tap an item option, use “<” or “>” and “+” or “–” to change values.
- Unit of temperature: FAHRENHEIT / KELVIN / CELSIUS
- Color gradient: Fusion / Rainbow / White Hot / Black Hot
- Thermal calibration AUTO / MANUAL
- Temperature range: DEFAULT / VERY HIGH TEMPERATURES
- Custom emissivity Emissivity (0.0 to 1.0; DV: 0.95)
Reflected temperature (-273° C to 1 000° C; DV: 20° C)
About Thermal calibration: AUTO mode is recommended for most users. If you select the
MANUAL mode, note that the application will periodically remind you to calibrate your
thermal camera, through the dedicated button of your HUD.
About Temperature range: DEFAULT (High-Gain) mode is recommended for scenes between
- 10° C and 140° C. VERY HIGH TEMPERATURES (Low-Gain) mode is recommended for scenes
between 140° C and 400° C.
About Reference values: adapt reference values to a specific target to improve the accuracy
of your measurements.
- Emissivity refers to the ability of surfaces to emit thermal (infra-red) radiation.
Emissivity values range from 0.0 to 1.0: the emissivity of highly polished metallic
surfaces seldom exceeds 0.10; the emissivity of the surface of a perfect black body is
1.0.
Page 37

User Guide v3.6 –
published on October 16, 2019
37
- Reflected temperature refers to the thermal radiation originating from objects which
reflect off the measurement target.
Tap “RESET THERMAL SETTINGS” on the bottom of the page to reset preferences. This button
also reinitializes thermal Spot and Absolute scales to default values, as well as visible and
thermal images blending.
Interface
Interface preferences set the amount of information which appear on your FreeFlight 6 HUD.
For most item, tap an option to select it – but tap “CHANGE” to access more FPV Goggles
options.
- Show minimap NEVER / WITH CONTROLLER / ALWAYS
- Map type ROADMAD / SATELLITE / HYBRID
- Show framing grid NO / 3x3 / 6x6
- Measurement system AUTO / IMPERIAL / METRIC
- FPV Goggles Tap “CHANGE” to access the following options:
Parrot – CockpitGlasses 1 / Homido
Parrot – CockpitGlasses 2 / Merge VR
Parrot – CockpitGlasses 3 / BNext
Google – DayDream View / Skillkorp VR5
Homido V2 / Zeiss VR One
Homido Prime
Tap “TEST” to verify the rendering of your selection
Tap “RESET ALL INTERFACE PREFERENCES” on the bottom of the page to reset preferences.
Safety
Through Safety preferences, you can set a safe and clear flying area for Thermal.
Set Thermal’s maximum flight altitude with the “Max altitude” slider.
To set a maximum distance from the pilot for your drone, move the “Max distance” slider to
the required value.
When the Geofence is activated, Thermal will automatically stop when it reaches the
maximum altitude or the maximum distance you have selected: a red prompt will also
appear on your HUD.
- Geofence NO / YES
- Max altitude 1m to 150m (DV: 30m)
- Max distance 10m to 4 km (DV: 300m)
- Minimum altitude when 20m to 100m (DV: 30m)
using RTH
Tap “RESET ALL SAFETY PREFERENCES” on the bottom of the page to reset preferences.
Page 38

38
Camera
Camera preferences enable you to select camera options, both in photo and video modes.
- Camera calibration Tap “CALIBRATE” to access “Correct horizon”, “Gimbal
Calibration” & “Cameras alignment” features.
- Auto record from take-off NO/ YES (video only)
- Lossless zoom only NO / YES (selecting “YES” blocks zoom in JPEG RECT)
- Display overexposure NO / YES
- Anti-flickering OFF / AUTO / 50Hz / 60 Hz
About Correct horizon: only resort to the “Correct horizon” procedure if you notice your videos
and photos are systematically tilted on the same side. Refer to the “
Camera calibration
”
section of this guide for the detailed procedure.
About Cameras alignment: only resort to the “Cameras alignment” procedure if you notice
the thermal and visible images of your Thermal are misaligned. Refer to the “
Camera
calibration
” section of this guide for the detailed procedure.
About Overexposure display: when this setting is activated, the HUD of FreeFlight 6 shows all
overexposed areas of the screen as hatched, which enables you to fine-tune your framing,
your EV settings, or both.
About Anti-flickering: this setting and the associated technology aim at eliminating the flicker
effect which can arise due to some artificial lights. The “AUTO” option should work for most
users, but depending on your country, you can try other settings if you feel bothered by a
flicker effect on your device’s screen, your artificial light videos, or both.
Tap “RESET ALL CAMERA PREFERENCES AND SETTINGS” on the bottom of the page to reset
preferences.
Network
Network preferences let you change your Thermal’s Wi-Fi network name, password,
and band.
- Network’s name Tap the field to change your Thermal’s network name
- Password Tap the box to change your network’s password
- Wi-Fi band AUTO / MANUAL
Page 39

User Guide v3.6 –
published on October 16, 2019
39
In addition to its thermography camera, Thermal is equipped with a state-of-the-art
4K, 3-axis-stabilized camera, which delivers astoundingly sharp motion and still pictures,
through a 1/2.4’’ CMOS 21MP sensor.
The lens of this camera includes low dispersion aspherical elements, that reduce chromatic
aberrations and flare, and guarantee optical excellence to such a small, smart and versatile
airborne imaging system.
Although you can film and take pictures using your device as Thermal’s only controller,
we recommend you always use the Parrot Skycontroller 3 and your device, for the best
controlled, most precise, and safest filming and photos-shooting flights.
Making videos
By default, Thermal and FreeFlight 6 are set to start recording a video as soon as
Thermal takes off. This literally means all you have to do, to start filming, is to fly
Thermal into the sky.
However, depending on your filming objectives, Thermal and FreeFlight 6 offer a
wealth of settings, from full auto to manual professional options, for you to make the most
of every situation.
If required, tap the photo/video toggle in the middle of the bottom bar of the HUD, to circle
the film camera (right icon) in white.
Main filming options are twofold, and accessible from the HUD of FreeFlight 6.
- First, select a video mode by tapping the corresponding box of the HUD.
The options appear on your device, as they do on the screen capture below. Tap a
video mode to select it and tap the video mode box again to confirm your choice.
- Second, select a video resolution and a framerate (fps – frames per second) value
from the corresponding box of the HUD.
Tap the video settings box to call the individual video resolution and fps boxes.
Tap the video resolution box to access the available video resolutions and tap one to
select it.
Tap the fps box to access the available fps values and tap one to select it.
Tap the video settings box again to close the sub-boxes and confirm your choices.
Page 40

40
Available video resolutions and fps values depend on the video mode you have selected:
Standard: all-round 4K, 2.7K or 1080p filming, at 24, 25 or 30fps.
Cinema: spectacular 4K cinema filming, at 24fps.
Hyperlapse: time-lapse video with a configurable speed factor (x15, x30, x60,
x120, x240), in 4K, 2.7K or 1080p, exported at 24, 25 or 30fps.
Slow-Motion 1080p filming at 48, 50 or 60fps, automatically slowed down by a
factor of 2 (x0.5) and exported at 24, 25 or 30fps.
Slow-Motion 720p filming at 96, 100 or 120fps, automatically slowed down by a
factor of 4 (x0.25) and exported at 24, 25 or 30fps.
High-Framerate: 1080p filming at 48, 50 or 60fps (ideal for post-processing) and
720p filming at 96, 100 or 120fps.
In the following screen capture, Standard video mode is activated: available video resolutions
are 4K (UHD), 2.7K and 1080p (FHD) – either in 24, 25 or 30fps, which you would find out by
taping “30 fps” on the bottom right of the screen.
iOS Standard video format menu
When you are happy with your settings and your framing, press the hard shutter button on
the right of Parrot Skycontroller 3 (or tap the soft shutter button of the HUD) to start filming.
The soft shutter button of the HUD animates and displays a cycle between red square, and
red circle. The timer starts running.
Press the hard shutter button of the controller (or tap the soft shutter button of the HUD)
again to end the recording. The soft shutter button of the HUD comes back to steady, red
and round. The timer resets.
Page 41

User Guide v3.6 –
published on October 16, 2019
41
Taking photos
To access the photo camera of Thermal, tap the photo/video toggle in the middle of
the bottom bar of the HUD, to circle the photo camera (left icon) in white.
Seven photo modes are available on Thermal: Single shot, Burst, Bracketing, Timer,
Timelapse, GPS Lapse and Panorama (5 formats).
Thanks to its 21MP CMOS sensor, Thermal produces three main picture formats:
- rectilinear (up to 16MP) or wide (21MP) JPEG;
- wide 21MP DNG (Digital NeGative: Adobe open standard RAW format);
- composite panoramas (JPEG), up to 32MP.
Main photography options are accessible from the HUD of FreeFlight 6.
- First, select a photo mode by tapping the corresponding box of the HUD.
The options appear on your device. Tap a photo mode to select it and tap the photo
mode box again to confirm your choice.
When the “Single” mode is selected, the soft shutter button of the HUD appears as a
full white circle.
When the “Burst” mode is selected, the soft shutter button of the HUD displays the
Burst icon inside a white circle.
Selecting the “Bracketing” mode opens three options: 3 photos (-1 EV, +0.0 EV, +1 EV),
5 photos (-2 EV to +2 EV) and 7 photos (-3 EV to +3 EV). When one of these options
has been selected, the soft shutter button of the HUD displays the Bracketing icon
inside a white circle.
Selecting the “Timer” mode opens three options: 3 secs, 5 secs and 10 secs. When one
of these options has been selected, the soft shutter button of the HUD displays
“3 secs”, “5 secs” or “10 secs” inside a white circle, depending on the option which has
been chosen.
Selecting the “Panorama” mode opens three options: Vertical, Horizontal and 360.
When one of these options has been selected, the soft shutter button of the HUD
displays the corresponding icon inside a grey ( Thermal landed) or white (
Thermal flying) circle.
The Panorama mode is indeed the only photography mode which requires the drone
to be flying before you can activate the shutter. Refer to the next section, “
Creating
Panoramas
”, for additional details about the “Panorama” mode.
Selecting the “Timelapse” mode opens six options: 5 secs, 10 secs, 15 secs, 30 secs,
60 secs, and 120 secs. When one of these options has been selected, the soft shutter
button of the HUD displays a Timelapse icon.
Page 42

42
Selecting the “GPS Lapse” opens six options: 5m, 10m, 20m, 50m, 100m, and 200m.
When one of these options has been selected, the soft shutter button of the HUD
displays a GPS Lapse icon.
- Second, select a photo format from the corresponding box of the HUD.
Tap the photo settings box to call the photo settings boxes.
Tap the last box on the right of the screen to access the available photo formats.
Available photo formats for each photo mode are as follows:
Single: JPEG RECT, JPEG WIDE, DNG+JPEG (RECT or WIDE)
Burst: JPEG RECT, JPEG WIDE
Bracketing: JPEG RECT, JPEG WIDE, DNG+JPEG (RECT or WIDE)
Timer: JPEG RECT, JPEG WIDE, DNG+JPEG (RECT or WIDE)
Panorama: JPEG RECT only
Timelapse: JPEG RECT, JPEG WIDE, DNG+JPEG (RECT or WIDE)
GPS Lapse: JPEG RECT, JPEG WIDE, DNG+JPEG (RECT or WIDE)
Tap a format (JPEG RECT, or JPEG WIDE if available, or any DNG+JPEG format if
available) to select it.
Tap the photo settings box again to close the sub-boxes and confirm your choice.
Android photo formats: DNG+JPEG WIDE (zoom is locked, stream image is WIDE)
Android photo formats: DNG+JPEG RECT (zoom is unlocked, stream image is RECT)
Page 43

User Guide v3.6 –
published on October 16, 2019
43
When you are happy with your settings and your framing, press the hard shutter button on
the right of the Parrot Skycontroller 3 (or tap the soft shutter button of the HUD) to take a
photo.
In “Single” mode, the screen flashes white then freezes briefly in black and white to confirm
a picture has been taken. The number to the left of the soft shutter button (the number of
media on the microSD card) of the HUD is increased by 1.
In “Burst” mode, the screen flashes white then freezes briefly in black and white to confirm
14 pictures have been taken in the span of 1 second. The number to the left of the soft
shutter button of the HUD is increased by 14.
In “Bracketing” mode, the screen flashes white then freezes briefly in black and white to
confirm 3, 5 or 7 pictures have been taken. The number to the left of the soft shutter button
of the HUD is increased by 3, 5 or 7, depending on your option choice.
In “Timer” mode, the countdown is displayed (from 3, 5 or 10 seconds) at the center of the
HUD, the timer of the soft button also countdowns, then the screen flashes white and
freezes briefly in black and white to confirm a picture has been taken. The timer of the soft
shutter button resets. The number to the left of the soft shutter button of the HUD is
increased by 1.
For additional details on the “Panorama” mode, refer to the next section, “
Creating
Panoramas
”.
In “Timelapse” mode, the screen flashes white then freezes briefly in black and white to
confirm a picture has been taken. 5 to 120 seconds later, depending on your option choice,
the drone takes another photo, and so on until you press the shutter button again to stop
the Timelapse. Between each shutter action, a green progress bar, at the bottom of the
screen, serves as a countdown. At the end of the Timelapse, the number to the left of the
soft shutter button reflects the total number of medias on the microSD card of the drone.
In “GPS Lapse” mode, the screen flashes white then freezes briefly in black and white to
confirm a picture has been taken. Control and move ANAFI Thermal: when the drone reaches
any point on a 5 to 200-meter bubble around the initial photo, depending on your option
choice, the drone takes another photo, and so on until you press the shutter button again to
stop the GPS Lapse. Between each shutter action, a green progress bar, at the bottom of the
HUD, lets you estimate the distance the drone must cover before the next shot. At the end of
the GPS Lapse, the number to the left of the soft shutter button reflects the total number of
medias on the microSD card of the drone.
About Thermal photo formats:
JPEG RECT: 4:3 aspect ratio, up to 16MP and 75.5° horizontal field of view (HFOV)
JPEG WIDE: 4:3 aspect ratio, 21MP, 84° HFOV – zoom is disabled for this format
DNG+JPEG: 4:3 aspect ratio, 21MP, 84° HFOV – zoom is disabled for WIDE option
Page 44

44
The DNG+JPEG options produces at least 2 files (1 DNG, 1 JPEG) for each shutter
action. As other RAW picture formats, DNG is a very useful format for professional
photography processing and workflow. Indeed, RAW formats retain all the information
gathered by photography sensors, contrary to JPEG formats – which are compressed
and processed renderings of this comprehensive information. In consequence, RAW
pictures such as Thermal’s DNG are heavy files, but they offer the very best
post-processing and retouching possibilities.
Creating Panoramas
Thermal panoramas are generated automatically through the gallery of FreeFlight 6,
based on a series of pictures taken by the drone.
The generation of a panorama, regardless of its format, implies three phases:
- collecting the pictures, in flight;
- downloading the pictures from Thermal to your device;
- stitching the pictures together to create the panorama, on your device, through the
gallery of FreeFlight 6.
Before shooting a panorama:
- Make sure you are not flying lower than 10 meters (30ft) over water.
- Make sure no object nor subject are present in a 10 meters (30ft) radius around
Thermal.
- Bear in mind Thermal locks the exposure (refer to the “
AE Lock
” section of this
guide for additional information on exposure locking) of the frame with which you
start your panorama. For this reason, Parrot recommends you always frame the main
subject of the intended panorama before pressing the shutter button.
- Bear in mind Thermal will not enable you to proceed with a panorama if the
drone is short on power (capturing a 360 Panorama takes Thermal up to
3 minutes).
To capture a panorama, select the “Panorama” box from the “Photo Mode” menu of the
HUD. Then, tap the panorama type you want to select it: Vertical, Horizontal or 360. The
soft shutter button icon reflects your choice, as on the screen capture below.
Page 45

User Guide v3.6 –
published on October 16, 2019
45
Android Panorama types
When you are happy with your framing, press the hard shutter button on the right of
the Parrot Skycontroller 3 (or tap the soft shutter button of the HUD) to begin the
Panorama capture. Thermal starts taking pictures and the bottom of the HUD
displays a progress bar which fills with green as the capture unfolds.
Panorama types capture characteristics:
- Vertical: Thermal takes 8 photos in about 35 seconds
- Horizontal: Thermal takes 10 photos in about 40 seconds
- 360: Thermal takes 42 photos in about 180 seconds (3 minutes)
To download the Panorama pictures to your device, land Thermal, access the
homepage of FreeFlight 6 and tap the microSD card box or the Gallery box to display
the media present on your microSD card. Like other media, Panoramas are marked with
their distinct icon and a green download box, which shows the size of the
corresponding series of pictures.
Android microSD gallery: a 360 panorama has been downloaded to the device
Tap the green box of the Panorama you want to generate to start downloading the
corresponding series of pictures to your device. When the download is complete,
FreeFlight 6 displays a page from where you can delete the downloaded photos: tap
Page 46

46
“Yes” to keep the originals on the microSD card; tap “No” to delete them. FreeFlight 6
displays the Local (device) gallery, which contains only the media you have downloaded
from Thermal’s microSD card.
Android Local (device) gallery
Finally, select the panorama you want to generate from your Local gallery: FreeFlight 6
displays the following screen.
Android Local (device) panorama generation page
Tap “Create” to generate the panorama (or tap the other icon to access the series of
individual pictures).
Depending on the power of your device, FreeFlight 6 may display one or two
resolution options, up to 32 MP. Select the option you want to launch the generation.
The time this process takes also depends on your device’s power. For the highest
quality 360 panorama (32 MP), it can take several minutes.
Page 47

User Guide v3.6 –
published on October 16, 2019
47
Android: Creating panorama
When the panorama creation is complete, FreeFlight 6 displays the panorama and
gives you the option to delete the original files.
For each Vertical or Horizontal panorama capture, you will be able to generate one
panorama only.
For each 360 capture, you will be able to generate three different preset panoramas
(Sphere, Little Planet and Tunnel) and a potentially infinite number of custom
panoramas, through the 360 editor.
Do not worry about stitching issues on your 360 editor screen, when you create a
custom panorama: the direct rendering is a preview only. For each custom panorama
you decide to create, FreeFlight 6 completely reprocesses the data to minimize
stitching issues and discrepancies.
An example of custom panorama
Page 48

48
Two of Thermal’s main assets are its gimbal tilt control capabilities (180°, from the
ground to the sky), and its zoom. This section presents these features and the way to
activate them.
Gimbal tilt control
Thermal’s gimbal tilt control is activated through the left trigger of Parrot
Skycontroller 3. It is available in all video and photo modes, and in all manual piloting modes.
- To aim the gimbal toward the ground, push the tilt control trigger down.
- To aim the gimbal toward the sky, pull the tilt control trigger up.
- To reset the gimbal tilt to a horizontal position, press the optics reset button on the
left of Parrot Skycontroller 3 (this action also resets the zoom factor of the lens to x1).
Zoom control
Thermal’s zoom control is activated through the right trigger of Parrot Skycontroller 3.
It is available in all video modes, and in JPEG RECT photo mode (with an impact on the final
resolution of your pictures). WIDE photo modes imply the use and rendering of all 21MP
delivered by Thermal’s CMOS sensor: zoom is deactivated in both WIDE photo modes.
- To zoom in on a subject, push the zoom trigger down.
- To zoom out, pull the zoom trigger up.
- Pressing the optics reset button on the left of Parrot Skycontroller 3 instantly resets
the zoom factor of the lens to x1 (this action also resets the gimbal tilt to a horizontal
position).
The HUD of FreeFlight 6 presents precise, decimal-by-decimal zoom information at all times,
in the middle of the left side of the screen, as shown on the following screen captures – note
that in these examples, Thermal’s gimbal is tilted all the way toward the ground.
Android 4K x1 zoom
Page 49

User Guide v3.6 –
published on October 16, 2019
49
Android 4K x1.4 zoom
Android 4K x2.8 zoom
As already mentioned, Thermal presents no lossless zoom capabilities for pictures: the
zoom is deactivated by design in WIDE formats (JPEG and DNG+JPEG), and it has an impact
on the resolution of the pictures in JPEG RECT format.
By contrast, Thermal offers impressive lossless zoom capabilities for 4K UHD (x1.4),
2.7K (x1.9) and 1080p (X2.8) videos.
Page 50

50
iOS 1080p x1 zoom
iOS 1080p x1.8 zoom
iOS 1080p x2.8 zoom
Note that in the video mode, when you leave the lossless envelope of the zoom, the zoom
indicator, on the middle left of the HUD, turns orange instead of white.
Page 51

User Guide v3.6 –
published on October 16, 2019
51
Camera Calibration: Correct horizon (exceptional procedure)
Your Thermal’s camera has been factory-calibrated with unparalleled precision.
Unlike the calibration of Thermal or that of the Parrot Skycontroller 3, which
must be carried out periodically, the camera calibration must not be carried out
unless it appears necessary – typically, after a crash.
If you notice a tilted horizon on all your videos and photos, and if this tilt is always on
the same side, access camera calibration to make your horizon perfectly straight
again.
This feature is accessible from the Thermal box on the FreeFlight 6 homepage (or
from the Thermal box of the HUD) and from the
“PREFERENCE – Camera”
menu.
Before starting this procedure, you need to position Thermal on a flat and perfectly
level surface, exactly perpendicular to any pattern containing straight lines you can use as
horizon references. A set square can help you check that a line on your floor is perpendicular
to your wall, as on the following pictures.
Finding a line perpendicular to the wall
Thermal ready for camera calibration
Page 52

52
When Thermal is correctly positioned, perpendicular to its straight horizon
reference, power it on, along with the Parrot Skycontroller 3 and your device, as you
would for any flight.
Access “Camera calibration” from the Thermal box of the homepage or the
HUD of FreeFlight 6, or from the “PREFERENCES-Camera” menu.
Select the “Correct horizon” option from the following screen.
Thermal: Camera calibration (Android)
The following screen appears.
Horizon correction: before (iOS)
Tap “–“ or “+” until the artificial horizon of Thermal matches the horizon
reference facing the drone. Do not worry about vertical lines: they may not appear
straight or parallel on the calibration screen.
Page 53

User Guide v3.6 –
published on October 16, 2019
53
Horizon correction: after (iOS)
When you have straightened the tilt of the camera, tap the “<” icon on the top left of
the screen to confirm your setting and exit camera calibration.
Camera Calibration: Gimbal calibration
Use this option to perform a gimbal calibration, similar to that which occurs after
Thermal is powered on.
Be aware that FreeFlight 6 can require you to carry out this procedure (as it can
require you to perform a drone magnetometer calibration) before allowing you to fly
Thermal.
Camera Calibration: Cameras alignment (exceptional procedure)
Use this option to align the images of your visible and thermal spectrum cameras.
As the interface advises, due to cameras parallax, use the farthest possible object as
your alignment reference.
Thermal: Camera alignment (Android)
Note that you can activate the zoom (right) trigger to magnify the view of your
reference.
Page 54

54
Tap “-“ or “+” on each axis to align visible and thermal views – note that on these
example screen captures, the alignment of the cameras does not need a correction.
Thermal: Camera alignment, zoomed in (Android)
Tap “<” on the top left of the screen to exit the interface and confirm your settings.
Page 55

User Guide v3.6 –
published on October 16, 2019
55
Thermal is set to deliver high quality and balanced 4K videos and 21MP photos, out of
the box.
Some image enthusiasts and all professional directors, videographers and photographers,
however, will find their way through pro-imaging settings. This section is designed to help
you exploit manual settings and develop your filming and photography styles.
The Exposure value (EV) is the only setting accessible in the Auto mode, from the
“Video/Photo settings box” menu of the HUD.
Exposure value (EV)
The EV expresses the general darkness or lightness of a photograph – or a video. At
+0.0 (zero) EV, Thermal automatically adapts the shutter speed and the ISO value to
deliver a perfectly balanced photo or video: not too dark and not too light.
Tap the “+0.0 EV” box to activate the EV slider.
Slide your finger on the screen to adapt your EV toward negative values and darken
your picture or video.
Use positive values to lighten your images. This can be useful if you want to capture a
backlit scene and to fade surroundings in light.
iOS -1.0 EV iOS +1.0 EV
To activate further settings, tap “Auto”, on the far left of the Video/Photo settings box. The
additional settings boxes are unlocked, they stand out in white and “Auto” has been replaced
with “Pro”.
Shutter speed (s)
The “s” value refers to the time, in fraction of second, when the shutter stays open to
capture a still picture: it is called exposure time.
In Auto mode, Thermal selects the best shutter speed and ISO value couple, in real
time, depending on the scene and available light. In consequence, selecting a shutter speed
also deactivates the Auto ISO mode.
Page 56

56
As Thermal’s f/2.4 aperture lens lets a lot of light in, even compared to most
professional SLR lenses, your drone can achieve very fast “s” values (down to 1/10000s) and
capture very fast action. It can also be used for slow shots, up to 1 second for the photo
mode.
Note that Thermal can shoot pictures and videos when it is not flying. You can even
hold it in your hand and use it as a premium stabilized 4K video and photo camera.
Tap the “s” box to open the shutter slider.
Select a value to exit the auto-mode for shutter speed and ISO. This action also
deactivates the EV slider.
Set the s value you require, then tap the “ISO” box to select an ISO value. Experiment!
The display of the HUD reflects your settings. If you get lost, tap Auto either on the
“s” or the “ISO” slider to get back to auto exposure and reactivate the EV slider.
ISO value (ISO)
The ISO value refers to the sensitivity of the sensor. As we have seen, it is linked to the
shutter speed value: both sliders activate when you deactivate the “Auto” mode and set a
value for one, or for the other. The lower the ISO value, the lower the sensitivity of the
sensor, and the lower the image noise (digital grain). Therefore, under good lighting
conditions, such as sunny daylight outside shots, low ISO values (100 or 200) should always
be selected. The sensitivity of the sensor increases as the ISO value goes up: 3200 ISO can be
used to capture low light interior scenes, or exterior shots at dusk or dawn, for example.
By default, in Auto mode, Thermal constantly adapts its ISO and shutter speed values
to the scene it is filming. Setting an ISO value for a whole shot or series of shot, however, is
very useful to professional filming.
Tap the ISO box to open the shutter slider.
Select a value to exit the Auto mode for ISO and shutter speed. This action also
deactivates the EV slider.
Set the ISO value you require, then tap the “s” box to select a shutter value.
Experiment! The display of the HUD reflects your settings. If you get lost, tap Auto
either on the “s” or the “ISO” slider to get back to auto exposure and reactivate the
EV slider.
White balance (WB)
White balance deals with the color temperature of the light. Cold lights make the whites look
blue. Warm lights make the whites look yellow. By default, in Auto WB mode, Thermal
keeps the whites white, at all times: it adapts its WB value in real time.
However, setting a WB value for an entire shot is especially useful for professional filming:
stable WB facilitates the grading (color treatment) of videos.
Page 57

User Guide v3.6 –
published on October 16, 2019
57
Tap the WB box to open the white balance options.
Select the WB preset that is best suited for your shooting conditions, your subject, or
both – or tap the CUSTOM option to set the temperature of the light of your scene
manually, between 2 000 and 10 000 K (kelvins).
The display of the HUD reflects your settings and helps you make the best choice.
Android Auto WB Android Incandescent WB
Android Fluo WB Android Sunny WB
Android Cloudy WB Android Shaded WB
Android 2 000 K WB Android 10 000 K WB
Page 58

58
HDR
HDR (high dynamic range) is another great way to enhance a video or a photo. The HDR
option is available for Standard video mode 4K, 2.7K and 1080p formats (regardless of
framerate values) and JPEG photos.
To activate the HDR option, select a Standard video mode or a JPEG photo format
from the relevant boxes of the bottom bar of the HUD. A white and round HDR icon
appears on the screen of your device, to the left of the photo/video trigger.
Tap this icon: it turns yellow and an HDR notice appears in black inside a yellow box,
under the “next available action” box, at the center of the top bar of the HUD. Press
the hard shutter button on your Parrot Skycontroller 3 (or the soft shutter button of
the HUD) to start filming in HDR or to take an HDR photo.
Tap the round HDR icon again to deactivate HDR. The yellow HDR box disappears from
the screen.
Android HDR off Android HDR on
Note that you cannot modify “s”, “ISO” or “WB” values when the HDR mode is
activated. However, you always keep control over your EV value.
Note that activating (or deactivating) HDR stops any ongoing video recording.
NATURAL Style
The Natural Style is the default Thermal Style: it respects nature’s colors and tones.
Activate the “NATURAL” Style from the “Style” box of the Video/Photo settings menu.
P-LOG Style
One alternative Style to Natural looking images (default value) can be selected for
Thermal both in the video mode, and in the photo mode. This alternative Style is called “PLOG”. It makes images a little less contrasted: P-LOG style is ideal for videos you want to edit
and process using professional grading tools and filters.
Activate the “P-LOG” Style from the “Style” box of the Video/Photo settings menu.
INTENSE Style
Another alternative Style to Natural looking images (default value) can be selected for
Thermal both in the video mode, and in the photo mode. It is called “Intense”. It makes
images more saturated and contrasted.
Activate the “INTENSE” Style from the “Style” box of the Video/Photo settings menu.
Page 59

User Guide v3.6 –
published on October 16, 2019
59
PASTEL Style
Another alternative Style to Natural looking images (default value) can be selected for
Thermal both in the video mode, and in the photo mode. It is called “Pastel”. It makes images
less saturated, but it brings out their warmest tones.
Activate the “PASTEL” Style from the “Style” box of the Video/Photo settings menu.
ADJUSTMENT
The ADJUSTMENT button, to the right of the PASTEL box, provides three additional settings
for your Normal Style still images and films:
- Saturation: sets the intensity of the colors (from -2 to +2)
- Contrast: sets the degree of difference between lighter and darker
parts of the image (from -2 to +2)
- Sharpness: sets the distinction of the reproduction of details (from -1 to +1)
All settings at minimal values (iOS)
All settings at maximal values (iOS)
Tap the RESET button, on the right of the screen, to bring all values to 0 (zero).
Tap the “<” icon, on the left of the screen, to confirm your settings and exit the ADJUSTMENT
menu.
Page 60

60
Lock AE
Another great feature of FreeFlight 6 is the possibility to lock the general exposure of a view,
to fine-tune the framing of a shot and keep the desired exposure.
To access this function, tap the “Video settings box” (video mode) or the “Photo
settings box” (photo mode) of the HUD.
A “Lock AE” icon appears, to the left of the HDR icon (it replaces the “HDR” icon in
DNG+JPEG photo format, since HDR is not available with this setting).
Tap the “Lock AE” icon to lock the exposure value to that of the current view. The icon
turns to yellow. A yellow “Lock AE” box appears under the “Next available action” box,
at the center of the top bar of the HUD.
Move Thermal around or tilt its gimbal to change the frame: the exposure
settings remain as they were when you activated the function.
Tap the “Lock AE” icon again to deactivate the exposure lock: the icon turns back to
white and the yellow “Lock AE” box disappears.
Exposure is locked on the sky (Android)
Page 61

User Guide v3.6 –
published on October 16, 2019
61
Lock AE Touch
With the “Lock AE Touch” (or “Spot AE”) function of FreeFlight 6, you can also lock the
exposure of a frame on any detail of any view.
To activate this function, follow the “Lock AE” procedure of the preceding section.
When the exposure is locked, touch the part of the frame you want to base your
exposure on. A yellow square animates around this spot and the yellow “Lock AE” box
is replaced by a yellow “Lock AE Touch” box.
Refer to the following screen captures for additional details on the logic of this great feature.
Exposure is locked on the top of the trees (Android): shutter speed is set at 1/240 s
Exposure is locked on a building on the horizon (Android): shutter speed is set at 1/500 s
Page 62

62
About Thermal Imaging
Thermal imaging – or infrared (IR) thermography – is the process of acquiring, measuring and
analyzing thermal information from non-contact devices, such as Thermal’s
FLIR Lepton 3.5 camera.
Thermal imaging devices transform invisible IR radiations, or heat transfers, into colored
images the human eye can interpret and analyze.
To access Thermal’s thermography mode, either tap the “THERMAL” box on the
homepage of FreeFlight 6 or tap the “SPECTRUM” box on the lower bar of the HUD
and select “Thermal”.
Presentation of the Thermal HUD
Lowest scene
temperature*
Highest scene temperature*
Temperature picker
(tap & drag to move)
Set Visible/ Pause view
Thermal blending
Take a screenshot
Select Thermal mode
(Relative, Spot, Absolute)
*
Note that depending on your device (tablet or phone) and OS (iOS or Android), lowest and
highest scene temperatures can be displayed on the right part of the screen, under the
“PREFERENCES” icon.
Page 63

User Guide v3.6 –
published on October 16, 2019
63
Note the “Pause view” button enables you modify your settings through the
“PREFERENCES” icon, on the far right of the top HUD bar: exiting the PREFERENCES
menu brings you back to the “paused view”. This is especially useful, for example,
when you want to change your settings for a precise inspection.
As for the Visible Spectrum, you can record both Thermal photos and videos: make your
choice through the photo/video toggle button in the lower bar of the HUD.
When in Thermal Spectrum, the choice of photo modes is limited to three options, each of
which delivering 3264x2448 rectilinear JPEG thermography images:
- Single shot
- Timelapse (10, 30, 60, 120 or 240 seconds intervals between shots)
- GPS Lapse (5, 10, 20, 50, 100 or 200 meters spherical intervals between shots)
Remember that all thermography pictures taken by Thermal can be analyzed and
processed into a report with the free version of
FLIR Tools ®
(smartphone app and desktop
software).
The Thermal Spectrum video mode is limited to a single option: Thermal shoots
9 frames per second 1440x1080 thermography MP4 (H264) videos.
Tap and drag the temperature picker, at any moment, to obtain a direct temperature
reading on any point of the central area of the screen – the part which is free from boxes
or icons.
Finally, note you can always capture screenshots, directly to your device, through the
dedicated screen button. This feature is especially useful when filming, as it enables you
to extract a still image from a film without stopping the recording.
Thermal is a double camera system. However, photo or video mode selection is
independent from the cameras. In other words, for example, switching from Visible
Spectrum photo mode calls the last Thermal Spectrum photo mode that was
selected; similarly, switching from Thermal Spectrum video mode calls the last Visible
Spectrum video mode that was selected.
Relative Thermal mode
The Relative mode is the default thermography mode of Thermal, which is activated
upon first access to the Thermal HUD.
The Relative mode is useful to get a quick overview of any scene’s temperature range. In this
mode, even slight heat differences materialize as strong contrasts.
Its main specificity is that the scale it displays, on the left of the HUD, matches by default
the temperature range of the scene Thermal is filming.
Page 64

64
Relative Thermal mode:
reference image
However, the lock button (under the scale, on the left of the screen) enables you to
temporarily lock the scale to the temperature range of any scene. This is especially useful if
you must reframe your scene to include part of the sky. Indeed, the sky always appears as a
very cold element, which disturbs the scale.
Refer to the two following screenshots to compare locked (green lock icon) and unlocked
(white lock icon) scales and color readings with the reference image.
Temperature scale has
been locked on reference
image (19 to 46° C): the
colors of the building are
kept, although the gimbal
has been reoriented
toward the sky and clouds
(which appear in grey and
black – out of the scale).
Temperature scale has not
been locked from reference
image: the scale has
adapted to the new scene
(- 50 to 42° C), the colors of
the building now lack
contrast, but the clouds and
sky have been colored.
Page 65

User Guide v3.6 –
published on October 16, 2019
65
Spot Thermal mode
The Spot Thermal mode of Thermal is especially useful to isolate cold or hot spots.
Use the inverted arrows button (under the scale, on the left of the screen) to toggle from hot
to cold (or from cold to hot) and slide your finger along the scale to adapt the threshold of
the scale to your scene and highlight only coldest or hottest spots.
Spot Thermal mode: only
the hottest elements of
the scene are colored.
Spot Thermal mode: the
double arrow button has
been activated from earlier
screenshot: only the coldest
elements of the scene are
colored.
Note that in Spot Thermal mode, as in Absolute Thermal mode, the thresholds you set
manually are only reset when you tap the “RESET THERMAL SETTINGS” button in the Thermal
Preferences tab.
Page 66

66
Absolute Thermal mode
The Absolute Thermal Mode is the most versatile of Thermal’s thermography modes. It
enables the user to select a custom temperature scale and to focus on it, to achieve
extremely precise color readings. Control your analysis through the two buttons located
under the temperature scale.
On the left, the double arrow button toggles from narrow scale (0 to 50° C) to
extended scale (- 10 to 140° C in DEFAULT range and – 10 to 400° C in VERY HIGH
TEMPERATURE range: set range through PREFERENCES).
On the right, the show/hide toggle enables you to color only the part of the scale you
have selected with the top and bottom white scale sliders.
Refer to the following screenshots for additional details on the features associated to these
buttons.
Absolute Thermal mode:
note the lack of contrast of
the image – double arrow
button is set on narrow
scale but the scale has the
entire range colored.
Both buttons have been
activated: extended scale is
showing, but only selected
range is colored. Contrast is
still very low.
Page 67

User Guide v3.6 –
published on October 16, 2019
67
The selected range has been
narrowed, from the bottom:
the contrast of the image
highlights the whole scale of
temperatures of the scene,
from blue (17° C) to yellow
(45° C) through purple, red
and orange.
The camera has been
reoriented toward the sky.
The selected scale is still
locked. The colder and distant
sky and clouds are excluded
from color readings.
Note that in Absolute Thermal mode, as in Spot Thermal mode, the thresholds you set
manually are only reset when you tap the “RESET THERMAL SETTINGS” button in the Thermal
Preferences tab.
Page 68

68
The Thermal analyzer feature of FreeFlight 6 provides you with a great tool to achieve quick
thermal analysis, directly from your device.
This function gives you full control over the on-screen rendering of any thermography video
or photo you have taken with Thermal. From the analyzer, you can:
- access Thermal Preferences directly from the preview’s Preferences icon, top right;
- navigate inside your thermography videos;
- use the temperature picker;
- modify the thermography modes (Relative, Spot, Absolute) and their associated
thresholds and functions (lock scale, hot or cold spot, etc.) at any point of any video or
on any photo;
- modify the blending between Visible and Thermal spectrums;
- save as many screenshots as you want.
However, Thermal analyzer videos cannot be saved or exported by FreeFlight 6 – even if most
devices enable you to record your screen.
To analyze a thermography media, access your Local FreeFlight 6 Gallery and open a
thermal video preview or a photo.
Thermography video preview (iOS)
Tap the green “ANALYZE” box.
The photo displays or the video plays in Analyzer mode. As shown on the following
screen captures (extracted from a video analysis), the interface gives you access to
most options available for filming.
Page 69

User Guide v3.6 –
published on October 16, 2019
69
Thermal analyzer interface, Relative mode (iOS)
Same image (hot) Spot mode (iOS)
Same image Absolute mode (iOS)
Page 70

70
Same image (hot) Spot mode, Thermal spectrum only (iOS)
Same image Visible spectrum only (iOS)
Page 71

User Guide v3.6 –
published on October 16, 2019
71
Thermal features a series of automated shots, which enable you to capture scenes
professionally.
iOS Cineshots Menu
Make sure you have selected the video settings you require, check that you are filming and
tap “CINESHOTS” in the bottom bar of the HUD to access Cineshots. Tap a Cineshot to select
it. For each, two options appear.
360°
The 360° Cineshot is self-explanatory: when it is activated, Thermal maintains its
position and altitude, and rotates slowly and completely around its axis to uncover a full
panorama.
Tap “Right” or “Left” to select the direction you want your drone to rotate, and to
activate the 360°. After a countdown on the HUD, Thermal starts its rotation.
An animation flashes on the screen of your device, and the “360°” box progressively
fills with green as the Cineshot unfolds.
Reveal
The Reveal Cineshot is a classic motion picture opening shot: when it is activated,
Thermal tilts its camera toward the ground and starts moving forward in a straight horizontal
line. Slowly, over 30 or 60 meters, the camera gimbal tilts up, revealing the scenery in front
of Thermal.
Before you activate the Reveal Cineshot, check the area in front of Thermal is
clear from obstacles, and safe.
Tap “30m” (small-arrow icon) or “60m” (large-arrow icon) to select the range of your
Reveal shot, and activate it. After a countdown on the HUD, Thermal tilts its
camera down and starts moving forward. An animation flashes on the screen of your
device, and the “Reveal” box progressively fills with green as the Cineshot unfolds.
Page 72

72
Spiral
The Spiral Cineshot is perfect to unveil your surroundings – or that of any object on the
ground. When it is activated, Thermal tilts its camera to the ground and starts moving
up, in a straight vertical line. Slowly, as it climbs to 30 or 60 meters, Thermal carries
out a full 360° rotation around its axis, then and its camera tilts up progressively, panning
over the scenery along a 180° rotation. Therefore, Thermal finishes the Spiral Cineshot
with a 180° angle, compared to its starting point.
Before you activate the Spiral Cineshot, check the area beyond Thermal is
clear from obstacles, and safe: do not activate the Spiral Cineshot under trees, or a
bridge, for example.
Tap “30m” (small-arrow icon) or “60m” (large-arrow icon) to select the range of your
Spiral shot, and activate it. After a countdown on the HUD, Thermal tilts its
camera down and starts moving up and rotating. An animation flashes on the screen
of your device, and the “Spiral” box progressively fills with green as the Cineshot
unfolds.
Epic
The Epic Cineshot offers another great way to dramatize any scene or location. When it is
activated, Thermal moves away backward in a smooth ascending line, keeping its
subject in the center of its frame for 30 or 60 meters. The Epic Cineshot gives best results
when Thermal starts from a close-up position, relative to its subject.
Before you activate the Epic Cineshot, check the area behind Thermal is clear
from obstacles, and safe.
Tap “30m” (small-arrow icon) or “60m” (large-arrow icon) to select the range of your
Epic shot, and activate it. After a countdown on the HUD, Thermal starts
moving backward and upward. An animation flashes on the screen of your device, and
the “Epic” box progressively fills with green as the Cineshot unfolds.
Activate and monitor all Cineshots with care: always check your automated shot
flight plan is clear from obstacles and safe, always retain visual contact with
Thermal, and always be ready to reclaim control of your drone: any action on any
stick of Parrot Skycontroller 3 immediately terminates the current Cineshot.
Page 73

User Guide v3.6 –
published on October 16, 2019
73
Tap the “PILOTING MODE” box in the bottom bar of the HUD of FreeFlight 6 to access the
piloting modes options.
Tap a mode to select it. Each mode is associated with a specific behavior, which this section
describes.
Manual flight
The Manual flight mode is Thermal’s default mode. It enables you to pilot the drone
and fully control its camera tilt and zoom.
When you release the commands in Manual flight mode, Thermal stays in position,
hovering.
Cameraman (visible spectrum only)
The Cameraman mode enables you to keep an object or a subject in the center of your
frame, while you pilot Thermal around it/him/her.
Frame the object or subject you want to film and fly around.
Tap the “PILOTING MODE” box in the bottom bar of the HUD to access the options. Tap
“Cameraman” to select this piloting mode.
Draw a rectangle with your finger on the screen of your device, around the object or
subject you want Thermal to follow – or double tap this object or subject.
When your target is locked, the blue rectangle turns to green and the orange “LAND”
box at the center of the top bar of the HUD turns red and displays “STOP”.
Thermal’s frame centers on your target, inside the green box.
Drag the green box to the area of the frame where you want your target to remain
at.
Fly Thermal around your target. The drone keeps your target in the part of the
frame you have selected. Therefore, if you push the right joystick of the Parrot
Skycontroller 3 to the left, Thermal circles around your target clockwise. If you
push the right joystick of the Parrot Skycontroller 3 to the right, Thermal circles
around your target counterclockwise.
When the Cameraman mode is activated, Thermal manages the gimbal tilt to
keep the target in the frame. Therefore, the left trigger of the Parrot Skycontroller 3
is deactivated in this mode. However, you can still control the zoom, with the right
trigger.
When you release the commands in the Cameraman mode, Thermal hovers and
rotates to keep following the target.
Page 74

74
To end the following of your target, tap the red “STOP” box at the center of the top bar of
the HUD.
When no target is selected, or when the following of the target has been ended by the pilot,
Thermal’s behavior is similar to that of the Manual flight mode.
Activate and monitor the Cameraman mode with care: always check your flight plan
and the trajectory of your subject are clear from obstacles and safe, always retain
visual contact with the drone, and always be ready to stop the following (tap the
“STOP” box of your HUD) in case a danger or any sort of unexpected obstacle arises.
Follow Me (visible spectrum only)
The Follow Me mode was designed to enable Thermal pilots to have their drone follow
them in action.
Fly Thermal at least 5 meters (15ft) high and 10 meters (30ft) in front of you,
facing you – FreeFlight 6 will inform you with a red alert at the bottom of the HUD if
you are too close from Thermal or if it is flying too low. Frame yourself.
Tap the “PILOTING MODE” box in the bottom bar of the HUD to access the options. Tap
“Follow Me” to select this piloting mode.
Both a drone GPS synchronization and a device GPS synchronization are imperative to
activate this mode: upon first activation, the following page appears.
iOS, Follow Me GPS warning
Tick the box on the bottom left on the page if you do not want this warning to appear
again when no prerequisite is missing. Tap “FLY” to access the Follow Me mode.
Select one of the three Follow Me options (refer to in-app tutorials for details):
- Track
- Lock
- Dynamic (Parrot recommends you only use this option in completely open and
unobstructed areas)
Page 75

User Guide v3.6 –
published on October 16, 2019
75
Draw a rectangle with your finger on the screen of your device, around yourself. When
Thermal has a lock on you, the blue rectangle turns to green and the orange
“LAND” box at the center of the top bar of the HUD turns red and displays “STOP”.
By default, Thermal keeps you in the center of the frame, but you can drag the
green box to the area of the screen you want to remain at. If you push the right
joystick of the Parrot Skycontroller 3 to the left, Thermal circles around you
clockwise. If you push the right joystick of the Parrot Skycontroller 3 to the right,
Thermal circles around you counterclockwise.
In the Follow Me mode, Thermal manages the gimbal tilt to keep you in the
center of the frame. Therefore, the left trigger of the Parrot Skycontroller 3 is
deactivated in this mode. However, you can still control the zoom, with the right
trigger.
When you release the commands in the Follow Me mode, Thermal keeps following you
from a constant distance if you are moving. If you stay immobile, Thermal stops and
stays focused on you.
To have Thermal stop tracking you, tap the red “STOP” box at the center of the top
bar of the HUD.
When no target is selected, or when the tracking has been ended by the pilot,
Thermal’s behavior is similar to that of the Manual flight mode.
In addition, the Follow Me mode features a series of exclusive Dronies which can be activated
as you move, always keeping you in the center of the frame. For each Dronie, two options
are available (they are listed between brackets):
- Orbit (left or right): Thermal circles around you in a full 360°.
- Parabola (10 or 30 m): Thermal flies in a circular arc over your head,
gaining 10 or 30 meters in altitude and turning 180° at
its peak.
- Tornado (10 or 30 m): Thermal performs a double “Orbit” around you,
one going up 10 or 30 meters, the other going down 10
or 30 meters, back to its original height.
- Boomerang (30 or 60 m): Thermal flies away from you for 30 or 60 meters,
with an ascending angle following that of the starting
gimbal tilt, then comes back to its starting point.
To select a Follow Me Dronie, make sure you are in the Follow Me mode and that
Thermal is tracking you.
Tap the “Select Dronie” box in the bottom bar of the HUD.
Page 76

76
Tap a Dronie to select it. Tap the option you have chosen to activate the Dronie: after
2 seconds, Thermal starts moving around you. The corresponding Dronie box
fills with green as the Dronie unfolds.
Activate and monitor the Follow Me mode and each Dronie with care: always check
your flight plan is clear from obstacles and safe, always retain visual contact with
Thermal, and always be ready to stop the following (tap the “STOP” box of
your HUD) in case a danger of any sort or an unexpected obstacle arises.
To optimize the drone’s tracking, always make sure you remain visible by
Thermal: do not let an obstacle obstruct the camera’s view and do not hide in the
shadows, or Thermal could lose track of you.
Smartdronies (visible spectrum only)
Thermal features four Smartdronies:
- the Orbit, Parabola and Boomerang Dronie can be accessed through this menu – refer
to the above section for details about these Smartdronies;
- however, the smartest of Thermal’s dronies is the Dolly Zoom.
We will not spoil it for you: just make sure you have a memorable scenery behind you.
Frame yourself (or better yet, your group of friends!) with Thermal: keep the
drone at least 5 meters away, at man level, between 1 and 2 meters above the
ground.
Check that the flight path of your drone is perfectly clear: at least 30 meters behind
it, flat and without obstacles.
Tap “Smartrdronies” from the “PILOTING MODE” box menu.
As for the Follow Me mode, both a drone GPS synchronization and a device GPS
synchronization are imperative to activate this mode: upon first activation, the same
warning page appears as for the Follow Me mode. Tick the box on the bottom left on
the page if you do not want this warning to appear again when no prerequisite is
missing. Tap “FLY” to access the Smartdronies mode.
Tap the Dolly Zoom Dronie to open its three options: try them all and enjoy the magic!
FPV (visible spectrum only)
As any drone of the series, Thermal can be flown in FPV (first-person view)
mode, using the Parrot Cockpitglasses 3 or any compatible FPV goggles.
Refer to the latest general user guide for additional information on FPV immersive
flying.
Page 77

User Guide v3.6 –
published on October 16, 2019
77
Flight Plan
Flight Plan is a powerful tool, which enables you to fully prepare and configure your flights
and filming sessions, from home, on the train, in a plane, or anywhere else you can take your
phone with you.
Through an example, this section will teach you the basics of automated flight and shooting
management, with Thermal and Flight Plan.
Tap Flight Plan from the “PILOTING MODE” box menu. The map of your surroundings
opens full screen. If you are not connected to Thermal, the minimized live view
is black, as on the screen captures that follow. Find your next dream flying spot on
the map.
iOS Flight Plan
Consider this pointy bit of land, with a lighthouse in the middle. Say you could fly
Thermal and shoot a film there. Let’s do it!
iOS: new Flight Plan
Page 78

78
First, select your initial waypoint: ideally, very close to your intended take-off point.
Tap the screen to set it. The green circle represents the waypoint, the white figure
the altitude of the drone, and the white arrow the direction of the drone’s camera.
iOS: initial waypoint
Tap the white arrow and hold it to move it around. In this example, we want
Thermal to frame the lighthouse as it starts the flight.
iOS: initial waypoint, with the camera framing the lighthouse
Tap the map to set the second waypoint: the distance between the two waypoints
appears on the screen. Use the slider on the right of the screen to set the altitude of
the waypoint.
Page 79

User Guide v3.6 –
published on October 16, 2019
79
In this example, Thermal will climb from 3 to 30 meters between the initial
waypoint and the second waypoint.
iOS: second waypoint
Add waypoints to tour the area and end your Flight Plan where you intend to land.
iOS: full Flight Plan
The tip of the peninsula is a POI: we want Thermal to focus on it while it flies
around it. Tap it and hold your finger on the screen to call choices (POI/Close).
iOS: setting a POI
Tap “Point of interest” to add the POI. It appears as a blue square diamond. The figure
in the center represents the height of the POI, which you can modify using the slider
Page 80

80
on the right of the screen. All waypoints turn white as they can now be selected to be
linked to the POI.
iOS: open waypoints
Tap waypoints to link them to the POI. In this example, we want Thermal to
film the tip of the peninsula as it flies around it: we have selected the three
waypoints to the left of the peninsula. The arrows of those waypoints have turned
toward the POI and are colored in blue – the last one which was selected has a blue
border around the white arrow.
iOS: three waypoints linked to the POI
Tap the POI to confirm your choices. Blue waypoints are linked to the POI, which
appears as a white square diamond with a blue border. During the entire blue part of
the flight, Thermal’s camera will stay focused on the tip of the peninsula,
enabling you to achieve the smoothest flyby shoot. Green waypoints remain
independent from the POI.
Page 81

User Guide v3.6 –
published on October 16, 2019
81
iOS: POI Flight Plan
Tap a green waypoint to edit it: use the slider on the right of the screen to modify its
height; tap and move its white arrow to set the direction of Thermal’s camera.
For this example, we had the drone point toward the land at most steps of the Flight
Plan, and toward the lighthouse at take-off and landing, with a descent from 30 to
3 meters between the last two waypoints.
iOS: POI Flight Plan
All you have to do now is to close FreeFlight 6, to get to your flying spot, to prepare
Thermal, your Parrot Skycontroller 3 and your device for the flight.
Tap the “PILOTING MODE” box on the HUD to call the options. Select “Flight Plan”: the
last plan you have set up appears.
Tap the green arrow on the right of the left bottom bar of the Flight Plan interface to
begin the Flight Plan: Thermal takes off, flies to the first waypoint and starts
the Flight Plan. At the end of the Flight Plan, depending on your settings and
depending on your version of FreeFlight 6, Thermal lands at, or hovers over,
the last waypoint you have set.
Page 82

82
That is why, for this section, we have chosen to consider that Thermal’s final
waypoint is also its landing spot.
Activate and monitor every Flight Plan with extreme care: always check your drone’s
route is clear from obstacles and safe, always retain visual contact with
Thermal, and always be ready to stop the Flight Plan (tap the “STOP” box of your HUD
or reclaim commands of the drone) in case a danger or any sort of unexpected
obstacle arises.
Page 83

User Guide v3.6 –
published on October 16, 2019
83
Touch & Fly: Waypoint
Waypoint is the default “Touch & Fly” mode. It enables you to fly Thermal to
any point on the map. Tap “Touch & Fly” from the “PILOTING MODE” box menu.
The map of your surroundings opens full screen. The live image captured by
Thermal is minimized in the bottom right corner of your screen.
Tap a point on the map to select a destination for Thermal: this point is
marked as a white circle with a green border. For each ne Waypoint Touch & Fly
session, FreeFlight 6 asks you to confirm the first destination of Thermal as on
the following screen capture. Tap the green “TAP HERE TO START” box, Thermal
starts flying toward its designated destination. Use the slider on the right of the
screen to control the drone’s altitude (the green figure inside the circle) when it
reaches its destination.
Android Touch & Fly: first destination confirmation screen
Activate “Touch & Fly” Waypoint with care: be especially careful with your touches on
the screen in this mode, as after the initial confirmation, any tap on the map will
immediately send Thermal to the corresponding spot.
For this reason, Parrot recommends you set your FreeFlight 6 filming or photography
options before activating the “Touch & Fly” Waypoint mode.
If, by mistake, you have sent Thermal toward a dangerous area, tap the STOP
box at the center of the top bar of the HUD, or firmly reclaim commands from the
Parrot Skycontroller 3.
Touch & Fly: POI
To access the POI “Touch & Fly option”, tap the “Type” box from the lower bar of the
HUD, and select POI.
In POI mode, tap a point on the map to create a point of interest (POI), marked as a
white square diamond with a blue border, labelled with a POI icon. Control the height
of the POI (the blue figure inside the square diamond) through the slider on the right:
this effectively controls the tilt of the gimbal, while you use the Parrot Skycontroller 3
to fly around your target. Thermal remains focused on the POI.
Page 84

84
Android Touch & Fly: POI
Tap “STOP” from the red box at the center of the top bar of your screen to halt
Thermal, or to reset a POI.
From the “Smartdronies” box, next to the “Type” box of the lower bar of the HUD, you
can also activate Smartdronies (Orbit, Parabola, Dolly Zoom, Boomerang) of your POI.
Refer to the
“Smartdonies”
section of this guide for additional information on
Smartdronies types.
If you have feedback or comments about the v3.6 of this user guide, please reach out to:
technical.writer@parrot.com
 Loading...