

Page 1
User Guide
Airborne Night Drone
TRAVIS MARS
Page 2
Tables Of Contents
.......................................................................................................................................................4
Before getting started
...........................................................................................................................................................................................................4
Charging the battery
...........................................................................................................................................................................................................5
Switching on the MiniDrone
...........................................................................................................................................................................................................5
Compatibility
...........................................................................................................................................................................................................5
Downloading the app
...........................................................................................................................................................................................................5
Connecting a smartphone
.......................................................................................................................................................6
Flying
...........................................................................................................................................................................................................7
Description of the control screen
...........................................................................................................................................................................................................7
Flat trim
...........................................................................................................................................................................................................7
Take Off
...........................................................................................................................................................................................................8
Controlling the MiniDrone in flight
...........................................................................................................................................................................................................10
Pre-programmed aerobatics
...........................................................................................................................................................................................................10
Adding blocks
...........................................................................................................................................................................................................10
Landing
...........................................................................................................................................................................................................11
Battery
...........................................................................................................................................................................................................11
Photos
...........................................................................................................................................................................................................11
Retrieving or deleting photos
...........................................................................................................................................................................................................11
Videos
.......................................................................................................................................................13
Settings
...........................................................................................................................................................................................................13
Max Altitude
...........................................................................................................................................................................................................13
Max Tilt
...........................................................................................................................................................................................................13
Left-handed mode
...........................................................................................................................................................................................................13
Control Settings
...........................................................................................................................................................................................................13
Automatic Recording
...........................................................................................................................................................................................................13
Max Vertical Speed
...........................................................................................................................................................................................................14
Max Rotation Speed
...........................................................................................................................................................................................................14
Short-Circuit
...........................................................................................................................................................................................................14
Charge Settings
...........................................................................................................................................................................................................14
Network Name
...........................................................................................................................................................................................................14
Versions
.......................................................................................................................................................15
Academy Drone
.......................................................................................................................................................17
Updates
Page 3
.......................................................................................................................................................18
General Information
...........................................................................................................................................................................................................18
Precautions for use and maintenance
...........................................................................................................................................................................................................18
Accessories and spare parts
...........................................................................................................................................................................................................18
Battery
...........................................................................................................................................................................................................19
Warranty
...........................................................................................................................................................................................................19
Modifications
...........................................................................................................................................................................................................19
Recycling this product
...........................................................................................................................................................................................................20
Declaration of Conformity
...........................................................................................................................................................................................................20
Registered tra demarks
...........................................................................................................................................................................................................20
Notice regarding the right to privacy
Page 4
4
Before getting started
Before getting started
Charging the battery
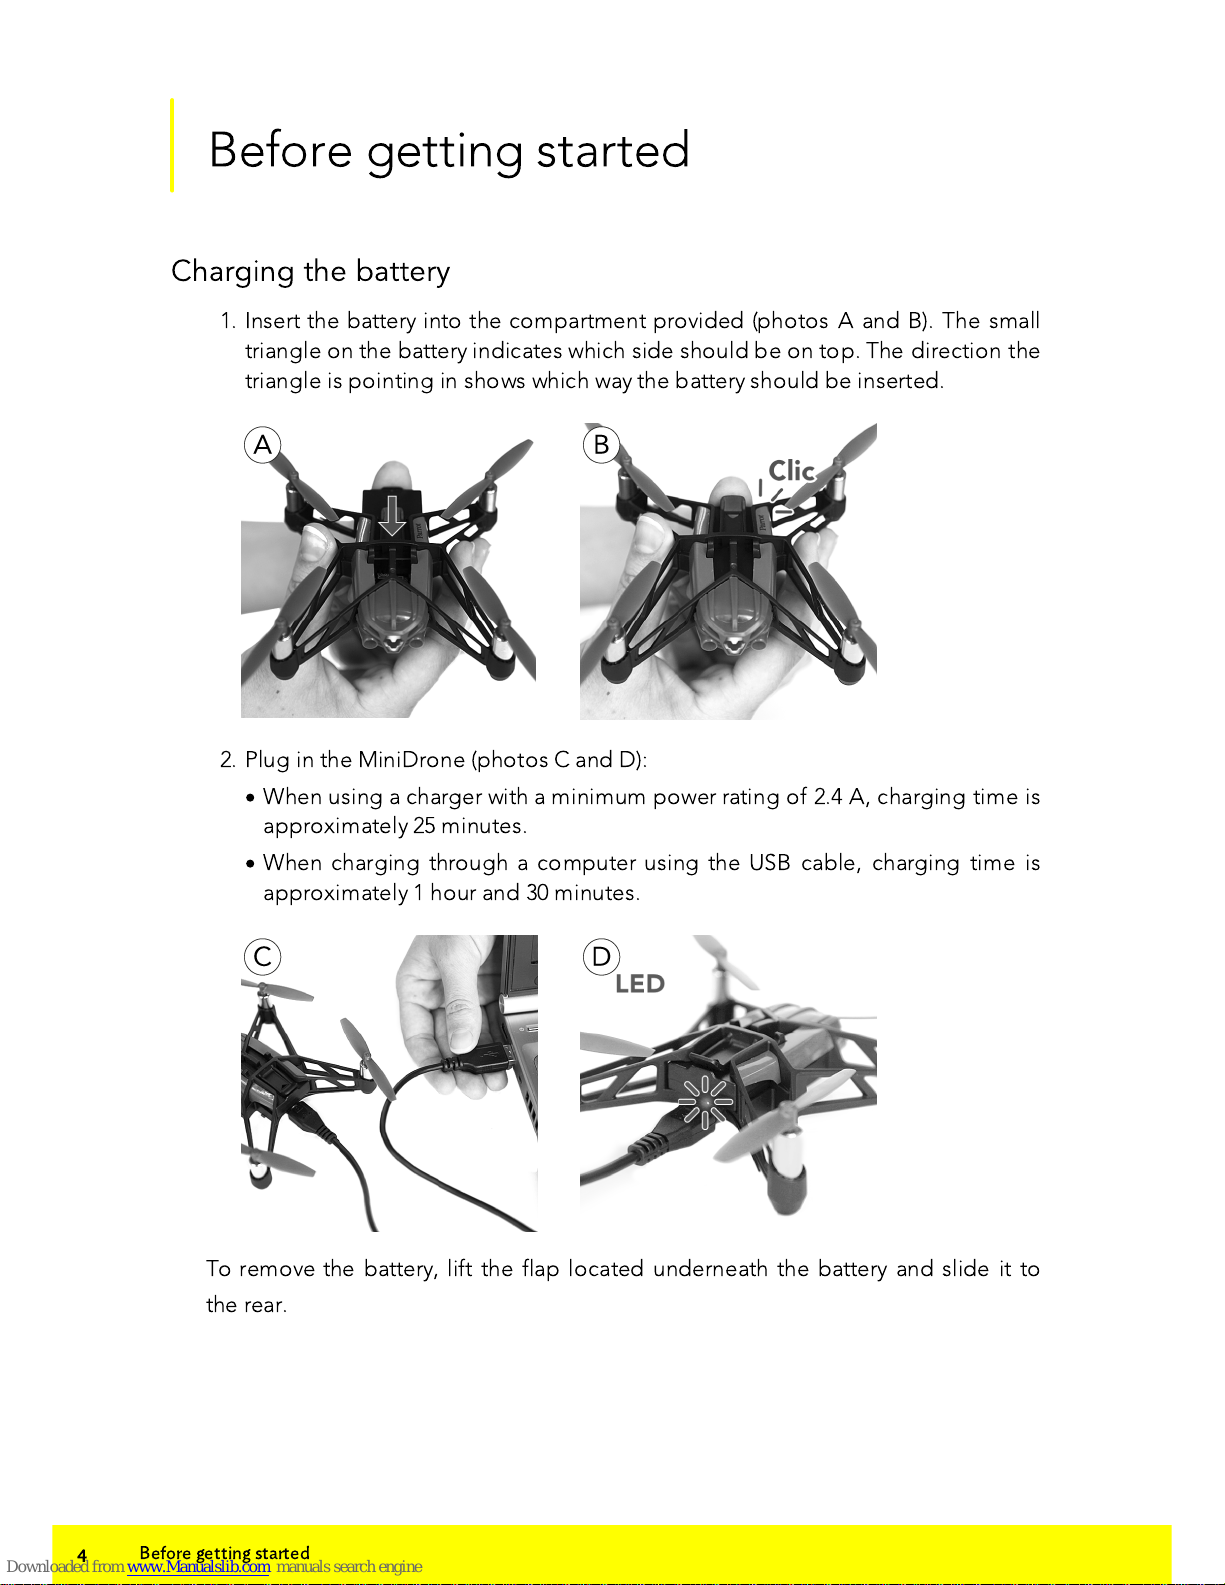
1. Insert the battery into the compartment provided (photos A and B). The small
triangle on the battery indicates which side should be on top. The direction the
triangle is pointing in shows which way the battery should be inserted.
2. Plug in the MiniDrone (photos C and D):
·
When using a charger with a minimum power rating of 2.4 A, charging time is
approximately 25 minutes.
·
When charging through a computer using the USB cable, charging time is
approximately 1 hour and 30 minutes.
To remove the battery, lift the flap located underneath the battery and slide it to
the rear.
Page 5
5
Before getting started
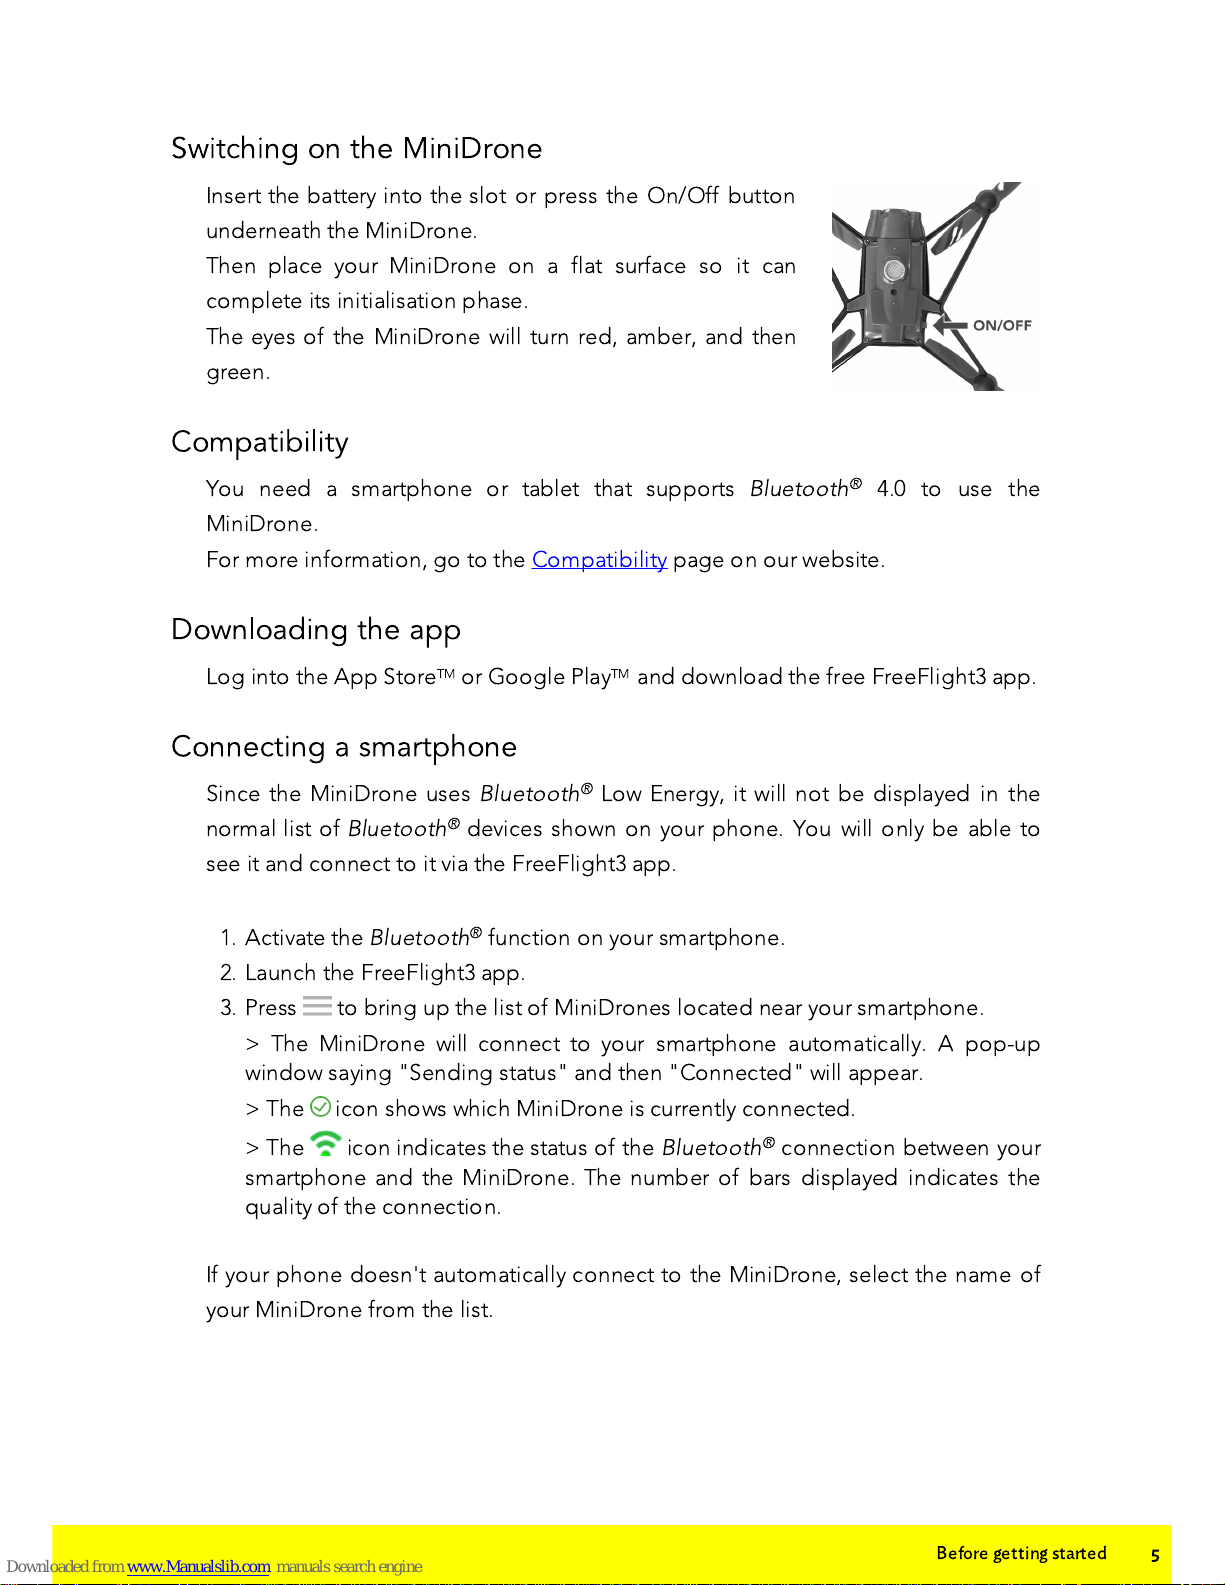
Switching on the MiniDrone
Insert the battery into the slot or press the On/Off button
underneath the MiniDrone.
Then place your MiniDrone on a flat surface so it can
complete its initialisation phase.
The eyes of the MiniDrone will turn red, amber, and then
green.
Compatibility
You need a smartphone or tablet that supports
Bluetooth® 4.0 to use the
MiniDrone.
For more information, go to the Compatibility page on our website.
Downloading the app
Log into the App StoreTM or Google Play
TM
and download the free FreeFlight3 app.
Connecting a smartphone
Since the MiniDrone uses
Bluetooth® Low Energy, it will not be displayed in the
normal list of
Bluetooth® devices shown on your phone. You will only be able to
see it and connect to it via the FreeFlight3 app.
1. Activate the
Bluetooth® function on your smartphone.
2. Launch the FreeFlight3 app.
3. Press to bring up the list of MiniDrones located near your smartphone.
> The MiniDrone will connect to your smartphone automatically. A pop-up
window saying "Sending status" and then "Connected" will appear.
> The icon shows which MiniDrone is currently connected.
> The icon indicates the status of the
Bluetooth® connection between your
smartphone and the MiniDrone. The number of bars displayed indicates the
quality of the connection.
If your phone doesn't automatically connect to the MiniDrone, select the name of
your MiniDrone from the list.
Page 6
6
Flying
Flying
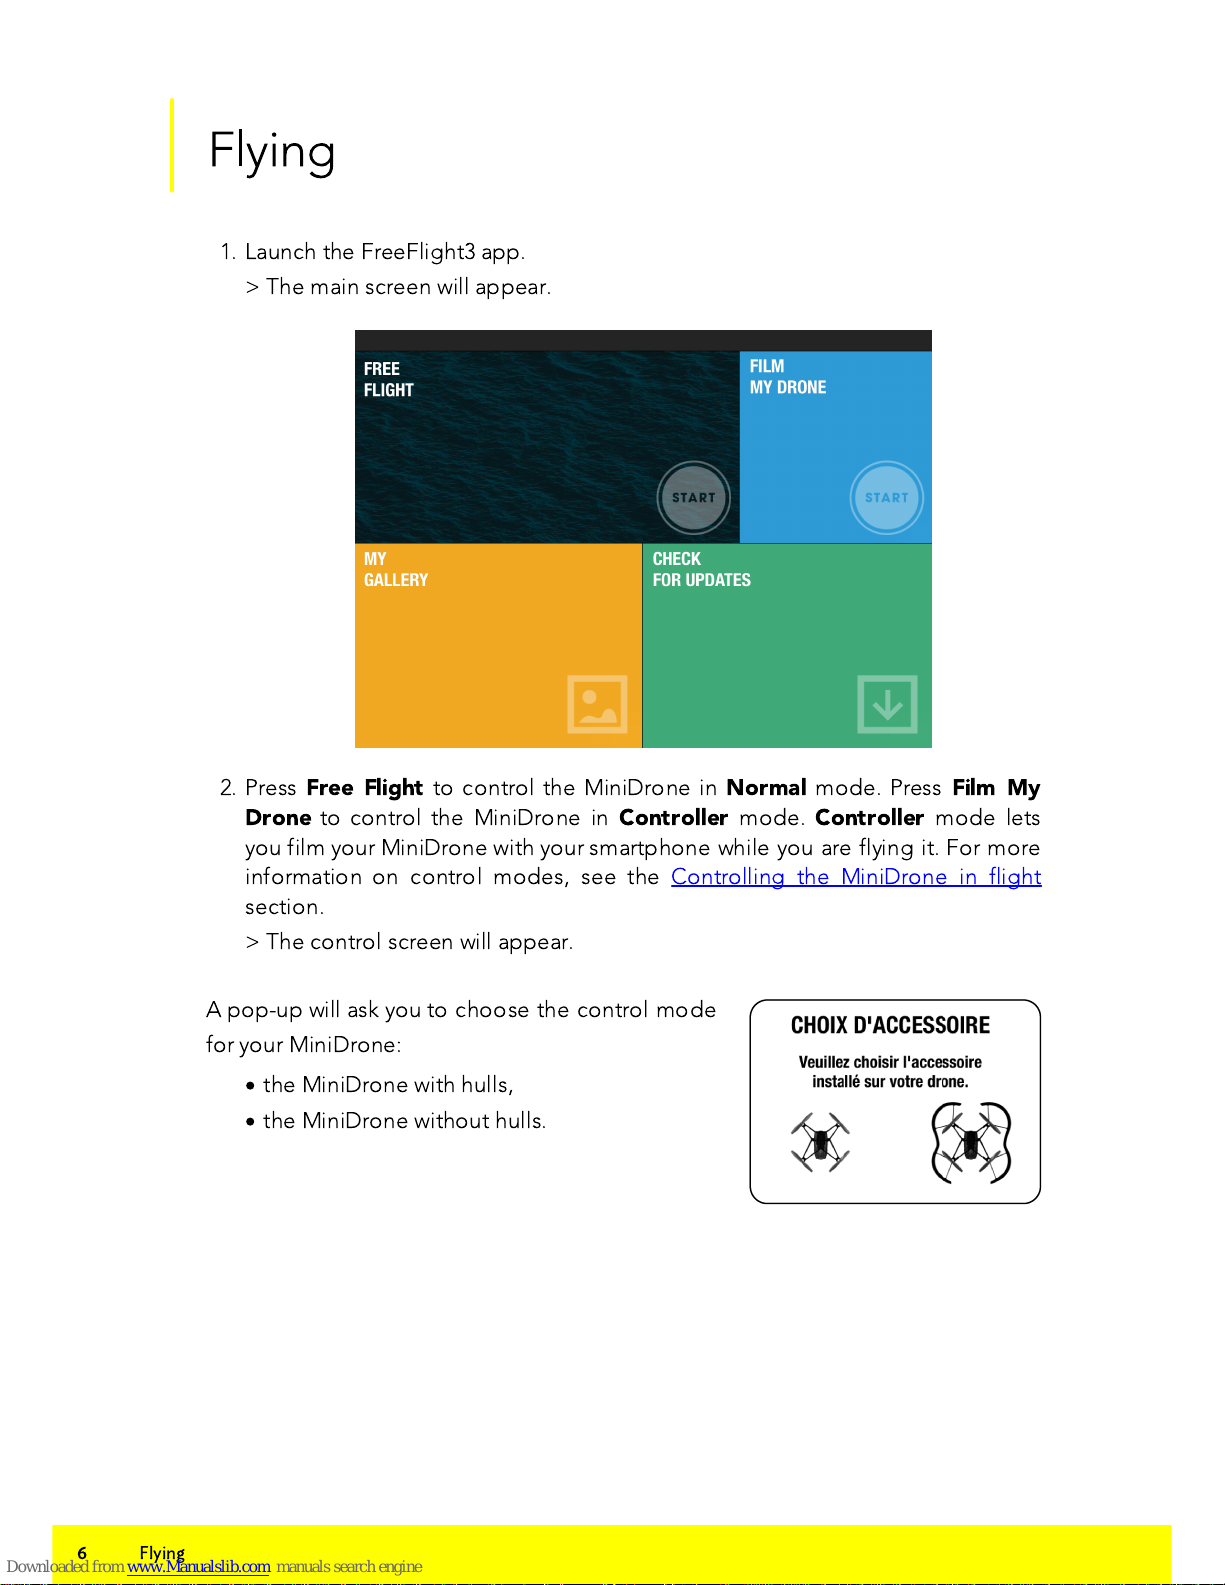
1. Launch the FreeFlight3 app.
> The main screen will appear.
2. Press
Free Flight
to control the MiniDrone in
Normal
mode. Press
Film My
Drone
to control the MiniDrone in
Controller
mode.
Controller
mode lets
you film your MiniDrone with your smartphone while you are flying it. For more
information on control modes, see the Controlling the MiniDrone in flight
section.
> The control screen will appear.
A pop-up will ask you to choose the control mode
for your MiniDrone:
·
the MiniDrone with hulls,
·
the MiniDrone without hulls.
Page 7

7
Flying
Description of the control screen
No.
Description
No.
Description
1
Return to previous screen
7
Photo
2
Settings
8
Left joystick
3
Flat trim
9
Right joystick
(accelerometer)
4
Emergency stop
10
Take off / Landing
5
Launched take off
11
Battery level
6
Pre-programmed aerobatics
Flat trim
Before each take off (especially after an impact or fall), check that the MiniDrone is
placed on a flat surface and press .
Take Off
Place the MiniDrone on a dry, flat surface, ensuring there are no obstacles in the
way, and press
Take Off
.
> The MiniDrone will take off and stabilise 1 metre above the ground.
Page 8

8
Flying
You can also also have the MiniDrone take off from your hand. To do this:
1. Press .
> The MiniDrone LEDs will blink red and green rapidly.
2. Throw the MiniDrone in front of you, up, or simply take away your hand to let it
fall.
> The motors for the MiniDrone propellers will start automatically and the
MiniDrone will stabilise itself.
Controlling the MiniDrone in flight
Flights depend on the settings for the selected control mode:
Controller, Normal
or
Expert. Normal
mode is selected by default. To change the control mode, go
to the Control Settingssection.
Normal
Left joystick
Right joystick (accelerometer)
·
Press or to pivot the
MiniDrone to the left or right.
·
Press on or to make the
MiniDrone climb or descend.
·
Press on the joystick and tilt your
smartphone up and down to move
the MiniDrone forwards or
backwards.
·
Tilt your smartphone left or right to
move the MiniDrone to the left or
right.
Page 9

9
Flying
Expert
Left joystick
Right joystick
·
Press or to pivot the
MiniDrone to the left or right.
·
Press on or to make the
MiniDrone climb or descend.
·
Hold down the middle button and tilt
your smartphone to move the
MiniDrone.
·
Drag your finger from the middle of
the joystick to the or to make
a quarter turn to the left or right.
·
Drag your finger from the middle of
the joystick to the or to make
a half turn to the left or right.
Controller
Left joystick
Right joystick
·
Press or to pivot the MiniDrone
to the left or right.
·
Press on or to make the
MiniDrone climb or descend.
·
Drag the joystick up or down to move
the MiniDrone forwards or backwards.
·
Drag the joystick left or right to move
the MiniDrone to the left or right.
The
Controller
mode lets you film the MiniDrone with the camera on your
smartphone while you are flying it.
To do this, press . Videos are automatically saved to the gallery in the
FreeFlight3 app.
To stop recording, press
again.
Page 10

10
Flying
Pre-programmed aerobatics
1. Press the Loop icon to bring up the list of pre-programmed aerobatics.
By default, no trick is selected.
Back loop
Front loop
Left loop
Right loop
N
o trick
2. Press the desired trick.
> The icon is displayed in place of .
3. Tap your smartphone screen twice to perform the selected trick.
4. Press on the aerobatic icon again to edit it.
Adding blocks
The MiniDrone can carry loads of up to 14 g.
When you pile blocks or figurines on the MiniDrone, make sure the weight is
equally distributed on both sides.
Landing
Make sure that the MiniDrone is above a flat, dry and unobstructed surface, then
press
Landing
to land your MiniDrone.
Only press
Emergency
in the event of a genuine emergency. The motors will
immediately cut out and the MiniDrone will fall from whatever height it is currently
at.
Page 11

11
Flying
Battery
The
icon shows the battery level for your MiniDrone.
A fully charged battery lasts for around 7 minutes when the hulls are attached to the
MiniDrone, and around 9 minutes if the hulls aren't used. The indicator turns red
when the battery level is low. When the battery level is too low, bring the
MiniDrone back towards you or land it.
Photos
Press the button to take a photo using the MiniDrone vertical camera. The
photo will be saved in the MiniDrone memory.
You can save hundreds of photos in the MiniDrone internal memory. When the
memory is full, a warning message will appear telling you it is no longer possible to
take photos.
Retrieving or deleting photos
To retrieve or delete photos, your smartphone must be connected to the
MiniDrone.
1. Bring up the context menu. To do this:
·
If the control screen is open, press then .
·
If the main screen is open, press .
2. Press
Internal Memory
.
> The list of stored photos in the MiniDrone memory will appear.
3. Select one or more files.
4. Press
Delete
or
Transfer
.
> The files will be transferred to the FreeFlight3 gallery and into your
smartphone's memory.
You can also retrieve or delete them by connecting the MiniDrone to your
computer using the USB cable. To do this, the battery for the MiniDrone must be
installed. Once connected, the MiniDrone will show up as a USB drive on your
computer. You can then copy files using your computer.
Videos
You can film your MiniDrone using your smartphone while you are flying it. To do
this, the
Controller
control mode must be activated. For more information, go to
the Control Settings section.
Page 12

12
Flying
To record a video, press . The icon will flash during recording. Frame your
MiniDrone with your smartphone.
To stop recording, press . The icon will change to
.
The videos will be automatically saved in the FreeFlight3 gallery and in your
phone's memory. To open the gallery:
1. Open the FreeFlight3 home screen.
2. Press then
Gallery
.
Page 13

13
Settings
Settings
Press to access the settings menu for your MiniDrone.
Press at any time to revert to factory settings.
Max Altitude
The
Max Altitude
option allows you to limit the maximum height your MiniDrone
can go. When the MiniDrone is about to go past this limit, it will automatically go
back down to the selected height.
Max Tilt
The
Max Tilt
option allows you to choose the maximum tilt angle the MiniDrone
can make while it is moving.
The higher this value is, the larger the pitch of the MiniDrone. The lower this value
is, the smaller the pitch of the MiniDrone.
This setting affects acceleration. With a large pitch, the MiniDrone will gain speed
quicker and will be more sensitive to commands.
Left-handed mode
The
Invert Controls
option allows you to invert the controls on your smartphone.
Control Settings
The
Expert, Normal
and
Controller
options let you choose the control mode you
want. For more information on control modes, see the Flight control section in this
guide.
Automatic Recording
The
Auto Rec
option is available in
Controller
mode only. It is used to
automatically trigger video recording as soon as you press
Take Off
. For more
information on video recording, see the Video section.
Max Vertical Speed
The
Max Vertical Speed
option allows you to set the maximum upward and
downward speed of the MiniDrone when you press the or buttons.
Page 14

14
Settings
Max Rotation Speed
The
Max Rotation Speed
option allows you to set the maximum rotation speed
for the MiniDrone when you press the or buttons.
Short-Circuit
The
Short-Circuit
option allows you to cut the motors in the event of prolonged
impact to the propellers on your MiniDrone. This option is deactivated by default,
but is useful if you are a beginner pilot.
Charge Settings
The
Charge Settings
screen shows you the last type of charging used and the
battery level of your MiniDrone.
Network Name
The
Network Name
option allows you to edit the
Bluetooth® name of how the
MiniDrone will be seen by your smartphone in the FreeFlight3 app. The name
change will take effect once the MiniDrone has been restarted.
The MiniDrone network name can only contain numbers, letters and underscores
("_"). It must not be longer than 32 characters.
Versions
The
General Information
shows you:
·
The version number of the FreeFlight3 app currently installed on your
smartphone.
·
The version number of the firmware installed on your MiniDrone.
·
The hardware version of your MiniDrone.
Page 15

15
Academy Drone
Academy Drone
An internet connection is necessary to use the Drone Academy.
To launch the Drone Academy:
1. Launch the
FreeFlight3
application.
2. Press
Drone Academy.
A profile is necessary to access the Drone Academy.
To create a profile:
1. Press
Sign up
now.
2. Type a user name, a password and an e-mail address.
3. Press
Register your profile
.
> The Drone Academy main screen appears:
N°
Description
1
Accessing the FreeFlight3 application home screen
2
Visualizing the map of the flights
3
Accessing your list of drones
4
Accessing your list of flights
Page 16

16
Academy Drone
5
Modifying and disconnecting your profile
6
Sending a Drone Academy invitation
To modify or delete your profile:
1. Press the Profile tab.
2. Press
3. Press Logout or Edit.
4. If you edit your profile slide the screens towards left to complete your profile.
To register a MiniDrone press
My drones.
The first time you connect the MiniDrone to your smartphone, a pop-up ask you to
register your MiniDrone in the Drone Academy.
To consult the shared flights:
1. Press
Map.
2. Press to search flights amongst:
·
your flights or other user's flights,
·
the type of media.
Press to search flights by user or place.
To consult and share your flights:
1. Press My pilotings.
>The list of your flights appears. You can sort them by date, rank or type.
2. Press the flight you wish to share.
3. Press Public to share the flight. You can also:
·
press the stars to rate the flight,
·
press the tabs at the bottom of the screen to consult the flight information.
Page 17

17
Updates
Updates
Press
Updates
to check if any software updates are available for the MiniDrone.
There are two ways to update your MiniDrone:
·
Via USB by downloading the update file from our website. This method requires
a computer. Check that the MiniDrone battery is installed and fully charged
before carrying out updates via USB link..
·
Via the FreeFlight3 app by pressing
Updates
.
Page 18

18
General Information
General Information
Precautions for use and maintenance
The MiniDrone is not suitable for children under 14 years of age.
The MiniDrone is a model aircraft designed for recreational and leisure purposes.
The pilot must always maintain direct visual contact with the MiniDrone and
monitor its trajectory. The MiniDrone must be used in accordance with the civil
aviation rules in your country. You should only use it in open spaces so you are
always able to ensure the safety of person, animals and property. There are some
public places (stations, airports etc.) and roads where you may not be permitted to
use your MiniDrone.
To use your MiniDrone indoors, use the shields to protect the MiniDrone in case it
collides with another object.
In flight, the propellers of the MiniDrone can cause injury to people and property.
Don’t touch the MiniDrone while it’s flying! Wait until the propellers have
completely stopped before handling the MiniDrone. Only use accessories
specified by the manufacturer. If sand or dust gets into the MiniDrone, irreversible
damage may be caused and it will not be able to operate properly. Do not use the
MiniDrone in adverse meteorological conditions (rain, strong wind, snow) or in
poor visibility conditions (at night).
K
eep the MiniDrone away from high voltage power lines, buildings or any other
potentially dangerous areas. Do not use this device close to any liquid substances.
Do not land the MiniDrone on water nor on any damp surface, it might cause
irreversible damage. Avoid subjecting the MiniDrone to any sudden significant
changes in altitude. Do not leave the MiniDrone in direct sunlight.
Accessories and spare parts
Accessories and spare parts are available from your Parrot retailer or from our
website store.parrot.com.
Battery
Failure to comply with instructions may cause permanent damage to the battery or
its surroundings, and may cause injury. Always use a LiPo battery charger. Never
charge via a discharge lead. Never trickle charge or charge below 2.5 V. Never allow
the battery temperature to exceed 60°C (140°F). Never disassemble or modify the
Page 19

19
General Information
wiring in the battery pack, or puncture the battery cell. Never place the battery on
top of flammable materials or leave it unattended while charging. Always charge in
a fireproof location. Always make sure that the charger output voltage corresponds
to the battery voltage. Always keep out of reach of children. Incorrect use of the
battery can cause fires, explosions or other damage.
The battery terminals should not be allowed to short-circuit. The product
must only be connected to class II appliances that display the symbol
opposite.
Warranty
For the warranty conditions please refer to the retailer’s General Conditions of Sale
where you purchased your MiniDrone.
Modifications
The explanations and specifications in this guide are given for information
purposes only and may be modified without prior notice. They are deemed to be
correct at time
of going to press. The utmost care has been taken when writing this guide,as part
of the aim to provide you with accurate information. However, Parrot shall not be
held
responsible for any consequences arising from any errors or omissions in the
guide, nor for any damage or accidental loss of data resulting directly or indirectly
from the use of the information herein. Parrot reserves the right to amend or
improve the product design or user guide without any restrictions and without any
obligation to notify users.
As part of our ongoing concern to upgrade and improve our products, the product
that you have purchased may differ slightly from the model described in this guide.
If so, a later version of this guide might be available in electronic format at Parrot’s
website at
www.parrot.com.
Recycling this product
The symbol on this product and on its literature shows that at the end of its
life, it is not to be disposed of with household waste. The uncontrolled
disposal of waste is harmful to the environment: please separate this from
other types of waste and dispose of responsibly. Private individuals are invited to
contact the retailer who sold them the product or to ask advice from their local
authority to find out how and where it can be recycled.
Page 20

20
General Information
Declaration of Conformity
Parrot SA, 174 quai de Jemmapes, 75010 Paris, France, declares under their sole
responsibility that the product described in this user guide complies with E
N
301489-17, EN300328, EN71-1, EN71-2, EN62115 technical standards following the
provision of the Radio Equipment, Telecommunication Equipment directive
(1999/5/EC R&TTE), and of the General Safety directive (2001/95/EC).
The Declaration of Conformity is available on our website:
www.parrot.com/fr/ce/?airborne-cargo-drone
Registered trademarks
Parrot, Parrot MiniDrones and the Parrot logo are trade-marks of PARROT SA.
App Store is a service mark of Apple Inc.
Google Play is a trademark of Google Inc.
The
Bluetooth® word mark and logos are registered trademarks owned by
Bluetooth SIG, Inc. and any use of such marks by Parrot SA is under license.
All other trademarks mentioned in this guide are protected and are the property of
their respective owners.
Notice regarding the right to privacy
Recording and distributing images of an individual without their consent could
constitute a violation of their privacy, for which you may be held liable. Ask for
permission before filming individuals, particularly if you want to keep your
recordings and/or share them online. Do not distribute any degrading images or
those that could undermine an individual's reputation or dignity.
 Loading...