

Parkside KH 3131 POWER PLANER, PEH 950 User Manual
PEH 950
2003
Kompernaß Handelsgesellschaft mbH
Burgstraße 21 · D-44867 Bochum (Germany)
Stand der Informationen 10/2003 · Ident.-No.: PEH950-102003-1
D Bedienungs- und Sicherheitshinweise Seite 5- 9
GB Operating and safety instructions Page 10-14
F Mode d'emploi et instructions de sécurité Page 15-19
I Informazioni di sicurezza e istruzioni per l‘uso Pagina 20-24
E Instrucciones para el manejo y la seguridad Página 25-29
P Instruções de utilização e de segurança Página 30-34
NL Bedienings- en veiligheidsaanwijzingen Pagina 35-39
GR АФ‰В›НВИ˜ ¯ВИЪИЫМФ‡ О·И ·ЫК·ПВ›·˜ ™ÂÏ›‰· 40 - 45
PL Wskazówki dotyczàce obs∏ugi i bezpieczeƒstwa Strona 46-50
CZ Pokyny k ovládání Strana 51-55
FIN Käyttö- ja turvaohjeet Sivu 56-60
S Användar- och Säkerhetsanvisning Sidan 61-65
4
Bedienungsanleitung lesen!
Please read the operating instructions!
Lire le mode d’emploi !
Leggere il manuale d’uso
¡Leer manual de instrucciones!
Ler manual de instruções!
Lees deze handleiding door!
¢È·‚¿ÛÙ ÙȘ Ô‰ËÁ›Â˜ ¯Ú‹Û˘!
Przeczytaç instrukcj´ obs∏ugi!
Pfieãtûte si návod k obsluze!
Käyttöohje on luettava!
Läs bruksanvisningen!
Warn- und Sicherheitshinweise beachten!
Observe all warnings and safety advice!
Tenir compte des avertissements et
des instructions de sécurité !
Osservare le note di avvertenza
e di sicurezza!
¡Tener en cuenta los avisos e indicaciones
de seguridad!
Ter em atenção os avisos e indicações de
segurança!
Gevaren- en veiligheidsinstructies in acht
nemen!
§¿‚ÂÙ ˘fi„Ë ÙȘ ÚÔÂȉÔÔÈ‹ÛÂȘ ηÈ
ÙȘ ˘Ô‰Â›ÍÂȘ ·ÛÊ·Ï›·˜!
Przestrzegaç wskazówek
ostrzegawczych i dotyczàcych
bezpieczeƒstwa!
Varoitus- ja turvallisuusohjeet on
huomioitava!
Beakta säkerhets- och varningsanvisningar!
Soft Start
Soft Start
Mise en marche en douceur Soft Start
Soft Start
Soft Start
Soft Start
Soft Start
Soft Start
Soft Start
¸agodny start
Mûkk˘ start
Pehmeä käynnistys
Mjukstart
Intelligent Power Control
Intelligent Power Control
Intelligent Power Control
Intelligent Power Control
Intelligent Power Control
Intelligent Power Control
Intelligent Power Control
Intelligent Power Control
Intelligent Power Control
Intelligent Power Control
Älykäs tehonsäätö
Intelligent Power Control
W
Watt (Wirkungsleistung)
Watt (effective output power)
Watts (puissance effective)
Watt (Potenza)
Watt (potencia)
Watt (potência)
Watt (vermogen)
Watt (·fi‰ÔÛË)
Wat (moc czynna)
Watty (v˘kon)
Wattia (Vaikutusteho)
Watt (effekt)
V~
Wechselspannung
AC voltage
Tension alternative
Tensione alternata
Tensión alternada
Tensão alternada
Wisselspanning
∂Ó·ÏÏ·ÛÛfiÌÂÓË Ù¿ÛË
Napi´cie przemienne
Stfiídavé napûtí
Vaihtojännite
Spänning
n
0
Bemessungs-Leerlaufdrehzahl
Design no-load speed
Vitesse de rotation à vide de calcul
N° di giri a vuoto
Velocidad de rotación de dimensión
Velocidade de rotação de
dimensionamento
Nominaal toerental
√УФМ·ЫЩИО¤˜ ЫЩЪФК¤˜ О·Щ¿ ЩЛ
ПВИЩФ˘ЪБ›· ВУ ОВУТ
Projektowe obroty biegu ja∏owego
Stanoven˘ poãet otáãek naprázdno
Mittaus-tyhjäkäyntipyörimisnopeus
Tomgångsvarvtal
Elektrowerkzeug der Schutzklasse II
Electrical tool with protection class II
Outil électrique de classe de protection II
Classe di protezione per utensili elettrici
Herramienta eléctrica de la categoría de
protección II
Ferramenta eléctrica da categoria de
protecção II
Elektrisch gereedschap van de
beschermingsklasse II
∏ПВОЩЪИОfi ВЪБ·ПВ›Ф ЩЛ˜ ОП¿ЫЛ˜
ЪФЫЩ·Ы›·˜ II
Elektronarz´dzie klasy ochronnoÊci II
Elektrick˘ nástroj ochranné tfiídy II
Suojausluokan II sähkötyökalu
Elverktyg,skyddsklass II
www.kompernass.com +++ www.kompernass.com +++ www.kompernass.com +++
5
k
555
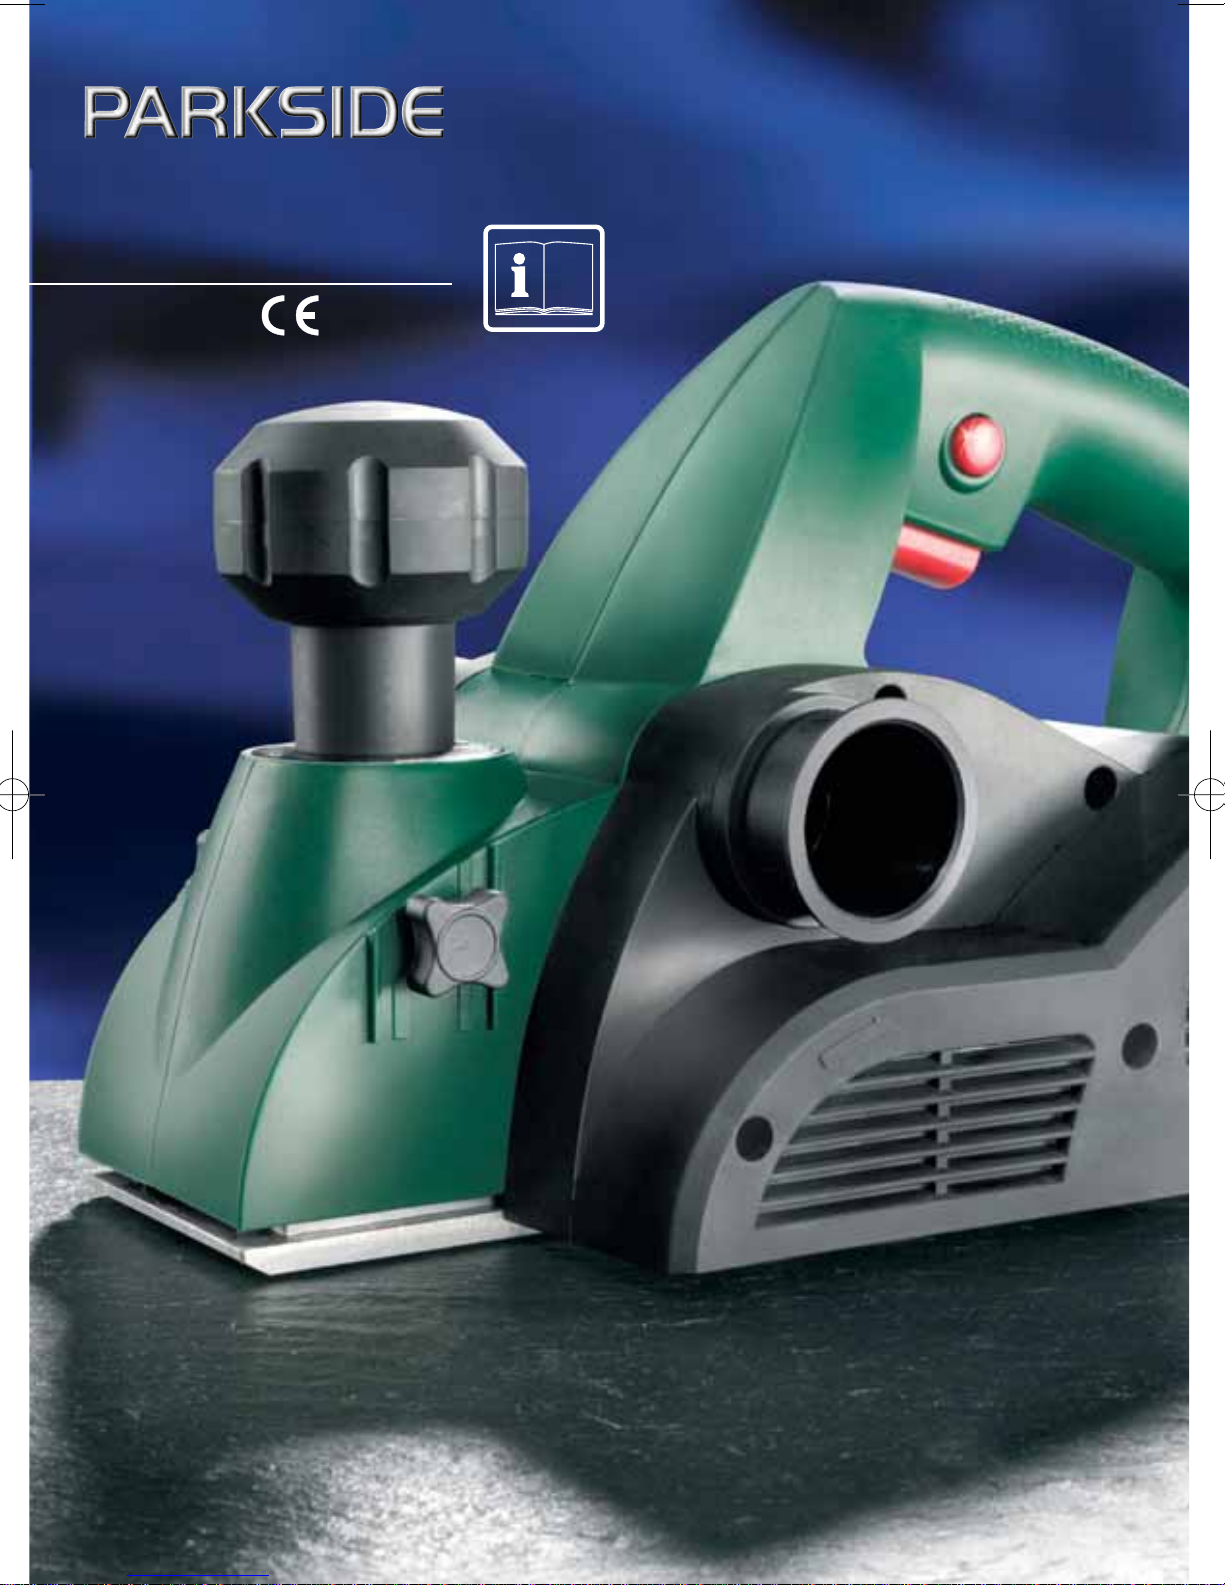
ELEKTROHOBEL PEH 950
Für Hobeln, Abschrägen und Falzen von Holz.
Verehrter Kunde! Wir freuen uns,dass Sie sich mit dem Elektro Hobel PEH 950 für ein Qualitätsprodukt aus unserem Hause entschieden haben. Machen Sie sich bitte unbedingt vor der ersten
Inbetriebnahme mit den Funktionen des Gerätes vertraut und informieren Sie sich über den richtigen
Umgang mit Elektrowerkzeugen. Lesen Sie bitte hierzu sorgfältig die nachfolgende Bedienungsanleitung sowie die beiliegenden Sicherheitshinweise . Benutzen Sie das Gerät nur wie
beschrieben und für die angegebenen Einsatzbereiche. So arbeiten Sie gefahrlos und erzielen bei
Ihren Arbeiten bessere Ergebnisse.Wir wünschen Ihnen viel Freude mit Ihrem Gerät.
BESTIMMUNGSGEMÄSSER GEBRAUCH
Der Elektrohobel ist bei fester Auflage der Werkstücke zum Hobeln von Holzwerkstoffen wie Balken
oder Bretter geeignet. Ferner eignet sich das Gerät zum Abschrägen von Kanten und zum Falzen.
Jede andere Verwendung oder Veränderung der Maschine gilt als nicht bestimmungsgemäß und birgt
erhebliche Unfallgefahren. Für aus bestimmungswidriger Verwendung entstandene Schäden übernimmt der Hersteller keine Haftung.
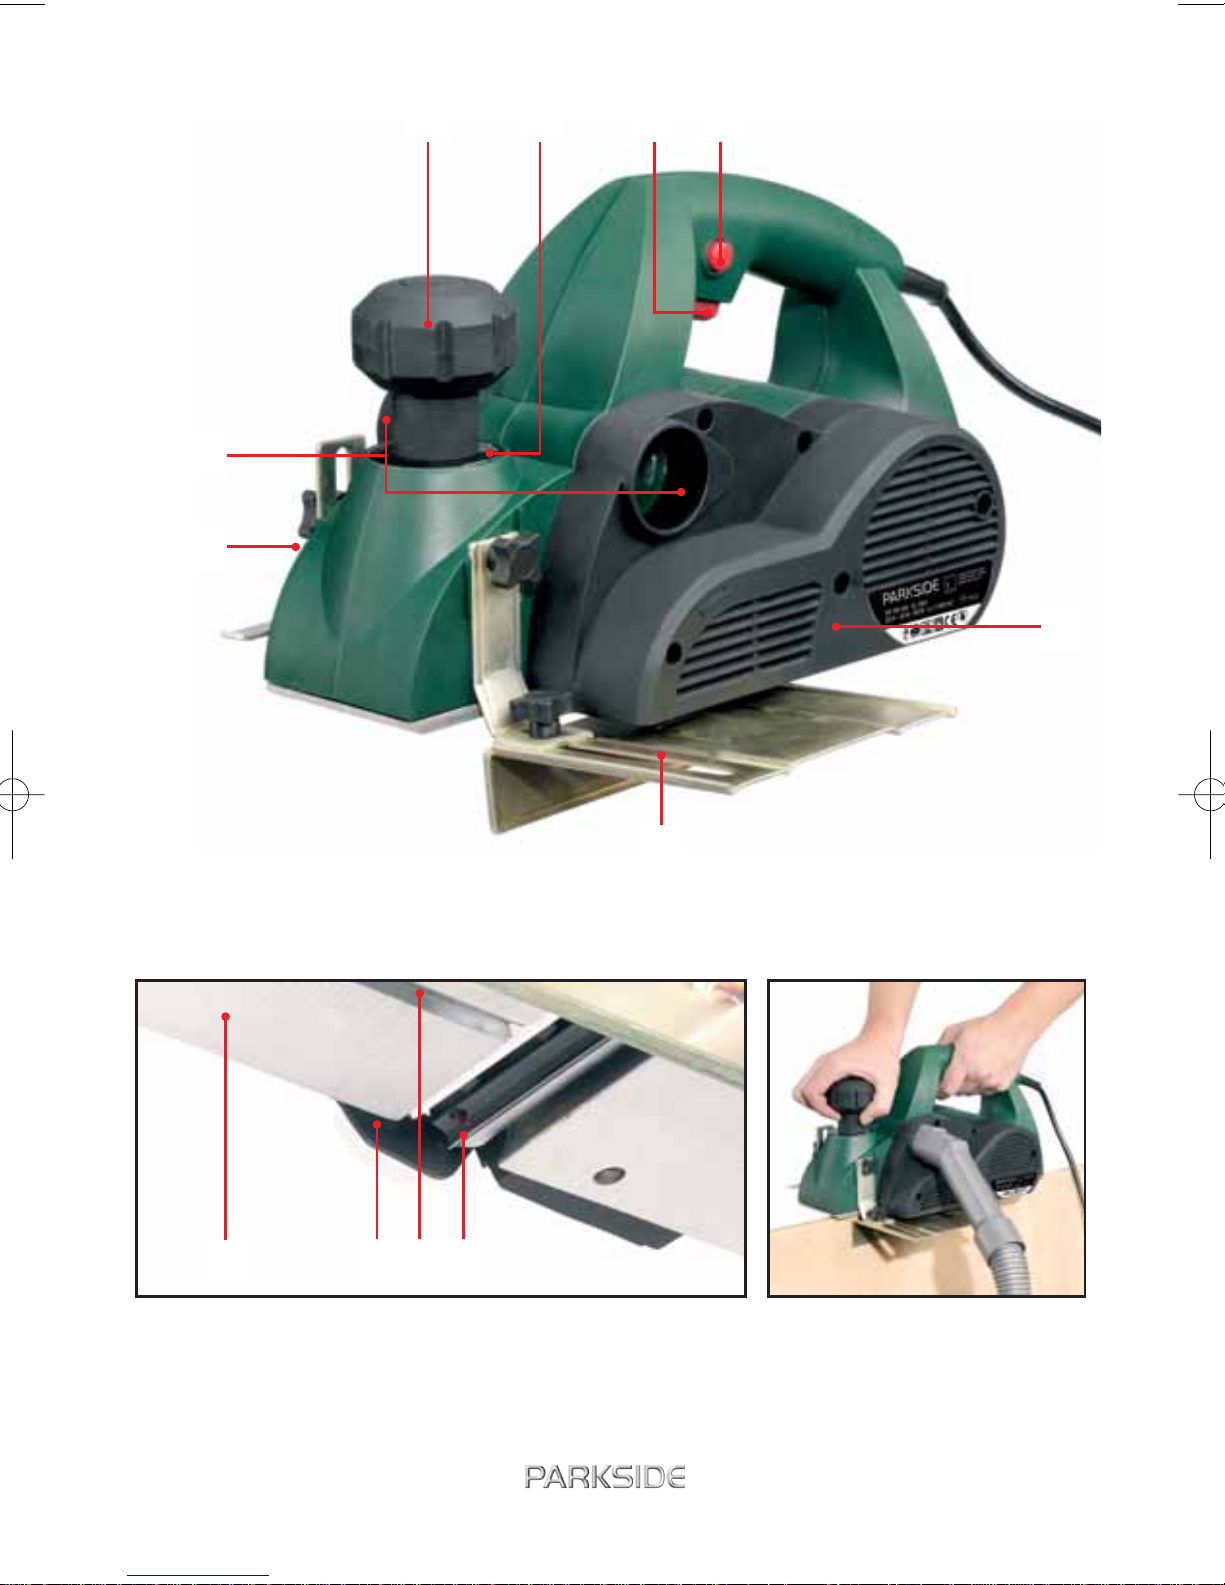
AUSSTATTUNG PEH 950
Führungsgriff / Falztiefenanschlag
Spantiefeneinstellung Spanaus wurf (beidseitig)
Hobeltiefenskala Grundplatte
EIN- /AUS-Schalter Schutzklappe
Einschaltsperre V-Nut
Zahnriemenabdeckung Messerkopf/Hobelmesser
Parallelanschlag
TECHNISCHE DATEN
Nennleistung: 950 W Gewicht: 4,3 kg
Nennspannung: 230 V ~ 50 Hz Schalldruckpegel: 0095 dB (A)
Bemessungs-Leerlauf- Schalleistungspegel: 108 dB (A)
Drehzahl: n
0
12.000 min
-1
Schwingungswert: 1,9 m/s
2
Hobeltiefe: 0 - 03,5 mm (Hand-Arm-Vibration)
Falztiefe: 0 - 24,0 mm Schutzklasse: II /
Hobelbreite: 82 mm
5
k
www.kompernass.com +++ www.kompernass.com +++ www.kompernass.com +++
www.kompernass.com +++ www.kompernass.com +++ www.kompernass.com +++
6
k
66
WICHTIGE SICHERHEITSHINWEISE
Lesen Sie vor der ersten Inbetriebnahme zusätzlich die Hinweise im beiliegenden Heft »Sicherheits-
hinweise«.
Der Elektro Hobel PEH 950 ist dafür ausgelegt, bei fester Auflage diverse Holzwerkstoffe (z.B.Balken,
Bretter) zu hobeln.
Wird bei Arbeiten die Netzleitung beschädigt oder gar durchtrennt,niemals die Netzleitung berühren -
ziehen Sie sofort den Netzstecker.Benutzen Sie niemals Elektrogeräte mit beschädigtem Kabel.
Wenn die Netzleitung beschädigt wird,muss sie durch eine besondere Netzleitung ersetzt werden, die
vom Hersteller oder seinem Kundendienst erhältlich ist.
Bei längerem Bearbeiten von Holz und insbesondere wenn Materialien bearbeitet werden, bei denen
gesundheitsgefährdender Staub entsteht, ist der Hobel an eine geeignete externe Absaugvorrichtung
anzuschließen.Tragen Sie einen Atemschutz.
Verwenden Sie ausschließlich scharfe Hobelmesser.
Führen Sie die Netzleitung immer nach hinten vom Gerät weg.
Hobeln Sie nie über Metallgegenstände, Nägel oder Schrauben.
Den Hobel nur eingeschaltet gegen das Werkstück führen.
Die Grundplatte muss beim Arbeiten flach aufliegen.
Nicht mit den Fingern in den Spanauswurf greifen. Benutzen Sie einen Holzstab,um einen
verstopften Spanauswurf von Spanmaterial zu befreien.
INBETRIEBNAHME
Der Elektro Hobel PEH 950 verfügt über INTELLIGENT POWER CONTROL.
Dieses elektronische Management misst und regelt die verschiedenen
Betriebszustände Ihres Hobels;
Betriebszustand Merkmal
Einschalten: Durch die IPC-Elektronik-Anlaufstufe läuft der Motor verzögert und an-
schließend sanft an. Starke Einschaltstromstöße werden dadurch weitgehend
vermieden. Dadurch wird das Ansprechen von Sicherungsautomaten
weitgehend verhindert (Baustellen, Haushalte).
Leerlauf: Nach dem Einschalten sorgt die IPC-Elektronik-Hochlaufstufe dafür,dass die
Maschine in den Sollwert beschleunigt.Anschließend sorgt die IPC-Drehzahlregelstufe für eine konstante Drehzahl.
ACHTUNG:
Bevor Sie Arbeiten an dem Hobel durchführen immer den Stecker aus der Steckdose ziehen.
Beachten Sie die Netzspannung. Die Spannung der Stromquelle muss mit den Angaben auf dem
Typenschild des Gerätes übereinstimmen.Geräte, die mit 230 V bezeichnet sind, können auch
mit 220 V betrieben werden.
6
k
www.kompernass.com +++ www.kompernass.com +++ www.kompernass.com +++

www.kompernass.com +++ www.kompernass.com +++ www.kompernass.com +++
7
k
777
EIN- UND AUSSCHALTER
Aus Gründen der Sicherheit kann der EIN-/AUS-Schalter
nicht auf Dauerbetrieb eingestellt werden.
Er muss während des Betriebs ständig gedrückt bleiben.
Warten Sie vor dem Ablegen des Elektrohobels den vollständigen Auslauf ab.
HOBELTIEFE EINSTELLEN
Die Hobeltiefe (Spantiefe) kann von 0 - 3,5 mm eingestellt werden. Drehen Sie den Führungsgriff
und stellen Sie den Pfeil auf die gewünschte Markierung bzw.den Wert ein.
SPANAUSWURF UND -ABSAUGUNG
Der Spanauswurf kann durch einfaches Umstecken von Verschlusskappe und Saugrohradapter
links oder rechts gewählt werden.
ARBEITSHINWEISE
Schalten Sie den Hobel immer vor Materialkontakt ein und führen Sie das Gerät erst dann an das
Werkstück.
FLÄCHEN HOBELN
Setzen Sie das Gerät mit dem vorderen Teil der Grundplatte
auf das zu bearbeitende Werkstück
auf. Beachten Sie unbedingt, dass beim Hobeln von Flächen wie Balken und Bretter die Grundplatte
immer auf der ganzen Fläche aufliegen muss, da sonst Rückschlaggefahr des Messer besteht.
Führen Sie den Hobel stets mit beiden Händen und gleichmäßigem Vorschub über die zu beabeitende
Fläche.
KANTEN ANFASEN
Durch die V-Nut
, die sich in der Mitte der vorderen Grundplatte befindet,können Sie schnell und
einfach die Kanten Ihres Werkstückes anfasen.Setzen Sie dazu den Hobel mit der V-Nut
auf die
Werkstückkante auf und führen sie ihn an dieser entlang.
Achten Sie während des Anfasens auf konstante Winkellage von 45° und gleichmäßigen Vorschub.
FALZEN
Z.B. für rechtsbündiges Falzen den Parallelanschlag
links und den Falztiefenanschlag rechts in
die vorhandenen Bohrungen des Gerätes montieren (Montage von oben gesehen).
Mit dem Falztiefenanschlag
wird die Falztiefe -max. 24 mm- eingestellt. Den Parallelanschlag
zur Begrenzung der gewünschten Breite einstellen. Die Hobeltiefenskala auf die maximale Tiefe von
3,5 mm justieren. Bearbeiten Sie das Werkstück mehrfach,bis die gewünschte Falztiefe erreicht ist.
7
k
www.kompernass.com +++ www.kompernass.com +++ www.kompernass.com +++

www.kompernass.com +++ www.kompernass.com +++ www.kompernass.com +++
8
k
88
HOBELMESSER WECHSELN ODER WENDEN
ACHTUNG:
Bevor Sie Arbeiten an dem Hobel durchführen immer den Stecker aus der Steckdose ziehen.
WICHTIGER
HINWEIS:
Die beiden Innensechskantschrauben nicht lösen. Sie dienen zur Höhenjustierung des Messerkopfes.
Eine Justierung ist nur notwendig, wenn Sie einen anderen Hobelmessertyp, wie z.B. ein Rustikalmesser,verwenden wollen.
Werkseitig sind HSS-Wendemesser eingesetzt.Bei einem Messerwechsel immer beide HSS-Messer
tauschen um einer Unwucht vorzubeugen. Die PARKSIDE-Wendemesser können -wenn sie stumpf
geworden sind- ohne Höhenjustierung des Messerkopfes gewendet oder gewechselt werden.
1) Lösen Sie zunächst nur einen Messerkopf
, so können Sie sich am werkseitig montierten zweiten
Messerkopf für den späteren Zusammenbau orientieren.
2) mit dem beiliegenden Maulschlüssel die 3 Schrauben des Messerkopfes
lösen.
3) den Messerkopf aus der Hobelwalze nehmen.
4) das Hobelmesser seitlich aus dem Messerkopf schieben.
HINWEIS: Der Messerkopf kann auch zerlegt werden, z.B. zur Reinigung.
5) Die Montage mit gedrehtem oder neuem Hobelmesser erfolgt in umgekehrter Reihenfolge.
6) Überprüfen Sie zur Sicherheit abschließend nochmals
- die Position des Hobelmessers im Messerkopf.
- den gleichmäßigen und festen Sitz des Messerkopfs und der 3 Spannschrauben.
- ob die Höhenjustierung (2 Innensechskantschrauben) korrekt ist.
7) - Hobelmesser erhalten Sie unter angegebener Serviceadresse (siehe Garantie).
ZAHNRIEMEN WECHSELN
Lösen Sie die Schrauben der Abdeckung und nehmen Sie die Zahnriemenabdeckung ab.
Durchtrennen Sie den Zahnriemen mit einem Seitenschneider oder Messer und entnehmen Sie den
verschlissenen Zahnriemen. Befreien Sie stets die Riemenscheibe sowie das Antriebsrad gründlich
von Schmutz, bevor Sie einen neuen Zahnriemen einbauen!
Den neuen Zahnriemen auf das Antriebsrad auflegen und unter Drehen auf die große Riemenscheibe
aufdrücken.
Zahnriemenabdeckung
wieder aufsetzen und mit den Schrauben befestigen.
WARTUNG UND PFLEGE
Reinigen Sie den Hobel regelmässig, am besten immer direkt nach Abschluss der Arbeit.
Keine scharfen Gegenstände zur Reinigung des Elektro Hobels verwenden. Es dürfen keine
Flüssigkeiten in das innere des Hobels gelangen. Zum Reinigen des Gehäuses ein weiches
Tuch verwenden – auf keinen Fall Benzin,Lösungsmittel oder Reiniger,die Kunststoff angreifen.
Lüftungsöffnungen müssen immer frei sein.
www.kompernass.com +++ www.kompernass.com +++ www.kompernass.com +++
8
k

www.kompernass.com +++ www.kompernass.com +++ www.kompernass.com +++ www.kompernass.com +++ www.kompernass.com +++ www.kompernass.com +++
9
k
999
TIPPS UND TRICKS
1. Vermeiden Sie überhöhten Vorschub – er mindert erheblich das Leistungsvermögen und verringert
zudem die Lebensdauer der Messer.
2. Stets scharfe Messer verwenden und stumpfe Messer rechtzeitig erneuern – Sie erhalten gute
Schnittleistungen und schonen das Gerät.
3. Beim Glatthobeln von Flächen empfiehlt es sich, nur geringe Spantiefen einzustellen und den
Hobelvorgang mehrmals zu wiederholen.
Weitere praktische Tipps finden Sie ebenfalls im beiliegenden Heft »Sicherheitshinweise«.
ENTSORGUNG
Die Verpackung besteht zu 100% aus umweltfreundlichen Materialen,die Sie über die örtlichen
Recyclingstellen entsorgen können.
Über Entsorgungsmöglichkeiten für ausgediente Elektrowerkzeuge informieren Sie sich bitte bei Ihrer
Gemeinde- oder Stadtverwaltung.
KONFORMITÄTSERKLÄRUNG
Wir,Kompernaß Handelsgesellschaft mbH,Burgstr.21, D-44867 Bochum, erklären hiermit für dieses
Produkt die Übereinstimmung mit folgenden EG-Richtlinien:
Maschinenrichtlinie: (98/37 EC)
EG-Niederspannungsrichtlinie: (73/23 EEC), (93/68 EEC)
Elektromagnetische Verträglichkeit: (89/336 EEC)
Angewandte harmonisierte Normen: EN 50144-1:1998+A1:2002
EN 50144-2.14: 2001
Maschinentyp/Type: PARKSIDE ELEKTROHOBEL PEH950
Bochum, 31.10.2003
Hans Kompernaß
- Geschäftsführer -
Technische Änderungen im Sinne der Weiterentwicklung sind vorbehalten.
9
k
10
PEH 950 POWER PLANER
FOR PLANING, CHAMFERING AND REBATING WOOD.
Dear Customer,We are delighted that you have decided to purchase our high quality PEH 950 power
planer.Please make sure you familiarise yourself fully with the way the equipment works before you
use it for the first time and that you understand how to handle electrical power tools correctly.Please
read the operating instructions below and the accompanying safety advice carefully.
Use the equipment only as described and for the indicated purposes. By doing this you will be able to
work in complete safety and produce better results.We hope you enjoy using your planer.
PROPER USE
The electric planer is suitable for planing wood in the form of beams or boards if the workpiece is
held securely in a fixed position.An y other use or modification to the belt sander shall be
considered as improper use and could give rise to considerable dangers.The manufacturer will not
accept liability for loss or damage arising from improper use.
FEATURES OF THE PEH 950
Guide handle/ Cutting block / planer blades
planing depth adjuster Planing depth scale
ON/OFF switch Base plate
Drive interrupt Vee groove
Toothed belt cover Dust outlet
Rebating depth stop Safety cover
Side fence
TECHNICAL INFORMATION
Nominal power: 950 W
Nominal voltage: 230 V ~ 50 Hz Weight: 4,3 kg
Design no-load speed: n
0
12,000 rpm Sound pressure level: 095 dB (A)
Planing depth: 0 - 03.5 mm Sound power level: 108 dB (A)
Rebating depth: 0 - 24.0 mm Vibration: 1,9 m/s
2
(hand-arm vibration)
Planing width: 82 mm Protection class: II /
10
www.kompernass.com +++ www.kompernass.com +++ www.kompernass.com +++ www.kompernass.com +++ www.kompernass.com +++ www.kompernass.com +++
10
t
www.kompernass.com +++ www.kompernass.com +++ www.kompernass.com +++
11
k
1111
wwww.kompernass.com +++ www.kompernass.com +++ www.kompernass.com +++
IMPORTANT SAFETY ADVICE
To be read in conjunction with the advice in the accompanying booklet on safety before using for the
first time.
The PEH 950 power planer is intended to be used for planing wood (e.g. beams, boards).
If the mains cable is damaged or cut through during the work - never touch the cable - pull out the
mains plug immediately.Never use electrical equipment with damaged cables.
For operating the planer for longer periods and particularly if dust that may be hazardous to heath is
created, the planer should be connected to a suitable external vacuum device.
Wear a dust mask.
Make sure you only use sharp blades.
Always keep the power cable fed to the rear of the machine.
Never plane over metal objects, nails or screws.
Only place the planer against the workpiece after switching it on.
The base plate must al ways lay flat on the workpiece when working.
Do not clear dust etc.from the dust outlet with your fingers. Use a piece of wood to dislodge any
trapped planing debris.
OPERATION
The PEH 950 power planer has INTELLIGENT POWER CONTROL.
This electronic management system monitors and controls your power planer
in its various operating states;
Operating state Feature
Switching On/Off: The IPC electronic system start-up mode ensures that the
motor starts up slowly and gently.This large ly avoids
heavy transient current surges, and means that electrical safety cut-out
devices are not generally tripped (building sites, domestic premises).
No-load running: After switching on, the IPC electronic management system run-up mode
takes the planer speed up to the pre-set required value.After this is reached,
the IPC system speed control mode keeps the grinder operating at a
constant speed.
W
ARNING:
Always remove the plug from the mains socket before working on the planer.
Take note of the mains voltage.The voltage must a gree with that sho wn on the rating pla te
(equipment shown as 230 V can also be used with 220 V).
ON / OFF SWITCH
On the grounds of safety the ON / OFF switch
cannot be locked in the ON position for continuous
operation. It must always be pressed during operation.
11
t

www.kompernass.com +++ www.kompernass.com +++ www.kompernass.com +++
12
k
12
SETTING THE PLANING DEPTH
The planing depth can be set between 0 - 3.5 mm.Turn the guide handle/ planing depth adjuster
and set the pointer to the desired mark or value.
DUST REMOVAL AND VACUUM EXTRACTION
The planing debris removal channel can be configured to the left or right as required by simply
inserting a closing cap and vacuum hose adapter.
OPERATING INSTRUCTIONS
Always switch on the planer before making contact with the material and then guide the planer on to
the workpiece.
PLANING SURFACES
Place the planer with the front of the base plate
on the workpiece.
Always make sure when you are planing surfaces such as beams and boards that the base plate
is
in full contact with the surface to avoid the danger of blade kickback.
Always use both hands to guide the plane over the workpiece with even forward pressure.
CHAMFERING CORNERS
The vee groove
in the centre of the front of the base pla te allows you to chamfer the corners of
your workpiece very quickly and easily.Place the planer on to the workpiece with the vee groove
on the corner and then guide the planer along the corner.Make sure you keep the angle at 45° and
an even forward pressure.
REBATING
Example set up: for right hand rebates the side fence
goes on the left and the reba ting depth
stop
goes on the right into the holes on the planer (with the planer viewed from above).
Set the rebating depth up to a max. 24 mm using the rebating depth stop
. Set the side fence to
give the required width.Adjust the planing depth scale
to the maximum of 3.5 mm. Go over the
workpiece as many times as is required to obtain the desired rebate.
12
t
www.kompernass.com +++ www.kompernass.com +++ www.kompernass.com +++

www.kompernass.com +++ www.kompernass.com +++ www.kompernass.com +++
13
k
1313
CHANGING OR REVERSING THE PLANER BLADES
WARNING: Before doing any work on the planer al ways pull out the plug from the mains.
IMPOR
TANT ADVICE:
Do not unscrew the two hexagonal socket headed screws.They adjust the height of the cutting block.
Adjustment is only required if you wish to change to another planer blade type e.g. a profiled blade.
HSS reversible blades are fitted as standard at the works.When you change blades, always change
both blades to avoid any imbalance.When they become blunt, the PARKSIDE reversible blades can be
changed without any height adjustment of the cutting block being necessary
1) First unscrew one cutting block
only so tha t you can use the works-mounted second cutting block
as an aid to setting up later.
2) Unscrew the three screws in the cutting block
using the supplied open spanner.
3) Take the cutting block out of the planing roller.
4) Slide the planer blade sideways out of the cutting block.
NOTE:The cutting block can also be dismantled, e.g.for cleaning.
5) Re-assembly with a reversed or new blade is done in reverse order.
6) Check again for safety:
- the position of the planer blade in the cutting block
- the balanced and secure seating of the cutting block and the 3 fixing screws
- that the height adjustment is correct (2 hexagonal socket headed screws).
7) Planer blades can be obtained from the service address indicated (see guarantee).
CHANGE TOOTHED BELT
Unscrew the screws in the cover and take off the toothed belt cover . Cut through the toothed belt
with side-cutting pliers or a knife and remove the severed toothed belt.Al ways clean off any dirt or
debris from the pulley and the drive wheel before installing the new belt.
Place the new toothed belt on to the drive wheel and push the belt over the large pulley wheel whilst
turning it.
Put the toothed belt cover
back in place and fasten with the screws.
MAINTENANCE AND CARE
Clean the planer regularly.For the best results do this straight after the work has been completed.
Do not allow liquids to get inside the planer. Use a soft cloth for cleaning the housing.Do not use
petrol, solvents or cleaners that might attack the plastic.Air vents must always be clear and clean.
www.kompernass.com +++ www.kompernass .com +++ www.komper nass .com +++
13
t

www.kompernass.com +++ www.kompernass .com +++ www.komper nass .com +++
14
k
14
TIPS AND TRICKS
1. Do not use too much forward pressure. - Too much pressure can considerably reduce performance
and increase the wear on the blades.
2. Always use sharp blades and replace blunt blades promptly.- You will get better cutting performance
and extended tool life.
3. To obtain smooth planed surfaces we recommend that you use shallo w planing depths and plane the
surface a number of times.
Further practical tips for power tools can be found in the accompanying booklet on safety advice.
We reserve the right to make technical modifications in the course of further development.
DISPOSAL
The packaging is wholly composed of environmentally-friendly materials that can be disposed of at a
local recycling centre.
Please contact your local council office to find out about disposal facilities for your worn-out electrical
tools.
STATEMENT OF CONFORMITY
We,Kompernaß Handelsgesellschaft mbH,Burgstr. 21, D-44867 Bochum,German y, hereby declare
that this product conforms with the following EC regulations:
Machinery Directive: (98/37 EC)
EU Low Voltage Directive: (73/23 EEC), (93/68 EEC)
Electromagnetic compatibility: (89/336 EEC)
Applicable harmonised standards: EN 50144-1: 1998+A1:2002
EN 50144-2.14: 2001
Description / Model type: PARKSIDE PEH 950 power planer
Bochum, 31.10.2003
Hans Kompernaß
- Managing Director -
14
t
www.kompernass.com +++ www.kompernass .com +++ www.komper nass .com +++
15
p
RABOT ÉLECTRIQUE PEH 950
POUR RABOTER, CHANFREINER ET FEUILLURER LE BOIS.
Cher client ! Merci d’avoir choisi le rabot électrique PEH 950, un de nos produits de qualité.Avant la
première utilisation, n'omettez pas de vous familiariser avec le fonctionnement de l’outil et de vous
informer sur l’utilisation correcte d’outils électroménagers. Dans ce but, nous vous prions de lire
attentivement ce mode d'emploi ainsi que les consignes de sécurité ci-jointes . Utilisez la
perceuse conformément aux instructions et uniquement dans le but décrit.Vous travaillerez ainsi en
toute sécurité et obtiendrez les meilleurs résultats. Nous vous souhaitons beaucoup de plaisir avec
votre nouvel outil.
UTILISATION CONFORME A L'USAGE PREVU
Les pièces à usiner reposant sur un support stable, le rabot électrique est conçu pour le rabotage de
bois tels que poutres ou planches.Toute utilisation autre ou modification de la machine est considérée
comme non-conforme à l'usage prévu et implique des risques d'accident importants. Le fabricant
n'assume aucune garantie ni responsabilité pour les dommages résultant d'une utilisation
non-conforme à l'usage prévu.
ÉQUIPEMENT PEH 950
Poignée de guidage/Réglage Guide parallèle
de la profondeur de rabotage Guide de profondeur de feuillure
Grille de réglage d’épaisseur Évacua tion des copeaux
des copeaux Socle
Gâchette Ca pot protecteur
Sécurité anti-démarrage Rainure en V
Capot de courroie Lame
CARACTÉRISTIQUES
Puissance nominale: 950 W Largeur de rabotage: 82 mm
Tension nominale: 230 V ~ 50 Hz Poids: 3,6 kg
Vitesse de rotation à Niveau de pression acoustique: 087 dB (A)
vide de calcul: n
0
11.000 min
-1
Niveau de puissance acoustique: 100 dB (A)
Épaisseur de copeaux: 0 - 03,5 mm Vibration bras-main: 2,5 m/s
2
Profondeur de feuillure: 0 - 24,0 mm Classe de protection: II /
www.kompernass.com +++ www.kompernass .com +++ www.komper nass .com +++
16
p
CONSIGNES DE SÉCURITÉ IMPORTANTES
Veuillez lire également les instructions du manuel «Consignes de sécurité» ci-joint avant la première
mise en service.
Le rabot électrique PEH 950 est conçu pour raboter divers matériaux dérivés du bois (par ex. des
poutres ou des planches) sur un support fixe.
En cas d’endommagement, voire de coupure du câble secteur pendant les travaux, évitez
absolument tous contacts avec le câble et débran chez immédiatement la fiche de courant.
N’utilisez jamais un appareil électrique si le câble secteur est endommagé.
Lors de travaux prolongés sur du bois et plus spécialement de matériaux susceptibles de dégager des
poussières nocives, vous devez raccor der le rabot à un aspirateur externe.
Portez un masque anti-poussières.
Utilisez uniquement des lames affûtées.
Veillez à ce que le câble secteur dégage toujours vers l’arrière de l’outil.
Ne rabotez jamais des surfaces comportant des objets métalliques, vis ou clous.
Le socle doit reposer à plat pendant le tra vail
Ne mettez jamais les doigts dans la buse d’évacuation des copeaux . Utilisez une baguette en bois
pour retirer les copeaux si la buse d’éva cuation est bouchée
MISE EN SERVICE
Le rabot électrique PEH 950 est équipé du système
INTELLIGENT POWER CONTROL. Ce variateur électronique mesure et règle
les différents états de fonctionnement de votre rabot;
État de fonctionnement Caractéristique
Mise en marche: Avec le module de démarra ge de l’IPC, le moteur démarre a vec un
léger retard et augmente progres sivement le régime. L’intensité du
courant de démarrage est ainsi diminuée, ce qui élimine pratiquement
le déclenchement des coupe-circuit automatiques (chantiers,
ménages).
Marche à vide: A près le démarrage, le module d’accélération contrôle l’accélération
de la machine à la valeur prescrite. Ensuite, le module de régulation
de la vitesse assure une vitesse constante.
A
TTENTION :
Débranchez toujours la prise secteur avant d’effectuer des travaux sur le rabot. Respectez la tension
secteur. La tension doit correspondre aux indications de la plaque signalétique de l’outil.Les a ppareils
indiqués pour 230 V peuvent aussi être branchés sur 220 V.

www.kompernass.com +++ www.kompernass .com +++ www.komper nass .com +++
17
p
GÂCHETTE
Pour des raisons de sécurité,la gâchette
ne peut pas être enclenchée en régime permanent et doit
donc être maintenue enfoncée durant le travail.
RÉGLAGE DE L’ÉPAISSEUR DE COPEAUX
L’épaisseur de copeaux (profondeur de rabotage) peut être réglée entre 0 et 3,5 mm. Tournez la
poignée de guidage
et réglez la flèche sur la valeur correspondante.
ÉVACUATION ET ASPIRATION DES COPEAUX
L'expulsion des copeaux peut a voir lieu à gauche ou à droite par simple transformation du cache
de fermeture et de l'adaptateur du tuyau aspirateur.
CONSIGNES DE TRAVAIL
Veillez à toujours mettre le rabot en marche avant de le poser sur la surface.
RABOTAGE DE SURFACES
Posez le rabot sur la surface de la pièce avec la partie avant du socle
. Lorsque vous rabotez des
surfaces telles que poutres ou planches, veillez absolument que le socle
repose entièrement sur la
surface pour éviter les risques de contrecoups.
Prenez toujours le rabot à deux mains et déplacez-le avec une vitesse d’avance régulière sur la
surface à usiner.
BISEAUTAGE D’ARÊTES
La rainure en V
située au milieu du socle avant permet de réaliser facilement des chanfreins.
Placez le rabot avec la rainure en V
sur l’arête de la pièce et a vancez-le le long de celle-ci.
Pendant le chanfreinage, veillez à conserver un angle de 45° constant et une vitesse d’avance
régulière.
FEUILLURE
Pour réaliser une feuillure à droite,montez le guide parallèle
à gauche et le guide de profondeur de
feuillure
à droite dans les fora ges prévus à cet effet (montage vu d’en haut).
Le guide de profondeur de feuillure
permet de régler la profondeur de feuillure entre 0 et 24 mm.
Le guide parallèle
permet de limiter la largeur désirée. Réglez la grille d’épaisseur de copeaux
sur la profondeur max. de 3,5 mm. Passez plusieurs fois sur la pièce jusqu’à ce que la profondeur de
feuillure désirée soit obtenue.

www.kompernass.com +++ www.kompernass .com +++ www.komper nass .com +++
18
p
REMPLACEMENT OU INVERSION DES LAMES
ATTENTION : Débranchez toujours la prise secteur avant d’effectuer des travaux sur le rabot.
A
VERTISSEMENT :
Ne desserrez pas les deux vis à six pans creux internes. Elles servent au réglage
de la hauteur du porte-lame. Un ajustement n’est nécessaire qu’en cas d’utilisation d’un autre type
de lame, par ex. une lame rusticale.
Les lames fournies sont des lames réversibles HSS. Remplacez toujours les deux lames HSS en
même temps pour garantir l’équilibrage. Les lames réversibles PARKSIDE peuvent, lorsqu’elles sont
émoussées, être inversées ou remplacées sans nécessiter l’ajustement de la hauteur du porte-lame.
1) Dévissez d’abord seulement une lame
, vous pouvez ainsi vous orienter sur la deuxième lame pour
le montage ultérieur.
2) Desserrez les 3 vis de la lame
a vec la clé à fourche fournie avec l’outil.
3) Retirez le porte-lame du cylindre de rabotage.
4) Retirez la lame latéralement du porte-lame.
REMARQUE : vous pouvez aussi démonter le porte-lame, par ex. pour le netto yer.
5) Effectuez le montage de la lame inversée ou changée dans l’ordre inverse.
6) Contrôlez ensuite pour votre sécurité
- la position de la lame dans le porte-lame
- le serrage correct et régulier du porte-lame et des 3 vis de serrage
- le réglage correct de la hauteur (2 vis à six pans creux internes).
7) Vous pouvez vous procurer les lames de rabot à l'adresse SAV mentionnée (voir garantie).
REMPLACEMENT DE LA COURROIE
Desserrez les vis du couvercle et retirez le capot protecteur de la courroie dentée . Coupez la
courroie avec une pince coupante ou un couteau et ôtez la courroie usée. Nettoyez ensuite la poulie
de courroie et la roue d’entraînement avant de placer la nouvelle courroie !
Placez la nouvelle courroie autour de la roue d’entraînement et engagez-la ensuite sur la poulie de
courroie en tournant. Replacez le capot protecteur
et resserrez les vis.
MAINTENANCE ET ENTRETIEN
Nettoyez le rabot régulièrement, de préférence directement après l’utilisation. N’utilisez pas d’objets
pointus pour le nettoyage. Protégez l’outil contre les infiltra tions de liquides. Essuyez le boîtier a vec
un chiffon doux. N’utilisez jamais d’essence, de solvant ou de détergent pouvant endommager le
plastique. Les fentes d’aération doivent rester libres et propres

19
p
www.kompernass.com +++ www.kompernass .com +++ www.komper nass .com +++
RECOMMANDATIONS ET CONSEILS
1. Évitez de raboter vite ou en puissance, vous réduisez le rendement de l’outil et les lames s’usent
plus vite.
2. Utilisez toujours des lames affûtées et remplacez à temps les lames émoussées, le rendement de
coupe sera meilleur et vous ménagez ainsi l’outil.
3. Pour le recalage de surfaces, nous recommandons de régler une épaisseur de copeaux faible et de
repasser plusieurs fois sur la pièce.
Vous trouverez d’autres conseils utiles concernant les outils électriques dans le manuel ci-joint
«Consignes de sécurité».Tous droits de modifications techniques réservés.
ELIMINATION
L'emballage se compose à 100% de matériaux écologiques, que vous pouvez éliminer par
l'intermédiaire des centres de recyclage locaux.
Pour les possibilités d'élimination des appareils électroménagers usagés, renseignez-vous auprès
e votre commune.
CERTIFICAT DE CONFORMITE
Le société Kompernaß Handelsgesellschaft mbH,Burgstr. 21,D-44867 Bochum, Allemagne,
certifie par le présent document que ce produit est conforme aux directives européennes suivantes:
Directive de la CE concermant les machines: (98/37 EC)
Directive sur les basses tensions: (73/23 EEC),(93/68 EEC)
Compatibilité électromagnétique: (89/336 EEC)
Normes correspondantes applicables: EN 50144-1: 1998+A1:2002
EN 50144-2.14: 2001
Marque : PARKSIDE
Machine/type : PEH 950
Désignation : RABOT ÉLECTRIQUE
Bochum, le 31.10.2003
Hans Kompernaß
- Directeur/Gérant-
PIALLATRICE ELETTRICA PEH 950
PER PIALLARE, SMUSSARE E PIEGARE LEGNO
Caro Cliente! Siamo lieti che Lei si deciso per la piallatrice elettrica PEH 950, che è un prodotto di
qualità della nostra azienda. La preghiamo di studiare bene, prima della prima messa in funzione,
sulle funzione dell’apparecchio e di informarsi sul giusto utilizzo d’attrezzature elettriche. Per questo
la preghiamo di leggere bene il seguente manuale d’uso e le istruzioni per la sicurezza
allegati . Utilizzate l’apparecchio solo come descritto e per gli scopi ai quali è destinato. Solo in
questo modo potete lavorare senza pericoli e raggiungere i risultati migliori. Vi auguriamo tanta
soddisfazione con il Vostro apparecchio.
UTILIZZO CORRETTO
La piallatrice elettrica è adatta a piallare pezzi in legno come travi e tavole in legno, se questi si
trovano su un supporto fermo. Ogni utilizzo oppure modifica dell’apparecchio non è corrispondente
al uso corretto e comporta gravi pericoli di incidenti.
Il produttore non risponde per danni causati dall’uso improprio dell’apparecchio.
EQUIPAGGIAMENTO PEH 950
Maniglia /regolazione profondità Fine corsa profondità di aggraffatura
di piallatura Uscita trucioli
Scala profondità di piallatura Piastra di base
Interruttore ON/OFF Sportello di protezione
Bloccaggio di accensione Scanalatura a V
Copertura cinghia dentata Testa coltello / coltello di piallatura
Fine corsa parallelo
DATI TECNICI
Capacità nominale: 950W Peso: 4,3kg
Tensione nominale: 230V ~ 50 Hz Livello pressione sonora: 095dB (A)
N° di giri a vuoto: n
0
12.000min
-1
Livello emissone sonora: 108dB (A)
Profondità di piallatura: 0 - 03,5 mm Valore oscillazione: 1,9m/s
2
Profondità di scanalatura: 0 - 24,0mm (vibrazione mano braccio)
Larghezza di piallatura: 82mm Classe di protezione: II/
www.kompernass.com +++ www.kompernass .com +++ www.komper nass .com +++
20
C
www.kompernass.com +++ www.kompernass .com +++ www.komper nass .com +++
21
C
IMPORTANTI AVVERTENZE DI SICUREZZA
Prima del primo utilizzare leggere attentamente le indicazioni per la sicurezza nel fascicolo allegato.
La piallatrice elettrica PEH 950 è stata costruita per piallare diverse tipologie di legno (p.e. travi,
tavole) su superficie fissa.
Se durante i lavori viene danneggiato o tranciato il cavo, non toccare mai il cavo togliere
immediatamente la spina. Non utilizzare mai apparecchi elettrici con cavi danneggia ti.
In caso di lavori lunghi sul legno e specialmente in caso si debba lavorare con materiali che generano
polveri pericolosi per la salute, si deve collegare un dispositivo di aspirazione adatto. Portare sempre
una mascherina.
Utilizzare solamente coltelli affilati.
Portare il cavo sempre verso indietro,via dall’apparecchio.
Piallare mai oggetti metallici, chiodi o viti.
Portare la piallatrice solamente accesa sul pezzo da lavorare.
La piastra di base deve appoggiare in piano durante il la voro.
Non entrare con le dita nell’uscita trucioli . Utilizzare un bastone di legno per liberare l’uscita
trucioli dai trucioli..
ESERCIZIO
La piallatrice elettrica PEH possiede un sistema
INTELLIGENT POWER CONTROL.
Questa gestione elettronica misura e regola i diversi tipi d’esercizio della
Vostra piallatrice;
Tipo d’esercizio Caratteristica
Accensione Attraverso lo stadio di avviamento dell’elettronica IPC
il motore si avvia ritardato e poi in modo morbido.
In questo modo si evitano correnti forti all’accensione.
La reazione delle centraline di corrente viene evitata
(p.e. Cantieri, case)
Folle: Dopo l’accensione lo stadio a giri alti dell’elettronica IPC fa sì che la
macchina velocizza sul valore richiesto precedentemente impostato.
Lo stadio di regolazione numero di giri IPC gestisce poi il numero di
giri costante.
A
TTENZIONE:
Prima di eseguire lavori sulla piallatrice togliere sempre la spina dalla presa.
Osservare la tensione di rete! La tensione deve corrispondere alle indicazioni sulla targhetta
dell’apparecchio (apparecchi che riportano una tensione di 230V possono essere collegati anche
ad una tensione di rete di 220V).
21

www.kompernass.com +++ www.kompernass .com +++ www.komper nass .com +++
22
C
ACCENSIONE E SPEGNIMENTO
Per ragioni di sicurezza l’interruttore ON/OFF
non può essere imposta to a lavoro continuo.
Deve rimanere premuto durante tutto l’esercizio.
IMPOSTAZIONE PROFONDITÁ DI PIALLATURA
La profondità di piallatura (profondità del truciolo) può essere impostato da 0 a 3,5mm.
Girare la maniglia
e portare la freccia sulla marca tura e/o il valore desidera ti.
USCITA TR UCIOLI ED ASPIRAZIONE
L’uscita trucioli può essere spostato a sinistra o destra,inserendo il tappo di chiusura e il tubo
aspiratore nella posizione desiderata.
ANNOTAZIONI PER IL LAVORO
Accendere la piallatrice sempre prima del contatto con il materiale e portare poi l’apparecchio sul
pezzo da lavorare.
PIALLARE SUPERFICI
Appoggiare l’apparecchio con la parte anteriore della piastra di base
sul pezzo da la vorare.
Fare sempre attenzione che, durante la piallatura di superfici come travi e tavole, la piastra di base
appoggi sempre su tutta la superficie; altrimenti vi è pericolo di ritorno dei coltelli.
Portare la piallatrice sempre con due mani e con avanzamento uniforme attraverso la superficie
da lavorare.
SMUSSARE BORDI
Attraverso la scanalatura a V
, che si trova nel centro della piastra di base anteriore,è possibile
smussare facilmente e velocemente i bordi del Vostro pezzo da lavorare.Per questo si appoggia la
scanalatura a V
sul bordo del pezzo, seguendolo.Durante la scanala tura prestare attenzione a
mantenere un posizionamento angolare di 45° ed un a vanzamento uniforme.
AGGRAFFARE
P.e. per aggraffatura destra montare il fine corsa parallelo
sinistra e il fine corsa di profondità
dell’aggraffatura
destra nei fori esistenti dell’a pparecchio (montaggio visto dall’alto)
Con il fine corsa della profondità di aggraffatura
si imposta la profondità – max. 24mm-.
Impostare il fine corsa parallelo
alla larghezza desidera ta. La scala della profondità di piallatura
deve essere impostata alla profondità massima di 3,5mm. Lavorare il pezzo più volte,fino a quando
si ha raggiunto la profondità di aggraffatura desiderata.
 Loading...