

Page 1

Parallels® Plesk Control Panel
Parallels Plesk Control Panel 8.4 for
Linux/Unix Administrator's Guide
(Revision 1.0)
Revision 1.0
Page 2

Copyright Notice
ISBN: N/A
Parallels
660 SW 39th Street
Suite 205
Renton, Washington 98057
USA
Phone: +1 (425) 282 6400
Fax: +1 (425) 282 6444
© Copyright 1999-2008,
Parallels, Inc.
All rights reserved
Distribution of this work or derivative of this work in any form is prohibited unless prior written
permission is obtained from the copyright holder.
Patented technology protected by U.S.Patents 7,328,225; 7,325,017; 7,293,033; 7,099,948;
7,076,633.
Patents pending in the U.S.
Product and service names mentioned herein are the trademarks of their respective owners.
Page 3

Contents
Preface 7
Who Should Read This Guide ....................................................................................................... 7
Typographical Conventions ........................................................................................................... 7
Feedback ....................................................................................................................................... 8
About Plesk 9
Overview of Business Model, Users Accounts and Permissions ................................................ 10
Overview of Software Components Managed by Plesk .............................................................. 12
What's New in This Version ......................................................................................................... 12
Getting Started 13
Logging in to Plesk ...................................................................................................................... 14
If You Forgot Your Password ............................................................................................ 16
Becoming Familiar with Plesk's Interface .................................................................................... 16
Items in the Desktop View ................................................................................................. 18
Items in the Standard View ............................................................................................... 19
Changing Your Password and Contact Information .................................................................... 20
Configuring Your Control Panel 21
Upgrading License Key for Your Control Panel .......................................................................... 22
Upgrading the Trial License Key ....................................................................................... 23
Installing Additional License Keys for Plesk Add-ons ....................................................... 24
Upgrading Your License Key ............................................................................................ 24
Rolling Back to Your Previously Used License Key .......................................................... 25
Securing Your Control Panel ....................................................................................................... 25
Restricting Administrative Access to Control Panel .......................................................... 26
Securing Communication to Server with SSL Encryption ................................................. 27
Setting Up Global Account .......................................................................................................... 30
Creating A Global Account ................................................................................................ 31
Connecting Local Accounts To Your Global Account ....................................................... 31
Switching Between Accounts ............................................................................................ 32
Changing Global Account Password ................................................................................ 32
Disconnecting Local Accounts From Global Account ....................................................... 33
Customizing Your Control Panel ................................................................................................. 33
Changing Interface Language and Skin ............................................................................ 35
Customizing the Control Panel in the Standard View ....................................................... 36
Customizing the Control Panel in the Desktop View......................................................... 48
Adjusting Session Idle Time ........................................................................................................ 53
Configuring and Maintaining Your Server 54
Adding and Removing IP Addresses........................................................................................... 55
Configuring DNS Services ........................................................................................................... 58
Configuring Plesk to Run Behind a Firewall ...................................................................... 61
Configuring Mail Services ............................................................................................................ 62
Setting Up Spam Protection .............................................................................................. 64
Configuring Antivirus ......................................................................................................... 71
Page 4

Preface 4
Configuring Mailman Mailing List Software ....................................................................... 73
Preventing Your Customers From Sending Mass E-mail ................................................. 73
Configuring Plesk for Database Hosting ..................................................................................... 73
Setting Up Remote Database Hosting .............................................................................. 75
Managing Database Servers............................................................................................. 78
Enabling Support for Adobe ColdFusion ..................................................................................... 80
Enabling Integration with Sitebuilder ........................................................................................... 81
Enabling Support for Miva E-commerce Applications ................................................................. 84
Configuring Statistics ................................................................................................................... 86
Configuring E-mail Notification System ....................................................................................... 86
Configuring Help Desk ................................................................................................................ 90
Adjusting System Date and Time ................................................................................................ 92
Starting, Stopping and Restarting Services ................................................................................ 93
Enabling Piped Logs for Web Server to Reduce the Risk of Web Service Disruption ................ 94
Monitoring Mail Server Message Queue and Troubleshooting Mail Congestion ........................ 94
Scheduling Tasks ........................................................................................................................ 96
Extending Plesk Capabilities with Modules ................................................................................. 98
Installing Modules ............................................................................................................. 99
Configuring and Managing Modules ................................................................................. 99
Removing Modules ......................................................................................................... 100
Serving Your Customers 101
Before You Start Serving Your Customers ............................................................................... 102
Simplifying Setup of User Accounts ................................................................................ 103
Simplifying Setup of Domains and Web Sites ................................................................. 107
Prepackaging Applications Your Customers Can Use.................................................... 111
Predefining Content for New Web Sites ......................................................................... 116
Managing User Accounts .......................................................................................................... 118
Adding User Accounts ..................................................................................................... 119
Modifying User Accounts ................................................................................................ 123
Suspending and Unsuspending User Accounts.............................................................. 128
Removing User Accounts ................................................................................................ 129
Hosting Web Sites ..................................................................................................................... 129
Obtaining Domain Names ............................................................................................... 130
Setting Up Hosting Account for a Web Site .................................................................... 131
Creating and Publishing a Site ........................................................................................ 140
Previewing a Site ............................................................................................................ 147
Deploying Databases ...................................................................................................... 147
Installing Applications ...................................................................................................... 151
Securing E-commerce Transactions with Secure Sockets Layer Encryption ................. 154
Restricting Access to Web Site's Resources with Password Protection ........................ 160
Organizing Site Structure with Subdomains ................................................................... 163
Setting Up Additional Domain Names for a Site (Domain Aliases) ................................. 165
Hosting Personal Web Pages on Your Web Server ....................................................... 168
Setting Up Anonymous FTP Access to the Server ......................................................... 170
Customizing Web Server Error Messages ...................................................................... 172
Customizing DNS Zone Configuration for Domains........................................................ 174
Serving Sites with External Domain Name Servers ........................................................ 178
Serving Domain Names for Sites Hosted on Other Servers (Domain Forwarding) ........ 180
Transferring Domains Between User Accounts .............................................................. 181
Suspending and Unsuspending Domains ....................................................................... 181
Removing Domains ......................................................................................................... 182
Using E-mail Services ............................................................................................................... 183
Creating Mailboxes ......................................................................................................... 184
Setting Up Your E-mail Program for Retrieving Mail from Your Mailbox ........................ 185
Accessing Your Mail from a Web Browser ...................................................................... 186
Protecting Mailboxes from Spam .................................................................................... 187
Protecting Mailboxes from Viruses ................................................................................. 192
Page 5

Preface 5
Suspending and Unsuspending Mailboxes ..................................................................... 194
Removing Mailboxes ....................................................................................................... 195
Switching off the Mailbox Service When You Have Decided to Turn Your Account into a Mail
Forwarder ........................................................................................................................ 195
Setting Up Mail Forwarding to a Single E-mail Address ................................................. 196
Setting Up Mail Forwarding to Multiple E-mail Addresses .............................................. 198
Removing Mail Forwarders ............................................................................................. 200
Setting Up Automatic Reply ............................................................................................ 201
Switching off Automatic Reply......................................................................................... 203
Setting Up Site-Wide Preferences for Handling Mail to Nonexistent Users (Mail Bounce)204
Introducing Similar Changes to a Number of Mail Accounts at Once ............................. 205
Sending E-mail Notices to Multiple Customers at Once ................................................. 206
Maintaining Mailing Lists ................................................................................................. 211
Using Help Desk for Resolving Your Customers' Issues .......................................................... 215
Viewing Trouble Tickets in Your Help Desk .................................................................... 216
Commenting and Closing Trouble Tickets ...................................................................... 217
Migrating User Accounts, Domain Names and Web Sites from Other Hosting Platforms ........ 218
Performing Migration Within a Single Server .................................................................. 221
Backing Up and Restoring Your Data 223
Backing Up the Entire Server .................................................................................................... 224
Backing Up Individual User Accounts with User's Domains ..................................................... 224
Backing Up Individual Domains (Web Sites) ............................................................................. 225
Scheduling Backups .................................................................................................................. 225
Optimizing Server Performance ...................................................................................... 228
Restoring Data From Backup Archives ..................................................................................... 229
Maintaining Backup Files Repository ........................................................................................ 231
Uploading Backup Files to Server ................................................................................... 231
Downloading Backup Files from Server .......................................................................... 232
Removing Backup Files from Server .............................................................................. 232
Configuring Control Panel for Using FTP Repository ................................................................ 233
Viewing Statistics 234
Adjusting Preferences for Web Statistics Presentation by Webalizer ....................................... 236
Hiding and Unhiding Internal References from Your and Other Sites ............................ 237
Grouping and Ungrouping References from Other Sites ................................................ 238
Hiding and Unhiding Direct Requests ............................................................................. 239
Automating Report Generation and Delivery by E-mail ............................................................ 240
Viewing Log Files and Configuring Recycling of Log Files ....................................................... 242
Monitoring Connections to Control Panel and FTP Services 243
Monitoring Connections to Control Panel .................................................................................. 243
Monitoring Connections to FTP Service .................................................................................... 244
Logging Actions Performed by Your Customers in the Control Panel 245
Setting Up Action Logging ......................................................................................................... 246
Downloading the Action Log ...................................................................................................... 247
Clearing the Action Log ............................................................................................................. 247
Using Centralized Access to Your Numerous Plesk Servers 248
Adding a Server Record ............................................................................................................ 249
Viewing Server Information and Logging in to a Server ............................................................ 249
Page 6

Preface 6
Removing a Server Record ....................................................................................................... 250
Upgrading Your Control Panel 251
Changing Updater Settings ....................................................................................................... 253
Blocking Access to Updater Functions from the Control Panel ................................................ 254
Appendix A. Advanced Features 255
Using Event Tracking Mechanism ............................................................................................. 255
Adding Event Handlers ................................................................................................... 256
Removing Event Handlers .............................................................................................. 276
Including Directives into Web Server Configuration File ........................................................... 277
Changing Tomcat Java Connector Ports .................................................................................. 278
Restoring Mail Configuration ..................................................................................................... 279
Installing Custom SSL Certificates for Qmail or Courier-IMAP Mail Servers ............................ 279
Installing SSL Certificate for Qmail ................................................................................. 280
Installing SSL Certificates for Courier-IMAP Mail Server ................................................ 282
Page 7

Preface 7
In this section:
Who Should Read This Guide ........................................................................... 7
Typographical Conventions ............................................................................... 7
Feedback .......................................................................................................... 8
Formatting
convention
Type of Information
Example
Special Bold
Items you must select,
such as menu options,
command buttons, or items
in a list.
Go to the System tab.
Titles of chapters, sections,
and subsections.
Read the Basic
Administration chapter.
Italics
Used to emphasize the
importance of a point, to
introduce a term or to
designate a command line
placeholder, which is to be
replaced with a real name
or value.
The system supports the
so called wildcard
character search.
Monospace
The names of commands,
files, and directories.
The license file is located
in the
http://docs/common
/licenses directory.
Preface
Who Should Read This Guide
This guide is intended for hosting resellers who manage their servers through Plesk and
have access to server administrator's account in Plesk.
Typographical Conventions
Before you start using this guide, it is important to understand the documentation
conventions used in it.
The following kinds of formatting in the text identify special information.
Page 8

8 Preface
Preformatted
On-screen computer output
in your command-line
sessions; source code in
XML, C++, or other
programming languages.
# ls –al /files
total 14470
Preformatted
Bold
What you type, contrasted
with on-screen computer
output.
# cd
/root/rpms/php
CAPITALS
Names of keys on the
keyboard.
SHIFT, CTRL, ALT
KEY+KEY
Key combinations for which
the user must press and
hold down one key and
then press another.
CTRL+P, ALT+F4
Feedback
If you have found a mistake in this guide, or if you have suggestions or ideas on how to
improve this guide, please send your feedback using the online form at
http://www.parallels.com/en/support/usersdoc/. Please include in your report the guide's title,
chapter and section titles, and the fragment of text in which you have found an error.
Page 9

Plesk is a hosting automation solution that gives hosting providers full control over the
In this chapter:
Overview of Business Model, Users Accounts and Permissions........................ 10
Overview of Software Components Managed by Plesk ..................................... 12
What's New in This Version ............................................................................... 12
C H A P T E R 1
About Plesk
managed Web hosting servers and simplifies setup and management of user accounts,
Web sites, and e-mail accounts.
Plesk is stable, secure and reliable, and the main benefit of using Plesk is that it will
save you and your technical staff much time and effort: all your customers (and
customers of your resellers) will have personal isolated control panel environments and
will be able to manage their sites and e-mail accounts on their own.
Page 10

10 About Plesk
Overview of Business Model, Users
Accounts and Permissions
Plesk user accounts hierarchy is limited to four user levels:
administrator account,
client accounts,
domain administrator accounts,
e-mail user accounts.
For your customers who need to resell hosting services or host numerous
domains/web sites, you will create client accounts.
Note: for the purpose of hosting your own sites, you should use a special service
account which is created during Plesk setup. The account is registered with the control
panel under the name My Domains.
Customers with access to client accounts can host on the server any number of sites
you allow. They can host the sites of their own and/or resell hosting services to other
users: for that purpose your resellers can create domain administrator accounts for
their own customers.
Customers with access to domain administrator accounts cannot resell Web hosting
services or host more than one site on their hosting accounts. They can only manage
their own sites. In the current implementation of Plesk control panel, domain
administrator accounts can be created only after the respective domains (web sites)
are hosted on the server.
All site owners can set up e-mail accounts for themselves and provide other users with
mail hosting services: for that purpose, they create e-mail user accounts and grant email users with access to control panel.
Site owners can also host personal web pages or small sites for other users under their
domains. However, the owners of such sites usually do not have their own domain
names and cannot have a dedicated control panel environment.
All permissions for operations performed in the control panel you define for a reseller
(client account) allow the reseller to further assign them to his or her customers. The
resource allotments you define for a reseller can be further redistributed among
reseller's customers. For a full list of permissions and resource usage limits you can
define, refer to the Managing User Accounts (on page 118) section.
All quotas you define for a client or domain administrator's account are soft quotas: the
control panel indicates resource overage by showing the respective icons in the control
panel, sends notices by e-mail to the respective users, but it does not automatically
suspend user accounts or Web sites.
Page 11

About Plesk 11
The control panel does not have a built-in billing system, therefore, we recommend that
you use a third-party solution of your choice, or use Plesk together with Parallels
Business Automation solution.
Page 12

12 About Plesk
Overview of Software Components
Managed by Plesk
Plesk control panel works in cooperation with the following third-party software
components and services:
Bind DNS server
Apache Web server
ProFTPd FTP server
MySQL and PostgreSQL database servers
Qmail mail server
Courier-IMAP IMAP/POP3 server
Mailman mailing list server
Spamassassin anti-spam software
Dr.Web antivirus
Webalizer and AWStats statistical packages
Tomcat
After installation of Plesk package, all essential services, such as DNS, Web, FTP and
Mail are configured to run with the default optimal settings, so you can start serving
your customers right away. However, we recommend that you review the default
settings to make sure that they satisfy your needs, and create user account templates
and domain templates, which will simplify further setup of hosting accounts.
What's New in This Version
Plesk Control Panel 8.4 offers you the following new features and enhancements:
Simplified installation of site applications. All site applications are sorted by categories,
which makes it easier to choose the right application to install.
DomainKeys support. Now you can use DomainKeys e-mail sender authentication
mechanism to reduce the amount of spam and phishing e-mails that are sent to your
customers. For more information, refer to the chapter Setting Up Spam Protection (on
page 64).
Updated components used with Plesk Control Panel. The latest versions of the following
software can be used with Plesk Control Panel: Acronis True Image Server 9.5,
Parallels Plesk Sitebuilder 4.2, Horde 3.1.7, SPAW 2.0 (editing software used in Plesk
File Manager), Adobe ColdFusion 8.
4PSA VoipNow software support. The VoIP solution developed by 4PSA is now fully
supported by Plesk Control Panel. For information about 4PSA VoipNow, refer to
http://www.4psa.com/index.php?pcat=products&pag=4psavoipnow
Page 13

This chapter describes the first actions you need to perform after installation of the
In this chapter:
Logging in to Plesk ............................................................................................ 14
Becoming Familiar with Plesk's Interface........................................................... 16
Changing Your Password and Contact Information ........................................... 20
C H A P T E R 2
Getting Started
Plesk Control Panel.
Page 14

14 Getting Started
Logging in to Plesk
To log in to your Plesk control panel:
1 Open your web browser, and in the address bar type the URL where
your Plesk control panel is located.
For example, https://your-domain.com:8443, where your-domain.com is the domain
name of your Web host.
2 Press ENTER. Plesk login screen will open.
3 Type the user name 'admin' and your password into the Login and
Password boxes, respectively. If this is your first login to the freshly
installed control panel, use the default password 'setup'.
4 If you log in for the first time, select the language for your control
panel from the Interface language menu. If you had previously specified
the interface language and saved it in your interface preferences,
leave the User default value selected.
5 Click Login.
After your first login, you should accept the license agreement and then specify the
host name and IP addresses to assign to the server.
6 Read carefully the terms of the License Agreement and, if you agree
to all the terms, select the I agree to the terms of this license agreement and
Do not show it again check boxes.
7 Click Accept to proceed to the post-install configuration.
8 In the Full hostname field, enter your server's host name. This should be
a fully qualified host name but without a trailing dot (for example,
host.domain.tld).
9 Specify the IP address that will be used as the default address of your
server. You have the following two options:
Select one of your existing IP address from the drop-down box. This list is
populated automatically and contains all IP addresses available on the server.
OR
Click the Add IP Address option button, select the network interface and enter the
new IP address and subnet mask in the IP address box.
Note: With Plesk you can mark all your IP addresses as shared or dedicated before
you assign them to your customers. This allows the control panel to distinguish
between them and not to let you assign a dedicated IP address to several
customers at once. A dedicated IP address can be assigned to a single customer,
while a shared IP address can be shared among several user accounts.
10 In the Shared IP section, specify the type for existing addresses: shared
or exclusive. Click the Shared and Exclusive buttons to change the types
of IP addresses.
Page 15

Getting Started 15
You can skip this stage and define the type of IP addresses later (Server > IP
In this section:
If You Forgot Your Password .............................................................................16
Addresses).
11 In the Administrator's preferences section, change the default
administrator password.
Change the default administrator's password. Enter the new password and confirm
it in the New password and Confirm password fields. The password can have up to 14
symbols. Note that the password is case sensitive.
Note: Do not forget to change the administrator's password from the default one to
your own personalized password; otherwise, access to the control panel under the
administrator account will be available with the default password 'setup', which is
known to many users of Plesk.
12 Click OK.
13 Fill in administrator‘s contact information. Be sure to leave the I would
like to create a default client account check box selected: Plesk assigns Web
sites to client accounts, and selecting this check box will create a
special user account "My Domains", which you will use for hosting
your own Web sites.
14 Click OK.
Page 16

16 Getting Started
If You Forgot Your Password
You can retrieve your forgotten password in any of the following ways:
Look it up in the /etc/psa/.psa.shadow file on the server's file system.
Use the password reminder in the control panel.
To use the password reminder:
1 In your web browser‘s address bar, type the URL where your Plesk
control panel is located (for example, https://your-domain.com:8443)
2 Press ENTER.
Plesk login screen will open.
3 Click the Forgot your password? link.
4 Specify your login name and e-mail address registered in the system.
5 Click OK.
Your password will be sent to your e-mail. If your password cannot be sent by email because it was stored by the system in encrypted form, you will be prompted to
set up a new password using a secret code that will be generated for that purpose
and sent to you.
6 Once you received the e-mail from the password reminder, click the
link in the message body.
A new browser window will open.
7 Specify your login name and a new password. The Secret Code field of
the form should be automatically filled by the system, and if it is not,
copy the secret code from the message you received to the clipboard
and paste to the form.
8 Click OK to submit.
Note: You should use the secret code within 24 hours after its generation, otherwise it
will expire and you will need to go through the whole process again.
Becoming Familiar with Plesk's Interface
When you log in to control panel, it can open in either a standard view, a simplified
desktop view, or a combination of both. The standard view is a customary view of the
control panel divided into two main areas: navigation pane on the left and the main
screen where operations are performed on the right.
Page 17
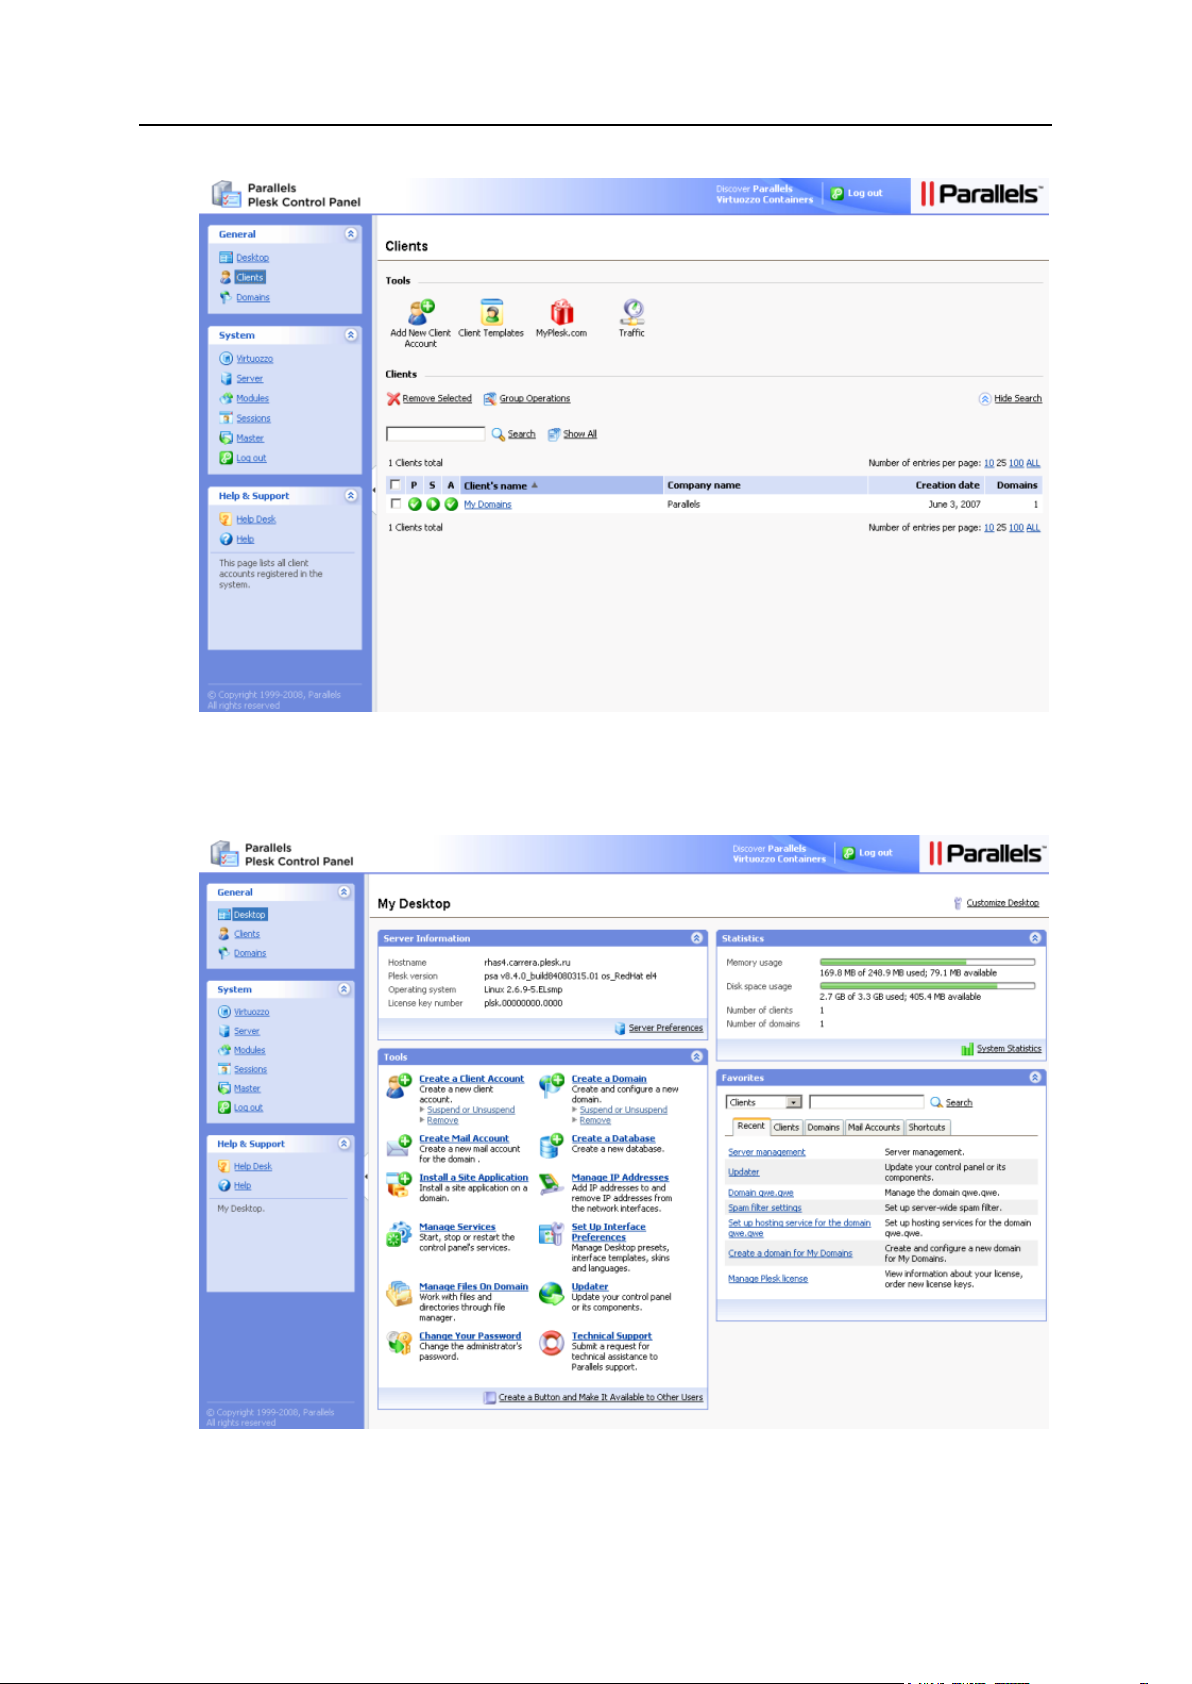
Getting Started 17
The desktop view can show server statistics and shortcuts to the operations you
frequently perform—everything you may need can now be accessible from a single
screen.
Page 18

18 Getting Started
You can switch between the views (by installing the appropriate license key) or use a
In this section:
Items in the Desktop View ................................................................................. 18
Items in the Standard View ................................................................................ 19
In this section:
Using Wizards ................................................................................................... 19
combination of them for your control panel. You can also specify what view should be
shown to other control panel users. To customize your control panel, refer to the
Customizing the Control Panel (on page 48) chapter.
Note: When Parallels Plesk Sitebuilder, the site creation and management program, is
installed on the server and Plesk is connected to it, a few more shortcuts related to
Sitebuilder management are added to the Plesk navigation pane. For more information
about connecting Plesk to Sitebuilder and using the shortcuts to Sitebuilder, refer to the
section Enabling Integration with Sitebuilder (on page 81).
Items in the Desktop View
The desktop view originally shows four sections:
Server Information. This shows your hostname, control panel version, operating
system and kernel versions, license key number, and system uptime.
Statistics. This shows average processor load for the last minute, five minutes, and
fifteen minutes, memory and disk space usage, number of served client accounts
and hosted domains (Web sites). The client accounts include accounts of resellers
and customers who have several sites—owners of a single domain are not counted.
Tools. This group shows shortcuts to the operations that you can perform through
the control panel. You can freely add and remove these shortcuts.
Favorites. This group shows five types of shortcuts sorted by type and placed on the
respective tabs. The Clients tab shows the shortcuts to administrative tools available
for a selected user account, the Domains tab shows shortcuts to domain
administration tools, the Mail Accounts tab shows shortcuts to the e-mail account
administration tools. The Shortcuts tab shows all other types of shortcuts that do not
relate to user accounts, domains and e-mail accounts. The Recent tab shows last
ten control panel screens you have been on. The Favorites group also provides
search tool for finding user accounts, web site hosting accounts, and e-mail
accounts. To use the search tool, select the item type from the drop-down box, type
the search criteria (this can be any combination of symbols, search is case
insensitive) and click Search.
Page 19

Getting Started 19
Using Wizards
When you work with Plesk in the Desktop view, you accomplish the tasks you need
through wizards. Each wizard is a series of consecutive screens. To accomplish a task
using a wizard, follow the instructions displayed on the wizard screens. For information
on individual options, refer to the respective sections of this guide.
Items in the Standard View
The navigation pane is located on the left. It gives you access to sets of administrative
functions:
Clients. This is where you manage your clients and all data related to their accounts.
Domains. This is where you manage Web sites and their respective e-mail services.
Server. This shortcut gives you access to server administration functions.
Modules. This is where you manage the additional modules that extend Plesk
capabilities, such as Firewall, Game Server, VPN and others.
Sessions. When clients, site and mailbox owners log in to control panel, or connect
to the server via FTP protocol, they establish sessions that you can monitor and
terminate.
Master. This shortcut gives you access to centralized management of Plesk enabled
servers.
Help Desk. This is the help desk system integrated with your control panel. You can
use it to view and solve the problems reported to you by your customers.
Help. Provides context sensitive help.
Log Out. When finished working with control panel, click this icon to close your
session.
Below the Help icon, there is a context help tip area. It provides a brief description of the
current screen or available operations. When you place the mouse pointer over a
system element or status icon, it displays additional information.
To navigate through Plesk, you can also use a path bar: a chain of links that appears in
the right part of the screen, below the banner area. To return to a previous screen, use
the Up Level icon in the upper-right corner of the screen.
To find items in lengthy lists, use search boxes located above every list of items: type a
search criterion into the input box, and click Search. A list will show the items matching
the search criteria. To return back to viewing all items, click Show All.
To sort a list by a certain parameter in ascending or descending order, click on the
parameter's title in the column heading. The order of sorting will be indicated by a small
triangle displayed next to the parameter's title.
Page 20

20 Getting Started
Changing Your Password and Contact
Information
To update your contact information:
1 Select the Server shortcut in the navigation pane
2 Click the Edit icon in the Administrator information group.
3 Update your information as required, and click OK.
To change your password:
1 Select the Server shortcut in the navigation pane
2 Click the Change Password icon in the Administrator information group.
3 Enter your old and new passwords.
4 Click OK.
If you forgot your password:
1 In your web browser‘s address bar, type the URL where your Plesk
control panel is located.
2 For example, https://your-server.com:8443.
3 Press ENTER. Plesk login screen will open.
4 Click the Forgot your password? link.
5 You will be prompted to specify your login name and e-mail address
registered in the system. Type your login name into the Login box, type
your e-mail address registered in the system into the E-mail box, and
click OK.
6 If your password cannot be sent by e-mail because it was stored by
the system in encrypted form, you will be prompted to set up a new
password using a secret code that will be generated for that purpose
and sent to your e-mail.
7 Once you received the e-mail from the password reminder, click the
link in the message body. A new browser window will open.
8 At this step, specify your login name and a new password.
The Secret Code field of the form should be automatically filled by the system, and if
it is not, copy the secret code from the message you received to the clipboard and
paste to the form.
9 Click OK to submit.
The instructions on how to restore your password will be sent to your e-mail
address.
Page 21

This chapter discusses the configuration steps required to set up and manage your
In this chapter:
Upgrading License Key for Your Control Panel ................................................. 22
Securing Your Control Panel ............................................................................. 25
Setting Up Global Account ................................................................................ 30
Customizing Your Control Panel ........................................................................ 33
Adjusting Session Idle Time .............................................................................. 53
C H A P T E R 3
Configuring Your Control Panel
Plesk Control Panel.
Page 22

22 Configuring Your Control Panel
Upgrading License Key for Your Control
In this section:
Upgrading the Trial License Key ........................................................................ 23
Installing Additional License Keys for Plesk Add-ons ......................................... 24
Upgrading Your License Key ............................................................................. 24
Rolling Back to Your Previously Used License Key ........................................... 25
Panel
Plesk comes with a trial license key, which is automatically installed to the control
panel. This license key allows you to create one user account, host one Web site and
one mail box. Therefore, to fully use the Plesk Control Panel as you need, you should
obtain a license key from Parallels or one of its resellers and install it to the control
panel.
Plesk license keys have a built-in expiration date. This has been implemented to help
prevent fraud and theft. It requires the Plesk software to check with Parallels licensing
server during a 10 day grace period (prior to the expiration date) to verify that the key
has not been reported stolen and is being used in accordance with the End User
License Agreement (that is, installed on only one server). Once this is verified, the
expiration date is prolonged.
Plesk will attempt to connect over TCP/IP to the licensing server through port 5224.
Please make sure that this is not blocked by a firewall. The update process runs
automatically and the Plesk administrator does not need to do anything unless there is
a problem. Should the Plesk key expire, check your firewall and then go to Server >
License Management and click Retrieve Keys. If the key cannot be updated, contact your
reseller or Parallels (if you purchased the license key directly from Parallels).
You can test the connection to the licensing server anytime by going to Server > License
Management and clicking Retrieve Keys.
Page 23

Configuring Your Control Panel 23
Upgrading the Trial License Key
To upgrade the trial license key:
1 Go to Server > License Management and click Order New Key.
2 The Parallels online store will open in a separate browser window. In
this window, select the items and features you want to include into
your Plesk license and click Submit. In the next steps, indicate the
currency, number of license keys, provide contact details, billing
address, and payment method, and submit the form. The new key will
be sent to the specified e-mail address.
3 Save the new key to the hard drive on your local machine.
4 Open again the License Management screen in Plesk (Server > License
Management) and click Upload Key.
5 Enter the path to the key file that you saved on your local machine or
click Browse to locate it.
6 Select the Replace the currently installed license key with the selected one check
box to confirm that you really want to replace the current license key
with the new one.
If this check box is not selected, the new license key will not be installed and
installation will be aborted.
7 If your new license key allows hosting fewer sites than you already
host on the server, Plesk will stop working. However, to prevent the
control panel from comparing the amount of the resources used and
those covered by the new key, select the Allow the resources usage override
check box.
This might be helpful if you want to temporarily install a license key that covers less
resources and then upgrade it through the control panel interface.
8 Click OK to install the new key to the control panel.
Page 24

24 Configuring Your Control Panel
Installing Additional License Keys for Plesk Add-ons
To install an additional license key for an add-on Plesk component:
1 Click the Server shortcut in the navigation pane.
2 Click the License Management icon in the System group.
3 Click Order Control Panel Add-Ons.
4 The Parallels online store page listing available add-ons will open in a
separate browser window. On this page, select the add-ons you want
to order and click Submit.
5 Because Plesk add-ons are added to the license keys that already
exist, the Plesk Number Checking System page will open. Enter the
number of your license key to which you add this feature and click
Submit.
6 In the next steps, indicate the currency, number of keys, provide
contact details, billing address, and payment method, and submit the
form. You will be notified by e-mail when your order is processed.
7 When you receive the e-mail notification, return to the License
Management screen (Server > License Management) and click Retrieve Keys to
retrieve the ordered license key. Plesk License Manager will retrieve
the upgraded license key from the Parallels licensing server and
automatically install it to your control panel.
Upgrading Your License Key
If you are planning to expand your customer base and host more sites on the server
than your current license allows, you need to upgrade your license key.
To upgrade the license key:
1 Click the Server shortcut in the navigation pane.
2 Click the License Management icon in the System group.
3 Click Order Control Panel Upgrades.
4 On the Parallels online store page, select the desired upgrade option
and click Submit.
5 In the next step, indicate purchase details and submit the form. You
will be notified by e-mail when your order is processed.
6 After you receive the e-mail notification, return to the License
Management screen (Server > License Management) and click Retrieve Keys to
retrieve the ordered license key. Plesk License Manager will retrieve
the purchased license key from the licensing server and automatically
upload it to your control panel.
Page 25

Configuring Your Control Panel 25
Rolling Back to Your Previously Used License Key
In this section:
Restricting Administrative Access to Control Panel ........................................... 26
Securing Communication to Server with SSL Encryption................................... 27
To roll back to the license key you previously used:
1 Click the Server shortcut in the navigation pane.
2 Click the License Management icon in the System group.
3 Click Roll Back Key. The previously installed license key will be
restored.
Securing Your Control Panel
Page 26

26 Configuring Your Control Panel
Restricting Administrative Access to Control Panel
To alleviate security concerns, you may want to restrict administrative access to your
control panel from specific IP addresses.
To allow administrative access to control panel only from specific IP addresses or
networks:
1 Go to Server > Access.
2 Click Add New Network and specify the required IP addresses. Click OK.
To specify subnets, you can use wildcard symbols (*) and subnet masks.
3 Select the Denied from the networks that are not listed option, and click Set.
When prompted to confirm the operation, click OK.
To prohibit administrative access from specific IP addresses or networks:
1 Go to Server > Access.
2 Click Add New Network and specify an IP address. Click OK.
To specify subnets, you can use wildcard symbols (*) and subnet masks.
3 Select the Allowed, excluding the networks in the list option, and click Set.
When prompted to confirm the operation, click OK.
By default Plesk allows multiple simultaneous sessions for several users logged into
the control panel using the same login and password combination. This can be useful
when delegating management functions to other users or in case if you accidentally
close your browser without logging out, thus becoming unable to log in again until your
session expires. You may want to switch off this capability, if you do not need it.
To disallow concurrent sessions for your administrative control panel:
1 Go to Server > Edit.
2 Clear the Allow multiple sessions under administrator's login check box and
click OK.
Page 27

Configuring Your Control Panel 27
Securing Communication to Server with SSL
Encryption
For security reasons, you can access your control panel only through a secure
connection provided by Secure Sockets Layer-enabled hypertext transfer protocol. All
data you exchange with the Plesk managed server are encrypted, thus preventing
interception of sensitive information. The SSL certificate used in the data encryption
process is automatically generated and installed on the server during installation of the
control panel. This is the so-called self-signed certificate: it is not signed by a
recognized certification authority (CA), therefore, upon attempt to connect to your
control panel, you and your customers will see warning messages in Web browsers.
To gain customer confidence, you should purchase an SSL certificate from a reputable
certification authority, and install it to the control panel.
You can either:
use the facilities for purchasing SSL certificates from GeoTrust, Inc. or GoDaddy
provided by your control panel,
OR
create a certificate signing request (CSR) from the control panel and submit it to the
certification authority of your choice, which will create an SSL certificate for you.
Note: If you are going to use the control panel's facilities for purchasing a certificate
through MyPlesk.com online store, you should not use command line tools for
creating the certificate signing request.
To purchase an SSL certificate from GeoTrust, Inc. or GoDaddy through MyPleskCom
online store and secure your control panel:
1 Go to Server > Certificates. A list of SSL certificates that you have in
your repository will be displayed.
2 Click Add New Certificate.
3 Specify the certificate properties:
Certificate name. This will help you identify this certificate in the repository.
Encryption level. Choose the encryption level of your SSL certificate. We
recommend that you choose a value more than 1024 bit.
Specify your location and organization name. The values you enter should not
exceed the length of 64 symbols.
Specify the host name for which you wish to purchase an SSL certificate. For
example: your-domain.com
Enter your e-mail address.
4 Make sure that all the provided information is correct and accurate, as
it will be used to generate your private key.
5 Click Buy Cert.
Your private key and certificate signing request will be generated — do not delete
them. MyPlesk.com login page will open in a new browser window.
Page 28

28 Configuring Your Control Panel
6 Register or log in to an existing MyPlesk.com account and you will be
taken step by step through the certificate purchase procedure.
7 Choose the type of certificate that you wish to purchase.
8 Click Proceed to Buy and order the certificate. In the Approver E-Mail
drop-down box, please select the correct Approver e-mail.
The approver e-mail is an e-mail address that can confirm that certificate for
specific domain name was requested by an authorized person.
9 Once your certificate request is processed, you will be sent a
confirmation e-mail. After you confirm, the certificate will be sent to
your e-mail.
10 When you receive your SSL certificate, save it on your local machine
or network.
11 Return to the SSL Certificates repository (Server > Certificates).
12 Click Browse in the middle of the page and navigate to the location of
the saved certificate. Select it, and then click Send File. This will upload
the certificate to the repository.
13 Select the check box corresponding to the certificate you just added,
and click Secure control panel.
To secure your control panel with an SSL certificate from other certificate authorities:
1 Go to Server > Certificates. A list of SSL certificates that you have in
your repository will be displayed.
2 Click Add New Certificate.
3 Specify the certificate properties:
Certificate name. This will help you identify this certificate in the repository.
Encryption level. Choose the encryption level of your SSL certificate. We
recommend that you choose a value more than 1024 bit.
Specify your location and organization name. The values you enter should not
exceed the length of 64 symbols.
Specify the host name for which you wish to purchase an SSL certificate. For
example: your-domain.com
Enter your e-mail address.
4 Make sure that all the provided information is correct and accurate, as
it will be used to generate your private key.
5 Click Request. Your private key and certificate signing request will be
generated and stored in the repository.
6 In the list of certificates, click the name of the certificate you need. A
page showing the certificate properties opens.
7 Locate the CSR section on the page, and copy the text that starts with
the line -----BEGIN CERTIFICATE REQUEST----- and ends with the line -----END
CERTIFICATE REQUEST----- to the clipboard.
Page 29

Configuring Your Control Panel 29
8 Visit the Web site of the certification authority from which you want to
purchase an SSL certificate, and follow the links on their site to start a
certificate ordering procedure. When you are prompted to specify CSR
text, paste the data from the clipboard into the online form and click
Continue. The certification authority will create an SSL certificate in
accordance with the information you supplied.
9 When you receive your SSL certificate, save it on your local machine
or network.
10 Return to the SSL Certificates repository (Server > Certificates).
11 Click Browse in the middle of the page and navigate to the location of
the saved certificate. Select it, and then click Send File. This will upload
the certificate to the repository.
12 Select the check box corresponding to the certificate you just added,
and click Secure control panel.
In case you need to generate a self-signed certificate, follow this procedure:
1 Go to Server > Certificates. A list of SSL certificates that you have in
your repository will be displayed.
2 Click Add New Certificate.
3 Specify the certificate properties:
Certificate name. This will help you identify this certificate in the repository.
Encryption level. Choose the encryption level of your SSL certificate. We
recommend that you choose a value more than 1024 bit.
Specify your location and organization name. The values you enter should not
exceed the length of 64 symbols.
Specify the host name for which you wish to purchase an SSL certificate. For
example: your-domain.com
Enter your e-mail address.
4 Click the Self-Signed button. Your certificate will be generated and
stored in the repository.
Page 30

30 Configuring Your Control Panel
Setting Up Global Account
In this section:
Creating A Global Account ................................................................................ 31
Connecting Local Accounts To Your Global Account ......................................... 31
Switching Between Accounts ............................................................................ 31
Changing Global Account Password ................................................................. 32
Disconnecting Local Accounts From Global Account ......................................... 33
Global Account is a Single Sign-On technology feature that allows you to log in to
different Parallels products using a single global login and password. If you have
several accounts in Plesk, you can connect them all to a global account and switch
between these accounts without entering a password every time. You can also connect
all your accounts in other Parallels products to your global account and switch between
them without providing credentials.
After you create a global account and connect local accounts to it, you will be able to
choose from any account connected to your global account when logging in under your
global account.
Note. Single Sign-On technology and the ability to use global accounts can only be
activated through API or Command Line Utility means. Please refer to your Service
Provider or the respective documentation for more information on activating Single
Sign-On.
Page 31

Configuring Your Control Panel 31
Creating A Global Account
To create a global account:
1 Log in to Plesk, go to Global Account and click Connect To Global Account.
2 Select Create new global account and provide the login and password for
your global account.
3 Click OK.
Your global account is active now, so you can proceed with connecting other accounts
to it. Refer to Connecting Local Accounts to Your Global Account (on page 31) section
for more information.
Connecting Local Accounts To Your Global Account
To connect a local Plesk account to your global account:
1 Log in to Plesk under the local account you want to connect.
2 Go to Global Account and click Connect To Global Account.
3 Make sure that Use existing global account option is selected and provide
the login and password for the global account you want to connect to.
4 Click OK.
Repeat steps 1-4 for other local accounts as necessary.
To connect an account in another product with SSO support to your global account:
1 Log in to software product with SSO support under the account you
want to connect.
2 Follow the instructions on connecting to a global account in respective
software product documentation. Make sure that you provide the
credentials for the existing global account when you are asked to.
Repeat steps 1-2 for other accounts or products as necessary.
Note. Different software products may use different names for the Global Account
feature, such as Federated Identity or Global Login. Refer to respective software
product documentation for more information.
After you have connected all required accounts to your global account, you can log in
under your global account all the time in any product where you have a local account
connected to your global account. You will be shown the list of local accounts
connected to your global account every time you log in under it, so you can choose
which account you would like to use now. You can switch to another account any time
you want. Refer to Switching Between Accounts (on page 31) section for more
information.
Page 32

32 Configuring Your Control Panel
Switching Between Accounts
To switch to another account:
1 Click Switch User in the upper right corner.
2 Select the account you want to switch to:
Choose the required local account from the list of accounts connected to your
global account
or
Select Specify credentials for another account and provide login and password for a
local account not connected to your global account or to another global account.
You can also specify the language for your control panel from the Interface
language menu. If you had previously specified the interface language for that
account and saved it in its interface preferences, leave the Default value
selected.
3 Click OK.
Changing Global Account Password
To change password of your global account:
1 Log in to Plesk under your global account or any local account
connected to it.
2 Go to Global Account and click Change Password.
3 Enter your old and new passwords, and click OK.
Page 33

Configuring Your Control Panel 33
Disconnecting Local Accounts From Global Account
To disconnect a local account from your global account:
1 Log in to Plesk under the local account you want to disconnect.
2 Go to Global Account and click Disconnect From Global Account.
3 Confirm the disconnection and click OK.
Repeat steps 1-3 for other local accounts as necessary.
Customizing Your Control Panel
The control panel's Desktop view and Standard view (as described in the chapter
Becoming Familiar with Plesk's Interface (on page 16)) have different customization
settings which are adjusted in different areas of the control panel.
To customize the Desktop view, refer to the section Customizing the Control Panel in
the Desktop View (on page 48).
To customize the Standard view (that is, all areas and screens of the control panel
except for Desktop), refer to the section Customizing the Control Panel in the Standard
View (on page 36).
Note that you can choose to have in your control panel only Desktop view, only
Standard view, or both views at once: to do this, you need to obtain and install a
license key that supports the required interface view. However, you can specify what
view should be shown to other control panel users regardless of your license key
features.
This chapter explains how to accomplish the following tasks:
Change the interface language and theme (skin) for your control panel (on page 35)
Remove unwanted buttons from the control panel (on page 37)
Add custom hyperlink buttons to the control panel (on page 46)
Set a custom logo to the banner area of the control panel (on page 46)
Add support for more control panel languages (on page 43)
Add interface themes (skins) (on page 44)
Add to and remove items from the Desktop (on page 48)
Page 34

34 Configuring Your Control Panel
In this section:
Changing Interface Language and Skin ............................................................. 35
Customizing the Control Panel in the Standard View ......................................... 36
Customizing the Control Panel in the Desktop View .......................................... 48
Page 35

Configuring Your Control Panel 35
Changing Interface Language and Skin
To change the interface language and skin for your control panel and for your
customers, follow these steps:
1 Go to Server > Control Panel > Server Preferences.
2 Specify the following:
a Default locale. Select the interface language that will be set as default for new
control panel users.
b Default skin. Select the interface skin (theme) that will be set as default for new
control panel users.
c Administrator's interface language. Select the language for your control panel.
d Administrator's interface skin. Select the skin (theme) for your control panel.
3 Click OK.
Note that on that control panel screen, there are also the following settings, which you
might want to review (we recommend leaving their default values for most users):
a Button label length. To prevent lengthy button captions in languages other than
English from overlapping in the control panel, you may want to specify a limit
here. Any button caption longer than the defined limit will be shortened and
ended with ellipsis (...).
b Prevent users from working with the control panel until interface screens are completely
loaded. Leave this selected to avoid errors that might occur when users try to
interact with control panel before is it ready.
c Default interface customization template. Once you customize the control panel and
save the settings in a template as described in Using Interface Customization
Templates (on page 37), you will be able to select your template here.
d Desktop preset. Once you customize the desktop and save the settings in a template
as described in Using Desktop Presets (on page 50), you will be able to select
your template here.
e Administrator's interface customization template. Once you customize the control panel
and save the settings in a template as described in Using Interface
Customization Templates (on page 37), you will be able to select your template
here.
f Allow multiple sessions under administrator's login. By default Plesk allows multiple
simultaneous sessions for several users logged into the control panel using the
same login and password combination. This can be useful when delegating
management functions to other users or in case if you accidentally close your
browser without logging out, thus becoming unable to log in again until your
session expires. You may want to switch off this capability, if you do not need it.
g Full host name.
Page 36

36 Configuring Your Control Panel
h Apache restart interval. Any changes to hosting account settings made through control
In this section:
Using Interface Customization Templates ......................................................... 37
Hiding and Unhiding Sets of Buttons ................................................................. 41
Super Administrative Overrides ......................................................................... 43
Installing and Uninstalling Interface Languages ................................................. 43
Installing and Uninstalling Control Panel Themes (Skins) .................................. 44
Rebranding Your Control Panel with a Custom Logo Banner ............................ 46
Adding and Removing Custom Hyperlink Buttons ............................................. 46
panel take effect only when Web server is restarted. By default, Web server is
set to restart not more than once in every 15 minutes. This value is optimal for
most cases, and we recommend leaving this default setting. Note that when
there are no changes in hosting account settings, the Web server is not forced
to restart.
i Web and traffic statistics retention period. By default, statistics are kept for three
months. You may want to specify another period here.
j Items that statistical utilities should count when calculating disk space and bandwidth usage.
Customizing the Control Panel in the Standard View
Page 37

Configuring Your Control Panel 37
Using Interface Customization Templates
In this section:
Creating Templates ........................................................................................... 38
Assigning Templates to User Accounts ............................................................. 39
Removing Templates ........................................................................................ 39
Changing Default Template ............................................................................... 40
Exporting and Importing Templates ................................................................... 40
Interface customization templates are sets of interface customization options assigned
to Plesk users. You can configure custom settings for interface elements and save
these settings in a template. Then, you assign the template to specific client accounts.
Default Customization Template is created automatically after Plesk installation.
Initially, the default template allows user access to all interface elements of the control
panel. The default template is automatically applied to all user accounts, including the
administrator, if no other template is explicitly specified. The default template cannot be
removed from the control panel. You can set another template as a default one. In the
list of templates, the default template is displayed in bold.
Thus, to customize interface options for customers, you can either modify the default
template or create own customization templates and assign them to user accounts.
Note that if you need to hide only buttons related to MyPlesk.com e-commerce portal
and buttons related to currently unavailable features (such buttons are shown in the
control panel as grayed out), you can do so without using interface customization
templates. This is described in Hiding and Unhiding Sets of Buttons.
Page 38

38 Configuring Your Control Panel
Creating Templates
To create a template and specify custom rules for interface elements:
1 Go to Server > Interface Management > Interface Templates tab and click Add
Interface Template.
2 On the next page, enter the name for the new template. This field is
required.
3 Select the Default check box to make this template default.
Remember that the default template is applied to all user accounts for which no
other template is explicitly defined.
4 Click Show Toolbar to customize the rules for interface elements.
The toolbar serves to customize the appearance of buttons on Plesk screens for
user accounts. The toolbar appears at the bottom of a Plesk screen. When the
toolbar is on, you can navigate through Plesk interface screens and define rules for
separate buttons.
5 Navigate to a Plesk screen on which you want to customize interface
elements.
6 On the toolbar, click the Customize button to switch on the
customization mode.
7 Click the transparent screen over a button you want to customize and
select one of the following options in the drop-down menu:
Hide – Hide this button from all users, including the administrator
Admin Only – Hide this button from all users, but show for the administrator
Show – Always show this button for all users
Default – Reset previous customizations you have made for this button to the
default settings.
8 When you finish customizing buttons, click OK on the toolbar.
9 Click Hide toolbar to exit the customization mode.
10 Return to the list of interface customization templates (Server > Interface
Management > Interface templates).
The template you have just created is added to the list of customization templates.
You can now assign the template to user accounts.
Page 39

Configuring Your Control Panel 39
Assigning Templates to User Accounts
To assign a template to your interface:
1 Go to Server > Edit.
2 In the Administrator's interface customization template menu, select the
customization template you need and click OK.
Note: In the list of templates, the template currently used for the administrator‘s
interface is shown in italic. The default template name is displayed in bold. If you are
using the default template, it is marked as bold italic.
To assign a template to a client account:
1 Go to Server > Interface Management > Interface Templates tab.
2 In the list of templates, click the number in the Usage column.
This number shows the number of client accounts that currently use this template.
3 Click Add New Client to assign this template to another client account.
4 In the list of clients that do not use this template, select one or
several client accounts and click OK.
The template will be assigned to the selected client accounts.
Note: You can also assign a template to a client when you are creating a new client
account or editing client account preferences. To create a new account, click Clients in
the navigation pane, then click Add New Client Account. To edit client account
preferences, click Clients in the Navigation pane and then click the client name you
need.
Removing Templates
To remove one template or several templates from the control panel:
1 Go to Server > Interface Management > Interface Templates tab.
2 Select a template or several templates using the check boxes on the
right.
3 Click Remove Selected.
4 Confirm the removal and click OK.
The specified templates are removed from the control panel and the default template is
assigned to all users that previously used the removed templates.
Page 40

40 Configuring Your Control Panel
Changing Default Template
To set another template as a default template:
1 Go to Server > Interface Management > Interface Templates tab.
2 Select a check box corresponding to the template you need.
3 Click Default. The selected template will be used for all users for
which no template is explicitly defined.
Exporting and Importing Templates
To import a template created on one Plesk server to another Plesk server:
1 Go to Server > Interface Management > Interface Templates tab.
2 Click the icon to save the template you want to export to a file.
3 In the File Download dialog box, click Save and specify the location on
your hard drive where to save the file.
The template settings will be saved as a template_name.xml file.
4 Transfer the template file to another Plesk server.
5 On another Plesk-enabled server, go to Server > Interface Management >
Interface templates tab and click Upload.
6 Enter the name of the template to be imported or locate the template
file on the hard drive.
The file must be in .xml format.
7 Click OK. View the customization settings of this template. In this step,
you can click Show Toolbar to edit the template.
8 When you finish editing, click OK. The new template will be uploaded
to this machine.
9 Assign this template to client accounts (see the Assigning Templates
to User Accounts section).
Page 41

Configuring Your Control Panel 41
Hiding and Unhiding Sets of Buttons
You can easily hide predefined groups of buttons from the Plesk interface. In this case,
users do not see the controls they are not allowed to operate or the features that are
not supported (services not installed).
To hide groups of buttons:
1 Click the Server shortcut in the navigation pane.
2 Click the Interface Management icon in the Control Panel group.
3 Click the Interface templates tab.
4 Click the Preferences icon in the Tools group.
5 Select the check boxes to hide the following groups of controls:
Grayed out buttons. Originally, grayed out icons in the control panel interface
show services or components that are not installed and, hence, cannot be
managed through the control panel. You can hide these buttons to prevent
users from being disappointed that some services are unavailable. To hide all
unavailable buttons, select the Hide all grayed out buttons by default check box.
Limit management controls. To prevent users from viewing grayed out limit
management controls they are not allowed to operate, select the Hide from users
the limit management controls they are not allowed to operate check box.
Permission management controls. To prevent users from viewing grayed out
permission management controls they are not allowed to operate, select the
Hide from users the permission management controls they are not allowed to operate
check box.
6 Under Button sets, select the check boxes to hide the following sets of
buttons or other control panel elements:
Buttons related to services provided by MyPlesk.com online store. If you are
reselling domain registration services and SSL certificates, select the check
boxes Hide buttons for domain registration, Hide buttons for certificate purchasing, and
Hide buttons for extra services. All buttons related to MyPlesk.com will be removed
from the control panel at all user levels.
Mail bounce controls. If you wish to prohibit your users from using their own mail
bounce policies for e-mail addressed to nonexistent e-mail recipients within their
domains, select the Hide mail bounce controls check box.
Control panel items that promote third-party services: link to Fotolia Web site
(stock photos) and newsfeeds from www.moreover.com which are shown in the
default pages for newly hosted Web sites and in the Webmail application.
7 Click OK.
To make groups of hidden buttons visible in the interface:
1 Click the Server shortcut in the navigation pane.
2 Click Interface Management icon in the Control Panel group.
3 Click the Interface templates tab.
Page 42

42 Configuring Your Control Panel
4 Click the Preferences icon in the Tools group.
5 Clear the corresponding check boxes to make the hidden groups of
buttons again visible in the interface.
6 Click OK.
Page 43

Configuring Your Control Panel 43
Super Administrative Overrides
The super administrator (root) can define a set of controls that are never shown in
Plesk control panel, even to a user with administrative privileges (and even in the
Customization mode). To do this:
1 Customize the interface through the Plesk control panel.
2 Create an empty file with name root.controls.lock in
/plesk_installation_directory/var/.
3 Login to the MySQL database server and retrieve the values
describing the state of the hidden controls.
# mysql -uadmin -Dpsa –p
mysql> select page, control from itmpl_data;
+-------------------------+-------------+
| /server/server.php3 | key_info |
+-------------------------+-------------+
4 Add these values to the
/plesk_installation_directory/var/root.controls.lock
file separating them with colons:
/server/server.php3:key_info
5 Save the file.
The values you put into this file will override the customizations made through the
control panel.
Installing and Uninstalling Interface Languages
You can download new language packs from Parallels site and install them to the
control panel. The number of languages you can use with your control panel depends
on the license key you purchased. The control panel will alert you when you attempt to
install more languages than allowed.
To view the interface languages installed in the control panel:
1 Click the Server shortcut in the navigation pane.
2 Click the Interface Management icon in the Control Panel group. The
following information is displayed:
Language status icon shows the current status of the language pack:
language pack is accessible to users, not accessible, the language pack
is not available to users because the limit on the number of language packs
supported by your current license is exceeded.
Note: you can make a language unavailable to control panel users. To do this,
click an icon . To make a language available to users, click an icon .
Language code contains the four-letter language code;
Language shows the name of the language;
Page 44

44 Configuring Your Control Panel
Country displays the countries where this language is native;
Used displays the number of control panel users at all levels that use this
language in their interface.
To install a new language pack that you downloaded from Parallels Web site:
1 Click the Server shortcut in the navigation pane.
2 Click the Interface Management icon in the Control Panel group.
3 Click the Add Locale button.
4 Enter the path to the language pack file or use the Browse button to
locate it.
If you use an RPM-based system, use language pack files with the .rpm file name
extension.
If you use a DEB-based system, use the language pack files with the .deb file name
extension.
If you use a FreeBSD system, use language pack files with the .tgz or .tbz file name
extension.
If you use a MacOS system, use language pack files with the .sh file name
extension.
5 Click OK to install the language to the system.
To uninstall a language pack from the control panel:
1 Click the Server shortcut in the navigation pane.
2 Click the Interface Management icon in the Control Panel group.
3 Select the appropriate check box and click Remove Selected. On the
next page, confirm the removal operation.
If the language pack you have just removed is used by some other users, their
interface language will be automatically set to the default language. The default
language of the Plesk distribution package (en-US) cannot be removed.
Installing and Uninstalling Control Panel Themes (Skins)
You can develop and use custom skins for your control panel. Be aware that use of
skins created by third parties can be dangerous, as the skin packages can contain
malicious code. We strongly recommend that you use only the skins received from the
trusted sources.
To view currently installed skins:
1 Click the Server shortcut in the navigation pane.
2 Click the Interface Management icon in the Control Panel group.
3 Click the Skins tab.
Page 45

Configuring Your Control Panel 45
To download a skin package:
1 Click the Server shortcut in the navigation pane.
2 Click the Interface Management icon in the Control Panel group.
3 Click the Skins tab.
4 Click the appropriate icon, or click a skin title and then click
Download Skin.
5 Select the type of archive you would like to have the skin files packed
into, and click OK.
Once the skin is prepared for downloading, a file download dialog window appears.
6 Click Save, specify the location and file name for the downloaded skin
package file to be saved, and then click Save.
You can now prepare your own skin by modifying the contents of the downloaded
archive file. To learn how to create custom skins for Plesk control panel, see the Skins
Reference document (Server > Interface Management > Skins > Skins Reference).
To install a new skin to control panel:
1 Click the Server shortcut in the navigation pane.
2 Click the Interface Management icon in the Control Panel group.
3 Click the Skins tab.
4 Click Add New Skin. Specify the skin package file location and click OK.
To update the contents of an already installed skin:
1 Click the Server shortcut in the navigation pane.
2 Click the Interface Management icon in the Control Panel group.
3 Click the Skins tab.
4 Click a skin title and then click Update Skin. Specify the skin package
file location and click OK.
To remove one or several skins from the repository:
1 Click the Server shortcut in the navigation pane.
2 Click the Interface Management icon in the Control Panel group.
3 Click the Skins tab.
4 Select the corresponding check box and click Remove Selected. Then,
confirm removal and click OK.
Note: When you remove a skin, which is currently used within a certain user‘s control
panel environment, the user‘s control panel appearance is automatically changed to
the default skin. You cannot remove the default control panel skin.
Page 46

46 Configuring Your Control Panel
Rebranding Your Control Panel with a Custom Logo Banner
You can replace the default Plesk logo banner in the top frame with your own logo. It
will be visible to your customers when they log in to their control panels. You can also
make your logo a clickable hyperlink.
You should use a GIF, JPEG or PNG format file for your logo, preferably not larger
than 100 kilobytes to minimize the download time. It is recommended that you use an
image of 50 pixels in height.
To set up your logo image:
1 Click the Server shortcut in the navigation pane.
2 Click the Logo Setup icon in the Control Panel group.
3 Specify the path to file or click Browse to locate it. Click Open.
4 To make the logo clickable hyperlink that refers users to your
corporate web site, type the desired URL into the Enter new URL for logo
box.
5 Click OK to submit.
When you wish to restore the default Plesk logo, click the Default Logo button.
Adding and Removing Custom Hyperlink Buttons
To add a custom hyperlink button to your Plesk control panel and specify whether
your customers will see it in their control panels:
1 Go to Server > Custom Buttons and click Add New Button.
2 Specify properties of the button:
Type the text that will show on your button in the Button label box.
Choose the location for your button. To place it in the navigation pane, select
the Navigation pane option from the Location drop-down box. To place it on each
client's home page or desktop, select the Client home page option. To place it on
each domain owner's home page or desktop (domain owners are your reseller's
customers), select the Domain administration page option.
Specify the priority of the button. Plesk will arrange your custom buttons on the
control panel in accordance with the priority you define: the lower the number –
the higher is priority. Buttons are placed in the left-to-right order.
To use an image for a button background, type the path to its location or click
Browse to browse for the desired file. It is recommended that you use a 16x16
pixels GIF or JPEG image for a button to be placed in the navigation pane, and
32x32 pixels GIF or JPEG image for buttons placed in the main frame or
desktop.
Type the hyperlink of your choice to be attached to the button into the URL box.
Using the check boxes, specify whether to include the information, such as
domain name, FTP login, FTP password and other data to be transferred within
the URL. These data can be used for processing by external web applications.
Page 47

Configuring Your Control Panel 47
In the Context help tip contents input field, type in the help tip that will be displayed
when you hover the mouse pointer over the button.
Select the Open URL in the Control Panel check box if you wish the destination URL
to be opened in the control panel's right frame, otherwise leave this check box
unchecked to open the URL in a separate browser window.
If you wish to make this button visible to your customers, your resellers and their
customers with access to control panel, select the Visible to all sub-logins check
box.
3 Click OK to complete creation.
To remove a hyperlink button from your Plesk control panel:
1 Go to Server > Custom Buttons.
2 Select a check box corresponding to the button that you wish to
remove and click Remove Selected.
Page 48

48 Configuring Your Control Panel
Customizing the Control Panel in the Desktop View
To add or remove items from the desktop:
1 Go to Desktop > Customize Desktop.
2 Specify whether to show the Server Information group and what items to
show there. Clearing check boxes will remove the respective items
from the desktop.
3 Specify what tasks you would like to accomplish through the control
panel. The appropriate shortcuts will be placed to the desktop. The
Selected tasks list shows the tasks for which shortcuts are already
placed on the desktop. The Available tasks list shows the tasks for which
you do not yet have shortcuts on your desktop.
To add a shortcut to the desktop, select the required tasks in the Available tasks
list and click Add >>.
To remove a shortcut from the desktop, select the task that you do not need in
the Selected tasks list and click << Remove.
4 To show your custom buttons on the desktop, under Tools, select the
Custom buttons check box.
5 Specify whether to show the Statistics and Favorites group and what
items to show there. Clearing check boxes will remove the respective
items from the desktop.
The Favorites group shows the links to items or control panel screens that you
added to desktop by navigating to the respective control panel screens and clicking
Add To Favorites or Create Shortcut icon.
6 Click OK.
To add items to the Favorites group of the desktop:
1 Navigate to the control panel screen you need.
2 Click either the Add To Favorites or Create Shortcut icon in the upper
right corner of the screen.
3 If you want to specify a custom label and description for the shortcut,
clear the Use default check boxes and specify the desired label and
description, then click OK.
To modify label or description for a shortcut in the Favorites group:
1 On the desktop, click the shortcut that you wish to modify.
2 Click the Edit Favorite or Edit Shortcut icon in the upper right corner
of the screen.
3 Modify the label and description as desired and click OK.
OR
Page 49

Configuring Your Control Panel 49
1 On the desktop, click the icon corresponding to the shortcut that
In this section:
Using Desktop Presets ...................................................................................... 50
you wish to modify.
2 Modify the label and description as desired and click OK.
To remove items from the Favorites group of the desktop:
1 On the desktop, click the shortcut that you wish to remove.
2 Click the Edit Favorite or Edit Shortcut icon in the upper right corner
of the screen, then click Remove.
OR
1 On the desktop, click the icon corresponding to the shortcut that
you wish to remove, then click Remove.
Page 50

50 Configuring Your Control Panel
Using Desktop Presets
Alternately, you can modify items in the desktop view by modifying and applying
desktop presets. The presets contain configurations of interface elements. You can
have several presets for your interface and switch between them when needed. You
can predefine the appearance of interface for your customers and customers of your
resellers.
To customize your desktop by means of a template:
1 Go to Server > Interface Management > Desktop Presets tab and click the
Default Administrator Desktop shortcut in the list of desktop presets.
If you wish to create a new preset based on an existing one, click the corresponding
icon.
2 Specify the configuration preset name.
3 Select the Default check box to apply this preset to the interface.
4 Specify whether to show the Server Information group and what items to
show there. Clearing check boxes will remove the respective items
from the desktop.
5 Specify what tasks you would like to accomplish through the control
panel. The appropriate shortcuts will be placed to the desktop. The
Selected tasks list shows the tasks for which shortcuts are already
placed on the desktop. The Available tasks list shows the tasks for which
you do not yet have shortcuts on your desktop.
To add a shortcut to the desktop, select the required tasks in the Available tasks
list and click Add >>.
To remove a shortcut from the desktop, select the task that you do not need in
the Selected tasks list and click << Remove.
6 To show your custom buttons on the desktop, select the Custom buttons
check box located above the list of Available tasks.
7 To show on the desktop a shortcut to functions for creating new
custom hyperlink buttons, select the Show the following buttons in the footer:
Create a new custom button check box below the Available tasks list.
8 Specify whether to show the Statistics and Favorites groups and what
items to show there. Clearing check boxes will remove the respective
items from the desktop. The Favorites group shows the links to items or
control panel screens that you added to desktop by navigating to the
respective control panel screens and clicking Add To Favorites or
Create Shortcut.
9 Click OK.
Page 51

Configuring Your Control Panel 51
To customize desktop for your resellers and customers who have several domains
(client accounts):
1 Go to Server > Interface Management > Desktop Presets tab and click the
Default Client Desktop shortcut in the list of desktop presets.
If you wish to create a new preset based on an existing one, click the corresponding
icon.
2 Specify the configuration preset name.
3 Select the Default check box to apply this preset to the interface.
4 Specify what tasks you would like your users to accomplish through
the control panel. The appropriate shortcuts will be placed to the
desktop. The Selected tasks list shows the tasks for which shortcuts are
already placed on the desktop. The Available tasks list shows the tasks
for which there are no shortcuts on the desktop.
To add a shortcut to the desktop, select the required tasks in the Available tasks
list and click Add >>.
To remove a shortcut from the desktop, select the task that you do not need in
the Selected tasks list and click << Remove.
5 To show custom buttons on the desktop, select the Custom buttons
check box located above the list of Available tasks.
6 To show on the desktop a shortcut to functions for creating new
custom hyperlink buttons, select the Show the following buttons in the footer:
Create a new custom button check box below the Available tasks list.
7 Specify whether to show the Statistics and Favorites group and what items
to show there. Clearing check boxes will remove the respective items
from the desktop.
The Favorites group shows the links to items or control panel screens that your
users add to their desktops by navigating to the respective control panel screens
and clicking the clicking Add To Favorites or Create Shortcut.
8 Click OK.
To customize desktop for your resellers' customers (domain owner accounts):
1 Go to Server > Interface Management > Desktop Presets tab and click the
Default Domain Owner Desktop shortcut in the list of desktop presets.
If you wish to create a new preset based on an existing one, click the corresponding
icon.
2 Specify the configuration preset name.
3 Select the Default check box to apply this preset to the interface.
Page 52

52 Configuring Your Control Panel
4 Specify what tasks you would like users to accomplish through the
control panel. The appropriate shortcuts will be placed to the desktop.
The Selected tasks list shows the tasks for which shortcuts are already
placed on the desktop. The Available tasks list shows the tasks for which
there are no shortcuts on the desktop.
To add a shortcut to the desktop, select the required tasks in the Available tasks
list and click Add >>.
To remove a shortcut from the desktop, select the task that you do not need in
the Selected tasks list and click << Remove.
5 To show custom buttons on the desktop, select the Custom buttons
check box located above the list of Available tasks.
6 To show on the desktop a shortcut to functions for creating new
custom hyperlink buttons, select the Show the following buttons in the footer:
Create a new custom button check box below the Available tasks list.
7 Specify whether to show the Statistics and Favorites group and what items
to show there. Clearing check boxes will remove the respective items
from the desktop.
The Favorites group shows the links to items or control panel screens that users add
to their desktops by navigating to the respective control panel screens and clicking
Add To Favorites or Create Shortcut.
8 Click OK.
To download a configuration preset in XML format:
1 Go to Server > Interface Management > Desktop Presets tab.
2 Select the check boxes corresponding to the presets that you wish to
download and click Export selected to file.
3 When prompted, specify file name and location where to save file and
click OK.
To upload a configuration preset in XML format:
1 Go to Server > Interface Management > Desktop Presets tab and click Upload.
2 Specify the path to preset file or click Browse to locate it.
3 Select the Overwrite presets with the same name and type check box if you
wish to avoid errors on overwriting presets already registered in the
control panel, then click OK.
4 To apply the preset, click its title, select the Default check box and click
OK.
Page 53

Configuring Your Control Panel 53
To remove a preset:
1 Go to Server > Interface Management > Desktop Presets tab.
2 Select the check box corresponding to the preset that you wish to
remove and click Remove Selected. Confirm removal and click OK.
Adjusting Session Idle Time
You can adjust the allowed idle time for any session in Plesk as required.
To adjust session security parameters:
1 Click Server shortcut in the navigation pane.
2 Click Session Settings in the Control Panel group.
3 Specify the required Session idle time in minutes in the appropriate field.
Should a user session remain idle for the time period exceeding the
one specified as the Session idle time, the Control Panel terminates
this session.
4 Click OK.
To reset all parameters back to their default values:
1 Click Server shortcut in the navigation pane.
2 Click Session Settings in the Control Panel group.
3 Click Default. The default session idle time will be set to 30 minutes.
4 Click OK.
Page 54

After you have installed Plesk software on your server and configured the control
In this chapter:
Adding and Removing IP Addresses ................................................................. 55
Configuring DNS Services ................................................................................. 58
Configuring Mail Services .................................................................................. 62
Configuring Plesk for Database Hosting ............................................................ 73
Enabling Support for Adobe ColdFusion ............................................................ 80
Enabling Integration with Sitebuilder ................................................................. 81
Enabling Support for Miva E-commerce Applications ........................................ 84
Configuring Statistics ......................................................................................... 86
Configuring E-mail Notification System .............................................................. 86
Configuring Help Desk ...................................................................................... 90
Adjusting System Date and Time ...................................................................... 92
Starting, Stopping and Restarting Services ....................................................... 93
Enabling Piped Logs for Web Server to Reduce the Risk of Web Service Disruption
.......................................................................................................................... 94
Monitoring Mail Server Message Queue and Troubleshooting Mail Congestion 94
Scheduling Tasks .............................................................................................. 96
Extending Plesk Capabilities with Modules ........................................................ 98
C H A P T E R 4
Configuring and Maintaining Your Server
panel, you need to configure your system and set up all services required for its
operation. To configure your Plesk managed server through the control panel, follow
the instructions provided in this chapter.
Page 55

Configuring and Maintaining Your Server 55
Adding and Removing IP Addresses
After installation, Plesk reads all your IP addresses from the network configuration files
and can then use these IP addresses for hosting DNS domains and Web sites.
When you obtain a new IP address that you would like to use on the server, you should
add the address through the control panel, as Plesk might not recognize manual
modifications you make to the network configuration files.
With Plesk you can mark all your IP addresses as shared or dedicated before you
assign them to your customers. This allows the control panel to distinguish between
them and not to let you assign a dedicated IP address to several customers at once. A
dedicated IP address can be assigned to a single customer, while a shared IP address
can be shared among several user accounts.
Note that SSL protection with authentic digital certificates and Anonymous FTP
services are available only to dedicated hosting accounts on a dedicated IP address.
Shared hosting accounts can also have SSL protection, but visitors to such protected
sites will get error messages in their browsers.
Note: in this version of Plesk control panel, dedicated IP addresses are referred to as
Exclusive IP addresses.
To view the IP addresses you have at your disposal:
1 Go to Server > IP Addresses.
Your IP addresses are listed and the following supplementary information is given:
An icon in the S (Status) column shows if your IP address is properly
configured on the network interface. If your IP address was removed from the
network interface, an icon will show .
An icon in the T (Type) column shows if an address was allocated to a single
customer as a dedicated IP address, and if an address is shared among
many customers.
The IP address, Subnet Mask and Interface columns show which IP addresses are
on which network interfaces.
The Clients column shows the number of user accounts who you assigned a
given IP address. To view the users by names, click the respective number in
the Clients column.
The Hosting column shows a number of web sites hosted on an IP address. To
view the domain names of these web sites, click the respective number in the
Hosting column.
2 To update the list of IP addresses and their status, click Reread IP.
Page 56

56 Configuring and Maintaining Your Server
To add a new IP address to the server:
1 Go to Server > IP Addresses and click Add New IP Address.
2 Select the network interface for the new IP from the Interface drop-
down box. All network cards installed on your server are shown in this
drop-down box.
3 Enter the IP address and subnet mask in the corresponding box (e.g.,
123.123.123.123/16).
4 Select the type of the new IP address, shared or exclusive, using the
IP type radio button.
5 From the drop-down box, select the SSL certificate for the new IP
address. You can select the following certificates:
Default certificate - the certificate that comes with the Plesk distribution package.
However, this certificate is not recognized by web browsers as it is not signed by
a Certificate Authority (a warning message appears). The default certificate is
used to provide access to the control panel via the https protocol (https://<Plesk
Server name or IP>:8443/).
Other certificates - the certificates (self-signed or signed by a Certificate Authority)
that you added to the repository of SSL certificates (about adding certificates,
see the Securing Sites with SSL encryption section).
6 Click OK.
To remove an IP address from the server:
1 Go to Server > IP Addresses.
2 Select the respective check box and click Remove Selected, confirm
removal and click OK.
To assign an IP address to a user:
1 Go to Server > IP Addresses and click the respective number in the Clients
column, then click Add New Client.
2 Select the user account you need and click OK.
To revoke an IP address from a user:
1 Go to Server > IP Addresses and click the respective number in the Clients
column.
2 Select the respective check box and click Remove Selected.
3 Confirm removal and click OK.
Page 57

Configuring and Maintaining Your Server 57
To specify what web site will open when users refer to the web resource on your
server by an IP address:
1 Go to Server > IP Addresses and click the respective number in the
Hosting column. All sites hosted on this IP will be listed.
2 Select the site you need and click Set as Default.
To change an IP address allocation type (shared, exclusive) or assign another SSL
certificate to an IP address:
1 Go to Server > IP Addresses and click the IP address you need.
2 Select the IP address allocation type and SSL certificate you need,
and click OK.
Page 58

58 Configuring and Maintaining Your Server
Configuring DNS Services
Your control panel works in cooperation with the BIND DNS server, which enables you
to run DNS service on the same machine where you host Web sites.
Setup of DNS zones for newly added domains is automated: When you add a new
domain name to control panel, a zone file is automatically generated for it in
accordance with the server-wide DNS zone template and registered in the name
server's database, and name server is instructed to act as a primary (master) DNS
server for the zone.
You can:
Add resource records to and remove from the template
Override the automatic zone configuration with custom settings on a per-domain
basis
Switch off the domain name service on this machine if your provider or another
organization is running DNS service for your sites
To view the default records in the server-wide DNS template:
1 Click the Server shortcut in the navigation pane.
2 Click the DNS icon in the Services group. All resource record templates
will be displayed.
The <ip> and <domain> templates are automatically replaced in the generated
zone with real IP addresses and domain names.
To add a new resource record to the server-wide DNS template:
1 Click the Server shortcut in the navigation pane.
2 Click the DNS icon in the Services group.
3 Click the Add New Record icon in the Tools group.
4 Select the resource record type and specify the record properties as
desired.
Note that you can use <ip> and <domain> templates that will be replaced in the
generated zone with real IP addresses and domain names. You can use a wildcard
symbol (*) to specify any part of the domain name, and you can specify the exact
values you need.
5 Click OK.
To remove a resource record from the server-wide DNS template:
1 Click the Server shortcut in the navigation pane.
2 Click the DNS icon in the Services group.
3 Select a check box corresponding to the record template you wish to
remove, and click Remove Selected.
Page 59

Configuring and Maintaining Your Server 59
4 Confirm removal and click OK.
Plesk updates automatically the zone name, hostname, administrator‘s e-mail address,
and serial number, and writes the default values for the rest of Start of Authority record
parameters to the zone files it maintains. If you are not satisfied with the default values,
you can change them through the control panel.
To change the Start of Authority (SOA) record settings in the server-wide DNS
template:
1 Click the Server shortcut in the navigation pane.
2 Click the DNS icon in the Services group.
3 Click SOA Preferences.
4 Specify the desired values:
TTL. This is the amount of time that other DNS servers should store the record in
a cache. Plesk sets the default value of one day.
Refresh. This is how often the secondary name servers check with the primary
name server to see if any changes have been made to the domain's zone file.
Plesk sets the default value of three hours.
Retry. This is the time a secondary server waits before retrying a failed zone
transfer. This time is typically less than the refresh interval. Plesk sets the
default value of one hour.
Expire. This is the time before a secondary server stops responding to queries,
after a lapsed refresh interval where the zone was not refreshed or updated.
Plesk sets the default value of one week.
Minimum. This is the time a secondary server should cache a negative response.
Plesk sets the default value of three hours.
5 Click OK. The new SOA record parameters will be set for the newly
created domains.
By default, transfer of DNS zones is allowed only for name servers designated by NS
records contained within each zone. If your domain name registrar requires that you
allow transfer for all zones you serve:
1 Click the Server shortcut in the navigation pane.
2 Click the DNS icon in the Services group.
3 Click the Common ACL icon in the Tools group. A screen will show all
hosts to which DNS zone transfers for all zones are allowed.
4 Click the Add New Address icon.
5 Specify the registrar's IP or network address and click OK.
Page 60

60 Configuring and Maintaining Your Server
In this section:
Configuring Plesk to Run Behind a Firewall .......................................................61
If you are using third-party DNS servers, and are not running your own DNS server,
you should switch off your control panel's DNS server:
1 Click the Server shortcut in the navigation pane.
2 Click the DNS icon in the Services group.
3 Click the Switch off icon in the Tools group.
To restore the original configuration of server-wide DNS template:
1 Click the Server shortcut in the navigation pane.
2 Click the DNS icon in the Services group.
3 Click the Default icon in the Tools group.
You can specify whether your DNS server should provide recursive service for queries.
With recursive service allowed, your DNS server, when queried, performs all the lookup
procedures required to find the destination IP address for the requestor. When
recursive service is not allowed, your DNS server performs minimal number of queries
only to find a server that knows where the requested resource resides and to redirect
the requestor to that server. Therefore, recursive service consumes more server
resources and makes your server susceptible to denial-of-service attacks, especially
when the server is set to serve recursive queries from clients outside your network.
After your install Plesk, the built-in DNS server defaults to serving recursive queries
only from your own server and from other servers located in your network. This is the
optimal setting. If your upgraded from earlier versions of Plesk, your DNS server
defaults to serving recursive queries from any host.
If you want to change the settings for recursive domain name service:
1 Click the Server shortcut in the navigation pane.
2 Click the DNS icon in the Services group.
3 Click the DNS Preferences icon in the Tools group.
4 Select the option you need:
To allow recursive queries from all hosts, select Any host.
To allow recursive queries from your own server and hosts from your network,
select Localnets.
To allow recursive queries only from your own server, select Localhost.
5 Click OK.
Page 61

Configuring and Maintaining Your Server 61
Configuring Plesk to Run Behind a Firewall
If you are running Plesk behind a firewall, you might encounter certain problems with
resolution of domain names served by Plesk: when you set up a new DNS domain in
Plesk, its zone file includes a resource record that associates the domain name with
the IP address your Plesk server is on, i.e. an internal network address like
192.168.1.1. As the 192.168.x.x IP addresses are reserved by the Internet Assigned
Numbers Authority (IANA) for use by private networks, this domain name will not be
accessible to the Internet users. To work around this, you would have to associate this
domain name with the IP address of the firewall machine in the domain‘s zone file
(Domains > domain name > DNS).
We recommend using the DNS zone template (Server > DNS) to automate association of
the newly added domain names with appropriate IP addresses.
Let‘s consider setting up a Plesk server running on 192.168.1.1 in a private network
protected by a firewall, which is running on 11.22.33.44:
1 Click the Server shortcut in the navigation pane.
2 Click the DNS icon under the Services group.
3 Locate all resource records of A type. As you cannot edit any of these
records, you should delete them and then create the new records: be
sure to leave the values in the Name column unchanged for each A
record, but replace the <ip> templates in the Value column with the IP
address of your firewall host – 11.22.33.44.
4 Configure your firewall so as to ensure the proper address translation.
Page 62

62 Configuring and Maintaining Your Server
Configuring Mail Services
Your control panel works in cooperation with Qmail mail server, which provides mail
services for your domains. After installation the mail server is configured automatically
and is ready to serve, however, we recommend that you review the default settings to
make sure that they satisfy your needs:
1 Click the Server shortcut in the navigation pane.
2 Click the Mail icon in the Services group. The server-wide mail
preferences screen will open on the Preferences tab.
3 If you wish to limit the size of an e-mail message that can be sent
through your server, type the desired value in kilobytes into the
Maximum letter size box, otherwise, leave this field blank.
4 To protect your server against unauthorized mail relaying or injection
of unsolicited bulk mail, select the Enable message submission check box
to allow your customers to send e-mail messages through the port
587.
Also notify your customers that they need to specify in their e-mail programs'
settings the port 587 for outgoing SMTP connections, and be sure to allow
connections to this port in your firewall settings.
5 Select the mail relay mode.
With closed relay the mail server will accept only e-mail addressed to the users who
have mailboxes on this server. Your customers will not be able to send any mail
through your outgoing SMTP server, therefore, we do not recommend closing mail
relay.
With relay after authorization, only your customers will be able to receive and send
e-mail through your mail server. We recommend that you leave the authorization is
required option selected, and specify allowed authentication methods:
POP3 authorization. With POP3 authorization, once a user has successfully
authenticated to the POP server, he or she is permitted to receive and send e-
mail through the mail server for the next 20 minutes (default value). You can
adjust this interval by specifying another value in the lock time box.
SMTP authorization. With SMTP authorization, your mail server requires
authorization if the e-mail message must be sent to an external address. Your
mail server supports LOGIN, CRAM-MD5 and PLAIN methods of SMTP
authorization.
6 If you wish to protect your users from dictionary attacks by not
allowing them to use simple passwords, select the Check the passwords
for mailboxes in the dictionary option.
A dictionary attack is when someone tries to find out a valid user name and
password by running a program that tries different combinations of dictionary words
in different languages. Dictionary attacks can be successful because many users
choose their passwords carelessly.
7 Select the mail account name format.
Page 63

Configuring and Maintaining Your Server 63
Selecting the Use of short and full names is allowed option will allow users to log in to
In this section:
Setting Up Spam Protection ............................................................................... 64
Configuring Antivirus ..........................................................................................71
Configuring Mailman Mailing List Software ........................................................73
Preventing Your Customers From Sending Mass E-mail ...................................73
their mail accounts by specifying only the left part of e-mail address before the @
sign (for example, username), or by specifying the full e-mail address (for example,
username@your-domain.com).
To avoid possible authorization problems for e-mail users who reside in different
domains but have identical user names and passwords, we recommend that you
choose the Only use of full mail account names is allowed option.
Once you have set your mail server to support only full mail account names, you
will not be able to switch back to supporting short account names until you make
sure there are no encrypted passwords for mailboxes and user accounts with
coinciding user names and passwords residing in different domains.
8 Click OK to submit any changes.
Note: If you wish to set up spam protection systems, such as SpamAssassin spam
filter, or protection systems based on DomainKeys, DNS blackhole lists or Sender
Policy Framework (SPF), proceed to the Setting Up Spam Protection (on page 64)
section.
Page 64

64 Configuring and Maintaining Your Server
Setting Up Spam Protection
To protect your users from spam, you can use the following tools with your control
panel:
SpamAssassin spam filter. It is a powerful spam filter that uses a wide variety of local
and network tests to identify spam signatures.
You can configure the spam filter so as to either delete suspicious messages when
they come to your mail server, or change the subject line and add "X-Spam-Flag:
YES" and "X-Spam-Status: Yes" headers to the messages. The latter can be useful
for users who prefer to filter mail with mail filtering programs installed on their own
computers.
To learn more about SpamAssassin, visit http://spamassassin.apache.org.
To configure and switch on the SpamAssassin filter, proceed to the Setting Up
SpamAssassin Spam Filter (on page 66) section.
DomainKeys. DomainKeys is a spam protection system based on sender
authentication. When an e-mail claims to originate from a certain domain,
DomainKeys provides a mechanism by which the recipient system can credibly
determine that the e-mail did in fact originate from a person or system authorized to
send e-mail for that domain. If the sender verification fails, the recipient system
discards such e-mail messages. To configure the DomainKeys system on your
server, refer to the section Switching on Spam Protection Based on DomainKeys
(on page 67).
DNS blackhole lists. This spam prevention system is based on DNS queries made by
your mail server to a database, which contains known and documented sources of
spam, as well as an extensive listing of dynamic IP addresses. Any positive
response from this database should result in your mail server returning a '550' error,
or rejection of the requested connection.
To configure your mail server for working with DNSBL databases, proceed to the
Switching On Spam Protection Based on DNS Blackhole Lists (on page 69) section.
Sender Policy Framework (SPF). This spam prevention system is also DNS query-
based. It is designed to reduce the amount of spam sent from forged e-mail
addresses. With SPF, an Internet domain owner can specify the addresses of
machines that are authorized to send e-mail for users of his or her domain.
Receivers that implement SPF then treat as suspect any e-mail that claims to come
from that domain but fails to come from locations that domain authorizes.
To learn more about SPF, visit http://www.openspf.org/howworks.html.
To enable filtering based on SPF, proceed to the Setting Up Support for Sender
Policy Framework System (on page 69) section.
Server-wide black and white lists. Black and white lists are standard mail server
facilities. You can use the black list to specify the domains from which mail must not
be accepted, and white list to specify the IP addresses of machines or networks
from which mail must always be accepted.
To set up server-wide black and white lists, proceed to the Setting Up Server-wide
Black and White Lists (on page 70) section.
Page 65

Configuring and Maintaining Your Server 65
In this section:
Setting Up SpamAssassin Spam Filter...............................................................66
Setting Up Spam Protection Based on DomainKeys ..........................................67
Switching On Spam Protection Based on DNS Blackhole Lists ..........................69
Setting Up Support for Sender Policy Framework System .................................69
Setting Up Server-wide Black and White Lists ...................................................70
Page 66

66 Configuring and Maintaining Your Server
Setting Up SpamAssassin Spam Filter
To switch on SpamAssassin spam filter:
1 Click the Server shortcut in the navigation pane.
2 Click the Spam Filter icon in the Services group.
3 To let your users set their own spam filtering preferences on a per-
mailbox basis, select the Apply individual settings to spam filtering check
box.
4 If you wish to adjust the amount of system resources the spam filter
should use, type the desired value from 1 to 5 into the Maximum number
of worker spamd processes to run (1-5) box (1 is the lowest load, and 5 is the
highest). We recommend that you use the default value.
5 If you wish to adjust the spam filter's sensitivity, type the desired
value in the The score that a message must receive to qualify as spam box.
SpamAssassin performs a number of different tests on contents and subject line of
each message. As a result, each message scores a number of points. The higher
the number, the more likely a message is spam. For example, a message
containing the text string ―BUY VIAGRA AT LOW PRICE!!!‖ in Subject line and
message body scores 8.3 points. By default, the filter sensitivity is set so that all
messages that score 7 or more points are classified as spam.
When your users receive lots of spam messages with the current setting, to
make filter more sensitive, try setting a lesser value in the The score that a
message must receive to qualify as spam box; for example, 6.
When your users are missing e-mails because your spam filter thinks they are
junk, try reducing filter sensitivity by setting a higher value in the The score that a
message must receive to qualify as spam box.
6 Specify how to mark messages recognized as spam.
At the server level, you cannot set the server-wide spam filter to automatically
delete spam: you can do it only on a per-mailbox basis. So, for the server-wide
policy, you can choose only marking messages as spam: ―X-Spam-Flag: YES‖ and
―X-Spam-Status: Yes‖ headers are added to the message source by default, and if
you want, the spam filter will additionally include a specific text string to the
beginning of Subject line. To include a desired combination of symbols or words to
the message subject, type it into the Add the following text to the beginning of subject of
each message recognized as spam box. If you do not want the spam filter to modify
message subject, leave this box blank. If you want to include into the subject line
the number of points that messages score, type _SCORE_ in this box.
7 If you do not want your users to receive e-mail from specific domains
or individual senders, click the Black List tab, and then add the
respective entries to the spam filter‘s black list:
Page 67

Configuring and Maintaining Your Server 67
To add entries to the black list, click Add Addresses. If you have a list of entries
stored in a file, click Browse to specify it, and then click OK. Otherwise, select the
From List option, and type the e-mail addresses into the E-mail addresses box.
Place each address in one row, or separate addresses with a coma, a colon, or
a white space. You can use an asterisk (*) as a substitute for a number of
letters, and question mark (?) as a substitute for a single letter. For example:
address@spammers.net, user?@spammers.net, *@spammers.net. Specifying
*@spammers.net will block the entire mail domain spammers.net. To save the
entries you added, click OK, then confirm adding, and click OK again.
To remove entries from the black list, under the Black List tab, select the entries
and click Remove Selected. Confirm removal and click OK.
8 If you want to be sure that you and your users will not miss e-mail
from specific senders, click the White List tab, and then add e-mail
addresses or entire domains to the spam filter‘s white list:
To add entries to the white list, click Add Addresses. If you have a list of entries
stored in a file, click Browse to specify it, and then click OK. Otherwise, select the
From List option, and type the e-mail addresses into the E-mail addresses box.
Place each address in one row, or separate addresses with a coma, a colon, or
a white space. You can use an asterisk (*) as a substitute for a number of
letters, and question mark (?) as a substitute for a single letter. For example:
address@mycompany.com, user?@mycompany.com, *@mycompany.com.
Specifying *@mycompany.com will add to the white list all e-mail addresses that
are under the mycompany.com mail domain. To save the entries you added,
click OK, then confirm adding, and click OK again.
To remove entries from the white list, under the White List tab, select the entries
and click Remove Selected. Confirm removal and click OK.
9 Once finished with setting up the spam filter, click the Switch On icon,
and then click OK.
Now all the incoming mail will be filtered on the server side. By default, spam filter
does not delete spam mail, it only adds the "X-Spam-Flag: YES" and "X-SpamStatus: Yes" headers to the message, and "*****SPAM*****" text string to the
beginning of Subject line of each message recognized as spam.
If you have enabled the Apply individual settings to spam filtering option, then your
users will be able to set their spam filters so as to automatically delete junk mail.
They will also be able to set up their personal black and white lists of
correspondents that will override the server settings, and teach the spam filter on a
per-mailbox basis.
If you wish to adjust spam filtering settings for a specific mailbox, proceed to the
Protecting Mailboxes From Spam section.
Setting Up Spam Protection Based on DomainKeys
To switch on spam protection based on DomainKeys:
1 Click the Server shortcut in the navigation pane.
2 Click the Mail icon in the Services group.
3 Under the DomainKeys spam protection group, select the following options:
Page 68

68 Configuring and Maintaining Your Server
Allow signing outgoing mail. Selecting this option allows you and your customers to
switch on support for DomainKeys e-mail signing on a per-domain basis through
the domain administration screens of the control panel (Domains > domain name >
Mail > Preferences > Use DomainKeys spam protection system to sign outgoing e-mail
messages option). It does not automatically switch on signing of outgoing e-mail
messages.
Verify incoming mail. Selecting this option will configure the DomainKeys system
to check all e-mail messages coming to e-mail users under all domains hosted
on the server.
4 Click OK.
Now your mail server will check all incoming e-mail messages to ensure that they come
from the claimed senders. All messages, sent from the domains that use DomainKeys
to sign e-mail, which fail verification will be discarded. All messages, sent from the
domains that do not participate in the DomainKeys program and do not sign e-mail, will
be accepted without verifying.
To switch on signing outgoing e-mail messages for a single domain:
1 Go to Domains > domain name > Mail > Preferences.
2 Select the Use DomainKeys spam protection system to sign outgoing e-mail
messages check box.
3 Click OK.
To switch on signing outgoing e-mail messages for a number of domains at once:
1 Click Domains.
2 Select the check boxes to the left of the domain names you need. To
select all domains in the list, select the upper left check box in the
column heading.
3 Click Group Operations.
4 Under Preferences, select the Switch on option next to the Use DomainKeys
spam protection system to sign outgoing e-mail messages field.
5 Click OK.
Now, the following will happen for the selected domains:
Private keys are generated and placed in the server's database.
Public keys are generated and placed in the TXT resource records created in the
domains' DNS zones.
The sender's policy advertised in the DNS TXT resource records is set to "all e-mail
messages sent from this domain must be cryptographically signed; if someone
receives an e-mail message claiming to originate from this domain, which is not
signed, then this e-mail must be discarded."
Outgoing e-mail messages are digitally signed: the "DomainKeys-Signature"
header containing a signature based on a private key is added to the message
headers.
Page 69

Configuring and Maintaining Your Server 69
Switching On Spam Protection Based on DNS Blackhole Lists
You can use free and paid subscription blackhole lists with your server. Visit
http://spamlinks.net/filter-dnsbl-lists.htm and choose a DNSBL server you want to use.
To switch on spam protection based on DNSBL:
1 Click the Server shortcut in the navigation pane.
2 Click the Mail icon in the Services group.
3 Select the Switch on spam protection based on DNS blackhole lists check box.
4 In the DNS zones for DNSBL service input box, specify the host name that
your mail server should query, for example: sbl.spamhaus.org.
5 Click OK.
Now, e-mail messages from known spammers should be rejected with an error code
550 (connection refused).
Setting Up Support for Sender Policy Framework System
To set up support for Sender Policy Framework on your server:
1 Click the Server shortcut in the navigation pane.
2 Click the Mail icon in the Services group. The server-wide mail
preferences screen will open on the Preferences tab.
3 Select the Switch on SPF spam protection check box and specify how to
deal with e-mail:
To accept all incoming messages regardless of SPF check results, select the
Create only Received SPF-headers, never block option from the SPF checking mode
drop-down box. This option is recommended.
To accept all incoming messages regardless of SPF check results, even if SPF
check failed due to DNS lookup problems, select the In case of DNS lookup
problems, generate temporary errors option from the SPF checking mode drop-down
box.
To reject messages from senders who are not authorized to use the domain in
question, select the option Reject mail if SPF resolves to fail from the SPF checking
mode drop-down box.
To reject the messages that are most likely from senders who are not authorized
to use the domain in question, select the option Reject mail if SPF resolves to softfail
from the SPF checking mode drop-down box.
To reject the messages from senders who cannot be identified by SPF system
as authorized or not authorized because the domain has no SPF records
published, select the option Reject mail if SPF resolves to neutral from the SPF
checking mode drop-down box.
To reject the messages that do not pass SPF check for any reason (for
example, when sender's domain does not implement SPF and SPF checking
returns the "unknown" status), select the option Reject mail if SPF does not resolve
to pass from the SPF checking mode drop-down box.
Page 70

70 Configuring and Maintaining Your Server
4 To specify additional rules that are applied by the spam filter before
the SPF check is actually done by the mail server, type the rules you
need in the SPF local rules box.
We recommend that you add a rule for checking messages against the open
database of trusted senders, for example, 'include:spf.trusted-forwarder.org'. For
more information on SPF rules, visit http://www.ietf.org/internet-drafts/draft-schlitt-
spf-classic-02.txt.
5 To specify the rules that are applied to domains that do not publish
SPF records, type the rules into the SPF guess rules box.
Specifying a/24 mx/24 ptr gives good results for spam filters scoring Received-SPF
lines.
6 To specify an arbitrary error notice that is returned to the SMTP
sender when a message is rejected, type it into the SPF explanation text
box.
If no value is specified, the default text will be used as a notification.
7 To complete the setup, click OK.
Setting Up Server-wide Black and White Lists
To block mail from specific domains:
1 Click the Server shortcut in the navigation pane.
2 Click the Mail icon in the Services group.
3 Click the Black List tab.
4 Click the Add Domain icon.
5 Specify the name of the domain from which you do not want to
receive e-mail. For example, 'evilspammers.net'.
6 Click OK.
7 Repeat steps from 4 to 6 to add as many domains as required.
To allow mail reception from specific domains or networks:
1 Click the Server shortcut in the navigation pane.
2 Click the Mail icon in the Services group.
3 Click the White List tab.
4 Click the Add Network icon.
5 Specify an IP address or range of IP addresses from which mail must
always be accepted.
6 Click OK.
7 Repeat steps from 4 to 6 to add as many addresses as required.
Page 71

Configuring and Maintaining Your Server 71
Configuring Antivirus
To provide your e-mail users with anti-virus protection, you can use either the Dr. Web
or Kaspersky Antivirus solutions. Both Dr. Web and Kaspersky Antivirus can scan
server's mail traffic in real time, however, only Kaspersky Antivirus allows fine tuning
and filtering of specific file types from attachments.
The both programs require an additional license key with annual renewal. Check the
current prices with your provider or visit Parallels site at
http://www.parallels.com/en/buyonline/plesk8/.
To install Dr. Web or Kaspersky Antivirus:
1 Go to Server > Updater.
2 Click your Plesk version.
3 In the list of components, select either Dr.Web antivirus or Kaspersky
antivirus.
4 Click Install.
After the installation is completed, obtain and install a license key for the selected
antivirus program, as described in the following steps.
5 Go to Server > License Management.
6 Click Order New Key. The Parallels online store page listing available
add-ons opens in a new browser window.
7 On this page, select the check box next to the Dr. Web antivirus or
Kaspersky Antivirus item and click ADD TO MY BASKET.
8 Because Plesk add-ons are added to the license keys that already
exist, the Plesk Number Checking System page will open. Enter the
number of your license key to which you add this feature and click
Submit.
9 In the next steps, indicate the currency, number of keys, provide
contact details, billing address, and payment method, and submit the
form. You will be notified by e-mail when your order is processed.
10 When you receive the e-mail notice, return to the License
Management screen (Server > License Management) and click
Retrieve Keys to retrieve the ordered license key. Plesk License
Manager will retrieve the upgraded license key from the Parallels
licensing server and install it to your control panel.
11 Go to Server > Mail.
12 Under Antivirus preferences, select the antivirus you need and click
OK.
If you installed Dr.Web, you can switch on antivirus protection only on a per-mailbox
basis, and only after you have set up mailboxes. By default, virus definitions are
retrieved every 5 hours from Dr.Web site, and this setting is not changeable through
the control panel.
Page 72

72 Configuring and Maintaining Your Server
To set up anti-virus protection for a mailbox, proceed to the Protecting Mailboxes From
Viruses section.
If you installed Kaspersky Antivirus, for instruction on setting up and using antivirus,
see the Kaspersky Antivirus Module Administrator's Guide at
http://www.parallels.com/en/products/plesk/docs/.
Page 73

Configuring and Maintaining Your Server 73
Configuring Mailman Mailing List Software
To provide your customers with capabilities to run their own mailing lists or newsletters,
you should install the GNU Mailman package on your server (you could have done so
during installation of Plesk), and set up the mailing list administrator's account—
otherwise it will not work.
To set up the mailing list administrator's account from your control panel:
1 Click the Server shortcut in the navigation pane.
2 Click the Set Up Mailman icon.
3 Specify the user name and password that you will use for
administration of mailing lists and their settings.
4 Click OK.
Once you have set up the Mailman administrator's account, you can configure the
mailing list software or change your administrative login and password by visiting the
URL: http://lists.yourservername.tld/mailman/admin/mailman
Note: After you have set up Mailman administrator's account, the Set Up Mailman icon
will be no longer be accessible from the control panel.
Preventing Your Customers From Sending Mass E-mail
To prevent your users from sending mass e-mail, do the following:
1 Create a file named maxrcpt in the directory
$QMAIL_ROOT_D/qmail/control/
where $QMAIL_ROOT_D is the location defined in the file /etc/psa/psa.conf
file.
2 Type the number of allowed recipients in this file and save it.
Note that this number also affect sending of messages to mailing list or mail group
subscribers. That is, if you set the value to 100, then only 100 subscribers will receive
the message sent to the mailing list or mail group.
When you no longer need to restrict the number of recipients, delete the maxrcpt file.
Configuring Plesk for Database Hosting
You can host users' databases either on a single server or on a number of different
servers. Having the user databases on a remote server can be useful in multi-server
installations, where centralized database hosting can be preferable for administration,
backup, and resource utilization. However, if you have a single Plesk server, you are
advised to keep all databases on it.
Page 74

74 Configuring and Maintaining Your Server
In this section:
Setting Up Remote Database Hosting ...............................................................75
Managing Database Servers ..............................................................................78
To use remote database servers with your hosting machine, you need to:
1 Set up a remote database server:
1. Install MySQL or PostgreSQL software.
2. Set up database administrator's account.
3. Enable network access to the database server.
2 Configure Plesk for working with your remote database server.
Page 75

Configuring and Maintaining Your Server 75
Setting Up Remote Database Hosting
If you are going to use a Plesk-managed server as a remote database server, you do
not need to install MySQL software: Plesk comes with MySQL software, which is
automatically installed during installation of Plesk. In this case, you only need to enable
network access to this database server and then register it with Plesk.
To set up a MySQL database server:
1 Copy to your server a MySQL distribution package from your
operating system distribution disk, or download it from
www.mysql.com site and save it on your server.
2 Log in as root to your server and change to the directory where you
saved the RPM distribution. Type the following command at the
prompt:
rpm -ivh mysql_file_name.rpm
3 Set the database server administrator‘s password. Type the following
command at the prompt:
mysqladmin -u root password your_desired_password
Change your_desired_password to anything you like.
4 Now proceed to the instructions on registering your database server
with Plesk.
To set up a PostgreSQL database server:
1 Copy to your server a PostgreSQL distribution package from your
operating system distribution disk, or download it from
www.postgresql.org site and save it on your server.
2 Log in as root to the server where you want to host databases, and
change to the directory where you saved the distribution package.
3 Install the package in a way suitable for your operating system.
For RPM based Linux systems, type the following command at the prompt: rpm
-ivh postgresql_file_name.rpm
For deb package based Linux systems, issue the command:
apt-get install package_name
For FreeBSD systems, to install from a package, issue the following command:
pkg_add pgsql-<version>.tgz
To install from ports, issue the following commands:
cd /usr/ports/databases/postgresql<version>-server
make install package clean
Page 76

76 Configuring and Maintaining Your Server
4 Open the file /var/lib/pgsql/data/postgresql.conf with a
text editor. If you are installing PostgreSQL version earlier than 8, add
the line tcpip_socket = true to this file. If you are installing
PostgreSQL version later than 8, add the line listen_addresses =
'*'.
5 Open the file /var/lib/pgsql/data/pg_hba.conf with a text
editor and make sure the following lines are there:
# local DATABASE USER METHOD [OPTION]
local samegroup all password
# host DATABASE USER IP-ADDRESS IP-MASK METHOD [OPTION]
host samegroup all 0.0.0.0 0.0.0.0 md5
6 To restart PostgreSQL, issue the following command at the prompt:
service postgresql restart
7 To set the database server administrator‘s password, issue the
following commands at the prompt (change 'your_desired_password'
to anything you like):
psql -d template1 -U postgres
alter user postgres with password 'your_desired_password';
8 Now proceed to the instructions on registering your database server
with Plesk.
To register a database server with Plesk:
1 Log in to Plesk.
2 Click the Server shortcut in the navigation pane.
3 Click the Database Servers icon in the Services group.
4 Click the Add Database Server icon in the Tools group.
5 Specify the properties of the database server:
Specify hostname or IP address of the database server.
Specify the port number the database server is listening on. By default, MySQL
servers listen on port 3306, and PostgreSQL on port 5342. You can leave the
Port number box blank, if your database server is listening on the default port.
Specify which database type is running on the database server.
To make this database server default for hosting customers‘ databases, select
the check box labeled Use this server as default for MySQL. If you have a
PostgreSQL database server, select the check box labeled Use this server as
default for PostgreSQL.
Specify the database server administrator's login name and password.
6 Click OK.
Page 77

Configuring and Maintaining Your Server 77
To set up database hosting preferences that will affect all databases created through
Plesk:
1 Go to Server > Database Servers > Preferences.
2 To simplify maintenance of customers' databases, select the Add
client's login name and underscore to beginning of database names check box. All
names of newly created databases will look like client's login
name_database name. This will allow you to locate databases related
to a particular Plesk user. Note that even if you do not select this
check box, on creation of a new database, Plesk will add client's login
name to the database name input box, and you will be able to edit it
or remove it.
3 You can also set up Plesk to add client's login names to
corresponding database user names, further simplifying the
maintenance of customers' databases. To do so, select the Add client's
login name and underscore to the beginning of database user names check box. All
names of newly created database users will look like client's login
name_database user name. This will allow you to locate database
users related to a particular Plesk user.
4 Specify whether creation of databases is allowed on your Plesk
server. Some applications do not support remote databases and can
work only with databases hosted on the same server. We recommend
leaving the default option Allow local hosting of databases for these site
applications selected, otherwise, you will not be able to use such
applications.
5 Click OK.
Page 78

78 Configuring and Maintaining Your Server
Managing Database Servers
To manage a database server:
1 Click the Server shortcut in the navigation pane.
2 Click the Database Servers icon in the Services group.
3 Click the icon corresponding to the database server you need. A
web interface of a database management tool will open in a separate
browser window.
To change the MySQL database server administrator's password:
1 Login to the MySQL database server as root.
2 Login to MySQL as root.
3 Issue the command at the prompt:
mysql> SET PASSWORD for ROOT = PASSWORD('new_password');
Where root is the user account, and new_password is the new administrator‘s
password.
4 Log in to your Plesk control panel.
5 Click the Server shortcut in the navigation pane.
6 Click the Database Servers icon in the Services group.
7 Click the database server‘s name.
8 Type the new administrator‘s password and click OK.
To change the PostgreSQL database server administrator's password:
1 Login to the PostgreSQL database server as root.
2 Login to PostgreSQL as root.
3 Issue the command at the prompt:
ALTER USER root WITH PASSWORD 'new_password';
4 Log in to your Plesk control panel.
5 Click the Server shortcut in the navigation pane.
6 Click the Database Servers icon in the Services group.
7 Click the database server‘s name.
8 Type the new administrator‘s password and click OK.
Page 79

Configuring and Maintaining Your Server 79
To unregister a database server from Plesk:
1 Click the Server shortcut in the navigation pane.
2 Click the Database Servers icon in the Services group.
3 Select the check box to the right of the database server‘s name.
4 Click Remove Selected.
5 Confirm the operation and click OK.
To unregister from Plesk a database server that has databases or is assigned as
default for hosting customers' databases:
1 Delete databases from the database server:
1. Click the Server shortcut in the navigation pane.
2. Click the Database Servers icon in the Services group.
3. Click the host name of a database server that you wish to
unregister from Plesk.
4. Click the Databases tab.
5. Select the checkbox in the upper-right corner of the list to
select all databases.
6. Click Remove Selected.
7. Confirm removal and click OK.
2 Make another database server default:
1. Click the Database servers shortcut in the path bar at the top of
the screen.
2. Click the host name of a database server that you wish to
make default. This should be the same database server type
(MySQL or PostgreSQL) as the one you are going to delete.
3. Select the check box labeled Use this server as default for MySQL. If
you have a PostgreSQL database server, select the check box
labeled Use this server as default for PostgreSQL.
4. Click OK.
3 Return to the list of database servers (Server > Database Servers).
4 Select a check box corresponding to the database server that you no
longer need.
5 Click Remove Selected.
6 Confirm the operation and click OK.
Important: You cannot remove site applications‘ databases this way. To remove them,
you should uninstall the respective site applications from the domains that use them.
Page 80

80 Configuring and Maintaining Your Server
For instructions on managing databases, refer to the Deploying Databases (on page
147) section of this guide.
Enabling Support for Adobe ColdFusion
If you want to support ColdFusion scripts on the server, you should obtain a distribution
package from Adobe and then install it on the server. Plesk Control Panel supports
Adobe ColdFusion versions 6,7, and 8.
After you have installed Adobe ColdFusion on your server, do the following:
1 Login to Plesk Control Panel as administrator.
2 Click the Server shortcut in the left side navigation pane.
3 Click the Updater icon in the right frame.
4 Click a link corresponding to the appropriate release version.
5 Select the check box corresponding to the ColdFusion support for Plesk
item, and click Install. Confirm the installation when prompted.
6 Once the selected components are installed, click the ColdFusion
Settings icon on the Server Administration screen (Plesk Control Panel
> Server).
7 Specify the path to ColdFusion installation directory and click OK.
Page 81

Configuring and Maintaining Your Server 81
Enabling Integration with Sitebuilder
Sitebuilder is a Web site creation and content management system developed by Parallels. It
has proven to be highly popular with site administrators because it enables users without any
technical skills and knowledge of markup languages to create professionally looking Web
sites.
To allow your Web hosting customers to create and publish their sites using Sitebuilder, do
the following:
1 Install Sitebuilder on the same server where Plesk is installed, if you did
not install it during installation of Plesk. This version of Plesk supports only
connections to locally installed Sitebuilder systems.
2 Install a license key for Sitebuilder. Log in to Sitebuilder at URL http://your
server's ip address or hostname/Admin, go to Server > License Management > Upload
License Key. Select the license key file in XML or ZIP format and click OK.
3 Log in to Plesk, click the Server shortcut in the navigation pane and click
Sitebuilder Support.
4 Specify the server administrator's username and password that you
specified in Sitebuilder during installation. They will be used by Plesk for
authorization in the Sitebuilder system.
5 Click OK.
Now Plesk is connected to Sitebuilder, and the Sitebuilder section appears in Plesk's
navigation pane providing the following shortcuts to the Sitebuilder administration panel:
Desktop. This provides shortcuts to the task-oriented wizards. Here you can perform any
operations on your Sitebuilder system. For more information, see
http://download1.parallels.com/SiteBuilder/4.0.0/doc/admin/en_US/html/using_desktop_in
terface.htm.
Users. Here you can add and manage user accounts and service plans for your
customers. For more information, see
http://download1.parallels.com/SiteBuilder/4.0.0/doc/admin/en_US/html/signing_up_custo
mers.htm.
Sites. Here you can add and manage sites. For more information, see
http://download1.parallels.com/SiteBuilder/4.0.0/doc/admin/en_US/html/managing_sites.h
tm.
Server. Here you can view and manage the following system settings:
Hosts. Here you can add and manage hosts. For more information, see
http://download1.parallels.com/SiteBuilder/4.0.0/doc/admin/en_US/html/specifying_ho
sts_used_for_publishing_sites.htm.
License Management. Here you can upload and retrieve your Sitebuilder license. For
more information, see
http://download1.parallels.com/SiteBuilder/4.0.0/doc/admin/en_US/html/updating_upg
rading_and_restoring_your_license.htm.
Page 82

82 Configuring and Maintaining Your Server
Integration. Here you can review single sign-on settings for Parallels products installed
on the server. For more information, see
http://download1.parallels.com/SiteBuilder/4.0.0/doc/admin/en_US/html/viewing_siteb
uilder_sso_settings.htm.
Backup. Here you can back up data from the Sitebuilder system on demand. For more
information, see
http://download1.parallels.com/SiteBuilder/4.0.0/doc/admin/en_US/html/backing_up_a
nd_restoring_sitebuilder_data.htm.
Trial Sites Settings. Here you can configure settings for trial sites created by your
prospective customers. For more information, see
http://download1.parallels.com/SiteBuilder/4.0.0/doc/admin/en_US/html/setting_up_sit
ebuilder_wizard_for_anonymous_visits.htm.
Branding. Here you can configure the logo and title setting for your prospective
customers. For more information, see
http://download1.parallels.com/SiteBuilder/4.0.0/doc/admin/en_US/html/setting_up_lo
go_and_title_bar_text.htm.
Log Settings. Here you can adjust how much information about system errors
Sitebuilder writes to log files. For more information, see
http://download1.parallels.com/SiteBuilder/4.0.0/doc/admin/en_US/html/specifying_act
ions_to_be_logged.htm.
Notifications. Here you can configure settings for notifications sent by Sitebuilder to
your users. For more information, see
http://download1.parallels.com/SiteBuilder/4.0.0/doc/admin/en_US/html/configuring_e
mail_message_sent_at_trial_site_publishing_attempt.htm.
Languages. Here you can view the list of available languages. For more information,
see
http://download1.parallels.com/SiteBuilder/4.0.0/doc/admin/en_US/html/obtaining_add
itional_language_packs.htm.
Skins. Here you can view the list of available skins. For more information, see
http://download1.parallels.com/SiteBuilder/4.0.0/doc/admin/en_US/html/choosing_lan
guage_skin_and_number_of_items_shown_per_page.htm.
Templates. Here you can view the list of available site design templates. For more
information, see
http://download1.parallels.com/SiteBuilder/4.0.0/doc/admin/en_US/html/manaing_site
_design_templates.htm.
Modules. Here you can view the list of available modules. For more information, see
http://download1.parallels.com/SiteBuilder/4.0.0/doc/admin/en_US/html/viewing_and_
configuring_available_modules.htm.
Page Sets. Here you can view the list of available page sets. For more information, see
http://download1.parallels.com/SiteBuilder/4.0.0/doc/admin/en_US/html/managing_sit
e_structure_templates.htm.
Site Families. Here you can view the list of available templates that combine design
templates and page sets. For more information, see
http://download1.parallels.com/SiteBuilder/4.0.0/doc/admin/en_US/html/managin_site
_templates.htm.
Logs. Here you can view system and security logs. For more information, see
http://download1.parallels.com/SiteBuilder/4.0.0/doc/admin/en_US/html/configuring_siteb
uilder_logs.htm.
Page 83

Configuring and Maintaining Your Server 83
You can provide your customers with access to site creation and management services on a
per user or per site basis: there are individual settings that you can adjust for a user account
(Clients > client name > Preferences) and for a Web site (Domains > domain name > Setup).
All customers who were given access to site creation and management services will be able
to create and update their sites by following the Sitebuilder Wizard shortcut which will appear in
the domain management screens of their Plesk control panels (domain name > Sitebuilder
Wizard). Also, in users' control panels, the following shortcuts will appear in the navigation
pane to allow them to manage their own accounts and sites through Sitebuilder: Desktop,
Users, Sites, Server (client's control panel); Desktop and Sites (domain administrator's control
panel).
Page 84

84 Configuring and Maintaining Your Server
Enabling Support for Miva E-commerce
Applications
To allow your customers use Miva e-commerce solutions, you need to install on the server
the Miva Empresa package shipped with Plesk distribution (if you did not install it during
installation of Plesk), and then enable support for Miva applications for the respective hosting
accounts.
The Miva Fasttrack and Miva Merchant online store applications are shipped with Plesk as
standard Web applications, which you or your customers can install from the control panel‘s
Application Vault section (Domains > domain name > Application Vault > Add New Application). Note
that your customers will need to obtain a license either from Miva or from Parallels and
specify its serial number during installation of Miva applications.
To learn more about Miva solutions, refer to http://docs.smallbusiness.miva.com/en-
US/merchant/WebHost/webhelp/web_host_resources.htm
To install the Miva Empresa package:
1 Go to Server > Updater.
2 Click the shortcut corresponding to your version of Plesk. For example,
Plesk 8.3.
3 Locate the Miva Empresa Support item and select the check box on the left.
4 Click Install. Now the Miva Empresa server environment is installed.
To enable support for Miva applications for all newly created hosting accounts using domain
templates:
1 Go to Domains > Domain Templates.
2 Click the template name you need.
3 Select the Miva support check box and click OK.
To enable support for Miva applications for existing hosting accounts:
1 Click the Domains shortcut in the navigation pane.
2 Select the check boxes corresponding to the domain names you need, and
click Group Operations.
3 Under the Hosting group, select the Switched on option to the left of the Miva
support field.
4 Click OK.
Page 85

Configuring and Maintaining Your Server 85
To enable support for Miva applications for an individual hosting account:
1 Go to Domains > domain name > Setup.
2 Select the Miva support check box and click OK.
To install Miva Fasttrack or Miva Merchant on a site, follow the instructions provided in the
Installing Applications (on page 151) chapter.
Page 86

86 Configuring and Maintaining Your Server
Configuring Statistics
After installation, the control panel's statistical utility is set up to:
Count the inbound and outbound traffic
Count the disk space occupied by Web content, log files, databases, mailboxes, Web
applications, mailing list archives, and backup files
Keep the Web statistics and traffic statistics gathered by Webalizer or AWstats programs
only for the last three months
To review or adjust these settings:
1 Click the Server shortcut in the navigation pane.
2 Click the Server Preferences icon in the Control Panel group.
3 Under the System preferences group, specify the term during which the
bandwidth usage statistics should be kept for your customers.
4 Specify the items that should be considered when disk space and
bandwidth usage is calculated.
5 Click OK.
Note: In addition to the settings related to statistics, this screen provides the means to
rename your server's hostname, and the option to allow or forbid users to create new
subdomains and domain aliases in the DNS zones belonging to other users (the Do not let
users create DNS subzones in other users' DNS superzones check box). We recommend that you
select this check box, otherwise, users will be able to create subdomains under domains
belonging to other users, and set up Web sites and e-mail accounts which could be used for
spamming or even phishing or identity theft.
For instruction on viewing statistics, refer to the chapter Viewing Statistics (on page 234).
Configuring E-mail Notification System
The control panel notifies you and your customers of disk space and bandwidth overage by
sending e-mail notifications. With the default settings, however, domain and web site owners
are not notified. We recommend that you enable resource overage notification for domain
and web site owners because they need to know what happens to their domains and web
sites.
Apart from resource overage, the control panel can notify the appropriate users when:
New user accounts are created
New domains are added
Hosting accounts are expired (expiration date is defined for user accounts and Web sites
separately)
There are new requests for assistance (trouble tickets) from your customers in Help Desk
The requests are fulfilled and the trouble tickets are closed in Help Desk
Page 87

Configuring and Maintaining Your Server 87
New comments are posted to the existing trouble tickets
Event type
Tags that can be used in notices
The data that tags denote
Creation of a
user account
<client> or
<client_contact_name>
user's first and last name
<client_login>
user name for authorization
in the control panel
<password>
user's password for
authorization in the control
panel
<hostname>
host name for access to
control panel
Expiration of a
user account
<client_login>
user name for authorization
in the control panel
<client> or
<client_contact_name>
user's first and last name
<expiration_date>
user account expiration
date
Addition of a
new domain
name to the
server
<domain_name> or
<domain>
domain name
<client_login>
user name for authorization
in the control panel
The closed trouble tickets are reopened because the customer has encountered the
same problem again
To view or modify the notification system settings:
1 Go to Server > Notifications.
2 By selecting the check boxes in the Notifications table, specify the types of
control panel users or external e-mail users who should receive notices on
events.
We recommend that you also select all check boxes in the domain administrator column in
order to let your resellers' customers know what happens to their Web sites.
3 To view or edit the default notice text, click the respective icon in the
Text column.
In notices you can use tags that will be replaced with actual data (see the table below).
4 Specify when to send the user account and domain (Web site) hosting
account expiration notices. By default, such notices are sent 10 days in
advance. Click OK.
Table. Tags used in notification messages
Page 88

88 Configuring and Maintaining Your Server
<client> or
<client_contact_name>
user's first and last name
<ip>
IP address the domain is
hosted on
Domain (Web
site) hosting
account
expiration
<domain_name> or
<domain>
domain name
<client_login>
user name for authorization
in the control panel
<client_contact_name> or
<client>
user's first and last name
<expiration_date>
account expiration date
Resource
overage
<domain> or
<domain_name>
domain name
<client_login>
user name for authorization
in the control panel
<client> or
<client_contact_name>
user's first and last name
<disk_usage>
information on disk space
usage
<disk_space_limit>
information on the disk
space allocated to the
account
<traffic>
information on bandwidth
usage
<traffic_limit>
information on the
bandwidth amount allotted
to the account
Help Desk
events
<ticket_id>
trouble ticket identification
number automatically
assigned by the system
<reporter>
returns user name for
requests submitted by
resellers or multi-domain
customers, a domain name
for requests submitted by
domain owner, and e-mail
address if the request was
submitted by e-mail.
Page 89

Configuring and Maintaining Your Server 89
<server>
the host name
<ticket_comment>
the contents of the ticket, or
a comment posted
Page 90

90 Configuring and Maintaining Your Server
Configuring Help Desk
Help Desk is a convenient way for your customers to reach you when they need your
assistance. After you set it up and switch on, the Help Desk becomes accessible to all users
who were granted access to control panel, including your resellers, domain owners, and email users. Additionally, you can allow submission of problem reports by e-mail.
Your Help Desk shows all reports posted by your resellers and their customers. Your
reseller's Help Desk shows only reports posted by himself or herself and his or her
customers. The domain owner's Help Desk shows only reports posted by himself or herself
and by e-mail users under his or her domain.
To configure Help Desk and allow your customers post problem reports through the control
panel:
1 Go to Help Desk > General Settings.
2 Select the Allow customers to submit tickets check box.
3 Select the trouble ticket queue, priority and category that will be offered to
your customers as the default choice.
When users post a new ticket, they can specify the order in which they would prefer their
problems to be resolved (queue), the priority of their requests (priority), and the category
to which the problem is related (category). The queue, priority and category are abstract
entities: they have no effect on the system, but they can help you decide what problems
to resolve in the first place. There are three predefined queues and priority levels and
nine predefined categories including Database, DNS, FTP, General, Hosting, Mail, Mailing Lists,
Site Applications, and Tomcat Java. You can remove these items and add your own.
4 Click Switch On in the Tools group, then click OK.
If you wish to allow users to submit problem reports by e-mail:
1 Create a POP3 mailbox with an e-mail address like helpdesk@your-
domain.com or anything you like.
2 Configure the Help Desk to periodically retrieve problem reports from that
mailbox and post them to your Help Desk.
3 Inform your customers of the Help Desk's e-mail address.
To allow users to submit problem reports to Help Desk by e-mail:
1 Go to Help Desk > Mail Gate Settings.
2 Specify the following settings:
Page 91

Configuring and Maintaining Your Server 91
Notification sender's name, and Notification sender's return address. Once a report has been
retrieved by e-mail and posted to the Help Desk, the Help Desk sends a notice to the
report sender. This allows the report sender to subsequently add comments to the
report by replying to the message. Therefore, we recommend that you specify your
Help Desk's e-mail address in the Notification sender's return address box, and type a
phrase like "<company name> Help Desk" into the Notification sender's name box. Be
sure to specify your organization name in place of <company name> and omit the
quotation marks.
POP3 server: POP3 server the mail should be fetched from.
POP3 login: user name for authentication to the mail server.
New POP3 password: password that will be used for authentication to the mail server
and retrieving problem reports from the mailbox.
Confirm POP3 password: retype password for confirmation.
Query mail once in: specify how often Help Desk should check for new reports.
Ticket subject must start with: specify the combination of symbols the subject line of e-
mail messages (problem reports) must start with. This can help filter out spam. All email messages that do not have the specified combination of symbols in the subject
line will be deleted.
3 Click Switch On in the Tools group and click OK.
To view, add, edit, or remove queues:
1 Go to Help Desk > Queues. The queues will be presented in a list.
To add a new queue, click Add New Queue, type the desired number into the Title box,
leave the Switched on check box selected, and click OK.
To edit a queue, click its title in the Title column. Edit it as required, and click OK.
To temporarily disallow your users to select a queue when posting new reports, click
its title in the Title column, clear the Switched on check box, and click OK.
To delete a queue, select the respective check box and click Remove Selected.
To view, add, edit, or remove priorities:
1 Go to Help Desk > Priorities. The priorities will be presented in a list.
To add a new priority, click Add New Priority, type the desired combination of symbols
into the Title box, leave the Switched on check box selected, and click OK.
To edit a priority, click its title in the Title column. Edit it as required, and click OK.
To temporarily disallow your users to select a priority when posting new reports, click
its title in the Title column, clear the Switched on check box, and click OK.
To delete a priority, select the respective check box and click Remove Selected.
To view, add, edit, or remove categories:
1 Go to Help Desk > Categories. The categories will be presented in a list.
To add a new category, click Add New Category, type the desired combination of
symbols into the Title box, leave the Switched on check box selected, and click OK.
To edit a category, click its title in the Title column. Edit it as required, and click OK.
Page 92

92 Configuring and Maintaining Your Server
To temporarily disallow your users to select a category when posting new reports,
click its title in the Title column, clear the Switched on check box, and click OK.
To delete a category, select the respective check box and click Remove Selected.
To disallow customers to send reports to Help Desk by e-mail:
1 Go to Help Desk > Mail Gate Settings.
2 Click Switch off in the Tools group.
To disallow use of Help Desk for all your customers and resellers:
1 Go to Help Desk > General Settings.
2 Click Switch off in the Tools group.
Also see the Using Help Desk for Resolving Your Customers' Issues section.
Adjusting System Date and Time
You can manually set the server date and time through the interface and enable server time
synchronization with a Network Time Protocol (NTP) server.
To adjust the system date and time settings:
1 Click the Server shortcut in the navigation pane.
2 Click System Time.
3 Edit the time and date settings as desired, and select your time zone.
You will need to reboot your Plesk server for the time zone change to take effect.
4 To synchronize your server time with that of a server running the Network
Time Protocol, select the Synchronize system time check box, and specify a
valid IP address or a domain name. For a list of available NTP servers,
visit
http://ntp.isc.org/bin/view/Servers/WebSearch?search=open+access&scop
e=text
5 Click OK.
Note. Enabling the Synchronize system time function will override any time and date you
manually enter in the System Date and Time fields. It is also important to be sure the domain
name or IP address you enter for synchronization is a valid NTP server. If not, this function
will not work and your server will continue running with its current time settings.
Page 93

Configuring and Maintaining Your Server 93
Starting, Stopping and Restarting Services
You can monitor, start, stop and restart various Plesk services from the control panel.
To see the status of a service:
1 Select the Server shortcut in the navigation pane.
2 Click Service Management on the Server administration page.
The current state of a service is marked by an icon: for the service running, for the
service stopped, and if service is not installed or its management capabilities are not
supported by the license key.
To start a service:
1 Select the Server shortcut in the navigation pane.
2 Click Service Management on the Server administration page.
3 Click the icon corresponding to the service you wish to start.
To restart a service:
1 Select the Server shortcut in the navigation pane.
2 Click the Service Management icon on the Server administration page.
3 Click the icon corresponding to the service you wish to restart.
To stop a service:
1 Select the Server shortcut in the navigation pane.
2 Click the Service Management icon on the Server administration page.
3 Click the icon corresponding to the service you wish to stop.
Page 94

94 Configuring and Maintaining Your Server
Enabling Piped Logs for Web Server to
Reduce the Risk of Web Service Disruption
If you are going to host more than 300 domains or Web sites on your server, you should
switch on support for piped logs in the Apache Web server. To do this, follow these steps:
1 Log in to the server shell.
2 Issue the command mysql -uadmin -p`cat /etc/psa/.psa.shadow` -D psa -e
"replace into misc (param,val) values ('apache_pipelog', 'true');"
3 Rebuild Apache configuration by issuing the command
/usr/local/psa/admin/sbin/websrvmng -a -v
This will allow to host about 900 domains/Web sites. If you need to host more than 900
domains/Web sites, then you will need to recompile Apache and some other system
packages, as described in the online knowledge base article at
http://kb.parallels.com/en/260.
Monitoring Mail Server Message Queue and
Troubleshooting Mail Congestion
If your customers complain that they cannot send e-mail through your mail server, this can
mean that your mail server is overloaded and cannot cope with the amount of received
messages. This can happen when somebody is sending spam through your mail server, or
the qmail-send daemon responsible for sending mail is down.
To return your mail server to an operable state, delete the unwanted messages from the mail
server‘s message queue.
To see the messages in the message queue and to delete them:
1 Click the Server shortcut in the navigation pane.
2 Click Mail icon in the Services group.
3 Click the Mail Queue tab. The following information will be presented:
Total number of undelivered messages. When messages come to your mail server
they are first added to the main queue. Then, the mail server preprocesses them in
order to find out whether they should be delivered to a local e-mail account on the
same server or sent further to a remote recipient‘s e-mail address. After
preprocessing, the messages directed at local mail recipients are put to a local queue,
and the messages directed at remote recipients are put to a remote queue. Once
delivered, the messages are removed from the queues.
Message properties: subject, sender, recipient, queue type (local, remote, not
preprocessed), date the message was sent from user‘s computer, the time lapsed
since the moment when message was put to queue (age), and message size.
Page 95

Configuring and Maintaining Your Server 95
4 To find a message with specific subject, select the queue in the Queues
drop-down box, type the desired combination of symbols into the Subject
box, and click Search. The messages matching your search criteria will be
listed at the bottom of the screen. To reset the filter, click Show All.
5 To find a message from a specific sender, click the Show Advanced link, type
the sender‘s e-mail address into the Envelope Sender box, and click Search.
The messages matching your search criteria will be listed at the bottom of
the screen. To reset the filter, click Show All.
6 To find a message addressed to a specific recipient, click the Show Advanced
link, type the recipient's e-mail address into the Recipients box, and click
Search. The messages matching your search criteria will be listed at the
bottom of the screen. To reset the filter, click Show All.
7 To find a message by date, age, or size, click the Show Advanced link, type
the required values into the Date, Age, or Size boxes, respectively, and click
Search. The messages matching your search criteria will be listed at the
bottom of the screen. To reset the filter, click Show All.
8 To delete a message from the queue, select the corresponding check box
and click Remove Selected. To delete all messages from the queue, select
the check box in the upper-right corner of the messages list, and click
Remove Selected.
Page 96

96 Configuring and Maintaining Your Server
Scheduling Tasks
If you need to run scripts on your server at specific time, use the task scheduling facility on
your server to make the system automatically run the scripts for you.
Important: To prohibit control panel users from scheduling tasks on behalf of user "root",
create on the server's file system an empty file with name root.crontab.lock in the
location /plesk_installation_directory/var/.
During installation of Plesk the following tasks are automatically created:
autoreport.php – delivers daily, weekly and monthly reports on clients and domains (three
separate tasks)
backupmng – initiates scheduled backing up of domains once every 30 minutes
statistics – generates statistics on the limits imposed on domains, such as traffic, disk
usage, and so on
mysqldump.sh - creates a backup copy of three MySQL databases: psadump, MySQL,
and Horde databases
As all these tasks are related to domain statistics, databases and reports, it is strongly
recommended that you neither change nor remove these tasks.
Note. You can also schedule tasks on a per-domain basis. To do so, follow the same
procedures listed below, but instead of going to Server > Scheduled Tasks, go to Domains >
domain name > Scheduled Tasks.
To schedule a task:
1 Click the Server shortcut in the navigation pane.
2 Click the Scheduled Tasks icon in the Services group.
3 Select the system user account on whose behalf the task will be executed.
4 Click Add New Task.
5 Specify when to run your command:
Minute - enter the value from 0 to 59
Hour - enter the value from 0 to 23
Day of the Month - enter the value from 1 to 31
Month - enter the value from 1 to 12, or select the month from a drop-down box
Day of the Week - enter the value from 0 to 6 (0 for Sunday), or select the day of the
week from a drop-down box
You can schedule the time using the UNIX crontab entry format. In this format, you can
enter several values separated by commas. Two numbers separated by a hyphen
mean an inclusive range. For example, to run a task on the 4th, 5th, 6th, and 20th of a
month, type 4-6,20.
insert an asterisk to specify all values allowed for this field. For example, to run a task
daily, type * in the Day of the Month text box.
Page 97

Configuring and Maintaining Your Server 97
To schedule the task to run every Nth period, enter the combination */N, where N is the
legal value for this field (minute, hour, day, month). For example, */15 in the Minute field
schedules the task to start every 15 minutes.
You can type the contracted names of months and days of the week, which are the first
three letters: Aug, Jul, Mon, Sat, etc. However, the contracted names cannot be
separated with commas or used together with numbers.
6 Specify which command to run. Type it into the Command input box.
7 Click OK.
To temporarily suspend execution of a scheduled task:
1 Click the Server shortcut in the navigation pane.
2 Click the Scheduled Tasks icon in the Services group.
3 Select the system user account on whose behalf the task is executed.
4 Locate the task that you want to suspend and click on the command name.
5 Clear the Switched on check box and click OK.
To resume execution of scheduled task:
1 Click the Server shortcut in the navigation pane.
2 Click the Scheduled Tasks icon in the Services group.
3 Select the system user account on whose behalf the task is executed.
4 Locate the task whose execution you want to resume and click the
command name.
5 Select the Switched on check box and click OK.
To cancel a task:
1 Click the Server shortcut in the navigation pane.
2 Click the Scheduled Tasks icon in the Services group.
3 Select the system user account on whose behalf the task is executed.
4 Select a check box to the left of the task that you want to cancel.
5 Click Remove Selected.
6 Confirm removal and click OK.
Page 98

98 Configuring and Maintaining Your Server
Extending Plesk Capabilities with Modules
In this section:
Installing Modules .............................................................................................. 99
Configuring and Managing Modules .................................................................. 99
Removing Modules ............................................................................................ 100
In this version of Plesk, you can extend the functionality of your control panel without
upgrade. This can be done by installing additional functional components, available as
modules developed by Parallels or third parties.
The modules can be easily installed, removed, and configured directly from the control panel.
The modules come as a single RPM package, a self-extracting shell script, or in any other
form suitable to your operating system. If you wish, you can also install the module from the
command line. When you install the module on server using the control panel, you are taken
to the module‘s configuration screen.
The following modules are available for Plesk 8:
Acronis True Image Server management module - Allows to create server disk backup
images without interrupting server operations and perform easy and fast recovery of the
entire system. This module is free, however, the Acronis True Image Server application
requires a license key, which you can purchase and install through Plesk control panel.
*Battlefield 2 Game Server module - Allows to install and manage Battlefield 2 game
servers.
*Counter-Strike Game Server module - Allows to install and update Half-Life: CounterStrike game server, to create and manage games.
Firewall module - Helps you protect your host and private network from unauthorized
access.
Kaspersky Antivirus module - Scans mail traffic for viruses and provides filtering of e-mail
attachments.Samba Fileserver Configuration module - Helps you share your directories in
SMB network.
Virtual Private Networking module - Builds a secure network over insecure channels.
Watchdog module - Monitors Plesk control panel services and scans your server for
security vulnerabilities.
Plesk modules marked with asterisk (*) require installing additional license keys (see page
24) for being used.
When you install Plesk on FreeBSD systems, all modules are installed by default. During
installation of Plesk on RPM/Deb package-based systems you are prompted to choose the
modules you would like to install.
Page 99

Configuring and Maintaining Your Server 99
Installing Modules
You can install a module to the Plesk server in two ways: from the control panel
(recommended), and from the command line.
To install modules from the control panel:
1 Login as administrator to the control panel.
2 Select the Modules shortcut in the navigation pane
3 Click Manage Modules.
4 Click Add new module.
5 Select a module package file, and click OK.
To install modules from the command line:
1 Login as root to the server, where Plesk is installed.
2 Run the command
/plesk_installation_directory/admin/bin/modulemng --
install --file=<module_filename>, where
'plesk_installation_directory' is the directory you installed Plesk to.
Example:
/usr/local/psa/admin/bin/modulemng --install --file=cs-gs-1.0.0rh9.build72041021.16.i586.rpm
Note: All modules that come with Plesk are located in the directory /opt/modules in Plesk
distribution.
Configuring and Managing Modules
Before you begin to use the module, you should configure it. Configuration steps vary
depending on each module. Once you install a module on the server using the control panel,
you are taken to the module‘s configuration screen. If you installed the module from the
command line, you need to configure it via Plesk.
To access the module configuration screen:
Select the Modules shortcut in the navigation pane, and then click the button labeled with
module‘s name.
Or
Select the Modules shortcut in the navigation pane, and then click Manage Modules. In the
list of modules, click the module‘s name presented as link.
Page 100

100 Configuring and Maintaining Your Server
Some modules might require you to install a license key in order to be able to use them. You
can check out the terms of usage on the module manufacturer‘s web site, or look them up in
the control panel‘s Modules management screen: for each module installed there is a
corresponding list entry accompanied by an icon, which shows whether license key is
required. There are three types of icon that indicate the following:
- the module does not require a license key
- the module requires a license key, and the key is installed
- the module requires a license key, but the key is not installed.
If a module is provided by Parallels and requires a license key, you can obtain it from
Parallels using the License Manager function. In other cases, you should obtain the
information on installation of license keys for modules from the module manufacturer.
Removing Modules
You can remove modules from Plesk in two ways: from the control panel (recommended),
and from the command line.
To remove a module using a control panel:
1 Login as admin to the control panel.
2 Select the Modules shortcut in the navigation pane.
3 Click Manage Modules.
4 Select a checkbox corresponding to the module you wish to remove, and
click Remove Selected.
To remove a module from the command line:
1 Login as root to the server, where Plesk is installed.
2 Run the command
/plesk_installation_directory/admin/bin/modulemng --
remove --module=<module_codename>.
Example:
/usr/local/psa/admin/bin/modulemng --remove --module=cs-gs
You can look up a module‘s codename by running the following command:
# echo "SELECT name, display_name FROM psa.Modules;" | mysql -u admin –
p<admin_password> psa
 Loading...