

Page 1

Parallels Virtuozzo
Containers 4.7 for Linux
User's Guide
Copyright © 1999-2012 Parallels IP Holdings GmbH and its affiliates. All rights reserved.
Page 2

Parallels IP Holdings GmbH.
c/o Parallels International GmbH.
Parallels International GmbH
Vordergasse 49
CH8200 Schaffhausen
Switzerland
Tel: + 41 526320 411
Fax: + 41 52672 2010
www.parallels.com
Copyright © 1999-2012 Parallels IP Holdings GmbH and its affiliates. All rights reserved.
This product is protected by United States and international copyright laws. The product’s underlying technology,
patents, and trademarks are listed at http://www.parallels.com/trademarks.
Microsoft, Windows, Windows Server, Windows NT, Windows Vista, and MS-DOS are registered trademarks of Microsoft
Corporation.
Apple, Mac, the Mac logo, Mac OS, iPad, iPhone, iPod touch, FaceTime HD camera and iSight are trademarks of Apple
Inc., registered in the US and other countries.
Linux is a registered trademark of Linus Torvalds.
All other marks and names mentioned herein may be trademarks of their respective owners.
Page 3

Contents
Introduction ............................................................................................................. 11
About This Guide .......................................................................................................... 11
Organization of This Guide .................................................................................................... 12
Documentation Conventions ................................................................................................. 13
Getting Help .................................................................................................................. 14
Feedback ...................................................................................................................... 14
Parallels Virtuozzo Containers Philosophy ............................................................. 15
About Parallels Virtuozzo Containers Software ............................................................... 15
What is Parallels Virtuozzo Containers ................................................................................... 16
What is Container .................................................................................................................. 17
Parallels Virtuozzo Containers Applications ............................................................................ 18
Distinctive Features of Parallels Virtuozzo Containers ...................................................... 19
OS Virtualization .................................................................................................................... 19
Using Virtuozzo File System ................................................................................................... 20
Templates ............................................................................................................................. 20
Resource Management ......................................................................................................... 21
Main Principles of Parallels Virtuozzo Containers Operation ............................................ 21
Basics of Parallels Virtuozzo Containers Technology ............................................................. 22
Parallels Virtuozzo Containers Configuration .......................................................................... 24
Parallels Virtual Automation Overview .................................................................................... 25
Parallels Power Panel Overview ............................................................................................. 26
Parallels Management Console Overview .............................................................................. 27
Hardware Node Availability Considerations .................................................................... 28
Operations on Containers ....................................................................................... 29
Creating Containers ...................................................................................................... 29
Before You Begin .................................................................................................................. 30
Choosing a Container ID ....................................................................................................... 31
Choosing an OS EZ Template ............................................................................................... 32
List of Supported Linux Distributions for Containers .............................................................. 33
Creating a Container ............................................................................................................. 34
Page 4

Contents
Configuring Containers .................................................................................................. 35
Setting Startup Parameters ................................................................................................... 35
Setting Network Parameters .................................................................................................. 36
Setting the root Password for Containers .............................................................................. 37
Starting, Stopping, Restarting, and Querying the Status of Containers ............................ 38
Listing Containers ......................................................................................................... 40
Setting Names for Containers ........................................................................................ 43
Storing Extended Information on Containers .................................................................. 45
Migrating Containers ..................................................................................................... 46
Standard Migration ................................................................................................................ 47
Zero-Downtime Migration ...................................................................................................... 50
Migrating Containers Based on Standard Templates ............................................................. 53
Configuring Non-Root Access for Migrating Containers ......................................................... 54
Moving Containers Within the Hardware Node ............................................................... 55
Copying Containers Within the Hardware Node.............................................................. 58
Backing Up and Restoring Containers ........................................................................... 61
Using vzabackup/vzarestore Utilities ...................................................................................... 62
Restoring Containers Based on Standard Templates ............................................................ 64
Managing Backups in Parallels Management Console ........................................................... 65
Reinstalling Containers ................................................................................................ 104
Customizing Container Reinstallation ................................................................................... 106
Deleting Containers ..................................................................................................... 108
Disabling Containers ................................................................................................... 110
Suspending Containers ............................................................................................... 112
Running Commands in Containers .............................................................................. 114
Updating Containers ................................................................................................... 115
Updating EZ Template Packages In Containers ................................................................... 116
Updating OS EZ Template Caches ...................................................................................... 118
Managing Resources ............................................................................................ 120
What are Resource Control Parameters? ..................................................................... 121
Managing Container CPU Resources ........................................................................... 122
Configuring CPU Units ......................................................................................................... 122
Configuring Number of CPUs .............................................................................................. 123
Configuring CPU Limits ....................................................................................................... 125
Page 5

Contents
Controlling Container CPU Usage With VZASysD Plug-in .................................................... 128
Configuring Containers to Run on Specific CPUs ................................................................ 130
Managing Network Accounting and Bandwidth ............................................................ 131
Network Traffic Parameters ................................................................................................. 132
Configuring Network Classes .............................................................................................. 133
Viewing Network Traffic Statistics ........................................................................................ 135
Turning On and Off Network Bandwidth Management ........................................................ 136
Configuring Network Bandwidth Management for Containers ............................................. 139
Managing Memory Parameters for Containers.............................................................. 141
Configuring Main VSwap Parameters .................................................................................. 142
Configuring the Memory Allocation Limit .............................................................................. 143
Tuning VSwap ..................................................................................................................... 144
Configuring Legacy Containers ............................................................................................ 145
Managing Disk Quotas ................................................................................................ 146
What are Disk Quotas? ........................................................................................................ 146
Disk Quota Parameters ....................................................................................................... 147
Turning On and Off Per-Container Disk Quotas ................................................................... 148
Setting Up Per-Container Disk Quota Parameters ............................................................... 152
Turning On and Off Second-Level Quotas for Containers .................................................... 154
Setting Up Second-Level Disk Quota Parameters ............................................................... 156
Checking Quota Status ....................................................................................................... 158
Cleaning Up Containers ....................................................................................................... 160
Managing Disk I/O Parameters .................................................................................... 162
Configuring Container Disk I/O Priority Levels ...................................................................... 163
Configuring the Disk I/O Bandwidth for Containers .............................................................. 165
Configuring the Number of I/O Operations Per Second ....................................................... 166
Viewing Disk I/O Statistics for Containers ............................................................................ 167
Detecting Disk I/O Bottlenecks ............................................................................................ 168
Setting Disk I/O Limits for Backups and Migrations ............................................................. 170
Managing Container Resources Configurations ............................................................ 171
Splitting the Hardware Node Into Equal Pieces .................................................................... 172
Scaling Container Configuration .......................................................................................... 174
Validating Container Configuration ....................................................................................... 176
Applying New Configuration Samples to Containers ............................................................ 178
Page 6

Contents
Real-Time Monitoring in Parallels Virtuozzo Containers ...................................... 180
Monitoring Resources with Console ............................................................................. 181
Monitoring Resources with Parallels Management Console .......................................... 183
Using Charts Representation ............................................................................................... 184
Using Table Representation ................................................................................................. 191
Subscribing to Parallels Management Console Alerts ................................................... 192
Managing Services and Processes ...................................................................... 196
What Are Services and Processes ............................................................................... 197
Main Operations on Services and Processes................................................................ 198
Managing Processes and Services .............................................................................. 199
Viewing Active Processes and Services ............................................................................... 200
Monitoring Processes in Real Time ...................................................................................... 203
Changing Services Mode..................................................................................................... 206
Determining Container Identifiers by Process IDs ................................................................ 207
Starting, Stopping, and Restarting Services ........................................................................ 208
Managing Parallels Virtuozzo Containers Network .............................................. 210
Managing Network Adapters on the Hardware Node ................................................... 211
Listing Adapters .................................................................................................................. 212
Creating a VLAN Adapter .................................................................................................... 214
Connecting Adapters to Virtual Networks ............................................................................ 216
Managing Virtual Networks .......................................................................................... 217
Creating a Virtual Network ................................................................................................... 218
Listing Virtual Networks ....................................................................................................... 220
Deleting a Virtual Network ................................................................................................... 221
Managing Virtual Network Adapters ............................................................................. 222
Container Networking Modes .............................................................................................. 222
Creating and Deleting veth Network Adapters ..................................................................... 226
Configuring veth Adapter Parameters .................................................................................. 228
Connecting Containers to Virtual Networks ......................................................................... 231
Managing Private Networks and Subnetworks ............................................................. 233
Learning Private Networks ................................................................................................... 234
Setting Up Private Networks ................................................................................................ 238
Page 7

Contents
Managing Hardware Nodes .................................................................................. 240
Managing Parallels Virtuozzo Containers Licenses ........................................................ 240
Understanding Licenses ...................................................................................................... 241
Installing Licenses................................................................................................................ 242
Updating Licenses ............................................................................................................... 245
Transferring Licenses to Another Node ................................................................................ 246
Viewing the Current License ................................................................................................ 247
Managing Files ............................................................................................................ 250
Uploading Files to the Hardware Node ................................................................................ 252
Downloading Files to the Local Computer ........................................................................... 255
Setting Permissions for Files on the Node ........................................................................... 256
Updating the Parallels Virtuozzo Containers Software ................................................... 257
Updating Parallels Virtuozzo Containers With vzup2date ..................................................... 258
Updating in Graphical Mode ................................................................................................ 259
Updating in Command-Line Mode ...................................................................................... 266
Using Parallels Management Console to Update Parallels Virtuozzo Containers Software ... 266
Advanced Tasks .................................................................................................... 273
Configuring Capabilities ............................................................................................... 273
Creating VZFS Symlinks Inside a Container ......................................................................... 274
Available Capabilities for Containers .................................................................................... 275
Migrating a Physical Server to a Container ................................................................... 277
Migration Overview .............................................................................................................. 278
Migration Steps ................................................................................................................... 279
Migration Requirements....................................................................................................... 281
Migration Restrictions .......................................................................................................... 282
Migrating in Command Line ................................................................................................. 283
Creating Customized Containers ................................................................................. 290
Using Customized OS EZ Templates ................................................................................... 291
Using EZ OS Template Sets ................................................................................................ 293
Using Customized Application Templates ............................................................................ 295
Page 8

Contents
Changing System Time From Containers ..................................................................... 297
Setting Up an iSCSI Environment in Parallels Virtuozzo Containers Systems ................. 298
Obtaining the Hardware Node ID From Containers ....................................................... 299
Mounting the /vz Partition via the Parallels Virtuozzo Containers Script ......................... 300
Managing Mount Points In Containers ......................................................................... 301
Preserving Application Data During Container Reinstallation ......................................... 303
Accessing Devices From Inside Containers .................................................................. 305
Moving Network Adapters to Containers ...................................................................... 307
Enabling VPN for Containers........................................................................................ 308
Managing Hardware Node Resources Parameters ....................................................... 309
Setting Immutable and Append Flags for Container Files and Directories ...................... 310
Creating Local Repository Mirrors for vzup2date .......................................................... 310
Parallels Virtuozzo Containers Repository Structure............................................................. 311
Creating a Local Mirror ........................................................................................................ 313
Choosing Updates for Downloading .................................................................................... 316
Managing iptables Modules ......................................................................................... 317
Loading iptables Modules to the Hardware Node ................................................................ 318
Sharing a File System Among Containers ..................................................................... 319
Creating Configuration Files for New Linux Distributions ............................................... 321
Rebooting Containers .................................................................................................. 322
Managing Graphical Applications In Containers ............................................................ 322
Running Graphical Applications in X Windows ..................................................................... 323
Running Graphical Applications via VNC ............................................................................. 329
Page 9

Contents
Assigning External IP Addresses to Containers ............................................................ 331
Mastering Parallels Management Console ........................................................... 332
Configuring Offline Management Parameters ............................................................... 333
Viewing Summary Pages ............................................................................................. 336
Managing Users and Groups In Containers .................................................................. 337
Configuring Firewall ..................................................................................................... 339
Managing Mount Points............................................................................................... 341
Viewing System and Parallels Virtuozzo Containers Logs .............................................. 342
Managing Files In Containers ....................................................................................... 344
Searching for Containers ............................................................................................. 346
Managing Container Search Domains .......................................................................... 347
Troubleshooting .................................................................................................... 348
General Considerations ............................................................................................... 349
Kernel Troubleshooting ................................................................................................ 351
Using ALT+SYSRQ Keyboard Sequences ........................................................................... 351
Saving Kernel Faults (OOPS) ............................................................................................... 352
Finding a Kernel Function That Caused the D Process State ............................................... 353
Problems With Container Management ........................................................................ 353
Failure to Start a Container .................................................................................................. 354
Failure to Access a Container From Network ....................................................................... 355
Failure to Log In to a Container ............................................................................................ 355
Failure to Back Up a Container in Parallels Management Console ....................................... 356
Failure to Display the List of Container Backups .................................................................. 356
Miscellaneous Problems .............................................................................................. 357
Corrupted Pseudographics in Parallels Virtuozzo Containers Utilities ................................... 357
Timeout When Accessing Remote Hosts ............................................................................ 357
Failure to Start iptables Modules After Physical Server Migration ......................................... 358
Getting Technical Support ........................................................................................... 358
Getting Assistance With Parallels Virtuozzo Containers Installation ...................................... 359
Preparing and Sending Questions to Technical Support ...................................................... 360
Submitting a Problem Report to Technical Support ............................................................. 361
Establishing a Secure Channel to Parallels Support ............................................................. 364
Setting Up the Monitor Node ....................................................................................... 365
Configuring a Serial Console on the Monitor Node .............................................................. 366
Page 10

Contents
Setting Up netconsole ......................................................................................................... 370
Preparing the Monitor Node for Sending Alerts .................................................................... 376
Using vzstatrep to Monitor Hardware Nodes ....................................................................... 378
Glossary ................................................................................................................. 379
Index ...................................................................................................................... 382
Page 11

C HAPTER 1
Introduction
This chapter provides basic information about Parallels Virtuozzo Containers 4.7 and this guide.
In This Chapter
About This Guide ................................................................................................... 11
Getting Help ........................................................................................................... 14
Feedback ............................................................................................................... 14
About This Guide
This guide is meant to provide comprehensive information on Parallels Virtuozzo Containers 4.7—
high-end server virtualization software for Linux-based servers. The issues discussed in this guide
cover the necessary theoretical conceptions as well as practical aspects of working with Parallels
Virtuozzo Containers. The guide will teach you to create and administer Containers (sometimes also
called Virtual Environments, or VEs) on servers running the Parallels Virtuozzo Containers software
and to employ both graphical and command line interfaces for performing various tasks.
Note: The guide does not familiarize you with the process of installing, configuring, and deploying
Parallels Virtuozzo Containers systems. Detailed information on these operations is given in the Parallels
Virtuozzo Containers Installation Guide.
According to the task-oriented approach, most topics of this guide are devoted to a particular task
and the ways to perform it. However, Parallels Virtuozzo Containers is equipped with as many as
three different tools to perform administrative tasks:
• the command-line interface
• Parallels Management Console with the graphical user interface
• Parallels Virtual Automation with the web interface
The given guide describes the ways to administer Parallels Virtuozzo Containers and perform main
tasks on Hardware Nodes (servers running the Parallels Virtuozzo Containers software) and in the
Container context using Parallels Management Console and the command-line interface. As to
Parallels Virtual Automation, it is provided with a comprehensive online help system.
Besides, there is another tool for managing Containers—Parallels Power Panel. This web-based
tool is mainly regarded as a means for individual Container users to manage their personal
Containers and also has its own online help system.
Page 12

Introduction
Organization of This Guide
Chapter 2, Parallels Virtuozzo Containers Philosophy, is a must-read chapter that helps you
grasp the general principles of Parallels Virtuozzo Containers operation. It provides an outline of
Parallels Virtuozzo Containers architecture and main features, of the way Parallels Virtuozzo
Containers stores and uses configuration information, and of the Parallels Virtuozzo Containers
licensing policy.
Chapter 3, Operations on Containers, describes operations you can perform on Containers:
creating and deleting Containers, starting and stopping them, backing up and restoring Containers,
and so on. You will also learn how to migrate Containers from one Hardware Node to another.
Chapter 4, Managing Resources, focuses on configuring and monitoring the resource control
parameters for Containers. These parameters comprise disk quotas, network accounting and
shaping, CPU and system resources.
Chapter 5, Real-Time Monitoring in Parallels Virtuozzo Containers, explains the way to keep
track of the resources consumption by running Containers and the Hardware Node itself in real
time.
Chapter 6, Managing Services and Processes, describes the operations you can perform on
processes and services in Parallels Virtuozzo Containers by using both the command-line utilities
and Parallels Management Console graphical interface.
Chapter 7, Managing Parallels Virtuozzo Containers Network, familiarizes you with the Parallels
Virtuozzo Containers network structure, enumerates Parallels Virtuozzo Containers networking
components, and explains how to manage these components in Parallels Virtuozzo Containersbased systems.
Chapter 8, Managing Hardware Nodes, centers on all those operations you can perform on
Hardware Nodes.
Chapter 9, Advanced Tasks, enumerates those tasks that are intended for advanced system
administrators who would like to obtain deeper knowledge about Parallels Virtuozzo Containers
capabilities.
Chapter 10, Mastering Parallels Management Console, focuses on those tasks that are most
comfortably accomplished using not the command-line utilities, but Parallels Management Console
graphical interface.
Chapter 11, Troubleshooting, suggests ways to resolve common inconveniences should they
occur during your work with the Parallels Virtuozzo Containers software.
12
Page 13

Introduction
Preformatted
Saved parameters for Container
Monospace Bold
C:\vzlist -a
Documentation Conventions
Before you start using this guide, it is important to understand the documentation conventions used
in it.
The table below presents the existing formatting conventions.
Formatting convention Type of Information Example
Special Bold
Italics
Monospace
Key+Key Key combinations for which the
Items you must select, such as
menu options, command buttons,
or items in a list.
Titles of chapters, sections, and
subsections.
Used to emphasize the
importance of a point, to
introduce a term or to designate a
command-line placeholder, which
is to be replaced with a real name
or value.
The names of commands, files,
and directories.
On-screen computer output in
your command-line sessions;
source code in XML, C++, or
other programming languages.
What you type, as contrasted with
on-screen computer output.
user must press and hold down
one key and then press another.
Go to the Resources tab.
Read the Basic Administration chapter.
These are the so-called OS templates.
To remove a Container, type vzctl
delete ctid.
Use vzctl start to start a Container.
101
Ctrl+P, Alt+F4
Besides the formatting conventions, you should also know about the document organization
convention applied to Parallels documents: chapters in all guides are divided into sections, which,
in their turn, are subdivided into subsections. For example, About This Guide is a section, and
Documentation Conventions is a subsection.
13
Page 14

Introduction
Getting Help
In addition to this guide, there are a number of other resources shipped with Parallels Virtuozzo
Containers 4.7 that can help you use the product more effectively. These resources include:
• Getting Started With Parallels Virtuozzo Containers 4.7 for Linux. This guide provides basic
information on installing Parallels Virtuozzo Containers 4.7 on your server, creating new
Containers, and performing the main operations on them.
• Parallels Virtuozzo Containers 4.7 for Linux Installation Guide. This guide provides exhaustive
information on the process of installing, configuring, and deploying your Parallels Virtuozzo
Containers system. Unlike the Getting Started With Parallels Virtuozzo Containers 4.7 for Linux
guide, it contains a more detailed description of the operations needed to install and set
Parallels Virtuozzo Containers to work (e.g., planning the structure of your network and
performing the Parallels Virtuozzo Containers unattended installation). Besides, it does not
include the description of any Container-related operations.
• Parallels Virtuozzo Containers 4.7 for Linux Templates Management Guide. This guide is meant
to provide complete information on Parallels Virtuozzo Containers templates—an exclusive
Parallels technology allowing you to efficiently deploy standard Linux applications inside
Containers and to greatly save the server resources (physical memory, disk space, and so on).
• Parallels Virtuozzo Containers 4.7 for Linux Reference Guide. This guide is a complete reference
on all Parallels Virtuozzo Containers configuration files and command-line utilities.
• Parallels Management Console Help. This help system provides detailed information on
Parallels Management Console—a graphical user interface tool for managing Hardware Nodes
and Containers.
• Parallels Virtual Automation Online Help. This help system shows you how to work with Parallels
Virtual Automation—a tool providing you with the ability to manage Hardware Nodes and
Containers with the help of a standard Web browser on any platform.
• Parallels Power Panel Online Help. This help system deals with Parallels Power Panel—a means
for administering individual Containers through a common Web browser on any platform.
Feedback
If you spot a typo in this guide, or if you have an opinion about how to make this guide more
helpful, you can share your comments and suggestions with us by completing the Documentation
Feedback form on our website (http://www.parallels.com/en/support/usersdoc/).
14
Page 15

C HAPTER 2
Parallels Virtuozzo Containers Philosophy
This chapter describes the general principles of Parallels Virtuozzo Containers operation. It provides
an outline of the Parallels Virtuozzo Containers architecture and lets you understand the Parallels
Virtuozzo Containers licensing policy.
In This Chapter
About Parallels Virtuozzo Containers Software ........................................................ 15
Distinctive Features of Parallels Virtuozzo Containers ............................................... 19
Main Principles of Parallels Virtuozzo Containers Operation ..................................... 21
Hardware Node Availability Considerations.............................................................. 28
About Parallels Virtuozzo Containers Software
This section provides general information about the Parallels Virtuozzo Containers software and its
applications.
Page 16

Parallels Virtuozzo Containers Philosophy
What is Parallels Virtuozzo Containers
Parallels Virtuozzo Containers is a patented OS virtualization solution. It creates isolated partitions
or Containers on a single physical server and OS instance to utilize hardware, software, data center
and management effort with maximum efficiency. The basic Parallels Virtuozzo Containers
capabilities are:
• Intelligent Partitioning. Divide a server into as many as hundreds of Containers with full
server functionality.
• Complete Isolation. Containers are secure and have full functional, fault and performance
isolation.
• Dynamic Resource Allocation. CPU, memory, network, disk and I/O can be changed
without rebooting.
• Mass Management. Suite of tools and templates for automated, multi-Container and multiserver administration.
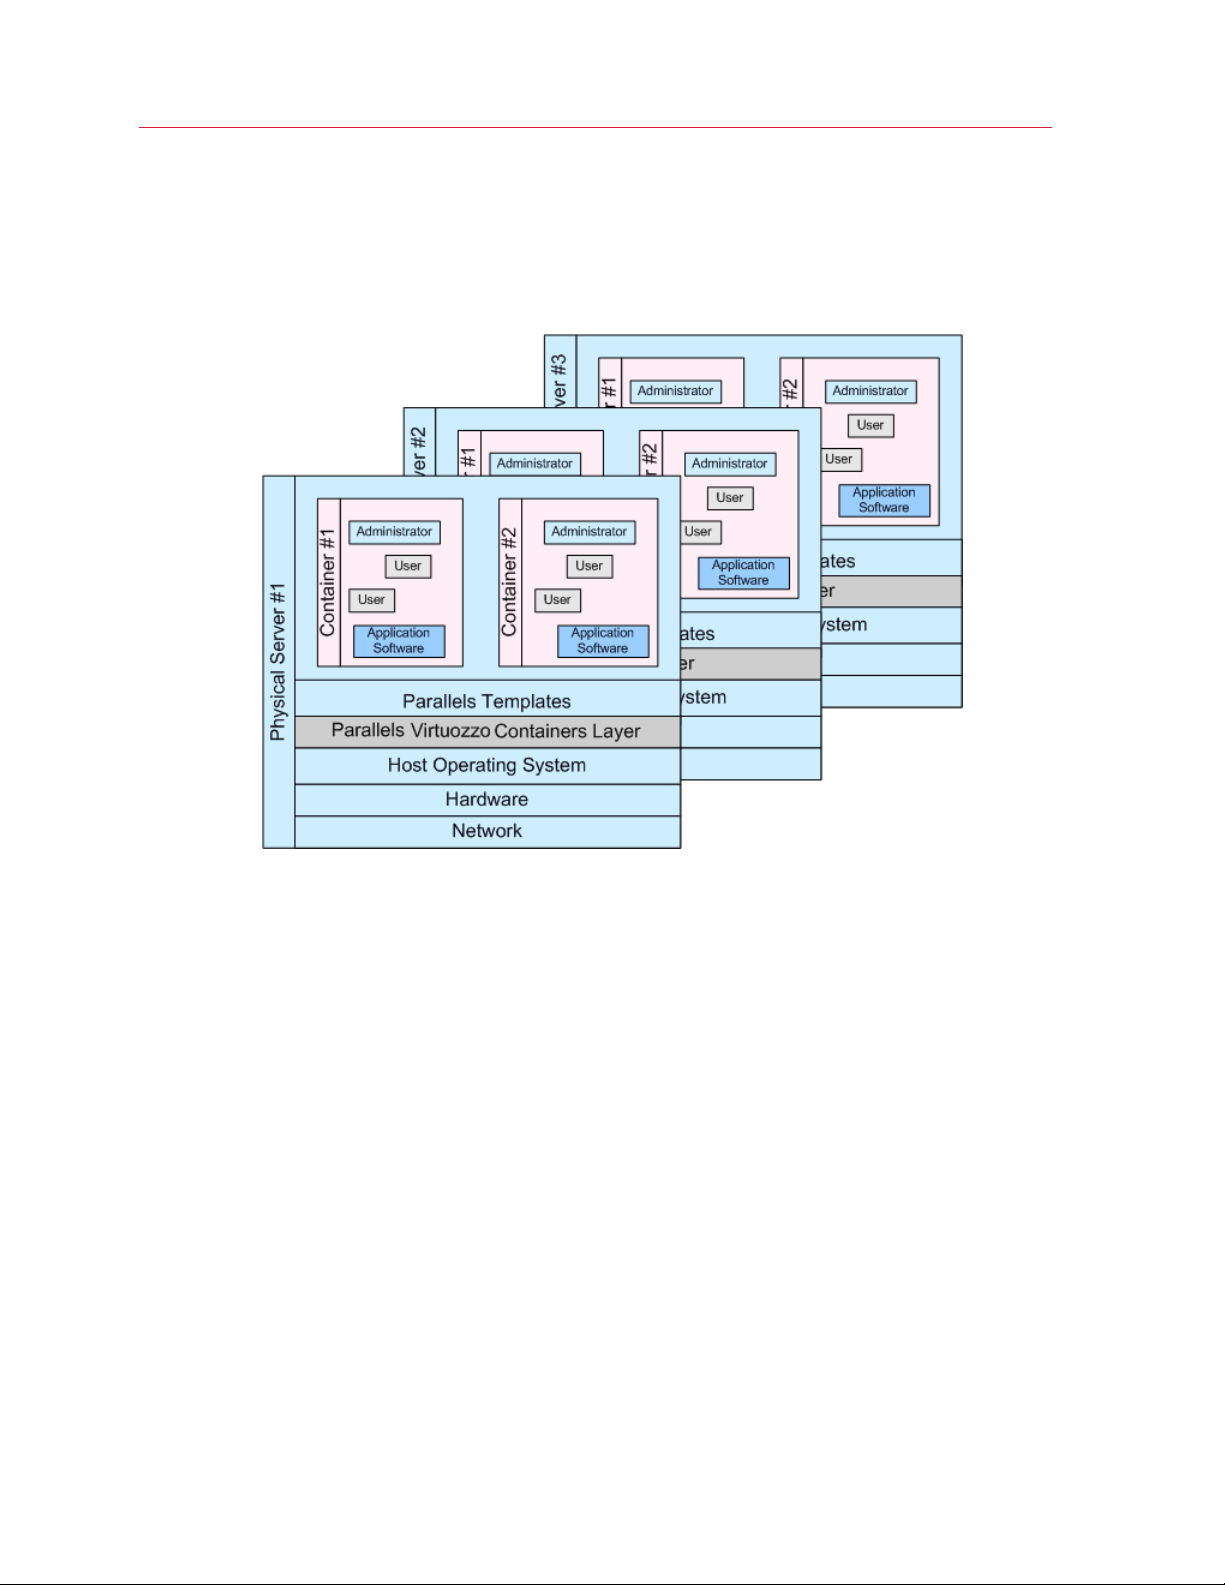
The diagram below represents a typical model of the Parallels Virtuozzo Containers-based system
structure:
16
Page 17

Parallels
Virtuozzo Containers Philosophy
The Parallels Virtuozzo Containers OS virtualization model is streamlined for the best performance,
management, and efficiency. At the base resides a standard Host operating system which can be
either Windows or Linux. Next is the virtualization layer with a proprietary file system and a kernel
service abstraction layer that ensure the isolation and security of resources between different
Containers. The virtualization layer makes each Container appear as a standalone server. Finally,
the Container itself houses the application or workload.
The Parallels Virtuozzo Containers OS virtualization solution has the highest efficiency and
manageability making it the best solution for organizations concerned with containing the IT
infrastructure and maximizing the resource utilization. The Parallels Virtuozzo Containers complete
set of management tools and unique architecture makes it the perfect solution for easily
maintaining, monitoring, and managing virtualized server resources for consolidation and business
continuity configurations.
What is Container
A Container is a virtual private server that is functionally identical to an isolated standalone server:
• Each Container has its own processes, users, files and provides full administrative access.
• Each Container has its own IP addresses, port numbers, filtering and routing rules.
• Each Container can have its own configuration for the system and application software, as well
as its own versions of system libraries. It is possible to install or customize software packages
inside a Container independently from other Containers or the host system. Multiple
distributions of a package can be run on one and the same server.
• Each Container has its own unique root user with full control over the given Container and full
access to other user accounts inside this Container.
17
Page 18

Parallels Virtuozzo Containers Philosophy
Parallels Virtuozzo Containers Applications
Parallels Virtuozzo Containers 4.7 can be efficiently applied in a wide range of areas: enterprise
server consolidation, web and applications hosting, software development and testing, user
training, and so on.
If you administer a number of Linux dedicated servers within an enterprise, you can benefit from the
Parallels Virtuozzo Containers solution in the following ways:
• Reduce the number of required physical servers and corresponding support by grouping a
multitude of your enterprise servers onto a single server without losing a bit of valuable
information and without compromising performance.
• Increase server utilization and maximize server potential.
• Provision servers in minutes by using the technology of Parallels Virtuozzo Containers
templates.
• Migrate Containers in the time of network data transfer, nearly eliminating the planned
downtime and enabling fast reaction to unplanned downtime situations.
• Monitor OS and application versions and update/upgrade the current software easily across all
of your physical servers running the Parallels Virtuozzo Containers software and their
Containers.
• Guarantee Quality-of-Service in accordance with a corporate service level agreement (SLA).
• Automate routine tasks such as upgrades and updates.
• Minimize software license and support requirements.
Due to its unique efficiency and completeness, Parallels Virtuozzo Containers has also a wide
variety of profitable uses for hosting service providers allowing them to:
• Provide complete self-administration panels (Parallels Power Panel) including system
backup/restore and monitoring tools.
• Have a multitude of customers with their individual full-featured Containers sharing a single
physical server.
• Transparently move customers and their environments between servers, without any manual
reconfiguration.
• Increase profitability through the better management and leverage of hardware and software
investments.
• Automate service provisioning by using the technology of Parallels Virtuozzo Containers
templates.
Besides, Parallels Virtuozzo Containers proves invaluable for IT educational institutions that can
now provide every student with a personal Linux server, which can be monitored and managed
remotely. Software development companies may use Containers for testing purposes and the like.
18
Page 19

Parallels
Virtuozzo Containers Philosophy
Distinctive Features of Parallels Virtuozzo Containers
The concept of Parallels Virtuozzo Containers is distinct from the concept of traditional virtual
machines in the respect that Containers always run the same OS kernel as the host system (that is,
Linux on Linux or Windows on Windows). This single-kernel implementation technology allows you
to run Containers with a near-zero overhead. Thus, Parallels Virtuozzo Containers offer an order of
magnitude higher efficiency and manageability than traditional virtualization technologies.
OS Virtualization
From the point of view of applications and Container users, each Container is an independent
system. This independence is provided by a virtualization layer in the kernel of the host OS. Note
that only a negligible part of the CPU resources is spent on virtualization (around 1-2%). The main
features of the virtualization layer implemented in Parallels Virtuozzo Containers are the following:
• Container looks like a normal Linux system. It has standard startup scripts, software from
vendors can run inside Container without Parallels Virtuozzo Containers-specific modifications
or adjustment.
• A user can change any configuration file and install additional software.
• Containers are fully isolated from each other (file system, processes, Inter Process
Communication (IPC), sysctl variables).
• Containers share dynamic libraries, which greatly saves memory.
• Processes belonging to a Container can be scheduled for execution on all available CPUs.
Consequently, Containers are not bound to only one CPU and can use all available CPU power.
19
Page 20

Parallels Virtuozzo Containers Philosophy
Using Virtuozzo File System
Virtuozzo File System (VZFS) is a legacy file system that allows sharing common files among
multiple Containers without sacrificing flexibility. Container users can modify, update, replace, and
delete shared files. When a user modifies a shared file, VZFS creates a private copy of that file
transparently for the user. Thus, modifications do not affect other users of the same file.
Although VZFS can help you save disk space and memory, it also has a number of limitations:
• You cannot store Containers using VZFS in Parallels Cloud Storage clusters.
• To migrate or restore a Container, you always need to have a corresponding OS template
installed on the destination server.
• VZFS-based Containers lack some functionality provided by Parallels Virtuozzo Containers 4.7
(like creating and managing snapshots).
Note: For more information on VZFS, see the documentation for Parallels Server Bare Metal 5.0.
Templates
A template (or a package set) in Parallels Virtuozzo Containers is a set of original application files
repackaged for mounting over Virtuozzo File System. Usually, it is just a set of RPM packages for
Red Hat like systems. Parallels Virtuozzo Containers provides tools for creating templates,
installing, upgrading, adding them to and removing them from a Container. Using templates lets
you:
• Share the RAM among similar applications running in different Containers to save hundreds of
megabytes of memory.
• Share the files comprising a template among different Containers to save gigabytes of disk
space.
• Deploy applications simultaneously in many Containers.
• Use different versions of an application in different Containers (for example, perform an upgrade
only in certain Containers).
There are two types of templates in Parallels Virtuozzo Containers 4.7. These are OS templates and
application templates. An OS template is an operating system and the standard set of applications
to be found right after the installation. Parallels Virtuozzo Containers uses OS templates to create
new Containers with a preinstalled operating system. An application template is a set of
repackaged software packages optionally accompanied with configuration scripts. Parallels
Virtuozzo Containers uses application templates to add extra software to an existing Container. For
example, you can create a Container on the basis of the CentOS 5 OS template and add the
MySQL application to it using the MySQL application template.
For detailed information on Parallels Virtuozzo Containers templates, see the Parallels Virtuozzo
Containers 4.7 Templates Management Guide.
20
Page 21

Parallels
Virtuozzo Containers Philosophy
Resource Management
Parallels Virtuozzo Containers resource management controls the amount of resources available to
Containers. The controlled resources include such parameters as CPU power, disk space, a set of
memory-related parameters. Resource management allows Parallels Virtuozzo Containers to:
• effectively share available Hardware Node resources among Containers
• guarantee Quality-of-Service in accordance with a service level agreement (SLA)
• provide performance and resource isolation and protect from denial-of-service attacks
• simultaneously assign and control resources for a number of Containers
• manage a multitude of Hardware Nodes in a unified way by means of Parallels Management
Console and Parallels Virtual Automation
• collect usage information for system health monitoring
Resource management is much more important for Parallels Virtuozzo Containers than for a
standalone server since server resource utilization in a Parallels Virtuozzo Containers-based system
is considerably higher than that in a typical system.
Main Principles of Parallels Virtuozzo Containers Operation
This section describes the basics of Parallels Virtuozzo Containers technology and discusses the
main tools for managing Parallels Virtuozzo Containers-based systems.
21
Page 22
Parallels Virtuozzo Containers Philosophy
Basics of Parallels Virtuozzo Containers Technology
In this section, we will try to let you form a more or less precise idea of the way the Parallels
Virtuozzo Containers software operates on your computer. Please see the figure below:
22
Page 23

Parallels
Virtuozzo Containers Philosophy
This figure presumes that you have a number of physical servers united into a network. In fact, you
may have only one dedicated server to effectively use the Parallels Virtuozzo Containers software
for the needs of your network. If you have more than one Parallels Virtuozzo Containers-based
physical server, each one of the servers will have a similar architecture. In Parallels Virtuozzo
Containers terminology, such servers are called Hardware Nodes (or just Nodes), because they
represent hardware units within a network.
Parallels Virtuozzo Containers 4.7 is installed on a Linux operating system configured in a certain
way. For example, such customized configuration should include the creation of a /vz partition,
which is the basic partition for hosting Containers and which must be way larger than the root
partition.
Note: For the full list of supported operating systems and detailed instructions on installing Linux (called
Host Operating System in the picture above) on physical servers, see the Parallels Virtuozzo Containers
4.7 Installation Guide.
Once Parallels Virtuozzo Containers is installed, you can run Parallels Virtuozzo Containers services
supporting virtualization on your server. This support is presented above as Parallels Virtuozzo
Containers Layer. The Parallels Virtuozzo Containers layer ensures that Containers, sharing the
same Hardware Node and the same OS kernel, are isolated from each other. A Container is a kind
of ‘sandbox’ for processes and users.
Before you are able to create a Container, you need to install the corresponding OS template in
Parallels Virtuozzo Containers 4.7. This is displayed as Parallels Templates in the scheme above.
Different Containers can be based on different OS templates and thus run different version of Linux
(for example, Ubuntu 10.4 or Fedora 13). Once you install at least one OS template, you can create
any number of Containers with the help of various Parallels management tools (the Parallels
Virtuozzo Containers command-line tools, Parallels Virtual Automation, or Parallels Management
Console), configure their network and/or other settings, and work with these Containers as with
fully functional LInux servers.
23
Page 24

Parallels Virtuozzo Containers Philosophy
Parallels Virtuozzo Containers Configuration
Parallels Virtuozzo Containers 4.7 allows you to flexibly configure various settings for your Parallels
Virtuozzo Containers system in general as well as for each and every Container. Among these
settings are disk and user quota, network parameters, default file locations and configuration
sample files, and others.
Parallels Virtuozzo Containers stores the configuration information in two types of files: the global
configuration file /etc/vz/vz.conf and Container configuration files
/etc/vz/conf/<CT_ID>.conf. The global configuration file defines global and default
parameters for Container operation, for example, logging settings, enabling and disabling disk
quota for Containers, the default configuration file and OS template on the basis of which a new
Container is created, and so on. On the other hand, a Container configuration file
(/etc/vz/conf/CT_ID) defines the parameters for a particular Container, such as disk quota
and allocated resources limits, IP address and host name, and so on. If a parameter is configured
in both the global configuration file and the Container configuration file, the Container configuration
file takes precedence. For the list of parameters that can be configured in the global and Container
configuration files, see the Parallels Virtuozzo Containers 4.7 Reference Guide.
The configuration files are read when the Parallels Virtuozzo Containers software and/or Containers
are started. However, Parallels Virtuozzo Containers standard utilities (for example, vzctl) allow
you to change many configuration settings “on-the-fly”, either without modifying the corresponding
configuration files or with their modification (if you want the changes to apply the next time the
Parallels Virtuozzo Containers software and/or Containers are started).
Some Parallels Virtuozzo Containers utilities have their own configuration files. For example,
vzbackup, which is responsible for backing up Container private areas and configuration files, has
its own global configuration file /etc/vzbackup.conf and can have a number of per-Node
configuration files located in the backup directory. This directory is defined in the backup global
configuration file. Both the global backup configuration file and per-Node ones are located on a
central Backup Node. There are a number of other specific configuration files. All of them are
described in detail in the Parallels Virtuozzo Containers 4.7 Reference Guide.
24
Page 25
Parallels
Virtuozzo Containers Philosophy
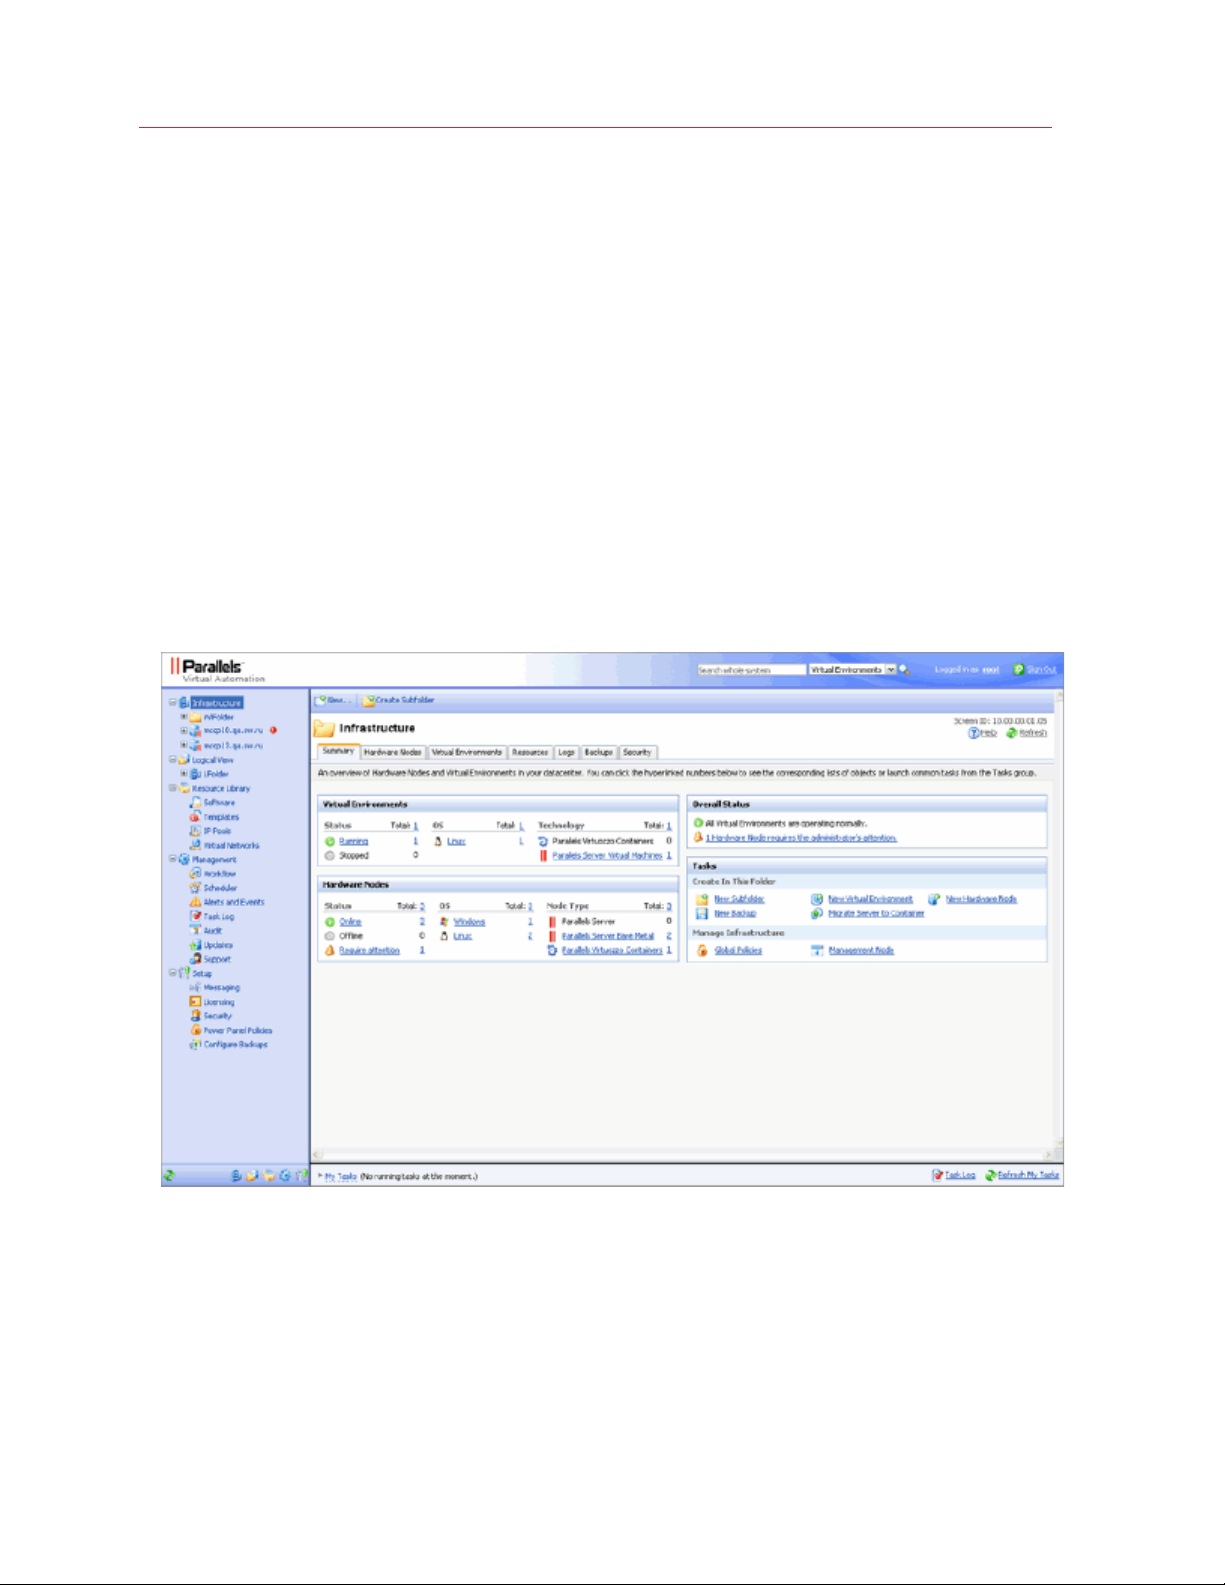
Parallels Virtual Automation Overview
Parallels Virtual Automation is designed for Hardware Node administrators and provides them with
the ability to manage multiple Hardware Nodes and all Containers residing on them with the help of
a standard web browser on any platform. The list of supported browsers is given below:
• Internet Explorer 6 and above
• Firefox 2.0 and above
• Safari 3.0 and above
Chances are that you will also be able to use other browsers, but Parallels Virtuozzo Containers has
not been extensively tested with them.
The Parallels Virtual Automation interface has been designed to let the Parallels Virtuozzo
Containers server administrator quickly perform all possible tasks through an intuitive navigation
system:
25
Page 26

Parallels Virtuozzo Containers Philosophy
The main components the Parallels Virtual Automation interface include:
• The left menu frame listing and allowing to access all your Hardware Nodes and Containers and
the main types of operations to be performed on them with the help of Parallels Virtual
Automation.
• The toolbar on top of the right frame allowing to perform on your Hardware Nodes and
Containers the actions most frequently called for in your routine management work and, when
necessary, a few more buttons allowing to perform additional actions on the objects listed in the
content part of the right frame (Container backups, packages updates, etc.).
• The content part on the right frame displaying the currently accessed Hardware Nodes or
Containers, the key information (their statuses, configuration, etc.) and links to advanced
actions.
Note: Detailed information on Parallels Virtual Automation is given in its comprehensive online help
system and the Parallels Virtual Automation Administrator's Guide.
Parallels Power Panel Overview
Wherever Parallels Virtuozzo Containers is applied, there are people who are supposed to be
administrators of particular Containers only, with no access rights to Hardware Nodes. Such people
can be subscribers to a hosting provider, university students, administrators of a particular server
within an enterprise, etc. Personal Containers can be managed with the help of Parallels Power
Panel. Power Panel is a means for administering personal Containers through a common browser:
Internet Explorer, Mozilla, and others. It allows Container administrators to do the following:
• Start, stop, or restart the Container.
• Back up and restore the Container.
• Change the Administrator password of the Container.
• Start, stop, or restart certain services inside the Container.
• View the processes currently running in the Container and send signals to them.
• View the current resources consumption and resources overusage alerts.
• Connect to the Container by means of RDP.
• View the system logs.
For more information on Parallels Power Panel, see its online help system.
Note: Apart from Parallels Power Panel, Container administrators are able to use the standard Windows
Remote Desktop Connection (RDP) or MS Terminal Service Client (MS TSC) to connect to their
Containers and work inside them.
26
Page 27
Parallels
Virtuozzo Containers Philosophy
Parallels Management Console Overview
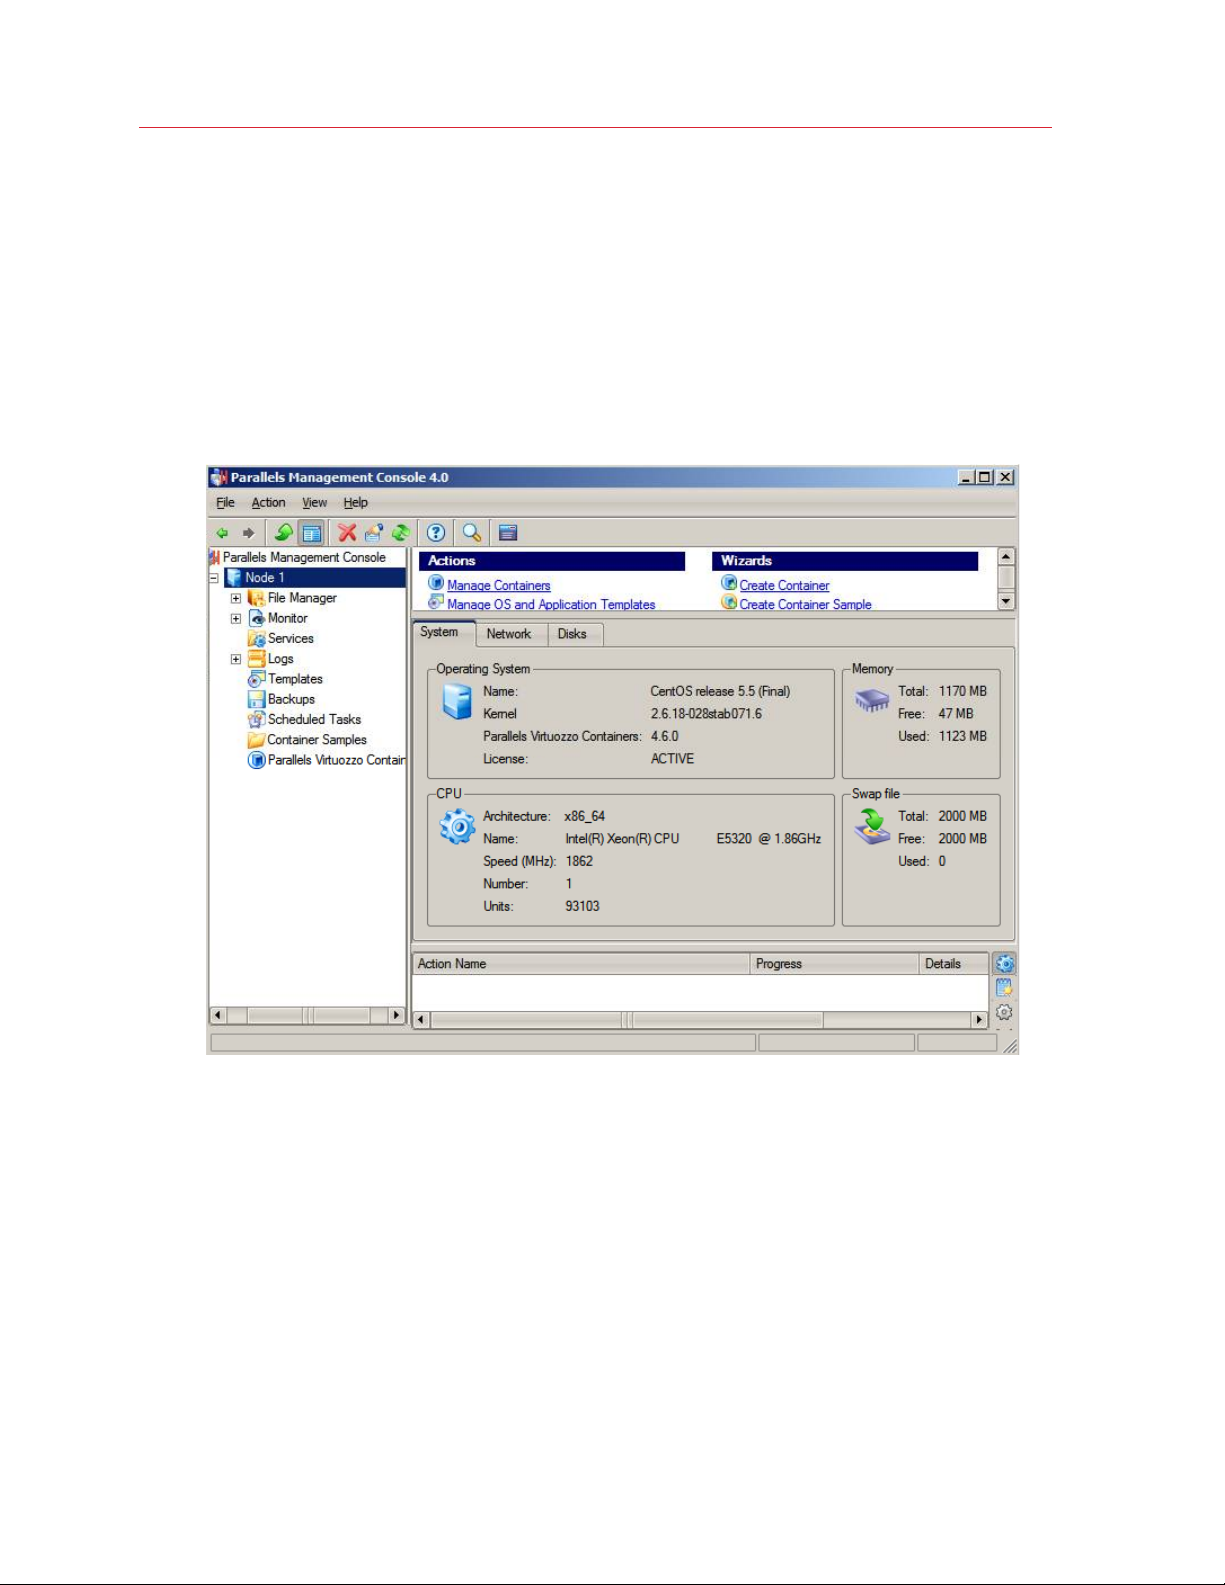
Parallels Management Console is a remote management tool for Parallels Virtuozzo Containers with
a graphical user interface. You can use to control Hardware Nodes, to manage Containers, and to
monitor the system. The main window of Management Console consists of two parts: the tree
pane on the left, and view pane on the right. There is a list of Hardware Nodes in the tree pane. The
Hardware Node subtree represents various aspects of its management, for example, Logs,
Services, and Templates. The content of the view pane depends on the selected item in the tree
pane.
27
Page 28

Parallels Virtuozzo Containers Philosophy
Below the view pane on the right, there is also a small Actions/Messages/Operations pane. You
can switch between the modes by clicking the corresponding buttons to the right of this pane. The
Actions pane displays the progress of Parallels Management Console actions. The Messages pane
displays the detailed diagnostics of various Management Console errors. The Operations pane
shows the result of various asynchronous tasks performed with Hardware Nodes and their
Containers.
Parallels Management Console uses a typical client/server architecture. The client Management
Console program runs on Microsoft Windows XP/2003/2008/2008 R2. The client application with
the graphical user interface connects to the Parallels Agent software, which is running on the
Hardware Node. Parallels Agent communicates with the client via the well-documented open
Parallels Agent XML API and controls the Hardware Node itself and its Containers.
The client can control multiple Hardware Nodes simultaneously by connecting to multiple Parallels
Agents. As the communications between the client and Parallels Agents are secure, the
Management Console workstation may be located virtually anywhere on the network.
More detailed information on installing Parallels Management Console is given in the Parallels
Virtuozzo Containers 4.7 Installation Guide.
Hardware Node Availability Considerations
Hardware Node availability is more critical than the availability of a typical server. Since it runs
multiple Containers providing a number of critical services, Hardware Node outage may be very
costly. Hardware Node outage can be as disastrous as the simultaneous outage of a number of
servers running critical services.
To increase the availability of your Hardware Node, we suggest you follow the recommendations
below:
• Use RAID storage for critical Container private areas. Do prefer hardware RAID, but software
mirroring RAID might suit too as a last resort.
• Do not run software on the Hardware Node itself. Create special Containers where you can
host necessary services such as BIND, FTPD, HTTPD, and so on. On the Hardware Node itself,
you need only the SSH daemon. Preferably, the Node should accept connections from a predefined set of IP addresses only.
• Do not create users on the Hardware Node itself. You can create as many users as you need in
Containers. Remember: compromising the Hardware Node means compromising all Containers
as well.
28
Page 29

C HAPTER 3
Operations on Containers
This chapter describes how to perform day-to-day operations on Containers.
Note: We assume that you have successfully installed, configured, and deployed your Parallels Virtuozzo
Containers system. If you have not, refer to the Parallels Virtuozzo Containers 4.7 Installation Guide.
In This Chapter
Creating Containers ................................................................................................ 29
Configuring Containers ........................................................................................... 35
Starting, Stopping, Restarting, and Querying the Status of Containers ..................... 38
Listing Containers ................................................................................................... 40
Setting Names for Containers ................................................................................. 43
Storing Extended Information on Containers ............................................................ 45
Migrating Containers ............................................................................................... 46
Moving Containers Within the Hardware Node ......................................................... 55
Copying Containers Within the Hardware Node ....................................................... 58
Backing Up and Restoring Containers ..................................................................... 61
Reinstalling Containers ............................................................................................ 104
Deleting Containers ................................................................................................. 108
Disabling Containers ............................................................................................... 110
Suspending Containers ........................................................................................... 112
Running Commands in Containers .......................................................................... 114
Updating Containers ............................................................................................... 115
Creating Containers
This section guides you through the process of creating a Container. We assume that you have
successfully installed Parallels Virtuozzo Containers and prepared at least one OS EZ template. If
you do not have any OS EZ templates prepared for creating Containers, see the Parallels Virtuozzo
Containers 4.7 Templates Management Guide first.
Page 30

Operations on Containers
Before You Begin
Before you start creating a Container, do the following:
• Check that the Hardware Node is visible on your network. You should be able to connect
to/from other hosts. Otherwise, Containers will not be accessible from other servers.
• Check that you have at least one IP address per Container and the addresses belong to the
same network as the Hardware Node or routing to the Containers has been set up via the
Hardware Node.
To create a new Container, you need to complete the following tasks:
1 Choose an ID for the Container.
2 Choose an OS template for the Container.
3 Create the Container.
30
Page 31

Operations on Containers
Choosing a Container ID
Every Container has a numeric ID, also known as Container ID, associated with it. The ID is a 32-bit
integer number beginning with zero and unique for a given Hardware Node. When choosing an ID
for a Container, follow the simple guidelines below:
• ID 0 is used for the Hardware Node itself. You cannot and should not try to create a Container
with ID 0.
• The Parallels Virtuozzo Containers software reserves the IDs ranging from 0 to 100. Do not
create Containers with IDs below 101.
The only strict requirement for a Container ID is to be unique for a particular Hardware Node.
However, if you are going to have several computers running Parallels Virtuozzo Containers 4.7, we
recommend assigning different Container ID ranges to them. For example, on Hardware Node 1
you create Containers within the range of IDs from 101 to 1000; on Hardware Node 2 you use the
range from 1001 to 2000, and so on. This approach makes it easier to remember on which
Hardware Node a Container has been created, and eliminates the possibility of Container ID
conflicts when a Container is migrated from one Hardware Node to another.
Another approach to assigning Container IDs is to follow some pattern of Container IP addresses.
Thus, for example, if you have a subnet with the 10.0.x.x address range, you may want to assign ID
17015 to the Container with IP address 10.0.17.15, ID 39108 to the Container with IP address
10.0.39.108, and so on. You can also think of your own patterns for assigning Container IDs
depending on the configuration of your network and your specific needs.
Before you decide on a new Container ID, you may want to make sure that no Container with this
ID has yet been created on the Node. The easiest way to check this is to run the following
command:
# vzlist -a 101
Container not found
This output shows that Container 101 does not exist on the Node; otherwise it would be present in
the list.
If you use Parallels Management Console, click on the name of your Hardware Node in the left
pane and then on the Parallels Virtuozzo Containers item. The Management Console right pane
will display the list of Containers existing on the Node.
WARNING! When deciding on a Container ID, do not use IDs that were once assigned to
Containers unless you are sure that no data belonging to the old Containers remains on the Node.
Otherwise, the administrator of the newly-created Container may get access to this data—that is,
to the backups of the old Container, its logs, statistics, and so on.
31
Page 32

Operations on Containers
Choosing an OS EZ Template
Before starting to create a Container, you need to choose the OS EZ template to base the
Container on. You can have several OS EZ templates installed on the Node and prepared for the
Container creation. Use the vzpkg list command to see all available OS templates:
# vzpkg list -O
centos-5-x86_64 2011-04-21 23:59:44
fedora-core-13-x86_64 2011-04-11 12:45:52
The -O option passed to the vzpkg list command allows you to list only OS EZ templates
installed on the Node. As you can see, two OS templates—centos-5-x86_64 and fedora-
core-13-x86_64—are currently available on the server. The time displayed beyond OS EZ
templates indicates when these templates were cached.
You can also use the --with-summary option to display brief information on the installed OS EZ
templates:
# vzpkg list -O --with-summary
centos-5-x86_64 :CentOS 5 (for AMD64/Intel EM64T) EZ OS template
fedora-core-13-x86 :Fedora 13 (for AMD64/Intel EM64T) EZ OS template
For more information on the vzpkg list command, see the Parallels Virtuozzo Containers 4.7
Reference Guide.
In Parallels Management Console, you can click the Templates item under the corresponding
Hardware Node name and then the OS Templates tab to see the list of the installed OS templates.
32
Page 33

Operations on Containers
List of Supported Linux Distributions for Containers
The current version of Parallels Virtuozzo Containers allows you to create Containers running the
following Linux distributions:
• Red Hat Enterprise Linux 5.6 and 6.x
• CentOS 5.6 and 6.x
• Debian 5.0 and 6.0
• Fedora 14
• OpenSUSE 11 with Service Packs 4
• SUSE Linux Enterprise Server 10 and 11
• Ubuntu 10.04, 10.10, and 11.04
33
Page 34

Operations on Containers
Creating a Container
Once you choose the Container ID and OS EZ template, you can create the Container private area
using the vzctl create command. A private area is the directory containing the VZFS symlinks,
copy-on-write area, and private files of the given Container. The private area is mounted to the
/vz/root/CT_ID directory on the Hardware Node and provides Container users with a complete
Linux file system tree.
The vzctl create command requires only the Container ID and the name of the OS template as
arguments. However, to avoid setting all the Container resource control parameters after creating
the private area, you can specify a sample configuration to be used for the new Container. All
sample configuration files are stored in the /etc/vz/conf directory and have names with the
following mask: ve-<configname>.conf-sample. The most commonly used sample is the
ve-basic.conf-sample file. this sample file has resource control parameters suitable for most
Containers.
Thus, for example, you can create a new Container by executing the following command:
# vzctl create 101 --ostemplate redhat-el5-x86 -–config basic
Creating Container private area (redhat-el5-x86)
Container is mounted
Postcreate action done
Container is unmounted
Container private area was created
Delete port redirection
Adding port redirection to Container(1): 4643 8443
This command creates a Container with ID 101, bases it on the redhat-el5-x86 OS EZ
template, and takes all necessary configuration parameters from the ve-basic.conf-sample
sample configuration file.
If you specify neither an OS template nor a sample configuration, vzctl will try to take the
corresponding values from the global configuration file (/etc/vz/vz.conf). So you can set the
default values in this file using your favorite text file editor and do without specifying these
parameters each time you create a new Container, for example:
DEF_OSTEMPLATE=".redhat-el5-x86"
CONFIGFILE="basic"
Now you can create a Container with ID 101 with the following command:
# vzctl create 101
Creating Container private area (redhat-el5-x86)
Container is mounted
Postcreate action done
Container is unmounted
Container private area was created
Delete port redirection
Adding port redirection to Container(1): 4643 8443
In principle, now you are ready to start your newly created Container. However, typically you need
to set its network IP address, hostname, DNS server address and root password before starting
the Container for the first time.
34
Page 35

Operations on Containers
Configuring Containers
As a rule, the process of configuring a Container includes the following tasks:
• setting Container startup parameters
• setting Container network parameters
• setting Container user passwords
• configuring Quality of Service (Service Level) parameters
For all these tasks, the vzctl set command is used. Using this command for setting Container
startup parameters, network parameters, and user passwords is explained later in this subsection.
Service Level Management configuration topics are discussed in the Managing Resources
chapter (p. 120).
Setting Startup Parameters
You can use the vzctl set command to set the onboot startup parameter for a Container.
Setting this parameter to yes makes the Container automatically boot at the Hardware Node
startup. For example, to enable Container 101 to automatically start when you boot the Hardware
Node, you can execute the following command:
# vzctl set 101 --onboot yes --save
Saved parameters for Container 101
The onboot parameter will have effect on the next Hardware Node startup.
35
Page 36

Operations on Containers
Setting Network Parameters
To make a Container accessible from the network, you need assign a valid IP address and
hostname to it and configure a DNS server the Container will use. You may also wish to start the
SSH daemon inside the Container. The session below illustrates setting all these network
parameters for Container 101:
# vzctl set 101 --hostname server101.parallels.com --save
Hostname for Container set: server101.parallels.com
Saved parameters for Container 101
# vzctl set 101 --ipadd 10.0.186.1/24 --save
Adding IP addresses to the pool: 10.0.186.1
Saved parameters for Container 101
# vzctl set 101 --ipadd fe80::20c:29ff:fe01:fb08 --save
Adding IP addresses to the pool: fe80::20c:29ff:fe01:fb08
Saved parameters for Container 101
# vzctl set 101 --nameserver 192.168.1.165 --save
File resolv.conf was modified
Saved parameters for Container 101
These commands will configure Container 101 as follows:
• Set IPv4 address 10.0.186.1 with subnet mask 255.255.255.0 and IPv6 address
fe80::20c:29ff:fe01:fb08.
Note: You can assign network masks to Containers operating in the venet0 networking mode only if
the USE_VENET_MASK parameter in the Parallels Virtuozzo Containers configuration file is set to yes.
• Set the hostname server101.parallels.com.
• Set the DNS server address to 192.168.1.165.
The –-save flag saves all the parameters to the Container configuration file. You can execute the
above commands when the Container is running. In this case, if you do not want the applied values
to persist, you can omit the –-save option and the applied values will be valid only until the
Container shutdown.
To check whether SSH is running inside the Container, you can use the vzctl exec command.
This command allows you to execute any commands in the Container context. In Red Hat-based
distributions, sshd is dependent on xinetd, so your session may look like the following:
# vzctl start 101
[This command starts Container 101, if it is not started yet]
# vzctl exec 101 service xinetd status
xinetd is stopped
# vzctl exec 101 service xinetd start
Starting xinetd: [ OK ]
# vzctl exec 101 service xinetd status
xinetd is started
The above example assumes that Container 101 is created on the CentOS OS template. For other
OS templates, consult their documentation.
For more information on running commands inside a Container from the Hardware Node, see the
Running Commands in Containers subsection (p. 114).
36
Page 37

Operations on Containers
Setting the root Password for Containers
Setting the root user password is necessary for connecting to a Container via SSH or Parallels
Power Panel. By default, the root account is locked in a newly created Container, and you cannot
log in to it. To unlock the root account, you can run the following commands on the Hardware
Node:
# vzctl start 101
[This command starts Container 101, if it is not started yet]
# vzctl set 101 --userpasswd root:test
In this example, we set the root password for Container 101 to test. Now you can log in to the
Container via SSH as root and administer it in the same way you would administer a standalone
Linux server: install additional software, add users, set up services, and so on. The password will
be set inside the Container in the /etc/shadow file in an encrypted form and will not be stored in
the Container configuration file. Therefore, if you forget the password, you have to reset it. Note
that --userpasswd does not requires the --save switch; the password is anyway persistently
set for the Container.
While you can create users and set passwords for them using the vzctl exec or vzctl set
commands, it is suggested that you delegate user management to Container administrators
advising them of the Container root account password.
37
Page 38

Operations on Containers
Starting, Stopping, Restarting, and Querying the Status of Containers
A Container can be started up and shut down like an ordinary server. For example, to start
Container 101, you can use the following command:
# vzctl start 101
Starting Container ...
Container is mounted
Adding port redirection to Container(1): 4643 8443
Adding IP address(es): 10.0.186.101
Hostname for Container 101 set: test.parallels.com
Container start in progress...
To check the status of a Container, use the vzctl status command:
# vzctl status 101
VEID 101 exist mounted running
The output displays the following information:
• Whether the Container private area exists.
• Whether this private area is mounted.
• Whether the Container is running.
In our case, vzctl reports that Container 101 exists, its private area is mounted, and the
Container is running. Alternatively, you can make use of the vzlist utility:
# vzlist 101
CTID NPROC STATUS IP_ADDR HOSTNAME
101 20 running 10.0.186.101 test.parallels.com
The following command is used to stop a Container:
# vzctl stop 101
Stopping Container ...
Container was stopped
Container is unmounted
vzctl has a two-minute timeout for the Container shutdown scripts to be executed. If the
Container is not stopped in two minutes, the system forcibly kills all the processes in the Container.
The Container will be stopped in any case, even if it is seriously damaged. To avoid waiting for two
minutes if you know that the Container is corrupt, you can use the --fast switch:
# vzctl stop 101 --fast
Stopping Container ...
Container was stopped
Container is unmounted
Make sure that you do not use the --fast switch with healthy Containers, as the forcible killing of
Container processes may be potentially dangerous.
To restart a Container, you can use the vzctl restart command:
38
Page 39

Operations on Containers
# vzctl restart 101
Stopping Container ...
Container was stopped
Container is unmounted
Starting Container ...
Container is mounted
Adding IP address(es): 10.0.186.101
Container start in progress...
Note: You can also use Container names to start, stop, and restart Containers. For detailed information
on Container names, see the Setting Names for Containers section (p. 43).
39
Page 40

Operations on Containers
Listing Containers
Sometimes, you may want to get an overview of the Containers existing on the Hardware Node
and to get additional information about them: their IP addresses, hostnames, current resource
consumption, and so on. In the most general case, you can get the list of all Containers by running
the following command:
# vzlist -a
CTID NPROC STATUS IP_ADDR HOSTNAME
1 135 running 10.101.60.79 localhost
101 8 running 10.101.66.1 ct101.parallels.com
102 7 running 10.101.66.159 ct102.parallels.com
103 - stopped 10.101.66.103 ct103.parallels.com
The -a switch tells the vzlist utility to output both running and stopped Containers. By default,
only running Containers are shown. The default columns inform you of the Container IDs, the
number of running processes inside Containers, their status, IP addresses, and hostnames. You
can customize this output as desired by using vzlist command line switches. For example:
# vzlist -o veid,diskinodes.s -s diskinodes.s
CTID DQINODES.S
1 400000
101 200000
102 200000
This shows only running Containers with the information about their IDs and soft limit on disk
inodes, with the list sorted by this soft limit. The full list of the vzlist command-line switches and
output and sorting options is given in the Parallels Virtuozzo Containers 4.7 Reference Guide.
In Parallels Management Console, you can display the list of all Containers by clicking the Parallels
Virtuozzo Containers item.
40
Page 41
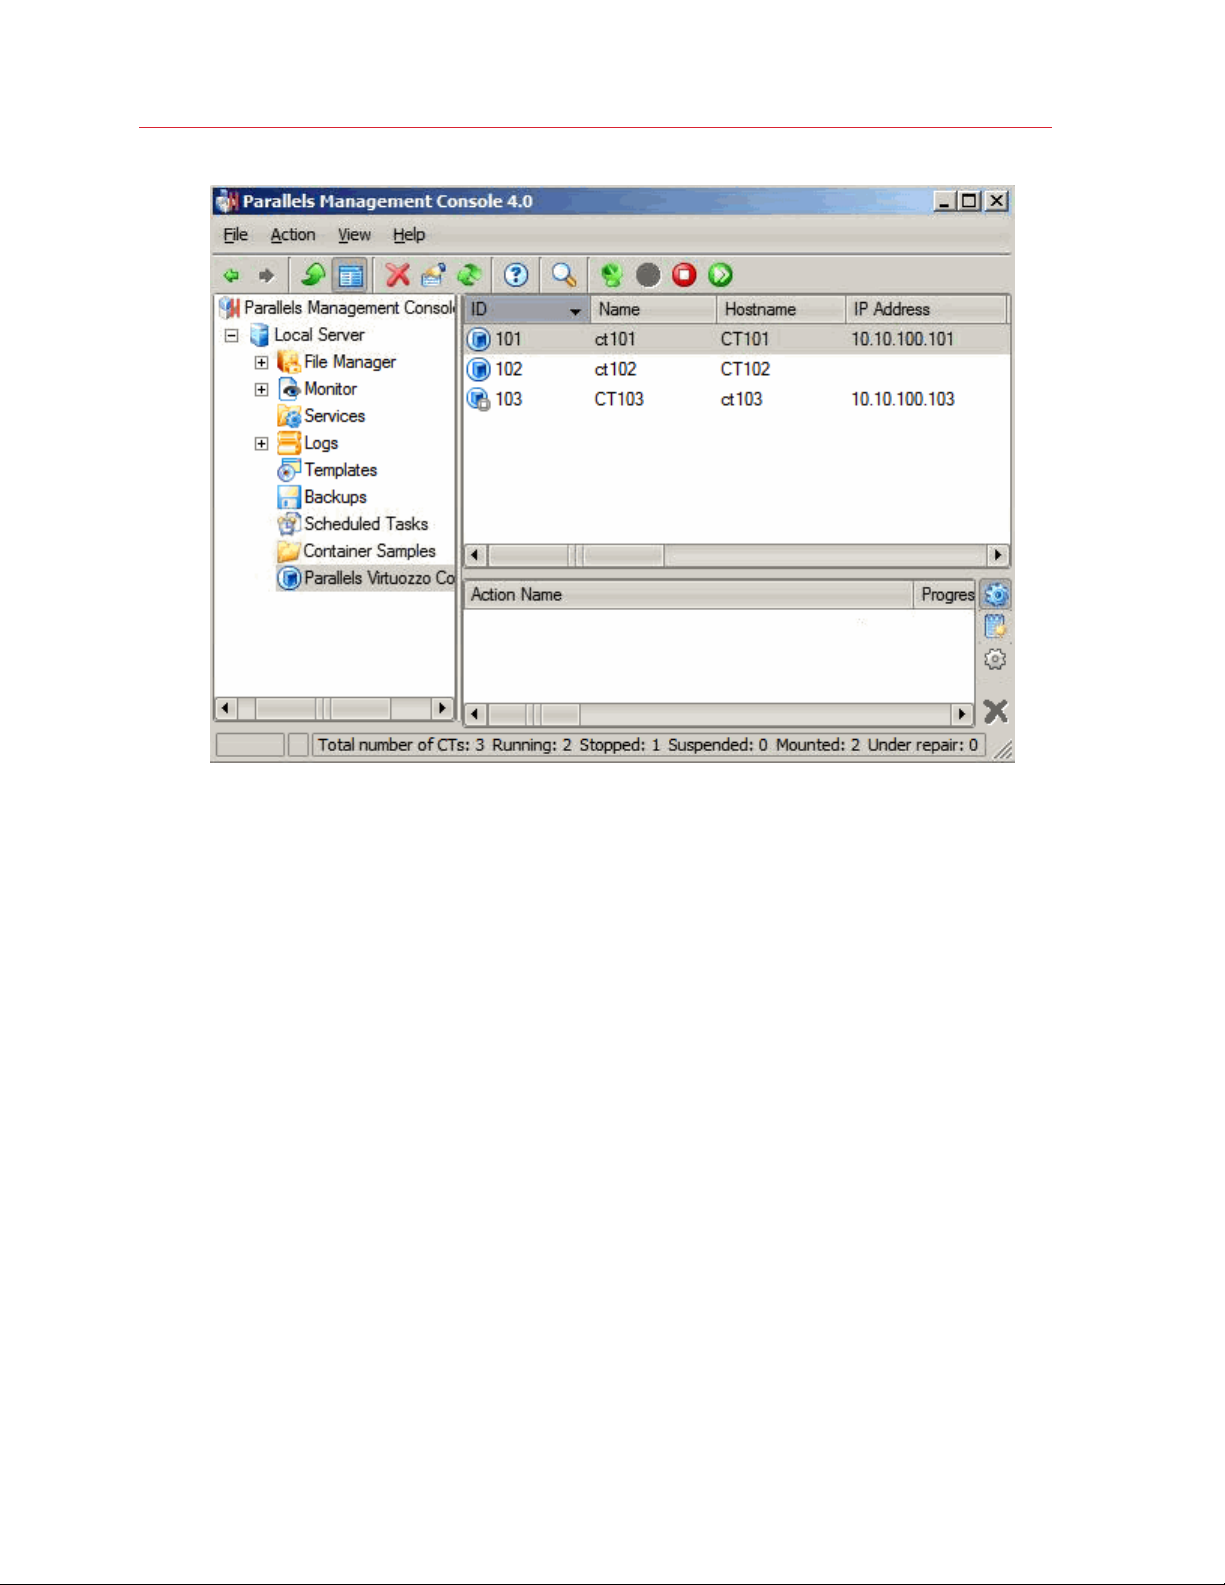
Operations on Containers
41
Page 42

Operations on Containers
You can see that currently Containers 101, 102, and 103 exist on the Hardware Node. All the
Container vital information (its IP address(es), hostname, statuses, etc.) is presented in the table
having the following columns:
Column Name Description
ID The ID assigned to the Container.
Name The name assigned to the Container. This name can be used, along with
the Container ID, to perform Container-related operations on the Hardware
Node.
Hostname The hostname of the Container.
IP Address The IP address assigned to the Container.
Status The current status of the Container.
Resources The circle opposite the corresponding Container reflects the current state
of the resource parameters consumed by the Container:
• If the resource consumption lies within 90% of the limits
defined for the Container, the green circle with a white tick is
displayed. It means that the Container experiences no shortage
in resources required for the normal course of work.
• If the Container consumes between 90% and 100% of the
limits defined for it, the orange circle with a white exclamation
mark is displayed.
• If the Container is currently consuming 100% or more of the
limits defined for it, the red circle with a white exclamation mark
is displayed. A Container is allowed to consume more than
100% of its quota only in extreme situations. If you do not solve
the problem in a reasonable time, applications running inside
the Container may be denied some of the resources, so
application crashes and other problems are most probable.
OS The OS template the Container is based on.
Architecture The system architecture of the Container.
Original Sample The name of the configuration sample the Container is based on.
Description The Container description.
To facilitate working with Containers, you can sort them by different parameters listed in the table
above: their ID, type, hostname, status, IP address, and so on. Just click the column with the
appropriate name to put Containers in the desired order.
42
Page 43

Operations on Containers
Setting Names for Containers
You can assign an arbitrary name to a Container and use it, along with the Container ID, to perform
Container-related operations. For example, you can start or stop a Container by specifying the
Container name instead of its ID.
You can assign names to Containers using the --name option of the vzctl set command. For
example, to set the computer1 name for Container 101, run this command:
# vzctl set 101 --name computer1 --save
Name computer1 assigned
Saved parameters for Container 101
You can also set a name for Container 101 by editing its configuration file:
1 Open the configuration file of Container 101 (/etc/vz/conf/101.conf) for editing, and add
the following string to the file:
NAME="computer1"
2 In the /etc/vz/names directory on the Node, create a symbolic link with the name of
computer1 pointing to the Container configuration file. For example:
# ln --symbolic /etc/vz/conf/101.conf /etc/vz/names/computer1
When specifying names for Containers, keep in mind the following:
• Names may contain the following symbols: a-z, A-Z, 0-9, underscores (_), dashes (-),
spaces, the symbols from the ASCII character table with their code in the 128-255 range, and
all the national alphabets included in the Unicode code space.
• Container names cannot consist of digits only. Otherwise, there would be no way to distinguish
them from Container IDs.
• If it contains one or more spaces, the Container name must be put in single or double quotes.
Once you assign the computer1 name to Container 101, you can start using it instead of ID 101
to perform Container-related operations. For example:
• You can stop Container 101 with the following command:
# vzctl stop computer1
Stopping Container ...
Container was stopped
Container is unmounted
• You can start Container 101 anew by running the following command:
# vzctl start computer1
Starting Container ...
...
You can find out what name is assigned to Container 101 in one of the following ways:
• Using the vzlist utility:
# vzlist -o name 101
NAME
computer1
43
Page 44

Operations on Containers
• Checking the NAME parameter in the Container configuration file (/etc/vz/conf/101.conf):
# grep NAME /etc/vz/conf/101.conf
NAME="computer1"
• Checking the NAME parameter in the /etc/vz/names/computer1 file which is a symlink to
the Container configuration file:
# grep NAME /etc/vz/names/computer1
NAME="computer1"
You can also use Parallels Management Console to set names for Containers:
1 Select the Parallels Virtuozzo Containers item under the corresponding Hardware Node,
right-click the Container, and choose Properties.
2 On the General tab of the displayed window, enter a name in the Name field.
3 Click OK.
44
Page 45

Operations on Containers
Storing Extended Information on Containers
Sometimes, it may be difficult to remember the information on certain Containers. The probability of
this increases together with the number of Containers and with the time elapsed since the
Container creation. Parallels Virtuozzo Containers allows you to set the description for Containers
and view it later on, if required. The description can be any text containing any Container-related
information; for example, you can include the following in the Container description:
• the owner of the Container
• the purpose of the Container
• the summary description of the Container
Let us assume that you are asked to create a Container for a Mr. Johnson who is going to use it for
hosting the MySQL server. So, you create Container 101 and then execute the following command
on the Hardware Node:
# vzctl set 101 --description "Container 101
> owner—Mr. Johnson
> purpose—hosting the MySQL server" --save
Saved parameters for Container 101
This command saves the following information related to the Container: its ID, owner, and the
purpose of its creation. At any time, you can display this information by running the following
command:
# vzlist -o description 101
DESCRIPTION
Container 101
owner—Mr. Johnson
purpose—hosting the MySQL server
You can also view the Container description by checking the DESCRIPTION parameter of the
Container configuration file (/etc/vz/conf/101.conf). However, the data stored in this file are
more suitable for parsing by the vzlist command rather than for viewing by a human because all
symbols in the DESCRIPTION field except the alphanumerical ones ('a-z', 'A-Z', and '0-9'),
underscores ('_'), and dots ('.') are transformed to the corresponding hex character code.
When working with Container descriptions, keep in mind the following:
• You can use any symbols you like in the Container description (new lines, dashes, underscores,
spaces, and so on).
• If the Container description contains one or more spaces or line breaks (as in the example
above), it must be put in single or double quotes.
• Unlike a Container name, a Container description cannot be used for performing Container-
related operations (for example, for starting or stopping a Container) and is meant for reference
purposes only.
To provide a description for a Container in Parallels Management Console, do the following:
45
Page 46

Operations on Containers
1 Select the Parallels Virtuozzo Containers item under the corresponding Hardware Node,
right-click the Container, and choose Properties.
2 On the General tab of the displayed window, type the necessary information in the Description
field.
3 Click OK.
Migrating Containers
A Hardware Node is the system with higher availability requirements in comparison with a typical
Linux system. If you are running your company mail server, file server, and web server in different
Containers on one and the same Hardware Node, then shutting it down for hardware upgrade will
make all these services unavailable at once. To facilitate hardware upgrades and load balancing
between Hardware Nodes, Parallels Virtuozzo Containers provides you with the ability to migrate
Containers from one physical box to another.
Migrating Containers is possible if Parallels Virtuozzo Containers 4.7 is installed on two or more
Hardware Nodes. You can choose one of the two ways to migrate a Container:
• Migrating a Container using the standard migration technology. In this case, there is a short
downtime needed to stop and start the Container during its migration from the Source Node to
the Destination Node.
• Migrating a Container using the zero downtime migration technology. In this case, the 'stop'
and 'start' operations are not performed and the migrated Container is restored on the
Destination Node in the same state as it was at the beginning of the migration. This greatly
reduces the migration time and puts it on the same footing as the delay caused by a short
interruption in the network connectivity.
Both ways are described in the following subsections in detail.
Note: Containers created under the Parallels Virtuozzo Containers x86 version can be migrated to
Hardware Nodes running the x86-64 version of Parallels Virtuozzo Containers, but not vice versa.
46
Page 47

Operations on Containers
Standard Migration
The standard migration procedure allows you to move both stopped and running Containers.
Migrating a stopped Container includes copying all Container private files from one Node to another
and does not differ from copying a number of files from one server to another over the network.
The migration procedure of a running Container, in turn, is a bit more complicated and can be
described as follows:
1 After initiating the migration process, all Container private data is copied to the Destination
Node. During this time, the Container on the Source Node continues running.
2 The Container on the Source Node is stopped.
3 The Container private data copied to the Destination Node is compared with that on the Source
Node, and if any files were changed during the first migration step, they are copied to the
Destination Node again and rewrite the outdated versions.
4 The Container on the Destination Node is started.
There is a short downtime needed to stop the Container on the Source Node, copy the Container
private data changes to the Destination Node, and start the Container on the Destination Node.
However, this time is very short and does not usually exceed one minute.
Note: Before the migration, it may be necessary to detach the Container from its caches. For more
information on cached files, see the Cleaning Up Containers subsection (p. 160).
The following session moves Container 101 from the current Hardware Node to a new Node
named ts7.parallels.com:
# vzmigrate ts7.parallels.com 101
root@ts7.parallels.com's password:
vzmsrc: Connection to destination Hardware Node (ts7.parallels.com) \
is successfully established
vzmsrc: Moving/copying Container#101 -> Container#101, [], [] ...
vzmsrc: Container migrating mode : first stage sync, with tracking, \
second stage sync, with Container stopping
vzmsrc: Syncing private area of Container#101 [/vz/private/101] ...
/ 100% |*****************************|
vzmsrc: done
vzmsrc: Stopping Container#101 ...
vzmsrc: done
vzmsrc: Fast syncing private area of Container#101 [/vz/private/101] ...
/ 100% |*****************************|
vzmsrc: done
vzmsrc: DST: Starting Container#101 ...
vzmsrc: DST: done
vzmsrc: Successfully completed
You can specify more than one Container ID simultaneously. In this case, all specified Containers
will be moved to a new Hardware Node one by one.
Important! For the command to be successful, a direct SSH connection (on port 22) must be allowed
between the Source and Destination Nodes.
47
Page 48

Operations on Containers
By default, once the migration is complete, the Container private area and configuration file on the
Source Node are renamed by receiving the .migrated suffix. However, if you want the Container
private area on the Source Node to be removed after the successful Container migration, you can
override the default vzmigrate behavior by changing the value of the REMOVEMIGRATED variable
in the global configuration file (/etc/vz/vz.conf) to yes or by using the –r yes switch of the
vzmigrate command.
To migrate one or more Containers using Parallels Management Console, select these Containers
from the list in the right pane after clicking the Parallels Virtuozzo Containers item in the left pane.
Then right-click the selection, and choose Tasks > Migrate to Another Hardware Node. Note
that the Destination Node must be already registered in Management Console; otherwise, the
migration option will not be available. The Migrate Containers window appears.
48
Page 49

Operations on Containers
In this window, do the following:
• Select the Destination Node where you want to move the Container.
• Make sure that the Offline migration radio button is selected. This option is used to migrate
Containers by means of the standard migration technology.
You can also specify the following options for the Container:
• The Do not start the Container after migration check box, if selected, prevents the migrated
Container from starting on the Destination Node after its successful migration. This option does
not have any effect if the Container was not running on the Source Node.
• The Force migration check box, if selected, forces the Container migration even if the
templates necessary for the Container correct operation are not installed on the Destination
Node. However, it will be impossible to start such a Container after the migration in case of the
absence of the needed templates.
• Select the Remove the Container private area(s) from the source server after migration
check box to delete the Container private area from the Source Node after the Container
successful migration.
When you are ready, click the Migrate button.
49
Page 50

Operations on Containers
Zero-Downtime Migration
The vzmigrate utility allows you to migrate Containers from one Hardware Node to another with
zero downtime. The zero-downtime migration technology has the following main advantages as
compared to the standard one:
• The process of migrating a Container to another Node is transparent for you and the Container
applications and network connections. That means that no modifications of system
characteristics and operational procedures inside the Container are performed on the Source
and Destination Nodes.
• The Container migration time is greatly reduced. In fact, the migration eliminates the service
outage or interruption for Container end users.
• The Container is restored on the Destination Node in the same state as it was at the beginning
of the migration.
• You can move the Containers running a number of applications that you do not want to be
rebooted during the migration.
Note: Zero-downtime migration cannot be performed on Containers having one or several opened
sessions established with the vzctl enter CT_ID command.
Before performing zero-downtime migration, it is recommended to synchronize the system time on
the Source and Destination Nodes, for example, by means of NTP (http://www.ntp.org). The
reason for this recommendation is that some processes running in the Container might rely on the
system time being monotonic and thus might behave unpredictably if they see an abrupt step
forward or backward in the time once they find themselves on the new Node with different system
clock parameters.
In the current version of Parallels Virtuozzo Containers, you can use the following types of zerodowntime migration for migrating a Container:
• Simple online migration. In this case, the Container is dumped at the beginning of the
migration—that is, all Container private data including the state of all running processes are
saved to an image file. This image file is then transferred to the Destination Node where it is
undumped.
• Lazy online migration. Using this type of online migration allows you to decrease the size of the
dumped image file storing all Container private data and transferred to the Destination Node by
leaving the main amount of memory in a locked state on the Source Node and swapping this
memory from the Source Node on demand. Thus, the migrated Container can be started before
the whole memory is transferred to the Destination Node, which drastically reduces the service
delay of the corresponding Container. When a process tries to access a page of memory that
has not yet been migrated, the request is intercepted and redirected to the Source Node where
this page is stored.
• Iterative online migration. In this case, the main amount of Container memory is transferred to
the Destination Node before the Container is dumped and saved to an image file. Using this
type of online migration allows you to attain the smallest service delay.
50
Page 51

Operations on Containers
• Iterative + lazy online migration. This type of online migration combines the techniques used in
both the lazy and iterative migration types when some part of Container memory is transferred
to the Destination Node before the Container is dumped and the rest is transported after the
Container has been successfully undumped on the Node.
To migrate a Container by using the zero downtime migration technology, use the --online
option of the vzmigrate utility. By default, the iterative online migration type is used to move a
Container from one Hardware Node to another. For example, you can migrate Container 101 from
the current Hardware Node to the Destination Node named my_node.com by executing the
following command:
Note: If the CPU capabilities of the Source Node exceed those of the Destination Node (for example, you
migrate from a Source Node running the Core 2 Duo processor to a Destination Node running the
Pentium 4 processor), the migration may fail and you will be presented with the corresponding warning
message. However, if you are sure that the CPU power of the Destination Node is sufficient to start and
run the Container being migrated, you can use the -f option to force the migration process.
# vzmigrate --online --require-realtime my_node.com 101
Enter password:
Connection to destination Hardware Node (192.168.1.57) \
is successfully established
Moving/copying Container#101 -> Container#101, [], [] ...
Syncing private area '/vz/private/101'
- 100% |***************************************
done
Suspending Container#101 ...
done
Dumping Container#101 ...
done
...
Migration completed
The --require--realtime option tells vzmigrate to move the Container by using the
iterative online migration type only. So, if this migration type cannot be carried out, the command
will fail and exit. If the --require--realtime option is omitted and the command fails,
vzmigrate will try to move the Container by means of the simple online migration. You can
specify more than one Container ID simultaneously. In this case, all specified Containers will be
moved to a new Hardware Node one by one.
If you want to use another migration type for migrating Containers, you need to pass the following
options to vzmigrate:
• Specify the --noiter option to migrate a Container using the simple online migration type.
• Specify the --noiter and --lazy options to migrate a Container using the lazy online
migration type.
• Specify the --lazy option to migrate a Container using the iterative + lazy online migrate type.
51
Page 52

Operations on Containers
To migrate one or more Containers in Parallels Management Console, select these Containers from
the list in the right pane after selecting the Parallels Virtuozzo Containers item in the left pane.
Then right-click the selection, and choose Tasks > Migrate to Another Hardware Node. Note
that the Destination Node must be already registered in Parallels Management Console; otherwise,
the migration option will not be available. The Migrate Containers window appears.
In this window, do the following:
• Select the Destination Node where you want to move the Container.
• Select the Live migration radio button used to migrate Containers by means of the zero
downtime migration technology. The Container will be migrated using the iterative online
migration type.
You can also specify the following options for the Container:
• The Force migration check box, if selected, forces the Container migration even if the
templates necessary for the Container correct operation are not installed on the Destination
Node. Keep in mind that you will not be able to start such a Container on the Destination
Server.
• Select the Remove the Container private area(s) from the source server after migration
check box to delete the Container private area from the Source Node after the Container
successful migration.
When you are ready, click the Migrate button.
52
Page 53

Operations on Containers
Migrating Containers Based on Standard Templates
If you have a Hardware Node running an old version of Parallels Virtuozzo Container (for example,
Virtuozzo 3.0), you probably have Containers that are based on standard OS templates and use
one or more standard application templates. To migrate such Containers to a Hardware Node
running Parallels Virtuozzo Containers 4.7, you need to complete the following tasks:
1 Migrate the OS standard template the Container is based on and all standard applications
templates the Container uses from the Source Node (that is, the Node where the template is
installed) to the Destination Node (that is, the Node with Parallels Virtuozzo Containers 4.7
where you plan to migrate Container 101).
2 Migrate the Container from the Source Node to the Destination Node.
The following example shows you how to migrate Container 101. This example assumes the
following:
• Container 101 is based on the redhat-as4 OS standard template.
• The postgresql-as4 standard application template is applied to Container 101.
• The Destination Node has the IP address of 192.168.0.197.
Migrating Standard Templates
In the first step, you need to migrate the OS and application standard templates used by Container
101 from the Source to the Destination Node. To do this, execute the following command on the
Source Node:
# vzmtemplate 192.168.0.197 redhat-as4 postgresql-as4
root@192.168.0.197's password:
Connection to Destination Node (192.168.0.197) is successfully established
Copying template "redhat-as4"
...
When executed, the vzmtemplate utility tries to connect to the Destination Node with IP address
192.168.0.197 and copy the specified templates there. By default, vzmtemplate logs in to the
Destination Node as root and asks you for the password of this user. However, you can make the
utility use other credentials to log in to the Destination Node. To do this, indicate the desired user
name with the @ symbol before the IP address in the command above (for example,
user1@192.168.0.123). Keep in mind that the specified user must have the root privileges;
otherwise, the command will fail.
To check that the redhat-as4 and postgresql-as4 templates have been successfully copied
to the Destination Node, run the following command on this Node:
# vzpkg list
redhat-as4 20100918
postgresql-as4 20100918
As you can see, both templates are now available on the Destination Node.
53
Page 54

Operations on Containers
Migrating the Container
Now that you have copied the standard templates, you can migrate Container 101. To do this, run
the following command on the Source Node:
# vzmigrate 192.168.0.197 101
root@192.168.0.197's password:
vzmsrc: Connection to destination Hardware Node (192.168.0.197) is successfully
established
vzmsrc: Moving/copying Container#101 -> Container#101, [], [] ...
...
Migrating the Container may take some time; please wait for the command to complete.
Configuring Non-Root Access for Migrating Containers
By default, you need to run the pmigrate utility as the root user to migrate Containers. You can,
however, configure your system so that pmigrate can be executed under another account. This
process involves editing the /etc/sudoers file on the Node.
Let us assume that you want to run the pmigrate utility under the pmigr_user account. To do
this:
1 Open the /etc/sudoers file for editing.
2 Locate the Defaults requiretty string in the file, and comment it:
# Defaults requiretty
3 Locate the following string in the file
root ALL=(ALL) ALL
and replace root with the pmigr_user name:
pmigr_user ALL=(ALL) ALL
4 Save the file.
54
Page 55

Operations on Containers
Moving Containers Within the Hardware Node
The vzmlocal utility allows you to move Containers within your Node. Moving a Container within
one and the same Node consists in changing the Container ID and its private area and root paths.
You can use vzmlocal to change the ID of the corresponding Container only or to additionally
modify its private area and root path.
Let us assume that you want to change the ID of your Container from 101 to 111 and modify its
private area and root paths from /vz/private/101 to /vz/private/my_dir and from
/vz/root/101 to /vz/root/ct111, respectively. To do this, execute the following command
on the Node:
# vzmlocal 101:111:/vz/private/my_dir:/vz/root/ct111
Moving/copying Container#101 -> Container#111,
[/vz/private/my_dir], [/vz/root/ct111] ...
...
Successfully completed
To check if Container 101 has been successfully moved to Container 111, you can use the
following commands:
# vzlist -a
CTID NPROC STATUS IP_ADDR HOSTNAME
1 43 running 10.0.10.1 localhost
111 - stopped 10.0.10.101 myContainer
# ls /vz/private
1 my_dir
# ls /vz/root
1 ct111
The commands output shows that the ID of Container 101 has been changed to 111, its private
area is now located in the /vz/private/my_dir directory on the Node, and the path to its root
directory is /vz/root/ct111.
Notes:
1. You can use the vzmlocal utility to move several Containers simultaneously.
2. You can run the vzmlocal utility on both running and stopped Containers.
In Parallels Management Console, you can move Containers within a Hardware Node using the
Move Container wizard. To invoke the wizard, select the Parallels Virtuozzo Containers item
under the corresponding Hardware Node name, right-click the Container you want to change the
ID of, and choose Tasks > Move Container. The wizard asks you to complete a number of tasks:
1 In the first step, you need to choose between two options:
• The first option (Change Container ID) lets you specify a new ID for the Container in
addition to specifying its new root and private area paths. Note that if you choose this
option, you will not be able to preserve the old ID for th Container.
55
Page 56

Operations on Containers
• The second option (Change Container location on Hardware Node) allows you to specify
the new root and private area paths without changing the Container ID.
2 If you choose the first option, you have to specify a new ID for the corresponding Container in
the second step of the wizard. Note that the old ID for the Container will be lost and all
Container private data will be transferred to the /vz/private/<new_CT_ID> directory where
<new_CT_ID> denotes the new ID assigned to the Container (for example,
/vz/private/111 for Container 111).
3 Next, you are presented with the Set New Container Root and Private Area Paths window.
56
Page 57

Operations on Containers
This window is displayed in one of the following cases:
• You selected the Change Container ID check box in the first step of the wizard, specified a
new ID for the Container, and clicked Next in the Specify New Container ID window. In
this case, the wizard will offer you to use the default paths, but will leave you the possibility
to alter these paths. To configure a path, select the corresponding check box, and type the
path in the field below the check box. If have made some changes to the default paths and
want to revert to these paths, click the Set Default button.
• You selected the Change Container location on Hardware Node check box and clicked
Next in the first step of the wizard. In this case, you can do the following:
- Manually enter the new private and root paths for the Container.
- Click the Set Default button to display and use the paths offered by the wizard.
4 In the last step of the Move Container wizard, you can review the settings made by you in the
previous steps. Click the Finish button to start moving the Container. This may take some time.
57
Page 58

Operations on Containers
Copying Containers Within the Hardware Node
Parallels Virtuozzo Containers allows you to create a complete copy of a particular Container (in
respect of all the Container data and resources parameters), or a Container clone. This saves your
time because you do not have to think of setting up the Container configuration parameters and the
like. Moreover, you can create a number of Container clones at a sitting.
In Parallels Virtuozzo Containers-based systems, you can use the vzmlocal utility to copy a
Container within the given Hardware Node. For example, you can issue the following command to
create Container 111 and make it be a complete copy of Container 101:
Note: You can clone both running and stopped Containers.
# vzmlocal -C 101:111
Moving/copying Container#101 -> Container#111, [], [] ...
Syncing private area '/vz/private/101'->'/vz/private/111'
...
Successfully completed
# vzlist -a
CTID NPROC STATUS IP_ADDR HOSTNAME
1 42 running 10.0.10.1 localhost
101 10 running 10.0.10.101 Container115
111 - stopped 10.0.10.115 Container115
As you can see from the example above, a clone of Container 101 (i.e. Container 111) has been
successfully created. However, before starting to use Container 111, you need to set another IP
address and another hostname for this Container which are currently identical to those of Container
101. Please consult the Configuring Containers section (p. 35) to learn how you can do it.
The vzmlocal utility also enables you to override the default private area and root paths of the
destination Container which, by default, are set to /vz/private/<dest_CTID> and
/vz/root/<dest_CTID>, respectively (where <dest_CTID> denotes the ID of the resulting
Container). In the case of Container 111, these paths are /vz/private/111 and
/vz/root/111. To define different private area and root paths for Container 111, you can
execute the following command:
# vzmlocal -C 101:111:/vz/private/dir_111/:/vz/root/ct111
Moving/copying Container#101 -> Container#111, [], [] ...
Syncing private area '/vz/private/101'->'/vz/private/dir_111'
...
Successfully completed
# ls /vz/private
1 101 dir_111
# ls /vz/root
1 101 ct111
To clone a Container in Parallels Management Console, click Parallels Virtuozzo Containers
under the name of the corresponding Hardware Node, right-click the Container you want to clone,
and choose Tasks > Clone Container(s). The Clone Container wizard will guide you through the
process of cloning the Container:
58
Page 59

Operations on Containers
1 First, you need to specify the number of Container clones to create and the starting Container
ID.
59
Page 60

Operations on Containers
Specify the number of clones to create in the Number of Containers to create field. By
default, one Container clone is created.
Similarly to creating new Containers, the Clone Container wizard allows the simultaneous
creation of several Container clones with IDs in a continuous series only. The default starting
Container ID, which is automatically offered, is the first unoccupied ID starting from 101. For
example, if you already have Containers with IDs from 101 through 105 and 107, the ID of 106
will be offered by default. And if you are creating only one Container clone, you can safely
accept this number. Or you can specify any other number, and the system will check up if the
ID is unoccupied. However, if you are going to create a number of Container clones, it is
recommended to decide on an unoccupied ID series in advance.
2 In the second step, you are asked to specify a new name and a new hostname for the resulting
Container. Type an arbitrary name you consider suitable for the Container in the Name field and
indicate its hostname, if necessary, in the Hostname field.
3 In the Assign Network Settings to Containers window, you can view and configure the virtual
network adapters that will be available inside the Container clone. Detailed information on all
network parameters and on the way to manage them is provided in the Configuring Virtual
Adapter Parameters subsection.
4 In the next step, you can change the path to the private area and root directory of the Container
clone by selecting the corresponding Override check boxes and entering the desired paths in
the fields provided.
5 The last window lets you review the parameters provided by you in the previous steps. You can
also select the Start the cloned Container after its creation check box to immediately start
the Container after its successful cloning. Click Finish to start the copying process.
Parallels Management Console also allows you to create several copies of a Container at once. To
do this, right-click the Containers to clone in the right pane, choose Tasks > Clone Container(s),
and in the displayed window, provide the necessary information for the cloned Containers.
60
Page 61

Operations on Containers
Backing Up and Restoring Containers
A regular backing up of the existing Containers is essential for any Hardware Node reliability. Any
Container is defined by its private area, configuration files, action scripts, and quota information.
Parallels Virtuozzo Containers allows to back up all these components. Each backup file can be of
one of the following 3 types:
• A full backup containing all Container data. This kind of backup is the most time-consuming,
space-intensive, and the least flexible one. However, full backups are the quickest to restore.
• An incremental backup containing only the files changed since the last full, differential, or
incremental backup. Incremental backups record only the changes since the last Container
backup (either full, differential, or incremental) and, therefore, are less in size and take less time
to complete than the full and differential backups.
• A differential backup containing only the files changed since the last full backup. This kind of
backup does not take into account available incremental and differential backup archives and
always backs up all the files modified since the last full backup.
61
Page 62

Operations on Containers
Using vzabackup/vzarestore Utilities
In Parallels Virtuozzo Containers 4.7, you can use the vzabackup and vzarestore utilities to
back up and restore Containers. These utilities can be run on virtually every Node in your network,
including
• the Source Node where the Container to be backed up is residing
• the Backup Node—a special Node with Parallels Virtuozzo Containers intended for storing
Container backups
• any other physical server with Parallels Virtuozzo Containers
To successfully run the vzabackup and vzarestore utilities, make sure of the following:
1 A Node where you plan to run the utilities has the vzabackup package installed. You can find
the vzabackup package in the /virtuozzo/RPMS directory of your Parallels Virtuozzo
Containers distribution and install it using the rpm -i command.
2 A network connection can be established between the Source and Backup Nodes.
3 Forward and reverse DNS lookups are correctly configured for both the Source and Backup
Nodes.
vzabackup is used to back up Containers. Let us assume the following:
• You want to create a full backup of Container 101 residing on the Source Node with the IP
address of 192.168.0.15.
• You can access the Source Node using the source_root user name and the 1234qwer
password.
• The backup will be created with the high level of compression.
• The backup will be stored on the Backup Node that you can access using the IP address of
192.168.200.200, the backup_root user name, and the 1qaz2wsx password.
• You want to exclude the /tmp directory in Container 101 from the backup.
• You want to set the following description for the resulting backup archive: The MySQL
database—latest changes.
To create a backup with the aforementioned parameters, you can execute the following command
on any Hardware Node with vzabackup installed and having the network connectivity to the
Source and Backup Nodes:
# vzabackup -D "The MySQL database—latest changes." -C3 \
--storage backup_root:1qaz2wsx@192.168.200.200 \
source_root:1234qwer@192.168.0.15 -e 101 \
--exclude-files /tmp
Starting backup operation for node '192.168.0.15'...
* Operation with the Container ct101 is started
* Backing up environment ct101 locally
* Checking parameters
* Dumping quota
62
Page 63

Operations on Containers
* Creating backup 3dec6e78-2f3e-7c4a-a969-f5b27e188783/20101013154047
* Adjusting backup type (full)
* Backup storage: receiving backup file
* Preparing for backup operation
* Backing up private area
100% |**************************************************************|
* Sending private backup data
* Backup storage: storing private backup data
* Backup storage: filling resultant backup info
* Operation with the Container ct101 is finished successfully.
Backup operation for node '192.168.0.15' was finished successfully.
Once the command is complete, you can find the created backup archive in the backup directory
on the Backup Node. By default, this directory is /vz/backups. Later on, you can restore the
Container backup from this directory.
You can specify any number of Hardware Nodes IP addresses in the command line. You can also
perform an incremental or a differential backup by additionally specifying the -I or --Tdiff
option, respectively. If you indicate the –I or --Tdiff option, and the utility cannot find the
corresponding full backup, a full backup is created. If you do not specify the Backup Node, the
backup will be put to the backup directory on your local Node. Detailed information on all options
that can be passed to the vzabackup utility is given in the Parallels Virtuozzo Containers 4.7
Reference Guide.
To restore Containers from their backups, you can use the vzarestore utility. However, before
starting to restore Containers, you may want to view the information about your backups. For
example, to examine the backups stored on the Backup Node with IP address
192.168.200.200, you can run the following command on this Node (or on any other Node
where the vzabackup package is installed):
# vzarestore --list --storage backup_root:1qaz2wsx@192.168.200.200
Show existing backups...
CTID Title Creation date/time Type Size
101 ct101 2010-02-11T111507+0004 full 8.79 Mb
...
If you are running vzarestore on the Backup Node itself, you can omit the --storage option.
To restore Container 101, you can run this command on the Source Node:
# vzarestore 101 --storage backup_root:1qaz2wsx@192.168.200.200
Restore container: Container101 from 1361ac21-4cae-4981-...
Container ct101 was restored successfully.
This command restores the latest backup of Container 101 stored on the Backup Node with IP
address 192.168.200.200 to the Node where you have run the command (in our case, on the
Source Node). If you want to restore a specific (not the latest) Container backup, use the -b option
and specify the ID of the backup instead of the Container ID. You can find out the backup ID
assigned to a Container backup using the -l and -f options of the vzarestore command. You
can also restore only certain files from the backup archive of Container 101 using the --files
option. For detailed information on all options that can be used with the vzarestore utility, see
the Parallels Virtuozzo Containers 4.7 Reference Guide.
63
Page 64

Operations on Containers
Restoring Containers Based on Standard Templates
If you have one or more backups of Containers that are based on standard templates, you can use
the following procedure to restore them on Hardware Nodes running Parallels Virtuozzo Containers
4.7 (called the Destination Node):
1 Make sure that the standard OS template and all standard application templates used by the
Container you plan to restore are installed on the Destination Node.
2 Restore the Container.
Installing Standard Templates
To install a standard OS or application template, you can use the rpm -i command. For example,
you can use the following command to install the Samba standard template:
# rpm -ivh samba-template-20060211-1.0-1.i386.rpm
Preparing... ################################### [100%]
1:samba-template ################################### [100%]
You can also use the vzmtemplate utility to copy standard templates from one Hardware Node
to another. For example, you can copy the redhat-as4 OS template installed on the Source
Node to the Destination Node with the IP address of 192.168.0.9 by running this command:
# vzmtemplate root@192.168.0.9 redhat-as4
root@192.168.0.197's password:
Connection to Destination Node (192.168.0.9) is successfully established
Copying template "redhat-as4"
...
Restoring the Container
Now that all necessary standard templates are available on the Hardware Node with Parallels
Virtuozzo Containers 4.7, you can restore the Container. For example, you can run the following
command on the Destination Node:
# vzarestore 101 --storage backup_root:1qaz2wsx@192.168.200.200
Restore container: Container101 from 1361ac21-4cae-4981-...
Container ct101 was restored successfully.
This command restores the latest backup of Container 101 stored on the Backup Node with IP
address 192.168.200.200 to the Destination Node. For more information on restoring
Containers, see Backing Up and Restoring Containers (p. 61).
64
Page 65

Operations on Containers
Managing Backups in Parallels Management Console
Parallels Management Console deals with three kinds of Nodes - the Source Nodes (the Nodes
where Containers are hosted during their backing up); the Backup Nodes (the Nodes where
Container backups are stored); and the Destination Nodes (the Nodes where Container backups
are restored).
These Nodes are singled out by their functionality only. In reality, one and the same Hardware Node
may perform two or even three functions. Usually, the Source and Destination Node are
represented by one and the same Hardware Node, because you will likely want the Containers you
back up to be restored to their original Node. However, setting up a dedicated Backup Node is
recommended.
You should make sure that all the three Nodes are registered in Management Console before
starting to work with them.
You can perform the following backup-related operations in Parallels Management Console:
• Assign the default Backup Node for the given Source Node.
• Set the default backup location on the Backup Node.
• Back up a single Container from the Source Node to the Backup Node.
• Back up a number of Containers or all Containers on the Node to the Backup Node.
• Restore a single Container from the Backup Node to the Destination Node.
• Restore a number of Containers or all Containers of a from the Backup Node to the Destination
Node.
• Restore individual files from the Container backup on the Backup Node to the Destination
Node.
• Manage the Backup Nodes.
• Search the backup of a given Container from the Source Node across all the Backup Nodes.
• Automate the task of backing up Containers by setting backups to be run on a schedule.
65
Page 66

Operations on Containers
Setting Default Backup Parameters
Parallels Virtuozzo Containers allows you to specify a number of default backup parameters that
can then be used when creating Container backup archives. These parameters include the
following:
• default Backup Node
• default backup location on the Backup Node
• default backup compression level (p. 69)
• default backup type (p. 71)
The following subsections describe in detail how to configure these parameters in Parallels
Management Console.
Assigning the Default Backup Node
When backing up Containers from a Source Node, you need specify the Backup Node where the
resulting backups will be stored. Parallels Management Console allows you to set the default
Backup Node for a given Source Node by doing the following:
1 Right-click the respective Source Node, and choose Backup > Set Default Backup Options.
2 Click the Change button next to the Server field:
66
Page 67

Operations on Containers
3 In the Backup Storage window, do the following:
• If you do not want to use a dedicated Node for storing Container backups, select the Use
local Hardware Node radio button, and click OK to set the Source Node as the default
Backup Node.
• If you are going to use a dedicated Node for storing Container backups, select the Choose
Hardware Node from the list below radio button. The table below this radio button lists all
Nodes registered in Parallels Management Console together with their IP addresses. If the
default Backup Node already exists for the given Source Node, it is selected in the table.
Select the Node you want to be the default Backup Node for the Source Node, and click
OK.
4 Click OK.
The assignment of the default Backup Node brings about the following effects:
• When backing up Containers from the corresponding Source Node in Parallels Management
Console and Parallels Virtual Automation using the 'default' backup mode, the backups are
automatically placed onto the default Backup Node.
• When backing up Containers form the corresponding Source Node in Parallels Management
Console and Parallels Virtual Automation using the 'custom' backup mode, you are
automatically offered to place the backups onto the default Backup Node.
• When a Container administrator backs up his or her Container using Parallels Power Panel, the
backup is automatically placed on the default Backup Node.
There are no restrictions as to which Hardware Node can be the default Backup Node. It just must
be registered in Parallels Management Console (otherwise, it will not be displayed in the table on
the Backup Storage screen) and have sufficient disk space for housing multiple backups.
Note: You can use any Hardware Node as a Backup Node irrespective of a Parallels Virtuozzo
Containers version installed on this Node. So, you can back up a Container from the Node running the
Parallels Virtuozzo Containers 32-bit version and store it on the Node running the Parallels Virtuozzo
Containers 64-bit version, and vice versa.
67
Page 68

Operations on Containers
Setting the Default Backup Location
Parallels Management Console allows you to change the location on the Backup Node where
Container backups are stored. By default, the /vz/backup directory is used. To set another
backup directory as the default one, right-click the Hardware Node in the left pane of the Parallels
Management Console main window, and choose Backup > Set Default Backup Location. The
Default Backup Location window appears.
In this window, do the following:
• Select the Back up to local Hardware Node radio button, and specify a backup directory on
one of the Backup Node local disk drives. To set a new backup directory, type its full path on
the Node in the Path field or click the ... button and select the desired directory in the displayed
window.
• Select the Back up to network share radio button to specify a backup directory on a network
share—that is, on a Backup Node network drive. To do this, enter the full path to the directory
in the Path field (for example, \\share\backup_directory). If the network drive where the
backup directory is located is password-protected, you need to additionally specify the user
name and password to access this share in the User and Password fields, respectively.
Once you specify the path to a new directory for storing Container backups, click OK for the
changes to take effect.
Note: While defining the default backup directory, make sure that the disk drive where this directory will
be located has sufficient disk space for storing multiple Container backups.
68
Page 69

Operations on Containers
Defining the Default Backup Compression Level
Parallels Virtuozzo Containers allows you to configure the default backup compression level by
setting it to one of the following:
• None. In this case, the Container backup is created without any compression. Using this level
of compression, you can greatly reduce the backup creation time. However, the size of the
resulting backup file may significantly increase as compared to other compression levels.
• Normal. In this case, the Container backup is created with a normal level of compression. This
compression level is set by default and is suitable for backing up most Container files and
directories.
• High. In this case, the Container backup is created with the high level of compression. The size
of the resulting backup file is smaller than that of the backup file compressed in the 'normal'
and 'none' modes; however, it takes longer to create the backup file.
• Maximum. In this case, the Container backup is created with the maximum level of
compression. The size of the resulting backup file is the smallest and the time of the backup
creation is the longest.
In general, the optimal data compression level depends on the type of files to be stored in the
backup archive. For example, it is advisable to use the 'normal' and 'none' compression types if
most of the files to be backed up are already compressed (e.g., the files with the .zip and .rar
extensions) or can be compressed with a low degree of efficiency (for example, all executable files
with the .exe extension or image files with the .jpg, .jpeg., and .gif extensions).
To configure the default backup compression level, do the following:
1 Right-click the respective Source Node, and choose Backup > Set Default Backup Options.
69
Page 70

Operations on Containers
2 Under the Compression Level group in the displayed window, move the slider to the left or to
the right to specify the desired compression level.
3 Click OK.
70
Page 71

Operations on Containers
Specifying the Default Backup Type
Another parameter that you may wish to configure and that will be applied to all Container backups
created using the default backup mode is the backup type. Each backup file can be of one of the
following types:
• A full backup containing the whole Container private area and its configuration file.
• An incremental backup containing only the files changed since the full backup or the previous
incremental backup. An incremental backup may prove very useful because it records only the
changes since the last Container backup (either full or incremental) and therefore is much less in
size and takes much less time than the full backup. However, after several consecutive
incremental backups it is recommended to create a full backup anew and start the incremental
backups chain from scratch.
• A differential backup containing only the files changed since the last full backup. As a rule, this
kind of backup requires less space than a full backup, but more space than an incremental
backup.
You can configure the default backup type by doing the following:
1 Right-click the respective Source Node, and choose Backup > Default Backup Node
Configuration:
71
Page 72

Operations on Containers
2 Under the Backup Type group in the displayed window, choose one of the following options:
• Select the Full radio button to always create full backup archives containing the whole
Container private area, all Container-related configuration files, action scripts, etc.
• Select the Incremental or Differential radio button to always perform incremental or
differential backups, respectively. If an incremental or differential backup is performed, and
the corresponding full backup cannot be found, a full backup is automatically performed.
3 Click OK.
Backing Up a Single Container
To back up a single Container on the Source Node, do the following:
1 In Parallels Management Console, click the Parallels Virtuozzo Containers item under the
corresponding Source Node to open the Container manager window.
2 Right-click the Container you want to back up, and choose Backup > Back Up Container.
The Back Up Containers wizard opens.
72
Page 73

Operations on Containers
3 In the first step of the wizard, choose the Container backup mode:
• Default: select this radio button to back up the Container using the default backup mode.
When run in this mode, the default backup parameters are used for creating the Container
backup. You can only set the backup description and configure the default backup policy.
Note: Detailed information on what default backup parameters are and how to manage them is given in
Setting the Default Backup Parameters (p. 66).
• Custom: select this radio button to manually set the parameters to be applied to the
resulting backup archive. In this case you will have to go through a number of steps (Steps
4 and 5) of the Back Up Containers wizard and set all the parameters of the Container
backup one by one.
4 In the second step of the wizard, specify the files and directories to be included in the backup:
73
Page 74

Operations on Containers
By default, all Container files and directories are included in the backup archive. To leave out a
file or directory from the backup process, clear its check box in the Included files table. You
can also select the Matching the following criteria check box and use the Add/Edit/Remove
buttons to set the parameters to be met by the file/directory to exclude it from the backup
process. You can specify the full path to the corresponding file/directory, enter its name, or
define any filter compatible with standard Linux masking rules (i.e. with standard globs). For
example, you can indicate /usr/MyDirectory/MyFile.txt to exclude the MyFile.txt
file from the backup process or type *.bmp to leave out all files with the bmp extension.
5 Next, specify the main backup parameters.
74
Page 75

Operations on Containers
In this window, you can configure the following backup parameters:
• Choose the Backup Node where the backup is to be stored. You can leave the Backup
Node offered by Parallels Management Console by default or use the Change button to
specify another Backup Node. For detailed information on Backup Nodes, see Assigning
the Default Backup Node (p. 66).
• Decide on the backup compression level: 'None', 'Normal', 'High', or 'Maximum'. Detailed
information on compression levels is given in Defining the Default Compression Level (p.
69).
• Specify the backup type. It can be full, incremental, or differential. Detailed information on
backup types is provided in Specifying the Default Backup Type (p. 71). If you are
backing up a single Container, and no backup of this Container has been found on the
Backup Node, the Backup Type group is not shown, and a full backup is automatically
created.
6 In the next step of the wizard, you can set the following backup parameters:
• Provide the backup description in the Backup description field, if necessary. The
description can be any text containing any backup-related information (for example, the
backup purpose).
• Do not stop the Container backup even if any errors appear (select the Do not stop on
errors check box) or break the backup process if any malfunction occurs (clear the check
box).
• Do not stop the backup process if one or more of the Containers to be backed up do not
exist on the Source Node (select the Ignore non-existent Containers check box) or break
the backup process in this case (clear the check box). You can use this option when
backing up several Containers at once.
7 The last screen allows you to review the information provided by you in the previous steps of
the wizard. Click Finish to start creating the Container backup; otherwise, click Back to return
to any step and correct the corresponding parameter.
75
Page 76

Operations on Containers
Backing Up Groups of Containers
To back up several or all Containers from a Source Node, right-click the Parallels Virtuozzo
Containers item under the corresponding Source Node, and choose Backup > Back up
Containers. The Back Up Containers wizard opens. In this wizard, do the following:
1 Choose the Containers from the Source Node to back up.
76
Page 77

Operations on Containers
To schedule one or more Containers for backing up, click the Add button in the top left corner,
and in the displayed window, select the names of the Containers to back up, and click OK. The
selected Containers will be shown in the table in the center of the Choose Containers to Back
Up screen. Click Next to proceed with the wizard.
2 Choose the Container backup mode:
• Default: select this radio button to back up the Container using the default backup mode.
When run in this mode, the default backup parameters are used for creating the Container
backup. You can only set the backup description and configure the default backup policy.
Note: Detailed information on what default backup parameters are and how to manage them is given in
Setting Default Backup Parameters (p. 66).
• Custom: select this radio button to manually set the parameters for the resulting backup
archive. In this case, you will have to go through a number of steps (Steps 3 and 4) of the
Back Up Containers wizard and set all the required backup parameters one by one.
3 Specify the files and directories to include in the backup.
77
Page 78

Operations on Containers
By default, all Container files and directories are included in the backup archive. However, you
can select the Matching the following criteria check box and use the Add/Edit/Remove
buttons to set the parameters to be met by the file/directory to exclude it from the backup
process. You can specify the full path to the corresponding file/directory, enter its name, or
define any filter compatible with standard Linux masking rules (i.e. with standard globs). For
example, you can indicate /usr/MyDirectory/MyFile.txt to exclude the MyFile.txt
file from the backup process or type *.bmp to leave out all files with the bmp extension.
4 Next, specify the main backup parameters.
78
Page 79

Operations on Containers
In this window, you can configure the following backup parameters:
• Backup Node. This Node is the place where the Container backup will be stored. You can
leave the Backup Node offered by Parallels Management Console by default or use the
Change button to specify the desired Backup Node. For detailed information on Backup
Nodes, see Assigning the Default Backup Node (p. 66).
• Backup compression level: 'None', 'Normal', 'High', or 'Maximum'. Detailed information on
compression levels is provided in Defining the Default Compression Level (p. 69).
• Backup type. It can be full, incremental, or differential. Detailed information on backup types
is provided in the Specifying the Default Backup Type subsection (p. 71).
5 In the next step of the wizard, you can set the following backup parameters:
• Provide the backup description in the Backup description field, if necessary. The
description can be any text containing any backup-related information (for example, the
backup purpose).
• Do not stop the Container backup even if any errors appear (select the Do not stop on
errors check box) or break the backup process if any malfunction occurs (clear the check
box).
• Do not stop the backup process if one or more of the Containers to be backed up do not
exist on the Source Node (select the Ignore non-existent Containers check box) or break
the backup process in this case (clear the check box).
6 Review the information provided by you in the previous steps of the wizard. Click Finish to start
creating the Container backup or click Back to return to any step and correct the
corresponding parameters.
Another way of backing up a number of Containers from the given Source Node is the following:
1 Expand the Source Node item in the left pane of the Parallels Management Console main
window, and click the Parallels Virtuozzo Containers item to open the Containers manager
window.
2 Select the Containers you want to back up. Use the CTRL and SHIFT keys for selecting a
number of Containers.
3 Right-click the selection, choose Back up Containers.
The aforementioned Back Up Containers wizard is opened directly at the second page because
the first page (Choose Containers to Back Up) becomes unnecessary.
79
Page 80

Operations on Containers
Browsing the Backup Contents
Parallels Management Console allows you to browse the directory structure of any Container
backup as if this backup had already been restored and restore only the needed files and
directories, if necessary. To view the backed up files and directories of a Container backup, do the
following:
1 Choose the Backups item in the Parallels Management Console right pane, right-click the
Container backup whose contents you want to browse, and choose Properties.
2 In the displayed window, select the corresponding backup in the Available backups table, and
click the Show Backup Contents button at the bottom of the window.
80
Page 81

Operations on Containers
3 Double-click the directory to see its contents. The information on any file/directory inside the
backup is shown in the table having the following columns:
Column Name Description
Title The name of the file/directory.
Type Denotes whether the object is a file, directory, or Parallels Virtuozzo Containers file link
(i.e. a link to the corresponding file on the Node).
Size The size of the file.
Modified The date and time when the file/directory was modified last time.
If you wish to restore any files and/or directories from the backup to the actual Container, select
the check boxes near the corresponding files/directories and click the Restore Selected Items
button. Detailed information on how to restore individual files/directories is provided in the
Restoring Container Files subsection.
81
Page 82

Operations on Containers
Restoring a Single Container
To restore a Container from its backup, do the following:
1 Expand the Source Node item in the left pane of the Parallels Management Console main
window, and click the Parallels Containers item to open the Containers manager window.
2 Select the Container whose backup you want to restore from the Backup Node.
3 Click the right mouse button, and choose Backup > Restore Container.
The Restore Container wizard opens.
82
Page 83

Operations on Containers
In this wizard, do the following:
• In the Choose Backup Node and Backup Archive window:
• Select the Backup Node. This Node is the place where the Container backup is stored. The
Last Backup Date column in the list of Backup Nodes shows the date and time of the last
backup (if any) of the selected Container on the corresponding Node.
• Select the backup from which to restore the Container. A Container can have a number of
backups made at different dates and of different types. As a rule, you choose the most
recent backup, unless you have reasons to restore an intermediary one.
• In the Review Container Restoration Settings window:
• Review the parameters provided by you in the previous step of the wizard.
• Click the Finish button to start restoring the Container.
Note: During this operation, the Destination Node is supposed to be the same as the Source Node. For
instructions on how to restore a Container to a Destination Node other than the Source Node, see
Managing the Backup Node.
83
Page 84

Operations on Containers
Restoring Container Files
Parallels Virtuozzo Containers allows you to browse the directory structure of any Container backup
as if this backup had already been restored and restore only the needed files and
folders/directories. To do this:
1 Expand the Source Node item in the left pane of the Parallels Management Console main
window, and click the Parallels Virtuozzo Containers item.
2 Right-click the Container the files/folders of which you want to restore, and choose Backup >
Restore Individual Container Files. The Restore Individual Container Files wizard opens.
84
Page 85

Operations on Containers
In the first step of the wizard, do the following:
• Choose the Backup Node. This Node is the place where the Container backup is stored. The
Last Backup Date column in the list of Backup Nodes shows the date and time of the last
backup (if any) of the selected Container on the corresponding Node.
• Choose the backup from which to restore the Container files/directories. A Container can have
a number of backups made at different dates and of different types.
The second step of the wizard allows you to review and explore the contents of all the directories
that were present inside the Container at the moment of the backup creation.
85
Page 86

Operations on Containers
Double-click the directory to see its contents. The information on any file/directory inside the
backup archive is presented in the table having the following columns:
Column Name Description
Title The name of the file/directory.
Type Denotes whether the object is a file, directory, or Parallels Virtuozzo Containers file link
(i.e. a link to the corresponding file on the Node).
Size The size of the file.
Modified The date and time of the last modification of the file/directory.
To enqueue a file/directory for being restored, select its check box. You can restore all the files and
subdirectories included in a given directory by selecting the check box next to this directory.
The last step of the wizard allows you to review the parameters provided by you in the previous
steps of the wizard. If you are satisfied with the specified parameters, click Finish to start restoring
the Container files/directories; otherwise, click Back and change the corresponding parameters.
Note: During this operation, the Destination Node is supposed to be the same as the Source Node. For
instructions on how to restore Container files/folders/directories to a Destination Node other than the
Source Node, see Managing the Backup Node.
86
Page 87

Operations on Containers
Restoring Groups of Containers
To restore several Containers of a single Source Node from their backups on the Backup Node, do
the following:
1 Right-click the Parallels Virtuozzo Containers item under the corresponding Source Node,
and choose Backup > Restore Containers. The Restore Containers wizard opens.
2 Choose the Backup Node on the Choose Backup Node screen. This Node is the place where
the backups of the Source Node Containers are stored. The Backup Availability column in the
list of Backup Nodes shows whether any backups have been found on the corresponding
Node.
3 On the Choose Containers to Restore screen, select the Containers you want to restore from
the Backup Node.
87
Page 88

Operations on Containers
By default, all backups of Containers originally belonging to the Source Node are selected. You
can exclude certain Containers from this list, as well as include in it any other backups found on
this Backup Node—that is, the backups of those Containers not belonging to the Source Node.
To include these other backups, you first need to make them visible by selecting the Show all
available backups check box.
4 If the Containers to restore exist on the Destination Node, you are presented with the Resolve
Conflicts With Existing Containers window listing these Containers. When deciding on
whether to restore a Container, keep in mind that, during the restore process, all Container
current data will be overwritten with data from the corresponding backup.
5 On the Review Containers Restoration Settings screen, click the Finish button to start
restoring the Containers.
Note: During this operation, all the Containers will be restored to the Source Node—that is, to the Node
for which you have invoked the wizard, irrespective of whether the backed up Containers originally
belonged to this Source Node or to any other Node.
You can also restore groups of Containers using these tools:
• Parallels Virtual Automation. For more information on this web-based tool, see the Parallels
Virtual Automation Administrator's Guide at
http://www.parallels.com/products/pva46/resources.
• vzarestore. Detailed information on this command-line utility is provided in the Parallels
Virtuozzo Containers 4.7 Reference Guide.
88
Page 89

Operations on Containers
Managing the Backup Node
Any Hardware Node can perform the functions of the Backup Node—that is, store the backups of
any Containers of any Hardware Nodes. To see the list of Container backups stored on a Hardware
Node, expand its name in the left pane of the Parallels Management Console main window, and
click the Backups item.
89
Page 90

Operations on Containers
The table in the right pane shows the following information about the backups stored on the given
Backup Node:
Column Name Description
Name The name of the backed up Container.
Source Node The Node where the Container was hosted during its backing up.
Last Backup Date The date and time when the last backing up of the Container took place.
Number of Backups The number of Container backups on the Node.
Description The backup description.
The backup manager window allows you to perform the following operations:
• Restore a single Container from its backup. To do this, right-click the needed Container
backup, and choose Restore Container to start the Restore Container wizard. In this wizard,
you need to select the Destination Node—the place whither to restore the Container. By
default, the Container Source Node is selected. Only the Nodes registered in Parallels
Management Console are shown.
• Restore one or several files and/or directories from a particular Container backup. To do this,
right-click the Container backup whose files/directories you want to restore, and choose
Restore Individual Container Files to start the Restore Individual Container Files wizard. In
this wizard:
1. Select the Destination Node—the place whither to restore the Container files/directories.
90
Page 91

Operations on Containers
91
Page 92

Operations on Containers
By default, the Container Source Node is selected. Only the Nodes registered in Parallels
Management Console are shown. You can also restore the files to your local computer, i.e.
to the computer where Parallels Management Console is installed. To do this, select the
Restore to local machine radio button and, in the Path field, specify the path to the folder
whither to restore the files.
2. Select the Container files/directories to restore to the Destination Node:
The Choose Files to Restore window lists all files and directories that you have backed up.
To enqueue a file/directory for being restored, select its check box. You can select the
check box next to the corresponding directory to restore all the files and subdirectories from
this directory.
3. In the Review Container Restoration Settings window, you can review the parameters
entered in the previous steps of the wizard. If you are satisfied with the specified
parameters, click Finish to start restoring the selected files/directories. Otherwise, click
Back, and change the necessary parameters.
92
Page 93

Operations on Containers
Right-clicking a Container backup in the backups list and choosing Properties brings about the
Container Backups dialog where you can do the following:
• View extensive information about the selected Container backup including all its full,
incremental, and differential backups.
• Delete any of the existing backups.
• Explore the backup contents (the Container files and directories)
• Restore the Container or any of its files/directories.
93
Page 94

Operations on Containers
Searching for Container Backups
If you do not remember the place where you are storing the backup of a particular Container
(identified by its ID or its IP address or its hostname or by the date of its creation), you can search
for the backup across all the Hardware Nodes registered in Parallels Management Console.
To search for a backup, do the following:
1 Right-click the Parallels Containers item under the corresponding Backup Node name, and
choose Backup > Search for Backups to open the Find Container Backups dialog:
94
Page 95

Operations on Containers
2 On the upper left drop-down menu, choose the Container parameter by which you want to
search for the corresponding Container backup.
3 Enter the value of the parameter in the text field on the right. All the Containers with the
corresponding parameter including the specified value as its part will be found. For example, if
you enter "100" as the value for Container ID, the backups of Containers 100, 1000, 1001,
1002, 2100, 3100, and so on, will be searched for.
4 Check those Nodes where you want to search for the backups.
5 Click the Search button.
The Search results table presents the following information about the found backups:
Column Name Description
Name The name of the Container whose backup has been found.
Source Node The Node where the Container was hosted during its backing up.
Date of Creation The date and time when the backup was created.
Type The backup type. Detailed information on all backup types is given in Defining
Default Backup Type (p. 71).
Backup Node The Backup Node - the Node where the backup has been found.
Description The backup description.
Double-clicking on a Container backup in this table brings about the Container Backups dialog
where you can view extensive information about the current Container backup, including all its full
and incremental backups, as well as delete any of these backups or restore them in the manner
depicted above.
95
Page 96

Operations on Containers
Scheduling Container Backups
Parallels Management Console allows you to automate the task of backing up Containers by
setting backups to be run on a schedule. For example, you can specify specific time intervals for
creating Container backups. You can set a Container to be backed up at different intervals: daily,
weekly, monthly. You can also specify a particular day of month for a Container backup to be
executed.
Parallels Management Console provides you with a special wizard—Schedule Task for Backing
Up Containers—that helps schedule the time for backing up Containers. To launch the wizard,
right-click the Scheduled Tasks item under the corresponding Hardware Node name, and choose
Schedule New Task > Back Up Containers.
In this wizard, do the following:
1 Choose the Containers to be backed up on the schedule you will set in the following steps of
the wizard.To do this, click the Add button in the top right corner of the Choose Containers to
Backup Up window, select the names of the corresponding Containers, and click OK. When
you are ready, click Next to proceed with the wizard.
2 Choose the Container backup mode:
• Default: select this radio button to back up the Container using the default backup mode.
When run in this mode, the default backup parameters are used for creating the Container
backup. You can only set the backup description and configure the default backup policy.
Note: Detailed information on what default backup parameters are and how to manage them is given in
Setting Default Backup Parameters (p. 66).
• Custom: select this radio button to manually set the parameters to be applied to the
resulting backup archive. In this case, you will have to go through a number of additional
steps (Steps 3 and 4) of the Schedule Backup Task for Container(s) wizard and set the
necessary backup parameters one by one.
3 Specify the files and directories to be included in the backup.
96
Page 97

Operations on Containers
97
Page 98

Operations on Containers
By default, all Container files and directories are included in the backup archive. To leave out a
file or directory from the backup process, clear its check box in the Included files table. You
can also select the Matching the following criteria check box and use the Add/Edit/Remove
buttons to set the parameters to be met by the file/folder to exclude it from the backup
process. You can specify the full path to the corresponding file/folder, enter its name, or define
any filter compatible with standard Linux masking rules (i.e. with standard globs). For example,
you can indicate /usr/MyDirectory/MyFile.txt to exclude the MyFile.txt file from
the backup process or type *.bmp to leave out all files with the bmp extension.
Note: The Included files table is not shown if you are creating a backup task for several Containers.
4 Next, you should specify the main backup parameters.
98
Page 99

Operations on Containers
In this window you can configure the following backup parameters:
• Backup Node. This Node is the place where the Container backup will be stored. You can
leave the Backup Node offered by Parallels Management Console by default or use the
Change button to specify the desired Backup Node. For detailed information on Backup
Nodes, see Assigning the Default Backup Node (p. 66).
• Backup compression level: 'None', 'Normal', 'High', or 'Maximum'. Detailed information on
compression levels is given in Defining the Default Compression Level (p. 69).
• Backup type. It can be full, incremental, or differential. Detailed information on backup types
is provided in Specifying the Default Backup Type (p. 71). If you are backing up a single
Container, and no backup of this Container has been found on the Backup Node, the
Backup Type group is not shown, and a full backup is automatically created.
5 In the next step of the wizard, you can set the following backup parameters:
• Provide the backup description in the Backup description field, if necessary. The
description can be any text containing any backup-related information (for example, the
backup purpose).
• Do not stop the Container backup even if any errors appear (select the Do not stop on
errors check box) or break the backup process if any malfunction occurs (clear the check
box).
• Do not stop the backup process if one or more of the Containers to be backed up do not
exist on the Source Node (select the Ignore non-existent Containers) or break the backup
process in this case (clear the check box). You can use this option when backing up several
Containers at once.
6 Next, you need specify a number of parameters for the backup task being created.
99
Page 100

Operations on Containers
100
 Loading...