

Page 1

Parallels Remote
Application Server
Administrator's Guide
v15.5 Update 2
Page 2

Parallels International GmbH
Vordergasse 59
8200 Schaffhausen
Switzerland
Tel: + 41 52 672 20 30
www.parallels.com
Copyright © 1999-2017 Parallels International GmbH. All rights reserved.
This product is protected by United States and international copyright laws. The product’s underlying technology,
patents, and trademarks are listed at http://www.parallels.com/about/legal/.
Microsoft, Windows, Windows Server, Windows Vista are registered trademarks of Microsoft Corporation.
Apple, Mac, the Mac logo, OS X, macOS, iPad, iPhone, iPod touch are trademarks of Apple Inc., registered in the US
and other countries.
Linux is a registered trademark of Linus Torvalds.
All other marks and names mentioned herein may be trademarks of their respective owners.
Page 3

Contents
Introduction ............................................................................................................... 9
About Parallels Remote Application Server ....................................................................... 9
About This Guide .......................................................................................................... 10
Terms and Abbreviations Used in This Guide ................................................................. 10
Installing Parallels Remote Application Server ...................................................... 13
System Requirements ................................................................................................... 13
Hardware Requirements ........................................................................................................ 13
Software Requirements ......................................................................................................... 14
Install Parallels Remote Application Server ..................................................................... 15
Sign In to Parallels My Account ...................................................................................... 16
Activate Parallels Remote Application Server .................................................................. 17
Getting Started with Parallels Remote Application Sever ..................................... 19
Parallels Remote Application Server Console ................................................................. 19
Setting Up a Simple RAS Environment ........................................................................... 21
Add a Terminal Server ........................................................................................................... 22
Publish an Application ........................................................................................................... 23
Invite Users ............................................................................................................................ 24
Conclusion ............................................................................................................................ 26
Parallels RAS Farm and Sites ................................................................................. 27
About Sites ................................................................................................................... 27
Viewing Sites in the RAS Console .................................................................................. 28
Adding a Site to the Farm .............................................................................................. 30
Managing Sites ............................................................................................................. 31
Managing Farm Administrative Accounts ....................................................................... 32
Adding an Administrator Account .......................................................................................... 32
Configuring Administrator Accounts Permissions .................................................................. 33
Managing Administrator Accounts ......................................................................................... 33
Using Instant Messaging for Administrators ........................................................................... 34
Joining Customer Experience Program ................................................................................. 34
Page 4

Contents
Terminal Servers ...................................................................................................... 36
Viewing Terminal Servers ............................................................................................... 36
Adding a Terminal Server .............................................................................................. 37
Installing RAS Terminal Server Agent Manually ...................................................................... 38
Configuring a Terminal Server ........................................................................................ 40
Check RAS Terminal Server Agent Status ............................................................................. 40
Change Terminal Server Site Assignment .............................................................................. 41
View and Modify Terminal Server Properties .......................................................................... 41
Grouping Terminal Servers ............................................................................................ 47
Using a Terminal Server Scheduler ................................................................................ 47
Managing Logons ......................................................................................................... 49
Publishing from a Terminal Server .................................................................................. 50
Publishing a Desktop from a Terminal Server ........................................................................ 50
Publishing an Application from a Terminal Server .................................................................. 53
Publishing a Web Application from a Terminal Server ............................................................ 56
Publishing a Network Folder from a Terminal Server .............................................................. 57
Publishing a Document from a Terminal Server ..................................................................... 59
VDI Hosts ................................................................................................................. 60
Adding a VDI Host ......................................................................................................... 60
Checking the RAS VDI Agent Status ..................................................................................... 62
Installing RAS VDI Agent Manually ......................................................................................... 62
Installing an Appliance and Configuring a VDI Host ......................................................... 63
Using Parallels RAS Templates ...................................................................................... 67
Creating a RAS Template ...................................................................................................... 68
Configuring a RAS Template ................................................................................................. 68
How Guest VMs Are Created From a Template ..................................................................... 70
RAS Template Maintenance .................................................................................................. 70
VDI Host Pool Management .......................................................................................... 72
Adding and Deleting Pools .................................................................................................... 72
Adding and Deleting Pool Members ...................................................................................... 72
Configuring Guest VMs in a Pool ........................................................................................... 73
Using a Wildcard to Filter VMs ............................................................................................... 74
Page 5

Contents
Persistent Guest VMs .................................................................................................... 75
Publishing from a Guest VM .......................................................................................... 75
Publishing a Virtual Desktop from a Guest VM ....................................................................... 75
Publishing an Application from a Guest VM ........................................................................... 76
Publishing a Web Application from a Guest VM ..................................................................... 77
Publishing a Network Folder from a Guest VM ...................................................................... 78
Publishing a Document from a Guest VM .............................................................................. 78
VDI Agent Technology ................................................................................................... 79
Prepare Citrix XenServer for Parallels RAS ............................................................................. 80
Prepare Hyper-V for Parallels RAS ......................................................................................... 88
Prepare VMware vSphere for Parallels RAS ........................................................................... 90
Remote PCs ........................................................................................................... 106
Adding a Remote PC .................................................................................................. 106
Installing RAS PC Agent Manually ................................................................................ 107
Configuring a Remote PC ............................................................................................ 108
Publishing from a Remote PC ...................................................................................... 109
Publishing a Desktop from a Remote PC ............................................................................. 109
Publishing an Application from a Remote PC ...................................................................... 110
Publishing a Web Application from a Remote PC ................................................................ 110
Publishing a Network Folder from a Remote PC .................................................................. 111
Publishing a Document from a Remote PC ......................................................................... 111
Page 6

Contents
Managing Published Resources ........................................................................... 113
General Management Tasks ........................................................................................ 113
Manage Published Applications ................................................................................... 114
Manage Published Desktops ....................................................................................... 117
Manage Published Documents .................................................................................... 119
Manage Published Folders .......................................................................................... 121
Using Filtering Rules .................................................................................................... 122
Setting Icon Resolution ................................................................................................ 124
RAS Secure Client Gateways ................................................................................ 125
RAS Secure Client Gateway Overview ......................................................................... 125
Adding a RAS Secure Client Gateway .......................................................................... 126
Manually Adding a RAS Secure Client Gateway ........................................................... 127
Checking the RAS Secure Client Gateway Status ........................................................ 128
Configuring RAS Secure Client Gateway ...................................................................... 128
Enable and Disable a Gateway ............................................................................................ 129
Set IP Address for Incoming Connections ........................................................................... 130
Configure RAS Secure Client Gateway Network Options ..................................................... 131
Configure SSL Encryption on a Gateway ............................................................................. 132
Configure HTML5 Connectivity ............................................................................................ 135
Set the Gateway Mode and Forwarding Settings ................................................................. 137
Enable Support for Wyse Thin Client OS ............................................................................. 138
Filter Access to a RAS Secure Client Gateway .................................................................... 138
Gateway Tunneling Policies ......................................................................................... 138
Parallels HTML5 Client .......................................................................................... 140
Configure HTML5 Connectivity .................................................................................... 140
Open Parallels HTML5 Client ....................................................................................... 140
Main Menu Options ..................................................................................................... 142
Launching Remote Applications and Desktops ............................................................ 142
Using the Toolbar ........................................................................................................ 143
Using the Toolbar on Desktop Computers........................................................................... 144
Using the Toolbar on Mobile Devices................................................................................... 146
Page 7

Contents
Using the Remote Clipboard ........................................................................................ 148
RAS Web Portal ..................................................................................................... 150
RAS Web Portal: Prerequisites and Installation ............................................................. 150
Log In to RAS Web Portal ............................................................................................ 152
Farm Settings .............................................................................................................. 153
General Settings .......................................................................................................... 156
RAS Publishing Agents ......................................................................................... 162
Viewing and Configuring RAS Publishing Agents .......................................................... 162
Secondary Publishing Agents ...................................................................................... 163
Managing Secondary Publishing Agents ...................................................................... 165
Load Balancing ...................................................................................................... 167
Resource Based & Round Robin Load Balancing ......................................................... 167
Load Balancing Advanced Settings ............................................................................. 168
High Availability Load Balancing ................................................................................... 169
Configuring HALB Appliances in the RAS Console .............................................................. 170
Changing HALB Appliance Password.................................................................................. 172
Universal Printing .................................................................................................. 174
Managing Universal Printing Servers ............................................................................ 174
Universal Printing Filtering ............................................................................................ 175
Font Management ....................................................................................................... 176
Universal Scanning ................................................................................................ 178
Managing Universal Scanning ...................................................................................... 178
Managing Scanning Applications ................................................................................. 179
User Device Management ..................................................................................... 180
Inviting Users to Connect to Parallels RAS ................................................................... 180
Monitoring Devices ...................................................................................................... 182
Managing Windows Devices ........................................................................................ 183
Windows Desktop Replacement.......................................................................................... 187
Windows Device Groups ............................................................................................. 189
Scheduling Windows Devices & Groups Power Cycles ................................................. 190
Managing Client Policies .............................................................................................. 192
Add a New Client Policy ...................................................................................................... 192
Configure Connection Properties ......................................................................................... 193
Page 8

Contents
Configure Client Policy Options ........................................................................................... 200
Configure Control Settings .................................................................................................. 202
RAS Reporting ....................................................................................................... 204
Deploy and Configure RAS Reports ............................................................................. 204
Advanced Settings .............................................................................................................. 206
RAS Reports ............................................................................................................... 206
Connection and Authentication Settings .............................................................. 209
RAS Publishing Agent Connection Settings .................................................................. 209
Restricting Access by Parallels Client Type and Build Number ...................................... 211
Second Level Authentication ....................................................................................... 211
Using RADIUS ..................................................................................................................... 212
Using SafeNet ..................................................................................................................... 213
Using Deepnet ..................................................................................................................... 216
Managing Parallels Remote Application Server ................................................... 230
Parallels Remote Application Server Status .................................................................. 230
Licensing .................................................................................................................... 231
Managing Sessions ..................................................................................................... 232
Configuring Monitoring Counters and Email Alerts ........................................................ 234
Configuring Monitoring Counters ......................................................................................... 234
Configuring SMTP Server Connection for System Notifications via Email ............................. 235
Viewing Parallels RAS Configuration Changes .............................................................. 235
Configuring Auditing Logging ....................................................................................... 235
Parallels Remote Application Server Logging Per Server ..................................................... 236
Parallels Remote Application Server Logging Per Site ......................................................... 236
Maintenance and Backup ............................................................................................ 237
Exporting and Importing Farm Settings via Command Line ........................................... 238
Problem Reporting and Troubleshooting ...................................................................... 238
Port Reference ....................................................................................................... 241
Index ...................................................................................................................... 245
Page 9

C HAPTER 1
Introduction
Welcome to Parallels Remote Application Server, an integrated solution to virtualize your
applications, desktops and data. Parallels Remote Application Server publishes applications and
delivers remote and virtual desktops to any device on your network, anywhere.
In This Chapter
About Parallels Remote Application Server .............................................................. 9
About This Guide ................................................................................................... 10
Terms and Abbreviations Used in This Guide .......................................................... 10
About Parallels Remote Application Server
Parallels Remote Application Server provides vendor independent virtual desktop and application
delivery from a single platform. Accessible from anywhere with platform-specific clients and web
enabled solutions, like the Parallels RAS HTML5 Gateway, Parallels Remote Application Server
allows you to publish remote desktops, applications and documents within a virtual environment,
improving desktop manageability, security and performance.
Parallels Remote Application Server extends Windows Terminal Services by using a customized
shell and virtual channel extensions over the Microsoft RDP protocol. It supports all major
hypervisors from Microsoft, VMware, and other vendors enabling the publishing of virtual desktops
and applications to Parallels Client.
The product includes powerful universal printing and scanning functionality, as well as high capacity
resource based load balancing and management features.
With Parallels Client Manager Module for Parallels Remote Application Server you can also centrally
manage user connections and PCs converted into thin clients using the free Parallels Client.
How does it work?
When a user requests an application or a desktop, the system finds a least loaded terminal server
or a guest VM on one of the least loaded VDI hosts and establishes an RDP connection with
it. Using Microsoft RDP protocol, the requested application or desktop is presented to the user.
Users can connect to Parallels Remote Application Server using Parallels Client (available at no
charge), which can run on Windows, Linux, macOS, Android, Chrome, and iOS. Users can also
connect via an HTML5 browser or Chromebook.
Page 10

Introduction
As newer versions of Windows keep on being developed as time goes by, you need to defend the
migration cost to your business. Parallels Remote Application Server can help. Desktop
replacement allows you to extend the lifespan of your hardware and delay migration to the latest
OSs to a time that suits you best. The Parallels Remote Application Server solution allows you to be
very flexible: you can lock machine configurations on the user side, placing your corporate data in
an extremely secure position; or you can opt to allow users to run some local and remote
applications. Parallels Client Desktop Replacement is able to reduce the operability of the local
machine by disabling the most common local configuration options, while guaranteeing the same
level of service and security afforded by thin clients, directly from your existing PCs.
About This Guide
This guide is intended for system administrators responsible for installing and configuring Parallels
Remote Application Server. This guide assumes that the reader is familiar with Microsoft Terminal
Server and has an intermediate networking knowledge.
Terms and Abbreviations Used in This Guide
The following terms and abbreviations are used in this guide:
Term/Abbreviation Description
Parallels Remote Application Server Console.
RAS Console
Category
Farm
Site
The RAS Console is the primary interface you use to
configure, manage, and run Parallels Remote
Application Server. As an administrator, you use the
RAS Console to manage farms, sites, terminal
servers, published resources, client connections, etc.
In the RAS Console, categories are displayed in the
left pane of the main interface. Each category consists
of a number of settings related to a specific task or
operation. The categories include Start, Farm, Load
Balancing, Publishing, Universal Printing, Universal
Scanning, Connection, Client Manager, and others.
A Parallels RAS farm is a logical grouping of objects
for the purpose of centralized management. A farm
configuration is stored in a single database which
contains information about all objects comprising the
farm. A farm consists of at least one site, but may
have as many sites as necessary.
A site consists of at least one RAS Publishing Agent,
RAS Secure Client Gateway (or multiple gateways),
and RAS agents installed on Terminal Servers,
virtualization (VDI) hosts, and Windows PCs. Note that
a given Terminal Server, VDI host, or PC can be a
member of only one site at any given time.
10
Page 11

Licensing Server Site
RAS Secure Client Gateway
HTML5 Client
Publishing
Introduction
The site where the main configuration database is
stored and manages all other sites in the RAS farm.
Other servers in a site can be upgraded to Licensing
Server if the main licensing server is not available.
Note: Upgrades of the Parallels Remote Application
Server MUST be applied to the licensing server site
first.
RAS Secure Client Gateway tunnels all traffic needed
by applications on a single port and provides secure
connections.
HTML5 client allows users to view and launch remote
applications and desktops in a web browser. The
HTML5 client functionality is a part of RAS Secure
Client Gateway.
The act of making items installed on a Remote
Desktop Server, VDI host or Remote PC available to
the users via the Parallels Remote Application Server.
RAS Publishing Agent
RAS Terminal Server Agent
RAS PC Agent
RAS Guest VM Agent
RAS VDI Agent
RAS Web Portal
RDS
RAS Publishing Agent provides load balancing of
published applications and desktops.
RAS Terminal Server Agent collects information from
the MS RDS hosts required by the Publishing Agent
and transmits to it when required.
RAS PC Agent collects information from Remote PC
hosts required by the Publishing Agent and transmits
to it when required.
RAS Guest VM Agent collects information from the
VDI desktop required by the Publishing Agent and
transmits to it when required.
RAS VDI Agent collects information from the Parallels
Remote Application Server Infrastructure and is
responsible for controlling VDI through its native API.
It also acts as a gateway between the Secure Client
Gateway or the client in direct mode and the RDP
server from the guest VM or VDI depending on VDI
implementation.
RAS Web Portal is a web page with auto client
detection and a client distribution point. It provides
access to published resources via web browser.
Remote Desktop Services is a Microsoft Windows
component that makes applications and the entire
desktop of a server running RDS accessible to a
remote client device that supports Remote Desktop
Protocol (RDP). RDS replaced Terminal Services
beginning with Windows 2008 R2.
Terminal Services
HALB
See RDS above.
HALB (High Availability Load Balancing) is a software
solution that sits between users and Parallels Secure
Client Gateways. Many HALB appliances can run
simultaneously, one acting as the master and the
11
Page 12

Introduction
others as slaves. The higher the number of HALB
appliances available, the lower the probability that
users will experience downtime. Master and slave
appliances share a common or virtual IP, also known
as VIP. Should the master HALB appliance fail, a
slave is promoted to master and takes its place
seamlessly without affecting the end user's
connection.
12
Page 13

C HAPTER 2
Installing Parallels Remote Application Server
This chapter describes how to install and activate Parallels Remote Application Server.
In This Chapter
System Requirements ............................................................................................ 13
Install Parallels Remote Application Server .............................................................. 15
Sign In to Parallels My Account ............................................................................... 16
Activate Parallels Remote Application Server ........................................................... 17
System Requirements
Before installing Parallels RAS, please verify that your hardware and software meet or exceed the
following requirements.
Hardware Requirements
Parallels Remote Application Server is extensively tested on both physical and virtual platforms. The
minimum hardware requirements approved to run Parallels Remote Application Server are outlined
below.
• Physical Machines – Dual Core Processor and a minimum of 4GB RAM.
• Virtual Machines – Two Virtual Processors and a minimum of 4GB of virtual hardware memory.
The server hardware requirements to install and configure Parallels Remote Application Server can
vary according to end-user requirements.
Typically for an installation of 30 users or under, Parallels Remote Application Server can be
installed on one high specification server and the resources published directly from it. For more
than 30 users, multiple servers may be required.
The below should be considered during the planning stage of a Parallels Remote Application Server
deployment:
• High specification servers should be used, consisting of multiple CPU cores, a high
specification disk transfer rate and plenty of RAM.
Page 14

Installing Parallels Remote Application Server
• A hypervisor-based virtual machine can be used as long as the resources required by the end-
users are calculated accordingly.
• Terminal servers should not exceed 50 users per terminal server in usage.
• The Secure Client Gateway should not exceed 200 users per server for incoming connections.
• When planning VDI Hypervisor resource requirements, extra requirements such as RAM usage
per virtual machine and disk space should be taken into account.
For port requirements, please see the Port Reference section (p. 241).
Software Requirements
Core Parallels Remote Application Server Components
RAS Publishing Agent and RAS Secure Client Gateway (the core components of Parallels Remote
Application Server) must be installed on one of the following versions of Windows Server:
• Windows Server 2008
• Windows Server 2008 R2
• Windows Server 2012
• Windows Server 2012 R2
• Windows Server 2016
Note: Parallels Remote Application Server should not be installed on a domain controller or any other
server where a DHCP server is running.
RAS Terminal Server Agent
RAS Terminal Server Agent must be installed on one of the following versions of Windows Server:
• Windows Server 2003 SP1 and newer
• Windows Server 2008
• Windows Server 2008 R2
• Windows Server 2012
• Windows Server 2012 R2
• Windows Server 2016
Parallels Client
Parallels Client is approved for the following operating systems (both 32 bit and 64 bit systems are
supported, where applicable):
• Windows XP SP3, Vista, 7, 8.x, 10
14
Page 15

• Windows Server 2003 SP1 and newer
• Windows Embedded
• macOS 10.7.3 and newer
• iOS 7.0 and newer (iPhone and iPad)
• Android 2.2 and newer
• Chrome OS
• Ubuntu 12.04 LTS
• Ubuntu 14.04 LTS
• Open Suse 12.3
• OpenSuse 13.2
• Fedora 20
• Xubuntu 15.10
• Raspbian OS Wheezy
• Raspbian OS Jessie
Installing Parallels Remote Application Server
Install Parallels Remote Application Server
To install Parallels Remote Application Server:
1 Before proceeding, make sure that you are logged in to the computer where you'll be
performing the installation with an account that has administrative privileges.
2 Download the latest version of Parallels Remote Application Server from the Parallels website.
3 Double click the RASInstaller.msi file to launch the Parallels Remote Application Server
installation wizard.
4 Read the info on the Welcome page of this wizard and click Next.
5 Review and approve the end-user license agreement and click Next.
6 Specify the folder location where Parallels Remote Application Server will be installed and click
Next.
7 Select the installation type:
• Select Parallels Remote Application Server to run the default installation, which will install
all necessary components for a fully functional Parallels RAS farm.
• Select Custom to install only the components that you need. You can specify the
components you wish to install after clicking Next.
8 Click Next.
9 Review the notice on the Important Notice wizard page. If there's a port conflict on your
computer, this information will be displayed here. You can resolve the conflict later.
15
Page 16

Installing Parallels Remote Application Server
10 Click Next.
11 On the Firewall Settings page, select Automatically add firewall rules to configure the
firewall on this computer for Parallels RAS to work properly.
12 Click Next and then click Install.
13 Wait for the installation to finish and click Finish.
Log in to Parallels RAS Console for the first time
The first time the Parallels RAS Console is launched, you need to specify credentials of a user with
administrative privileges (usually a domain or local administrator). The user name must be specified
using the UPN format (e.g. administrator@domain.local). The specified user will be
automatically configured as the Parallels Remote Application Server administrator.
Enter the username and password and click Connect. The Sign In to Parallels My Account
dialog opens. Read on.
Sign In to Parallels My Account
To activate Parallels RAS, you must register for Parallels My Account. When you run the RAS
console for the first time, you'll see the Sign In to Parallels My Account dialog. If you already have
an account, type the email address and password you used to register the account and click Sign
In.
If you don't have a Parallels My Account, you can register for one as follows:
16
Page 17

Installing Parallels Remote Application Server
1 In the Sign In to Parallels My Account dialog, click Register. The Register Parallels My
Account dialog opens.
If you have an existing 2X Remote Application Server license and are upgrading to the new
Parallels Remote Application Server, the Register Parallels My Account dialog will be prefilled
with the information from your existing license. If you don't have an existing license (or if you've
installed Parallels Remote Application Server on a new server), you'll need to fill in the
registration information as described in the next step.
2 Enter your name, email address, a desired password, and your company info (all fields are
required).
3 Click Register to register an account. This will create a personal account for yourself and a
business account for your organization to which you will be assigned as administrator.
If you are upgrading an existing 2X license, the Migrating license key window will open and your
license will be migrated to the new Parallels Remote Application Server format. When the migration
is completed, your upgraded license key will be registered with Parallels My Account and your
Parallels Remote Application Server will be activated.
If you don't have an existing 2X license, you should see the confirmation message saying that your
account has been registered successfully. Click OK to close the message box. In the Sign In to
Parallels My Account dialog, provide the email address and password and click Sign In. You'll
see the Activate Product dialog.
Read on to learn how to activate Parallels Remote Application Server.
Activate Parallels Remote Application Server
After you sign in to Parallels My Account, the Activate Product dialog opens asking you to activate
Parallels Remote Application Server.
If you already have a Parallels Remote Application Server license key, select the Activate using
license key option and enter the key in the field provided. You can click the button next to the field
to see the list of subscriptions and/or permanent license keys you have registered in Parallels My
Account. If the list is empty, it means that you don't have any subscriptions or license keys and
need to purchase one first.
Note: You can manage your Parallels RAS license using the Licensing category in the Parallels RAS
console. The management tasks include viewing the license information, switching to a different Parallels
My Account, and activating Parallels RAS using a different license key. For more information, please see
the Licensing section (p. 231).
If you don't have a Parallels RAS subscription or license key, you have the following options:
• Purchase a subscription online by clicking the Purchase a license link.
• Activate Parallels RAS as a trial by selecting the Activate trial version option.
17
Page 18

Installing Parallels Remote Application Server
After entering a license key (or selecting to activate a trial version), click Activate. You should see a
message that your Parallels Remote Application Server was activated successfully. Click OK to
close the message box. The Parallels Remote Application Server Console opens:
1 First, a dialog is displayed informing you that you have no active servers configured. This means
that to begin using Parallels RAS, you need at least a Terminal Server and you also need to
publish applications, desktops or other resources for your users. We'll get to that at the end of
this section.
2 Click OK to close the message box.
3 You will then see the Applying Settings dialog. Wait for the initial configuration of Parallels RAS
to complete and click OK.
4 You will now be taken to the Parallels Remote Application Server console where you can begin
configuring your Parallels RAS installation.
Read on to learn how to add a Terminal Server, publish resources, and invite your users to Parallels
RAS.
18
Page 19

C HAPTER 3
Getting Started with Parallels Remote Application Sever
This chapter will help you get started with Parallels Remote Application Server. Read it to learn how
to use the Parallels RAS Console and how to set up a simple RAS environment.
In This Chapter
Parallels Remote Application Server Console .......................................................... 19
Setting Up a Simple RAS Environment .................................................................... 21
Parallels Remote Application Server Console
The Parallels RAS Console is where you manage Parallels Remote Application Server. Use the
console to publish an application or a desktop, add a terminal server of a VDI host to the farm,
backup the Parallels Remote Application Server configuration, and perform other administrative
tasks.
Page 20

Getting Started with Parallels Remote Application Sever
Parallels Remote Application Server Console Layout
The RAS Console consists of the following sections:
This section lists categories. Selecting a category will populate the right pane with
elements relevant to this category.
This section becomes available only for the Farm and the Publishing categories.
The navigation tree allows you to browse through the objects related to that
category.
This section displays the selected object or category properties, such as servers in
a farm or published application properties.
This information bar displays the site you are currently logged into and the user
account being used for the connection. Please also note the "Press Apply to
commit the new settings" message in the middle (in red). The message is displayed
when you made changes to one or more objects/items, but did not commit them
to Parallels Remote Application Server. Click the Apply button (at the bottom of the
screen) to commit the changes. If there are no currently pending changes, the
message is not displayed.
20
Page 21

Getting Started with Parallels Remote Application Sever
The information bar at the bottom of the screen is used to display the most recent
console notification (if one is available).
Setting Up a Simple RAS Environment
In this section, we'll set up a simple Parallels Remote Application Server environment where all
required components run on a single server. Once you are familiar with basic principles of setting
up a Parallels RAS environment, you can use the instructions as a basis for setting up a more
advanced environment according to your needs.
To set up a Parallels RAS environment:
1 Log in to the Parallels Remote Application Server console.
2 In the console, select the Start category. This category gives you access to three wizards that
you can use to easily perform essential tasks, such as adding terminal servers, publishing
applications, and inviting users to Parallels RAS.
21
Page 22

Getting Started with Parallels Remote Application Sever
Add a Terminal Server
First, we need to add a Terminal Server to the site. In this tutorial, we'll add the local server, on
which Parallels Remote Application Server is installed, as a Terminal Server.
Note: A Terminal Server serves published resources (applications, desktops, and others) to Parallels RAS
users via Remote Desktop Services. In order to access these resources, each user connecting to
Parallels RAS must be a member of the Remote Desktop Users group on the server hosting the
resources (i.e. the Terminal Server). Before inviting your users to connect to Parallels RAS, you need to
add all your users to the local Remote Desktop Users group on the Terminal Server. For the instructions
on how to do it, please consult the Microsoft Windows documentation.
To add a Terminal Server to the site:
1 Click the Add Terminal Servers item. The Add Terminal Servers wizard opens.
2 On the first page, select the local server in the list or type the host name in the edit box at the
bottom of the page and then click the plus-sign icon.
3 Click Next.
22
Page 23

Getting Started with Parallels Remote Application Sever
4 On the next page, you can specify whether the firewall should be configured on the server and
the RDS role should be installed (and some others). Keep the default values and click Next.
5 Review the settings and click Next.
6 The Install Terminal Server Agent dialog opens. When the Terminal Server Agent is installed
on the server, click Done to close the dialog.
7 Click Finish to close the wizard.
If you would like to verify that the Terminal Server has been added to the site, click the Farm
category (below the Start category) and then click Terminal Servers in the navigation tree (the
middle pane). The server should now be included in the Terminal Servers list. The Agent State
column may display a warning message. If it does, reboot the server. The Agent State column
should now say, "Agent OK", which means that your Terminal Server is fully operational.
Publish an Application
Now that you have a Terminal Server, you need to publish an application that it will serve to the
users. In this example, we'll publish the RAS Console application (you can publish any other
application that's available on your server).
To publish an application:
1 Click the Publish Applications item.
Note: If you see a message box saying that there are no servers available, make sure that you added
the server as a Terminal Server to the site and then restarted it.
2 The Publish Applications wizard opens.
3 The first page of the wizard will not be displayed if you have just one Terminal Server. If you
have more than one Terminal Server, the page will be displayed and you can select the Terminal
Server(s) from which the application should be published. For instance, you can select the
Individual Servers option and then select the local server in the list.
4 On the next page, navigate to Parallels / Parallels Remote Application Server and select the
Parallels Remote Application Server Console application (or any other application that you
want to publish).
If you have more than one Terminal Server and select more than one server on the previous
screen, the Show applications not available on all target servers option becomes enabled. If
the option is cleared (default), the directory tree will contain applications that are available on
each and every server that you selected. If the option is selected, the tree will contain
applications that may be available on some server(s), but not on the others.
5 Click Next. Review the summary information and click Next again.
6 Click Finish when ready.
7 To verify that the application has been published, select the Publishing category and see that
the Parallels Remote Application Server Console application is present in the Published
Resources list (the middle pane).
23
Page 24

Getting Started with Parallels Remote Application Sever
Invite Users
Your Parallels RAS environment is now fully operational. You have a Terminal Server and a
published application. All you need to do now is invite your users to install the Parallels Client
software on their devices, which will enable them to use the published application.
To invite users:
1 Click the Invite Users item. The Invite Users wizard opens.
2 If you haven't configured anything yet in your Parallels RAS installation, the first wizard page will
prompt you to configure a mailbox for sending notifications to your users.
3 Enter your outgoing mail server name and sender address (e.g. your email address). Choose
whether to use the TLS/SSL protocol and whether your SMTP server requires authentication
(provide the username and password if it does). You can also send a test email to test your
outgoing mail server settings.
4 Click Next.
5 On the next page of the wizard, specify target devices and connection options:
24
Page 25

Getting Started with Parallels Remote Application Sever
• In the target devices list, select the types of devices to send an invitation to. Each target
device of a particular type will receive an email with instructions on how to download, install,
and configure the Parallels Client software on that device type.
• In the Public Gateway IP field, specify the RAS Secure Client Gateway domain name or IP
address. Please note that this can be a public IP address in order to reach the system from
a remote user. You can click the [...] button to select a gateway from the list.
• In the Connection Mode drop-down list, select the RAS Secure Client Gateway connection
mode. Please note that SSL modes require the gateway to have SSL configured.
• Click the Advanced button to open the Advanced Settings dialog. This dialog allows you
to specify a third-party credential provider component. If you use such a component to
authenticate your users, specify its GUID on this dialog. For more information, see
Configure Client Policy Options > Single Sign-On (p. 200).
6 Click Next.
7 On the next page, specify the email recipients. Click the [...] button to select users or groups.
25
Page 26

Getting Started with Parallels Remote Application Sever
8 Review the invitation email template displayed in the Review the invitation e-mail box. You
can modify the template text as needed. The template also uses variables, which are explained
below.
• %RECIPIENT% — Specifies the name of a recipient to whom the email message is
addressed.
• %SENDER% — The sender's email address that you specified in the first step of this wizard
when you configured the outgoing email server settings.
• %INSTRUCTIONS% — Includes a script for automatic configuration of Parallels Client and a
link that will run it.
• %MANUALINSTRUCTIONS% — Includes instructions for manual configuration of Parallels
Client.
The variables are defined dynamically depending on the type(s) of the target devices and other
settings. Normally, you should always include them in the message, so your users will receive all
the necessary instructions and links. To preview the message, click the Preview button. This
will open the HTML version of the message in a separate window. This is the email message
that your users will receive.
9 Click Next, review the settings that you specified, and click Next again to send the invitation
email to the selected users.
After you send the invitation email to your users, they'll be able to follow the instructions in it and
install Parallels Client on their devices. They will then be able to connect to Parallels Remote
Application Server and use the application that you published for them.
Conclusion
In this tutorial, we have configured a simple Parallels Remote Application Server environment
consisting of one Terminal Server and one published application. We then configured a mailbox for
outgoing emails and sent an invitation email to our users with instructions on how to: install Parallels
Client; connect to Parallels Remote Application Server; and run the published application remotely.
In other words, we successfully created a fully functional Parallels Remote Application Server farm
serving remote applications to end users.
If you wish, you can repeat the tutorial and add more Terminal Servers or publish more
applications, or send an invitation email to users who use different types of devices. The
instructions remain essentially the same.
Naturally, Parallels Remote Application Server is not limited to the functionality demonstrated in this
short tutorial. Continue reading this guide to learn what Parallels Remote Application Server can do
for you.
26
Page 27

C HAPTER 4
Parallels RAS Farm and Sites
Parallels RAS farm is a logical grouping of objects for the purpose of centralized management. A
farm configuration is stored in a single database which contains information about all objects
comprising the farm. A site is the next level grouping in the farm hierarchy which contains servers
and other objects providing connection and remote application services.
In This Chapter
About Sites ............................................................................................................ 27
Viewing Sites in the RAS Console ........................................................................... 28
Adding a Site to the Farm ....................................................................................... 30
Managing Sites ...................................................................................................... 31
Managing Farm Administrative Accounts................................................................. 32
About Sites
A Parallels RAS farm consists of at least one site, but may have as many sites as necessary.
Sites are often used to separate management and/or location functions. For example, by creating a
site, you can delegate permissions to a site admin without granting them full farm permissions. Or
you can have separate sites for different physical locations with the ability to copy the same
settings to each site while using Terminal Servers, VDI hosts, or PCs that are closer to end users or
(depending on your needs) to back-end servers. For instance, it would make sense for a
client/server application querying a database to be published from a Terminal Server which is
located closer to the database server.
Each site is completely isolated from other sites within the same farm. The farm simply groups the
sites logically and stores configuration properties of each site (and the objects that comprise it) in a
single database. Sites don't communicate with each other and don't share any objects or data.
The only exception to this rule is the RAS Licensing Server site which periodically communicates
with other sites to obtain statistics.
Individual object settings in a given site can be replicated to all other sites. This does not mean that
the settings will be shared between sites. The settings that you choose will simply be applied to
other sites. For more information, see the Managing Sites section (p. 31).
Page 28

Parallels RAS Farm and Sites
When you install Parallels Remote Application Server for the first time, a farm with a single site is
created automatically. This first site becomes the RAS Licensing Server site and the host for the
main Parallels RAS configuration database. When you add more sites to the farm, the data in this
database is automatically synchronized with every site that you add. When changes are applied to
a particular site, the main configuration database is automatically updated to reflect the changes.
Each site must have at least the following components installed:
• Master RAS Publishing Agent
• RAS Secure Client Gateway
• Terminal Server, VDI, or PC
• Published resources (applications, desktops, documents).
When you install Parallels RAS using default installation options, the master RAS Publishing Agent
and the RAS Secure Client Gateway are automatically installed on the server on which you perform
the installation. You can then add one or more Terminal Servers to the site and publish resources
hosted by those servers. You can also add more sites to the farm if needed and configure individual
components for each site as you desire.
Viewing Sites in the RAS Console
To view existing sites, open Parallels RAS Console and select the Farm category in the left pane.
Existing sites are listed in the right pane.
Note: The Farm node will only be visible to an administrator who has full permissions to manage the
farm. For more information about farm/site permissions, please refer to Managing Farm Administrative
Accounts (p. 32).
28
Page 29

Parallels RAS Farm and Sites
The Farm category displays the configuration of only one site at a time. If you login as the farm
administrator, the configuration of the Licensing Server site will be displayed. If you login as an
administrator who has access to a specific site (but not the farm), the configuration of that site will
be displayed. The site which configuration is currently displayed in the console is marked as
"Current Site" in the Priority column. If you have multiple sites and want to manage one of them,
right-click it in the right pane and choose Switch to this Site. The site configuration will be loaded
into the RAS Console, so you can see its components and configure them as you require.
To change the farm name, click the Change Farm Name button in the right pane. To change a site
name, right-click it in the right pane and choose Properties. Type a new name and click OK.
The middle pane displays the components of the current site. We will talk more about each one of
them later in this guide. The following list is a short overview:
• Designer. Displays a visual representation of the site. Use the icons at the top to add more
components to the diagram (if you add a component, it will actually be added to the site). Click
Print to print the diagram.
• Terminal Servers. Add, remove, and configure RAS Terminal Servers.
• VDI Hosts. Add, remove, and configure RAS VDI Hosts.
• Remote PCs. Add, remove, and configure Remote PCs.
• Gateways. Add, remove, and configure RAS Secure Client Gateways.
29
Page 30

Parallels RAS Farm and Sites
• Publishing Agents. Add, remove, and configure RAS Publishing Agents.
• HALB. Enable or disable High Availability Load Balancing.
• Settings. Configure general site settings.
Adding a Site to the Farm
To add a site to the farm:
1 In the RAS Console, select the Farm category in the left pane and then select the farm in the
middle pane.
2 In the Tasks drop-down menu (the right pane, above the Site list), click Add (or click the +
icon).
3 In the Add Site dialog:
• In the Site field, specify a site name.
• In the Server field, specify the IP address or FQDN of the server where the Master
Publishing Agent and Secure Client Gateway should be installed.
• Select the Add an SSL certificate and enable HTML5 Gateway option to automatically
create a self-signed certificate, enable SSL, and enable HTML5 support. For more info,
please see Enable HTML5 Support on the Gateway (p. 135).
4 Click Next.
5 The Site Master Properties dialog opens. First, it verifies if RAS Publishing Agent is installed
on the specified site server. If it isn't, it will indicate this in the Status field.
6 Click the Install button to install the agent.
7 In the Install RAS Publishing Agent dialog, highlight the server name on which the RAS
Publishing Agent is to be installed.
8 (Optional) Select the option Override system credentials to specify and use different
credentials to connect to the server and install the agent.
9 Click Install to install the publishing agent and gateway. Click Done once it has been
successfully installed.
Once a new site is created, you can view and manage its configuration by right-clicking the site in
the RAS Console ans choosing Switch to this Site.
30
Page 31

Parallels RAS Farm and Sites
Managing Sites
Replicating Site Settings to all Sites
Site-specific settings configured for a given site can be replicated to all other sites in a farm. Refer
to the table below for the information about which settings can be replicated to other sites.
To replicate site settings to all other sites, select Farm / Site / Settings and then select the
Replicate settings option (at the bottom of the Auditing tab page). Please note that this option is
disabled if you have just one site in the farm.
Overriding Site Replicated Settings
If an administrator who has permissions to enable or disable replication settings makes a change to
a specific setting, such setting is replicated to all other sites.
If an administrator has access to a particular site only, upon modifying site settings which have
been replicated, the replicated settings are overridden and the option Replicate Settings is
automatically cleared, therefore such settings will no longer be replicated to other sites.
31
Page 32

Parallels RAS Farm and Sites
Setting a Site as a Licensing Server
If the licensing server fails, or if you would like to set a different site as a Licensing Server, click on
the site name in the Farm node and then click Set Site as Licensing Server in the Tasks drop-down
menu.
Managing Farm Administrative Accounts
You can have more than one Parallels Remote Application Server administrator who can manage
the farm and sites. If needed, you can configure permissions to limit access to specific categories
and sites.
If the Parallels Remote Application Server is installed in an Active Directory environment, any user
that has elevated privileges and write access to the installation directory can be configured as a
Parallels Remote Application Server administrator.
If the Parallels Remote Application Server is installed on a standalone machine, any user that has
elevated privileges and write access to the installation directory can be configured as a Parallels
Remote Application Server administrator.
Default Parallels Remote Application Server Administrator
The user you specified when you logged into the RAS Console for the first time is automatically
granted full permissions and can perform any task in the farm. There should always be at least one
enabled administrator with full permissions in the farm.
Adding an Administrator Account
To add an administrator account to the Parallels Remote Application Server:
1 In the RAS Console, select the Administration category and then click the Administration tab
in the right pane.
2 Click the Tasks drop-down menu and choose Add.
3 The Administrator Properties dialog opens.
4 Specify a user name, email address, and the mobile phone number.
5 The Permissions field allows you to configure permissions for this user. By default, the Full
Permissions option is selected. To grant specific permissions, click the Change Permissions
button. For further instructions, please read the Configuring Administrator Accounts
Permissions section (p. 33).
6 In the Receive system notifications via drop-down list, select Email, so any system
notifications are sent to the specified email address. Select None to disable email system
notifications for this account.
32
Page 33

Parallels RAS Farm and Sites
7 Click OK to add the new administrator account.
Configuring Administrator Accounts Permissions
Administrator permissions can be configured when creating a new administrator account or from
the Properties of an existing account. Permissions can be assigned per category (e.g. Farm,
Publishing, Universal Printing, etc.) and also per site.
Select the Full Permissions option to enable the administrator to modify all categories, sites, and
global settings in the farm.
Select one or more options in the Site permissions section and then select one or more sties to
which these permissions should apply. You can grant the following permissions to an administrator:
• Allow Site changes. Can modify the following categories: Site, Load Balancing, Universal
Printing, Universal Scanning.
• Allow Publishing changes. Can modify the Publishing category.
• Allow Connection changes. Can modify the Connection category.
• Allow viewing of RAS Reporting. Can view reports generated by the RAS Reporting engine.
• Allow viewing of Site Information. Can view (but not modify) the site information.
• Allow Session Management. Can manage running sessions.
• Allow Client Management changes. Can modify the Client Manager category.
• Allow access to Information. Can view the read-only Information category.
Managing Administrator Accounts
To view and modify administrator's accounts:
1 In the RAS Console, select the Administration category and click the Administration tab.
2 Right-click an account and choose Properties in the context menu.
3 Use the Administrator Properties dialog to modify the necessary information. For more info,
see Adding an Administrator Account (p. 32).
Logging off an Administrator
When an administrator is accessing a category (e.g. Universal Printing), the category is locked for all
other administrators. Therefore, upon trying to access a category locked by another administrator,
the administrator will be alerted with an error that the object is locked.
If you need to release a lock, you can do the following:
33
Page 34

Parallels RAS Farm and Sites
1 On the Administration tab page, click the Tasks drop-down menu and choose Show
Sessions.
2 In the Sessions dialog, select the administrator who's locking a category and then click Send
Message to communicate with the administrator or click Log Off.
Using Instant Messaging for Administrators
Parallels Remote Application Server administrators that are logged on to the same farm can
communicate with each other using a built-in instant messenger.
To communicate with an administrator (or all logged on administrators) using the instant
messenger:
1 In the RAS Console, select the Administration category.
2 Expand the drop-down menu next to your name (top-right corner of the console screen) and
click Chat....
3 The Parallels Remote Application Server Chat window opens.
To send a message:
1 Type the message text in the lower input panel.
2 In the Logged on administrators list box, select a particular administrator to send the
message to or All to send the message to all logged on administrators.
3 Click Send.
4 Your message history is displayed in the Messages panel. To clear the history, click Clear All.
5 You can also view the chat history listing all messages between all administrators (not just your
own messages). To do so, select the Administration node in the console and then select the
Chat History tab.
Joining Customer Experience Program
Parallels Customer Experience Program helps us to improve the quality and reliability of Parallels
Remote Applications Server. If you accept to join the program, we will collect information about the
way you use Parallels Remote Application Server. We will not collect any personal data, like your
name, address, phone number, or keyboard input.
To jon the program:
1 In the RAS Console, select the Administration category.
2 In the right pane, click the CEP tab (you may need to scroll the right pane horizontally to see it).
3 Select the Join Parallels Customer Experience Program option.
34
Page 35

Parallels RAS Farm and Sites
After you join the program, CEP will automatically start to collect information about how you use
Parallels Remote Application Server. Data collected from you and other participants is combined
and thoroughly analyzed to help us improve Parallels Remote Application Server.
35
Page 36

C HAPTER 5
Terminal Servers
To be able to publish applications and desktops for your users through Parallels Remote
Application Server, a site must have one or more Terminal Servers. Read this chapter to learn how
to add, configure and perform other operations on Terminal Servers.
In This Chapter
Viewing Terminal Servers ........................................................................................ 36
Adding a Terminal Server ........................................................................................ 37
Configuring a Terminal Server ................................................................................. 40
Grouping Terminal Servers ..................................................................................... 47
Using a Terminal Server Scheduler.......................................................................... 47
Managing Logons .................................................................................................. 49
Publishing from a Terminal Server ........................................................................... 50
Viewing Terminal Servers
To view the list of terminal servers in the farm:
1 In the RAS Console, navigate to Farm / <site-name> / Terminal Servers.
2 The available terminal servers are displayed on the Terminal Servers tab page in the right
pane.
You can filter the Terminal Servers list as follows:
1 Click the magnifying glass icon, which is located on a toolbar above the list.
2 An extra row is displayed at the top of the list where you can type a string in one or more
columns that will be used to filter the list.
3 For example, if you want to search for a server by its name, enter the text in the Server column.
You can type the entire server name or the first few characters until a match is found. The list
will be filtered as you type and only the matching server(s) will be displayed.
4 If you type a filter string in more than one column, they will be combined using the logical AND
operator.
5 To remove the filter and display the complete list, click the magnifying glass icon again.
6 If you click the magnifying glass icon one more time, you'll see that the filter that you specified
earlier is still there. To remove it completely, simply delete the filter string(s) from the column(s).
Page 37

Terminal Servers
Adding a Terminal Server
A Terminal Server serves published resources (applications, desktops, and others) to Parallels RAS
users via Remote Desktop Services. A Parallels RAS site must have at least one Terminal Server
but may have as many as you require.
Terminal Server Requirements
A Terminal Server must have the Remote Desktop Services (RDS) installed. RDS was known as
Terminal Services prior to Windows 2008 R2. On some older versions of Windows Server, Terminal
Services are not installed by default. If you'll be using such a server, you can install RDS on it right
from the RAS Console, as described later in this section.
Note: In order to access remote resources, each user connecting to Parallels RAS must be a member of
the Remote Desktop Users group on the server hosting the resources (i.e. the Terminal Server). Before
inviting your users to connect to Parallels RAS, you need to add all your users to the local Remote
Desktop Users group on the Terminal Server. For the instructions on how to do it, please consult the
Microsoft Windows documentation.
Quickly Adding a Terminal Server
You can quickly add a Terminal Server to a site from the Start category in the RAS Console. This
process is described in the Setting Up a Simple RAS Environment section (p. 21).
The rest of this section describes how to add a Terminal Server from the Farm category. This
process consists of more steps, but gives you more options.
Searching for Servers
You can search for servers in your Active Directory domain that meet the necessary requirements
to be used as terminal servers (see System Requirements).
To search for servers:
1 On the Terminal Servers tab page, click Tasks > Find.
2 The Find Servers dialog opens and begins searching for suitable servers. If no servers are
found, you'll see a message box where you can click OK to close the box and the dialog. In
such a case, you can add a server manually (jump to the Adding a Terminal Server Manually
subsection below).
3 If at least one suitable server is found, it will be displayed in the dialog.
37
Page 38

Terminal Servers
4 Select a server that you would like to add as a Terminal Server to the site and verify whether the
RAS Terminal Server Agent is installed on it by looking at the Agent column. If the agent is not
installed, click the Install Agent button and follow the instructions. Make sure that you install
RDS on the server too (see Terminal Server Requirements above).
Adding a Terminal Server Manually
If you couldn't find any servers using the functionality described above, you can add a server
manually as follows:
1 Click Add in the Tasks drop-down menu to launch the Add Terminal Server wizard.
2 In the Server field, specify the server IP address or FQDN.
3 Select the Add Firewall Rules option to automatically configure the firewall on the server.
4 Select the Install Terminal Services option if the server doesn't have it installed. See Terminal
Server Requirements at the beginning of this topic.
5 Select the Reboot (if required) option. The server will be restarted if Parallels RAS finds it
necessary. Please note that this option is ignored if a reboot is pending on a local machine (i.e.
the reboot of a local machine will not be forced).
6 Click Next.
7 In the next step, a checking is performed if the RAS Terminal Server Agent is installed on the
server.
If the result is negative (agent is not installed):
a Click Install to push install the agent.
b In the Installing Terminal Server Agent dialog, select the server name on which the agent
is to be installed.
c (Optional) Select the Override system credentials option to specify and use different
credentials to connect to the server.
d Click Install to install the agent. Click Done once the agent is installed. If the push
installation of the RAS Terminal Server Agent fails (e.g. SMB share is not available, cannot
push agent due to firewall rules, etc.), please refer to the Installing RAS Terminal Server
Agent Manually section (p. 38), which follows this one.
8 In the Agent Information dialog, click Add to add the terminal server to the Parallels RAS site.
9 Click Apply to commit the new settings.
Installing RAS Terminal Server Agent Manually
You may need to install the RAS Terminal Server Agent manually if the automatic push installation
cannot be performed. For instance, an SMB share may be not be available or the firewall rules may
interfere with the push installation, etc.
38
Page 39

Terminal Servers
Installing RAS Terminal Server Agent Manually
1 Log into the server where the RAS Terminal Server Agent is to be installed using an
administrator account and close all other applications.
2 Copy the Parallels Remote Application Server installation file (RASInstaller.msi) to the
server and double-click it to launch the installation.
3 Once prompted, click Next and accept the End-User license agreement.
4 Specify the path where the RAS Terminal Server Agent should be installed and click Next.
5 Select Custom and click Next.
6 Click on RAS Terminal Server Agent and select Entire Feature will be installed on local
hard drive from the drop-down menu.
7 Ensure that all other components are deselected and click Next.
8 Click Install to start the installation.
9 Click Finish once the installation is finished.
The RAS Terminal Server Agent doesn't require any configuration. Once the agent is installed,
highlight the server name in the Parallels Remote Application Server Console and click Check
Agent in the Tasks drop-down menu to update the server status.
Uninstalling RAS Terminal Server Agent
To uninstall RAS Terminal Server Agent from a server:
1 Navigate to Start > Control Panel > Programs > Uninstall a Program.
2 Find Parallels Remote Application Server in the list of installed programs.
3 If you don't have any other Parallels RAS components on the server that you want to keep,
right-click Parallels Remote Application Server and then click Uninstall. Follow the
instructions to uninstall the program. You may skip the steps below.
4 If you have other RAS components that you want to keep on the server, right-click Parallels
Remote Application Server and then click Change.
5 Click Next on the Welcome page.
6 On the Change, repair, or remove page, select Change.
7 On the next page, select Custom.
8 Select RAS Terminal Server Agent, then click the drop-down menu in front of it, and click
Entire feature will be unavailable.
9 Click Next and complete the wizard.
39
Page 40

Terminal Servers
Configuring a Terminal Server
After you add a Terminal Server to a site, you can begin using it to host published resources right
away. In this section, we'll talk about how you can configure and manage an existing Terminal
Server.
Read on to learn how to:
• Check RAS Terminal Server Agent Status (p. 40)
• Change a Terminal Server Site Assignment (p. 41)
• View and Modify Terminal Server Properties (p. 41)
Check RAS Terminal Server Agent Status
A terminal server must have a RAS Terminal Server Agent installed to provide the intended
functionality. In addition to this, Remote Desktop Services (formerly Terminal Services) must be
installed in Windows on the server.
Normally, when you add a terminal server to a site in the RAS Console, the Terminal Server Agent
and the Remote Desktop Services are installed by default. However, if you skipped the installation
(or if you or someone uninstalled the agent or RDS from the server later), you can check their status
and take appropriate actions.
To check the RAS Terminal Server Agent and RDS status and install them if necessary:
1 First, you can look at the Agent State column in the Terminal Services list. If there's a
problem with the Terminal Server Agent or RDS, the column will display an appropriate error
message.
40
Page 41

Terminal Servers
2 Right-click a server and then click Check Agent in the context menu. The Agent Information
dialog opens.
3 If the agent and/or Terminal Services (RDS) are not installed on the server, you need to install
them. To do so, click Install and follow the instructions.
4 After the installation is complete, you may need to reboot the terminal server on which the
installation was performed.
Change Terminal Server Site Assignment
You can assign a terminal server to a different site in your farm if you need to do so. Please note
that this functionality is only available if you have more than one site in your farm.
To change the site assignment:
1 Right-click a terminal server and then click Change Site in the context menu. The Change Site
dialog opens.
2 Select a site in the list and click OK. The server will be moved to the Terminal Servers list of
the target site (Farm / <new-site-name> / Terminal Servers).
View and Modify Terminal Server Properties
To configure a Terminal Server:
1 In the RAS Console, navigate to Farm / Site / Terminal Servers.
2 Right-click a server and click Properties in the context menu.
3 The Server Properties dialog opens where you can configure the terminal server.
41
Page 42

Terminal Servers
The rest of this section describes how to set individual server configuration properties.
General
Select or clear the Enable Server in site option to enable or disable a server in the site. By default,
a server is enabled. A disabled server cannot serve published applications and virtual desktops to
clients.
Other elements on this page are:
• Server: Specifies the server name.
• Description: Specifies the server description.
• Change Direct Address: Select this option if you need to change the direct address that
Parallels Client uses to establish a direct connection with the terminal server.
42
Page 43

Terminal Servers
Agent
Each terminal server in the farm has a RAS Terminal Server Agent installed to provide a connection
between the Parallels Remote Application Server and the terminal server. Use the Agent tab page
to configure the agent.
To use default settings, select the Inherit default settings option. To view or modify the default
settings, click the Edit Defaults link.
If you want to specify custom settings for a given server, clear the Inherit default settings option
and specify agent properties as follows:
• Port. Specifies a different remote desktop connection port number if a non-default port is
configured on the server.
• Max Sessions. Specifies the maximum number of sessions.
• Publishing Session Disconnect Timeout. Specifies the amount of time each session remains
connected in the background after the user has closed the published application. This option is
used to avoid unnecessary reconnections with the server.
43
Page 44

Terminal Servers
• Publishing Session Reset Timeout. This feature allows you to control how long it takes for a
session to be logged off after it is marked as "disconnected".
• Allow Client URL/Mail Redirection. Select this option to allow http and mailto links to be
opened using a local application on the client computer rather than the server’s resources. To
configure a list of URLs which should not be redirected, navigate to the URL Redirection tab in
the Settings node of a site.
• Allow 2XRemoteExec to send command to the client. Select this option to allow a process
running on the server to instruct the client to deploy an application on the client side. More
about 2XRemoteExec in the Using RemoteExec subsection below.
• Enable applications monitoring. Enable or disable monitoring of applications on the server.
Disabling application monitoring stops the WMI monitoring to reduce CPU usage on the server
and network usage while transferring the information to RAS Publishing Agent. If the option is
enabled, the collected information will appear in a corresponding RAS report. If the option is
disabled, the information from this server will be absent from a report.
• Use RemoteApps if available. Enable this option to allow use of remote apps for shell-related
issues when an app is not displayed correctly. This feature is supported on the Parallels Client
for Windows only.
Using 2XRemoteExec
2XRemoteExec is a feature that facilitates the servers ability to send commands to the client. This is
done using the command line utility 2XRemoteExec.exe. Command line options include:
Command Line Parameter Parameter Description
-s
-t
-?
"Path for Remote Application"
Used to run the 2XRemoteExec command in ‘silent’ mode.
Without this parameter, the command will display pop up
messages from the application. If you include the parameter, the
messages will not be displayed.
Is used to specify the timeout until the application is started.
Timeout must be a value between 5000ms and 30000ms. Note
that the value inserted is in ‘ms’. If the timeout expires the
command returns with an error. Please note that the application
might still be started on the client.
Shows a help list of the parameters that 2XRemoteExec uses.
The Application that will be started on the client as prompted
from the server.
2XRemoteExec examples:
The following command displays a message box describing the parameters that can be used.
2XRemoteExec -?
This command runs Notepad on the client.
2XRemoteExec C:\Windows\System32\Notepad.exe
In this example, the command opens the C:\readme.txt file in the Notepad on the client. No
message is shown and 2XRemoteExec would wait for 6 seconds or until the application is started.
44
Page 45

Terminal Servers
2XRemoteExec C:\Windows\System32\Notepad.exe “C:\readme.txt”
User Profile Disks
User profile disks store user and application data on a single virtual disk that is dedicated to one
user’s profile. Virtual disks are reattached at logon and are completely transparent to the user, so
the user can save their data or change and save their app settings on what appears to be a local
disk. All personal data and settings persist when connecting to different computers in a virtual
desktop collection or session collection.
To use default user profile disks settings, select the Inherit default settings option. To view or
modify the default settings, click the Edit Defaults link.
To use specific settings:
1 Clear the Inherit default settings option.
2 In the User profile disks drop down list, select one of the following:
• Do not change. Keep the current server settings. This is the default setting.
• Enabled. Enable user profile disks.
• Disabled. Disable user profile disks.
45
Page 46

Terminal Servers
3 Specify a network location where the disks should be created using the Microsoft Windows
UNC format (e.g. \\RAS\users\disks).
4 Specify the maximum allowed disk size (in gigabytes) in the Maximum size field.
Please note that the server must have full control permissions on the user profile disk share.
RDP Printer
The RDP Printer tab page allows you to configure the renaming format of redirected printers. The
format may vary depending on which version and language of the server you are using.
To use the default RDP printer settings, select the Inherit default settings option. To view or
modify the default options, click the Edit Defaults link.
The RDP Printer Name Format drop-down list allows you to select a printer name format
specifically for the configured server.
Select the Remove session number from printer name and/or the Remove client name from
printer name to exclude the corresponding information from the printer name.
46
Page 47

Terminal Servers
Grouping Terminal Servers
Terminal Server groups can be used to specify from which group of servers a published resource
should be published in the wizard. It is highly recommended to use groups in a multi-server
environment to ease the management of publishing items.
To create or modify a terminal server group:
1 With Farm > Terminal Servers selected in the navigation tree, click the Groups tab.
2 To create a new group, click Add from the Tasks drop down menu (or click the + icon). To
modify an existing group, right-click it and then click Properties in the context menu.
3 In the Group Properties dialog, specify the group name and select the servers to add to the
group.
Using a Terminal Server Scheduler
The Scheduler tab page in the Terminal Servers view allows you to reboot or temporarily disable
servers according to a schedule.
To create a new scheduler task or modify an existing one:
1 In the RAS Console, navigate to Farm / <server-name> / Terminal Servers.
2 In the right pane, click the Scheduler tab.
3 To create a new task, click Add in the Tasks drop-down menu and select a desired task from
the following options:
• Disable Server
• Disable Server Group
• Reboot Server
• Reboot Server Group
To modify an existing task, right-click it and select Properties in the context menu. To delete a
task, right-click it and select Delete.
4 The schedule properties dialog will have slightly different options depending on the task type
that you choose in the Tasks > Add drop-down menu. The differences are described in the
following steps.
5 Select Enable Schedule to enable the task.
6 Specify the task name, target server (or server group if you've selected a group task), and an
optional description.
7 Specify the start date and time, duration, and the scope (the Repeat property). If you select
Never in the Repeat drop-down box, the task will run only once.
47
Page 48

Terminal Servers
8 The Notify Users Message box allows you to type a message that will be sent to the users
before the task is executed (you can select the time period using the Send message [ ] before
action is triggered drop-down list).
9 The Options section will have different options depending on the task type:
• If a task is Disable Server or Disable Server Group, the available option is On Disable.
You can use it to specify how the active session states should be handled.
• If a task is Reboot Server or Reboot Server Group, the available options are Enable Drain
Mode and Force Server Reboot After (the options work together). If you enable the drain
mode, the following will happen. When the task triggers, new connections to a server will be
refused but active connections will continue to run. A server will be rebooted when all active
users end their sessions or when it's time to force reboot it, whichever comes first. For
active users not to lose their work, specify a message in the Notify Users Message box
advising them to save their work and log off. Please also see the Terminal Server Drain
Mode Examples subsection below.
10 Click OK to save the changes and close the dialog.
Terminal Server Drain Mode Examples
Example 1: Scheduling a server group for reboot without the drain mode
A server group contains 3 servers: A, B, C
• Date: 7/24/2015
• Start Time: 10:45am
• Send Message: 2 minutes before
Users with active sessions are notified 2 minutes before the server rebooting task is triggered.
Example 2: Scheduling a server group for reboot with the drain mode enabled
A server group containing 3 servers: A, B, C
• Date: 7/24/2015
• Start Time: 10:45am
• Drain mode: enabled
• Force reboot after: 3 hours
• Send Message: 2 minutes before
The session users are notified 2 minutes before the server rebooting task is triggered.
When the task is triggered:
1 The drain mode is enabled on the servers.
2 Server A and B have no active or disconnected sessions, so they are restarted immediately.
48
Page 49

Terminal Servers
3 Server C still has open/disconnected sessions, so it continues to run until all users end their
sessions. If the server still has active sessions in three hours, the sessions are terminated and
the server is restarted.
Note: Computer Configuration / Administrative Templates / Windows Components / Remote
Desktop Services / Remote Desktop Session Host / Connection / Allow users to connect remotely
using remote desktop services must be set to Not configured, otherwise it takes precedence.
Managing Logons
The logon management feature allows you to enable or disable logons from Terminal Servers. The
feature performs the same tasks as the change logon command-line utility.
To manage logons:
1 In the Parallels Remote Application Server Console, navigate to Farm / Site / Terminal
Servers.
2 Select a terminal server and click Tasks > Control.
3 The Control menu item has the following submenu items:
• Enable logons — enables logons. This option performs the same action as the change
logon /enable command.
• Disable logons and reconnections — disables subsequent logons. Does not affect
currently logged on users. This option performs the same action as change logon
/disable command.
• Disable logons until server reboot — disables logons until the computer is restarted, but
allows reconnections to existing sessions. Same action as the change logon
/drainuntilrestart command.
To see the current logon control mode for a terminal server, right-click it and point to Control in the
context menu. The checked-out option indicates the current logon control mode of the selected
terminal server. To do this check from the command line, execute the chan ge logon /QUERY
command on the server.
Please also note the following:
• When applying a logon control mode on a server, ensure that the agent state is updated
accordingly.
• You must set the logon control options for the servers one-by-one. If you need to do it for a
group of servers, you can use the scheduler (see Using a Terminal Server Scheduler (p. 47)).
• There's no option for disabling logons from new client sessions but allowing reconnections to
existing sessions (change logon /DRAIN) because its behavior is identical to the Disable
logons until server restart option (change logon /DRAINUNTILRESTART).
49
Page 50

Terminal Servers
• Computer Configuration / Administrative Templates / Windows Components / Remote
Desktop Services / Remote Desktop Session Host / Connection / Allow users to connect
remotely using remote desktop services must be set to Not configured, otherwise it takes
precedence.
Publishing from a Terminal Server
This section describes how to publish resources hosted by a Terminal Server. The publishing
functionality described here is accessed from the Publishing category in the RAS Console.
You can also publish resources using a publishing wizard in the Start category, as described in the
Setting Up a Simple RAS Environment section (p. 21). The Start category publishing wizard is a
simplified version that gives you convenient options of selecting the resources that you want to
publish. You may try both approaches and choose the one that better suits your needs.
Read on to learn how to publish resources from a Terminal Server.
Publishing a Desktop from a Terminal Server
To publish a desktop from a terminal server:
1 In the RAS Console, select the Publishing category and click the Add icon below the
Published Resources tree. This will launch the publishing wizard.
50
Page 51

2 In the first step of the wizard, select Desktop and click Next.
Terminal Servers
51
Page 52

Terminal Servers
3 In the Select Desktop Type step, select Terminal Server Desktop and click Next.
4 Select the Terminal Server(s) which desktops you want to publish. You can select all servers on
the site, server group(s), or individual servers. Please note that if you have just one terminal
server, this step will be skipped.
5 Click Next.
6 In the next step:
• Specify a name and description for the shared desktop, and, optionally, change the icon.
• Select the Connect to console option, so that the users will be connecting to console
rather than a virtual session.
• Select the Start automatically when user logs on option if you want to open a desktop as
soon as a user logs on.
• Specify the desired screen resolution using the Desktop Size drop-down list. To set a
custom width and height of the screen, select Custom in the Size drop-down list and
specify the desired values in the fields provided.
52
Page 53

Terminal Servers
• In the Multi-Monitor drop-down, select whether the multi-monitor support should be
enabled, disabled, or whether the client settings should be used.
7 When done, click Finish to publish the desktop.
Publishing an Application from a Terminal Server
To publish an application from a terminal server follow the below procedure:
1 In the RAS Console, select the Publishing category and then click the Add icon below the
Published Resources tree (or right-click inside the Published Resources box and click Add
in the context menu). This will launch the publishing wizard.
53
Page 54
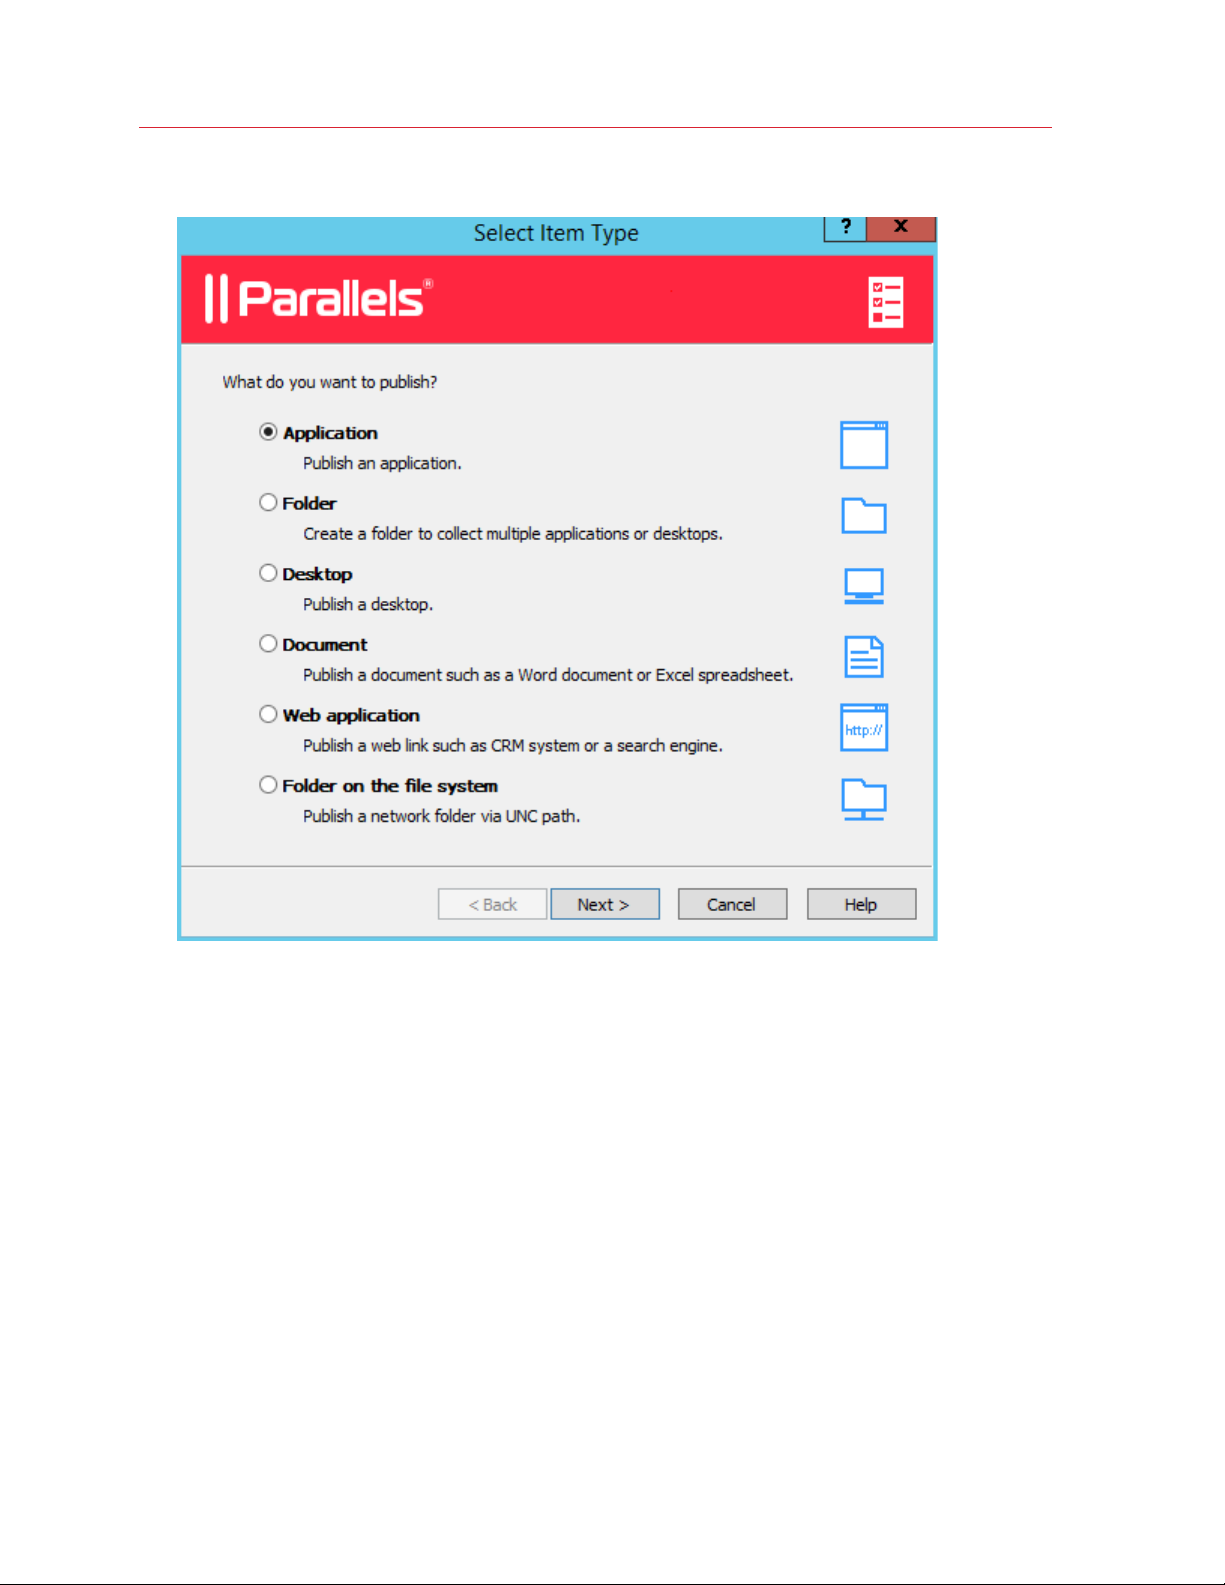
Terminal Servers
2 On the Select Item Type wizard page, select Application and click Next.
3 On the Select Server Type page, select Terminal Server and click Next.
4 One the Select Application Type page, select one of the following available options:
• Single Application. Choose this option to fully configure the application settings yourself
such as the executable path etc.
• Installed Application. Choose this option to publish an application that is already installed
on the server, therefore all of the application settings are automatically configured.
• Predefined Application. Choose this option to publish a commonly used Windows
application such as Windows Explorer.
5 Click Next.
6 On the Publish From page, specify from which terminal servers the application should be
published. You have the following options:
• All Servers in Site. If selected, the application will be published from all servers that are
available on the site.
54
Page 55

Terminal Servers
• Server Groups. Select this option and then select individual server groups to publish the
application from.
• Individual Servers. Select this option and select individual servers to publish the application
from.
Please note that the Publish From wizard page will appear only if you have multiple terminal
servers. If you have just one server, this page will be skipped by the wizard. The page will also
be skipped if the application type that you are installing is Predefined Application.
7 Click Next.
8 Depending on the application type that you selected on the Select Application Type page, the
next wizard page will be one of the following:
• If you selected Single Application, the Application page will open where you have to
specify the application settings manually (more about this option later in this section).
• If you selected Installed Applications, the Installed Applications page will open listing
available applications (the applications are grouped by functionality). Select an application
you wish to install and click Next. Follows the instructions to complete the wizard.
• If you selected Predefined Application, the Select Predefined Applications page will
open listing available applications. Select an application you wish to publish and click Finish.
9 If you selected Single Application on the Select Application Type wizard page, the
Application page will open at this point. Specify the application settings as follows (see the
screenshot below):
Note that if you populate the Target field first using the "browse" button ([...]), the application
Name, Description, and icon will be chosen automatically. You can override this selection if
you wish.
• Name. Choose and type a name for the application.
• Description. Type an optional description.
• Run. Select the application window state (normal window, minimized, maximized).
• Start automatically when user logs on. Select this option if you want to start an
application as soon as a user logs on. This option works on desktop versions of Parallels
Client only.
• Change Icon. Change the application icon (optional).
• Server(s). Allows you to specify the rest of the server parameters individually for each server
the application was published from. Select a server from the drop-down list box and specify
the parameters. Repeat for other servers in the list.
• Target. Specify the application executable path and file name.
• Start in. If the Target field is valid, this field will be populated automatically. You can specify
your own path if needed.
55
Page 56

Terminal Servers
• Parameters. If the application accepts startup parameters, you can specify them in this
field.
10 When done, click Finish to publish the application.
Publishing a Web Application from a Terminal Server
A web application is like any other application that you can publish using the standard application
publishing functionality. However, to simplify publishing of straight URL links to web applications, a
separate publishing item type is available that allows you to accomplish this task with minimal
number of steps.
To publish a web application:
1 In the RAS Console, select the Publishing category and then click the Add icon below the
Published Resources tree (or right-click inside the Published Resources box and click Add
in the context menu). This will launch the publishing wizard.
2 On the Select Item Type wizard page, select Web Application and click Next.
56
Page 57

Terminal Servers
3 On the Select Server Type page, select Terminal Server and click Next.
4 On the Publish From page, select the server(s) to publish from. Note that if you have just one
terminal server, the Publish From page will not appear.
5 On the Web Application wizard page that opens, specify the web application name,
description, window state, and the URL. Select the Force to use Internet Explorer option if
needed. To browse for a specific application icon, click Change Icon.
6 When done, click Finish to publish the application.
When published, the web application will appear in the Publishing > Published Resources list,
just like any other application.
Publishing a Network Folder from a Terminal Server
You can publish a filesystem folder via UNC path to open in Windows explorer. To minimize the
number of configuration steps, a special publishing item is available that allows you to publish a
network folder from a terminal server.
To publish a network folder:
1 In the RAS Console, select the Publishing category and then click the Add icon below the
Published Resources tree (or right-click inside the Published Resources box and click Add
in the context menu). This will launch the publishing wizard.
2 On the Select Item Type wizard page, select Folder on the file system and click Next.
3 On the Select Server Type page, select Terminal Server and click Next.
4 On the Publish From page, select the server(s) to publish from. Note that if you have just one
terminal server, the Publish From page will not appear.
5 On the UNC Folder wizard page, specify the usual application properties.
57
Page 58

Terminal Servers
6 In the UNC path field, enter the UNC path of the folder you wish to publish. Click the [...]
button to browse for a folder (it may take some time for the Browse for Folder dialog to open).
7 Click Finish to publish the folder and close the wizard.
When published, the network folder will appear in the Publishing > Published Resources list, just
like any other application. If you select it and then click the Application tab, the application settings
will be as follows:
• The Target property will always be set to PublishedExplorer.exe. This binary is created
automatically (via agents pushing) and is simply a copy of the standard explorer.exe
executable.
• The Parameters property specifies the network folder that we want to publish. The folder path
can be in any format that the explorer.exe can handle.
Please note that although you have all standard application property tabs enabled for this
publishing item, at least the following items should be ignored, as they are completely irrelevant:
• Publish From
• File Extensions
58
Page 59

Terminal Servers
Publishing a Document from a Terminal Server
To publish a document from a terminal server, follow the below procedure:
1 In the RAS Console, select the Publishing category and then click the Add icon below the
Published Resources tree (or right-click inside the Published Resources box and click Add
in the context menu). This will launch the publishing wizard.
2 On the Select Item Type wizard page, select Document and click Next.
3 Select Terminal Server and click Next.
4 Specify the content type of the document you want to publish. You can select the content type
from the predefined list or specify a custom content type in the Custom content types input
field.
5 Click Next when ready.
6 On the Publish From page, specify from which terminal servers the application should be
published. You have the following options:
• All Servers in Site. If selected, the application will be published from all servers that are
available on the site.
• Server Groups. Select this option and then select individual server groups to publish the
application from.
• Individual Servers. Select this option and select individual servers to publish the application
from.
Please note that the Publish From wizard page will appear only if you have multiple terminal
servers. If you have just one server, this page will be skipped by the wizard.
7 On the Application page, enter a name, an optional description, a Window state, and an icon if
needed.
8 Use the [...] button next to the Target input field to browse for the document. All other fields will
be automatically populated. To edit any of the auto populated fields, highlight them and enter
the required details.
9 (Optional) In the Parameters input field, specify the parameters to pass to the application when
it starts.
Note: Use the Server(s) drop down list to specify different document settings for a specific server in
case the document is configured differently on that particular server. The settings will be saved for each
server you select individually.
10 Click Finish to publish the document.
59
Page 60

C HAPTER 6
VDI Hosts
A VDI host is a computer on which a hypervisor is running one or more virtual machines (also
known as guest virtual machines or guest VMs). Each VM runs an operating system called the
guest operating system (or guest OS). Please note that Parallels Remote Application Server
supports Windows as a guest OS only.
By adding a VDI host to a site, you can manage VMs running on it, create new VMs from a
template, and publish desktops and applications from their respective guest operating systems.
This chapter explains how to add, configure, and use VDI hosts and guest VMs to serve published
resources to your users.
In This Chapter
Adding a VDI Host .................................................................................................. 60
Installing an Appliance and Configuring a VDI Host .................................................. 63
Using Parallels RAS Templates ............................................................................... 67
VDI Host Pool Management .................................................................................... 72
Persistent Guest VMs ............................................................................................. 75
Publishing from a Guest VM ................................................................................... 75
VDI Agent Technology ............................................................................................ 79
Adding a VDI Host
Before adding a server as a VDI host to a site, you need to install one of the supported hypervisors
on it. Parallels Remote Application Server supports VDI hosts based on the following virtualization
technologies:
• VMware ESXi
• VMware VCenter
• Microsoft Hyper-V
• Microsoft Hyper-V Failover Cluster
• Citrix XenServer
The VDI Agent Technology section (p. 79) provides information on how to install different
hypervisors. The rest of this section assumes that a hypervisor is already installed on a server.
Page 61

VDI Hosts
Searching for VDI Hosts
To search for available VDI hosts on your network:
1 In the RAS console, navigate to the Farm / Site / VDI Hosts node, where <site_name> is the
site to which you would like to add a VDI host.
2 On the Virtual Desktop Hosts tab page, click Tasks > Find.
3 The Find Virtual Desktop Hosts dialog opens and begins to search for VDI hosts. If no VDI
hosts are found, you can add a host manually (jump to the Manually Adding a VDI Host
subsection below).
4 If at least one suitable VDI host is found, it will be displayed in the dialog. You can select the
Show all hosts option to display all available hosts, including the hosts that don't meet the
minimum system requirements. To refresh the list, click Refresh.
5 Verify that the host of interest has RAS VDI Agent installed by looking at the Agent column. If
the agent is not installed, click the Install Agent button and follow the instructions.
6 Click OK to add the VDI host to the site.
Manually Adding a VDI Host
To add a VDI host manually:
1 In the Tasks drop-down menu, click Add to launch the Add VDI Server wizard.
2 Select the hypervisor type that your VDI host is running and specify the host's IP address or
FQDN.
3 Select the Add Firewall Rules option to automatically configure the firewall on the server.
4 The VDI Agent-specific options behave differently for different hypervisor types. The VDI Agent
Technology section (p. 79) provides the complete details.
5 Click Next.
6 In this step, Parallels Remote Application Server checks if the RAS VDI Agent is installed on the
VDI host. If the agent is not installed, do the following:
a Click Install to push install the agent on the VDI host.
b In the Installing RAS VDI Host Agent dialog, highlight the server name on which the RAS
Agent is to be installed.
c (Optional) Select the Override system credentials option to specify and use different
credentials to log into to the target server.
d Click Install to install the agent.
e Click Done once the agent is installed. If the automatic installation of the RAS VDI Agent
fails, refer to the Installing RAS VDI Agent Manually section (p. 62).
7 Click Add to add the VDI host to the Parallels Remote Application Server farm.
61
Page 62

VDI Hosts
Checking the RAS VDI Agent Status
The RAS VDI Agent must be installed on a VDI host in order for it to communicate with the
hypervisor and provide the remote desktop services.
To check the RAS VDI Agent status:
1 First, you can look at the Agent State column in the VDI Hosts list. If there's a problem with
the agent, the column will display an appropriate error message.
2 Right-click a host and then click Check Agent in the context menu. The VDI Agent
Information dialog opens displaying the information about the VDI Agent, VDI Services, and
other related info.
3 If the VDI Agent is not installed, click the Install button and follow the instructions. Similarly, if
VDI Services are not enabled, enable them.
Installing RAS VDI Agent Manually
You may need to install the RAS VDI Agent on a VDI host manually if the automatic push installation
cannot be performed. For instance, an SMB share may be not be available or the firewall rules may
interfere with the push installation, etc.
Installing RAS VDI Agent Manually
To install the agent:
1 Log into the server where the RAS VDI Agent is to be installed using an administrator account
and close all other applications.
2 Copy the Parallels Remote Application Server installation file (RASInstaller.msi) to the
server and double-click it.
3 Once prompted, click Next and accept the End-User license agreement.
4 Specify the path where the RAS Agent should be installed and click Next.
5 Select Custom and click Next.
6 Click on the RAS VDI Agent and select Entire Feature will be installed on local hard drive
from the drop-down menu.
7 Ensure that all other components are deselected and click Next.
8 Click Install to start the installation. Click Finish once the installation is finished.
The RAS VDI Agent does not require any configuration. Once the agent is installed, highlight the
server name in the RAS Console and click Check Agent. If the agent is installed properly, the
status should change to Agent Installed.
62
Page 63

VDI Hosts
Uninstalling RAS VDI Agent
To uninstall the RAS VDI Agent from a server:
1 Navigate to Start > Control Panel > Programs > Uninstall a Program.
2 Find Parallels Remote Application Server in the list of installed programs.
3 If you don't have any other Parallels RAS components on the server that you want to keep,
right-click Parallels Remote Application Server and then click Uninstall. Follow the
instructions to uninstall the program. You may skip the rest of these instructions.
4 If you have other RAS components that you want to keep on the server, right-click Parallels
Remote Application Server and then click Change.
5 Click Next on the Welcome page.
6 On the Change, repair, or remove page, select Change.
7 On the next page, select Custom.
8 Select RAS VDI Agent, then click the drop-down menu in front of it, and click Entire feature
will be unavailable.
9 Click Next and complete the wizard.
Installing an Appliance and Configuring a VDI Host
For some hypervisors, such as VMware and XenServer, you have to configure and run a virtual
appliance on a VDI host instead of the RAS VDI Agent. A virtual appliance is a virtual machine
image pre-configured in a certain way, which you can designate as RAS VDI Agent.
Installing the Appliance
For the information about how to install an appliance, refer to the VDI Agent Technology section
(p. 79).
Configuring a VDI Host
To configure a VDI host, select it in the Virtual Desktop Hosts list and click Tasks > Properties.
The Host Properties dialog opens.
Note: Some of the properties described below may be unavailable on some servers. This depends on
the type of the hypervisor installed on the host server.
63
Page 64

VDI Hosts
Enabling or Disabling a VDI Host in the Farm
By default a VDI host is enabled in the farm. When it is disabled, published applications and virtual
desktops cannot be served from it. To disable a host, clear the Enable Host in site option on the
Properties tab page.
Configuring VDI Host Connection Settings
The following properties can be configured on the Properties tab page:
• VDI Type. Virtualization technology type.
• VDI Version. A version of the selected virtualization technology. If the hypervisor version that
you are using is not listed, select Other.
• VDI Host. The VDI host IP address.
• VDI Port. Port number on which the VDI host listens for incoming connections.
• VDI Agent. The appliance IP address (if the agent is running on an appliance).
64
Page 65

VDI Hosts
• Change Direct Address. If selected, allows to specify the IP address that can be used by
Parallels Clients to directly connect to the host. The direct address is only used in the Direct
Connection mode and it could be an internal or external IP address.
Specifying Credentials
On the Credentials tab page, specify the user name and password to log into the VDI host. Click
the Check Credentials button to verify the credentials that you've entered.
65
Page 66
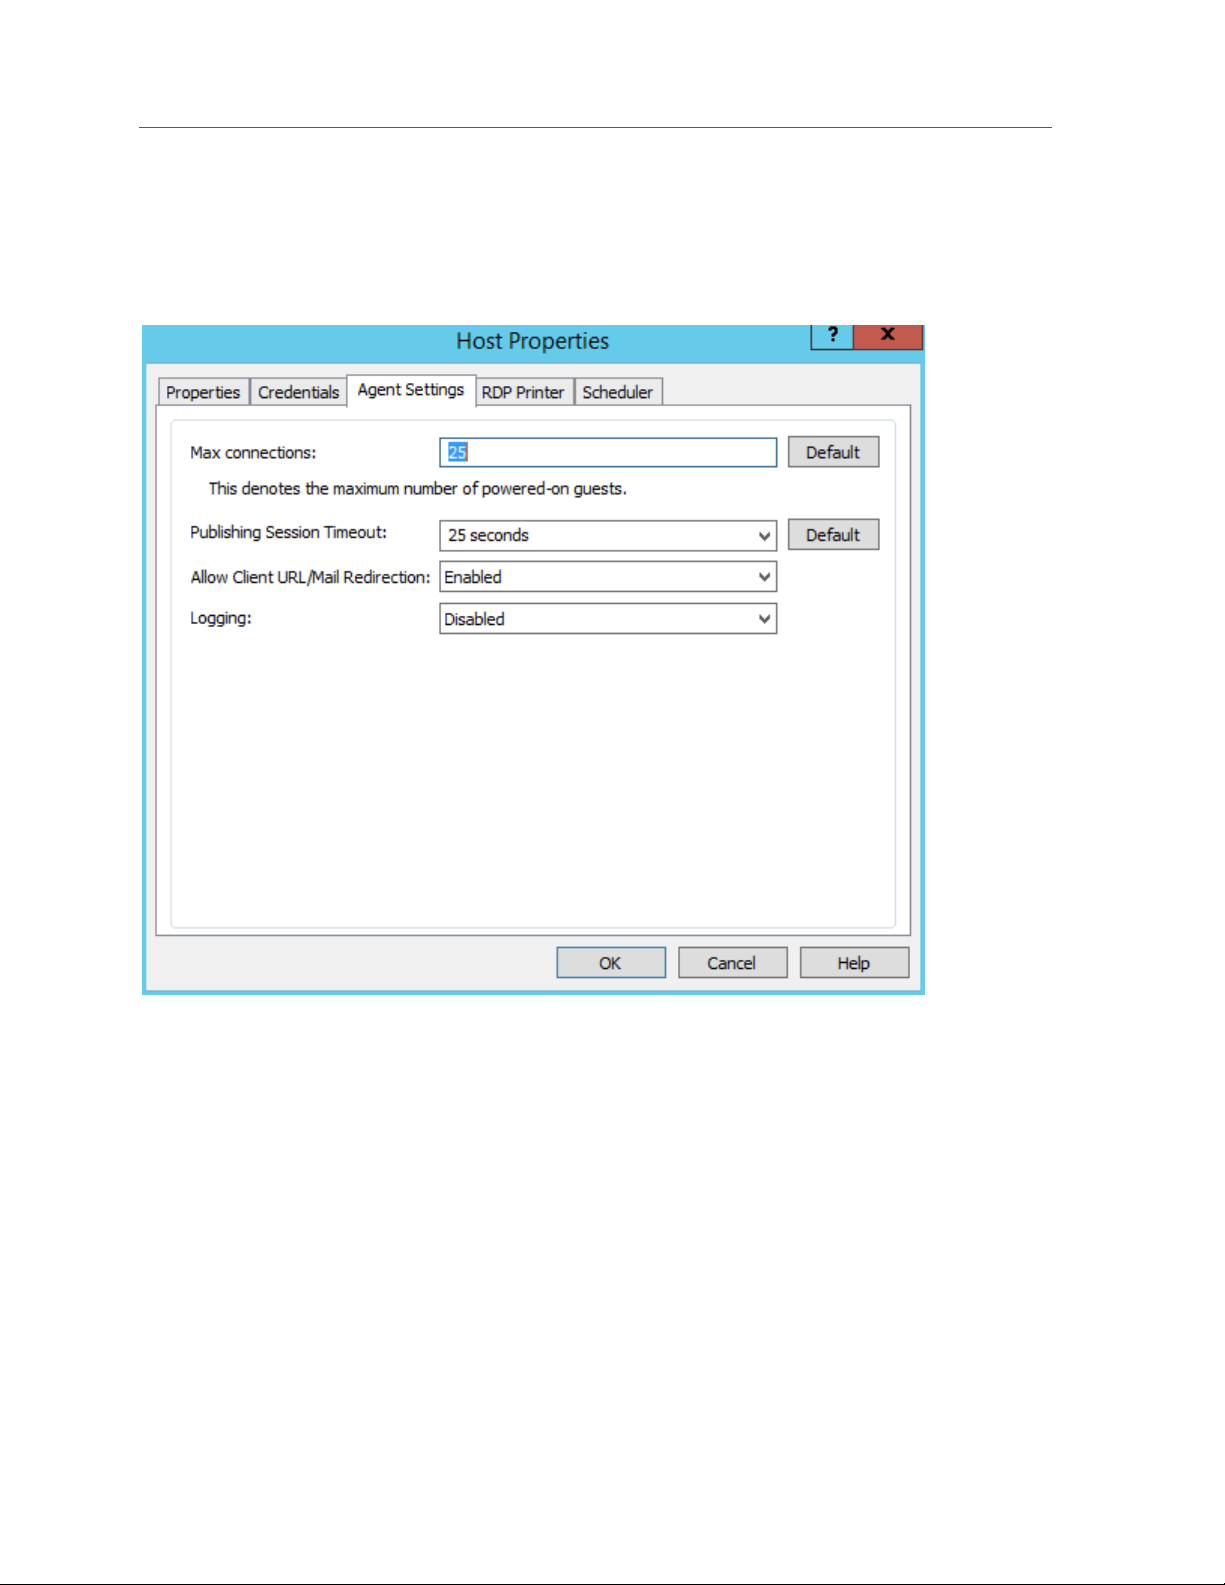
VDI Hosts
Configuring the RAS VDI Agent on the Server
Each VDI host in the farm has the RAS VDI Agent installed (or running as an appliance). The VDI
agent can be configured on the Agent Settings tab page.
• Max Connections. Specifies the maximum allowable number of powered-on guest VMs.
• Publishing Session Timeout. Specifies the amount of time each session remains connected in
the background after the user has closed the published application. This option is used to avoid
unnecessary reconnections with guest VMs.
• Allow Client URL/Mail Redirection. Select this option to allow http and mailto links to be
opened using a local application on the client computer rather than the server resources.
• Logging. Enable or disable the RAS VDI Agent logging. Logging should only be enabled if
instructed by the Parallels RAS Support.
Configuring RDP Printing
The RDP Printer tab allows you to configure the renaming format of redirected printers. The
format may vary depending on which version and language of the server you are using. Select the
RDP Printer Name Format option specifically for the configured server:
66
Page 67

VDI Hosts
• Printername (from Computername) in Session no.
• Session no. (computername from) Printername
• Printername (redirected Session no)
The other RDP Printing options available in the RDP Printer tab are:
• Remove session number from printer name
• Remove client name from printer name
Configuring VDI Host Maintenance Time Window
The Scheduler tab page allows you to create a maintenance time window for the server. During
this time, published resources won’t be accessible from that server.
To configure a maintenance time window click Tasks > Add and then set the following options:
• Start date
• Time
• Duration
• Repeat
The On disable option allows you to specify what should happen to current sessions when a
scheduled task triggers.
Using Parallels RAS Templates
Parallels RAS Templates are used to automate the creation and deployment of guest VMs in
Parallels Remote Application Server. A RAS Template is created as a copy of an existing guest VM
but cannot run as a regular virtual machine. You can customize a RAS Template for use with
Parallels Remote Application Server according to your needs. Once a template is ready, you can
use it to create guest VM clones (copies) that will inherit all the properties of the template. Guest
VMs are created as normal virtual machines from which you can serve applications, documents,
desktops to your Parallels RAS users.
RAS Templates can only be created with the following versions of Windows as a guest OS:
• Windows XP SP3
• Windows Vista
• Windows 7
• Windows 8
• Windows 10
Read on to learn how to create and configure Parallels RAS Templates.
67
Page 68

VDI Hosts
Creating a RAS Template
Note: To create a template from an existing virtual machine, the guest OS (Windows) must be configured
to obtain an IP address from a DHCP server.
To create a RAS Template:
1 In the RAS Console, navigate to Farm / Site / VDI Hosts.
2 Select the RAS Templates tab in the right pane.
3 In the Tasks drop-down menu, click Add.
4 In the Guest VM List dialog, select a guest VM from which you would like to create a RAS
Template and click OK.
5 In the next step, Parallels Remote Application Server will check if the source VM has the RAS
Guest VM Agent installed. If the agent is not installed, click Install and then specify credentials
to log into Windows in the VM. Click Done when finished. If the automatic installation of the
RAS Guest VM Agent fails (e.g. an SMB share is not available or the firewall rules don't allow to
perform a push installation), try installing it manually by running the main Parallels Remote
Application Server installer (RASInstaller.msi) in Windows in the VM. Use the Custom
installation option and select the RAS Guest VM Agent component to install.
6 In the Guest VM Agent Information dialog, click the Make Template button to create a RAS
Template.
7 The source VM will be powered off and the template creation process will begin.
Read on to learn how to configure a RAS Template.
Configuring a RAS Template
Once the template is created, the template configuration wizard automatically opens. You need to
complete the wizard before you can use the template to create virtual machines from it.
The RAS template configuration wizard consists of a few pages, which are described below.
Note: You can access the same configuration pages for an existing template by selecting it in the list and
then clicking Tasks > Properties. This will open a dialog (instead of the wizard described below), but the
pages and configuration options will be the same.
General
On the General page, specify the following options:
• RAS Template. Specify a name for the template.
68
Page 69

VDI Hosts
• Maximum guest VMs. Specify the maximum number of guest VMs that can be created from
this template. Once the number of existing guest VMs exceeds this number, a VM is deleted to
comply with the limitation.
• Pre-created guest VMs. Specify the number of VMs that will be automatically created in
advance. This is done in order to have some VMs ready right away. If all pre-created VMs are
already in use and another one is needed, it will be created on demand.
• Virtual machine name prefix. Specify a name prefix for guest VMs. A VM ID will be appended
to it to make the final VM name unique.
• Delete unused guest VMs after the following period. Enable this option to automatically
delete VMs that haven't been used for a specified period of time. Use the drop-down list to
specify the time period.
Advanced
On the Advanced page, specify the following options:
• Folder. Specify the folder where guest VMs created from this RAS Template will be stored. This
option is available if you are using Hyper-V, Hyper-V Failover Cluster, VMware vCenter and
Citrix XenServer.
• Native Pool. Specify the native pool to add the VMs to. This option is available if you are using
VMware ESX and VMware vCenter.
SysPrep
On the SysPrep page, you can configure SysPrep settings in Windows inside the RAS Template.
Specify the following properties:
• Computer name. Computer name that should be assigned to a VM.
• Owner name. Owner name.
• Organization. Organization name.
• Administrative password. Local Windows administrator password.
• Join domain. Name of a domain for the VM to join.
• Administrator. Domain account.
• Password. Domain account password.
• Target OU. Full DN of an organizational unit. Click the [...] button to browse Active Directory
and select an OU.
License Keys
On the License Keys page, specify the license key information that will be used to activate virtual
machines created from this template.
69
Page 70

VDI Hosts
First, select the license key management type that you are using in your organization (KMS or
MAK):
Key Management Service (KMS): If you are using KMS, click the Finish button to save the
template configuration information. Virtual machines that will be created from this template will look
for KMS in DNS (at the end of the OS mini-setup and domain joining) and will be activated
accordingly.
Multiple Activation Keys (MAK): If you are using MAK, do the following:
1 Click the Add button and type a valid key in the License key field.
2 In the Max guest VMs field, specify the maximum number of VMs that can be created from this
template.
3 Click OK.
4 Click Finish to save the template configuration information.
If you need to change the template configuration later, select it in the RAS Templates list and click
Tasks > Properties. Use the dialog that opens to view and modify the template properties.
How Guest VMs Are Created From a Template
After the RAS Template changes are committed to Parallels Remote Application Server, it will begin
creating guest VMs from the template, one virtual machine at a time. The number of VMs that will
be created is determined by the value specified in the Pre-created guest VMs field on the
Properties page (see Configuring a RAS Template (p. 68)).
As soon as a user connects to an existing guest VM, Parallels Remote Application Server begins
creating a new VM from the template, so the number of pre-created VMs remains unchanged.
Please note that creating a new VM from a template takes some time. If a VM is in the middle of
being created, and no other VMs are available, the user will have to wait until the VM is ready.
When a guest VM is no longer in use, and if the number of existing VMs exceeds the "pre-created"
value, a VM is deleted after the time period specified in the Delete unused guest VM after field on
the Properties page. If you didn't select that option, a VM is never deleted, but the total number of
VMs will never exceed the value specified in the Maximum guest VMs field on the Properties
page.
RAS Template Maintenance
In addition to viewing and modifying template configuration properties, you can perform a number
of maintenance tasks on a template. These tasks are described below.
70
Page 71

VDI Hosts
Viewing guest VMs created from a template
To view the list of guest VMs created from a template, select a template in the list and click Tasks
> Show guest VMs. The Template Guest VMs List dialog lists the guest VMs and their relevant
information. You can also see the remaining licenses info at the bottom of the screen.
Updating RAS Guest VM Agent inside a template
A RAS template should have the latest version of RAS Guest VM Agent installed in it. The agent is
installed when you create a template. When a new version of RAS Guest VM Agent becomes
available, it should be updated.
To check the RAS Guest VM Agent status inside a template, click Tasks > Check agent. If the
agent is up to date, a message box will be displayed confirming this. If a newer version of RAS
Guest VM Agent is available, you'll see a dialog asking if you want to update it. Click Yes to update
the agent. If you click No, you can check the status again later and update the agent at that time.
Template Maintenance Mode
Maintenance mode is used to update Windows inside a RAS Template. For instance, if you want to
install a server pack or a software update, you need to use the maintenance mode.
To install updates in Windows in a RAS Template:
1 Select a RAS Template and click Tasks > Maintenance. The template becomes disabled
(grayed out), so all operations on it (including creating new guest VMs) are suspended.
2 Using native tools of the corresponding hypervisor, start the template as a normal virtual
machine.
3 Install Windows updates or software as necessary.
4 When done, shut down the virtual machine.
5 Back in the RAS Console, select the template and click Tasks > Maintenance again to switch
the maintenance mode off.
Please note that any updates applied to a template in the maintenance mode will only affect future
clones. Existing guest VMs that were created from this template will not be affected, so if you want
them to include these updates, you will have to delete them and create new VMs.
When you are done configuring a RAS Template, click the Apply button on the main RAS Console
window to commit the changes to Parallels Remote Application Server.
71
Page 72

VDI Hosts
VDI Host Pool Management
Pools offer administrators more flexibility when managing an extensive number of guest VMs,
especially when they are implemented in large company infrastructures. The RAS Console provides
you with the framework and tools needed to create a complete Pool Management foundation.
To manage pools, in the RAS Console, navigate to Farm / Site / VDI Hosts and then click the
Pool Management tab.
Read on to learn how to:
• Add and Deleting Pools (p. 72)
• Add and Deleting Pool Members (p. 72)
• Configure Guest VMs in a Pool (p. 73)
• Use a Wildcard to Filter VMs (p. 74)
Adding and Deleting Pools
To add a pool, click the Tasks drop-down menu above the Pools list and then click Add (or click
the plus-sign icon). Type a pool name and then click anywhere outside the edit field.
To delete a pool, right-click it and then click Delete (or click the minus-sign icon, or Tasks >
Delete).
Adding and Deleting Pool Members
A VDI pool can contain different types of members. These could be all available guest VMs, specific
guest VMs, guest VMs created from a template, and even other pools.
To add a member to a pool:
1 Select a pool in the Pools list.
2 In the Tasks drop-down menu above the Members list, click Add and choose a member type
from the following list:
• All guest VMs in site. All guest VMs on all VDI hosts that are located on the site.
• All guest VMs in host. All guest VMs that are located on a particular VDI host. After clicking
this options, you'll be able to select a VDI host.
• Guest VM. A specific guest VM located in the farm. After clicking this options, you'll be able
to select a guest VM from the list.
72
Page 73

VDI Hosts
• Native pool. A group of guest VMs that were natively configured in the hypervisor as a pool.
Please note that a hypervisor may use a different term for pools (e.g. "resource pools"). After
clicking this option, you'll be able to select a native pool from the list, if any are available.
• Pool. An existing pool in the Parallels Remote Application Server (pool nesting). After
clicking this option, you'll be able to select an existing pool from the list.
• RAS template. Guest VMs that are automatically created from a RAS Template. After
selecting this option, you'll be able to select a RAS template. For more information about
RAS Templates, refer to Managing RAS Templates (p. 67).
3 After you click one of the above menu items (except All Guest VMs in Site), you will be
presented with the list of the available hosts, guest VMs, pools, or templates from which you
can make your selection. The All guest VMs in site item is simply added to the member list as
it adds all available guest VMs to the pool.
To delete a member from a pool, select the pool, then select a pool member you wish to delete,
and then click Tasks > Delete.
Configuring Guest VMs in a Pool
To configure a guest VM included in a pool, select a pool and then click Tasks > Show guests in
pool to open the Virtual Guests List dialog.
Checking the RAS Guest VM Agent Status
A guest VM should have the RAS Guest VM Agent installed in it. The agent is installed by default
when a guest VM is created from a RAS Template. If a guest VM was created outside the RAS
Console using the native hypervisor tools, it may not have the RAS Guest VM Agent installed in it. In
such a case, the guest VM will be able to serve only the desktop, but no applications or
documents. As a general rule, it is advisable that the RAS Guest VM Agent be installed in a guest
VM.
To check if the RAS Guest VM Agent is installed in a guest VM:
1 Select a guest VM in the list and then click Tasks > Check Agent.
2 The Guest VM Agent Information dialog opens displaying the information about the RAS
Guest VM Agent.
3 If the agent is not installed, click the Install button and follow the instructions. The agent will be
push installed in Windows running inside the guest VM.
Performing Guest VM Power Operations
The power operations icons at the bottom of the dialog allow you to start, stop, suspend, and reset
a guest VM.
73
Page 74

VDI Hosts
Configuring Guest VM Properties
To view and modify properties of a guest VM:
Select a guest VM and click Tasks > Properties. The Guest VM Advanced Settings dialog
opens. In the dialog, configure the following properties:
• Do not use this guest VM. If selected, the guest VM will not be used.
• Computer name. Specifies the network name (domain name / IP address) that the system will
use to connect to this guest VM.
• Port. Specifies the port number that the system will use to connect to this guest VM.
• Override default settings. If cleared, the default settings will be used for the grayed out
properties. To override the default settings, select this option and specify your own values.
• To view and modify the default settings, click the Default Settings button. See Configuring
Default Guest VM Properties below for the info on how to set the default settings.
• Connection timeout. If a connection with the guest VM cannot be established in this time
period, Parallels Remote Application Server will cancel the attempt to connect.
• Protocol. Specifies a protocol that Parallels Remote Application Server will use to
communicate with the guest VM.
• If session disconnects. Specifies the action that should be taken if a user disconnects from a
session. Use the after field to specify the amount of time that has to pass before the selected
action takes place.
• End a disconnected session. Specifies whether (and when) the disconnected session should
be ended. Please note that the user can reconnect to a previous session if the session is still
available.
Click OK to save the changes and close the dialog.
Configuring Default Guest VM Properties
To configure default guest VM settings, in the Virtual Guest VM List dialog, click Tasks > Default
settings (or click the gear icon). Use the Default Guest VM Advanced Settings dialog to specify
the default settings. See above for the explanation of what these properties represent.
Using a Wildcard to Filter VMs
Use the Wildcard input field at the bottom of the Pool management tab to specify a wildcard to
indicate which guest VMs should be available for users. If a VM name matches the wildcard, it will
be available. If not, the users will not be able to use it. Use the the asterisk operator (*) to specify a
wildcard (e.g. ABC*, *ABC*).
74
Page 75

VDI Hosts
Persistent Guest VMs
When an application or a desktop published from a guest VM is set as persistent, the first time a
user launches the application or desktop, the publishing agent will create a persistent guest VM
rule. Persistent guest VM rules can be configured on the Persistent guest VMs tab page.
Deleting a Persistent Guest VM Rule
To delete a persistent guest VM rule, highlight the rule on the Persistent guest VMs tab page and
click Tasks > Delete. If you want to delete all rules, select all rules by pressing CTRL+A and press
the delete key.
Configuring Automatic Deleting of Persistent Guest VM Rules
In the Auto remove persistence if guest VM was not used for drop-down menu (at the bottom
of the Persistent guest VMs tab) you can specify the maximum time an unused persistent guest
VM rule is kept before being automatically deleted. Alternately, you can also manually type in the
desired time, for example 1 week 3 days.
Publishing from a Guest VM
This section describes how to publish resources hosted by a guest VM. The publishing functionality
described here is accessed from the Publishing category in the RAS Console.
Read on to learn how to publish resources from a guest VM.
Publishing a Virtual Desktop from a Guest VM
To publish a virtual desktop from a guest VM or guest VM clone, follow the below procedure:
1 In the RAS Console, select the Publishing category and click the Add icon below the
Published Resources tree. This will launch the publishing wizard.
2 In the first step of the wizard select Desktop and click Next.
3 On the Select Desktop Type page, select Virtual Desktop and click Next.
4 On the Virtual Desktop page, enter a virtual desktop name, an optional description, and
change the icon if needed.
5 In the Properties section, specify from where the virtual desktop should be published.
First, you need to select an option in the Connect to drop-down list and then specify an
additional parameter in the field below it, as explained below:
• Any guest VM. Use the from Pool drop-down list to specify a pool.
75
Page 76

VDI Hosts
• Specific guest VM. Specify a guest VM by expanding the Guest drop-down menu and
then selecting a guest VM from a list.
• Guest VM. Specify the pool in the from Pool drop-down list and then specify where name
equals Username or IP.
• Specific RAS template. Select a template by expanding the RAS Template drop-down list.
6 Select the Persistent option to create a persistent guest VM rule the first time the user
connects.
7 In the Desktop Size section, specify the desktop screen resolution and size.
8 Click Finish when done.
Publishing an Application from a Guest VM
To publish an application from a guest VM or guest VM clone:
1 In the RAS Console, select the Publishing category and then click the Add icon below the
Published Resources tree (or right-click inside the Published Resources box and click Add
in the context menu). This will launch the publishing wizard.
2 On the Select Item Type wizard page, select Application and click Next.
3 On the Select Server Type page, select Virtual guest VM and click Next.
4 On the Select Application Type page, select Single application and click Next. The Virtual
Desktop Application page opens.
5 Enter a name and an optional description.
6 In the Run drop-down menu, specify if the application should run in a normal window,
maximized, or minimized.
7 In the Target field, specify the application that you want to publish. You may click the [...]
button to browse for it.
8 In the Start in field, specify (or browse for) the "start in" folder. Use Windows environment
variables if you are manually entering the path.
9 (Optional) In the Parameters input field, specify the parameters to pass to the application when
it starts.
10 In the Virtual guest VM settings section, specify from where the application should be
published.
First, you need to select an option in the Connect to drop-down list and then specify an
additional parameter in the field below it, as explained below:
• Any guest VM. Use the from Pool drop-down list to specify a pool.
• Specific guest VM. Specify a guest VM by expanding the Guest drop-down menu and
then selecting a guest VM from the list.
• Guest VM. Specify the pool in the from Pool drop-down list and then specify where name
equals Username or IP.
76
Page 77

VDI Hosts
• Specific RAS template. Select a template by expanding the RAS Template drop-down list.
11 Select the Persistent option to create a persistent guest VM rule the first time the user
connects.
12 When done, click Finish to publish the application.
Publishing a Web Application from a Guest VM
A web application is like any other application that you can publish using the standard application
publishing functionality. However, to simplify publishing of straight URL links to web applications, a
separate publishing item type is available that allows you to accomplish this task with minimal
number of steps.
To publish a web application:
1 In the RAS Console, select the Publishing category and then click the Add icon below the
Published Resources tree (or right-click inside the Published Resources box and click Add
in the context menu). This will launch the publishing wizard.
2 On the Select Item Type wizard page, select Web application and click Next.
3 On the Select Server Type page, select Virtual guest and click Next.
4 On the Virtual Desktop Web Application wizard page that opens, specify the web application
name, description, window state, and the URL. Select the Force to use Internet Explorer
option if needed. To browse for a specific application icon, click Change Icon.
5 Use the Virtual guest VM settings section to specify from where the application should be
published.
The options are:
• Any guest VM. Publish the application from any guest VM in the selected pool. Select this
option and then select a pool in the from Pool drop-down list.
• Specific guest VM. Publish the application from a specific guest VM. Select this option and
then select a guest VM in the from Pool drop-down list.
• Guest VM. Select this option and then select a pool in from Pool. In the where name
equals drop-down list, select Username or IP. The application will be published from a
guest VM from the selected pool whose name/IP matches the username/IP of the user
connecting.
• Specific RAS template. Publish the application from a specific RAS template. Select this
option and then select a template in the RAS template drop-down list.
Select the Persistent option to create a persistent guest VM rule.
6 When done, click Finish to publish the application.
77
Page 78

VDI Hosts
Publishing a Network Folder from a Guest VM
You can publishing a filesystem folder via UNC path to open in Windows explorer. To minimize the
number of configuration steps, a special publishing item is available that allows you to publish a
network folder from a guest VM.
To publish a network folder:
1 In the RAS Console, select the Publishing category and then click the Add icon below the
Published Resources tree (or right-click inside the Published Resources box and click Add
in the context menu). This will launch the publishing wizard.
2 On the Select Item Type wizard page, select Folder on the file system and click Next.
3 On the Select Server Type page, select Virtual guest VM and click Next.
4 On the Virtual Desktop UNC Folder wizard page, specify the usual application properties.
5 In the UNC path field, enter the UNC path of the folder you wish to publish. Click the [...]
button to browse for a folder (it may take some time for the Browse for Folder dialog to open).
6 Specify the Virtual guest VM settings as described in Publishing an Application from a
Guest VM (p. 76).
7 Click Finish to publish the folder and close the wizard.
When published, the network folder will appear in the Publishing > Published resources list, just
like any other application. To view its properties, select it and then click the Virtual Desktop
Application tab:
• The Target property will always be set to PublishedExplorer.exe. This binary is created
automatically (via agents pushing) and is simply a copy of the standard explorer.exe
executable.
• The Parameters property specifies the network folder that we want to publish. The folder path
can be in any format that the explorer.exe can handle.
Publishing a Document from a Guest VM
To publish a document from a guest VM or guest VM clone:
1 In the RAS Console, select the Publishing category and then click the Add icon below the
Published Resources tree (or right-click inside the Published Resources box and click Add
in the context menu). This will launch the publishing wizard.
2 On the Select Item Type wizard page, select Document and click Next.
3 Select Virtual Guest VM and click Next.
4 Specify the content type of the document you want to publish. You can select the content type
from the predefined list or specify a custom content type in the Custom content types input
field.
78
Page 79

VDI Hosts
5 Click Next.
6 On the Virtual Desktop Application page, enter a name, an optional description, a Window
state, and an icon if needed.
7 Use the [...] button next to the Target input field to browse for the document. All other fields will
be automatically populated. To edit any of the auto populated fields, highlight them and enter
the required details.
8 (Optional) In the Parameters input field, specify the parameters to pass to the application when
it starts.
Note: Use the Server(s) drop down list to specify different document settings for a specific server in
case the document is configured differently on that particular server. The settings will be saved for each
server you select individually.
9 In the Virtual guest VM settings section, specify from where the virtual desktop should be
published.
First, you need to select an option in the Connect to drop-down list and then specify an
additional parameter in the field below it, as explained below:
• Any guest VM. Use the from Pool drop-down list to specify a pool.
• Specific guest VM. Specify the guest VM by expanding the Guest drop-down menu and
then selecting the guest from a list.
• Guest VM. Specify the pool in the from Pool drop-down list and then specify where name
equals Username or IP.
• Specific RAS template. Select a template by expanding the RAS Template drop-down list.
10 Select the Persistent option to create a persistent guest VM rule the first time the user
connects.
11 Click Finish to publish the document.
VDI Agent Technology
Before adding a server as a VDI host to a Parallels RAS site, you need to install a hypervisor on it.
Parallels Remote Application Server supports VDI hosts based on the following virtualization
technologies:
• VMware ESXi
• VMware VCenter
• Microsoft Hyper-V
• Microsoft Hyper-V Failover Cluster
79
Page 80

VDI Hosts
• Citrix XenServer
This section describes how to:
• Prepare Citrix XenServer for Parallels RAS (p. 80)
• Prepare Hyper-V for Parallels RAS (p. 88)
• Prepare VMware vSphere for Parallels RAS (p. 90)
Prepare Citrix XenServer for Parallels RAS
Before you set up your environment, please make sure that your XenCenter can connect to your
Citrix XenServer.
A guest operating system (Windows) must be created on the Citrix XenServer which features an
RDP server.
Important: Ideally, the guest VM name should be the same as the computer name.
80
Page 81

VDI Hosts
Please install XenServer tools in the guest OS.
After the guest OS installation is complete, make sure that the RDP server is started. To confirm
that the server is running, launch a Remote Desktop Client and connect to the guest operating
system using the computer name (of the guest OS) and the RDP port (default RDP port is 3389).
Setting up the RAS VDI Agent Appliance for Citrix XenServer
The RAS VDI Agent Appliance for Citrix XenServer can be downloaded from the following location:
http://download.parallels.com/ras/v15.5/RAS_VDI_Appliance.ova
Once the RAS VDI Agent Appliance is downloaded, it must be installed on a server.
To install the appliance:
1 Extract the ZIP file contents into a temporary directory.
2 Open XenCenter.
3 Right click on the host and choose Import.
81
Page 82

VDI Hosts
4 Choose the OVA file extracted from step 1.
82
Page 83

5 Choose the storage location and click Next.
VDI Hosts
83
Page 84

VDI Hosts
6 Configure the network settings and click Next.
84
Page 85

7 Choose not to use Operating System Fixup.
VDI Hosts
85
Page 86

VDI Hosts
8 Select the network for importing the appliance and click Next.
86
Page 87

9 Click Finish and wait for the import job to complete.
VDI Hosts
The network administrator should assign a fixed IP address to the appliance.
87
Page 88

VDI Hosts
When using DHCP, take note of the MAC address assigned to the appliance and add a DHCP
reservation. If DHCP isn't available, a static IP address needs to be configured manually. Network
settings can be changed by going to the Advanced > Networking menu.
Prepare Hyper-V for Parallels RAS
RAS VDI Agent System Requirements
• 6.0.6001 Windows Server 2008 Standard (Full / Server Core)
• 6.0.6001 Windows Server 2008 Enterprise (Full / Server Core)
• 6.0.6001 Windows Server 2008 Datacenter (Full / Server Core)
• 6.1.7601 Windows Server 2008 R2 Standard (Full / Server Core)
• 6.1.7601 Windows Server 2008 R2 Enterprise (Full / Server Core)
• 6.1.7601 Windows Server 2008 R2 Datacenter (Full / Server Core)
Windows Server 2016
88
Page 89

VDI Hosts
• 6.1.7600 Hyper-V Server 2008 R2
• 6.2.9200 Windows Server 2012 Standard (Full / Server Core)
• 6.2.9200 Windows Server 2012 Datacenter (Full / Server Core)
• 6.2.9200 Hyper-V Server 2012
• 6.3.9600 Windows Server 2012 R2 Standard (Full / Server Core)
• 6.3.9600 Windows Server 2012 R2 Datacenter (Full / Server Core)
• 6.3.9600 Hyper-V Server 2012 R2
• 10.0.14300 Hyper-V Server 2016
• 10.0.14300 Windows Server 2016 Datacenter (Full / Server Core)
• 10.0.14300 Windows Server 2016 Standard (Full / Server Core)
Before continuing to set up your environment please make sure that Hyper-V is installed and that
the role is enabled on your Windows Server.
89
Page 90

VDI Hosts
A guest operating system (e.g. Windows) must be created on the Hyper-V server which features an
RDP server.
Important:
• The guest VM name must be the same as the computer name.
• The use of fixed IPs on the guest operating systems is preferred.
After the guest OS installation is complete, make sure that the RDP server is started. To confirm
that the server is running, launch a Terminal Server client on the host machine (the Hyper-V server)
and connect to the guest operating system using the computer name (of the guest OS) and the
RDP port (default RDP port is 3389).
Prepare VMware vSphere for Parallels RAS
RAS VDI Agent System requirements
• VMware ESXi
• VMware vSphere Client
• VMware vCenter
Starting from vSphere v5.1 it's possible to use the vSphere Web Client instead of the native
vSphere Client.
90
Page 91

VDI Hosts
Before continuing to set up your environment, please make sure that your VMware vSphere Client
can connect to your VMware vSphere server.
A guest operating system (Windows) must be created on the VMware vSphere server which
features an RDP server.
Ideally, the guest VM name should be equal to the computer name.
The use of fixed IPs on the guest operating systems is preferred.
After the guest OS installation is complete, make sure that the RDP server is started. To confirm
that the server is running, launch a Remote Desktop Client and connect to the guest operating
system using the computer name (of the guest OS) and the RDP port (default RDP port is 3389).
Setting up the RAS VDI Agent Appliance for VMware vSphere
Instructions for the native vSphere Client:
1 Extract the ZIP file contents into a temporary directory.
91
Page 92

VDI Hosts
2 Login with the VMware vSphere client.
3 Select Deploy OVF Template from the file menu.
92
Page 93

VDI Hosts
4 Browse to the folder where the ZIP file (containing the appliance) was extracted and click Next.
93
Page 94

VDI Hosts
5 Review product details and click Next.
94
Page 95

6 Choose a name and location for the deployed template and click Next.
VDI Hosts
95
Page 96

VDI Hosts
7 Choose on which host or cluster to deploy the template and click Next.
96
Page 97

8 Choose the desired resource pool and click Next.
VDI Hosts
97
Page 98

VDI Hosts
9 Choose the desired disk provisioning format and click Next.
98
Page 99

10 Choose the appropriate VDI network for the appliance and click Next.
VDI Hosts
11 Select the Power on after deployment option.
12 Click Finish and wait for the import job to complete.
99
Page 100

VDI Hosts
Instructions for the vSphere Web Client:
1 Extract the ZIP file contents into a temporary directory.
2 Login into the vSphere Web client.
100
 Loading...