

Page 1

Parallels Remote
Application Server
Parallels Client for iOS User's Guide
v15
Copyright © 1999-2016 Parallels IP Holdings GmbH and its affiliates. All rights reserved.
Page 2

Parallels IP Holdings GmbH
Vordergasse 59
8200 Schaffhausen
Switzerland
Tel: + 41 52 632 0411
Fax: + 41 52 672 2010
www.parallels.com
Copyright © 1999-2016 Parallels IP Holdings GmbH and its affiliates. All rights reserved.
This product is protected by United States and international copyright laws. The product’s underlying technology,
patents, and trademarks are listed at http://www.parallels.com/trademarks.
Microsoft, Windows, Windows Server, Windows NT, Windows Vista, and MS-DOS are registered trademarks of Microsoft
Corporation.
Apple, Mac, the Mac logo, Mac OS, iPad, iPhone, iPod touch, FaceTime HD camera and iSight are trademarks of Apple
Inc., registered in the US and other countries.
Linux is a registered trademark of Linus Torvalds.
All other marks and names mentioned herein may be trademarks of their respective owners.
Page 3

Contents
Getting Started with Parallels Client for iOS ............................................................4
Installing Parallels Client ....................................................................................................4
Configuring a Connection.................................................................................................. 5
Using Parallels Client for iOS ....................................................................................8
Logging On and Working with Sessions ............................................................................8
Adding a New Connection ................................................................................................8
Modifying Connection Properties..................................................................................... 12
Display .................................................................................................................................. 12
Printing.................................................................................................................................. 13
Local Resources.................................................................................................................... 14
Experience ............................................................................................................................ 14
Network ................................................................................................................................ 14
Authentication ....................................................................................................................... 15
Advanced .............................................................................................................................. 15
Modifying Parallels Client Settings ...................................................................................16
Appearance........................................................................................................................... 16
User Input.............................................................................................................................. 17
Session Settings.................................................................................................................... 23
Checking the Build Number ............................................................................................24
Working in Parallels Client
Remote Application Server Connection ........................................................................... 25
Standard RDP Connection.............................................................................................. 27
......................................................................................25
Using Keyboard and Mouse....................................................................................29
Mouse Settings ............................................................................................................... 29
Keyboard Settings .......................................................................................................... 32
Index ........................................................................................................................ 33
Page 4

C HAPTER 1
Getting Started with Parallels Client for iOS
About Parallels Client for iOS
Parallels Client for iOS is an app that allows you to connect to Remote Application Server from your
iOS devices.
Invitation Email
Before you start with Parallels Client, your system administrator must send you an invitation email
with the instructions on how to install Parallels Client and configure the first connection.
Read on the following topics for more details.
In This Chapter
Installing Parallels Client............................................................................................ 4
Configuring a Connection ......................................................................................... 5
Installing Parallels Client
System Requirements
To install Parallels Client, you must have an iOS device with iOS version 7.0 or later.
Note: To learn how to check the version of iOS on your device, please refer to the device manufacturer's
documentation.
Installation Procedure
The preferred way to install Parallels Client is to follow the instructions from the invitation email (p.
4).
Another way to install Par
1 On your iOS device, open App Store.
2 Search for Parallels Client.
allels Client is to install it from the App Store. Do the following:
Page 5
Getting Started with Parallels Client for iOS
3 Tap Install and follow the onscreen instructions.
Configuring a Connection
To configure the first connection, follow the instructions from the invitation email (p. 4).
Configure Connection Automatically
To configure Parallels Client to connect to Remote Application Server automatically, follow the
instructions from the invitation email.
Configure Connection Manually
The invitation email from your system administrator contains the parameters that you can use to
configure a connection manually. Do the following:
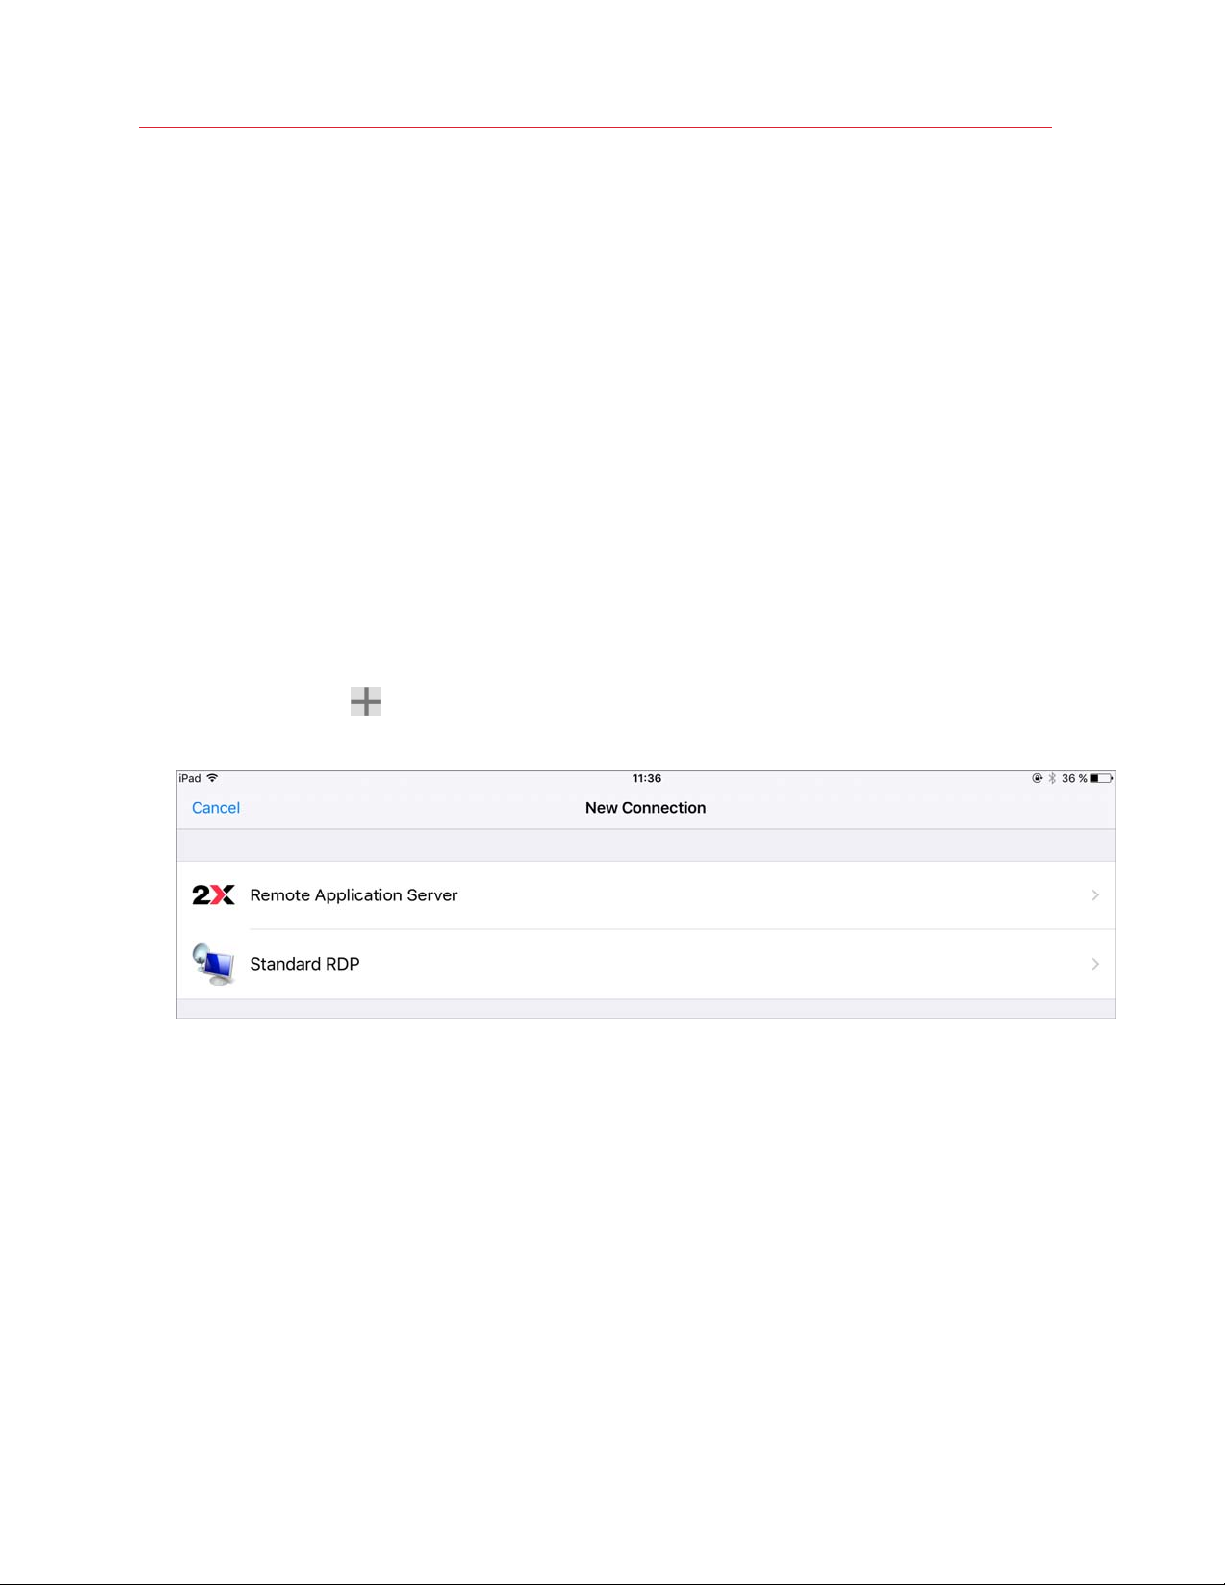
1 Open Parallels Client on your iOS device.
2 Tap the Plus icon
3 Then you need to select the type of connection to configure:
• Tap Remote Application Server to create a Parallels Remote Application Server
connection.
• The Standard RDP option creates a standard Remote Desktop connection.
in the top right corner.
5
Page 6
Getting Started with Parallels Client for iOS
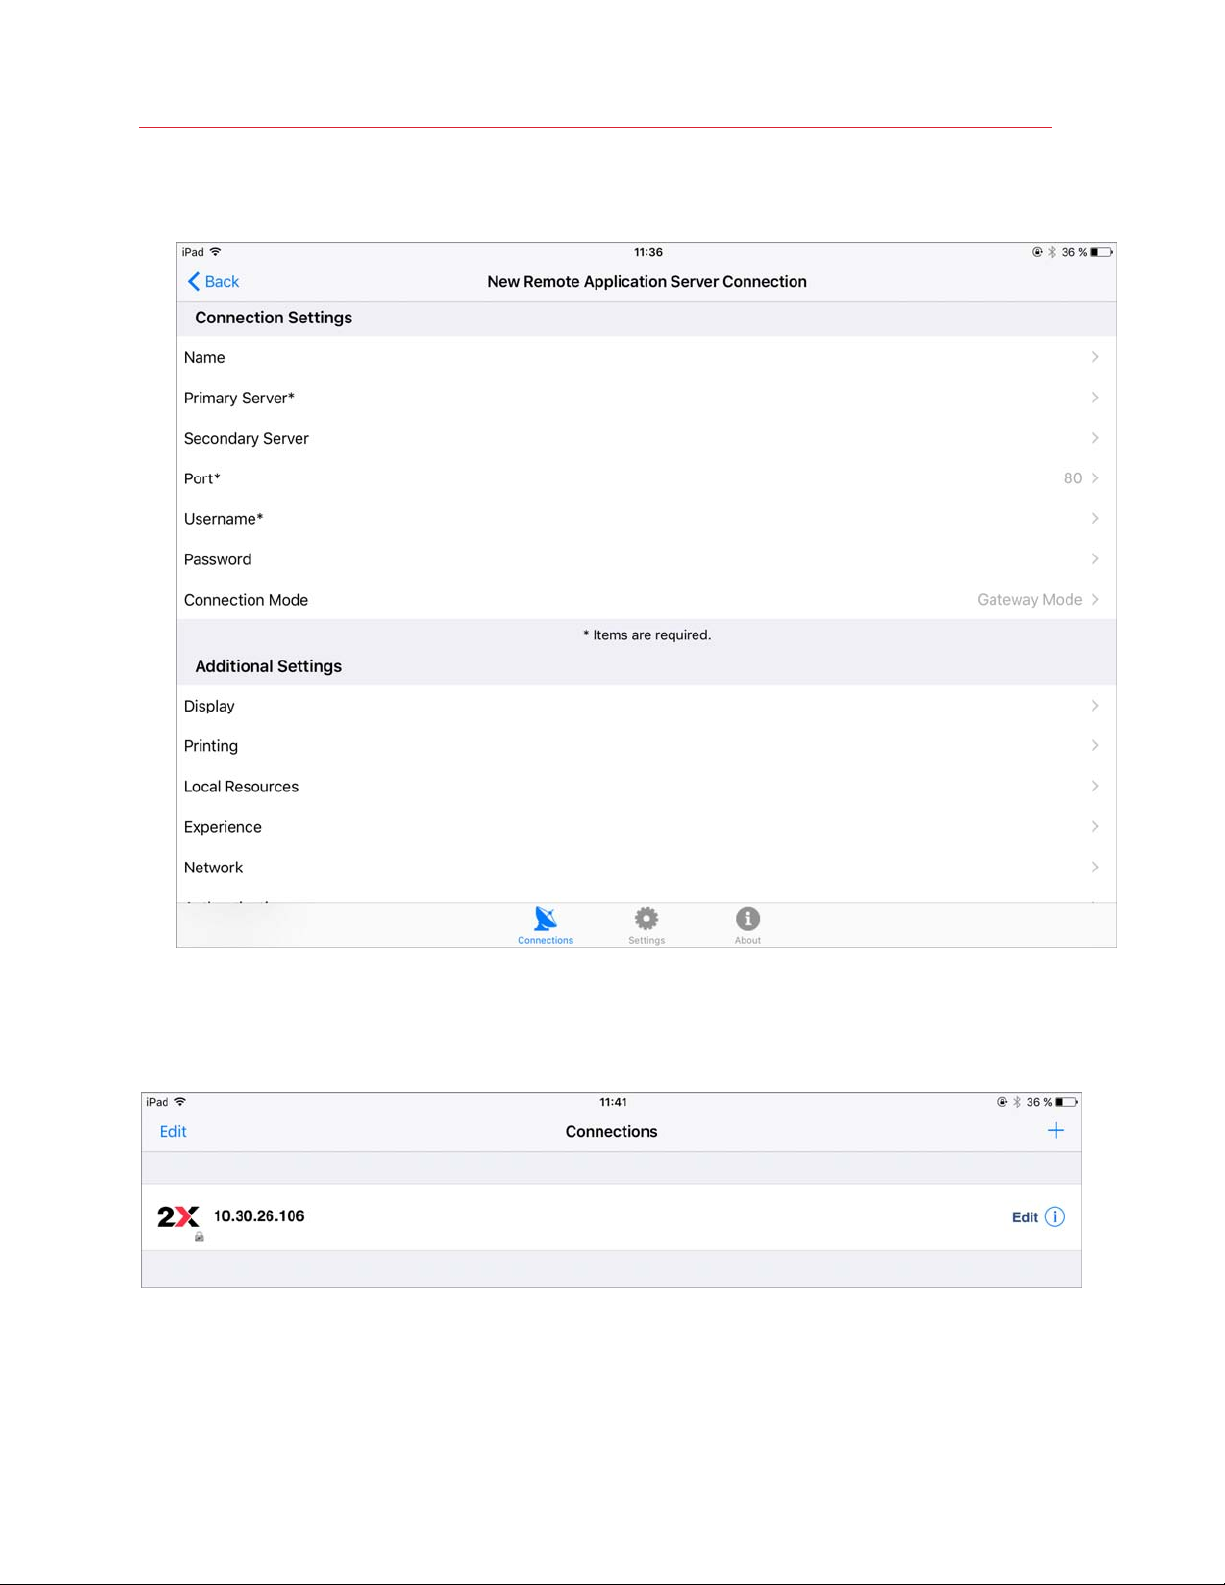
4 In the next step, specify the Primary Server, Port, and Connection Mode settings. You must
take them from the invitation email.
5 Enter your user name.
6 Tap Back.
Now you should see the connection that you just created.
To connect to Parallels Remote Application Server using the connection that you created:
1 Tap the connection.
2 When asked, enter your password.
6
Page 7
Getting Started with Parallels Client for iOS
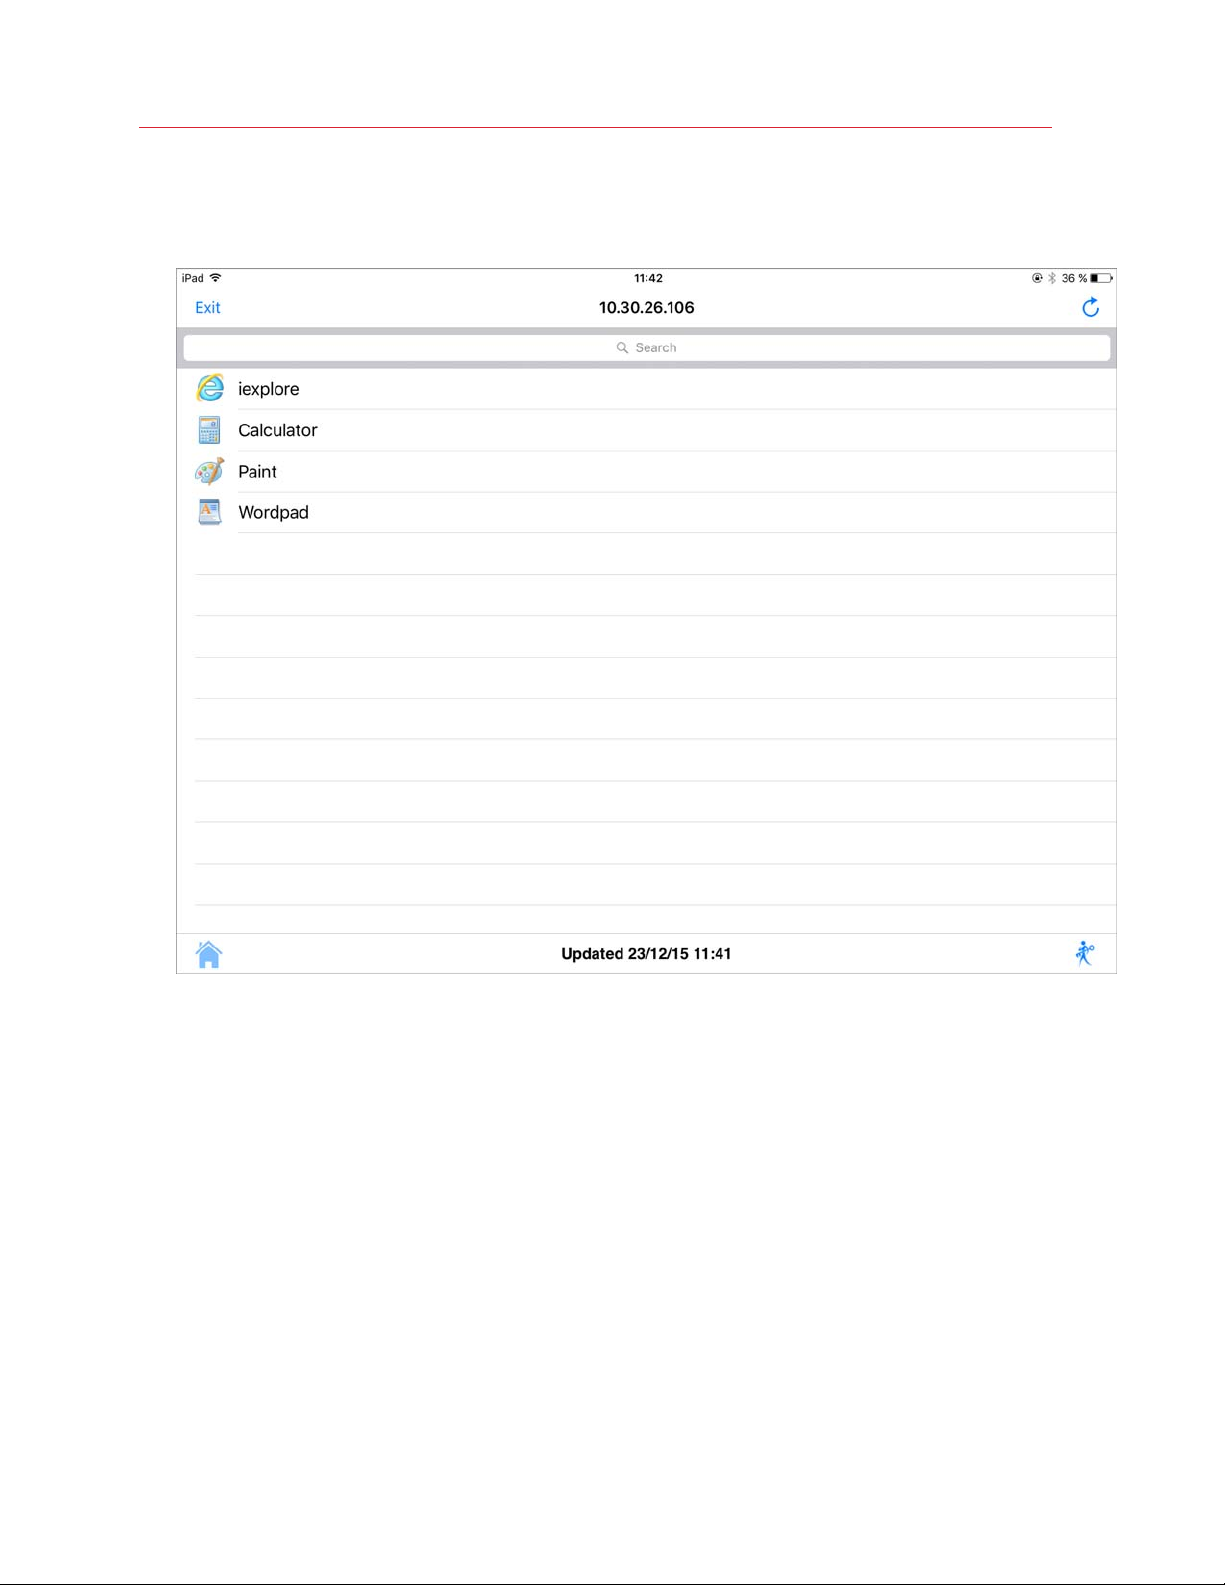
3 If the connection was successful, you will see the published resources that you can use. If you
receive an error, verify that the connection and logon information is entered correctly and try
again.
7
Page 8

C HAPTER 2
Using Parallels Client for iOS
In This Chapter
Logging On and Working with Sessions ................................................................... 8
Adding a New Connection........................................................................................ 8
Modifying Connection Properties .............................................................................. 12
Modifying Parallels Client Settings ............................................................................ 16
Checking the Build Number...................................................................................... 24
Logging On and Working with Sessions
To connect to a remote server, tap a connection in the Connections list.
Every time you connect to a remote server using Parallels Client, a session is created for the
connection. When you're connected to a remote server and see the published resources, you can
do the following:
• Refresh the session and published resources view by tapping the Refresh icon
right corner.
• Disconnect your session by tapping Exit in the top left corner.
in the top
Adding a New Connection
Parallels Client allows you to create and save more than one connection, so you could easily
connect to different servers or using different connection properties, etc.
To add a new connection:
1 Open Parallels Client on your iOS device.
2 Tap the Plus icon
in the top right corner.
Page 9
Using Parallels Client for iOS
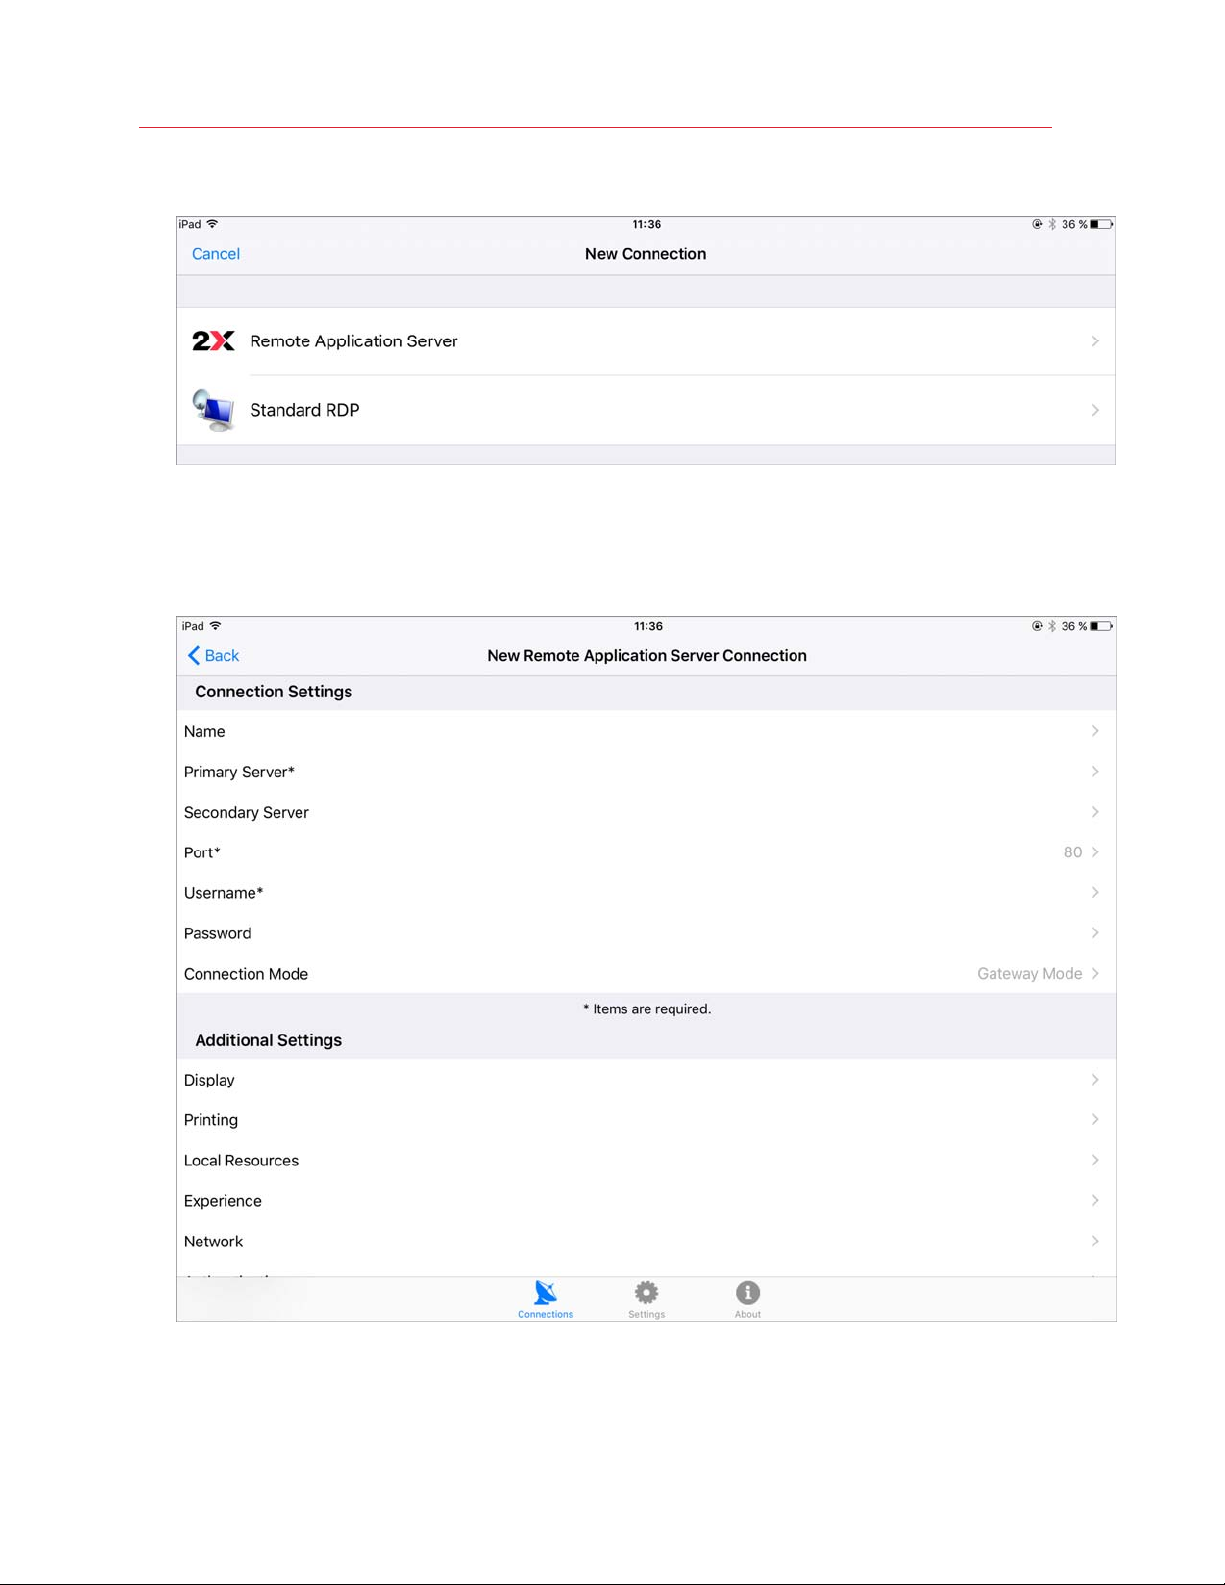
3 Then you need to select the type of connection to configure:
• Tap Remote Application Server to create a Parallels Remote Application Server
connection.
• The Standard RDP option creates a standard Remote Desktop connection.
4 In the next step, enter the connection properties:
• Name. Choose and type a friendly name for this connection.
• Primary Server. Specify the RAS Secure Client Gateway name or IP address.
9
Page 10

Using Parallels Client for iOS
• Secondary Server. If you have more than one Gateway available to connect to your farm,
you can use a secondary connection. The client will use the secondary connection if the
primary server fails.
• Port. This field normally contains a default value (80). For RDP connections, the default
value is 3389. You should only modify it if your system administrator told you to do so.
• User Name. Enter your user name.
• Connection Mode. Select one of the following:
Note: This option is not available for RDP connections.
a Gateway Mode. Parallels Client connects to the RAS Secure Client Gateway and the
session connection is tunneled through the first available connection. This mode is ideal for
Terminal servers, VDI desktops and remote PCs that are only reachable via the gateway and
do not require a high level of security.
b Gateway SSL Mode. Same as the gateway mode above, but uses encryption to secure
the data.
c Direct Mode. Parallels Client first connects to the RAS Secure Client Gateway for the best
available terminal server and then connects directly to that server. This is best used when
the Parallels Client and the terminal server reside on the same network.
d Direct SSL Mode. Same as the direct mode above, but uses encryption to secure the
data.
5 Tap Back.
Now you should see the connection that you just created.
To connect to Parallels Remote Application Server using the connection that you created:
1 Tap the connection.
2 When asked, enter your password.
10
Page 11

Using Parallels Client for iOS
3 If the connection was successful, you will see the published resources that you can use. If you
receive an error, verify that the connection and logon information is entered correctly and try
again.
11
Page 12

Using Parallels Client for iOS
Modifying Connection Properties
To modify connection properties, tap Edit from the Connections list:
The following subsections describe the tabs that you can tap to view and configure the groups of
connection properties.
Display
On the Display tab, specify the following display options:
Graphics Settings
• Acceleration. This menu allows you to select the graphics encoding. Choose one of the
following:
Note: The acceleration setting does not affect connections with color depth less than 32 bit.
12
Page 13

Using Parallels Client for iOS
• None. Select this option for devices with low processing capabilities.
• Basic. Select this option for devices with average processing capabilities and latency
network environments. The option requires additional processing power from the client
device to support improved image compression.
• RemoteFX. Select this option for devices with average processing capabilities and average
to low latency network environments. The option makes your remote session experience the
most fluid.
Note: If you select RemoteFX, the color depth is forced to 32 bit.
• Color Depth. This menu allows you to select the color resolution. High Color (16 bits) is
recommended.
Desktop Settings
• Use Optimized Size. Select this option to use the most suitable screen resolution. If disabled,
you will be able to select from a range of screen resolutions.
• Orientation. Use this menu to choose the screen orientation you need.
Printing
The Printing tab allows you to configure the printing options.
RAS Universal Printing
From the RAS Universal Printing menu, select one of the following:
• Disable. Disables your ability to redirect printing devices from published resources.
• Print. Choose this option to redirect print jobs from a published resource to a selected printer.
• View. Select this option to open the printing document in the PDF format.
Default Printer Settings
From the Default Printer menu, select one of the following:
• None. Default printer for the session is chosen depending on the server settings.
• RAS Universal Printer. Select this option if you want to use RAS Universal Printer.
• Custom. When this option is selected, you can specify a custom printer which might be
installed on the remote computer. The first printer that matches the printer name inserted in the
custom text box, will be set as the default printer on the remote computer.
Select Match exact printer name to match the name exactly as inserted in the custom text
field. Please note that the remote printer name might differ from the original printer name. Also
note that local printers might not be redirected due to server settings or policies.
13
Page 14

Using Parallels Client for iOS
Local Resources
The Local Resources tab allows you to configure how the sound on the remote computer should
be handled.
From the Sound Output menu, choose one of the following:
• Don't Play. Select this option to disable sound.
• Redirect to Device. Select this option to redirect sound from the remote computer and play it
on your iOS device.
• Leave at Remote Computer. Select this option to play sound on the remote computer.
Experience
The Experience tab allows you to tweak the connection speed to optimize the performance of the
connection with the remote host. The following options can be configured:
Note: Most of these options make the remote computer desktop, menus and windows look pretty but
may slow down the connection speed. It's safe to enable these options if your connection speed is 100
Mbps or faster.
• Connection Speed. Select the suitable connection speed to match your environment for the
most fluid experience.
• Desktop Background. Enable this option to show the remote computer desktop background.
• Font Smoothing. This option makes all fonts smooth for improved readability.
• Menu Animation. If menus and windows on the remote computer have visual effects and this
option is enabled, these effects are also shown on your iOS device.
• Desktop Composition. Desktop composition changes the way windows are depicted on the
screen.
• Window Dragging. Enable this option to show window contents when dragging windows.
• Themes. Enable this option to use the remote desktop themes when connected.
• Bitmap Caching. This option must be enabled to increase the connection bandwidth
efficiency.
• Enable Compression. It is recommended to enable this option to have a more efficient
connection.
Network
The Network tab allows you to configure a proxy server if you have to use one to connect to
Parallels Remote Application Server.
14
Page 15

Using Parallels Client for iOS
To configure a proxy server, enable Use Proxy Server, tap Server Type and then select the
protocol from the following list:
• SOCKS4. Enable this option to transparently use the service of a network firewall.
• SOCKS4A. Enable this option to allow a client that cannot connect to resolve the destination
host’s name to specify it.
• SOCKS5. Enable this option to be able to connect using authentication.
• HTTP 1.1. Enable this option to connect using the standard HTTP 1.1 protocol connections.
Specify the proxy host domain name or IP address and the port number.
For SOCKS5 and HTTP 1.1 protocols, select Authentication and enter user credentials.
Authentication
The Authentication tab allows you to specify what happens if Parallels Client fails to authenticate
with the Terminal Server.
From the On Authentication Failure menu, select one of the following options:
• Connect. The user can ignore the certificate of the server and still connect.
• Warn. The user is alerted about the certificate and still has the ability to choose whether to
connect or not.
• Do not connect. The user is not allowed to connect.
Advanced
The Advanced tab allows you to customize the default behavior of Parallels Client. You can specify
the following properties.
Redirection
• Redirect URLs to this Device. Enable this option to use the local web browser when opening
'http:" links.
• Redirect MAIL to this Device. Enable this option to use the local mail client when opening
‘mailto:’ links.
Authentication
• Use Pre Windows 2000 Login Format. Enable this option to use domain\user as the login
format to log in to remote computer.
• Network Level Authentication. Select this option to enable network level authentication, which
will require the client to authenticate before connecting to the server.
15
Page 16

Using Parallels Client for iOS
Override Device Name
Use the Override Device Name field to specify the name that your device will use during a remote
desktop session. If set, this will override the default device name. Any filtering set by the
administrator on the server side will make use of the Override Device Name value.
Modifying Parallels Client Settings
To modify the Parallels Client settings, tap Settings at the bottom of the screen.
The following subsections describe the tabs that you can click to view and configure the Parallels
Client settings.
Appearance
The Appearance section allows you to configure the following appearance settings:
16
Page 17

Using Parallels Client for iOS
• Auto Sort Connections. When selected, all connections will be sorted by name.
• Auto Sort Application Listing. When selected, all applications will be sorted by name. Folders
are placed at the top of the listing.
• Hide iOS Status Bar. When selected, the status bar hides automatically when not in use.
User Input
The User Input section allows you to configure the mouse-, and keyboard-related settings.
• Swap Mouse Buttons. When enabling this setting, the mouse buttons will be swapped on the
remote computer.
Keyboard
Tap Configure Keyboard to configure the following keyboard-related settings:
• Keyboard Type. From this menu, select one of the following:
• PC Keyboard. A fully emulated PC keyboard will be used when working with a remote
computer.
• iOS Native Keyboard. The iOS native keyboard will be used when working with a remote
computer.
• Auto-Show Keyboard. Use this menu to configure whether you want to show the keyboard
automatically. Choose one of the following:
• Show. Select this option to show the keyboard when the user sets focus on a text box in a
remote session. The keyboard will not hide automatically when the focus is set on a nontextbox area.
• Show & Hide. Select this option to show the keyboard when the user sets focus on a text
box in a remote session. The keyboard will automatically hide when the focus is set on a
non-textbox area.
• No. If this option is selected, the keyboard will not be shown automatically when the user
sets focus on a textbox in a remote session.
• Keyboard Locale. This menu allows you to select the keyboard layout you need.
• Key Clicker. When this option is enabled and you're working with a remote computer, each
keyboard tap will produce an audible sound of a click.
Gestures
Tap Configure Gestures to configure what happens when you perform various gestures.
17
Page 18

Using Parallels Client for iOS
Please see below which gestures can be used and which of them can be configured.
18
Page 19

Using Parallels Client for iOS
19
Page 20

Using Parallels Client for iOS
20
Page 21

Using Parallels Client for iOS
21
Page 22

Using Parallels Client for iOS
22
Page 23

Using Parallels Client for iOS
All the configurable gestures can be set to one of the following actions:
Session Settings
The Session Settings section allows you to configure connection settings.
• Sleep On Idle. Select this option to switch your device to sleep mode if the device is not used
for some time and connection is lost.
• Auto Reconnect. Select this option to configure your device to reconnect automatically after
connection is again available after some failure.
• Accept All Certificates. Select this option to accept all certificates automatically (malformed
certificates will be rejected).
23
Page 24

Using Parallels Client for iOS
Checking the Build Number
To check the version and build number of Parallels Client for iOS, tap About at the bottom of the
screen.
24
Page 25

C HAPTER 3
Working in Parallels Client
In This Chapter
Remote Application Server Connection .................................................................... 25
Standard RDP Connection ....................................................................................... 27
Remote Application Server Connection
Tap the Remote Application Server connection you have configured to display the list of published
resources and folders.
To refresh the window contents, tap the Refresh icon in the top right corner.
Page 26

Working in Parallels Client
To launch any published application, just tap it. Once a published application is open, tap the
Settings icon at the bottom of the screen to use the following options:
• Disconnect. Tap this item to close the connection.
• Logoff. Tap this item to log off if you need to switch a user.
• Launch Applications. Allows you to open one more published app.
• Session Information. This menu item allows you to check the connection parameters.
Tap Cancel to exit without disconnecting.
26
Page 27

Working in Parallels Client
Standard RDP Connection
Tap the standard RDP connection you have configured on your iOS device to connect to the
remote computer. Once the remote desktop is displayed, tap the Start menu to access the
published applications.
27
Page 28

Working in Parallels Client
Tap the Settings icon at the bottom of the screen to use the following options:
• Disconnect. Tap this item to close the connection.
• Session Information. This menu item allows you to check the connection parameters.
Tap Cancel to exit without disconnecting.
28
Page 29

C HAPTER 4
Using Keyboard and Mouse
In This Chapter
Mouse Settings ........................................................................................................ 29
Keyboard Settings.................................................................................................... 32
Mouse Settings
To display the mouse when you're connected to the remote computer or working with a published
application, tap the Mouse icon at the bottom of the screen.
Page 30

Using Keyboard and Mouse
The mouse is displayed on the screenshot above.
• A - anywhere on the screen where the mouse cursor is not positioned.
• B - the mouse main area. You can drag the circle icon anywhere you like if it prevents you from
seeing the window contents.
• C - tap to right-click in any application.
• D - tap to show the keyboard.
• E - tap to open/close other options (right-click and keyboard).
Please see the table describing what happens when you press and release the areas shown on the
screenshot.
Position Action Result Windows
Messages
A Short Press
& Move
A Tap Left Click at Position Lbutton down +
A Double Tap Double Left Click at Position (Lbutton down +
A long press start drag LButton down
A long press
move
A long press
release
B Short Tap Left Click at Position Lbutton down +
B Double Tap Double Left-Click at
Pan Screen N/A
Lbutton up
Lbutton up +
Lbutton down +
Lbutton up)
drag mouse Move
end drag Lbutton up
Lbutton up
Lbutton down +
Position
Lbutton up +
Lbutton down +
Lbutton up
B Short Press
and Move
B Long Press Start Drag LButton Down
30
Move Cursor N/A
Page 31

Using Keyboard and Mouse
B Long Press
Drag Mouse Move
and Move
B Long Press
End Drag Lbutton up
Release
C Short Tap Right Click at Positon Rbutton down +
Rbutton up
C Double Tap Double Left Click at Position Rbutton down +
Rbutton up +
Rbutton down +
Rbutton up
C Short Press
Move Cursor N/A
and Move
C Long Press Start Right Drag Rbutton down
C Long Press
Drag Mouse Move
Move
C Long Press
End Drag Rbutton Up
Release:
D Tap Open Keyboard N/A
E Tap Open/Close Other Options N/A
31
Page 32

Using Keyboard and Mouse
Keyboard Settings
While you're connected to a remote computer from your iOS device, you can use a complete PC
keyboard. To display the keyboard, tap the Keyboard icon at the bottom of the screen.
Tap the button next to "AltGr" as illustrated above to display the following additional keypads:
ABC – By default, the keyboard displays alphabetical characters, including the shift, space, delete
and enter keys.
1 &123 – Displays numbers, symbols, escape, insert etc. Tap the "Shft" key to show additional
symbols.
2 Num – A full emulation of the keyboard numpad. Tap the ‘Num’ button to switch between
numeric and action keys.
3 Fn – All available function keys including screen lock, print screen and many more.
Note that CTRL, Alt, Win, Shift and AltGr keys are accessible on all screens. In addition, change
the input language from tabs – ABC and &123.
Alternatively you can also set the default keyboard on the User Input tab. For more details, please
read here (p. 17).
32
Page 33

Index
Index
A
Adding a New Connection - 8
Advanced - 15
Appearance - 16
Authentication - 15
C
Checking the Build Number - 24
Configuring a Connection - 5
D
Display - 12
E
Experience - 14
G
Getting Started with Parallels Client for iOS -
4
I
Installing Parallels Client - 4
R
Remote Application Server Connection - 25
S
Session Settings - 23
Standard RDP Connection - 27
U
User Input - 17
Using Keyboard and Mouse - 29
Using Parallels Client for iOS - 8
W
Working in Parallels Client - 25
K
Keyboard Settings - 32
L
Local Resources - 14
Logging On and Working with Sessions - 8
M
Modifying Connection Properties - 12
Modifying Parallels Client Settings - 16
Mouse Settings - 29
N
Network - 14
P
Printing - 13
 Loading...