

Page 1

Parallels Remote
Application Server
Parallels Client for Linux User's Guide
v15
Copyright © 1999-2016 Parallels IP Holdings GmbH and its affiliates. All rights reserved.
Page 2

Parallels IP Holdings GmbH
Vordergasse 59
8200 Schaffhausen
Switzerland
Tel: + 41 52 632 0411
Fax: + 41 52 672 2010
www.parallels.com
Copyright © 1999-2016 Parallels IP Holdings GmbH and its affiliates. All rights reserved.
This product is protected by United States and international copyright laws. The product’s underlying technology,
patents, and trademarks are listed at http://www.parallels.com/trademarks.
Microsoft, Windows, Windows Server, Windows NT, Windows Vista, and MS-DOS are registered trademarks of Microsoft
Corporation.
Apple, Mac, the Mac logo, Mac OS, iPad, iPhone, iPod touch, FaceTime HD camera and iSight are trademarks of Apple
Inc., registered in the US and other countries.
Linux is a registered trademark of Linus Torvalds.
All other marks and names mentioned herein may be trademarks of their respective owners.
Page 3

Contents
Getting Started ..........................................................................................................5
System Requirements ....................................................................................................... 5
Installing Parallels Client for Linux ......................................................................................5
Configuring Parallels Client for Linux.................................................................................. 8
Checking for Updates .....................................................................................................10
Using Parallels Client for Linux ............................................................................... 12
Adding a New Connection ..............................................................................................12
Configuring a RAS Connection........................................................................................ 14
Connection............................................................................................................................ 15
Display .................................................................................................................................. 18
Printing.................................................................................................................................. 19
Local Resources.................................................................................................................... 22
Experience ............................................................................................................................ 23
Network ................................................................................................................................ 24
Authentication ....................................................................................................................... 24
Advanced Settings ................................................................................................................ 25
Configuring an RDP Connection...................................................................................... 26
Connection............................................................................................................................ 27
Display .................................................................................................................................. 29
Local Resources.................................................................................................................... 30
Programs .............................................................................................................................. 31
Experience ............................................................................................................................ 32
Network ................................................................................................................................ 33
Authentication ....................................................................................................................... 33
Advanced Settings ................................................................................................................ 34
Configuring Global Options ............................................................................................. 36
Using a RAS Connection................................................................................................. 39
Using an RDP Connection............................................................................................... 39
Exporting and Importing Parallels Client Settings............................................................. 40
Parallels Client Command Line Interface.......................................................................... 40
General Options .................................................................................................................... 40
Page 4

Contents
RDP Options ......................................................................................................................... 41
Device Options ...................................................................................................................... 42
Other Options........................................................................................................................ 43
Examples .............................................................................................................................. 44
Index ........................................................................................................................46
Page 5

C HAPTER 1
Getting Started
In This Chapter
System Requirements .............................................................................................. 5
Installing Parallels Client for Linux ............................................................................. 5
Configuring Parallels Client for Linux ......................................................................... 8
Checking for Updates............................................................................................... 10
System Requirements
Parallels Client is approved for the following Linux distributions:
x86/x64
• Ubuntu 12.04 LTS
• Ubuntu 14.04 LTS
• Open Suse 12.3
• OpenSuse 13.2
• Fedora 20
• Xubuntu 15.10
Installing Parallels Client for Linux
Your system administrator will send you an invitation email with the instructions on how to install
Parallels Client for Linux and configure a Parallels Remote Application Server connection. The
invitation email will contain the following information and action links:
• A message from your system administrator.
• A link to download Parallels Client for Linux (links to Parallels Client for other platforms may also
be included if you are using other devices in addition to a Linux computer).
• A link to automatically configure Parallels Client on your computer, so you can connect to the
Parallels Remote Application Server.
Page 6

Getting Started
• Parallels Remote Application Server connection properties. You can use this information to
manually create a Parallels Remote Application Server connection. The automatic configuration
via the link (see above) is the preferred and the easiest method, but you can use this information
to create a connection manually if needed for any reason.
To install Parallels Client for Linux using an invitation email:
1 Make sure you are logged into your computer as a user with administrative privileges.
2 In the invitation email, click the Linux thumbnail to download Parallels Client for Linux installer.
3 Download the installer and store it locally.
Installation Procedure - GUI
Installation via GUI is only valid on DEB and RPM versions.
• Install the package using the default package installer.
Installation Procedures - CLI
DEB Version
To install Parallels Client, switch to the root user and type the following at the command prompt:
dpkg -i 2XClient.deb
If the installation fails because of missing dependencies, try installing these dependencies using the
following command:
apt-get -f install
Parallels Client for Linux binaries are now installed in the following directory:
/opt/2X/Client/bin
Run the following command to launch Parallels Client:
/opt/2X/Client/bin/2XClient
You can also run the following commands to obtain a list of all usage parameters for a Parallels
Client session:
cd /opt/2X/Client/bin
/appserverclient -?
RPM Version
• To install Parallels Client, switch to the root user and type the following command:
rpm –ivh 2XClient.i386.rpm
Parallels Client binaries are now installed in the following directory:
/opt/2X/Client/bin
Run the following command to launch Parallels Client:
/opt/2X/Client/bin/2XClient
6
Page 7

Getting Started
You can also run the following commands to obtain a list of all usage parameters for a Parallels
Client session:
cd /opt/2X/Client/bin
/appserverclient -?
.TAR.BZ2 Version
To install Parallels Client, switch to the root user and then switch to the root directory:
cd /
To install, type the following command:
tar jxvf 2XClient.tar.bz2
Parallels Client binaries are now installed in the following directory:
/opt/2X/Client/bin
It is recommended that the post-install script is launched in order to register icons, mimetypes, URL
schema, and databases configurations. This script is located under: /opt/2X/Client/scripts/install.sh
Run the following command to launch Parallels Client:
/opt/2X/Client/bin/2XClient
You can also run the following commands to obtain a list of all usage parameters for a Parallels
Client session:
cd /opt/2X/Client/bin
/appserverclient -?
To unregister the components registered during installation, it is recommended to launch the
uninstall script located under: /opt/2X/Client/scripts/uninstall.sh
SSO (Single Sign On) Installation Procedures
Depending on the package used to install Parallels Client, the SSO installation procedure may vary:
Already available with Parallels Client package:
• TAR package — Run script at location /opt/2X/Client/scripts/install.sh
• RPM package — Manual installation is required.
Separate package to Parallels Client:
• Debian package — Requires Parallels Client pre-installed. Install package using the default
package installer.
Manual installation procedure (RPM Required)
Install pam_2xclient.so module to have Single Sign On for Parallels Client.
This file is located under /opt/2X/Client/lib/security/pam_2xclient.so no matter the package used.
7
Page 8

Getting Started
The module always returns true and will use an authentication token that will be provided by a
higher authentication module.
Note: When a higher authentication module has been configured to SUFFICIENT, it will return on
success immediately and pam_2Xclient.so won’t be called. Please change SUFFICIENT TO REQUIRED.
To install Parallels Client PAM module, add two lines to your session manage service (eg. /etc/pam
d/gdm):
auth optional pam_2xclient.so
password optional pam_2xclient.so
Module arguments:
Debug: Debug trace will be written to /tmp/pam_2xclient.log. If the file cannot be opened, then
syslog will be used.
You can use debug argument with all module types. EG. Session optional pam_2xclient.so debug
• The module will create an SSO cookie only for well known session services.
• You can change the list of services to allow: EG. auth optional pam_2xclient.so gdm kde kdm-
kde4
Configuring Parallels Client for Linux
Once Parallels Client for Linux is installed on your computer, you need to configure it, so you can
connect to Parallels Remote Application Server.
To configure Parallels Client:
1 In the invitation email that you received from your system administrator, find the Configure
section and click the Click Here to auto configure the downloaded client link and follow the
instructions.
8
Page 9
Getting Started
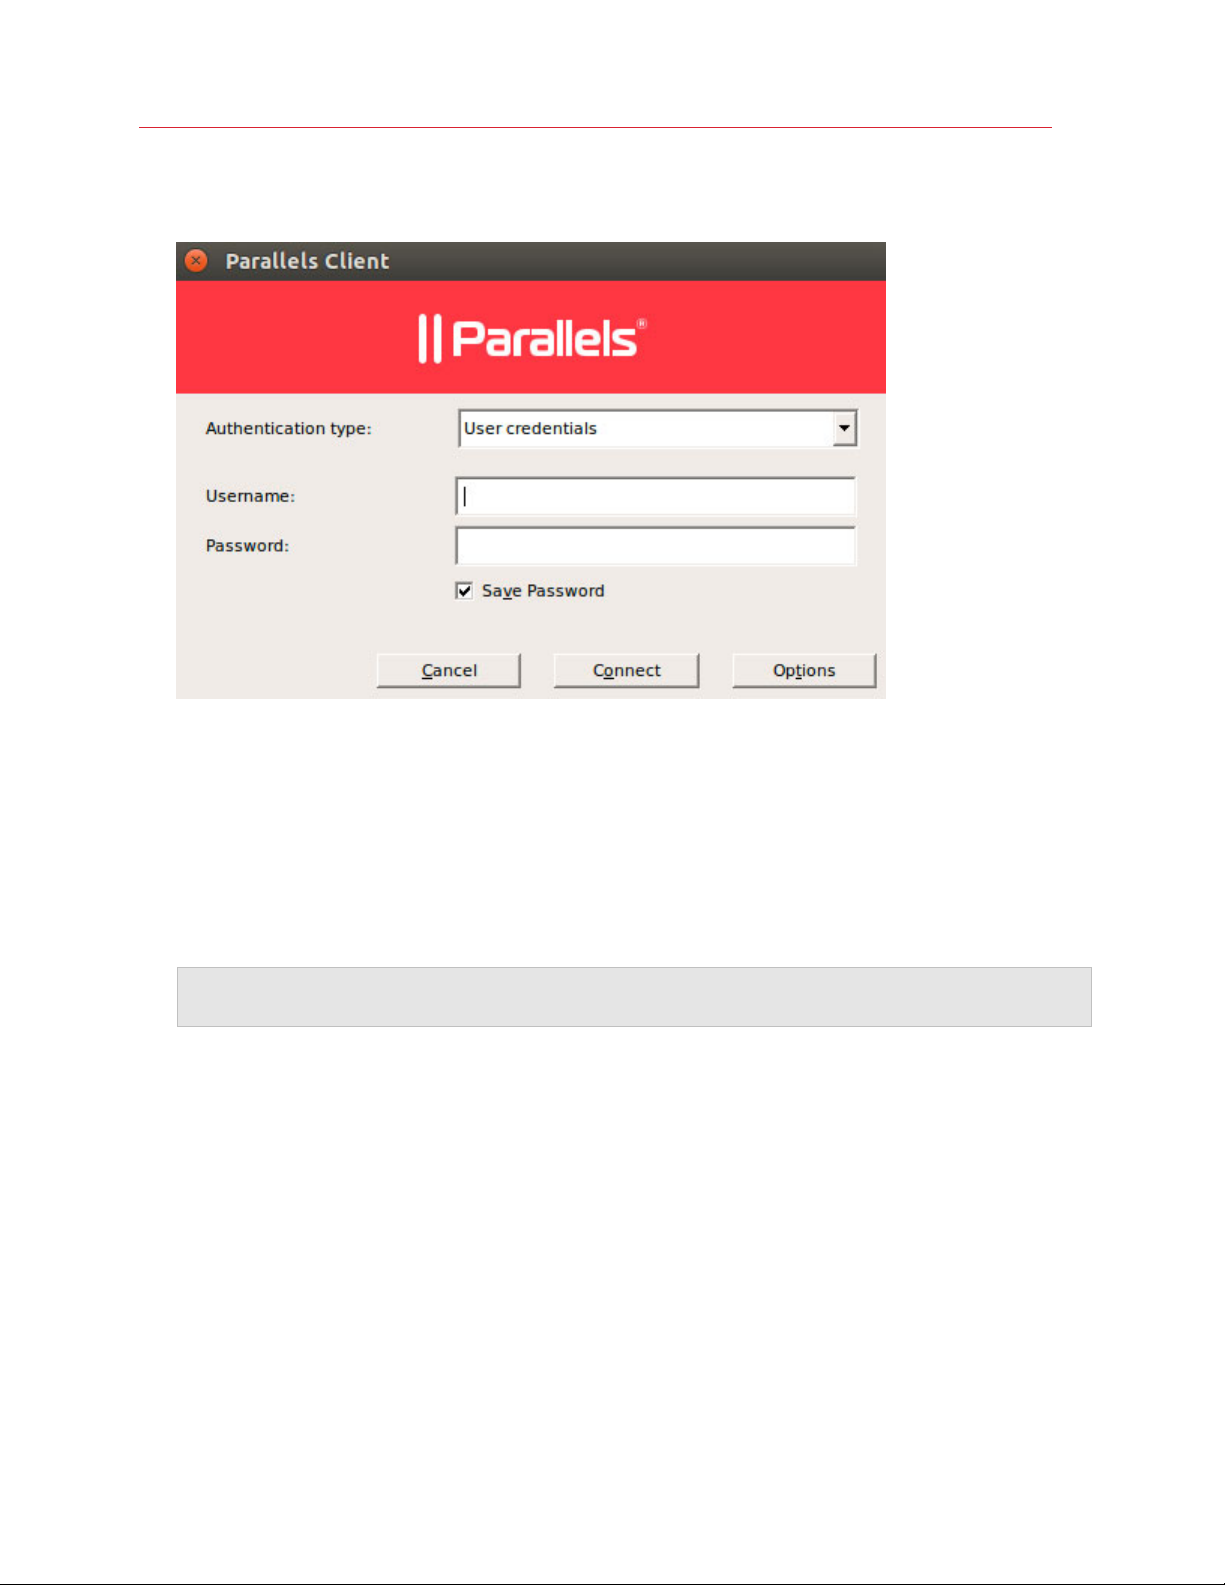
2 Once the Parallels Client is configured, it will open and ask you to log into Parallels Remote
Application Server.
3 Select the Authentication type from the following:
• Credentials. Select this option to connect to Parallels Remote Application Server by
supplying your credentials, such as your domain user name and password.
• Smart card. Select this option to connect to Parallels Remote Application Server using a
smart card.
• Single Sign-On. This option will be included in the list only if the Single Sign-On module is
installed during Parallels Client installation. Select this option to use local system credentials
to connect to the remote server
Note for Administrators: The allowed authentication type(s) must be specified in the RAS Console in
Connection / Authentication.
4 Depending on the authentication type selected, type your user name and password or insert a
smart card into a reader. If using a smart card, enter a PIN when prompted.
9
Page 10
Getting Started
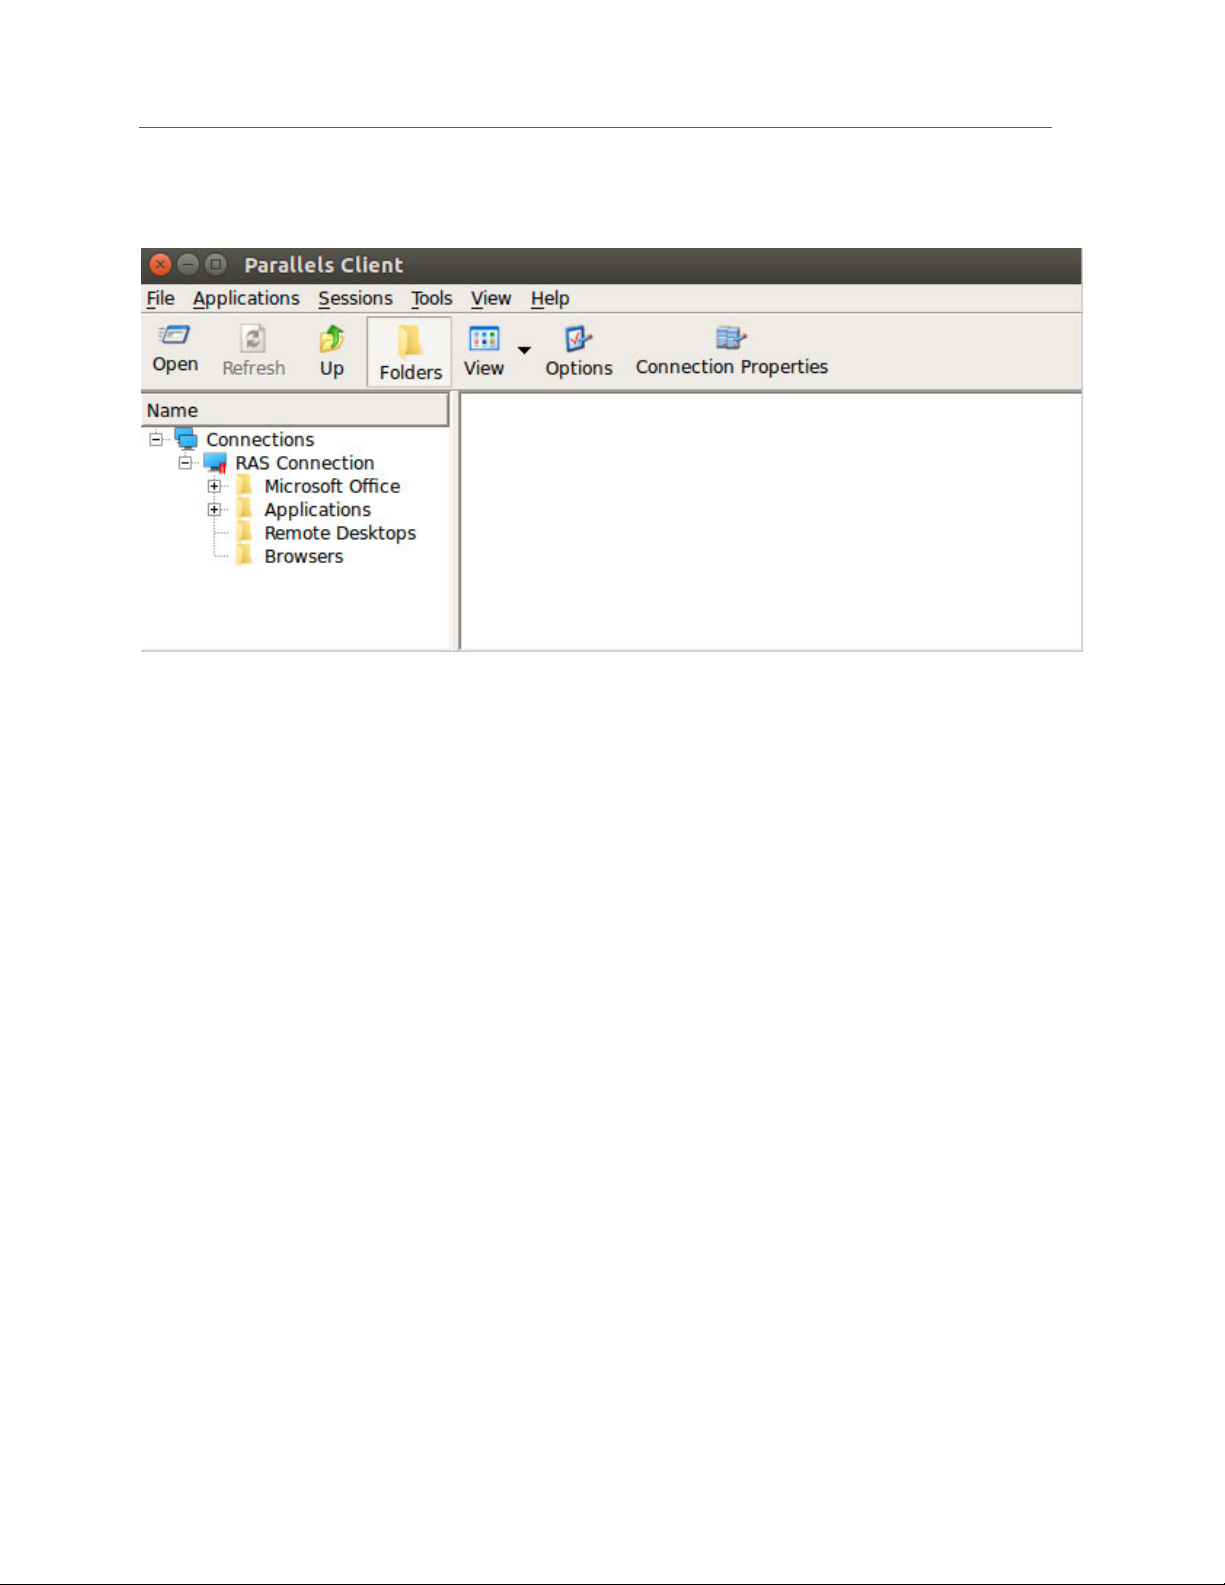
5 Click Connect. If the login is successful, the main Parallels Client window will open and will
display the published resources that you can use.
To open a resource, navigate the published folder tree and double-click a desired resource to open
it. When the resource opens in a new window, you can begin using as if it was running on your
local computer.
Checking for Updates
To check for the latest available version of Parallels Client for Linux:
1 In the main Parallels Client for Linux window, click the Options toolbar item.
10
Page 11
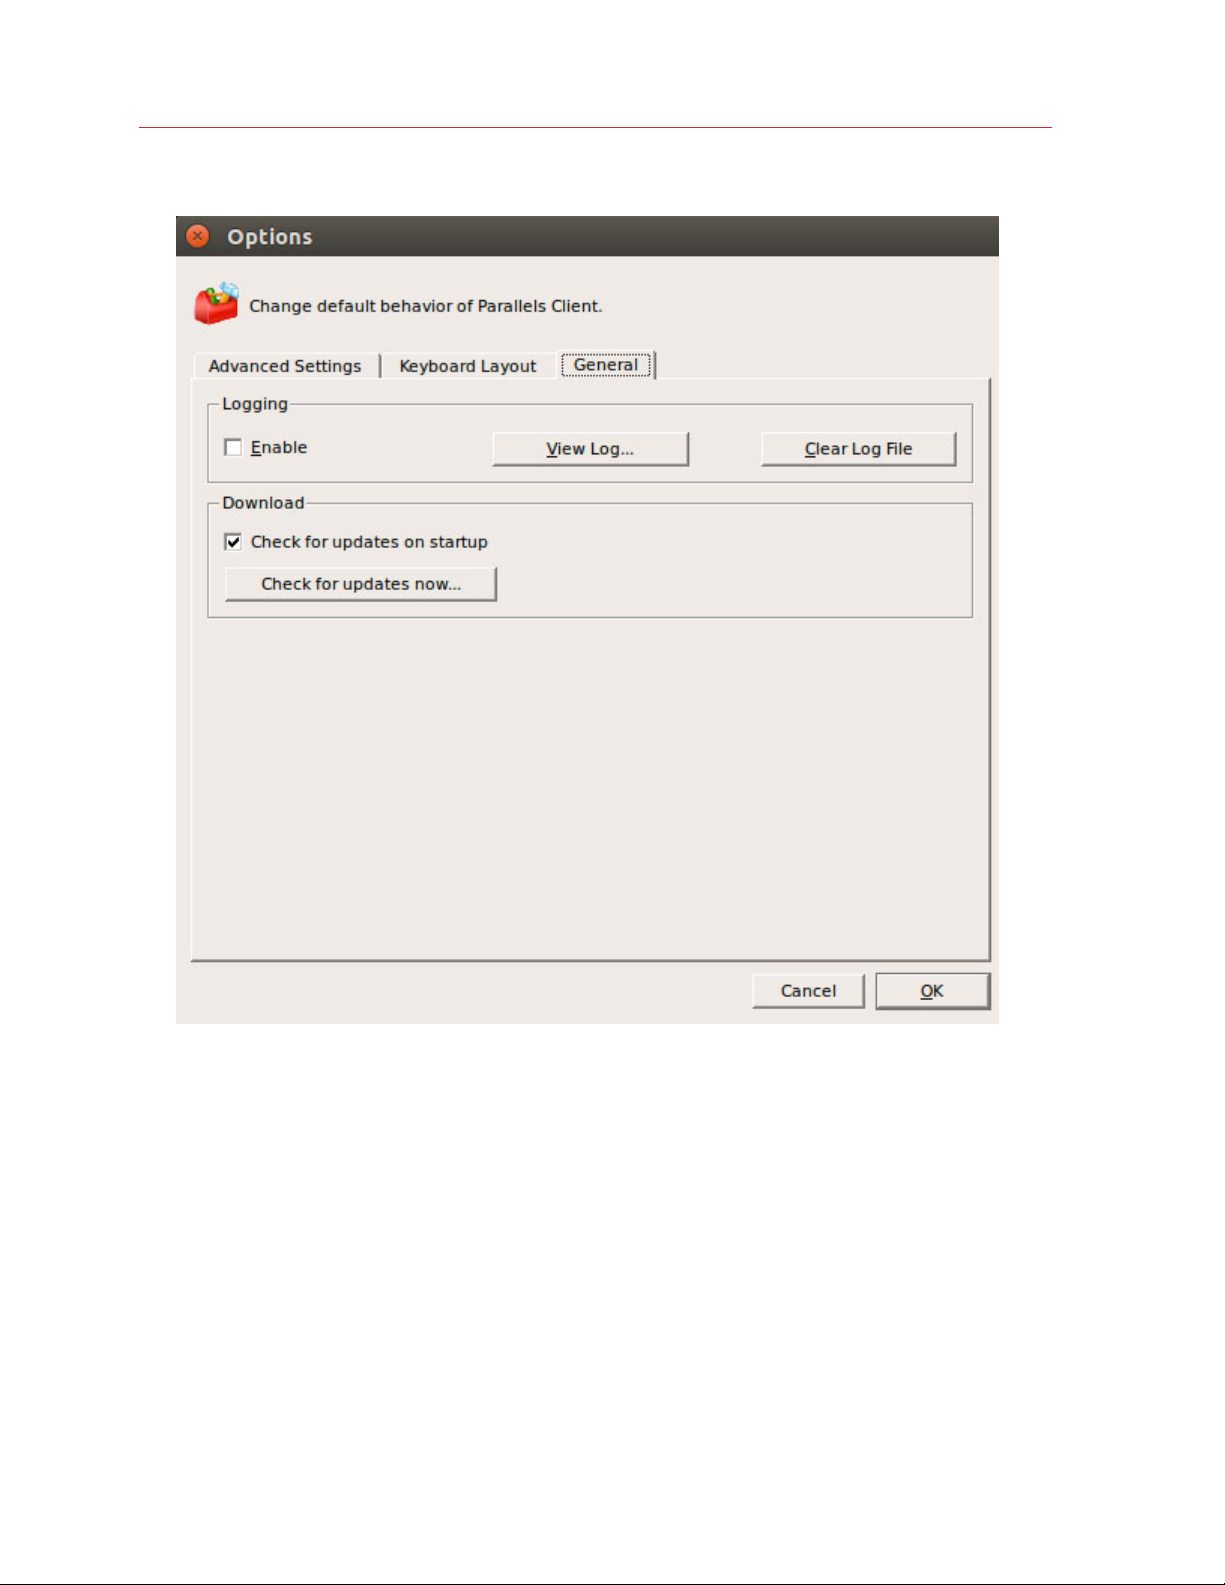
2 In the Options dialog that opens, click the General tab.
Getting Started
3 Click the Check for updates now button to see if a newer version of Parallels Client for Linux is
available.
4 You can also select the Check for updates on startup option to check for Parallels Client
updates every time you open it.
11
Page 12

C HAPTER 2
Using Parallels Client for Linux
In This Chapter
Adding a New Connection........................................................................................ 12
Configuring a RAS Connection ................................................................................. 14
Configuring an RDP Connection ............................................................................... 26
Configuring Global Options....................................................................................... 36
Using a RAS Connection .......................................................................................... 39
Using an RDP Connection........................................................................................ 39
Exporting and Importing Parallels Client Settings ...................................................... 40
Parallels Client Command Line Interface................................................................... 40
Adding a New Connection
Parallels Client allows you to have more than one connection, so you could easily connect to
different servers or using different connection properties, etc.
To manually add a connection:
1 From the main menu, click File > Add New Connection.
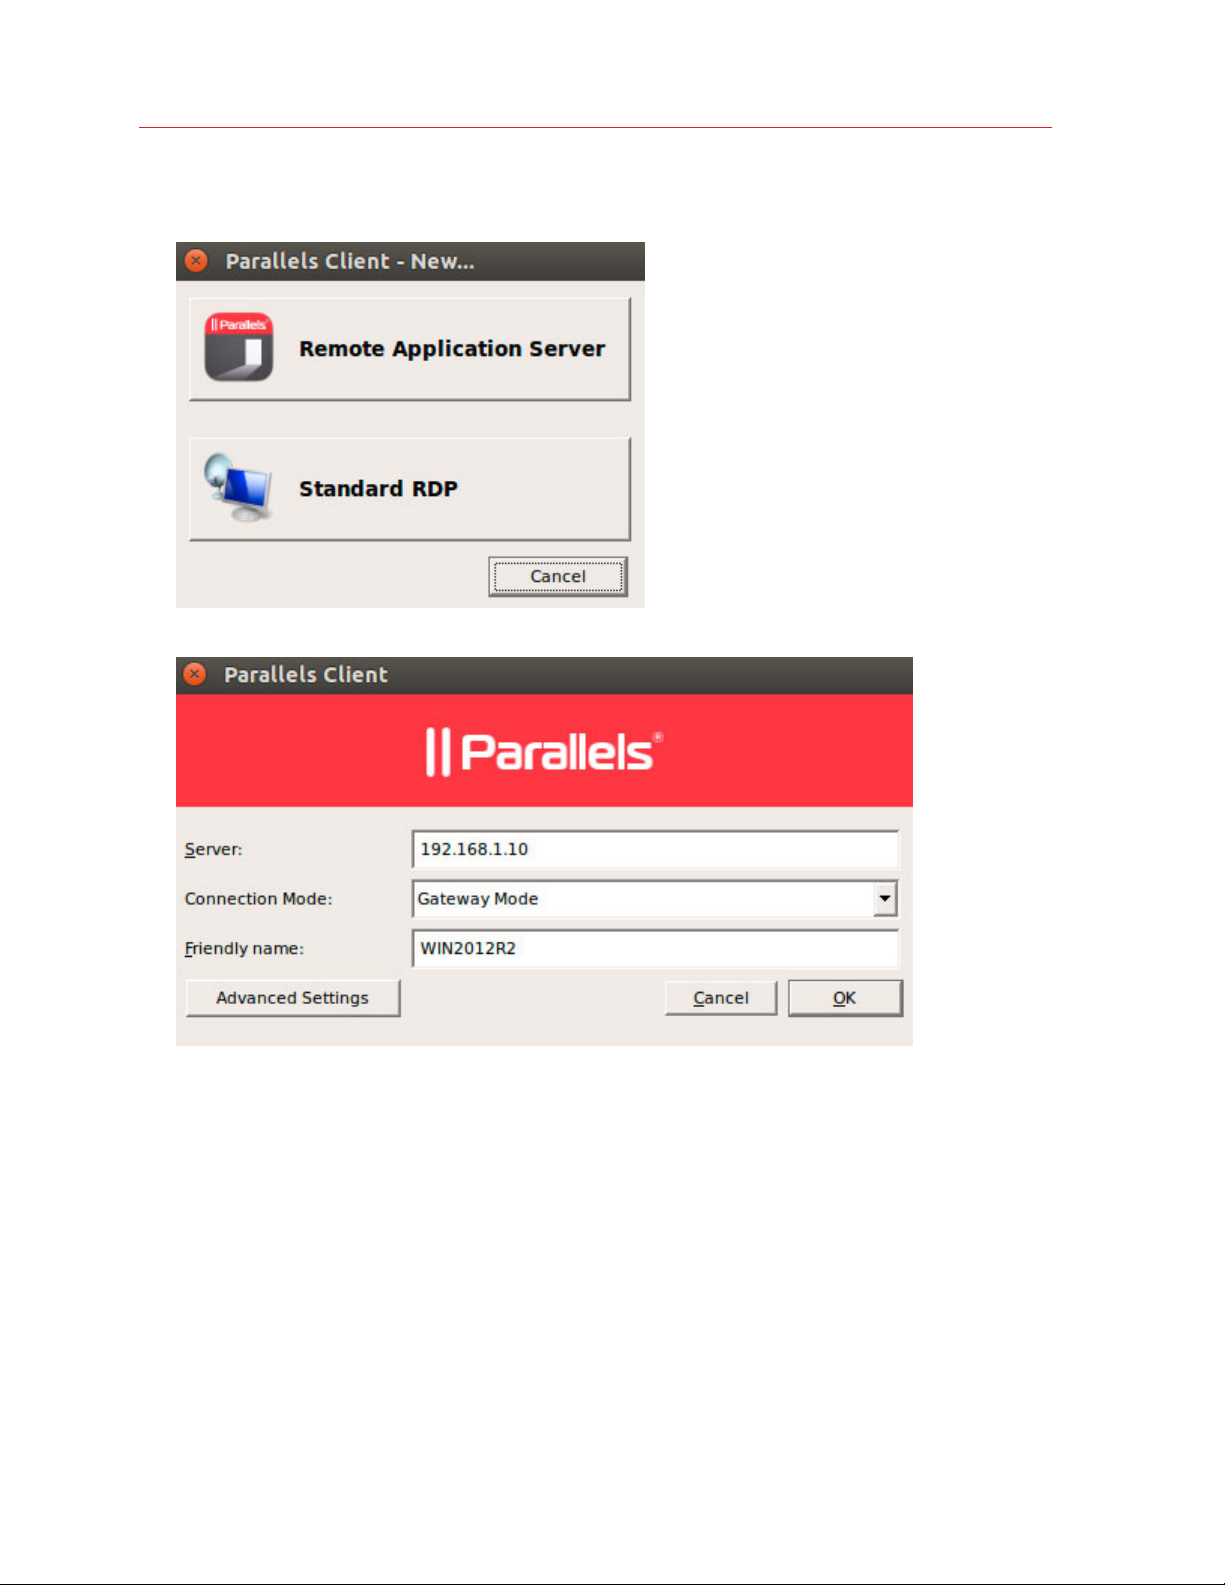
2 Select the type of connection to create:
• Click Remote Application Server to create a Parallels Remote Application Server
connection. This will allow you to use applications, documents, or desktops published in
Parallels Remote Application Server.
Page 13
Using Parallels Client for Linux
• Click Standard RDP to create a standard Remote Desktop connection. This will allow you
to connect to any remote computer that accepts standard Remote Desktop connections.
3 On the next screen, enter the connection properties.
When creating a Remote Application Server connection, your system administrator should give
you the connection information that must be specified in this dialog. If you received an invitation
email from your administrator, you can find this information at the bottom of the message. The
information will look similar to the following:
To manually configure the RAS Connection, use the following
settings:
Server: 192.168.1.10
Port: 443
Connection Mode: Gateway Mode
When creating a Standard RDP connection, you need to know the IP address or hostname of
the remote computer you want to connect to.
13
Page 14

Using Parallels Client for Linux
4 In the Server field, enter the Parallels Remote Application Server IP address or hostname (this
should be the server where the RAS Secure Client Gateway resides). If creating a Standard
RDP connection, specify the remote computer IP address or hostname.
5 The Connection mode drop-down list is enabled only when creating a Remote Application
Server connection. Select one of the following options:
• Gateway Mode. Parallels Client connects to the RAS Secure Client Gateway and the
session connection is tunneled through the first available connection. This mode is ideal for
servers that are only reachable via the gateway and do not require a high level of security.
• Gateway SSL Mode. Same as the gateway mode above, but uses encryption to secure the
data.
• Direct Mode. Parallels Client first connects to the RAS Secure Client Gateway for the best
available terminal server and then connects directly to that server. This is best used when
the Parallels Client and the terminal server reside on the same network.
• Direct SSL Mode. Same as the direct mode above, but uses encryption to secure the data.
6 In the Friendly name field, choose and type a friendly name for this connection.
7 The Advanced settings button opens the Connection Properties dialog where you can
specify additional connection properties. For more information, please see Configuring a RAS
Connection (p. 14) or Configuring an RDP Con
nection (p. 26).
8 Click OK to create a connection.
Configuring a RAS Connection
To modify the properties of an existing Remote Application Server connection, right-click it in the
main Parallels Client window and then click Connection Properties in the context menu. This will
open the Connection Properties dialog. Properties are grouped in the dialog by functionality using
tab pages. The following subsections describe each tab page in detail.
14
Page 15

Using Parallels Client for Linux
Connection
The Connection tab page allows you specify connection settings and logon information.
Configuring the Primary Connection
On the Connection tab page, you can define a primary connection and one or more secondary
connections.
15
Page 16

Using Parallels Client for Linux
The primary connection is what Parallels Client will use first to connect to the specified server. This
should be the server where the primary RAS Secure Client Gateway is running.
To specify the primary connection information:
1 In the Primary Connection field, specify the server name or IP address.
2 In the Connection Mode drop-down list, select one of the following options:
• Gateway Mode. Parallels Client connects to the RAS Secure Client Gateway and the
session connection is tunneled through the first available connection. This mode is ideal for
servers which are only reachable via the gateway and do not require a high level of security.
• Gateway SSL Mode. Same as the gateway mode above, but uses encryption to secure the
data.
• Direct Mode. Parallels Client first connects to the RAS Secure Client Gateway for the best
available terminal server and then connects directly to that particular server. This is best
used when the Parallels Client and the terminal server are on the same network.
• Direct SSL Mode. Same as the direct mode above, but uses encryption to secure the data.
3 In the Port field, specify the port on which the gateway listens for incoming connections. If the
default value (80) has been modified on the server side, you have to replace the default value
here as well. Ask your system administrator about the port number if you are having a problem
connecting to the server.
4 In the Friendly Name field, choose and type a name of your choice, so you could easily identify
the server in Parallels Client later.
Configuring a Secondary Connection
If the Remote Application Server that you are connecting to has more than one RAS Secure Client
Gateway, you can define a secondary connection, which will be used as a backup connection in
case the primary gateway connection fails.
To add a secondary connection:
1 Click the Secondary Connections button.
2 In the Secondary Connections dialog, click the Add button and specify a server name or IP
address. This should be a server hosting a secondary RAS Secure Client Gateway (the primary
gateway is used by the primary connection).
3 Select the connection mode and modify the port number if necessary. Click OK and then click
OK again to return to the Connection Properties dialog.
Configuring the Logon Information
In the Logon section, specify the following properties:
1 Select the Auto Logon option to enable Parallels Client to connect automatically without
displaying the Logon dialog every time you connect to a remote server.
16
Page 17

Using Parallels Client for Linux
2 In the Authentication type drop-down list, select the desired method of authentication:
• Credentials. Select this option and then enter the username, password, and domain
information. You will be authenticated on the remote server using the specified credentials.
• Smart Card. Select this option to authenticate using a smart card. When connecting to the
remote server, insert a smart card into the card reader and then enter a PIN when
prompted.
• Single Sign-On. This option will be included in the list only if the Single Sign-On module is
installed during Parallels Client installation. Select this option to use local system credentials
to connect to the remote server.
Note for Administrators: The allowed authentication type(s) must be specified in the RAS Console in
Connection / Authentication.
17
Page 18

Using Parallels Client for Linux
Display
The Display tab page allows you to configure display options.
In the General Options section, specify the general display properties, including color depth and
screen size. If you would like to specify a custom screen size, select Custom in the drop-down list
and then specify the size using the Width and Height fields. You can also select a graphics
accelerator to use from the provided drop-down list.
18
Page 19

Using Parallels Client for Linux
If you have more than one monitor connected to your Linux computer, you can select the Use
primary monitor only option to display published applications on that monitor only. If you clear the
option, the applications can be displayed on all connected monitors.
By selecting the Span desktop across all monitors option you can span the published desktops
across all connected monitors (if you have more than one).
Printing
The Printing tab page allows you to configure printing options.
19
Page 20

Using Parallels Client for Linux
In the Technology drop-down list, select the technology to use when redirecting printers to a
remote computer:
• None. No printer redirection will be configured.
• RAS Universal Printing technology. Select this option to use RAS Universal
Printing technology.
• Microsoft Basic Printing Redirection technology. Select this option to use Microsoft Basic
printing technology.
• RAS Universal Printing and Microsoft Basic redirection technologies. Select this option to
use both Parallels RAS and Microsoft technologies.
RAS Universal Printing Technology
If you selected RAS Universal Printing technology, you need to select printers to redirect in the
Redirect Printers drop-down list:
• All. All printers on the client side will be redirected.
• Default only. Only the Windows default printer will be redirected.
• Specific only. Select the printers to redirect in the provided list. The list becomes enabled for
selection only if you select this option.
Microsoft Basic Printing Redirection Technology
If you selected Microsoft Basic Printing Redirection technology, you can modify printer
properties by selecting a printer in the list and then clicking the Edit button. In the dialog that
opens, specify a desired printer manufacturer and model number.
Default printer settings
To configure default printer settings, click the Change Default Printer settings button.
The default printer list shows the available printers that are ready to be redirected by the client to
the remote computer. The list also includes the printing technology that the available printers will
use. The technology reflects the setting selected, as described in the Technology section (above).
For example, if the technology was set to RAS Universal Printing technology, only the printers
using RAS Universal Printing will be listed.
To disable the default printer, select <none>. To redirect the default local printer on the client side
to the remote computer, select <defaultlocalprinter>. When <custom> is selected, you can
specify a custom printer which might be installed on the remote computer. The first printer that
matches the printer name inserted in the custom text box, will be set as the default printer on the
remote computer.
20
Page 21

Using Parallels Client for Linux
Select Match exact printer name to match the name exactly as inserted in the custom text box.
Please note that the remote printer name may be different than the original printer name. Also note
that local printers may not be redirected due to server settings or policies.
You can specify the time a printer will be forced as default. If the default printer is changed during
this time after the connection is established, the printer is reset as default.
Select the Update the remote default printer if the local default printer is changed option to
change the remote default printer automatically when the local default printer is changed. Please
note that the new printer must have been previously redirected.
21
Page 22

Using Parallels Client for Linux
Local Resources
Use the Local Resources tab page to configure how local resources are handled by the remote
desktop.
You can see that these are the same options that are available when using a standard Microsoft
Remote Desktop Connection. The options are self-explanatory, so you can set them according to
your preferences.
22
Page 23

Using Parallels Client for Linux
Experience
The Experience tab page allows you to tweak the connection speed to optimize the performance
of the connection with the remote computer.
If you are connecting to a remote computer on a local network that runs at 100 Mbps or higher, it is
usually safe to have all of the experience options turned on.
23
Page 24

Using Parallels Client for Linux
Network
Use the Network tab page to configure a proxy server if you have to use one to connect to the
remote computer.
To configure a proxy server, select the Use proxy server option and then select the protocol from
the following list:
• SOCKS4. Enable this option to transparently use the service of a network firewall.
• SOCKS4A. Enable this option to allow a client that cannot connect to resolve the destination
host’s name to specify it.
• SOCKS5. Enable this option to be able to connect using authentication.
• HTTP 1.1. Enable this option to connect using the standard HTTP 1.1 protocol connections.
Specify the proxy host domain name or IP address and the port number.
For SOCKS5 and HTTP 1.1 protocols, select Proxy requires authentication and enter user
credentials.
Authentication
Use the Authentication tab page to specify what happens if server authentication fails.
In the If authentication fails drop-down list, select one of the following options:
• Connect. The user can ignore the certificate of the server and still connect.
• Warn. The user is alerted about the certificate and still has the ability to choose whether to
connect or not.
• Do not connect. The user is not allowed to connect.
24
Page 25

Using Parallels Client for Linux
Advanced Settings
The Advanced Settings tab page allows you to customize the default behavior or Parallels Client.
You can specify the following properties:
• Create shortcuts configured on server. For each published application, the administrator can
configure shortcuts that can be created on the client's desktop and the Start menu. Select this
option to create the shortcuts, or clear the option if you don't want to create them.
• Redirect URLs to this computer. Enable this option to use the local web browser when
opening 'http:" links.
25
Page 26

Using Parallels Client for Linux
• Redirect Mail to this computer. Enable this option to use the local mail client when opening
‘mailto:’ links.
• Enable Compression. Enables compression to have a more efficient connection.
• Connect to console. This option is used for administration of a Remote Desktop Session Host
server. It acts as if a standard Remote Desktop connection is initiated from the command line
with the /admin option.
• Use Pre Windows 2000 login format. If this option is selected, it allows you to use legacy
(pre-Windows 2000) login format.
• Network Level Authentication. Check this option to enable network level authentication,
which will require the client to authenticate before connecting to the server.
The Override computer name field specifies the name that your computer will use during a remote
desktop session. If set, this will override the default computer name. Any filtering set by the
administrator on the server side will make use of this name.
Configuring an RDP Connection
To modify the properties of an existing standard RDP connection, right-click it in the main Parallels
Client window and then click Connection Properties in the context menu. This will open the
Connection Properties dialog. Properties are grouped in the dialog by functionality using tab
pages. The following subsections describe each tab page in detail.
26
Page 27

Using Parallels Client for Linux
Connection
The Connection tab page allows you specify connection settings and logon information.
In the Connection Settings section, specify the following properties:
3 In the Primary Connection field, specify the remote computer hostname or IP address.
4 The Port field contains the TCP port 3389 by default, which is the standard port for RDP
connections. You can modify it if the port number was changed on the remote computer.
27
Page 28

Using Parallels Client for Linux
5 In the Friendly Name field, choose and type a name of your choice, so you could easily identify
the server in Parallels Client later.
In the Logon section, specify the following properties:
1 Select the Auto Logon option to enable Parallels Client to connect automatically without
displaying the Logon dialog every time you connect to a remote server.
2 In the Authentication type drop-down list, select the desired method of authentication:
• Credentials. Select this option and then enter the username, password, and domain
information. You will be authenticated on the remote server using the specified credentials.
• Smart Card. Select this option to authenticate using a smart card. When connecting to the
remote server, insert a smart card into the card reader and then enter a PIN when
prompted.
• Single Sign-On. This option will be included in the list only if the Single Sign-On module is
installed during Parallels Client installation. Select this option to use local system credentials
to connect to the remote server.
Note for Administrators: The allowed authentication type(s) must be specified in the RAS Console in
Connection / Authentication.
28
Page 29

Display
The Display tab page allows you to configure display options.
Using Parallels Client for Linux
In the General Options section, specify the general display properties, including color depth and
screen size. If you would like to specify a custom screen size, select Custom in the drop-down list
and then specify the size using the Width and Height fields. You can also select a graphics
accelerator to use from the provided drop-down list.
29
Page 30

Using Parallels Client for Linux
If you have more than one monitor connected to your Linux computer, you can select the Use
primary monitor only option to display published applications on that monitor only. If you clear the
option, the applications can be displayed on all connected monitors.
By selecting the Span desktop across all monitors option you can span the published desktops
across all connected monitors (if you have more than one).
Local Resources
Use the Local Resources tab page to configure how local resources are handled by the remote
desktop.
30
Page 31

Using Parallels Client for Linux
You can see that these are the same options that are available when using a standard Microsoft
Remote Desktop Connection. The options are self-explanatory, so you can set them according to
your preferences.
Programs
The Programs tab page allows you to specify a program that will be started automatically on the
remote computer when you establish a connection with it.
Select the Start the following program on connection option and then specify the Program path
and file name and Start in the following folder options.
31
Page 32

Using Parallels Client for Linux
Experience
The Experience tab page allows you to tweak the connection speed to optimize the performance
of the connection with the remote computer.
If you are connecting to a remote computer on a local network that runs at 100 Mbps or higher, it is
usually safe to have all of the experience options turned on.
32
Page 33

Using Parallels Client for Linux
Network
Use the Network tab page to configure a proxy server if you have to use one to connect to the
remote computer.
To configure a proxy server, select the Use proxy server option and then select the protocol from
the following list:
• SOCKS4. Enable this option to transparently use the service of a network firewall.
• SOCKS4A. Enable this option to allow a client that cannot connect to resolve the destination
host’s name to specify it.
• SOCKS5. Enable this option to be able to connect using authentication.
• HTTP 1.1. Enable this option to connect using the standard HTTP 1.1 protocol connections.
Specify the proxy host domain name or IP address and the port number.
For SOCKS5 and HTTP 1.1 protocols, select Proxy requires authentication and enter user
credentials.
Authentication
Use the Authentication tab page to specify what happens if server authentication fails.
In the If authentication fails drop-down list, select one of the following options:
• Connect. The user can ignore the certificate of the server and still connect.
• Warn. The user is alerted about the certificate and still has the ability to choose whether to
connect or not.
• Do not connect. The user is not allowed to connect.
33
Page 34

Using Parallels Client for Linux
Advanced Settings
The Advanced Settings tab page allows you to customize the default behavior or Parallels Client.
You can specify the following properties:
• Create shortcuts configured on server. For each published application, the administrator can
configure shortcuts that can be created on the client's desktop and the Start menu. Select this
option to create the shortcuts, or clear the option if you don't want to create them.
• Redirect URLs to this computer. Enable this option to use the local web browser when
opening 'http:" links.
34
Page 35

Using Parallels Client for Linux
• Redirect Mail to this computer. Enable this option to use the local mail client when opening
‘mailto:’ links.
• Enable Compression. Enables compression to have a more efficient connection.
• Connect to console. This option is used for administration of a Remote Desktop Session Host
server. It acts as if a standard Remote Desktop connection is initiated from the command line
with the /admin option.
• Use Pre Windows 2000 login format. If this option is selected, it allows you to use legacy
(pre-Windows 2000) login format.
• Network Level Authentication. Check this option to enable network level authentication,
which will require the client to authenticate before connecting to the server.
The Override computer name field specifies the name that your computer will use during a remote
desktop session. If set, this will override the default computer name. Any filtering set by the
administrator on the server side will make use of this name.
35
Page 36

Using Parallels Client for Linux
Configuring Global Options
You can configure the Parallels Client global options by clicking the Options toolbar item. This will
open the Options dialog.
Advanced Settings
The Advanced Settings tab page allows you to configure advanced options:
• Language. Allows you to select the graphical user interface language.
• Always on top. With this option enabled, other applications will no longer mask the launcher.
36
Page 37

Using Parallels Client for Linux
• Do not warn if server certificate is not verified. When connected over SSL, and the
certificate is not verified, a warning message will be displayed. You can disable this warning
message by enabling this option.
• Show folders page. Enabling this option will show the available folders while showing the
hierarchy of the application groups as configured on the server.
• Minimize to tray on close or escape. Enable this feature to place the Parallels Client into the
System Tray when you click on the Close button or hit escape.
Keyboard Layout
The Keyboard Layout tab page allows you to select a keyboard layout to use in the graphical user
interface. Select System Default to use the default layout or select User defined and then select a
keyboard from the list.
37
Page 38

Using Parallels Client for Linux
General
The General tab page allows you to configure general options:
• Logging. The Enable option enables or disables logging. Click the View Log button to view
the log. Click the Clear Log File button to remove the information from the file.
• Check for updates on startup. This option is available only with administrative rights. If this
option is selected, Parallels Client will check for available Parallels Client updates on startup.
You can also click the Check for updates now button to check for updates at any time.
38
Page 39

Using Parallels Client for Linux
Using a RAS Connection
To connect to Parallels Remote Application Server, double-click a connection in the Connections
list (or right-click > Connect).
You can have multiple active connections at the same time (both Remote Application Server and
standard RDP). To switch between active connections in Parallels Client, click a connection in the
left pane or click the corresponding tab page in the right pane.
Right-click an active connection to perform the following actions:
• Connect. This menu item is disabled for an active connection.
• Refresh. Use this option to refresh the session and the the published resources view in the
right pane. If there were changes on the Parallels Remote Application Server side, they will be
reflected in the Parallels Client.
• Connection Properties. Display the connection properties dialog where you can view (but not
modify) the connection properties. To modify the connection properties, you must disconnect it
first.
• Delete. Deletes a connection. A confirmation dialog is displayed before the connection is
deleted.
• Change password. Allows you to change the user password on the remote server. Displays
the Parallels Client logon dialog where you should specify the existing password. Then displays
the Change Password dialog allowing you to specify a new password.
• Create Shortcuts for all visible Applications. Creates shortcuts on the local desktop for all
applications that are displayed in the published resources pane in the main Parallels Client
window.
• Delete shortcuts from Desktop. Deletes shortcuts from the local desktop that were previously
created by clicking the Create Shortcuts for all visible Applications menu item.
• Logoff. Loggs off Parallels Client from the session.
• Disconnect. Disconnects the selected connection.
Using an RDP Connection
To connect to a remote computer, double-click an RDP connection (or right-click > Connect).
You can have multiple active connections at the same time (both standard RDP and Remote
Application Server). To switch between active connections in Parallels Client, click a connection in
the left pane or click the corresponding tab page in the right pane.
Right-click an active RDP connection to perform the following actions:
39
Page 40

Using Parallels Client for Linux
• Connect. This menu item is disabled for an active connection.
• Connection Properties. Display the connection properties dialog where you can view (but not
modify) the connection properties. To modify the connection properties, you must disconnect it
first.
• Delete. Deletes a connection. A confirmation dialog is displayed before the connection is
deleted.
• Create Shortcut. Creates a shortcut for this connection on the local desktop.
• Delete shortcut from Desktop. Deletes the shortcut from the local desktop that was
previously created by clicking the Create Shortcut menu item.
• Disconnect. Disconnects the connection.
Exporting and Importing Parallels Client Settings
You can export current Parallels Client settings to a file to have a backup or to import the settings
into a Parallels Client installed on a different computer. The following settings are exported:
• All existing connections including all individual connection properties.
• Parallels Client preferences (global options).
To export the current Parallels Client settings to a file, click File on the main menu and then click
Export Settings. In the dialog that opens, specify a file name and a destination folder. Click Save
to export the settings. The file is saved with the ".2xc" extension.
To import the settings, click File > Import Settings. In the dialog that opens, select the ".2xc" file
and click Open. Please note that the Parallels Client settings stored in a file will override the current
Parallels Client settings.
Parallels Client Command Line Interface
Usage
/opt/2X/Client/bin/appserverclient -s Server -u User [options]
General Options
General options:
-m: operating mode
2G for 2X Application Server gateway access client(default)
2D for 2X Application Server direct access client
40
Page 41

Using Parallels Client for Linux
AL for 2X Application Server application list
MS for Microsoft Terminal Server client
MF for Microsoft Terminal Server fullscreen client
MX for Microsoft Terminal Server fullscreen client, that spans over all monitors
-s: server[:port] (default port is 80 for 2G and 2D modes and 3389 for MS and MF modes)
-s: ssl://server[:port] secure access client (TLS/SSL)
-b: altserver[:port] (default port is 80 for 2G and 2D modes and 3389 for MS and MF modes)
-u: user name. It can include domain: -u user@host.domain or -u user@ntdomain
-p: password.
-d: domain.
-a: application to start.
-f: working folder.
-i: 2xa shortcut file.
2xa shortcut files available through Parallels Remote Application Server web interface, and
include published application settings.
-o: full path to application listing output file
-x: proxy, can be:
socks4://[username@]proxy[:port]
socks4a://[username@]proxy[:port]
socks5://[username[:password]@]proxy[:port]
http://[username[:password]@]proxy[:port]
RDP Options
RDP options:
-H: client hostname.
-T: window title for desktop connection.
-w: override desktop width. It should be used with -h parameter.
-h: override desktop height. It should be used with -w parameter.
41
Page 42

Using Parallels Client for Linux
-g, -geometry {width}x{height}[{+-}{xoff}[{+-}{yoff}]]:
standard application geometry, should be used with -m MS parameter only.
-c: connection color depth in bits (default: 24 bits).
-1: force seamless application placement on primary monitor only.
-X: embed into another window with a given id, should be used with -m MS parameter only.
-K: keep window manager key bindings.
-e: RDP experience one or more ORed value(s) from:
0x7F to disable everything
0x01 to disable wallpapers
0x02 to disable full window drag
0x04 to disable menu animations
0x08 to disable theming
0x20 to disable cursor shadow
0x40 to disable cursor blinking
0x80 to enable font smoothing
0x00 to disable nothing (default)
-z: RDP compression
0x00 to disable nothing (default)
0x01 to disable compression
0x02 to limit to RDP4 compression
0x03 to limit to RDP5 compression
-t: maximum network timeout in seconds (default: 5 seconds)
-l: locale identifier in HEX format (default: 0x0409 - English (United States))
--admin or -q: connect to administer server
Device Options
Device options:
-P: redirect printer(s) (this flag can be repeated), can be
"printcap" to use printers from '/etc/printcap'
42
Page 43

Using Parallels Client for Linux
use this option if printcap was configured to contain driver name as printer comment:
lp0|drivername:rm=clientname:rp=lp0:
"printername" to use default printer driver
"printername=drivername" to specify driver name
-S: redirect sound, can be
"off" to disable sound (default)
"local"= quality to bring it to the client with:
"normal" for normal quality
"good" for good quality (default)
"verygood" for very good quality
"remote" to leave it on the server
-D: redirect drive(s) (this flag can be repeated), can be
"remotename=localpath"
-O [option]: redirect serial ports (this flag can be repeated with option)
"off" to disable port redirection (default)
"auto" for COM1=/dev/ttyS0, COM2=/dev/ttyS1, LPT1=/dev/lp0
or option to override local device path: COM1=/dev/debugtty
-C: redirect smart card reader; pcscd smart card manager should be installed in order to use this
feature.
-U [options]: redirect URI. options are comma separated list of:
"off" disable URI redirection (default).
"url" redirect URL (http: and https:).
"mailto" redirect Mail (mailto:).
Use "url,mailto" to redirect both URL and Mail.
-k [command]: execute special command in active session, where command is one of:
"logoff" gracefully log off a published application session.
"disconnect" gracefully disconnect a session.
Other Options
Other options:
-v: print version info
43
Page 44

Using Parallels Client for Linux
--help or -?: to get help information
Examples
The following examples illustrate the use of the Parallels Client for Linux command-line interface:
appserverclient -s<Server IP> -a<"Application Name"> -u<User Name>
appserverclient -s192.168.0.1 -a"Internet Explorer" -uAdministrator
In this case you are requested to logon before the application is loaded.
appserverclient -s<Server IP> -a<"Application Name"> -u<User Name> -p<Password>
appserverclient -s192.168.0.1 -a"Media Player" -uAdministrator –ppassword
In this case, the logon screen is bypassed if the password is correct.
Note: The application name is case sensitive and must be enclosed in quotes. Examples: "Notepad",
"Internet Explorer", "Media Player".
Table of Available Locale Identifiers
Identifier Name
0x0401 Arabic (Saudi Arabia)
0x0403 Catalan (Spain)
0x0404 Chinese (Taiwan)
0x0804 Chinese (People's Republic of China)
0x0405 Czech (Czech Republic)
0x0406 Danish (Denmark)
0x0407 German (Germany)
0x0807 German (Swiss)
0x0408 Greek (Greece)
0x0409 English (United States)
0x0809 English (Great Britain)
0x0C0A Spanish - Modern Sort (Spain)
0x0425 Estonian (Estonia)
0x040B Finnish (Finland)
0x040C French (France)
0x080C French (Belgium)
0x0C0C French (Canada)
0x100C French (Swiss)
44
Page 45

Using Parallels Client for Linux
0x040D Hebrew (Israel)
0x040E Hungarian (Hungary)
0x0410 Italian (Italy)
0x0411 Japanese (Japan)
0x0412 Korean (Korea)
0x0427 Lithuanian (Latvia)
0x0426 Latvian (Latvia)
0x0413 Dutch (Netherlands)
0x0813 Dutch (Belgium)
0x0414 Norwegian (Norway)
0x0415 Polish (Poland)
0x0416 Portuguese (Brazil)
0x0816 Portuguese (Portugal)
0x0418 Romanian (Romania)
0x0419 Russian (Russia)
0x041A Croatian (Croatia)
0x041B Slovak (Slovakia)
0x041D Swedish (Sweden)
0x041E Thai (Thailand)
0x041F Turkish (Turkey)
0x0424 Slovenian (Slovenia)
0x042A Vietnamese (Vietnam)
0x042D Basque (Spain)
0x040F Icelandic (Iceland)
45
Page 46

Index
Index
A
Adding a New Connection - 12
Advanced Settings - 25, 34
Authentication - 24, 33
C
Checking for Updates - 10
Configuring a RAS Connection - 14
Configuring an RDP Connection - 26
Configuring Global Options - 36
Configuring Parallels Client for Linux - 8
Connection - 15, 27
D
Device Options - 43
Display - 18, 29
E
Examples - 44
Experience - 23, 32
Exporting and Importing Parallels Client
Settings - 40
P
Parallels Client Command Line Interface - 40
Printing - 19
Programs - 31
R
RDP Options - 41
S
System Requirements - 5
U
Using a RAS Connection - 39
Using an RDP Connection - 39
Using Parallels Client for Linux - 12
G
General Options - 40
Getting Started - 5
I
Installing Parallels Client for Linux - 5
L
Local Resources - 22, 30
N
Network - 24, 33
O
Other Options - 44
 Loading...