

Page 1

Remote Application Server
Version 14
Last updated: 25-02-15
Page 2

Informationinthisdocumentissubjecttochangewithoutnotice.Companies,names,anddatausedinexamples
hereinarefictitiousunlessotherwisenoted.Nopartofthisdocumentmaybereproducedortransmittedinany
formorbyanymeans,electronicormechanical,foranypurpose,withouttheexpresswrittenpermissionof2X
SOFTWARELtd.
2XRDPClientisacopyrightof2XSOFTWARELtd.199920142XSOFTWARELtd.Allrightsreserved.
Version14–LastupdatedFebruary,25,2015
Page 3

ManualIndex
Section1Introductionto2XRemoteApplicationServer
1. Whatis2XRemoteApplicationServerandHowDoesWork?
2. AboutthisDocument
3. WhatisnewinVersion14?
Section2Installing2XRemoteApplicationServer
4. SystemRequirements
5. InstallingandConfiguring2XRemoteApplicationServer
Section3GettingStartedwith2XRemoteApplicationServer
6. 2XRemoteApplicationServerConsole
7. SettingupanSMBEnvironment
Section4SitesandAdministrators
8. SitesandManagement
9. Administrators:Adding,ManagingandConfiguring
Section5TerminalServers
10. AddingaTerminalServer
11. Installingthe2XTerminalServerAgentManually
12. ConfiguringaTerminalServer
13. GroupingTerminalServers
14. PublishingaDesktopfromaTerminalServer
15. PublishingandConfiguringanApplicationfromaTerminalServer
16. PublishingaDocumentfromaTerminalServer
Section6VDIHosts
17. AddingaVDIHost
18. InstallingtheVDIAgentManually
19. InstallinganApplianceandConfiguringaVDIHost
20. ConfiguringandManagingPools
21. ConfiguringandManaging2XTemplatesforGuestClones
22. PersistentGuests
23. PublishingaVirtualDesktopfromaGuest
24. PublishinganApplicationfromaGuest
25. PublishingaDocumentfromaGuest
Section7RemotePC’s
26. AddingaRemotePC
27. Installingthe2XRemotePCAgentManually
Page 4

28. ConfiguringaRemotePC
29. PublishingaDesktop,ApplicationandDocumentfromaGuest
Section8PublishingandFiltering
30. ManagingPublishedApplications
31. ManagingPublishedDesktops
32. ManagingPublishedDocuments
33. ManagingPublishedFolders
34. FilteringRulesbyUser,Client,IP,MACandGateway
Section92XSecureClientGateways
35. 2XSecureClientGatewayandTypes
36. Addinga2XSecureClientGateway
37. ManuallyAddinga2XSecureClientGateway
38. Managing2XSecureClientGateway
39. GatewayTunnelingPolicies
Section102XRASPortal
40. PrerequisitesandInstallation
41. LoggingintotheAdministrativePage
42. FarmSettings
43. GeneralSettings
Section112XBackupServers
44. Addinga2XBackupServer
45. ManagingBackupServers
Section12LoadBalancing
46. ResourceBased&RoundRobinLoadBalancing
47. LoadBalancingAdvancedSettings
48. HighAvailabilityLoadBalancing
Section132XUniversalPrinting
49. Managing2XUniversalPrintingServers
50. FontManagement
Section142XUniversalScanning
51. ManagingUniversalScanning
52. ManagingScanningApplications
Section16ManagingDevices
53. InvitingUserstoConnectDevices
Page 5

54. MonitoringDevices
55. ManagingWindowsDevices
56. WindowsDeviceGroups
57. SchedulingWindowsDevices&GroupsPowerCycles
58. Managing2XRDPClientSettings
Section17Reporting
59. DeployandConfigureReports
60. 2XRASReports
Section18ConnectionandAuthenticationSettings
61. 2XPublishingAgentConnectionSettings
62. SecondLevelAuthentication
63. RestrictingAccessbyOSBuildNumber
Section19Managingthe2XRemoteApplicationServer
64. 2XRemoteApplicationServerStatus
65. ConfiguringMonitoringCountersandEmailAlerts
66. Monitoring2XRemoteApplicationServerConfigurationChanges
67. ConfigureLogging
68. Maintaining2XRemoteApplicationServerandBackingUpConfiguration
Section21TroubleshootingandSupport
69. TroubleshootingandSupport
Page 6

What is 2X Remote Application Server?
2X Remote Application Server provides vendor independent virtual desktop and application delivery from
a single platform. Accessible from anywhere with native clients and web enabled solutions like the 2X RAS
Portal, 2X Remote Application Server allows you to publish full desktops, applications and documents within a
virtual environment, improving desktop manageability, security and performance.
2X Remote Application Server extends Windows Terminal Services by using a customized shell and virtual
channel extensions over the Microsoft RDP protocol. It supports all major Hypervisors from Microsoft,
VMware and more enabling the publishing of virtual desktops and applications to the 2X Client.
The product includes powerful universal printing and scanning functionality, high capacity resource based
load balancing and management features.
With the 2X Client Manager Module for 2X Remote Application Server you can also centrally manage user
connections and PCs converted into thin clients using the free 2X RDP client.
How does it work?
When a user requests a virtual desktop or application, the system finds a guest on one of the least loaded
hosts and starts or restores the guest connection. Using Microsoft RDP protocol, the virtual desktop or
publish application is presented to the user.
Users can connect to the 2X Remote Application Server using the free the 2X RDP Client which can run
on Windows, Linux, MAC, Android, Chrome and iOS. Users can also connect via an HTML 5 browser or
Chromebook.
Windows XP is already at the end of its life, Vista is following shortly and later on Windows 7 and 8 will also
follow. How can you defend the migration cost to your business? 2X RAS can help: the desktop replacement
allows you to extend the lifespan of your hardware and delay migration to the latest OSs to a time that suits
you best. The 2X solution allows you to be very flexible: you can lock machine configuration on the user side,
placing your corporate data in an extremely secure position, or you might decide to allow users to run some
local and remote applications. 2X Client Desktop Replacement is able to reduce the operability of the local
machine by disabling the most common local configuration options, while guaranteeing the same level of
service and security afforded by thin clients directly from your existing PCs.
Page 7

About This Document
Introduction
This product manual assumes that the reader is familiar with Microsoft Terminal Server and has an
intermediate networking knowledge.
All Titles, labels and names (such as product features, buttons and links) will be displayed in bold.
Terminology
Category
A category consists of a number of settings related to a specific task or operation. In the 2X Remote
Application Server Console the following categories are available:
● Farm
● Load Balancing
● Publishing
● Universal Printing
● Universal Scanning
● Connection
● Client Manager
● Policies
● Administration
● Information
● Reporting
● Licensing
Farm
A farm consists of a 2X Remote Application Server installation on a site or multiple sites.
Licensing Server Site
The site where the main configuration database is stored and manages all other sites in the 2X Farm. Other
servers in a site can be upgraded to Licensing Server if the main licensing server is not available. Note:
Upgrades of the 2X Remote Application Server MUST be applied to the licensing server site first.
Publishing
The act of making items installed on a Remote Desktop Server, VDI Host or Remote PC available to the
users via the 2X Remote Application Server.
Publishing Agent
The Publishing Agent provides load balancing of published applications and desktops.
RDS
Remote Desktop Services is a server role in Windows Server that provides technologies to enable users
to connect to virtual desktops and session-based desktops. RDS replaced Terminal Services beginning in
Windows 2008 R2.
Site
A site consists of a publishing agent, a SecureClient GW or multiple gateways and the agents installed on the
Terminal Servers, VDIs and PCs.
Page 8

What is new in Version 14
The new 2X Remote Application Server version 14 focuses on reporting, continuous availability and
enhanced technology to support mobile workforces. Highlights of the new features are:
2X Reporting
The new 2X Reporting engine is capable of providing information that helps administrators adjust systems
for better performance and efficiency. Support users in a pre-emptive manner, by detecting and preventing
bottlenecks before they escalate into issues, rather than dealing with outages as they arise. The intuitive
reporting interface boasts 14 new reports in total, separated into 5 groups for easy access. Below are the
groups available:
1. User Reports group provides insight into how end users are interacting with 2X RAS.
2. Group Reports indicate how groups of users are interacting with the system.
3. Devices Reports yields information about the devices that are connecting to 2X RAS.
4. Server Reports generate 2X RAS server component usage statistics including server health,
showing CPU and RAM usage in a graph.
5. Application Reports to learn which applications are being used.
High Availability Load Balancing
HALB is a software solution that sits between the user and the 2X RAS gateways. Many HALB services
can run simultaneously, one acting as the master and the others as slaves. The higher the number of
HALB services available, the lower the probability that users will experience downtime. The master and
slave appliances share a common or virtual IP, also known as VIP. Should the master HALB service
fail, a slave is promoted to master and takes its place seamlessly.
Invitation Email
2X Remote Application Server supports multiple platforms, and the product has always been designed
to help administrators by facilitating the installation and client rollout process. The invitation email allows
the administrator to send the installation and auto-configuration instructions to end users from the
central management console.
Universal Scanning WIA and Scanner Rename Pattern
It is now possible to redirect Windows Image Acquisition (WIA) enabled devices. Further customize how
the scanner name is presented to the user with the new scanner renaming pattern.
IPV6 Ready
Version 14 of 2X RAS introduces IPv6 to the system. The Increasing number of Devices connected
over internet has created the need to have a better addressing system. The product will still need IPv4
in order to work as IPv6 is introduced at the Secure Proxy Gateway and Connectivity Level. This means
that IPv6 is for end user usage to address this need.
Other Major Improvements in 2X Remote Application Server V14
● Enhanced Windows device Features in the Client Manager
● Added more encryption algorithms 2X Gateways
● SSO for window 8 , 8.1 and 2012
● Improved reliability for RDP connection on Windows clients using UDP protocol tunneling for
better performance, even with a slow connection or high latency.
● Enhanced processing of multiple print jobs
● Printing redirection enhanced for mobile devices (Android, iOS, HTML5 Gateway, Chrome App)
● Firewall friendly desktop shadowing. Further simplification in desktop management: automatic
firewall client setting and updated graphical user interface.
Page 9

System Requirements
Software Requirements
The 2X Remote Application Server core components (2X Publishing Agent and 2X SecureClientGateway)
should be installed on Windows 2003, Windows 2008, Windows 2008 R2, Windows 2012 and Windows 2012
R2 Server operating system.
Recommendation: The 2X Remote Application Server should not be installed on a domain controller or any
other server where a DHCP server is running.
2X Terminal Server Agents should be installed on Windows 2003 SP1, Windows 2008, Windows 2008 R2,
Windows 2012 Server, Windows 2012 R2 Server operating system with Terminal Services / Remote Desktop
Services enabled.
2X RDP Client is approved for the following operating systems:
● Windows XP SP3
● Windows Vista
● Windows 2003 SP1
● Windows 7
● Windows 8. 8.1
● Windows CE
● Windows Embedded
● Mac 10.5.x and above
● iOS (iPhone and iPad)
● Android 1.5 and above
● Ubuntu 8.04, 8.10, 9.04, 9.10
● OpenSuse 11.1
● Fedora Core 9, 11
● CentOs 5.2
● VectorLinux 6.0
● Chrome OS
Minimum Hardware Requirements
2X Remote Application Server is extensively tested on both physical and virtual platforms. The minimum
hardware requirements approved to run 2X RAS are outlined below:
● Physical Machines – Dual Core Processor with a minimum of 4GB of physical memory.
● Virtual Machines – 2 Virtual Processors with a minimum of 4GB of virtual hardware memory.
General guidelines for scaling 2X Remote Application Server can be found here: http://www.2x.com/2x-
server-hardware-requirements/
Port requirements for each of the separate functions can be found here: http://www.2x.com/firewall-
requirements-2x-remote-application-server/
Page 10

Installing and Configuring 2X Remote Application Server
Installing 2X Remote Application Server
Note: You should be logged in with an account that has administrative privileges to install 2X Remote
Application Server. Close all other Windows programs before running the installation.
1. Login to the machine and download the latest version of the 2X Remote Application Server from the
2X website.
2. Double click the 2xAppServer.msi to launch the 2X Remote Application Server installation wizard.
Click Next when prompted.
3. Review and approve the end-user license agreement and click Next.
4. Specify the folder location where 2X Remote Application Server will be installed and click Next.
5. Select the option 2X Remote Application Server for a default installation of the 2X Remote
Application Server and click Next.
6. Click Install to start the installation. The setup will now copy all files and install the 2X Application
Server services.
7. Click Finish when ready.
Configuring a 2X Remote Application Server Administrator Account
The first time you launch the 2X Remote Application Server Console you have to specify a username and
password in FQDN format example administrator@domain.local, as seen in the below screenshot. The user
specified will be automatically configured as the 2X Remote Application Server administrator. Use any user
from the active directory or machine to login where the 2X Remote Application Server is installed.
2X Remote Application Server Console First Time Login Prompt
Page 11

2X Remote Application Server Console
Introduction
One of the fundamental features of 2X Remote Application Server is the ability to publish seamless
applications individually to your users. This means users will only see the applications you give them
access to and not a full terminal service desktop
The 2X Remote Application Server Console is from where you can manage 2X Remote Application
Server. Use the console to publish an application or desktop, add a terminal server of VDI host to the
farm, backup the 2X Remote Application Server configuration and all other configuration changes.
2X Remote Application Server Console Layout
2X Remote Application Server Console
Section 1: This section contains all the categories.
Section 2: This information bar displays the site you are currently logged in on the left and the user
currently logged in on the right.
Section 3: Toolbar from where you can launch the publishing wizards.
Section 4: Available only in the Farm and Publishing category, the navigation tree allows you to browse
through the objects related to that category.
Section 5: This section displays the selected object or category properties, such as servers in a farm or
published application properties.
Page 12

Section 6: In this section the latest console notification are displayed.
Page 13

Setting Up an SMB Environment
This getting started guide explains how to add the server where the 2X Remote Application Server
is installed as terminal server to a site in the farm and publish an application (2X Application Server
Console) from it.
Add a Terminal Server
1. Launch the 2X Remote Application Server Console, select the Farm category and click on
Terminal Servers from the navigation tree.
2. Select Add from the Tasks drop down menu to launch the setup wizard and once prompted
enter the server FQDN or IP. In this case enter the IP address of the 2X Remote Application
Server server and click Next.
First Step of the Terminal Server Wizard
3. In the next step the 2X Remote Application Server checks if the 2X Agent is installed on the
server. Once confirmed click Add to add the server to the farm.
2X Terminal Server Agent Check
Publish an Application
The below procedure explains how to publish the 2X Remote Application Server Console as an
application, but you can publish any other application you like.
1. Click the Publishing category and click the Application icon from the console top menu to
launch the wizard.
Page 14

First Step of the Application Publishing Wizard
2. In the first step of the wizard select Terminal Server and click Next as seen in the screenshot
above.
3. In the second step select Installed Application to select the application from a list of installed
applications on the server and click Next.
4. Expand the 2X > Application Server node and tick 2X Remote Application Server Console
to publish the 2X Remote Application Server console as seen in the screenshot below.
Page 15

Highlighting the 2X Remote Application Server Console to publish it
5. Click Finish when ready.
Publish a Desktop
The below procedure explains how to publish the desktop of the server where the 2X Remote
Application Server is installed.
1. Click Publishing from the system menu and click the Desktop icon from the console top menu
to launch the wizard.
2. In the first step of the wizard select Terminal Server Desktop and click Next
3. Next, select individual or multiple servers that the desktop will be published from.
4. In the third step of the wizard you have to specify a Name and Description for the shared
desktop and (optional) change the Icon. Enable the option Connect to console so users
connect to console rather than a virtual session.
Page 16

Second Step of the Desktop Publishing Wizard
5. As seen from the above screenshot, in the third step of the wizard you can also configure
the size and resolution of the desktop from the Size drop down menu. Once configured, click
Finish to publish the desktop.
Page 17

Sites and Management
A 2X Remote Application Server farm can contain multiple sites which can be administered by different
administrators.
Sites
A 2X Remote Application Server farm can have multiple sites. Each site consists of a publishing agent, a
SecureClient GW or multiple gateways, and the agents installed on the Terminal Servers, VDIs and PCs.
At least one server has to be dedicated for a site where the master publishing agent and gateway will be
installed.
The first default site added to the 2X Remote Application Server farm is the Licensing Server, where the
main 2X Remote Application Server configuration database is stored. Every other additional site on the farm
will have a synched copy of the configuration database and once changes are applied to a particular site, the
Licensing Server database is updated.
Sites can be managed from the Farm node in the navigation tree available in the Farm category.
Configuring Sites in 2X Remote Application Server
Note: The Farm node is only available to administrators which have full permissions on the farm. For more
information about administrators and permissions refer to the Administrators section on page .
Adding a New Site to the Farm
To add a site to the 2X Remote Application Server farm follow the below procedure:
1. Click the Farm node in the navigation tree and click the Green Plus button to launch the Add Site
wizard. Alternatively you can also select the Add option from the Tasks drop down menu.
Page 18

2. In the first step of the wizard, specify a site name in the Site input filed and specify the server IP or
FQDN where the master publishing agent and gateway will be installed in the Server input field.
First Step of the Add a New Site Wizard
3. In the second step of the wizard the 2X Remote Application Server checks if the 2X Publishing Agent
is installed on the site server. If not, click Install to proceed with the remote installation.
Second Step of the Add a New Site Wizard – Check for Publishing Agent
4. In the Installing 2X Publishing Agent dialog, highlight the server name on which the 2X Publishing
Agent is to be installed as seen in the below screenshot.
5. (Optional) Tick the option “Override system credentials” to specify and use different credentials to
connect to the server and install the 2X Agent.
Page 19

Installing 2X Publishing Agent Dialog Box
6. Click Install to install the publishing agent and gateway, and click Done once it has been successfully
installed.
7. In the last step of the Add Site wizard, click OK.
Accessing Site Configuration
Once a new site is created you can access its configuration by running the 2X Remote Application Server
Console on the site server or by switching to its configuration from the 2X Remote Application Server Console
as explained in the following section Switching Between Sites Configurations.
Note: When running the 2X Remote Application Server Console you will always be connected to the licensing
server database, even if running it from a site server. Once changes are applied, configuration changes are
replicated from the licensing server to the site servers.
Switching Between Sites Configurations
From the 2X Remote Application Server Console you can only view the configuration of one site at a time.
If you login as a farm administrator, the configuration of the Licensing Server site will be loaded. If you login
with an administrator that has access to a specific site, the configuration of that site will be loaded.
To switch between the configuration of different sites from the 2X Remote Application Server Console follow
the below procedure:
1. Open the Farm category and click on the Farm node from the navigation tree to access the list of
sites in the farm.
2. Highlight the site you would like to configure and from the Tasks drop down menu select Switch to
this Site. Alternatively you can use the top bar and select the site you want to switch to from the Site
drop down menu.
Page 20

Managing Multiple Sites from the Farm Node
Managing Sites
Sites can be managed from the Farm node in the navigation tree available in the Farm category. From this
section you can change the farm name and also add or delete sites.
Replicating Site Settings to all Sites
Any setting which is site dependant can be replicated to all other sites. Refer to the below table for more
specific information about which settings can be replicated to other sites.
Page 21

To replicate a specific setting to all other sites, tick the option Replicate settings highlighted in the below
screenshot.
Enabling Replication of Configuration Changes to all other Sites
Page 22

Overriding Site Replicated Settings
If an administrator has permissions to enable or disable the replication settings makes a change to a specific
setting, such setting is replicated to all other sites.
If an administrator has access to a particular site only, upon modifying site settings which have been
replicated, the replicated settings are overridden and the option Replicate Settings is automatically switched
off, therefore such settings will no longer be replicated to other sites.
Setting a Site as a Licensing Server
If the licensing server fails, or if you would like to set a different site as a Licensing Server, click on the site’s
name from the Farm node in the navigation tree, and from the Tasks drop down menu select Set Site as
Licensing Server.
Page 23

Administrators: Adding, Managing and Configuring
It is possible to have multiple 2X Remote Application Server administrators that can manage and configure
the farm and sites within the farm. Permissions can also be configured to limit access to specific categories
and Sites.
If the 2X Remote Application Server is installed in an Active Directory environment, any user that has
elevated privileges and write access to the installation directory can be configured as a 2X Remote
Application Server administrator.
If the 2X Remote Application Server is installed on a standalone machine, any user that has elevated
privileges and write access to the installation directory can be configured as a 2X Remote Application Server
administrator.
Managing Administrators from the Administration Category
Default 2X Remote Application Server Administrator
The user you specified the first time to login to the 2X Remote Application Server Console will automatically
have full permissions and can perform any task in the farm. There should always be at least one enabled
administrator with full permissions in the farm.
Adding an Administrator Account
To add an administrator account to the 2X Remote Application Server follow the below procedure:
1. Access the Administration category and click the Administration tab.
2. From the Tasks drop down menu select Add.
Page 24

3. Specify a username in the Username field or click the browse (...) button to select a user from the
active directory or local machine in the Administrator Properties dialog box.
Configuring a New 2X Remote Application Server Administrator
4. Specify an email address in the Email input field and contact mobile number in the Mobile field.
5. By default the new Administrator account will be assigned full permissions. Click the Change
Permissions button to modify the permissions. For more information on administrators permissions,
refer to the section Configuring Administrator Accounts Permissions below.
6. From the Receive system notifications via drop down menu select Email so any system
notifications are sent to the specified email address. Select None to disable email system notifications
for this account.
7. Click OK to add the new administrator account.
Configuring Administrator Accounts Permissions
Administrator permissions can be configured when creating a new administrator account or from the
Properties of an existing account.
Permissions can be assigned per category (e.g. Farm, Publishing, Universal Printing etc) and also per site as
seen in the below screenshot.
Page 25

Configuring 2X Remote Application Server Administrator Permissions
An account with Full Permissions can modify all categories, sites and global settings in the farm.
Permissions Example
To allow an administrator to manage and configure publishing and published objects on TS1, disable all
permissions except the Allow Publishing changes option and tick TS1 as seen in the above screenshot.
Managing Administrator Accounts
From the Administration tab in the Administration category you can add new administrator accounts and
modify or delete existing ones.
Sending Console Messages between Administrator Accounts
If multiple administrators are logged in to the 2X Remote Application Server console, they can send
messages to each other. To send message to another logged in administrator click the arrow next to your
account name (top right corner) in the 2X Remote Application Server Console and select Send Message
from the drop down menu.
Note: the same administrator may be logged in more than one session.
From the Sessions dialog box highlight the account and click Send Message.
Page 26

Sessions Dialog Box Lists all Currently Logged in Administrators
Note: Messages between administrators are not archived or recorded.
Logging off Other Administrators
When an administrator is accessing a category, for example Universal Printing, it will be locked for all other
administrators. Therefore upon trying to access a category locked by another administrator, the administrator
will be alerted with an error that the object is locked.
Alert Generated when a Category is Locked by another Administrator
To log off an administrator from locking a category, navigate to the Administration category, and from the
Administration tab click the Tasks drop down menu and select Show Sessions. From the sessions dialog
box you can send messages to other administrators or log them off from their 2X Remote Application Server
Console session.
Page 27

Adding a Terminal Server
To be able to publish Applications and Desktops for your users through 2X Remote Application Server first
you need to add a server to the farm. This chapter explains how to add and manage a Terminal Server in the
farm.
Requirement: To add a terminal server to the farm it must have the Remote Desktop Services installed.
Follow the below procedure to add a Terminal Server to the farm:
1. Launch the 2X Remote Application Server Console, select the Farm category and click on
Terminal Servers from the navigational tree.
2. Click Add from the Tasks drop down menu to launch the setup wizard and once prompted
specify the server IP address or FQDN and click Next.
3. In this step the 2X Remote Application Server checks if the 2X agent is installed on the
Terminal Server. If it is installed, proceed to step 7 of this procedure. If it is not installed, click
Install to remotely install the 2X Agent.
4. In the Installing 2X Terminal Server Agent dialog highlight the server name on which the 2X
Agent is to be installed.
5. (Optional) Tick the option “Override system credentials” to specify and use different credentials
to connect to the server and install the 2X Agent as seen in the below screenshot.
Specifying Different Credentials to Install 2X Terminal Server Agent
6. Click Install to install the agent and click Done once it has been successfully installed. If the
automatic installation of the 2X Agent fails refer to the following section Installing the 2X
Terminal Server Agent Manually.
7. Click Add to add the Terminal Server to the 2X Remote Application Server farm.
Tip: Use the Find option from the Tasks drop down menu to find existing terminal servers in your active
directory domain.
Page 28

Installing the 2X Terminal Server Agent Manually
2X Terminal Server Agent System Requirements
1.
● Windows 2003 SP1 Server or 2008 Server or Advanced Server with Remote Desktop Services
enabled.
● The same hardware requirements as specified by Microsoft when deploying a Remote Desktop
Services environment will apply.
Installing the 2X Terminal Server Agent Manually
1. Login to the server where the 2X Terminal Server Agent is to be installed using an administrator
account and close all other applications.
2. Copy the 2X Remote Application Server installation file (2XAppServer.msi) to the server and double
click it to launch the installation.
3. Once prompted click Next and accept the End-User license agreement.
4. Specify the path where the 2X Agent should be installed and click Next.
5. Select Custom and click Next.
6. Click on the 2X Terminal Server Agent and select Entire Feature will be installed on local hard
drive from the drop down menu as seen from the below screenshot.
Manually installing a Terminal Server Agent
7. Ensure that all other components are deselected and click Next.
8. Click Install to start the installation and Finish once the installation is finished.
Note: The 2X Agent does not require any configuration. Once the 2X Agent is installed, highlight the server
name in the 2X Remote Application Server Console and click Check Agent. If the agent is installed properly,
the status should change to Agent Installed as seen in the below screenshot.
Page 29

Configuring a Terminal Server
To access the properties of a Terminal Server highlight the server from the navigation tree in the 2X Remote
Application Server Console and select Properties from the Tasks drop down menu. All of the below
configuration options can be configured from the Server Properties.
Enabling or Disabling a Terminal Servers
By default a server is enabled in the farm. When it is disabled, published applications and virtual desktops
cannot be served from it.
To disable a server from the farm untick the option Enable Server in farm from the Properties tab in the
Server Properties. Tick back (enable) any of the tick boxes to enable the server back in the farm.
Properties Tab in Server Properties
Configuring Server Name and Maximum Sessions
From the Properties tab shown in the above screenshot you can also configure the server name, maximum
number of sessions allowed to connect to the server simultaneously and the server description.
Configuring the 2X Terminal Server Agent on the Server
Each Terminal Server in the farm has a 2X Agent installed to provide a connection between the 2X Remote
Application Server and the Terminal Server. The agent can be configured from the Agent Settings tab in the
server properties.
Page 30

Configuring Terminal Server Agent from the Agent Settings Tab in Server Properties
Configuring the Remote Desktop Connection Port
Specify a different remote desktop connection port number in the Port input field if a non default port is
configured on the server.
Changing the Direct Address
This address is only used in Direct Connection mode and it could be an internal or external IP address. To
change the Direct Address of a server tick the option Change Direct Address and specify the new address in
the Direct Address input field.
Changing the Session Timeout
To change the amount of time each session remains connected in the background after the user has closed
the published application specify a new value in the Publishing Session Timeout input field. This option is
used to avoid unnecessary reconnections with the server.
Configuring URL and Mail Redirect / Restricting Access
To allow http and mailto links to be opened using a local application on the client computer rather than the
server’s resources, enable the option Allow Client URL/Mail Redirection. To configure a list of URLs which
should not be redirected navigate to the URL Redirection tab in the Settings node of a site.
Allow 2XRemoteExec to send commands to client
To allow a process which is running on the server to instruct the client to deploy an application on the client
side, enable this option. For more information about 2XRemoteExec refer to the following article: http://
www.2x.com/remoteexec/
Use RemoteApps if available
Enable this option to allow use of remote apps for shell related issues when an app is not displayed
correctly. This feature is supported on the 2X RDP client for Windows only.
Page 31
Configuring 2X Terminal Server Agent Logging
To enable or disable the 2X Terminal Server Agent logging use the Logging drop down menu. Such logging
should only be enabled if instructed by the 2X support team.
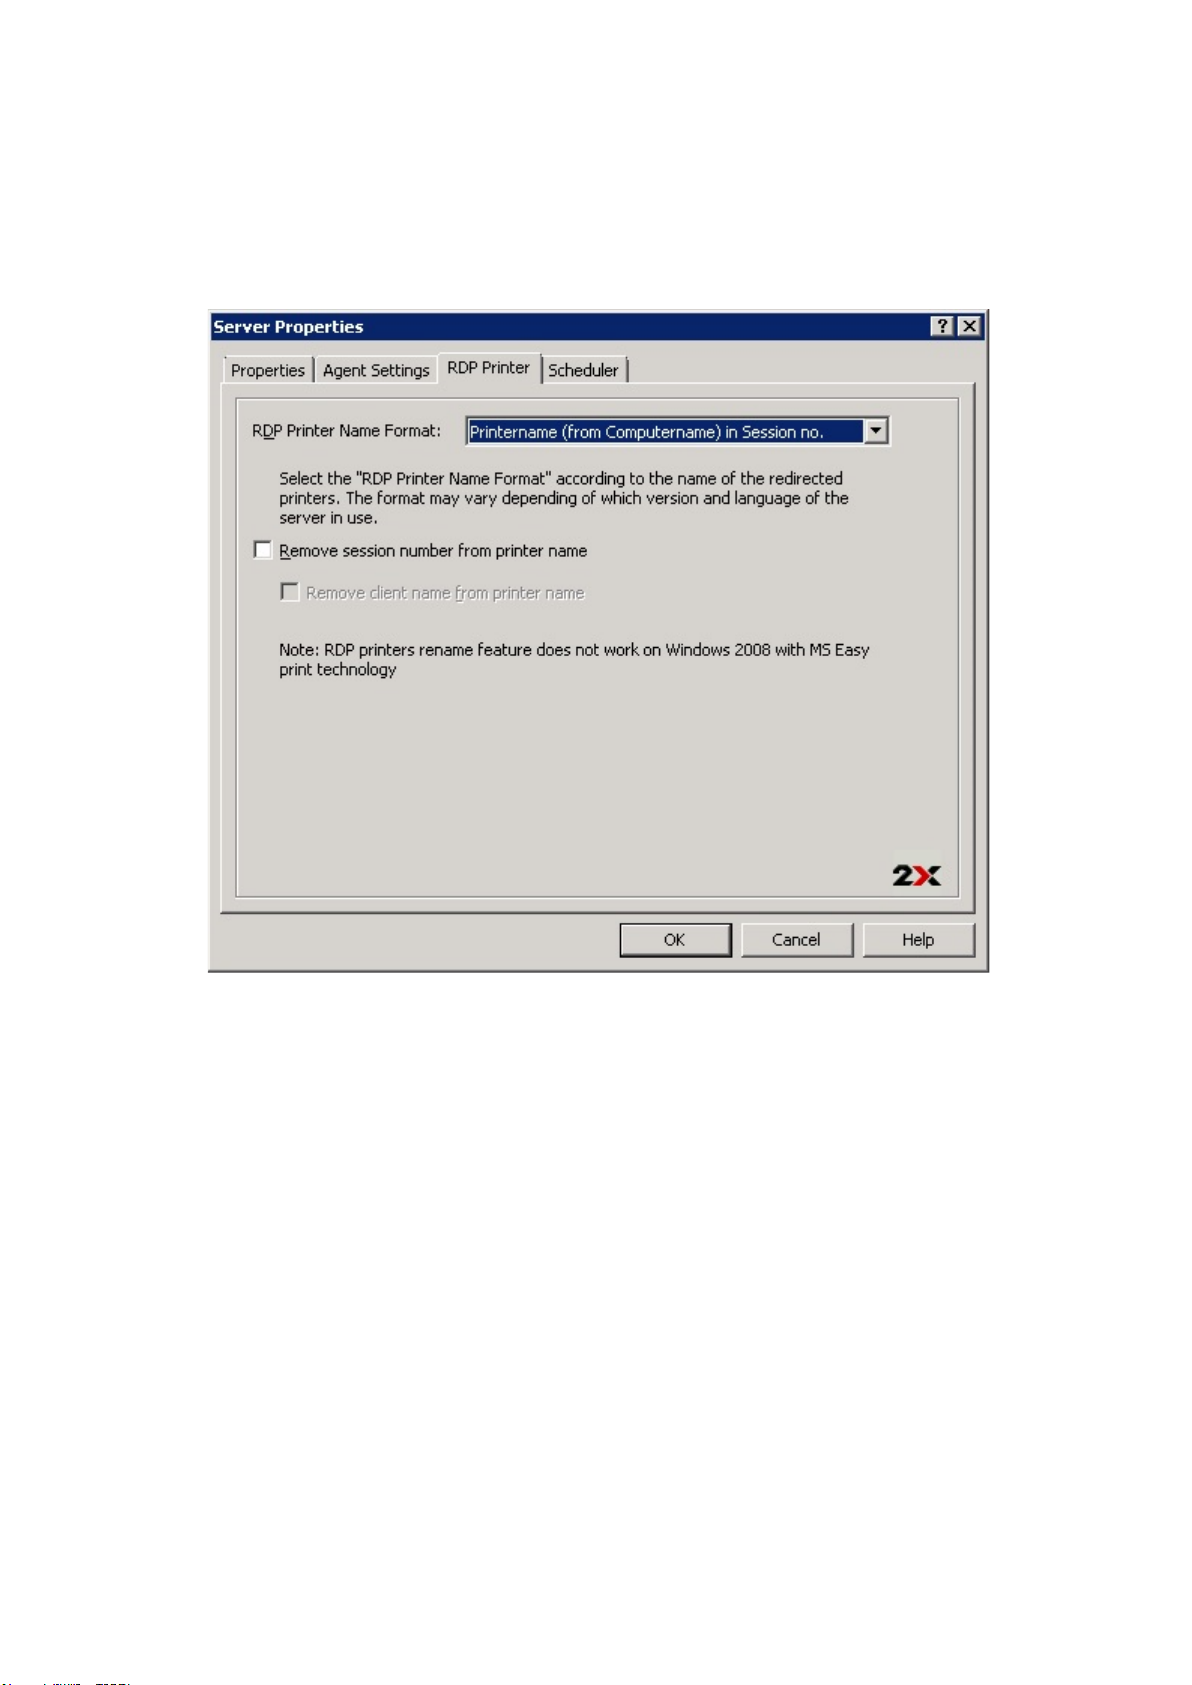
Configuring RDP Printing for Terminal Server
The RDP Printer tab allows you to configure the renaming format of redirected printers. The format may vary
depending on which version and language of the server you are using.
Configuring RDP Printers from the RDP Printer Tab in Server Properties
Set your RDP Printer Name Format specifically for the configured server by choosing any of the below
options from the RDP Printer Name Format drop down menu:
● Printername (from Computername) in Session no.
● Session no. (computername from) Printername
● Printername (redirected Session no.)
The other RDP Printing options available in the RDP Printer tab are:
● Remove session number from printer name
● Remove client name from printer name
Configuring Terminal Server Maintenance Time Window
From the Scheduler tab in the server properties you can create and configure a maintenance time window for
the server. During a maintenance window published resources won’t be accessible from that server. Current
active sessions can be left running, disconnected or even reset.
Page 32
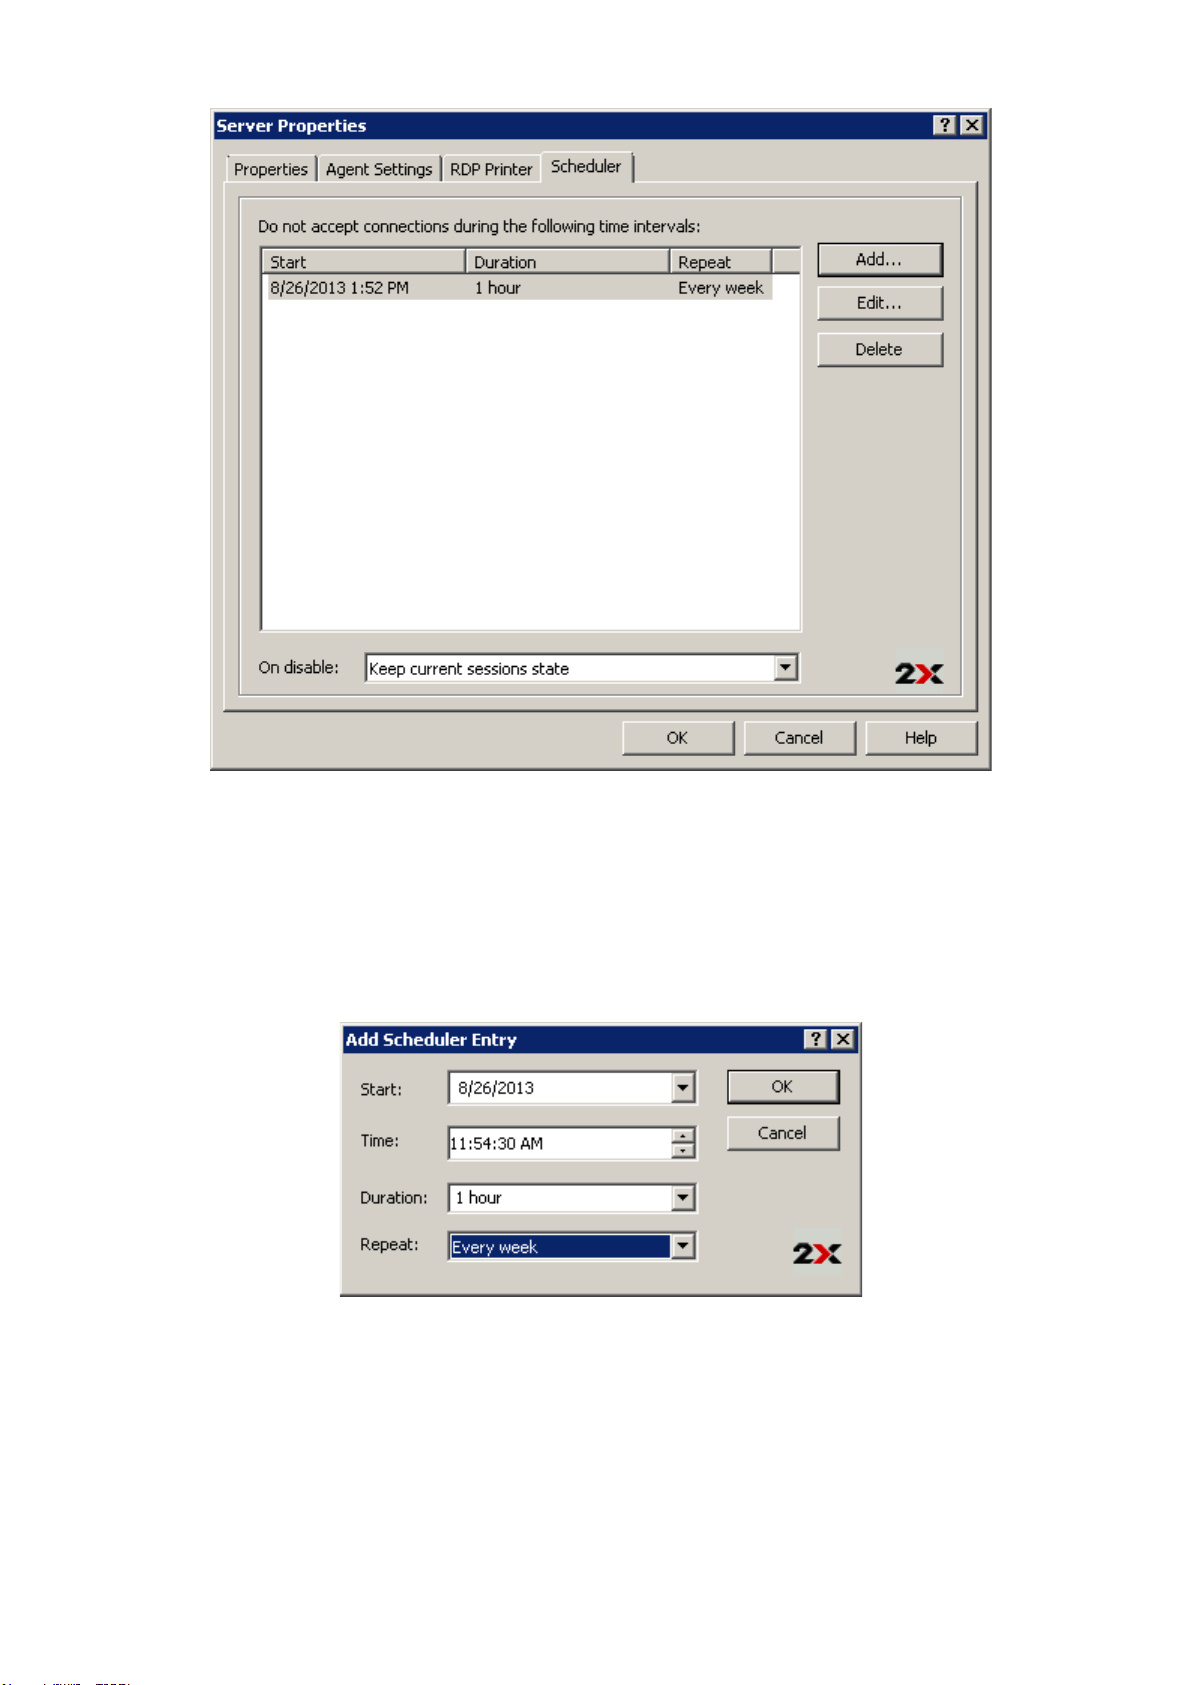
Configuring Maintenance Time Window from the Scheduler Tab in Server Properties
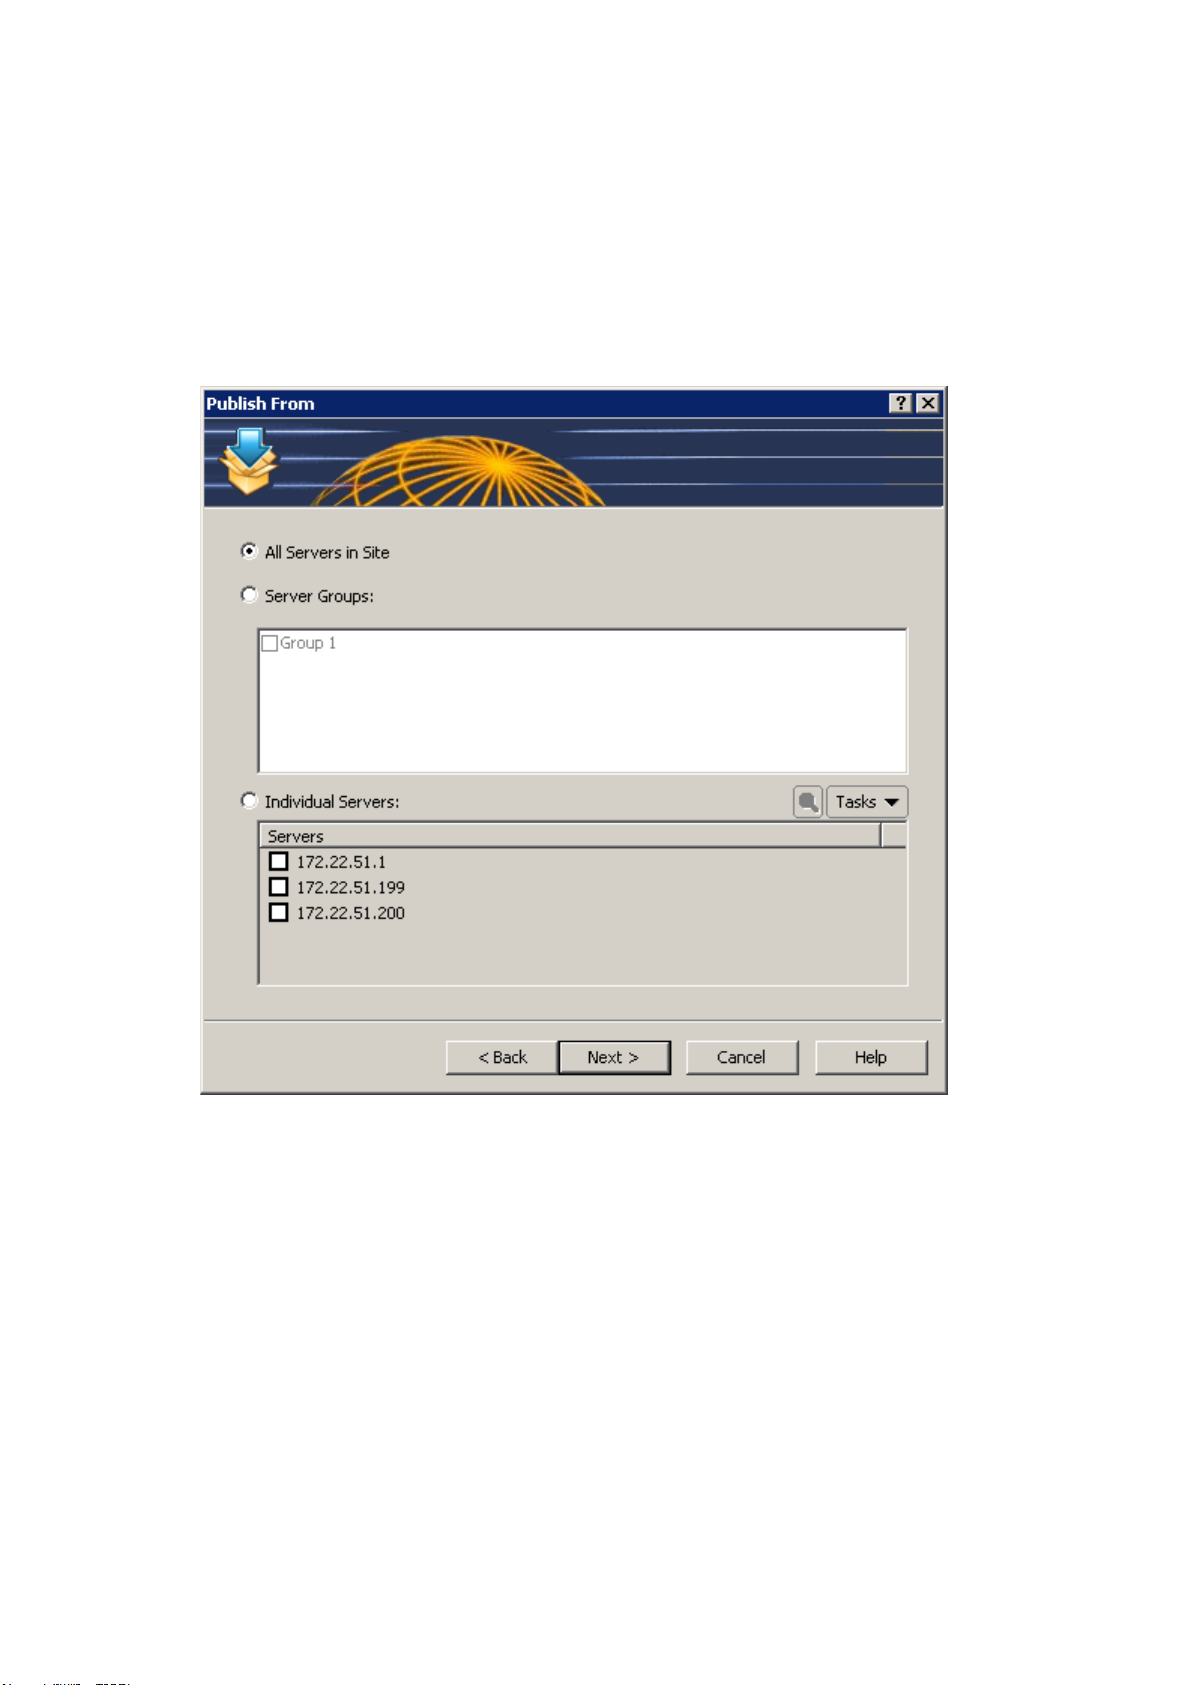
To configure a maintenance time window click the Add button to configure the:
● Start date
● Time
● Duration
● Repeat: from this option configure the repeat interval of the maintenance time window, for
example every week, month etc.
Configuring a New Maintenance Time Window
Once you configure the time for the maintenance window, use the drop down menu On Disable at the bottom
of the Scheduler tab to specify what happens of the current sessions once the server has been disabled for
maintenance.
Page 33

Grouping Terminal Servers
Terminal Servers groups can be used to specify from which group of servers a published resource should be
published in the wizard. It is highly recommended to use groups in a multi-server environment to ease the
management of publishing items.
Click the Groups tab in the Terminal Servers section to create and manage terminal servers groups. Click
Add from the Tasks drop down menu to create a new terminal server group, or Properties to modify an
existing terminal server group and Delete to delete the highlighted terminal server group.
Configuring a New Terminal Servers Group
Page 34
Publishing a Desktop from a Terminal Server
To publish a desktop from a terminal server follow the below procedure:
1. Select the Publishing category and click the Desktop icon from the top navigation bar to launch the
desktop publishing wizard.
2. Select Terminal Server Desktop in the first step of the wizard and click Next.
3. In the second step of the wizard specify from which Terminal Servers the desktop should be
published. You can specify to publish the desktop from All Servers in Farm, Server Group/s or from
a number of Individual Servers as seen in the below screenshot.
Selecting Terminal Servers from Where to Publish a Desktop
4. In the third step of the wizard specify a Name and Description in the Desktop section. From the
same section you can also configure a different icon by clicking on the Change Icon button. Tick
the option Connect to console so users connecting to the published desktops will connect to the
terminal server’s console rather than a virtual desktop session.
5. From the Desktop Size section you can also specify the resolution of the desktop.
Page 35
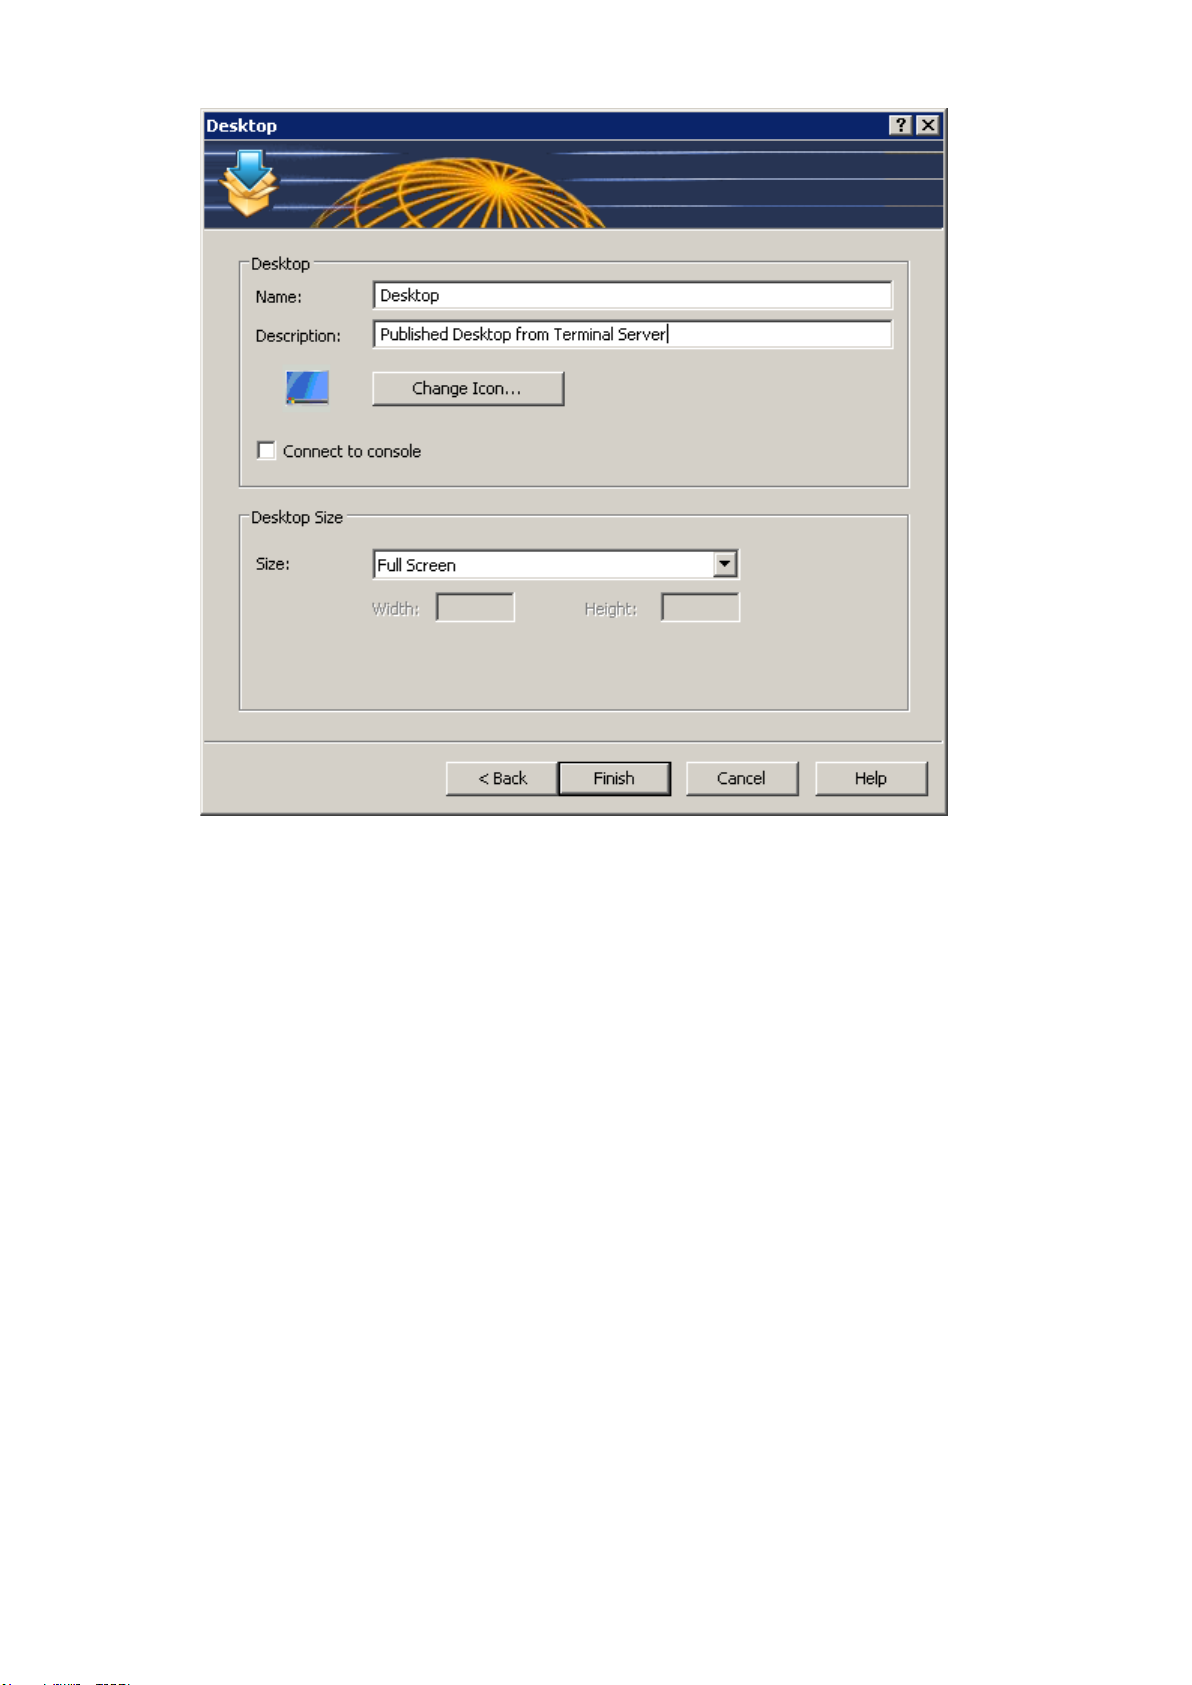
Configuring a desktop to be published from a Terminal Server
6. Click Finish to publish the desktop.
Page 36

Publishing and Configuring an Application from a Terminal
Server
To publish an application from a terminal server follow the below procedure:
1. Open the Publishing category and click the Application icon from the top navigation bar.
2. Select Terminal Server in the first step of the wizard and click Next.
3. In the second step of the wizard, select the type of application to be published. The options are:
a. Single Application: Choose this option to fully configure the application settings yourself such
as the executable path etc.
b. Installed Application: Choose this option to publish an application that is already installed on
the server therefore all of the application settings are automatically configured.
c. Predefined Application: Choose this option to publish a commonly used Windows application
such as Windows Explorer.
Selecting an Application Type from the Publish an Application Wizard
4. In the third step of the wizard specify from which Terminal Servers the application should be
published. You can specify to publish the desktop from All Servers in Farm, Server Group/s or from
a number of Individual Servers.
5. If you selected Installed Application or Predefined Application in the fourth step of the wizard
you have to select the application to be published by ticking the application name and click Finish to
publish the application. If you selected Single Application you have to configure the application as
explained in the following procedure:
Configuring a Single Application
Note: By browsing to an application using the the Browse button next to the Target input filed all entries will
be automatically populated. Else follow the below procedure to populate all fields manually.
Page 37

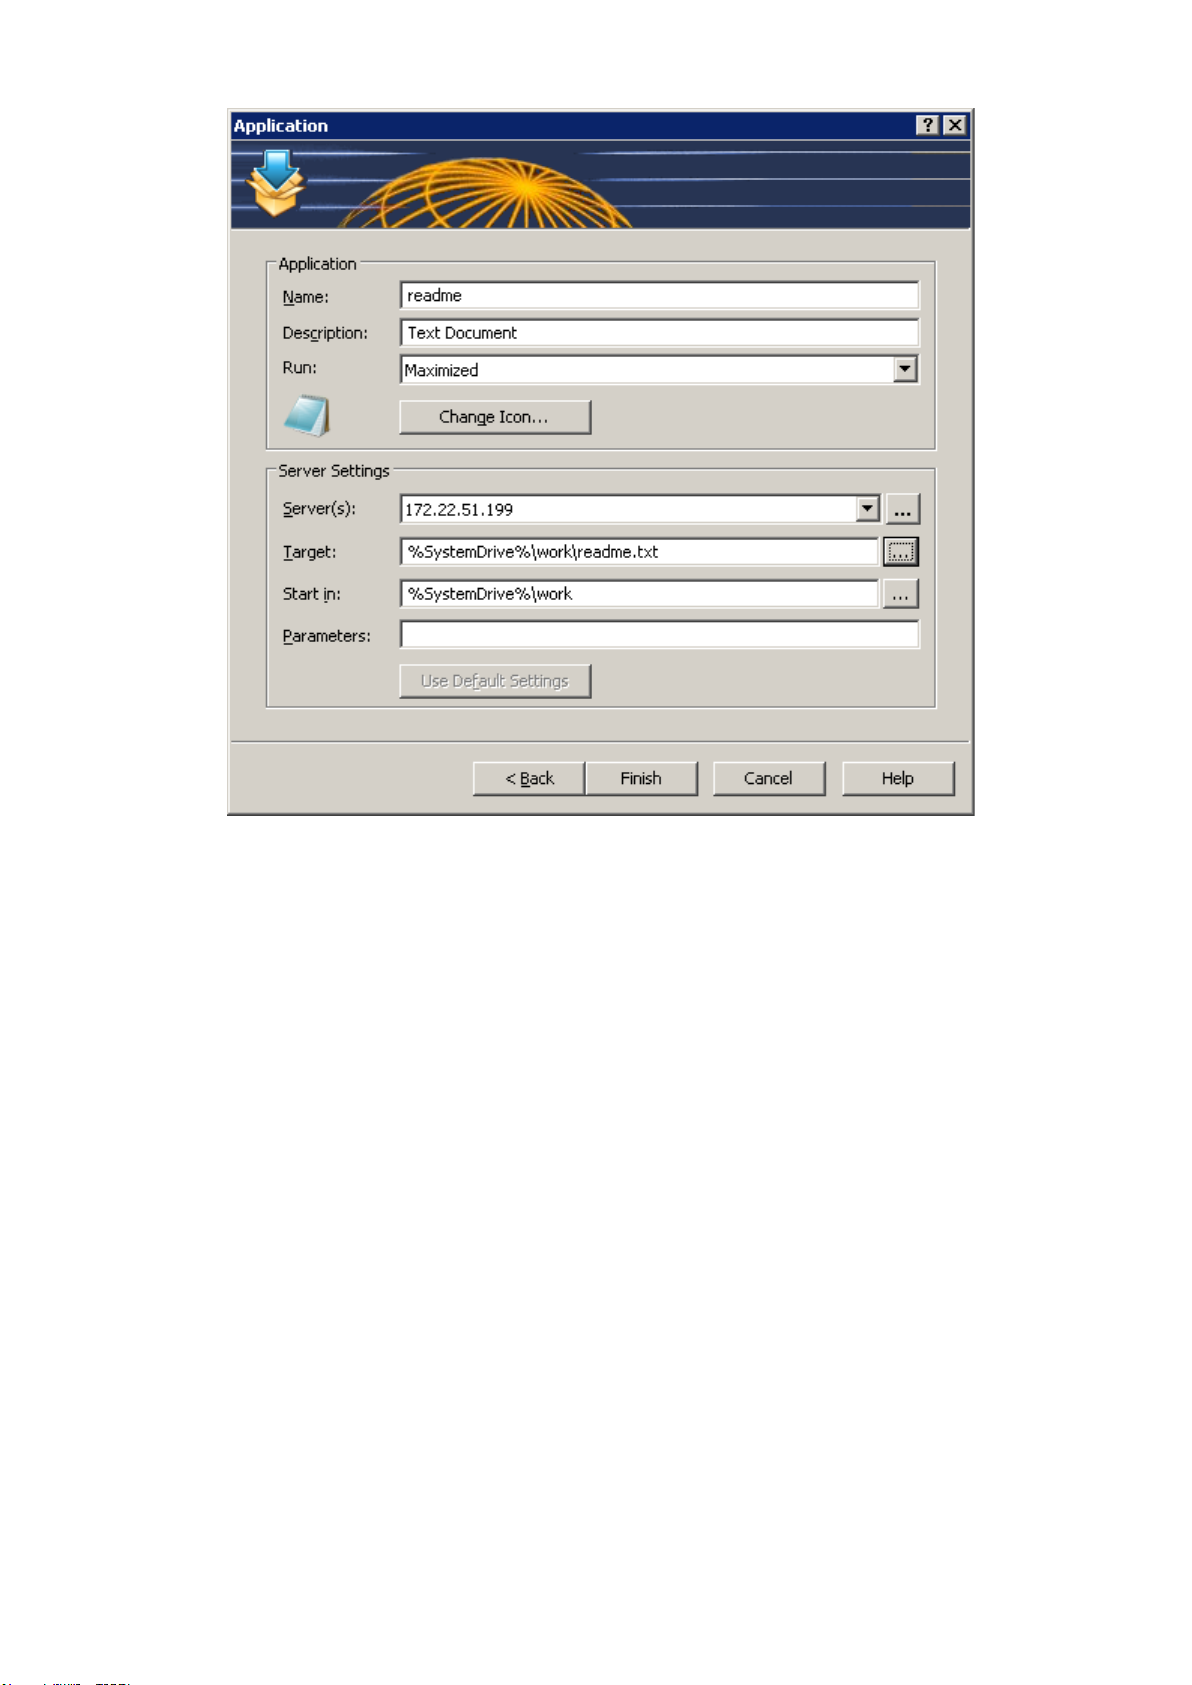
6. Enter a Name and Description in the Application section and from the Run drop down menu specify
if the application should run in a normal window, maximized or minimized.
7. (Optional) You can change the icon for the published application by clicking the Change Icon button.
8. Specify the path where the application executable is in the Target input field by clicking the browse
button and browse to the executable. Use Windows environment variables if you are manually
specifying the path.
9. The Start In input field will be automatically populated. To specify a different folder from where the
application should be launched click the Browse button. A different folder might be specified if for
example the application needs to use files from another location to run. In such case, specify such
folder location so the published application will be able to locate them upon it being launched.
10. (Optional) In the Parameters input field you can specify parameters which have to be passed to the
application upon being launched.
Configuring a New Application to be Published from a Terminal Server
Note: Use the Server(s) drop down menu to specify different application settings for a specific server in case
the application is installed in a different path on that particular server.
11. Once the application is configured click Finish to publish the application.
Page 38

Publishing a Document from a Terminal Server
To publish a document from a terminal server follow the below procedure:
1. Select the Publishing category and click the Document icon from the top navigation bar.
2. Select Terminal Server in the first step of the wizard and click Next.
3. In the second step specify the content type of the document you want to publish. You can select
the content type from the predefined list or specify a custom content type from the Custom content
types input field. Click Next once ready.
Configuring a Content Type for the Document
4. In the third step of the wizard specify from which Terminal Servers the document should be published.
You can specify to publish the desktop from All Servers in Farm, Server Group/s or from a number
of Individual Servers.
5. In the fourth step of the wizard, use the Browse button next to the Target input field to browse to the
document. All other fields will be automatically populated. To edit any of the auto populated fields
highlight them and enter the required details.
6. (Optional) In the Parameters input field you can specify parameters which have to be passed to the
application running the document upon being started.
Page 39
Configuring the Document to be Published from a Terminal Server
Note: Use the Server(s) drop down menu to specify different document settings for a specific server in case
the document is configured differently on that particular server.
7. Once ready click Next and configure the filtering options. For more information about filtering options
refer to the Filtering section on page .
8. Click Finish to publish the document.
Page 40

Adding a VDI Host
A VDI Host (host machine) is defined as the computer on which a hypervisor is running one or more virtual
machines. Each virtual machine is called a guest machine. The hypervisor presents the guest operating
systems with a virtual operating platform and manages the execution of the guest operating systems. Multiple
instances of a variety of operating systems may share the virtualized hardware resources.
By adding the VDI Host to the 2X Application Server you can manage the virtual machines on the VDI Host,
create guest clones and publish virtual desktops and applications from virtual guests.
To add a VDI Host to the farm follow the below procedure:
1. Launch the 2X Remote Application Server Console, click the Farm category and click on VDI Hosts
node of the site where you would like to add the hypervisor.
2. Click Add from the Tasks drop down menu to launch the setup wizard and once prompted select the
type of VDI from the VDI Type drop down menu.
Adding a VDI Host
3. Specify the IP address or FQDN of the VDI Host and click Next (Refer to the note below for more
information about configuring the VDI Agent for some of the hypervisors).
4. In this step the 2X Remote Application Server checks if the 2X VDI agent is installed on the VDI Host.
If it is installed, proceed to step 8 of this procedure. If it is not installed, click Install to remotely install
the 2X agent.
5. In the Installing 2X VDI Host Agent dialogue highlight the server name on which the 2X Agent is to
be installed.
6. (Optional) Tick the option “Override system credentials” to specify and use different credentials to
connect to the server and install the 2X Agent.
7. Click Install to install the agent and click Done once it has been successfully installed. If the
automatic installation of the 2X Agent fails refer to the following section Installing the 2X VDI Agent
Manually.
8. Click Add to add the VDI Host to the 2X Remote Application Server server farm.
Note: To add some of the supported hypervisors different steps and procedures must be followed, such as
installing the 2X VDI Agent appliance on the hypervisor server. Before adding a hypervisor server to the
farm, refer to the hypervisor manuals which are available in the 2X documents page; http://www.2x.com/
Learn/documentation/. All hypervisors manuals are available under the Supported VDI Hypervisors
Page 41

section.
Page 42

Installing the 2X VDI Agent Manually
2X VDI Agent System Requirements
● Windows XP, Windows Vista, Windows 2000 Server, Windows 2003 Server or Windows 2008
Server or Advanced Server.
● The same hardware requirements as specified by your virtualization software will apply.
● One of the supported virtualization software technology:
o If you are planning to use VMware on Windows, make sure the VMware VmCOM
Scripting API is installed. The following error will be displayed if VmCOM Scripting API is
not detected: “VMware VmCom Scripting API is not installed on the host. Please install
this client component from the VMware installer.”
o If you are planning to use VMware v1.* on Linux, make sure the VMware VIX API
for Linux is installed. The following error will be displayed if VIX API for Linux is not
detected: “VMware VIX API for Linux is not installed on this host. Please download this
component from http://www.vmware.com”
o If you are planning to use Virtual Iron, make sure that you install Java Runtime
Environment on the same machine where 2X VDI Agent is installed.
Installing the 2X VDI Agent Manually
1. Login to the server where the 2X VDI Agent is to be installed using an administrator account and
close all other applications.
2. Copy the 2X Remote Application Server installation file (2XAppServer.msi) to the server and double
click it to launch the installation.
3. Once prompted click Next and accept the End-User license agreement.
4. Specify the path where the 2X Agent should be installed and click Next.
5. Select Custom and click Next.
6. Click on the 2X VDI Agent and select Entire Feature will be installed on local hard drive from the
drop down menu as seen in the below screenshot.
Manually Installing the VDI Agent
Page 43

7. Ensure that all other components are deselected and click Next.
8. Click Install to start the installation and Finish once the installation is finished.
Note: The 2X Agent does not require any configuration. Once the 2X Agent is installed, highlight the server
name in the 2X Remote Application Server console and click Check Agent. If the agent is installed properly,
the status should change to Agent Installed as seen in the below screenshot.
Page 44

Installing an Appliance and Configuring a VDI Host
For some of the Hypervisors such as VMWare ESXi server, you have to configure and run an appliance
instead of the 2X agent. An appliance is a pre-configured virtual machine (including the operating system and
other relevant settings) which you can add to the list of virtual machines running on the hypervisor to act as a
2X Agent.
Installing the Appliance
To install an appliance on a hypervisor refer to the hypervisor’s documentation found in the 2X documentation
page; http://www.2x.com/learn/documentation/.
Configuring a VDI Host
To access the properties of a VDI Host highlight the server from the navigation tree in the 2X Remote
Application Server Console and select Properties from the Tasks drop down menu. All of the below
configuration options can be configured from the Server Properties.
Note: Some of the settings mentioned below might be unavailable out for some servers. This depends on the
type of hypervisor server being used.
Enabling or Disabling a VDI Servers in the Farm
By default a VDI host is enabled in the farm. When it is disabled, published applications and virtual desktops
cannot be served from it.
To disable a server from the farm untick the option Enable Server in farm from the Properties tab in the
Server Properties. Tick back (enable) any of the tick boxes to enable the server back in the farm.
Configuring VDI Host Connection Settings
From the Properties tab in the Server Properties you can configure any of the below settings:
● VDI Type
● VDI Version
● VDI Host IP Address or FQDN
● VDI Port
● VDI Agent IP Address (if the agent is running on an appliance)
● Username and Password in case server requires different credentials
Page 45

Configuring the Properties and connection settings of a VDI Host
Configuring the 2X VDI Agent on the Server
Each VDI Host server in the farm has a 2X Agent installed (or running as an appliance) to provide a
connection between the 2X Remote Application Server and the VDI Host. The agent can be configured from
the Agent Settings tab in the server properties.
Page 46

Configuring VDI Agent from the Agent Settings Tab in the VDI Host Properties
Changing the Direct Address
This address is only used in Direct Connection mode and it could be an internal or external IP. To change the
Direct Address of a remote PC tick the option Change Direct Address and specify the new address in the
Direct Address input field.
Changing the Maximum Number of Connections to the VDI Host
You can change the maximum number of connections that can connect to the VDI host from the Max
Connections input field. Click the Default button to reset the value to the default configured value.
Change the Session Timeout
To change the amount of time each session remains connected in the background after the user has closed
the published application specify a new value in the Publishing Session Timeout input field. This option is
used to avoid unnecessary reconnections with the guests.
Configuring URL and Mail Redirect / Restricting Access
To allow http and mailto links to be opened using a local application on the client computer rather than the
server’s resources, enable the option Allow Client URL/Mail Redirection.
Configuring 2X VDI Agent Logging
To enable or disable the 2X VDI Agent logging use the Logging drop down menu. Such logging should only
be enabled if instructed by the 2X support team.
Configuring RDP Printing for VDI Host
The RDP Printer tab allows you to configure the renaming format of redirected printers. The format may vary
depending of which version and language of the server you are using. Set your RDP Printer Name Format
specifically for the configured server by choosing any of the below options from the RDP Printer Name
Format drop down menu:
● Printername (from Computername) in Session no.
Page 47

● Session no. (computername from) Printername
● Printername (redirected Session no)
The other RDP Printing options available in the RDP Printer tab are:
● Remove session number from printer name
● Remove client name from printer name
Configuring RDP Printers for a VDI Host
Configuring VDI Host Maintenance Time Window
From the Scheduler tab in the VDI host properties you can create and configure a maintenance time window
for the server. During a maintenance window published resources won’t be accessible from that server. To
configure a maintenance time window click the Add button to configure the:
● Start date
● Time
● Duration
● Repeat: from this option configure the repeat interval of the maintenance time window, for
example every week, month etc.
Once you configure the time for the maintenance window, use the drop down menu On Disable to specify
what happens of the current sessions once the server has been disabled for maintenance.
Page 48
Configuring and Managing Pools
Pools offer administrators more flexibility when managing an extensive number of Guests, especially when
they are implemented in large company infrastructures. The 2X Remote Application Server Console provides
the framework and tools needed to create a complete Pool Management foundation.
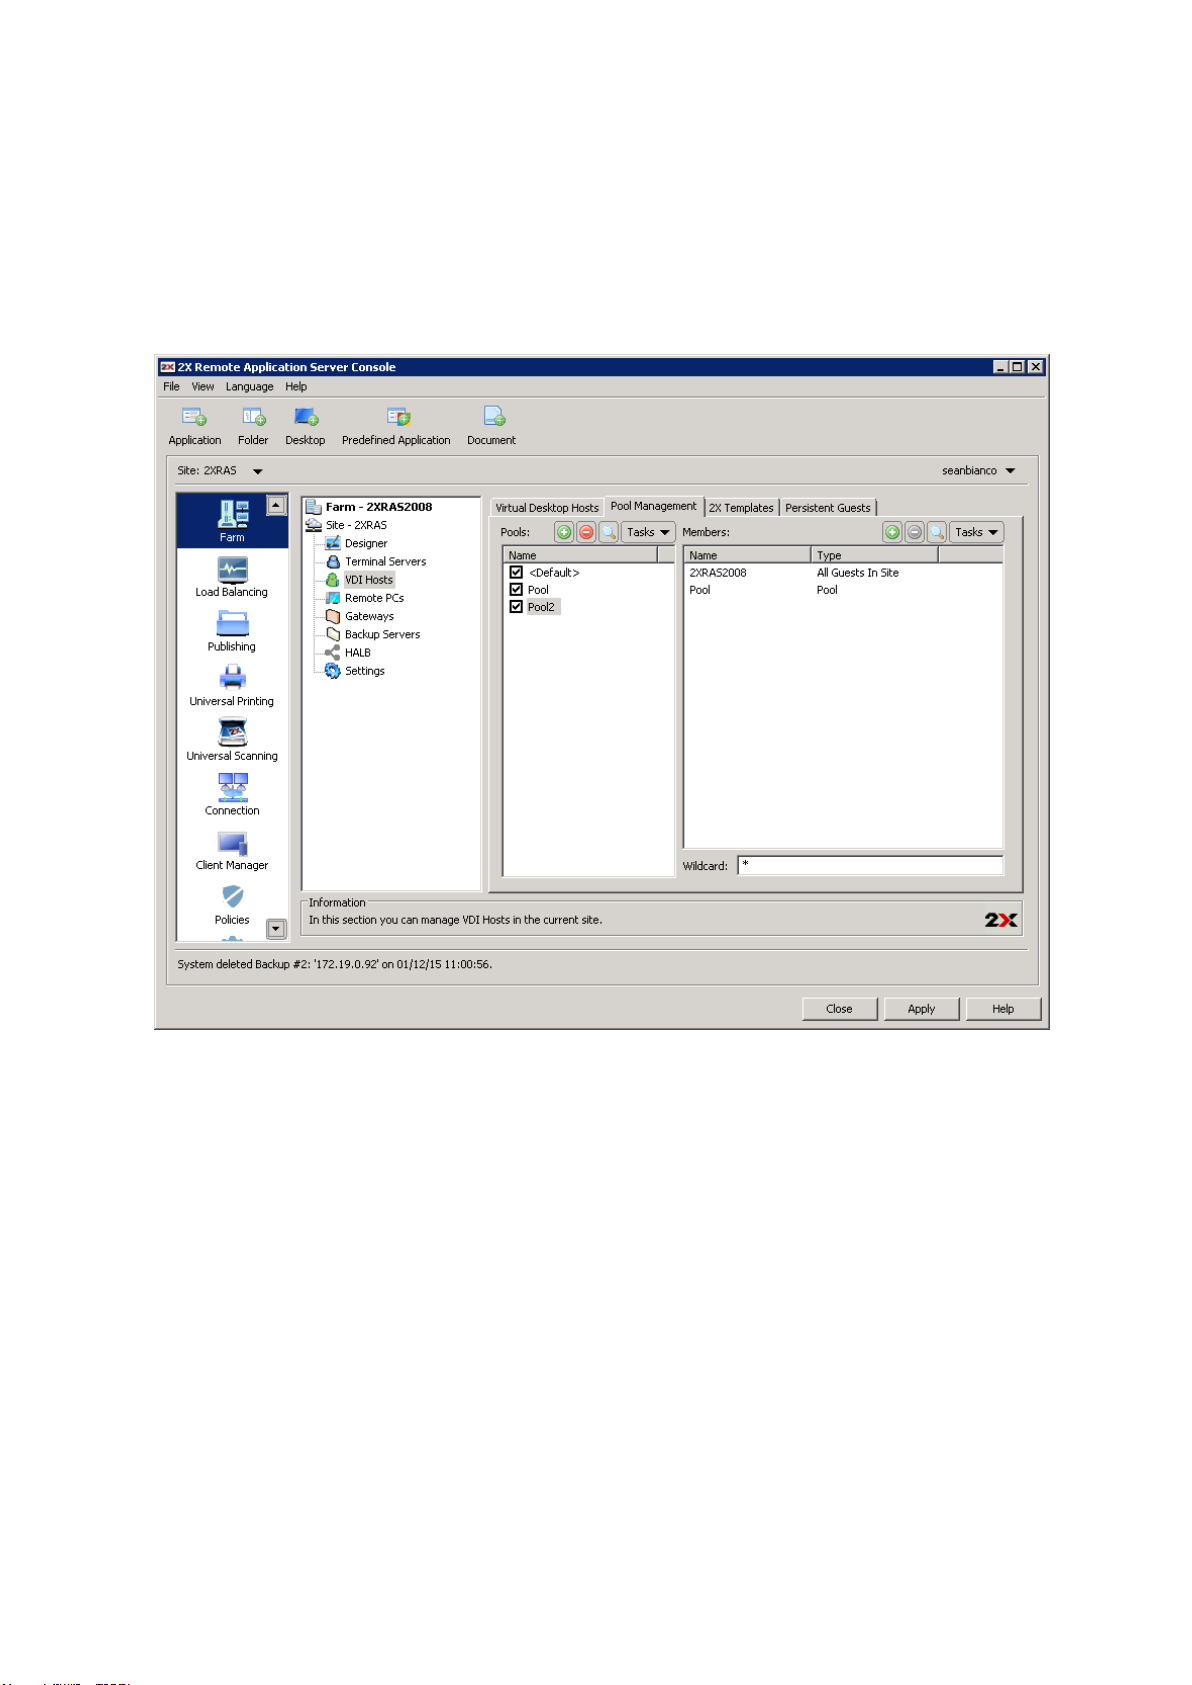
Pools can be managed from the Pools Management tab in VDI Hosts node from the 2X Remote Application
Server Console, as seen in the screenshot below.
Managing Pools for VDI Hosts
Adding and Deleting Pools
Adding a Pool
To add a Pool click Add from the Tasks drop down in the Pools column and specify a name.
Deleting a Pool
To delete a Pool highlight the Pool name and select Delete from the Tasks drop down menu in the Pools
column.
Managing Members in a Pool
Adding Members to a Pool
To add members to a pool, navigate to the Pools Management tab, highlight the Pool’s name and click
Add. You can add any of the following:
● All Guests in Site: All guests on all VDI hosts that are located in the site.
● All Guests in Host: All guests that are located on a particular VDI host.
● Guest: A single guest located in the farm.
Page 49

● Native Pool: Group of guests that have been previously configured from the hypervisor
management tool as a pool. Note: hypervisor may use different terminology instead of pools (e.g.
resource pools)
● Pool: Add an already existing configured pool in the 2X Remote Application Server (pool nesting)
● 2X Template: Guests that are automatically created from a 2X Template. For more information
about 2X Templates refer to the section Configuring and Managing 2X Templates for Guest
Clones on page .
Once you select the type of member to add to a Pool you will be presented with the list of available pools or
guests. Highlight the name of the member you would like to Add to the Pool and click OK.
Deleting a Member from a Pool
To delete a member from a Pool, highlight the Pool name, click on the pool member and click Delete from the
Tasks drop down menu.
Configuring Virtual Guests in a Pool
You can configure all virtual guests in a VDI host or in a Pool. To configure a virtual guest from a Pool
highlight the Pool name and from the Tasks drop down menu of the Pools column select Show Guests in a
Pool. Once in the Virtual Guest List dialog box highlight the virtual guest name and click Properties.
Configuring Virtual Guest in a Pool
From the Guest Advanced Settings dialog box shown in the screenshot above you can configure the
following settings:
● Enable Do not use this guest checkbox so the system ignores the particular Virtual Guest.
● Specify a computer name in the Computer Name field to set the network name (domain name
/ IP address) of the computer that the system will use to connect to the Virtual Guest.
● Specify a port number in the Port field that the system will use to connect to the Virtual Guest.
● In the Connection Timeout field set a time limit the 2X Remote Application Server has to wait
when connecting until the connection times out.
● Select the protocol from the Protocol drop down menu the 2X Remote Application Server uses
to communicate with the Virtual Guest.
Page 50

● Specify what happens of the Virtual Guest if a user disconnects from a session by choosing an
option from the If session disconnects drop down menu. You can also specify the amount of
time that needs to pass before the selected action is taken from the After input field.
● You can also specify to end a disconnected or not from the End a disconnected session drop
down menu. From the same drop down menu you can also specify the amount of time that
needs to pass before a disconnected session is terminated. Note: The user can reconnect to a
previous session if the session is still available.
Configuring Virtual Guests Default Settings
In the Virtual Guests List dialog box click the Default Settings button to specify the default settings for all
the virtual guests in the pool.
Resetting Virtual Guest Settings to Default
To reset the virtual guest’s settings to the default settings highlight the virtual guest name from the Virtual
Guests List dialog box and click the Clear Settings button.
Using the Wildcard Function
Use the Wildcard input field at the bottom of the Pool Management tab to match specific guests for the
available guests within the pool which will be available for the user. Therefore if some of the virtual guests
names won’t match the wildcard, they won’t be available for the users.
For example, XP* will match only guests whose name starts with XP and *XP* will match guests which have
XP in any part of their name.
Page 51

Configuring and Managing 2X Templates for Guest Clones
Introduction
2X Templates allow you to better utilize host resources by automatically creating and deploying virtual guests
clones when needed. 2X Templates and clones can only be created for the following Windows workstations:
● Windows XP SP3
● Windows Vista
● Windows 7
● Windows 8
Managing 2X Templates from the 2X Templates Tab
Creating a 2X Template
Requirement: To create a template of a Windows workstation the machine should be configured to obtain an
IP via a DHCP server.
To create a new 2X Template of a Windows workstation follow the below procedure:
1. Navigate to the Farm category, click the 2X Templates tab from the VDI Hosts node and click Add
from the Tasks drop down menu.
2. Select a guest from which you would like to create a 2X template from the Virtual Guests List dialog
box, shown in the screenshot below and click OK.
Page 52

List of available guests to create a 2X Template from
3. In the next step of the process the 2X Remote Application Server will check if the virtual guest has the
2X Guest Agent installed. If it is not installed click the Install button.
4. In the Installing 2X Guest Agent dialog box you can specify different credentials to connect to the
server by clicking the option Override system credentials and specifying new credentials. Click
Install to proceed with the agent installation and click Done once it has been successfully installed. (If
the automatic installation of the 2X Agent fails, refer to the Section Installing the 2X Terminal Server
Agent Manually on page .
5. Once the 2X Guest Agent is installed click OK.
Configuring a 2X Template
To configure a 2X Template highlight the template name from the 2X Templates node and click Properties
from the Tasks drop down menu.
Basic 2X Template Settings – Configuring Maximum Guests and Pre-Created Guests
From the Properties tab shown in the below screenshot you can configure any of the following settings:
● 2X Template: Name for the template
● Maximum Guests: Specify the maximum number of guest clones that can be created
● Pre-created Guests: Specify the number of guest clones that will be pre-created so they are
always available for users to connect to.
● Guest Name: Specify the guest clones machine name. Note that each guest clone name will
be appended with the Guest ID.
● Delete unused guests: Enable this option to delete all guest clones that are not being used.
You can also specify the time for a guest clone to be considered as unused from the after drop
down menu.
Page 53

2X Templates Properties
Configure Location Where Virtual Guest Clones will be Stored
From the Advanced tab you can configure the folder where newly created guest clones created from the 2X
Template will be created in the Folder input field. This option is available if you are using Hyper-V, Parallels
Server4, Citrix Xen and VCenter.
Page 54

Configuring the location where Virtual Guest Clones will be stored
If the hypervisor you are using supports Native Pools, the newly created guest clones will be part of the
specified Native Pool location. This option is available if you are using VMWare ESX, VMWare VCenter and
VMWare Server 2.
Configuring SysPrep for Virtual Guest Clones
From the SysPrep tab shown in the below screenshot you can configure SysPrep settings for the virtual
guest clones in the 2X Template. The following options can be configured:
● Computer Name
● Owner Name
● Organization
● Administrative Password
● Join Workgroup: select this option and specify a workgroup if the virtual guest clone will be
part of a workgroup
● Join domain: select this option and specify a domain and credentials to join the domain if the
virtual guest clone will be part of a domain.
Page 55
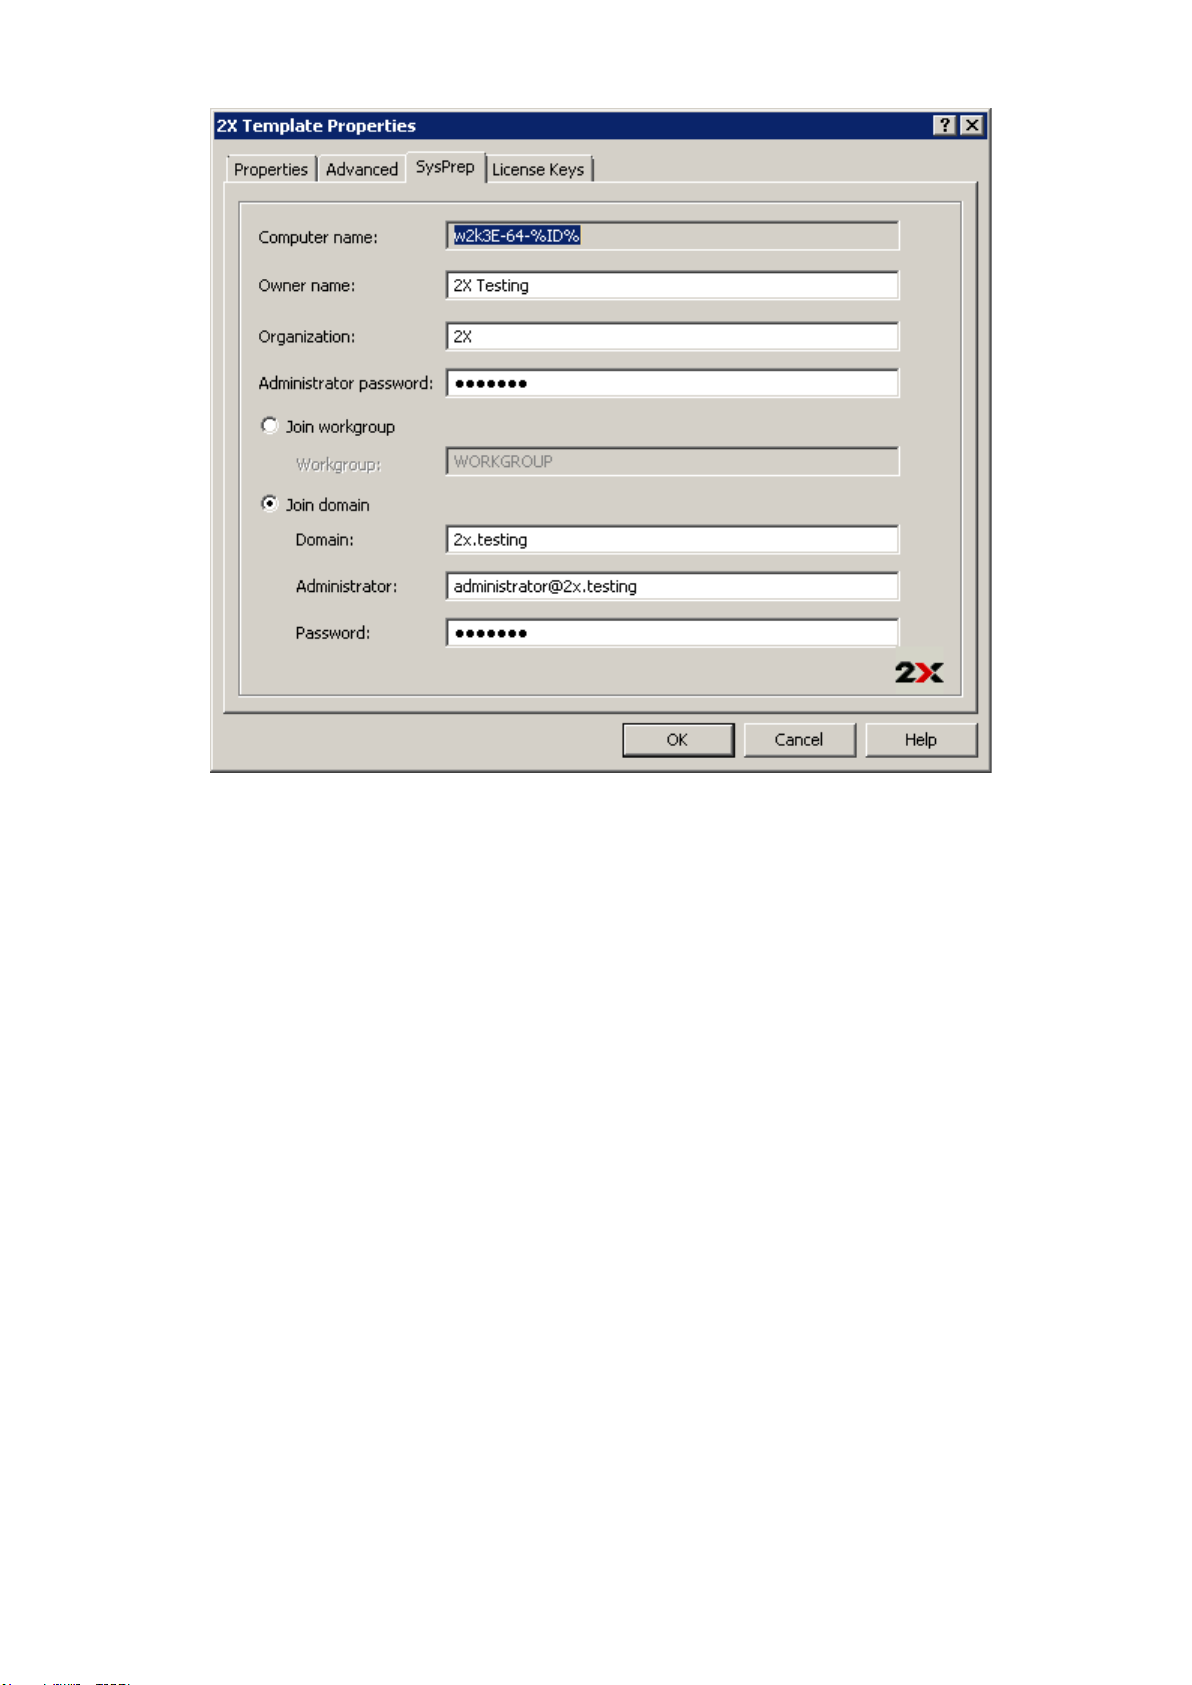
Configuring sysprep settings for virtual guest clones
Configuring License Key and Limit for Virtual Guest Clone
From the License tab you can specify the operating system license key and the key limit.
Updating the Template Operating System
If you need to update the template operating system, such as installing a service pack or new software, you
need to put the template into maintenance mode. To put a template into maintenance mode highlight the
template name from the template list and click Maintenance from the Tasks drop down menu.
Note: While in maintenance mode, clones cannot be created from the guest and the entry in the list of 2X
templates will be greyed out.
During the maintenance mode, the template OS is booted and can be modified. Once the changes have been
applied you can put the template off Maintenance Mode by clicking again the Maintenance button.
Note: Updates applied to the template OS during maintenance mode will only affect newly created clones.
Already created clones will not be affected.
Page 56

Persistent Guests
When a published application or desktop from a virtual guest is set as persistent, the first time a user
launches the application or desktop the publishing agent will create a persistent guest rule. Persistent Guests
rules can be accessed from the Persistent Guests tab seen in the below screenshot.
Configuring persistent guests from the Persistent Guests tab
Deleting a Persistent Guest Rule
To delete a persistent guest rule highlight the rule from the Persistent Guests tab and click Delete from the
Tasks drop down menu. If you want to delete all rules, select all rules by pressing CTRL+A and hit the delete
key.
Configuring Automatic Deleting of Persistent Guest Rules
From the Auto remove persistence if guest was not used for drop down menu at the bottom of the
Persistent Guests tab you can specify the maximum time an unused persistent guest rule is kept before
being automatically deleted. Alternatively you can also manually type in the desired time, for example 1 week
3 days.
Page 57

Publishing a Virtual Desktop from a Guest
To publish a virtual desktop from a guest or guest clone follow the below procedure:
1. Click the Publishing category and click the Desktop icon from the top navigation bar.
2. Select Virtual Desktop in the first step of the wizard and click Next.
Selecting Virtual Desktop from the Desktop Publishing Wizard
3. In the second step of the wizard enter a Name and Description in the Virtual Desktop section. From
the same section you can also configure a different icon by clicking on the Change Icon button.
4. From the Properties section you have to specify from where the virtual desktop should be published.
The options are:
a. Any Guest from a specified pool in the from pool drop down menu
b. Specific guest
c. Guest from a specified pool in the from pool drop down menu where name equals username
or IP
d. Specific 2X Template from a specified 2X Template in the 2X Template drop down menu
5. Tick the Persistent option to create a persistent guest rule the first time the user connections.
6. From the Desktop Size section you can specify the resolution of the desktop.
Page 58
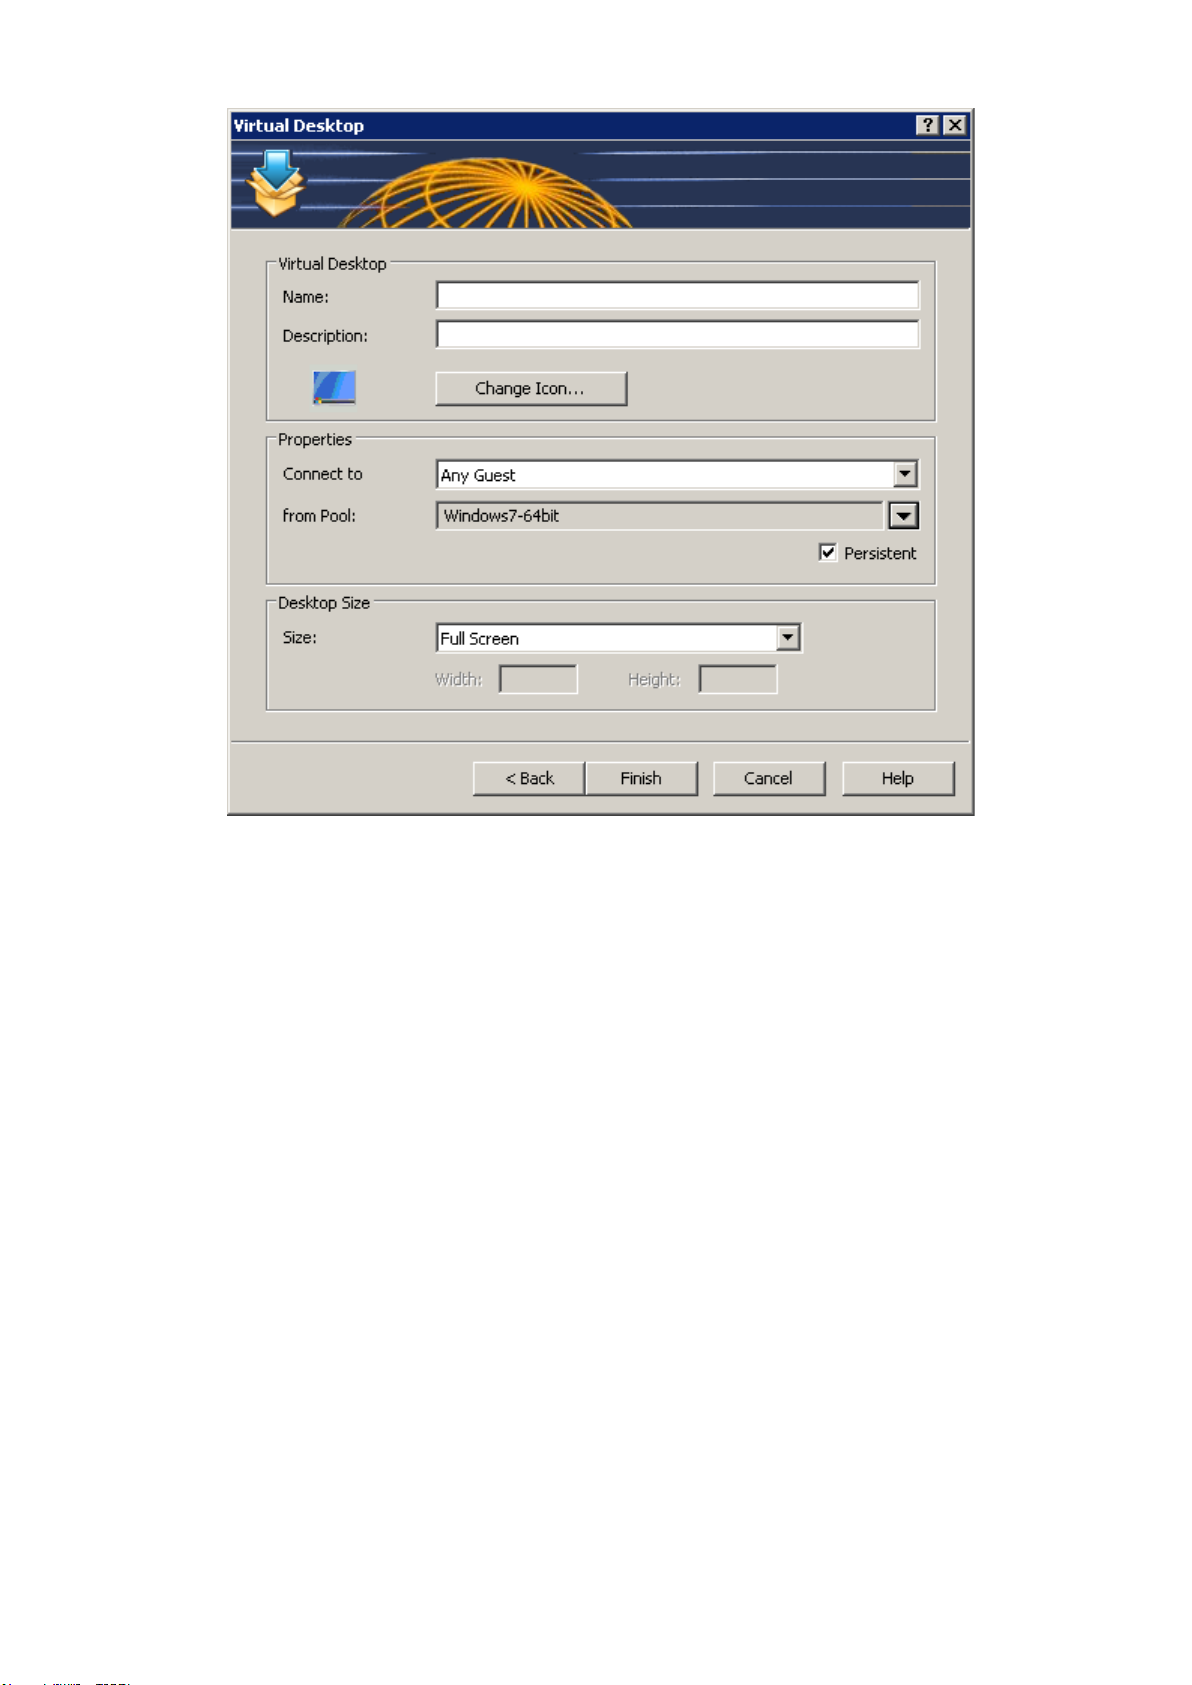
Configuring a Desktop to be Published
7. Once ready click Finish to publish the application.
Page 59

Publishing an Application from a Guest
To publish an application from a guest or guest clone follow the below procedure:
1. Click the Publishing category and click the Application icon from the top navigation bar.
2. Select Virtual Guest in the first step of the wizard and click Next.
3. In the second step of the wizard select Single Application and click Next.
4. In the third step of the wizard browse to the application by clicking on the Browse button next to the
Target input field so all details are populated. Alternatively you can configure all options manually by
following the steps below.
5. Enter a Name and Description in the Application section.
6. From the Run drop down menu specify if the application should run in a normal window, maximized or
minimized.
7. In the Target input field the path of where the application is installed should be specified. To specify a
new path of the executable click the Browse (...) button and browse to the executable. Use Windows
environment variables if you are manually entering the path.
8. In the Start In input field specify the folder that contains the original object or any other related file. For
example sometimes applications need to use files from another location. In such cases specify such
folder location so the published application will be able to locate them upon it being launched.
9. (Optional) In the Parameters input field you can specify parameters which have to be passed to the
application upon being started.
10. From the Virtual Guest Settings section you have to specify from where the application should be
published. The options are:
● Any Guest from a specified pool in the from pool drop down menu
● Specific guest
● Guest from a specified pool in the from pool drop down menu where name equals
username or IP
●
Specific 2X Template from a specified 2X Template in the 2X Template drop down
menu
11. Tick the Persistent option to create a persistent guest rule the first time the user connections.
Page 60

Configuring a Virtual Application to be Published
12. Once ready click Finish to publish the application.
Page 61

Publishing a Document from a Guest
To publish a document from a guest or guest clone follow the below procedure:
1. Click Publishing from the system menu and click the Document icon from the top navigation bar.
2. Select Virtual Guest in the first step of the wizard and click Next.
3. In the second step specify the content type to browse for. You can also specify a custom content
type from the Custom content types input field. Click Next once ready.
Configuring a Content Type for the Document
4. In the third step of the wizard use the Browse button next to the Target input field to browse to
the document and all the other entries are automatically populated. If you would like to configure
all entries manually follow the steps below.
5. Enter a Name and Description for the document in the Application section.
6. From the Run drop down menu specify if the application should run in a normal window,
maximized or minimized.
7. In the Target input field the path of where the document is stored should be specified. To specify
a new path of the executable click the Browse (...) button and browse to the document. Use
Windows environment variables if you are manually entering the path.
8. In the Start In input field specify the folder that contains the original document or any other related
file. For example sometimes applications need to use files from another location. In such cases
specify such folder location so the published application will be able to locate them upon it being
launched.
9. (Optional) In the Parameters input field you can specify parameters which have to be passed to
the application upon being started.
10. You can change the icon for the published application by clicking the Change Icon button and
configure shortcut options by clicking the Advanced Settings button.
Page 62
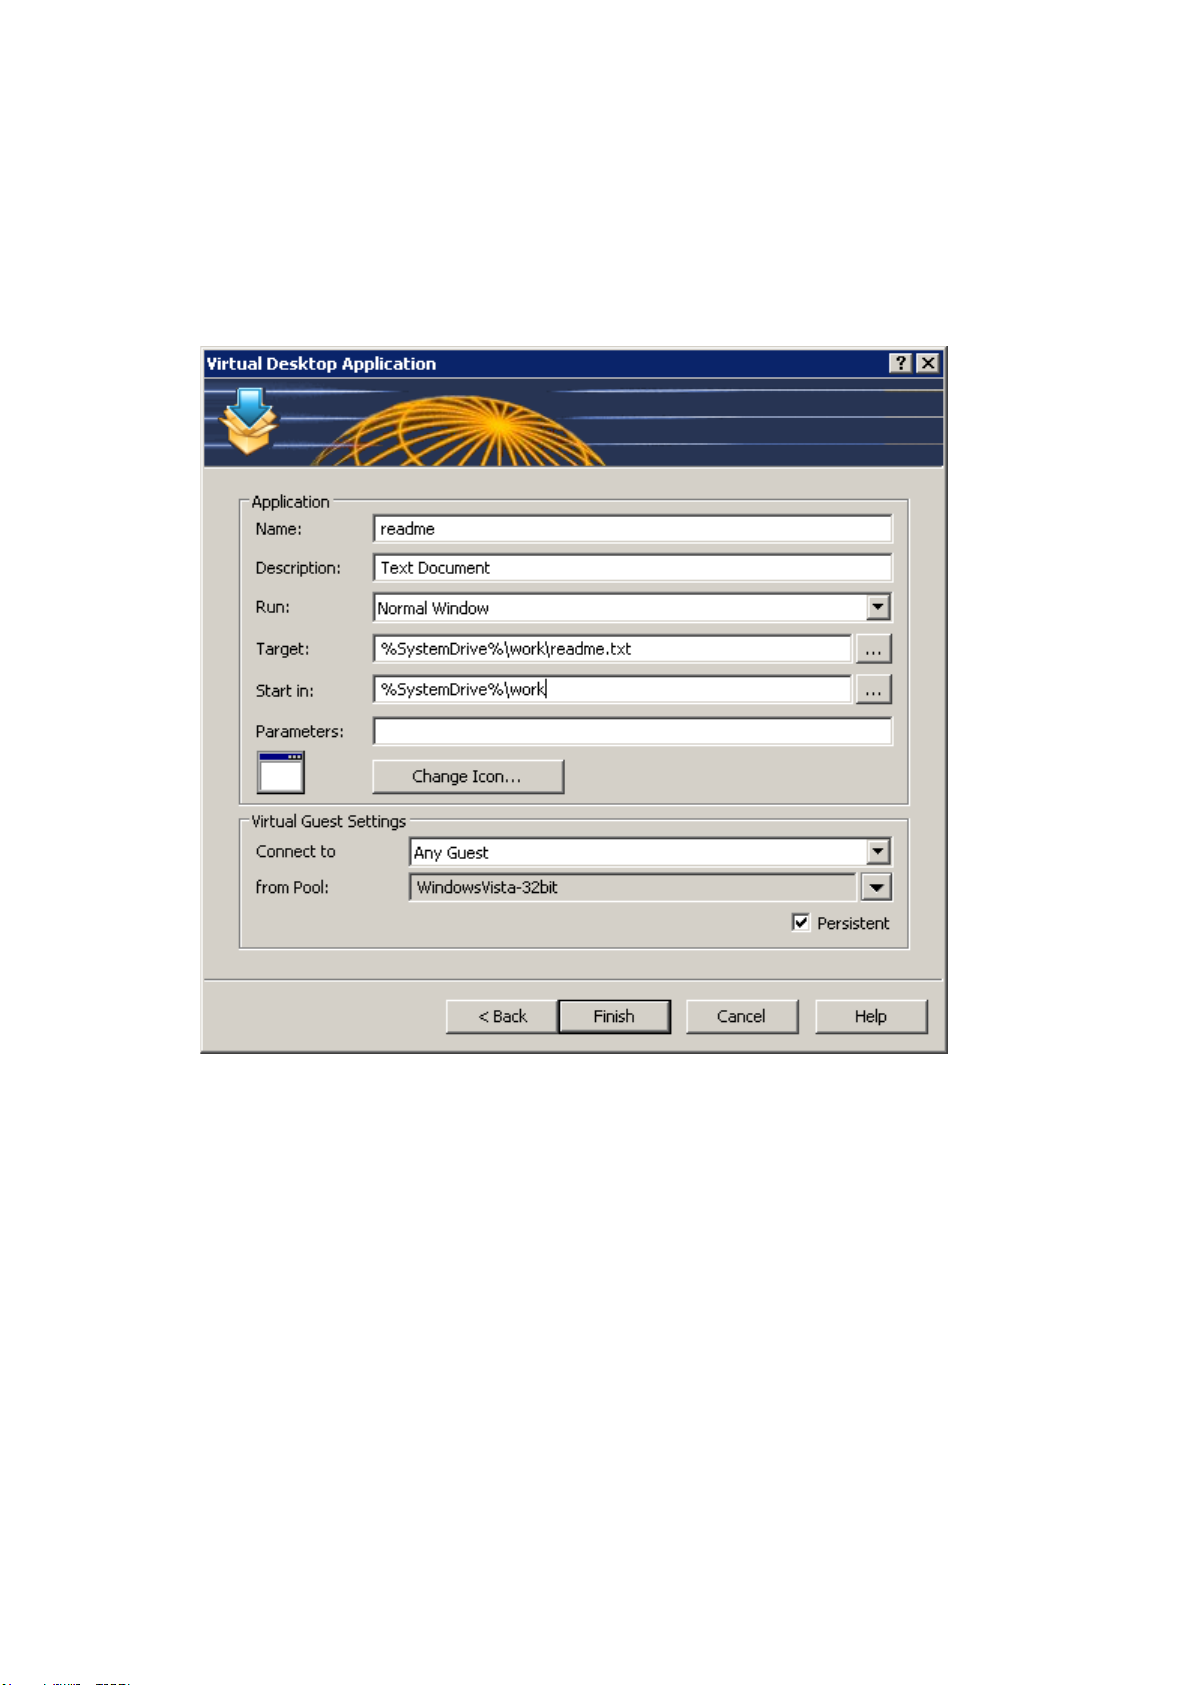
11. From the Virtual Guest Settings section you have to specify from where the application should
be published. The options are:
a. Any Guest from a specified pool in the from pool drop down menu
b. Specific guest
c. Guest from a specified pool in the from pool drop down menu where name equals
username or IP
d. Specific 2X Template from a specified 2X Template in the 2X Template drop down
menu
12. Tick the Persistent option to create a persistent guest rule the first time the user connections.
Configuring a Virtual Document to be Published
Once ready click Finish to publish the application.
Page 63

Adding a Remote PC
Introduction
Desktops and applications can also be published from any supported version of Microsoft Windows
workstation operating system (Remote PCs). Remote PCs are similar to Guest Virtual Machines in the farm
but typically they are standalone PC installations.
Follow the below procedure to add a Remote PC to the farm:
1. Launch the 2X Remote Application Server Console, select the Farm category and select on Remote
PCs from the navigational tree.
2. Click Add from the Tasks drop down menu to launch the setup wizard and once prompted specify the
server IP address or FQDN and click Next.
First Step of the Add a Remote PC Wizard
3. In this step the 2X Remote Application Server checks if the 2X agent is installed on the Remote PC.
If it is installed, proceed to step 7 of this procedure. If it is not installed, click Install to remotely install
the 2X agent.
2X Remote Application Server Checking if Remote PC Agent is Installed
Page 64
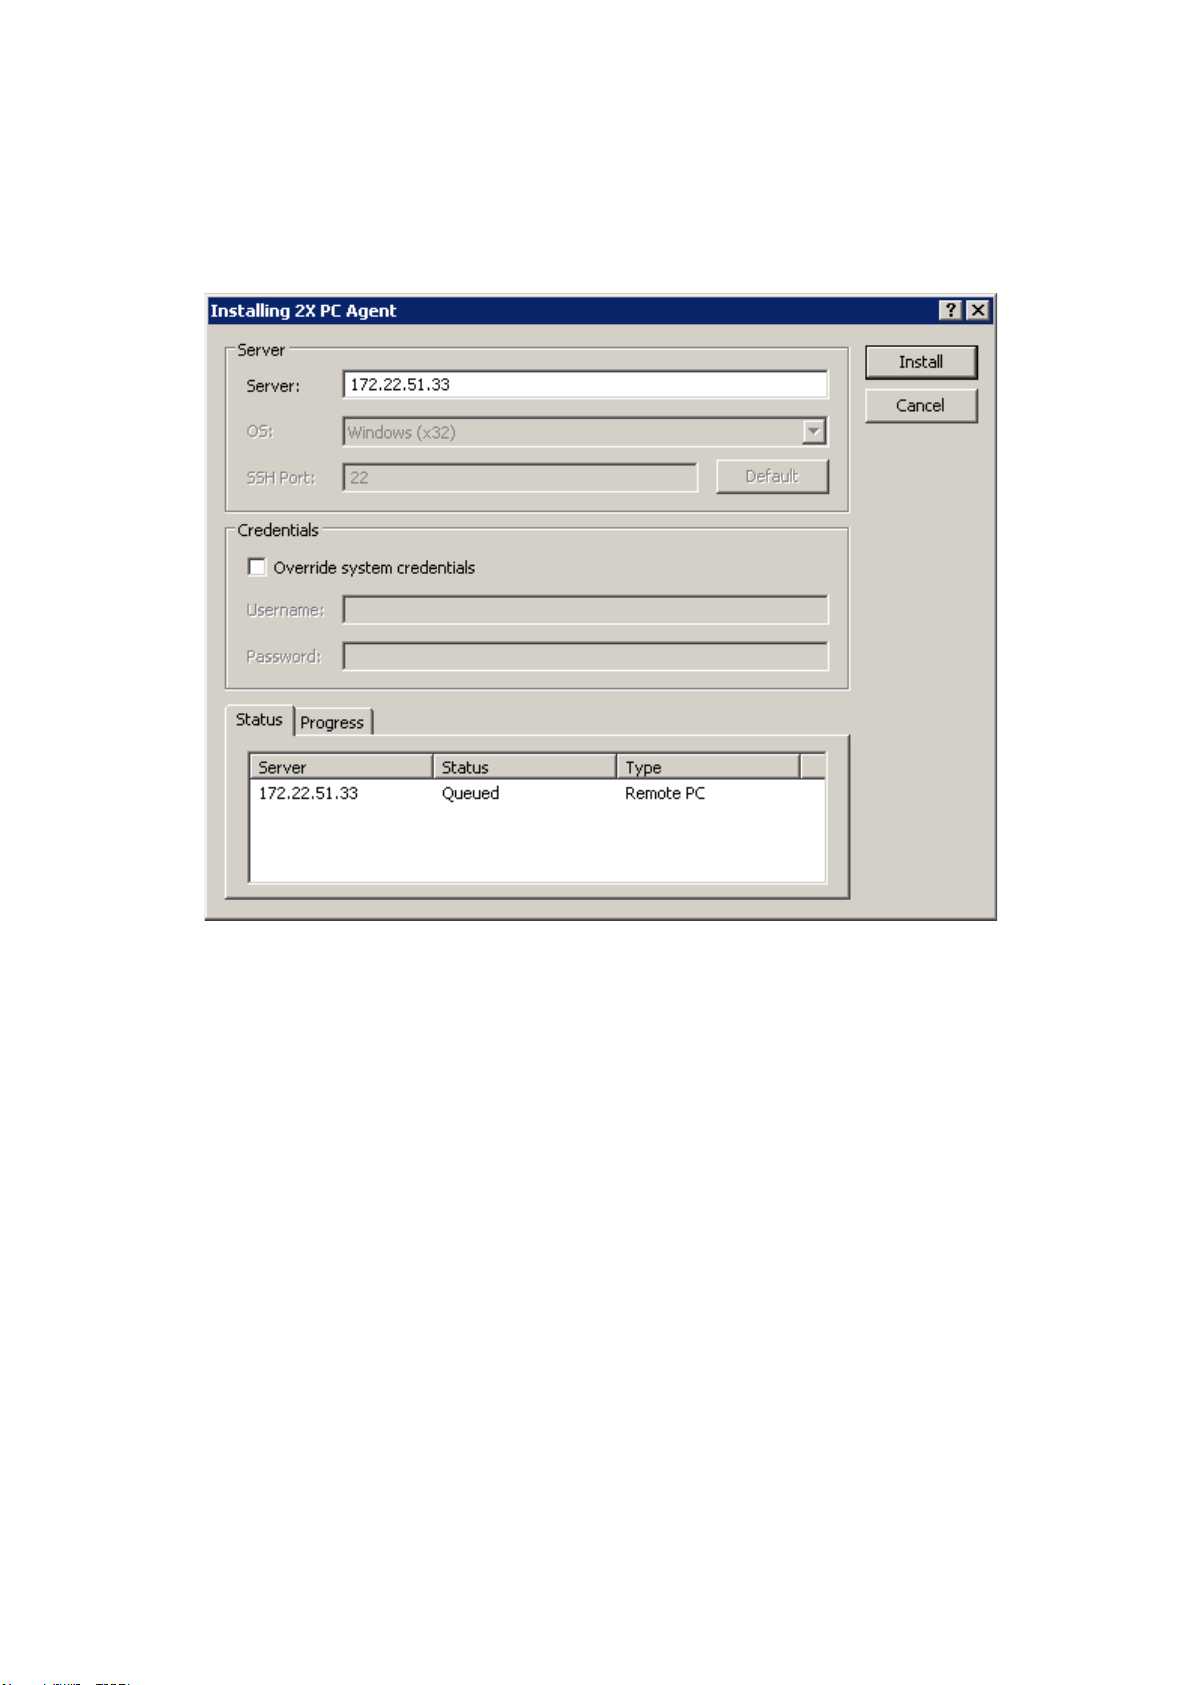
4. In the Installing 2X Remote PC Agent dialog highlight the PC name on which the 2X Agent is to be
installed.
5. (Optional) Tick the option “Override system credentials” to specify and use different credentials to
connect to the PC and install the 2X Agent.
6. Click Install to install the agent and click Done once it has been successfully installed. If the
automatic installation of the 2X Agent fails refer to the following section Installing the 2X Remote PC
Agent Manually.
Installing 2X PC Agent Remotely
7. Click Add to add the Remote PC to the 2X Remote Application Server server farm.
Tip: Use the Find button to find existing terminal servers and citrix servers in your active directory domain.
Page 65

Installing the 2X Remote PC Agent Manually
2X Remote PC Agent System Requirements
● Windows XP, Windows Vista, Windows 7.
● The same hardware requirements as specified by Microsoft when deploying a terminal services
environment will apply.
Installing the 2X Remote PC Agent Manually
1. Login to the PC where the 2X Remote PC Agent is to be installed using an administrator account and
close all other applications.
2. Copy the 2X Remote Application Server installation file (2XAppServer.msi) to the PC and double click
it to launch the installation.
3. Once prompted click Next and accept the End-User license agreement.
4. Specify the path where the 2X Agent should be installed and click Next.
5. Select Custom and click Next.
6. Click on the 2X PC Agent and select Entire Feature will be installed on local hard drive from the
drop down menu as seen in the below screenshot.
Manually Installing the Remote PC Agent
7. Ensure that all other components are deselected and click Next.
8. Click Install to start the installation and Finish once the installation is finished.
Note: The 2X Agent does not require any configuration. Once the 2X Agent is installed, highlight the Remote
PC name in the 2X Remote Application Server Console and click Check Agent. If the agent is installed
properly, the status should change to Agent Installed as seen in the below screenshot.
Page 66
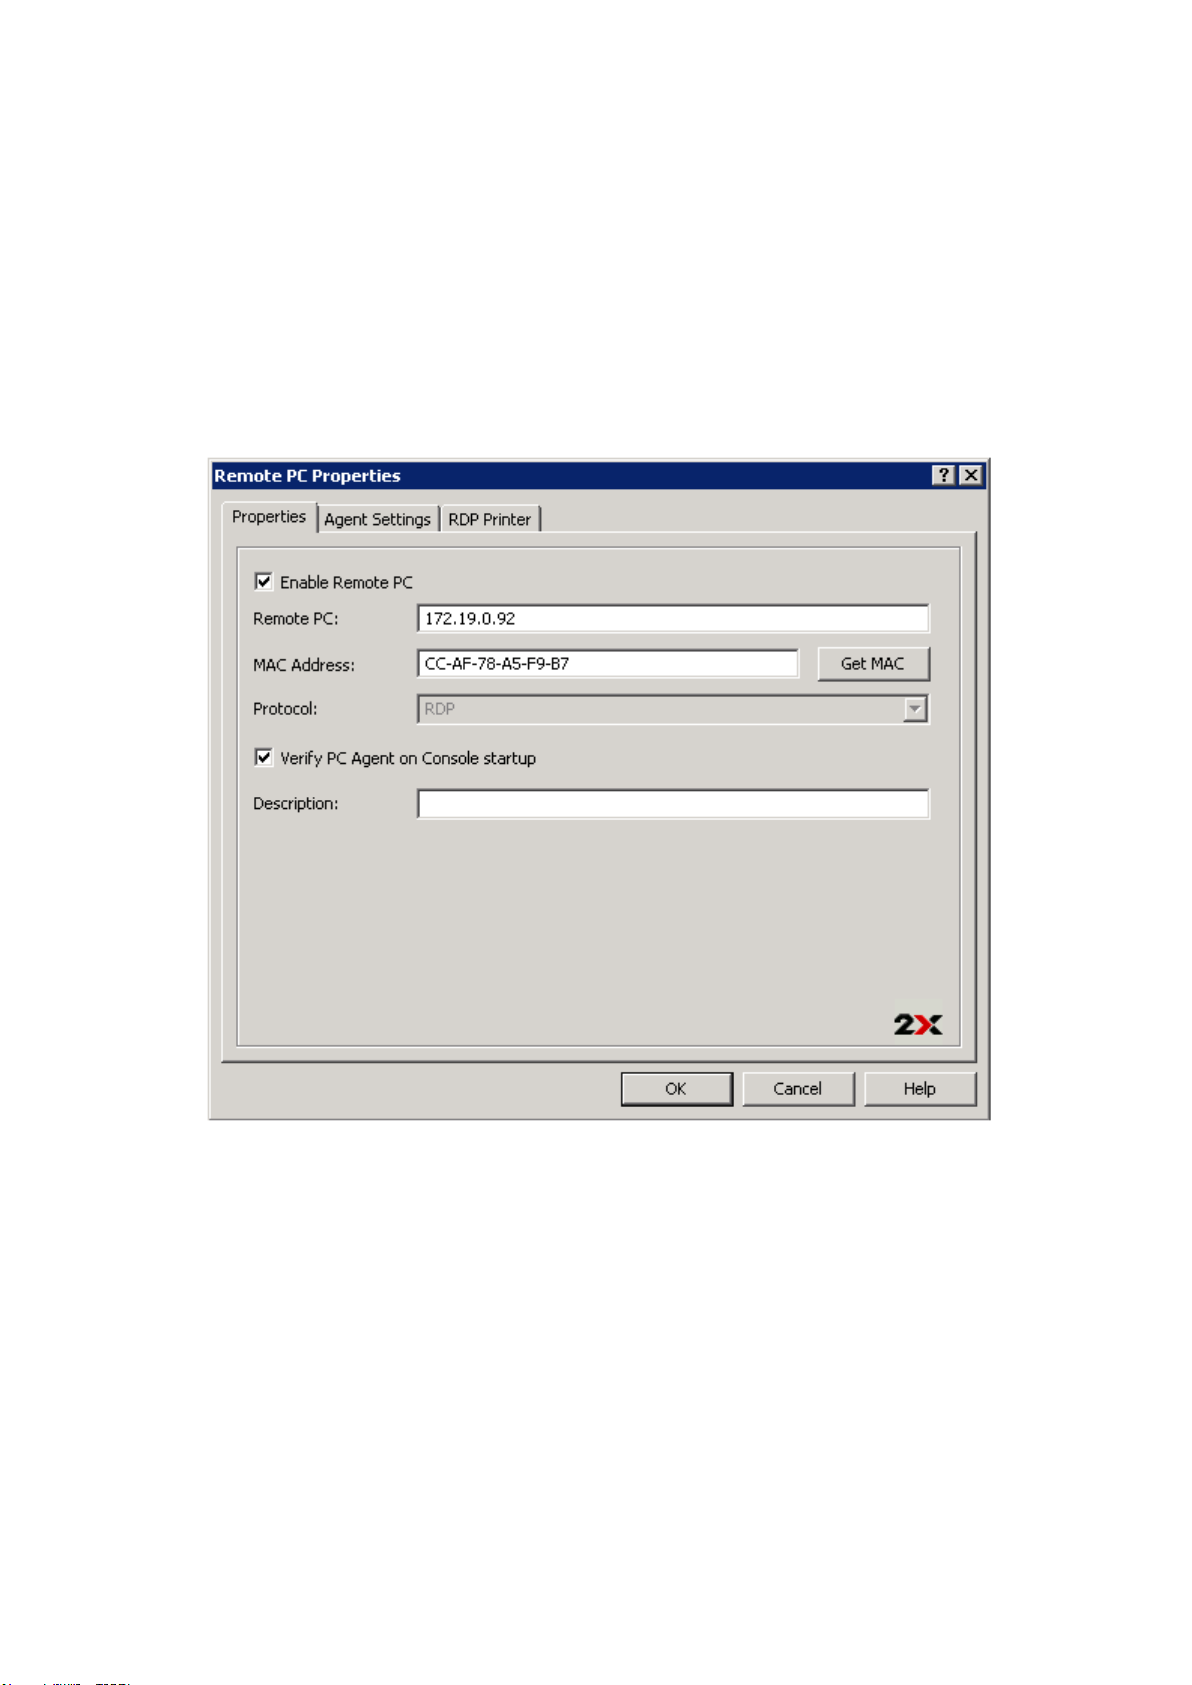
Configuring a Remote PC
To access the properties of a Remote PC highlight the computer name from the navigation tree in the 2X
Remote Application Server Console and click Properties from the Tasks drop down menu. All of the below
configuration options can be configured from the Remote PC Properties.
Enabling or Disabling a Remote PC in the Farm
By default a PC is enabled in the farm. When it is disabled, published applications and virtual desktops
cannot be served from it.
To disable a PC from the farm untick the option Enable Remote PC from the Properties tab in the Remote
PC Properties. Tick back (enable) any of the tick boxes to enable the computer back in the farm.
Properties Tab in Remote PC Properties
Configuring or Changing a Remote PC IP Address
From the Properties tab you can also change the remote PC IP address and add a description. The MAC
address is also needed to automatically switch ON the PC when accessing resources from it.
Note: The Wake On Lan option should be enabled in the PC Bios options so the machine could be
automatically turned on.
Configuring the Remote PC Agent
Each Remote PC in the farm has a 2X Agent installed to provide a connection between the 2X Remote
Application Server and the PC. The agent can be configured from the Agent Settings tab in the pc
properties.
Page 67
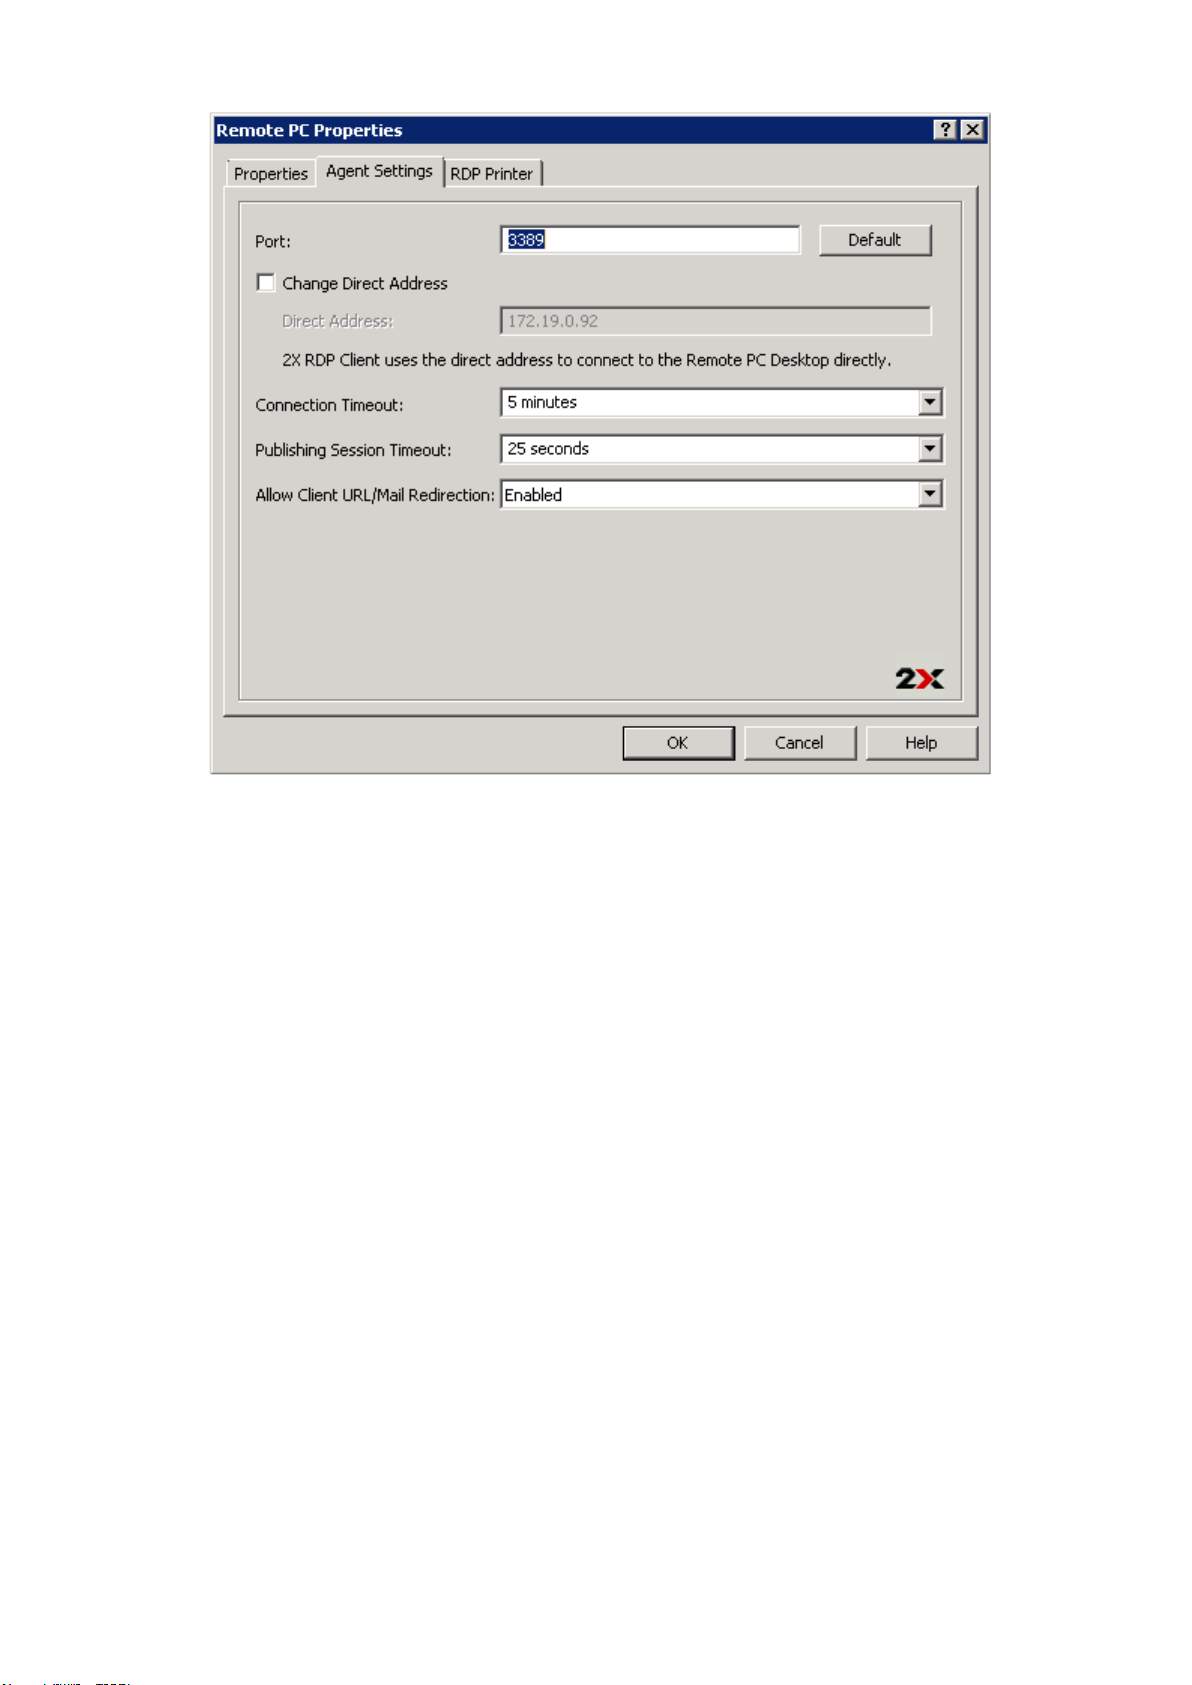
Configuring Remote PC Agent Settings from Agent Settings Tab
Configuring the Remote Desktop Connection Port
Specify a different remote desktop connection port number in the Port input field if a non default port is
configured on the pc.
Changing the Direct Address
This address is only used in Direct Connection mode and it could be an internal or external IP. To change the
Direct Address of a remote PC tick the option Change Direct Address and specify the new address in the
Direct Address input field.
Changing Connection Timeout
To increase the connection timeout of a remote PC select a value from the drop down menu Connection
Timeout.
Changing the Session Timeout
To change the amount of time each session remains connected in the background after the user has closed
the published application specify a new value in the Publishing Session Timeout input field. This option is
used to avoid unnecessary reconnections with the pc.
Configuring URL and Mail Redirect / Restricting Access
To allow http and mailto links to be opened using a local application on the client computer rather than the
server’s resources, enable the option Allow Client URL/Mail Redirection. To configure a list of URLs which
should not be redirected navigate to the URL Redirection tab in the Settings node of a site.
Configuring RDP Printing for Remote PC
The RDP Printer tab allows you to configure the renaming format of redirected printers. The format may vary
depending of which version and language of the server you are using.
Page 68

Configuring RDP Printing from the RDP Printer Tab in Remote PC Properties
Set your RDP Printer Name Format specifically for the configured server by choosing any of the below
options from the RDP Printer Name Format drop down menu:
● Printername (from Computername) in Session no.
● Session no. (computername from) Printername
● Printername (redirected Session no)
The other RDP Printing options available in the RDP Printer tab are:
● Remove session number from printer name
● Remove client name from printer name
Page 69

Publishing a Desktop, Application and Document from a
Remote PC
Publishing a Desktop from a Remote PC
To publish a desktop from a terminal server follow the below procedure:
1. Click Publishing from the system menu and click the Desktop icon from the top navigation bar.
2. Select Remote PC Desktop in the first step of the wizard and click Next.
3. In the second step of the wizard specify a Name and Description in the Desktop section. From the
same section you can also configure an icon by clicking on the Change Icon button.
4. Click the Browse button in the Remote PC section to specify from which Remote PC the desktop
should be published.
5. From the Desktop Size section you can specify the resolution of the desktop.
Configuring a Desktop to be Published from a Remote PC
6. Once ready click Finish to publish the desktop.
Publishing an Application from a Remote PC
To publish an application from a terminal server follow the below procedure:
1. Select the Publishing category from the system menu and click the Application icon from the top
navigation bar.
2. Select Remote PC in the first step of the wizard and click Next.
3. From Remote PCs you can only publish Single Application. Therefore in the second step of the
wizard click Next.
Page 70
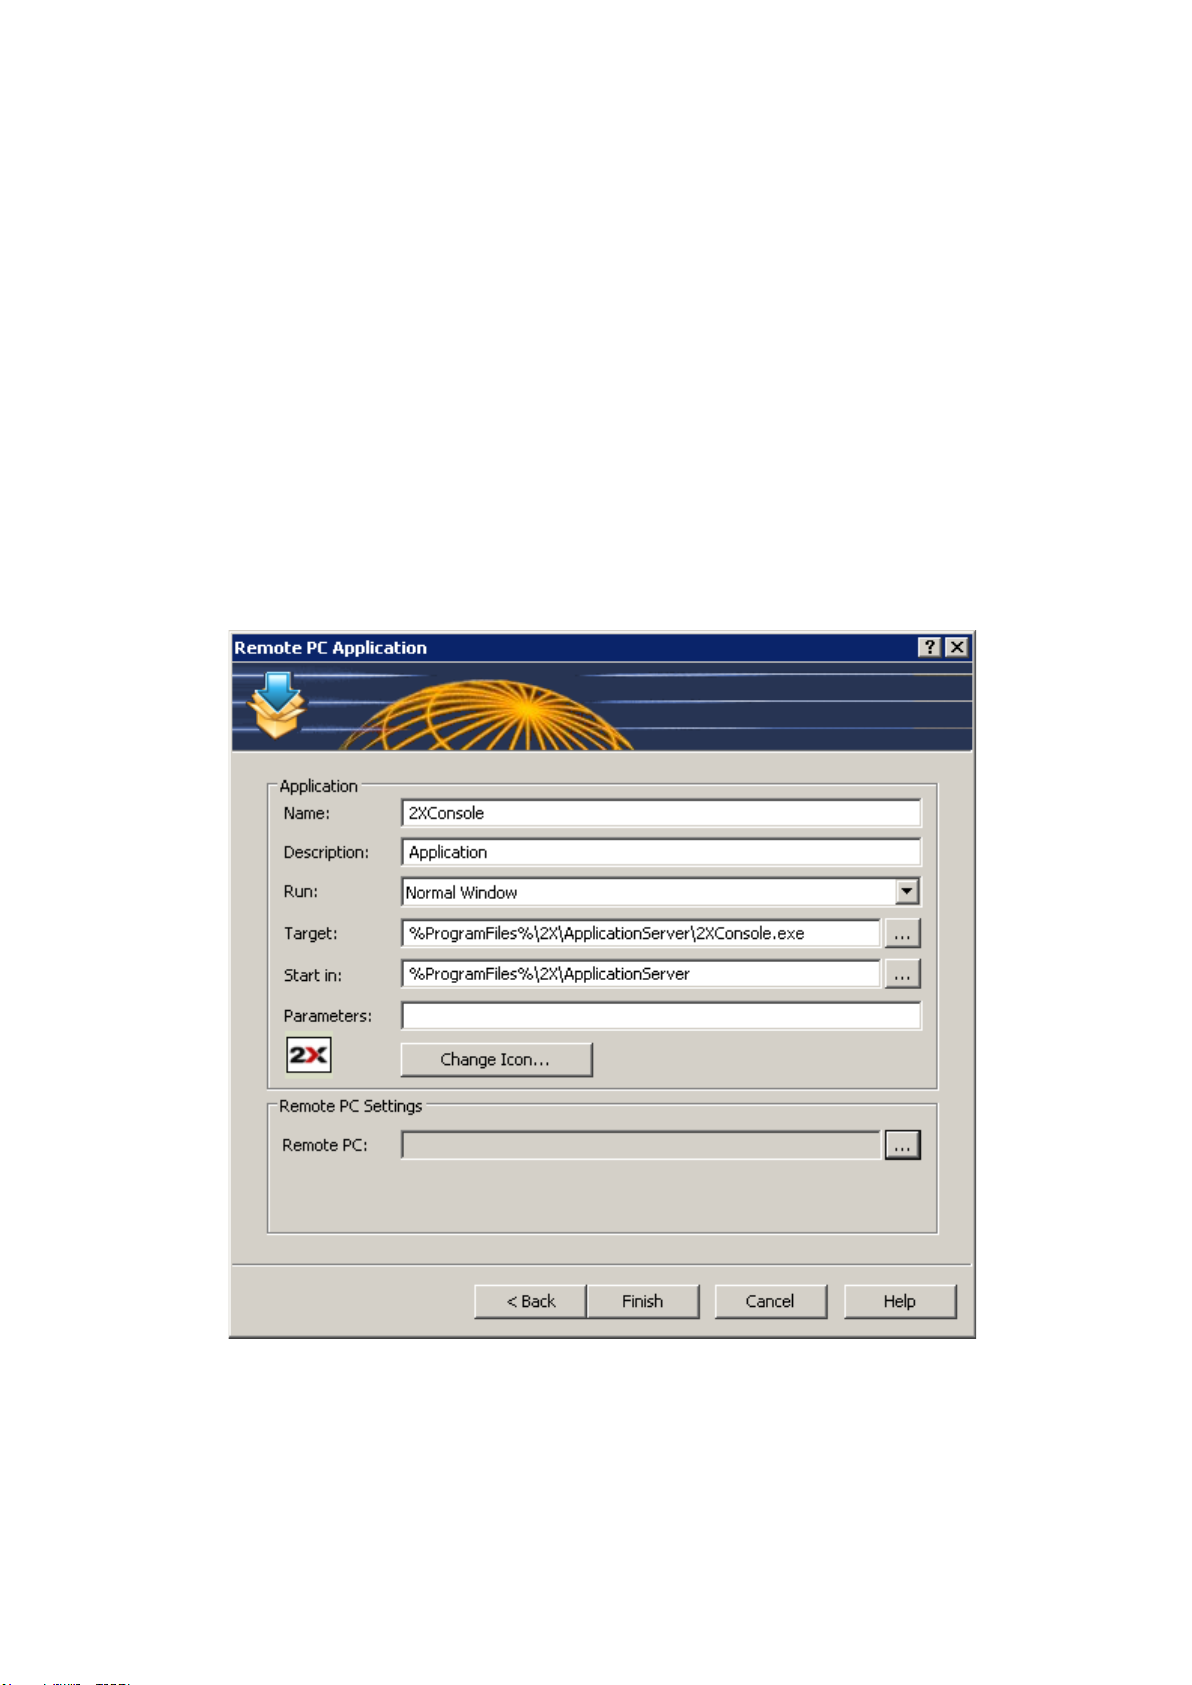
4. In the third step of the wizard you have to configure the application.
Note: Use the Browse button next to the Target input field to browse to the application executable. Once
the application is selected, all other configuration options will be automatically populated. If you would like to
configure all application entries manually, follow the below procedure.
5. Enter a Name and Description in the Application section.
6. From the Run drop down menu specify if the application should run in a normal window, maximized or
minimized.
7. Specify the path where the application executable is in the Target input field by clicking the browse
button and browse to the executable. Use Windows environment variables if you are manually
specifying the path.
8. The Start In input field will be automatically populated. To specify a different folder from where the
application should be launched click the Browse button. A different folder might be specified if for
example the application needs to use files from another location to run. In such case, specify such
folder location so the published application will be able to locate them upon it being launched.
9. (Optional) In the Parameters input field you can specify parameters which have to be passed to the
application upon being launched.
10. You can change the icon for the published application by clicking the Change Icon button.
11. Click the Browse button in the Remote PC Settings section to select a remote PC from the list from
which the application should be published.
Configuring an Application to be Published from a Remote PC
12. Once ready click Finish to publish the application.
Publishing a Document from a Remote PC
To publish a document from a terminal server follow the below procedure:
Page 71

1. Click the Publishing category and click the Document icon from the top navigation bar.
2. Select Remote PC in the first step of the wizard and click Next.
3. In the second step specify the content type of the document you want to publish. You can select
the content type from the predefined list or specify a custom content type from the Custom content
types input field. Click Next once ready.
Configuring a Content Type for the Document
Note: In the third step of the wizard use the Browse button next to the Target input field to browse to the
document. Once the document is selected, all other configuration options will be automatically populated. If
you would like to configure all entries manually, follow the below procedure.
4. In the third step of the wizard enter a Name and Description for the document in the Application
section.
5. From the Run drop down menu specify if the document should run in a normal window, maximized or
minimized.
6. Specify the path where the document is in the Target input field by clicking the browse button and
browse to the document. Use Windows environment variables if you are manually specifying the path.
7. The Start In input field will be automatically populated. To specify a different folder from where the
document should be launched click the Browse button.
8. (Optional) In the Parameters input field you can specify parameters which have to be passed to the
application upon being started and you can change the icon for the published document by clicking
the Change Icon button.
9. Click the Browse button in the Remote PC Settings section to select a remote PC from the list from
which the document should be published.
Page 72
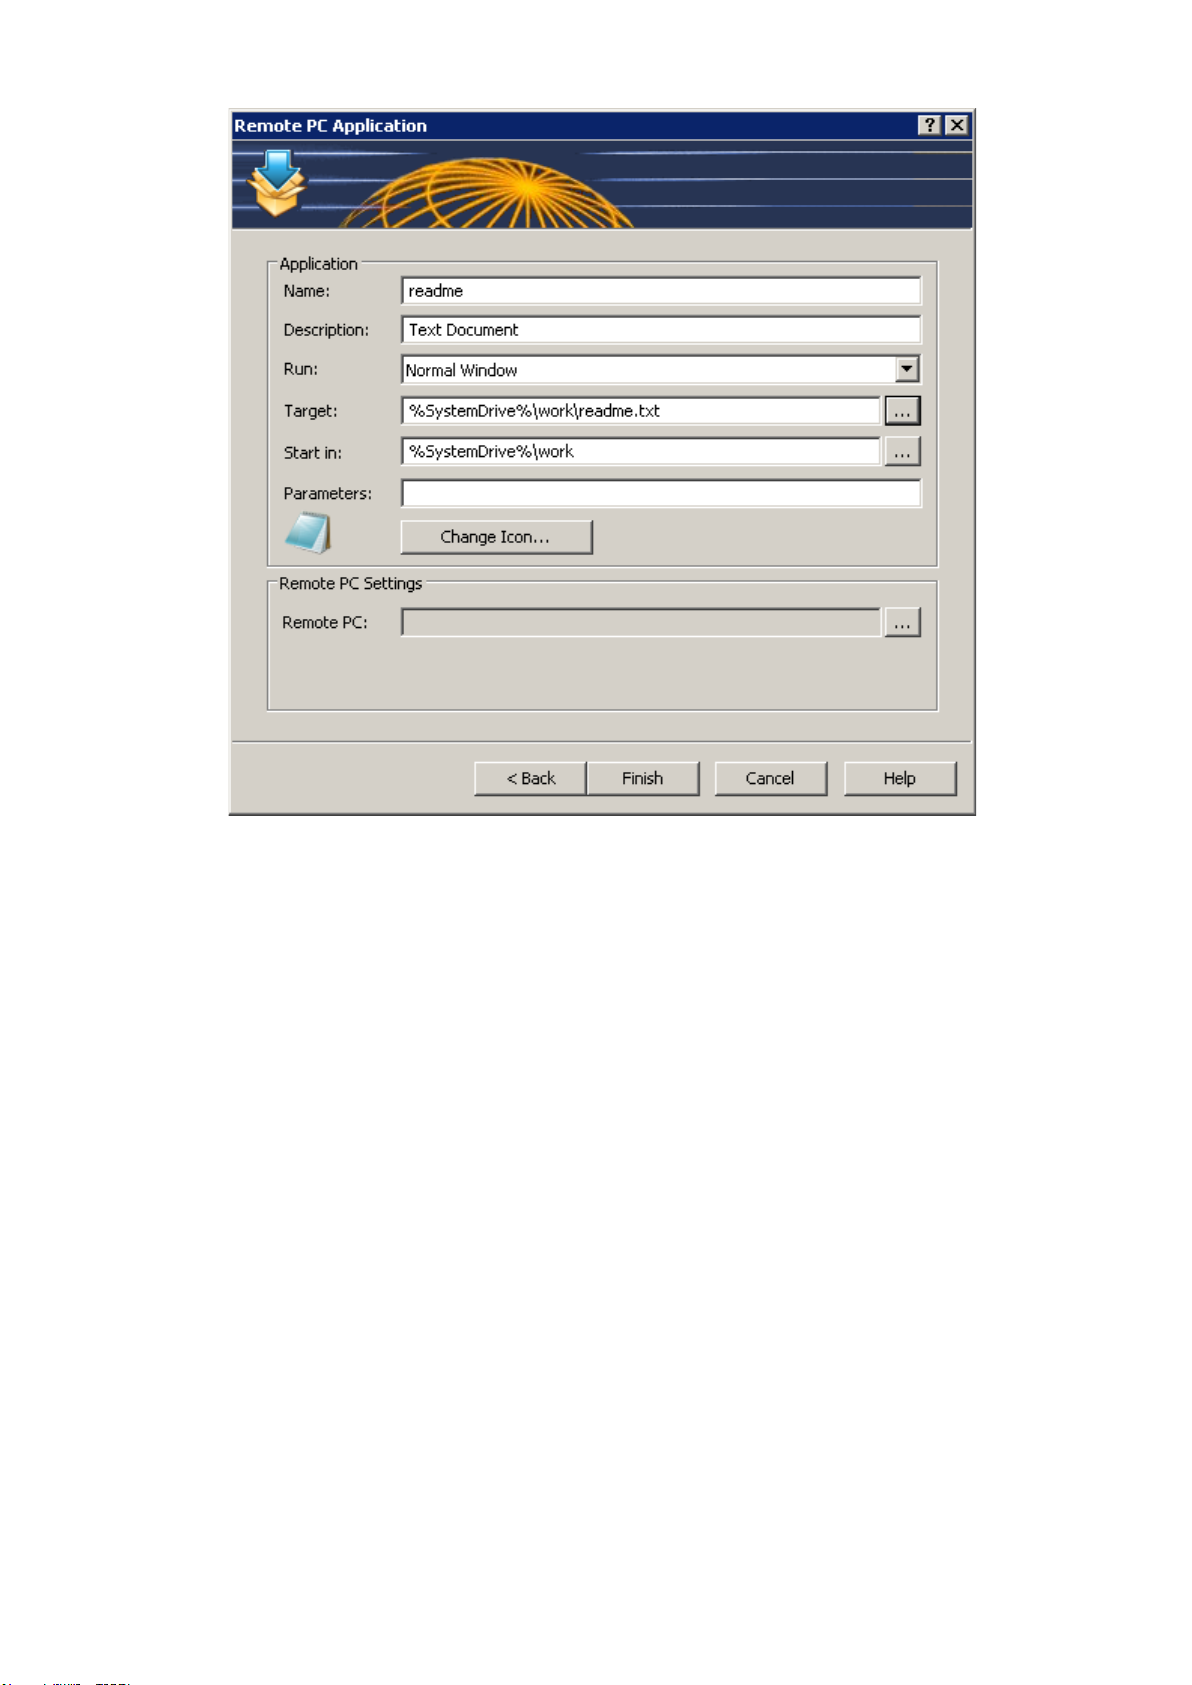
Configuring a Document to be Published from a Remote PC
10. Once ready click Finish to publish the document.
Page 73

Managing Published Applications
Publishing is one of the fundamental uses and features of the 2X Remote Application Server. The 2X Remote
Application Server can be used to publish:
● Applications
● Folders
● Desktops
● Predefined Applications
● Documents
Publishing an Application
To publish an application that can be accessed by users on the network, you can follow any of the following
procedures:
● Publishing an Application from a Terminal Server here.
● Publishing an Application from a Remote PC here.
● Publishing an Application from a Guest here.
Configuring a Published Application
When publishing an application through the wizard you have to specify several application parameters such
as the name, the executable path etc. These options and several others can also be modified once the
application has been published.
To modify a published application, select the application from the Published Resources tree in the
Publishing category.
Configuring a Published Resource
Configuring the Sites through which a Published Application is Available
Page 74
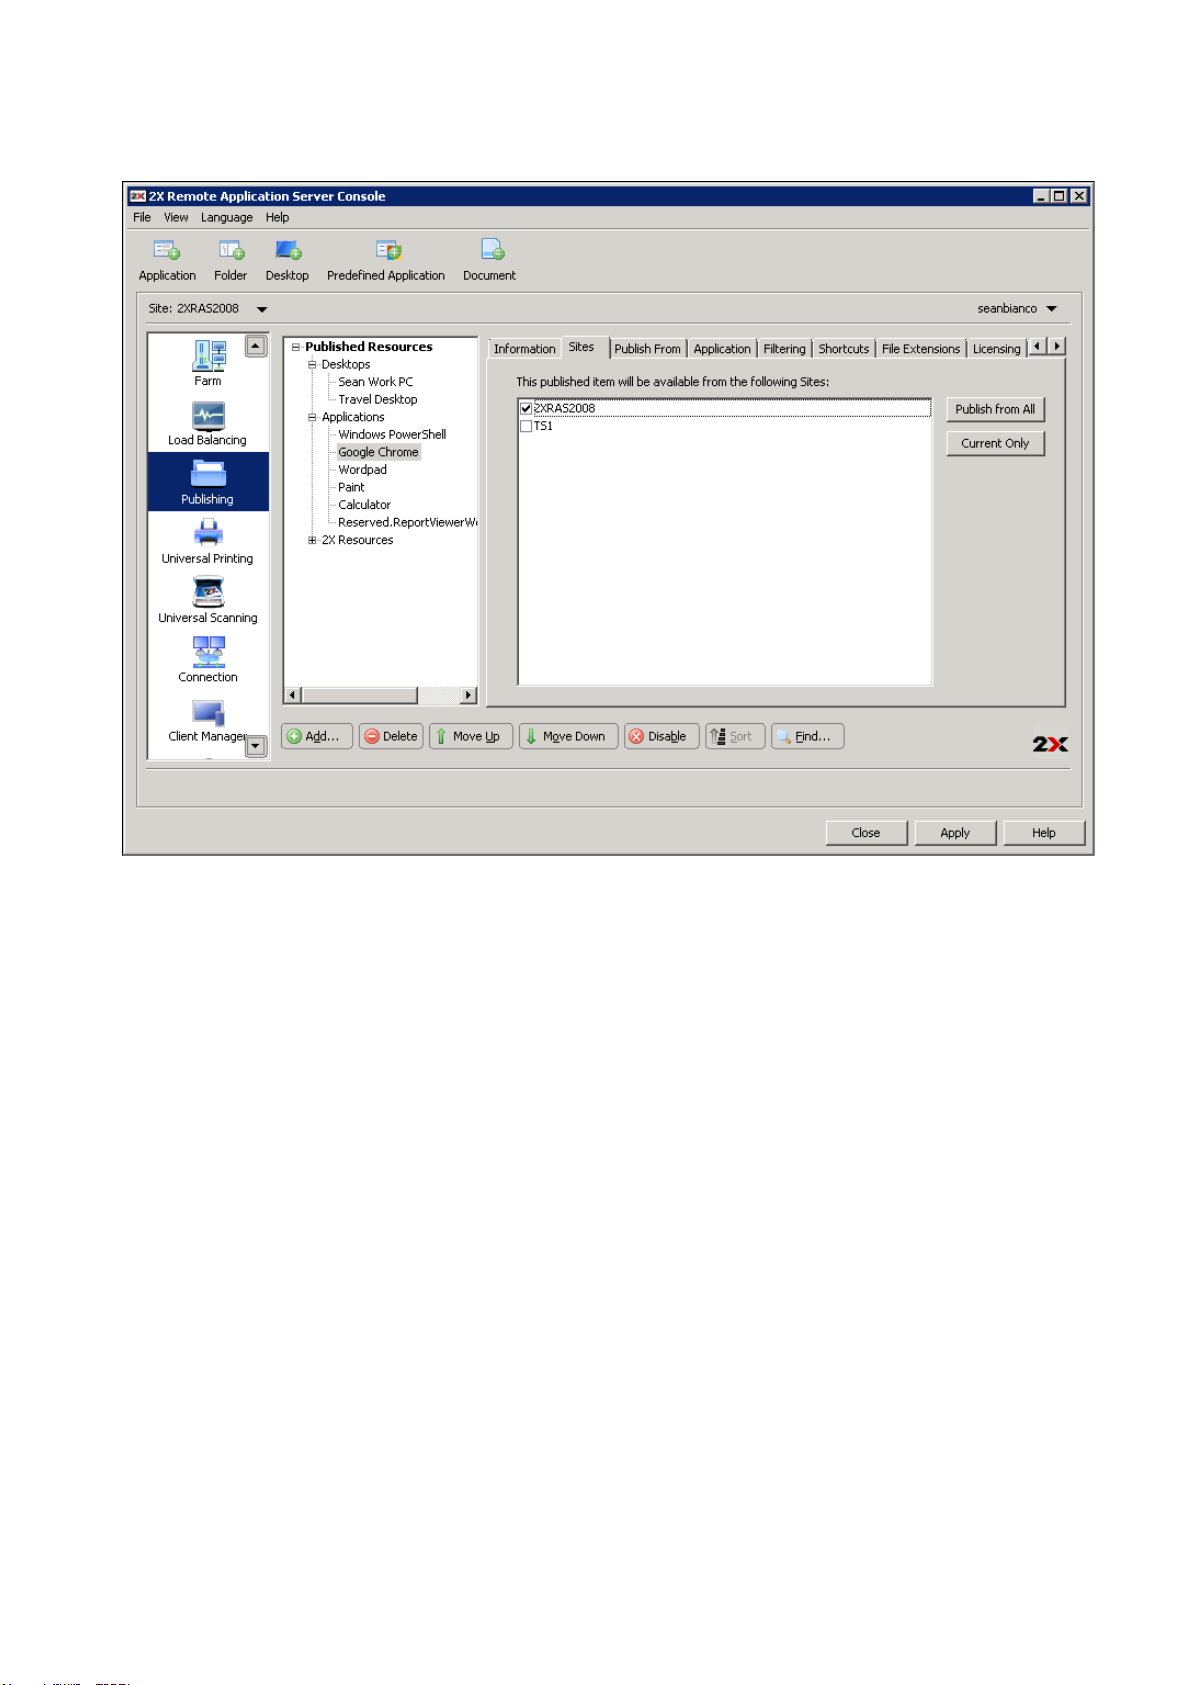
By default a published application is available through all the sites. To restrict access to a specific site or
group of sites, select the list of sites from the Sites tab in the published application options.
Configuring the Sites a Published Application is Available Through
Configuring from which Servers the Application is Published From
From the Publish From tab you can specify from which terminal servers should the published application be
published as seen in the below screenshot.
Page 75
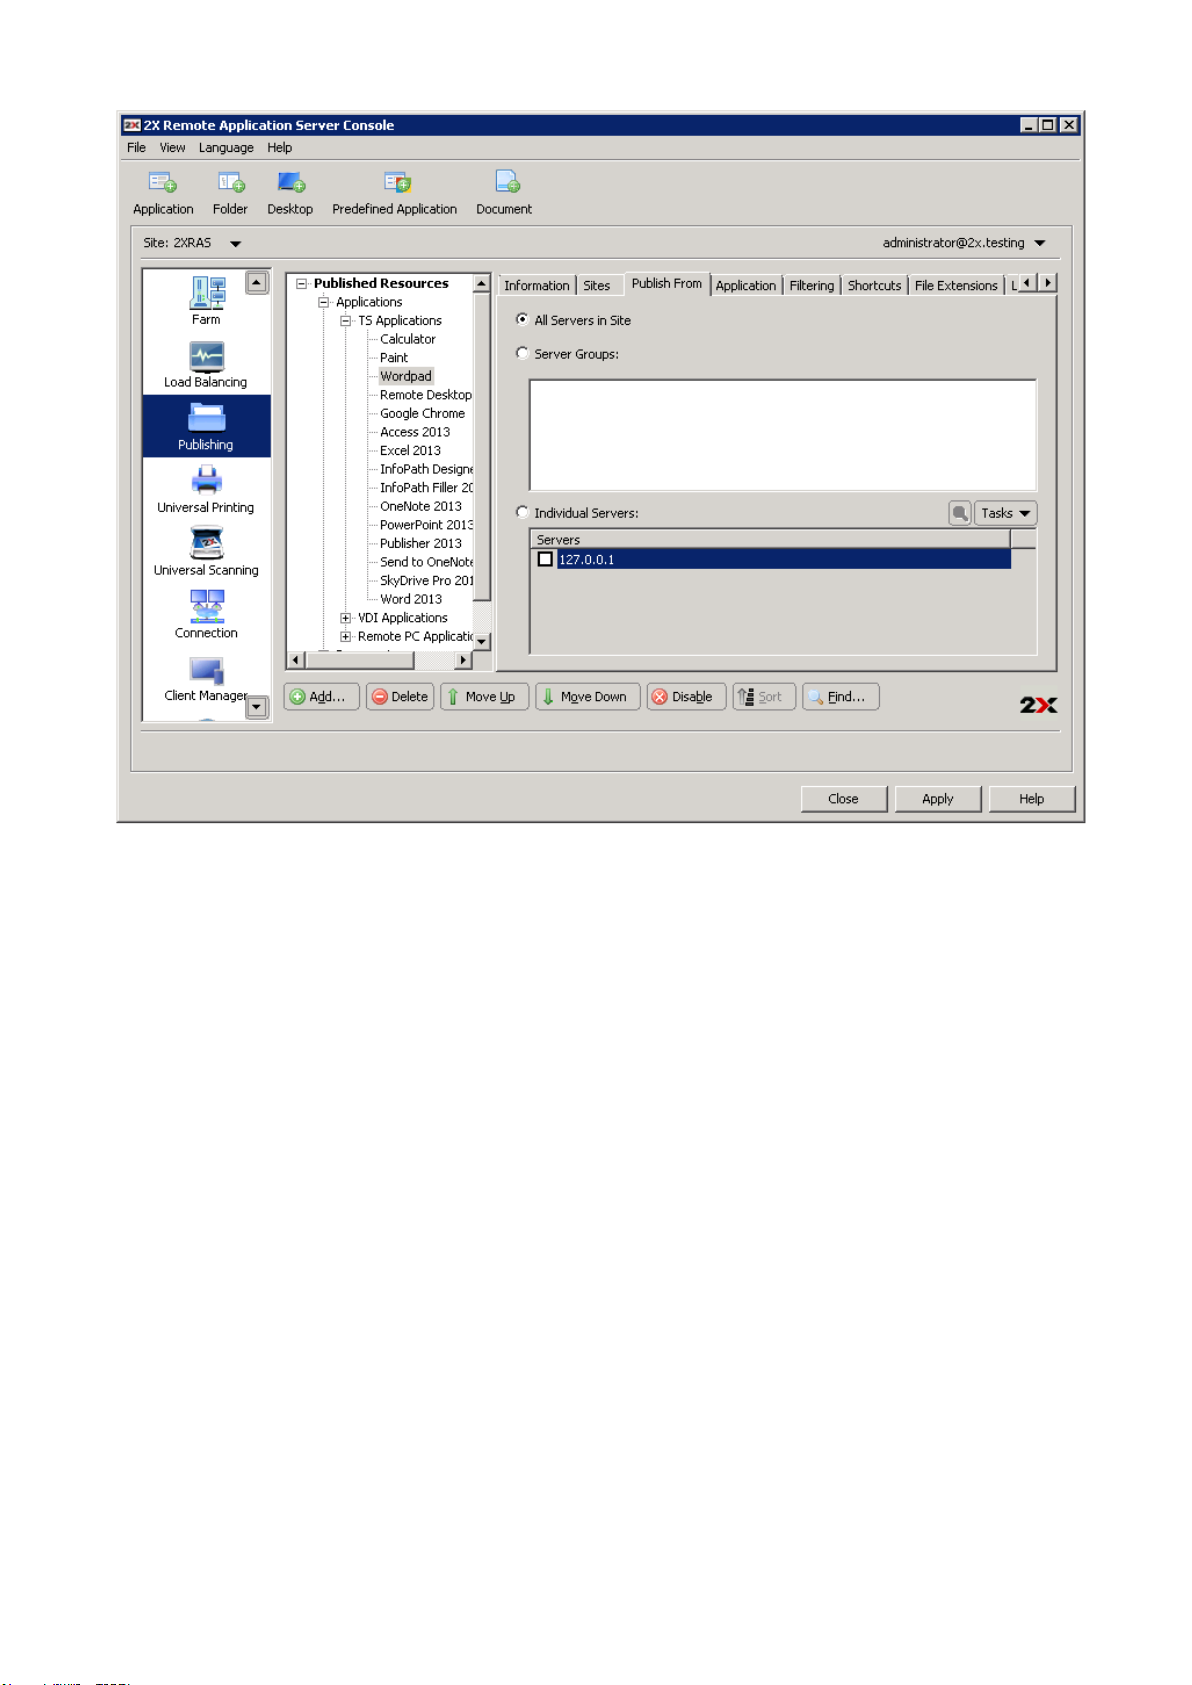
Configuring from which Servers a Published Application is Available
Configuring Server Specific Application Settings
By default the settings configured in the Target (application path), Start In and Parameters apply to all
servers an application is published from. In case the application is installed in a different path on one of the
servers, use the Server(s) drop down menu in the Application tab to specify new settings in the Target,
Start In and Parameter input fields specific for that server.
Page 76

Configuring Server Specific Settings for a Published Application
Configuring Shortcuts Options for a Published Application
Click the Shortcuts tab in the application settings to enable the creation of shortcuts on the user’s desktop,
shortcuts in the start folder with relative folder and shortcut in the Auto start folder. When the Auto start
shortcut is enabled the application will be started when the Operating system the client is running is started.
Note: This option is not available on all operating systems.
Page 77

Configuring Shortcut Options for a Published Application
Configuring File Extension Associations
To modify file extension association for a particular published application, click the File Extensions tab in the
application settings.
Page 78
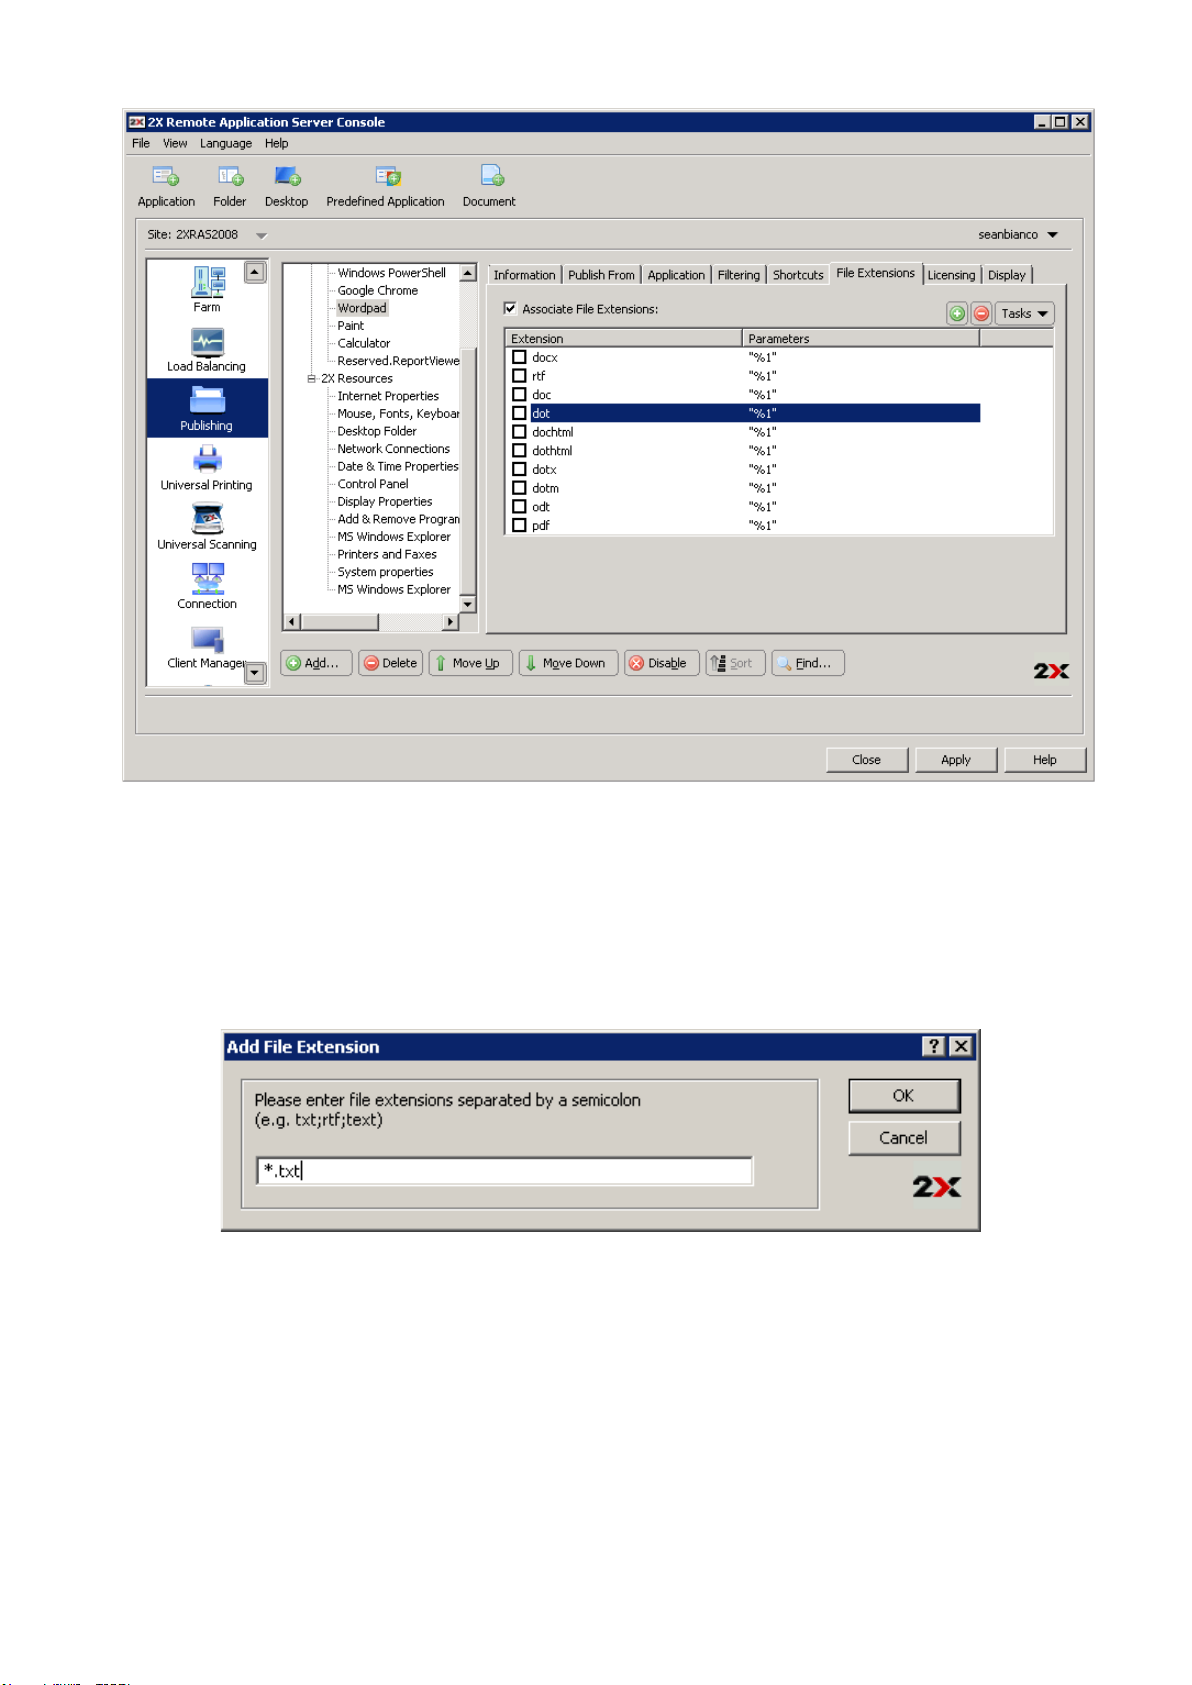
Configuring File Extension Associations for a Published Application
Note: A list of typically associated file extensions is automatically generated once an application is published.
If you would like to modify the preconfigured list and add, remove or modify an existing entry, tick the option
Associate File Extensions.
To add a new extension to the list, click Add from the Tasks drop down menu and specify the extension as
shown in the below screenshot.
Configuring a new File Extension
To modify an extension’s parameters, highlight the extension and click Properties from the Tasks drop down
menu.
Configuring Licensing Options for Published Applications
Click the Licensing tab to configure any of the below licensing options:
Disable session Sharing: If this option is enabled, it allows you to isolate the published application to one
session. Therefore if the same application is launched twice, the multiple instances of the application will run
in the same isolated session.
Page 79
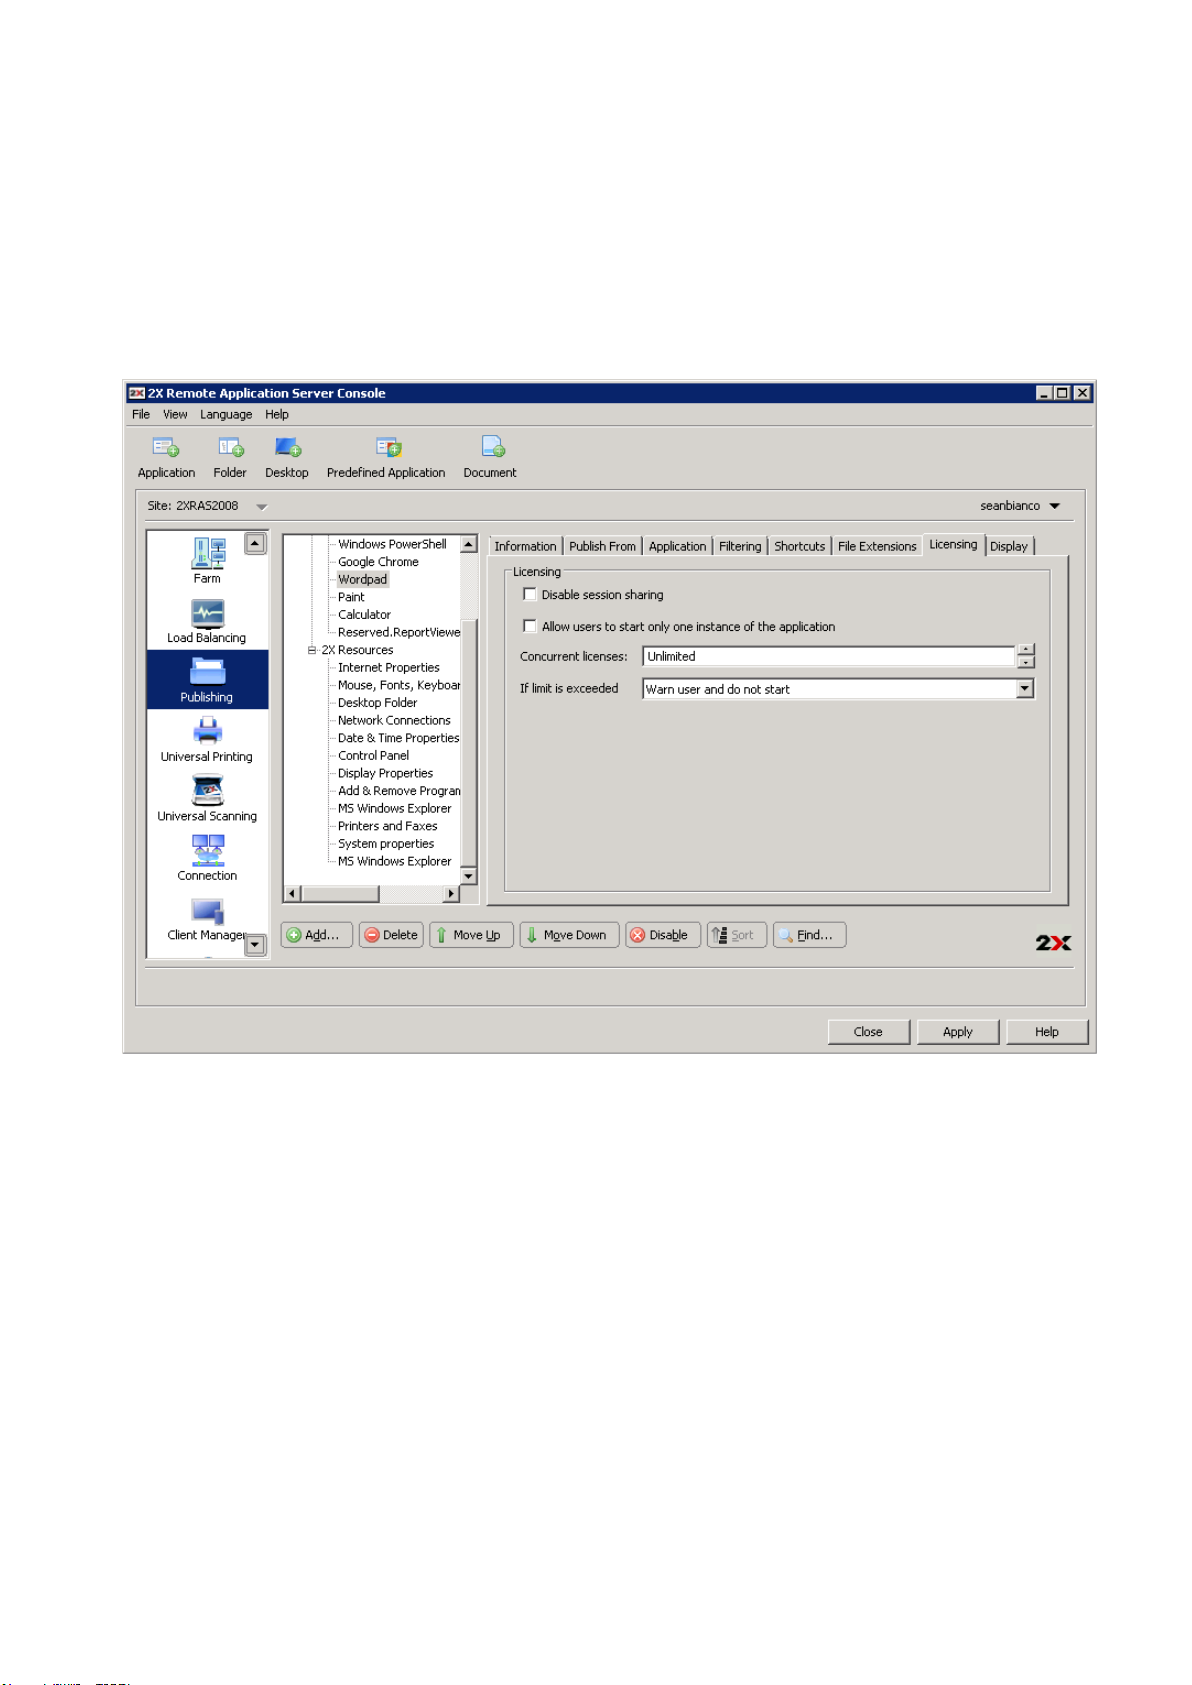
Allow users to start only one instance of the application: If this option is enabled, a user can only launch
a single instance of the application.
Concurrent Licenses: Use this option to specify the maximum number of concurrent instances the
application can run. E.g. if the license of the application allows you to only run 10 instances of the
application, set the Concurrent licences option to 10 so once such limit is reached, other users cannot
initiate other instances.
If limit is exceeded: From this drop down menu you can specify what action should the 2X Remote
Application Server take in case any of the above licensing configured limits has been exceeded.
Configuring Licensing Options of a Published Application
Configuring Display Settings for a Published Application
Click the Display tab to configure the color depth of the published application, resolution and width and
height. If these options are left as default, the client specified options will take over.
From this section you can also enable the option to wait for the 2X Universal Printers to be redirected before
the application is loaded. When enabling this option you can also configure the maximum time to wait in
seconds for the 2X Universal Printers to be redirected.
Page 80

Configuring Display Options of a Published Application
Filtering
Filtering is comprehensively described in full detail here: http://www.2x.com/support/ras-
documentation/manual/filter-rules/
Page 81
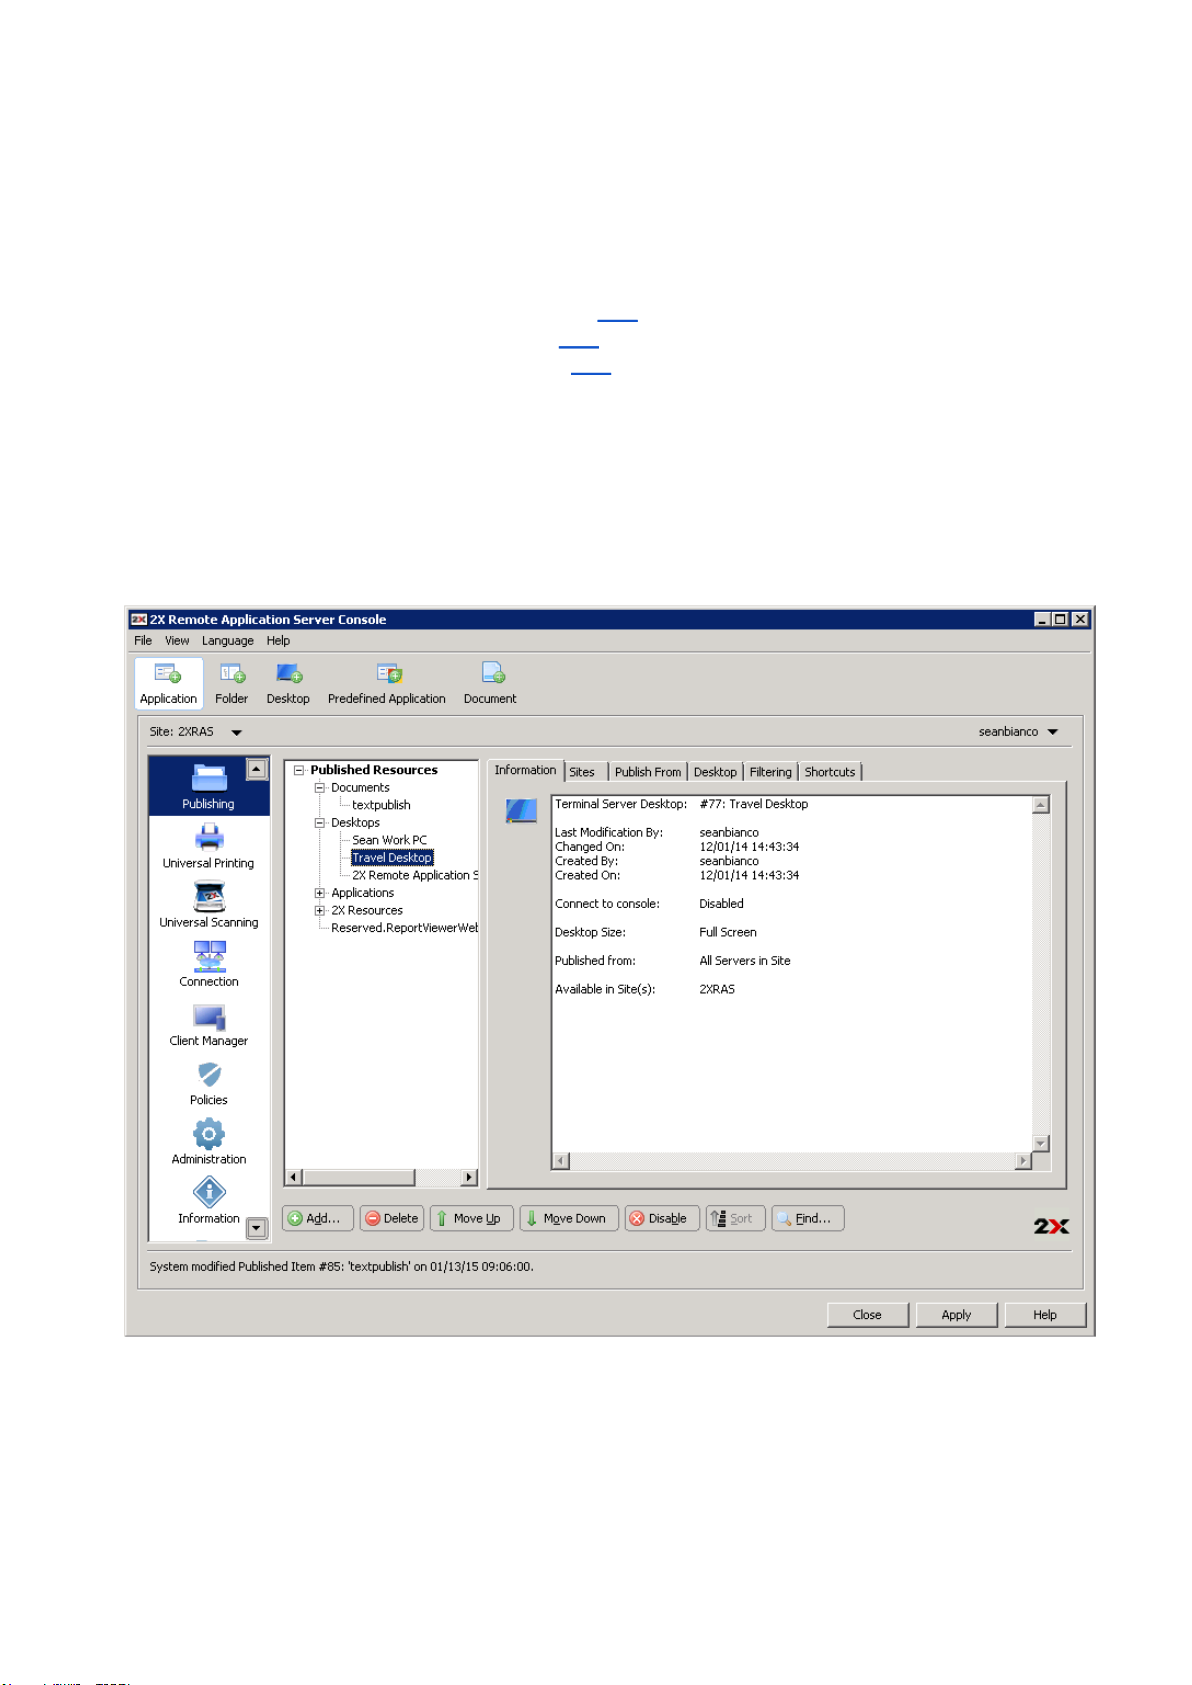
Managing Published Desktops
Publishing a Desktop
To publish a desktop that can be accessed by users on the network, you can follow any of the following
procedures:
● Publishing a Desktop from a Terminal Server here.
● Publishing a Desktop from a Remote PC here.
● Publishing a Virtual Desktop from a Guest here.
Configuring a Published Desktop
When publishing a desktop through the wizard you have to specify all the desktop settings, such as
display size etc. These options and several others can also be modified once the desktop has been
published.
To modify a published desktop, select the desktop from the Published Resources tree in the
Publishing category.
Configuring a Published Desktop
Configuring the Sites through which a Published Desktop is Available
By default a published desktop is available through all the sites. To restrict access to a specific site or
group of sites, select the list of sites from the Sites tab in the published desktop options.
Page 82

Configuring the Sites a Published Desktop is Available Through
Configuring from which Servers the Desktop is Published From
From the Publish From tab you can specify from which terminal servers should the published desktop
be published as seen in the below screenshot.
Page 83

Configuring the Servers a Published Desktop is Published From
Configuring Desktop Resolution and Other Properties
Click the Desktop tab to configure the desktop name, description, icon and resolution. From the
Desktop tab you can also configure the virtual desktop to allow users to allow to the console of a server
rather than a virtual instance.
Page 84

Configuring the Desktop Resolution
Configuring Shortcuts Options for a Published Desktop
Click the Shortcuts tab in the desktop settings to enable the creation of shortcuts on the user’s
desktop, shortcuts in the start folder with relative folder and shortcut in the Auto start folder. When the
Auto start shortcut is enabled the application will be started when the Operating system the client is
running is started.
Note: This option is not available on all operating systems.
Page 85

Configuring the 2X Shortcut Options for a Published Desktop
Filtering
Filtering is comprehensively described in full detail here: http://www.2x.com/support/ras-
documentation/manual/filter-rules/
Page 86

Managing Published Documents
Publishing a Document
To publish a document that can be accessed by users on the network, you can follow any of the
following procedures:
● Publishing a Document from a Terminal Server here.
● Publishing a Document from a Remote PC here.
● Publishing a Document from a Guest here.
Configuring a Published Document
When publishing a document using the wizard you have to specify all the document settings, such as
where it is stored etc. These options and several others can also be configured once the document has
been published.
To modify a published document, select the published document from the Published Resources tree
in the Publishing category.
Configuring a Published Document
Configuring the Sites through which a Published Document is Available
By default a published document is available through all the sites. To restrict access to a specific site or
group of sites, select the list of sites from the Sites tab in the published document options.
Page 87

Configuring the Sites a Published Document is Available Through
Configuring from which Servers the Document is Published From
From the Publish From tab you can specify from which terminal servers should the published
document be published as seen in the below screenshot.
Page 88

Configuring the Servers a Published Document is Published From
Configuring Server Specific Document Settings
By default the settings configured in the Target (application path), Start In and Parameters apply to
all servers a document is published from. In case the document is saved in a different path on one of
the servers, use the Server(s) drop down menu in the Application tab to specify new settings in the
Target, Start In and Parameter input fields specific for that server.
Page 89
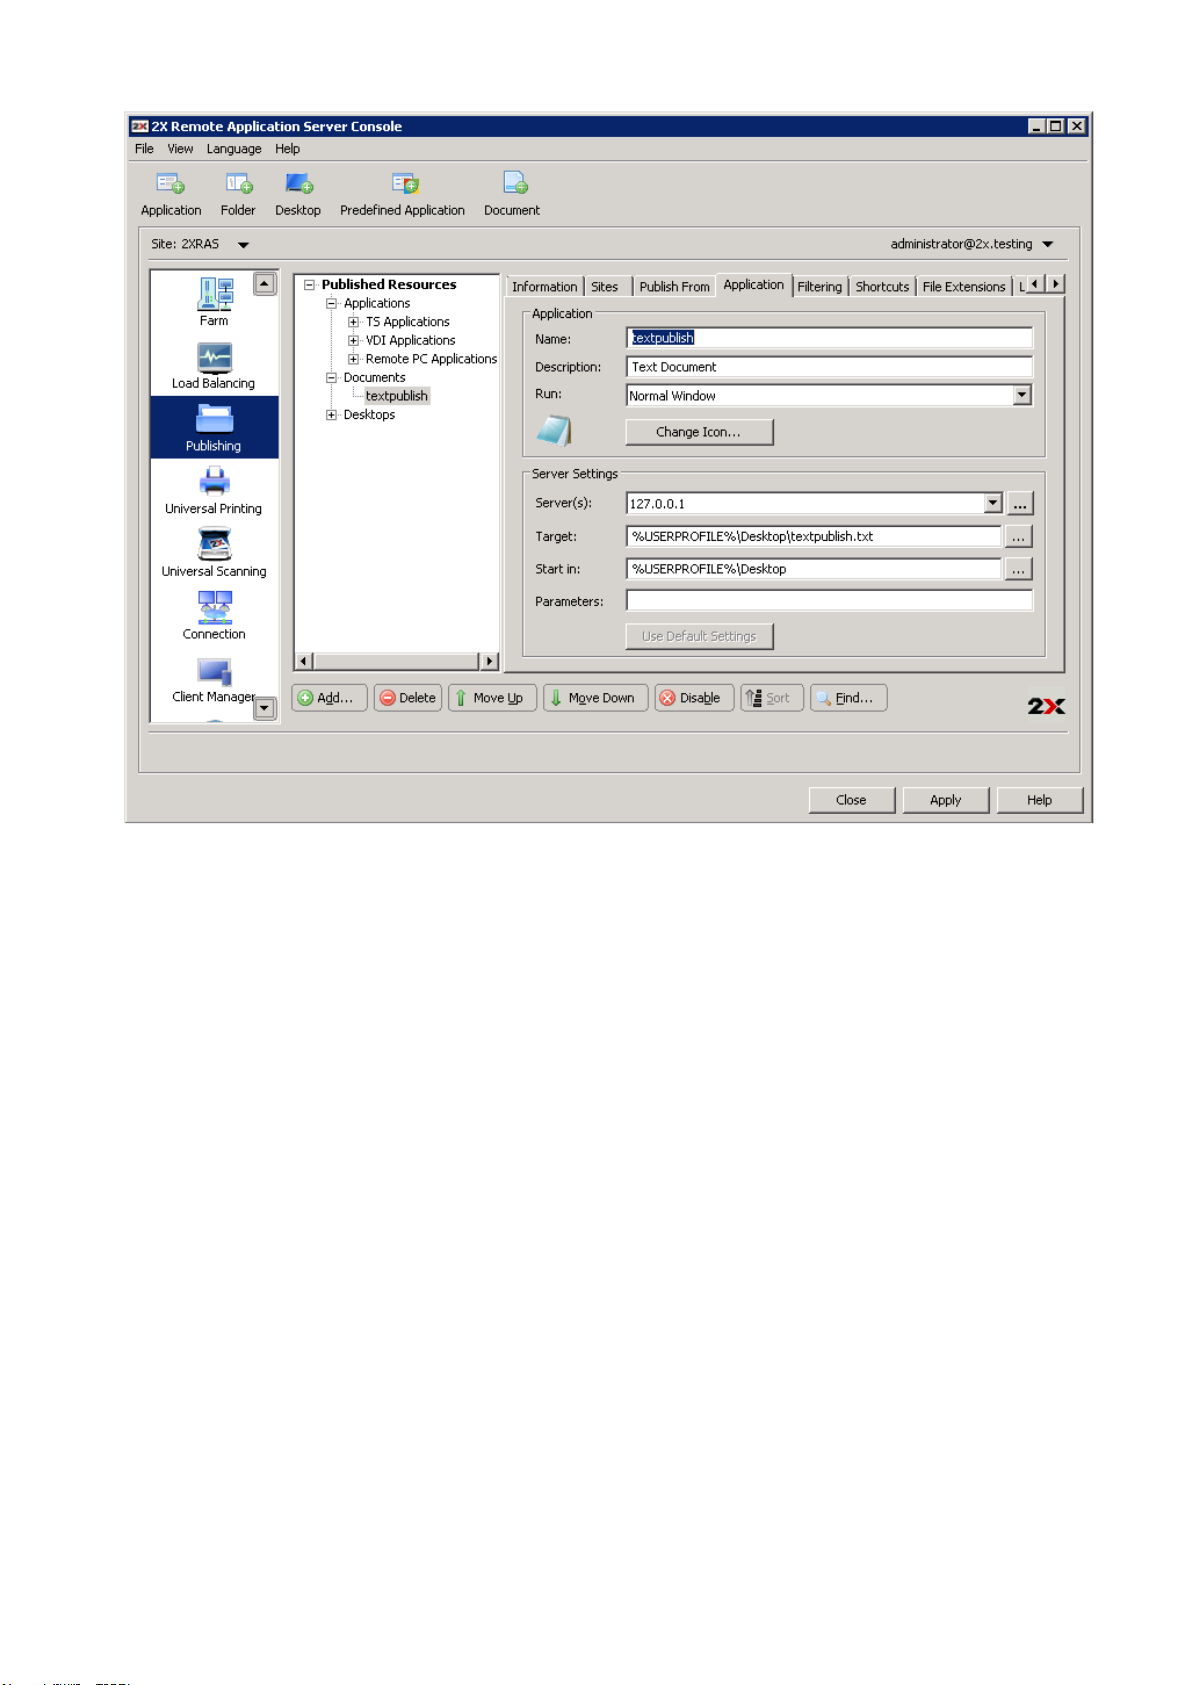
Configuring Server Specific Settings for a Published Document
Configuring Shortcuts Options for a Published Document
Click the Shortcuts tab in the application settings and configure to enable the creation of shortcuts on the
user’s desktop, shortcuts in the start folder with relative folder and shortcut in the Auto start folder. When the
Auto start shortcut is enabled the application will be started when the Operating system the client is running is
started.
Note: This option is not available on all operating systems.
Page 90
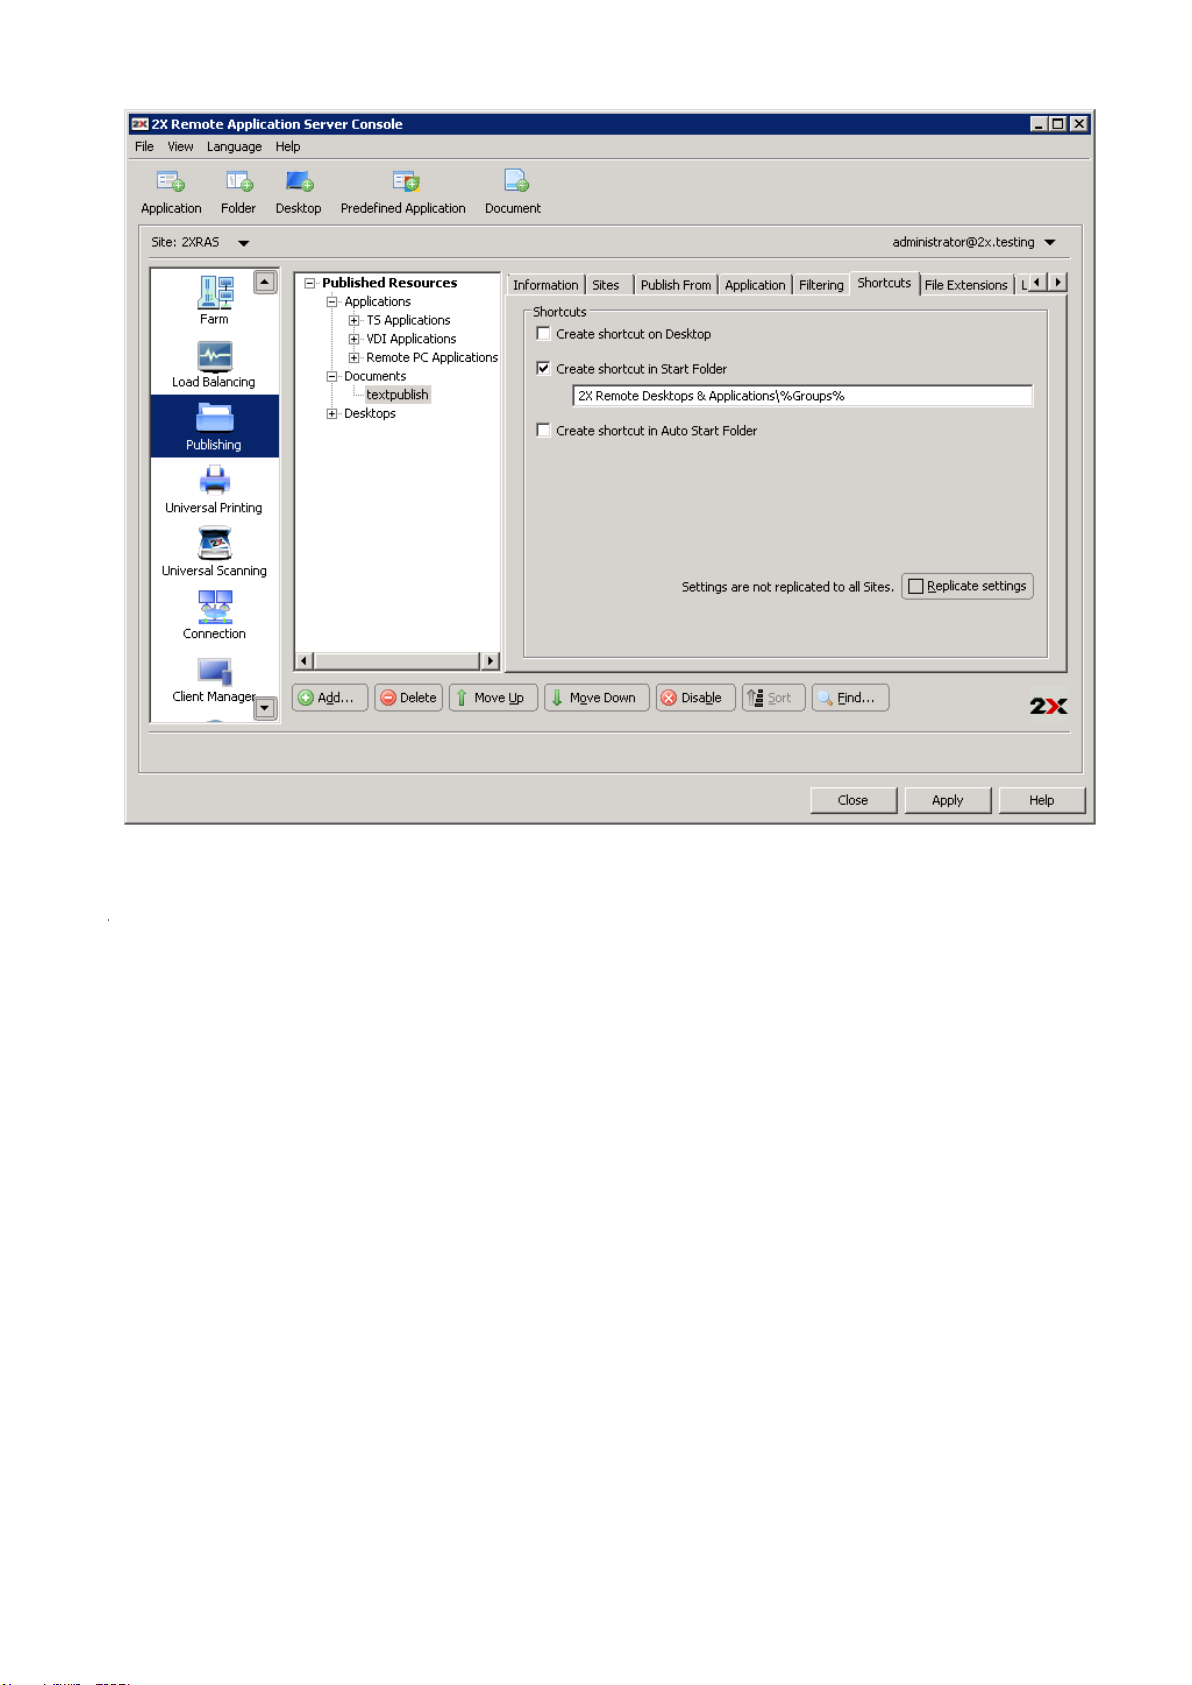
Configuring Shortcut Options for a Published Document
Configuring File Extension Associations
To modify file extension association for a particular published document, click the File Extensions tab in the
document settings.
Page 91

Configuring File Extension Associations for a Published document
Note: A list of typically associated file extensions is automatically generated once a document is published.
If you would like to modify the preconfigured list and add, remove or modify an existing entry, tick the option
Associate File Extensions.
To add a new extension to the list, click Add from the Tasks drop down menu and specify the extension as
shown in the below screenshot.
Configuring a new File Extension
To modify an extension’s parameters, highlight the extension and click Properties from the Tasks drop down
menu.
Configuring Licensing Options for Published Documents
Click the Licensing tab to configure any of the below licensing options:
Disable session Sharing: If this option is enabled, it allows you to isolate the published application to one
session. Therefore if the same application is launched twice, the multiple instances of the application will run
in the same isolated session.
Page 92

Allow users to start only one instance of the application: If this option is enabled, a user can only launch
a single instance of the application.
Concurrent Licenses: Use this option to specify the maximum number of concurrent instances the
application can run. E.g. if the license of the application allows you to only run 10 instances of the
application, set the Concurrent licences option to 10 so once such limit is reached, other users cannot
initiate other instances.
If limit is exceeded: From this drop down menu you can specify what action should the 2X Remote
Application Server take in case any of the above licensing configured limits has been exceeded.
Configuring Licensing Options of a Published Document
Configuring Display Settings for a Published Document
Click the Display tab to configure the color depth of the published document, resolution and width and height.
If these options are left as default, the client specified options will take over.
From this section you can also enable the option to wait for the 2X Universal Printers to be redirected before
the application is loaded. When enabling this option you can also configure the maximum time to wait in
seconds for the 2X Universal Printers to be redirected.
Page 93
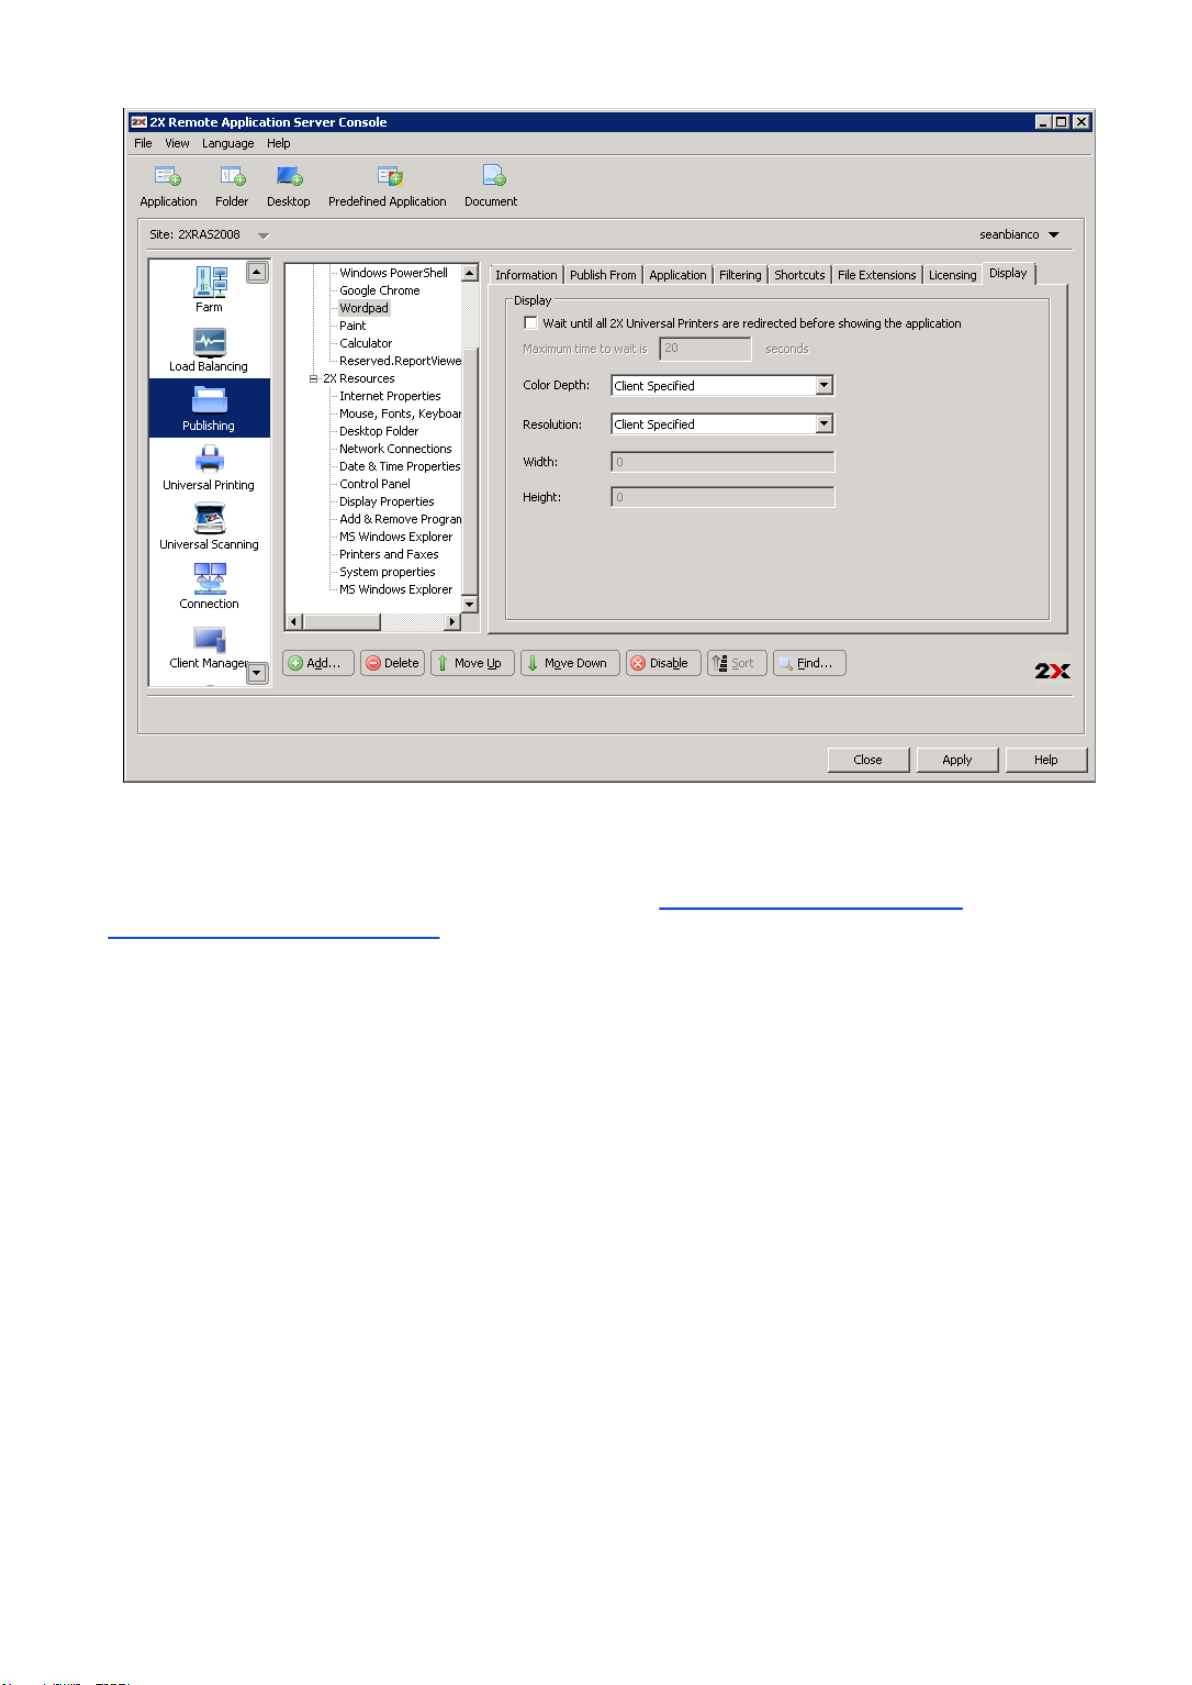
Configuring Display Options of a Published document
Filtering
Filtering is comprehensively described in full detail here: http://www.2x.com/support/ras-
documentation/manual/filter-rules/
Page 94
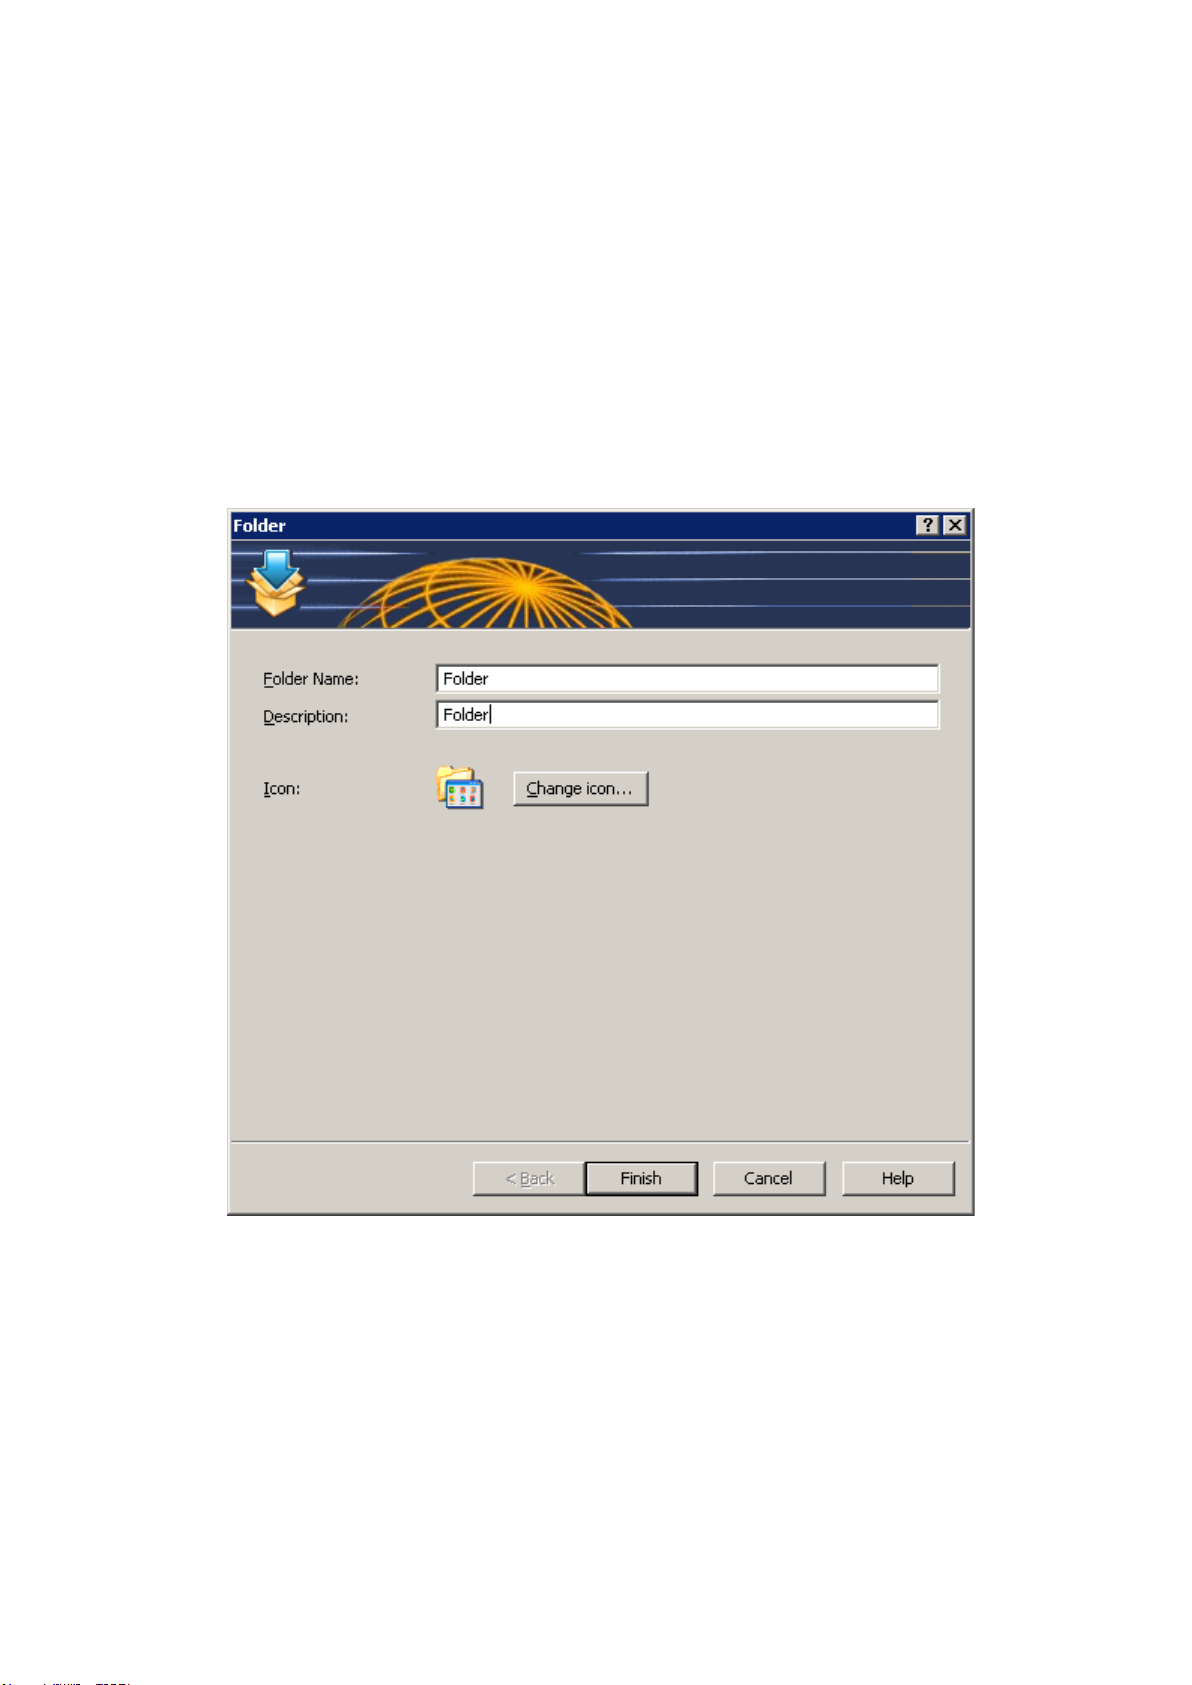
Managing Published Folders
Introduction
Folders can be used to organize published resources and also to facilitate the filtering options. For example
you can configure filtering options for a specific folder and then move the published resources under the new
folder so the filtering settings are inherited. For more information about Filtering refer to the Filtering section
on page.
Publishing a Folder
To publish a folder follow the below procedure:
1. Navigate to the Publishing category and click the Folder icon in the top navigation bar.
2. Specify a folder name in the Folder input field and a description in the Description input field.
3. (Optional) Change the folder’s icon by clicking on the Change Icon button.
Publishing a Folder
4. Click Finish to publish the folder
Managing Published Folders
Like with any other published resource, you can configure a published folder by selecting its name from the
Published Resources navigate tree. The below options are available:
Sites Tab
From the sites tab you can specify through which sites the published folder will be available.
Folder Tab
From the folder tab you can configure the folder name and also the description.
Page 95

Filtering Tab
From the filtering tab you can configure the filtering options for the published folder. The filtering options will
be inherited by all other published resources in that folder. For more information about filtering options, refer
to the Filtering section on this page: http://www.2x.com/support/ras-documentation/manual/filter-rules/
Adding Published Resources to a Folder
To add a published resource to a folder select the published resource name and drag it under the folder in the
Published Resources navigation tree. All published resources in that folder will inherit the folder’s filtering
options.
Page 96

Filtering Rules by User, Client, IP, MAC and Gateway
Introduction
By default there are no filtering rules configured for a published resource, therefore it will be available to
anyone who is connected to the 2X Remote Application Server. Filtering allows you to control who can
and who cannot access the published resource. You can create several filtering rules based on any of the
following filtering options:
● User
● Client (managed client)
● IP Address
● MAC Address
● Gateway
Once you specify a filtering rule, only those who match the rule can access the published resource.
Creating New Filtering Rules
Filtering Rules can be created from the published resource options by selecting the published resource name
and click the Filtering tab.
Filtering Options of a Published Resource
Filtering by User
To allow a specific user, list of users or a group to access the published resource, follow the following
procedure:
1. Select User from the Search Filtering Type drop down menu
2. Enable the option Allow the following Users
3. Select if you will be specifying users, groups or both from the Default Object Type drop down menu.
Page 97

4. Specify the browsing mode you would like to use to connect to active directory or Windows OS from the
Browse Mode drop down menu. The options are:
a. Secure Identifier: This is the preferred and fastest method. It supports group nesting and
renaming.
b. WinNT: WinNT is faster than LDAP but does not support group nesting. Used only for backward
compatibility.
c. LDAP: LDAP supports group nesting but is slow. Used only for backward compatibility.
5. Select Add from the Tasks drop down menu to specify the user or group from the Select Users or
Groups dialog box
6. Click OK to add the objects to the list.
Configuring User Based Filtering Rules
To delete an object from the list, select the entry from the list and select Delete from the Tasks drop down
menu.
Converting Existing Users to SID
To convert users or groups specified using WinNT or LDAP, select the entry and select Convert from the
Tasks drop down menu.
Filtering by Client
To allow a specific client or a list or clients to access the published resource, follow the following procedure:
1. Select Client from the Search Filtering Type drop down menu
2. Enable the option Allow the following Clients
3. Click Add from the Tasks drop down menu and select the client(s) from the Select Client dialog box
Page 98

Adding Clients to the Filtering Options
4. Click OK to add the clients to the list.
Configuring Client Based Filtering Rules
To delete a client from the list, highlight the entry from the list and click Delete from the Tasks drop down
menu.
Filtering by IP Address
To allow a specific IP or a specific list or range of IP addresses to access the published resource, follow the
following procedure:
1. Select IP Address from the Search Filtering Type drop down menu
2. Enable the option Allow the following IPs
Page 99

3. Click Add from the Tasks drop down of the IPv4/ IPv6 menu to specify the IP Address or a range of IP
Addresses and click OK
Configuring an IP or Range of IPs for IP Based Filtering Rules
To modify an existing IP range, highlight the entry name from the list and click Properties. To delete an IP
Address or a range of IP Addresses from the list, highlight the entry from the list and click Delete from the
Tasks drop down menu.
Configuring IP Based Filtering Rules
Filtering by MAC Address
To allow a MAC address or a specific list of MAC addresses to access the published resource, follow the
following procedure:
Page 100
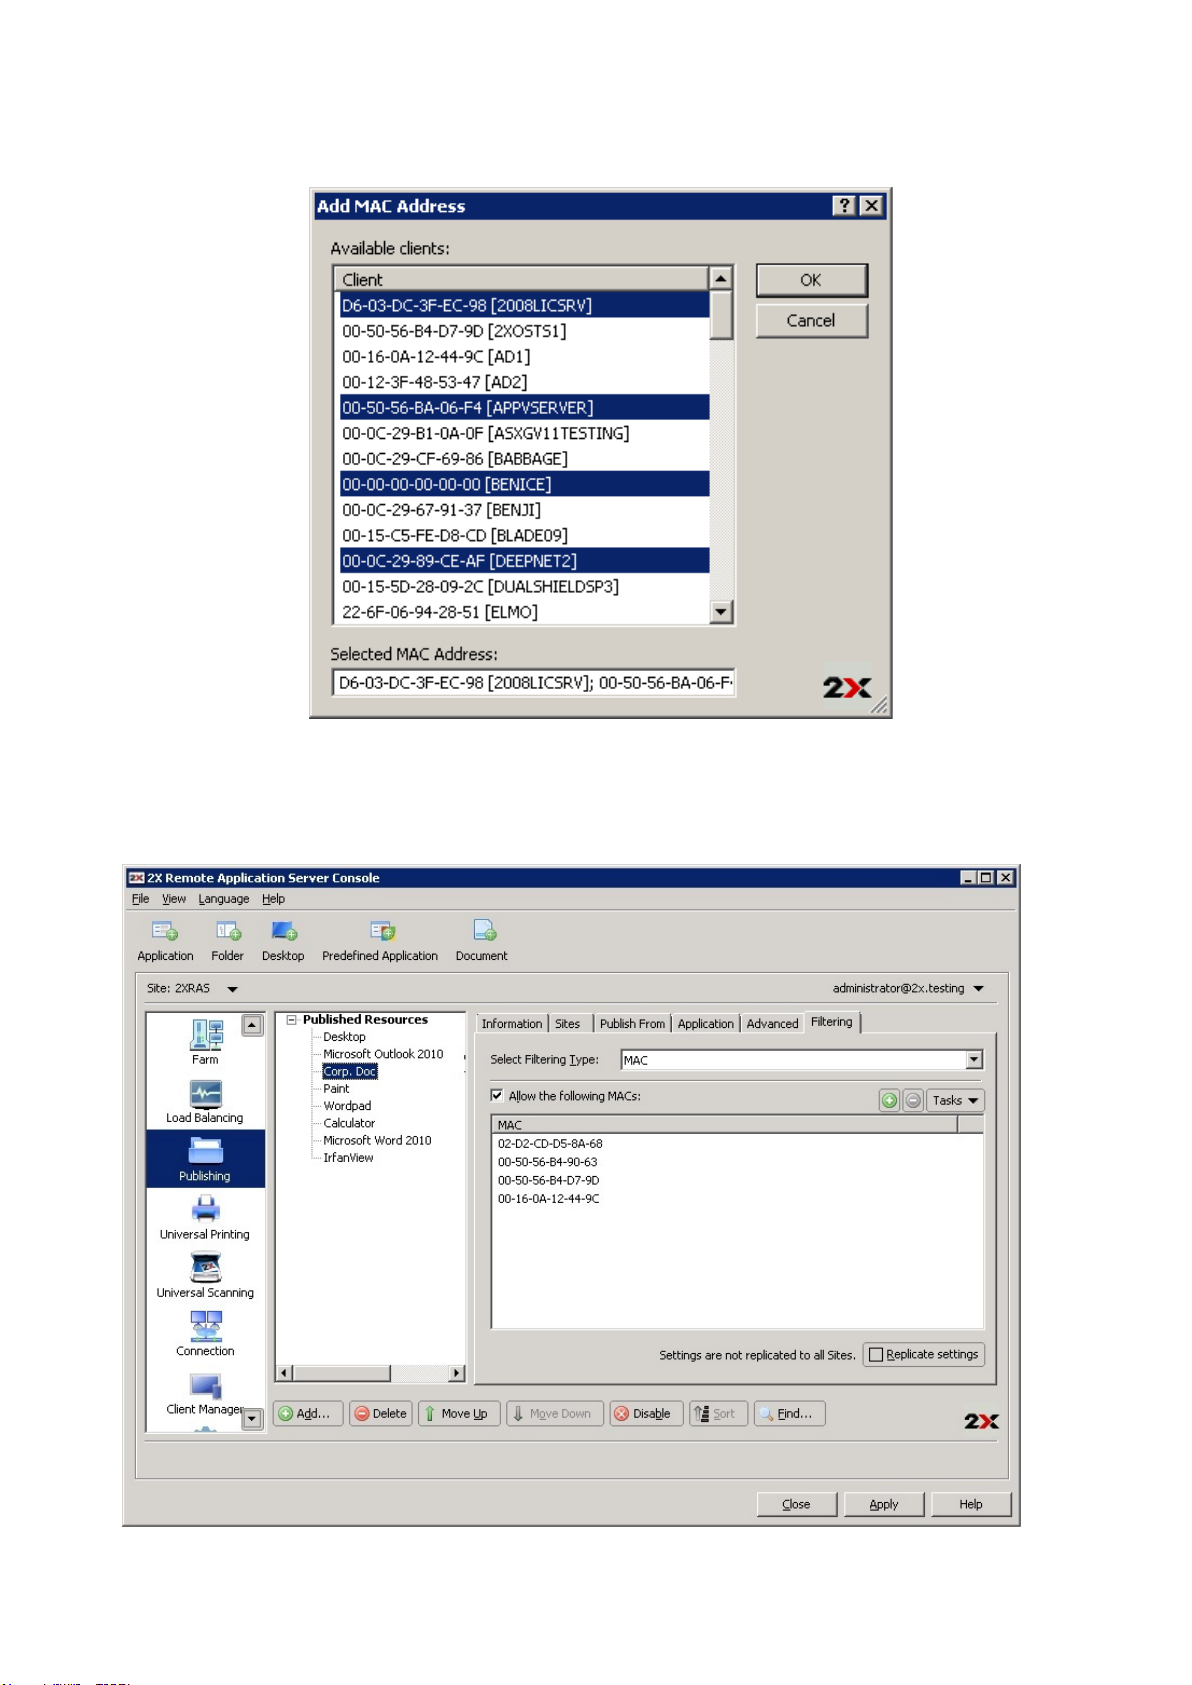
1. Select MAC from the Search Filtering Type drop down menu
2. Enable the option Allow the following MACs
3. Click Add from the Tasks drop down menu to select the MAC address(es) and click OK
Selecting a MAC Address or Addresses MAC Based Filtering Rules
To delete a MAC address from the list, highlight the MAC address from the list and click Delete from the
Tasks drop down menu.
 Loading...