

Page 1

Parallels Presence Builder 12.0
Standalone
Installation and Administration Guide
Last updated: 22 May 2014
Page 2

Contents
About This Guide 4
Feedback ....................................................................................................................................... 4
About Parallels Presence Builder Standalone 5
Preparing for Installation 6
Requirements for the Core Server ................................................................................................ 7
Requirements for Publishing Servers ............................................................................................ 8
Supported Web Browsers ............................................................................................................. 8
Installing Parallels Presence Builder Standalone 9
Installing on CentOS.................................................................................................................... 10
Installing on Debian ..................................................................................................................... 11
Troubleshooting Installation Issues ............................................................................................. 12
Setting the Administrator’s Password and Installing a License Key ........................................... 13
Upgrading to Parallels Presence Builder 12 Standalone from Previous Versions 15
Upgrading on CentOS ................................................................................................................. 16
Upgrading on Debian .................................................................................................................. 17
Troubleshooting Upgrade Issues ................................................................................................ 17
Integrating Parallels Presence Builder Standalone with Your Hosting Software 18
Checking if Your Hosting Platform Is Compatible with Presence Builder ................................... 20
Providing Site Owners with Access to the Editor ........................................................................ 20
Initializing the API Library .................................................................................................. 21
Adding the Create Site Button........................................................................................... 21
Adding the Edit Site Button ............................................................................................... 24
Deleting Sites from Presence Builder.......................................................................................... 26
Upselling Hosting Services 27
Upselling Hosting Services with Restricted Functionality Techniques ........................................ 28
Restricting Resources by Means of the API ..................................................................... 31
Configuring the Buy and Publish Dialog Window .............................................................. 35
Upselling Hosting Services with Automated Site Creation .......................................................... 38
Configuring the Promotional Footer ............................................................................................ 41
Retrieving the Current Content of the Promotional Footer ............................................... 43
Changing the Default Content of the Promotional Footer ................................................. 45
Showing the Promotional Footer on Websites .................................................................. 47
Removing the Promotional Footer from Websites ............................................................ 49
Configuring the Trial Mode 51
Page 3

About This Guide 3
Placeholders Used in Trial Mode Messages ............................................................................... 54
Locale Strings Shown in Trial Mode ............................................................................................ 56
Customizing the Information Box ................................................................................................ 57
Customizing Text in E-mail Notices ............................................................................................. 61
Customizing the Pop-Up Message .............................................................................................. 63
Rebranding Presence Builder 66
Changing the Editor’s Name ....................................................................................................... 69
Changing the Product and Company Logos, Hyperlinks, and Copyright Notice ........................ 70
Changing the Link to the User’s Guide ....................................................................................... 71
Changing the Links to the Getting Started Video ........................................................................ 72
Customizing the Functionality of Presence Builder 73
Redirecting Users to the Login Page........................................................................................... 74
Prohibiting Users from Removing Their Sites ............................................................................. 75
Making Modules Unavailable in the Editor .................................................................................. 75
Making the Site Import Functionality Unavailable ....................................................................... 76
Adding Custom Banner Images .................................................................................................. 77
Adding Custom Design Templates .............................................................................................. 79
Adding the Support Button .......................................................................................................... 80
Adding the Link for Sending Feedback ....................................................................................... 81
Adding the Button to Return Users to Control Panel ................................................................... 82
Removing the Option to Add a Site Copy to Facebook............................................................... 83
Disabling Access to the Google Services from Presence Builder ............................................... 84
Removing Sites from Hosting Accounts ...................................................................................... 85
Viewing Service Logs 86
Removing Parallels Presence Builder Standalone 88
Appendix A. API Reference: Methods, Operations, and Resources 89
Request Format ........................................................................................................................... 90
Response Format ........................................................................................................................ 95
Operations on Resources ............................................................................................................ 96
Retrieving the Software Version........................................................................................ 97
Creating a Site................................................................................................................... 98
Generating a Security Token for Accessing a Site ......................................................... 102
Creating a Site Based on a Website Topic ..................................................................... 106
Retrieving Information About a Specific Site ................................................................... 112
Retrieving Information About All Sites ............................................................................ 115
Changing Site Properties and Settings ........................................................................... 118
Publishing a Website ....................................................................................................... 122
Deleting a Site ................................................................................................................. 123
Retrieving the Current Content of the Promotional Footer ............................................. 125
Setting Trial Mode Messages .......................................................................................... 127
Changing the Default Content of the Promotional Footer ............................................... 137
Showing the Promotional Footer on Websites ................................................................ 139
Removing the Promotional Footer from Websites .......................................................... 141
Page 4

This guide is intended for hosting service providers who want to deploy Parallels
In this chapter:
Feedback .......................................................................................................... 4
C H A P T E R 1
About This Guide
Presence Builder Standalone on servers managed by control panel software other than
Parallels Operations Automation and Parallels Plesk.
Feedback
If you have found an error in this guide, or if you have suggestions or ideas on how to
improve this guide, please send your feedback using the online form at
http://www.parallels.com/en/support/usersdoc/. Please include in your report the
guide’s title, chapter and section titles, and the fragment of text in which you have
found an error.
Page 5

Parallels Presence Builder Standalone is a software suite for hosting providers. It
C H A P T E R 2
About Parallels Presence Builder
Standalone
includes the following components:
Presence Builder - website design and promotion tool.
API for integration into a hosting company’s infrastructure.
This solution is ideal for hosting service providers who have their own shared hosting
control panel and a billing system, and who want to offer Presence Builder to their
customers.
Presence Builder can operate in the trial mode. When the trial mode is properly
configured, prospective customers can access the editor, create websites, and publish
them after they sign up to hosting services. To learn more about the trial mode, see the
chapter Configuring the Trial Mode (on page 51).
Page 6
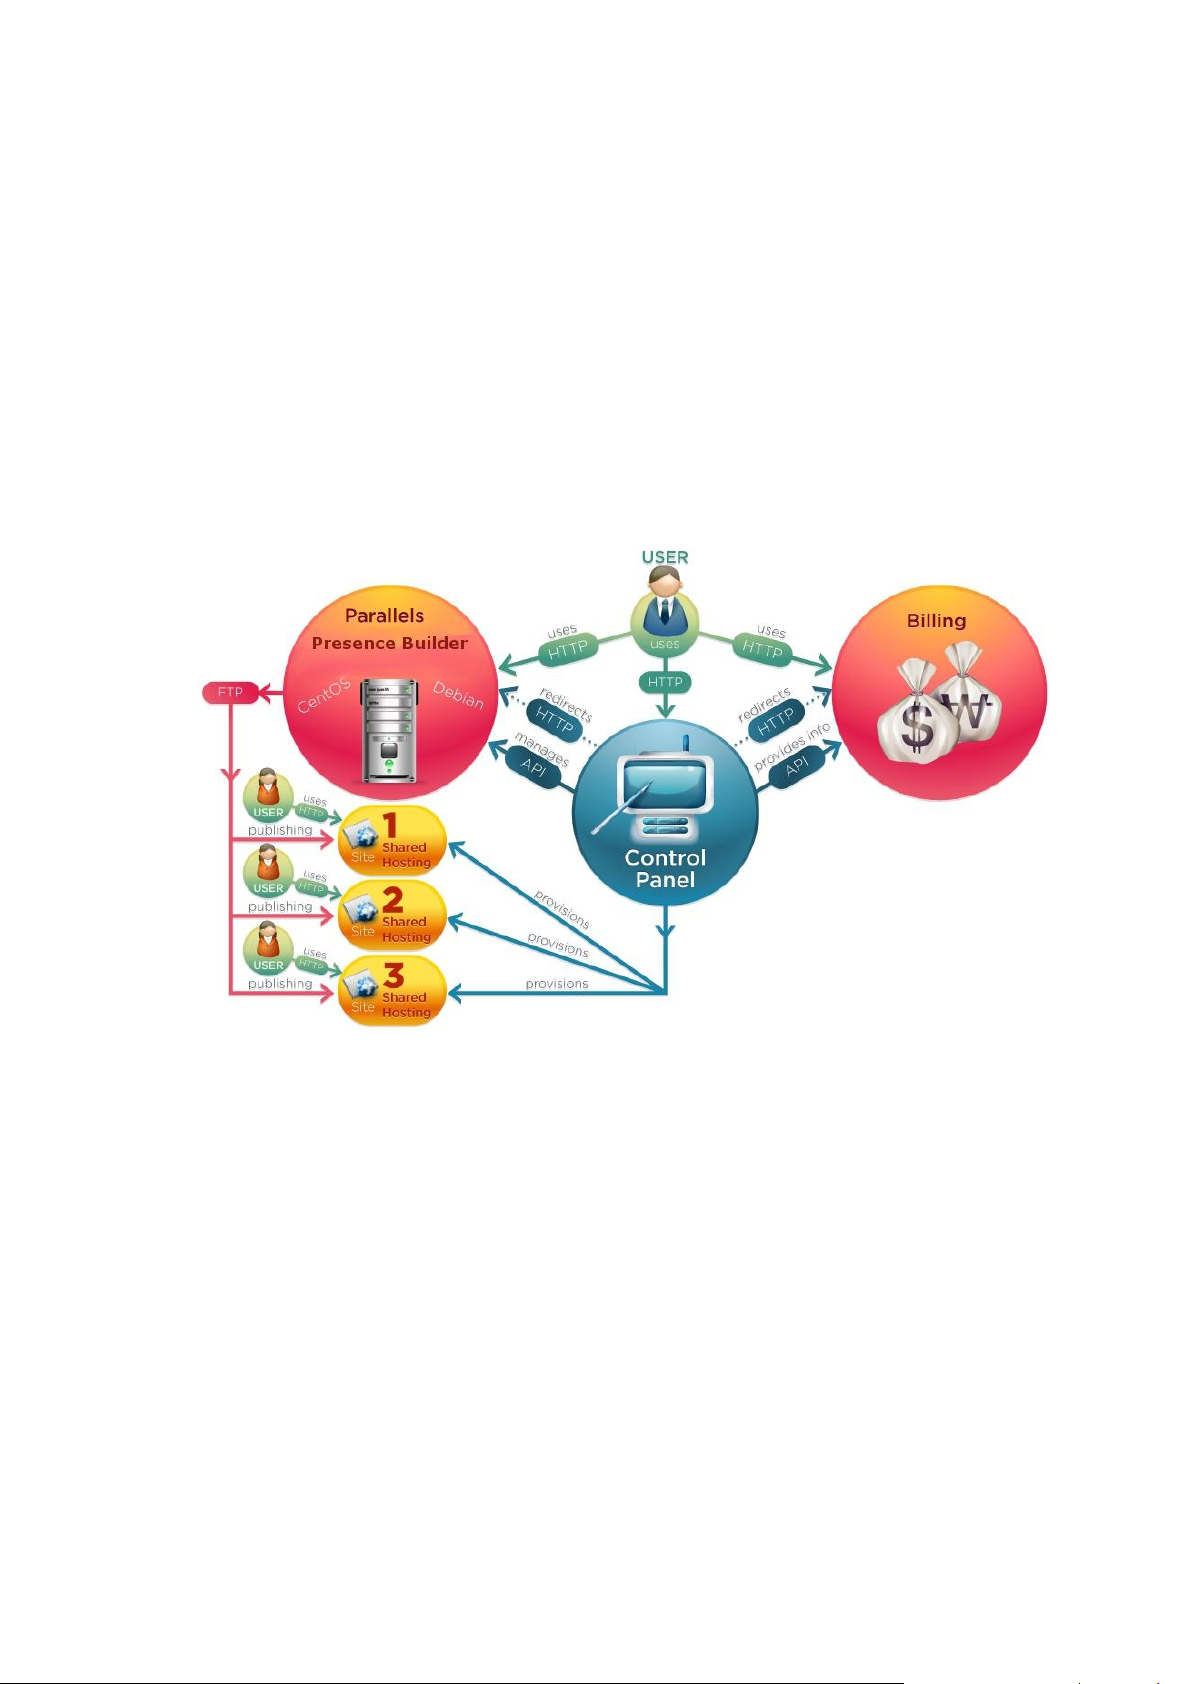
You can install the core components of the system on the same server on which you
In this chapter:
Requirements for the Core Server ..................................................................... 7
Requirements for Publishing Servers ................................................................ 8
Supported Web Browsers.................................................................................. 8
C H A P T E R 3
Preparing for Installation
plan to host websites, or have one dedicated server for running the system (let’s call it
the core server) and publish websites on separate hosting servers. The following figure
illustrates a typical deployment scheme and the interaction of the components.
Before installing, make sure that the following requirements for the core server (on
page 7) and publishing servers (on page 8) are met.
Page 7

Preparing for Installation 7
Requirements for the Core Server
Minimum Hardware Requirements
Intel or AMD CPU, 800 MHz.
500 megabytes of free disk space for installation of the core components, plus at
least 300 kilobytes for each hosted site.
8 gigabytes of RAM.
Software Requirements and Prerequisites
Parallels Presence Builder Standalone can be installed on the following operating
systems:
CentOS 5.10, 6.5 (32-bit and 64-bit).
Debian 6.0, 7.0 (32-bit and 64-bit).
The following software components, which are not included in the distribution package,
must be additionally installed:
Apache web server (apache2 package).
After installing Apache on CentOS systems, make sure that the following directive
is not present in the Apache configuration file /etc/httpd/conf/httpd.conf:
Alias /error/ “/var/www/error/”.
If it is present, comment it out and restart the web server.
MySQL Server version 5.0 or later.
Important: Make sure that the old_passwords value in the MySQL configuration
file is set to “0” (“off”). You can also check the current value of this parameter in the
database by issuing the following SQL query:
~# mysql -u<MYSQL_USER> -p<MYSQL_PASSWORD> -e”show variables
like ‘old_passwords’”
mod_fcgid.
This is available from the Debian 6 repositories (called libapache2-mod-fcgid), but if
you want to install on CentOS, you will need to obtain it from other third-party
repositories.
Important: On CentOS systems, SELinux must be disabled.
You can check whether SELinux is disabled by issuing the command
/usr/sbin/getenforce. If it is enabled, then do the following to switch it off:
1. Open the file /etc/selinux/config in a text editor and locate the
line SELINUX=<value>.
2. Change it to SELINUX=disabled.
Page 8

8 Preparing for Installation
3. If you cannot find this file, open the file /boot/grub/grub.conf in a
text editor and add the parameter selinux=0 to the Grub Boot Loader:
title SE-Linux Test System
root (hd0,0)
kernel /boot/vmlinuz-2.4.20-selinux-XXXXXXXXXX ro
root=/dev/hda1 nousb selinux=0
#initrd /boot/initrd-2.4.20-selinux-XXXXXXXXXX.img
4. Restart the server to apply the changes.
5. If you do not want to restart, issue the command setenforce 0.
Note: The default values of the PHP settings memory_limit and
max_execution_time allow comfortable working with sites that have fewer than 500
pages. For this reason, the maximum number of pages that a site can have is set to
500 by default. If you want to support sites with a greater number of pages, configure
the PHP settings memory_limit and max_execution_time accordingly, and set a
greater value in the file /usr/local/sb/config, in the line maxPagesNumber =
500.
Requirements for Publishing Servers
Regardless of whether you plan to host customers’ sites on the same core server or
separate servers, ensure that the following additional requirements are met:
The servers are resolvable on the Internet: DNS settings are properly configured.
PHP version 5.2 or later is installed.
PHP supports multibyte string functions (mbstring extension).
In php.ini, the following directive is set: default_charset = “UTF-8”
Supported Web Browsers
Parallels Presence Builder Standalone supports the following browsers:
Internet Explorer 10 and 11.
Mozilla Firefox 19 or later.
Safari 6 for Mac.
Google Chrome 25 or later.
Page 9

This chapter describes how to deploy Parallels Presence Builder Standalone.
In this chapter:
Installing on CentOS ......................................................................................... 10
Installing on Debian ........................................................................................... 11
Troubleshooting Installation Issues ................................................................... 11
Setting the Administrator’s Password and Installing a License Key ................... 13
C H A P T E R 4
Installing Parallels Presence Builder
Standalone
Page 10

10 Installing Parallels Presence Builder Standalone
Installing on CentOS
The following instructions describe how to install Parallels Presence Builder
Standalone by using the yum software management tool on CentOS 5.x-6.x.
To install Parallels Presence Builder Standalone on CentOS, do the
following:
1. In /etc/yum.repos.d/, create a file with the name wpb.repo.
2. Add the following text to the file.
[wpb-dist]
name=wpb
baseurl=http://download1.parallels.com/WPB/Standalone/12.0/di
st-rpm-CentOS-$releasever-$basearch/
gpgcheck=0
priority=10
enabled=1
[wpb-third]
name=wpb-third
baseurl=http://download1.parallels.com/WPB/Standalone/12.0/th
irdparty-rpm-CentOS-$releasever-$basearch/
gpgcheck=0
priority=10
enabled=1
3. Issue the following command:
# yum install wpb
After installation is finished, set the administrator’s password and install a license key
as described in Setting the Administrator’s Password and Installing a License Key (on
page 13).
If you want to make sure that the installation completed successfully, visit the editor in
the trial mode and create a trial site by accessing a URL very similar to this:
http://sitebuilder.<host name>/Try. You can find out the exact host name
and IP address by issuing the command apachectl -S.
Additionally, to ensure that the Presence Builder Standalone installation is accessible
by the domain name sitebuilder.<host name>, check and correct the DNS zone settings.
Important: If you plan to host websites on separate servers, make sure that these
servers are properly resolved from the core server and are accessible over HTTP and
FTP. You might need to manually configure DNS zones to ensure that the publishing
servers are resolved.
Page 11

Installing Parallels Presence Builder Standalone 11
Installing on Debian
The following instructions describe how to install Parallels Presence Builder
Standalone by using the APT tools on Debian.
To install Parallels Presence Builder Standalone on Debian 6.0:
1. Add the following lines to the file /etc/apt/sources.list:
On 32-bit operating systems:
deb http://download1.parallels.com/WPB/Standalone/12.0/distdeb-Debian-6.0-i386 /
deb
http://download1.parallels.com/WPB/Standalone/12.0/thirdparty
-deb-Debian-6.0-i386 /
On 64-bit operating systems:
deb http://download1.parallels.com/WPB/Standalone/12.0/distdeb-Debian-6.0-x86_64 /
deb
http://download1.parallels.com/WPB/Standalone/12.0/thirdparty
-deb-Debian-6.0-x86_64 /
2. Issue the following command:
# apt-get update
3. Issue the following command:
# apt-get install wpb
After installation is finished, set the administrator’s password and install a license key
as described in Setting the Administrator’s Password and Installing a License Key (on
page 13).
If you want to make sure that the installation completed successfully, visit the editor in
the trial mode and create a trial site by accessing a URL very similar to this:
http://sitebuilder.<host name>/Try. You can find out the exact host name
and IP address by issuing the command apachectl -S.
Additionally, to ensure that the Presence Builder Standalone installation is accessible
by the domain name sitebuilder.<host name>, check and correct the DNS zone settings.
Important: If you plan to host websites on separate servers, make sure that these
servers are properly resolved from the core server and are accessible over HTTP and
FTP. You might need to manually configure DNS zones to ensure that the publishing
servers are resolved.
Page 12

12 Installing Parallels Presence Builder Standalone
Troubleshooting Installation Issues
Issue
Installation has finished successfully, but Parallels Presence Builder Standalone does
not start. The following error message can be seen in /var/log/httpd/error.log:
Failed loading /usr/lib/php/modules/swengine/ioncube_loader_lin_5.3.so: /usr/lib/php/modules/swengine/ioncube_loader_lin_5.3.so: cannot restore segment prot
after reloc: Permission denied
DEBUGGER DETECTED... Bye!
Resolution
This error may occur when SELinux is switched on.
To check whether SELinux is switched on, issue the command
/usr/sbin/getenforce. If it is switched on (enabled), then do the following to
switch it off:
1. Open the file /etc/selinux/config in a text editor and locate the
line SELINUX=<value>.
2. Change it to SELINUX=disabled.
3. If you cannot find this file, open the file /boot/grub/grub.conf in a
text editor and add the parameter selinux=0 to the Grub Boot Loader:
title SE-Linux Test System
root (hd0,0)
kernel /boot/vmlinuz-2.4.20-selinux-XXXXXXXXXX ro
root=/dev/hda1 nousb selinux=0
#initrd /boot/initrd-2.4.20-selinux-XXXXXXXXXX.img
4. Restart the server to apply the changes.
5. If you do not want to restart, issue the command setenforce 0.
Page 13

Installing Parallels Presence Builder Standalone 13
Issue
During installation, the following error message is shown in the console:
[ERROR] Unable to connect to database. System message:
SQLSTATE[HY000] [2000] mysqlnd cannot connect to MySQL 4.1+
using the old insecure authentication. Please use an
administration tool to reset your password with the command SET
PASSWORD = PASSWORD(‘your_existing_password’). This will store a
new, and more secure, hash value in mysql.user. If this user is
used in other scripts executed by PHP 5.2 or earlier you might
need to remove the old-passwords flag from your my.cnf file
Resolution
Before installing Presence Builder, verify that the old_passwords option is switched
off in the MySQL configuration file. You can use the following command to verify the
value set for this option:
~# mysql -u<MYSQL_USER> -p<MYSQL_PASSWORD> -e”show variables
like ‘old_passwords’”
To switch off this option, add the line “old_passwords=0” into the file /etc/my.cnf,
section [mysqld].
Restart mysqld to apply the new settings:
~# /etc/init.d/mysqld restart
If, after restarting MySQL, you cannot access the editor in the trial mode (at
http://sitebuilder.<Presence Builder host name>/Try), and an error
message is shown in the browser, then you need to run the post-install configuration:
~# sw-engine /usr/local/sb/utils/post_configure.php
Setting the Administrator’s Password and
Installing a License Key
Before you can start using Presence Builder, you need to do the following:
Set the administrator’s password. There is only one administrator account. The
username is admin, and it cannot be changed.
Install a license key. To obtain a license key for the product, contact your vendor or
Parallels sales representatives. For contact information, refer to
www.parallels.com/contact.
To install a license key:
1. Set the administrator’s password by issuing the following command:
Page 14

14 Installing Parallels Presence Builder Standalone
# sb_config—sb_passwd <new_password_here>
2. In a web browser, visit
https://sitebuilder.<host_name>/License/.
3. Click through the SSL warnings.
4. When prompted for a username and a password, provide the username
admin and the password that you specified in step 1.
5. Click Upload Key.
6. Browse to the license key file and click OK.
After the license key is uploaded, you can integrate Presence Builder with your control
panel or billing software by means of the API. For information about using the API,
refer to the chapters Integrating Parallels Presence Builder Standalone with Your Hosting
Software (on page 18) and Appendix A. API Reference: Methods, Operations, and Resources
(on page 89).
You can also set Presence Builder to notify you when the number of published
websites allowed by your license has reached 90 percent. To do this:
1. On the Presence Builder server, open the configuration file
/usr/local/sb/config.
2. Add the following line after the line [general]:
admin_email = <your e-mail address>
3. Save the file.
Notices will be sent once a week.
To verify that the installation has been successfully completed, you can log in to the
editor in the trial mode by visiting http://sitebuilder.<host_name>/Try.
Page 15

This chapter describes how to upgrade to Parallels Presence Builder 11 Standalone
In this chapter:
Upgrading on CentOS ....................................................................................... 16
Upgrading on Debian ........................................................................................ 17
Troubleshooting Upgrade Issues ....................................................................... 17
C H A P T E R 5
Upgrading to Parallels Presence Builder
12 Standalone from Previous Versions
from the previous versions, 10.3, 10.4, 11.0, and 11.5.
What happens during an upgrade:
The product packages that are installed in the system are upgraded by using the
native means of package managers (apt or yum).
The product’s database and websites are upgraded to match the new product
version; however, all website content remains intact.
The contents of the configuration file /usr/local/sb/config are overwritten.
This means that all customizations made by editing the configuration file are
discarded.
Page 16

16 Upgrading to Parallels Presence Builder 12 Standalone from Previous Versions
Upgrading on CentOS
The following instructions describe how to upgrade Parallels Presence Builder
Standalone by using the yum software management tool on CentOS 5.x-6.x or later.
To upgrade Parallels Presence Builder Standalone on CentOS, do the
following:
1. In /etc/yum.repos.d/, open the pa4wp.repo file for editing.
2. In the baseurl values specified under the sections titled
[sitebuilder-dist] and [sitebuilder-third], replace the old
addresses of the product repository with the following new addresses.
[wpb-dist]
baseurl=http://download1.parallels.com/WPB/Standalone/12.0/di
st-rpm-CentOS-$releasever-$basearch/
[wpb-third]
baseurl=http://download1.parallels.com/WPB/Standalone/12.0/th
irdparty-rpm-CentOS-$releasever-$basearch/
3. Issue the following command:
# yum install wpb
If you want to make sure that the upgrade has completed successfully, visit
http://sitebuilder.<host_name>/Try.
Page 17

Upgrading to Parallels Presence Builder 12 Standalone from Previous Versions 17
Upgrading on Debian
The following instructions describe how to upgrade Parallels Presence Builder
Standalone by using the APT tools on Debian.
To upgrade Parallels Presence Builder Standalone on Debian 6.0:
1. Edit the file /etc/apt/sources.list to point the package manager to the
new repositories:
On 32-bit operating systems:
deb http://download1.parallels.com/WPB/Standalone/12.0/distdeb-Debian-6.0-i386 /
deb
http://download1.parallels.com/WPB/Standalone/12.0/thirdparty
-deb-Debian-6.0-i386 /
On 64-bit operating systems:
deb http://download1.parallels.com/WPB/Standalone/12.0/distdeb-Debian-6.0-x86_64 /
deb
http://download1.parallels.com/WPB/Standalone/12.0/thirdparty
-deb-Debian-6.0-x86_64 /
2. Issue the following command:
# apt-get update
3. Issue the following command:
# apt-get install wpb
If you want to make sure that the upgrade has completed successfully, visit
http://sitebuilder.<host_name>/Try.
Troubleshooting Upgrade Issues
Issue
On Debian Linux, upgrade of Presence Builder may fail with a “fatal error” message.
This could happen if some services required by Presence Builder, such as MySQL,
were not running when the upgrade was attempted.
Resolution
Start the MySQL database server and run the upgrade process again. Alternatively,
you can resume the upgrade by issuing the command dpkg—configure wpb-core.
Page 18

This chapter provides general information about how you can integrate Parallels
C H A P T E R 6
Integrating Parallels Presence Builder
Standalone with Your Hosting Software
Presence Builder Standalone with your existing hosting software.
If your hosting software uses service plans, and the customer’s control panel
functionality is governed by plan options, you can customize the plans to include
access to the editor as an option. For information about adding custom plan options to
your hosting software, please consult the relevant documentation.
If your hosting software does not use service plans, or if you want to provide all hosting
customers with access to the editor regardless of the plans, then you need to do the
following:
1. Prepare scripts that will perform the necessary operations in the editor over the
API. The scripts will create sites in Presence Builder and redirect the user’s
browser to the editor.
2. Add a button leading to Presence Builder to the customers’ control panel area. The
button could be labeled, for example, Launch Presence Builder, or its caption could be
changed from Create Site to Edit Site, depending on whether a site for a given user
account or domain name is already present in Presence Builder.
When a user clicks Create Site, a new site should be created in Presence Builder
and the user’s browser should be redirected to the site creation wizard.
When a user clicks Edit Site, the control panel or a custom integration script must
redirect the user’s browser to the editor window containing the user’s site, ready
for editing.
After successful integration, your hosting customers will be able to access the
Presence Builder editor, create and edit sites, and publish them to their webspaces
over FTP.
Contents of this chapter:
Checking If Your Hosting Platform Is Compatible with Presence Builder. This section
describes how to check whether your hosting platform meets the hosting
requirements for publishing sites created with Presence Builder.
Providing Site Owners with Access to the Editor. This section describes how to
implement scripts for the Create Site and Edit Site buttons.
Deleting Sites from Presence Builder. This section describes how to implement
removal of sites from Presence Builder by means of the API.
Page 19

Integrating Parallels Presence Builder Standalone with Your Hosting Software 19
In this chapter:
Checking if Your Hosting Platform Is Compatible with Presence Builder ........... 20
Providing Site Owners with Access to the Editor ............................................... 20
Deleting Sites from Presence Builder ................................................................ 26
Page 20

20 Integrating Parallels Presence Builder Standalone with Your Hosting Software
Checking if Your Hosting Platform Is
Next in this section:
Initializing the API Library .................................................................................. 21
Adding the Create Site Button ........................................................................... 21
Adding the Edit Site Button ................................................................................ 24
Compatible with Presence Builder
Before you start preparing for the integration of Presence Builder with your hosting
platform, make sure that the latter meets Presence Builder’s hosting requirements. You
can do this by using a special script called check.php, which is shipped with
Presence Builder installations.
To check whether your hosting platform meets the hosting requirements
of Presence Builder:
1. Set up a web hosting account on your hosting platform. For example,
let’s assume that the hosting account will be associated with the
domain name example.com.
2. On the server where Presence Builder is installed, go to the directory
/usr/local/sb/resources/publish/.
3. Copy the script check.php from that directory to the hosting account’s
document root to make that script accessible by HTTP.
4. Using a web browser, visit http://example.com/check.php.
The script will show a report on the availability of the necessary hosting features.
Providing Site Owners with Access to the
Editor
To provide domain administrators (or site owners) with access to the Presence Builder
editor and enable them to create and edit websites, you need to add custom buttons or
hyperlinks labeled Create Site and Edit Site to the appropriate locations of your hosting
control panel. These locations might be a user’s home page, account profile, or
account dashboard page - whatever is present in your system. To learn how to add
custom buttons, consult the documentation for your hosting software.
Page 21

Integrating Parallels Presence Builder Standalone with Your Hosting Software 21
Initializing the API Library
For integration purposes, we suggest that you use a library of PHP scripts that interact
with Presence Builder’s API. The library is shipped with Presence Builder. It is located
in the directory /usr/local/sb/utils/api-php/src.
To use the API library in your scripts, you need to do the following:
1. Ensure that PHP 5.2.x or later and the cURL PHP extension are installed on the
server where you will run scripts.
2. Take the scripts from the server where Presence Builder is installed - from
/usr/local/sb/utils/api-php/src, and copy them to the server where your
hosting platform is running.
3. In your PHP script (let’s call it create_site.php for illustration purposes) insert
the following lines:
<?php
require_once ‘/<path to the API library>/src/WpbApi.php’;
$config = array(
‘applicationApiUrl’ => ‘https://<your Presence Builder host name>:443/api/5.3’,
‘user’ => ‘admin’,
‘password’ => ‘<Presence Builder password>’
);
$wpbApi = new WpbApi($config);
Where:
<path to the API library> is the directory to which you have copied the library in step
1.
<your Presence Builder host name> - the server where Presence Builder is
installed.
<Presence Builder password> - the password to your Presence Builder installation
that you specified after installing Presence Builder. This is described in the section
Setting the Administrator’s Password and Installing a License Key (on page 13).
For a complete list of operations that you can perform by means of the API, see
Appendix A. API Reference: Methods, Operations, and Resources (on page 89).
Adding the Create Site Button
The Create Site button must invoke a script written in PHP for example, which will create
a site in Presence Builder by means of the RestAPI HTTP requests. For details on
methods and parameters that can be used in an HTTP request, refer to the chapter API
Reference: Methods, Operations, and Resources, section Creating a Site (see page 98).
Page 22

22 Integrating Parallels Presence Builder Standalone with Your Hosting Software
To create a site, you need to do the following:
Step 1. Connect the API library as described in the section Initializing the API Library (on
page 21).
Step 2. Prepare data that should be passed to Presence Builder for creating a new site.
The data must be presented in an array, as in the following example.
$siteData = array(
‘state’ => ‘regular’,
‘publicationSettings’ => array(
‘targetUrl’ =>
‘ftp://user:password@ftp.example.com/httpdocs’,
‘webSiteUrl’ => ‘http://example.com’
),
‘ownerInfo’ => array(
‘personalName’ => ‘John Doe’,
‘companyName’ => ‘My Company LTD’,
‘email’ => ‘admin@example.com’,
‘phone’ => ‘+1-000-000-0000’,
‘address’ => ‘Chambers St 138’,
‘city’ => ‘New York’,
‘state’ => ‘New York’,
‘zip’ => ‘10292’,
‘country’ => ‘United States’
)
);
Where:
state - is the parameter that specifies whether the site is in trial mode, suspended or
active (regular value). Sites in trial mode can be edited, but cannot be published to a
hosting account. This parameter is mandatory.
publicationSettings - is the set of parameters that specify where to publish
the site over FTP and what account credentials to use:
targetUrl - is the FTP account username, password, and address for
uploading the site.
webSiteUrl - is the address at which the published site must be available.
ownerInfo - is the set of parameters that specify information about the site owner.
To learn more about the parameters used in this array, refer to the section Creating a
Site (on page 98).
Step 3. Create a site by using the API library.
// Create a new site with the $siteData structure
$siteUuid = $wpbApi->requestToApi(‘/sites/’, WpbApi::POST,
array($siteData));
Page 23

Integrating Parallels Presence Builder Standalone with Your Hosting Software 23
// Here you need to add a code that will save $siteUuid somewhere in your hosting
platform. This site ID is needed for further access to the website editor
// Generate an authorization token for the website
$params = array(
‘localeCode’ => ‘en_US’,
‘sessionLifeTime’ => 1800
);
$token = $wpbApi->requestToApi(‘sites/’ .$siteUuid . ‘/token’,
WpbApi::POST, array($params));
$wpbUrl = ‘<your Presence Builder host name>’;
// Redirect to the Presence Builder editor by using the authorization token
header(‘Location: ‘ . $wpbUrl . ‘/Start?token=’ . $token);
Where:
siteUuid - is a unique site ID.
localeCode - is the parameter that specifies the language that should be set for
the user interface when the user (site owner) logs in to the editor. The following
languages are supported:
en_US - American English
en_GB - British English
de_DE - German
es_ES - Spanish
fr_FR - French
it_IT - Italian
ja_JP - Japanese
nl_NL - Dutch
pl_PL - Polish
pt_BR - Brazilian Portuguese
ru_RU - Russian
zh_CN - simplified Chinese
zh_TW - traditional Chinese
sessionLifeTime - is the parameter that specifies (in seconds) the period of
inactivity for a user’s session in the editor. When this period elapses, the security
token expires and the user needs to log in again.
token - is the security token for redirecting a user’s browser to the editor.
wpbUrl - is the host name of the server where Presence Builder is installed.
Page 24

24 Integrating Parallels Presence Builder Standalone with Your Hosting Software
To learn more about these parameters, refer to the section Generating a Security Token for
Accessing a Site (on page 102).
This script sample creates a website and returns a unique site identifier (UUID) for the
newly created site. It is important that you save this site ID for future reference because
you will need to specify that ID when retrieving information about a site, selecting a site
for editing, changing site properties, or deleting a site. Therefore, you need to write a
script that will save the received site ID to a file or a database.
Based on the site ID, the script must generate a security token for access to the editor,
and then redirect the user’s browser to the editor. A new security token must be
generated each time a site is opened for editing.
Adding the Edit Site Button
To add the Edit Site button, read the documentation for your hosting software. The Edit
Site button must contain a reference to a script written in PHP for example, which will
do the following:
1. Connect the API library as described in the section Initializing the API Library (on page
21).
2. Check in the database whether there is a site ID for a given domain name or a user
account.
3. Retrieve a site ID for a selected domain name or user account.
4. Generate a security token for that site ID through the API library. Note that the
security token is required to properly redirect the browser to the editor. A new
security token must be generated each time a site is opened for editing.
5. Redirect the user’s browser to the editor window.
The following sample script creates a security token for the retrieved site ID.
$siteUuid; //This variable contains the retrieved site ID
// Generate an authorization token for the website
$params = array(
‘localeCode’ => ‘en_US’,
‘sessionLifeTime’ => 1800
);
$token = $wpbApi->requestToApi(‘sites/’ . $siteUuid . ‘/token’, WpbApi::POST,
array($params));
$wpbUrl = ‘<your Presence Builder host name>’;
// Redirect to the Presence Builder editor by using the authorization token
header(‘Location: ‘ . $wpbUrl . ‘/Start?token=’ . $token);
Where:
siteUuid - is a unique site ID.
Page 25

Integrating Parallels Presence Builder Standalone with Your Hosting Software 25
localeCode - is the parameter that specifies the language that should be set for
the user interface when the user (site owner) logs in to the editor. The following
languages are supported:
en_US - American English
en_GB - British English
de_DE - German
es_ES - Spanish
fr_FR - French
it_IT - Italian
ja_JP - Japanese
nl_NL - Dutch
pl_PL - Polish
pt_BR - Brazilian Portuguese
ru_RU - Russian
zh_CN - simplified Chinese
zh_TW - traditional Chinese
sessionLifeTime - is the parameter that specifies (in seconds) the period of
inactivity for a user’s session in the editor. When this period elapses, the security
token expires and the user needs to log in again.
token - the security token for redirecting a user’s browser to the editor.
wpbUrl - the host name of the server where Presence Builder is installed.
To learn more about these parameters, refer to the section Generating a Security Token for
Accessing a Site (on page 102).
The URL for redirecting the user’s browser to the editor looks like the following:
http://<your Presence Builder host name>/Start?token=$token.
Page 26

26 Integrating Parallels Presence Builder Standalone with Your Hosting Software
Deleting Sites from Presence Builder
Your customers will be able to remove their sites from the Presence Builder editor
(unless you prohibit them from doing so (on page 75)), so there is no need to add a
special button for deleting sites to your hosting software. However, you might want to
automate deletion of sites from Presence Builder in cases when the corresponding
user accounts and domains are removed from your hosting platform.
To delete sites, your script must do the following:
1. Connect the API library as described in the section Initializing the API Library (on page
21).
2. Retrieve site IDs for the domain names or user accounts that must be removed.
3. Call the following REST API method through the API library:
$siteUuid; //This is the ID of the site to be deleted
$wpbApi->requestToApi(‘/sites/’ . $siteUuid, WpbApi::DELETE);
Page 27

This chapter describes how to use the following techniques for upselling hosting
In this chapter:
Upselling Hosting Services with Restricted Functionality Techniques ................28
Upselling Hosting Services with Automated Site Creation ..................................38
Configuring the Promotional Footer ...................................................................40
C H A P T E R 7
Upselling Hosting Services
services:
Differentiation of hosting plans based on the editor’s functionality available to
customers.
Automatic creation of websites for customers who purchase only domain name
registration services.
Showing an advertisement block on websites of the users who are subscribed to
free or low-cost service plans.
Page 28
28 Upselling Hosting Services
Upselling Hosting Services with Restricted
Functionality Techniques
One of the methods that may help to upsell is differentiation of hosting plans based on the
editor functionality available to customers. For example, you can set up hosting plans that
allow users to create limited numbers of website pages, and you can charge extra money for
the use of the Image Slider, Image Gallery, Map, and other modules.
The following overview describes how the restriction method can be configured and used:
1. You configure how many editor modules or website pages can be used per website. This
can be done by means of the API for both newly created and already existing sites. This
is described in the section Restricting Resources by Means of the API (on page 31).
2. A user logs in to the editor and starts creating a website. When the specified limit for the
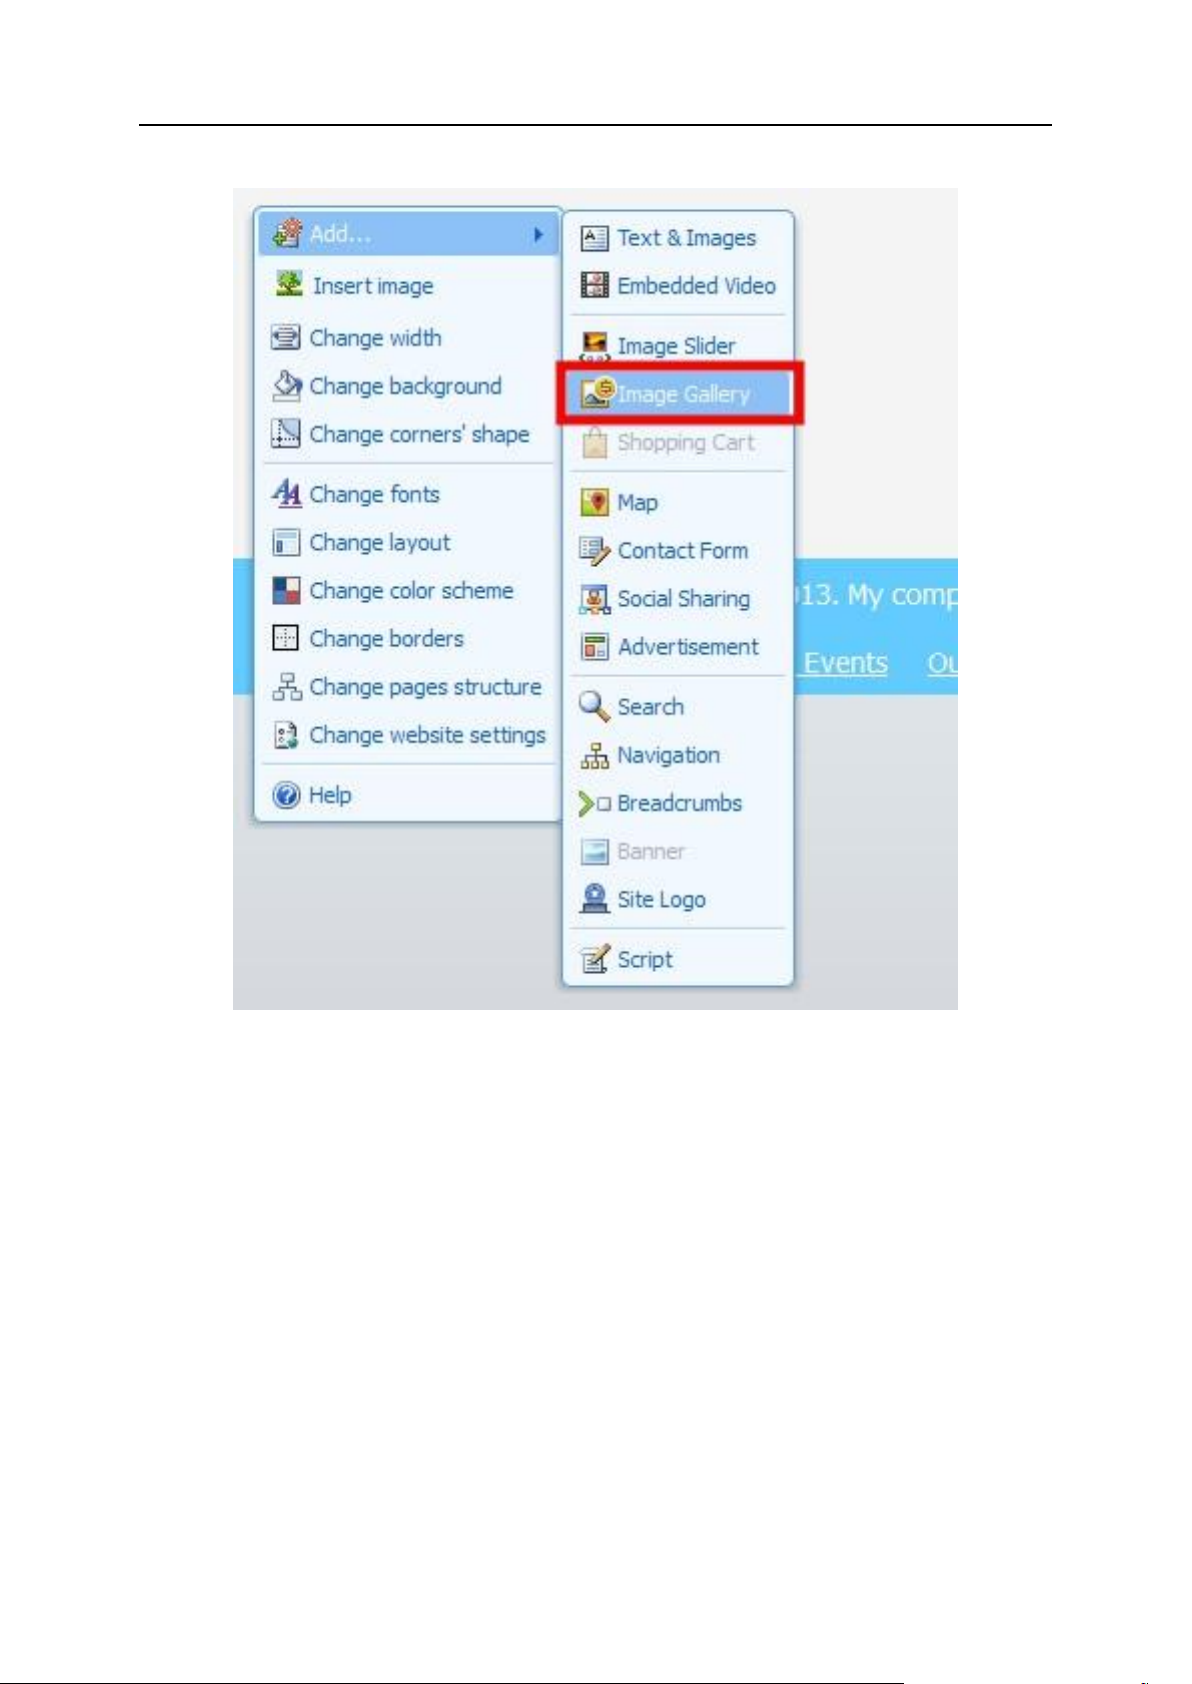
number of website pages or site modules is reached, a special icon with a dollar sign
appears.
The icon in the toolbar.
Page 29
Upselling Hosting Services 29
The icon in the context menu.
Page 30
30 Upselling Hosting Services
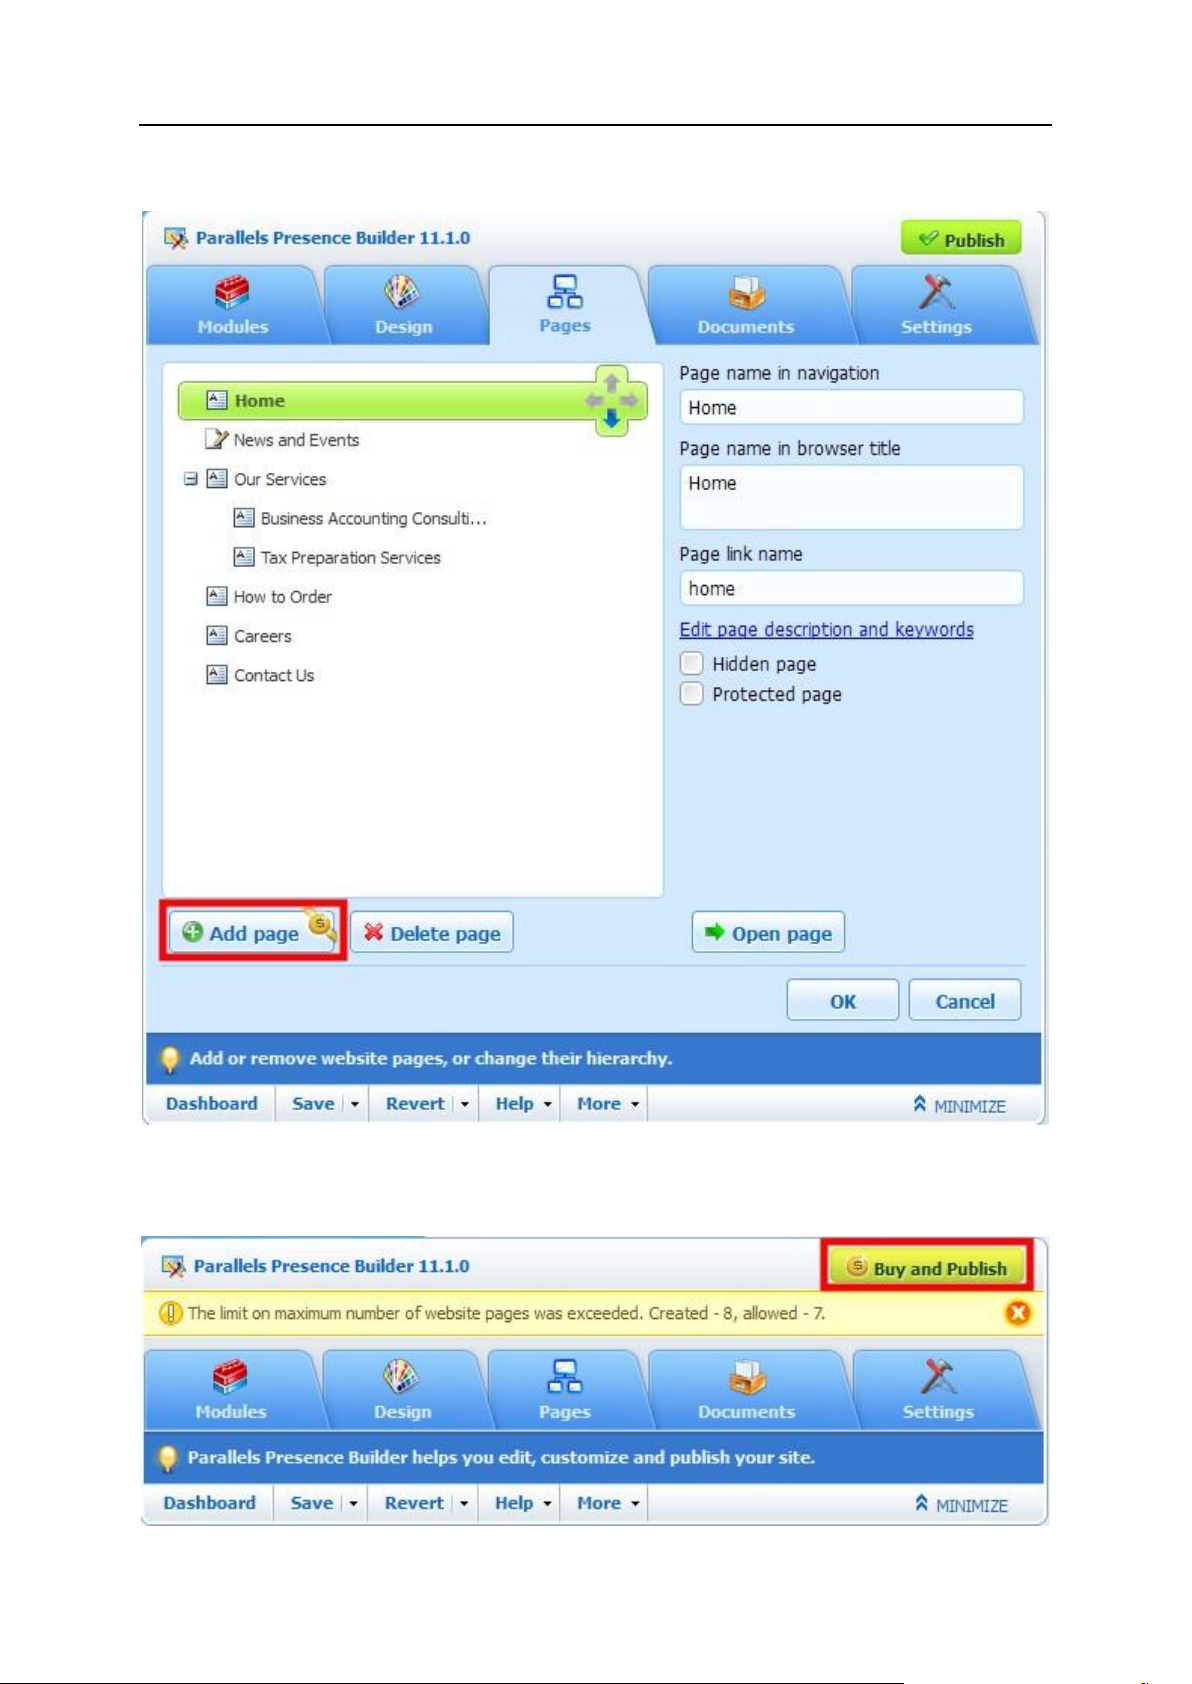
The icon in the page creation wizard.
3. If the user adds one more module or a website page that exceeds the specified limits, he
is prompted to pay for additional resources. Otherwise, he will not be able to publish the
website. The text on the Publish button is changed to Buy and Publish.
Page 31

Upselling Hosting Services 31
4. When the user clicks Buy and Publish, the following dialog window is shown.
Next in this section:
Restricting Resources by Means of the API ...................................................... 31
Configuring the Buy and Publish Dialog Window .............................................. 35
Resource description
Value
Number of pages on a site
maxPagesNumber
Embedded Video module
video
Image Gallery module
imagegallery
Blog module
blog
Online Store and Shopping
Cart modules
eshop
Commenting module
commenting
Contact Form module
contact
You can customize this dialog to include any text you want, and configure the Buy button
to redirect the user to your online store or a billing system. This can be done by means of
the API. This is described in the section Configuring the Buy and Publish Dialog Window
(on page 35).
Restricting Resources by Means of the API
To set a limit on a resource, invoke the following method through the API:
URI: /api/5.3/sites/{siteUuid}/limits/
Content: [{”module_name_1”:5,”module_name_2”:10,”maxPagesNumber”:10}]
HTTP method: PUT
HTTP response code: 200
The following table describes the parameters that can be set with a request.
Page 32

32 Upselling Hosting Services
Social Sharing module
sharethis
Advertisement module
advertisement
Map module
map
Search module
search
Navigation module
navigation
Breadcrumbs module
breadcrumbs
Site Logo module
siteLogo
Script module
script
Image Slider module
slider
Page 33

Upselling Hosting Services 33
Code example in PHP
<?php
require_once ‘/<path to the Presence Builder API library>/src/WpbApi.php’;
$config = array(
‘applicationApiUrl’ => ‘https://<your Presence Builder host
name>:443/api/5.3’,
‘user’ => ‘admin’,
‘password’ => ‘<Presence Builder password>’
);
$wpbApi = new WpbApi($config);
$siteUuid = ‘81fee76b-7d90-01c9-a1a6-aad0a36b1036’;
$limits = array(
‘maxPagesNumber’ => ‘5’,
‘map’ => ‘1’
);
// Update website resource limits
$wpbApi->requestToApi(‘/sites/’ . $siteUuid . ‘/limits/’, WpbApi::PUT, array($limits));
Request
PUT /api/5.3/sites/81fee76b-7d90-01c9-a1a6-aad0a36b1036/ HTTP/1.1
Authorization: Basic YWRtaW46YWRtaW4=
User-Agent: WBP API
Host: 192.168.10.1
Accept: /
Connection: close
Accept-encoding: gzip, deflate
Content-type: application/json
Content-Length: 30
[{”maxPagesNumber”:5,”map”:1}]
Page 34

34 Upselling Hosting Services
Response
HTTP/1.1 200 OK
Date: Thu, 01 Nov 2012 04:27:28 GMT
Server: Apache/2.2.16 (Debian)
P3P: CP=”NON COR CURa ADMa OUR NOR UNI COM NAV STA”
Vary: Authorization
Connection: close
Transfer-Encoding: chunked
Content-Type: application/json
{”response”:”done”}
Page 35

Upselling Hosting Services 35
Configuring the Buy and Publish Dialog Window
Variable
Value
%sbSiteUuid%
Website ID.
%videoLimit%
The maximum allowed number of Embedded Video modules.
%videoUsage%
The number of currently used Embedded Video modules.
%imagegalleryLimit%
The maximum allowed number of Image Gallery modules.
%imagegalleryUsage%
The number of currently used Image Gallery modules.
%blogLimit%
The maximum allowed number of Blog modules.
%blogUsage%
The number of currently used Blog modules.
%commentingLimit%
The maximum allowed number of Commenting modules.
To customize the Buy and Publish dialog, you need to invoke the following method through
the API:
URI: /api /{sbApiVersion}/system/trial-mode/messages/
Parameters: UpsellDialogTitle, UpsellDialogMsg
Content:
[ [{
“localeCode”: “en_US”,
“messages”: {
“upsellDialogTitle”:”How to Publish Your Site”,
“upsellDialogMsg”:”Upsell message”
}
}, {
“localeCode”: “de_DE”,
“messages”: {
“upsellDialogTitle”: “How to Publish Your Site “,
“upsellDialogMsg”: “Upsell message”
}
}]]
HTTP method: PUT
HTTP response code: 200
You can use the following placeholder variables in the text that you set for the parameters
upsellDialogTitle and upsellDialogMsg.
Page 36

36 Upselling Hosting Services
%commentingUsage%
The number of currently used Commenting modules.
%contactLimit%
The maximum allowed number of Contact Form modules.
%contactUsage%
The number of currently used Contact Form modules.
%sharethisLimit%
The maximum allowed number of Social Sharing modules.
%sharethisUsage%
The number of currently used Social Sharing modules.
%advertisementLimit%
The maximum allowed number of Advertisement modules.
%advertisementUsage
%
The number of currently used Advertisement modules.
%searchLimit%
The maximum allowed number of Search modules.
%searchUsage%
The number of currently used Search modules.
%navigationLimit%
The maximum allowed number of Navigation modules.
%navigationUsage%
The number of currently used Navigation modules.
%breadcrumbsLimit%
The maximum allowed number of Breadcrumbs modules.
%breadcrumbsUsage%
The number of currently used Breadcrumbs modules.
%siteLogoLimit%
The maximum allowed number of Site Logo modules.
%siteLogoUsage%
The number of currently used Site Logo modules.
%sliderLimit%
The maximum allowed number of Image Slider modules.
%sliderUsage%
The number of currently used Image Slider modules.
%scriptLimit%
The maximum allowed number of Script modules.
%scriptUsage%
The number of currently used Script modules.
%mapLimit%
The maximum allowed number of Map modules.
%mapUsage%
The number of currently used Map modules.
%eshopLimit%
The maximum allowed number of Online Store and Shopping
Cart modules.
%eshopUsage%
The number of currently used Online Store and Shopping Cart
modules.
%pagesLimit%
The maximum allowed number of website pages.
Page 37

Upselling Hosting Services 37
%pagesUsage%
The number of currently created website pages.
Page 38

38 Upselling Hosting Services
Upselling Hosting Services with Automated
Site Creation
This section describes a scenario that will help providers to upsell web hosting services to
customers who purchase only domain name registration services. The following is an
explanation of how the scenario can be implemented:
1. When a customer purchases a domain name, a website based on a suitable topic is
automatically created for them in the Presence Builder editor.
2. A promotional e-mail message containing links for access to the editor is sent to the
customer. In that e-mail message, the customer is offered the opportunity to edit their site
with Presence Builder and host it for free for one month, and then to switch their domain
name permanently to that site and pay for a subscription.
To create websites for a number of customers at once:
Step 1. Copy all files from the directory /usr/local/sb/utils/api-
php/examples/massive_creation to a directory from which you will run scripts. For
example, /root/myscripts/.
Step 2. Prepare a CSV file and specify the site name, language, topic, customers’ personal
information, and settings for website publishing.
The first line in the file must contain the following fields, separated by commas:
siteName,siteLanguage,siteTopic,personalName,companyName,email,phone
,address,city,state,zip,country,targetUrl,webSiteUrl
This line acts as a table heading, with the commas acting as column separators, where:
siteName - website title shown in the header area.
siteLanguage - website topic language.
siteTopic - topic ID, for example “cafe”. You can retrieve a list of site topic IDs by issuing
the command in the server console: sw-engine
/usr/local/sb/utils/snapshot2wst.php export—
file=/root/myscripts/topics.ini. This will create the topics.ini file in
/root/myscripts/. In this file, you will see lines like toy_store.info = Toy
Store. The toy_store part without .info is the topic’s ID.
personalName - customer’s name.
companyName - customer’s company name.
e-mail, phone, address, city, state, zip, country - contact information.
targetUrl - link to the FTP account where the site must be published.
webSiteUrl - the website’s domain name.
Page 39

Upselling Hosting Services 39
The second and other lines must contain the corresponding values for each customer
account. For example:
siteName,siteLanguage,siteTopic,personalName,companyName,email,phone,address,city,st
ate,zip,country,targetUrl,webSiteUrl
My cool site,en_US,cafe,John Doe,John’s Company LTD,admin@example.com,+1-000-0000000,Chambers St 138,New York,New York,10292,United
States,ftp://user:password@ftp.example.com,http://example.com
Step 3. Save the file as clients.csv in the directory /root/myscripts/.
Step 4. Edit the file /root/myscripts/massive_creation.php.
In the section
$config = array(
‘applicationApiUrl’ =>
‘https://sitebuilder.yourdomain.com:443/api/5.3’,
‘user’ => ‘admin’,
‘password’ => ‘yourpassword’
);
Set ‘applicationApiUrl’ to the URL where the API of your Presence Builder installation
is available.
Set ‘password’ to the administrator’s password.
Step 5. Edit the file /root/myscripts/editor_entry_point.php.
In the section
$config = array(
‘applicationApiUrl’ =>
‘https://sitebuilder.yourdomain.com:443/api/5.3’,
‘user’ => ‘admin’,
‘password’ => ‘yourpassword’
);
Set ‘applicationApiUrl’ to the URL where the API of your Presence Builder installation
is available.
Set ‘password’ to the administrator’s password.
Step 6. To ensure that the links to the editor in e-mail notifications work properly, do the
following:
1. Move the file editor_entry_point.php from /root/myscripts/ to a hosting
account directory available via HTTP. For example, make it available at http://mydomain.com/editor_entry_point.php.
Page 40

40 Upselling Hosting Services
2. Copy the file WpbApi.php from /usr/local/sb/utils/api-php/src/ to the same
hosting account directory.
Step 7. Adjust the text that is sent in e-mail notices. Edit the file
/root/myscripts/massive_creation_functions.php.
Make the necessary corrections to the following code.
function sendNotifacationMail($siteId, $csvData) {
//The e-mail address from which notification e-mails will be sent
$emailFrom = ‘hoster@hosterdomain.com’;
$subject = ‘Your new website’;
$message = ‘<html>
<body>
<div>Especially for you, ‘ . $csvData[’personalName’] .’, and your company ‘ .
$csvData[’companyName’]. ‘, we have created a website at <a href=”’ .
$csvData[’webSiteUrl’] . ‘”>’ . $csvData[’webSiteUrl’] . ‘</a> To start editing your site,
click <a href=”http://my-domain.com/editor_entry_point.php?ident=' .
urlencode($siteId) .'&locale=' . urlencode($csvData['siteLanguage']) . ‘”>here</a>.
<div>
</body>
</html>’;
In this code:
Specify the provider’s e-mail address in $emailFrom.
Specify the message subject in $subject.
Correct the message text in $message.
In the line <a href=”http://my-
domain.com/editor_entry_point.php?ident=’ . urlencode($siteId) .
‘&locale=’ . urlencode($csvData[’siteLanguage’]) . ‘”>here</a>,
specify the correct URL of the editor_entry_point.php file that you uploaded to a
hosting account in Step 6.
Step 8: Run a script called massive_creation.php by issuing the following commands.
cd /root/myscripts/
php ./massive_creation.php
The script will create websites for the customers specified in the clients.csv file, and will
send them e-mail invitations to visit the editor.
Page 41

Upselling Hosting Services 41
Configuring the Promotional Footer
A promotional footer is an advertisement block that you can place on websites of customers
who are subscribed to low-cost hosting plans, or whose sites are hosted at no charge.
Placing your company’s advertisement or a line with the text “Hosted by Provider Name” on
customers’ websites can be beneficial for the following reasons:
It helps to attract new customers to your services, thereby compensating for lower
revenues from selling cheap hosting plans.
It helps to upsell: customers willing to remove the advertisement block from their sites will
probably want to upgrade to more expensive plans which do not include this feature.
The promotional footer, when shown on a site, is located at the bottom of every page of the
site.
Page 42

42 Upselling Hosting Services
It can contain HTML tags, CSS definitions, and JavaScript code. By default, it contains the
Next in this section:
Retrieving the Current Content of the Promotional Footer ................................. 43
Changing the Default Content of the Promotional Footer ................................... 45
Showing the Promotional Footer on Websites ................................................... 47
Removing the Promotional Footer from Websites .............................................. 49
following code:
Created with <a href=”http://www.parallels.com/ru/products/plesk/webpresence-builder/”>Parallels Presence Builder</a>.
You can perform the following operations on the footer:
Set custom content.
Show it on selected sites.
Remove it from selected sites.
All these operations can be performed by means of the API.
Page 43

Upselling Hosting Services 43
Retrieving the Current Content of the Promotional Footer
URI: /api /5.3/system/promo-footer
HTTP method: GET
HTTP response code: 200
Code example in PHP
<?php
require_once ‘/<path to the Presence Builder API library>/src/WpbApi.php’;
$config = array(
‘applicationApiUrl’ => ‘https://<your Presence Builder host name>
:443/api/5.3’,
‘user’ => ‘admin’,
‘password’ => ‘<Presence Builder password>’
);
$library = new WpbApi($config);
$promoFooterHtmlCode = $library->requestToApi(‘/system/promo-footer’, WpbApi::GET);
Request
GET /api/5.3/system/promo-footer/ HTTP/1.1
Authorization: Basic YWRtaW46YWRtaW4=
User-Agent: WBP API
Host: 192.168.10.1
Accept: /
Connection: close
Accept-encoding: gzip, deflate
Response
HTTP/1.1 200 OK
Date: Thu, 01 Nov 2012 04:09:16 GMT
Server: Apache/2.2.16 (Debian)
P3P: CP=”NON COR CURa ADMa OUR NOR UNI COM NAV STA”
Vary: Authorization
Connection: close
Page 44

44 Upselling Hosting Services
Transfer-Encoding: chunked
Content-Type: application/json
{”response”:”Created with <a href=\”http:\/\/www.parallels.com\/ru\/products\/plesk\/webpresence-builder\/\”>Parallels Presence Builder<\/a>”}
Page 45

Upselling Hosting Services 45
Changing the Default Content of the Promotional Footer
URI: /api /5.3/system/promo-footer
HTTP method: PUT
HTTP response code: 201
Code example in PHP
<?php
require_once ‘/<path to the Presence Builder API library>/src/WpbApi.php’;
$config = array(
‘applicationApiUrl’ => ‘https://<your Presence Builder host name>
:443/api/5.3’,
‘user’ => ‘admin’,
‘password’ => ‘<Presence Builder password>’
);
$library = new WpbApi($config);
$code = ‘This site is hosted by <a href=”http://www.example.com” target=”_blank”>Company
Name</a>.’;
$library->requestToApi(‘/system/promo-footer’, WpbApi::PUT, array($code));
Request
PUT /api/5.3/system/promo-footer/ HTTP/1.1
Authorization: Basic YWRtaW46YWRtaW4=
User-Agent: WBP API
Host: 192.168.1.10
Accept: /
Connection: close
Accept-encoding: gzip, deflate
Content-type: application/json
Content-Length: 100
[”This site is hosted by <a href=\”http:\/\/www.example.com\” target=\”_blank\”>Company
Name<\/a>.”]
Page 46

46 Upselling Hosting Services
Response
HTTP/1.1 201 OK
Date: Thu, 08 Nov 2012 08:13:16 GMT
Server: Apache/2.2.16 (Debian)
P3P: CP=”NON COR CURa ADMa OUR NOR UNI COM NAV STA”
Vary: Authorization
Connection: close
Transfer-Encoding: chunked
Content-Type: application/json
{”response”:”done”}
Page 47

Upselling Hosting Services 47
Showing the Promotional Footer on Websites
You can configure Presence Builder to show the promotional footer on selected sites. To do
this, use the following API method (described in detail in the section Changing Site
Properties and Settings (on page 118)) to set the parameter isPromoFooterVisible =
true:
URI: /api /5.3/sites/{site_uuid}/
Options: {uuid}, {isPromoFooterVisible}
HTTP method: PUT
HTTP response code: 200
Code example in PHP
<?php
require_once ‘/<path to the Presence Builder API library>/src/WpbApi.php’;
$config = array(
‘applicationApiUrl’ => ‘https://<your Presence Builder host
name>:443/api/5.3’,
‘user’ => ‘admin’,
‘password’ => ‘<Presence Builder password>’
);
$wpbApi = new WpbApi($config);
$siteUuid = ‘81fee76b-7d90-01c9-a1a6-aad0a36b1036’;
// Change the site’s settings
$wpbApi->requestToApi(‘/sites/’ . $siteUuid, WpbApi::PUT, array(array(
‘isPromoFooterVisible’ => true,
)));
Request
PUT /api/5.3/sites/81fee76b-7d90-01c9-a1a6-aad0a36b1036/ HTTP/1.1
Authorization: Basic YWRtaW46YWRtaW4=
User-Agent: WBP API
Host: 192.168.10.1
Accept: /
Connection: close
Accept-encoding: gzip, deflate
Page 48

48 Upselling Hosting Services
Content-type: application/json
Content-Length: 31
[{”isPromoFooterVisible”:true}]
Response
HTTP/1.1 200 OK
Date: Thu, 01 Nov 2012 04:27:28 GMT
Server: Apache/2.2.16 (Debian)
P3P: CP=”NON COR CURa ADMa OUR NOR UNI COM NAV STA”
Vary: Authorization
Connection: close
Transfer-Encoding: chunked
Content-Type: application/json
{”response”:”done”}
Page 49

Upselling Hosting Services 49
Removing the Promotional Footer from Websites
To remove the promotional footer from a website, use the following API method to set the
parameter isPromoFooterVisible = false:
URI: /api /5.3/sites/{site_uuid}/
Options: {uuid}, {isPromoFooterVisible}
HTTP method: PUT
HTTP response code: 200
Code example in PHP
<?php
require_once ‘/<path to the Presence Builder API library>/src/WpbApi.php’;
$config = array(
‘applicationApiUrl’ => ‘https://<your Presence Builder host
name>:443/api/5.3’,
‘user’ => ‘admin’,
‘password’ => ‘<Presence Builder password>’
);
$wpbApi = new WpbApi($config);
$siteUuid = ‘81fee76b-7d90-01c9-a1a6-aad0a36b1036’;
// Change the site’s settings
$wpbApi->requestToApi(‘/sites/’ . $siteUuid, WpbApi::PUT, array(array(
‘isPromoFooterVisible’ => false,
)));
Request
PUT /api/5.3/sites/81fee76b-7d90-01c9-a1a6-aad0a36b1036/ HTTP/1.1
Authorization: Basic YWRtaW46YWRtaW4=
User-Agent: WBP API
Host: 192.168.10.1
Accept: /
Connection: close
Accept-encoding: gzip, deflate
Content-type: application/json
Page 50

50 Upselling Hosting Services
Content-Length: 32
[{”isPromoFooterVisible”:false}]
Response
HTTP/1.1 200 OK
Date: Thu, 01 Nov 2012 04:27:28 GMT
Server: Apache/2.2.16 (Debian)
P3P: CP=”NON COR CURa ADMa OUR NOR UNI COM NAV STA”
Vary: Authorization
Connection: close
Transfer-Encoding: chunked
Content-Type: application/json
{”response”:”done”}
Page 51

This section describes how to set up the trial mode in Presence Builder Standalone
C H A P T E R 8
Configuring the Trial Mode
and attract prospective customers to your hosting services.
The trial mode lets anyone evaluate the editor and create websites for free. However,
to acquire such websites, a site owner will need to sign up for your services.
When users log in to the editor, they are shown an information box with a notice that
they are working in the trial mode. This notice can be adjusted as necessary.
The configuration of the trial mode involves the following steps:
1. Configure the information box shown at the top of the pages in the trial mode.
Page 52

52 Configuring the Trial Mode
You can adjust the appearance of the box, change the text shown in it, and add
hyperlinks to your billing system or hosting control panel.
2. Configure an e-mail message to be sent to users who create trial websites.
You can change the appearance of the message, change text shown in it, and add
hyperlinks to your billing system or hosting control panel.
3. Configure the pop-up message shown to users when they attempt to publish trial
websites.
Page 53

Configuring the Trial Mode 53
You can change the appearance of the message, change the text shown in it, and
In this chapter:
Placeholders Used in Trial Mode Messages ...................................................... 54
Locale Strings Shown in Trial Mode .................................................................. 56
Customizing the Information Box ....................................................................... 57
Customizing Text in E-mail Notices ................................................................... 61
Customizing the Pop-Up Message .................................................................... 63
add hyperlinks to your billing system or hosting control panel.
In the text shown in the information box, the e-mail message, and the pop-up message,
you can use custom placeholder variables and predefined placeholder variables
supported by Presence Builder. Such placeholder variables include the customer’s
name, website ID, and others.
Important: This chapter describes how to configure the trial mode messages by
means of the API. The API methods supersede the previously used methods that
involved editing of the tbbMessagesDefault.lng file, as described in the Plesk
documentation. Any changes you make to the tbbMessagesDefault.lng file will be
overwritten by the changes made through the API.
Page 54

54 Configuring the Trial Mode
Placeholders Used in Trial Mode
Messages
Placeholder variables are used to present certain values in trial mode messages. For
example, the siteOwnerName placeholder is used in the e-mail message template that
is sent to customers upon creation of trial websites. This placeholder is replaced with a
name that the user types in on the website topic selection screen.
Presence Builder can use predefined placeholders (which are listed below), and
custom placeholders that you can define. Custom placeholder variables can be applied
to all websites in Presence Builder or to a specific site.
To use a custom placeholder variable for all websites in Presence Builder, you need to
add the prefix “systemCustomProperty.” to the variable name. For example, let’s define
a custom variable named “var1” for all sites. To do this:
1. Invoke an API method:
URI: /api/5.3/system/custom-properties
HTTP method: PUT
Within a request, you can pass data in the JSON format:
[[{”name”:”var1”,”value”:”The value of the var1 variable”}]]
2. To use this variable in a message, you need to form a placeholder name by adding
the prefix “systemCustomProperty.”. The resulting variable will be
“systemCustomProperty.var1”. In the message, the text “The value of the var1
variable” will be used instead of this placeholder.
To retrieve information about custom variables, invoke the following API method:
URI: /api/5.3/system/custom-properties
HTTP method: GET
The data will be returned in the JSON format. For example:
{”response”:[{”name”:”var1”,”value”:”The value of the var1
variable”},{”name”:”variable”,”value”:”The value of the var1
variable”}]}
To use a custom placeholder variable for a certain site, you need to add the prefix
“siteCustomProperty.” to the variable name. For example, let’s define a custom variable
named “siteVar1” for the site with UUID “123”. To do this:
1. Invoke an API method:
URI: /api/5.3/system/custom-properties/{site UUID}
HTTP method: PUT
Within a request, you can pass data in the JSON format:
[[{”name”:”siteVar1”,”value”:”The value of the siteVar1
variable”}]]
Page 55

Configuring the Trial Mode 55
2. To use this variable in a message, you need to form a placeholder name by adding
Placeholder
Description
sbSiteUuid
Unique site ID (UUID)
sbOneTimeBackUrl
URL to the Presence Builder Start step with a token (host name
will be received from HTTP request)
locale
Presence Builder UI locale name
trialSiteLifeTime
Trial site’s lifetime
trialSiteExpireDate
Localized date of trial site expiration
trialSiteUrl
URL for editing a trial site (permanent)
siteOwnerName
Site owner’s name (the default value for the en_US locale is
“Customer”)
siteOwnerCompanyName
Company name of the site owner (an empty string by default)
siteOwnerEmail
Site owner’s e-mail address (an empty string by default)
siteOwnerPhone
Site owner’s telephone number (an empty string by default)
siteOwnerAddress
Site owner’s address (an empty string by default)
siteOwnerCity
Site owner’s city (an empty string by default)
siteOwnerCountry
Site owner’s country (an empty string by default)
queryString
An additional query string passed to a trial entry point (an empty
string by default)
helpUrl
The URL to the Presence Builder user documentation
sbHttpHost
HTTP URL to the Presence Builder server (for example:
https://example.com:443)
the prefix “siteCustomProperty.”. The resulting variable will be
“siteCustomProperty.siteVar1”. In the message, the text “The value of the siteVar1
variable” will be used instead of this placeholder.
To retrieve custom site-related variables, invoke the following API method:
URI: /api/5.3/system/custom-properties/{site UUID}
HTTP method: GET
The data will be returned in the JSON format. In our case this would be:
{”response”:[{”name”:”siteVar1”,”value”:”The value of the siteVar1
variable”}]}
You can use the following placeholders in Presence Builder trial mode notifications.
Page 56

56 Configuring the Trial Mode
These placeholders can be used in different contexts: as a JS variable, as an HTML
Message keyword
Message description
editorTopMessageTrialSite
The message in the information box at the top of Presence Builder
editor shown to a new customer who is creating a trial site.
defaultPersonalName
The default name of the customer shown on the Presence Builder
start page. If a user has not specified a user name, the word
“Customer” will be used by default.
initialMailSubject
The subject of the e-mail message sent to users who create trial
sites.
initialMailHtml
The text of the e-mail message sent to users who create trial sites.
trialSiteSignUpPublishTitle
The title of the dialog window shown upon clicking the Publish
button to a new customer who is creating a trial site.
trialSiteSignUpPublishMsg
The text shown in the pop-up window after a user clicks the
Publish button.
trialFeatureDisabled
The error message shown in the status bar when a new customer
tries to verify ownership in the settings of a trial site.
value, or as part of a URL. Therefore, placeholder values can be encoded using
different algorithms and thereby can take different markers:
&placeholder_name& - when you use a placeholder inside a hyperlink.
@placeholder_name@ - when you use a placeholder inside a JavaScript code.
%placeholder_name% - when you use a placeholder in plain text.
Locale Strings Shown in Trial Mode
The following table describes all messages shown in the trial mode. You might want to
customize them.
Page 57

Configuring the Trial Mode 57
Customizing the Information Box
The text notification about working in trial mode is displayed in the information box at
the top of the editor’s pages.
To customize the appearance and the text shown in the information box, use the
following API method:
URI: /api/5.3/system/trial-mode/messages/
HTTP method: PUT
Within a request, you can pass the following data in the JSON format:
[[{
“localeCode”:”en_US”,
“messages”:{
“editorTopMessageTrialSite”:”_localized_message_”}
},{
“localeCode”:”de_DE”,
“messages”:{
“editorTopMessageTrialSite”:”_localized_message_”}
}]]
Example HTML Code of the Message
<div class=’sb-top-message sb-top-message-warning’>
<table class=’sb-top-message-container’><tr>
<td class=’sb-top-message-text sb-top-message-text-icon-16’>
<div class=’sb-top-message-icon’></div>
Presence Builder is working in Trial mode. To publish this trial website, buy a
service plan with Presence Builder included.
</td>
<td class=”sb-top-message-actions”>
<form method=’post’
action=’@systemCustomProperty.billingSignUpEntryPoint@’>
<input type=’hidden’ name=’sbSiteUuid’ value=’@sbSiteUuid@’/>
<input type=’hidden’ name=’siteOwnerName’
value=’@siteOwnerName@’/>
<input type=’hidden’ name=’siteOwnerCompanyName’
value=’@siteOwnerCompanyName@’/>
Page 58

58 Configuring the Trial Mode
<input type=’hidden’ name=’siteOwnerEmail’
value=’@siteOwnerEmail@’/>
<input type=’hidden’ name=’siteOwnerPhone’
value=’@siteOwnerPhone@’/>
<input type=’hidden’ name=’siteOwnerAddress’
value=’@siteOwnerAddress@’/>
<input type=’hidden’ name=’siteOwnerCity’
value=’@siteOwnerCity@’/>
<input type=’hidden’ name=’siteOwnerCountry’
value=’@siteOwnerCountry@’/>
<table cellspacing=’0’ class=’sb-btn x-btn x-btn-noicon’>
<tbody class=’x-btn-small x-btn-icon-small-left’>
<tr>
<td class=’x-btn-tl’><i> </i></td>
<td class=’x-btn-tc’></td>
<td class=’x-btn-tr’><i> </i></td>
</tr>
<tr>
<td class=’x-btn-ml’><i> </i></td>
<td class=’x-btn-mc’><em
unselectable=’on’ class=”><button type=’submit’ class=’x-btn-text’
onmouseover=”Ext.get(this).up(‘table’).addClass(‘x-btn-
over’)”onmouseout=”Ext.get(this).up(‘table’).removeClass(‘x-btnover’)”>Buy</button>
</em>
</td>
<td class=’x-btn-mr’><i> </i></td>
</tr>
<tr>
<td class=’x-btn-bl’><i> </i></td>
<td class=’x-btn-bc’></td>
<td class=’x-btn-br’><i> </i></td>
</tr>
</tbody>
</table>
</form>
</td>
</tr>
</table>
Page 59

Configuring the Trial Mode 59
</div>
The following code sample sets the text for the information box by means of the
Presence Builder API library:
<?php
require_once ‘/<path_to_the_Presence Builder_API_library>/WpbApi.php’;
$config = array(
‘applicationApiUrl’ => ‘https://<Presence
Builder_server_address>:443/api/5.3’,
‘user’ => ‘admin’,
‘password’ => ‘<admin_password>’
);
$library = new WpbApi($config);
$properties = array(array(
‘localeCode’ => ‘en_US’,
‘messages’ => array(“editorTopMessageTrialSite” => “<div class=’sb-top-message
sb-top-message-warning’>
<table class=’sb-top-message-container’>
<tr>
<td class=’sb-top-message-text sb-top-message-text-icon-16’>
<div class=’sb-top-message-icon’></div>
Presence Builder is working in Trial mode. To publish this trial website, buy a
service plan with Presence Builder included.</td>
<td class=sb-top-message-actions>
<form method=’post’
action=’@systemCustomProperty.billingSignUpEntryPoint@’>
<input type=’hidden’ name=’sbSiteUuid’ value=’@sbSiteUuid@’/>
<input type=’hidden’ name=’siteOwnerName’
value=’@siteOwnerName@’/>
<input type=’hidden’ name=’siteOwnerCompanyName’
value=’@siteOwnerCompanyName@’/>
<input type=’hidden’ name=’siteOwnerEmail’
value=’@siteOwnerEmail@’/>
<input type=’hidden’ name=’siteOwnerPhone’
value=’@siteOwnerPhone@’/>
<input type=’hidden’ name=’siteOwnerAddress’
value=’@siteOwnerAddress@’/>
<input type=’hidden’ name=’siteOwnerCity’
value=’@siteOwnerCity@’/>
<input type=’hidden’ name=’siteOwnerCountry’
value=’@siteOwnerCountry@’/>
Page 60

60 Configuring the Trial Mode
<table cellspacing=’0’ class=’sb-btn x-btn x-btn-noicon’>
<tbody class=’x-btn-small x-btn-icon-small-left’>
<tr>
<td class=’x-btn-tl’><i> </i></td>
<td class=’x-btn-tc’></td>
<td class=’x-btn-tr’><i> </i></td>
</tr>
<tr>
<td class=’x-btn-ml’><i> </i></td>
<td class=’x-btn-mc’><em
unselectable=’on’ class=”><button type=’submit’ class=’x-btn-text’
onmouseover=’Ext.get(this).up(‘table’).addClass(‘x-btn-over’)’
onmouseout=’Ext.get(this).up(‘table’).removeClass(‘x-btnover’)’>Buy</button></em></td>
<td class=’x-btn-mr’><i> </i></td>
</tr>
<tr>
<td class=’x-btn-bl’><i> </i></td>
<td class=’x-btn-bc’></td>
<td class=’x-btn-br’><i> </i></td>
</tr>
</tbody>
</table>
</form>
</td>
</tr>
</table>
</div>”
)));
$library->requestToApi(‘/system/trial-mode/messages/’, WpbApi::PUT,
array($properties));
?>
Page 61

Configuring the Trial Mode 61
Customizing Text in E-mail Notices
To customize the appearance and the text in the e-mail message sent to users who
create trial sites, use the following API method:
URI: /api/5.3/system/trial-mode/messages/
HTTP method: PUT
Within a request, you can pass the following data in the JSON format:
[[{
“localeCode”:”en_US”,
“messages”:{
“initialMailSubject”:”_localized_message_”,
“initialMailHtml”:”_localized_message_”}
},{
“localeCode”:”de_DE”,
“messages”:{
“initialMailSubject”:”_localized_message_”,
“initialMailHtml”:”_localized_message_”}
}]]
Where:
initialMailSubject - is the subject of the e-mail message sent to users who create
trial sites.
initialMailHtml - is the text of the e-mail message sent to users who create trial
sites.
Example
Message subject: Your website was created
Message text:
<p>Dear %siteOwnerName%,</p>
<p>Thank you for your interest in our services.</p><p>Your trial website at
%trialSiteUrl% will be available for editing until %trialSiteExpireDate%. If you would
like to keep this site and publish it on the Internet, please sign up for our services
here: <a
href=”http://example.com/sign_up.php?sbSiteUuid=&sbSiteUuid&&sbOneTimeBack
Url=&sbOneTimeBackUrl&&siteOwnerName=&siteOwnerName&&siteOwnerEmail=
&siteOwnerEmail&”>http://example.com/sign_up.php?sbSiteUuid=&sbSiteUuid&&s
bOneTimeBackUrl=&sbOneTimeBackUrl&&siteOwnerName=&siteOwnerName&&si
teOwnerEmail=&siteOwnerEmail&</a></p>
Page 62

62 Configuring the Trial Mode
<p>With best regards,<br>Hosting Provider, Inc.</p>
The following code sample sets the text for the e-mail notices by means of the
Presence Builder API library:
<?php
require_once ‘/<path_to_the_Presence Builder_API_library>/WpbApi.php’;
$config = array(
‘applicationApiUrl’ => ‘https://<Presence
Builder_server_address>:443/api/5.3’,
‘user’ => ‘admin’,
‘password’ => ‘{<admin_password>}’
);
$library = new WpbApi($config);
$subject = “; // Here you should insert the text of your message subject
$message = “; // Here you should insert the message text
$properties = array(array(
‘localeCode’ => ‘en_US’,
‘messages’ => array(
‘initialMailSubject’ => $subject,
‘initialMailHtml’ => $message
)
));
$library->requestToApi(‘/system/trial-mode/messages/’, WpbApi::PUT,
array($properties));
?>
Page 63

Configuring the Trial Mode 63
Customizing the Pop-Up Message
To customize the pop-up message that shows when users click the Publish button, use
the following API method:
URI: /api/5.3/system/trial-mode/messages/
HTTP method: PUT
Within a request, you can pass the following data in the JSON format:
[[{
“localeCode”:”en_US”,
“messages”:{
“trialSiteSignUpPublishTitle”:”_localized_message_”,
“trialSiteSignUpPublishMsg”:”_localized_message_”}
},{
“localeCode”:”de_DE”,
“messages”:{
“trialSiteSignUpPublishTitle”:”_localized_message_”,
“trialSiteSignUpPublishMsg”:”_localized_message_”}
}]]
Where:
trialSiteSignUpPublishTitle - is the title of the dialog window shown upon clicking
the Publish button to a new customer who is creating a trial site.
trialSiteSignUpPublishMsg - is the text shown in the pop-up window after a user
clicks the Publish button.
Example
Dialog window title: “How to Publish Your Website”
Message text: “Thank you for trying out our website design tool. If you want to publish
your website on the Internet, please sign up for our services. Sign Up Now.”
HTML Code for the Message
<table cellspacing=’0’ border=’0’><tr><td class=’sb-tbb-icon’></td>
<td valign=’top’>
Thank you for trying out our website design tool. If you want
to publish your website on the Internet, please sign up for our
services.
<form method=’post’
action=’@sbHttpHost@@sign_up.php@?@queryString@’>
Page 64

64 Configuring the Trial Mode
<input type=’hidden’ name=’sbSiteUuid’ value=’@sbSiteUuid@’/>
<input type=’hidden’ name=’sbOneTimeBackUrl’ value=’@sbOneTimeBackUrl@’/>
<input type=’hidden’ name=’siteOwnerName’ value=’@siteOwnerName@’/>
<input type=’hidden’ name=’siteOwnerCompanyName’
value=’@siteOwnerCompanyName@’/>
<input type=’hidden’ name=’siteOwnerEmail’ value=’@siteOwnerEmail@’/>
<input type=’hidden’ name=’siteOwnerPhone’ value=’@siteOwnerPhone@’/>
<input type=’hidden’ name=’siteOwnerAddress’ value=’@siteOwnerAddress@’/>
<input type=’hidden’ name=’siteOwnerCity’ value=’@siteOwnerCity@’/>
<input type=’hidden’ name=’siteOwnerCountry’ value=’@siteOwnerCountry@’/>
<br/><br/>
<table cellspacing=’0’ class=’sb-btn x-btn x-btn-noicon’>
<tbody class=’x-btn-small x-btn-icon-small-left’>
<tr>
<td class=’x-btn-tl’><i> </i></td>
<td class=’x-btn-tc’></td>
<td class=’x-btn-tr’><i> </i></td>
</tr>
<tr>
<td class=’x-btn-ml’><i> </i></td>
<td class=’x-btn-mc’><em unselectable=’on’
class=”><button type=’submit’ class=’x-btn-text’
onmouseover=”QUOTE”Ext.get(this).up(‘table’).addClass(‘x-btnover’)”QUOTE”
onmouseout=”QUOTE”Ext.get(this).up(‘table’).removeClass(‘x-btnover’)”QUOTE”>Sign Up Now</button></em></td>
<td class=’x-btn-mr’><i> </i></td>
</tr>
<tr>
<td class=’x-btn-bl’><i> </i></td>
<td class=’x-btn-bc’></td>
<td class=’x-btn-br’><i> </i></td>
</tr>
</tbody>
</table>
</form>
</td>
</tr>
</table>
Page 65

Configuring the Trial Mode 65
The following code sample sets the text for the pop-up message box by means of the
Presence Builder API library:
<?php
require_once ‘/<path_to_the_Presence Builder_API_library>/WpbApi.php’;
$config = array(
‘applicationApiUrl’ => ‘https://<Presence
Builder_server_address>:443/api/5.3’,
‘user’ => ‘admin’,
‘password’ => ‘{<admin_password>}’
);
$library = new WpbApi($config);
$dialogWindowTitle = “; // Here you should insert the title of the dialog window
$dialogWindowMessage = “; // Here you should insert the message
$properties = array(array(
‘localeCode’ => ‘en_US’,
‘messages’ => array(
‘trialSiteSignUpPublishTitle’ => $dialogWindowTitle,
‘trialSiteSignUpPublishMsg’ => $dialogWindowMessage
)
));
$library->requestToApi(‘/system/trial-mode/messages/’, WpbApi::PUT,
array($properties));
?>
Page 66

This chapter describes how to rebrand Presence Builder to show your custom product
C H A P T E R 9
Rebranding Presence Builder
name, product and company logo images; to take users to a branded website with
user’s documentation; and to show a customized Getting Started video tutorial.
It also describes how to embed your own Getting Started video in languages other than
English. You might want to prepare custom localized videos if most of your customers
speak other languages.
Where to Find These Items in the Product?
The Product Name
The product name is shown in the editor’s toolbar and in various information and error
messages. Note that the product version cannot be changed.
Page 67

Rebranding Presence Builder 67
To learn how to change the product name, see the section Changing the Editor’s Name
(on page 69).
The Product and Company Logo Images, and the Copyright Notice
The Presence Builder logo, the company logo (that of Parallels), and the copyright
notice are shown only on the topic selection page. This is the first page that users see
when they visit the editor.
Page 68

68 Rebranding Presence Builder
In this chapter:
Changing the Editor’s Name ..............................................................................69
Changing the Product and Company Logos, Hyperlinks, and Copyright Notice .70
Changing the Link to the User’s Guide ...............................................................71
Changing the Links to the Getting Started Video ................................................72
The product logo, the company logo, and the copyright notice have hyperlinks attached
to them. The product logo refers to http://www.parallels.com/products/web-presencebuilder, the company logo and the copyright notice refer to the Parallels site at
http://www.parallels.com.
To learn how to change these logos, hyperlinks, and the copyright notice, see the
section Changing the Product and Company Logos, Hyperlinks, and Copyright Notice
(on page 70).
Links to the User’s Guide and Getting Started Video
The links to the User’s Guide and the Getting Started video are accessible from the
Presence Builder toolbar > Help menu. Users are also advised to watch the Getting
Started video when they visit the editor for the first time.
The User’s Guide is hosted on the Parallels site, and the Getting Started video is
hosted on the Parallels YouTube channel.
To learn how to change or remove these links, refer to the corresponding sections of
this document:
Changing the Links to the User’s Guide. (on page 71)
Changing the Link to the Getting Started Video. (on page 72)
Page 69

Rebranding Presence Builder 69
Changing the Editor’s Name
To change the editor’s name Parallels Presence Builder to a custom
name:
1. On the Presence Builder server, open the configuration file
/usr/local/sb/config.
2. In the [general] section of the file, locate the following line:
product = “Parallels Presence Builder”
3. Type the desired product name instead of Parallels Presence Builder, and
save the file.
Page 70

70 Rebranding Presence Builder
Changing the Product and Company
Logos, Hyperlinks, and Copyright Notice
To replace the product logo:
1. Prepare an image file in PNG format and save it as product-
logo.png.
The image should be 50 pixels in height to perfectly fit in the header area.
2. Upload the file to the directory
/usr/local/sb/htdocs/skins/default/images/ on the
Presence Builder server. Confirm overwriting when prompted.
To replace the company logo:
1. Prepare an image file in PNG format and save it as producer-
logo.png.
The image should be 43 pixels in height to perfectly fit in the header area.
2. Upload the file to the directory
/usr/local/sb/htdocs/skins/default/images/ on the
Presence Builder server. Confirm overwriting when prompted.
To change the links attached to the product and company logos:
1. On the Presence Builder server, open the configuration file
/usr/local/sb/config.
2. In the [general] section of the file, locate the following lines:
product_website_url = “http://www.parallels.com/products/web-presencebuilder”
company_website_url = “http://www.parallels.com”
3. Type the desired addresses within the quotation marks and save the
file.
To change the company name shown in the copyright notice:
1. On the Presence Builder server, open the file
/usr/local/sb/resources/locale/<locale_code>/Common.l
ng.
2. Locate the following line:
copyright = “© Copyright 1999-%s Parallels.”
3. Type the desired text within the quotation marks and save the file.
Page 71

Rebranding Presence Builder 71
Note that a hyperlink to www.parallels.com is automatically added to the copyright
notice. If you have previously specified a website address by adding the line
company_website_url = “your-company-name.com” to the configuration file
/usr/local/sb/config (as described in the preceding procedure), this hyperlink
will point to that address.
Changing the Link to the User’s Guide
To change the link to the User’s Guide:
1. On the Presence Builder server, open the configuration file
/usr/local/sb/config.
2. Add the line [help] to the file. If it is already present, skip this step.
3. Add the following line after the line [help]:
help_url = <link_to _your_documentation>
For example: http://example.com/userguide/index.html?%%CONTEXT%%
At the end of this link, the mechanism providing context-sensitive help will
automatically add a GUI screen identifier, so the resulting URL will appear as:
http://example.com/user-
guide/index.html?%2FSiteBuilder%2FPanel.
The value that you specify as help_url may contain the following placeholders:
%%LOCALE%% - 4-letter code of the locale currently set in the editor, for example,
en-US or ru-RU.
%%VERSION%% - full Presence Builder version, for example, 11.1.0.
%%MAJOR_VERSION%% - major Presence Builder version (first two numbers),
for example, “11.1”.
%%CONTEXT%% - GUI screen identifier.
For example: If a user views the Presence Builder 11 editor in English, and clicks
the Help link on the first page of the editor (which opens after clicking the Create Site
button), the link
http://example.com/%%MAJOR_VERSION%%/%%VERSION%%/%%LOCALE%%
/user-guide/index.html?%%CONTEXT%% will be replaced with
http://example.com/11.0/11.1.0/en-US/user-
guide/index.html?%2FSiteBuilder%2FPanel.
4. Save the file.
Page 72

72 Rebranding Presence Builder
Changing the Links to the Getting Started
Video
To change the link to the Getting Started video:
1. On the Presence Builder server, open the configuration file
/usr/local/sb/config.
2. In the [help] section, Add the following lines after the line [help]:
getting_started_video_url = <video_link>
getting_started_video_enabled = true
3. Save the file.
To use a custom Getting Started video for a specific language:
1. On the Presence Builder server, open the configuration file
/usr/local/sb/config.
2. Add the following line below getting_started_video_url:
getting_started_video_url_locale_<locale-name> = <localized_video_link>
Where <locale-name> is the four-letter code of the Presence Builder locale (for
example, en_US or ru_RU) in which the video will show.
Note: The locale must be supported by the Presence Builder editor. For a list of
supported languages and locale codes, refer to the section Generating a Security
Token for Accessing a Site (on page 102).
3. Ensure that the file contains the following line:
getting_started_video_enabled = true
4. Save the file.
To remove the link to the Getting Started video:
1. On the Presence Builder server, open the configuration file
/usr/local/sb/config.
2. Add the line [help] to the file. If it is already present, skip this step.
3. Add the following line after the line [help]:
getting_started_video_enabled = false
If the file contains the line getting_started_video_enabled = true, just
change true to false.
4. Save the file.
Page 73

This chapter describes how to change the behavior of certain user interface elements
C H A P T E R 10
Customizing the Functionality of
Presence Builder
and how to make certain functions of the Presence Builder editor unavailable to
customers. In particular, it explains how to perform the following tasks:
Specify the URLs to which users should be redirected after removing a website
from the editor; on attempting to use the editor after their sessions expire; and on
attempting to access the editor without authorization.
If, while editing a site, a user leaves the browser window open for a long time
without performing any actions, their session expires. On attempt to resume editing
in the browser they will be taken to a blank page.
If a user attempts to go to the editor by typing a URL in their browser, they will be
taken to a blank page.
After removing a site from the editor, the user is taken back to the editor, and if the
trial mode is switched on, a trial site is automatically created for them. If the trial
mode is switched off, then the user is taken to a blank page.
In all of these cases, the page URL is set to sitebuilder.<hostname>/. We
suggest that you change the URL to point to the login page of your hosting
software.
Prohibit your customers from removing their sites from the editor. You can do this
by removing the Remove Site button.
Make the following modules unavailable in the editor: Embedded Video, Image
Gallery, Image Slider, Blog, Online Store, Shopping Cart, Commenting, Contact
Form, Social Sharing, Advertisement, Search, Navigation, Breadcrumbs, Banner,
Site Logo, and Script.
Remove the option to use the following Google services: Google site search,
Google Analytics, Picasa Web Albums, Google Fonts, Google Maps.
Make the functionality for importing sites from SiteBuilder 4.5 unavailable.
Expand the library of website banner images that are available to customers.
Expand the library of design templates that are available to customers.
Enable your customers to request technical assistance. This can be done by adding
a special button to the editor.
Enable your customers to submit feedback. This can be done by adding a special
button to the editor.
Enable your customers to easily return to your hosting control panel software from
the Presence Builder editor, by adding a special button.
Remove the option to publish a copy of a website on Facebook.
Configure the editor to remove published sites from hosting accounts when users
click the Remove Site button in the editor.
Page 74

74 Customizing the Functionality of Presence Builder
In this chapter:
Redirecting Users to the Login Page ..................................................................74
Prohibiting Users from Removing Their Sites .....................................................75
Making Modules Unavailable in the Editor .........................................................75
Making the Site Import Functionality Unavailable ...............................................76
Adding Custom Banner Images .........................................................................77
Adding Custom Design Templates .....................................................................79
Adding the Support Button .................................................................................80
Adding the Link for Sending Feedback...............................................................81
Adding the Button to Return Users to Control Panel ..........................................82
Removing the Option to Add a Site Copy to Facebook ......................................83
Disabling Access to the Google Services from Presence Builder .......................84
Removing Sites from Hosting Accounts .............................................................85
Redirecting Users to the Login Page
The following procedure describes how to redirect users to the login page after their
site has been removed or their session has expired.
To redirect users to the login page:
1. On the Presence Builder server, open the configuration file
/usr/local/sb/config.
2. In the [general] section of the file, locate the following lines:
unauthorized_access_redirect_url = /
session_expired_redirect_url = /
removed_site_redirect_url = /
3. Delete the slashes (/) and type the URL of your hosting system’s login
page. For example: http://cp.example.com.
4. Save the file.
Page 75

Customizing the Functionality of Presence Builder 75
Prohibiting Users from Removing Their
Sites
The following procedure describes how to prevent your customers from deleting their
sites from the editor. You can do this by removing the Remove Site button.
To remove the button from the editor:
1. On the Presence Builder server, open the configuration file
/usr/local/sb/config.
2. In the [general] section of the file, locate the following line:
allow_delete_site_ui = true
3. Replace the true value with false.
4. Save the file.
Making Modules Unavailable in the Editor
If you want to prevent your customers from using certain modules in the editor, you can
make them unavailable. Unavailable modules are not visible in the editor, and therefore
are not accessible to customers.
During restoration of a website from a snapshot, the modules that you make
unavailable, and their content, are not restored. The user is notified that the snapshot
contains unavailable or unsupported functionality, and is prompted to choose whether
to restore the rest of the site, or cancel restoration.
When a new website based on a website topic is opened in the editor, the modules that
are unavailable are not added to the site.
To remove modules from the editor:
1. On the Presence Builder server, open the configuration file
/usr/local/sb/config.
2. In the [general] section of the file, add the following line:
hidden_widgets = <module’s code name 1>, <module’s code name 2>
Where <module’s code name 1> and <module’s code name 2> are code
names of the modules, separated by a comma.
3. Save the file.
The following is a list of codes for all modules in Presence Builder 11.5.
Page 76

76 Customizing the Functionality of Presence Builder
Module’s name in the editor
Module’s code name
Embedded Video
video
Image Gallery
imagegallery
Image Slider
slider
Blog
blog
Online Store and Shopping
Cart
eshop
Commenting
commenting
Contact Form
contact
Social Sharing
sharethis
Advertisement
advertisement
Map
map
Search
search
Navigation
navigation
Breadcrumbs
breadcrumbs
Site Logo
siteLogo
Script
script
Making the Site Import Functionality
Unavailable
If you want to prevent your customers from importing sites from SiteBuilder 4.5 hosting
accounts, you can remove the Import Site from SiteBuilder 4.5 button from the editor. This
can be done by adding a line to the configuration file.
To make the site import functionality unavailable to users:
1. On the Presence Builder server, open the configuration file
/usr/local/sb/config.
2. In the [general] section of the file, add the following line:
show_import_site_button = 0
3. Save the file.
Page 77

Customizing the Functionality of Presence Builder 77
Adding Custom Banner Images
This section explains how to add custom banner images to Presence Builder’s image
library, and make them available for selection in the editor.
Suppose, you have an image file with the name jungle.jpg, and you want to add it
to the editor. Do the following:
1. Resize the image to 960 pixels in width and 250 pixels in height, and
save it as header.jpg.
2. Create a copy of header.jpg, resize it to 200 pixels in width, and 57
pixels in height. Save it as preview.jpg.
3. Create a file with the name info.xml and insert the following lines into
it:
<?xml version=”1.0” encoding=”utf-8”?>
<header>
</header>
4. Connect over SSH to the server where Presence Builder is installed.
5. Locate the directory /sb/htdocs/headers/, and create a
subdirectory with the banner name. For example,
/sb/htdocs/headers/jungle_01.
6. Upload the header.jpg, preview.jpg, and info.xml files that you
prepared to the directory /sb/htdocs/headers/jungle_01/.
7. Add keywords for the image.
Keywords are used for the following purposes:
Binding of images to website topics. When a new site is created based on a website
topic, the editor searches for banner images that may be relevant to the topic,
and adds one of them to the generated website. It also uses the relevant
banners in generated design templates, which users can preview and select in
the editor > Design tab > Templates. The relevance is determined by matching
keywords in the website topic’s meta data and in the headers.lng file
containing descriptions of all banner images in the form of keywords.
Enabling users to find images by keywords in the banner selection menu.
To add keywords, do the following:
a. Open for editing the file
/sb/resources/locale/<locale_code>/headers.lng.
b. Add a string in the following format:
<header_id> = “<keyword_1>,<keyword_2>,<keyword_3>”
Page 78

78 Customizing the Functionality of Presence Builder
Where:
<header_id> is the image ID that you specified in step 6, but with certain
transformations: all uppercase letters must be changed to lower case,
hyphens must be removed, the next symbol following a hyphen must be
changed to upper case.
For example:
If the <header_id> is Jungle_01-eXample, then it must be changed to
jungle_01Example.
If the <header_id> is my-super-banner, then it should be transformed to
mySuperBanner.
If the <header_id> is my_super_banner, then it should be transformed to
my_super_banner.
<keyword> is a human-readable word that describes the image or identifies
items on the picture.
You can use several keywords separated by commas. White spaces can be
used only if they are part of a descriptive phrase or a combination of words.
Example:
jungle01 = “jungle,tropics,green,nature,family travel”
c. Save the file.
8. Issue the following command:
For Presence Builder running under Parallels Plesk -
/usr/local/psa/bin/sw-engine-pleskrun
/usr/local/sb/utils/updateResources.php header
For Presence Builder Standalone - /usr/bin/sw-engine
/usr/local/sb/utils/updateResources.php header
Now you can go to the editor and open the list of banner images. The newly added
image should be at the end of the list.
Page 79

Customizing the Functionality of Presence Builder 79
Adding Custom Design Templates
This section explains how you can prepare your own design templates and make them
available to your customers.
A design template is a combination of website elements (banner, footer, sidebars, sitewide modules), page layout settings, and colors, which are applied to a site when it is
created in the editor.
The editor provides a selection of 24 design templates, 16 of which are randomly
generated, and 8, created by a graphic designer especially for Presence Builder.
Users can view the design templates and apply them to their sites in the editor, on the
Design tab > Templates. Randomly generated designs are listed in the Generated section,
and the templates prepared by the designer, in the Special section.
Preparing a Custom Design Template
The following site elements and settings can be saved in a design template:
The website layout: the location and size of the header, footer, content areas, and
sidebars.
The banner image.
All site-wide modules.
The color scheme or individually selected colors.
The fonts.
The information about the borders and shapes of the page elements’ corners.
To create a custom design template and add it to Presence Builder editor:
1. Log in to the editor and start creating a site.
2. Adjust the layout and design.
If you need instructions on how to do this, refer to Presence Builder User’s Guide,
sections Changing Your Website Layout and Selecting Website Colors, Fonts, and Styles for
Borders and Corners.
3. Add the necessary site-wide modules and a banner.
If you need instructions on how to do this, refer to Presence Builder User’s Guide, the
chapter Content: Text, Tables, Images, Video, Forms, and Scripts, and the section
Changing the Website Header Elements.
4. Save the design template: Go to the Design tab, and click Export Design.
5. On the Presence Builder server, create a directory in
/usr/local/sb/htdocs/templates/generic/presets/.
The directory name should correspond to the desired name of the new template.
For example:
/usr/local/sb/htdocs/templates/generic/presets/my_mega_design.
Page 80

80 Customizing the Functionality of Presence Builder
6. Extract the contents of the ZIP archive with the template into the
directory you have just created.
7. Prepare a thumbnail that will be shown in the editor: Make a screen
capture of your design in the editor, resize the picture to 213 pixels in
width and 151 pixel in height, and save it as screenshot.png.
8. Upload the file screenshot.png to the directory
/usr/local/sb/htdocs/templates/generic/presets/<your_
template_name>.
The template will show in Design tab > Templates > Special section.
To delete a custom design template, delete the directory
/usr/local/sb/htdocs/templates/generic/presets/<your_tem
plate_name> from the server.
Adding the Support Button
To enable your customers to submit technical support requests from the Presence
Builder editor, you can add to the editor a button with the label Support. The button will
be placed in the editor’s toolbar, in the Help menu.
To add the button:
1. On the Presence Builder server, open the configuration file
/usr/local/sb/config.
2. In the [help] section of the file, add the following line:
support_url = <URL>
Where <URL> is the address of your online support help desk or a support forum.
For example: http://helpdesk.example.com.
The value that you specify as support_url may contain the following placeholders:
%%LOCALE%% - 4-letter code of the locale currently set in the editor, for example,
en-US or ru-RU.
%%VERSION%% - full Presence Builder version, for example, 11.1.0.
%%SITE_UUID%% - website ID.
For example:
If a user views the Presence Builder 11.1 editor in English, and clicks the Support
link, the link
http://helpdesk.example.com/index.php?locale=%%LOCALE%%&versi
on=%%VERSION%%&siteid=%%SITE_UUD%% will be transformed to
http://helpdesk.example.com/index.php?locale=en-
US&version=11.1.0&siteid=93ea19b0-7537-fb22-d603-685e29cfd3e8.
3. Save the file.
Page 81

Customizing the Functionality of Presence Builder 81
Adding the Link for Sending Feedback
If you want to enable customers to send you feedback, you can do the following:
1. Set up a forum on your site.
2. Configure the editor to show a link with the label Give Feedback, which will direct
users to that forum.
The link will be placed in the editor’s toolbar, in the Help menu.
To add the link:
1. On the Presence Builder server, open the configuration file
/usr/local/sb/config.
2. In the [help] section, locate the line containing feedback_url. If this
line is not present, add the following line:
feedback_url = “<URL to your online forum>”
where “<URL to your online forum>” is your forum’s address enclosed in quotation
marks.
3. Save the file.
To remove the link:
1. On the Presence Builder server, open the configuration file
/usr/local/sb/config.
2. In the [help] section, locate the line containing feedback_url, and
remove the address enclosed in quotation marks. If this line is not
present, add the following line:
feedback_url = “”
3. Save the file.
Page 82

82 Customizing the Functionality of Presence Builder
Adding the Button to Return Users to
Control Panel
To enable your customers to easily return to your hosting control panel software from
the Presence Builder editor, you can add to the editor a button with the label Return to
Control Panel. The button will be placed in the editor’s toolbar, next to the Publish button.
To add the button:
1. On the Presence Builder server, open the configuration file
/usr/local/sb/config.
2. In the [general] section of the file, add the following line:
control_panel_link = <URL>
Where <URL> is the address of your hosting system’s login page. For example:
http://cp.example.com.
The editor will automatically append the site ID to the URL by adding the
?siteuuid={UUID} parameter.
3. Save the file.
Note: In some cases, the URL to return to your hosting control panel is specific for
each customer. For example, this URL can contain a customer’s login name or
information about their session. In this case, use the API means and specify the URL to
return to your control panel by the security token parameter controlPanelLink (on
page 102).
Page 83

Customizing the Functionality of Presence Builder 83
Removing the Option to Add a Site Copy
to Facebook
If you want to prevent your customers from publishing website copies on Facebook,
you can remove the corresponding option from the editor. This can be done by adding
a line to the configuration file.
To make the functionality for publishing sites on Facebook unavailable to
users:
1. On the Presence Builder server, open the configuration file
/usr/local/sb/config.
2. In the [general] section of the file, add the following line:
facebook_application_url = “”
3. Save the file.
Page 84

84 Customizing the Functionality of Presence Builder
Disabling Access to the Google Services
from Presence Builder
Users of Presence Builder can use several Google services on their sites:
Google site search
Google Analytics
Picasa Web Albums
Google Fonts
Google Maps
If you operate in a country that requires providers to block access to Google services,
you might want to remove the corresponding options from the editor to comply with the
local legislation and to decrease site loading times in Presence Builder.
To make the Google services unavailable to users:
1. On the Presence Builder server, open the configuration file
/usr/local/sb/config.
2. In the [general] section of the file, add the following lines:
google_search_enabled = false
google_analytics_enabled = false
picasa_enabled = false
google_fonts_enabled = false
hidden_widgets= map
3. Save the file.
Page 85

Customizing the Functionality of Presence Builder 85
Removing Sites from Hosting Accounts
When users remove a site from the Presence Builder editor, only the current site draft
opened in the editor and saved site snapshots are removed. By default, published sites
are not removed from hosting accounts.
If you want to save disk space, we recommend that you configure the editor to remove
sites from hosting accounts when their owners click the Remove Site button.
To do this:
1. On the Presence Builder server, open the configuration file
/usr/local/sb/config.
2. In the [general] section of the file, locate the following line:
delete_published_site_files = false
3. Change false to true.
4. Save the file.
Page 86

This chapter describes how to access service logs for troubleshooting purposes.
C H A P T E R 11
Viewing Service Logs
The main log file of Presence Builder can be found in the following location:
/usr/local/sb/tmp/sitebuilder.log
When you upgrade Presence Builder, all events are recorded in the following log file:
/usr/local/sb/tmp/upgrade.log
When you use the console utility sb_config for setting the administrator’s password,
all events are recorded in the following log file:
/usr/local/sb/tmp/sb_config-<date and time>.log
When websites are created and edited in Presence Builder, all events are recorded in
the following log files:
/usr/local/sb/logs/<two initial letters of a site UUID>/<site UUID>.log
When unhandled exceptions occur, they are recorded in the files defined by PHP
settings. By default, these files can be found in the following locations:
/var/log/apache2/sitebuilder_error.log
/var/log/apache2/sitebuilder_error.log.ssl
Changing Logging Settings
The level of detail in log files and other logging settings can be defined in the Presence
Builder configuration file /usr/local/sb/config.
The logging settings are located in the [log] section:
system_log_level = 2
site_log_level = 2
rotate = 1
max_file_size = 1024
max_log_files = 10
Where:
system_log_level is the level of detail in server-wide log files. It can take values
from 1 (more detail) to 5 (less detail).
site_log_level is the level of detail in per-site log files. It can take values from 1
(more detail) to 5 (less detail).
Page 87

Viewing Service Logs 87
rotate - specifies whether to rotate per-site logs. When this option is set to 0 or
false, log files are continually appended with new data and can grow too large. When
this option is set to 1 or true, the log rotation is performed: Every time a log file
reaches 1024 kilobytes (the default setting defined by the max_file_size value), it is
saved under a new name, with a number appended to the end of the file name, and a
new log file is created. When the total number of files reaches the value specified with
the option max_log_files, the oldest log file is removed.
Page 88

To remove Parallels Presence Builder Standalone, issue the following
C H A P T E R 12
Removing Parallels Presence Builder
Standalone
commands in the console:
On Debian-based systems:
# apt-get remove wpb
On CentOS-based systems:
# yum remove wpb
Note that running these commands will not remove the product’s database or data
related to customers’ websites. These data are stored in /usr/local/sb/.
Page 89

Parallels Presence Builder Standalone API is a programming interface that allows
In this chapter:
Request Format ................................................................................................ 90
Response Format .............................................................................................. 94
Operations on Resources .................................................................................. 96
C H A P T E R 13
Appendix A. API Reference: Methods,
Operations, and Resources
Presence Builder installations to be managed without an administrative graphical user
interface. The API is based on the REST approach. All methods require basic
authentication and operate only via HTTPS.
Access to the API is provided through HTTP requests. Operations are performed by
means of HTTP methods: GET, POST, PUT, and DELETE.
The object model comprises two types of resources: system and sites. The
resources are referenced by their namespace URIs.
By using the system methods, you can learn your current version of Parallels
Presence Builder Standalone.
By using the sites methods, you can create, edit, and remove sites, view information
about existing sites, retrieve a token for site editing, and set and update publishing
settings and site owner’s contact information.
Page 90

90 Appendix A. API Reference: Methods, Operations, and Resources
Request Format
All requests to Parallels Presence Builder Standalone’s REST API require you to
authenticate using HTTP basic authentication method to convey your identity. The
username is admin, and the password is the one you set with the sb_config console
utility before installing the license key (on page 13).
API is accessed through HTTPS via port 443. Attempts to access the API over HTTP
result in the response “401 Unauthorized”.
Retrieving Resources with the HTTP GET Method
To retrieve a representation of a resource, make a GET request to the resource’s URL.
Possible GET response status codes:
200 OK. The request was successful.
400. Bad Request. The request cannot be fulfilled because of bad syntax.
401 Unauthorized. Wrong username or password.
403. Forbidden. The server refused to respond to the request.
404. Not Found. The requested resource was not found.
500. Internal Server Error.
Code example in PHP
The following example script retrieves the current version of Presence Builder. In this
example, /usr/local/sb/utils/api-php/src is the directory where we have the
PHP API library.
<?php
require_once ‘/usr/local/sb/utils/api-php/src/WpbApi.php’;
$config = array(
‘applicationApiUrl’ => ‘https://<your Presence Builder host
name>:443/api/5.3’,
‘user’ => ‘admin’,
‘password’ => ‘<Presence Builder password>’
);
$wpbApi = new WpbApi($config);
$wpbApi->requestToApi(‘/system/version’, WpbApi::GET);
Page 91

Appendix A. API Reference: Methods, Operations, and Resources 91
Request
GET /api/5.3/system/version/ HTTP/1.1
Authorization: Basic YWRtaW46YWRtaW4=
User-Agent: WBP API
Host: 192.168.10.1
Accept: /
Connection: close
Response
HTTP/1.1 200 OK
Date: Thu, 01 Nov 2012 02:40:49 GMT
Server: Apache/2.2.16 (Debian)
P3P: CP=”NON COR CURa ADMa OUR NOR UNI COM NAV STA”
Vary: Authorization
Connection: close
Transfer-Encoding: chunked
Content-Type: application/json
{”response”:”11.1.0”}
Creating or Updating Resources with the HTTP POST and PUT
Methods
To create resources and update their properties, you need to make the HTTP PUT or
POST requests to the resource’s URL.
Possible POST or PUT response status codes:
201 Created. The request was fulfilled and a new resource was created.
400. Bad Request. The request cannot be fulfilled because of bad syntax.
401 Unauthorized. Wrong username or password.
403. Forbidden. The server refused to respond to the request.
404. Not Found. The requested resource was not found.
500. Internal Server Error.
Page 92

92 Appendix A. API Reference: Methods, Operations, and Resources
Code example in PHP
The following example creates a site.
<?php
require_once ‘/<path to the Presence Builder API library>/src/WpbApi.php’;
$config = array(
‘applicationApiUrl’ => ‘https://<your Presence Builder host
name> :443/api/5.3’,
‘user’ => ‘admin’,
‘password’ => ‘<Presence Builder password>’
);
$wpbApi = new WpbApi($config);
$siteData = array(
‘state’ => ‘regular’,
‘publicationSettings’ => array(
‘targetUrl’ =>
‘ftp://user:password@ftp.example.com/httpdocs’,
‘webSiteUrl’ => ‘http://example.com’
),
‘ownerInfo’ => array(
‘personalName’ => ‘John Doe’,
‘companyName’ => ‘My Company LTD’,
‘email’ => ‘admin@example.com’,
‘phone’ => ‘+1-000-000-0000’,
‘address’ => ‘Address’,
‘city’ => ‘City’,
‘state’ => ‘State’,
‘zip’ => ‘123123’,
‘country’ => ‘Country’
)
);
// Create a new site with the $siteData structure
$siteUuid = $wpbApi->requestToApi(‘/sites/’, WpbApi::POST, array($siteData));
Request
POST /api/5.3/sites/ HTTP/1.1
Authorization: Basic YWRtaW46YWRtaW4=
User-Agent: WBP API
Host: 192.168.10.1
Accept: /
Page 93

Appendix A. API Reference: Methods, Operations, and Resources 93
Connection: close
Accept-encoding: gzip, deflate
Content-type: application/json
Content-Length: 373
[{”state”:”regular”,”publicationSettings”:{”targetUrl”:”ftp:\/\/user:password@ftp.example.c
om\/httpdocs”,”webSiteUrl”:”http:\/\/example.com”},”ownerInfo”:{”personalName”:”John
Doe”,”companyName”:”My Company LTD”,”email”:”admin@example.com”,”phone”:”+1000-0000000”,”address”:”Address”,”city”:”City”,”state”:”State”,”zip”:”123123”,”country”:”Country”
}}]
Response
HTTP/1.1 201 Created
Date: Thu, 01 Nov 2012 02:50:20 GMT
Server: Apache/2.2.16 (Debian)
P3P: CP=”NON COR CURa ADMa OUR NOR UNI COM NAV STA”
Vary: Authorization
Connection: close
Transfer-Encoding: chunked
Content-Type: application/json
{”response”:”6d3f6f9f-55b2-899f-5fb4-ae04b325e360”}
Deleting Resources with the HTTP Delete Method
To delete a resource, make an HTTP DELETE request to the resource’s URL.
Possible DELETE response status codes:
200 OK. The request was successful.
400. Bad Request. The request cannot be fulfilled because of bad syntax.
401 Unauthorized. Wrong username or password.
403. Forbidden. The server refused to respond to the request.
404. Not Found. The requested resource was not found.
500. Internal Server Error.
Code example in PHP
The following example deletes a site.
<?php
Page 94

94 Appendix A. API Reference: Methods, Operations, and Resources
require_once ‘/<path to the Presence Builder API library>/src/WpbApi.php’;
$config = array(
‘applicationApiUrl’ => ‘https://<your Presence Builder host
name> :443/api/5.3’,
‘user’ => ‘admin’,
‘password’ => ‘<Presence Builder password>’
);
$wpbApi = new WpbApi($config);
$siteUuid = ‘5a821ed8-78a9-f5d0-8895-4d7abf0fe4e0’;
$wpbApi->requestToApi(‘/sites/’ . $siteUuid, WpbApi::DELETE);
Request
DELETE /api/5.3/sites/5a821ed8-78a9-f5d0-8895-4d7abf0fe4e0/ HTTP/1.1
Authorization: Basic YWRtaW46YWRtaW4=
User-Agent: WBP API
Host: 192.168.10.1
Accept: /
Connection: close
Accept-encoding: gzip, deflate
Response
HTTP/1.1 200 OK
Date: Thu, 01 Nov 2012 03:14:18 GMT
Server: Apache/2.2.16 (Debian)
P3P: CP=”NON COR CURa ADMa OUR NOR UNI COM NAV STA”
Vary: Authorization
Connection: close
Transfer-Encoding: chunked
Content-Type: application/json
{”response”:”done”}
Page 95

Appendix A. API Reference: Methods, Operations, and Resources 95
Response Format
The API returns the resource representation in the JSON notation.
The following example shows a response from the server to a request for site
information.
HTTP/1.1 200 OK
Date: Thu, 01 Nov 2012 03:34:58 GMT
Server: Apache/2.2.16 (Debian)
P3P: CP=”NON COR CURa ADMa OUR NOR UNI COM NAV STA”
Vary: Authorization
Connection: close
Transfer-Encoding: chunked
Content-Type: application/json
{”response”:{”state”:”regular”,”creationDate”:”2012-1101T10:34:58+07:00”,”isPublished”:false,”publicationSettings”:{”targetUrl”:”ftp:\/\/user:pa
ssword@ftp.example.com\/httpdocs”,”webSiteUrl”:”http:\/\/example.com”,”fallbackIp”:nu
ll},”ownerInfo”:{”personalName”:”John Doe”,”companyName”:”My Company
LTD”,”phone”:”+1-000-0000000”,”email”:”admin@example.com”,”address”:”Address”,”city”:”City”,”state”:”State”,”zi
p”:”123123”,”country”:”Country”}}}
Exceptions and Error Codes
The following exceptions are returned with error codes in the response headers:
400. Bad Request. The request cannot be fulfilled because of bad syntax.
401 Unauthorized. Wrong username or password.
403. Forbidden. The server refused to respond to the request.
404. Not Found. The requested resource was not found.
500. Internal Server Error.
Page 96

96 Appendix A. API Reference: Methods, Operations, and Resources
Operations on Resources
Next in this section:
Retrieving the Software Version ........................................................................ 97
Creating a Site .................................................................................................. 98
Generating a Security Token for Accessing a Site ............................................. 102
Creating a Site Based on a Website Topic ........................................................ 106
Retrieving Information About a Specific Site ...................................................... 112
Retrieving Information About All Sites ............................................................... 115
Changing Site Properties and Settings .............................................................. 118
Publishing a Website ......................................................................................... 122
Deleting a Site ................................................................................................... 123
Retrieving the Current Content of the Promotional Footer ................................. 125
Setting Trial Mode Messages ............................................................................ 127
Changing the Default Content of the Promotional Footer .................................. 137
Showing the Promotional Footer on Websites ................................................... 139
Removing the Promotional Footer from Websites ............................................. 141
This section provides a reference for all resource types and methods that you can use
when interacting with the system over the API.
Page 97

Appendix A. API Reference: Methods, Operations, and Resources 97
Retrieving the Software Version
URI: /api/5.3/system/version/
HTTP method: GET
HTTP response code: 200.
Parameters that can be passed within a response: version number.
Code example in PHP
<?php
require_once ‘/<path to the API library>/src/WpbApi.php’;
$config = array(
‘applicationApiUrl’ => ‘https://<your Presence Builder host
name>:443/api/5.3’,
‘user’ => ‘admin’,
‘password’ => ‘<Presence Builder password>’
);
$wpbApi = new WpbApi($config);
$version = $wpbApi->requestToApi(‘/system/version’, WpbApi::GET);
Request
GET /api/5.3/system/version/ HTTP/1.1
Authorization: Basic YWRtaW46YWRtaW4=
User-Agent: WBP API
Host: 192.168.10.1
Accept: /
Connection: close
Accept-encoding: gzip, deflate
Response
HTTP/1.1 200 OK
Date: Thu, 01 Nov 2012 02:40:49 GMT
Server: Apache/2.2.16 (Debian)
Page 98

98 Appendix A. API Reference: Methods, Operations, and Resources
P3P: CP=”NON COR CURa ADMa OUR NOR UNI COM NAV STA”
Parameter name
Parameter values
Parameter description
state
trial | suspended | regular
This parameter is optional.
It specifies whether the site is in the trial
mode, suspended or active (regular
value). Sites in the trial mode can be
edited, but cannot be published to a
hosting account.
publicationSett
ings
“publicationSettings”:
{”targetUrl”:”ftp://username:pass
word@ftp.example.com/path”,
“webSiteUrl”:”http://example.com
”,
“fallbackIp”:”192.168.1.3”
}
This parameter is optional.
It specifies where to publish the site
over FTP and what account credentials
to use:
targetUrl - the FTP account
username, password, and address
for uploading the site. This is a
required parameter.
webSiteUrl - the address at which
the published site must be available.
This is a required parameter.
fallbackIP - the IP address
associated with the site’s domain
name. It is used by the editor in
cases when the domain name
cannot be resolved in the DNS.
Although the fallbackIP parameter is
optional, if you specify it, then you must
also specify at least the targetUrl
and webSiteUrl values.
Vary: Authorization
Connection: close
Transfer-Encoding: chunked
Content-Type: application/json
{”response”:”11.1.0”}
Creating a Site
URI: /api/5.3/sites/
HTTP method: POST
HTTP response code: 201
The following table describes all parameters that can be passed within a request.
Page 99

Appendix A. API Reference: Methods, Operations, and Resources 99
ownerInfo
“ownerInfo”:
{”personalName”:”John Doe”,
“companyName”:”My Company
LTD”,
“phone”:”+1-954-555-555”,
“email”:”john@example.com”,
“address”:”New”,
“city”:”New York”,
“state”:”New York”,
“zip”:”10292”,
“country”:”United states”}
This parameter is optional.
It specifies the contact information of
the site owner, that is:
Personal name.
Company name.
Phone.
E-mail.
Address.
City.
State.
Postal or ZIP code.
Country.
isPromoFooterVi
sible
true | false
This parameter is optional.
It specifies whether a text box
containing an advertisement should be
shown in a website footer (a section
that appears at the bottom of every
page on a site).
To learn more about how to set the
content to be shown in the promotional
footer, see the section Configuring the
Promotional Footer (on page 40).
Page 100

100 Appendix A. API Reference: Methods, Operations, and Resources
Code example in PHP
The following example creates a site.
<?php
require_once ‘/<path to the Presence Builder API library>/src/WpbApi.php’;
$config = array(
‘applicationApiUrl’ => ‘https://<your Presence Builder host
name> :443/api/5.3’,
‘user’ => ‘admin’,
‘password’ => ‘<Presence Builder password>’
);
$wpbApi = new WpbApi($config);
$siteData = array(
‘state’ => ‘regular’,
‘publicationSettings’ => array(
‘targetUrl’ =>
‘ftp://user:password@ftp.example.com/httpdocs’,
‘webSiteUrl’ => ‘http://example.com’
),
‘ownerInfo’ => array(
‘personalName’ => ‘John Doe’,
‘companyName’ => ‘My Company LTD’,
‘email’ => ‘admin@example.com’,
‘phone’ => ‘+1-000-000-0000’,
‘address’ => ‘Address’,
‘city’ => ‘City’,
‘state’ => ‘State’,
‘zip’ => ‘123123’,
‘country’ => ‘Country’
)
);
// Create a new site with the $siteData structure
$siteUuid = $wpbApi->requestToApi(‘/sites’, WpbApi::POST, array($siteData));
Request
POST /api/5.3/sites/ HTTP/1.1
Authorization: Basic YWRtaW46YWRtaW4=
User-Agent: WBP API
Host: 192.168.10.1
 Loading...