

Page 1

Parallels Operations
Automation 5.4
Parallels Presence Builder Integration
Revision 1.33 (July 29, 2013)
Copyright © 1999-2013 Parallels IP Holdings GmbH and its affiliates. All rights reserved.
Page 2

Parallels IP Holdings GmbH
Vordergasse 59
8200 Schaffhausen
Switzerland
Tel: + 41 52 632 0411
Fax: + 41 52 672 2010
Copyright © 1999-2013 Parallels IP Holdings GmbH and its affiliates. All rights reserved.
Distribution of this work or derivative of this work in any form is prohibited unless prior written permission is
obtained from the copyright holder.
{ Patented technology protected by U.S.Patents 7,328,225; 7,325,017; 7,293,033; 7,099,948; 7,076,633.
Patents pending in the U.S.}
Product and service names mentioned herein are the trademarks of their respective owners.
Parallels Operations Automation is a registered trademark of Parallels.
Page 3

Contents
Preface ....................................................................................................................... 4
Documentation Conventions ............................................................................................. 4
Typographical Conventions ..................................................................................................... 4
General Conventions ............................................................................................................... 5
Feedback .......................................................................................................................... 5
Introduction ............................................................................................................... 6
Integration Overview .......................................................................................................... 7
System Requirements ....................................................................................................... 8
Deploying Parallels Presence Builder for PA ........................................................... 9
Licensing ........................................................................................................................ 10
Pre-Deployment Actions ................................................................................................. 10
Importing Parallels Presence Builder for PA Application ................................................... 12
Creating 'Parallels Presence Builder for PA' External Provisioning Attribute ..................... 12
Adding Parallels Presence Builder for PA Specific Resource Types ................................. 13
Selecting Hosts for Deployment ...................................................................................... 14
Creating Instance of Parallels Presence Builder for PA .................................................... 15
Saving URL and Password of Installed Parallels Presence Builder for PA ........................ 15
Preparing Parallels Presence Builder Service Template ....................................... 16
Pre-deployment Actions .................................................................................................. 16
Importing Parallels Presence Builder Application ............................................................. 17
Creating 'Hosting for Parallels Presence Builder Sites' Attribute ...................................... 17
Adding Specific Resource Types ..................................................................................... 18
Creating Physical Hosting Resource Type for Linux ............................................................... 19
Creating Physical Hosting Resource Type for Windows ......................................................... 19
Preparing Service Template ............................................................................................ 20
Known Limitations ................................................................................................... 21
Common Operations ............................................................................................... 22
Installing a Package on the Host ..................................................................................... 23
Index ........................................................................................................................ 29
Page 4

C HAPTER 1
Preface
This section contains introductory notes and important information about typographical
conventions used in this document.
In This Chapter
Documentation Conventions ..................................................................................... 4
Feedback .................................................................................................................. 5
Documentation Conventions
Before you start using this guide, it is important to understand the documentation
conventions used in it.
Typographical Conventions
Formatting convention Type of Information Example
Special Bold
Italics
Monospace
CAPITALS Names of keys on the keyboard. SHIFT, CTRL, ALT
KEY+KEY Key combinations for which the
Items you must select, such as
menu options, command buttons,
or items in a list.
Titles of chapters, sections, and
subsections.
Used to emphasize the importance
of a point, to introduce a term or to
designate a command line
placeholder, which is to be
replaced with a real name or value.
The names of commands, files,
and directories.
user must press and hold down
one key and then press another.
Go to the Resources tab.
Refer to the Managing Your
Account chapter.
Type a placeholder into the From
field, e.g.
@@Order_Vendor_Account_BillingC
ontact_Email@
payflow.verisign.com
CTRL+P, ALT+F4
Page 5

Preface
General Conventions
Be aware of the following conventions used in this book.
Modules in this guide are divided into sections, which, in turn, are subdivided into
subsections. For example, Documentation Conventions is a section, and General
Conventions is a subsection.
When following steps or using examples, be sure to type double-quotes ("), left single-quotes
(`), and right single-quotes (') exactly as shown.
The key referred to as RETURN is labeled ENTER on some keyboards.
Commands in the directories included into the PATH variable are used without absolute path
names. Steps that use commands in other, less common, directories show the absolute
paths in the examples.
Feedback
If you have found a mistake in this guide, or if you have suggestions or ideas on how to
improve this guide, please send your feedback to userdocs@parallels.com
your report the guide's title, chapter and section titles, and the fragment of text in which you
have found an error.
. Please include in
5
Page 6

C HAPTER 2
Introduction
In This Chapter
Integration Overview .................................................................................................. 7
System Requirements ............................................................................................... 8
Page 7
Introduction
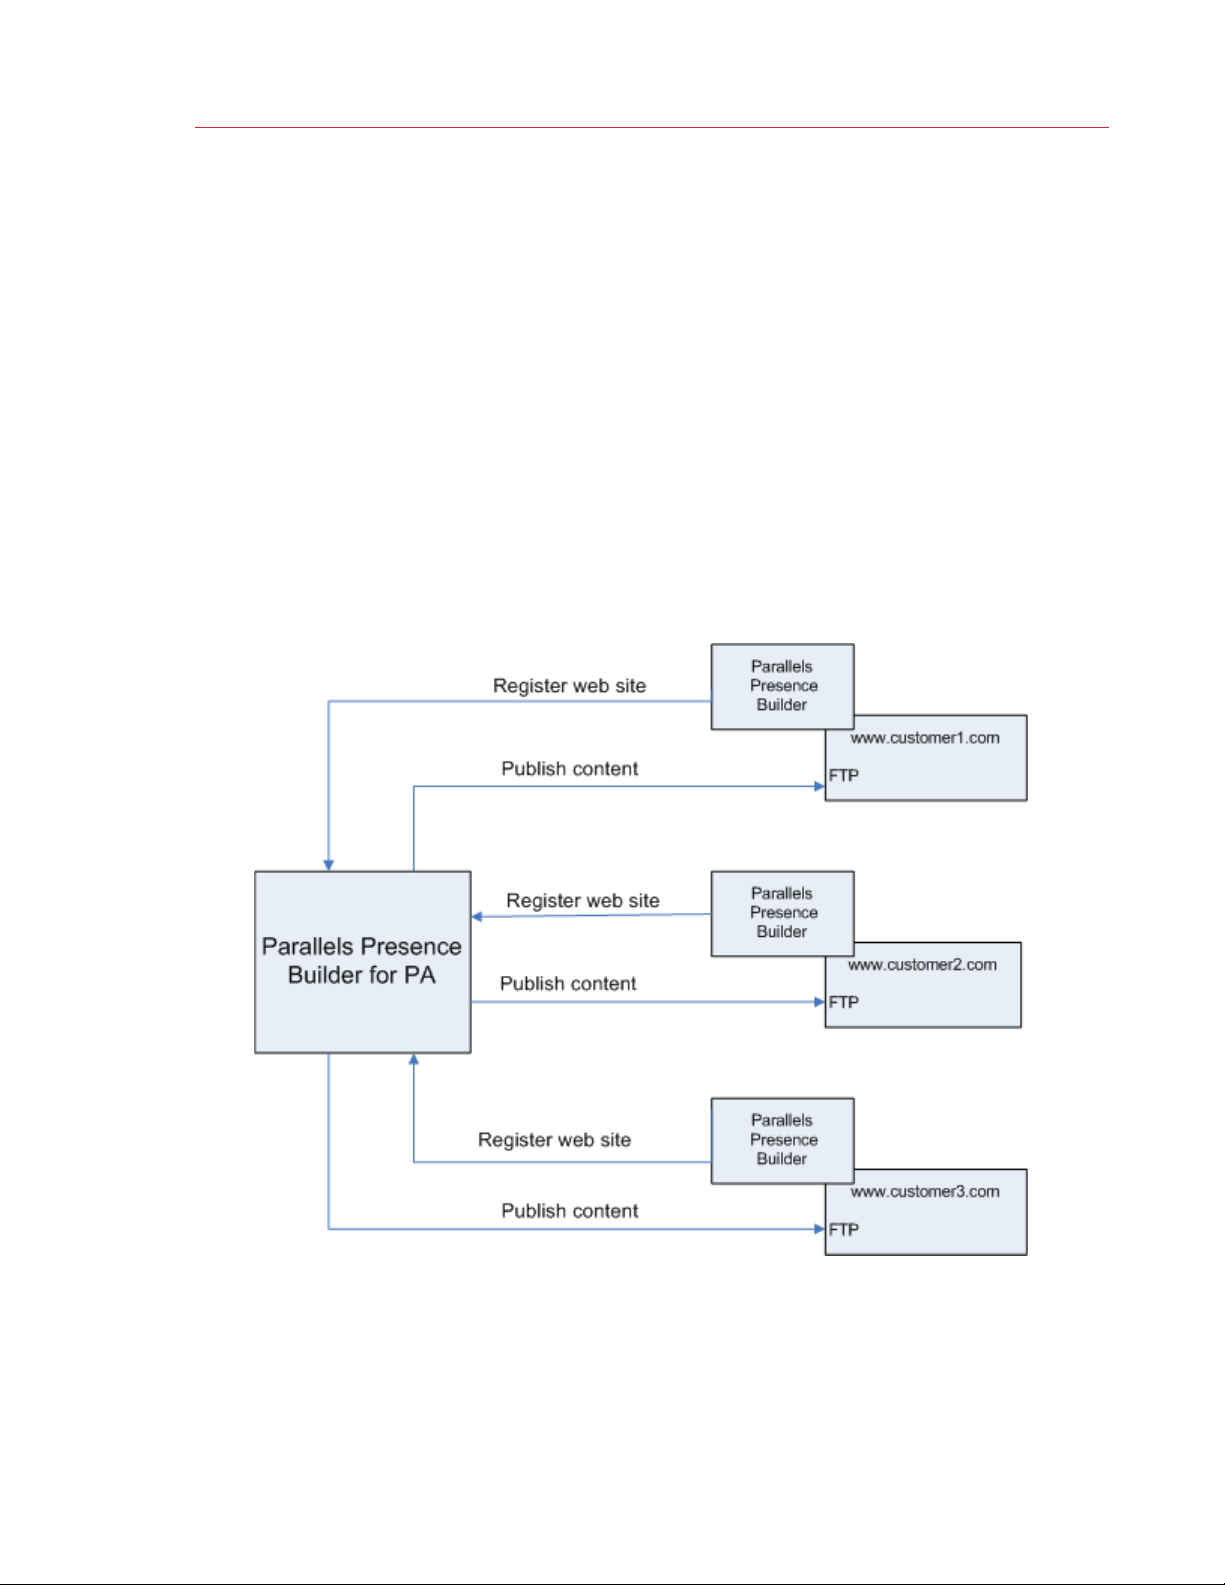
Integration Overview
Parallels Presence Builder for PA is а site creation and content management solution
produced by Parallels. Parallels Presence Builder for PA provides unique capabilities for nontechnical users who want to create, publish, and maintain their web sites without any
knowledge of HTML or other programming languages. The Parallels Presence Builder for PA
website content management solution allows wide groups of users to create their websites
with minimum efforts.
Parallels Presence Builder 11.5 is integrated with POA using two APS packages:
• Parallels Presence Builder for PA - main application, which allows editing and
publishing websites.
• Parallels Presence Builder - connector package, that can be installed on customer's
domain to provide publishing functionality.
7
Page 8

Introduction
System Requirements
General system requirements:
•
POA 5.4.14 or later with APS and Linux Shared Hosting modules.
POA 5.4.14 or later with APS and Windows Shared Hosting modules.
•
Important: Parallels Presence Builder of version 11.5 will not work with POA of version older than
5.4.14.
Parallels Presence Builder for PA system requirements:
• 10 gigabytes of free disk space.
• 1 gigabyte of RAM.
• Linux Shared Hosting or Linux Shared Hosting NG.
• MySQL 5.0 (or later) server.
• Exclusive IPv4 address
Important: Enable sw-engine support on the host, where Parallels Presence Builder for PA
Application will be installed. This package is required for correct work of the application.
You can install Parallels Presence Builder for PA on any Linux Shared Hosting host (Legacy
Apache Web Server, Web Server NG or Web Cluster NG). Parallels Presence Builder
package can be installed on (customers sites can be published to) any LInux or Windows
Shared Hosting host with IIS 7.0 or 7.5.
Make sure that POA websites can be resolved from the node on which Parallels Presence
Builder for PA will be installed; and the node, where customer sites will be published.
Note: Please, configure firewall on Web Server(s), that will host Parallels Presence Builder for PA,
to allow connections to Parallels licensing servers on port 5224. These measures are required to
enable automatic update of the Parallels Presence Builder for PA license.
8
Page 9

C HAPTER 3
Deploying Parallels Presence Builder for PA
In This Chapter
Licensing................................................................................................................... 10
Pre-Deployment Actions ........................................................................................... 10
Importing Parallels Presence Builder for PA Application ............................................. 12
Creating 'Parallels Presence Builder for PA' External Provisioning Attribute ............... 12
Adding Parallels Presence Builder for PA Specific Resource Types ........................... 13
Selecting Hosts for Deployment ................................................................................ 14
Creating Instance of Parallels Presence Builder for PA ............................................... 15
Saving URL and Password of Installed Parallels Presence Builder for PA................... 15
Page 10

Deploying Parallels Presence Builder for PA
Licensing
License must be acquired and installed for every instance of Parallels Presence Builder for
PA.
There are two types of licensing:
• Unlimited license. Number of customer web sites is not limited. Usage statistics is
collected using CSR tool. Provider is billed depending on actual usage.
• License for a limited number of web sites.
The license and the respective activation code can be acquired from the Parallels sales team.
The activation code must be specified in the settings of Parallels Presence Builder for PA
Resource Type before installation.
Pre-Deployment Actions
Adjust PHP Settings on Web Server
Important: It is recommended to create separate Apache Configuration for the needs of Parallels
Presence Builder, as this configuration is specific and may not properly work for another purpose.
PHP4 must be disabled on the web server, and default values of some PHP settings should
be modified to allow proper functioning of Parallels Presence Builder for PA application.
1 In Provider's Control Panel, go to Service Director > Shared Hosting Manager >
Apache Configurations.
2 To select Apache Configuration for web server/cluster, that will host Parallels Presence
Builder for PA, move to PHP Configuration tab and then click Edit.
3 Make sure that PHP as module value is not PHP4, and PHP4 CGI option is disabled.
4 Click Submit.
5 Move to the Resource Limits subtab.
6 Adjust the following PHP settings to recommended values:
• max_execution_time = 600
• memory_limit = 192M
• post_max_size = 2147483647
• upload_max_size = 2147483647
Prepare Legacy Apache Shared Node
10
Page 11

Deploying Parallels Presence Builder for PA
• Install ‘sw-engine’ package following the instructions from Installing a Package on the
Host section (on page 23).
Note: Due to package incompatibilities MySQL and sw-engine cannot be installed on the same
host.
Adjust PHP Settings on Legacy Apache Shared Node
PHP4 must be disabled on the web server, and default values of some PHP settings should
be modified in the php.ini configuration file to allow proper functioning of Parallels
Presence Builder for PA application.
1 On the shared node go to /usr/lib64.
2 If there is no php.ini file in this location, create such file.
3 Adjust the following PHP settings to the file:
• max_execution_time = 600
• memory_limit = 192M
• upload_max_filesize = 2147483647
• post_max_size = 2147483647
• upload_max_size = 2147483647
11
Page 12

Deploying Parallels Presence Builder for PA
Importing Parallels Presence Builder for PA Application
To import the Parallels Presence Builder for PA Application to POA:
1 In POA Control Panel, go to Top > Service Director > Application Manager >
Applications. The list of the applications appears.
2 Click the Import Package button.
3 Specify the URL to Parallels Presence Builder for PA package.
You can find out the URL to the latest version of the package at
http://download.pa.parallels.com/poa/SiteBuilder/11.5/.
4 Select the Enabled (available in subscriptions) checkbox.
5 Click the Submit button.
Check that all tasks are finished successfully: go to Top > System Director -> Task
Manager and click Refresh (till task disappears).
Check that new version of Parallels Presence Builder for PA is available: Top > Service
Director > Application Manager > Applications > Parallels Presence Builder for PA >
Versions.
Creating 'Parallels Presence Builder for PA' External Provisioning Attribute
In POA, the Attributes mechanism allows pointing a host where a resource should be
provisioned.
An Attribute is a special label using which the Provider marks the resource (more precisely,
Resource Type) to be provided. The same label is marked on the host, where this resource
should be provisioned.
To create an Attribute, follow these steps:
1 In Provider's Control Panel, go to Top > Service Director > Provisioning Manager >
Attributes submenu of the Navigation tree.
2 Click the Add New Attribute button. The adding new attribute window appears on the
screen.
3 Enter Parallels Presence Builder for PA for the Attribute name and description.
4 Click the Submit button.
12
Page 13

Deploying Parallels Presence Builder for PA
Adding Parallels Presence Builder for PA Specific Resource Types
For the detailed information on installing and configuring Parallels Presence Builder for PA,
refer to the POA Application Hosting Deployment Guide, Deployment Scenarios: Shared
Environment (Linux) section.
To create a Resource Type:
1 In POA Control Panel, go to Top > Service Director > Provisioning Manager >
Resource Types. The list of existing Resource Types opens.
2 Click on the Add New Resource Type button. The list of Resource Classes opens.
3 Select resource class, type resource name (see details below).
4 Assign provisioning attribute Parallels Presence Builder for PA.
Below, we only describe in details resource classes to be selected and resource name.
Create the following Resource Types:
MySQL databases:
Select 'MySQL databases' -> type name 'MySQL databases for PA for Web Presence.
Diskspace:
Select 'Diskspace' -> type name 'Diskspace for PA for Web Presence'
Traffic:
Select 'Traffic' -> type name 'Traffic for PA for Web Presence'
Physical Hosting:
1 Select 'Physical hosting (Apache) '
2 Type the name 'Physical hosting (Apache) for PA for Web Presence'. Click Next.
3 Select Default PHP5 mode for webspaces to 'Run as a CGI application’.
Parallels Presence Builder for PA Application:
1 Select 'Application'.
2 Type the name 'Parallels Presence Builder for PA'. Click Next.
3 Select 'Parallels Presence Builder for PA'. Click Next.
13
Page 14

Deploying Parallels Presence Builder for PA
4 Put a tick into the box next to Allow Account's SSL Certificate to enable it, select SSL
enabled, and select HTTPS entry points from SSL protection menu.
Selecting Hosts for Deployment
To assign a provisioning Attribute to a server, perform the following actions:
1 In POA Control Panel, go to Top > Deployment Director > Server Manager >
Hardware Nodes. The list of the registered in POA Hardware Nodes is displayed.
2 Click on the name of the server for Apache hosting or for MySQL hosting.
The Summary tab opens.
3 Go to the General tab > Attributes sub tab. The list of the Attributes already assigned to
the servers (if any) opens.
4 Click the Assign button. The list of existing Attributes opens.
5 Select the Attribute you have created for the APS Application - Parallels Presence Builder
for PA.
6 Click the Submit button.
14
Page 15

Deploying Parallels Presence Builder for PA
Creating Instance of Parallels Presence Builder for PA
To create an instance of Parallels Presence Builder for PA:
1 Open hosting panel (click ‘Hosting CP’ link in the right top corner).
2 As the Hosting CP opens, select Applications > Parallels Presence Builder for PA
3 Click Create.
4 Click Next
5 Click Finish.
Return to POA Administrator Control Panel. Check that all tasks are finished successfully: go
to Top > System Director > Task Manager and click Refresh (till task disappears).
To learn information on licensing and activation codes, refer to the Licensing section.
Saving URL and Password of Installed Parallels Presence Builder for PA
To get the URL and password of installed Parallels Presence Builder for PA:
1 Open hosting panel (click ‘Hosting CP’ link in the right top corner).
2 To get the URL: Select Applications > Parallels Presence Builder for PA and then
select the General tab. Copy the URL of Parallels Presence Builder for PA link at the
bottom of the screen.
3 To get the Password: select the Settings tab. The password is shown in the field
Password to Parallels Presence Builder for PA.
15
Page 16

C HAPTER 4
Preparing Parallels Presence Builder Service Template
In This Chapter
Pre-deployment Actions ............................................................................................ 16
Importing Parallels Presence Builder Application ....................................................... 17
Creating 'Hosting for Parallels Presence Builder Sites' Attribute ................................ 17
Adding Specific Resource Types ............................................................................... 18
Preparing Service Template ...................................................................................... 20
Pre-deployment Actions
Prepare Legacy Apache Shared Node/Windows Shared Node
After a website is created in Parallels Presence Builder, its content is to be published to one
of POA web servers. You need to install ‘ionCube Loader’ PHP extension on Apache Web
Server/Windows Shared Node following the instructions from the Installing a Package on
the Host section (on page 23).
Page 17

Preparing Parallels Presence Builder Service Template
Importing Parallels Presence Builder Application
To import the Parallels Presence Builder Application to POA:
1 In POA Control Panel, go to Top > Service Director > Application Manager >
Applications. The list of the applications appears.
2 Click the Import Package button.
3 Specify the URL to Parallels Presence Builder package.
You can find out the URL to the latest version of the package at
http://download.pa.parallels.com/poa/SiteBuilder/11.5/
4 Select the Enabled (available in subscriptions) checkbox.
5 Click the Submit button.
Check that all tasks are finished successfully: go to Top > System Director > Task
Manager and click Refresh (till task disappears).
Check that new version of Parallels Presence Builder is available: Top > Service Director >
Application Manager > Applications > Parallels Presence Builder > Versions.
Creating 'Hosting for Parallels Presence Builder Sites' Attribute
To create an Attribute, follow these steps:
1 In Provider's Control Panel, go to Top > Service Director > Provisioning Manager >
Attributes submenu of the Navigation tree.
2 Click the Add New Attribute button. The adding new attribute window appears on the
screen.
3 Enter Hosting for Parallels Presence Builder Sites for the Attribute name and description.
4 Click the Submit button to finish attribute adding.
17
Page 18

Preparing Parallels Presence Builder Service Template
Adding Specific Resource Types
The set of resource types needed for Parallels Presence Builder for Linux and for Windows
has a common part described in this section. Physical Hosting resource types differ
depending on the platform.
To create a Resource Type:
1 In POA Control Panel, go to Top > Service Director > Provisioning Manager >
Resource Types. The list of existing Resource Types opens.
2 Click on the Add New Resource Type button. The list of Resource Classes opens.
3 Select resource class, type resource name (see details below).
4 Assign provisioning attribute Hosting for Parallels Presence Builder.
Below, we only describe in details the resource classes to be selected, resource names, and
additional resource configuration if such is needed.
Create the following Resource Types:
Parallels Presence Builder Application:
1 Select Site Applications.
2 Type 'Parallels Presence Builder Site Application' .
3 Select 'Parallels Presence Builder'.
4 Click Next.
5 Enter URL and password to Parallels Presence Builder for PA saved before .
ProFTPD:
Select ProFTPD domain services and type name ‘ProFTPD for Parallels Presence Builder
sites’.
Physical Hosting:
Please follow the links to get instructions for different platforms about Physical Hositng
Resource Types creation:
• For Linux
• For Windows
18
Page 19

Preparing Parallels Presence Builder Service Template
Creating Physical Hosting Resource Type for Linux
In this section we describe only resource class selection and further configuration of resource
type. The common steps of resource type creation are described in the Adding Specific
Resource Types section.
To create the Physical Hosting Resource Type for Parallels Presence Builder for Linux:
1 Select Physical hosting (Apache) resource class.
2 Type name ‘Physical hosting (Apache) for Presence Builder sites’.
3 Click Next.
4 Select ‘Default PHP5 mode for webspaces’ as ‘Run as a CGI application’.
5 Select Default Domain's Identifier.
Creating Physical Hosting Resource Type for Windows
In this section we describe only resource class selection and further configuration of resource
type. The common steps of resource type creation are described in the Adding Specific
Resource Types section.
1 Select Physical hosting (IIS).
2 Type name ‘Physical hosting (Windows) for Presence Builder sites’.
3 Click Next.
4 Select PHP mode (FastCGI will be used in case of empty parameter) as Run only as
a FastCGI application.
5 Select Default Domain's Identifier.
6 Select IIS version in the IIS version (IIS 6.0 will be used in case of empty parameter)
drop-down list. It is strongly recommended to select IIS 7.0.
19
Page 20

Preparing Parallels Presence Builder Service Template
Preparing Service Template
To prepare service template with Parallels Presence Builder service:
1 Go to Top > Service Director -> Provisioning Manager -> Service Templates
2 Click Add New Service Template
3 Type the name, for example ‘Hosting plan with Parallels Presence Builder’, check
‘Autoprovisioning’ box, click Next.
4 To select resources, choose the corresponding check boxes next to resources names:
• Diskspace
• DNS hosting
Select the Physical Hosting resource type Parallels Presence Builder sites, depending on
the platform:
• Physical hosting (Apache) for Linux platform
• Physical hosting (IIS) for Windows platform
• ProFTPD for Parallels Presence Builder sites,
• Parallels Presence Builder Site Application,
• Traffic
• IP addresses - Optional, but needed to sell sites with exclusive IP addresses.
Click Next.
5 Set limits for all resources.
6 Click Finish.
7 Activate the service template for Parallels Presence Builder. Go to Top > Service
Director > Provisioning Manager > Service Templates > open your service template
‘Hosting plan with Parallels Presence Builder’, and click Activate.
20
Page 21

C HAPTER 5
Known Limitations
• Branding is not supported. Instead we propose the following:
• Provider creates Resource Type of Parallels Presence Builder for PA for reseller;
• Provider installs Parallels Presence Builder for PA for reseller;
• Provider creates Parallels Presence Builder Resource Type with proper Parallels
Presence Builder for PA settings for Reseller.
• IPv6 is not supported in the following configurations: Parallels Presence Builder for PA on
legacy Linux Shared Hosting on IPv6, Parallels Presence Builder on legacy Shared
Hosting on IPv6 (for FTP or web site).
• Applying modified settings (especially URL of Parallels Presence Builder for PA instance)
of Parallels Presence Builder Resource Type to existing instances does not imply
migration of customer sites from one instance of Parallels Presence Builder for PA to
another. Thus, such operation will potentially produce errors during Parallels Presence
Builder application reconfiguration.
• Editing and publishing of web sites on wildcard domains is not supported.
• For large number of Parallels Presence Builder for PA Resource Types and instances
under one subscription (e.g. Provider subscription) do not use 'Show application in
navigation menu'. This can cause clutter in Provider's hosting Control Panel.
• For Parallels Presence Builder to work properly, Customer webspace must have PHP5
enabled by default. To avoid misconfiguration, one can disable PHP4 support in Service
Templates with Parallels Presence Builder.
Page 22

C HAPTER 6
Common Operations
In This Chapter
Installing a Package on the Host ............................................................................... 23
Page 23

Common Operations
Installing a Package on the Host
This section describes the following operations:
• Installing a package on the host. Use this operation to install one package on one host.
For example, to install a Service Controller on the Management Node.
• Installing a set of packages on the group of hosts. Use this operation to install a set of
packages on the group of hosts. For example, to install a Control Panels on several UI
Servers.
Installing a Package on the Host
To install a package on the host, perform the following steps:
1 In POA Control Panel, go to the target host (path in Control Panel depends on type of
host):
• Hardware Node: Top > Deployment Director > Server Manager > Hardware
Nodes.
• VPS: Top > Service Director > Virtuozzo Manager > VPSs.
2 Select the host you wish to install the package on by clicking on it. The Summary tab
opens.
3 Click on the Packages tab. The list of installed packages appears.
23
Page 24

Common Operations
Figure 1: Installing Package - List of Installed Packages
4 Click on the Install Package button. You will be offered the list of available components,
not yet installed.
24
Page 25

Common Operations
Figure 2: Installing Package - List of Available Components
5 Select the package you'd like to install and click on appropriate
in the Actions column. The list of components that should be installed on the host is
displayed.
Install package icon
Figure 3: Installing Package - List of Components That Should Be Installed
There are the following types of packages:
25
Page 26

Common Operations
• Package has no editable properties. In this case the following icon is displayed in the
Actions column:
• Package has editable properties. Properties have default values and can be
customized. In this case the following icon is displayed in the Actions column:
• Package has editable properties. Properties have no default values and should be
defined prior to package installation. In this case the following icon is displayed in the
Actions column:
6 Click on
or icon and specify package's properties. Click on the Submit button.
Figure 4: Installing Package - Edit Package Properties Screen
Note: This step is performed if a package has editable properties or properties that are
mandatory to fill out.
7 Click the Finish button to install the package.
Important: Starting from POA 5.2, POA Service Controller Package is installed in the following
way: go to Top > System Director > Configuration Manager > Service Controllers, click on the
Install Service Controller button, and then follow the installation Wizard.
Note: To check that a package is installed on the host, the following options are available: 1.
Select the target host, switch to the Packages tab, and check that package is available in the list
of installed packages. 2. Use the Notification system. Notification system is described in the POA
Provider's Guide, Monitoring System > Managing Notifications section.
Installing Set of Packages on Group of Hosts
To install a set of packages on the group of hosts, perform the following actions:
1 Fill out the mandatory properties of packages you wish to install. To do that, execute the
following steps:
a In POA Control Panel, go to Top > Deployment Director > Package Manager >
Packages Repository.
b Select the target package and click on
icon in the Actions area.
26
Page 27

Common Operations
c Fill out mandatory package properties and click on the Submit button.
Important: Execute these steps for every package which participates in the installing
operation and has mandatory properties.
2 In POA Control Panel, go to Top > Deployment Director > Package Manager > PPM
Group Operations.
3 Click on the Create new PPM group operation link. The Create PPM group operation
wizard starts.
4 Select the Installation option in the Operation area and click on the Next button to
continue.
Figure 5: PPM Group Operations Wizard - Select Operation Type Screen
5 Select target hosts and click on the Next button to continue.
Figure 6: PPM Group Operations Wizard - Select Target Hosts Screen
6 Select packages to install and click on the Next button to continue.
27
Page 28

Common Operations
Figure 7: PPM Group Operations Wizard - Select Packages Screen
7 Click on the Finish button to start the installation of packages on the selected hosts.
Note: To check that a package is installed on the host, the following options are available: 1.
Select the target host, switch to the Packages tab, and check that package is available in the list
of installed packages. 2. Use the Notification system. Notification system is described in the POA
Provider's Guide, Monitoring System > Managing Notifications section.
28
Page 29

Index
Index
A
Adding Parallels Presence Builder for PA
Specific Resource Types - 13
Adding Specific Resource Types - 18
C
Common Operations - 22
Creating 'Hosting for Parallels Presence
Builder Sites' Attribute - 17
Creating Instance of Parallels Presence
Builder for PA - 15
Creating 'Parallels Presence Builder for PA'
External Provisioning Attribute - 12
Creating Physical Hosting Resource Type for
Linux - 19
Creating Physical Hosting Resource Type for
Windows - 19
D
Deploying Parallels Presence Builder for PA -
9
Documentation Conventions - 4
L
Licensing - 10
P
Pre-deployment Actions - 16
Pre-Deployment Actions - 10
Preface - 4
Preparing Parallels Presence Builder Service
Template - 16
Preparing Service Template - 20
S
Saving URL and Password of Installed
Parallels Presence Builder for PA - 15
Selecting Hosts for Deployment - 14
System Requirements - 8
T
Typographical Conventions - 4
F
Feedback - 5
G
General Conventions - 5
I
Importing Parallels Presence Builder
Application - 17
Importing Parallels Presence Builder for PA
Application - 12
Installing a Package on the Host - 23
Integration Overview - 7
Introduction - 6
K
Known Limitations - 21
 Loading...