

Page 1
Parallels® Plesk Sitebuilder
Page 2

Copyright Notice
ISBN: N/A
Parallels
660 SW 39th Street
Suite 205
Renton, Washington 98057
USA
Phone: +1 (425) 282 6400
Fax: +1 (425) 282 6444
© Copyright 1999-2008,
Parallels, Inc.
All rights reserved
Distribution of this work or derivative of this work in any form is prohibited unless prior written
permission is obtained from the copyright holder.
Product and service names mentioned herein are the trademarks of their respective owners.
Page 3

Preface 3
Contents
Preface 4
About Parallels Plesk Sitebuilder ................................................................................................... 4
What's New in This Version ................................................................................................. 5
About This Guide ............................................................................................................................ 6
Who Should Read This Guide ........................................................................................................ 6
Typographical Conventions ............................................................................................................ 6
Feedback ........................................................................................................................................ 7
Getting Started 8
Logging In to Plesk Sitebuilder ....................................................................................................... 9
Recovering Forgotten Password........................................................................................11
Learning Plesk Sitebuilder Administrator Panel Interface ............................................................12
Navigating in Plesk Sitebuilder ..........................................................................................13
Working with Lists ..............................................................................................................17
Using Context Help ............................................................................................................19
Getting Help .................................................................................................................................20
Configuring Settings Related to Your Account 21
Changing Your Password and Updating Personal Information ...................................................22
Choosing Language, Skin, and Number of Items to Be Shown per Page ...................................23
Setting Up Global Account ...........................................................................................................24
Creating Global Account ....................................................................................................26
Connecting Local Accounts to Your Global Account .........................................................26
Switching between Accounts .............................................................................................27
Editing Global Account Properties .....................................................................................28
Disconnecting Local Accounts from Global Account .........................................................29
Viewing Information about Your Copy of Plesk Sitebuilder and Service Plan Limitations ...........29
Managing Sites 30
Registering Site in System ...........................................................................................................32
Assigning Trial Site to Your Account ............................................................................................36
Creating or Editing Site Content in Wizard ..................................................................................36
Previewing Site .............................................................................................................................37
Renaming Site ..............................................................................................................................37
Publishing Site ..............................................................................................................................38
Requirements to Publishing Location ................................................................................39
Editing Site Publishing Settings ...................................................................................................39
Promoting Site and Tracking Site Popularity ...............................................................................40
Submitting Site to Search Engines ....................................................................................41
Tracking Visits to Site ........................................................................................................42
Removing Site from Plesk Sitebuilder ..........................................................................................43
Appendix. Troubleshooting Plesk Sitebuilder 44
Typical Site Publishing Errors ......................................................................................................44
General Publishing Issues .................................................................................................45
Known Issues with Third Party Components .....................................................................46
Page 4

4 Preface
In this section:
About Parallels Plesk Sitebuilder ....................................................................... 4
About This Guide ............................................................................................... 6
Who Should Read This Guide ........................................................................... 6
Typographical Conventions ............................................................................... 6
Feedback .......................................................................................................... 7
In this section:
What's New in This Version ............................................................................... 5
Preface
About Parallels Plesk Sitebuilder
Parallels Plesk Sitebuilder consists of two parts: the Wizard and the Administrator Panel.
Plesk Sitebuilder Wizard is a web application enabling its users to create web sites and
publish them on the Internet.
The Administrator Panel is a tool for managing Plesk Sitebuilder system-wide preferences
and maintaining web sites created in the Wizard.
Page 5

Preface 5
What's New in This Version
Plesk Sitebuilder 4.5 offers the following new features:
Site Map module. Allows you to display a clickable hierarchical model of your site structure
to visitors
Removing design template from pages. You can now remove design template's layout and
graphics from the desired pages.
External Page module. Allows you to link site menu items to external web sites.
Save button. A handy way to save changes you make while working on your site.
Counter settings are moved to the Wizard. You can now enable a counter on your site at the
Pages step of the Wizard, which previously required going to the Administrator Panel.
Site visitor management is moved to the Wizard. You can now manage your registered visitors
through the Registration module editor at the Edit step of the Wizard, which previously
required going to the Administrator Panel.
Updated WYSIWYG editor to fix a series of issues.
Page 6

6 Preface
About This Guide
Formatting
Convention
Type of Information
Example
Special Bold
Items you must select, such as
menu options, command buttons, or
items in a list.
Go to the Interface tab.
Titles of chapters, sections, and
subsections.
Read the Getting Started chapter.
Italics
Used to emphasize the importance
of a point, to introduce a term or to
designate a command line
placeholder, which is to be replaced
with a real name or value.
Trial sites - sites created by
anonymous users.
Monospace
URLs, names of commands, files,
and directories.
For example:
http://[Sitebuilder_host]/Login
CAPITALS
Names of keys on the keyboard.
SHIFT, CTRL, ALT
KEY+KEY
Key combinations for which the user
must press and hold down one key
and then press another.
CTRL+P, ALT+F4
This guide instructs you how to manage and maintain your web sites created in Plesk
Sitebuilder.
Who Should Read This Guide
This guide is intended for users who manage and maintain web sites created in Plesk
Sitebuilder using a site owner account.
Typographical Conventions
Before you start using this guide, it is important to understand the documentation
conventions used in it.
The following kinds of formatting in the text identify special information.
Page 7

Preface 7
Feedback
If you have found a mistake in this guide, or if you have suggestions or ideas on how to
improve this guide, please send your feedback using the online form at
http://www.parallels.com/en/support/usersdoc/. Please include in your report the guide's title,
chapter and section titles, and the fragment of text in which you have found an error.
Page 8

This chapter guides you through the initial steps that should be taken to start using
In this chapter:
Logging In to Plesk Sitebuilder .......................................................................... 9
Learning Plesk Sitebuilder Administrator Panel Interface .................................. 12
Getting Help ...................................................................................................... 20
C H A P T E R 1
Getting Started
Plesk Sitebuilder.
Page 9

Getting Started 9
Logging In to Plesk Sitebuilder
To log in to Plesk Sitebuilder:
1 Open your Internet browser.
2 Enter the URL you have received from your Plesk Sitebuilder provider
into the address bar of your browser.
For example, http://sitebuilder/login
where 'sitebuilder' is the domain name of the server where Plesk Sitebuilder is
installed.
Figure 1: Logging In to Plesk Sitebuilder
3 Press ENTER.
4 In the User name field, enter your user name.
5 In the Password field, enter your password.
You can change your password at any time (see section Changing Your Password and
Updating Personal Information (on page 22)).
6 From the Interface language list, select the language of Plesk Sitebuilder
interface.
7 Click Log in.
Page 10

10 Getting Started
If prior to gaining a Plesk Sitebuilder account you have created a trial site in the Plesk
In this section:
Recovering Forgotten Password ....................................................................... 11
Sitebuilder Wizard (on the same computer that you are logging in from), you will be
prompted to assign the site to your account and thus upgrade it to a regular one. You
may skip this step and appropriate the site (see page 36) at a later stage, but note that it
may be deleted by your Plesk Sitebuilder provider or automatically destroyed after the
expiration date.
If you have not worked in the Plesk Sitebuilder Wizard before (or worked on another
computer), you proceed directly to the Wizard where you can create your site. For
instructions on working with the Wizard, refer to Plesk Sitebuilder for Linux/Unix Wizard
User's Guide (http://www.parallels.com/en/products/sitebuilder/docs/).
To proceed to your Administrator Panel, click the Go to Admin Panel shortcut in the
upper part of the Wizard screen.
Page 11
Getting Started 11
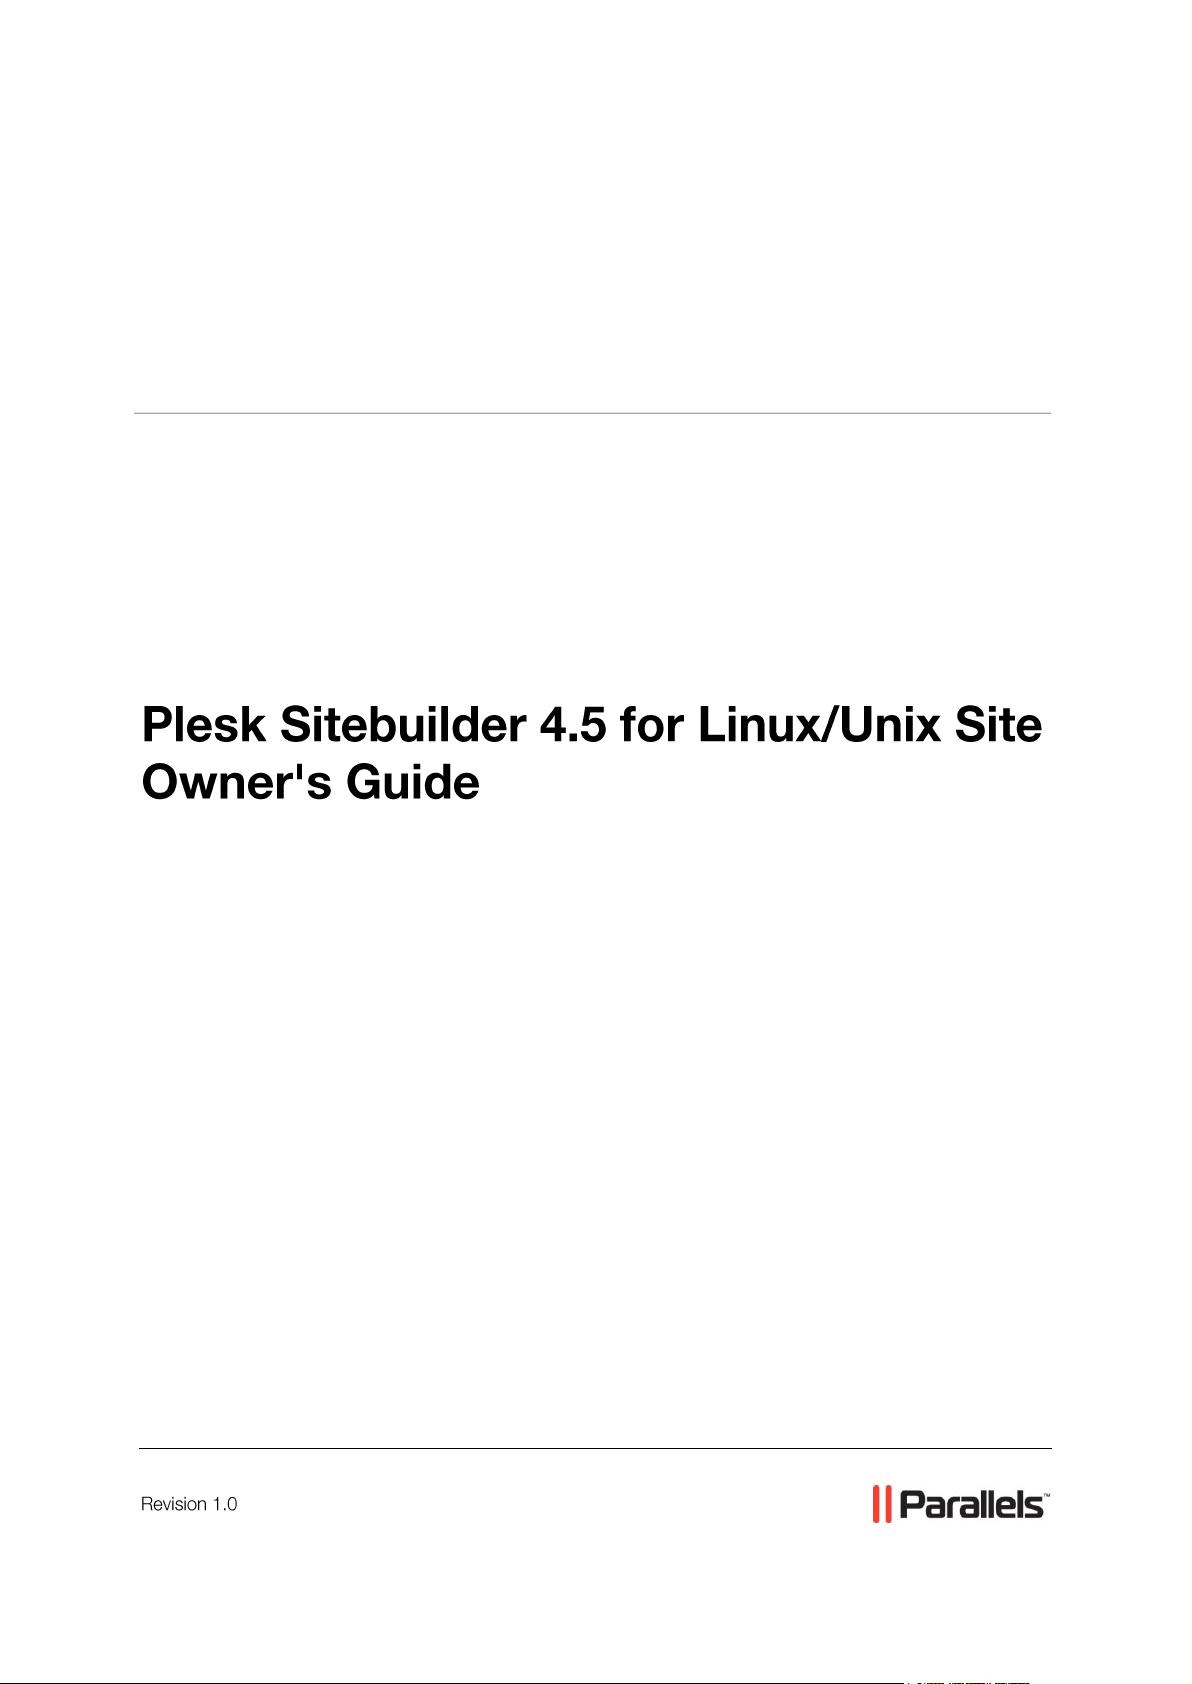
Recovering Forgotten Password
To recover your forgotten password:
1 In your browser's address bar, enter the URL to your Plesk Sitebuilder
Administrator Panel.
For example, http://sitebuilder/login
where 'sitebuilder' is the domain name of the server where Plesk Sitebuilder is
installed.
Figure 2: Recovering Forgotten Password
2 Press ENTER.
3 Click Forgot Your Password?
4 On the Reset Password screen, enter your user name and e-mail
address registered in the system.
5 Click Send.
After your e-mail address is received, the system checks if it is stored in the
database and sends the password recovery link and instructions to your e-mail
address.
6 Click the password recovery link in the automatic message you
receive from Plesk Sitebuilder.
7 On the Change Password screen, enter and confirm your new password.
8 Click Change.
Page 12

12 Getting Started
Learning Plesk Sitebuilder Administrator
In this section:
Navigating in Plesk Sitebuilder .......................................................................... 13
Working with Lists ............................................................................................. 17
Using Context Help ........................................................................................... 19
Panel Interface
Read the following section to learn the basic principles of working with Plesk
Sitebuilder interface.
Page 13
Getting Started 13
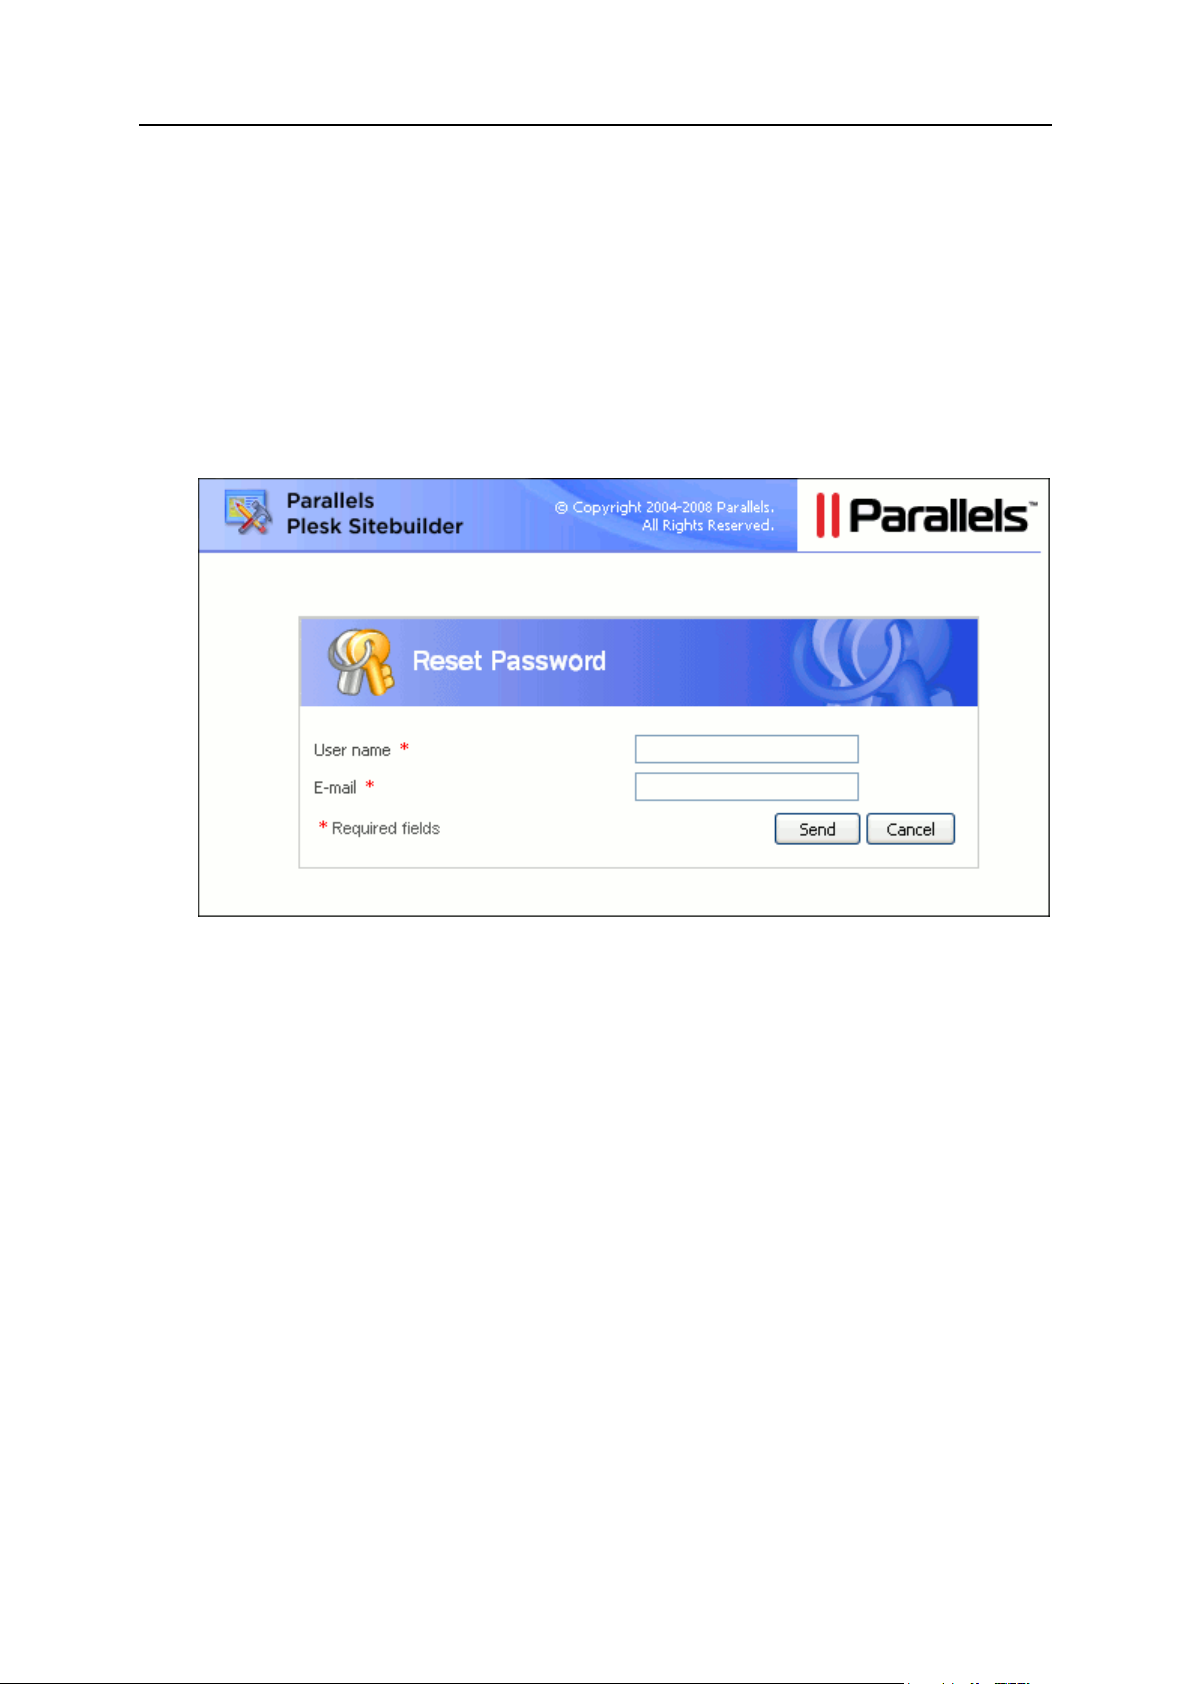
Navigating in Plesk Sitebuilder
The Plesk Sitebuilder Administrator Panel interface enables you to use two ways of
navigation through the application: desktop view and standard view.
The standard view (see page 15) is a customary view of the control panel divided into
two main areas: the navigation pane on the left and the work area, where operations
are performed, on the right.
Figure 3: Plesk Sitebuilder Standard View
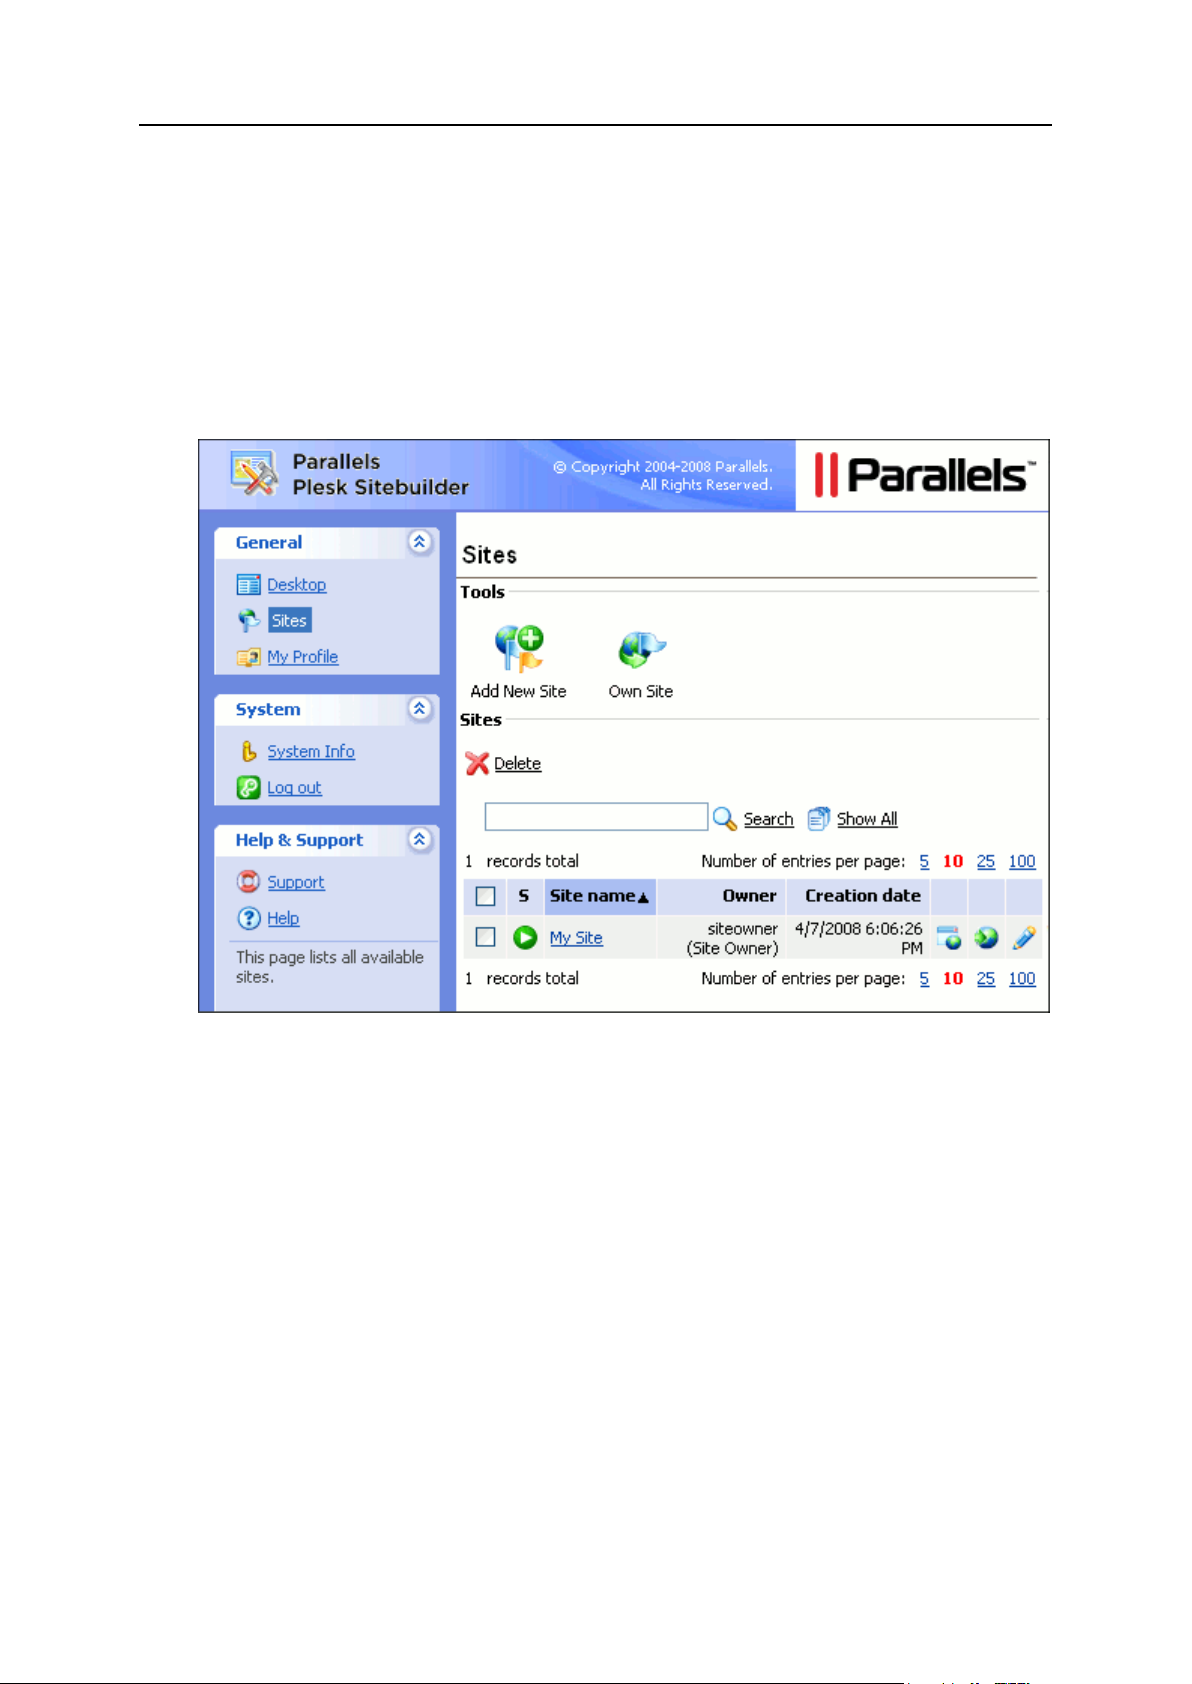
The desktop view (see page 16) displays system statistics and shortcuts to the main
functionalities of the Administrator Panel.
Page 14
14 Getting Started
Figure 4: Plesk Sitebuilder Desktop View
In this section:
Using Navigation Pane ...................................................................................... 15
Using Desktop Interface .................................................................................... 16
Using Path Bar .................................................................................................. 17
On second- and deeper-level screens, there is a path bar (see page 17) to help you
navigate back to the main screen.
Page 15
Getting Started 15
Using Navigation Pane
The navigation pane is located in the left part of the Plesk Sitebuilder screen.
Figure 5: Plesk Sitebuilder Navigation Pane
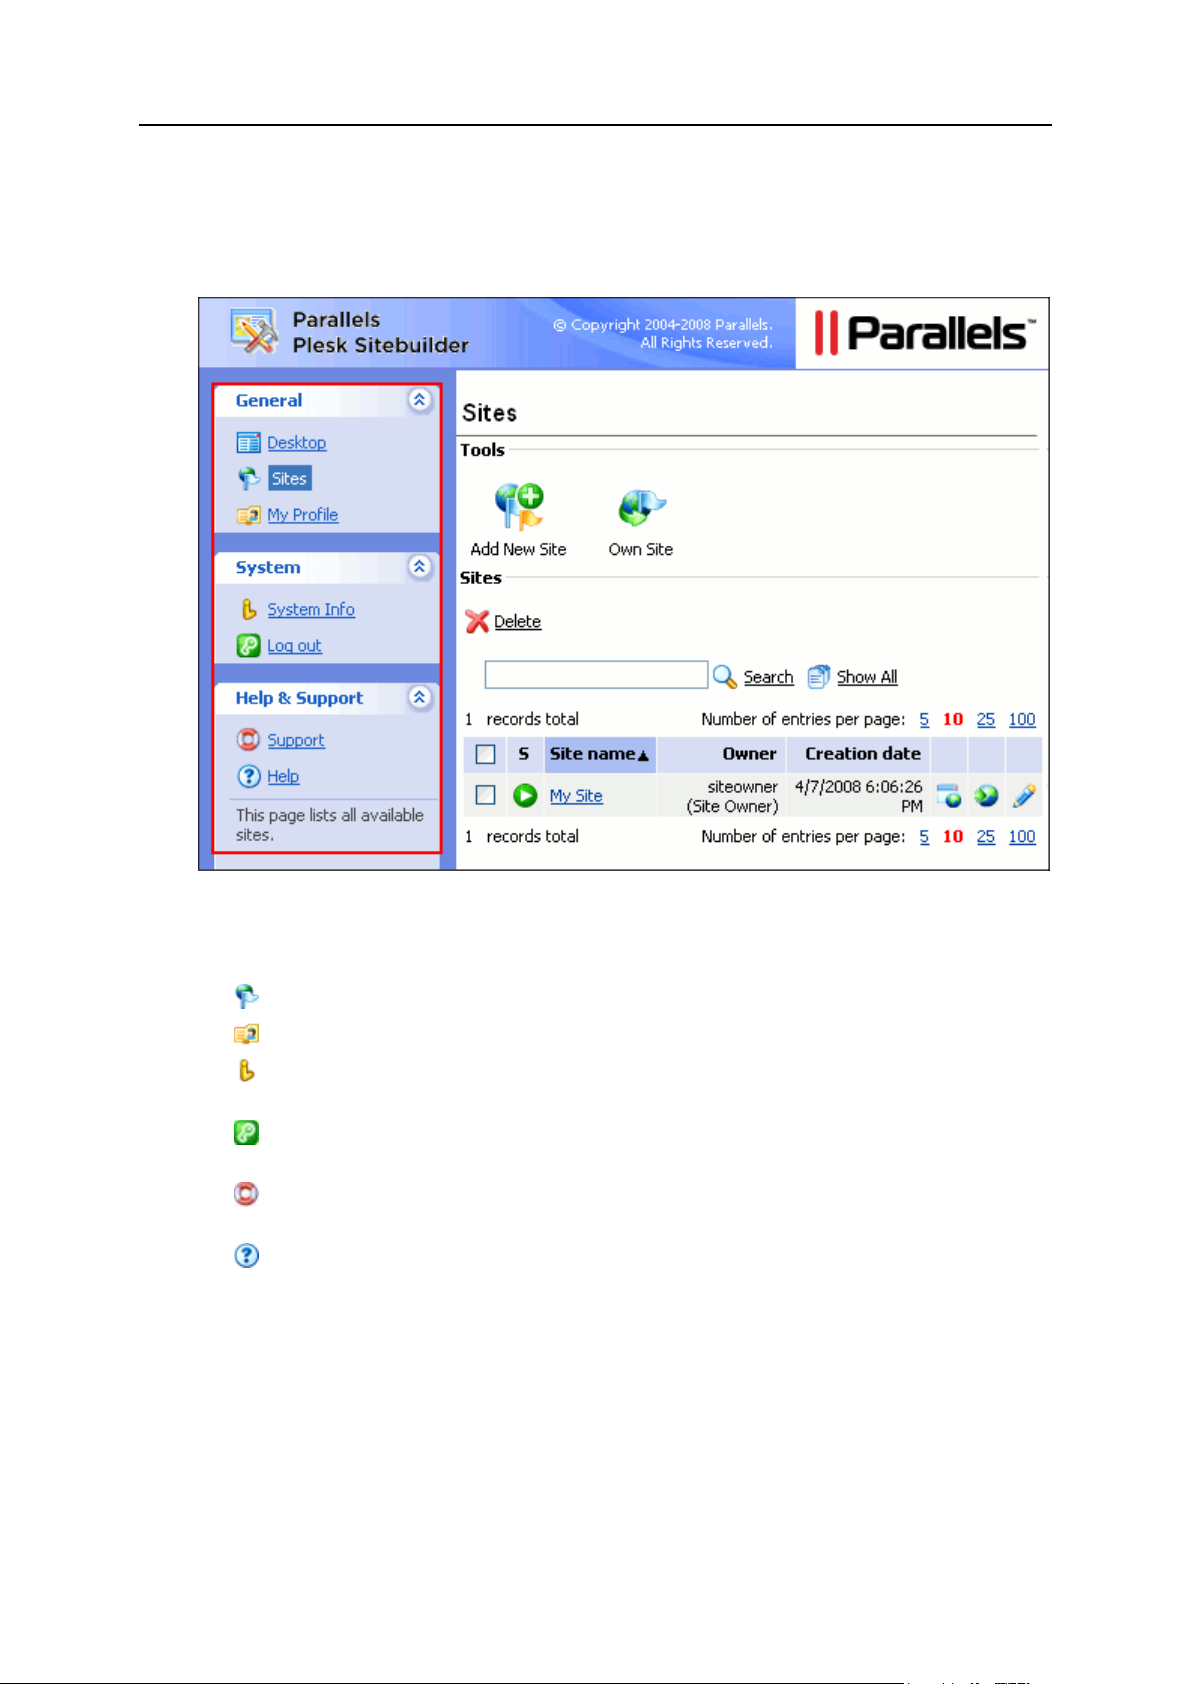
The navigation pane gives you access to the following functions:
Sites. Enables you to add and manage sites.
My Profile. Enables you to configure your account parameters.
System Info. Enables you to view information about the Plesk Sitebuilder program
and the limits and permissions of your service plan.
Log out. Finishes the current session with the Plesk Sitebuilder Administrator
Panel.
Support. Enables you to submit a request to your technical support
representative.
Help button opens the context-sensitive online help on the corresponding page.
Page 16

16 Getting Started
Using Desktop Interface
Plesk Sitebuilder Desktop looks as follows:
Figure 6: Plesk Sitebuilder Desktop Interface Structure
The Desktop screen is logically divided into the following parts:
1 Short tips describing basic management options of the Plesk Sitebuilder
Administrator Panel, and shortcuts to these options.
2 An area where you can appropriate a trial site created in the Plesk Sitebuilder
Wizard, if you have created one before getting a Plesk Sitebuilder account. To
register a trial site and assign it to your account:
Specify the trial site URL in the Site URL field. You can take this URL from the
Publish screen of this site in the Wizard.
Enter any arbitrary name for the site in the Site name field.
Click Own Site.
Page 17

Getting Started 17
3 Shortcut to Plesk Sitebuilder Wizard. The Wizard opens on the Overview page,
where you can select which of your sites you want to edit. If you wish to create a
new site, refer to Registering Site in System (on page 32) for details. Information about
working with Plesk Sitebuilder Wizard is provided in the Plesk Sitebuilder for Linux/Unix
Wizard User's Guide (http://www.parallels.com/en/products/sitebuilder/docs/).
If you do not want these options to be displayed ever again, click Close in the
bottom right corner of the section. When you log in to Plesk Sitebuilder next time,
this section is not displayed.
Statistics section, which displays the number of created sites, the total number of
sites permitted for creation by your service plan, and the number of sites still
available for creation.
4 Tasks. This section shows shortcuts to the frequently performed operations.
When working in Plesk Sitebuilder, you can access the desktop by clicking Desktop
on the top of the navigation pane.
Using Path Bar
To work with the second- and deeper-level screens of the application, use a path bar: a
chain of links that appears in the upper-left part of the work area, above the screen title.
Use a corresponding path bar link to return to the main screen, or to one of the
intermediate screens.
Figure 7: Navigating in Plesk Sitebuilder Using Path Bar and "Up Level" Button
You can also use the Up level button in the upper-right corner of the screen to return
to the previous screen.
Working with Lists
On the management pages of various system objects (sites, registered site visitors,
etc.), information is present in the form of object lists.
Page 18

18 Getting Started
In such a list, each object record is a table row displaying the object name, status, and
relevant parameters of the object (for example, for each site, the owner and creation
date is shown). Above and below each list, the total number of items contained in the
list is displayed. Below the list, you can adjust the number of items to be displayed per
page (5, 10, 25 or 100). In multi-page lists, you can navigate between the pages by
clicking the page number shortcuts above and below the list. To go to the first/last page
of the list, click First Page or Last Page, accordingly.
In lengthy lists, you can find items using the search function, or sort items by one of
available parameters. To find an item, type a search criterion into the input box above
the list, and click Search. The list will show the items matching the search criterion. To
return back to viewing all items, click Show All.
Figure 8: Searching for Objects
To sort list items by a certain parameter in ascending or descending order, click the
parameter's title in the column heading. The order of sorting will be indicated by a small
triangle displayed next to the parameter's title.
Figure 9: Sorting Objects
To choose an object for further operation, select the check box on the left of the
object's name.
Figure 10: Selecting Particular Objects in a List
To choose all objects in the list, select the check box at the head of the column.
Figure 11: Selecting All List Objects at Once
Page 19

Getting Started 19
To perform operations with objects in a list, select the required items and click the
group operation shortcut above the list (for example, Delete, Activate, Add to plan, etc.).
Figure 12: Performing Operations on Objects
To proceed to editing a list item, click its name in the list. The non-editable items (for
example, built-in Plesk Sitebuilder page sets) are not clickable.
In all major Plesk Sitebuilder lists, the status of an item is indicated by a status icon in
the Status (S) column ( or ). For sites, their status (published or unpublished), is
indicated by or icons.
In some lists, individual operation shortcuts are displayed for each item. For example,
for each site on the Sites screen, there is a Preview icon, a Publish icon, and an
Edit icon.
Using Context Help
Below the Help icon, there is a context help tip area. It provides a brief description of the
current screen and the operations available from it. When you place the mouse cursor
over a system element or status icon, additional information about this element is
displayed.
Page 20

20 Getting Started
Figure 13: Using Context Help
Getting Help
If you encounter a problem while using Plesk Sitebuilder, there are several resources
available to help you troubleshoot the problem:
Use on-screen context-sensitive help.
At the bottom of the navigation pane, you can find short instructions on the
operations that are available on the current page.
Refer to our knowledge base (http://kb.parallels.com/en/products/sitebuilderlinux).
The knowledge base provides solutions to the most common problems with Plesk
Sitebuilder.
Go to our forum
(http://forum.swsoft.com/forumdisplay.php?s=f2b895fc3636e705ec9b9a85ef81f040
&forumid=99).
Here all users can post questions, exchange ideas, and troubleshoot issues not
described in the knowledge base. Note that Parallels does not provide official
support through this forum.
Contact technical support.
If you have any problems or questions that are not covered in the user
documentation or knowledge base, you can click Support located on the
navigation pane and submit your problem to your technical support representative.
Page 21

This chapter describes how to set up and customize your Plesk Sitebuilder
In this chapter:
Changing Your Password and Updating Personal Information .......................... 22
Choosing Language, Skin, and Number of Items to Be Shown per Page .......... 23
Setting Up Global Account ................................................................................ 24
Viewing Information about Your Copy of Plesk Sitebuilder and Service Plan
Limitations ......................................................................................................... 29
C H A P T E R 2
Configuring Settings Related to Your
Account
Administrator Panel.
Page 22

22 Configuring Settings Related to Your Account
Changing Your Password and Updating
Personal Information
To change your password:
1 On the navigation pane, click My Profile.
Figure 14: Changing Your Password and Personal Information
2 On the Personal Info tab, click Change Password.
3 Type your old and new passwords in the respective fields.
The password cannot be empty and cannot contain more than 255 characters.
4 Click OK.
To update your personal information:
1 On the navigation pane, click My Profile.
2 On the Personal Info tab, you can update your first, last name and e-
mail address in the corresponding fields.
3 Click OK.
Page 23

Configuring Settings Related to Your Account 23
Choosing Language, Skin, and Number of
Items to Be Shown per Page
To customize your Administrator Panel interface:
1 On the navigation pane, click My profile.
2 Go to the Interface tab.
Figure 15: Choosing Language, Skin, and Number of List Items Shown per Page
3 From the Language list, select the desired language.
4 From the Skin list, select the desired skin.
5 In the Items per page field, specify the number of items to be displayed
per one page.
Page 24

24 Configuring Settings Related to Your Account
Setting Up Global Account
Global Account is a Single Sign-On technology feature that allows you to log in to
different Parallels products using a single global login and password. If you have
several accounts in Plesk Sitebuilder, you can connect them all to a global account and
switch between these accounts without entering a password every time. You can also
connect all your accounts in other Parallels products to your global account and switch
between them without providing credentials.
After you create a global account and connect local accounts to it, you will be able to
choose from any account connected to your global account when logging in under your
global account.
Single Sign-On technology and the ability to use global accounts can be activated only
by Plesk Sitebuilder administrator.
If the SSO feature is enabled in your Plesk Sitebuilder, you can proceed to managing
your SSO settings by clicking the Global Account shortcut in the navigation panel.
Figure 16: Proceeding to Managing Your Global Account
Page 25

Configuring Settings Related to Your Account 25
In this section:
Creating Global Account ................................................................................... 26
Connecting Local Accounts to Your Global Account .......................................... 26
Switching between Accounts ............................................................................. 27
Editing Global Account Properties ..................................................................... 28
Disconnecting Local Accounts from Global Account .......................................... 29
Page 26

26 Configuring Settings Related to Your Account
Creating Global Account
To create a global account:
1 On the navigation pane, click Global Account.
2 Click Connect to Global Account.
3 Select Create new global account.
Figure 17: Creating a New Global Account
4 Provide the login and password for your global account.
5 Provide an e-mail address to be used for password recovery.
6 Click OK.
Your global account is active now, so you can proceed with connecting other accounts
to it. Refer to Connecting Local Accounts to Your Global Account (on page 26).
Connecting Local Accounts to Your Global Account
To connect a local Plesk Sitebuilder account to your global account:
1 Log in to Plesk Sitebuilder under the local account you want to
connect.
2 On the navigation pane, click Global Account.
3 Click Connect to Global Account.
4 Make sure that Use existing global account option is selected and provide
the login and password for the global account you want to connect to.
Page 27

Configuring Settings Related to Your Account 27
Figure 18: Connecting an Existing Local Account to Your Global Account
5 Click OK.
Repeat the procedure for other local accounts as necessary.
To connect an account in another product with SSO support to your global account:
1 Log in to software product with SSO support under the account you
want to connect.
2 Follow the instructions on connecting to a global account in respective
software product documentation. Make sure that you provide the
credentials for the existing global account when you are asked to.
Repeat steps 1-2 for other accounts or products as necessary.
Note. Different software products may use different names for the Global Account
feature, such as Federated Identity or Global Login. Refer to respective software
product documentation for more information.
After you have connected all required accounts to your global account, you can log in
under your global account to any product where you have a local account connected to
your global account. You will be shown the list of local accounts connected to your
global account every time you log in under it, so you can choose which account you
would like to use now. You can switch to another account any time you want. For more
information, refer to Switching between Accounts (on page 27).
Switching between Accounts
To switch to another account:
1 On the navigation pane, click Log out.
2 Click Switch User.
3 Select the account you want to switch to:
Choose the required local account from the list of accounts connected to your
global account
Page 28

28 Configuring Settings Related to Your Account
or
Select specify another account and provide login and password for a local account
not connected to your global account, or for another global account. You can
also choose the language for your control panel from the Interface language list.
Figure 19: Switching to Another Account, Local or Global
4 Click Log In.
Editing Global Account Properties
To edit the properties of your global account:
1 Log in to Plesk Sitebuilder under your global account or any local
account connected to it.
2 On the navigation pane, click Global Account.
3 Click Edit Global Account.
4 To change your password, enter your old and new passwords in
respective fields.
5 If necessary, edit your global account e-mail address.
6 Click OK.
Page 29

Configuring Settings Related to Your Account 29
Disconnecting Local Accounts from Global Account
To disconnect a local account from your global account:
1 Log in to Plesk Sitebuilder under the local account you want to
disconnect.
2 On the navigation pane, click Global Account.
3 Click Disconnect from Global Account.
4 Click OK to confirm the disconnection.
Repeat the procedure for other local accounts as necessary.
Viewing Information about Your Copy of
Plesk Sitebuilder and Service Plan
Limitations
To view information about the Plesk Sitebuilder program and the limits and
permissions set in your plan:
1 On the navigation pane, click System Info.
2 Switch between the tabs to view the respective information.
Page 30

From your Administrator Panel, you can register a new site (as many new sites as
C H A P T E R 3
Managing Sites
allowed by your plan), or appropriate a trial site created in Plesk Sitebuilder Wizard in
demo mode (if you have one).
After registering or appropriating a site, you can proceed to creating or editing it in
Plesk Sitebuilder Wizard.
To proceed to managing sites, click Sites on the navigation pane.
For information on how to operate with list objects, refer to section Working with Lists (on
page 17).
Figure 20: Sites Management Screen
Page 31

Managing Sites 31
In this chapter:
Registering Site in System ................................................................................ 32
Assigning Trial Site to Your Account ................................................................. 36
Creating or Editing Site Content in Wizard ........................................................ 36
Previewing Site ................................................................................................. 37
Renaming Site ................................................................................................... 37
Publishing Site .................................................................................................. 38
Editing Site Publishing Settings ......................................................................... 39
Promoting Site and Tracking Site Popularity...................................................... 40
Removing Site from Plesk Sitebuilder................................................................ 43
Page 32

32 Managing Sites
Registering Site in System
To register a site:
1 On the navigation pane, click Sites.
2 Click Add New Site.
If you have already reached the maximum number of sites allowed by your plan, the
Add New Site button is disabled.
3 On the General tab, provide any arbitrary name for the site in the Site
name field.
Figure 21: Registering a Site in the System
The name is used to identify the site in Plesk Sitebuilder and is not displayed in
visitors’ web browsers.
4 Click the Publishing Settings tab.
Page 33
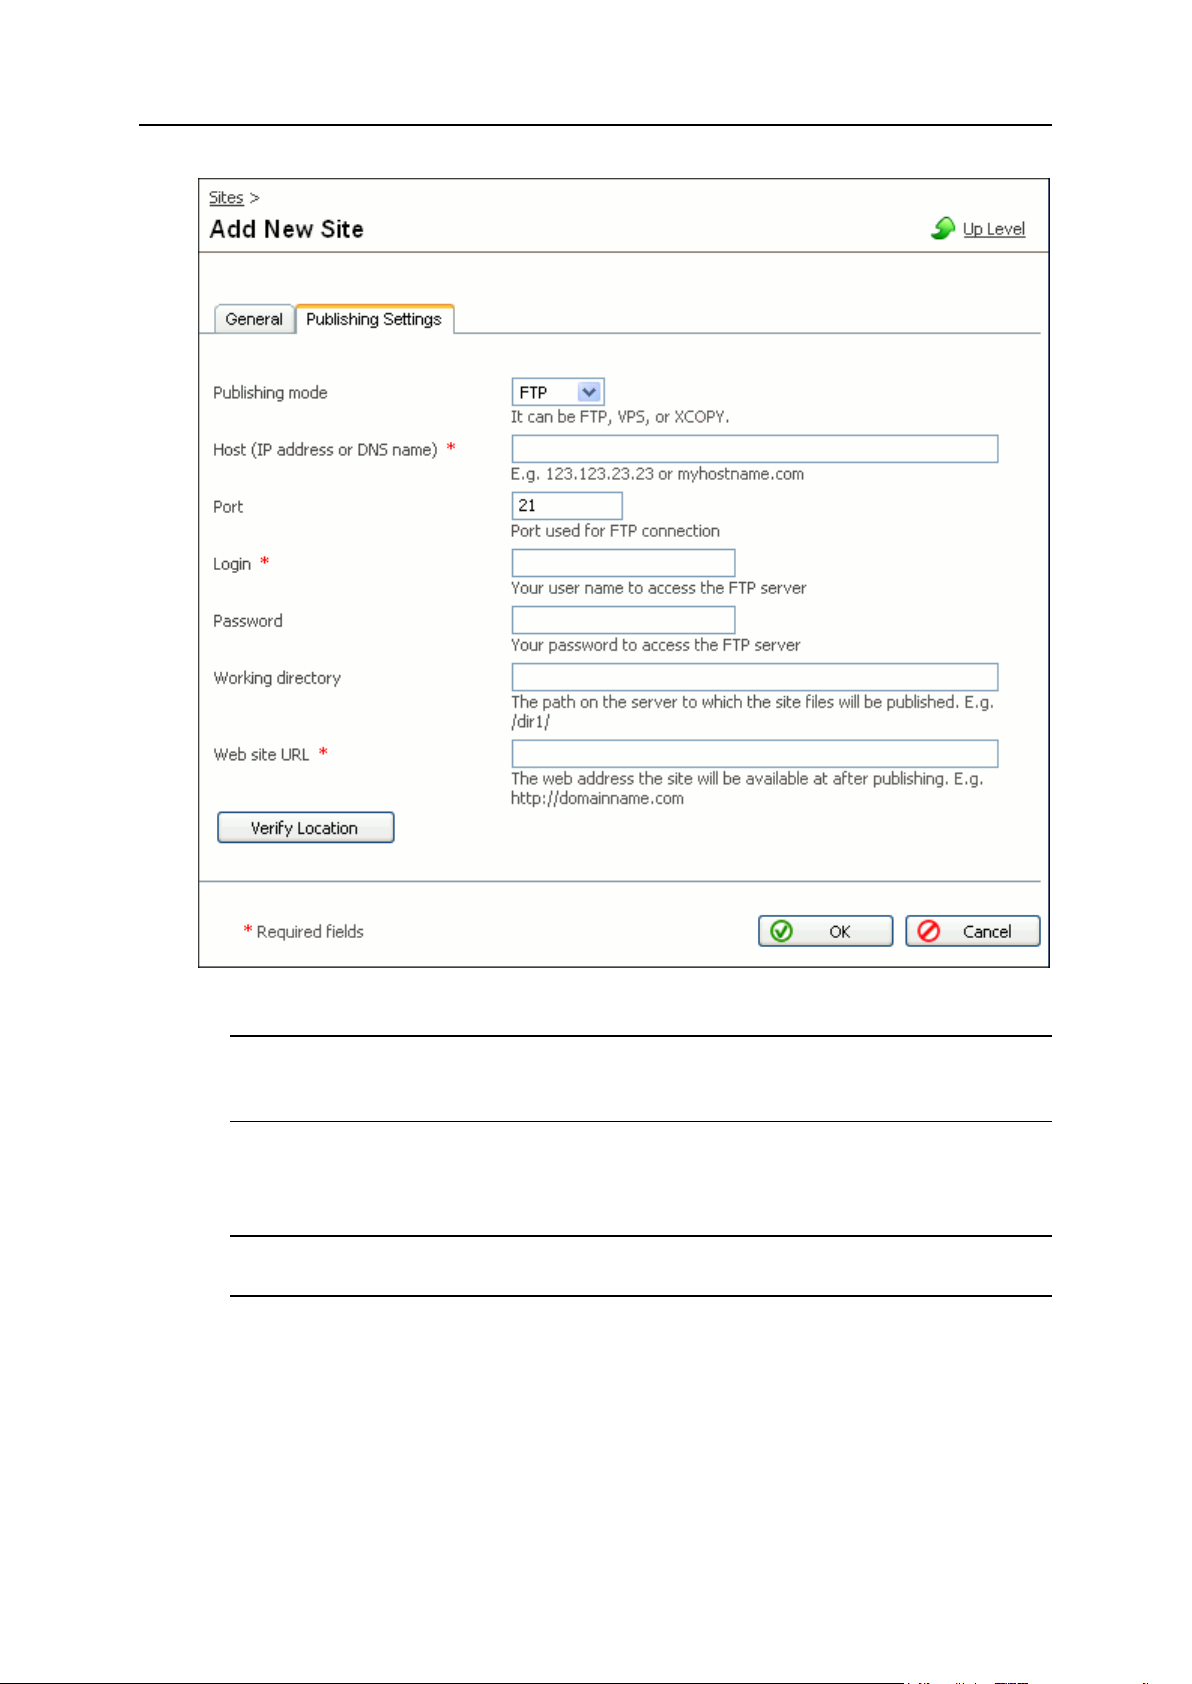
Managing Sites 33
Figure 22: Registering a Site in the System: Specifying Publishing Settings
Important: Your Plesk Sitebuilder administrator may disallow you to modify site
publishing settings. In that case, the Publishing Settings tab is missing on the site
management page.
If you do not see the Publishing Settings tab, just click OK to register your site.
5 On the Publishing Settings tab, select a publishing mode: FTP, VPS, or
XCOPY.
Important: The list of available publishing modes is configured by the Plesk
Sitebuilder administrator in your service plan.
6 If you select FTP publishing mode, provide the following parameters:
In the Host field, enter the IP address or domain name (without the http:// prefix)
of the server to which you want to publish the site.
If the maximum number of hosts allowed by your plan is limited, select a host
from the list. This list contains hosts specified in your plan.
Page 34

34 Managing Sites
If the number of hosts allowed by your plan is unlimited, you can specify any
FTP server you have at your disposal (make sure that the server meets the
requirements (see page 39)).
For information about the allowed number of hosts (limited or unlimited),
contact your Plesk Sitebuilder administrator.
In the Login and Password fields, provide your FTP server access credentials.
In the Working directory field, specify the path on the server where the site
content will be stored after publication.
In the Web site URL field, enter the web address where the site will be available
after publication.
Note: Make sure that the Web site URL and the Working directory settings point to
the same publishing location. For example, to publish site with URL
http://test.url.com/myfolder, specify working directory myfolder.
7 If you select VPS publishing mode:
In the Host field, enter the IP address or domain name of your Parallels
Virtuozzo Container.
In the Container ID field, specify an integer number of the Virtuozzo Container is
identified it on the physical server.
In the User field, enter the name of the Apache user on the Plesk Sitebuilder
machine (apache, www-data, etc.).
In the Group field, specify the name of the Apache group on the Plesk Sitebuilder
machine (apache, www-data, etc.).
In the Working directory field, specify the absolute path on the Virtuozzo
Container to the folder where the site content will be stored after publication.
In the Web site URL field, enter the web address where the site will be available
after publication.
Note: Using this mode you can publish sites only to servers running Parallels
Business Automation, Standard.
8 If you select XCOPY publishing mode:
In the Working directory field, enter the name of a directory (with full path) where
the site content will be stored after publication. For example,
/var/www/yoursite.
In the Web site URL field, specify the web address where the site will be available
after publication.
9 Click Verify Location.
In order for the published sites to work properly, the location you specify for
publishing a site should be checked for Plesk Sitebuilder consistency. During this
check, the system verifies whether the specified publishing parameters are valid
and the publishing location meets all the requirements. This verification may take
several minutes; the results are displayed on the same screen.
Page 35

Managing Sites 35
If you see errors or warning messages, review the site publishing settings for
consistency. See section Requirements to Publishing Location (on page 39) and make
sure that all requirements to the publishing location are met. For details about
typical Plesk Sitebuilder publishing issues and their resolution, see Appendix.
Troubleshooting Plesk Sitebuilder (on page 44). If you find no answers to your question
in these sections, contact your Plesk Sitebuilder administrator.
10 Click OK.
Page 36

36 Managing Sites
Assigning Trial Site to Your Account
If before getting a Plesk Sitebuilder account, you have created a trial site in the Wizard,
you can assign this site to your account and continue working with it. To do so, you
need the site's URL which was displayed at the Publish step of the Wizard.
To assign a site to your account:
1 On the navigation pane, click Sites.
2 Click Own Site.
Figure 23: Assigning a Trial Site to Your Account
If you have already reached the maximum number of sites allowed by your plan, the
Own Site button is disabled.
3 In the Site URL field, specify the URL of the site you want to
appropriate.
If you have created a trial site on the same computer, the URL is already present in
the Site URL field.
4 In the Site name field, provide any arbitrary name for the site.
5 Click OK.
Alternatively, you can go to navigation pane > Desktop, specify the site URL and
name in respective fields in the site appropriating area (see page 16), and click Own Site.
Creating or Editing Site Content in Wizard
After you register or appropriate a site in your Administrator Panel, you can proceed to
creating or editing the site content in Plesk Sitebuilder Wizard.
To proceed to creating or editing the site content:
Page 37

Managing Sites 37
1 On the navigation pane, click Sites.
2 Click the Edit icon for the respective site in the list.
3 Make necessary changes and publish them as described in the Plesk
Sitebuilder for Linux/Unix Wizard User's Guide
(http://www.parallels.com/en/products/sitebuilder/docs).
Previewing Site
To preview a site:
1 On the navigation pane, click Sites.
2 Click the Preview icon for the respective site in the list.
Renaming Site
To rename a site:
1 On the navigation pane, click Sites.
2 Click the name of the site you want to rename.
3 On the General tab, provide the new name for the site in the Site name
box.
This can be any arbitrary name you will use to identify the site. It is not displayed in
visitors' web browsers.
4 Click OK.
Page 38

38 Managing Sites
Publishing Site
In this section:
Requirements to Publishing Location ................................................................ 39
You can publish the sites listed on the Sites screen directly from the Administrator
Panel. The icon indicates that a site has been published on the Internet, the icon
indicates a not published site.
Prior to publishing a site, make sure that the publishing location meets all the
requirements (see page 39).
To publish a site:
1 On the navigation pane, click Sites.
2 Click the corresponding Publish icon.
The system will check whether the publishing parameters of the site are valid and the
specified location meets all the requirements. If all the parameters are correct, the
publishing process will start. After successful publishing, the icon is displayed
against the site name in the list.
If changing publishing settings is allowed in your plan, you have an option to verify that
the publishing location meets all Plesk Sitebuilder requirements, prior to publishing the
site. To do so, click the site name, proceed to the Publishing Settings tab and click Verify
Location.
Note: If changing site publishing settings is not allowed in your plan, the Publishing
Settings tab is absent on the site management screen.
If you see an error message, revise your publishing settings (see Registering Site in
System (on page 32)). For details about typical Sitebuilder publishing issues and their
resolution, see Appendix. Troubleshooting Sitebuilder (on page 44). If you find no answers
to your questions in these sections, contact your Plesk Sitebuilder administrator.
Page 39

Managing Sites 39
Requirements to Publishing Location
The requirements imposed upon a publishing server depend on the type of sites to be
published on this server: static or dynamic.
In Plesk Sitebuilder, a static site is a site which contains only static HTML pages
created with the help of WYSIWYG editor, and does not contain modules - except for
the Script and Flash Intro modules. There are no special requirements to a host used
for static sites publishing.
A dynamic site is a site with dynamic pages: a site containing at least one module
(except for the mentioned Script and Flash Intro).
To guarantee correct operation of dynamic sites, make sure that the publishing server
meets the following requirements:
PHP version 4.3.9 or later is installed on the publishing server.
PHP supports:
The ionCube PHP Loader 3.1.15 or later
DOM XML with XSLT support or PHP XSLT extension (Sablotron)
Multibyte string functions (mbstring extension)
Zlib compression functions (zlib extension)
Session handling functions support (session extension)
SQLite 2.x with UTF-8 encoding support
GD library 2.0.1 or later
In php.ini the following directive is installed:
default_charset = ”UTF-8”
Note: Make sure that all extensions you have installed are listed in the extensions
directory and in the php.ini file. If PHP is installed as an Apache module, restart
Apache after applying the changes.
Editing Site Publishing Settings
Your Plesk Sitebuilder administrator may disallow you to modify site publishing
settings. In that case, the Publishing Settings tab is missing on the site management
page.
If the Publishing Settings tab is present, you can edit these settings as described below.
To change the publishing settings of a site:
1 On the navigation pane, click Sites.
2 Click the name of the site you want to change the publishing settings
for.
Page 40

40 Managing Sites
3 On the Publishing Settings tab, edit the settings as desired.
In this section:
Submitting Site to Search Engines .................................................................... 41
Tracking Visits to Site ........................................................................................ 42
For detailed instructions on inputting the settings, refer to Registering Site in System
(on page 32).
4 Click OK.
Important: If a site contains modules, we do not recommend changing the FTP Login
for FTP publishing mode. Changing your FTP login will change the home directory of
the site, and the modules data, which is stored in the former home directory, may be
lost. If you have access to your publishing server, you can move your modules data
manually from the former home directory (the path on the server will be [Sitebuilder
sites directory/Login1/Working directory]) to the new home directory ([Sitebuilder sites
directory/Login2/Working directory]). If you have no access to the publishing server, or
insufficient permissions for moving files, leave the FTP Login field as is, or contact your
Sitebuilder administrator for assistance.
Promoting Site and Tracking Site
Popularity
To make it easy to find a site on the Internet, the best option is to submit the site to a
popular search engine. In Plesk Sitebuilder, you can submit sites to MSN and Google
search engines.
As a part of maintaining a published site you can enable the statistics count on the site
and therefore accumulate and analyze the site attendance statistics, which helps to
track the popularity of the site. Besides, you can add a counter to your site, so that the
total number of site visitors would be displayed for all comers.
Page 41

Managing Sites 41
Submitting Site to Search Engines
To submit a site to a search engine:
1 On the navigation pane, click Sites.
2 Click on your site name.
3 Click Search Engine Submit.
Figure 24: Submitting a Site to Search Engines
4 To submit the site to MSN search engine, click the Submit your site to
MSN search engine link.
A new window will open providing you with further instructions.
5 To submit the site to Google search engine, click the Submit your site to
Google search engine link.
A new window will open saying that the site has been successfully submitted to the
Google search engine.
Keywords and description used to index your site by search engines are configured on
the Edit step of the Wizard.
Page 42

42 Managing Sites
Tracking Visits to Site
Note that statistics-related options are available only if the Statistics module is enabled
in your service plan.
To enable statistics count on your site:
1 On the navigation pane, click Sites.
2 Click your site name.
3 Click Statistics Settings.
Figure 25: Turning On Statistics Count on a Site
4 Select the Statistics is turned on check box.
5 Click OK.
To add a counter to your site:
1 On the navigation pane, click Sites.
2 Click the Edit icon opposite your site name to open it in the Wizard.
3 Go to the Pages step.
4 Select the Add a counter to every page check box.
5 In the Initial value field, enter a number that will be a starting point for
the counter.
6 From the Counter style list, select the appearance of the counter.
7 Click Save Changes.
To view statistics about site attendance:
1 Click Sites on the navigation pane.
2 Click your site name.
3 Click Site Statistics.
Page 43

Managing Sites 43
Figure 26: Viewing Site Attendance Statistics
Removing Site from Plesk Sitebuilder
After you remove your site, you will not be able to edit and publish it through Plesk
Sitebuilder any longer. Note that after you remove an already published site, it remains
live on the Internet.
To remove your site:
1 On the navigation pane, click Sites.
2 Select your site.
3 Click Delete.
Page 44

This Appendix provides detailed troubleshooting procedures for most known issues
In this chapter:
Typical Site Publishing Errors ............................................................................ 44
In this section:
General Publishing Issues ................................................................................. 45
Known Issues with Third Party Components ..................................................... 46
C H A P T E R 4
Appendix. Troubleshooting Plesk
Sitebuilder
encountered during Plesk Sitebuilder operation.
Typical Site Publishing Errors
During the site publishing process the specified publication settings are being checked
by Plesk Sitebuilder against the publishing requirements. Here we will outline typical
errors which may occur during site publication, describe their reasons and provide
possible solutions and workarounds.
If on the publishing server:
There is no GD library (version 2.0.1 or above)
There is no Multibyte string functions (mbstring extension)
- a user will see only general error messages in his or her Administrator Panel.
Page 45

Appendix. Troubleshooting Plesk Sitebuilder 45
General Publishing Issues
Some of the typical publishing errors are:
Site publishing settings have been changed. Some data stored at the published site may be
lost.
This warning occurs when you try to publish a site containing modules to another
publishing location. The modules data is stored on the published site. Therefore,
after you publish the site to another host, these data become unavailable.
If you wish to publish a site to the new publishing location, perform the following
steps in the following order:
1. Move your site directory to the new location.
2. Change your publishing settings in Plesk Sitebuilder to point to the new location.
3. Republish the site.
Make sure not to make any changes on the site in Plesk Sitebuilder before the
process is completed. Otherwise, your changes may be lost.
If you have no access to the publishing location or do not have enough permissions
for writing on the new location, contact your hosting provider for assistance.
Cannot copy the site files to the specified site location. It is possible that you do not have
enough permissions for writing, or there is not enough free disk space on the server.
This happens when:
The provided publication settings (FTP/XCOPY/VPS) are incorrect.
FTP connection is not possible due to some reasons. If may be the firewall
issue or something else.
Check out the connection settings of the target server and the publishing settings of
the site ( Sites > the site name > Publishing Settings tab).
Cannot publish to the specified host via [FTP, VPS, or XCOPY]. Authorization failed.
This most probably means that FTP user name or password specified on the
publishing server and in the site publication settings do not match. This may
happen if, for example, the FTP user name and password have been updated on
the server, and haven't been updated in site publishing settings. Check out the FTP
credentials on the publishing location and in site publishing settings ( Sites > the
site name > Publishing Settings tab).
Cannot connect to the specified site URL.
The specified site URL cannot be reached. The site may be down due to a variety
of reasons. Check the site publishing settings ( Sites > the site name > Publishing
Settings tab) and try publishing the site again after some time.
Cannot find site files at [site URL]. The specified site URL does not match the [FTP, VPS, or
XCOPY] settings.
The specified URL does not correspond to the specified settings
(FTP/XCOPY/VPS).
For example, the address http://test.url.com/ corresponds to the following FTP
folder:
Page 46

46 Appendix. Troubleshooting Plesk Sitebuilder
Host (IP address or DNS name): 123.123.23.23
Working directory: /
Login: test
Password: test
In this case the “/” working directory is the site root folder (DocumentRoot). If you
are trying to publish with the working directory specified as “/myfolder”, then the
URL http://test.url.com/ does not correspond to the specified publication settings.
The correct URL for publishing in "/myfolder" working directory is
http://test.url.com/myfolder.
If you try publishing the site to directory /myfolder with the URL http://test.url.com/
(without specifying the working directory in the URL), an error is displayed.
Sometimes users experience difficulties with specifying the path. The path should
be specified in relation to the directory the user is in after logging in to the FTP
server.
For example, the user’s home directory with SSH access is /var/www/test. The
DocumentRoot of the web server is the /var/www/test/httpdocs directory.
Upon providing their credentials and logging in to the FTP server, users find
themselves in the /var/www/test directory.
If the user wants to publish the site directly in DocumentsRoot, the working
directory should be /httpdocs.
If the user wants to publish the site to /myfolder subdirectory, then the working
directory should be /httpdocs/myfolder.
Known Issues with Third Party Components
Some issues may also occur due to the specifics of third party components necessary
for site publishing and operation on the target server. A list of all required components
is provided in section Requirements to Publishing Location (on page 39), earlier in this guide.
If some of these necessary components are missing, you will see the corresponding
notifications in your Plesk Sitebuilder.
Below you will find the additional information about these components, as well as the
configuration and troubleshooting instructions.
Before you start publishing sites to a target server, make sure that:
SQLite version 2.x is installed on the target server.
Plesk Sitebuilder supports SQLite versions 2.x.
SQLite 3.x is currently not supported.
PHP has SQLite support included.
On PHP 4.x, use one of the following options to enable SQLite:
Page 47

Appendix. Troubleshooting Plesk Sitebuilder 47
If the publishing server runs Parallels Plesk Control Panel version 8.x or
later, use a special "Sitebuilder publishing support for Plesk" component
(sb-publish) shipped by Parallels. This component is applied
automatically during Plesk Control Panel installation (using Autoinstaller), or
during installation of Parallels Virtuozzo Containers application template
psa-sb-publish. If the component has not been installed (for example, in
case of manual installation of Plesk Control Panel), find this component in
the thirdparty- directory of Plesk Control Panel distribution and install it
on the publishing server.
Recompile PHP with --enable-sqlite option and add the sqlite.so
extension to the php.ini file.
Find, download and install a ready third-party SQLite 2.x package for PHP
4.x. You may look for such packages on the RPMfind.net (http://rpmfind.net)
server and other similar resources.
On PHP 5.x, SQLite support is enabled by default, unless you have disabled it by
compiling PHP with the --without-sqlite option on purpose. In this case,
recompile PHP with the --with-sqlite option and add the sqlite.so
extension to the php.ini file.
If this doesn't work, find, download and install a third-party SQLite 2.x package
for PHP 5.x. You may look for such packages on the RPMfind.net
(http://rpmfind.net) server and other similar resources.
UTF8 support is included for SQLite.
To enable UTF8 support, recompile PHP with --enable-sqlite-utf8.
DOM XSLT or PHP XSLT extension (Sablotron) is installed on the target server.
In case it is not installed, install one of the following components on the target
server:
DOM with XSLT support
PHP XSLT extension (Sablotron)
Note: 1. With PHP 5.x installed on the target server, it is necessary to compile PHP
with the following options: -with-dom-xslt=/usr; -with-dom-exslt=/usr; with-dom=shared and -with-xsl.
2. Make sure that all extensions you have installed are listed in the extensions
directory and in the php.ini file.
ionCube PHP Loader (v 3.1 or newer) is installed at the target server.
Download an appropriate version of ionCube Loader from the ionCube, Ltd. official
web site (http://www.ioncube.com/loaders.php). For detailed installation instructions,
refer to the Loader Installation page (http://www.ioncube.com/loader_installation.php)
on the ionCube, Ltd. web site.
 Loading...