

Page 1

SWsoft, Inc.
SWsoft SiteBuilder 3.2
for Windows
Installation Guide
(c) 1999-2006
Page 2

ISBN: N/A
SWsoft, Inc.
13755 Sunrise Valley Drive
Suite 325
Herndon
VA 20171 USA
Phone: +1 (703) 815 5670
Fax: +1 (703) 815 5675
Copyright © 1999-2006 by SWsoft, Inc. All rights reserved
Distribution of this work or derivative of this work in any form is prohibited unless prior written permission is
obtained from the copyright holder.
Solaris is a registered trademark of Sun Microsystems, Inc.
X Window System is a registered trademark of X Consortium, Inc.
Intel, Pentium, and Celeron are registered trademarks of Intel Corporation.
MS Windows, Windows 2003 Server, Windows XP, Windows 2000, Windows NT are registered trademarks of
Microsoft Corporation.
IBM DB2 is a registered trademark of International Business Machines Corp.
SSH and Secure Shell are trademarks of SSH Communications Security, Inc.
MegaRAID is a registered trademark of American Megatrends, Inc.
PowerEdge is a trademark of Dell Computer Corporation.
Request Tracker is a trademark of Best Practical Solutions, LLC
ActiveSite Compiller v4 is a trademark of Intorel, Inc.
XML-RPC Library under MIT License
Page 3

3
Contents
Preface 6
About This Guide .........................................................................................................................................6
Who Should Read This Guide......................................................................................................................6
Organization of This Guide ..........................................................................................................................7
Documentation Conventions.........................................................................................................................7
Typographical Conventions...............................................................................................................7
General Conventions.........................................................................................................................8
Feedback.......................................................................................................................................................8
Preparing for Installation 9
About SiteBuilder.........................................................................................................................................9
System Requirements ...................................................................................................................................9
Software Requirements....................................................................................................................10
Hardware Requirements..................................................................................................................10
About SiteBuilder Installation Wizard 11
How It Works .............................................................................................................................................12
Components Installed During Installation Process.....................................................................................13
Installing SiteBuilder 14
Launching SiteBuilder Installation Wizard.................................................................................................15
Selecting Type of Installation.....................................................................................................................18
Typical Installation..........................................................................................................................19
Custom Installation..........................................................................................................................20
Installing Templates and Language Packages ............................................................................................29
Configuring IIS Security Settings...............................................................................................................30
Removing SiteBuilder from Your System 31
Removing SiteBuilder Using MS Windows Interface................................................................................31
Removing SiteBuilder Using SiteBuilder Installation Wizard ...................................................................32
Remaining Data..........................................................................................................................................34
Repairing SiteBuilder 35
Upgrading SiteBuilder 38
Migrating from SiteBuilder 2.0.5 to SiteBuilder 3.2 ..................................................................................38
Initial Conditions.............................................................................................................................38
Migration Scheme ...........................................................................................................................39
Migration General Rules .................................................................................................................39
Transferring User Accounts.............................................................................................................39
Transferring Sites ............................................................................................................................40
Limitations of Migration Procedure................................................................................................40
Upgrading SiteBuilder 3.0 to SiteBuilder 3.2.............................................................................................41
Page 4

Contents 4
Clustering Installation 44
Overview ....................................................................................................................................................45
Logical Architecture........................................................................................................................45
Deployment Architecture ................................................................................................................46
Installation Walkthrough ............................................................................................................................47
Prerequisites ....................................................................................................................................47
Installing SiteBuilder Server ...........................................................................................................48
Appendix ....................................................................................................................................................50
Index 53
Page 5

5
Table of Figures
Figure 1: Selecting SQL Server ................................................................................................15
Figure 2: Launching SiteBuilder Installation Wizard............................................................16
Figure 3: Viewing SiteBuilder License Agreement.................................................................17
Figure 4: Selecting Type of Installation................................................................................... 18
Figure 5: Selecting Destination Folder.....................................................................................19
Figure 6: Completing SiteBuilder Installation........................................................................20
Figure 7: Selecting Destination Folders ...................................................................................21
Figure 8: Selecting Shortcuts Location....................................................................................22
Figure 9: Indicating SQL Server Connection Parameters.....................................................23
Figure 10: Selecting Installation Scenario ...............................................................................24
Figure 11: Providing IIS Web Site Parameters.......................................................................25
Figure 12: Selecting IIS Web Site.............................................................................................26
Figure 13: Launching Installation Process.............................................................................. 27
Figure 14: Completing SiteBuilder Installation......................................................................28
Figure 15: Removing SiteBuilder, Welcome Screen...............................................................32
Figure 16: Selecting Removal Operation.................................................................................33
Figure 17: Launching Removal Process...................................................................................33
Figure 18: Completing Removal Operation ............................................................................34
Figure 19: Repairing SiteBuilder, Welcome Screen ...............................................................35
Figure 20: Selecting Repair Operation ....................................................................................36
Figure 21: Launching Repair Process......................................................................................36
Figure 22: Completing Repair Operation................................................................................37
Figure 23: Upgrading SiteBuilder, Welcome Screen..............................................................41
Figure 24: Launching Upgrade Process...................................................................................42
Figure 25: Completing Upgrade Operation.............................................................................42
Figure 26: Application components..........................................................................................45
Figure 27: Web Farm ................................................................................................................46
Page 6

6
C HAPTER 1
Preface
In This Chapter
About This Guide .................................................................................................................. 6
Who Should Read This Guide...............................................................................................6
Organization of This Guide................................................................................................... 7
Documentation Conventions................................................................................................. 7
Feedback ............................................................................................................................... 8
About This Guide
SWsoft SiteBuilder 3.2 for Windows Installation Guide instructs you how to install, upgrade,
remove and repair SiteBuilder software. This guide also contains instructions on clustering
installation.
Who Should Read This Guide
This guide is intended for those who downloaded SiteBuilder and want to install it in their
systems.
Page 7

Preface 7
Organization of This Guide
The guide consists of four chapters:
Chapter 2, Preparing for Installation, describes the initial system requirements and
preparations for the installation process.
Chapter 3, About SiteBuilder Installation Wizard, provides detailed information about
Installation Wizard and what components are installed during the process.
Chapter 4, Installing SiteBuilder, describes types of the installation and provides a step-by-
step description of two types of the SiteBuilder for Windows installation.
Chapter 5, Removing SiteBuilder from Your System, describes the SiteBuilder for Windows
uninstallation process.
Chapter 6, Repairing SiteBuilder, describes the SiteBuilder for Windows repair operation.
Chapter 7, Upgrading SiteBuilder, provides detailed information about the migration and
upgrade processes.
Chapter 8, Clustering Installation, describes the logic of clustering process and contains
instructions on clustering installation.
Appendix, contains the list of installer parameters for unattended installation.
Documentation Conventions
Before you start using this guide, it is important to understand the documentation conventions
used in it.
T ypographical Conventions
Before you start using this guide, it is important to understand the documentation conventions
used in it.
The following kinds of formatting in the text identify special information.
Formatting
convention
Special Bold
Type of Information Example
Items you must select, such as
menu options, command butt ons,
or items in a list.
Titles of chapters, sections, and
subsections.
Go to the System tab.
Read the Basic
Administration chapter.
Page 8

Preface 8
Italics Used to emphasize the importance
of a point, to introduce a term or to
designate a command line
placeholder, which is to be
replaced with a real name or value.
Monospace
Preformatted On-screen computer output in your
Preformatted
Bold
CAPITALS Names of keys on the keyboard. SHIFT, CTRL, ALT
KEY+KEY Key combinations for which the
The names of commands, files,
and directories.
command-line sessions; source
code in XML, C++, or other
programming languages.
What you type, contrasted with
on-screen computer output.
user must press and hold down one
key and then press another.
The system supports the so
called wildcard character
search.
The license file is located in
the
http://docs/common/license
s directory.
# ls –al /files
total 14470
# cd
/root/rpms/php
CTRL+P, ALT+F4
General Conventions
Chapters in this guide are divided into sections, which, in turn, are subdivided into
subsections. For example, Documentation Conventions is a section, and General Conventions
is a subsection.
When following steps or using examples, be sure to type double-quotes ("), left single-
quotes (`), and right single-quotes (') exactly as shown.
Feedback
If you spot a typo in this guide, or if you have thought of a way to make this guide better, we
would love to hear from you!
If you have a suggestion for improving the documentation (or any other relevant comments), try
to be as specific as possible when formulating it. If you have found an error, please include the
chapter/section/subsection name and some of the surrounding text so that we could find it
easily.
Please submit a report by e-mail to
userdocs@swsoft.com.
Page 9

9
C HAPTER 2
Preparing for Installation
This chapter provides general information about SiteBuilder itself and initial system
requirements that must be met in order to launch SiteBuilder installed in user's system.
Before initiating the SiteBuilder installation process, check whether your system meets the
following requirements:
Software requirements (see page
Hardware requirements (see page
After making sure that software and hardware described above are present in the system, you
are ready to launch the installation process.
10)
10)
In This Chapter
About SiteBuilder ................................................................................................................. 9
System Requirements............................................................................................................ 9
About SiteBuilder
SiteBuilder consists of two parts: the Wizard and the Administrator Panel.
Wizard is a web application enabling its users to create web sites and publish them on the
Internet.
The Administrator Panel is a tool for managing and maintaining web sites created in the Wizard.
System Requirements
This section describes what software and hardware should be installed in your system for
SiteBuilder to operate properly.
Page 10

Preparing for Installation 10
Software Requirements
In order for SiteBuilder to work properly, the following software should be installed in the
system prior to the SiteBuilder installation:
OS Windows 2000 Advanced Server with Service Pack 4 or OS Windows Server 2003 any
edition with Service Pack 1.
Note: It is very important to have the latest service packs installed in your operating systems
prior to installing SiteBuilder.
If you have OS Windows 2000 Advanced Server with Service Pack 4 installed, then you
need IIS 5.1 installed on your computer.
If you have OS Windows Server 2003 any edition with Service Pack 1, then you need IIS
6.0 installed on your computer.
Note: If your IIS works in the 64-bit mode, it will be automatically switched to the 32-bit
mode.
Below is the list of another type of software that should also be installed in the system prior to
SiteBuilder installation. If this software is not installed in the system, the SiteBuilder
Installation Wizard installs it automatically during the installation process:
MS framework.net 2.0
MS SQL Server 2005 Express Edition
MDAC 2.8
Windows Installer 3.1
Internet Explorer 5.x or later
Note: Your computer must not be a domain controller. Otherwise, installation will end with the
error.
Hardware Requirements
Prior to installing the SiteBuilder program, make sure that your server meets the following
hardware requirements:
Processor: 1-gigahertz (GHz) Pentium III-compatible or faster processor recommended
Memory: 512 megabytes (MB) of RAM or more recommended
Hard Disk: Approximately 350 MB of available hard-disk space for the recommended
installation
Drive: CD-ROM or DVD-ROM drive
Page 11

11
C HAPTER 3
About SiteBuilder Installation Wizard
The main purpose of the SiteBuilder Installation Wizard is to copy SiteBuilder files to the user's
system in the folders indicated by a user during the installation process. It also checks and then
copies other software, necessary for running SiteBuilder, if you did not install it previously on
the computer (see Software Requirements (see page
performed by the SiteBuilder Installation Wizard and tells what SiteBuilder components are
installed during the installation process.
In This Chapter
How It Works........................................................................................................................12
Components Installed During Installation Process ...............................................................13
10)). This chapter describes operations
Page 12

About SiteBuilder Installation Wizard 12
How It Works
During the SiteBuilder installation process, the SiteBuilder Installation Wizard performs the
following operations in the order as they are listed below:
1 Checks for prerequisites, i.e. checks your computer for other additional software, necessary
for running SiteBuilder for Windows (see the detailed list of this software in Software
Requirements (see page
Wizard installs necessary programs to your system.
2 Stops the installation process if either one of the following software requirements is not
met:
Your operation system is neither Windows Server 2003 Enterprise Edition nor Windows
2000 Advanced Server
Your computer is a domain controller
IIS version is earlier than 5.0
3 Copies all necessary SiteBuilder files (for a detailed information, read Components Installed
During Installation Process (see page
10)). If this software is not found, the SiteBuilder Installation
13)).
4 Creates virtual directories and sites for Web and Sites folders.
5 Sets up “Site Builder for Windows Hosting Service” service and launches it.
6 Initializes database. In the case of remote server, it creates users, providing them, as well as
local Network Service users, with rights to access databases.
7 Dynamically creates shortcuts for the Wizard and Administrator Panel default pages.
8 Uninstalls later versions of the product at the end of the installation process.
9 If required, the SiteBuilder Installation Wizard installs ASP.net extensions and allows them
for site and virtual directories. It also installs ASP.net.
Page 13

About SiteBuilder Installation Wizard 13
Components Installed During Installation Process
During the SiteBuilder installation process the following SiteBuilder components are
dynamically generated by the Installation Wizard in your system:
Web application files. Images, styles, DLL files, and design.
Content. Templates of a site content placement on web pages.
Design. Site skin templates.
Site Builder for Windows Hosting Service files.
Other components: Localization files, skins, modules,
Empty folders to store sites and logs.
Page 14

14
C HAPTER 4
Installing SiteBuilder
Before installing SiteBuilder, download the SiteBuilder Installation Wizard bundle. It can be
found at SWsoft site (available here (
In This Chapter
Launching SiteBuilder Installation Wizard........................................................................... 15
Selecting Type of Installation ............................................................................................... 18
Installing Templates and Language Packages....................................................................... 29
Configuring IIS Security Settings.........................................................................................30
http://www.swsoft.com/)).
Page 15
Installing SiteBuilder 15
Launching SiteBuilder Installation Wizard
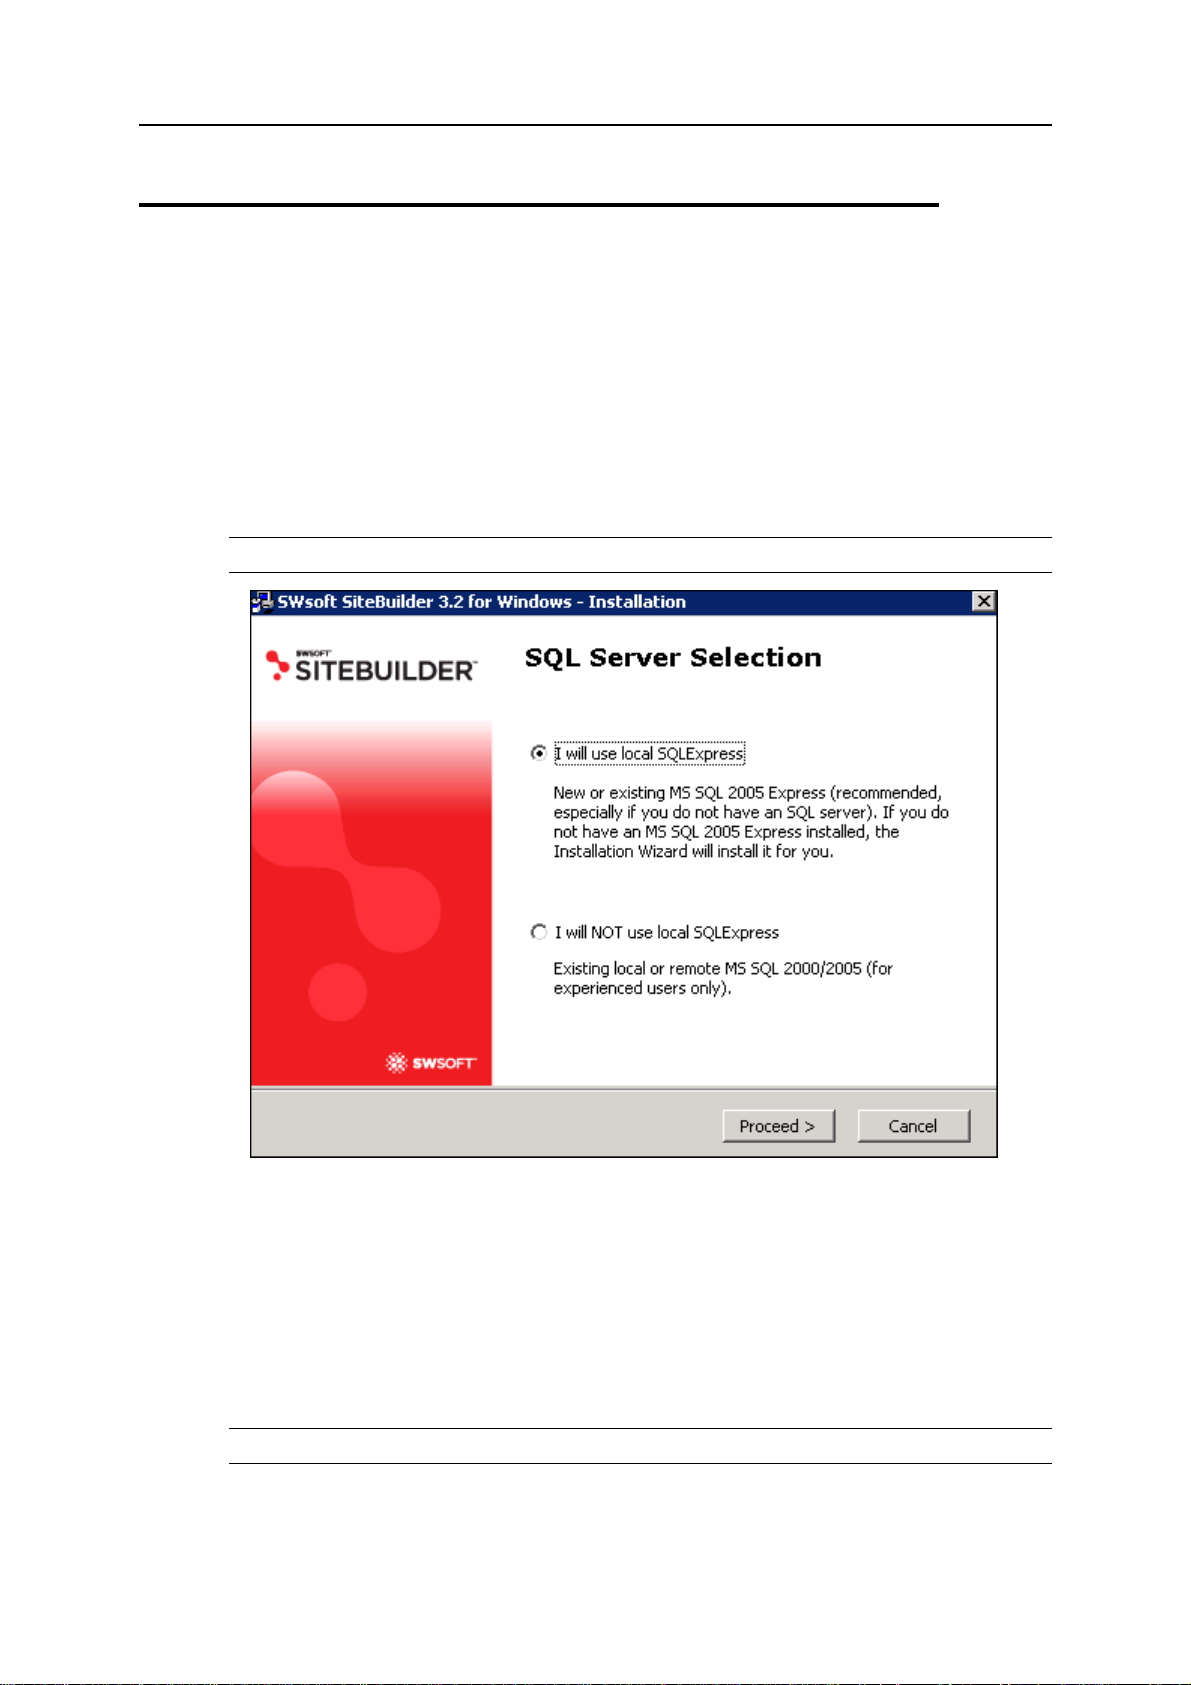
¾ To launch the SiteBuilder installation process:
1 Open your Windows Explorer.
2 Go to the folder where you have downloaded the SiteBuilder Installation
Wizard bundle.
3 Click the sitebuilder4win_3.2.0_build060721.1xx.exe file.
4 On the screen appeared, indicate what type of connection you have with the
remote MS SQL server.
Note: You must be logged in to your computer as administrator.
Figure 1: Selecting SQL Server
5 If you do not have a local MS SQL 2005 Express installed, but want to have
it installed on your computer, select the I will use local SQLExpress option.
When you select this option, the SiteBuilder Installation Wizard runs a check on your
computer to detect this software. If the software selected is not found, MS SQL 2005
Express is installed on your computer prior to the SiteBuilder installation. If the SiteBuilder
Installation Wizard detects this software on your computer, the installation process
continues.
Note: This option is recommended to regular users.
Page 16
Installing SiteBuilder 16
6 If you select the I will NOT use local SQLExpress option, set parameters of
connection with a remote or local SQL server. SiteBuilder doesn't run a
check for this software.
Note: Select this option only if you are an experienced computer user. Also you should be
administrator of this remote server.
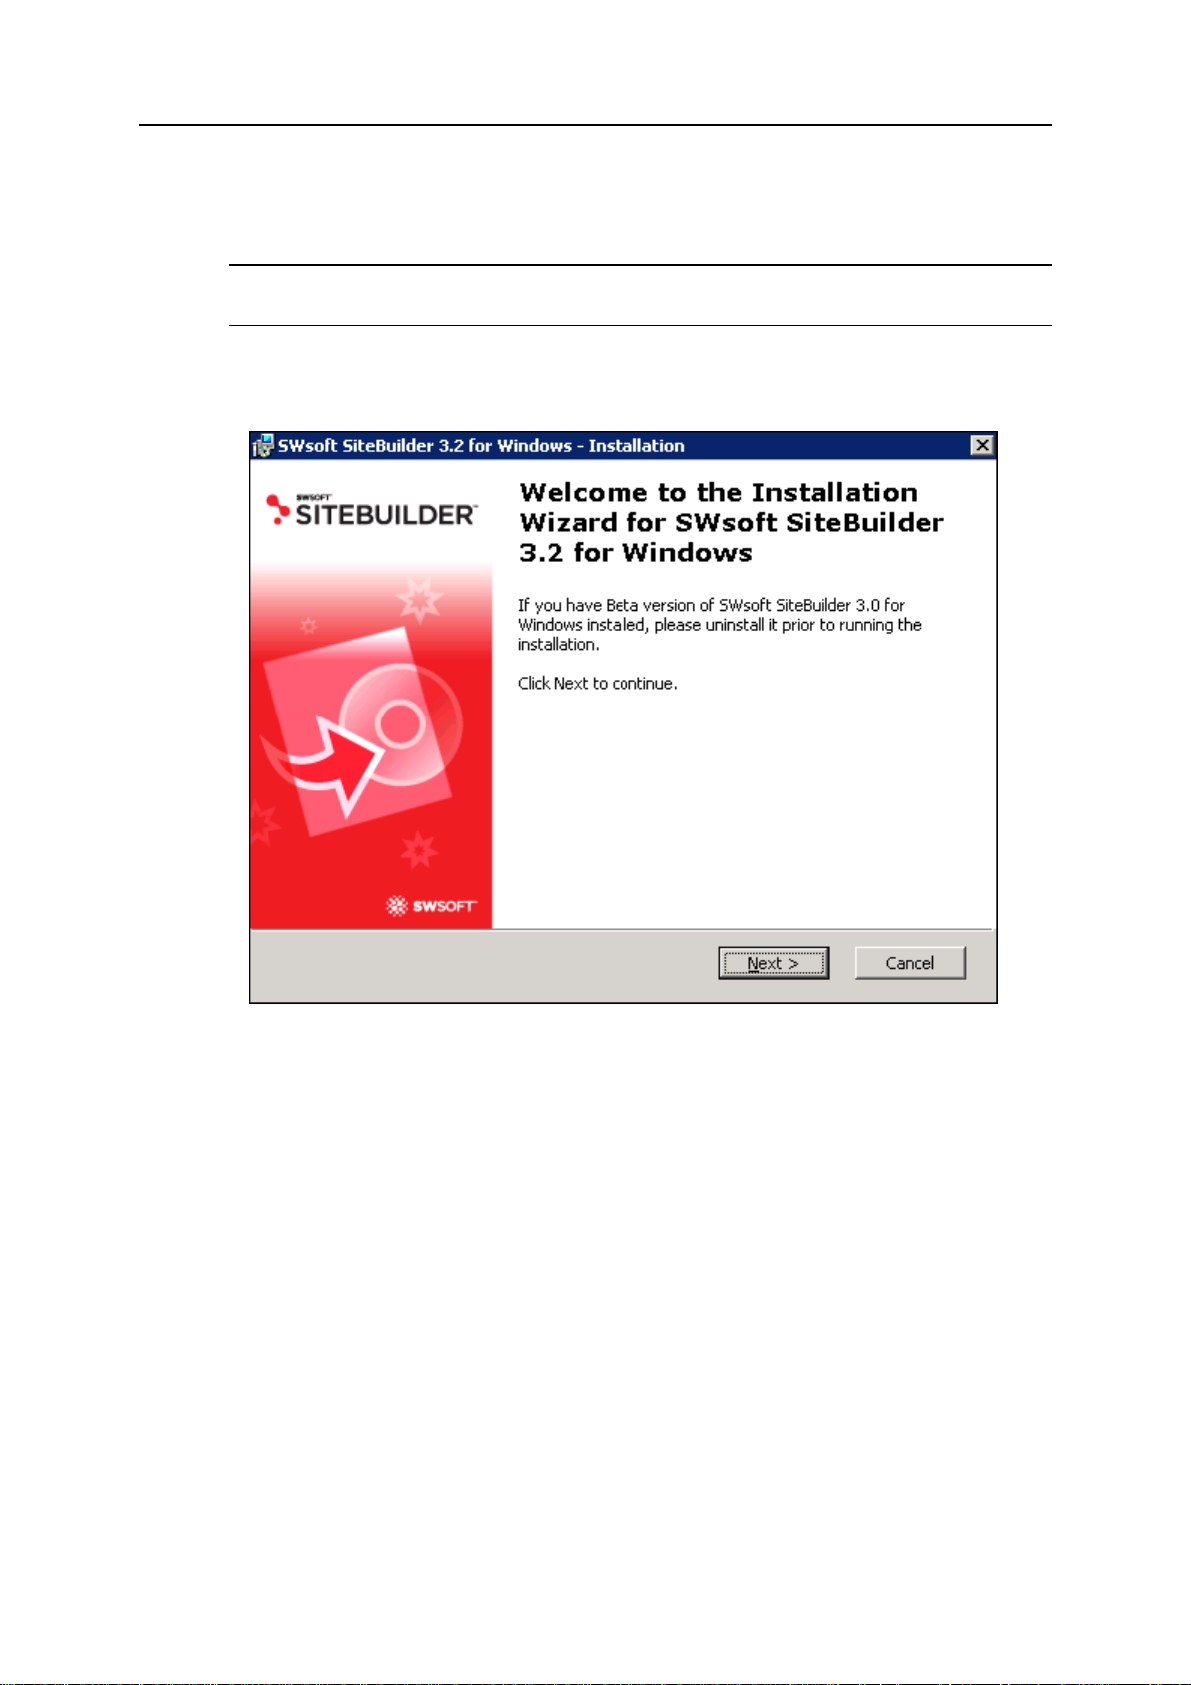
After the SiteBuilder Installation Wizard completes the software requirements check on
your computer, the Welcome to the Installation Wizard for SWsoft SiteBuilder 3.2 for Windows
screen appears.
Figure 2: Launching SiteBuilder Installation Wizard
7 Click Next to continue the installation.
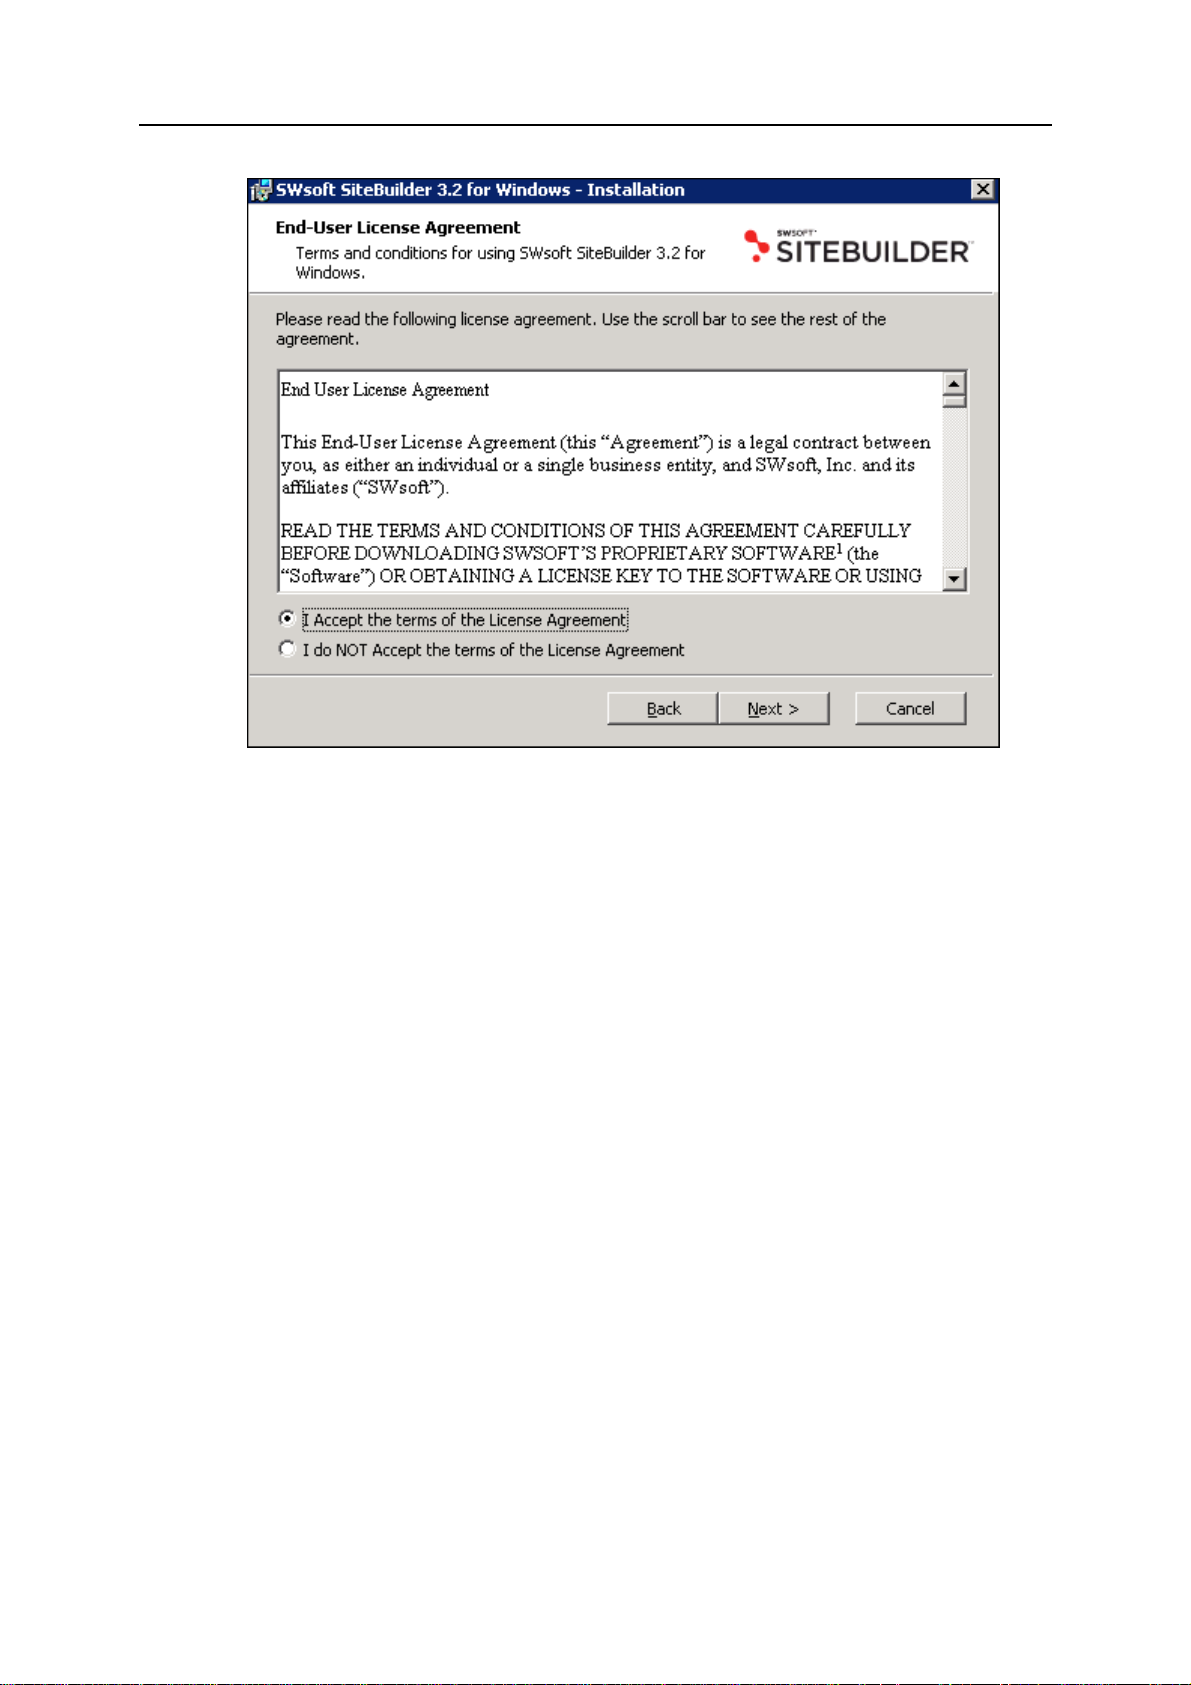
The End-User License Agreement screen appears.
8 Read the terms and conditions for using SWsoft SiteBuilder 3.2 for
Windows.
Page 17
Installing SiteBuilder 17
Figure 3: Viewing SiteBuilder License Agreement
9 If you agree with terms of the End User Agreement, select I Accept the terms
of the License Agreement option and click Next.
The Installation Type Selection screen appears. Information about the installation types see in
Types of Installation section later in this chapter (see page
18).
Page 18

Installing SiteBuilder 18
Selecting Type of Installation
There are two types of SiteBuilder installation:
Typical installation (see page
19). This type of installation is recommended to users with a
basic knowledge of computers. All data is installed automatically in the folder indicated by
user.
Custom installation (see page
20). During this installation a user can indicate the following:
Folders in the user's system, where SiteBuilder elements should be copied
SQL server parameters
Installation scenario
IIS web site parameters
Note: This type of installation better suits for users with the advanced computer knowledge.
Select the type of the installation on the Installation Type Selection screen and click Next.
Figure 4: Selecting Type of Installation
Page 19

Installing SiteBuilder 19
T ypical Installation
¾ To launch typical installation:
1 Select Typical on the Installation Type Selection screen and click Next.
The Destination Folder Selection screen appears.
Figure 5: Selecting Destination Folder
2 To check how much available space you have on your disk, click Disk Usage.
The Disk Space Requirements screen appears, providing you with the following information
about your hard disk:
Disk Size is the total size of your hard disks.
Available shows how much disk space is available at present.
Required shows how much disk space is required for the SiteBuilder software to be
installed.
Difference is the difference between available disk space and required disk space.
3 Click OK to return to the Destination Folder Selection screen.
4 Indicate a folder that will contain SiteBuilder sub-folders and files.
Initially, the default folder will be displayed in the Destination folder for SiteBuilder field. To
install SiteBuilder files into another folder, click Browse and select the folder you require.
5 Click Install.
SiteBuilder will be automatically installed in the specified folder. After the installation
process is completed, the following screen is displayed.
Page 20

Installing SiteBuilder 20
Figure 6: Completing SiteBuilder Installation
Before you exit the Installation Wizard, you can require to open the SiteBuilder readme
file after the installation process is completed. Also you can select the Complete your system
setup after installation check box. If you select this option then after you click Finish, the
SiteBuilder registration form appears. In this form you can register your first administrator
account. If you clear this check box and click Finish, the SiteBuilder Installation Wizard
closes.
6 Click Finish to close the SiteBuilder Installation Wizard.
After the SiteBuilder installation is completed, the following shortcuts appear on your desktop
and program menu:
Shortcut to the SiteBuilder Administrator Panel
Shortcut to the SiteBuilder Wizard
Custom Installation
If you click Custom on the Installation Type Selection screen, you initiate the custom SiteBuilder
installation process. You should configure this installation process yourself. Following
subsections describe this process in detail.
Page 21

Installing SiteBuilder 21
Selecting Destination Folders
On the Destination Folder Selection screen, you can select folders for storing the following
SiteBuilder components:
Core files are main SiteBuilder files
Repository includes SiteBuilder components (modules, templates, etc.)
Sites are folders containing sites data about trial sites created in SiteBuilder
Figure 7: Selecting Destination Folders
¾ To select a destination folder for a certain SiteBuilder component:
1 Click Browse beside a corresponding field and select the folder.
2 Click Next.
Page 22

Installing SiteBuilder 22
Selecting Shortcuts Location
¾ To select where to install shortcuts to SiteBuilder:
1 On the Shortcuts Location screen, select where to install the SiteBuilder for
Windows shortcuts:
In the Program Menu
On your Desktop
2 Click Next.
Figure 8: Selecting Shortcuts Location
Page 23

Installing SiteBuilder 23
Indicating SQL Server Parameters
¾ To configure SQL server connection parameters:
1 Enter an SQL server name in the SQL server name field.
2 Select an authentication type:
If you select Windows authentication, the Username for connection to SQL server and the
Password for connection to SQL server fields are grayed out.
If you select SQL server authentication, enter a username and password for connection to
SQL server in the corresponding fields.
3 Enter a name of new SiteBuilder database in the Name of new SiteBuilder
database field.
Note: 1) Your SQL server account will be used during the SiteBuilder installation only.
After SiteBuilder is installed, it will create its own account on this SQL server.
2) If the database with the same name exists on your SQL server and you selected
the Overwrite existing database check box, existing database will be deleted from your SQL
Server and overwritten by the new database. If this checkbox will be left unselected, the
installation process will be suspended and error message will be displayed.
4 Click Next.
Figure 9: Indicating SQL Server Connection Parameters
Page 24

Installing SiteBuilder 24
Selecting Installation Scenario
On the Installation Scenario Selection screen, you can select how to install SiteBuilder:
If you want to create a new IIS web site for SiteBuilder, select the New IIS web site option
and click Next. The IIS Web Site Parameters screen opens. For detailed information regarding
this option, see Providing IIS Web Site Parameters (see page
If you want to choose an existing IIS web site for SiteBuilder, select the Existing IIS web site
option and click Next. The Selecting IIS Web Site screen opens. For detailed information
regarding this option, see Selecting IIS Web Site (see page
Note: If there are no IIS sites in the system, the installation scenario automatically becomes
New IIS web site.
25).
26).
Figure 10: Selecting Installation Scenario
Note: If another application is installed in the existing IIS site root at the time of SiteBuilder
installation, configuration of this application contained in the web.config file can conflict
with the SiteBuilder settings that can lead to SiteBuilder crash. In order to avoid such situation,
check web.config file of that application, and web.config file of your computer.
Page 25

Installing SiteBuilder 25
Providing IIS Web Site Parameters
When you select the New IIS web site scenario, the SiteBuilder Installation Wizard takes you to
the IIS Web Site Parameters screen, where you can provide parameters for creation of a new IIS
web site.
Figure 11: Providing IIS Web Site Parameters
¾ To configure parameters required to create a new IIS web site:
1 Enter a name of a new IIS web site in the IIS web site name field.
2 Enter an HTTP port for a new IIS web site in the HTTP port field.
3 Enter an IIS web site host header in the Host headers field.
4 Enter an IIS web site IP address in the IP address field.
Note:
1. Make sure that there is no IIS web site in your IIS with the same HTTP port, host headers,
and IP address. If such site exists, your current SiteBuilder installation ends with an error.
2. Make sure that no other application is used on the IIS site HTTP port. Otherwise,
SiteBuilder software will not be installed in your system.
5 Click Next.
Page 26

Installing SiteBuilder 26
Selecting IIS Web Site
When you select the Existing IIS web site scenario, the SiteBuilder Installation Wizard takes you
to the IIS Web Site Selection screen, where you can select an IIS site.
¾ To launch installation according to the Existing IIS web site scenario:
1 Select an IIS web site from the Existing IIS web site list.
2 If you require to install SiteBuilder in a new virtual directory of the existing
IIS site, select the Create virtual directory check box and enter a name of this
virtual directory.
Figure 12: Selecting IIS Web Site
3 If you want to install SiteBuilder in the root folder of your existing IIS site,
clear the Create virtual directory check box.
4 Click Next.
Page 27

Installing SiteBuilder 27
Installing SiteBuilder
Before launching the installation, read the information displayed on the Ready to Install the
Program screen to make sure that all installation settings are specified correctly.
To initiate the SiteBuilder installation process, click Install.
Figure 13: Launching Installation Process
Page 28

Installing SiteBuilder 28
Completing SiteBuilder Custom Installation
After the installation process is completed, the following screen is displayed.
Figure 14: Completing SiteBuilder Installation
Before you click Finish and exit the Installation Wizard, you can require to open the SiteBuilder
readme file after the installation process is completed.
Also you can select the Complete your system setup after installation check box. If you select
this option then after you click Finish, the SiteBuilder registration form appears. In this form
you can register your first administrator account. If you clear this check box and click Finish,
the SiteBuilder Installation Wizard closes.
Page 29

Installing SiteBuilder 29
Installing Templates and Language Packages
After you install SiteBuilder, create your administrator account and register your copy of
SiteBuilder. Now you can install additional templates and language packages.
¾ To install the SiteBuilder templates and languages packages:
1 Download the files with the desired packages from the SWsoft web site
(http://www.swsoft.com/).
2 Launch the downloaded files.
The packages will be automatically installed on you computer.
Note: If the installed packages do not appear in the list of available SiteBuilder components,
reload the IIS service by running the iisreset command in the command line interface.
Page 30

Installing SiteBuilder 30
Configuring IIS Security Settings
If you plan to use SiteBuilder web services, you should configure Internet Information Services
(IIS) Web Site Security settings in order to access SiteBuilder web services from another
computer. By default web services are allowed only from localhost.
Note: To prevent the unauthorized access to SiteBuilder web services, grant the access
permissions only to the specific machines.
¾ To configure IIS Web Site Security settings:
1 Click Start in MS Windows 2003 Professional.
2 Click Control Panel.
3 Click Administrative Tools.
4 Click Internet Information Services (IIS) Manager.
5 In the Internet Information Services (IIS) Manager, click Web Sites.
6 Select the SiteBuilder Web Site folder. If you have installed SiteBuilder in any
other virtual folder, select this folder.
7 Select the Service Facade folder.
8 Right click Service Facade folder to access its properties.
9 Click the Directory Security tab in the Service Facade properties.
10 Click Edit button in the IP Address and Domain Name Restrictions area.
11 Click Add in the IP Address and Domain Name Restriction dialog box.
12 Select Single computer option.
13 Enter the IP address of the computer from which you will be accessing
SiteBuilder web services.
14 Click OK.
If you will have any questions regarding this procedure, click Help to read more help tips
regarding IIS configuration.
Page 31

31
C HAPTER 5
Removing SiteBuilder from Your System
There are instances where administrators may want to uninstall the SiteBuilder for Windows
software. During the removal process, all the software elements copied are uninstalled from
your computer and registry. It may be necessary for you to remove the software, if, for example,
you need to move the SiteBuilder elements to another computer. Few elements that remain after
such removal process are described in Remaining Data later in this chapter (see page
In This Chapter
Removing SiteBuilder Using MS Windows Interface.......................................................... 31
Removing SiteBuilder Using SiteBuilder Installation Wizard..............................................32
Remaining Data..................................................................................................................... 34
34).
Removing SiteBuilder Using MS Windows Interface
Note: After you remove SiteBuilder, all the language packages and template packages will be
also removed.
¾ To remove SiteBuilder using MS Windows interface:
1 Open the MS Windows Control Panel.
2 Click Add/Remove Programs.
3 Click Remove next to the SiteBuilder software icon.
4 Click Yes when the Add/Remove Programs application asks you "Are you
sure you want to remove this software?".
MS Windows automatically removes the SiteBuilder data from your system.
5 Click Close.
Page 32

Removing SiteBuilder from Your System 32
Removing SiteBuilder Using SiteBuilder Installation Wizard
Note: After you remove SiteBuilder, all the language packages and template packages will be
also removed.
¾ To remove SiteBuilder with the help of SiteBuilder Installation Wizard:
1 Open the MS Windows Control Panel.
2 Click Add/Remove Programs.
3 Click Change beside the SiteBuilder icon.
The following screen opens.
Figure 15: Removing SiteBuilder, Welcome Screen
4 Click Next.
The Program Maintenance screen opens.
Page 33

Removing SiteBuilder from Your System 33
Figure 16: Selecting Removal Operation
5 Select the Remove option and click Next.
The SWsoft SiteBuilder 3.2 for Windows Removal screen opens.
Figure 17: Launching Removal Process
Page 34

Removing SiteBuilder from Your System 34
6 Click Remove.
After SiteBuilder elements are removed from your system, the screen below is displayed.
Figure 18: Completing Removal Operation
7 Click Finish.
Remaining Data
After the SiteBuilder removal process is completed, the following elements copied to your
system during the SiteBuilder installation remain in the system:
SiteBuilder operation logs.
Trial and regular sites created in your copy of SiteBuilder.
Additional programs that the SiteBuilder Installation Wizard might have copied to your
system during the installation process, such as:
MS framework.net 2.0
MS SQL Server 2005 Express Edition
MDAC 2.8
Windows Installer 3.1
Page 35

35
C HAPTER 6
Repairing SiteBuilder
Besides removing SiteBuilder from your system, you can also initiate the SiteBuilder repair
process. This repair process is useful in several cases, for example:
If one or several SiteBuilder files copied to your computer during the SiteBuilder
installation were removed.
If shortcuts to the SiteBuilder Administrator Panel or Wizard were removed from your
desktop.
During the repair process, the SiteBuilder Installation Wizard checks your system for
SiteBuilder data and copies SiteBuilder elements if they are found as missing from the system.
¾ To repair SiteBuilder:
1 Go to the MS Windows Control Panel.
2 Launch the Add/Remove Programs application.
3 Click Change beside the SiteBuilder icon.
The following screen opens.
Figure 19: Repairing SiteBuilder, Welcome Screen
4 Click Next.
The following screen opens.
Page 36

Repairing SiteBuilder 36
Figure 20: Selecting Repair Operation
5 Select the Repair option and click Next.
The following screen opens.
Figure 21: Launching Repair Process
Page 37

Repairing SiteBuilder 37
6 Click Repair.
The repair process is automatic. SiteBuilder informs you about its progress in the Status line
displayed on the Repairing SiteBuilder screen. After the repair process is completed, the
following screen opens.
7 Click Finish.
Figure 22: Completing Repair Operation
Page 38

38
C HAPTER 7
Upgrading SiteBuilder
This chapter describes the ways you can upgrade your SiteBuilder version.
In This Chapter
Migrating from SiteBuilder 2.0.5 to SiteBuilder 3.2.............................................................38
Upgrading SiteBuilder 3.0 to SiteBuilder 3.2....................................................................... 41
Migrating from SiteBuilder 2.0.5 to SiteBuilder
3.2
Migration from SiteBuilder 2.0.5 for Windows to SiteBuilder 3.2 for Windows is initiated by
the SiteBuilder Migration Utility. This utility is contained in the SiteBuilder 3.2 for Windows
Installation Wizard bundle.
Note: Prior to migration, it is necessary to backup SiteBuilder 2.0.5 for Windows and
SiteBuilder 3.2 for Windows installations, including databases, file repositories of sites, etc.
This section provides the following information regarding the migration process:
Initial conditions for migration procedure (see page
Scheme of migration procedure (see page
General rules for migration procedure (see page
Description of user account transfer (see page
Description of site transfer (see page
The list of migration process limitations (see page
39)
40)
38)
39)
39)
40)
Initial Conditions
The following initial conditions should be met in order for the migration procedure to be
successful:
Fully installed SiteBuilder 2.0.5 for Windows (including full configuration of database and
root)
Fully installed SiteBuilder 3.2 for Windows (including fully completed configuration of
administrator account and SiteBuilder registered License)
Page 39

Upgrading SiteBuilder 39
Migration Scheme
Migration Utility transforms and adds the contents of SiteBuilder 2.0.5 for Windows database,
including file repository of sites and other data not stored in MSSQL to SiteBuilder 3.2 for
Windows program.
The global settings, settings of existing users in SiteBuilder 3.2 for Windows, site settings, or
other SiteBuilder settings are not re-configured.
Migration General Rules
There are two general rules for successful process:
If Migration Utility fails to create a user account, site or any other SiteBuilder 3.2 for
Windows entity, the warning message is displayed and the migration procedure of this entity
and entities connected with it is terminated.
If there are no corresponding values for some of the migrating parameters and settings of
entities (such as: locale, skin, template and etc.) in SiteBuilder 2.0.5 for Windows, the
default values are set for these parameters and settings in SiteBuilder 3.2 for Windows.
T ransferring User Accounts
For each administrator and reseller account (except administrator root account) presented in
SiteBuilder 2.0.5 for Windows the corresponding accounts with the same settings are created in
SiteBuilder 3.2 for Windows.
Also for each regular site presented in SiteBuilder 2.0.5 for Windows SiteBuilder 3.2 for
Windows creates site owner account. During this transfer process the site titles of SiteBuilder
2.0.5 for Windows sites become names of the corresponding site owners accounts in SiteBuilder
3.2 for Windows. E-mail notification address contained in the SiteBuilder 2.0.5 for Windows
user account becomes the e-mail address in the site owner account in SiteBuilder 3.2 for
Windows. E-mail address transfers are done this way because in SiteBuilder 2.0.5 for Windows
different user accounts can have the same e-mail addresses, but in SiteBuilder 3.2 for Windows
such occurrences are prohibited. If SiteBuilder 3.2 for Windows finds several user accounts
presented in SiteBuilder 2.0.5 for Windows and containing the same e-mail addresses, this email address is set as the e-mail address of the first site account transferred to SiteBuilder 3.2 for
Windows, but for the rest of the user accounts the program generates new e-mail addresses.
User passwords for SiteBuilder 3.2 for Windows are generated randomly and stored in the
new_users_pwd file, also containing user logins and e-mail addresses. The SiteBuilder
administrator can send out new passwords and logins to users, who migrated to SiteBuilder 3.2
for Windows, using the data contained in new_users_pwd.
Page 40

Upgrading SiteBuilder 40
T ransferring Sites
During the SiteBuilder migration procedure the sites are transferred according to the following
scheme:
Reseller has trial and regular sites in SiteBuilder 2.0.5 for Windows. During the site transfer,
trial sites are assigned to this reseller, but regular sites are assigned to newly created site owners
accounts (see Transferring User Account section earlier in this chapter (see page
39)), dependent
to that reseller.
Limitations of Migration Procedure
The content and structure of the transferred sites are copied with the following limitations:
The module content migration is not supported during the transfer. Instead of modules,
SiteBuilder 3.2 for Windows inserts the placeholders with messages and module names.
It may be necessary to do some additional manual correction work on some of the
references since the find/replace scheme of src- and href- references on the pages is
based on the simple and regular expressions. Only src- and href- of regular attributes
are replaced automatically, but for scripts and other elements, this replacement is not
supported.
Plans are transferred to SiteBuilder 3.2 for Windows without attributes which present only
in the previous version of the program.
The templates and modules, included in SiteBuilder 2.0.5 for Windows Plans, but not
included in SiteBuilder 3.2 for Windows are ignored during transfer. If the elements,
included in the SiteBuilder 2.0.5 for Windows Plan, do not correspond with SiteBuilder 3.2
for Windows elements completely, then SiteBuilder 3.2 for Windows Plan may include
default limits, License limits, or limits contained in the “parents” Plan.
Note: During the host transfer, for the SiteBuilder 2.0.5 for Windows hosts, containing the
range of hosts, one new host is created per one IP address of this range.
Page 41

Upgrading SiteBuilder 41
Upgrading SiteBuilder 3.0 to SiteBuilder 3.2
You can upgrade SiteBuilder 3.0 to SiteBuilder 3.2 using the SiteBuilder Installation Wizard.
Remember that when you upgrade SiteBuilder, all SiteBuilder 3.0 templates and language
packages are removed from your computer.
¾ To upgrade SiteBuilder:
1 Download the SiteBuilder 3.2 Installation Wizard bundle from the SWsoft
web site (http://www.swsoft.com/).
2 Open your Windows Explorer.
3 Go to the folder where you have downloaded the SiteBuilder Installation
Wizard bundle.
4 Launch the sitebuilder4win_3.2.0_build060721.1xx.exe file.
The Welcome to the Installation Wizard screen appears.
Figure 23: Upgrading SiteBuilder, Welcome Screen
5 Click Next.
The End-User License Agreement screen appears.
Page 42

Upgrading SiteBuilder 42
Figure 24: Launching Upgrade Process
6 Select the I Accept the terms of the License Agreement option and click Upgrade.
After the upgrade process is completed, the following screen appears.
Figure 25: Completing Upgrade Operation
Page 43

Upgrading SiteBuilder 43
Before you click Finish and exit the Installation Wizard, you can require to open the
SiteBuilder readme file after the installation process is completed.
Also you can select the Complete your system setup after installation check box. If you select
this option then after you click Finish, the SiteBuilder registration form appears. In this form
you can register your first administrator account. If you clear this check box and click
Finish, the SiteBuilder Installation Wizard closes.
7 Click Finish.
Note: After you complete the upgrade process, create your administrator account and
register your copy of SiteBuilder.
Page 44

44
C HAPTER 8
Clustering Installation
In This Chapter
Overview............................................................................................................................... 45
Installation Walkthrough....................................................................................................... 47
Appendix............................................................................................................................... 50
Page 45

Clustering Installation 45
Overview
Logical Architecture
SiteBuilder is based on layered architecture and supports several deployment scenarios in which
system components may be distributed on multiple physical tiers. In terms of application
deployment components are grouped into logical tiers which forms the deployment units. As
shown in Figure 1, multi-tiered deployment architecture consists of Data, Storage and
Application tiers.
Data Tier
Data tier consists of SQL Server database, which stores application business entities such as
user accounts, sites and system settings.
Storage Tier
Storage tier consists of file-based Repository components providing persistence service for user
sites and their building blocks such as design templates, page sets and modules.
Application Tier
Application tier is composed of Web-based front-end application and Windows Service that are
integrated with Internet Information Services (IIS). Web application provides user interface (UI)
for the end users and system administrators and also exposes several Web Services for
integration and remote administration. Preview hosting service provides design time IIS hosting
for the user web sites and manages their life time.
Figure 26: Application components
Page 46

Clustering Installation 46
Deployment Architecture
You can install the logical tiers of the SiteBuilder server on one or more physical computers. In
the context of this guide we will consider multi server deployment. Figure 2 shows typical
implementation of Web Farm based on Network Load Balancing (NLB) clusters. For details of
how to implement NLB cluster, see the deployment guide at Microsoft web site
(
http://technet2.microsoft.com/WindowsServer/en/Library/e1aaa9e3-1e8d-408f-b00d-
7de6521c00251033.mspx?mfr=true). Additional details regarding IIS scalability with Network
Load Balancing may be found at Microsoft web site
(
http://technet2.microsoft.com/WindowsServer/en/library/c40f7f5b-7d8c-48d9-81d0-
dfcfa2fafa6b1033.mspx?mfr=true).
Web farm network segment represents NLB cluster consisting of two or more computers with
NLB enabled network adapters. Application tier should be deployed on each web farm server
which is part of virtual SiteBuilder cluster (within a single physical cluster there might be
several virtual clusters distinguished by cluster address).
Important: NLB cluster should be configured to use a single client affinity to guaranty correct
operations of SiteBuilder application tier components.
Storage and Data tiers reside within the private LAN segment. They might be deployed to
storage and database servers correspondingly or installed on one computer. Though from the
beginning it might be enough to have a single server with RAID 5 disk system for both storage
and database tiers, it’s recommended to deploy these tiers to different computers in order to be
able to scale out the machines independently on demand to load growth.
To increase availability of the storage server, you may install the storage tier on several
machines and then setup Distributed File System (DFS) with File Replication Service (FRS). If
you decide to do so, you should manually configure DFS and FRS services; for details, see the
guide at Microsoft web site (
7c15-4306-8edc-a80b8c57c67d1033.mspx?mfr=true).
To increase availability of the database server, you may implement failover SQL Server 2005
cluster; for details, see the guide at Microsoft web site (
us/library/ms179530.aspx).
http://technet2.microsoft.com/WindowsServer/en/library/42befce4-
http://msdn2.microsoft.com/en-
Figure 27: Web Farm
Page 47

Clustering Installation 47
Installation Walkthrough
SiteBuilder components should be installed in a certain order. First you should prepare the
database server and then install the storage tier components; SiteBuilder database is deployed as
a part of the storage tier components installation. After you have completed the storage tier
installation you are ready to deploy the application tier components to multiple nodes of
SiteBuilder NLB cluster.
Prerequisites
Active Directory domain.
To set up and configure a SiteBuilder Server in NLB cluster environment, you should use
computers that are joined to an Active Directory domain.
NLB cluster.
It’s recommended to complete NLB cluster setup with at least one host before SiteBuilder
installation.
Two service accounts in the scope of AD for SiteBuilder server.
One account will be used for the web application pool identity (Worker Process Account),
the second one - for previewing hosting windows service.
A user account for completing setup that is a member of the
Administrator security group
on application and storage server computers.
SQL server login having SA rights or at least
Application server software requirements
DBCreator and SecurityAdmin rights.
Windows Server 2003 Enterprise or Datacenter edition
Internet Information Services (IIS) 6.0
.Net framework runtime 2.0
Storage server software requirements
Windows Server 2003/2000 any edition
.Net framework runtime 2.0
Database server software requirements
Windows Server 2003/2000 any edition
Microsoft SQL Server 2000/2005 any edition
Page 48

Clustering Installation 48
Installing SiteBuilder Server
¾ To install the storage tier components:
1 Install and complete prerequisites for the storage server computer.
Ensure that the computer is a member of Active Directory domain.
Install Microsoft .Net Framework 2.0 runtime.
Obtain two domain user accounts, see Prerequisites section.
2 Create batch file for launching storage tier installer
(for complete parameters reference, see Appendix (see page 50)).
Set /qb - use basic GUI.
Set CLUSTER_INSTALLATION_TYPE=1.
Define SQL server connection parameters: SQLSRVER, SQLWINAUTH, SQLUSER and
SQLPWD.
Define service accounts’ parameters: SBWPA_USER, SBSERVICE_USER.
Define CLUSTER_ADDRESS parameter.
Optionally define INSTALLDIR_SB parameter to specify installation folder.
3 Launch installation using created batch file.
Sample batch file
SBInst.msi /qb CLUSTER_INSTALLATION_TYPE=1
SQLSERVER="tcp:dataserver,1433" SQLUSER=sa SQLPWD=sa
SQLWINAUTH=false SB_DOMAIN=vmfarm SBWPA_USER="sbwpa"
SBSERVICE_USER="sbservice" CLUSTER_ADDRESS=cluster.domain.com
SiteBuilder storage-tier installer creates new file share named SiteBuilder, prepares
install_application_node.bat batch file, and several additional files necessary to
run application-tier installation, within the folder named Installer.
Use the batch file created by the Installer to run application tier installation.
¾ To install the application-tier components:
1 Install and complete prerequisites for the application tier computer.
Ensure that the computer is a member of Active Directory domain.
Install Internet Information Services (IIS) 6.0.
Install Microsoft .Net Framework 2.0 runtime.
2 Launch install_application_node.bat batch file from command
line with passwords for user accounts as parameters. Example:
install_application_node.bat sqlPwd wpaPwd servicePwd
¾ To install a language pack:
Page 49

Clustering Installation 49
A language pack should be deployed on the storage and application tiers. First you should install
the language pack to the storage tier and then install on each node in the application tier.
Note: 1) The same language packs have to be deployed across all nodes in application tier.
2)You may see new languages in the admin panel\server\languages list, but users will
not be able to use new languages until completion of the SiteBuilder installation registration
procedure.
¾ To install a template pack:
A template pack should be installed on the data tier only. To install the template pack launch
installer on the data tier machine. It will check SiteBuilder installation presence, extracts the
templates’ files and register them within the SiteBuilder database. After installation you may
add new templates to the users’ plans as necessary.
Page 50

Clustering Installation 50
Appendix
Installer parameters for unattended installation
Parameter Possible
Values
INSTALLDIR_SB
INSTALLDIR_REP
INSTALLDIR_SITES
INSTALLSCENARIO
WEBSITESERVERCOMMENT
WEBSITEPORT
Full path No Install folder for main product files.
Full path No Install folder for System Repository.
Full path No Folder for user’s sites storage.
1 | 2 No Install scenario (default 1):
string No Name to locate existing Web site
Number
0 - 65534
Required Description
Not used for clustering installation.
Not used for clustering installation.
1 – install product into new Web Site
2 – install product into existing Web
Site
(second scenario).
No Listening Port; used to configure the
existing Web Site (second scenario).
WEBSITEIP
WEBSITEHH
CREATEDWEBSITESERVERCOMMENT
CREATEDWEBSITEPORT
CREATEDWEBSITEIP
CREATEDWEBSITEHH
SBVDNAME
IP | * No Listening IP address; used to configure
the existing Web Site (second scenario).
string No Host headers; used to configure the
existing Web Site (second scenario).
string No Name of the new Web site (first
scenario).
Number
0 - 65534
IP | * No Listening IP address; used to configure
string No Host headers; used to configure the new
string No Virtual directory under Web site to
No Listening Port; used to configure the
new Web Site (first scenario).
the new Web Site (first scenario).
Web Site (first scenario).
install web application; leave blank to
install into web site root.
Page 51

Clustering Installation 51
Parameter Possible
Values
VDCREATE
SQLSERVER
SQLUSER
SQLPWD
SQLWINAUTH
1 | 0 No Flag to force virtual directory creation,
string Yes SQL Server name to connect to for
string No User name for SQL Server connection
string No User password for SQL Server
1 | 0 Yes Flag to use Integrated Windows
Required Description
if it does not exist.
database deployment.
(install time only). Ignored when
SQLWINAUTH = “1”
connection (install time only). Ignored
when SQLWINAUTH = “1”
Authentication for SQL Server
connection. When this flag is set on,
installer will connect to SQL Server
under identity of currently logged in
user and further on configure
SiteBuilder to use Integrated Windows
Authentication (grant rights to access
SiteBuilder database to the Network
Service or SBWPA_USER in case
specified).
DBNAME
INSTALL_DESKTOP_SHORTCUTS
INSTALL_PMENU_SHORTCUTS
WSB_USER
WSB_USER_PWD
string No Database name.
1 | 0 No Flag to install desktop shortcuts.
1 | 0 No Flag to install program menu files
shortcuts.
string No User name for SiteBuilder administrator
account to create during the installation
process. If blank or not set, SiteBuilder
will show registration form to create
administrator account on first request to
application.
string No User password for SiteBuilder
administrator account created during the
installation process.
Page 52

Clustering Installation 52
Parameter Possible
Values
CLUSTER_INSTALLATION_TYPE
CLUSTER_FILESERVER_NETWORK_P
0 | 1 | 2 Yes Cluster installation node type:
string No Storage tier server NetBIOS name or IP.
ATH
CLUSTER_ADDRESS
SB_DOMAIN
SBWPA_USER
string Yes Cluster address; IP or domain name.
string Yes NetBIOS domain name for process
string Yes User name for SiteBuilder worker
Required Description
0 – Single server (default)
1 – Storage tier
2 – Application tier
Example:
accounts defined bellow.
process account (Web App pool
identity).
\\fs.domain.com
SBWPA_PWD
SBSERVICE_USER
SBSERVICE_PWD
string Yes Password for SiteBuilder worker
process account.
string Yes User name to run SiteBuilder hosting
service process.
string Yes Password for service process account.
Page 53

53
Index
A
About SiteBuilder • 9
About SiteBuilder Installation Wizard • 11
About This Guide • 6
Appendix • 52
C
Clustering Installation • 44
Completing SiteBuilder Custom Installation •
28
Components Installed During Installation
Process • 13
Configuring IIS Security Settings • 30
Custom Installation • 20
D
Deployment Architecture • 47
Documentation Conventions • 7
F
Feedback • 8
G
General Conventions • 8
M
Migrating from SiteBuilder 2.0.5 to
SiteBuilder 3.2 • 38
Migration General Rules • 39
Migration Scheme • 39
O
Organization of This Guide • 7
Overview • 45
P
Preface • 6
Preparing for Installation • 9
Prerequisites • 49
Providing IIS Web Site Parameters • 25
R
Remaining Data • 34
Removing SiteBuilder from Your System • 31
Removing SiteBuilder Using MS Windows
Interface • 31
Removing SiteBuilder Using SiteBuilder
Installation Wizard • 32
Repairing SiteBuilder • 35
H
Hardware Requirements • 10
How It Works • 12
I
Indicating SQL Server Parameters • 23
Initial Conditions • 38
Installation Walkthrough • 48
Installing SiteBuilder • 14, 27
Installing SiteBuilder Server • 50
Installing Templates and Language Packages •
29
L
Launching SiteBuilder Installation Wizard • 15
Limitations of Migration Procedure • 40
Logical Architecture • 45
S
Selecting Destination Folders • 21
Selecting IIS Web Site • 26
Selecting Installation Scenario • 24
Selecting Shortcuts Location • 22
Selecting Type of Installation • 18
Software Requirements • 10
System Requirements • 9
T
Transferring Sites • 40
Transferring User Accounts • 39
Typical Installation • 19
Typographical Conventions • 7
U
Upgrading SiteBuilder • 38
Upgrading SiteBuilder 3.0 to SiteBuilder 3.2 •
41
Page 54

Index 54
W
Who Should Read This Guide • 6
 Loading...