

Page 1

Parallels® Plesk Sitebuilder
Page 2

Copyright Notice
ISBN: N/A
Parallels
660 SW 39th Street
Suite 205
Renton, Washington 98057
USA
Phone: +1 (425) 282 6400
Fax: +1 (425) 282 6444
© Copyright 1999-2008,
Parallels, Inc.
All rights reserved
Distribution of this work or derivative of this work in any form is prohibited unless prior written
permission is obtained from the copyright holder.
Product and service names mentioned herein are the trademarks of their respective owners.
Page 3

Contents
Preface 5
About this Guide ............................................................................................................................ 5
Who Should Read this Guide ........................................................................................................ 5
Typographical Conventions ........................................................................................................... 5
Feedback ....................................................................................................................................... 6
About Plesk Sitebuilder 7
Plesk Sitebuilder User Roles ......................................................................................................... 8
Overview of Plesk Sitebuilder Business Logic .............................................................................. 9
What's New in this Version .......................................................................................................... 10
Getting Started 11
Creating First Administrator Account ........................................................................................... 12
Logging In to Plesk Sitebuilder .................................................................................................... 15
Recovering Forgotten Password ....................................................................................... 16
Learning Plesk Sitebuilder Administrator Panel Interface ........................................................... 17
Navigating in Plesk Sitebuilder .......................................................................................... 18
Working with Lists ............................................................................................................. 23
Using Context Help ........................................................................................................... 25
Submitting Feedback on Plesk Sitebuilder Functionality ............................................................ 26
Getting Help ................................................................................................................................. 27
Configuring Settings Related to Your Account 28
Changing Your Password and Personal Information .................................................................. 29
Choosing Language, Skin, and Number of List Items Shown per Page ..................................... 30
Setting Up Global Account .......................................................................................................... 31
Creating Global Account ................................................................................................... 32
Connecting Local Accounts to Your Global Account ........................................................ 33
Switching Between Accounts ............................................................................................ 34
Editing Global Account ...................................................................................................... 35
Disconnecting Local Accounts from Global Account ........................................................ 35
Upgrading Your License .............................................................................................................. 36
Viewing System Information .............................................................................................. 37
Setting Up and Maintaining Plesk Sitebuilder 38
Rebranding Your Plesk Sitebuilder ............................................................................................. 38
Setting Up Logo and Title Bar Text ................................................................................... 39
Customizing Help and Support Links ................................................................................ 40
Setting Up SMTP Server for Sending Notifications from Plesk Sitebuilder ................................. 41
Obtaining Additional Skins, Languages, and Site Design Templates ......................................... 42
Viewing and Configuring Plesk Sitebuilder Wizard Presets and Modules .................................. 43
Managing Site Design Templates ..................................................................................... 44
Managing Site Structure Templates (Page Sets) .............................................................. 45
Managing Site Templates (Site Families) ......................................................................... 51
Managing Modules ............................................................................................................ 56
Updating Plesk Sitebuilder .......................................................................................................... 69
Page 4

Preface 4
Specifying Hosts Used for Publishing Sites ................................................................................ 70
Requirements to Hosts ...................................................................................................... 72
Adding Host ....................................................................................................................... 75
Specifying Hosts Available to Certain Users ..................................................................... 77
Modifying Host Settings .................................................................................................... 77
Removing Host from List of Available Hosts ..................................................................... 77
Setting Up Plesk Sitebuilder for Anonymous Visits ..................................................................... 78
Setting Up Service Plan for Anonymous Users ................................................................ 79
Setting Language and Skin for Anonymous User Sessions ............................................. 80
Setting Up Advertising Banner Shown on Trial Sites ........................................................ 81
Setting Up Message Displayed at Publish Step of Wizard ............................................... 82
Setting Up Notification Sent at Trial Site Publication Attempt ........................................... 83
Inserting Macros, Links, and HTML Code into Notification Messages ............................. 85
Prohibiting Anonymous Users from Accessing Plesk Sitebuilder Wizard ......................... 87
Viewing Plesk Sitebuilder Logs ................................................................................................... 88
Serving Your Customers 92
Setting Up Service Plans ............................................................................................................. 93
Adding Plan ....................................................................................................................... 95
Assigning Plan to User ...................................................................................................... 99
Modifying Plan ................................................................................................................... 99
Changing Plan Status ..................................................................................................... 100
Removing Plan ................................................................................................................ 100
Signing Up Customers .............................................................................................................. 101
Creating User Account .................................................................................................... 103
Viewing List of Sites Belonging to User .......................................................................... 104
Suspending and Unsuspending User Accounts.............................................................. 104
Upgrading and Downgrading User Accounts .................................................................. 105
Changing User Account Password and Contact Information .......................................... 105
Logging In On Behalf of Your Customers ....................................................................... 105
Removing User Account ................................................................................................. 106
Managing Sites .......................................................................................................................... 107
Registering Site in System .............................................................................................. 109
Assigning Trial Site to Your Account ............................................................................... 112
Renaming Site ................................................................................................................. 113
Changing Site Owner ...................................................................................................... 113
Editing Site Publishing Settings ...................................................................................... 113
Publishing Site................................................................................................................. 114
Creating Your Own Site in Plesk Sitebuilder Wizard ...................................................... 114
Previewing and Editing Site ............................................................................................ 115
Promoting Site and Tracking Site Popularity .................................................................. 115
Removing Site ................................................................................................................. 118
Backing Up and Restoring Your Data 119
Backing Up from Your Administrator Panel ............................................................................... 119
Backing Up from Command Line .............................................................................................. 120
Restoring Plesk Sitebuilder Data ............................................................................................... 121
Page 5

Preface 5
In this section:
About this Guide ................................................................................................ 5
Who Should Read this Guide ............................................................................ 5
Typographical Conventions ............................................................................... 5
Feedback .......................................................................................................... 6
Formatting Convention
Type of Information
Example
Special Bold
Items you must select,
such as menu options,
command buttons, or items
in a list.
Go to the Hosts tab.
Titles of chapters, sections,
and subsections.
Read the Getting Started chapter.
Preface
About this Guide
This guide instructs you how to set up Plesk Sitebuilder system preferences and manage
and maintain web sites created in Plesk Sitebuilder.
Who Should Read this Guide
This guide is intended for users who manage Plesk Sitebuilder and all its components using
administrator account.
Typographical Conventions
Before you start using this guide, it is important to understand the documentation
conventions used in it.
The following kinds of formatting in the text identify special information.
Page 6

6 Preface
Italics
Used to emphasize the
importance of a point, to
introduce a term or to
designate a command line
placeholder, which is to be
replaced with a real name
or value.
These types of users are called
Plesk Sitebuilder user roles.
Monospace
URLs, names of
commands, files, and
directories.
For example:
http://[Sitebuilder_host]/Ad
min
CAPITALS
Names of keys on the
keyboard.
SHIFT, CTRL, ALT
KEY+KEY
Key combinations for
which the user must press
and hold down one key
and then press another.
CTRL+P, ALT+F4
Feedback
If you have found a mistake in this guide, or if you have suggestions or ideas on how to
improve this guide, please send your feedback using the online form at
http://www.parallels.com/en/support/usersdoc/. Please include in your report the guide's title,
chapter and section titles, and the fragment of text in which you have found an error.
Page 7

Plesk Sitebuilder consists of two parts: the Wizard and the Administrator Panel.
In this chapter:
Plesk Sitebuilder User Roles ............................................................................. 8
Overview of Plesk Sitebuilder Business Logic ................................................... 9
What's New in this Version ................................................................................ 10
C H A P T E R 1
About Plesk Sitebuilder
The Wizard is a web application enabling its users to create web sites and publish
them on the Internet.
The Administrator Panel is a tool for managing Plesk Sitebuilder system-wide
preferences and maintaining web sites created in the Wizard.
Page 8

8 About Plesk Sitebuilder
Plesk Sitebuilder User Roles
In Plesk Sitebuilder, different types of users have different levels of administration
privileges. These types of users are called user roles.
There are three user roles in Plesk Sitebuilder:
1 Administrator manages all Plesk Sitebuilder elements.
Plesk Sitebuilder administrators can perform the following main operations:
Add and manage hosts, that is servers used for sites publication
Create and manage plans, that is tariffs regulating the distribution of Plesk
Sitebuilder resources
Create and manage administrators, resellers, and site owners accounts
Add and manage sites
Manage components and settings of Plesk Sitebuilder
View system and security logs
2 Reseller is a distributor of the Plesk Sitebuilder services.
Plesk Sitebuilder resellers may perform the following main operations:
Add and manage hosts
Create and manage plans
Create and manage resellers and site owners accounts
Add and manage sites
Configure system settings
3 Site owner is a user who has purchased the hosting service bundled with Plesk
Sitebuilder. Site owners are registered in Plesk Sitebuilder after they purchase
hosting service and receive their Plesk Sitebuilder credentials (login and password)
upon this purchase. Their main tool is Plesk Sitebuilder Wizard, which is described
in the Parallels Plesk Sitebuilder for Windows Wizard User's Guide
(http://www.parallels.com/en/products/sitebuilder/docs/). Site owners can manage
their own sites only.
Besides, you, as administrator, can make the Plesk Sitebuilder Wizard available for
anonymous visitors, who are, in fact, potential site owners. They can create trial sites in
Plesk Sitebuilder but cannot publish them on the Internet. After anonymous users
create trial sites, they are offered to purchase hosting service to publish their sites on
the Internet. Anonymous user can use the Plesk Sitebuilder Wizard only.
Page 9

About Plesk Sitebuilder 9
Overview of Plesk Sitebuilder Business
Logic
Below you will find the recommended scenario of getting started with Plesk Sitebuilder.
Read this information to understand the logic of Plesk Sitebuilder application, learn
about its main functionalities and work out the most reasonable and time-saving order
of operations.
Tasks you can perform in Plesk Sitebuilder can be logically divided into the following
categories:
Configuring the Settings of your Administrator Panel and account
At this stage you customize the basic settings of your Plesk Sitebuilder:
Upgrade your Plesk Sitebuilder license
Configure your account information
Choose the language and skin for your interface
Preparing Plesk Sitebuilder for serving your customers
This stage implies several preparatory steps:
Rebranding Plesk Sitebuilder:
Uploading the logo and specifying your custom title bar text for the Plesk
Sitebuilder window
Specifying your custom links for Help and Support buttons
Configuring Plesk Sitebuilder Wizard presets:
Site design templates (obtaining additional templates)
Functional modules (configuring the Area Map module, integrating custom
payment system in the eShop module)
Site structure templates, or page sets (creating your custom page sets)
Site templates, or site families (creating your custom site families)
Preparing publishing host(s) for working with Plesk Sitebuilder and specifying them
in Plesk Sitebuilder system settings.
Configuring Plesk Sitebuilder settings for anonymous user sessions:
Creating a special trial service plan for anonymous users
Setting up the message displayed on the Publish step of the Plesk Sitebuilder
Wizard, the advertising banner to be shown on trial sites, and configuring the
automatic e-mail notification sent to users after the creation of a trial site
Serving your customers
At this stage, you integrate Plesk Sitebuilder into your business process and start
working in it.
Page 10

10 About Plesk Sitebuilder
Creating service plans to configure Plesk Sitebuilder limits and permissions for
certain users. In service plans, you also specify the hosts, modules, site families,
page sets, and site design templates available to users.
Creating user accounts in the system and assigning service plans to them.
If necessary, registering sites for users.
If necessary, providing basic site promotion services and monitoring site
performance:
Register users' sites on Google and MSN search engines.
Enable and view site attendance statistics.
Backing up and restoring Plesk Sitebuilder
At this stage, you ensure the safety and integrity of your and your customers' data. We
recommend creating Plesk Sitebuilder backups on a regular basis.
The current Administrator's Guide is structured according to this logical order of
operations.
What's New in this Version
Plesk Sitebuilder 4.5 offers the following new features:
Order New Key button that opens a page on the Parallels Web site where you can
purchase the desired Plesk Sitebuilder license and support option.
Major Features for End-Users
Site Map module. Allows site owners to display a clickable hierarchical model of their
site structure to visitors
Removing design template from pages. Site owners can now remove design template's
layout and graphics from the desired pages.
External Page module. Allows site owners to link site menu items to external web
sites.
Save button. A handy way for site owners to save changes they make while working
on their site.
Counter settings are moved to the Wizard. Site owners can now enable a counter on
their sites at the Pages step of the Wizard, which previously required them to go to
the Administrator Panel.
Site visitor management is moved to the Wizard. Site owners can now manage their
registered visitors through the Registration module editor at the Edit step of the
Wizard, which previously required them to go to the Administrator Panel.
Page 11

This chapter guides you through the initial steps that should be taken to start using
In this chapter:
Creating First Administrator Account ................................................................. 12
Logging In to Plesk Sitebuilder .......................................................................... 15
Learning Plesk Sitebuilder Administrator Panel Interface .................................. 17
Submitting Feedback on Plesk Sitebuilder Functionality .................................... 26
Getting Help ...................................................................................................... 27
C H A P T E R 2
Getting Started
Plesk Sitebuilder.
Page 12

12 Getting Started
Creating First Administrator Account
After Plesk Sitebuilder setup, the next step is to create first administrator account that
will allow its owner to log in to the Administrator Panel and start working with it. User
with access to the first administrator account can later create more administrator
accounts to be able to delegate Plesk Sitebuilder management to them, if necessary.
Unlike these later created administrator accounts, the first administrator account cannot
be removed from the system or downgraded to a lower level of user hierarchy.
To create first administrator account:
1 Click the shortcut to the Plesk Sitebuilder Administration Panel
located on your desktop.
Page 13

Getting Started 13
Figure 1: Creating Your Administrator Account
2 From the Interface language list, select the language that will be used as
default when you log in to the Administrator Panel.
3 In the Account information section, specify your contact and login
information.
4 In the SMTP server settings section, set up the SMTP server through
which system notification messages will be sent to your e-mail.
Page 14

14 Getting Started
5 Click Next.
You will be taken to the Desktop page of the Administrator Panel.
Page 15

Getting Started 15
Logging In to Plesk Sitebuilder
To log in to Plesk Sitebuilder:
1 In your browser's address bar, enter the URL to your Plesk Sitebuilder
Administrator Panel.
For example, http://sitebuilder:2006/Admin
where 'sitebuilder' is the domain name of the server where your Plesk Sitebuilder is
installed, and '2006' is the port number for connecting to the Plesk Sitebuilder
server.
2 Press ENTER.
Figure 2: Logging In to Plesk Sitebuilder
3 In the User name field, enter your user name.
4 In the Password field, enter your password.
5 From the Interface language list, select the desired language of the Plesk
Sitebuilder interface.
6 Click Log in.
You can change your password at any time (read Changing Your Password and Personal
Information (on page 29)).
Page 16

16 Getting Started
In this section:
Recovering Forgotten Password ....................................................................... 16
Recovering Forgotten Password
To recover your forgotten password:
1 In your browser's address bar, enter the URL to your Plesk Sitebuilder
Administrator Panel.
For example, http://sitebuilder:2006/Admin
where 'sitebuilder' is the domain name of the server where your Plesk Sitebuilder is
installed, and '2006' is the port number for connecting to the Plesk Sitebuilder
server.
2 Press ENTER.
3 Click Forgot Your Password.
Figure 3: Recovering Forgotten Password
4 Enter your user name and e-mail address registered in the system.
5 Click Send.
You will receive the e-mail message with instructions how to set up a new
password. Follow the provided URL and type your new password and its
confirmation and click Change. You will be logged in to Plesk Sitebuilder with this
new password.
Page 17

Getting Started 17
Learning Plesk Sitebuilder Administrator
In this section:
Navigating in Plesk Sitebuilder .......................................................................... 18
Working with Lists ............................................................................................. 23
Using Context Help ........................................................................................... 25
Panel Interface
Read the following section to learn the basic principles of working with Plesk
Sitebuilder interface.
Page 18

18 Getting Started
Navigating in Plesk Sitebuilder
The Plesk Sitebuilder Administrator Panel interface enables you to use two ways of
navigation through the application: desktop view and standard view.
The standard view is a customary view of the control panel divided into two main areas:
the navigation pane on the left and the work area, where operations are performed, on
the right.
Figure 4: Plesk Sitebuilder Standard View
The desktop view displays system statistics and shortcuts to the main functionalities of
the Administrator Panel.
Page 19

Getting Started 19
In this section:
Using Navigation Pane ...................................................................................... 20
Using Desktop Interface .................................................................................... 21
Using Path Bar ................................ ................................................................ .. 22
Figure 5: Plesk Sitebuilder Desktop
Page 20

20 Getting Started
Using Navigation Pane
The navigation pane is located on the left part of the Plesk Sitebuilder screen.
Figure 6: Navigating in Plesk Sitebuilder Using Navigation Pane
The navigation pane gives you access to the following administrative functions:
Users. Enables you to manage your dependent users and all data related to their
accounts.
Sites. Enables you to add and manage sites.
My Profile. Enables you to configure your account parameters.
Server. Enables you to view and manage various system parameters.
Logs. Enables you to view and manage logs of operations performed in Plesk
Sitebuilder.
Log out. Finishes the current session with the Plesk Sitebuilder Administrator
Panel.
Feedback. Enables you to submit your opinion or suggestions on Plesk
Sitebuilder usability and functionality to Parallels team.
Support. Enables you to submit a request to Parallels technical support team.
Help. Provides the context-sensitive online help.
Page 21

Getting Started 21
Using Desktop Interface
Plesk Sitebuilder Desktop looks as follows:
Figure 7: Navigating in Plesk Sitebuilder Using Desktop Interface
The Desktop screen is logically divided into the following parts:
1 If you have not signed up your Plesk Sitebuilder server to the Google Maps API
service yet, a warning message is displayed at the top of the Desktop screen. You
do not have to sign up for the service immediately - you can do it at any time later
on. For details, read Setting Up Area Map Module (on page 58).
2 Short tips describing basic management options of the Plesk Sitebuilder
Administrator Panel, and shortcuts to these options.
Page 22

22 Getting Started
3 Shortcut to the Plesk Sitebuilder Wizard. If you have not registered any sites yet,
clicking this link will automatically register a site and will open it in the Wizard. If you
have already registered a site or a number of sites, following this link will open the
Wizard on the Overview page, where you can select which site you want to edit.
Information about working with the Plesk Sitebuilder Wizard is provided in the
Parallels Plesk Sitebuilder for Windows Wizard User's Guide
(http://www.parallels.com/en/products/sitebuilder/docs/).
If you do not want these options to be displayed ever again, click Close at the
bottom right part of the section.
4 Statistics section, which displays the following statistical data:
Users. The number of created user accounts and the maximum number of user
accounts allowed by your license.
Sites. The number of sites in the system and the maximum number of sites
allowed by your license.
Hosts. The number of registered publishing servers and the maximum number of
publishing servers allowed by your license.
5 Tasks section, which contains shortcuts to the main functionalities of the
Administrator Panel.
Using Path Bar
To work with the second-level and deeper-level screens of the application, use a path
bar: a chain of links that appears in the upper-left part of the main application screen.
Use a corresponding path bar link to return to the main screen, or to one of the
intermediate screens.
Figure 8: Navigating in Plesk Sitebuilder Using Path Bar and "Up Level" Button
You can also use the Up Level shortcut in the upper-right corner of the screen to
return to the previous screen.
Page 23

Getting Started 23
Working with Lists
On the management pages of various system objects (sites, users, etc.), information is
presented in the form of object lists.
In such a list, each object record is a table row displaying the object name, status, and
relevant parameters of the object (for example, for each site, the owner and creation
date is shown). Above and below each list, the total number of items contained in the
list is displayed. Below the list, you can adjust the number of items to be displayed per
page (10, 25 or 100). In multi-page lists, you can navigate between the pages by clicking
the page number shortcuts above and below the list. To go to the first/last page of the
list, click First or Last, accordingly.
To configure the number of items to be displayed per page in all Plesk Sitebuilder lists,
see section Choosing Language, Skin and Number of Items to be Displayed per Page (on page
30).
In lengthy lists, you can find items using the search function, or sort items by one of
available parameters. To find an item, type a search criterion into the input box above
the list, and click Search. The list will show the items matching the search criterion. To
return back to viewing all items, click Show All.
Figure 9: Searching Objects
To sort list items by a certain parameter in ascending or descending order, click the
parameter's title in the column heading. The order of sorting will be indicated by a small
triangle displayed next to the parameter's title.
Figure 10: Sorting Objects
In some lists, you can filter items by a number of additional parameters by selecting
one of such parameters from the View box (for example, on the Sites screen, you can
choose to view My sites, All sites, All trial sites, or My trial sites).
Page 24

24 Getting Started
Figure 11: Filtering Objects
To choose an object for further operation, select the check box on the left of the
object's name.
Figure 12: Selecting Particular Objects in a List
To choose all objects in the list, select the check box at the head of the column.
Figure 13: Selecting All List Objects at Once
To perform operations with objects in a list, choose the required items and click an
operation shortcut above the list (for example, Delete, Activate, Add to plan, etc.).
Figure 14: Performing Operations on List Objects
To proceed to editing a list item, click its name in the list. For non-editable items (for
example, built-in Plesk Sitebuilder page sets), the item names are not clickable.
In some lists, the status of an object is indicated by an icon in the Status (S) column (
or ). For sites, their status (published or not published), is indicated by or
icons.
For some objects individual operation shortcuts are displayed. For example, for each
site on the Sites screen, there is a Preview icon, a Publish icon, and an Edit
icon.
Page 25

Getting Started 25
Using Context Help
Below the Help icon, there is a context help area. It provides a brief description of the
current screen and the operations available from it. When you place the mouse pointer
over a system element or status icon, additional information about this element is
displayed.
Figure 15: Using Context Help
Page 26

26 Getting Started
Submitting Feedback on Plesk Sitebuilder
Functionality
If you would like to share your opinion or suggestions regarding Plesk Sitebuilder
functionality with Parallels team, you can easily submit your feedback through the
Administrator Panel.
To submit your feedback:
1 On the navigation pane, click Feedback.
Figure 16: Submitting Feedback on Plesk Sitebuilder Functionality
2 From the Type list, specify what kind of feedback you would like to
provide: positive, neutral, or negative.
3 In the Your e-mail field, enter your e-mail address.
4 In the Your message field, type the feedback text.
5 Click Send.
Page 27

Getting Started 27
Getting Help
If you encounter a problem while using Plesk Sitebuilder, there are several resources
available to help you troubleshoot the problem:
Use on-screen context-sensitive help.
At the bottom of the navigation pane, you can find short instructions on the
operations that are available on the current page.
Refer to our knowledge base (http://kb.parallels.com/en/products/sitebuilderwindows).
The knowledge base provides solutions to the most common problems with Plesk
Sitebuilder.
Go to our forum (http://forum.swsoft.com/forumdisplay.php?f=118).
Here all users can post questions, exchange ideas, and troubleshoot issues not
described in the knowledge base. Note that Parallels does not provide official
support through this forum.
Contact technical support.
If you have any problems or questions that are not covered in the user
documentation or knowledge base, you can click Support located on the
navigation pane and submit your problem to our Technical Support team.
Page 28

This chapter describes how to configure your Plesk Sitebuilder account and manage
In this chapter:
Changing Your Password and Personal Information ......................................... 29
Choosing Language, Skin, and Number of List Items Shown per Page ............. 30
Setting Up Global Account ................................................................................ 31
Upgrading Your License .................................................................................... 36
C H A P T E R 3
Configuring Settings Related to Your
Account
your Plesk Sitebuilder license.
Page 29

Configuring Settings Related to Your Account 29
Changing Your Password and Personal
Information
To change your password and personal information:
1 On the navigation pane, click My Profile.
Figure 17: Changing Your Password and Personal Information
2 To change your password:
On the Personal Info tab, click Change Password.
Type your old and new passwords.
Click OK.
3 To update your first and last names and e-mail address, configure the
corresponding fields and click OK.
Page 30

30 Configuring Settings Related to Your Account
Choosing Language, Skin, and Number of
List Items Shown per Page
To customize your Administrator Panel interface:
1 On the navigation pane, click My Profile.
2 Go to the Interface tab.
Figure 18: Choosing Language, Skin, and Number of List Items Shown per Page
3 From the Language list, select the desired language.
4 From the Skin list, select the desired skin.
5 In the Items per page field, specify the number of items (sites, users, and
so on) to be displayed per one page.
Page 31

Configuring Settings Related to Your Account 31
Setting Up Global Account
In this section:
Creating Global Account ................................................................................... 32
Connecting Local Accounts to Your Global Account .......................................... 33
Switching Between Accounts ............................................................................ 34
Editing Global Account ...................................................................................... 35
Disconnecting Local Accounts from Global Account .......................................... 35
Global Account is a Single Sign-On technology feature that allows you to log in to
different Parallels products using a single global login and password. If you have
several accounts in Plesk Sitebuilder, you can connect them all to a global account and
switch between these accounts without entering a password every time. You can also
connect all your accounts in other Parallels products to your global account and switch
between them without providing credentials.
After you create a global account and connect local accounts to it, you will be able to
choose from any account connected to your global account when logging in under your
global account.
Single Sign-On technology and the ability to use global accounts can be activated only
through Plesk Sitebuilder API or from Parallels Plesk (if Plesk Sitebuilder is run behind
Plesk).
You can view whether the SSO feature is enabled or not in your Plesk Sitebuilder at
Server > Integration. If SSO is enabled, the URL of the SSO server is also displayed
on the Integration screen.
Page 32
32 Configuring Settings Related to Your Account
Creating Global Account
To create a global account:
1 On the navigation pane, click Global Account.
2 Click Connect to Global Account.
Figure 19: Creating Global Account
3 Select Create new global account.
4 Provide the login and password for your global account.
5 Provide an e-mail address to be used for password recovery.
6 Click OK.
Your global account is active now, so you can proceed with connecting other accounts
to it. For more information, refer to Connecting Local Accounts to Your Global Account (on
page 33).
Page 33

Configuring Settings Related to Your Account 33
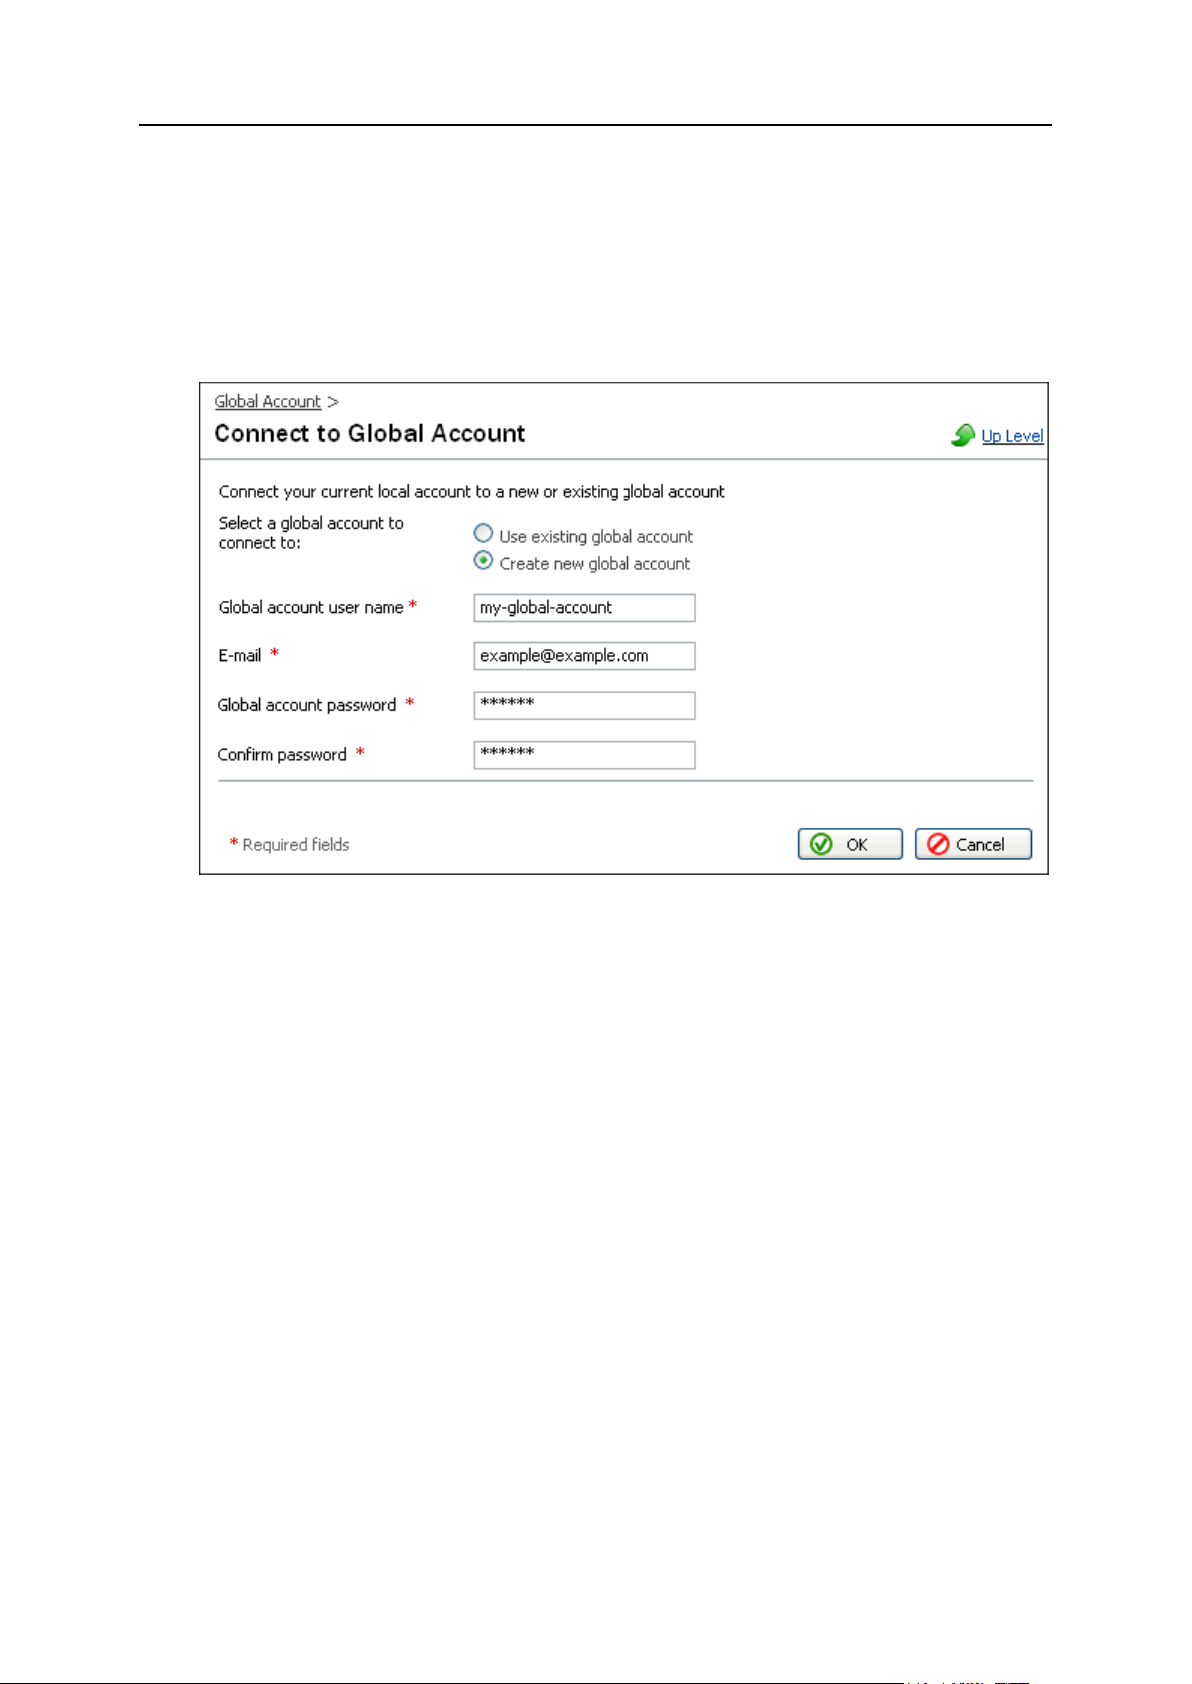
Connecting Local Accounts to Your Global Account
To connect a local Plesk Sitebuilder account to your global account:
1 Log in to Plesk Sitebuilder under the local account you want to
connect.
2 On the navigation pane, click Global Account.
3 Click Connect to Global Account.
4 Make sure that Use existing global account option is selected and provide
the login and password for the global account you want to connect to.
Figure 20: Connecting Local Accounts to Your Global Account
5 Click OK.
Repeat the procedure for other local accounts as necessary.
To connect an account in another product with SSO support to your global account:
1 Log in to software product with SSO support under the account you
want to connect.
2 Follow the instructions on connecting to a global account in respective
software product documentation. Make sure that you provide the
credentials for the existing global account when you are asked to.
Repeat steps 1-2 for other accounts or products as necessary.
Note: Different software products may use different names for the Global Account
feature, such as Federated Identity or Global Login. Refer to respective software
product documentation for more information.
Page 34

34 Configuring Settings Related to Your Account
After you have connected all required accounts to your global account, you can log in
under your global account all the time in any product where you have a local account
connected to your global account. You will be shown the list of local accounts
connected to your global account every time you log in under it, so you can choose
which account you would like to use now. You can switch to another account any time
you want. For more information, refer to Switching Between Accounts (on page 34).
Switching Between Accounts
To switch to another account:
1 On the navigation pane, click Log out.
2 Click Switch User.
3 Select the account you want to switch to:
Choose the required local account from the list of accounts connected to your
global account
or
Select Specify another account and provide login and password for a local account
not connected to your global account or to another global account. You can also
select the language for your Administrator Panel from the Interface language list.
Figure 21: Switching Between Accounts
4 Click OK.
Page 35

Configuring Settings Related to Your Account 35
Editing Global Account
To edit your global account:
1 Log in to Plesk Sitebuilder under your global account or any local
account connected to it.
2 On the navigation pane, click Global Account.
3 Click Edit Global Account.
4 Enter your old and new passwords.
5 Enter an e-mail address to be used for password recovery.
6 Click OK.
Disconnecting Local Accounts from Global Account
To disconnect a local account from your global account:
1 Log in to Plesk Sitebuilder under the local account you want to
disconnect.
2 On the navigation pane, click Global Account.
3 Click Disconnect from Global Account.
Figure 22: Disconnecting Local Accounts from Global Account
4 Click OK to confirm the disconnection.
Repeat the procedure for other local accounts as necessary.
Page 36

36 Configuring Settings Related to Your Account
Upgrading Your License
Plesk Sitebuilder is shipped with a default license that allows creating one site and one
publishing server. Therefore, to fully use the Plesk Sitebuilder as you need, you should
obtain a license key from Parallels or one of its resellers.
Plesk Sitebuilder license keys have a built-in expiration date, so, to keep your license
active, Plesk Sitebuilder will periodically connect to the licensing server and retrieve the
latest license key. This process is run automatically, and the date the next upgrade is
scheduled for is displayed on the License Management screen: Server > License
Management > Product Info tab > License expiration date. You can manually prolong your
current license by clicking Retrieve Keys.
To upgrade your Plesk Sitebuilder license:
1 On the navigation pane, click Server.
2 Click License Management.
To upgrade your license to support more sites, click Order New Key.
The Parallels online store will open in a separate browser window. In this
window, select the desired license and click Add to My Basket. In the next steps,
indicate the number of license keys, provide contact details, billing address, and
payment method, and submit the form. The new key will be sent to the specified
e-mail address. Save the new key to the hard drive on your local machine.
To upgrade your license for larger installations of Plesk Sitebuilder, multi-server
publishing and clustered services, contact Parallels Sales
(mailto:sales@parallels.com).
After you purchase a license, you will be provided with a license key or
activation code.
3 Open again the License Management screen in Plesk Sitebuilder.
To upload your license key to Plesk Sitebuilder, click License Key Upload, click
Browse, locate the file with the license key or specify its URL and click Upload.
Figure 23: Uploading Your License Key
Page 37

Configuring Settings Related to Your Account 37
To enter your activation code, click Activation Code and input the code you
In this section:
Viewing System Information .............................................................................. 37
received from the sales representative.
Figure 24: Updating Your License Using Activation Code
If after upgrade you wish to restore the default Plesk Sitebuilder license, click
Restore Default License Key.
Viewing System Information
To view information about the Plesk Sitebuilder program and the limits and
permissions set in your license:
1 On the navigation pane, click Server.
2 Click License Management.
3 Switch between the tabs to view the respective information.
Page 38

This chapter describes how to set up Plesk Sitebuilder and manage its basic tools.
In this chapter:
Rebranding Your Plesk Sitebuilder .................................................................... 38
Setting Up SMTP Server for Sending Notifications from Plesk Sitebuilder ......... 41
Obtaining Additional Skins, Languages, and Site Design Templates ................. 42
Viewing and Configuring Plesk Sitebuilder Wizard Presets and Modules .......... 43
Updating Plesk Sitebuilder ................................................................................ 69
Specifying Hosts Used for Publishing Sites ....................................................... 70
Setting Up Plesk Sitebuilder for Anonymous Visits ............................................ 78
Viewing Plesk Sitebuilder Logs ......................................................................... 88
In this section:
Setting Up Logo and Title Bar Text .................................................................... 39
Customizing Help and Support Links ................................................................. 40
C H A P T E R 4
Setting Up and Maintaining Plesk
Sitebuilder
Rebranding Your Plesk Sitebuilder
Plesk Sitebuilder allows you to rebrand the application interface according to your
corporate style:
You can replace the default Plesk Sitebuilder logo with your own one, and make the
logo point to your web site. You can also replace the text displayed in the title bar of
Plesk Sitebuilder interface with your own text - for example, with your company
name. These logo and title bar text will be shown on all pages of the Plesk
Sitebuilder Wizard, to regular and anonymous users, and in all dependent users'
Administrator Panels.
You can customize the link attached to the Help button and the e-mail address
attached to the Support button in the Administrator Panel and in the Wizard.
Page 39

Setting Up and Maintaining Plesk Sitebuilder 39
Setting Up Logo and Title Bar Text
To set up your logo:
1 On the navigation pane, click Server.
2 Click Branding.
Figure 25: Customizing Application Logo and Title Bar Text
3 Click Browse and locate the file with your new logo. Click Open.
4 Click Upload to load the image to the server.
Note: Logo image files must have one of the following formats: *.jpeg, *.jpg, *.gif, or
*.png
5 To make the logo a link to a web site, enter the desired URL in the
Link field.
6 Click OK.
To set a new text in the browser's title bar:
1 Type the new title in the Title field.
2 Click OK.
You can always restore the default logo, title, and link by clicking Restore Default Settings.
Page 40

40 Setting Up and Maintaining Plesk Sitebuilder
Customizing Help and Support Links
To customize help and support links:
1 On the navigation pane, click Server.
2 Click Branding.
3 Go to the Help & Support Links tab.
Figure 26: Customizing Help and Support Links
4 In the Help area, customize the links to the online help for different
user roles as desired.
5 In the Support link field, enter the e-mail address to which users'
support requests should be sent. When a user clicks the Support
button, a mail program on their computer opens a "Compose New
Message" window with this e-mail address specified as the recipient
address.
6 Click OK.
Page 41

Setting Up and Maintaining Plesk Sitebuilder 41
Setting Up SMTP Server for Sending
Notifications from Plesk Sitebuilder
To set up the SMTP server for sending e-mail notifications from Plesk Sitebuilder:
1 On the navigation pane, click Server.
2 Click SMTP Server Settings.
Figure 27: Setting Up SMTP Server for Sending Notifications from Plesk Sitebuilder
3 In the SMTP server host field, enter the domain name of the SMTP
server.
4 In the SMTP server port field, enter the number of port for connection to
the SMTP server.
5 In the SMTP server from address field, enter an e-mail address that will be
displayed in the 'From' field of the notification e-mail.
6 If the SMTP server is password protected, click Change Password and
provide the credentials.
7 Click OK.
Page 42

42 Setting Up and Maintaining Plesk Sitebuilder
Obtaining Additional Skins, Languages,
and Site Design Templates
Plesk Sitebuilder is shipped with a default set of skins, site design templates, and one
language pack (English). If you want to have extra templates, languages, or skins for
your Plesk Sitebuilder, you can install them additionally. To obtain these extra
components, you can:
Download them from the Parallels web site
(http://www.parallels.com/en/download/sitebuilder/) (excepting skins)
Create them yourself using Parallels Plesk Sitebuilder Software Development Kit
(for more details, visit Parallels Developer Network
(http://swdn.swsoft.com/en/download/sdk/) and read the Plesk Sitebuilder SDK
documentation)
Obtain them from a third party
To view the currently installed components:
To view the list of available skins, go to Server > Skins
To view the list of available languages, go to Server > Languages
To view the list of available templates, go to Server > Templates
To find out about available third-party language packs (if any), or share useful
information on localization issues, visit Parallels Localization forum
(http://forum.swsoft.com/forumdisplay.php?s=&forumid=207).
Page 43

Setting Up and Maintaining Plesk Sitebuilder 43
Viewing and Configuring Plesk Sitebuilder
Wizard Presets and Modules
Plesk Sitebuilder is shipped with a number of built-in site development presets
(templates intended to facilitate the site creation process in the Plesk Sitebuilder
Wizard) and modules (components which extend site functionality (Blog, Guestbook,
eShop, etc.)).
Set of modules you have at your disposal is regulated by your license. Which modules
will be available to your dependent users you define in their service plans. Creating or
integrating custom Plesk Sitebuilder modules is not supported.
Site development templates can be divided into three types:
Design Templates. These are ready graphic design solutions developed for certain
categories of web sites (Personal, Art and Photography, Business, etc.). Your users
can apply one of these templates to their web sites on the Design step of the Plesk
Sitebuilder Wizard and then tweak it according to their preferences by choosing a
color scheme, page banner, menu style, and other parameters. Custom design
templates cannot be created through the Plesk Sitebuilder interface, but it is
possible to develop them using Parallels Plesk Sitebuilder Software Development
Kit (for more details, visit Parallels Developer Network
(http://swdn.swsoft.com/en/download/sdk/) and read Plesk Sitebuilder SDK
documentation). Also, you can download additional design templates from the
Parallels web site (http://www.parallels.com/en/download/sitebuilder/).
Site Structure Templates (page sets). These are pre-defined site structures,
common for sites devoted to a certain subject. For example, a personal site usually
consists of the following pages: Home page, About Myself page, My Family page,
Photos, and so on. Your users can choose one of these page sets and adjust it to
their needs on the Pages step of the Plesk Sitebuilder Wizard. If it is allowed by your
license, you can create your own pages sets in Plesk Sitebuilder and provide them
to your users.
Site Templates (site families). A site family is a template of a larger scale: a
combination of a design template and a page set. If it is allowed by your license,
you can create your own site families in Plesk Sitebuilder and provide them to your
users. These site templates are offered to your users on the Start page of the Plesk
Sitebuilder Wizard. The choice of a site family determines
the choice of a default design template on the Design step
the choice of a default page set offered on the Pages step of Plesk Sitebuilder
Wizard.
On each respective step, your users can choose any other design template or page
set instead of the default ones.
Page 44

44 Setting Up and Maintaining Plesk Sitebuilder
In this section:
Managing Site Design Templates ...................................................................... 44
Managing Site Structure Templates (Page Sets) ............................................... 45
Managing Site Templates (Site Families) .......................................................... 51
Managing Modules ............................................................................................ 56
Managing Site Design Templates
A design template is a ready graphic design solution developed for certain categories
of web sites (Personal, Art and Photography, Business, etc.). Your users can apply one
of these templates to their web sites on the Design step of the Plesk Sitebuilder Wizard
and then tweak it according to their preferences by choosing a color scheme, page
banner, logo, and menu style.
Custom design templates cannot be created through the Plesk Sitebuilder interface,
but it is possible to develop them using Parallels Plesk Sitebuilder Software
Development Kit (for more details, visit Parallels Developer Network
(http://swdn.swsoft.com/en/download/sdk/) and read Plesk Sitebuilder SDK
documentation). Also, you can download additional design templates from the Parallels
web site (http://www.parallels.com/en/download/sitebuilder/) and install them as
described in the Plesk Sitebuilder for Windows Installation Guide
(http://www.parallels.com/en/products/sitebuilder/docs).
To view available site design templates, go to Server > Templates.
For information on how to operate with list objects, see Working with Lists (on page 23).
To specify design templates available to certain users:
1 Create a special service plan for these users as described in Adding
Plan (on page 95) - or edit an existing plan (which may be already
assigned to some users) as described in Modifying Plan (on page 99).
2 In this plan, on the Templates tab, select the design templates you want
to hide, and click Remove from plan.
3 On the same tab, select the design templates you want to provide to
users, and click Add to plan.
4 Assign the respective users to this plan as described in Assigning Plan to
User (on page 99).
To specify available templates for anonymous users, make respective changes in the
trial plan. For details about trial plans, see Setting Up Service Plan for Anonymous Users (on
page 79).
Page 45

Setting Up and Maintaining Plesk Sitebuilder 45
Managing Site Structure Templates (Page Sets)
A page set is a pre-defined site structure, common for sites devoted to a certain
subject. Your users can choose one of these page sets and adjust it to their needs on
the Pages step of the Plesk Sitebuilder Wizard. Plesk Sitebuilder is shipped with a
number of built-in page sets, which you cannot edit or remove from Plesk Sitebuilder,
but if it is allowed by your license, you can create your own page sets either on the basis
of existing Plesk Sitebuilder page sets (see page 47) or from scratch (see page 49). Learn
about the types of single pages offered by Plesk Sitebuilder in Types of Pages (see page
46). You also have an option of configuring the list of available page sets for certain users
(see page 50).
To view the list of available page sets, go to Server > Page Sets. Pages contained
in each page set are enumerated in the Pages column of the list.
For information on how to operate with list objects, see Working with Lists (on page 23).
Figure 28: Page Sets Management Screen
Page 46

46 Setting Up and Maintaining Plesk Sitebuilder
In this section:
Types of Pages ................................................................................................. 46
Creating Page Set Using Existing One as Template .......................................... 47
Creating Page Set from Scratch ........................................................................ 49
Editing Page Set ............................................................................................... 49
Specifying Page Sets Available to Certain Users .............................................. 50
Removing Page Set .......................................................................................... 50
Types of Pages
When creating a page set, you can use the following types of pages:
Standard (common) pages - ordinary HTML pages where site owners can insert
text, graphics, etc. Such pages are marked with icons in the site map.
Special pages - page modules which extend the site functionality. Each module is
designed for a certain purpose and is identified by its own icon. There are the
following types of page modules in Plesk Sitebuilder:
Blog. Supports a standard set of blog functionality: posting, commenting,
content categorizing, etc. A Blog page is very convenient for organizing the
News, Events and similar pages on sites.
Image Gallery. Allows you to share images or photos online. Supports batch
image upload with group editing functions, organizing images into albums, etc.
File Download. Allows providing content for download to site visitors.
eShop. Online store creation and management tool featuring shopping cart,
multi-currency, categorized product catalog with thumbnail upload capability,
product inventory and shipping cost support, order management. Provides
integration with 5 online payment gateways, including PayPal, Authorize.Net,
2Checkout.com, WorldPay, and BluePay, and allows to integrate one custom
payment system of your choice.
Flash Intro. A pre-designed flash introduction to your site. It is possible to
choose between several designs of the intro and insert custom text information
into it.
Guestbook. Allows you to create a guestbook and manage the posted
messages.
Forum. Allows you to set up a forum where visitors can post questions and
participate in discussions.
Registration. Allows you to set up voluntary user authentication on sites. After
a registered site visitor opts in, their details are automatically inputted in all
forms they open on the site, for example, when submitting a forum topic or
shopping at the online store. You can suspend a visitor account, thus restricting
a visitor from authenticating under his or her user name.
External Page. Allows incorporating links to external pages into the site menu.
The list of available modules is determined by your license.
Page 47
Setting Up and Maintaining Plesk Sitebuilder 47
Creating Page Set Using Existing One as Template
To create a page set on the basis of an existing page set:
1 On the navigation pane, click Server.
2 Click Page Sets.
3 In the list of available page sets, click the Clone icon against the
page set you want to take as a basis.
Figure 29: Creating a Page Set: Adding Pages
4 In the Code field, provide a code for the page set.
Code is used for identifying page sets in Plesk Sitebuilder. It can be any arbitrary
text, but it must be unique for every page set.
5 In the Title field, specify a name for the page set.
The page set appears under this name in the list of available page sets at the Pages
step of the Wizard.
6 To add a page to the page set, select it in the Special pages box and
click Add.
7 To move a page up or down at the same level, select it in the Page set
structure box and click Up or Down respectively.
Page 48

48 Setting Up and Maintaining Plesk Sitebuilder
8 To move a page from the second level to the top level, select it in the
Page set structure box and click Left.
9 To move a page from the top level to the second level, select it in the
Page set structure box and click Right.
10 To remove a page from the page set, select it and click Delete.
11 To edit the title and content of a page, click its name in the Page set
structure box.
The page settings will be available for editing in the Page info area.
12 Click OK.
Figure 30: Creating a Page Set: Setting Up Pages
Page 49

Setting Up and Maintaining Plesk Sitebuilder 49
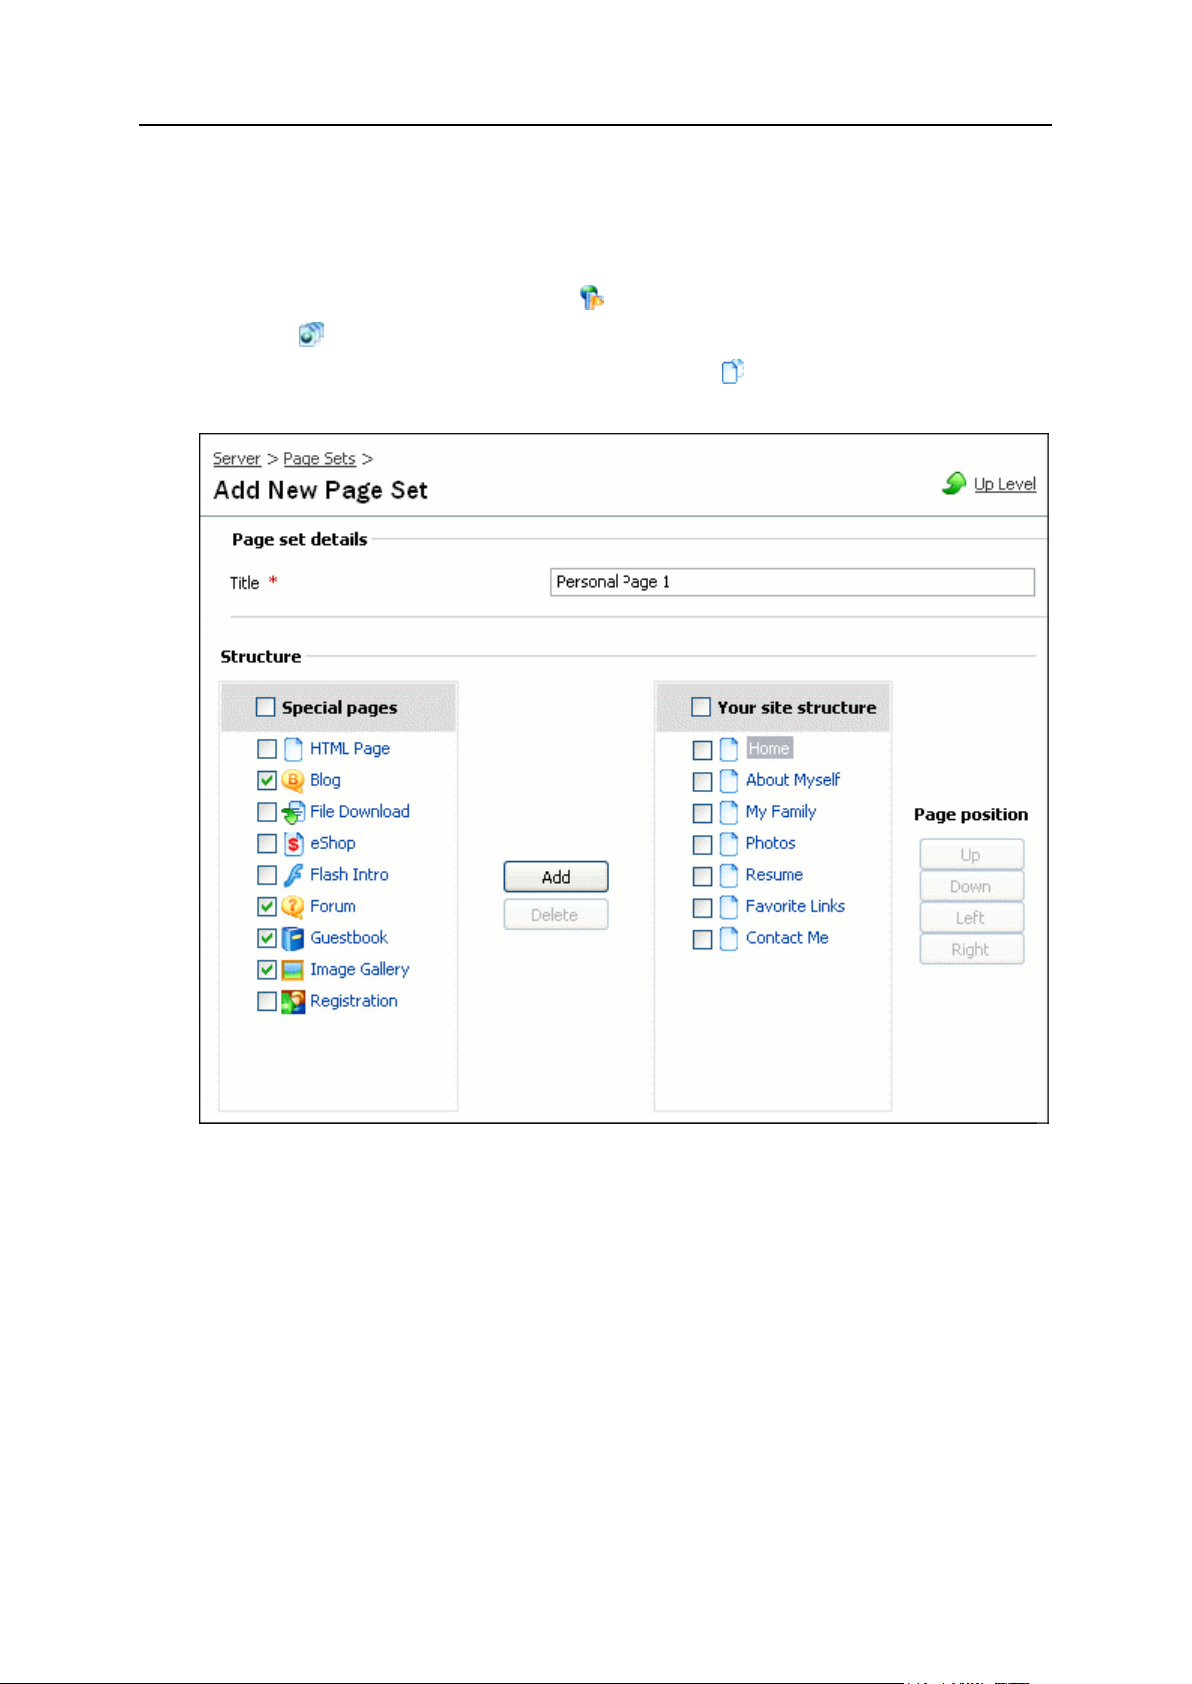
Creating Page Set from Scratch
To create a page set from scratch:
1 On the navigation pane, click Server.
2 Click Page Sets.
3 Click Add New Page Set.
4 In the Code field, provide a code for the page set.
Code is used for identifying page sets in Plesk Sitebuilder. It can be any arbitrary
text, but it must be unique for every page set.
5 In the Title field, specify a name for the page set.
The page set appears under this name in the list of available page sets at the Pages
step of the Wizard.
6 To add a page to the page set, select it in the Special pages box and
click Add.
7 To move a page up or down at the same level, select it in the Page set
structure box and click Up or Down respectively.
8 To move a page from the second level to the top level, select it in the
Page set structure box and click Left.
9 To move a page from the top level to the second level, select it in the
Page set structure box and click Right.
10 To remove a page from the page set, select it in the Page set structure
area and click Delete.
11 To edit the title and content of a page, click its name in the Page set
structure box.
The page settings will be available for editing in the Page info area.
12 Click OK.
Editing Page Set
You can edit only custom page sets.
To edit a page set:
1 On the navigation pane, click Server.
2 Click Page Sets.
3 In the Code column, click the code of the page set you want to edit.
4 Make necessary changes.
5 Click OK.
Page 50

50 Setting Up and Maintaining Plesk Sitebuilder
Specifying Page Sets Available to Certain Users
By default, all page sets already existing in your Plesk Sitebuilder are included in all
newly created service plans and therefore become available to all users these plans
are assigned to. When you create a custom page set, it is not automatically added to
the existing plans, so to serve newly created page sets out to your customers, you
should add them to the list of available page sets in the corresponding plans (see page 95). If
you do not want a page set to be available to a customer, you just exclude it from the
customer’s service plan.
To specify page sets available to certain users:
1 Create a special service plan for these users as described in Adding
Plan (on page 95) - or edit an existing plan (which may be already
assigned to some users) as described in Modifying Plan (on page 99).
2 In the plan editor
Go to the Page Sets tab, select the page sets you want to hide and click
Remove from plan.
On the same tab, select the page sets you wish to include in the plan, and click
Add to plan.
3 Assign all respective users to this plan as described in Assigning Plan to
User (on page 99).
To configure page sets available to anonymous users, make the respective changes in
the trial plan. For details about trial plans, refer to Setting Up Service Plan for Anonymous
Users (on page 79).
Removing Page Set
Note that you cannot delete built-in Plesk Sitebuilder page sets or the only available
page set in any of Plesk Sitebuilder plans.
After you delete a custom page set, it is removed permanently from Plesk Sitebuilder
and cannot be recovered.
Sites already created using the removed page set are not affected.
To remove a page set:
1 On the navigation pane, click Server.
2 Click Page Sets.
3 Select the page set you want to remove and click Delete.
Page 51

Setting Up and Maintaining Plesk Sitebuilder 51
Managing Site Templates (Site Families)
In this section:
Creating Site Family .......................................................................................... 52
Editing Site Family............................................................................................. 53
Specifying Site Families Available to Certain Users........................................... 54
Setting Default Site Family ................................................................................ 55
Removing Site Family ....................................................................................... 55
A site family is a site template comprised of a design template and a page set. These
site templates are offered to your users on the Start page of the Plesk Sitebuilder
Wizard. Users will always be able to choose another design template or page set
instead of the default ones proposed by the site family.
Plesk Sitebuilder is shipped with a number of built-in site families, which you cannot
edit or remove from Plesk Sitebuilder. But if it is allowed by your license, you can
create your own site families and offer them to your users. You also have an option of
specifying site families available to certain users (see page 54).
To view the list of available site families, go to Server > Site Families.
For information on how to operate with list objects, see Working with Lists (on page 23).
Figure 31: Site Families Management Sreen
Page 52
52 Setting Up and Maintaining Plesk Sitebuilder
Creating Site Family
To create a site family:
1 On the navigation pane, click Server.
2 Click Site Families.
3 Click Add New Site Family.
Figure 32: Creating a Site Family: Configuring the Appearance
4 On the Appearance tab, provide a code for the site family in the Code
field.
Code is used for identifying site families in Plesk Sitebuilder. It can be any arbitrary
text, but it must be unique for every site family.
5 In the Title field, specify a name for the site family.
The site family is displayed under this name in the list of site types on the Start page
of the Wizard.
6 If you want to provide a description of the site family, enter a
description text in the Description area.
Page 53

Setting Up and Maintaining Plesk Sitebuilder 53
This description is displayed to the right of the site family name on the Start page of
the Wizard.
7 If you want to add an image to be displayed beside the site family
name, upload an image file from your computer.
You can preview the uploaded image in the Image preview area.
Note: Image size must be 147x90 px. It must be in one of the following formats:
*.jpeg, *.jpg, *.gif, or *.png.
8 Click the Generic tab.
9 From the Template category list, select a template category to be
included in the new site family.
10 From the Page set list, select a page set to be included in the new site
family.
11 Click OK.
Editing Site Family
You can edit only your custom site families.
To edit a site family:
1 On the navigation pane, click Server.
2 Click Site Families.
3 Click the site family you want to modify.
4 Make necessary changes.
5 Click OK.
Web sites already created using this site family are not affected.
Page 54

54 Setting Up and Maintaining Plesk Sitebuilder
Specifying Site Families Available to Certain Users
By default, all site families already existing in your Plesk Sitebuilder are included in all
newly created service plans and therefore become available to all users these plans
are assigned to. When you create a custom site family, it is not automatically added to
the existing plans, so to serve newly created site families out to your customers, you
should add them to the list of available site families in the corresponding plans (see page 95).
If you do not want a site family to be available to a customer, you just exclude it from
the customer’s service plan.
To specify site families available to certain users:
1 Create a special service plan for these users as described in Adding
Plan (on page 95) - or edit an existing plan (which may be already
assigned to some users) as described in Modifying Plan (on page 99).
2 On the Site Families tab, select the site families you want to make
unavailable and click Remove from plan.
3 On the same tab, select the site families you wish to include in the
plan, and click Add to plan.
When including a site family into a plan, make sure that the page set and at least
one design template from the appropriate category which constitute the site family
are included in the plan. If this condition is not met, the site family cannot be
included in the plan.
You can exclude all site families from the plan, except the one you set as a default
one for this plan. The default site family is highlighted in color on the Site Families tab
of the plan editor. For details about changing the default site family, refer to Setting
Default Site Family (on page 55).
4 Click OK.
5 Assign all respective users to this plan as described in Assigning Plan to
User (on page 99).
If you wish to configure the site families available to anonymous users, make the
respective changes in the trial plan. For details about trial plans, refer to Setting Up
Service Plan for Anonymous Users (on page 79).
If you wish to completely replace the existing site families with your custom ones for
certain users, add your custom site families to the respective plan, set one of your
custom site families as a default site family, and remove all built-in Plesk Sitebuilder
site families from the plan.
Page 55

Setting Up and Maintaining Plesk Sitebuilder 55
Setting Default Site Family
A default site family is a site family which is selected by default when a user comes to
the Start page of the Wizard. Every plan must contain one default site family (which can
be removed neither from plan, nor from the list of created site families).
To set a default site family for certain users:
1 From the navigation pane, go to Users > Plans.
2 Click the name of the corresponding plan in the list of plans on the
Plans page.
3 On the Site Families tab, select the required site family and click Set as
Default.
4 Click OK.
Removing Site Family
Note that you cannot delete built-in Plesk Sitebuilder site families, default site family, or
the only available site family in any of Plesk Sitebuilder plans.
After you delete a custom site family, it is removed permanently from Plesk Sitebuilder,
and cannot be recovered.
Sites already created using the removed site family are not affected.
To remove a site family:
1 On the navigation pane, click Server.
2 Click Site Families.
3 Select the site family you want to remove and click Delete.
Page 56

56 Setting Up and Maintaining Plesk Sitebuilder
Managing Modules
Plesk Sitebuilder modules are components which extend the site functionality: Blog,
Guestbook, eShop, etc. The set of site modules you have at your disposal is regulated
by your license. Which modules will be available to your dependent users you define in
their service plans. Creating or integrating custom Plesk Sitebuilder modules is not
supported.
To view a list of available modules, go to Server > Modules.
For information on how to operate with list objects, refer to section Working with Lists (on
page 23).
Figure 33: Modules Management Screen
On the Modules screen, the following information about modules is available:
Title. The name under which a module is displayed to the Wizard users.
Level. The type of a module. Currently, there are three module types:
Block module is embedded in the body of a page as a functional block (for
example, Feedback Form).
Page module is a web page added to site structure as a separate section (for
example, Forum).
Page 57

Setting Up and Maintaining Plesk Sitebuilder 57
Site module adds a functionality to a site as a whole (is not visible in the site
In this section:
Specifying Modules Available to Certain Users ................................................. 57
Setting Up Area Map Module ............................................................................ 58
Setting Up Site Pal Module ................................................................................ 59
Setting Up eShop Module.................................................................................. 60
structure). For example - Web Statistics module, which allows site owners to
monitor visitor attendance statistics.
Version. The version of a module.
Specifying Modules Available to Certain Users
By default, all modules that go with your license are included in all created service
plans and therefore become available to all users these plans are assigned to. To
customize the list of modules available to a certain customer, you should add/remove
the desired modules to/from the customer's service plan.
To specify modules available to certain users:
1 Create a special service plan for these users as described in Adding
Plan (on page 95) - or edit an existing plan (which may be already
assigned to some users) as described in Modifying Plan (on page 99).
2 On the Modules tab, select the modules you want to make unavailable
and click Remove from plan. On the same tab, select the modules you
wish to include in the plan, and click Add to plan.
3 Click OK.
4 Assign all respective users to this plan as described in Assigning Plan to
User (on page 99).
To specify modules available to anonymous users, make respective changes in the trial
plan. For details about trial plans, see Setting Up Service Plan for Anonymous Users (on
page 79).
Page 58

58 Setting Up and Maintaining Plesk Sitebuilder
Setting Up Area Map Module
The Area Map module allows site owners to insert fragments of geographical maps into
their site pages.
Site owners can choose between two mapping service providers: Google Maps (freeof-charge) or Microsoft MapPoint (account must be purchased). The Microsoft
MapPoint Web Service is configured by site owners in the Plesk Sitebuilder Wizard.
As for the Google Maps API service, to make it available to the site owners in the Area
Map module, you need to get a Google Maps API key for your Plesk Sitebuilder server.
Site owners, in their turn, should get Google Maps API keys particularly for each site to
make the embedded maps available to their site visitors.
Note: After an anonymous user purchases a Plesk Sitebuilder account and publishes
the site, he or she will need to re-generate the Google Maps API key for the new site
URL.
To enable the Google Maps API service for your Plesk Sitebuilder server:
1 On the navigation pane, click Server.
2 Click Modules.
3 In the list of modules, click Area Map.
4 Click Sign up for a Google Maps API key.
5 On the Google web site, perform the steps required to generate a
Google Maps API key.
In the 'My web site URL' field, you type the URL at which your Plesk Sitebuilder
server is accessible to your customers.
6 Copy the generated Google Maps API key to clipboard and then paste
it into the Google Maps API key field on the Area Map screen.
7 To make sure that the key you specified is valid (that is, it
corresponds to the URL of your Plesk Sitebuilder server), click Verify
Key.
8 Click OK.
Figure 34: Setting Up Area Map Module
Page 59

Setting Up and Maintaining Plesk Sitebuilder 59
Setting Up Site Pal Module
With the help of the SitePal module, your site owners can add SitePal speaking animated
characters (http://www.sitepal.com) to their web sites, to enrich site visitor experience
and increase sales.
You have an option of registering an affiliate account with Oddcast, Inc. (the owner of
the SitePal trademark), which would allow you to earn commissions from each SitePal
character purchased by site owners through your Plesk Sitebuilder. By default, all
commissions from your SitePal sales are paid to Parallels, as Oddcast general partner.
After you register an affiliate account with Oddcast, the commissions are shared
between you and Parallels. You can initiate affiliate account setup directly from your
Administrator Panel.
To set up a SitePal affiliate account:
1 On the navigation pane, click Server.
2 On the Server screen, click Modules.
3 In the list of modules, click SitePal.
Figure 35: Setting Up Site Pal Module
4 Specify your first name, last name and e-mail address.
Note: The e-mail address you specify in the Administrator Panel is used as your
SitePal account login. Therefore, editing your e-mail address in the Administrator
Panel will result in losing your existing account and the record of all its earned
commissions, and creating a new account.
5 Click OK.
A confirmation e-mail is sent to the specified e-mail address. In this e-mail, you will
find a link by which you can activate your account, and the credentials (your login
and an automatically generated password) for logging in to your account on the
Oddcast server.
6 Click the account activation link provided in the confirmation e-mail.
7 Log in to your affiliate account using the provided credentials.
Once logged in to your account, you may:
Page 60

60 Setting Up and Maintaining Plesk Sitebuilder
Edit your account information and download tax ID forms (This can be found
In this section:
Specifying Payment Systems Available to E-Shop Owners ............................... 61
Setting Up BluePay Affiliate Account ................................................................. 63
Integrating Custom Payment System ................................................................ 65
under the 'Account Info' tab)
Get SitePal banners to place on your site (This can be found under the
'Banners' tab)
Monitor sales made via these banners and commissions you have earned from
the sales (This can be found under the 'Reports' tab)
8 Go to the Account Info tab and click Edit to proceed to setting up your
created account.
For instructions on managing your SitePal affiliate account, refer to the Oddcast
Affiliate Program User's Guide
(https://www.oddcast.com/affiliates/docs/Affiliate_UserGuide.pdf).
If later you wish to update your first name, last name or the e-mail specified for your
SitePal affiliate account, make sure to update them in your Administrator Panel. If you
update them on the Oddcast server first, you will receive authorization errors in the
Wizard, and to continue working with SitePal through Plesk Sitebuilder, you will need to
register a new SitePal account from your Administrator Panel. In this case, the record
of commissions earned through your previous account will be lost.
Setting Up eShop Module
The eShop module enables site owners to set up online stores on their web sites,
allowing them to sell products and accept payments online. The current section tells
you how to configure the payment system settings of the eShop module in your
Administrator Panel.
Page 61

Setting Up and Maintaining Plesk Sitebuilder 61
Specifying Payment Systems Available to E-Shop Owners
In your Administrator Panel, you can select which payment systems will be available to
your online store owners. By default, all payment systems are enabled.
To specify payment systems available to online store owners:
1 On the navigation pane, click Server.
2 On the Server screen, click Modules.
3 In the list of modules, click eShop.
4 On the eShop screen, go to the Payment Systems tab.
Figure 36: Specifying Payment Systems Available to E-Shop Owners
5 Disable/enable desired payment system by selecting the check boxes
next to their names.
Page 62

62 Setting Up and Maintaining Plesk Sitebuilder
6 Click OK.
The selected payment systems appear on the Payment Systems tab on the eShop
module settings in the Plesk Sitebuilder Wizard.
For information on configuring additional settings for the BluePay payment system,
refer to Setting Up BluePay Affiliate Account (on page 63).
Page 63

Setting Up and Maintaining Plesk Sitebuilder 63
Setting Up BluePay Affiliate Account
The eShop module is integrated with a built-in form for registering BluePay merchant
accounts by e-shop owners directly from the Plesk Sitebuilder Wizard. You can enable
or disable this option. Besides, you can register an affiliate account with BluePay,
which would allow you to earn a commission each time a merchant account is
registered from your Plesk Sitebuilder. The revenue generated from newly registered
merchant accounts will be shared between you and Parallels according to your
selected pricing plan.
Your resellers also have an option to enable built-in BluePay registration for their site
owners, and to register their own BluePay affiliate accounts.
To set up a BluePay affiliate account:
1 On the navigation pane, click Server.
2 Click Modules.
3 Click eShop.
4 Go to the Payment Systems tab.
5 Select the Enable built-in merchant account registration for e-shop owners check
box.
Figure 37: Setting Up BluePay Affiliate Account
6 Click the link Do not have a BluePay affiliate account yet? in the BluePay
section of the screen.
7 Fill in the appeared form and click OK.
Page 64

64 Setting Up and Maintaining Plesk Sitebuilder
8 Your posted data will be sent to the BluePay representative.
9 The BluePay representative will send the affiliate paperwork to you.
10 Once the signed paperwork is returned to the representative, your
affiliate account will be created and you will be supplied with a user
name and password (a temporary password will be sent to you in a
separate e-mail) for logging in to the BluePay Portal Site
(https://portal.bluepay.com).
11 If you express interest in using the Merchant API to submit
merchants, you will receive this credentials as well:
API Account ID
Secret Key
Agent Online Application ID
12 Specify these parameters in the corresponding fields in the BluePay
section of the screen.
13 Click OK.
Alternatively, you can place a URL to the BluePay Online Application on your site. The
URL is available by clicking the OnlineApp Weblink menu option on the left hand side
when logged into the BluePay Portal Site. This URL contains a unique identifier, so
that BluePay could track which affiliate brought in the deal.
Page 65

Setting Up and Maintaining Plesk Sitebuilder 65
Integrating Custom Payment System
Plesk Sitebuilder eShop module supports the following online payment systems:
PayPal
Authorize.Net
2Checkout.com
BluePay
WorldPay
Plesk Sitebuilder administrators and resellers can integrate the eShop module with one
custom payment system. This can be a custom developed payment system or some
third-party provider's one. To integrate Plesk Sitebuilder with a payment system, you
need a proxy web application that will redirect payment transactions to a desired
payment system. Parallels provides you with two sample proxy web applications which
you can use as a reference to develop your own one for integration with a desired
payment system. You will also need the integration documentation of the custom
payment system - to obtain information about required parameters and parameters'
names syntax. To obtain these samples, you need to install Plesk Sitebuilder SDK
(available for download here (http://swdn.swsoft.com/en/download/sitebuilder/)). After
you install Plesk Sitebuilder SDK, you will find the applications in the
<path_to_SDK_installation>\Samples\Integration\ASP\CustomPaymentSyste
m folder. This folder contains the applications allowing you to perform a test integration
with BluePay (BluePay.cs and Bluepay2API.cs) or Authorize.Net
(AuthorizeNet.cs) payment system, and a file with instructions on how to do this
(readme.htm).
To integrate Plesk Sitebuilder with a custom payment system:
1 On the navigation pane, click Server.
2 On the Server screen, click Modules.
3 In the list of modules, click eShop.
4 On the eShop screen, go to the Custom Payment System tab.
Page 66

66 Setting Up and Maintaining Plesk Sitebuilder
Figure 38: Integrating Custom Payment System: Specifying General Properties
5 On the Custom Payment System tab, select the Enable custom payment system
check box.
At any time later you can disable the custom payment system by clearing this check
box. In this case, all settings you specify during the payment system setup remain
on the screen in read-only format (grayed out), and the payment system becomes
unavailable to all site owners. After site owners republish their sites, the payment
system disappears from the Checkout form of their online stores.
6 In the Name field, specify a name for the payment system as it will be
displayed to end-users (e-shop owners and customers).
7 In the Payment gateway URL field, specify the URL pointing to your proxy
web application.
8 From the Request method list, select a method used for sending HTTP
request to the payment system (see the payment system
specification).
9 In the Positive result expression field, specify a regular expression to
define accepted transactions:
For example: errorText=(?'confirmationId'.+)
10 In the Negative result expression field, specify a regular expression to
define transactions declined by the payment system:
For example:errorText=(?'errorText'.+)
11 Specify parameters to be provided by online store owners - refer to
the payment system API documentation for information about required
parameters and parameters' names syntax.
Page 67

Setting Up and Maintaining Plesk Sitebuilder 67
Figure 39: Integrating Custom Payment System: Specifying Parameters To Be
Requested from Online Store Owners
1. To add a new parameter, click Add New.
2. In the Parameter name field, enter the original parameter name.
3. In the Field name in the interface field, enter a name for the parameter as it will be
displayed to e-shop owners on the Payment Systems tab in the eShop module
editor.
4. In the Data type field, select a data type to be associated with the field. The
supported types are:
String - allows specifying any arbitrary text string. It may include national
characters, punctuation marks, and spaces, but may not include line breaks.
Text - same as string, but with line breaks allowed. On the published site the
text is displayed in the multi-line mode.
E-mail - allows inputting e-mail addresses only.
Double - allows entering a floating point number, with a point or a comma as
a decimal point.
Integer - allows entering an integer number (positive, negative, or zero).
Numeric - allows entering a positive integer number, or zero (only numbers
are allowed).
Currency - allows entering a floating point number.
Date - allows entering a date in format MM/DD/YYYY, with a slash ("/") as a
separator.
Phone - allows entering an international phone number. May contain
numbers, spaces, parentheses, "+" and "-" symbols.
Password - allows entering any arbitrary text string.
CAPTCHA - allows entering a confirmation code from the provided picture, for
anti-spam protection purposes.
5. To specify whether the field is required for filling in or optional, select or clear
the Required check box.
Page 68

68 Setting Up and Maintaining Plesk Sitebuilder
6. To set the order of the fields, click the corresponding upward and downward
arrows.
7. To delete a parameter, click the Delete icon beside the corresponding
parameter.
12 Specify parameters to be provided by online store customers - see
step 11.
13 In the Other parameters to be included in the HTTP request section, specify
which information should be taken from order information (i.e. from
the Plesk Sitebuilder database).
Figure 40: Integrating Custom Payment System: Specifying Parameters To Be Taken
from Placed Orders
1. To add a new parameter, click Add New.
2. In the Parameter name field, enter the original parameter name - refer to the
payment system documentation for information about required parameters and
parameters' names syntax.
3. From the Source list, select which part of order information will be used as the
source of the parameter's value.
The following options are available:
Order ID. The identifier of an order in the orders index of a particular Plesk
Sitebuilder eShop module.
Site ID. The identifier of an order originating site in Plesk Sitebuilder.
Shop ID. The identifier of an order originating eShop module in Plesk
Sitebuilder (one site may contain several eShop modules).
Site owner ID. The identifier of the site owner whose site originated an order.
Site owner user name. The user name of a site owner.
Order amount. The amount of an order (excluding the shipping cost).
Order total. The amount of an order (with the shipping cost included).
Order shipping cost. The shipping cost of an order.
Currency ISO code. The ISO code of an order currency.
14 Click OK.
Page 69

Setting Up and Maintaining Plesk Sitebuilder 69
To test payment system operation, make a test purchase:
1 Register a developer account with the payment system.
A developer account will allow you to make payment transactions using test buyer
information, such as credit card number, CVV code, etc.
For instructions on registering a developer account, contact a payment system
representative by details provided on their web site.
2 Go to the Plesk Sitebuilder Wizard and create a site containing the
eShop module.
3 Go to Edit step > eShop page > Products tab and create a product.
4 Go to the Payment Systems tab.
5 Enable the payment system you want to test and specify your account
credentials.
6 Click Preview in the right-bottom part of the Plesk Sitebuilder window.
7 Navigate to the e-shop page and "buy" the product you have
previously created.
In case of a successful transaction, the order status must change from New to Paid on
the Orders tab of the online store, and the transaction ID of the order in the payment
system is placed in the order comment.
In case of a declined transaction, the order status must change from New to Failed. An
error message specifying the reasons of the failure (failed authorization, invalid credit
card number, etc.) is placed in the order comment in Plesk Sitebuilder, and displayed
on the site.
Updating Plesk Sitebuilder
Plesk Sitebuilder allows you to install product updates issued by Parallels directly from
your Administrator Panel.
To update your Plesk Sitebuilder:
1 On the navigation pane, click Server.
2 Click Autoupdate.
3 Click Refresh to retrieve the most recent updates from the Parallels
server.
4 Select the update you want to install and click Download & Install.
Page 70

70 Setting Up and Maintaining Plesk Sitebuilder
Specifying Hosts Used for Publishing
Sites
In Plesk Sitebuilder, sites can be published to:
FTP servers. This option corresponds to the FTP publishing mode in site publishing
settings.
To Parallels Virtuozzo Containers on servers running Parallels Business
Automation, Standard. This option corresponds to the Virtuozzo publishing mode in
user site publishing settings.
Local Plesk Sitebuilder server using XCOPY technology. This option corresponds
to the XCOPY publishing mode in site publishing settings.
The basic Plesk Sitebuilder license allows you to register only one host. To purchase a
license with unlimited number of publishing servers, contact Parallels Sales
(mailto:sales@parallels.com).
The number of hosts defines the way you (and your dependent users) configure site
publishing settings:
If the maximum number of hosts is Unlimited, then to publish to a host, it is not
necessary to register it in Plesk Sitebuilder - after a host is specified it in the site
publishing settings (see page 109), it is registered automatically.
If the maximum number of hosts is limited, then to be able to publish a site to a host
it is necessary to register this host in Plesk Sitebuilder (see page 75) first. Once a host
is registered, it becomes available for selection in the site publishing settings.
For those users who do not have access to a server they could use for publishing sites,
you provide the publishing settings for the servers you have at your own disposal.
Which servers will be available to a particular user is defined in the service plan
assigned to that user.
To proceed to managing hosts, from the navigation pane, go to Server > Hosts.
Page 71

Setting Up and Maintaining Plesk Sitebuilder 71
Figure 41: Publishing Servers Management Screen
In this section:
Requirements to Hosts ...................................................................................... 72
Adding Host....................................................................................................... 75
Specifying Hosts Available to Certain Users ...................................................... 77
Modifying Host Settings ..................................................................................... 77
Removing Host from List of Available Hosts ...................................................... 77
For information on how to operate with list objects, see Working with Lists (on page 23).
To be able to publish sites to a host, make sure that this host meets all Plesk
Sitebuilder requirements (see Requirements to Hosts (on page 72), and Verifying
Publishing Location (on page 74)).
Page 72

72 Setting Up and Maintaining Plesk Sitebuilder
Requirements to Hosts
For the published sites to work correctly, publishing server must meet the following
requirements:
ASP.NET 2.0.50727 or later is installed on the publishing server.
For detailed information about configuring ASP.NET 2.0, refer to the ASP.NET 2.0
Deployment Guide
(http://www.microsoft.com/downloads/details.aspx?familyid=9E33EA25-666C-
47FA-AC52-8D04785C4BD2&displaylang=en).
The working directory is mapped on the IIS server as web application.
Application pool to which the working directory is assigned does not contain
ASP.NET 1.1 applications.
For the ASP.NET ISAPI to be executed, the working directory must have the
Scripting permission enabled (working directory menu > Execute Permissions >
Scripts Only).
ASP.NET account has the following permissions:
If the App_Data folder does not exist, read/write/delete permission for the
working directory is required.
If the App_Data folder exists, then read/write/delete permission for the
App_Data folder and read permission for the working directory are required.
Note: 1. If you use IIS 5.0, the above permissions should be given to the
identity specified in
/configuration/system.web/deployment/processModel/@userN
ame of the
%WINDIR%\Microsoft.NET\Framework\v2.0.50727\CONFIG\machi
ne.config file.
2. If you use IIS 6.0, the above permissions should be given to the application
pool identity specified in IIS settings (Start > IIS Manager > Application Pools >
respective application pool > Properties > Identity tab).
IIS application pool identity (NETWORK SERVICE by default) must have
permission to create files and folders in the %WINDIR%\temp folder.
The order in which the default documents (default.htm, default.aspx, and so on) will
be used to respond the browser request is defined (working directory menu >
Properties > Documents tab).
Publishing server works in the Medium Trust mode at least. If a server works in the
Medium Trust mode, it must be granted with OleDbPermission for accessing
Microsoft Access database and with WebPermission for some of the modules to
work correctly.
OleDbPermission is set in the web_mediumtrust.config file, stored on
the publishing server. By default, this permission is disabled. To grant this
permission, you should add the OleDbPermission class to the following
sections of the web_mediumtrust.config file:
SecurityClasses
Example:
Page 73

Setting Up and Maintaining Plesk Sitebuilder 73
<SecurityClass Name="OleDbPermission"
In this section:
Verifying Publishing Location ............................................................................ 74
Description="System.Data.OleDb.OleDbPermission,
System.Data, Version=2.0.0.0,
Culture=neutral,
PublicKeyToken=b77a5c561934e089"/>
PermissionSet
Example:
<IPermission class="OleDbPermission" version="1"
Unrestricted="true" />
WebPermission is set in the web_mediumtrust.config file. To grant this
permission, add the WebPermission class to the PermissionSet section of
the web_mediumtrust.config file.
Example:
<IPermission class="WebPermission" version="1"
Unrestricted="true" />
Note: The server where Plesk Sitebuilder is installed must work in the Full Trust
mode.
More detailed information about OleDbPermission you can find here
(http://msdn2.microsoft.com/en-
us/library/ms998341.aspx#paght000020_oledbpermission).
More detailed information about trust levels you can find here
(http://msdn2.microsoft.com/en-us/library/wyts434y.aspx).
Page 74

74 Setting Up and Maintaining Plesk Sitebuilder
Verifying Publishing Location
To verify that a publishing location meets all the Plesk Sitebuilder requirements:
1 Go to Sites > site name > Publishing Settings tab.
2 Specify all the required parameters and click Verify Location.
The system will check whether the specified publishing parameters are valid and the
publishing location meets all the requirements. After completing the verification, the
publishing location is given one of the following statuses:
Error. This status is assigned if the specified site URL is invalid.
Static only. This status is assigned if the server you are trying to publish your site to
supports only static pages publishing.
If the site contains modules, publication fails. In this case, you can complete static
publication, if you delete all the dynamic pages from your site. The reasons why a
publishing server may not support dynamic content publishing are the following:
ASP.NET 2.0 software is not installed on the server or is configured
incorrectly
ASP.NET version is earlier than 2.0.50727
The working directory is not mapped on the IIS server as web application
ASP.NET account has not a read\write\delete permission for the App_Data
folder
ASP.NET account has not read\write permission for the sitebuilder.mdb
file
OLE DB Provider is not installed on the server
Dynamic. This status is assigned if the publishing location meets all the
requirements and is ready for publishing.
Page 75

Setting Up and Maintaining Plesk Sitebuilder 75
Adding Host
Prior to adding a host, read the requirements (on page 72) a publishing location must meet
in order for the published sites to work correctly.
To add a host:
1 On the navigation pane, click Server.
2 Click Hosts.
3 Click Add New Host.
4 On the Host Settings tab, enter a host title in the Host title field.
It can be any title that will be easy for you to remember and associate with a
particular host.
Figure 42: Adding a Publishing Server: Specifying General Settings
5 In the IP address or DNS name field, enter the IP address or domain name
of the host.
Note: 1. Do not use loopback address (127.0.0.1) or domain name "localhost".
2. You cannot create two hosts with the same IP address.
6 To set up SMTP server for sending e-mail notifications from sites:
Click the SMTP Settings tab.
Page 76

76 Setting Up and Maintaining Plesk Sitebuilder
Figure 43: Adding a Publishing Server: Specifying SMTP Settings
In the SMTP server host field, enter the domain name of the SMTP server.
In the SMTP server port field, enter the number of port used for connection to the
SMTP server.
In the SMTP server from address field, enter an e-mail address that will appear in
the 'From' field of notifications.
If the SMTP server is password protected, click Change Password and provide the
credentials.
7 Click OK.
Page 77

Setting Up and Maintaining Plesk Sitebuilder 77
Specifying Hosts Available to Certain Users
To specify hosts available to certain users:
1 Create a special service plan for these users as described in Adding
Plan (on page 95) - or edit an existing plan (which may be already
assigned to some users) as described in Modifying Plan (on page 99).
2 On the Hosts tab, select the hosts you want to make unavailable and
click Remove from plan. On the same tab, select the hosts you wish to
include in the plan, and click Add to plan.
By default, all existing Plesk Sitebuilder hosts are included in all new plans.
3 Click OK.
4 Assign all respective users to this plan as described in Assigning Plan to
User (on page 99).
Modifying Host Settings
To modify host settings:
1 On the navigation pane, click Server.
2 Click Hosts.
3 Click the name of the host you want to modify.
4 Make necessary changes and click OK.
Removing Host from List of Available Hosts
After deleting a host, it is removed from all plans, containing it, and from all publishing
parameters of the sites scheduled for publishing on this host. Sites already hosted on
the removed host are not affected, but they cannot be re-published to this host any
longer.
To remove a host:
1 On the navigation pane, click Server.
2 Click Hosts.
3 Select the host you want to remove.
4 Click Delete.
Page 78

78 Setting Up and Maintaining Plesk Sitebuilder
Setting Up Plesk Sitebuilder for
In this section:
Setting Up Service Plan for Anonymous Users .................................................. 79
Setting Language and Skin for Anonymous User Sessions ............................... 80
Setting Up Advertising Banner Shown on Trial Sites ......................................... 81
Setting Up Message Displayed at Publish Step of Wizard ................................. 82
Setting Up Notification Sent at Trial Site Publication Attempt ............................ 83
Inserting Macros, Links, and HTML Code into Notification Messages ............... 85
Prohibiting Anonymous Users from Accessing Plesk Sitebuilder Wizard ........... 87
Anonymous Visits
You can offer your potential customers a free trial of Plesk Sitebuilder Wizard, so they
could create a site without any purchasing obligation. The demo version of Plesk
Sitebuilder can be accessed by the URL http://[Sitebuilder_host:port]/wizard.
Users accessing Plesk Sitebuilder in demo mode are called anonymous users, and
sites they create are called trial sites. Trial sites have a limited lifetime period and
cannot be published until their owners register in Plesk Sitebuilder (and purchase
hosting services).
You can at your discretion set up the Wizard for anonymous visits: set a service plan,
interface skin, and default interface language common for all anonymous users,
configure advertising banner to be placed on every trial site and set up notification
messages sent/displayed to anonymous users. Or you can prohibit anonymous users
from accessing the Plesk Sitebuilder Wizard.
Page 79

Setting Up and Maintaining Plesk Sitebuilder 79
Setting Up Service Plan for Anonymous Users
A plan is a set of limits and permissions applied to each Plesk Sitebuilder user. Unlike
with registered users - when you can assign particular user accounts to particular plans
- anonymous users are subject to a single special plan (trial plan), which you can set
up according to your needs.
During Plesk Sitebuilder installation, a default trial plan is created. You cannot delete or
deactivate this default plan until another plan is created and set as a trial plan instead
of it.
To set up service plan for anonymous Wizard users:
1 On the navigation pane, click Users.
2 Click Plans.
3 To modify the default plan, click it and make necessary changes.
4 To set up a new plan:
Click Add New Plan, set up the new plan according to your needs and click OK.
(For more details on creating plans, refer to Adding Plan (on page 95))
Select the check box beside the newly created plan and click Set as Trial Plan.
The plan which is set for anonymous visits is indicated with color.
Page 80

80 Setting Up and Maintaining Plesk Sitebuilder
Setting Language and Skin for Anonymous User
Sessions
To set Wizard interface language and skin for anonymous visits:
1 On the navigation pane, click Server.
2 Click Trial Sites Settings.
3 Go to the Wizard Interface tab.
Figure 44: Setting Up Language and Skin for Anonymous User Sessions
4 From the Language list, select the desired language.
5 From the Skin list, select the desired skin.
6 Click OK.
Page 81

Setting Up and Maintaining Plesk Sitebuilder 81
Setting Up Advertising Banner Shown on Trial Sites
In Plesk Sitebuilder, you to place an advertising banner on every site created by
anonymous Wizard users. This advertising banner is a text message displayed in the
top left corner of the trial site screen. You can configure this message to promote your
web hosting services, and make it a hyperlink to your corporate web site.
To configure advertising banner message:
1 On the navigation pane, click Server.
2 Click Trial Sites Settings.
3 Click the Advertising Banner tab.
4 If you wish to set your advertising banner in different language, select
the desired language from the Language list.
5 In the Advertising banner message text box, specify the desired text.
Figure 45: Configuring Advertising Banner Shown on Trial Sites
6 Click OK.
Above the Advertising banner message text box, there is the Promotional link which opens
the Plesk Sitebuilder Wizard in guest mode. You can use this link to attract potential
customers by giving them a chance to try out the software and create trial sites before
they decide to get a Plesk Sitebuilder account and purchase hosting services. The
process of providing the instructions on how an anonymous user can register and
upgrade a trial site to a regular site is described in Setting Up Message Displayed at Publish
Step of Wizard (on page 82).
For each of your resellers, a separate promotional link is generated - to identify the
owner of certain trial sites and assign the sites to the corresponding user.
Page 82

82 Setting Up and Maintaining Plesk Sitebuilder
Besides text, you can insert the following elements in the body of advertising banner
message:
Macros (see page 85)
HTML code (see page 85)
Hyperlinks (see page 86)
E-mail links (see page 86)
Anchors (see page 87)
Setting Up Message Displayed at Publish Step of
Wizard
When anonymous Wizard users try to publish a site, they see a message saying that
publishing is not available until they sign up. This message also contains general
information about their site, including its URL, site lifetime period, and instructions on
how to publish the site permanently. You can customize this message and insert any
relevant information into it.
To set up message displayed at the Publish step of the Wizard:
1 On the navigation pane, click Server.
2 Click Trial Sites Settings.
3 Click the Publish Step Message tab.
Figure 46: Setting Up Message Displayed at Publish Step of Wizard
Page 83

Setting Up and Maintaining Plesk Sitebuilder 83
4 If you wish to set your notification message in a different language,
select the desired language from the Language list.
5 Specify the information you want to deliver to the anonymous users.
6 Click OK.
Besides text, you can insert the following elements in the body of the message:
Macros (see page 85)
HTML code (see page 85)
Hyperlinks (see page 86)
E-mail links (see page 86)
Anchors (see page 87)
Setting Up Notification Sent at Trial Site Publication
Attempt
After creating a trial site, on the Publish screen of Plesk Sitebuilder Wizard, an
anonymous user is offered to send information about the trial site to his or her e-mail.
You can configure the autoreply message sent by Plesk Sitebuilder in response to such
requests. Plesk Sitebuilder offers a default text of the message, which you can replace
with your own text or edit as desired.
The SMTP server through which the notification messages are sent you set up at
Server > SMTP Server Settings (for more details, refer to Setting Up SMTP Server for Sending
Notifications from Plesk Sitebuilder (on page 41)).
To configure notification sent to anonymous users at trial site publishing attempt:
1 On the navigation pane, click Server.
2 Click Notifications.
Page 84

84 Setting Up and Maintaining Plesk Sitebuilder
Figure 47: Setting Up E-mail Message Sent at Trial Site Publication Attempt
3 If you wish to set your notification message in a different language,
select the desired language from the Language list.
4 In the From field, specify the sender's e-mail address.
5 In the Subject field, type the subject of notification message.
6 In the Text field, type the text of notification message.
Besides text, you can insert the following elements in the body of the notification
message:
Macros (see page 85)
HTML code (see page 85)
Hyperlinks (see page 86)
E-mail links (see page 86)
Anchors (see page 87)
Page 85

Setting Up and Maintaining Plesk Sitebuilder 85
Inserting Macros, Links, and HTML Code into
Notification Messages
View the following topics for guidelines on how to insert macros, links, and HTML code
into notification messages sent to anonymous Plesk Sitebuilder users.
Inserting Macros
When composing notification messages, you can use macros - placeholders for various
information which will be automatically replaced with the real information when
message is displayed to a reader. For example, the sb:sitepreviewlink macro will be
replaced with the link to a site in the preview mode, and the sb:siteeditlink macro will
be replaced with the link to a site in the editing mode.
To insert a macro into notification message:
1 Place the cursor where you want to insert a macro.
2 Select the desired macro from the Macro list.
3 Click OK.
Inserting HTML Code
If you want to arrange the text of notification message beyond standard formatting, you
can use HTML tools for that purpose.
To format notification message in HTML mode:
1 Click the HTML mode icon.
2 Make necessary formatting changes.
To preview the formatted text, click the Simple text mode icon.
3 Click OK.
Page 86

86 Setting Up and Maintaining Plesk Sitebuilder
Inserting Hyperlinks
To insert a hyperlink:
1 Place the cursor where you want to insert a link (or select a text which
you want to set as hyperlink).
2 Click the Hyperlink Manager icon.
3 In the URL field, specify the web address which you want the link to
point to.
4 In the Link text field, specify (or change) the text that will make up the
link.
5 From the Protocol list, select the protocol to be used to access the
linked resource (http, ftp, and other).
6 From the Target list, select how the link will open (in the same window,
in the new window, and so on).
7 In the Tooltip field, type the text to be displayed when the cursor is
hovered over the link.
8 To set up the appearance of the link, select a desired style from the
CSS class field.
9 Click OK.
Inserting E-mail Links
You can insert a link to an e-mail address into your notification message.
To insert an e-mail link:
1 Select the text which you want to set as the e-mail link.
2 Click the Hyperlink Manager icon.
3 Click the E-mail tab.
4 In the Address field, type the needed e-mail address.
5 In the Subject field, type the text that will be the subject of the e-mail
message.
6 To set up the appearance of the link, select a desired CSS class from
the CSS class list.
7 Click OK.
Page 87

Setting Up and Maintaining Plesk Sitebuilder 87
Inserting Anchors
Anchor is a word or a group of words that define the destination a hyperlink leads to.
Anchors are very helpful in facilitating navigation through a great amount of text located
in a single place. With this function, you can provide the readers of the message with
an easy way to jump from one part of the text to another.
To insert an anchor:
1 Place the cursor where you want the link to lead to.
2 Click the Hyperlink Manager icon.
3 Click the Anchor tab.
4 Enter a name for the anchor and click OK.
5 Select some text or an image that will be the hyperlink leading to the
anchor.
6 Click the Hyperlink Manager icon again.
7 On the Hyperlink tab, select the newly created anchor from the Existing
anchor field.
8 Click OK.
Prohibiting Anonymous Users from Accessing Plesk
Sitebuilder Wizard
To prohibit anonymous users from accessing the Plesk Sitebuilder Wizard:
1 Open the <path_to_Sitebuilder>/Web/web.config file
2 Find the 'AllowAnonymousSites' parameter and change its value
to 'false'.
Page 88

88 Setting Up and Maintaining Plesk Sitebuilder
Viewing Plesk Sitebuilder Logs
Logs are journals of actions and errors occurring in your Plesk Sitebuilder. Logs help
you to determine the source of system errors and restore the chain of events that led to
a particular error. Also, logs make it easy to determine which user is responsible for a
particular error.
To view logs:
1 On the navigation pane, click Logs.
Figure 48: Logs Management Screen
Log records of the same type are arranged into groups. On the Logs screen, you
can see the following general information about log groups:
L. The level of severity of logged events. Below is a list of possible severity
levels:
Debug. Logs of this type contain information about Plesk Sitebuilder internal
services' activities.
Info. Logs of this type contain the results of operations on Plesk Sitebuilder
objects (sites, user accounts, etc.).
Warning. Logs of this type contain warnings about unsuccessful completion of
operations due to overreaching some limits. For example, if a site was not
created because the limit on sites was overreached.
Error. Logs of this type contain information about any error occurred in Plesk
Sitebuilder. For example, if there is not enough disk space on the Plesk
Sitebuilder server.
Fatal. Logs of this type contain information about critical errors.
Page 89

Setting Up and Maintaining Plesk Sitebuilder 89
To define starting from which level of severity the events will be logged, open the
<path_to_Sitebuilder>\Web\log4net.config file and edit the value of the level
parameter. For example, to log only critical errors, set the value of the level
parameter to 'FATAL':
<level value="FATAL"/>
If you specify a less-severe level, then Plesk Sitebuilder will log the events of all
more-severe levels left. For example, if you set the severity level to 'DEBUG', Plesk
Sitebuilder will log events with Info, Warning, Error, and Fatal levels; if you set the
severity level to 'INFO', Plesk Sitebuilder will log events with Warning, Error, and
Fatal levels; etc.
Last log date. The date when the last log in a group was recorded.
Logs. The number of logs contained in a group.
2 To view the detailed information about a particular group, click it in
the list.
Figure 49: Viewing Log Group Details
3 In the Log group details area, you can view the following additional
information about the group:
Group creation date. The date when the group was created.
Message. The generic description of the logged event.
Stack trace. A record showing the origin of the logged action, that is where
exactly in the system the logged action occurred.
Logger. The name of the internal Plesk Sitebuilder service that generated the log
record.
Group hash. A digital identifier of the group in the system.
Plesk Sitebuilder version. The version number of your Plesk Sitebuilder.
4 To view a list of logs contained in the group, click View all logs.
Page 90

90 Setting Up and Maintaining Plesk Sitebuilder
Figure 50: Vewing Logs Contained in a Particular Group
5 To view a particular log, click it in the list.
Figure 51: Viewing a Particular Log Record
6 For each log, the following detailed information is available:
Position in list. The index number of the log in the list sorted by certain parameter
and in certain order.
Message. The description of the logged event.
Creation date. The time and date when the log was generated
User name / User ID. The user name or ID of the user who was logged in when the
log was generated
Site ID. The ID of a Plesk Sitebuilder site originated the log.
Page 91

Setting Up and Maintaining Plesk Sitebuilder 91
User agent. Selected information about the software installed on the user's
computer (for example, user's operating system and browser).
Requested URL. The URL of the page where the logged event occurred.
IP address. The IP address of the user who was logged in when the log was
generated.
Referrer URL. The URL of the page previous to the page where the logged event
occurred.
Impersonating user. The user name of a user who was logged in under another
user's account when the log was generated.
To write the buffered logs into the Plesk Sitebuilder database and refresh the list of log
groups, click Refresh.
To delete the logs older than a certain date, select a desired date and click Clear all
logs.
Page 92

This chapter tells how to sign up and manage customers, set up service plans for them,
In this chapter:
Setting Up Service Plans ................................................................................... 93
Signing Up Customers ...................................................................................... 101
Managing Sites ................................................................................................. 107
C H A P T E R 5
Serving Your Customers
and manage web sites.
Page 93

Serving Your Customers 93
Setting Up Service Plans
In Plesk Sitebuilder, a plan is a set of limits applied to user accounts assigned to it. The
general purpose of plans is to regulate distribution of the Plesk Sitebuilder resources, such
as hosts, sites, modules, and so on among the users.
In Plesk Sitebuilder, one of the plans must be set as a plan for anonymous users - for they
could access the Wizard and create trial sites. So, when you log in to Plesk Sitebuilder for
the first time, there is already one trial service plan in the list. You cannot delete or deactivate
a trial plan, but you still can prohibit anonymous users from accessing the Wizard (see page 87).
Trial service plan can be assigned to regular users as well - all the advanced permissions
contained in this plan (the publishing settings access, hosts and promotional footers) are
disabled for anonymous users.
Service plans can be created and managed only by the users with administrator or reseller
accounts. Such users create custom plans and then assign them to dependent users.
Dependent users, in their turn, can create their own plans within the limits set in the plan
assigned to them by a higher user. For information about creating user accounts and
assigning plans to them, read Signing Up Customers (on page 101).
For you, as administrator, the Plesk Sitebuilder license plays the role of plan. For detailed
information about the license, read Upgrading Your License (on page 36).
To proceed to managing plans, from the navigation pane, go to Users > Plans.
Figure 52: Plans Management Screen
Page 94

94 Serving Your Customers
For information how to operate with list objects, see Working with Lists (on page 23).
In this section:
Adding Plan ....................................................................................................... 95
Assigning Plan to User ...................................................................................... 99
Modifying Plan ................................................................................................... 99
Changing Plan Status ........................................................................................ 100
Removing Plan .................................................................................................. 100
Page 95

Serving Your Customers 95
Adding Plan
To add a plan:
1 On the navigation pane, click Users.
2 Click Plans.
3 Click Add New Plan.
4 Click the General tab.
Figure 53: Creating a Service Plan: Specifying General Settings
5 In the Name field, specify a name for the new plan.
6 To easily distinguish the created plan from other plans, you can provide a
short description for it in the Description field.
7 Define the maximum number of:
Pages per site
Root level pages per site
Page 96

96 Serving Your Customers
Regular sites
User accounts
Hosts
- that the plan assignees are allowed to have.
8 If you are creating the plan to be used for anonymous visits to the Wizard,
define the period of time during which sites created by anonymous Wizard
users will be stored on your server.
9 To make up the list of hosts, templates, page sets, modules, and site
families to be included in the plan, click the respective tab, select one or
several objects and click Add to Plan or Remove from Plan.
Figure 54: Creating a Service Plan: Specifying Publishing Servers To Be Available to Plan
Assignees
Whether an object is or is not included in the plan is indicated with the signs (included)
and (not included).
You can add modules to the plan for evaluation purposes only, which gives site owners a
chance to try out required modules before they pay for them. To do so, select one or
several modules and click Add to Plan for Evaluation. Users under this plan will not be
able to publish sites containing evaluation modules until they purchase an appropriate
service plan from you. Resellers under this plan will not be able to remove the 'evaluation
only' status from a module.
Note: Site families may have two statuses: activated or deactivated status (indicated in
the A column). A site family has activated status if the page set and at least one template
from the category specified for the site family are included in the plan. If this condition is
not met, you can add the site family to the plan, but it will be marked as deactivated,
which means that the sites containing this site family are not available for visitors.
10 Go the Publishing Settings tab.
Page 97

Serving Your Customers 97
Figure 55: Creating a Service Plan: Configuring Site Publishing Settings
If you wish to allow users to change the publishing settings of their sites, select the
Allow users to modify publishing settings check box.
Users without this permission can publish their sites only after a higher-level user
specifies the publishing settings for their sites.
Note: For site owner accounts, you need to allow this permission in the Plesk
Sitebuilder configuration file as well. To do so, open the
<path_to_Sitebuilder>/Web/web.config file, find the
'PublishSettingsVisibleForSiteOwner' parameter and change its value to
'true'.
Specify the publishing modes available for users assigned to this plan. The options
are: FTP, Virtuozzo, and XCOPY.
Note: Which publishing modes are available to you is defined in your license
(navigation pane > Server > License Management > License Info tab).
11 If you wish to include your own promotional content into your users' site
pages, go to the Promotional Footers tab and enter the content into the text
box.
Page 98

98 Serving Your Customers
Figure 56: Setting Up a Promotional Footer To Be Placed on the Plan Assignees' Sites
The content may include all kinds of animation, banners, pop-up windows, and text
messages. This content is displayed on all site pages, including the second-level pages
of Plesk Sitebuilder modules, below the page content area. The promotional content you
include here is displayed to all users assigned to this service plan, and to their dependent
users.
12 If you wish to let resellers add their own content to your promotional
footers, select the Allow resellers to append to your promotional footers check box.
Resellers assigned to the current plan cannot edit the content you have added. They can
append their own content, and can in turn enable or disable this option for their
dependent resellers.
13 Click OK.
Note: Every created plan must include at least one design template and site family.
Page 99

Serving Your Customers 99
Assigning Plan to User
To assign a plan to a user:
1 On the navigation pane, click Users.
2 Proceed to creating a new user account or select an existing one.
3 From the Plan list, select a plan.
Figure 57: Assigning a Service Plan to a User Account
4 Click OK.
Modifying Plan
To modify a plan:
1 On the navigation pane, click Users.
2 Click Plans.
3 Click the plan you want to modify.
4 Make necessary changes.
5 Click OK.
After you update the plan parameters, new values are applied to all the users to whom this
plan is assigned.
Page 100

100 Serving Your Customers
Changing Plan Status
In Plesk Sitebuilder, a plan can have either activated or deactivated status. Deactivation of a
plan is used to mark those plans which you have assigned to certain users but do not want to
assign to any other users. Deactivation of a plan has no impact on the workflow of the users
this plan is assigned to. You can always change the deactivated status back to activated.
To change plan status:
1 On the navigation pane, click Users.
2 Click Plans.
3 To deactivate a plan, select an active plan and click Deactivate.
4 To activate a deactivated plan, select it and click Activate.
Note: You cannot deactivate a trial plan.
Removing Plan
Note that you cannot delete a plan if it is assigned to some users.
To remove a plan:
1 On the navigation pane, click Users.
2 Click Plans.
3 Select the plan you want to remove.
4 Click Delete.
 Loading...