

Page 1

Parallels® Panel
Page 2

Copyright Notice
Parallels IP Holdings GmbH
Vordergasse 59
CH-Schaffhausen
Switzerland
Phone: +41 526320 411
Fax: +41 52672 2010
Global Headquarters
500 SW 39th Street, Suite 200
Renton, WA 98057
USA
Phone: +1 (425) 282 6400
Fax: +1 (425) 282 6445
EMEA Sales Headquarters
Willy-Brandt-Platz 3
81829 Munich, DE
Phone: +49 (89) 450 80 86 0
Fax:+49 (89) 450 80 86 0
APAC Sales Headquarters
3 Anson Road, #36-01
Springleaf Tower, 079909
Singapore
Phone: +65 6645 32 90
Copyright © 1999-2013 Parallels IP Holdings GmbH. All rights reserved.
This product is protected by United States and international copyright laws. The product’s
underlying technology, patents, and trademarks are listed at http://www.parallels.com/trademarks.
Microsoft, Windows, Windows Server, Windows NT, Windows Vista, and MS-DOS are registered
trademarks of Microsoft Corporation.
Linux is a registered trademark of Linus Torvalds.
Mac is a registered trademark of Apple, Inc.
All other marks and names mentioned herein may be trademarks of their respective owners.
Page 3

Contents
After Upgrading to Panel 11.5 10
Upgrade from Earlier Panel Versions .......................................................................................... 11
Upgrade from Small Business Panel........................................................................................... 14
Differences between SBP and Panel 11 ........................................................................... 14
About Parallels Plesk Panel 18
About Panel Users....................................................................................................................... 19
The Panel GUI ............................................................................................................................. 20
Interface Views .................................................................................................................. 24
Customizing Power User View .......................................................................................... 25
Web Servers 27
Apache Web Server (Linux) ........................................................................................................ 28
Apache with nginx ............................................................................................................. 30
Adjusting Apache Settings for Virtual Hosts ..................................................................... 34
Adjusting nginx Settings for Virtual Hosts ......................................................................... 35
Optimizing Apache Web Server ........................................................................................ 38
IIS Web Server (Windows) .......................................................................................................... 41
Adjusting IIS Settings for Websites ................................................................................... 42
IIS Application Pool ........................................................................................................... 42
Web Hosting 44
Website Directory Structure ........................................................................................................ 44
Defining a Custom Virtual Host Template ......................................................................... 45
Virtual Host Structure (Linux) ............................................................................................ 45
Virtual Host Structure (Windows) ...................................................................................... 47
Website Preview .......................................................................................................................... 50
PHP Configuration ....................................................................................................................... 50
PHP Handlers.................................................................................................................... 52
Custom PHP Configuration ............................................................................................... 54
Multiple PHP Versions ................................................................................................................. 58
Configuring ASP.NET (Windows) ................................................................................................ 60
DNS 63
Server-Wide DNS Template ........................................................................................................ 64
Adjusting DNS Template ................................................................................................... 65
Applying DNS Template Changes (Linux) ........................................................................ 68
DNS Zones for Subdomains ........................................................................................................ 69
Configuring the Recursive DNS .................................................................................................. 70
Restricting DNS Zones Transfer ................................................................................................. 71
Restricting Users' Access to Other Users' DNS Zones ............................................................... 71
Using BIND Instead of Microsoft DNS (Windows) ...................................................................... 72
Switching Off the DNS Service .................................................................................................... 72
Using External DNS Servers ....................................................................................................... 72
Panel Without a DNS Server ....................................................................................................... 74
Page 4

After Upgrading to Panel 11.5 4
Mail 75
Configuring Server-Wide Mail Settings ....................................................................................... 77
Using Panel Without the Mail Server........................................................................................... 79
Removing Mail Functionality from the Control Panel .................................................................. 81
Using Other Mail Server Software ............................................................................................... 82
Antispam Tools ............................................................................................................................ 83
SpamAssassin Spam Filter ............................................................................................... 85
DomainKeys Protection ..................................................................................................... 88
DNS Blackhole Lists .......................................................................................................... 90
Server-wide Black and White Lists.................................................................................... 90
Sender Policy Framework System (Linux) ........................................................................ 92
Greylisting (Linux) ............................................................................................................. 93
Outbound Spam Protection ......................................................................................................... 94
Installing Parallels Premium Outbound Antispam ............................................................. 95
Configuring Protection ....................................................................................................... 96
Antivirus Software...................................................................................................................... 100
Webmail Software ..................................................................................................................... 102
Mailing Lists (Linux) ................................................................................................................... 103
Preventing Mass Email Sending (Linux) ................................................................................... 104
Mail Queue (Linux) .................................................................................................................... 104
Mass Email Notifications ........................................................................................................... 105
Creating, Editing and Removing Message Templates .................................................... 106
Sending E-mail Notices ................................................................................................... 108
Configuring Email Notifications ................................................................................................. 109
Database Servers 112
Adding and Removing Database Servers ................................................................................. 114
Configuring Backup Settings for Remote SQL Servers ............................................................ 116
Changing Database Administrator's Credentials....................................................................... 117
Database Hosting Preferences ................................................................................................. 118
Database Management Tools ................................................................................................... 119
Connecting to External Databases (Windows) .......................................................................... 120
Server Administration 121
IP Pool ....................................................................................................................................... 122
Scheduling Tasks ...................................................................................................................... 126
Scheduling Tasks on Linux-based Servers ..................................................................... 127
Scheduling Tasks on Windows-based Servers ............................................................... 129
Server Settings .......................................................................................................................... 131
System Services ........................................................................................................................ 132
System Date and Time .............................................................................................................. 134
Firewall ...................................................................................................................................... 135
The Panel Firewall (Linux) .............................................................................................. 135
The Panel Firewall (Windows) ........................................................................................ 136
Panel Administration 138
Panel Licensing ......................................................................................................................... 139
Installing a Panel License Key ........................................................................................ 140
Installing Additional License Keys for Panel Add-ons ..................................................... 141
Upgrading Your License Key .......................................................................................... 142
Rolling Back to Your Previously Used License Key ........................................................ 142
Securing Panel .......................................................................................................................... 142
Restricting Administrative Access ................................................................................... 143
Page 5

After Upgrading to Panel 11.5 5
Restricting Remote Access via API RPC ........................................................................ 144
Setting Up the Minimum Password Strength .................................................................. 144
Turning On the Enhanced Security Mode ....................................................................... 145
Using Secure FTP ........................................................................................................... 146
SSL Protection ................................................................................................................ 146
Panel and Network Environments ............................................................................................. 151
Ports Used by Panel ....................................................................................................... 152
Running Panel Behind a Router with NAT ...................................................................... 153
Configuring Port Range for Passive FTP Mode (Windows) ............................................ 154
Setting Up Help Desk ................................................................................................................ 155
Trial (Try and Buy) Mode for Presence Builder ......................................................................... 157
Configuring the Try and Buy for Existing Customers ...................................................... 160
Configuring the Try and Buy for Potential Customers .................................................... 161
Customizing Trial Mode Notifications .............................................................................. 162
Offering the Try and Buy with Alternative Billing Solutions ............................................. 165
Changing Your Password and Contact Information .................................................................. 168
If Your Panel Works with Parallels Customer and Business Manager ........................... 169
Appearance and Branding ......................................................................................................... 170
Appearance ..................................................................................................................... 170
Branding and Themes ..................................................................................................... 176
Panel Components .................................................................................................................... 176
Web Applications ....................................................................................................................... 177
How Apps Become Available to Your Customers ........................................................... 181
Application Vault ............................................................................................................. 183
Session Preferences ................................................................................................................. 187
Managing Panel from Mobile Devices ....................................................................................... 188
Panel Inside Parallels Virtuozzo Containers ............................................................................. 192
Remote Access (Windows) ....................................................................................................... 194
Additional Administrator Accounts............................................................................................. 195
Creating Additional Administrator Accounts .................................................................... 196
Modifying Additional Administrator Accounts .................................................................. 196
Suspending and Activating Additional Administrator Accounts ...................................... 197
Removing Additional Administrator Accounts ................................................................. 197
Event Tracking ........................................................................................................................... 198
Adding Event Handlers (Linux) ....................................................................................... 199
Adding Event Handlers (Windows) ................................................................................. 200
Removing Event Handlers .............................................................................................. 201
Migration from Other Hosting Platforms .................................................................................... 202
Data Transfer from Another Panel ............................................................................................ 202
Panel Extensions (Linux) ........................................................................................................... 203
Counter-Strike Game Server Extension .......................................................................... 204
File Server Extension ...................................................................................................... 215
Firewall Extension ........................................................................................................... 223
Watchdog (System Monitoring) Extension ...................................................................... 230
VPN Extension ................................................................................................................ 242
Panel Updates and Upgrades 248
Panel Updates ........................................................................................................................... 249
Panel Upgrades ......................................................................................................................... 251
Changing the Updates/Upgrades Source ................................................................................. 253
Reporting Upgrade Problems .................................................................................................... 254
Statistics and Monitoring 255
Action Logs ................................................................................................................................ 256
Setting Up Action Logging ............................................................................................... 257
Downloading the Action Log ........................................................................................... 257
Clearing the Action Log ................................................................................................... 258
Page 6

After Upgrading to Panel 11.5 6
Viewing Statistics ....................................................................................................................... 259
Automating Report Generation and Delivery by E-mail .................................................. 260
Viewing Virus and Spam Protection Statistics (Windows) .............................................. 261
About Disk Space Usage Calculation ............................................................................. 262
Server Health Monitor ............................................................................................................... 266
Installing Health Monitor .................................................................................................. 266
Tracking Server Health ................................................................................................... 266
Accuracy of Health Monitor Values ................................................................................. 268
Configuring Alarms, Trends, and E-mail Notifications .................................................... 268
Updating Health Parameters After Hardware Change .................................................... 268
Monitoring Connections to Panel .............................................................................................. 269
Monitoring User Sessions ............................................................................................... 269
Monitoring FTP Users Sessions...................................................................................... 270
Monitoring Terminal Connections (Windows) ................................................................. 271
Backup and Restoration 272
Configuring Global Backup Settings.......................................................................................... 274
Configuring Panel for Using FTP Repository ............................................................................ 275
Backing Up the Entire Server .................................................................................................... 276
Backing Up Individual Accounts and Sites ................................................................................ 276
Scheduling Backups .................................................................................................................. 277
Restoring Data from Backup Archives ...................................................................................... 279
Downloading Backup Files from Server .................................................................................... 281
Uploading Backup Files to Server ............................................................................................. 281
Removing Backup Files from Server ......................................................................................... 282
Backup Logs .............................................................................................................................. 282
Shared Files and Folders 283
File Sharing Settings ................................................................................................................. 284
Sharing and Protecting Files ..................................................................................................... 285
Sharing Files with Other Users Within the Organization ................................................. 286
Publishing Files for Partners ........................................................................................... 287
Publishing Files for Your Customers ............................................................................... 289
Uploading Your Files to a Private Directory on the Server ............................................. 290
Transferring Large Files that Cannot Be Sent by E-mail ................................................ 291
Accessing and Working with Files................................................................................... 292
Customers and Resellers 303
Hosting Plans and Subscriptions ............................................................................................... 305
Relationship Between Plans and Subscriptions .............................................................. 306
Setting Up Hosting Plans ................................................................................................ 308
Setting Up Add-on Plans ................................................................................................. 311
Subscribing Customers to Plans ..................................................................................... 312
Managing Customers ...................................................................................................... 314
Managing Subscriptions .................................................................................................. 317
Serving Non-Technical Customers ................................................................................. 321
Reseller Plans ........................................................................................................................... 322
Setting Up Reseller Plans ............................................................................................... 323
Subscribing Resellers to Plans ....................................................................................... 323
Website Management 324
Quick Start with Parallels Panel ................................................................................................ 326
Set Up Your First Website ............................................................................................... 327
Set Up Mail Accounts ...................................................................................................... 331
Page 7

After Upgrading to Panel 11.5 7
View Site Visit Statistics .................................................................................................. 350
Customer Account Administration ............................................................................................. 350
Changing Your Password and Contact Information ........................................................ 354
Viewing Subscription Summary ...................................................................................... 355
Managing Account Balance and Invoices ....................................................................... 362
Ordering More Resources ............................................................................................... 366
Viewing Statistics ............................................................................................................ 368
(Advanced) Managing Auxiliary User Accounts .............................................................. 370
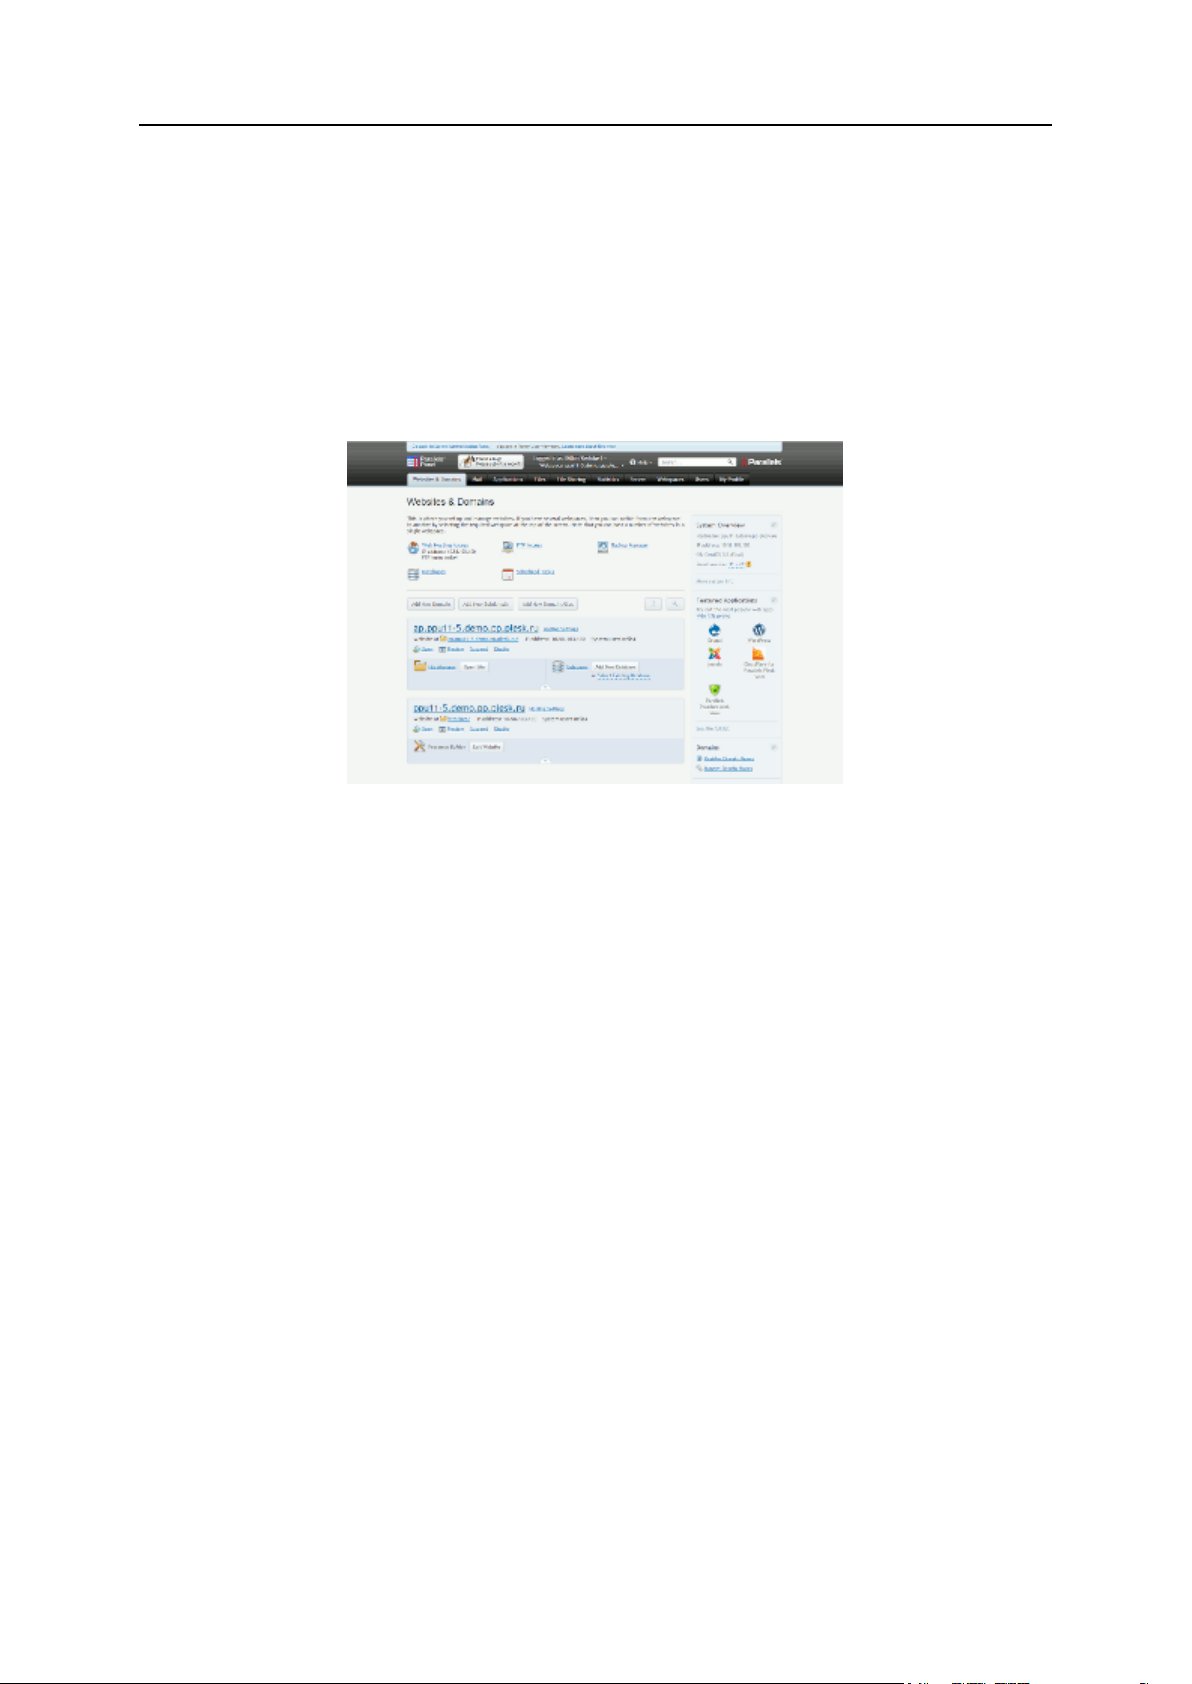
Websites and Domains ............................................................................................................. 377
Domains and DNS .......................................................................................................... 378
Hosting Settings .............................................................................................................. 395
Website Content .............................................................................................................. 413
(Advanced) Restricting Access to Content ..................................................................... 418
Previewing Websites ....................................................................................................... 420
Web Applications ............................................................................................................ 421
(Advanced) Website Security .......................................................................................... 429
(Advanced) Extended Website Management ................................................................. 435
Creating Sites with Presence Builder ........................................................................................ 467
Getting Familiar With Presence Builder .......................................................................... 470
Creating a Website .......................................................................................................... 472
Importing Sites from SiteBuilder 4.5................................................................................ 473
Editing Websites ............................................................................................................. 474
Saving and Loading Copies of a Website ....................................................................... 513
Publishing a Website to the Internet ............................................................................... 515
Publishing a Website Copy to Facebook ........................................................................ 516
Viewing Site Visits Statistics, Comments, and New Orders on the Dashboard .............. 518
Deleting Websites ........................................................................................................... 520
FTP Access to Your Websites ................................................................................................... 521
Changing FTP Access Credentials ................................................................................. 521
Adding FTP Accounts ..................................................................................................... 522
Setting Up Anonymous FTP Access ............................................................................... 524
Mail Accounts ............................................................................................................................ 526
Adding Mail Accounts ...................................................................................................... 527
Configuring Mail Account ................................................................................................ 528
(Advanced) Configuring Global Mail Settings ................................................................. 535
Using Mailing Lists .......................................................................................................... 536
Scheduling Tasks ...................................................................................................................... 537
Scheduling Tasks (Linux) ................................................................................................ 538
Scheduling Tasks (Windows) .......................................................................................... 540
Website Databases ................................................................................................................... 542
Creating Databases ........................................................................................................ 543
Accessing Databases ...................................................................................................... 543
Copying Databases ......................................................................................................... 544
Exporting and Importing Databases ................................................................................ 544
Managing Database User Accounts ............................................................................... 545
Accessing Databases with ODBC (Windows) ................................................................. 546
Backing Up and Recovering Websites ...................................................................................... 547
Backing Up Data ............................................................................................................. 548
Managing Backup Files ................................................................................................... 554
Restoring Data ................................................................................................................ 556
Appendix A: Properties of Hosting Plans and Subscriptions 558
Visibility of Hosting Features in the Control Panel .................................................................... 560
Resources ................................................................................................................................. 561
Permissions ............................................................................................................................... 564
Hosting Parameters ................................................................................................................... 568
PHP Settings ................................................................................................................... 571
Web Server (Apache) ................................................................................................................ 571
Mail ............................................................................................................................................ 572
Page 8

After Upgrading to Panel 11.5 8
DNS ........................................................................................................................................... 573
Performance .............................................................................................................................. 573
Logs & Statistics ........................................................................................................................ 574
Applications ............................................................................................................................... 574
Additional Services .................................................................................................................... 574
Appendix B: Properties of Reseller Plans and Subscriptions 575
Resources ................................................................................................................................. 576
Permissions ............................................................................................................................... 577
IP Addresses ............................................................................................................................. 577
Applications ............................................................................................................................... 578
Appendix C: Event Parameters Passed by Event Handlers 579
Administrator information updated ............................................................................................ 581
Service stopped ......................................................................................................................... 581
Service started ........................................................................................................................... 581
Service restarted ....................................................................................................................... 581
IP address created .................................................................................................................... 581
IP address updated ................................................................................................................... 581
IP address deleted..................................................................................................................... 581
Session settings updated .......................................................................................................... 582
Customer account created ........................................................................................................ 582
Customer account updated ....................................................................................................... 582
Customer account deleted ........................................................................................................ 582
Customer account status updated ............................................................................................. 583
Customer's interface preferences updated ............................................................................... 583
Customer GUID updated ........................................................................................................... 583
Reseller account created ........................................................................................................... 583
Reseller account updated .......................................................................................................... 584
Reseller account deleted ........................................................................................................... 584
Reseller account status updated ............................................................................................... 584
Reseller's interface preferences updated .................................................................................. 584
Reseller's IP pool updated ......................................................................................................... 584
Disk space limit for reseller account reached ............................................................................ 584
Traffic limit for reseller account reached ................................................................................... 584
Disk space limit for subscription reached .................................................................................. 585
Traffic limit for subscription reached .......................................................................................... 585
Default domain (the first domain added to a subscription/webspace) created ......................... 585
Default domain (the first domain added to a subscription/webspace) updated ........................ 586
Default domain (the first domain added to a subscription/webspace) deleted ......................... 586
Subscription owner changed ..................................................................................................... 586
Default domain, status updated ................................................................................................. 586
Default domain, DNS zone updated .......................................................................................... 586
Default domain, GUID updated ................................................................................................. 586
Subdomain of a default domain created ................................................................................... 586
Subdomain of a default domain updated .................................................................................. 587
Subdomain of a default domain deleted .................................................................................... 587
Default domain, alias created .................................................................................................... 587
Default domain, alias updated ................................................................................................... 588
Default domain, alias deleted .................................................................................................... 588
Default domain, alias DNS zone updated ................................................................................. 589
Reseller account limits updated ................................................................................................ 589
Subscription limits updated ....................................................................................................... 589
Panel user logged in .................................................................................................................. 589
Panel user logged out ............................................................................................................... 589
Panel user failed to log in .......................................................................................................... 589
Page 9

After Upgrading to Panel 11.5 9
Panel user failed to log in through API 589
Mail account created ................................................................................................................. 590
Mail account updated ................................................................................................................ 590
Mail account deleted.................................................................................................................. 590
Mailing list created ..................................................................................................................... 590
Mailing list deleted ..................................................................................................................... 591
Hosting settings created ............................................................................................................ 591
Standard or frame forwarding hosting created .......................................................................... 592
Hosting settings updated ........................................................................................................... 593
Hosting settings deleted ............................................................................................................ 593
Standard or frame forwarding hosting updated ......................................................................... 593
Standard or frame forwarding hosting deleted .......................................................................... 593
Web user account created ........................................................................................................ 593
Web user account updated ....................................................................................................... 594
Web user account deleted ......................................................................................................... 594
Web application installed ........................................................................................................... 594
Web application reconfigured .................................................................................................... 595
Web application uninstalled ....................................................................................................... 595
Web application upgraded ......................................................................................................... 595
License key updated ................................................................................................................. 595
License key expired ................................................................................................................... 595
Database server created ........................................................................................................... 596
Database server updated .......................................................................................................... 596
Database server deleted ........................................................................................................... 596
Database created ...................................................................................................................... 596
Database deleted ...................................................................................................................... 596
Database user account created ................................................................................................ 597
Database user account updated ............................................................................................... 597
Database user account deleted ................................................................................................. 597
Parallels Plesk Panel component updated or added ................................................................ 598
Reseller plan created ................................................................................................................ 598
Reseller plan updated ............................................................................................................... 598
Reseller plan deleted ................................................................................................................. 598
Service plan of reseller created ................................................................................................. 598
Service plan of reseller updated ................................................................................................ 598
Service plan of reseller deleted ................................................................................................. 599
Service plan of administrator created ........................................................................................ 599
Service plan of administrator updated ....................................................................................... 599
Service plan of administrator deleted ........................................................................................ 599
Additional FTP account created 600
Additional FTP account updated 600
Additional FTP account deleted 600
Server health status changed .................................................................................................... 601
Update available ........................................................................................................................ 601
Update installed ......................................................................................................................... 601
Page 10

This chapter is intended to the users who switched to Panel 11.5 either from Plesk
In this chapter:
Upgrade from Earlier Panel Versions ................................................................ 11
Upgrade from Small Business Panel ................................................................. 14
C H A P T E R 1
After Upgrading to Panel 11.5
Panel 9 and earlier or from Parallels Small Business Panel. The chapter describes the
main changes in the business model of Panel 11.5 comparing to these products.
Page 11

After Upgrading to Panel 11.5 11
Upgrade from Earlier Panel Versions
Compared to the previous versions of Plesk software (Plesk 9 and earlier), Parallels
Plesk Panel 10 introduces the following changes:
User accounts. In Panel 11, there are no client accounts and domain administrator
accounts. For users who need to resell hosting services and host their own
websites, you will set up reseller accounts. For users who do not need to resell
hosting services, but only host their own websites, you will set up customer
accounts.
Customers can create user accounts in the Panel if they want to allow other users
to access the Panel for managing websites, installed applications, or use e-mail
services. In 11, customers can create any number of users for access to their
Panel, and set up multiple additional FTP accounts for access to the webspace.
Service plans. In Panel 11, there are no reseller, client, or domain templates.
Instead, there are service plans that you create according to your service offerings:
Reseller plans for signing up resellers, and hosting plans, for signing up customers
who do not need to resell services. After plans are created, you create reseller or
customer accounts and subscribe them to the plans - and the users are provisioned
with the necessary resources and authorized to perform operations in the Panel.
The most important change brought in by service plans is that, unlike old Plesk
templates, they are not applied only once, during the initial resources provisioning,
but remain connected to them, so that modifications of a plan change the
provisioned resources and privileges.
In addition to hosting plans, there are also add-on plans. You can use them to
allocate more resources and services to customers.
Subscriptions. Multi-domain hosting subscriptions replace domains. Instead of
creating domains for your customers, you subscribe them to a hosting plan, or, in
other words, you create a subscription for the customer. Actually, not only
customers can be subscribed to hosting services and host their websites and mail,
the Panel administrator and resellers can have their own subscriptions as well,
which they may use for their own purposes.
Subscriptions can be created based on service plans or configured manually.
When subscribing a new customer to your services in Panel 11, you specify a
domain name at the first step. A customer's subscription is always linked to a
domain, which is identified by such attributes as domain name, IP address and
system user account. All subscriptions are named after the domains to which they
are linked. This link is permanent and cannot be broken in any way, so moving a
domain from one subscription to another is impossible. However, you can still
rename domains.
You can host a number of websites under a single subscription, and you can create
several subscriptions for a single customer account.
Allocation of resources. In previous versions of Plesk, resources were allocated to
reseller accounts, client accounts, and domains. In Panel 11, resources are
allocated to resellers and hosting service subscriptions. Customer accounts in
Panel 11 do not get any resource allocations directly, so they cannot redistribute
them among subscriptions that they purchase. All resources allocated to a single
subscription are shared among all websites hosted in the webspace associated with
the subscription.
Page 12

12 After Upgrading to Panel 11.5
Two separate panels: Server Administration Panel and Control Panel. System
Objects in previous versions of Plesk
Objects in Panel 11
Reseller account
Reseller account
administration, and customer and reseller account management tasks are
performed in Server Administration Panel. All operations related to managing
websites, hosting features, and mail accounts are performed in Control Panel.
Server Administration Panel provides links for access to Control Panel: You can
use them to log in to Control Panel and manage websites on behalf of your
resellers and customers.
Changes in organization of subdomain-related directories. Due to safety reasons, Panel
now stores content and configuration of hosted subdomains in separate directories:
/<VHOST>/<subdomain_name>, the directory that contains HTTP/HTTPs
documents (unlike the earlier versions that separated HTTP and HTTPS
documents).
/<VHOST>/<subdomains>/<subdomain_name>, the service directory that
keeps subdomain configuration. We strongly recommend that you do not
change the content of this directory.
What Happens When You Upgrade or Migrate to Panel 11
When you upgrade or migrate to Panel 11, accounts, domains, users, and domain
templates are transformed according to the following schemes:
Reseller accounts are transferred without changes, and resources are allocated to
them by means of custom subscription, which are not bound to plans.
Client accounts become customer accounts, and after upgrade or migration is
finished, you need to perform either of the following operations to make sure that
the accounts fit in the new business model:
Redistribute former clients' resources among the subscriptions belonging to
them.
Convert customers to resellers and assign the existing subscriptions to them.
This can be done if the customer accounts did not belong to a reseller before
upgrade or migration.
Domains are converted to individual subscriptions. The subscriptions are assigned
to the administrator, resellers, or customers, depending on whom the former
domains belonged to.
Domain administrator accounts are converted to user accounts, which are assigned
to the customers who own the corresponding domains.
Domain templates belonging to the server administrator and resellers are converted
to hosting plans.
Reseller templates are converted to reseller plans.
The following table summarizes the conversion of business objects.
Page 13

After Upgrading to Panel 11.5 13
Client account
Customer account
Domain
Subscription (Custom)
Domain administrator account
User account
Reseller template
Reseller plan
Domain template
Hosting plan
Page 14

14 After Upgrading to Panel 11.5
Upgrade from Small Business Panel
Next in this section:
Differences between SBP and Panel 11 ............................................................ 14
Next in this section:
Extended User Role Permissions ...................................................................... 15
Presence Builder Tool ....................................................................................... 16
SSL Protection .................................................................................................. 16
Web Apps.......................................................................................................... 17
Extended Mail Management .............................................................................. 17
Other Panel Features ........................................................................................ 17
This chapter is intended for users who have migrated from Parallels Small Business Panel
(SBP) to Parallels Plesk Panel and want to know about changes in management operations,
as well as about new product possibilities. If you want to learn more about the migration
procedure, refer to Installation, Upgrade, and Migration Guide, section Migrating from Parallels Small
Business Panel.
Migration to Panel is almost seamless as Panel allows you to perform the majority of tasks
you did in SBP. The main difference you may find is that some functions are now available in
new locations or have a slightly different effect. Moreover, Panel provides you with a number
of features unavailable in SBP, such as enhanced user role permissions, the Presence
Builder tool, or access to new web apps. Learn more about product differences in the section
Differences between SBP and Panel 11 (on page 14).
After the migration, you will use Panel in Power User view - a replacement of the SBP
interface. Power User view is almost identical to the SBP user interface. Panel in this view is,
in essence, Control Panel with server management capabilities. For more information on
Power User view, refer to the section The Panel GUI (on page 20).
Differences between SBP and Panel 11
User interfaces of SBP and Panel in Power User view are almost identical. Therefore, here
we will discuss only the most important changes to the way you work with Panel.
Page 15

After Upgrading to Panel 11.5 15
Extended User Role Permissions
SBP permission
Panel permission
Migration result comments
Manage users
Manage roles
Manage users and roles
The permission is granted, if
one of the SBP permissions is
granted.
Manage websites and
domains
Create and manage sites
Configure log rotation
Configure anonymous FTP service
Create and manage scheduled tasks
Create and manage databases
Configure and perform data backup
and restoration
View statistics
Design sites in Presence Builder
Create and manage additional FTP
accounts
Manage DNS settings
Install and manage Java applications
Change server settings
-
The permission is not migrated,
as Panel allows changing
server settings to users with the
Administrator role only.
Manage mail
Create and manage mail accounts
Create and manage mailing lists
Update personal
information
-
The permission is not migrated,
as Panel allows changing
personal information to all
users.
-
Upload and manage files
By default, this permission is
denied after migration.
-
Configure spam filter
By default, this permission is
denied after migration.
-
Configure antivirus
By default, this permission is
denied after migration.
Panel, comparing to SBP, allows more accurate adjustment of user role privileges due to a
larger number of available permissions. For example, Panel allows dividing users on those
who can manage mail accounts and those who can manage company mailing lists. As Panel
has the extended list of permissions, some of SBP permissions can migrate into a number of
related Panel permissions. For better understanding how permissions are migrated, refer to
the table below.
For more information on user role properties, refer to the section User Roles (on page 371).
Page 16

16 After Upgrading to Panel 11.5
Presence Builder Tool
While using SBP, you could easily create your own websites with the Site Editor tool. For the
same purposes, Panel provides you with the much more powerful tool, Presence Builder.
Comparing to Site Editor, Presence Builder offers:
New intuitive interface that allows creating websites in less number of steps.
About 100 website templates filled with content that you can use as a basis for your sites.
Additional components that can be easily integrated with your site, such as the online
store or the embedded video.
Integration of your website with Facebook and much more.
For more information on Presence Builder, refer to the section Building Websites with Presence
Builder (on page 467).
Note that websites created in Site Editor are not compatible with Presence Builder.
Nevertheless, if Site Editor is installed in Panel, you can edit such websites with it. In that
case, websites in Websites & Domains list will contain the additional button Edit in SiteBuilder 4 or
Site Editor.
SSL Protection
Panel allows you to secure connections to your websites the same way as you did in SBP.
That means you can obtain SSL certificates in Server > Tools & Settings > SSL Certificates and
assign them to IP addresses in Server > Tools & Settings > IP Addresses. As in SBP, you can
assign only one certificate per IP address. Thus, if your hosting resources include one
shared IP address, you can secure only one website. Panel provides enhanced SSL
protection features that allow you to resolve this problem:
Separate SSL certificates for websites.
If you use Panel on a Linux operating system with the SNI technology support, it is
possible to use authentic SSL certificates for sites hosted on shared IP addresses. In
other words, Panel allows using separate SSL certificate for each website. Learn more
about separate SSL certificates in the section SSL and Shared IP Addresses (Linux) (on page
150).
Shared SSL certificate for a number of websites.
If you use Panel on a Windows operating system, it is possible to use one shared SSL
certificate to secure connections to all sites. In that case, certificate is assigned to a
domain that shares it with others. That domain is called master SSL domain. In other
words, all websites will use common SSL certificate, despite of the fact it is issued to only
one of your websites. Learn more about shared SSL certificates in the section SSL and
Shared IP Addresses (Windows) (on page 150).
The process of assigning an SSL certificate to a website is covered in the section Securing
Connections with SSL Certificates (on page 430).
Page 17

After Upgrading to Panel 11.5 17
Web Apps
Comparing to SBP, the app management in Panel has little or no changes. As in SBP, the
list of available web apps is accessed through the Applications tab. For more information on
app management, refer to the section Using Website Applications (on page 421).
Note that the uploading of your own app packages is now performed by means of Application
Vault. Vault is the local Panel repository of web apps. Besides of extending the list of
available apps, it allows you to update apps, configure their server-wide settings, and carry
out some other operations. For more information on Application Vault, refer to the section
Web Applications (on page 177).
Extended Mail Management
Mail management in Panel slightly varies from those in SBP. General mail settings are now
available in Mail > Change Settings, while other settings are located in Server > Settings > Mail.
Comparing to SBP mail functionality, Panel provides a number of additional mail features:
Enhanced spam protection:
Server black and white lists.
Use these lists to always reject or always receive mail from selected servers. Learn
more on black and white mail lists in the section Server-wide Black and White Lists (on
page 90).
Extended SpamAssassin settings.
Panel allows you to configure SpamAssassin more accurately. For example, you have
access to such settings as spam filter sensitivity or SpamAssassin's black and white
lists. Moreover, you can configure spam filter individually for each mail account. Learn
more in the Protecting from Spam (on page 530) section.
Monitoring mail server message queue (on Linux platforms).
This can be helpful when your mail server is overloaded and cannot cope with the amount
of received messages. You can find out the reason that caused the overload using the
mail queue. Learn more about message queue in the section Mail Congestion and Message
Queue (Linux) (on page 104).
Other Panel Features
On top of main changes described above, Panel contains a number of features unavailable
in SBP at all. These are event management, server health monitoring, custom branding
themes and many more. The scope of this chapter does not allow to cover all of them. For
the detailed information on other server management operations, refer to certain sections of
this guide.
Page 18

Parallels Plesk Panel is designed to help IT specialists manage web, DNS, mail and
In this chapter:
About Panel Users ............................................................................................ 19
The Panel GUI .................................................................................................. 20
C H A P T E R 2
About Parallels Plesk Panel
other services through a comprehensive and user-friendly GUI. It is a hosting control
panel, an intermediary between system services and users. For example, when a user
creates a website through the Panel GUI, Panel propagates this request to a web
server, either Apache or IIS, and the latter adds a new virtual host to the system. This
method of administering all system services from a single web interface reduces
maintenance costs and gives administrators more flexibility and control.
How Can I Use Panel?
Panel is an essential instrument for hosting service providers (HSPs) - companies that
sell shared and dedicated hosting accounts. Being installed on a server, Panel enables
HSPs to organize server resources into packages and offer these packages to their
customers. The customers are companies and individuals who need web presence but
do not have the necessary IT infrastructure. Learn more about the Panel intended
audience in the section About Panel Users (on page 19).
Can I Customize Panel to Address My Needs?
Each Panel user group is provided with their own GUI that is customized to fully meet
their needs. Thus, HSPs get tools for offering hosting services, including an integrated
billing solution that automates their business. By contrast, companies that use Panel to
manage their own web infrastructure do not have hosting selling capabilities in their
GUI. Instead, they can perform server management operations (such as system
recovery, web server configuration, and so on). Learn more about the Panel interface
in the section The Panel GUI (on page 20).
Next in this chapter we explain how different user groups should use Panel to gain all
its benefits.
Page 19

About Parallels Plesk Panel 19
About Panel Users
Panel is a web hosting panel that targets four user groups:
Power users.
These are companies that buy VPS hosting with preinstalled Panel or deploy it by
themselves on their IT infrastructure. Panel allows such customers not only to
manage various aspects of their web presence but also to have full control over
server management operations, such as server backup, configuration of PHP
settings, and so on. For example, web design studios use Panel as a platform for
web development. Panel allows them to test created websites and present the
results to clients.
Hosting service providers (HSPs).
HSPs use Panel for two main purposes. First, as an easy tool for services
configuration. Thus, providers do not need to separately configure web or FTP
server - everything is done in the Panel GUI. Once services are configured, HSPs
can combine them with server resources (like disk space or traffic) into hosting
packages (service plans). For example, one package can contain a website, mail
accounts, and a number of web applications. These packages are then sold to
HSPs' clients - hosting customers and resellers.
Resellers.
These are companies that resell hosting services provided by HSPs. They use
Panel to buy hosting resources in bulk, and then split the resources into smaller
packages, and sell them to their customers. All server management is performed by
HSPs, allowing resellers to reduce their costs and concentrate on offering services
to end-users.
Customers.
These are the end-users of Panel. By subscribing to one of the hosting plans
offered by an HSP or a reseller, they get access to Panel and manage the services
they have bought. They can create sites, fill them with content, add mail accounts,
and so on.
Page 20

20 About Parallels Plesk Panel
The Panel GUI
For convenience, Panel tools for performing server and account management tasks are
divided between two web interfaces called panels: Server Administration Panel and Control
Panel. In earlier Panel versions, each panel had its own unique responsibilities:
The Control Panel focused on web hosting operations and had all means to create and
manage websites, mailboxes, and so on.
The Server Administration Panel was in charge of server maintenance and accounts
management.
If administrators needed to perform a web hosting management task, for example, add a
mailbox under a certain customer’s account, they located the account in the Server
Administration Panel and then opened the account in the Control Panel. As Panel evolved
over time, the border between the panels has become subtle. Now, the only significant
difference between the two panels is that tools for serving customers and resellers are
available only in the Server Administration Panel. As for the other functions, the panels are
quite similar: Both of them allow you to maintain a server and manage web hosting. If you do
not use Panel for selling hosting services, you can choose any of these two panels.
The brief description of each panel is provided below, but before we go into details, we would
like to acquaint you with Panel views because views and panels are tightly connected.
Panel Views
Each Panel user group has its own Panel usage scenarios. The GUI can be configured to
better meet the needs of a certain group by rearranging tools between different web
interfaces and hiding odd tools. For example, power users may prefer to use only the Control
Panel with tools for server management, whereas hosting service providers use both panels
with all available tools; shared hosting customers use the Control Panel without server
management facilities. Such a user-targeted combination of available panels and tools is
called view. Learn more about the views in the section Interface Views (on page 24).
Server Administration Panel
Page 21
About Parallels Plesk Panel 21
The Server Administration Panel is the main instrument of hosting providers that allows them
to serve their customers and maintain a server. Here, for example, the administrator creates
new hosting plans and customer accounts, configures server-wide settings of system
services, and so on. In addition, the administrator can set up Panel to manage web hosting
right from the Server Administration Panel (create websites and mail accounts for their
customers, install web apps, and so on). Learn more in the section Interface Views (on page
24).
Control Panel
Page 22
22 About Parallels Plesk Panel
The main task of the Control Panel is managing hosting services. Customers use this panel
to add domains and mailboxes, manage website content and so on. The administrator can
use this panel to create their own hosting accounts - webspaces or access customer
accounts. Learn more about webspaces and hosting management in the chapter Web Hosting
Management (on page 324).
Power users also use the Control Panel but in Power User view. In this view, the Control
Panel gets additional capabilities for server administration. Thus, power users can not only
maintain their websites but control various server parameters, for example, switch off unused
Apache modules or perform Panel update. Learn more about interface views in the section
Interface Views (on page 24).
Parallels Plesk Panel Suite Components
In addition to the standard Panel functionality, Parallels Plesk Panel suite offers two optional
components that significantly increase Panel capabilities: Customer & Business Manager
and Presence Builder. These components are tightly integrated with Panel and have their
own user interfaces.
Customer & Business Manager.
Page 23
About Parallels Plesk Panel 23
Customer and Business Manager (hereafter referred to as Business Manager) is an
Next in this section:
Interface Views .................................................................................................. 24
Customizing Power User View .......................................................................... 25
optional solution that automates all business operations, for example, charging customers
and generating invoices. Note that Customer and Business Manager is an optional
component and you may decide to use another solution or perform business operations
manually. Learn more about Business Manager in the Administrator's Guide to Parallels
Customer and Business Manager.
Presence Builder.
Presence Builder is a site building tool that helps customers create polished,
professional-looking web sites in record time based on more than 100 site templates.
Learn more about the tool in the section Building Websites with Presence Builder (on page
467).
Page 24

24 About Parallels Plesk Panel
Interface Views
As mentioned earlier, each Panel user group carries out their own set of tasks through Panel.
To better meet user needs, Panel offers two interface views: Service Provider and Power
User. These views define what panels you use, what tools are present in these panels, and
how the tools are organized.
Service Provider view.
This view is convenient for HSPs as it is intended for selling hosting services. It has all
the features required to create and manage customer accounts, subscriptions, and
service plans. This view includes the Server Administration Panel and the Control Panel.
Power User view.
This view is the best for power users - those who use Panel solely for personal needs,
such as for maintaining a company portal or a mail server. In this view, both server
administration and hosting services management take place in the Control Panel. As this
view does not assume a reselling service to others is needed, it does not provide facilities
for managing hosting plans, subscriptions, resellers, and customers. Also, as the server
administration functions are included in the Control Panel in this view, the Server
Administration Panel becomes unavailable.
This view can be tailored to needs of an administrator if you select Custom view in the
view selector. For details on how to do the customization, read Customizing Power User View
(see page 25).
You can change the Panel view any time from Tools & Settings > Interface Management.
Hosting Operations in Server Administration Panel
By default, when you want to perform an operation in a certain hosting account (for example,
create a mailbox), you open this account with the link on the Domains or Subscriptions pages.
The account is opened in a new window.
Since Panel 10.4, there has been no need to open hosting accounts in separate windows.
This may be convenient when you want to perform a series of hosting operations on a group
of accounts or you are just accustomed to carrying out all hosting tasks from a single GUI as
in previous Panel versions. You can set Panel to perform all hosting operations in the Server
Administration Panel on the Tools & Settings > Interface Management page. Once you activate
the option, Panel will open hosting accounts in the interface that is similar to the Control
Panel but shown on the current page of the Server Administration Panel.
Page 25

About Parallels Plesk Panel 25
Customizing Power User View
Power User view has a subtype, Custom View (available in Tools & Settings > Interface
Management), which serves two main purposes:
To simplify the user experience of administrators who use managed hosting.
Some administrators carry out only basic administration tasks (monitoring system
services, administering user accounts, and so on) leaving more complex tasks, usually
server and services configuration, to the support service of a service provider. This user
group wants to have only tools they really need and hide the other tools.
Make Panel safer and more comfortable.
Administrators can voluntarily revoke some of their permissions to hide the tools they do
not need in everyday operations and return to the full-featured Power User view only if
they need some system tuning (for example, to turn on server backups).
If you go to the Tools & Settings > Custom View Settings page (the Administrative Tools tab), you
can select the tools the administrator will see in this view. The view settings may be
unavailable if the service provider who gave you access to Panel has decided to lock Custom
view.
Locking Custom View and Hiding Custom View Settings
To lock Custom view means to limit the selection of Panel features available to the
administrator and disallow any changes to the features list. Thus, when Custom view is
locked, it is impossible to switch to any other view from the GUI (or API RPC) or change the
Custom view settings. Generally, if you are a service provider, you can make some tools
unavailable to administrators, and, thus, separate Panel administration into two parts:
Day-by-day operations. These operations are performed by the Panel administrator, the
person who purchased the web hosting.
Complex configuration and maintenance. These operations are accomplished by your
support team. Such operations may include configuration of a network, DNS, web server
and so on.
If a Panel administrator needs a certain feature and is unable to find it, your support team
turns this feature on by unlocking Custom view, modifying the view settings, and locking the
view again.
Custom view is locked only through a command-line call of the poweruser utility:
poweruser --on -simple true -lock true
The lock is removed by calling poweruser --on -lock false.
Page 26

26 About Parallels Plesk Panel
Custom View and Webspaces
The peculiarity of Custom view is that you can instantly adjust permissions, hosting
parameters, PHP settings, and other webspace parameters of all webspaces you have
created in this view. This is possible because each webspace you create in this view derives
from the artificial Custom service plan that is not visible in the plans list. The settings of this
plan are available in Tools & Settings > Custom View Settings. When you change the settings, the
changes (if possible) are automatically applied to all webspaces under the Custom plan.
Another point that deserves attention is that the Custom plan has a special permission,
Ability to create, remove, and switch among webspaces. If this permission is cleared in the
GUI, it is not possible to create webspaces in Custom view.
If you need to adjust custom view settings through the command-line, use the admin utility.
Learn more about the utility options in Parallels Plesk Panel 11.5 for Linux (Windows): Reference for
Command Line Utilities.
Page 27

In this chapter:
Apache Web Server (Linux) .............................................................................. 28
IIS Web Server (Windows) ................................................................................ 41
C H A P T E R 3
Web Servers
Page 28

28 Web Servers
Apache Web Server (Linux)
Parallels Plesk Panel for Linux uses the Apache HTTP Server (http://httpd.apache.org/
http://httpd.apache.org/) for hosting websites. Apache itself does not operate with
websites; it manages virtual hosts - web resources identified either by an IP address or
a host name. When you create a site, Panel adds a new virtual host to Apache so that
the site becomes available through the web server.
By default, to achieve better performance when delivering web content, Apache is
supplemented with another web server - nginx. For the details about how Apache is
integrated with nginx in Panel and how to make Apache a standalone server, see
Apache with nginx (on page 30).
Default Web Server Configuration
The file /etc/httpd/conf/httpd.conf defines Apache configuration for all virtual
hosts in the system. The configuration files for virtual hosts are on the lowest level of
the configuration files hierarchy. They are included into the Apache configuration file
(last_httpd.conf) through several levels of inclusion using the include directive. The
nginx web server is configured similarly: the /etc/nginx/nginx.conf file includes
the configuration files of all virtual hosts through several levels of inclusion. To learn
about the hierarchy of configuration files, see Web Server Configuration Files in the
Advanced Administration Guide.
Each virtual host in the system has two files - last_httpd.conf and
last_nginx.conf - that define default Apache and nginx configuration for this virtual
host correspondingly. These files (located in
/var/www/vhosts/system/<domain_name>/conf/) are generated automatically
based on so-called configuration templates. Therefore, if you want to change the
default web server configuration, you should adjust these template files. Learn how to
do this in the Changing Virtual Hosts Settings Using Configuration Templates in the Advanced
Administration Guide.
Custom Web Server Configuration
Website owners may need custom web server capabilities that are not provided by the
default configuration. For example, unusual types of index files or the restricted access
to the site by IP address. This can be done by overriding the default configuration for
specific customers.
The default web server configuration can be overridden on the following levels:
Service plan
The configuration defined on the service plan level overrides the default
configuration. You can set any Apache and nginx directives for a particular service
plan. These settings are stored in Panel database and will be applied to all
customers’ (plan subscribers’) websites by default. See Web Server (Apache) (on
page 571).
Page 29
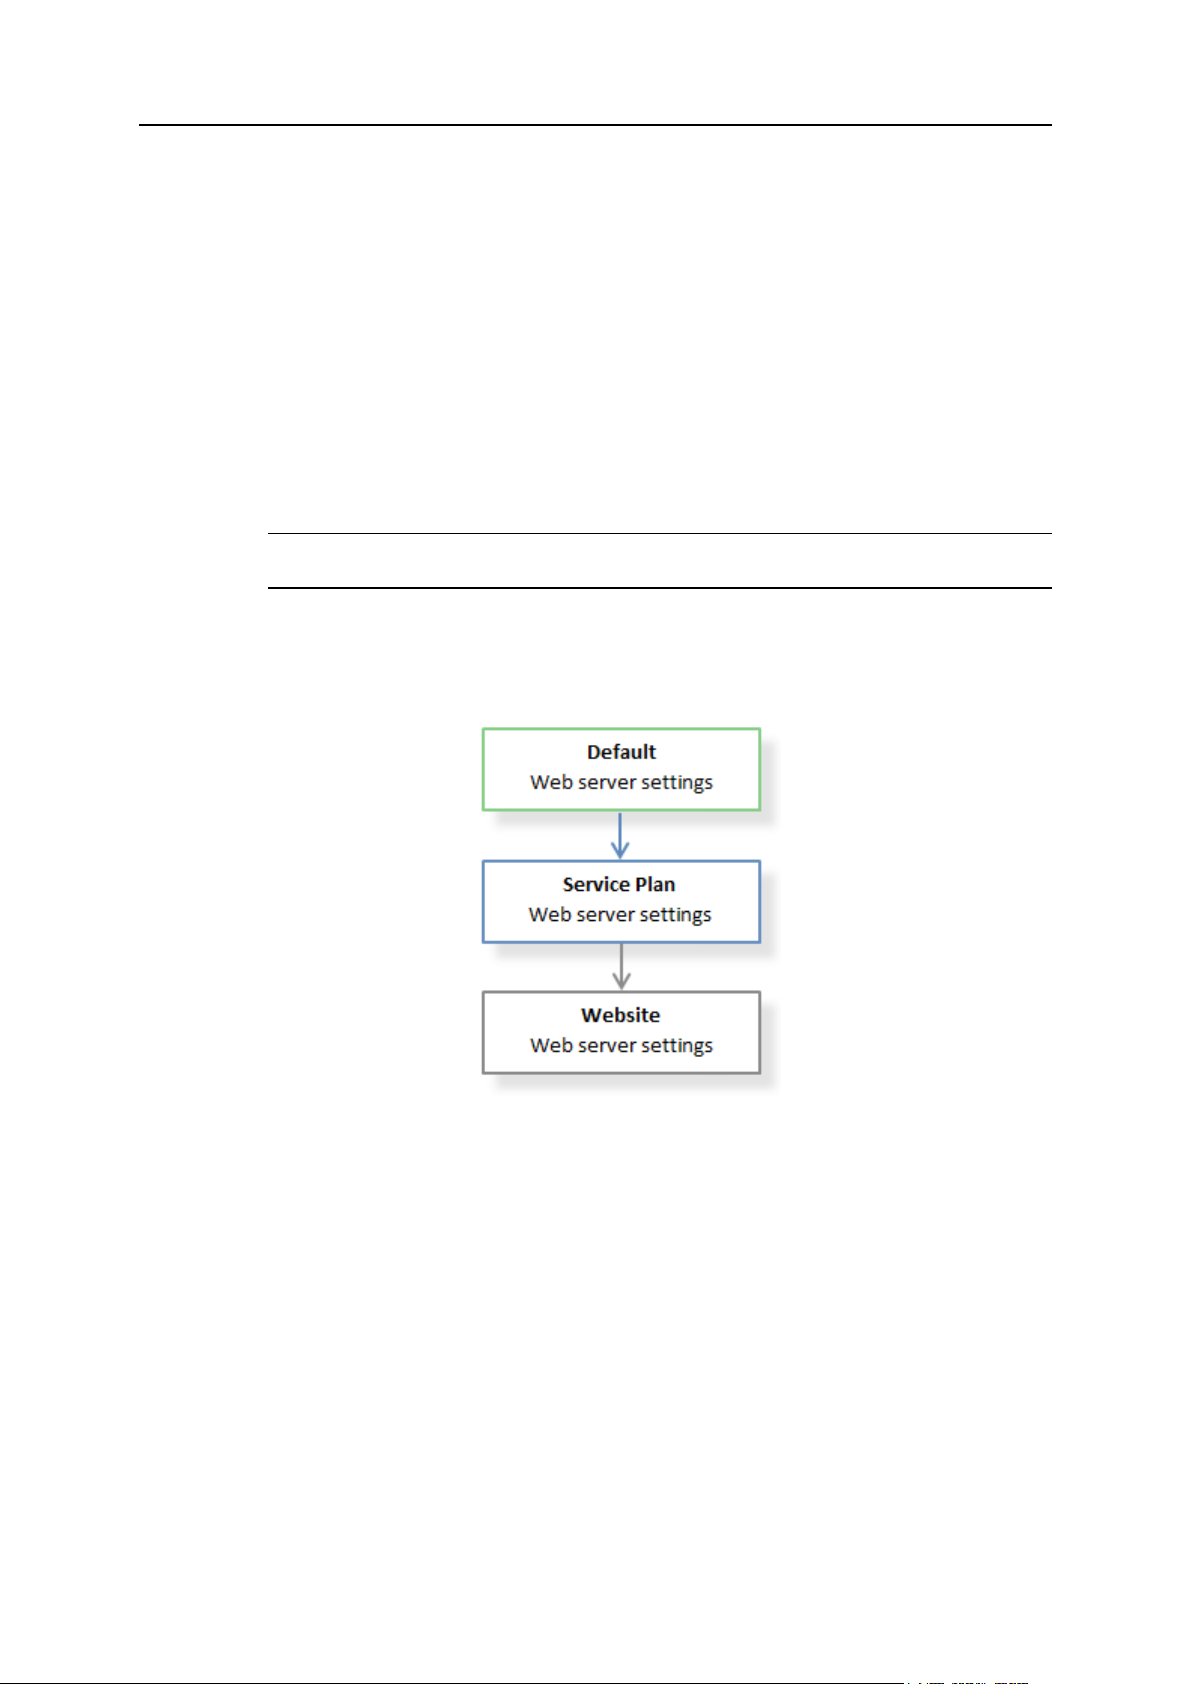
Web Servers 29
Website (virtual host)
Next in this section:
Apache with nginx ............................................................................................. 30
Adjusting Apache Settings for Virtual Hosts....................................................... 34
Adjusting nginx Settings for Virtual Hosts .......................................................... 35
Optimizing Apache Web Server......................................................................... 38
The custom virtual host (website) configuration overrides the configuration defined
in its service plan. When you set Apache and nginx directives for a particular
website, your directives are saved in the vhost.conf, vhost_ssl.conf and
vhost_nginx.conf files (located in
/var/www/vhosts/system/<domain_name>/conf/).
You can configure web server settings for a website (virtual host) in two ways:
By specifying your settings in the Control Panel. When you save your changes,
Panel creates corresponding directives in the virtual host configuration files. For
details, see Adjusting Apache Settings for Virtual Hosts (on page 34) and Adjusting
nginx Settings for Virtual Hosts (on page 35).
By editing configuration files manually. For details, refer to the Advanced
Administration Guide, Virtual Host Configuration Files.
Note: Only the Linux user root can add or modify custom Apache and nginx
configuration files manually.
Note that website settings work only for the selected website and are used instead
of the default settings and the service plan level settings.
See the hierarchy of web server settings on the diagram below.
Page 30
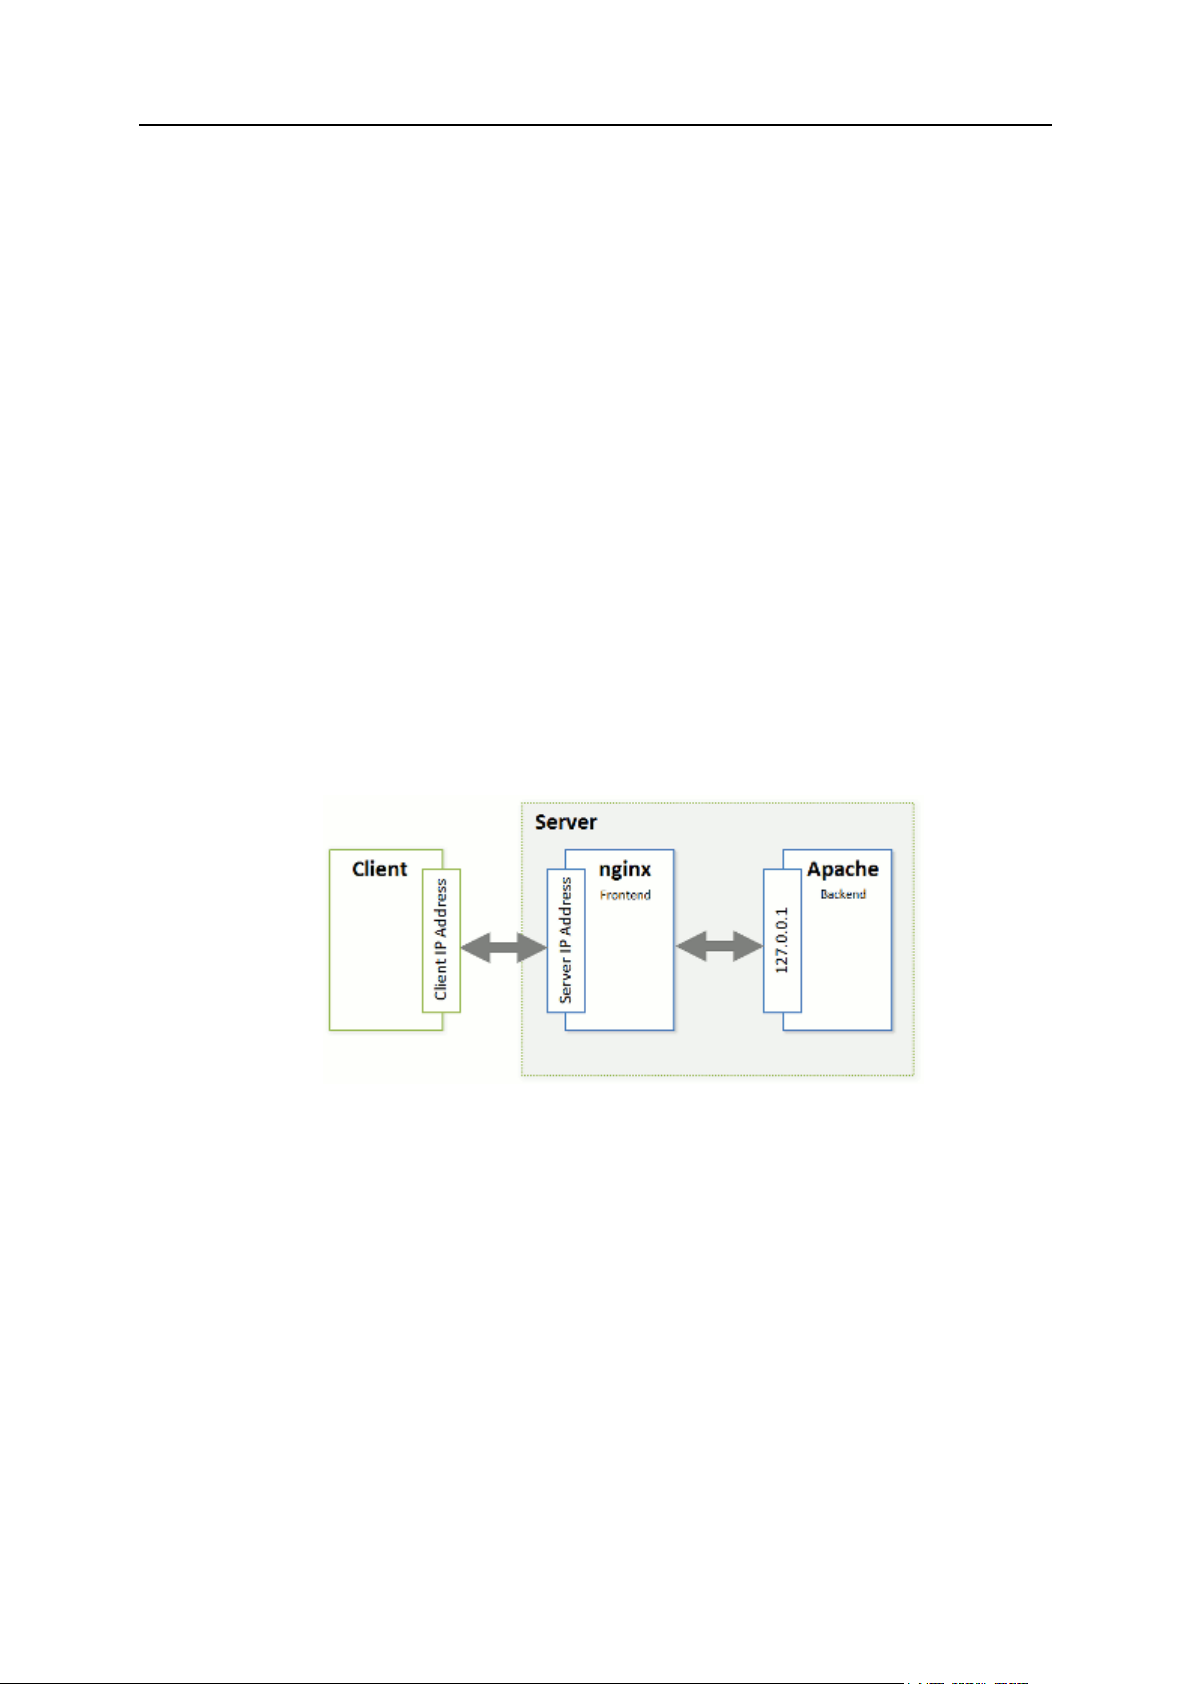
30 Web Servers
Apache with nginx
You can improve the work of the web server which hosts customer websites by
installing nginx, a supplementary high-performance web server which is typically used
as a reverse proxy server. This web server was specifically designed for delivering
large amounts of static content (such as images, video, css, xml, and so on). As
opposed to Apache, nginx is much more efficient when it comes to handling a large
number of concurrent connections. Another advantage of this web server compared
with Apache is that nginx has a significantly smaller memory footprint per client
connection.
To leverage all the benefits of nginx, Panel configures it as a reverse proxy server that
stands between the Internet and Apache (see the diagram below). This means that
nginx becomes a frontend web server that processes all incoming requests from site
visitors. The requests are sent to Apache which, in turn, distinguishes requests for
static and dynamic content. If a request is for a static file (such as jpg, css, html, and so
on), Apache passes the request through all registered handlers (applies .htaccess
directory-level configuration, rewrites a URL, and so on) and returns to nginx a
response which contains only the location of the requested file on the file system. nginx
locates the file and sends it to the client. If the request is for a dynamic file (such as a
PHP script), Apache executes the file and sends the response to nginx, which delivers
it to the client.
Page 31

Web Servers 31
Such a combination of nginx and Apache gives the following advantages:
The maximum number of concurrent connections to a website increases.
The consumption of server CPU and memory resources decreases.
The maximum effect will be achieved for websites with a large amount of static
content (such as photo galleries, video streaming sites, and so on).
The efficiency of serving visitors who have a slow connection speed (GPRS,
EDGE, 3G, and so on) improves.
For example, a client with a 10 KB/s connection requests a PHP script, which
generates a 100 KB response. If there is no nginx on the server, the response is
delivered by Apache. During the 10 seconds required to deliver the response,
Apache and PHP continue to consume full system resources for this open
connection. If nginx is installed, Apache forwards the response to nginx (the nginxto-Apache connection is very fast as both of them are located on the same server)
and releases system resources. As nginx has a smaller memory footprint, the
overall load on the system decreases. If you have a large number of such slow
connections, use of nginx will significantly improve website performance.
The technical details on how Panel processes HTTP requests with the help of nginx
are provided next in this section. For information on how to turn on the support for
nginx in Panel, refer to the section Installing nginx (on page 34). If you do not want to
use nginx, make Apache your frontend web server following the instructions in the
section Turning off nginx (on page 34).
How Panel with nginx Processes HTTP Requests
To seamlessly integrate nginx with Apache, Panel uses two additional Apache
modules:
mod_aclr2.
This module sets up a handler which runs after handlers of all other Apache
modules (mod_rewrite, .htaccess related modules, mod_php, and so on).
Therefore, if the request is for dynamic content, mod_aclr2 will never get it as the
request will be served by upper-level handlers of certain Apache modules
(mod_php, mod_perl, mod_cgi, and so on). The only exceptions are SSI requests:
once they reach mod_aclr2, it redirects them to proper handlers. If the request is for
a static file, mod_aclr2 searches for the exact file location on the file system and
sends the location to nginx.
mod_rpaf.
From the point of view of Apache, all of its clients have the same IP address - the
address of the nginx server (see the diagram above). This causes problems for
websites and web apps that use client IP addresses for authentication, statistic
purposes, and so on. mod_rpaf solves the problem by replacing the IP address of
the nginx server in all requests with client IP addresses. In more detail, the module
uses the special X-Forwarded-For header in which nginx puts the IP address of a
client.
Let us take a closer look at how Panel processes requests for static and dynamic
content with the help of these modules.
The sequence of processing an HTTP request for a static file is as follows (see the
diagram):
Page 32

32 Web Servers
1. A client sends a request to a web server.
2. nginx adds the X-Accel-Internal (used by mod_aclr2) and X-Forwarded-For (which
contains the IP address of the client) headers to the request and sends the request
to Apache.
3. Apache receives the request and starts to process it by registered handlers (applies
.htaccess configuration, rewrites URL, and so on). In this step, mod_rpaf
replaces the IP address of the nginx server in the REMOTE_ADDR Apache
variable with the client's address from the X-Forwarded-For header.
4. After the request is processed by all registered handlers, it reaches mod_aclr2. The
handler checks for the X-Accel-Internal header presence. If the header is present,
the module sends to nginx a response with zero content length and the X-Accel-
Redirect header. This header contains the exact location of the file as determined
by mod_aclr2.
5. Once nginx receives the response, it locates the file and delivers it to the client.
The diagram below is an example of how Panel handles a request for a 2 KB GIF file.
Page 33

Web Servers 33
In the case of processing requests for dynamic content, the steps from 1 to 3 are the
Next in this section:
Installing nginx .................................................................................................. 34
Turning off nginx ............................................................................................... 34
same. Then the request passes to the handler of the appropriate Apache module
(mod_php, mod_perl, mod_cgi, and so on). The request never reaches mod_aclr2
(except for SSI requests). The handler generates a response and sends it to nginx,
which, in turn, delivers the response to the client. The diagram below illustrates how
Panel processes a request for a PHP file.
Page 34

34 Web Servers
Installing nginx
If you perform a clean installation of Panel 11, nginx will be turned on by default. If you
upgrade from earlier versions, you can add the nginx component at any time after the
upgrade in Tools & Settings > Updates & Upgrades > Add Components. Once the component
is added, you should run the Reverse Proxy Server (nginx) service in Tools & Settings >
Services Management.
You can view the version of the installed nginx server in Tools & Settings > Server
Components.
Turning off nginx
To return to the configuration with a single Apache web server, stop the Reverse Proxy
Server (nginx) service in Tools & Settings > Services Management.
To make nginx the frontend web server again, start the Reverse Proxy Server (nginx)
service.
Note: The start and stop operations for the Reverse Proxy Server (nginx) service do not
only start and stop nginx, they actually switch the web server configuration (nginx and
Apache combination or just Apache as a frontend web server). The restart operation
works in the same way as for all other services: the nginx service is restarted.
Adjusting Apache Settings for Virtual Hosts
You can customize Apache configuration for a particular website in the Control Panel
on the Websites & Domains > <domain_name> > Web Server Settings page.
Adjusting Common Apache Settings
The section Common Apache settings contains the settings that website owners typically
want to adjust. For example, to add custom index files or restrict access to the site by
IP address. For each parameter, you can either type a custom value, or use the default
Apache configuration (by selecting the Default value).
Note: As opposed to other web server settings, the Deny access to the site parameter
does not override but supplements the list of IP addresses provided in the default
configuration. In case of a conflict (for example, when you allow the address that is
denied in the default configuration), your values will be used.
Page 35

Web Servers 35
Adjusting Additional Apache Directives
To add Apache directives for a website that are not available in the Common Apache
settings, use the Additional directives for HTTP and Additional directives for HTTPS fields.
When editing the fields, use the syntax as in httpd.conf. For example, if you want to
set a custom error page, add the line:
ErrorDocument 401 /my_error_page.html
Important: Your customers cannot view and edit these fields.
Adjusting nginx Settings for Virtual Hosts
By default, the Apache web server is working in conjunction with nginx. The benefits
are that web pages load faster and server resources are saved. To learn how Apache
and nginx collaborate by default, see Apache with nginx (on page 30).
For any website, you can change the default way of Apache and nginx collaboration.
More exactly, you can specify which web content (static or dynamic) should be
processed by each of the servers. This can help optimize the performance of highly
loaded web applications that have a lot of dynamic content (PHP files) or a lot of static
content. The corresponding settings are available in the Control Panel on the Websites &
Domains > <domain_name> > Web Server Settings page.
Note: nginx-related settings are available only if nginx is turned on.
The diagrams below show all the possible configurations and provide comments on
pros and cons of each configuration.
Processing Static Content
The following table shows how Panel will handle the request for a 2KB GIF image file
depending on the ngienx configuration.
Page 36

36 Web Servers
Smart static files
processing is turned on
It is the optimal configuration in
terms of performance and
reliability.
The request is passed to Apache
which returns only a file location.
The file is located and delivered
by nginx.
Smart static files
processing is turned off
nginx passes requests and
responses without modification
which allows using the mode for
troubleshooting nginx related
issues.
The file is sent twice: from
Apache to nginx and from nginx
to client. This may slightly
reduce the performance
especially when delivering large
files.
The GIF file extension
is included into Serve
static files directly by
nginx
This mode improves
performance of delivering static
files.
Note that as requests never
reach Apache, they do not pass
through Apache handlers. This
means that, for example, rewrite
rules or .htaccess directives
will not be applied.
Processing Dynamic Content
The following table shows how Panel will handle the request for a PHP file depending
on the nginx configuration.
Page 37

Web Servers 37
Process PHP by nginx is
turned off
It is the optimal configuration in
terms of performance and
reliability.
The request is passed to Apache
which executes the file and
returns the result.
Depending on the site’s hosting
settings, Apache uses one of the
following handlers: FastCGI,
CGI, or the Apache module. You
can also choose the PHP
version individually for each site.
Process PHP by nginx is
turned on
nginx itself executes the file
using the PHP-FPM handler.
The PHP-FPM handler offers
enhanced FastCGI capabilities,
which may improve performance
of web apps, especially those
with many users.
Note that as requests never
reach Apache, they do not pass
through Apache handlers. This
means that some web apps may
not operate as expected. Apache
.htaccess directives and
rewrite rules will not be applied
as well.
Important: To make the option Process PHP by nginx available, you should install PHP-
FPM support for nginx. For details on installing PHP-FPM support, refer to the section
PHP Handlers (on page 52).
Setting Up Additional nginx Directives
To add custom nginx directives for a website, use the Additional nginx directives field.
When editing the field, use the syntax as in nginx.conf. For example, if you want to
pack all the proxied requests with gzip, add the line:
gzip_proxied any;
Note that your customers cannot view and edit the Additional nginx directives field.
Page 38

38 Web Servers
Optimizing Apache Web Server
Next in this section:
Switching On and Off Apache Modules ..............................................................39
Running Apache with Piped Logs ......................................................................40
Setting Up the Apache Restart Interval ..............................................................41
To increase the performance of your Apache web server, you can employ the following
practices:
Switching on and off Apache modules allows decreasing the server resource
consumption by using only Apache modules that you really need for proper
functioning of websites on your server.
Running Apache with piped logs increases the website density on the server.
Setting up the Apache restart interval allows you to decrease the number of Apache
restarts.
Page 39

Web Servers 39
Switching On and Off Apache Modules
You can switch off the Apache web server modules that are not critical to hosting
services in Tools & Settings > Apache Web Server. This will allow you to reduce server
resources consumption (for example, get the smaller RAM footprint that is critical to
VPS) and, as a result, provide for more hosting customers on a server.
Note that some modules are interdependent and can be switched off (on) only when
the modules they depend on are off (on). For example, the cache module depends on
disk_cache, file_cache, and mem_cache modules. This means that you cannot switch
off the cache until its three dependent modules are off.
Caution: This feature is for advanced users only. Toggle modules only if you
completely understand the consequences of your actions. Note that some
modifications may reduce Apache performance or even lead to it becoming inoperable.
In addition, these changes may affect certain Panel functions. For example, if you turn
off mod_perl or mod_php, the Perl and PHP scripts (including webmail) will stop
working on websites. This may cause a situation in which you offer a feature that does
not work in a service plan.
Depending on your operating system, the following Apache modules are always
enabled:
Debian or Ubuntu:
env
auth_digest
authn_file
authz_host
authz_user
actions
alias
dav
dav_fs
mime
ssl
Redhat or CentOS:
env
auth_digest
authn_file
authz_host
authz_user
actions
alias
autoindex
Page 40

40 Web Servers
dav
dir
log_config
mime
negotiation
setenvif
ssl
SUSE:
env
auth_digest
authn_file
authz_host
authz_user
actions
alias
dav
dir
log_config
Running Apache with Piped Logs
If you are going to host more than 300 domains or web sites on your server, we
recommend that you switch on the support for piped logs in the Apache web server. By
default, Apache restarts when it needs to process log files, for example, rotate them.
When the number of websites on your server is about 300 or more, this will slow down
the server because of frequent Apache restarts. If you switch on the support for piped
logs, Apache will write error and access logs through a pipe to another process instead
of direct writing to log files. This lets Apache work without restarting every time it
processes the logs.
You can switch on the support for piped logs using the Tools & Settings > Apache Web
Server > Piped Logs option.
Note: If the number of websites you plan to host on your server exceeds 900, you
should recompile Apache with more file descriptors as described in the section
Recompiling Apache with More File Descriptors of the Advanced Administration Guide.
Page 41

Web Servers 41
Setting Up the Apache Restart Interval
Next in this section:
Adjusting IIS Settings for Websites .................................................................... 42
IIS Application Pool ........................................................................................... 42
When users perform operations with domains and subdomains (such as creating,
removing, or changing their configurations), the changes take effect only after the
restart of Apache.
If you want to avoid too many Apache restarts, you can set a fixed interval of time in
which Panel should restart Apache. Note that if the interval is 0 seconds, Apache
restarts immediately after each change. It is recommended to always set this interval to
more than 0 seconds, especially if users perform a lot of operations with domains and
subdomains through Panel.
If during the specified interval of time no changes were made with domains, Apache
will not restart.
IIS Web Server (Windows)
Parallels Plesk Panel for Windows uses the IIS HTTP Server (http://www.iis.net/) for
hosting and managing websites.
IIS manages websites - web resources identified either by an IP address or a host
name. When you create a site, Panel adds a new virtual host to IIS so that the site
becomes available for browsers through the web server.
Default Web Server Configuration
The default IIS configuration is defined by the hosting provider using IIS tools such as
IIS Manager. The default configuration is applied to all websites on the server.
However, a number of configuration parameters can be changed for individual websites
right in the Panel UI.
Custom Web Server Configuration
Website owners may need custom web server capabilities that are not provided by the
default configuration. For example, unusual types of index files or the restricted access
to the site by IP address.
You or site owners can configure web server settings for a website by specifying IIS
settings in the Control Panel. The custom website configuration overrides the default
configuration. For details about custom IIS configuration, see Adjusting IIS Settings for
Websites (on page 42).
Page 42

42 Web Servers
Adjusting IIS Settings for Websites
You or site owners can customize IIS configuration for a particular website in the
Control Panel in Websites & Domains > select a domain > Web Server Settings. All the
settings are divided into three groups:
Common Settings
The section Common settings contains the settings that website owners typically
want to adjust. For example, to add custom index files or allow directory browsing.
For each parameter, you can either type a custom value, or use the default IIS
configuration (by selecting the Default value).
Directory Security Settings
The settings in the section Directory security settings allow you to enforce HTTPS
connections and to prohibit anonymous access to the site.
Access Restriction Settings
The settings in the section Access restriction settings allow you to control access to
the website by IP addresses.
Note: As opposed to other web server settings, the Deny access to the site parameter
does not override but supplements the list of IP addresses provided in the default
configuration. In case of a conflict (for example, when you allow the address that is
denied in the default configuration), your values will be used.
IIS Application Pool
IIS application pool serves websites and web applications hosted on your server.
Dedicated IIS application pool allows your customers to have a level of isolation
between websites. Since each dedicated application pool runs independently, errors in
one application pool belonging to one user will not affect the applications running in
other application pools dedicated to other users.
By default, Parallels Plesk Panel offers a shared application pool for all users.
However, users can use dedicated application pools if this option is provided by the
hosting package.
IIS application pool can work in the following two modes:
Shared pool - one pool is used for all users and websites by default.
Dedicated pool - separate pool for every customer is provided. It is also possible to
allocate per-package pools within the customer's pool, that will isolate running
websites hosted under a particular package from other customer's websites.
To change the IIS application pool working mode:
1. Go to Tools & Settings > IIS Application Pool.
2. Select the Global Settings tab.
3. Select the required mode and click OK.
Page 43

Web Servers 43
To limit the amount of CPU resources that the IIS application pool can
use:
1. Go to Tools & Settings > IIS Application Pool.
2. Select the Switch on CPU monitoring checkbox and provide a number (in
percents) in the Maximum CPU use (%) field.
3. Click OK.
To stop all applications running in the server application pool:
1. Go to Tools & Settings > IIS Application Pool.
2. Click Stop.
To start all applications in the application pool:
1. Go to Tools & Settings > IIS Application Pool.
2. Click Start.
To restart all applications running in the application pool:
1. Go to Tools & Settings > IIS Application Pool.
2. Click Recycle. This can be handy if some applications are known to have
memory leaks or become unstable after working for a long time.
Page 44

Web hosting configuration implies adjustment of a number of web server settings and
In this chapter:
Website Directory Structure ............................................................................... 44
Website Preview ............................................................................................... 50
PHP Configuration............................................................................................. 50
Multiple PHP Versions ....................................................................................... 58
Configuring ASP.NET (Windows) ...................................................................... 60
Next in this section:
Defining a Custom Virtual Host Template .......................................................... 45
Virtual Host Structure (Linux) ............................................................................ 45
Virtual Host Structure (Windows) ....................................................................... 47
C H A P T E R 4
Web Hosting
settings of other related services. Thus, on Panel for Linux, you can switch off unused
Apache modules; for IIS server, you can configure its application pool.
Website Directory Structure
When someone creates a website, Panel not only adds a new virtual host to the web
server but also creates the site’s directory structure and fills the directories with certain
initial content. These directories are located in the corresponding virtual host
directories:
On Linux: /var/www/vhosts/<domain_name>
On Windows: C:\inetpub\vhosts\<domain_name>
<domain_name> here is the website's domain name. The directory structure is defined by
the default virtual host template (see the sections Virtual Host Structure (Linux) (on page
45) and Virtual Host Structure (Windows) (on page 47) for details).
If you want to change the files and directories included in new sites, for example, you
want to add scripts or change the error pages, you can define a custom virtual host
template. Resellers can also customize virtual host templates for their customers.
Note: Subdomains have the same status as domains and employ the same directory
structure. Thus, they have a separate directory in /var/www/vhosts and their own
configuration files, such as php.ini or vhost.conf.
Page 45

Web Hosting 45
Defining a Custom Virtual Host Template
Directories Tree
User
Group
Permissions
Description
Created
/<VHOST
>
user
root
755
Always
/anon_ftp
user
psaserv
750
Anonymous FTP files
On demand
/error_docs
root
psaserv
755
Error message files
Always
<doc>.html
user
psaserv
755
/httpdocs
user
psaserv
750
HTTP documents
Always
To define a custom virtual host template:
1. On your local file system, create the following directories:
cgi-bin if you want to include custom scripts in the template.
httpdocs if you want to include custom documents such as web pages or
images.
error_docs if you want to include custom error messages.
2. Place the files you need in the corresponding directories.
You can use the default files stored in the /var/www/vhosts/.skel/0 on Linux
or C:\inetpub\vhosts\.skel\0 on Windows.
3. Pack the directories into an archive in tgz, tar, tar.gz, or zip
format.
Make sure that the directories are in the root of the archive file and not in a
subdirectory. If you include other directories or files in the root of the archive, Panel
will not add them to the template.
4. Upload the archive to Panel on the Tools & Settings > Virtual Host Template
page.
To switch back to the default virtual host template, go to Tools & Settings > Virtual Host
Template and click the Default button.
Virtual Host Structure (Linux)
The table below shows the list of directories that Panel creates for each virtual host.
Note that Panel does not add all the directories by default. It creates some of the
directories only when the website owner needs them. Such directories are marked as
created On demand. For example, after a customer adds a website, it does not have the
/web_users directory. Panel will create it only after the customer adds his first web
user.
The following table lists subdirectories of a virtual host directory
/var/www/vhosts/<vhost>:
Page 46

46 Web Hosting
/cgi-bin
user
psacln
755
CGI scripts
Always
/logs
root
root
777
Link to
../system/<vhost>
/logs
Always
/bin root
root
755
Chroot environment
directories
On demand
/dev
root
root
755
/etc root
root
755
/lib root
root
755 /tmp
root
root
755
/usr root
root
755 /var root
root
755
/web_users
root
root
755
Web users' directory
On demand
/<web_user>
user
psaserv
750
Web user directory
On demand
/<subdomain>
user
psaserv
750
HTTP and HTTPs
documents of a
subdomain
On demand
/<domain>
user
psaserv
750
HTTP and HTTPs
documents of an
additional domain
On demand
Directories Tree
User
Group
Permissions
Description
Created
/<VHOST
>
root
psaserv
744
Always
/conf
root
psaserv
750
Configuration files.
Always
/etc root
root
755
Configuration files
Always
/logs
psaadm
psacln
750
Virtual host logs
Always
/pd root
psaserv
750
Passwords to
protected directories
Always
d..<dir1>@<dir2>
root
psaserv
310 Always
/statistics
root
psaserv
550
Statistics directory
Always
/anon_ftpstat
root
root
755
Anonymous FTP
statistics.
Always
/ftpstat
root
root
755
FTP user statistics
Always
/logs
root
root
777
Link to /logs
Always
/webstat
root
root
755
HTTP user statistics
Always
The following table lists directories created for a virtual host in the
/var/www/vhosts/system/<vhost>:
Page 47

Web Hosting 47
/webstat-ssl
root
root
755
HTTPS user
statistics
Always
Differences from Previous Versions
Old Location
New Location
Comment
/<VHOST>/conf
/system/<VHOST>/conf
Configuration files
/<VHOST>/pd
/system/<VHOST>/pd
Passwords to protected directories
/<VHOST>/statistics
/system/<VHOST>/statistics
Statistics directory
/<VHOST>/statistics/logs
/system/<VHOST>/logs
Virtual host logs
Directories Tree
User
Permissions
Description
Created
\<VHOST>
None
\.plesk
List contents
Always
\statistics\<do
main_name>\
List contents
Statistics
directory
Always
\anon_ftpstat
List contents
Anonymous
FTP statistics
Always
The structure described above was introduced in Panel 11.5. It has the following
differences compared to the structure of earlier Panel versions:
Some directories are created on demand. Previously, all the directories were
created by default.
The following directories were moved from /var/www/vhosts/<VHOST> to
/var/www/vhosts/system/<VHOST>:
The following directories are not included in Panel virtual hosts:
/httpsdocs
/subdomains
/private
Virtual Host Structure (Windows)
The table below shows the list of directories that Panel creates for each virtual host.
Note that Panel does not add all the directories by default. It creates some of the
directories only when the website owner needs them. Such directories are marked as
created On demand. For example, after a customer adds a website, it does not have the
/web_users directory. Panel will create it only after the customer adds their first web
user.
Page 48

48 Web Hosting
\ftpstat
List contents
FTP user
statistics
Always
\webstat
List contents
HTTP user
statistics
Always
\.security
Read
Security
settings
Always
\.web.<user>.
security
Read
On demand
\anon_ftp
List contents
Anonymous
FTP files
On demand
\cgi-bin
List contents
CGI scripts
On demand
\error_docs
List contents
Error
message files
Always
<doc>.html
Read, write
\httpdocs
Full control
HTTP
documents
Always
\logs
List contents
Virtual host
logs
Always
\web_users
None
Web users'
directory
On demand
\<web_user>
None
\<subdomai
n>
Full control
HTTP and
HTTPs
documents of
a subdomain
On demand
\<domain>
Full control
HTTP and
HTTPs
documents of
an additional
domain
On demand
Differences from Previous Versions
Old Location
New Location
Comment
\statistics
\.plesk\statistics
Statistics directory
\statistics\logs
\logs
Virtual host logs
\.security
\.plesk\.security
Security settings
The structure described above was introduced in Panel 11.5. It has the following
differences compared to the structure of earlier Panel versions:
Some directories are created on demand. Previously, all the directories were
created by default.
The following directories have different locations:
Page 49

Web Hosting 49
\.web.<user>.security
\.plesk\.security
The following directories are not included in Panel virtual hosts:
\httpsdocs
\subdomains
\private
Page 50

50 Web Hosting
Website Preview
Your customers can preview their websites during domain name propagation. The two
preview modes are available: Quick Preview and Limited Preview.
Quick Preview, the recommended option, presents customers' sites as subdomains
of one of your domains. For example, customer-site.tld will be available for preview
as customer-site.tld.192-0-2-12.your-domain.tld. Here 192-0-2-12 is the site's IP
where dots are replaced with dashes. Note that if you do not specify a preview
domain, the site preview function will be unavailable to your customers.
(Default) Limited Preview is used in earlier Panel versions; it presents customers'
sites as directories on the Panel server. For example, server-host-
name:8443/sitepreview/http/your-domain.tld/. This mode has two major drawbacks:
Only authorized users can view such websites and some scripts and Flash
animation might not work well on them. We recommend to use this mode only
before the Quick Preview is configured.
Note that both these options do not work properly for password-protected directories.
The preview selector and the form to configure the preview domain name is located in
Tools & Settings > Website Preview Settings.
Note: Customers also could preview their sites prior to Panel 10.4, but the preview
feature had a number of limitations due to different implementation methods.The major
difference is that since 10.4 customers can share the preview link with anybody,
whereas previously they could only view the domain themselves. In addition, sites in
the earlier preview mode would not work with complex CGI scripts or Flash content.
PHP Configuration
PHP is one of the most popular scripting languages for creating dynamic web pages.
The majority of today's websites and web applications are based on PHP scripts. Thus,
site administrators should clearly understand how they can control the execution of
PHP scripts.
There are three main factors that define how PHP scripts will be executed for a certain
website:
1. PHP handler.
When a visitor accesses a site based on PHP scripts, a web server interprets site
scripts to generate a page that will be shown to the visitor. The PHP handler calls
PHP libraries needed for this interpretation.
You can select a PHP handler for a service plan or a website correspondingly in:
service plan settings (Hosting Parameters tab > Scripting > Run PHP as).
website settings (Control Panel > Websites & Domains > select a domain > General
tab > Web Scripting and Statistics > Run PHP as).
Page 51

Web Hosting 51
You can choose from a number of PHP handlers: ISAPI (Windows), Apache
Next in this section:
PHP Handlers ....................................................................................................52
Custom PHP Configuration ................................................................................54
module (Linux), FastCGI, CGI, or PHP-FPM (Linux). What PHP handler to choose
depends on factors such as security considerations, script execution speed, and
memory consumption.
Learn about PHP handler features in the section PHP Handlers (on page 52).
2. PHP version.
Panel supports different versions of PHP. For each available handler, one or more
PHP versions can be selected. For details, see Multiple PHP Versions (on page 58).
3. PHP settings.
PHP behavior is defined by a number of configuration settings. These settings
specify various aspects of script execution, such as performance (for example, the
amount of memory a script can use), security (for example, access to the file
system and services), and so on. Administrators may adjust these settings for a
number of reasons: to prevent a memory leak caused by poorly written scripts, to
protect data from malicious scripts, to meet the requirements of a certain web app,
and so on.
Learn about the PHP settings hierarchy and about how to adjust the settings in the
section Custom PHP Configuration (on page 54).
Page 52

52 Web Hosting
PHP Handlers
Run PHP as
Performance
Memory
Usage
Security
Apache
module (Linux
only)
High.
Runs as a part of
the Apache web
server.
Low
This handler (also known as mod_php) is the least secure
option as all PHP scripts are executed on behalf of the
apache user. This means that all files created by PHP
scripts of any plan subscriber have the same owner
(apache) and the same permission set. Thus, it is
theoretically possible for a user to affect the files of another
user or some important system files.
Note: You can avoid some security issues by turning
the PHP safe_mode option on. This disables a number
of PHP functions that have potential security risks.
Note that this may lead to inoperability of some web
apps. The safe_mode option is considered to be
obsolete and has been removed since PHP 5.3.
ISAPI
extension
(Windows
only, not
supported
since PHP
5.3)
High.
Runs as a part of
the IIS web server.
Low
The ISAPI extension can provide site isolation if a dedicated
IIS application pool is switched on for subscriptions. Site
isolation means that the sites of different customers run their
scripts independently. Thus, an error in one PHP script does
not affect the work of other scripts. In addition, PHP scripts
run on behalf of a system user associated with a hosting
account. Learn how to configure the IIS application pool in
the section Configuring IIS Application Pool (Windows) (on page
42).
Note: The ISAPI extension handler is not supported
starting from PHP 5.3.
CGI
application
Low.
Creates a new
process for each
request and closes it
once the request is
processed.
Low
The CGI handler provides PHP script execution on behalf of
a system user associated with a hosting account. On Linux,
this behavior is possible only when the suEXEC module of
the Apache web server is on (default option). In other cases,
all PHP scripts are executed on behalf of the apache user.
We recommend that you use the CGI handler only as a
fallback.
The list of PHP handlers available in the Panel UI depends on the operating system
and the web server that is processing PHP files. One of the handlers, PHP-FPM,
additionally needs to be installed with the Parallels Installer.
You can choose one of the following PHP handlers at Hosting Parameters > Scripting >
Run PHP as taking into consideration the resources consumption and security aspects of
each option:
Page 53

Web Hosting 53
FastCGI
application
High (close to
Apache module and
ISAPI extension).
Keeps the
processes running
to handle further
incoming requests.
High
The FastCGI handler runs PHP scripts on behalf of a
system user associated with a hosting account.
PHP-FPM
application
(Linux only)
High
Low
The PHP-FPM is an advanced version of FastCGI which
offers significant benefits for highly loaded web applications.
Unlike other handlers, PHP-FPM cannot be selected for all
websites at once in service plan settings; you can use this
handler only for individual websites.
To be able to use this handler, install the support for PHPFPM through Tools & Settings > Updates and Upgrades >
Add/Remove components > Plesk hosting features > nginx web
server and reverse proxy support > PHP-FPM support for nginx.
Important: Depending on your operating system, you
may need to add third-party repositories to install PHPFPM. Parallels Installer shows information about
required repositories beside the component's name.
To use the PHP-FPM handler for a website:
1. Go to Subscriptions > <domain_name> > Manage
hosting or open the subscription in the
Control Panel.
2. Go to Websites & Domains > <domain_name> >
Web Server Settings page and turn on the
option Process PHP by nginx.
Note that other PHP handlers are not available for selection
if the option Process PHP by nginx is turned on.
Note: Switching PHP from Apache module to FastCGI application may impair the
functionality of existing PHP scripts. Switching to PHP-FPM by selecting Process PHP by
nginx in the website’s web server settings may do the same.
Adjusting the List of PHP Handlers Available to Customers
You can limit the list of PHP handlers available for customers using the
site_isolation_settings.ini file. This file is available on both Windows and
Linux Panel servers. For details, see Configuring Site Isolation Settings in the Advanced
Administration Guide.
Page 54

54 Web Hosting
Custom PHP Configuration
Custom PHP Settings in Panel
Generally, PHP settings are defined by the server-wide configuration file. For Linux it
is, typically, /etc/php.ini and for Windows %plesk_dir%\Additional\PleskPHP5\php.ini. This file defines the PHP
configuration for all websites hosted on your server.
Note: In Panel for Linux, you can add custom PHP handlers that can have their own
php.ini located in some other directory.
Since Panel 10.4, PHP settings are visible in the Panel GUI and you can adjust them
individually for each hosting plan or subscription. Moreover, your customers (if allowed)
can adjust your PHP settings and preset them individually for each of their websites
and subdomains. See the PHP settings hierarchy on the diagram below.
Page 55

Web Hosting 55
You can set the custom PHP configuration on the PHP Settings tab of a certain service
plan, add-on plan, or subscription. Custom PHP settings for a website or subdomain
can be set in the Control Panel, Websites & Domains > select a website or subdomain >
PHP Settings. PHP settings from a higher level act as a preset for a lower level, thus
each lower level overrides them. For example, you can purposely apply some PHP
limitations to a service plan and then offer your customers the add-on plan that
removes the limitations. PHP settings of the add-on plan will override the settings
defined in the main service plan.
If customers have the corresponding permissions, they can specify the PHP
configuration that is unique for each website (or subdomain) in their subscription.
Groups of PHP Settings
For convenience, all PHP settings in Panel are categorized into three groups:
Performance settings.
These settings define how scripts work with system resources. For example: Use
the memory_limit parameter to limit the amount of memory for a script and, as a
consequence, to prevent memory leaks; or set max_execution_time to limit the
maximum time a script is allowed to run, and thus prevent scripts from tying up the
server.
Note: The typical default limit for PHP scripts is 60 seconds. Increasing the
max_execution_time can affect limitations on the virtual host level. If you or your
customers set a custom max_execution_time of PHP scripts on a site, and this
value is greater than the web server's time limits on script execution (in Apache,
nginx, and FastCGI settings), then the web server's time limits for this site will be
set to the same value as PHP scripts' max_execution_time.
Common settings.
This group contains other commonly used PHP settings. Generally, these are:
Security settings (such as the PHP safe mode toggle or the permission to register
global variables), error reporting settings (such as the directive to log errors), and
so on.
Additional directives.
If you cannot find particular parameters among performance or common settings,
add them in the PHP Settings > Additional configuration directives field. All directives
from that field will be included in the final PHP configuration. For example, if you
want PHP to log errors to your own file, add the line:
error_log=/tmp/my_file.log. The entire list of PHP directives is available at
http://php.net/manual/en/ini.list.php. As additional directives, you can add directives
that have the PHP_INI_USER and PHP_INI_ALL modes.
Note that additional directives are available only to the Panel administrator. Your
customers do not have a corresponding field in Control Panel.
Important: If you use Panel for Windows or Panel for Linux where PHP does not run
as an Apache module, your customers can override some PHP settings regardless of
any permissions in force. They can use the ini_set() function in their scripts to
change the values of the following parameters: memory_limit,
max_execution_time, and those of your additional directives that PHP allows to set
anywhere (PHP_INI_ALL directives; learn more at http://php.net/manual/en/ini.list.php).
Page 56

56 Web Hosting
The Default Values of PHP Parameters
You can set the value of each parameter in PHP Settings either by selecting a value from
a preset, typing a custom value, or leaving the Default value. In the latter case, Panel
takes the parameter value from the server-wide PHP configuration. The only
exceptions are add-on plans: the value set to Default on the add-on's PHP Settings tab
will keep the parameter's value from the main service plan.
It is possible to use three placeholders in parameter values:
{DOCROOT} for the document root directory of a domain that gets custom PHP
configuration.
{WEBSPACEROOT} for the root directory of a subscription (webspace).
{TMP} for the directory which stores temporary files.
Note: Default values of PHP settings in Panel differ from the ones suggested by the
official PHP documentation at http://php.net/manual/en/ini.list.php.
Allowing Customers to Change PHP Settings
You can allow your customers to override subscription PHP settings with their own perwebsite and per-subdomain PHP configuration. For this purpose, you should use the
following permissions on the Permissions tab of a certain service plan or subscription:
Hosting performance settings management.
Along with management of some other settings, this permission grants customers
access to PHP settings from the performance settings group.
Common PHP settings management.
If granted, allows customers to adjust PHP settings from the common settings
group.
Note that you can toggle these permissions for a plan (subscription) only if it has the
granted Hosting settings management permission.
Even if your customers do not have permissions to adjust PHP settings, you (as the
administrator) can always perform such per-website (subdomain) PHP configuration.
To do this, open a hosting account from the Server Administration Panel and apply
changes on the PHP Settings tab of the particular website (subdomain) you wish to
change. The Additional configuration directives field will also be available to you.
Page 57

Web Hosting 57
Location of Website-Level PHP Settings in Panel for Windows
After you apply all the necessary modifications, you can view the modified php.ini for
a certain website. The paths to the ini files are kept in the Windows registry, under
HKEY_LOCAL_MACHINE\SOFTWARE\PHP\Per Directory Values. For example:
HKEY_LOCAL_MACHINE\SOFTWARE\PHP\Per Directory
Values\C\Inetpub\vhosts\<DOMAIN NAME>\httpdocs
where <DOMAIN NAME> stands for a certain domain name.
Learn more about PHP settings in Windows registry at
http://php.net/manual/en/configuration.changes.php.
Page 58

58 Web Hosting
Multiple PHP Versions
Most PHP versions are not backward-compatible. For example, 5 is not compatible
with 4, 5.2 with 5.1, and so on. Therefore, a web app that requires PHP 4 might not
work with PHP 5.3 supplied with Panel 11.5. To avoid this, you can install any PHP
version on the server in addition to the supplied one. After registering this version in
Panel, you can set it as default for certain service plans or any website in Panel.
Customers granted the Hosting settings management permission will be able to specify the
PHP version for a particular website.
Using Multiple PHP Versions in Panel on Linux
On Linux systems, you can install any PHP version you need and then make it
available in Panel by registering it with the php_handler command-line utility.
To add the support for an arbitrary PHP version in Panel:
1. Install the desired PHP version on your server. For installation guidelines, refer to
the official PHP documentation available at http://php.net/manual/en/install.php. In
brief, the installation includes the following main steps.
Warning: These steps are provided for demonstration purposes only. Depending
on your operating system and the desired configuration, installation steps can differ
significantly. When you install an additional PHP version on your server, read the
official PHP documentation on installation.
1. Log in to your server as root.
2. Obtain the PHP source you need from the official website
(http://php.net/downloads.php) and unpack it:
gunzip php-NN.tar.gz
tar -xf php-NN.tar
3. Configure and build PHP. This is when you can customize PHP with various
options, such as specifying which extensions will be enabled. Run
./configure --help for a list of available options.
cd ../php-NN
./configure --prefix /usr/local/phpNN
make
make install
4. Set up your php.ini:
cp php.ini-development /usr/local/lib/php.ini
You may edit your .ini file to set PHP options. If you prefer having php.ini in
another location, run the configure utility with the option --with-config-
file-path=/some/path in step 3.
Page 59

Web Hosting 59
2. Register the new PHP version in Panel:
/usr/local/psa/bin/php_handler --add -displayname <NN> -path
<path to php cgi> -phpini <path to php.ini> -type <php handler> -id <NN-custom>
where
-displayname <NN> is the PHP version name that will be shown in the Panel
UI. We recommend that you include the version number in the displayname,
for example, you can name the version "5.3.3-custom".
-path <path to php cgi>i is the location of the PHP CGI binary file. You can find
this in the output of the command make install in the line Installing PHP CGI
binary. For example, if you see the line Installing PHP CGI binary: /usr/local/bin/,
the location you need to specify is /usr/local/bin/php-cgi. Learn more at
http://php.net/manual/en/install.unix.commandline.php.
-phpini <path to php.ini> is the location of the php.ini file, for example,
/some/path/php.ini .
-type <php handler> is the type of the PHP handler associated with this version.
Learn more about PHP handlers in the section PHP Handlers (on page 52).
Important: You can set either the CGI or FastCGI PHP handler. mod_php is
not supported.
(Optional) -id <NN-custom> is the identifier that you will use for referring to this
PHP version when adjusting or removing it.
After you register the PHP version in Panel, it will be available for selection in service
plan settings and in the hosting settings of a particular website. See the picture below.
Using Multiple PHP Versions in Panel on Windows
All up-to-date and commonly used versions of PHP are shipped with Panel and can be
installed through Tools & Settings > Updates and Upgrades > Add/Remove Components.
You can specify a certain PHP version for a service plan and for a website in their
hosting settings, in PHP support > PHP version:
Version 4.x is outdated, use it only if you need to host old PHP application versions.
Version 5.x is current and its use is recommended.
Page 60

60 Web Hosting
Configuring ASP.NET (Windows)
ASP.NET is a flexible set of tools and web development technologies that allows you to
employ a number of applications based on ASP.NET framework. Parallels Plesk Panel
supports 1.1.x, 2.0.x and 4.0.x versions of the .NET framework and allows configuring
most of its settings. Most ASP.NET configuration settings that commonly need to be
customized in order for ASP.NET applications to function in a desirable way can be
edited through Parallels Plesk Panel.
To configure the server-wide ASP.NET settings:
1. Go to Tools & Settings > ASP.NET Settings (in the Applications group). The
settings for ASP.NET 1.1.x, ASP.NET 2.0.x and ASP.NET 4.0.x are
located under the corresponding tabs.
2. Set up the strings that determine database connection data for
ASP.NET applications which use databases. This option is available
only for ASP.NET 2.0.x.
When you open the ASP.NET configuration page for the first time, sample
connection parameters with common constructions are displayed. You can
delete them and specify your own strings.
To add a string, enter the required data into the Name and Connection Parameters
input fields and click next to them.
To remove a string, click next to it.
3. Set up custom error messages that will be returned by ASP.NET
applications in the Custom Error Settings field:
To set the custom error messages mode, select an appropriate option from the
Custom error mode menu:
On - custom error messages are enabled.
Off - custom error messages are disabled and detailed errors are to be
shown.
RemoteOnly - custom error messages are displayed only to remote clients,
and ASP.NET errors are shown to the local host.
To add a new custom error message (which will be applied unless the Off mode
was selected), enter the values in the Status Code and Redirect URL fields, and
click .
Status Code defines the HTTP status code resulting in redirection to the error
page.
Redirect URL defines the web address of the error page presenting
information about the error to the client.
Due to possible conflicts, you cannot add a new custom error message with an
error code that already exists, but you can redefine the URL for the existing
code.
Page 61

Web Hosting 61
To remove a custom error message from the list, click next to it.
4. Configure compilation settings in the Compilation and Debugging field:
To determine the programming language to be used as default in dynamic
compilation files, choose an entry from Page default language list.
To enable compiling retail binaries, leave the Enable debugging checkbox empty.
To enable compiling debug binaries, select the Enable debugging checkbox. In
this case, the source code fragments containing error will be shown in a
diagnostic page message.
Note: When running applications in debug mode, a memory and/or performance
overhead occurs. It is recommended to use debugging when testing an application
and to disable it before deploying the application into production scenario.
5. Configure encoding settings for ASP.NET applications in the Globalization
Settings section:
To set an adopted encoding of all incoming requests, enter an encoding value
into the Request encoding field (default is utf-8).
To set an adopted encoding of all responses, enter an encoding value into the
Response encoding field (default is utf-8).
To set an encoding which must be used by default for parsing of .aspx, .asmx,
and .asax files, enter an encoding value into the File encoding field (default is
Windows-1252).
To set a culture which must be used by default for processing incoming web
requests, select an appropriate item from the Culture list.
To set a culture which must be used by default when processing searches for a
locale-dependent resource, select an appropriate item from the UI Culture list.
6. Set a code access security trust level for ASP.NET applications in the
Code Access Security field.
CAS trust level is a set of restrictions applied to an app. For example, the Low level
restricts app’s network capabilities (like sending mail) while the Full trust level
removes any restrictions.
To allow changing the CAS trust level for websites, select the checkbox Allow
changing the CAS trust level for individual websites. If you do not select this
checkbox, websites will use the server-wide setting. Otherwise, each website
will be able to have its own CAS trust level specified in the website's hosting
settings.
Important: When an assembly is assigned a trust level that is too low, it does not
function correctly. For more information on the permissions levels see
http://msdn.microsoft.com/library/enus/dnnetsec/html/THCMCh09.asp?frame=true#c09618429_010.
Page 62

62 Web Hosting
7. Set client session parameters in the Session Settings field:
To set up the default authentication mode for applications, select an appropriate
item from the Authentication mode list. Windows authentication mode should be
selected if any form of IIS authentication is used.
To set up time that a session can remain idle before it is abandoned, enter the
appropriate number of minutes into the Session timeout field.
8. Click OK to apply all changes.
Note: Parallels Plesk Panel supports separate configurations for different versions of
the .NET framework (1.1.x, 2.0.x and 4.0.x).
Page 63

Your Parallels Plesk Panel works in cooperation with a DNS server which enables you
C H A P T E R 5
DNS
to run the DNS service on the same machine where you host websites. Particularly,
this server is BIND on Linux and Microsoft DNS or BIND on Windows. For instructions
on switching between these two DNS servers on Windows, see Using BIND Instead of
Microsoft DNS (Windows) (on page 72).
How Panel Creates DNS Zones
Setup of DNS zones for newly added domains is automated: When you add a new
domain name to the Control Panel, a zone file is automatically generated for it and
registered in the name server's database, and name server is instructed to act as a
primary (master) DNS server for the zone. Subscribers can manage DNS zones of their
domains through the Control Panel if their subscriptions provide the corresponding
permissions. Additionally, subscribers can choose whether they want to use Panel
DNS server as a master or a slave DNS server, or switch off the DNS service for their
domains. To learn how to manage DNS zones of domains within a subscription, refer to
the section (Advanced) Configuring DNS for a Domain (on page 386).
Panel creates DNS zones for domains in accordance with the server-wide DNS
template. The template defines the structure of DNS zones for all domains in Panel. To
learn how to edit the DNS template and apply its changes to existing zones, refer to the
section Server-Wide DNS Template (on page 64).
Switching Off the DNS Service for Hosted Domains
Panel allows you to switch off the DNS service for all or certain domains hosted on
your server. To learn how to do this, see the section Switching Off the DNS Service (on
page 72).
External DNS Servers
If you do not want to run the DNS service on your Panel server, you can use an
external DNS for domains hosted on your server. Learn more in the section Using
External DNS Servers (on page 72).
Page 64

64 DNS
Using Panel Without a DNS Server
In this chapter:
Server-Wide DNS Template .............................................................................. 64
DNS Zones for Subdomains .............................................................................. 69
Configuring the Recursive DNS ......................................................................... 70
Restricting DNS Zones Transfer ........................................................................ 71
Restricting Users' Access to Other Users' DNS Zones ...................................... 71
Using BIND Instead of Microsoft DNS (Windows) ............................................. 72
Switching Off the DNS Service .......................................................................... 72
Using External DNS Servers ............................................................................. 72
Panel Without a DNS Server ............................................................................. 74
Next in this section:
Adjusting DNS Template ................................................................................... 65
Applying DNS Template Changes (Linux) ......................................................... 68
You can exclude the DNS server component from your Panel installation. If you do this,
Panel does not provide the DNS service for websites hosted on it until you install a
DNS server or connect an external DNS service. To learn what happens when the DNS
service is not configured in your Panel, see the section Panel Without a DNS Server (on
page 74).
Next in this chapter, we will provide details on how to configure various aspects of the
DNS service for domains hosted on your server.
Server-Wide DNS Template
In Panel, DNS zones are built from the server-wide DNS template that is available in
Tools & Settings > DNS Template. The DNS template defines which records Panel will
create in DNS zones of hosted domains. For example, the <domain>. A <ip.web>
record in the template may transform into something like example.com. A
10.52.0.1 in the DNS zone file.
To learn how to define the DNS template, see the section Adjusting DNS Template (on
page 65).
One of the main benefits the DNS template gives you is adjusting all DNS zones at
once. In other words, it allows adding, modifying, or removing DNS records from all or
a large amount of zones. To learn how Panel applies the server-wide DNS template
changes to DNS zones, refer to the section Applying DNS Template Changes (on page 68).
Page 65

DNS 65
Adjusting DNS Template
Viewing the Default Records in the Server-Wide DNS Template
To view the default records in the server-wide DNS template:
Go to Tools & Settings > DNS Template. All resource record templates will be displayed.
The <ip> and <domain> templates are automatically replaced in the generated zone
with real IP addresses and domain names.
Adding Resource Records to the Server-Wide DNS Template
To add a new resource record to the server-wide DNS template:
1. Go to Tools & Settings > DNS Template.
2. Click Add DNS Record.
3. Select the resource record type and specify the record properties as
desired.
Note that you can use <ip> and <domain> templates that will be replaced in the
generated zone with real IP addresses and domain names. You can use a wildcard
symbol (*) to specify any part of the domain name, and you can specify the exact
values you need.
4. Click OK.
Removing Resource Records from the Server-Wide DNS Template
To remove a resource record from the server-wide DNS template:
1. Go to Tools & Settings > DNS Template.
2. Select a checkbox corresponding to the record template you wish to
remove, and click Remove.
3. Confirm removal and click OK.
Page 66

66 DNS
Restoring the Default Configuration of the Server-Wide DNS Template
Panel provides you with the option to return the DNS template to the state in which it
was right after Panel installation.
To restore the original configuration of server-wide DNS template:
1. Go to Tools & Settings > DNS Template.
2. Click Restore Defaults.
Editing the Start of Authority (SOA) Record
The Panel updates automatically the zone name, host name, administrator’s e-mail
address, and serial number, and writes the default values for the rest of Start of
Authority record parameters to the zone files it maintains. If you are not satisfied with
the default values, you can change them through the control panel.
To change the Start of Authority (SOA) record settings in the server-wide
DNS template:
1. Go to Tools & Settings > DNS Template.
2. Click SOA Records Template.
3. Specify the desired values:
TTL. This is the amount of time that other DNS servers should store the record in
a cache. The Panel sets the default value of one day.
Refresh. This is how often the secondary name servers check with the primary
name server to see if any changes have been made to the domain's zone file.
The Panel sets the default value of three hours.
Retry. This is the time a secondary server waits before retrying a failed zone
transfer. This time is typically less than the refresh interval. The Panel sets the
default value of one hour.
Expire. This is the time before a secondary server stops responding to queries,
after a lapsed refresh interval where the zone was not refreshed or updated.
The Panel sets the default value of one week.
Minimum. This is the time a secondary server should cache a negative response.
The Panel sets the default value of three hours.
4. Click OK. The new SOA record parameters will be set for the newly
created domains.
Usage of serial number format recommended by IETF and RIPE is mandatory for many
domains registered in some high-level DNS zones, mostly European ones. If your
domain is registered in one of these zones and your registrar refuses your SOA serial
number, using serial number format recommended by IETF and RIPE should resolve
this issue.
Page 67

DNS 67
Parallels Plesk Panel servers use UNIX timestamp syntax for configuring DNS zones.
UNIX timestamp is the number of seconds since January 1, 1970 (Unix Epoch). The
32-bit timestamp will overflow by July 8, 2038.
RIPE recommends using YYYYMMDDNN format, where YYYY is year (four digits), MM
is month (two digits), DD is day of month (two digits) and NN is version per day (two
digits). The YYYYMMDDNN format will not overflow until the year 4294.
To change the Start of Authority (SOA) serial number format to
YYYYMMDDNN for the server-wide DNS template:
1. Go to Tools & Settings > DNS Template.
2. Click SOA Records Template.
3. Select the Use serial number format recommended by IETF and RIPE checkbox.
Note: See the sample of SOA serial number generated with the selected format. If
the resulting number is less, than the current zone number, the modification may
cause temporary malfunction of DNS for this domain. Zone updates may be
invisible to Internet users for some time.
4. Click OK.
To restore the default Start of Authority (SOA) serial number format (UNIX
timestamp) for the server-wide DNS template:
1. Go to Tools & Settings > DNS Template.
2. Click SOA Records Template.
3. Clear the Use serial number format recommended by IETF and RIPE checkbox.
Note: See the sample of SOA serial number generated with the selected format. If
the resulting number is less, than the current zone number, the modification may
cause temporary malfunction of DNS for this domain. Zone updates may be
invisible to Internet users for some time.
4. Click OK.
Page 68

68 DNS
Applying DNS Template Changes (Linux)
Once you change the structure of the server-wide DNS template, you can apply
changes to existing zones in Panel for Linux by clicking Apply DNS Template Changes.
The following options become available after clicking Apply DNS Template Changes:
Apply changes to unaltered zones.
Use this option if you desire to obtain more control and apply changes only to direct
template copies leaving user-modified zones for manual review and per-zone
application.
Apply changes to all zones.
Use this option to deliver changes to all zones at once.
To apply changes to a particular zone, open the related subscription in the Control
Panel, and go to Websites & Domains > <domain_name> > DNS Settings and select the
zone. You should see the corresponding button in the toolbar.
Note: If you apply changes to all zones, the zones become unaltered and will remain in
this status until somebody modifies them. The same goes for a user-modified zone if
you apply the changes directly to it.
In Panel for Windows, the changes in the server-wide DNS template are applied only to
newly created zones.
The template changes are applied using the following rules:
User-modified records always remain intact (are not modified or removed under any
circumstances).
Records added to the template are added to the zone.
Records removed from the template are removed from the zone (if they were not
changed by users before that).
Records modified in the template are modified in the zone (if they were not
changed by users before that).
Note: After restoration, migration, or upgrade, all zones are treated as user-modified by
default, so no changes will be applied if you update something in the DNS template
and forward the changes only to unaltered zones. If you wish to perform DNS zone
changes in bulk after upgrade, apply the changes to all zones at the first time.
Page 69

DNS 69
DNS Zones for Subdomains
ON
Has no effect on the DNS zone of a parent domain.
OFF
A new DNS zone is created
for the subdomain, and all
DNS records corresponding
to this subdomain are
removed from the parent
domain's DNS zone.
Only A and AAAA records
corresponding to this
subdomain are added to the
parent domain's DNS zone.
Panel allows each subdomain to have its own DNS zone. These subdomain zones are
useful if you wish to specify a custom name server for a particular subdomain or
shorten the number of domain DNS records by rearranging them to subordinate zones.
Generally speaking, subdomain DNS zones bring all domain DNS features to the
subdomain level.
By default, Panel does not create separate DNS zones for subdomains. However, if
you wish to try out this feature, use the following command-line call:
server_pref –u –subdomain-dns-zone own
To turn this feature off, use:
server_pref –u –subdomain-dns-zone parent
Learn more about running Panel utilities at
(Linux) http://download1.parallels.com/Plesk/PP11/11.5/Doc/en-US/online/plesk-
unix-cli/37894.htm
(Windows) http://download1.parallels.com/Plesk/PP11/11.5/Doc/en-
US/online/plesk-win-cli/44076.htm
Note: The default behavior in 10.4 versions before MU#9 was to create subdomain
DNS zones. If you apply Update #9 to 10.4, the feature will remain active. Otherwise,
the default behavior will be not to create the separate zones.
When subdomain zones are off, customers modify the parent domain's DNS zone by
toggling Panel control over a particular subdomain zone. In fact, when they go to
Websites & Domains > <domain_name> > DNS Settings > Switch On/Off the DNS Service and
clicks Manage next to a subdomain name, the following situations are possible.
Page 70

70 DNS
Configuring the Recursive DNS
Panel allows you to configure its DNS server to provide the recursive service for
queries. With recursive service allowed, your DNS server, when queried, performs all
the lookup procedures required to find the destination IP address for the requester.
When recursive service is not allowed, your DNS server performs minimal number of
queries only to find a server that knows where the requested resource resides and to
redirect the requester to that server. Therefore, recursive service consumes more
server resources and makes your server susceptible to denial-of-service attacks,
especially when the server is set to serve recursive queries from clients outside your
network.
After your install Parallels Plesk Panel, the built-in DNS server serves recursive queries
only from your own server and from other servers located in your network. This is the
optimal setting. If you upgraded from earlier versions of Parallels Plesk Panel, your
DNS server may be configured to serve recursive queries from any host.
If you want to change the settings for recursive domain name service:
1. Go to Tools & Settings > DNS Template > DNS Recursion.
2. Select the option you need:
To allow recursive queries from all hosts, select Any host.
To allow recursive queries from your own server and hosts from your network,
select Localnets.
To allow recursive queries only from your own server, select Localhost.
3. Click OK.
Page 71

DNS 71
Restricting DNS Zones Transfer
By default, transfer of DNS zones is allowed only for name servers designated by NS
records contained within each zone. If your domain name registrar requires that you
allow transfer for all zones you serve, adjust the restrictions on DNS zones transfer as
described below.
To define hosts to which DNS zone transfers are allowed:
1. Go to Tools & Settings > DNS Template.
2. Click Transfer Restrictions Template. A screen will show all hosts to which
DNS zone transfers for all zones are allowed.
3. Click Add New Address.
4. Specify the registrar's IP or network address and click OK.
Restricting Users' Access to Other Users' DNS Zones
By default, users can create new subdomains and domain aliases in the DNS zones
belonging to other users. This means that they can set up websites and e-mail
accounts which could be used for spamming, phishing or identity theft.
To prevent users from setting up domains and domain aliases in the DNS
zones belonging to other users:
1. Go to Tools & Settings > Server Settings.
2. Select the Forbid users to create DNS subzones in other users' DNS superzones
checkbox.
3. Click OK.
Page 72

72 DNS
Using BIND Instead of Microsoft DNS (Windows)
On Windows, there are two DNS servers available as Panel components: Microsoft
DNS and BIND. The default Panel installation includes only Microsoft DNS. However,
you can install the BIND DNS server and switch to it at any time.
To switch from Microsoft DNS to BIND:
1. Go to Tools & Settings > Updates and Upgrades and install the BIND DNS
server using the Parallels Installer.
2. Go to Tools & Settings > Server Components and click DNS Server.
3. Select BIND DNS Server and click OK.
When you have both DNS servers installed on your server, you can switch between
them at any time on the page Tools & Settings > Server Components > DNS Server.
Switching Off the DNS Service
By default, Panel server acts as a primary name server for all hosted domains.
However, if you do not want to provide the DNS service, you can switch it off by
clicking Switch Off in the Tools & Settings > DNS Template. Note that this will switch off the
DNS only for domains created after you click the button. Additionally, subscribers of
service plans that include the permission DNS zone management will still be able to switch
on the DNS for their domains through the Control Panel.
Using External DNS Servers
Although Panel provides all the instruments to run DNS on your server, you also can
host the DNS zones on an external DNS server. This may be your own separate server
or a third-party DNS service such as Amazon Route 53
(http://aws.amazon.com/route53/) or DynECT (http://dyn.com/dns/dynect-managed-
dns/).
By default, Panel is unable to automatically manage DNS zones on external DNS
servers.To make this possible, you should write an integration script. The script should
communicate with the DNS server’s backend (like API) and apply all DNS zones
changes occurred in Panel. To learn how to prepare such a script, refer to the
document Developing Extensions for Parallels Plesk Panel 11.5, section Integration with Third-
Party DNS Services.
Page 73

DNS 73
Note: If you perform clean Panel installation and plan to use an external DNS server,
you can exclude the DNS server component as described in the section 3. Choose Panel
Components of the Installation, Upgrade, Migration, and Transfer Guide. To learn how Panel
behaves when it is not connected to an external DNS service and does not have a local
DNS server, see the section Panel Without a DNS Server (on page 74).
With external DNS, all Panel features related to DNS are supported and work as usual,
namely:
DNS template, zones, and records management by means of the Panel UI,
command-line utilities, and API requests.
APS applications that use the DNS aspect.
Other services that use DNS, for example, DomainKeys spam protection and
Sender Policy Framework. To learn more, see the sections Antispam Tools (on page
83).
Integration with Amazon Route 53
An example of the script that integrates Panel with Amazon Route 53 is available in the
/examples/route53-dns.zip file from the plesk-extensions-sdk.zip archive
available at http://download1.parallels.com/Plesk/Doc/en-US/zip/plesk-extensions-
sdk.zip.
To integrate your Panel with Amazon Route 53:
1. Download the file http://download1.parallels.com/Plesk/Doc/en-
US/zip/plesk-extensions-sdk.zip.
2. Copy the file route53.php from the archive /examples/route53-
dns.zip file to any location on your Panel server.
3. Specify your Amazon security credentials in the script (lines 23 and 24):
'client' => array(
'key' => '<key>',
'secret' => '<secret>',
),
4. Make the script route53.php readable by the user psaadm. Run:
chown psaadm /usr/share/route53.php
chmod 400 /usr/share/route53.php
5. Download the library for working with Amazon Web Services in PHP -
aws.phar from http://aws.amazon.com/sdkforphp/ and place it in the
same directory with the script.
6. Run the following command line utility:
plesk bin server_dns --enable-custom-backend '/usr/bin/php
/<path_to_route53>/route53.php
Page 74

74 DNS
Subscription Transferring Issue
If you transfer subscriptions from Panel with a local DNS service to Panel with an
external DNS service, the DNS zones of the domains are not transferred to the external
nameservers automatically. You should create the zones on the nameservers
manually.
Panel Without a DNS Server
If you exclude a DNS server from your Panel installation (as described in the section 3.
Choose Panel Components of the Installation, Upgrade, Migration, and Transfer Guide) and do
not connect an external DNS service, Panel does not provide the DNS service for
websites hosted on it. Additionally, the following changes in Panel behavior take place:
The DNS Template link is not displayed on the Tools & Settings page of the Server
Administration Panel.
In the Control Panel, the link DNS Settings in Websites & Domains > <domain_name> is
replaced with the link Whois Information that opens a page with the information about
the domain name registration.
Panel users are unable to install web applications that require DNS zone
management permission (or DNS aspect).
Panel returns errors on attempts to manage its DNS server or DNS zones by
means of the command line utility dns or API RPC requests with <dns> nodes.
Important: If you already have domains on your Panel server and then install a DNS
server or connect an external DNS service, you should configure DNS zones of these
domains manually. DNS zones for domains created after you configure DNS service in
your Panel will be created automatically in accordance with the server-wide DNS
template.
Page 75

By default, your Parallels Plesk Panel works in cooperation with a mail server, which
In this chapter:
Configuring Server-Wide Mail Settings .............................................................. 77
Using Panel Without the Mail Server ................................................................. 79
Removing Mail Functionality from the Control Panel ......................................... 81
Using Other Mail Server Software ..................................................................... 82
Antispam Tools ................................................................................................. 83
Outbound Spam Protection ............................................................................... 94
C H A P T E R 6
enables you to run the mail services on the same machine where you host websites.
The mail server settings are available in Tools & Settings > the Mail group. For details,
see Configuring Server-Wide Mail Settings (on page 77).
Mail Server Software
By default, the Postfix mail server is installed on Parallels Plesk Panel for Linux, and
MailEnable on Parallels Plesk Panel for Windows.
Other supported software is Qmail on Linux (shipped with Panel), and IceWarp or
SmarterMail on Windows (need to be installed separately). For details, see Using Other
Mail Server Software (on page 82).
Using Panel Without the Mail Server
Using the mail server in Panel is optional. Parallels Plesk Panel for Linux allows you to
switch off or not install the mail service for all domains hosted on your server. On
Windows, you cannot uninstall the default mail server, but you can change the server's
configuration to prohibit outgoing mail.
Learn the aspects of using Panel without the mail server in Using Panel Without the Mail
Server (on page 79).
Removing Mail Functionality from the Control Panel
You may want to prohibit your users from operating mail services, without uninstalling
the mail server. In this case, you can hide some mail-related UI elements. For details,
see Removing Mail Functionality from the Contro (on page 81)l Panel.
Next in this chapter, we will provide details on how to configure various aspects of the
mail service for domains hosted on your server.
Page 76

76 Mail
Antivirus Software ............................................................................................. 100
Webmail Software ............................................................................................. 102
Mailing Lists (Linux) ........................................................................................... 103
Preventing Mass Email Sending (Linux) ............................................................ 103
Mail Queue (Linux) ............................................................................................ 104
Mass Email Notifications ................................................................................... 105
Configuring Email Notifications .......................................................................... 109
Page 77

Mail 77
Configuring Server-Wide Mail Settings
By default, Panel works in cooperation with mail server software, which provides email
services for mailboxes and mailing lists. After installation, the mail server is configured
automatically and is ready to serve. However, we recommend that you review the
default settings to make sure that they satisfy your needs.
To view or configure the mail service settings:
1. Go to Tools & Settings > Mail Server Settings (in the Mail group). The server-
wide mail preferences screen will open on the Settings tab.
2. Leave the Enable mail management functions in Panel checkbox selected if
you want to allow your users to create mail accounts through Control
Panel and use the mail services provided by the Panel -managed mail
server. If you are using an external mail server, clear this checkbox.
3. If you want to limit the size of an email message that can be sent
through your server, type the desired value in kilobytes into the Maximum
message size box. Otherwise, leave this field blank.
4. To protect your server against unauthorized mail relaying or injection of
unsolicited bulk mail, select the Enable message submission checkbox to
allow your customers to send email messages through the port 587.
Also notify your customers that they need to specify in their email programs'
settings the port 587 for outgoing SMTP connections, and be sure to allow
connections to this port in your firewall settings.
5. Select the mail relay mode.
With closed relay the mail server will accept only mail addressed to the users who
have mailboxes on this server. Your customers will not be able to send any mail
through your outgoing SMTP server, therefore, we do not recommend closing mail
relay.
With relay after authorization, only your customers will be able to receive and send
email through your mail server. We recommend that you leave the authorization is
required option selected, and specify allowed authentication methods:
POP3 lock time. With POP3 authorization, once a user has successfully
authenticated to the POP server, he or she is permitted to receive and send
email through the mail server for the specified period of time.
SMTP. With SMTP authorization, your mail server requires authorization if the
email message must be sent to an external address.
Note for Windows hosting users: If you do not wish to use relay restrictions
for networks that you trust, specify the network IP and mask in the Use no
relay restrictions for the following networks: field (e.g., 123.123.123.123/16) and
click the icon. To remove a network from the list, click the icon
corresponding to the network you wish to remove.
Page 78

78 Mail
The relay hosts on the networks in the list are considered not to be potentially
operated by spammers, open relays, or open proxies. A trusted host could
conceivably relay spam, but will not originate it, and will not forge header
data. DNS blacklist checks will never query for hosts on these networks.
There is also an option to allow open relay without authorization, which, by default,
is hidden from the user interface. Opening mail relay without authorization is not
recommended because it allows spammers to send unsolicited mail through your
server. If you want to set the open relay, log in to the server's file system, locate the
file root.controls.lock in your Parallels Plesk Panel installation directory
(PRODUCT_ROOT_D/var/root.controls.lock on Unix and
PRODUCT_DATA_D/var/root.controls.lock on Windows platforms) and
remove the line /server/mail.php3:relay_open from this file. The open relay
option will show in your control panel.
6. Select the antivirus program that should be used on the server. For
details, see Antivirus Software (on page 100).
7. Select the spam protection options that should be used on the server.
Note: If you wish to set up spam protection systems, such as SpamAssassin spam
filter, or protection systems based on DomainKeys, DNS blackhole lists or Sender
Policy Framework (SPF), proceed to the section Antispam Tools (on page 83).
8. If you are using Qmail mail server, you can also select the mail account
format.
Selecting the Use of short and full names is allowed option will allow users to log in to
their mail accounts by specifying only the left part of e-mail address before the @
sign (for example, username), or by specifying the full email address (for example,
username@your-domain.com).
To avoid possible authorization problems for email users who reside in different
domains but have identical user names and passwords, we highly recommend that
you choose the Only use of full mail account names is allowed option.
Once you have set your mail server to support only full mail account names, you
will not be able to switch back to supporting short account names until you make
sure there are no encrypted passwords for mailboxes and user accounts with
coinciding user names and passwords residing in different domains.
9. Click OK to submit the changes.
Page 79

Mail 79
Using Panel Without the Mail Server
Using the mail server in Panel is optional. Parallels Plesk Panel for Linux allows you to
switch off (uninstall) the mail service for all domains hosted on your server. On the
Windows hosting, you cannot switch off the default mail server, but you can change its
configuration to prohibit outgoing mail. Also, you can exclude the mail server from the
installed components during Panel installation.
However, when the mail server is not installed or prohibited from sending outgoing
mail, you face the problem: Panel still needs to send notifications, and customers'
scripts may need to send emails. To solve this problem, Panel can send outgoing mail
through an arbitrary external SMTP server.
Using an External SMTP Server for Outgoing Mail (Linux)
When the Panel-managed mail server is not installed, Panel uses the built-in SMTP
client to send mail through the specified external SMTP server. By default, the client is
not installed, and the link External SMTP Server is not available in Tools & Settings > the
Mail group. Panel allows you to install the client only instead of the Panel-managed mail
server.
To use the external SMTP server:
1. Uninstall the Panel mail server and install the SMTP client: In Tools & Settings >
Updates and Upgrades > Add/Remove Components > Mail hosting features select MSMTP
relay only mail server (SMTP client) instead of the selected mail server.
After you have uninstalled the Panel mail server, customers cannot use mail
services. For details, see Control Panel Functionality Without the Mail Server below on
this page.
2. Set the SMTP server in Tools & Settings > External SMTP Server (in the Mail group) and
select at least one of the options:
Allow Panel to send email notifications through this SMTP server
Allow users' scripts to send mail through this SMTP server Other ways to set up the
external SMTP server settings:
By the command line utility mailserver (the --update-smtp-settings
command)
By API RPC requests with the server operator (set.prefs operation)
3. If the SMTP server requires authentication, you need to notify site owners about the
credentials (Username and Password) that they should use in their scripts to enable
the scripts to send mail.
Panel will send notifications and mail generated by scripts through the specified
external SMTP server. Note that if you do not specify the external SMTP server
settings, no mail services will be available.
After you install the client, only one link - External SMTP Server - will be found in Tools &
Settings > the Mail group.
Page 80

80 Mail
Note: If you exclude the mail server from the list of components during Panel
installation, the SMTP client is automatically installed instead of mail server software. In
this case, you will be prompted to provide the SMTP client settings during Panel
installation.
Using an External SMTP Server for Outgoing Mail (Windows)
Panel has a built-in SMTP client that sends outgoing mail to the SMTP server specified
in Tools & Settings > External SMTP Server (in the Mail group). By default, the Panel mail
server is specified there, so that Panel sends all outgoing mail (including notification
and mail generated by scripts) through the Panel mail server.
When you prohibit any outgoing mail from Panel mail server, you should specify
another SMTP server in Tools & Settings > External SMTP Server (in the Mail group) and
select at least one of the options:
Allow Panel to send email notifications through this SMTP server
Allow users' scripts to send mail through this SMTP server.
If the SMTP server requires authentication, you need to notify site owners about the
credentials (Username and Password) that they should use in their scripts to enable the
scripts to send mail.
Panel will send notifications and mail generated by scripts through the specified
external SMTP server.
If you do not set the external SMTP server, no outgoing mail services will be available.
Control Panel Functionality Without the Mail Server
With the mail server uninstalled, Panel does not provide mail-related functionality for
your subscribers. The Mail tab and UI elements related to mailboxes are not available.
In addition, other changes take place when no mail server is installed:
Webmail is not available.
Users cannot install APS applications that require mail service.
Note thatall the files and folders containing mail data of your subscribers remain on
Panel server.
Important: When you perform transfer of domains from Panel with a mail service to
Panel without the mail service, all the data that concerns domains’ mailboxes is not
transferred.
Page 81

Mail 81
Removing Mail Functionality from the Control Panel
If you want to use a mail server running on a separate machine, or want to prohibit your
users from operating mail services, you can remove controls related to managing email
services and adding new mail accounts from the Panel UI. To do this, turn off the
Enable mail management functions in Panel option. This option does not actually switch off
the Panel-managed mail server, but only removes some UI elements from the Control
Panel. These elements will be hidden from hosting service customers and their users.
The following items are removed:
The Mail tab.
Users tab > user name > Change Settings > Create an e-mail address under your account
option.
To hide the user interface elements related to mail services from the
Control Panel:
1. In the Server Administration Panel, go to Tools & Settings > Mail Server
Settings (in the Mail group).
2. Turn off the Enable mail management functions in Panel option and click OK.
Alternatively, you can hide mail-related functionality and corresponding permissions
using the /usr/local/psa/admin/conf/panel.ini file. To do so, add the
following line:
services.withoutMailService = true
Page 82

82 Mail
Using Other Mail Server Software
Using Other Mail Server Software (Linux)
Panel for Linux is shipped with the Postfix and Qmail mail servers. You can switch
between the two servers in Tools & Settings > Updates and Upgrades > Add/Remove
Components > Mail hosting features.
Panel will start using the new mail server without any need for server restart. You can
select another mail server at any time later.
Using Other Mail Server Software (Windows)
Apart from the default mail server (MailEnable), Panel for Windows supports IceWarp
(Merak) and SmarterMail, which are not shipped with Panel but should be installed
separately. To use IceWarp or SmarterMail, do the following:
1. Download and install the mail server software according to the
instructions provided by the mail server manufacturer.
2. Log in to Panel and go to Tools & Settings > Server Components > the Mail
Server link.
The mail server you have installed should now be displayed in the list of available
mail servers.
3. Select the mail server you need and click OK.
Panel will start using the new mail server without any need for server restart. You can
select another mail server at any time later.
Page 83

Mail 83
Antispam Tools
To protect your users from spam, you can use the following tools with your Panel:
SpamAssassin spam filter. It is a powerful spam filter that uses a wide variety of local
and network tests to identify spam signatures.
You can configure the spam filter so as to either delete suspicious messages when
they come to your mail server, or change the subject line and add "X-Spam-Flag:
YES" and "X-Spam-Status: Yes" headers to the messages. The latter can be useful
for users who prefer to filter mail with mail filtering programs installed on their own
computers.
To learn more about SpamAssassin, visit http://spamassassin.apache.org.
To configure and switch on the SpamAssassin filter, proceed to the section
SpamAssassin Spam Filter (on page 85).
DomainKeys. DomainKeys is a spam protection system based on sender
authentication. When an e-mail claims to originate from a certain domain,
DomainKeys provides a mechanism by which the recipient system can credibly
determine that the e-mail did in fact originate from a person or system authorized to
send e-mail for that domain. If the sender verification fails, the recipient system
discards such e-mail messages. To configure the DomainKeys system on your
server, refer to the section DomainKeys Protection (on page 88).
DNS blackhole lists. This spam prevention system is based on DNS queries made by
your mail server to a database, which contains known and documented sources of
spam, as well as an extensive listing of dynamic IP addresses. Any positive
response from this database should result in your mail server returning a '550' error,
or rejection of the requested connection.
To configure your mail server for working with DNSBL databases, proceed to the
section DNS Blackhole Lists (on page 90).
Sender Policy Framework (available only for Linux hosting). This spam prevention
system is also DNS query-based. It is designed to reduce the amount of spam sent
from forged e-mail addresses. With SPF, an Internet domain owner can specify the
addresses of machines that are authorized to send e-mail for users of his or her
domain. Receivers that implement SPF then treat as suspect any e-mail that claims
to come from that domain but fails to come from locations that domain authorizes.
To learn more about SPF, visit http://www.openspf.org/howworks.html.
To enable filtering based on SPF, proceed to the section Sender Policy Framework
System (Linux) (on page 92).
Server-wide black and white lists. Black and white lists are standard mail server
facilities. You can use black and white lists to block or receive mail from specific
servers. Your mail server retrieves domain names and IP addresses of servers
which attempt to establish connection with it. If a domain name is matched against
black list entries, your server refuses the connection. Thus, the potential spam
message will be never received. If an IP address is matched against white list
entries, your server receives a message from the sender without using the spam
protection systems such as sender authentication, greylisting, or DNSBL.
To set up server-wide black and white lists, proceed to the section Server-wide Black
and White Lists (on page 90).
Page 84

84 Mail
Greylisting (available only for Linux hosting). Greylisting is a spam protection system
Next in this section:
SpamAssassin Spam Filter ................................................................................85
DomainKeys Protection .....................................................................................88
DNS Blackhole Lists ..........................................................................................90
Server-wide Black and White Lists .....................................................................90
Sender Policy Framework System (Linux) .........................................................92
Greylisting (Linux) ..............................................................................................93
which works as follows: For every e-mail message that comes to the server,
sender's and receiver's e-mail addresses are recorded in a database. When a
message comes for the first time, its sender and receiver addresses are not listed in
the database yet, and the server temporarily rejects the message with an SMTP
error code. If the mail is legitimate and the sending server is properly configured, it
will try sending e-mail again and the message will be accepted. If the message is
sent by a spammer, then mail sending will not be retried: spammers usually send
mail in bulk to thousands of recipients and do not bother with resending.
The greylisting protection system also takes into account the server-wide and peruser black and white lists of e-mail senders: e-mail from the white-listed senders is
accepted without passing through the greylisting check, and mail from the blacklisted senders is always rejected.
When the greylisting support components are installed on the server, then
greylisting is automatically switched on for all domains. You can switch off and on
greylisting protection for all domains at once (at Tools & Settings > Spam Filter
Settings), or for individual subscriptions (in Control Panel > Mail tab > Change Settings).
Page 85

Mail 85
SpamAssassin Spam Filter
The SpamAssassin spam filter identifies spam messages among emails sent to
mailboxes hosted on your Panel server. To achieve the desired level of spam
protection, Panel lets you configure a number of SpamAssassin settings, namely:
Spam filter sensitivity
To identify spam messages, SpamAssassin performs a number of different tests on
contents and subject line of each message. As a result, each message scores a
number of points. The higher the number, the more likely a message is spam. For
example, a message containing the text string “BUY VIAGRA AT LOW PRICE!!!” in
Subject line and message body scores 8.3 points. By default, the filter sensitivity is
set so that all messages that score 7 or more points are classified as spam. If your
users still receive spam messages with the default sensitivity, increase it by setting
a lesser value, for example, 6. If SpamAssassin marks valid messages as spam,
decrease the sensitivity by setting a higher value.
Spam marks
At the server level, you cannot set the server-wide spam filter to automatically
delete spam: you can do it only on a per-mailbox basis. So, for the server-wide
policy, you can choose only marking messages as spam: X-Spam-Flag: YES and
X-Spam-Status: Yes headers are added to the message source by default. If
you want, the spam filter will additionally include a specific text string to the
beginning of the messages' subject line (by default, this string is
*****SPAM*****).
Though you cannot configure SpamAssassin to delete all spam messages, you can
let each mailbox owner configure their own spam protection settings. This includes,
for example, setting their spam filters to automatically delete messages marked by
SpamAssassin, or setting up their personal black and white lists. For details on
adjusting spam filtering settings for a specific mailbox, refer to the section Protecting
from Spam (on page 530).
Maximum size of messages to check
Analyzing a huge number of emails can heavily increase the load on your server.
To avoid this, you can set the maximum size of the message that the spam filter will
test.
Number of SpamAssassin processes
Another way to limit the server loading by SpamAssassin is defining the maximum
number of SpamAssassin processes (on Linux) or threads (on WIndows) running
simultaneously on the server.
Trusted languages and locales (only on WIndows)
You can define the language characteristics of mail that should always pass the
filter by specifying trusted languages and locales. Letters written in the specified
languages and with the defined character sets will not be marked as spam.
Black and white lists
SpamAssassin lets you include certain senders into its black and white lists:
If you do not want your users to receive e-mail from specific domains or
individual senders, add the respective entries to the spam filter’s black list.
If you want to be sure that you and your users will not miss e-mail from specific
senders, add e-mail addresses or entire domains to the spam filter’s white list.
Page 86

86 Mail
These settings are available to you on the Tools & Settings > Spam Filter Settings page.
Next in this section:
Switching on SpamAssassin ............................................................................. 86
Defining the Maximum Mail Size for SpamAssassin (Linux) .............................. 87
Configuring Black and White Lists ..................................................................... 87
Note: Panel exposes only basic SpamAssassin functionality. If you want to create
complex antispam rules, edit SpamAssassin configuration files. For more information
on advanced SpamAssassin configuration, refer to the Advanced Administration Guide,
Spam Protection for both Linux and Windows and other respective documentation at
http://spamassassin.apache.org/doc/Mail_SpamAssassin_Conf.html.
Switching on SpamAssassin
To switch on SpamAssassin:
1. Go to Tools & Settings > Spam Filter Settings (in the Mail group).
2. Select the option Switch on server-wide SpamAssassin spam filtering.
3. To let your users set their own spam filtering preferences on a per-
mailbox basis, select the option Apply individual settings to spam filtering.
4. Specify the maximum number of SpamAssassin processes in the field
Maximum number of worker spamd processes to run (1-5). We recommend that
you use the default value.
5. Adjust the spam filter's sensitivity by typing the desired value in the field
The number of points a message must score to qualify as spam.
6. On Windows, define the maximum size of messages that
SpamAssassin will process by selecting the option Do not filter if mail size
exceeds specified size and providing the desired value. On Linux, this
parameter is unavailable in Panel. For details on editing the maximum
mail size on Linux, see Defining the Maximum Mail Size for SpamAssassin (Linux)
(on page 87).
7. Specify how to mark messages recognized as spam in the field Add the
following text to the beginning of subject of each message recognized as spam. If
you do not want the spam filter to modify message subject, leave this
box blank. If you want to include into the subject line the number of
points that messages score, type _SCORE_ in this box.
8. On Windows, specify trusted languages and locales using the lists
Trusted languages and Trusted locales.
9. Click OK.
Page 87

Mail 87
Defining the Maximum Mail Size for SpamAssassin (Linux)
To decrease the load on your server caused by SpamAssassin, you can limit the
maximum size of emails that SpamAssassin should analyze. All messages exceeding
this size will be delivered to their recipients without checking.
To define the maximum size of messages that SpamAssassin will
process:
1. Open for editing the configuration file /etc/psa/psa.conf
2. Specify the desired value in bytes for the parameter
SA_MAX_MAIL_SIZE.
By default, the maximum email size is 256000 bytes. We recommend that you limit
the maximum mail size to 150 - 250 Kbytes, which is usual for mail messages in
HTML format with images. The size of the mail is considered critical for filter and
server overload if it exceeds 500 Kbytes, which is usual for mail messages
containing attachments.
Configuring Black and White Lists
To add entries to the black or white list:
1. Go to the corresponding tab of the Tools & Settings > Spam Filter Settings
page.
2. Click Add Addresses.
3. Provide the list of entries you want to add to the list.
Separate addresses with a coma, a colon, or a white space. You can use an
asterisk (*) as a substitute for a number of letters, and question mark (?) as a
substitute for a single letter. For example: address@spammers.net,
user?@spammers.net, *@spammers.net. Specifying *@spammers.net will block
the entire mail domain spammers.net. If you use a Windows-based server, also
specify what to do with messages coming from the specified addresses.
4. Click OK.
To remove entries from the black or white list:
Select the entries on the corresponding tab and click Remove.
Page 88

88 Mail
Prohibiting Relaying Spam Through Panel Server on Windows
In Panel for Windows, the white list contains localhost (127.0.0.1) by default. This
means that SpamAssassin does not check incoming messages sent from addresses
hosted on your server. Spam senders may use this for relaying spam messages
through your server.
To prohibit relaying mail for unauthenticated SMTP connections:
Remove 127.0.0.1 from the white list.
DomainKeys Protection
To switch on spam protection based on DomainKeys:
1. Go to Tools & Settings > Mail Server Settings (in the Mail group).
2. Under the DomainKeys spam protection group, select the following options:
Allow signing outgoing mail. Selecting this option allows you and your customers to
switch on support for DomainKeys e-mail signing on a per-subscription basis
through the Control Panel (Control Panel > Mail tab > Change Settings). It does not
automatically switch on signing of outgoing e-mail messages.
Verify incoming mail. Selecting this option will configure the DomainKeys system
to check all e-mail messages coming to e-mail users under all domains hosted
on the server.
3. Click OK.
Now your mail server will check all incoming e-mail messages to ensure that they come
from the claimed senders. All messages, sent from the domains that use DomainKeys
to sign e-mail, which fail verification will receive the header DomainKey-Status: 'bad'.
All messages, sent from the domains that do not participate in the DomainKeys
program and do not sign e-mail, will be accepted without verifying.
To switch on signing outgoing e-mail messages for all domains in a
subscription:
1. Go to Control Panel > Mail tab > Change Settings.
2. Select the Use DomainKeys spam protection system to sign outgoing e-mail
messages checkbox.
3. Click OK.
Page 89

Mail 89
Now, the following will happen for the selected domains:
Private keys are generated and placed in the server's database.
Public keys are generated and placed in the TXT resource records created in the
domains' DNS zones.
The sender's policy advertised in the DNS TXT resource records is set to "all e-mail
messages sent from this domain must be cryptographically signed; if someone
receives an e-mail message claiming to originate from this domain, which is not
signed, then this e-mail must be discarded."
Outgoing e-mail messages are digitally signed: the "DomainKeys-Signature"
header containing a signature based on a private key is added to the message
headers.
Page 90

90 Mail
DNS Blackhole Lists
You can use free and paid subscription blackhole lists with your server.
To switch on spam protection based on DNSBL:
1. Go to Tools & Settings > Mail Server Settings (in the Mail group).
2. Select the Switch on spam protection based on DNS blackhole lists checkbox.
3. In the DNS zones for DNSBL service input box, specify the host name that
your mail server should query, for example: sbl.spamhaus.org.
4. Click OK.
Now, e-mail messages from known spammers should be rejected with an error code
550 (connection refused).
Important: If you use the Qmail mail server and switch on DNSBL, senders with IP
addresses from the blackhole list will not be able to send email even if they pass SMTP
authentication. To avoid this problem, switch on the message submission as described
in the section Configuring Server-Wide Mail Settings (on page 77).
Server-wide Black and White Lists
To reject connections from specific mail servers:
1. Go to Tools & Settings > Mail Server Settings (in the Mail group).
2. Click the Black List tab.
3. Click Add Domain.
4. Specify the name of the domain from which you do not want to receive
e-mail. For example, 'evilspammers.net'.
5. Click OK.
6. Repeat steps from 3 to 5 to add as many domains as required.
To assure mail reception from specific servers or networks:
1. Go to Tools & Settings > Mail Server Settings (in the Mail group).
2. Click the White List tab.
3. Click Add Network.
4. Specify an IP address or range of IP addresses from which mail must
always be accepted.
Page 91

Mail 91
5. Click OK.
6. Repeat steps from 3 to 5 to add as many addresses as required.
Page 92

92 Mail
Sender Policy Framework System (Linux)
To set up support for Sender Policy Framework on your Linux-based
server:
1. Go to Tools & Settings > Mail Server Settings (in the Mail group). The server-
wide mail preferences screen will open on the Settings tab.
2. Select the Switch on SPF spam protection checkbox and specify how to deal
with e-mail:
To accept all incoming messages regardless of SPF check results, select the
Create only Received SPF-headers, never block option from the SPF checking mode
drop-down box. This option is recommended.
To accept all incoming messages regardless of SPF check results, even if SPF
check failed due to DNS lookup problems, select the In case of DNS lookup
problems, generate temporary errors option from the SPF checking mode drop-down
box.
To reject messages from senders who are not authorized to use the domain in
question, select the option Reject mail if SPF resolves to fail from the SPF checking
mode drop-down box.
To reject the messages that are most likely from senders who are not authorized
to use the domain in question, select the option Reject mail if SPF resolves to softfail
from the SPF checking mode drop-down box.
To reject the messages from senders who cannot be identified by SPF system
as authorized or not authorized because the domain has no SPF records
published, select the option Reject mail if SPF resolves to neutral from the SPF
checking mode drop-down box.
To reject the messages that do not pass SPF check for any reason (for
example, when sender's domain does not implement SPF and SPF checking
returns the "unknown" status), select the option Reject mail if SPF does not resolve
to pass from the SPF checking mode drop-down box.
3. To specify additional rules that are applied by the spam filter before the
SPF check is actually done by the mail server, type the rules y ou need
in the SPF local rules box.
We recommend that you add a rule for checking messages against the open
database of trusted senders, for example, 'include:spf.trusted-forwarder.org'. For
more information on SPF rules, visit http://tools.ietf.org/html/rfc4408.
4. To specify the rules that are applied to domains that do not publish SPF
records, type the rules into the SPF guess rules box.
For example: v=spf1 +a/24 +mx/24 +ptr ?all
5. To specify an arbitrary error notice that is returned to the SMTP sender
when a message is rejected, type it into the SPF explanation text box.
If no value is specified, the default text will be used as a notification.
6. To complete the setup, click OK.
Page 93

Mail 93
Greylisting (Linux)
When the greylisting support components are installed on the server, greylisting
protection is automatically switched on for all domains. Therefore, no additional actions
are required. If you do not want to use greylisting protection, you can switch it off.
To switch off greylisting protection for all domains:
1. Go to Tools & Settings > Spam Filter Settings (in the Mail group).
2. Clear the Switch on server-wide greylisting spam protection checkbox.
3. Click OK.
To switch on greylisting protection for all domains:
1. Go to Tools & Settings > Spam Filter Settings (in the Mail group).
2. Select the Switch on server-wide greylisting spam protection checkbox.
3. Click OK.
To switch off greylisting protection for all domains in a subscription:
1. Go to Control Panel > Mail tab > Change Settings.
2. Clear the Switch on greylisting spam protection for all mail accounts under this
domain checkbox.
3. Click OK.
To switch on greylisting protection for all domains in a subscription:
1. Go to Control Panel > Mail tab > Change Settings.
2. Select the Switch on greylisting spam protection for all mail accounts under this
domain checkbox.
3. Click OK.
Page 94

94 Mail
Outbound Spam Protection
Type
Description
Confirmed spam
Spam messages that contain patterns seen in global
spam attacks. For example, these messages are sent
from compromised computers (zombies).
Bulk spam
Spam messages sent in bulk quantities from sources
that were not yet identified as spammers. The patterns
of such messages were seen in global spam attacks.
If your hosting offerings include mail services, keep in mind that your mail server can
be used for malicious purposes. For example, spammers can use compromised
accounts for sending mass e-mails containing spam or viruses, compromised
computers (also called zombies) could relay spam through your server, and so on. This
may cause an increased load on the server, spam or malware complaints from
recipients, or your server’s IP addresses may be added to public black lists.
To prevent sending spam and other malicious messages from your server, we offer
Parallels Premium Outbound Antispam (hereafter referred to as Outbound Antispam).
This is an additional Panel component that analyzes all outgoing mail and blocks
sending of undesired messages. To learn how to install Outbound Antispam, see the
section Installing Parallels Premium Outbound Antispam. (on page 95)
To detect outgoing spam and virus messages, the component uses the external
Parallels Premium Outbound Antispam service that identifies outbreaks of spam and
email-borne malware over the Internet in real time. Every email outbreak can be
identified by one or more recurrent patterns, even if messages within the attack differ
from each other. The Parallels Premium Outbound Antispam service detects such
outbreaks using constantly updated global service repositories where all spam and
virus patterns are stored. When your mail server (qmail or Postfix) is requested to send
a message, the local Outbound Antispam component extracts the message patterns
and compares them to its local cache or sends to the service repository to identify
whether they were seen in global spam or virus attacks. All messages which patterns
were identified as malicious are blocked. An even more important benefit of using
Outbound Antispam is that it allows you to identify spammers who use your server
within the first few messages they send out, allowing you to prevent them from issuing
the attack. In addition, the component counts mail from each unique sender notifying
you when a sender exceeds a certain message threshold.
To learn how to turn on and configure protection from outbound spam on your server,
see the section Configuring Protection (on page 96).
Mail Classification
Outbound Antispam uses the following mail classification.
Page 95

Mail 95
Suspected spam
Messages that are sent in bulk quantities but not yet
confirmed as spam. This can be sending of legitimate
mass e-mails as well as spam messages in the first few
seconds of the attack.
Virus messages
Messages that either contain characteristics of
confirmed malware or with high likelihood pose a
malware threat.
Valid mail
Legitimate messages for which Outbound Antispam
does not have any incriminating information.
Non spam
Messages that are confirmed, without doubt, as coming
from trusted sources. This classification is very rarely
used.
Next in this section:
Installing Parallels Premium Outbound Antispam .............................................. 95
Configuring Protection ....................................................................................... 96
Installing Parallels Premium Outbound Antispam
To start using Parallels Premium Outbound Antispam, perform the following steps:
1. Install the component. This is done from the Tools & Settings > Updates & Upgrades.
After the installation is completed, you will find the component on the Tools &
Settings > Outbound Spam Filter page.
2. Activate the component. Parallels Premium Outbound Antispam requires a
separate license key. You can purchase such a key from your service provider or
directly from Parallels. Once you have obtained a key, install it to Panel using the
Tool & Settings > License Management > Additional License Keys page.
Page 96

96 Mail
Configuring Protection
Next in this section:
Connection Settings .......................................................................................... 97
Sender Identification Policy ............................................................................... 98
Saving Message Samples ................................................................................. 98
Protection Policy ................................................................................................ 98
Setting up outbound spam protection with Parallels Premium Outbound Antispam
includes configuration of the following aspects:
1. Connection settings (on page 97). To let the Parallels Premium Outbound Antispam
component installed on your Panel communicate with the external part of the
antispam system (the repositories), you should configure the component's
connection settings.
2. Sender identification policy (on page 98). To effectively fight sending of spam, the
outbound antispam solution includes a mechanism that allows you to identify the
actual e-mail senders even if they send spam from multiple e-mail addresses. You
should define how the system will identify senders.
3. Saving of message samples (on page 98). To track suspicious activities of senders
on your server, you can configure Parallels Premium Outbound Antispam to save
message samples in a specified directory to let you analyze them later.
4. Protection policy (on page 98). To define how the system will handle spam and
malware messages, configure the protection policy. For example, you can prohibit
sending of spam messages or limit the total number of messages from a single
sender. Additionally, if you are sure that a certain sender is not a spammer, you can
add them to the white list or bulk senders list. The system will send mail from these
senders bypassing some of the antispam checks.
Page 97

Mail 97
Connection Settings
To detect malicious messages, Parallels Premium Outbound Antispam uses the
external Parallels Premium Outbound Antispam service that checks patterns of
outgoing mail. As Parallels Premium Outbound Antispam requires a permanent
connection to the service, the default policy prohibits sending any messages when the
service is unavailable. This could happen, for example, if your Parallels Premium
Outbound Antispam license key has expired or due to network connection problems.
To let users send e-mails when the service is unavailable, select the checkbox Skip
scanning when the service is unavailable in Tools & Settings > Outbound Spam Protection >
Server Configuration tab.
Note: The Parallels Premium Outbound Antispam service address is specified in the
corresponding field on the Server Configuration tab of the Parallels Premium Outbound
Antispam page. Normally, you should not change the default value
resolver%d.plesk.ctmail.com. The only exception is when you experience
connectivity problems and want to troubleshoot them.
Page 98

98 Mail
Sender Identification Policy
An important aspect of outbound spam protection is identification of mail senders. The
sender identification allows you to know the problematic users or accounts on your
server and take actions to prevent them from sending more spam or doing other
actions related to mail sending.
To let you effectively recognize unique senders, Parallels Premium Outbound Antispam
offers you the following ways of identification:
SMTP authentication username. If your Panel server uses SMTP authentication,
Parallels Premium Outbound Antispam will identify users by usernames provided
during the SMTP authentication. To switch on the SMTP authentication in Panel, go
to Tools & Settings > Mail Server Settings > Relay options.
IP address from which a sender connects to your server.
SMTP authentication username if available; otherwise, IP address.
Custom mail header. This may be any string of text included in the message
header.
For example, if you choose IP address, the system will identify all users that connect to
your server from this IP address as a single sender even if they use different e-mail
addresses. To choose a way to identify unique senders, select the corresponding
option in the Tools & Settings > Outbound Spam Protection > Unique Sender Identifier tab.
Saving Message Samples
To keep track of suspicious activities of e-mail senders and identify potential
spammers, you can configure Parallels Premium Outbound Antispam to save samples
of outgoing messages to a specific directory. To do this, select the corresponding
checkbox in the Tools & Settings > Outbound Spam Protection > Unique Sender Identifier tab,
specify the directory, and enter the thresholds for different message types: spam,
suspected spam, and virus messages (see the classification in Protecting from Outbound
Spam (on page 94)). When a number of messages of a certain type from a sender
reaches the corresponding threshold, the system adds the last of these messages to
the specified directory to let you analyze the message's content later. Then the system
starts counting messages again from zero. For example, if you set the threshold for
suspected messages to 10, the system will save each tenth suspected message.
Note: The thresholds do not limit the number of messages that each sender can send.
Protection Policy
The protection policy settings located on the Tools & Settings > Outbound Spam Protection
> Protection Policy tab define what types of messages according to the Parallels
Premium Outbound Antispam classifications the system will block.
Page 99

Mail 99
As described in the section Protecting from Outbound Spam (on page 94), protection
works in the following way: When the Panel mail server receives a request to send a
message, the Outbound Antispam component extracts message patterns and sends
them to the external service. The latter, in its turn, identifies a message type (spam,
valid mail, and so on) and sends the result back to the component. If the message type
is selected in Block message sending, a server will refuse the SMTP transaction with the
5xx PERMFAIL reply code. For a sender, this means that a message could not be sent
under any circumstances. If the sender is another mail server, it is discouraged from
retrying to send the message. If the sender is a mail client (like Microsoft Outlook or
Mozilla Thunderbird), the message will bounce back to it.
Additional Protection Settings
Outbound Antispam allows you not only to reject messages of a certain type, but to
identify their senders by means of Thresholds for blocking senders that you can set for
each message type. The system keeps statistics (available at the Dashboard tab) on
unique senders who exceed these thresholds. Outbound Antispam counts all
messages of the selected type within the 5 minute window. If a counter value exceeds
a threshold, your mail server refuses the SMTP transactions for all messages until the
counter value does not become lower than the threshold again (this will mean that a
sender stopped trying to send messages of that type). You can specify how the server
should reject messages:
Delay sending. In this case, the system will refuse SMTP transactions with the 4xx
TEMPFAIL reply code. For the sending server this means that it could try to resend
this message. For the users of mail clients (like Microsoft Outlook or Mozilla
Thunderbird) this means that the message will stay unsent in their outbox.
Block sending. In this case, the system will refuse SMTP transactions with the 5xx
PERMFAIL reply code. As described above, this means that a message could not
be sent under any circumstances.
Let us take a look at how the blocking thresholds work. For example, we set the
threshold for blocking spam to 10 and some sender tries to send 3 spam messages per
minute through our server. See the timeline below. On the 4th minute, the counter
reaches 10 and Outbound Antispam starts to block all spam messages from the
sender. Note that the 5 minute counting window has a 1 minute shift, thus on the 6-th
minute, the counter's value will be equal to the sum of messages sent from 2-nd to 6-th
minute, and so on. On the 8-th minute, the sender stops trying to send spam, but the
counter's value still exceeds the threshold. Starting from the 10-th minute (when the
counter's value is equal to 9), Outbound Antispam will begin to accept messages from
the sender again.
Page 100

100 Mail
Such temporary blocking can help you to identify compromised accounts and
spammers who use them. If they are unable to send messages from a certain account,
they will probably stop trying to use this account.
Note that temporary blocking does not override the Block message sending settings but
supplements them. For example, if you choose to block spam in Block message sending
and then set the threshold for blocking spam, all spam messages will be always
blocked regardless of the message counter value. In this case, this threshold will just
help you to identify who is permanently trying to send spam through your server.
Another benefit of using thresholds is that you can limit the overall messages sending
rate (the Total messages parameter).
Allowing Certain Users to Send All Kinds of E-mail
If you are sure that a certain sender is not a spammer, you can make the system send
their mail without scanning. To do this, add the identifiers of these senders to the white
list or bulk senders list. These lists are located in Tools & Settings > Outbound Spam
Protection > White List and Tools & Settings > Outbound Spam Protection > Bulk Senders List
tabs respectively. The difference between the lists is in the following:
Users from the white list can send any number of messages including messages
considered as spam. Parallels Premium Outbound Antispam does not check
messages from the senders in the white list.
Users from the bulk senders list can send any number of suspected spam - mass e-
mails that Parallels Premium Outbound Antispam does not consider spam. Spam
and virus messages sent by senders from this list will be blocked.
For example, if you know that your customer sends mass non-spam e-mails such as
newsletters, you should add their identifier to the bulk senders list to protect them from
blocking by the Parallels Premium Outbound Antispam. However, note that if the
system detects these newsletters as spam, it will block sending anyway.
Antivirus Software
To provide your e-mail users with anti-virus protection, you can use either the Parallels
Premium Antivirus or Kaspersky Antivirus solutions. Both solutions can scan server's
mail traffic in real time, however, only Kaspersky Antivirus allows fine tuning and
filtering of specific file types from attachments.
The both programs require an additional license key with annual renewal. Check the
current prices with your provider or visit Parallels site.
To install Parallels Premium Antivirus or Kaspersky Antivirus:
1. Go to Tools & Settings > Updates. Updater will open in a new window or tab.
2. Click Cancel updating.
3. Click Add Components.
 Loading...