

Page 1

Parallels® Panel
Page 2

Copyright Notice
Parallels IP Holdings GmbH
Vordergasse 59
CH-Schaffhausen
Switzerland
Phone: +41 526320 411
Fax: +41 52672 2010
Global Headquarters
500 SW 39th Street, Suite 200
Renton, WA 98057
USA
Phone: +1 (425) 282 6400
Fax: +1 (425) 282 6445
EMEA Sales Headquarters
Willy-Brandt-Platz 3
81829 Munich, DE
Phone: +49 (89) 450 80 86 0
Fax:+49 (89) 450 80 86 0
APAC Sales Headquarters
3 Anson Road, #36-01
Springleaf Tower, 079909
Singapore
Phone: +65 6645 32 90
Copyright © 1999-2013 Parallels IP Holdings GmbH. All rights reserved.
This product is protected by United States and international copyright laws. The product’s
underlying technology, patents, and trademarks are listed at http://www.parallels.com/trademarks.
Microsoft, Windows, Windows Server, Windows NT, Windows Vista, and MS-DOS are registered
trademarks of Microsoft Corporation.
Linux is a registered trademark of Linus Torvalds.
Mac is a registered trademark of Apple, Inc.
All other marks and names mentioned herein may be trademarks of their respective owners.
Page 3

Contents
Becoming Familiar with Parallels Plesk Panel 5
Acquainting Yourself with the Panel Interface ............................................................................... 7
Managing Your Profile ................................................................................................................... 9
Viewing Your Subscription Properties ......................................................................................... 10
Viewing Resources ........................................................................................................... 11
Viewing Permissions ......................................................................................................... 13
Viewing IP Addresses ....................................................................................................... 14
Understanding Service Plans and Subscriptions 16
Properties of Hosting Plans, Add-ons and Subscriptions ........................................................... 18
Visibility of Hosting Features in the Control Panel ............................................................ 20
Resources ......................................................................................................................... 21
Permissions ....................................................................................................................... 24
Hosting Parameters .......................................................................................................... 28
Mail .................................................................................................................................... 37
DNS ................................................................................................................................... 38
Performance ...................................................................................................................... 38
Logs & Statistics ................................................................................................................ 39
Applications ....................................................................................................................... 39
Additional Services ............................................................................................................ 39
Syncing Subscriptions and Plans ................................................................................................ 40
Starting Your Business in Panel 42
Changing Branding and Interface Settings 44
Managing Customer Accounts 47
Managing Subscriptions 48
Backing Up and Restoring Data 50
Configuring the Control Panel for Using FTP Repository ............................................................ 51
Backing Up Your Account with Your Sites .................................................................................. 51
Scheduling Backups .................................................................................................................... 52
Restoring Data From Backup Archives ....................................................................................... 53
Downloading Backup Files from Server ...................................................................................... 54
Uploading Backup Files to Server ............................................................................................... 54
Removing Backup Files from Server ........................................................................................... 54
Website Management 55
Quick Start with Parallels Panel .................................................................................................. 57
Page 4

Becoming Familiar with Parallels Plesk Panel 4
Set Up Your First Website ................................................................................................. 58
Set Up Mail Accounts ........................................................................................................ 62
View Site Visit Statistics .................................................................................................... 81
Customer Account Administration ............................................................................................... 81
Changing Your Password and Contact Information .......................................................... 85
Viewing Subscription Summary ........................................................................................ 86
Managing Account Balance and Invoices ......................................................................... 93
Ordering More Resources ................................................................................................. 97
Viewing Statistics .............................................................................................................. 99
(Advanced) Managing Auxiliary User Accounts .............................................................. 101
Websites and Domains ............................................................................................................. 108
Domains and DNS .......................................................................................................... 109
Hosting Settings .............................................................................................................. 125
Website Content .............................................................................................................. 143
(Advanced) Restricting Access to Content ..................................................................... 148
Previewing Websites ....................................................................................................... 150
Web Applications ............................................................................................................ 151
(Advanced) Website Security .......................................................................................... 160
(Advanced) Extended Website Management ................................................................. 166
Creating Sites with Presence Builder ........................................................................................ 199
Getting Familiar With Presence Builder .......................................................................... 202
Creating a Website .......................................................................................................... 204
Importing Sites from SiteBuilder 4.5................................................................................ 205
Editing Websites ............................................................................................................. 206
Saving and Loading Copies of a Website ....................................................................... 245
Publishing a Website to the Internet ............................................................................... 247
Publishing a Website Copy to Facebook ........................................................................ 248
Viewing Site Visits Statistics, Comments, and New Orders on the Dashboard .............. 250
Deleting Websites ........................................................................................................... 252
FTP Access to Your Websites ................................................................................................... 252
Changing FTP Access Credentials ................................................................................. 252
Adding FTP Accounts ..................................................................................................... 253
Setting Up Anonymous FTP Access ............................................................................... 255
Mail Accounts ............................................................................................................................ 256
Adding Mail Accounts ...................................................................................................... 257
Configuring Mail Account ................................................................................................ 258
(Advanced) Configuring Global Mail Settings ................................................................. 265
Using Mailing Lists .......................................................................................................... 266
Scheduling Tasks ...................................................................................................................... 267
Scheduling Tasks (Linux) ................................................................................................ 268
Scheduling Tasks (Windows) .......................................................................................... 270
Website Databases ................................................................................................................... 272
Creating Databases ........................................................................................................ 273
Accessing Databases ...................................................................................................... 273
Copying Databases ......................................................................................................... 274
Exporting and Importing Databases ................................................................................ 274
Managing Database User Accounts ............................................................................... 275
Accessing Databases with ODBC (Windows) ................................................................. 276
Backing Up and Recovering Websites ...................................................................................... 277
Backing Up Data ............................................................................................................. 278
Managing Backup Files ................................................................................................... 284
Restoring Data ................................................................................................................ 286
Page 5

Parallels Plesk Panel offers an easy and convenient graphical user interface that
C H A P T E R 1
Becoming Familiar with Parallels Plesk Panel
enables you to start your hosting business quickly and maintain it effortlessly. With
Panel, you set up your hosting offers, manage customer accounts, and do other tasks
to run and grow your business. Your customers benefit from using Panel too since it
gives them a complete set of tools for creating and editing their websites. For serving
both resellers and customers, the Panel GUI is divided into two parts:
Server Administration Panel.
In this panel, you set up and maintain your business. Here you create hosting plans
and customer accounts, manage subscriptions, and so on. For a comprehensive
overview of operations available to you in the Server Administration Panel, see the
section Acquainting Yourself with the Panel Interface (on page 7).
Control Panel.
When someone subscribes to one of your hosting plans, Panel sets up an account
for the subscriber. Under this account, the customer can add domain names and
mailboxes, edit website content, and carry out other hosting management routines.
Customers perform these operations in a separate panel called the Control Panel.
To learn more about operating in the Control Panel, refer to the section Website
Management (on page 55).
So, after logging in to Panel, customers see the Control Panel while resellers see the
Server Administration Panel. This is for convenience, to separate the administration of
customer accounts from administration of websites and hosting services.
However, you will need to go to the Control Panel in the following cases:
To assist customers with performing their tasks. In this case, you log in to the
Control Panel on a customer's behalf.
To create and manage your own websites. In this case, you create your own
subscription and log in to the Control Panel using your account.
The links that let you log in to the Control Panel using your own and your customers'
accounts are located in the list of subscriptions (Server Administration Panel > Hosting
Services group of the navigation pane > Subscriptions.)
Page 6

6 Becoming Familiar with Parallels Plesk Panel
Your Panel Account and Subscriptions
In this chapter:
Acquainting Yourself with the Panel Interface .................................................... 7
Managing Your Profile ....................................................................................... 9
Viewing Your Subscription Properties................................................................ 10
When you subscribe to a reseller plan, you get a reseller account in Panel. This
account stores your profile information and is linked to your subscription - the package
of hosting resources that you lease for reselling and use for your own needs.
Your account has a unique username and a password that you use to log in to Panel.
You can change these at any time. The section Managing Your Profile (on page 9)
explains how to do it.
To allow you to easily monitor the current state of your resources and services (for
example, disk space currently consumed by your account and your customers), Panel
automatically calculates the resource usage and displays it to you on the appropriate
pages. To learn how to track the usage of your hosting resources and services, refer to
the section Viewing Your Subscription Properties (on page 10).
Page 7

Becoming Familiar with Parallels Plesk Panel 7
Acquainting Yourself with the Panel Interface
When you log in to Parallels Plesk Panel, you see the Home page with a summary on
allocated and used resources.
The top banner area provides the following links:
A link with your name. Click this if you need to update your contact information. Find out
more about updating contact information in the section Managing Your Profile (on page 9).
Log out. This is where you close your session when you have finished working with the
Panel.
Help. This provides context-sensitive help with a search function.
The navigation pane on the left provides access to the following sets of functions:
Home. This is where you start working with the Panel. On this page, you can see the
following elements.
Overview. This widget contains information about your hosting package and provides
links to the detailed information about available hosting resources and your
permissions. The section Viewing Your Subscription Properties (on page 10) provides
information that helps you understand the Panel resources and learn how to view the
set of resources that you can use or sell.
My Subscriptions. This is where you see a list of your own websites hosted on the
Panel server.
Customers. This is where you perform operations on customer accounts. Particularly, you
can accomplish the following tasks from this page:
Create, modify, suspend, unsuspend, and remove user accounts.
View traffic usage reports.
Domains. This is where you view information about hosted websites and their domain
names, and go to the Control Panel for managing them.
Subscriptions. This is where you manage customer subscriptions to your services.
Subscription is a way a customer obtains services and resources provided by a service
plan.
Service Plans. This is where you manage your service plans. Service plan is a set of
resources and services provided to hosting service customers by means of subscriptions.
There are also service plan add-ons that extend the amount of resources and services
provided with a subscription.
Tools & Utilities. This is where you configure and manage system services, and view
resource usage statistics.
Profile. This is where you fill in your contact information. Learn more about the contact
information and other profile settings in the section Managing Your Profile (on page 9).
Change Password. This is where you change your password for logging in to the Server
Administration Panel.
Interface Preferences. This is where you set interface language and skin. Learn more about
changing Panel appearance in the section Changing Interface Settings.
Page 8

8 Becoming Familiar with Parallels Plesk Panel
To see information about a tool or an item on the page, place the mouse pointer over an item
without clicking it, and a small tooltip box appears with supplementary information regarding
that item.
The main working area on the right provides access to the tools available for the section
currently selected in the navigation pane. Additional operations are accessible from the More
Actions menus.
To navigate through Parallels Plesk Panel, you can use a path bar: a chain of links that
appears in the right part of the screen, below the banner area.
To return to a previous screen, use the shortcuts in the path bar, or the Up Level icon in the
upper-right corner of the screen.
To sort a list by a certain parameter in ascending or descending order, click on the
parameter's title in the column heading. The order of sorting will be indicated by a small
triangle displayed next to the parameter's title.
Page 9

Becoming Familiar with Parallels Plesk Panel 9
Managing Your Profile
Your account in Panel stores your access credentials and contact information such as e-mail,
address, and phone number. Depending on how you subscribed to a Panel reseller plan, you
can choose your username and password yourself or receive them from your hosting
provider. To change your account password, click the Change Password link in the navigation
pane. Your username can only be changed by your provider. If you forget your password and
cannot log in to Panel, click the Forgot Your Password? link on the login page. Then enter your
username and the e-mail specified in your contact information into the corresponding fields.
When you fill in this information, Panel will send your password to the specified e-mail
address.
If the contact details in your profile require updating, or you want to add or remove some of
them, click the Profile link in the navigation pane or the link with your name at the top of the
page and Panel will take you to a page where you can manage the details.
Page 10

10 Becoming Familiar with Parallels Plesk Panel
Viewing Your Subscription Properties
Next in this section:
Viewing Resources ............................................................................................ 11
Viewing Permissions ......................................................................................... 13
Viewing IP Addresses ....................................................................................... 14
The number of hosting resources and services available to you for reselling or to use for your
own needs is defined by your reseller subscription. A subscription can limit the use of a
resource to a certain value, for example, allow you to consume 75 GB of disk space.
Alternatively, it can allow a resource to be used without limits. In addition, the subscription
defines what services you can use and what server management actions you can perform:
manage DNS zones, access application catalogs, and so on.
To view the information about your subscription, click the My resources and permissions overview
link on the Home page.
The subsections of this section tell you more about reseller subscription properties:
Panel resources sold in reseller subscriptions: Section Viewing Resources (on page 11).
Permissions and services: Section Viewing Permissions (on page 13).
IP Addresses: Section Viewing IP Addresses (on page 14).
Page 11

Becoming Familiar with Parallels Plesk Panel 11
Viewing Resources
This section lists Panel resources included in reseller subscriptions. To view the resources
allotted for your account, go to Home > My resources and permissions overview.
Overselling policy
Defines if you can sell more resources than allocated to you with the plan. If overselling is
allowed, you are governed by actual resource usage instead of initial resource allocation. If
overselling is prohibited, you can create only the number of service subscriptions limited to
the total amount of disk space or traffic provided to you with your plan.
Overselling is a marketing strategy based on the following scheme: a reseller, who was
allotted, for example, ten gigabytes of disk space, allocates five gigabytes of disk space for
each of their customers, assuming that none of them will actually use all of their allocated
disk space.
Domains
The total number of subscriptions that you can create for your customers and for your own
purposes.
Subdomains
The total number of subdomains that can be hosted within the subscription.
Domain aliases
The total number of additional alternative domain names that can be used for websites within
the reseller subscription.
Disk space
The total amount of disk space that can be used by your own websites and sites of your
customers. It includes disk space occupied by all files related to your reseller subscription:
contents of websites, databases, applications, mailboxes, log files and backup files.
Traffic
The amount of data that can be transferred from the subscription's websites and FTP/Samba
shares during a month.
Additional FTP accounts
The maximum number of FTP accounts used to access the files and folders hosted with a
subscription.
Databases (Unix hosting)
The total number of databases that can be created on the Panel database servers and used
by the subscription's websites.
Page 12

12 Becoming Familiar with Parallels Plesk Panel
MySQL databases and Microsoft SQL Server databases (Windows hosting)
The maximum number of MySQL and Microsoft SQL Server databases respectively that can
be created on the database servers registered in the Panel and used by websites hosted
with the subscription.
MySQL databases quota and Microsoft SQL databases quota (Windows hosting)
The maximum total amount of disk space (in megabytes) that the MySQL and Microsoft SQL
Server databases respectively can occupy.
Mailboxes
The total number of mailboxes that can be hosted within the subscription.
Mailbox size
The maximum amount of disk space that can be allocated to a mailbox for storing e-mail
messages and auto-reply attachment files. You will not be able to specify the bigger mailbox
size in your service plans.
Mailing lists
The total number of mailing lists that can be hosted with the subscription.
Customers
The maximum number of customer accounts that you can create and serve.
Web users
The total number of personal web pages that can be hosted on the websites within
subscription. This service is mostly used in educational institutions that host non-commercial
personal pages of their students and staff. These pages usually have addresses like
http://example.com/~webuser.
Java applications
The total number of Java applications or applets that can be hosted on websites within the
subscription
Sites published with Presence Builder
The total number of websites that can be created, published, and then edited with Presence
Builder.
Mobile sites
The total number of websites that can be hosted with the UNITY Mobile online service, which
optimizes sites for viewing on mobile devices.
Page 13

Becoming Familiar with Parallels Plesk Panel 13
FrontPage accounts (Windows hosting)
The maximum number of Microsoft FrontPage accounts that can be used within the
subscription.
Shared SSL links (Windows hosting)
The total number of shared SSL links that can be used within the subscription.
IIS application pools (Windows hosting)
The total number of dedicated IIS application pools that can be allocated for websites
created within the reseller subscription.
ODBC connections (Windows hosting)
The total number of ODBC connections that can be used within the subscription.
ColdFusion DSN connections (Windows hosting)
The total number of ColdFusion DSN connections that can be used within the subscription.
Viewing Permissions
Your permissions either denote the operations available to you as a reseller in the Panel, or
define which services and privileges can be enabled in the subscriptions of your customers.
If a particular permission in your reseller subscription is set to Off, then a service subscription
will not provide the corresponding service or a privilege. A disabled permission also means
that you are prohibited to perform the designated action in the Control Panel. For example, if
your subscription does not provide a privilege to use Scheduler (Scheduler management is Off),
then none of your subscribers will be able to use it, and neither will you.
Reseller-specific privileges (the ones that do not affect service subscriptions you create for
your customers) are as follows:
Subscription creation in Server Administration Panel and domain creation in Control Panel. Shows
whether you can create hosting service subscriptions, add domains, create websites, and
set up web forwardings.
Ability to use API RPC. Shows whether you can remotely manage Web sites through
custom applications. The remote API is an interface that can be used for developing
custom applications integrated with Web sites, which could be used, for instance, for
automating setup of hosting accounts and provisioning of services for customers
purchasing hosting services from your site. To learn more, refer to the Parallels Plesk Panel
11.5: API RPC Protocol Reference.
Access to the Panel. Shows that you can use the Panel graphical user interface.
Customer account creation. Lets you create user accounts and subscriptions for your
customers in the Panel.
Allow overselling. Lets you set up oversell policy, meaning that you yourself can define if
overselling is allowed to you or not.
Page 14

14 Becoming Familiar with Parallels Plesk Panel
Overselling allows you to sell more resources than is allocated with a plan. If overselling
is allowed, a reseller is governed by actual resource usage instead of initial resource
allocation. Overselling is a marketing strategy based on the following scheme: a reseller,
who was allotted, for example, ten gigabytes of disk space, allocates five gigabytes of
disk space for each of their customers, assuming that none of them will actually use all of
their allocated disk space.
Meanings of the other permissions are the same as in the service subscriptions (on page
24).
To view the full list of your subscription permissions, go to Home > My resources and
permissions overview > Permissions tab.
Viewing IP Addresses
To view the IP addresses included in your hosting package, go to Tools & Utilities > IP
Addresses. Your IP addresses are listed and the following supplementary information is given:
An icon in the S (Status) column shows if your IP address is properly configured on
the network interface. If your IP address was removed from the network interface by your
provider, an icon will show .
An icon in the T (Type) column shows if you were allotted a dedicated IP address, and
if the address is shared among other customers of your service provider. A dedicated
IP address is not used by other users, so you can use it to host either:
A single e-commerce website secured with Secure Sockets Layer encryption.
or
A number of websites that do not need Secure Sockets Layer encryption.
Note: Shared IP addresses should be used for hosting only non e-commerce websites.
The Certificate column shows which SSL certificate (for what domain name) is tied to an
IP address.
The FTP over SSL column (on Windows-based servers) shows whether it is possible to use
secure FTP connection (FTP over SSL) on one of the domains hosted on this IP address.
The Hosting column shows a number of websites hosted on an IP address. To view the
domain names of these websites, click the number in the Hosting column.
You can perform the following operations on IP addresses:
Change IP allocation type. You can mark your IP addresses as shared or dedicated
before you use them for hosting websites. This allows the Panel to distinguish between
them and to not let you use a dedicated IP address for several customers at once. A
dedicated IP address can be used in subscriptions of a single customer, while a shared
IP address can be shared among different customers' subscriptions. Note that SSL
protection with authentic digital certificates and Anonymous FTP services are available
only to a dedicated hosting account on a dedicated IP address. Shared hosting accounts
can also have SSL protection, but visitors of such protected sites will receive error
messages in their browsers.
Assign an SSL certificate to an IP address. This will assign the selected SSL certificate to
all websites hosted on that IP address.
Page 15

Becoming Familiar with Parallels Plesk Panel 15
Select a default website. Because users can refer to a web resource on your server by
typing an IP address and there can be several websites hosted on that address, the
Panel needs to know which of the sites to show in such cases. The Panel automatically
assigns the first website created on an IP address as the default website; however, you
can select any other website and make it default.
To change an IP address allocation type (shared, dedicated), assign another
SSL certificate to an IP address, or select the default website:
1. Go to Tools & Utilities > IP Addresses, and click the IP address you need.
2. Make the required changes, and click OK.
Page 16

When you start your hosting reselling business, you should define how you will offer
C H A P T E R 2
Understanding Service Plans and Subscriptions
your hosting resources and services to customers. Parallels Plesk Panel lets you
organize your business by means of service plans and subscriptions.
A service plan is a combination of hosting resources that you sell to your customers.
For example, a plan can provide customers with the web hosting service, five gigabytes
of disk space on the server, and ten gigabytes of data transfers each month.
There are also add-on plans that let you offer additional resources and services to
subscribers, such as, for example, an additional gigabyte of disk space.
When customers want to host a website on a Panel-managed server, they subscribe to
a plan that offers the resources they need. In other words, a subscription is a set of
resources defined by a plan and available to a certain customer.
The section Properties of Hosting (Add-on) Plans and Subscriptions provides a complete list
of Panel server resources and services that you can include in your hosting plans.
Allocation of Resources and Services
Service plans define potential services; the Panel does not check if a service or a
resource that a service plan should provide is actually available, whether in the system
in general or in your reseller subscription. For example, when creating a plan, you can
choose to allow subscribers to connect to the server shell over SSH even if your
subscription does not provide the Management of access to the server over SSH privilege. In
such a case, the Panel will let you do this and will show no error or warning messages.
Subscriptions provide actual resources and services that are allocated during the
creation of each subscription.
Page 17

Understanding Service Plans and Subscriptions 17
Relations Between Subscriptions and Service/Add-on Plans
In this chapter:
Properties of Hosting Plans, Add-ons and Subscriptions ................................... 18
Syncing Subscriptions and Plans ...................................................................... 40
Normally, a subscription is associated with a service plan, and this association is
reflected in a list of subscriptions: each subscription name contains the service plan
name in parentheses at the end. The amount of resources and services provided with a
subscription can be extended by associating the subscription with add-on plans. A
subscription can be associated with several add-ons, but each add-on can be added to
the subscription only once.
It is also possible to have subscriptions that are not associated with any service plans
or add-on plans. We call such subscriptions custom subscriptions, and their names are
extended with "(Custom)" in the list of subscriptions. Having a custom subscription may
be useful if you want to provide services on specific terms that differ from the usual
offerings in your business model.
At any time, you can change the association between a subscription and plans in the
following ways:
Associate the subscription with another service plan.
Add and remove add-on plans.
Remove the subscription association with the service plan and add-ons.
Syncing Service Plans and Subscriptions
When you change the properties of a service plan, Panel automatically applies the
changes to all subscriptions to this plan. If you want to prohibit automatic updating of a
certain subscription, you can lock this subscription. To learn how to configure the
synchronizing (or syncing) of your plans with subscriptions, see the section Syncing
Subscriptions and Plans (on page 40).
Page 18

18 Understanding Service Plans and Subscriptions
Properties of Hosting Plans, Add-ons and
Next in this section:
Visibility of Hosting Features in the Control Panel ............................................. 20
Resources ......................................................................................................... 20
Permissions ....................................................................................................... 24
Hosting Parameters ........................................................................................... 28
Mail ................................................................................................................... 37
Subscriptions
Properties of a hosting plan and subscription are grouped as follows:
Resources
Includes validity period, policy on overusing resources, system resources like disk space
and traffic, and service resources like websites, subdomains, mailboxes, databases and
so on.
Permissions
Includes provided services and privileges.
Note: Some permissions prevent settings of the following services from syncing (on page
40). See the details in the Permissions section (on page 24).
Hosting Parameters
Includes parameters of the provided hosting service.
Mail
Includes parameters of the provided mail service.
DNS
Specifies if the DNS zones of the subscription's domains should be master or slave.
Note: In case the DNS zone management privilege is provided, this parameter is not synced,
and subscribers can set up this parameter on a per-domain basis.
Performance
Includes parameters that affect performance of all services provided with the plan.
Logs & Statistics
Includes settings of how statistics and logs of the plan's subscriptions should be stored.
Note: Hosting, Mail, DNS, Performance, Logs & Statistics parameters are fully visible and editable
in the Administrative Panel only for service plans. For subscriptions, these parameters are
available only in the Control Panel. To view or modify the parameters of a particular
subscription, go to Subscriptions and click Control Panel to the right of the subscription name.
Also note that the availability of these parameters to a subscriber depends on the
permissions.
Applications
Lets you select which applications available to you should be provisioned to your
customers.
Page 19

Understanding Service Plans and Subscriptions 19
DNS .................................................................................................................. 38
Performance ...................................................................................................... 38
Logs & Statistics ................................................................................................ 39
Applications ....................................................................................................... 39
Additional Services ............................................................................................ 39
Page 20
20 Understanding Service Plans and Subscriptions
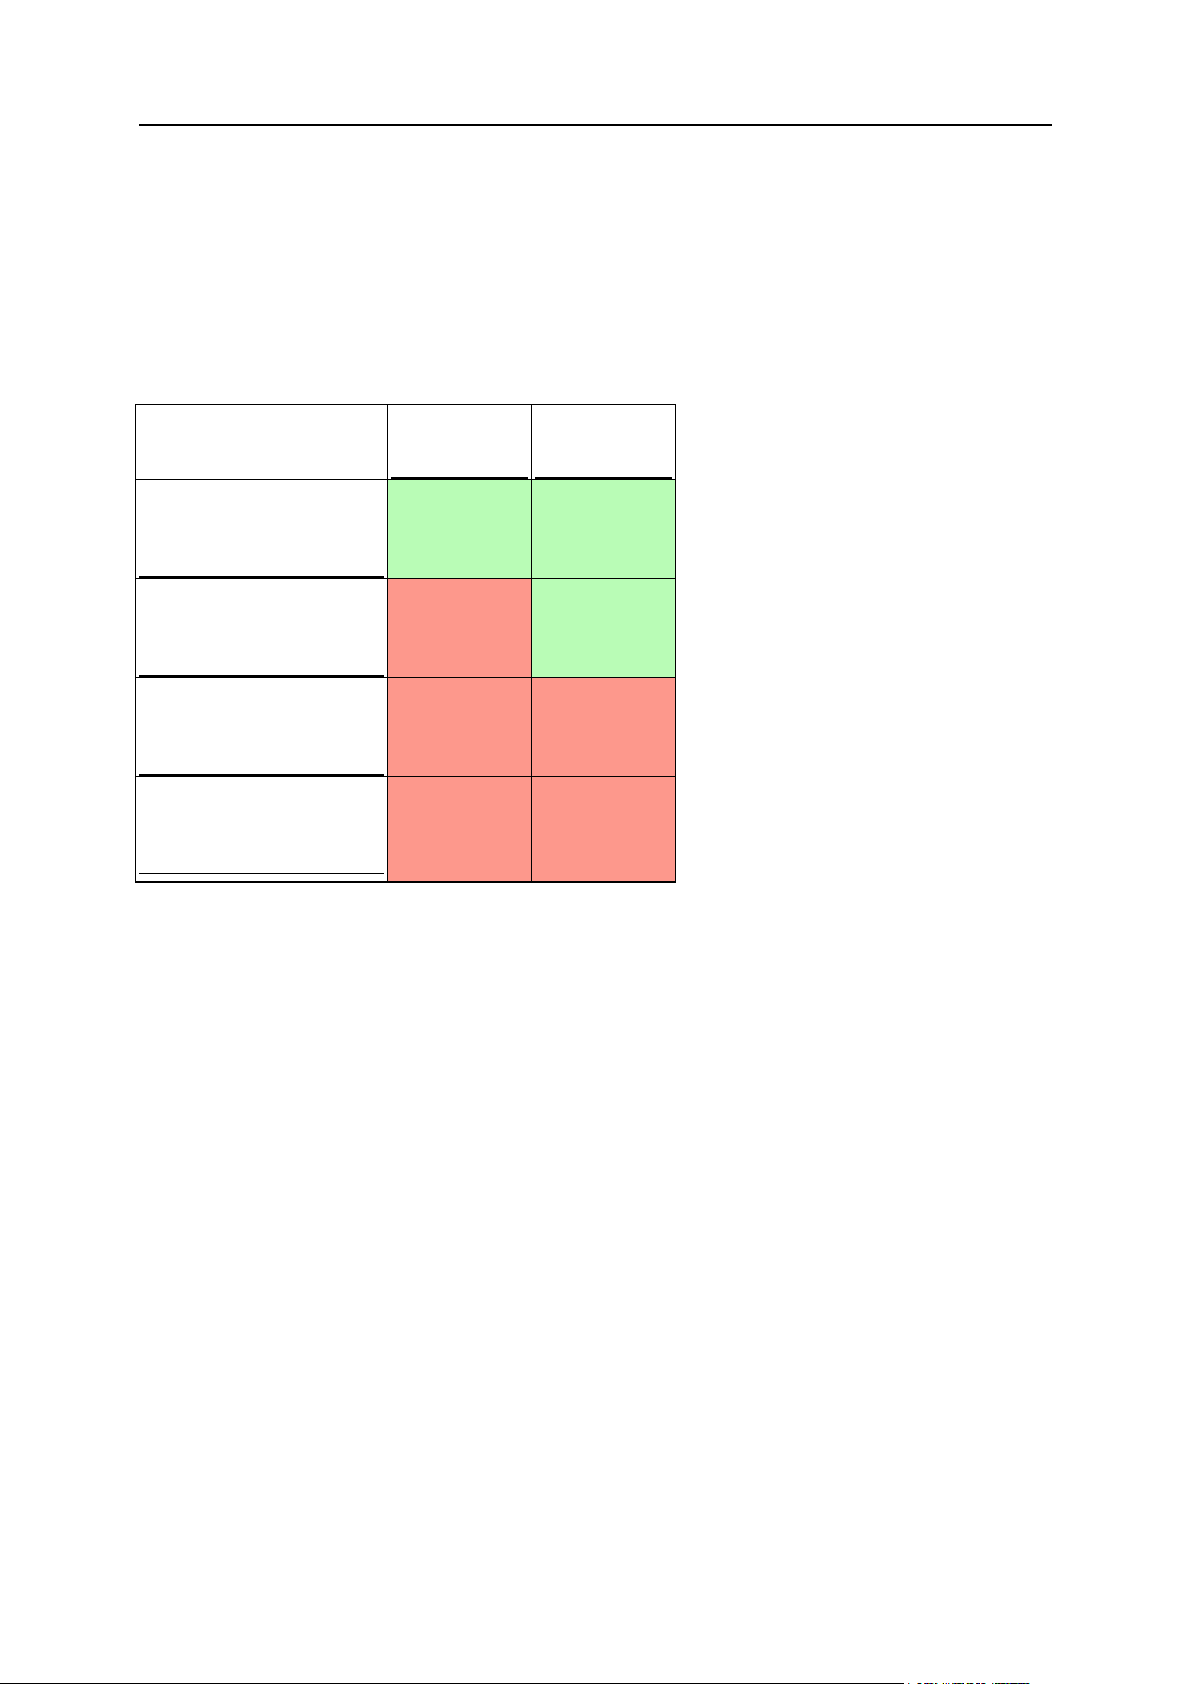
Visibility of Hosting Features in the Control Panel
Visible to a
Customer
Visible to the
Administrator
Resource Limit > 0
Permission = True
Yes
Yes
Resource Limit > 0
Permission = False
No
Yes
Resource Limit = 0
Permission = True
No
No
Resource Limit = 0
Permission = False
No
No
Since version 10.4, Panel hides from customers those hosting features that are not provided
in their subscription. The visibility of GUI elements responsible for a certain feature is
determined by permissions and resource limits of a subscription. Note that when you (as the
administrator) log in to the customer's Control Panel, you see GUI elements regardless of
customer's permissions. The table below explains GUI visibility logic.
For example, when the number of Domains in a subscription is 10 and the Domains management
permission is off, a customer does not see the Add New Domain button in the Control Panel.
Nevertheless, this button is available to the administrator that logs in to the customer's
Control Panel.
Resources Without Numerical Limits
If the resource type is logical or in other words, it can be just switched on or off (such as
scripting language support), its visibility is controlled by a certain permission only. For
example, if the Hosting settings management permission is granted, a customer is able to toggle
the support of various scripting languages for their site. If the permission is not granted, the
customer sees the list of languages that are switched on for their site in the read only mode.
The disabled languages are not shown in the list.
Page 21

Understanding Service Plans and Subscriptions 21
Resources
Resources (located at Service Plans > select a plan > Resources tab) define what system
resources are provided with the subscription.
Overuse policy
Defines what happens if the subscription's usage of disk space and traffic reaches limit
values:
Overuse is not allowed will suspend the subscription only if you select the checkbox Suspend
subscription when its disk space or traffic usage goes beyond the limit. If you do not select it,
websites will not be suspended; only a notice will be sent to the subscribers.
You can set up sending of notifications as soon as usage of disk space or traffic reaches
a particular value (the Notify upon reaching options), in order to prevent subscriptions from
suspension. The notifications will be sent according to the server notifications policy.
Overuse is allowed will let the subscription operate properly.
The option When limit on usage of a resource is reached, send e-mail according to the server
notification settings triggers sending notifications according to the server notifications
policy.
Note: The overuse policy does not apply to the limits set on size of mailboxes. Therefore,
even if you enable overuse, be sure to allocate enough disk space to mailboxes.
Disk space
The total amount of disk space allocated to the subscription. It includes disk space occupied
by all files related to the subscription: content of websites, databases, applications,
mailboxes, log files, and backup files.
Traffic
The amount of data that can be transferred from the subscription's websites and FTP/Samba
shares during a month.
Notify upon reaching
Available only if overuse is not allowed. This sets the soft quota for disk space or traffic
usage in order to prevent subscriptions from suspension. When the quota is reached, the
Panel sends notifications to users' e-mail addresses specified in Settings > Notifications:
Resource usage limits exceeded by subscription.
Sites published with Presence Builder
The number of websites that can be published with Presence Builder.
Domains
The total number of domain names that the subscriber will be able to host within the
subscription. This includes websites, web forwarding configurations that point to websites
hosted on other servers, and domain names on which a website or web forwarding is not yet
set up (domains with no hosting).
Page 22

22 Understanding Service Plans and Subscriptions
Mobile sites
The total number of websites that can be hosted with the UNITY Mobile online service, which
optimizes sites for viewing on mobile devices. UNITY Mobile hosts the optimized site copies
on their own servers.
How it works:
1. A user creates a website with the domain name example.com and clicks the link Create
Mobile Site in the Control Panel.
2. The user is prompted to specify a domain name for access to the mobile site copy. The
user specifies mobile.example.com.
3. The Panel connects to the UNITY Mobile hosting servers, sets up an account with UNITY
Mobile for the domain name mobile.example.com.
4. The user’s browser opens the UNITY Mobile website, where the user is automatically
logged in to their account and prompted to import their website from the Panel-managed
server.
5. After the site is imported and optimized for mobile viewing, it becomes accessible by the
address mobile.example.com. The Panel’s DNS server keeps a CNAME record pointing
to the site on a UNITY Mobile server.
The user can now perform the following operations on mobile site using links in the
Control Panel:
Open site editor.
Change mobile site name.
Remove mobile site.
For more information about UNITY Mobile services, visit their website at
http://www.unitymobile.com.
For instructions on managing mobile sites through the Control Panel, refer to the Customer's
Guide, section Setting Up Mobile Sites.
Subdomains
The total number of subdomains that the subscriber will be able to host within the
subscription.
Domain aliases
The total number of additional alternative domain names that the subscriber will be able to
use for their websites.
Mailboxes
The total number of mailboxes that the subscriber can host within the subscription.
Mailbox size
The amount of disk space that is allocated to each mailbox in a subscription for storing e-mail
messages and auto-reply attachment files.
Page 23

Understanding Service Plans and Subscriptions 23
Total mailboxes quota (available only for Windows hosting)
The total amount of disk space in megabytes available for all mailboxes within the
subscription.
Mailing lists
The total number of mailing lists that the subscriber can host within the subscription.
Additional FTP accounts
The maximum number of FTP accounts used to access the files and folders created within a
subscription. This number does not include an account that is always created during the
subscription creation.
Databases (Unix hosting)
The total number of databases that can be created on the Panel database servers and used
by the subscription's websites.
MySQL databases and Microsoft SQL Server databases (Windows hosting)
The maximum number of MySQL and Microsoft SQL Server databases respectively that can
be created on the Panel database servers and used by the subscription's websites.
MySQL databases quota and Microsoft SQL databases quota (Windows hosting)
The maximum amount of disk space (in megabytes) that the subscription's MySQL or
Microsoft SQL Server databases can occupy respectively.
Validity period/Expiration Date
The term for a subscription.
In service plan properties, it is Validity period: it is used only when a subscription is created:
the Panel derives the subscription expiration date from it.
In subscription properties, it is Expiration date: At this date, the subscription will be suspended,
meaning that all sites within the subscription will be suspended, their Web, FTP and mail
services will no longer be accessible to the Internet users, and the subscriber and their users
will not be able to log in to the Control Panel.
Subscriptions are not renewed automatically, so to bring a subscription's services back to
operation, you will need to manually activate the subscription (on page 48).
Java applications
The total number of Java applications that can be hosted on the subscription's websites.
Web users
The total number of personal Web pages that the subscriber can host for other users under
their websites. This service is mostly used in educational institutions that host noncommercial personal pages of their students and staff. These pages usually have addresses
like http://example.com/~webuser.
Page 24

24 Understanding Service Plans and Subscriptions
FrontPage accounts (Windows hosting)
The maximum number of Microsoft FrontPage accounts that the subscriber can create within
the subscription.
Shared SSL links (Windows hosting)
The total number of shared SSL links that the subscriber can use within the subscription.
ODBC connections (Windows hosting)
The total number of ODBC connections that the subscriber can use within the subscription.
ColdFusion DSN connections (Windows hosting)
The total number of ColdFusion DSN connections that the subscriber can use within the
subscription.
Permissions
Permissions (located at Service Plans > select a plan > Permissions tab) define what privileges
and services are provided with the subscription.
DNS zone management
Allows the subscriber to manage the DNS zones of their domains.
Note: If this permission is granted, then the DNS service settings are not synced.
Hosting settings management
Allows modifying parameters of the hosting service provided with the subscription: changing
hosting account features, setting up custom web server settings, and switching on or off
support for programming and scripting languages, custom error documents, SSL support,
and (Windows only) Microsoft FrontPage support. In addition, it allows you to toggle the
following permissions: Hosting performance settings management and Common PHP settings
management.
Note: If this permission is granted, then the mentioned hosting parameters are not synced.
Common PHP settings management
Allows the subscriber to adjust common PHP settings individually for each website
(subdomain) in their subscription.
Note: If this permission is granted, then the common PHP settings are not synced.
Setup of potentially insecure web scripting options that override provider's policy. Allows the
subscriber to override the hosting security policy, if it is applied by the provider.
Page 25

Understanding Service Plans and Subscriptions 25
Management of access to server over SSH (Linux hosting)
Allows the subscriber to access the server shell over SSH under their system user account.
Also, lets the subscriber set up such hosting parameter as SSH access to server shell under the
subscription's system user.
Note: If this permission is granted, then the mentioned hosting parameter is not synced.
Management of access to server over Remote Desktop (Windows hosting)
Allows the subscriber to access the server via Remote Desktop protocol.
Anonymous FTP management
Provides the anonymous FTP service, which lets the subscriber set up a directory shared
over FTP protocol and available to anonymous users. A subscription should reside on a
dedicated IP address in order to provide this service.
Scheduler management
Allows the subscriber to schedule running of scripts or utilities.
Spam filter management
Lets the subscriber customize filtering settings of the SpamAssassin spam filter.
Antivirus management
Allows the subscriber to change settings of the server-side protection of incoming and
outgoing mail from viruses.
Data backup and restoration using the server repository
Allows the subscriber to back up and restore their websites, and use the storage on the
server for keeping backups.
Data backup and restoration using a personal FTP repository
Allows the subscriber to back up and restore their websites, and use external FTP servers for
storing their backups.
Web statistics management
Allows the subscriber to select which Web statistics engine should be used, and whether
reports should be accessible via a specific password-protected directory.
Note: If this permission is granted, then the mentioned hosting parameter is not synced.
Page 26

26 Understanding Service Plans and Subscriptions
Log rotation management
Allows the subscriber to adjust the cleanup of processed log files for their sites. Also, allows
the subscriber to remove log files.
Note: If this permission is granted, then the Logs & Statistics parameters (on page 39) are not
synced.
Access to Application Catalog
Provides the subscriber with access to prepackaged applications that can be installed on
websites. If you select this option, be sure to select the PHP support checkbox on the Hosting
Parameters tab.
You can view a list of applications available from your provider by doing the following:
1. Set up your own website by using a plan or a custom subscription that grants access to
the Application Catalog.
2. Go to the Server Administration Panel > Subscriptions, and click the Manage Hosting link
corresponding to your domain name. The Control Panel will open in a new browser
window or tab.
3. In the Control Panel, go to the Applications tab > All Available Applications.
There is also a page in the Server Administration Panel, where you can view and update
installed applications, and purchase license keys for commercial applications at Parallels
Online Store: Tools & Utilities > Application Vault.
For instructions on installing applications and license keys, refer to the Customer's Guide,
section Using Website Applications.
Domains management
Allows the subscriber to add domains, create websites and set up web forwarding.
Subdomains management
Allows the subscriber to set up additional websites accessible by <subdomain>.<domain>
addresses.
Domain aliases management
Allows the subscriber to set up additional alternative domain names for their websites.
Additional FTP accounts management
Allows the subscriber to manage FTP accounts for accessing the subscription's files and
folders.
Java applications management
Allows the subscriber to install Java applications on their websites.
Page 27

Understanding Service Plans and Subscriptions 27
Mailing lists management
Allows the subscriber to use mailing lists provided by the GNU Mailman software.
Note: If this permission is granted, then the Enable mailing lists parameter (on page 37) is not
synced.
Hosting performance settings management
Allows the subscriber to adjust performance PHP settings individually for each website
(subdomain) in their subscription. In addition, lets the subscriber set up the limits on
bandwidth usage and number of connections to their websites.
Note: If this permission is granted, then the following settings are not synced: PHP
performance settings, performance settings (on page 38) for bandwidth usage and the number
of connections.
IIS application pool management (Windows hosting)
Provides the subscriber with a dedicated IIS application pool and the means to manage it:
enable or disable it, and set up the maximum amount of CPU power that the pool may use.
Note: If this permission is granted, then the Logs & Statistics parameter (on page 39) called
Use dedicated pool is not synced.
Additional write/modify permissions management (Windows hosting)
Allows the subscriber to toggle the hosting parameter Additional write/modify permissions.
These permissions are required if a subscriber's web applications use a file-based database
(like Jet) located in the root of httpdocs folder. Please note that selecting this option might
seriously compromise the websites' security.
Note: If this permission is granted, then the hosting parameter Additional write/modify
permissions is not synced.
Shared SSL management (Windows hosting)
Provides the shared SSL service, and allows the subscriber to set up shared SSL links for
their websites within the subscription.
Hard disk quota assignment
Allows the subscriber to set up the hosting parameter Hard disk quota.
Note: If this permission is granted, then the mentioned hosting parameter is not synced.
Database server selection
Allows subscribers to select a database server for their databases, as opposed to using the
default database server. For details about default database servers, see the section Hosting
Parameters (on page 28).
Page 28

28 Understanding Service Plans and Subscriptions
Access to advanced operations: Website Copying and Website Maintenance Mode
Specifies whether the website copying and maintenance mode are available to the
subscriber in the Control Panel > Websites & Domains > Show Advanced Operations. If denied, the
Website Copying and Website Maintenance Mode links are not available to the subscriber.
Password-protected directories management
Specifies whether the protected directories feature is available to the subscriber in the Control
Panel > Websites & Domains > Show Advanced Operations. If denied, the Password-protected
directories link is not available to the subscriber.
Ability to manage auxiliary user accounts
Specifies whether the subscriber can manage auxiliary user accounts on the Control Panel >
Users tab. If denied, the Users tab is not available to the subscriber.
Allow activating APS apps using license keys from the Panel license pool
If granted, users will be able to install certain APS apps without the need to purchase app
licenses from vendors. In this case, app license keys will be taken from the Panel license
pool. Note that you cannot limit the number of app installations a user is allowed to perform.
This permission is relevant only if your Panel license comes in a bundle with APS app
licenses. Learn more about license bundles.
Hosting Parameters
These parameters define the hosting service provided with the plan or subscription. The
parameters can be found in:
Service Plans > select a plan > Hosting Parameters tab
Subscriptions > select a subscription > Customize > Hosting Parameters tab
Note: Unless specifically noted, the parameters are not synced if the Hosting management
permission is granted to a subscription.
Enable hosting
Defines whether the hosting service is actually provided with the plan.
Turn off this option to make up a service plan that provides only mail service. Subscribers of
such a plan will be able to have 'domains without hosting' which will serve mailboxes.
Status of websites in suspended subscriptions
Defines whether sites in suspended subscriptions should be available over the Internet and
which hosting services should be available for these sites.
Page 29

Understanding Service Plans and Subscriptions 29
In Panel, a website can receive a new status in two ways:
When the site owner or hosting provider changes the status individually for the site (in
Websites & Domains > Edit > Change status). As long as the subscription stays active,
services like mail are available for sites with any status, and these services can be
managed by means of Panel. Learn more in Website Status (on page 130).
After the subscription has been suspended. It can be suspended automatically (when its
expiration date passes) or manually by the hosting provider (using the Suspend button in
the subscription's settings). The DNS and mail services are available for sites in
suspended subscriptions, but cannot be managed by means of Panel.
The setting Status of websites in suspended subscriptions enables you to specify the status
that websites will receive when their subscription becomes suspended.
Websites in suspended subscriptions can have the following statuses:
Disabled. Disabled websites have all associated hosting services disabled. Visitors see
the web server's default page defined by the hosting provider.
Disabled websites are no longer hosted on the server: They are excluded from the web
server configuration. However, the physical directories and files of disabled websites can
be accessed using FTP clients and File Manager.
Important: In Panel versions earlier than 11.5 this status was called Suspended. After
upgrading from earlier Panel versions to 11.5, all websites that had the Suspended status
will receive the status Disabled in order to keep their correct behavior.
Suspended. Suspended websites do not open in browsers. Visitors are redirected with the
search engine friendly 503 HTTP code to the custom maintenance page.
Note: You can customize the maintenance page by using the Edit maintenance error page
link in Control Panel > Websites & Domains > domain name. This link is displayed only if you
select the Custom error documents checkbox in the site settings in Websites & Domains >
domain name > Edit. Site owners can edit the maintenance page too.
Suspended websites remain hosted on the server, which means that the services such as
mail are running and web server configuration for these websites is kept on the server.
Active. The website works as usual.
Hard disk quota
Hard quota imposed on disk space in addition to the soft quota (set with the option Notify upon
reaching (on page 20)). Hard disk quota will not allow writing more files to the web space
when the limit is reached: users will get an "Out of disk space" error at an attempt to write
files.
Note: (Linux hosting) Confirm that your operating system supports hard disk quota before
you set any value other than Unlimited. In case you define a hard quota when it is not
supported, you will get a synchronization conflict on all the plan's subscriptions.
SSL support
Allows setting up SSL encryption on websites hosted within the subscription.
Page 30

30 Understanding Service Plans and Subscriptions
Web statistics
Selects a statistics engine that will create reports on how the subscription's websites are
visited: how many people visited a site, and which web pages they viewed.
The accessible via password protected directory /plesk-stat/webstat option allows a subscriber view
website statistics at URLs like https://example.com/plesk-stat/webstat using their system
user account login and password.
Note: This parameter is not synced if the Web statistics management permission is selected.
Custom error documents
Allows subscribers to design and use their own error pages that the web server returns with
HTTP error codes.
SSH access to server shell under the subscription's system user (Linux/Unix hosting)
Allows subscribers to upload securely web content to the server through SSH.
Note: This parameter is not synced if the Management of access to server over SSH permission is
selected.
Scripting
Support for programming and scripting languages that should be interpreted, executed or
otherwise processed by a web server: Microsoft ASP.NET framework, PHP hypertext
preprocessor (PHP), Common Gateway Interface (CGI), Perl, Python, Fast Common
Gateway Interface (FastCGI), Microsoft or Apache Active Server Pages (ASP), Server Side
Includes (SSI), ColdFusion, and Miva scripting required for running Miva e-commerce
solutions.
To learn more about adjustable PHP settings, see the section PHP Settings.
Additional write/modify permissions (Windows hosting)
This option is required if subscriber's web applications use a file-based database (like Jet)
located in the root of httpdocs folder. Please note that selecting this option might seriously
compromise the Web site security.
Allow web users to use scripts
Allows scripting at web pages available at URLs like
http://example.com/~<username>/<webpage>, where <username> refers to a web user.
Web users are individuals who do not need their own domain names. This service is popular
with educational institutions that host non-commercial personal pages of their students and
staff.
FrontPage support (Windows hosting).
The options in the FrontPage support group allow subscribers to connect to the server and
create websites with Microsoft Frontpage.
Page 31

Understanding Service Plans and Subscriptions 31
Default Database Server
Next in this section:
PHP Settings ..................................................................................................... 32
Customizing PHP Configuration ........................................................................ 34
Specifies default database servers of each supported type to be used within a plan.
Customers will be able to create databases only on the default database servers. Note that if
you disable a database server for an existing plan or subscription (the None option), the
databases already used by customers will still be accessible.
Page 32

32 Understanding Service Plans and Subscriptions
PHP Settings
Performance
Memory
Usage
Security
Apache
module (Linux
only)
High.
Runs as a part of
the Apache web
server.
Low
This handler (also known as mod_php) is the least secure
option as all PHP scripts are executed on behalf of the
apache user. This means that all files created by PHP
scripts of any plan subscriber have the same owner
(apache) and the same permission set. Thus, there is a
theoretical possibility that some users will try to affect files of
another users or some important system files.
Note: You can evade some security issues by turning
the PHP safe_mode option on. It disables a number of
PHP functions that bring potential security risk. Note
that this may lead to inoperability of some web apps.
The safe_mode option is considered to be obsolete
and is deprecated in PHP 5.3.
ISAPI
extension
(Windows
only, not
supported
since PHP
5.3)
High.
Runs as a part of
the IIS web server.
Low
The ISAPI extension can provide site isolation in case a
dedicated IIS application pool is switched on for
subscriptions. Site isolation means that sites of different
customers run their scripts independently. Thus, an error in
one PHP script does not affect the work of other scripts. In
addition, PHP scripts run on behalf of a system user
associated with a hosting account.
Note: The ISAPI extension handler is not supported
since PHP 5.3.
CGI
application
Low.
Creates a new
process for each
request and closes it
once the request is
processed.
Low
The CGI handler provides PHP script execution on behalf of
a system user associated with a hosting account. On Linux,
this behavior is possible only when the suEXEC module of
the Apache web server is on (default option). In other case,
all PHP scripts are executed on behalf of the apache user.
We recommend that you use the CGI application handler only
as a fall-back.
FastCGI
application
High (close to
Apache module and
ISAPI extension).
Keeps the
processes running
to handle further
incoming requests.
High
The FastCGI handler runs PHP scripts on behalf of a
system user associated with a hosting account.
Choose one of the following PHP handlers at Hosting Parameters > PHP handler type taking into
consideration resources consumption and security aspects of each option:
Page 33

Understanding Service Plans and Subscriptions 33
PHP-FPM
application
(Linux only)
High
Low
The PHP-FPM is an advanced version of FastCGI which
offers significant benefits for highly loaded web applications.
The PHP-FPM handler is available only if it was installed by
hosting provider and if the option Process PHP by nginx in the
website’s settings is turned on (Websites & Domains > select a
domain > Web Server tab).
Note: Switching PHP from Apache module to FastCGI application may break functionality of
existing PHP scripts. Switching to PHP-FPM by selecting Process PHP by nginx in the website’s
web server settings may do the same.
PHP Version
Panel supports different versions of PHP. For each handler, one or more PHP versions can
be available. The list of available versions is defined by your hosting provider and available
to you in the same location where you select the PHP handler: Websites & Domains tab >
<domain_name> > Edit.
Note: Always use PHP 5.x except the cases when you need PHP 4.x to host some old PHP
apps.
Since Panel 10.4, you have the ability to adjust PHP configuration individually for each
hosting plan or subscription. For this purpose, Panel exposes a number of PHP configuration
settings on the PHP Settings tab. To learn more about custom per-subscription PHP
configuration, refer to the section Customize PHP Configuration.
Page 34

34 Understanding Service Plans and Subscriptions
Customizing PHP Configuration
PHP is one of the most popular scripting languages for creating dynamic web pages. The
majority of today's websites and web applications are based on PHP scripts. Thus, site
administrators should understand how they can control the execution of PHP scripts.
Typically, PHP behavior is defined by a number of configuration settings. These settings
specify various script execution aspects, like performance (for example, the amount of
memory a script can use), security (for example, access to file system and services), and so
on. Administrators might want to adjust these settings for a number of reasons:
Preventing a memory leak or server hang-up by poorly written scripts.
Protecting data from malicious scripts.
Meeting the requirements of a certain web app.
Testing own scripts and other.
Custom PHP Settings in Panel
Generally, PHP settings are defined by the server-wide configuration file. For Linux it is,
typically, /etc/php.ini and for Windows - %WIN%\php.ini. This file is managed by your
hosting provider and defines PHP configuration for all websites hosted on the server. Since
Panel 10.4, PHP settings are adjustable through the Control Panel and you can adjust them
individually for each hosting plan or subscription. Moreover, your customers (if allowed) can
adjust your PHP settings preset individually for each of their websites and subdomains. See
the PHP settings hierarchy on the diagram below.
Page 35

Understanding Service Plans and Subscriptions 35
Page 36

36 Understanding Service Plans and Subscriptions
You can set the custom PHP configuration in the properties of a certain service plan, add-on
plan, or subscription (on the PHP Settings tab). PHP settings from a higher level act as a
preset for a lower level, thus each lower level overrides them. For example, you can
consciously apply some PHP limitations to a service plan and then offer your customers the
add-on plan that removes the limitations. PHP settings of the add-on plan will override the
settings defined in the main service plan.
If customers have the corresponding permissions, they can specify the PHP configuration
that is unique for each website (or subdomain) in their subscription.
Groups of PHP Settings
For convenience, all PHP settings in Panel are divided into two groups:
Performance settings.
These settings define how scripts work with system resources. For example: Use the
memory_limit parameter to limit the amount of memory for a script and, as a
consequence, to prevent memory leaks; or prevent scripts from tying up the server by
limiting the maximum time scripts are allowed to run in max_execution_time.
Common settings.
This group contains other commonly used PHP settings. Generally, these are: Security
settings (say, the PHP safe mode toggle or the permission to register global variables),
error reporting settings (say, the directive to log errors), and others.
Important: If you use Panel for Windows or for Linux, where PHP runs not as an Apache
module, your customers are able to override some PHP settings regardless of any
permissions. They can use the ini_set() function in their scripts to change values of the
following parameters: memory_limit, max_execution_time, and those of your
additional directives that PHP allows to set anywhere (PHP_INI_ALL directives; learn more
at http://php.net/manual/en/ini.list.php).
If you cannot find particular parameters among performance or common settings, contact
your hosting provider.
The Default Values of PHP Parameters
You can set the value of each parameter in PHP Settings either by selecting a value from a
preset, typing a custom value, or leaving the Default value. In the latter case, Panel takes the
parameter value from the server-wide PHP configuration. The only exceptions are add-on
plans: the value set to Default on the add-on's PHP Settings tab will keep the parameter's value
from the main service plan.
Page 37

Understanding Service Plans and Subscriptions 37
Allowing Customers to Change PHP Settings
You can allow your customers to override subscription's PHP settings with their own perwebsite and per-subdomain PHP configuration. For this purpose, you should use the
following permissions on the Permissions tab of a certain service plan or subscription:
Hosting performance settings management.
Along with management of some other settings, this permission grants customers access
to PHP settings from the performance settings group.
Common PHP settings management.
If granted, allows customers to adjust PHP settings from the common settings group.
Note that you can toggle these permissions for a plan (subscription) only if it has the granted
Hosting settings management permission.
Even if your customers do not have permissions to adjust PHP settings, you (as the
administrator) can always perform such per-website (subdomain) PHP configuration. To do
this, open a certain hosting account from the Server Administration Panel and apply changes
to the settings of a particular website (subdomain) on the PHP Settings tab.
These parameters (located at Service Plans > select a plan > Mail tab) define the mail service
provided with the plan.
Webmail
Provides the webmail service, which allows users of mailboxes within the subscription to
work with their mail using a web-based mail application.
Enable mailing lists
Turns on the mailing lists service provided by the GNU Mailman software on the
subscription's websites.
Note: This parameter is not synced if the permission Mailing lists management is selected.
Policy on mail for non-existent users
Defines how mail server should treat e-mail messages sent to e-mail addresses that are
supposed to be registered under the subscription's domains but actually do not exist. The
following options are available:
Bounce with message returns the mail back to sender with a notice.
Forward to address forwards the mail to another e-mail address.
Reject silently rejects the mail without accepting it. This setting can decrease mail server
load caused by a large amount of spam, which is often directed at randomly generated
user names. However, this might be useful to spammers because scanning your mail
server for valid e-mail addresses will speed up in such a case.
Redirect to external mail server with IP address (on Windows hosting), forwards the mail to the
specified mail server.
Page 38

38 Understanding Service Plans and Subscriptions
DNS
These parameters (located at Service Plans > select a plan > DNS tab) define how the DNS
service running on the Panel-managed server will serve DNS zones for websites hosted on
the plan.
Master
A master or primary name server stores locally the zone file it serves, while a secondary
server only retrieves a copy of this file from the primary.
Slave
A slave or secondary server retrieves a copy of the zone file from the primary name server.
Performance
These system parameters (located at Service Plans > select a plan > Performance tab) define
performance of all services provided with the plan.
Use dedicated IIS application pool (Windows hosting)
Enables the use of dedicated IIS application pool for web applications within the subscription.
Using dedicated IIS application pool dramatically improves the stability of web applications
due to worker process isolation mode. This mode gives each site hosted on the server a
possibility to allocate a separate process pool for execution of its web applications. This way,
malfunction in one application will not cause stopping of all the others. This is especially
useful when you are using shared hosting package. The Maximum CPU use (%) option limits the
amount of the server CPU that the pool can use.
Maximum bandwidth usage
Defines the maximum speed (measured in KB per second) that a domain can share between
all its connections.
Connections limited to
Defines the maximum number of simultaneous connections to web server for all websites
within the subscription. This setting is intended for preventing the websites from Denial of
Service (DOS) attacks and excessive usage of bandwidth.
Page 39

Understanding Service Plans and Subscriptions 39
Logs & Statistics
These parameters (located at Service Plans > select a plan > Logs & Statistics tab) define how
statistics and logs of a subscription should be stored.
Note: These settings in subscriptions are not synchronized with service plans.
Retain web and traffic statistics
Sets a period (in months) for which reports on the subscription's web statistics (generated by
the selected web statistics component) and traffic statistics (generated by Panel) should be
available.
Note: The setting Retain web and traffic statistics is not changed in subscriptions when you
update it for a service plan. The only way to update this setting for each domain is changing
it in the Panel database. See http://kb.parallels.com/en/6246 for details.
Log rotation
Enables automatic cleanup and recycling of web server log files. You can also switch on
compression of processed log files and sending them to a specific e-mail address.
Applications
Depending on the service plan, a number of prepackaged applications can be available to
Panel users. You can install the apps on your own sites as well as provision them to your
customers.
When setting up a hosting plan, you can select which of the apps should be provisioned to
customers:
To provide all available applications, on the Permissions tab, select the option Access to
Application Catalog.
To provide only selected applications, on the Permissions tab, select the option Access to
Application Catalog, and then go to the Applications tab and select the option Provide only
applications that I select. Use the button >> to add the selected applications to the plan.
Additional Services
If your provider configured Panel to provide custom additional services, then the Additional
Services tab is shown in hosting plan properties. On this tab, you can select the services that
you want to provide to subscribers.
Page 40

40 Understanding Service Plans and Subscriptions
Syncing Subscriptions and Plans
Subscriptions associated with a particular plan are synchronized, or synced, with it: any
changes made to the plan are automatically applied to all its subscriptions. This is true for
both service and add-on plans.
In case a plan offers a privilege which makes it possible for a subscriber to change a
particular resource or service, this resource/service allocation is not synced. For example, if
a subscription provides the privilege of DNS zone management, then the DNS zone settings
of the associated service plan are ignored during synchronization.
States of Subscription
Subscriptions associated with a particular plan are synchronized, or synced, with it: any
changes made to the plan are automatically applied to all its subscriptions. This is true for all
kinds of plans: service plans, their add-ons, and reseller plans.
The Panel allows the following deviations from the default subscription state (active and
synced with the service plans):
Locked state, which means locked for syncing, indicates that a subscription is excluded
from syncing with the associated plans.
A subscription gets locked if you change the parameters of the subscription, without
changing the associated service plan. Such locking secures your customizations so that
they are not overwritten the next time you change the plan and all its subscriptions are
synced.
Unsynced state indicates that some services or resources offered with the associated
plans cannot actually be provided with the subscription.
Suspended state. This state is not related to the synchronization of a subscription with the
service plan, but it affects the behavior of websites. Panel suspends subscriptions
automatically if their expiration date passes. In addition, you can suspend a subscription
manually.
Note: If a plan offers a privilege that makes it possible for a subscriber to change a particular
resource or service, this resource/service allocation is ignored during a sync. For example, if
the plan provides the privilege of PHP settings management and a customer changes some
PHP setting, its subscription remains synced with the plan (even if a value of the PHP setting
in the subscription differs from the corresponding one in the plan).
Page 41

Understanding Service Plans and Subscriptions 41
Unsynced Subscriptions
Panel does not check whether a service or a resource that a service plan should provide is
actually available in the system. For example, when creating a plan, you can select to
provide ColdFusion when ColdFusion is not installed on the server, and Panel will let you do
it and will show no error or warning messages.
A subscription is automatically marked as Unsynced if Panel cannot provision the resources
and/or services defined by the plan. This may happen in the following cases:
When the subscription is created.
When the properties of the associated plan are changed.
When an add-on plan is added to or removed from the subscription.
To know which of the subscription's resources or services are not synced with
the plan:
1. Go to Subscriptions, and click the unsynced subscription name.
2. Click Sync.
The Panel will retry syncing the subscription with associated plans, and will display the
conflicting properties if syncing fails.
Be sure to take note of the conflict report: which properties are affected, and what the
Plan value and the Available value are.
Clicking OK at this page will initiate setting the subscription values according to the
available values, Cancel will leave everything unchanged.
Once you have identified the problem, you can resolve it. There are two possible ways:
1. Fine-tune the plan to conform to the system's capabilities.
2. Fine-tune the system to provide resources and services offered with the plan.
To change the plan properties to conform to the system:
1. Go to Service plans > <plan name>.
2. Adjust the required settings so that they correspond to the Available values
(see above).
3. Click Update & Sync.
The subscriptions will be synced automatically.
To adjust the system:
Contact your service provider.
Page 42

Organizing your offerings into service plans is only one of the many steps required to
C H A P T E R 3
Starting Your Business in Panel
get your business ready to run. Before you can start serving customers, you should
also think about how potential customers will find your offerings, how you will subscribe
new customers and take payments, and other aspects of your business. To start your
business more easily, you can use automation solutions that carry out different routines
for you, for example, issue invoices and take payments from customers.
The automation tools included in your reseller package by your hosting provider define
whether you will be able to automate certain business routines. If your hosting provider
offers you a business automation solution, learn how to automate certain routines in
the appropriate documentation. Otherwise, you should take care of various aspects of
your business on your own before you start serving customers. However, in this case,
you can automate some aspects, for example, financial ones, by means of the
appropriate software as well.
To start your hosting business in Panel, do the following:
Rebrand Panel and prepare hosting plans.
Set up a website for your own company.
After you complete these operations, you can start subscribing customers to your
services.
Rebranding Panel and Preparing Hosting Plans
Before you can start serving your customers, you should do the following:
1. Adjust Panel branding and appearance as described in the section
Changing Branding and Interface Settings (on page 44).
2. On the Service Plans page, add service plans and add-ons that you will
offer to your customers.
Setting Up Your Company's Presence on the Web
To let your prospective customers become acquainted with your offerings and contact
you, set up a website and e-mail addresses for your company on the Panel-managed
server.
To set up your website, create your own hosting subscription by clicking Subscriptions >
Create New Subscription. This will enable you to log in to the Control Panel and manage
your web hosting just as your customers do: you can create web pages and mailboxes,
install web applications, secure access to websites with SSL certificates, and so on.
For detailed information about using your hosting resources for your own needs, see
the chapter Website Management (on page 55).
Page 43

Starting Your Business in Panel 43
Subscribing Customers to Your Services
After you set up hosting plans in Panel, you can start subscribing customers to your
services. When a new customer subscribes to your services, create an account and a
subscription for this customer in Customers > Add New Customer. You will be prompted to
enter the following information:
The customer's contact information.
A username and a password that the customer will use to log in to the Control
Panel.
Subscription details:
A domain name that the customer owns and will use for their website hosted in
Panel.
An IP address used by the customer's website.
The customer's username and password that they will use to access their
folders, for example, using FTP.
The service plan to which the customer subscribes.
(Optional) Add-ons that the customer wants to add to the subscription.
If the plan selected by the customer does not completely meet their needs and you
do not offer add-ons that could help, adjust the subscription settings by selecting
the checkbox Proceed to customizing the subscription parameters after the customer
account is created.
Once you create the account and the subscription, pass on the Panel access
credentials to the customer and they will be able to log in to Panel and create their
website.
Periodically, you will need to manually perform various operations on user accounts
and subscriptions. For example, renew (prolong) subscriptions at the end of
subscription periods, or suspend the accounts of customers who do not pay on time.
To learn how to manage existing customer accounts and subscriptions in Panel, refer
to the sections Managing Customer Accounts (on page 47) and Managing Subscriptions (on
page 48).
Page 44

This chapter describes how to select Panel's interface language, rebrand Panel, and
C H A P T E R 4
Changing Branding and Interface Settings
add links to external sites or web applications.
Change Interface Language
In addition to English, Panel can be viewed in the following languages:
Chinese (traditional and simplified)
Dutch
French
German
Italian
Japanese
Polish
Portuguese
Russian
Spanish
If you want to switch Panel to any of these languages, go to My Profile > Interface
Preferences.
When you switch to a language different from English, some button captions may
become too long and corrupt the Panel layout. To prevent this, you can specify a limit
on button caption length. In this case, the system will automatically shorten button
captions longer than this limit and end them with an ellipsis (...).To define the caption
length limit, enter its value in the Button label length field in My Profile > Interface
Preferences. To disable automatic shortening, clear this field.
Add Branded Content
To disguise the fact that you are reselling another company's hosting resources, you
can add your own branded content to Panel. Specifically, this content may be the
following:
The logo in the top left corner. Upload your own logo and your customers will see this
instead of the original Panel logo in the Control Panel. Use a GIF, JPEG, or PNG
file for your logo, preferably not larger than 100 kilobytes to minimize the download
time. To ensure that your logo will fit into the top area, we recommend that you use
an image 50 pixels in height.
Page 45

Changing Branding and Interface Settings 45
The URL to which the logo points. Make your logo a clickable link that points to your
company's website to let your customers easily open the website any time they are
in the Control Panel.
The pages title. Let your customers see your company name or other relevant text in
their browsers' title bars when they work in the Control Panel.
To change any of these settings, go to Tools & Utilities > Panel Branding.
Add Links to Websites and Applications
If you want to have quick access from Panel to certain websites and applications, or
wish to provide your customers with such access, create custom buttons. The buttons
may lead to web resources, such as your corporate site, or to a web application that
can process online requests and accept additional information about the users clicking
the buttons. You can place these buttons on your Home page for yourself or in the
Control Panel for your customers.
You can place the buttons in the following locations of the Server Administration Panel
and the Control Panel, and decide who should be able to see them:
On the Home page in the Server Administration Panel, visible only to you. This is
achieved by selecting the Reseller's Home page option in the button properties.
On the Home tab in the Control Panel, visible to the hosting service customers and
their users who are allowed to log in to the Control Panel. This is achieved by
selecting the Customer's Home page option in the button properties.
On the Websites & Domains tab in the Control Panel, visible to the hosting service
customers and their users who are allowed to log in to the Control Panel. This is
achieved by selecting the Websites & Domains page of Subscription option in the button
properties.
On the Home page in the Server Administration Panel and Control Panel, visible to
you and your customers. This is achieved by selecting the Common access option in
the button properties.
You can specify what information about users should be passed:
Subscription ID.
Primary domain name associated with a subscription.
FTP account username and password.
Customer's account ID, name, e-mail, and company name.
To add a custom hyperlink button to the Server Administration Panel or
the Control Panel:
1. Go to Tools & Utilities > Custom Buttons (in the Panel Management group), and
click Create Custom Button.
2. Specify the following properties of the button:
Type the text that will show on your button in the Button label box.
Choose the location for your button.
Page 46

46 Changing Branding and Interface Settings
Specify the priority of the button. Your custom buttons will be arranged in the
Panel in accordance with the priority you define: the lower the number, the
higher the priority. Buttons are placed in the left-to-right order.
To use an image for a button background, click Browse to browse for the desired
file. It is recommended that you use a 16x16 pixel GIF or JPEG image for a
button to be placed in the navigation pane, and a 32x32 pixels GIF or JPEG
image for a button placed in the main frame.
Type the hyperlink to be attached to the button into the URL box.
Using the checkboxes, specify whether you want the customer information and
other data to be transferred within the URL. These data can be used for
processing by external web applications.
In the Tooltip text input field, type in the help tip that will be displayed when users
place the mouse pointer over the button.
Select the Open URL in Parallels Panel checkbox if you want the destination URL to
be opened in the main frame of the Panel; otherwise, leave this checkbox
cleared to open the URL in a separate browser window or tab.
If you want to make this button visible only to you, select the Show to me only
checkbox.
3. Click Finish to complete creation.
To remove a custom button from the Panel, go to Tools & Utilities > Custom Buttons (in
the Panel Management group), select the corresponding checkbox and click Remove.
Page 47

If you use Panel without software that automates creating and managing customer
C H A P T E R 5
Managing Customer Accounts
accounts, manage these accounts in Panel manually.
To view the details of a customer account, click the customer's name on the Customers
page. To change these details, use the buttons on the page:
Edit Contact Info lets you update the customer's contact information: name, e-mail,
address, phone, and so on.
Edit Login Info lets you change the customer's username and password.
If you want to stop serving a customer, for example, if they do not pay for your
services, you may suspend the customer's accounts - block access to the Control
Panel for this customer and users that they created. To suspend an account, click
Suspend on the customer details page. In addition to suspending the account, this will
suspend all its subscriptions making the customer's websites, FTP and mail services
unavailable to the Internet users.
Later you will be able to cancel the suspension by clicking Activate on the customer
details page.
You can also suspend multiple accounts at once or activate multiple suspended
accounts. To do this, select the accounts that you want to suspend or activate at the
Customers page and choose the appropriate action from the More Actions menu.
To remove customer accounts and all subscriptions belonging to them, select these
accounts at the Customers page and click Remove.
Page 48

In Panel, you can do the following with existing subscriptions belonging to your
C H A P T E R 6
Managing Subscriptions
customers and yourself:
Change hosting settings of a subscription.
That is, the IP address on which the subscription's websites are hosted, and
credentials of system user account linked with the subscription (used to manage
files and folders of websites within the subscription, and to access the server via
SSH or Remote Desktop). To change a subscription's hosting settings, go to
Subscriptions > subscription's name, and click Change Hosting Settings.
Transfer one or several subscriptions to another user.
This means that you change owner of subscriptions, or, in other words, reassign
subscriptions to another user: another customer or yourself. In this case, the
subscriptions are automatically unbound from their plans and become custom. To
transfer one or several subscriptions to another user, go to Subscriptions, select the
corresponding checkboxes and click Change Subscriber.
Suspend subscriptions.
Websites, FTP and mail services of suspended subscriptions are no longer
accessible to the Internet users. Suspending a subscription manually may be useful
in cases when a website hosted within the subscription gets attacked or the
subscriber does not pay for the services.
To suspend one or several subscriptions, go to Subscriptions, select the
corresponding checkboxes and click Suspend.
Activate suspended subscriptions.
Once a subscription is activated, all the services provided with it resume operation.
Activation is only useful for subscriptions that were suspended manually: if you
activate a subscription that was expired, Panel will automatically suspend it again
on the next day. To make an expired subscription active, renew it as described
below.
To activate one or several subscriptions, go to Subscriptions, select the
corresponding checkboxes and click Activate.
Renew an expired subscription.
When a subscription's expiration date comes, Panel suspends it. In such cases,
you should renew subscriptions manually.
To renew a subscription, go to Subscriptions > subscription's name, click Activate,
and then set a new expiration date (it may be unlimited). Then apply the new
settings by clicking Update & Lock.
Note: After this step, the system will not apply further changes of the plan settings
to this subscription. If you try to sync this subscription with the plan, the subscription
will expire again unless you set the Unlimited validity period for this plan.
Page 49

Managing Subscriptions 49
Remove subscriptions.
To remove subscriptions, go to Subscriptions, select the corresponding checkboxes
and click Remove.
Page 50

With the data backup and restore functions provided by your Parallels Plesk Panel, you
In this chapter:
Configuring the Control Panel for Using FTP Repository ................................... 51
Backing Up Your Account with Your Sites ......................................................... 51
Scheduling Backups .......................................................................................... 52
Restoring Data From Backup Archives .............................................................. 53
Downloading Backup Files from Server ............................................................. 54
Uploading Backup Files to Server ..................................................................... 54
Removing Backup Files from Server ................................................................. 54
C H A P T E R 7
Backing Up and Restoring Data
can perform the following operations:
Back up your account with all domains. The backup archive will include all settings and
data related to your account and your domains (websites).
Back up individual domains (websites). The backup archive will include all data related
to a website and mail services, including the contents of mailboxes, address book
contact lists, antispam and antivirus settings. The instruction for backing up a
certain website is provided in the section Backing Up and Recovering Websites (on
page 277).
Schedule backups. Scheduling backup can be done both for your account and your
domains.
Restore your data from backup archives.
Your customers granted with the permission to use the backup and restore functions
can back up and restore their own account settings and websites through the Panel.
Page 51

Backing Up and Restoring Data 51
Configuring the Control Panel for Using FTP Repository
If you are going to use an FTP server for storing backup files, you should
set up the Control Panel appropriately:
1. Go to Tools & Utilities > Backup Manager > Personal FTP Repository Settings.
2. Specify the following settings:
FTP server's IP address or host name.
Directory on the server, where you want to store backup files.
User name and password for access to the FTP account.
3. Click OK.
Backing Up Your Account with Your Sites
To back up your account with domains:
1. Go to Tools & Utilities > Backup Manager, and click Back Up.
2. Specify the following:
Backup file name prefix and description. You cannot specify an arbitrary file
name, however, you can set the control panel to add a prefix to backup file
names. Note that the control panel automatically adds the date and time of
backup file creation (in Universal Time) to backup file names.
Splitting of the backup file. To create a multivolume backup, select the
respective check box and specify volume size in megabytes.
Location where to store the backup file. Select the repository where you would
like to store the backup file.
What data to back up. You can back up only the settings related to the user
accounts and Web sites, or the settings with all user data.
E-mail notification on backup completion. If you want to be notified of the
backup completion, type your e-mail address.
3. Click Back Up. The backup process will start and the progress will be
shown under the Current Back Up Tasks tab. You can use the Refresh button
to update the information on the screen. When backing up is finished,
the backup file will be saved to the reposi tory you selected.
Page 52

52 Backing Up and Restoring Data
Scheduling Backups
To schedule backing up of data:
1. Go to Tools & Utilities > Backup Manager.
2. Click Scheduled Backup Settings.
3. Select the Activate this backup task checkbox and specify the following:
When and how often to run the backup.
Backup file name.
Splitting of the backup file. To create a multivolume backup, select the
respective check box and specify volume size in megabytes. Note that volume
size cannot exceed 4095 megabytes.
Location where to store the backup file. Select the repository where you would
like to store the backup file.
Maximum number of backup files stored in the repository. Type a number if you
want to recycle backup files: When this limit is reached, the oldest backup files
are removed.
E-mail notification on backing up errors. If you want to send an e-mail notice
when something goes wrong during backing up, type the e-mail address you
need.
What data to back up. You can back up only settings, or settings and user data.
4. Click OK.
Page 53

Backing Up and Restoring Data 53
Restoring Data From Backup Archives
You can restore data from backup files kept in Panel's repository on the server, a
custom FTP repository (on page 51), and you can upload a backup file (on page 54) in
a ZIP archive (on Windows systems) or tar archive (on Linux systems), and then
restore data from it.
To restore data from a backup file:
1. Go to Tools & Utilities > Backup Manager.
2. Click the backup file name.
3. Specify the following settings:
Types of data to be restored.
Suspend domain (Web site) until restoration task is completed. Select this if you want
to avoid possible conflicts that may occur when users modify site content or
settings while they are being restored.
Send an e-mail notice when restoration task is completed. Type your e-mail address if
you want the Control Panel to notify you when restoring is completed.
Conflicts resolution policy. Specify what to do if any conflicts occur during
restoration.
4. Click Restore.
In case if any errors or conflicts occur during restoration of data, the wizard will
prompt you to select an appropriate resolution. Follow the instructions provided on
the screen to complete the wizard.
Note: The Overwrite data restoring mode means that all objects will be restored
from the backup files regardless of their current presence in the system. The
Overwrite mode works as follows:
If an object or settings from the backup file are not present in Parallels Plesk
Panel, then they are created or set in Parallels Plesk Panel.
If an object or settings from the backup file are present in Parallels Plesk Panel,
then the object or settings from the backup file replace the corresponding object
or settings that are present in Parallels Plesk Panel.
If an object or settings are present in Parallels Plesk Panel, but are missing from
the backup file, then the object or settings currently present in Parallels Plesk
Panel are not changed.
Page 54

54 Backing Up and Restoring Data
Downloading Backup Files from Server
To download a backup file from a backup repository within the Panel:
1. Go to Tools & Utilities > Backup Manager.
2. Click the icon corresponding to the backup file you want to download.
3. Select the location where you want to save the backup file and click
Save.
The backup file will be downloaded from the backup repository.
Uploading Backup Files to Server
To upload a backup file to a backup repository within the Panel:
1. Go to Tools & Utilities > Backup Manager.
2. Click Upload Files to Server Repository.
3. Click Browse and select the required backup file.
Note: Make sure you select the appropriate backup file format, which depends on
the operating system on which Parallels Plesk Panel is installed. On Linux/Unix
systems, you should upload tar or zipped tar archives, and on Windows, ZIP
archives.
4. Click OK.
The backup file will be uploaded to the backup repository.
Removing Backup Files from Server
To remove a backup file from the backup repository in the Panel:
1. Go to Tools & Utilities > Backup Manager.
2. Select a checkbox corresponding to the backup file you want to remov e.
3. Click Remove.
4. Confirm removal and click OK.
Page 55

The Panel's main function is simplified administration of hosted websites, mailboxes,
Section
Description
Quick Start with Parallels Panel
Explains the workflow of setting up a website
and a mail account in the Control Panel.
Customer Account Administration
Explains how to view and manage account
settings, subscriptions, invoices, and
resources in the Control Panel.
C H A P T E R 8
Website Management
and other network resources. As a reseller, you can use leased hosting resources for
your own needs as well as for selling these resources to customers. For example, you
can set up your corporate website or mailbox on the Panel server. To set up your own
hosting account, create a subscription in Panel by clicking Subscriptions > Add New
Subscription. Then provide a domain name for this subscription, specify access
credentials, and choose a service plan and add-ons if you need them. The subscription
will appear in the list on the Subscription page together with your customers'
subscriptions. To start creating your website or to edit the subscription settings, click
the Open in Control Panel link next to the subscription's name. A list of operations
available to you in the Control Panel is provided in the table below.
Helping Customers Manage Their Subscriptions
Your customers will have different levels of technical expertise and, therefore, may
have problems with managing certain settings of their subscriptions. To assist your
customers, you can log in to the Control Panel under a customer's account and edit
their websites and subscription properties as if they were your own. To start managing
a customer's subscription in the Control Panel, find the subscription in the list on the
Subscriptions page and click Open in Control Panel.
Operating in Control Panel
Operations related to managing hosting accounts, such as managing website content,
adding and removing mailboxes, changing hosting settings, and so on, are available to
you in a separate interface called the Control Panel.
The sections of this chapter explain how to perform hosting operations in the Control
Panel. The instructions are applicable to your own subscriptions and subscriptions of
your customers. This means that when we say your website, your subscription, and so
on, we imply both your own and your customers' websites or subscriptions. The table
below lists the sections of this chapter and briefly describes what you can learn from
them.
Page 56

56 Website Management
Websites and Domains
Explains how to create websites, fill them
with content, add applications, and configure
subscription properties related to websites
and domain names.
Building Websites with Presence Builder
Provides instructions on creating websites
using Presence Builder - a visual website
editor coming in a bundle with Panel.
FTP Access to Your Websites
Explains how to set up access to websites
using FTP for subscribers and auxiliary
users.
Mail
Describes how to set up mail accounts and
configure mail settings under subscriptions.
Scheduling Tasks
Provides instructions on configuring Panel to
automatically run scripts at specific times.
Using Databases
Explains how to use databases under
subscriptions: create new databases, import
existing ones, or access external databases.
Backing Up and Recovering Websites
Provides instructions on backing up and
restoring the data of certain hosting
subscriptions on behalf of subscribers.
In this chapter:
Quick Start with Parallels Panel......................................................................... 57
Customer Account Administration ..................................................................... 81
Websites and Domains ..................................................................................... 108
Creating Sites with Presence Builder ................................................................ 199
FTP Access to Your Websites ........................................................................... 252
Mail Accounts .................................................................................................... 256
Scheduling Tasks .............................................................................................. 267
Website Databases ........................................................................................... 272
Backing Up and Recovering Websites............................................................... 277
Page 57

Website Management 57
Quick Start with Parallels Panel
Next in this section:
Set Up Your First Website ................................................................................. 58
Set Up Mail Accounts ........................................................................................ 62
View Site Visit Statistics .................................................................................... 81
According to the latest studies, the Internet has become the most popular source of
information in the world, leaving far behind all traditional media such as TV or
newspapers. Nowadays, the first thing people do when trying to find services is to
searching for them on the web. Thus, a proper web presence is vital for every
business. There are a number of ways you can present your company on the Web. A
web presence may be as simple as a contacts page, or as complex as a large
company website with access to an ERP system. In both cases, you should perform
the same steps to get your business online.
Before proceeding any further, you will need to take the following two essential steps:
Purchase a customer account from a hosting provider.
Your customer account provides access to the services that are vital for a web
presence - Internet connectivity, disk space to store your website content, and so
on. For more information about customer accounts in Panel, refer to the chapter
Customer Account Administration.
Register a domain name.
This is the name people will use to access your site from their browsers. For
example, www.example.com.
These two elements - an account for web hosting management and a domain name
make up your website.
In this chapter, we will explain how to create your first website, fill it with content, create
mailboxes for users of the site, and, finally, view the site visits statistics.
Advanced Hosting Features
Once you are comfortable with basic Panel capabilities, try out some advanced hosting
features: Expand website functionality by installing web applications (on page 151),
secure your sites with SSL certificates (on page 161), employ databases, and much
more.
Note: Hosting providers can turn off some of the advanced features to make your
Control Panel look simple and user friendly. We have used the (Advanced) prefix to
designate the sections about features that may be turned off. If you require one of the
advanced options, contact your hosting provider.
Page 58

58 Website Management
Set Up Your First Website
Next in this section:
1. Create Your Site ............................................................................................ 58
2. Preview Your Site .......................................................................................... 61
Next in this section:
Presence Builder............................................................................................... 59
Content Management Systems ......................................................................... 59
Uploading Content ............................................................................................ 60
Now that you have a customer account and a domain name, the first thing you will want to do
is create a website. The information about the possible ways to do it is provided in the
section 1. Create Your Site (on page 58)
When your site is ready, you may want to take a look at the result in your browser. Learn
how to do it in the section 2. Preview your Site (on page 61).
1. Create Your Site
There are three general ways to create a website:
Employ a web design studio to create a site for you, and then you will just maintain its
content.
Create a site by yourself using Presence Builder - the powerful tool that allows you to
create professional-looking websites in a few mouse clicks. Learn more in the section
Presence Builder (on page 59).
Create your website in a third-party Content Management System - an editor that allows
you to easily create and edit website content such as pages, scripts, applications, and so
on. To learn more about creating sites in third-party content management systems, see
the section Content Management Systems (on page 59).
If you have purchased a ready-made site or created it by yourself, you should upload the site
content to your account to make the site visible on the web. There are two ways to upload
content:
Using FTP. Learn more in the section Uploading Content Using FTP (on page 61).
Using an integrated File Manager. Learn more in the section Uploading Content with File
Manager (on page 61).
Page 59

Website Management 59
Presence Builder
Presence Builder is a tool that enables users with no knowledge of HTML markup or graphic
design skills to create professional-looking sites. This tool provides a simple visual editor and
a huge set of templates for different websites. The editor allows you to create web pages,
add content of different types (text, images, video, scripts), and edit website settings such as
website name, keywords, icons, and so on.
To create websites in Presence Builder, ensure that your hosting subscription includes this
option. If it does not, choose another way or upgrade your subscription.
To create a website with Presence Builder:
1. Go to the Websites & Domains tab and click your domain name.
2. Click the link Launch Presence Builder.
3. Select a topic that best suits your website.
4. Edit the website:
a. Structure: add more pages, remove the predefined pages that you do
not need.
b. Content: change the predefined content to your own, add text,
images, videos, scripts, and other required elements.
c. Design: change the layout and color scheme.
5. Publish the website.
Find more information about creating websites with Presence Builder in the section Building
Websites with Presence Builder (on page 199).
Content Management Systems
Content Management Systems (or CMS) are applications that provide a graphical user
interface for adding and editing website content: pages, scripts, files, multimedia content, and
so on.
Before you can create a website in a third-party CMS, you should install the CMS on your
hosting account. Note that you can install the CMS only if your hosting subscription allows it.
To create a website using a CMS:
1. Go to the Applications tab.
2. Find the CMS you need in the list of available applications, and install it as
described in the section Using Website Applications (on page 151).
3. Create your website in the CMS. For information about creating websites
with your CMS, refer to the relevant documentation.
Page 60

60 Website Management
Uploading Content
Next in this section:
Uploading Content Using FTP........................................................................... 61
Uploading Content with File Manager ............................................................... 61
If you already have a website created by yourself or a web design studio, just upload the
website files and folders to your provider's server. You can do this in one of the following
ways:
Using FTP. This way is better when several people manage a website's content because
it does not require access to your customer account. You can just create FTP users for
them. Learn more about this method in the section Uploading Content Using FTP (on page
61).
Using Control Panel File Manager. This way is more convenient since it uses the Control
Panel GUI and provides a set of useful features, for example, a visual HTML editor and a
file permissions manager. Find more information on the features of File Manager in the
section Uploading Content with File Manager (on page 61).
Page 61

Website Management 61
Uploading Content Using FTP
To publish a website using FTP:
1. Connect to your webspace on the server with an FTP client program, using
your FTP account username and password.
You can change your username and password in the Panel at the Websites & Domains tab
> Web Hosting Access.
The FTP address should be ftp://your-domain-name.com, where your-domain-name.com
is your site's Internet address.
Enable the passive mode if you are behind a firewall.
2. Upload the files and directories of your site to the httpdocs directory. If you
use CGI scripts, place them in the cgi-bin directory.
3. Close your FTP session.
You can also set up additional FTP accounts if you need to collaborate on website content
with other users. For more information, see the section Adding FTP Accounts (on page 253).
Uploading Content with File Manager
To upload a website from your computer to Panel server with File Manager, open the Files
tab of Control Panel and drag the website folder to the central area of this tab. You can also
upload your website as a compressed ZIP file and then extract the contents using the
archiver integrated in File Manager.
With File Manager, you can also do the following:
Edit HTML files in the visual editor.
Preview website pages.
Edit files in the text editor.
Manage the files' access permissions.
Learn more about uploading and editing website files and folders with File Manager in the
section Managing Website Content (on page 143).
Page 62

62 Website Management
2. Preview Your Site
Next in this section:
1. Create Mail Account ...................................................................................... 63
2. Access Your Mailbox ..................................................................................... 64
After you uploaded website files to the webspace, you can check how your site will look in a
web browser, even before the information about the new site has spread in the Domain
Name System.
To preview a site:
1. If you are subscribed to several hosting packages and have access to
several webspaces associated with your account, select the required
webspace in the Subscription menu at the top of the screen.
2. Go the Websites & Domains tab.
3. Click Preview below the domain name of the website that you want to preview.
You site will open in a new browser window.
Note: The contents of password-protected directories might be inaccessible in the Preview
mode.
Sometimes, you may need to show your site to someone when your domain name is not
registered yet. There are several ways to do it without giving a person access to your
customer account. Learn more in the section Previewing Websites (on page 150).
Set Up Mail Accounts
Once your website is ready, you can start creating mail accounts. You can choose, for
example, to create mail accounts for all users within your organization. Note that the number
and size of mailboxes is limited by your hosting plan.
Page 63

Website Management 63
1. Create Mail Account
To create an e-mail address:
1. If you are subscribed to several hosting packages and have access to
several webspaces associated with your account, in the Subscription menu at
the top of the screen, select the required webspace.
2. Click the Mail tab.
3. Click Create E-mail Address.
4. Type the left part of the e-mail address before the @ sign, and, if you have
several domain names on your account, select the domain name under
which the e-mail address will be created.
5. Leave the Mailbox checkbox selected.
Clearing this checkbox makes sense only if you want to use this address as a mail
forwarder, which will forward all incoming mail to another address.
6. Specify the mailbox size or use the default size defined by the provider's
policy or your service plan.
7. Specify a password consisting of five or more Latin characters.
8. Click OK.
Page 64

64 Website Management
2. Access Your Mailbox
Next in this section:
Access from Webmail ........................................................................................ 65
Access from Microsoft Office Outlook ................................................................ 65
Access from Microsoft Outlook Express ............................................................ 69
Access from Mozilla Thunderbird ...................................................................... 73
Access from Apple Mail ..................................................................................... 76
There are two ways to access a mailbox for sending and receiving e-mail messages:
Set up and use an e-mail client program on your computer. Typically, in such programs
you should specify the following settings:
Username. In this field, specify your full e-mail address. For example,
johndoe@example.com.
Password. Most likely, the password to your e-mail account.
Mail server protocol. This property defines whether you want to keep copies of
messages on the server or not. To keep the copies on the server, select the IMAP
option. If you do not want to keep them on the server, select POP3. Selecting IMAP will
also allow you to train the SpamAssassin spam filter on e-mail messages you receive,
if SpamAssassin is enabled on the server.
Incoming mail server (POP3/IMAP). Type your domain name. For example,
example.com. The POP3 port is 110. The IMAP port is 143.
Outgoing mail server (SMTP). Type your domain name. For example, example.com.
The SMTP port is 25. This server requires authentication.
To get detailed instructions on configuring popular e-mail clients to work with your
mailbox, see subsections of this section.
Use a web browser to connect to the webmail interface.
Note: If you cannot access your mailbox following the instructions in this section, this might
be caused by mail server settings. Contact your hosting provider to resolve the issue.
Page 65

Website Management 65
Access from Webmail
To access your mailbox through webmail, do any of the following:
In a Web browser, visit the URL webmail.example.com, where example.com is the
Internet address of your website. When prompted, specify your full e-mail address as the
username (for example, mail@example.com), and specify the password that you use
for logging in to the Panel.
When logged in to the Panel, click the Mail tab, and in the list of e-mail addresses, click
an icon corresponding to the e-mail address you need.
Access from Microsoft Office Outlook
To set up Microsoft Office Outlook 2010:
1. Open Microsoft Office Outlook.
2. Go to File > Info > Add Account.
3. Select the checkbox Manually configure server settings or additional server types.
Click Next.
Page 66

66 Website Management
4. Select the Internet E-mail option and click Next.
Page 67

Website Management 67
5. Specify the following:
Your name.
Your e-mail address.
Account type. If you want to keep copies of messages on the server, select the IMAP
option. If you do not want to keep any messages on the server, select the POP3
option. Selecting IMAP will also allow you to train the SpamAssassin spam filter on email messages you receive, if SpamAssassin is enabled on the server.
Incoming mail server. Type your domain name. For example, example.com.
Outgoing mail server (SMTP). Type your domain name. For example, example.com.
User Name. Specify your full e-mail address. Example: johndoe@example.com.
Password. Most likely, this password coincides with the password you use for logging
in to Panel.
Require logon using Secure Password Authentication (SPA). Leave this option cleared.
Page 68

68 Website Management
6. Click More Settings, open the Outgoing Server tab and check My outgoing server
(SMTP) requires authentication.
7. Click Next.
8. Click Finish.
Page 69

Website Management 69
Access from Microsoft Outlook Express
The instructions provided in this section were verified against Microsoft Outlook Express 6.
They might not work with earlier or later versions of Microsoft Outlook Express.
To set up Microsoft Outlook Express:
1. Open Microsoft Outlook Express.
2. Go to Tools > Accounts.
3. Click the Add button and select the Mail item.
4. Enter your name as you want it to appear in any messages you send, and
click Next.
Page 70

70 Website Management
5. Type your e-mail address, and click Next.
Page 71

Website Management 71
6. Specify the following settings:
Protocol of your incoming mail server.
If you want to keep copies of messages on the server, select the IMAP option. If you
do not want to keep any messages on the server, select the POP3 option. Selecting
IMAP will also allow you to train the SpamAssassin spam filter on e-mail messages
you receive, if SpamAssassin is enabled on the server.
Incoming mail server. Specify your website's Internet address.
Outgoing mail server. Specify your website's Internet address.
Page 72

72 Website Management
7. Click Next.
8. Specify the following:
Your account name. Type your e-mail address in the Account name box.
Your password. Most likely, this password coincides with the password you use for
logging in to the Panel.
Remember password checkbox. Leave it selected if you do not want to be prompted to
enter password each time your e-mail program connects to the mail server to check
for new mail, and click Next.
9. To complete setting up your e-mail program, click Finish.
Page 73

Website Management 73
Access from Mozilla Thunderbird
The instructions provided in this section were verified against Mozilla Thunderbird 12. They
might not work with earlier or later versions of Mozilla Thunderbird.
To set up Mozilla Thunderbird:
1. Open Mozilla Thunderbird.
2. Go to Tools > Account Settings > Account Actions > Add Mail Account.
3. Specify the following:
Your name, as you want it to appear in any messages you send.
Your e-mail address and password.
Page 74

74 Website Management
4. Click Continue.
5. If Thunderbird fails to find the settings automatically, specify the following:
Account type. If you want to keep copies of messages on the server, select the IMAP
option. If you do not want to keep any messages on the server, select the POP3
option. Selecting IMAP will also allow you to train the SpamAssassin spam filter on email messages you receive, if SpamAssassin is enabled on the server.
Page 75

Website Management 75
6. Click Create Account.
If you set up a mail account manually, please use the following typical combinations of
connection security and authentication method settings. If the settings do not work for you,
ask your hosting provider about the correct combination.
On Linux:
Connection security: STARTTLS
Authentication method: Encrypted password
On Windows, IMAP:
Connection security: None
Authentication method: Encrypted password
On Windows, POP3:
Connection security: None
Authentication method: Password, transmitted insecurely Other parameters that you may need
when configuring your account manually:
POP3 port: 110
IMAP port: 143
SMTP port: 25
Username. Your full e-mail address. For example: johndoe@example.com.
Incoming server address (POP3/IMAP). Specify your website's Internet address. Example:
example.com
Outgoing server address. Specify your website's Internet address. Example: example.com
Page 76

76 Website Management
Access from Apple Mail
The instructions provided in this section were verified against Apple Mail 3.6 (Leopard). They
might not work with earlier or later versions of Apple Mail.
To set up Apple Mail:
1. Run Apple Mail.
If you run it for the first time and do not have any mail accounts configured in it, skip the
next step: Apple Mail will take you directly to creating one.
2. Open the Adding Mail Account wizard:
a. Click Mail > Preferences....
b. Select the Accounts tab.
c. Click the + button at the bottom left corner.
3. Enter the account information:
Your full name
Your full e-mail address
The password you use to log in to the Panel.
Page 77

Website Management 77
4. Click Continue.
5. Fill in the following incoming mail server information:
Account Type: select whether you want to use IMAP or POP protocol.
We recommend selecting IMAP if you use SpamAssassin as a spam filtering solution:
IMAP account is a requirement for SpamAssassin learning which messages are spam
and which are not.
Incoming Mail Server: type in the name of domain which serves your mail (which follows
the @ sign in your e-mail address).
User Name: enter your full e-mail address.
Password: leave it auto-completed (Apple Mail takes it from the previous step).
Page 78

78 Website Management
6. Click Continue.
7. (Optional) Specify the incoming mail security options:
a. Select the Use Secure Sockets Layer (SSL) checkbox.
b. Select the authentication method.
Keep the default method if you are not sure which to select.
Apple Mail displays this setup screen only if a mail server bundled with Panel supports
SSL for the selected account type (POP or IMAP).
Page 79

Website Management 79
8. Click Continue.
9. Fill in the following outgoing mail server information:
Outgoing Mail Server: type in the name of domain which serves your mail (which follows
the @ sign in your e-mail address).
Use only this server: selected.
Use Authentication: selected.
User Name: enter your full e-mail address.
Password: leave it auto-completed (Apple Mail takes it from the previous step).
Page 80

80 Website Management
10. Click Continue.
Apple Mail displays overall description of the mail account that is going to be created.
11. Select the Take account online checkbox and click Create.
Page 81

Website Management 81
View Site Visit Statistics
Finally, when your site works fine and search engines return it in search results, it is the best
time to evaluate site efficiency by viewing the visits statistics.
To find out how many people visited a site, from what countries, and what
pages of the site they viewed:
1. If you are subscribed to several hosting packages and have access to
several webspaces associated with your account, in the Subscription menu at
the top of the screen, select the required webspa ce.
2. Go to the Websites & Domains tab and click the domain name for which you
want to view the statictics
3. Click Web Statistics.
The site visitor statistics will show in a new browser window.
4. To view statistics for web pages viewed from the SSL -secured area of your
site, select SSL Web Statistics in the menu.
5. To view statistics for files downloaded over the file transfer protocol (FTP),
select FTP Statistics in the menu.
Alternately, you can view the visits statistics for a site by visiting the following URL:
https://your-domain.com/plesk-stat/webstat. When prompted for username and password,
specify your FTP account username and password.
You have successfully completed the quick start part of the guide. Feel free to read about
other features that are available to you in the Control Panel.
Customer Account Administration
As described in the section Quick Start with Parallels Panel, the first step in establishing your
company's web presence is signing up to the services provided by a hosting company
(hosting provider). After you subscribe to a hosting plan, a customer account in Panel is
created to enable you to log in to Panel and use the hosting services and resources like
mailboxes, disk space, and bandwidth.
Page 82

82 Website Management
Customer Account and Multiple Subscriptions
Panel allows you to subscribe to as many hosting plans as you need. For example, if you do
not want your main site to share hosting resources with a company's branch site you can
subscribe to another hosting plan under the same customer account. In other words, a
customer account is a personalized access to all your subscriptions (see the picture below).
Page 83

Website Management 83
Another reason for using multiple subscriptions is that subscription is limited to only one IPv4
and one IPv6 address. Thus, all domains within a subscription share the same IP address
(v4 or v6). If you need to host sites on different IP addresses, you should additionally order
the same plan for as many IP addresses as you need. This can be useful, for example, if you
want to secure connections to each of your sites with a separate SSL certificate. For
information on how to purchase an additional subscription, refer to the section Ordering More
Resources (on page 97).
If you have multiple subscriptions under a single customer account, you can easily switch
among them from the Account tab. To be more specific, the Account tab provides access to
operations that apply to all your subscriptions. All other tabs (like Mail, Users, or Domains &
Websites) are, on the contrary, subscription-wide. This means that to change mail settings on
a particular subscription, you should first switch to it before clicking Mail.
System Users
For each hosting subscription, Panel creates a system user - a user account in the Panel
server operating system. Customers obtain their system users' access credentials from their
service providers and use these credentials for connecting to the server through FTP, SSH,
and so on. In addition, all operations with files and directories in Panel are performed on
behalf of system users. For example, when a customer adds a new file in File Manager, the
subscription's system user becomes the owner of the file.
Adding Resources to a Subscription
Purchasing a new subscription for extending hosting resources is not always necessary. You
can always improve just one of your subscriptions. For example, add extra disk space or SSL
support. This can be done by switching to another hosting plan or by purchasing hosting plan
add-ons. Learn more in the section Ordering More Resources (on page 97).
Managing Customer Account
In Panel, you can perform a number of administrative operations on your customer account:
Change an account password and personal information. Learn more in the section
Changing Your Password and Contact Information (on page 85).
View the list of services and resources provided by subscription on the Account tab. For
detailed information about all subscription features, refer to the section Viewing
Subscription Summary (on page 86).
Make payments to renew your subscription. Learn more in the section Managing Account
Balance and Invoices (on page 93).
View statistics on your account: For example, disk space or traffic usage. Learn more in
the section Viewing Statistics (on page 99).
Page 84

84 Website Management
Allowing Other Users to Access Your Account
Next in this section:
Changing Your Password and Contact Information ........................................... 85
Viewing Subscription Summary ......................................................................... 86
Managing Account Balance and Invoices .......................................................... 93
Ordering More Resources ................................................................................. 97
Viewing Statistics .............................................................................................. 99
(Advanced) Managing Auxiliary User Accounts ................................................. 101
If the number of hosting maintenance operations is too large to be handled by one person,
you can delegate some of them to other people. For this purpose, you can create auxiliary
user accounts grouped by means of user roles. For example, you can create a group that is
allowed to only upload content to websites. Users in this group will not be able to perform
any operations except for managing website content. For more information about auxiliary
users, refer to the section (Advanced) Managing Auxiliary User Accounts (on page 101).
Page 85

Website Management 85
Changing Your Password and Contact Information
To change your password for access to the Control Panel:
1. Click a link with your name at the top of the screen.
2. Type a new password, and click OK.
To change a username or password that you use for connecting to your
subscription over FTP or SSH:
1. Click the Websites & Domains tab.
2. Click Web Hosting Access.
3. Type the new username or password, and click OK.
To change your contact information:
1. Click a link with your name at the top of the screen.
2. Click the Contact Details tab.
3. Update your contact information and click OK.
Page 86

86 Website Management
Viewing Subscription Summary
When you subscribe to hosting services, a user account is created in the Panel to allow you
to manage your websites and mailboxes on your own.
You can view the following information about your account:
Current subscriptions to service plans.
You can be subscribed to a number of service plans at once, and, therefore, can have
several subscriptions associated with your account. If a billing system is connected to the
Panel, then you can also purchase additional subscriptions, upgrade or downgrade them,
and pay your invoices.
Allocated and consumed resources.
Hosting features available for your websites.
Operations you can perform in your Panel.
Account balance, unpaid invoices, and monthly fee for your hosting package.
To view the information about your account and your current subscriptions:
1. Click the Account tab.
A list of your current subscriptions is shown.
2. If the billing system is integrated with the Panel, then the following
information is shown:
Account credit balance. This is how much money is available in your billing account.
Due invoices balance. This is how much money you owe to your provider. Here, you can
pay all invoices at once by clicking Pay All Outstanding Invoices, or pay one of invoices
by clicking a Pay Now link in the list titled Latest Outstanding Invoices. You can also view
all invoices by clicking the link Show all invoices, or print an invoice by clicking an
invoice number and then clicking Print.
Latest to-do items. This shows reminders from the system about the actions you need to
take.
List of all your subscriptions. You can use links in the list to perform the following
operations:
View subscription properties by clicking a link with subscription name.
Select a subscription that you want to manage through the Control Panel by
clicking the corresponding link Switch to Subscription.
Order an SSL certificate for a site by clicking Request SSL Certificate. This operation
is described in the section Ordering SSL Certificates.
View properties of already ordered SSL certificates by clicking Show Certificate Info.
View or change domain information, contact information, and DNS settings
specified at a registrar's site, by clicking Show Domain Info. These operations are
described in the section Registrar's DNS Settings in Panel (on page 122).
3. To view detailed information about resource allotments, available hosting
options, and permissions for operations, click a subscription's name.
Page 87

Website Management 87
4. Do any of the following:
Next in this section:
Allocated and Consumed Resources ................................................................. 88
Hosting Features Available for Your Websites ................................................... 90
To view a list of allocated and consumed resources, click the Resources tab.
To view a list of hosting features available for your account, click the Hosting Options
tab.
To view a list of operations that you can perform in your Hosting Panel, click the
Permissions tab.
Page 88

88 Website Management
Allocated and Consumed Resources
If you are subscribed to a number of service plans at once, then you have several
subscriptions. For each subscription, the following types of allocated resources are listed in
the Panel at the Account tab > subscription name > Resources tab:
Disk space. This is the total amount of disk space allocated to your account with
subscription. This amount includes all data related to your websites, e-mail accounts,
applications, backups, and log files.
Traffic. This is the total amount of data in megabytes that can be transferred monthly from
all your websites.
Domains. This is the number of websites that can have separate second-level domain
names, such as, for example, example.com.
For information about setting up websites, refer to the sections Set Up Your First Website
(on page 58) and Adding Domains (on page 110).
Subdomains. This is the number of additional websites that can have third-level domain
names, such as, for example, news.example.com.
For information about setting up subdomains, refer to the section Adding Subdomains (on
page 112).
Domain aliases. This is the number of additional domain names that can be set up to point
to one of your sites. For example, example.fr and example.de can both point to
example.com.
For information about setting up domain aliases, refer to the section Adding Domain Aliases
(on page 114).
Mailboxes. This is the number of mailboxes that can be created under all your websites.
For information about creating mailboxes, refer to the chapter Mail.
Mailbox size. This is the amount of disk space that can be occupied by a mailbox.
Total mailboxes quota. This is the total amount of disk space that can be used by all
mailboxes under all your domains. This option is available only on Windows-based
customer accounts.
Mailing lists. This is the total number of mailing lists that can be set up under all your
websites. Note that there are mailing lists and mail groups, which serve the same
purpose, but are slightly different in functionality. Mailing lists support archiving and premoderation of messages, while mail groups can only be used for sending one message to
a number of recipients at once.
For information about setting up and using mailing lists, refer to the section Using Mailing
Lists (on page 266).
Additional FTP accounts. This is the number of FTP accounts that can be set up for
accessing the webspace, in addition to the main FTP account that was created when your
subscription was activated.
For information about setting up FTP accounts, refer to the sections Changing FTP Access
Credentials (on page 252) and Adding FTP Accounts (on page 253).
Databases (Linux). This is the number of databases that can be hosted for all your
websites. Databases are a standard means of organizing data storage that allows
dynamic websites, web applications, and their users to store, search, and retrieve
information.
For information about working with databases, refer to the chapter (Advanced) Using
Databases.
Page 89

Website Management 89
MySQL databases and Microsoft SQL Server databases (Windows). This is the maximum
number of MySQL and Microsoft SQL Server databases respectively that can be created
on the Panel database servers and used by the subscription's websites.
MySQL databases quota and Microsoft SQL databases quota (Windows). This is the maximum
amount of disk space (in megabytes) that the subscription's MySQL and Microsoft SQL
Server databases respectively can occupy.
Java applications. This is the number of Java applications packaged in WAR format that
you can install on your sites.
Sites published with Presence Builder. This is the number of sites that you can create and
publish using Presence Builder, if Presence Builder option is included in your hosting
package.
Mobile sites.This is the total number of websites that you can host with the UNITY Mobile
online service, which optimizes sites for viewing on mobile devices.
Web users. This is the number of user accounts that you can create for hosting web pages
for other users under your domains.
FrontPage accounts. This is the number of Microsoft FrontPage user accounts that you can
create for collaboration on site content using FrontPage. This option is available only for
Windows-based customer accounts.
Shared SSL links. This is the number of websites that you can secure with an SSL
certificate shared by your provider. This option is available only for Windows-based
customer accounts.
ODBC DSN connections. This is the number of connections to external databases that you
can create for web applications running on your customer account. This option is
available only for Windows-based customer accounts.
ColdFusion DSN connections. This is the number of connections to external databases that
you can create for web applications written in Adobe ColdFusion, which are running on
your customer account. This option is available only for Windows-based customer
accounts.
Page 90

90 Website Management
Hosting Features Available for Your Websites
Depending on your service plan, the following hosting features may be available for your
websites (listed at the Account tab > subscription name > Hosting Options tab):
SSL support. This allows you to secure connections to websites with SSL encryption.
For information about securing sites with SSL, refer to the section Securing Connections
with SSL Certificates (on page 161).
Web statistics. This allows you to view website visits statistics presented in diagrams and
charts.
For information about viewing website visits statistics, refer to the section Viewing Statistics
(on page 99).
Custom error documents. This allows you to create custom HTML pages and configure web
server to show them instead of typical error messages, such as 404 Not Found.
For information about setting up custom error documents, refer to the section Setting Up
Custom Error Pages (on page 170).
Support for programming and scripting languages, such as PHP, CGI, Perl, Python, Microsoft
ASP, ASP.NET, Adobe ColdFusion, SSI.
Microsoft FrontPage support and Microsoft FrontPage over SSL support. These allow you to use
Microsoft FrontPage to create and edit website content. These options are available only
for Windows-based customer accounts.
Remote Microsoft FrontPage authoring (Windows). This allows you to use Microsoft
FrontPage to create and edit website content directly on the server. This option is
available only for Windows-based customer accounts.
Dedicated IIS application pool (Windows). This provides isolation and improved stability for
web applications working on sites.
Additional write/modify permissions (Windows). This option allows the web applications to
use a file-based database (like Jet) located in the root of httpdocs folder.
Allow web users to use scripts. This allows scripting at web pages available at URLs like
http://example.com/~<username>/<webpage>, where <username> refers to a web user.
Web users are individuals who do not need their own domain names. This service is
popular with educational institutions that host non-commercial personal pages of their
students and staff.
The following is a list of permissions for operations that you can perform in your Panel
(shown at the Account tab > subscription name > Permissions tab):
DNS zone management. Manage resource records in the DNS zones of websites. DNS
stands for Domain Name System. It is a service that enables web browsers to locate
websites by domain names.
For information about configuring DNS settings for your websites, refer to the section
(Advanced) Configuring DNS for a Domain (on page 116).
Hosting settings management. Manage web hosting settings, such as custom web server
settings or support for scripting languages.
Page 91

Website Management 91
PHP safe mode management. This option is available only for Linux-based customer
accounts. It allows you to switch PHP safe mode on or off for websites. Safe mode is a
security restriction that does not allow scripts written in PHP to perform potentially
dangerous operations on the server. You might need to switch off the safe mode for PHP
if you use some web applications written in PHP and if they do not function properly.
Management of access to the server over SSH and Management of access to the server over Remote
Desktop. Securely upload web content to the server through Secure Shell (Linux) or a
Remote Desktop connection (Windows).
Anonymous FTP management. Set up a folder on the server which should be accessible to
the Internet users over FTP protocol. This folder can have an address like, for example,
ftp://downloads.example.com. This feature is called anonymous FTP because the users
will not need to specify a username and password to browse, download, or upload files.
For information about setting up FTP folder with unrestricted access, refer to the section
Setting Up Anonymous FTP Access (on page 255).
Scheduler management. Schedule execution of programs or scripts in the server's operating
system.
For information about scheduling tasks, refer to the chapter Scheduling Tasks.
Spam filter management. Set custom settings for protection from unsolicited commercial e-
mail, also known as spam.
For information about setting up spam filtering, refer to the section Protecting Mailboxes
from Spam.
Antivirus management. Set custom settings for protection from viruses and other malicious
software that spreads itself through e-mail.
For information about setting up virus protection, refer to the section Protecting Mailboxes
from Viruses.
Data backup and restoration using the server repository. Use the backup and restore functions
of the Panel to back up and restore websites, mail accounts, settings, and keep your
backup files on the server.
For information about backing up and restoring data, refer to the chapter (Advanced) Back
Up and Restore Data.
Data backup and restoration using a personal FTP repository. Use the backup and restore
functions of the Panel to back up and restore websites, mail accounts, settings, and save
your backup files to an FTP folder on another server.
For information about backing up and restoring data, refer to the chapter (Advanced) Back
Up and Restore Data.
Web statistics management. Set custom preferences for visitor statistics reports.
For information about configuring and viewing website visitor statistics, refer to the
section Viewing Statistics (on page 99).
Log rotation management. Set custom preferences for recycling (rotation) of web server
logs. Web server records information about connections to your sites and errors occurred
on attempts to retrieve missing files. You can use these log files for website debugging
purposes.
For information about working with web server access logs, refer to the section Log Files
(on page 100).
Access to Application Catalog. View and install applications on websites. For information
about applications, refer to the section Employing Website Applications (on page 151).
Setup of potentially insecure web scripting options that override provider's policy. This allows you
to override the hosting security policy, if it is applied by the provider.
Page 92

92 Website Management
Domain creation. Set up and manage new websites.
For information about setting up websites, refer to the sections Set Up Your First Website
(on page 58) and Adding Domains (on page 110).
Subdomains management. Set up and manage new websites with addresses like
forum.example.com.
For information about setting up subdomains, refer to the section Adding Subdomains (on
page 112).
Domain aliases management. Set up and manage additional domain names for a site.
For information about setting up domain aliases, refer to the chapter Adding Domain Aliases
(on page 114).
Additional FTP accounts management. Set up and manage additional FTP accounts. To
enable collaboration on website content, you can set up FTP accounts for other users
and specify which directories of the site should be accessible to them.
For information about setting up FTP accounts, refer to the section Adding FTP Accounts
(on page 253).
Java applications management. Install and manage Java applications distributed in WAR
archives and obtained separately from third-party vendors or application developers.
For information about installing Java applications, refer to the section Installing Java
Applications.
Mailing lists management. Set up and manage mailing lists.
For information about setting up and using mailing lists, refer to the section Using Mailing
Lists (on page 266).
Hosting performance settings management. Limit the bandwidth and number of connections to
websites.
For information about restricting bandwidth usage for sites, refer to the section Limiting
Bandwidth and Number of Connections to Websites (on page 177).
IIS application pool management. Set custom preferences for IIS application pool (available
only on Windows-based customer accounts).
For information about setting up IIS application pool, refer to the section Setting Up IIS
Application Pool (Windows) (on page 196).
Additional write/modify permissions management. Set additional write/modify permissions for
websites that use file-based databases (available only on Windows-based customer
accounts).
Shared SSL management. Secure connections to your sites with SSL protection by using an
SSL certificate shared by your provider.
For more information, refer to the section Using Shared SSL Certificates (Windows) (on page
165).
Hard disk quota assignment. Adjust hard quotas on disk space if that is supported by your
customer account.
Database server selection. Select a database server for creating databases, if multiple
database servers are available.
Page 93

Website Management 93
Managing Account Balance and Invoices
The operations described below are available if your Control Panel is integrated with
Parallels Parallels Customer and Business Manager.
To view your account balance and pay for hosting services:
1. Click the Account tab.
2. The following information is shown:
Account credit balance. This is how much money is available in your account.
(Optional) Usage charge. If your subscription allows consuming hosting resources
over the plan limit, this number shows how much money you should pay for these
resources in addition to your subscription price. To view the detailed information about
how much resources you used over limits, click the link See details below the charge
amount. To learn how the system calculates usage charges, see the section
Calculating Usage Charges (on page 95).
Due invoices balance. This is how much money you owe to your provider. Here, you
can pay all invoices at once by clicking Pay All Outstanding Invoices, or pay one of
invoices by clicking a Pay Now link in the list titled Latest Outstanding Invoices.
Latest to-do items. This shows reminders from the system about actions you need to
take.
(Optional) Affiliate programs. Your provider may let you earn money for promoting
their plans. To start earning, you should join their affiliate programs. Here you can find
the link to join affiliate programs or the info about your money you earn if you already
joined the programs. To learn how to get profit from affiliate programs, see the section
Earning Money by Promoting a Provider's Plans (on page 95).
List of all your subscriptions. You can use links in the list to perform the following
operations:
To view subscription properties, click a link with subscription name.
To select a subscription that you want to manage through the Control Panel, click
the corresponding link Switch to Subscription.
To order an SSL certificate for a site, click Order a Certificate. For more information
about this operation, see the section Ordering SSL Certificates.
To view properties of already ordered SSL certificates, click Show Certificate Info.
To view or change domain information, contact information, and DNS settings
specified at a registrar's site, click Show Domain Info. For more information about
these operations, see the section Registrar's DNS Settings in Panel (on page 122).
Page 94

94 Website Management
To choose a payment method that you would like to use for paying for
Next in this section:
Calculating Usage Charges ............................................................................... 95
Earning Money by Promoting a Provider's Plans ............................................... 95
services:
1. Go to the Account tab > Billing Accounts.
A record about the payment method that you used for purchasing the services for the first
time is shown.
2. Do any of the following:
To view or change settings for a billing account, click the corresponding link in the
Billing account name column, specify the information about your bank card or account,
and select the subscriptions that should be paid by it. Click OK.
To add a new billing account, click Add New Billing Account, select the payment method,
and click Next. Then choose the account owner (you or an auxiliary user that will be
able to use this account), specify the required information about your bank card or
account, and select the subscriptions for which you will pay with it. Click OK.
To remove a billing account, click the corresponding Remove link.
Page 95

Website Management 95
Calculating Usage Charges
If the pay-as-you-go web hosting is allowed for a plan, Business Manager calculates usage
charges - total costs of hosting resources overage - for the plan's subscribers basing on
resource usage statistics that Business Manager collects from the connected Panels on a
daily basis. No matter what billing mode and billing cycles you use, this happen on the first
day of each month: The system finds the average daily overage of each resource except
traffic and multiplies it by the month length and the monthly usage price of this resource.
Traffic
The traffic usage charge is calculated in the following way: Business Manager counts the
total traffic overage for a month and multiplies it by the monthly traffic usage price. For
example, if subscribers download 10 GB of files during a month while the plan limit is 5 GB,
then the traffic overage is 5 GB. Assuming that the traffic usage price is $1 for a 1 GB, such
subscribers will pay (10 GB - 5 GB) * $1 = $5 traffic usage fee.
Other Resources
For calculation usage charges for other resources, Business Manager uses the average daily
usage values. For example, if a customer uses 500 MB of disk space over the subscription
quota for 15 days and then uses extra 700 MB for other 15 days, the average overage will be
(500 * 15 + 700 * 15)/30 = 600 MB. If the disk space usage price is $1 for 1 GB, then the
customer will pay $0.6 for disk space overage this month.
Calculating Usage with Add-ons
If a customer purchases additional resources in the middle of a month, then the system
subtracts the resource amount provided by the add-on from the daily resource usage of each
day starting from the add-on purchasing day.
For example, if a customer uses 500 MB of disk space over the plan limit for a whole month
and purchases the add-on that provides an additional 1 GB of disk space on the 7th day of
the month, then the usage charge will include the payment for only 7 days of 500 MB of disk
space overage.
Earning Money by Promoting a Provider's Plans
Panel lets you earn money for promoting your provider's service plans. Particularly, you can
get a certain commission for each subscription ordered in the provider's online stores by
people who signed up using your referral link.
Page 96

96 Website Management
Participants of affiliate programs (affiliates) distribute links to their provider's online stores.
Each link is unique, so the system defines who brought a new customer and adds the
commission to the link owner's affiliate balance. This commission is defined by the terms of
the affiliate program and may vary depending on an online store. The commission consists of
two different elements:
Initial rate - a percentage that the affiliate earns from the price of each order placed using
the affiliate's link.
Recurrent rate - a percentage that the affiliate earns from each invoice issued for
subscriptions that were ordered using the affiliate's link.
Affiliates can use money they earn only after the provider pays out the money to them.
Depending on the affiliate program conditions, the provider can pay out the commission
either to the affiliate's account credit balance or transfer the money outside the system, for
example, by check or cash. Normally, the provider pays out affiliates' commissions when
they exceed the affiliate program's payment threshold. When the threshold is exceeded,
affiliates can request the provider to pay out the commission by using the button in the
Control Panel. Alternatively, affiliates can delay payments in order to earn a larger amount.
Becoming an Affiliate
To start earning money, click the link Become an Affiliate on the Account tab. Once became an
affiliate, you will get the access to the list of the provider's affiliate programs and your affiliate
links. To see the programs list and your links, click the Affiliate Programs list on the Account
tab.
Tracking Your Earnings
To see your current affiliate balance, go to the Account tab and find the balance in the Affiliate
Programs group. If you want to see detailed information about your earnings, click the link
Revenue from Referrals.
To request a payout after exceeding a payment threshold, go to the Affiliate Programs page,
select the programs and click Request Payout.
Note: If none of your affiliate balances exceed the corresponding thresholds, you will not see
the Request Payout button.
Example
For example, your provider offers you an affiliate program with 10% commission rate and
$20 payment threshold. You share your affiliate link with your friends, and three of them
subscribe to a web hosting plan which costs $50. The total commission that you get to your
affiliate balance is $50 * 3 * 10% = $15. This amount is less than the program's payment
threshold, so to receive credits, you should bring more customers to the online store with
your link. When you do this and your balance exceeds the payment threshold which is $20,
the provider will add this balance to your credits. When you receive them, you can use them
to pay for your subscriptions or subscribe to new services in the provider's online stores.
Page 97

Website Management 97
Participating in Multiple Programs
Your hosting provider may have multiple online stores with different currencies. If the
provider offers affiliate programs for stores with different currencies, you will receive separate
commissions in the corresponding currencies. For example, if you distribute links to stores
with USD and EUR currencies, your affiliate balance contains two separate affiliate balances,
one for each currency. Your provider pays out the commissions separately as well. For
example, your affiliate balance is USD 50 and EUR 40 and the payment thresholds of the
corresponding programs are USD 40 and EUR 45, your provider will pay out USD 50 to your
credits and your affiliate balances will be USD 0 and EUR 40.
Ordering More Resources
The operations described below are available if your Control Panel is integrated with a billing
system.
To add more resources to your subscription or upgrade to another service
plan:
1. Click the Account tab.
2. In the list of subscriptions, locate the subscription that you want to upgrade
to another service plan, and click a link with the currently used plan's name.
3. Click Upgrade.
If there is no Upgrade link, then it means that you cannot upgrade to another hosting plan
from your Control Panel, and you need to contact your provider.
4. Do any of the following:
To add resources to your subscription without upgrading to another plan, select the
options you would like to add and click Adjust Add-ons.
To upgrade to another service plan, click Order Upgrade.
To reduce the amounts of resources or downgrade to another service plan:
1. Click the Account tab.
2. In the list of subscriptions, locate the subscription that you want to
downgrade to another service plan, and click a link with the currently used
plan's name.
3. Click Downgrade.
If there is no Downgrade link, then it means that you cannot downgrade to another hosting
plan from your Control Panel, and you need to contact your provider.
4. Do any of the following:
To reduce the amounts of allocated resources without downgrading to another plan,
select the options you would like to reduce and click Adjust Add-ons.
To downgrade to another service plan, click Order Downgrade.
Page 98

98 Website Management
To subscribe to a hosting plan in addition to your main plan:
1. Go to the Account tab and click the Add Subscription link.
2. Select the hosting plan to which you want to subscribe, and click Buy Now.
Follow the instructions on the screen to complete the order.
Page 99

Website Management 99
Viewing Statistics
Next in this section:
Log Files ........................................................................................................... 100
To view the reports on disk space and traffic usage by your account:
1. If you have several subscriptions associated with your account, in the
Subscription menu at the top of the screen, select the required subscription.
2. Click the Statistics tab.
The following information is presented in charts:
Disk space used by the following files and directories in the subscription:
Websites
Mail accounts
Databases
Logs
Backups
Chroot directories
Configuration files
Anonymous FTP directory
Traffic used by FTP, web, and mail services during the current month.
FTP field shows the information about the total size of files transferred to and from the
webspace over the file transfer protocol.
HTTP field shows the information about the total amount of data transferred from all of
your websites over HTTP protocol, that is, retrieved by web browsers.
POP3/IMAP field shows the total amount of data received by all mail accounts under
your domains.
SMTP field shows the total amount of data sent by all mail accounts under your
domains.
3. Do any of the following:
To view a report on the amount of data transferred to and from your sites over FTP,
click FTP Statistics.
To view a report on the amount of data transferred to and from your FTP directory,
which is accessed without authorization, click Anonymous FTP statistics.
To view a report on the amount of traffic used by services during a certain month, click
Data Transfer Statistics, and select the required month from the menu.
Page 100

100 Website Management
Log Files
All connections to the web server and requests for files that were not found on the server are
registered in log files. These log files are analyzed by the statistics programs running on the
server, which then present graphical reports on demand. You may want to download these
log files to your computer for processing by third-party statistics programs, or view their
contents for web server debugging purposes.
To prevent these log files from growing too large, you should enable automatic
cleanup and recycling of log files:
1. If you are subscribed to several hosting packages and have access to
several webspaces associated with your account, in the Subscription menu at
the top of the screen, select the required webspace.
2. Go to the Websites & Domains tab > Logs > Log Rotation.
3. Click Switch On. If you see only the Switch Off button there, this means that log
recycling is already switched on.
4. Specify when to recycle log files and how many copies of each log file to
store on the server. Also specify whether they should be compressed and
sent to an e-mail address after processing.
5. Click OK.
To view the contents of a log file or download it to your computer:
1. If you are subscribed to several hosting packages and have access to
several webspaces associated with your account, in the Subscription menu at
the top of the screen, select the required webs pace.
2. Go to the Websites & Domains tab > Logs. A list of log files opens.
3. Do any of the following:
To view all entries in a log file, click the log file name. If you want to view only a few
last lines from the log file, type the number of lines into the input box under the Settings
group, and then click the log file name.
To download a file to your computer, click the corresponding icon .
To remove a processed log file from the server, select the corresponding checkbox
and click Remove. Confirm removal and click OK.
To download log files to your computer via FTP:
1. Connect to the Panel server via FTP.
2. Go to the /var/www/vhosts/<domain_name>/logs directory and copy
the log files to you computer.
 Loading...