

Page 1

Parallels® Plesk Panel
Page 2

Contents
Preface 5
Typographical Conventions ........................................................................................................... 5
Feedback ....................................................................................................................................... 6
Getting Started after Migration from Small Business Panel 7
Differences between SBP and Panel 10 ....................................................................................... 7
Extended User Role Permissions ....................................................................................... 8
Web Presence Builder Tool ................................................................................................ 9
SSL Protection .................................................................................................................... 9
Web Apps .......................................................................................................................... 10
Extended Mail Management ............................................................................................. 10
Other Panel Features ........................................................................................................ 10
Overview of the Main Changes Since Panel 9 11
Quick Start with Parallels Panel 14
Set Up Your First Website ........................................................................................................... 15
1. Create Your Site ............................................................................................................ 16
2. Preview Your Site .......................................................................................................... 18
3. Submit Your Sites to Search Engines ........................................................................... 19
Set Up Mail Account .................................................................................................................... 20
1. Create Mail Account ...................................................................................................... 20
2. Access Your Mailbox ..................................................................................................... 21
View Site Visit Statistics .............................................................................................................. 36
Hosting Account Administration 37
Changing Your Password and Contact Information .................................................................... 39
Viewing Account Information ....................................................................................................... 40
Information About Your Account and Subscriptions .................................................................... 41
Allocated and Consumed Resources ................................................................................ 41
Hosting Features Available for Your Websites ................................................................. 43
Managing Account Balance and Invoices ................................................................................... 47
Ordering More Resources ........................................................................................................... 49
Viewing Statistics ......................................................................................................................... 50
Log Files ............................................................................................................................ 51
(Advanced) Configuring Access to Hosting Account ................................................................... 52
User Roles ......................................................................................................................... 53
User Accounts ................................................................................................................... 54
Custom Links..................................................................................................................... 56
Websites and Domains 58
Domains and DNS ....................................................................................................................... 59
Adding Domains ................................................................................................................ 60
Adding Subdomains .......................................................................................................... 62
Page 3

Preface 3
Adding Domain Aliases ..................................................................................................... 63
(Linux) Adding Wildcard Subdomains ............................................................................... 65
(Advanced) Configuring DNS for a Domain ...................................................................... 66
Changing Hosting Settings .......................................................................................................... 74
Web Scripting Settings ...................................................................................................... 76
Suspending and Activating Websites .......................................................................................... 81
Suspending Websites for Maintenance ............................................................................ 82
Managing Website Content ......................................................................................................... 83
Creating Websites with Web Presence Builder ................................................................ 83
Uploading Content over FTP............................................................................................. 84
Using File Manager ........................................................................................................... 85
Previewing Websites ......................................................................................................... 90
(Advanced) Restricting Access to Content ....................................................................... 91
Employing Website Applications ................................................................................................. 93
Configuring Apps ............................................................................................................... 94
Granting Panel Users Access to Apps .............................................................................. 95
Linking App and Panel Accounts ...................................................................................... 95
Updating Installed Apps .................................................................................................... 95
(Advanced) Securing Your Websites .......................................................................................... 96
Securing Connections with SSL Certificates ..................................................................... 96
Protecting Sites from Hotlinking (Windows Hosting)....................................................... 102
(Advanced) Extended Website Management ............................................................................ 103
Working with a Staging Site ............................................................................................ 103
Setting Up Mobile Sites ................................................................................................... 106
Setting Up Custom Error Pages ...................................................................................... 107
Adding a Domain Forwarder ........................................................................................... 109
Using Google Services .................................................................................................... 110
Hosting Personal Web Pages Under Your Domains ...................................................... 112
Limiting Bandwidth and Number of Connections to Websites ........................................ 114
Working with Microsoft Frontpage Websites (Windows Hosting) ................................... 115
Using Virtual Directories (Windows Hosting) .................................................................. 119
Setting Up IIS Application Pool (Windows Hosting) ........................................................ 131
Web Publishing with Web Deploy (Windows Hosting) .................................................... 132
FTP Access to Your Websites 134
Changing FTP Access Credentials ........................................................................................... 134
Adding FTP Accounts ................................................................................................................ 135
Setting Up Anonymous FTP Access ......................................................................................... 137
Mail 139
Adding Mail Accounts ................................................................................................................ 139
Configuring Mail ......................................................................................................................... 140
Configuring Mail Account ................................................................................................ 141
(Advanced) Configuring Global Mail Settings ................................................................. 147
Using Mailing Lists..................................................................................................................... 148
Scheduling Tasks 150
Scheduling Tasks (Linux Hosting) ............................................................................................. 151
Scheduling Tasks (Windows Hosting) ....................................................................................... 153
(Advanced) Using Databases 156
Managing Databases ................................................................................................................ 156
Creating Databases ........................................................................................................ 157
Importing Databases ....................................................................................................... 158
Page 4

Preface 4
Creating Database User Accounts .................................................................................. 159
Accessing External Databases (Windows Hosting) .................................................................. 160
(Advanced) Backing Up and Restoring Data 162
Backing Up Data ........................................................................................................................ 163
Backing Up Account and Websites ................................................................................. 164
Backing Up Databases (Windows Hosting) .................................................................... 166
Scheduling Backups ........................................................................................................ 167
Managing Backup Files ............................................................................................................. 168
Uploading and Downloading Backup Files ..................................................................... 168
Uploading and Downloading Database Backup Files (Windows Hosting) ..................... 169
Restoring Data ........................................................................................................................... 170
Restoring Backups .......................................................................................................... 170
Restoring Databases (Windows Hosting) ....................................................................... 170
Page 5

Preface 5
In this section:
Typographical Conventions ............................................................................... 5
Feedback .......................................................................................................... 6
Formatting convention
Type of Information
Example
Special Bold
Items you must select,
such as menu options,
command buttons, or
items in a list.
Go to the System tab.
Titles of chapters,
sections, and subsections.
Read the Basic Administration
chapter.
Italics
Used to emphasize the
importance of a point, to
introduce a term or to
designate a command line
placeholder, which is to be
replaced with a real name
or value.
The system supports the so
called wildcard character search.
Monospace
The names of commands,
files, and directories.
The license file is located in the
http://docs/common/licen
ses directory.
Preface
Typographical Conventions
Before you start using this guide, it is important to understand the documentation
conventions used in it.
The following kinds of formatting in the text identify special information.
Page 6

6 Preface
Formatting convention
Type of Information
Example
Preformatted
On-screen computer
output in your commandline sessions; source code
in XML, C++, or other
programming languages.
# ls –al /files
total 14470
Preformatted Bold
What you type, contrasted
with on-screen computer
output.
# cd /root/rpms/php
CAPITALS
Names of keys on the
keyboard.
SHIFT, CTRL, ALT
KEY+KEY
Key combinations for
which the user must press
and hold down one key
and then press another.
CTRL+P, ALT+F4
Feedback
If you have found an error in this guide, or if you have suggestions or ideas on how to
improve this guide, please send your feedback using the online form at
http://www.parallels.com/en/support/usersdoc/. Please include in your report the guide's title,
chapter and section titles, and the fragment of text in which you have found an error.
Page 7

This chapter is intended for users who have migrated from Parallels Small Business
In this chapter:
Differences between SBP and Panel 10 ............................................................ 7
In this section:
Extended User Role Permissions ...................................................................... 8
Web Presence Builder Tool ............................................................................... 9
SSL Protection .................................................................................................. 9
Web Apps ......................................................................................................... 10
Extended Mail Management .............................................................................. 10
Other Panel Features ........................................................................................ 10
C H A P T E R 1
Getting Started after Migration from
Small Business Panel
Panel (SBP) to Panel and want to know about changes in management operations as
well as about new product possibilities. If you want to learn more about the migration
procedure, refer to Migration Guide.
Migration to Panel is almost seamless as Panel allows you to perform the majority of
tasks you did in SBP. The main difference you may find out is that some functions are
now available in new locations or have a slightly different effect. Moreover, Panel
provides you with a number of features unavailable in SBP, such as enhanced user
role permissions, the Web Presence Builder tool, or access to new web apps. Learn
more about product differences in the section Differences between SBP and Panel 10 (on
page 7).
After the migration, you will use Panel in Power User view - a replacement of the SBP
interface. Power User view is almost identical to the SBP GUI. Panel in this view is, in
essence, Control Panel with server management capabilities. For more information on
Power User view, refer to the Administrator's Guide, Becoming Familiar with Parallels Plesk
Panel section.
Differences between SBP and Panel 10
User interfaces of SBP and Panel in Power User view are almost identical. Thus, here
we will discuss only the most important changes that could affect or improve your work
in Panel.
Page 8

8 Getting Started after Migration from Small Business Panel
Extended User Role Permissions
SBP permission
Panel permission
Migration result comments
Manage users
Manage roles
Manage users and roles
The permission is granted, if
one of the SBP permissions is
granted.
Manage websites and
domains
Create and manage sites
Configure log rotation
Configure anonymous FTP service
Create and manage scheduled tasks
Create and manage databases
Configure and perform data backup
and restoration
View statistics
Design sites in Web Presence Builder
Create and manage additional FTP
accounts
Manage DNS settings
Install and manage Java applications
Change server settings
-
The permission is not migrated,
as Panel allows changing
server settings to users with the
Administrator role only.
Manage mail
Create and manage mail accounts
Create and manage mailing lists
Update personal
information
-
The permission is not migrated,
as Panel allows changing
personal information to all
users.
-
Upload and manage files
By default, this permission is
denied after migration.
-
Configure spam filter
By default, this permission is
denied after migration.
-
Configure antivirus
By default, this permission is
denied after migration.
Panel, comparing to SBP, allows more accurate adjustment of user role privileges due
to a larger number of available permissions. For example, Panel allows dividing users
on those who can manage mail accounts and those who can manage company mailing
lists. As Panel has the extended list of permissions, some of SBP permissions can
migrate into a number of related Panel permissions. For better understanding how
permissions are migrated, refer to the table below.
Page 9

Getting Started after Migration from Small Business Panel 9
For more information on user role properties, refer to the section User Roles (on page
53).
Web Presence Builder Tool
While using SBP, you could easily create your own websites with the Site Editor tool.
For the same purposes, Panel provides you with the much more powerful tool, Web
Presence Builder. Comparing to Site Editor, Web Presence Builder offers:
New intuitive interface that allows creating websites in less number of steps.
About 100 website templates filled with content that you can use as a basis for your
sites.
Additional components that can be easily integrated with your site, such as the
online store or the embedded video.
Integration of your website with Facebook and much more.
For more information on Web Presence Builder, refer to the User's Guide to Web Presence
Builder.
Note that websites created in Site Editor are not compatible with Web Presence
Builder. Nevertheless, if Site Editor is installed in Panel, you can edit such websites
with it. In that case, websites in Websites & Domains list will contain the additional button
Edit in SiteBuilder 4 or Site Editor.
SSL Protection
Panel allows you to secure connections to your websites the same way as you did in
SBP. That means you can obtain SSL certificates in Server > Settings > SSL Certificates
and assign them to IP addresses in Server > Settings > IP Addresses. As in SBP, you can
assign only one certificate per IP address. Thus, if your hosting resources include one
shared IP address, you can secure only one website. Panel provides enhanced SSL
protection features that allow you to resolve this problem:
Separate SSL certificates for websites.
If you use Panel on a Linux operating system with the SNI technology support, it is
possible to use authentic SSL certificates for sites hosted on shared IP addresses.
In other words, Panel allows using separate SSL certificate for each website. Learn
more about separate SSL certificates in Administrator's Guide, Hosting Multiple SSL
Sites on a Single IP Address (Linux Hosting) section.
Shared SSL certificate for a number of websites.
If you use Panel on a Windows operating system, it is possible to use one shared
SSL certificate to secure connections to all sites. In that case, certificate is assigned
to a domain that shares it with others. That domain is called master SSL domain. In
other words, all websites will use common SSL certificate, despite of the fact it is
issued to only one of your websites. Learn more about shared SSL certificates in
Administrator's Guide, Securing Sites with a Single SSL Certificate (Windows Hosting)
section.
The process of assigning an SSL certificate to a website is covered in the section
Securing Connections with SSL Certificates (on page 96).
Page 10

10 Getting Started after Migration from Small Business Panel
Web Apps
Comparing to SBP, the app management in Panel has little or no changes. As in SBP,
the list of available web apps is accessed through the Applications tab. For more
information on app management, refer to the section Employing Website Applications (on
page 93).
Note that the uploading of your own app packages is now performed by means of
Application Vault. Vault is the local Panel repository of web apps. Besides of extending
the list of available apps, it allows you to update apps, configure their server-wide
settings, and carry out some other operations. For more information on Application
Vault, refer to the Administrator's Guide, Managing Applications section.
Extended Mail Management
Mail management in Panel slightly varies from those in SBP. General mail settings are
now available in Mail > Change Settings, while other settings are located in Server >
Settings > Mail.
Comparing to SBP mail functionality, Panel provides a number of additional mail
features:
Enhanced spam protection:
Server black and white lists.
Use these lists to always reject or always receive mail from selected servers.
Learn more on black and white mail lists in the Administrator's Guide, Setting up
Spam Protection section.
Extended SpamAssassin settings.
Panel allows you to configure SpamAssassin more accurately. For example, you
have access to such settings as spam filter sensitivity or SpamAssassin's black
and white lists. Moreover, you can configure spam filter individually for each mail
account. Learn more in the Protecting from Spam (on page 144) section.
Monitoring mail server message queue (on Linux platforms).
This can be helpful when your mail server is overloaded and cannot cope with the
amount of received messages. You can find out the reason that caused the
overload using the mail queue. Learn more about message queue in the
Administrator's Guide, Monitoring Mail Server Message Queue and Troubleshooting Mail
Congestion (Linux Hosting) section.
Other Panel Features
On top of main changes described above, Panel contains a number of features
unavailable in SBP at all. These are event management, server health monitoring,
custom branding themes and many more. The scope of this chapter does not allow to
cover all of them. For the detailed information on other server management operations,
refer to the Administrator's Guide. If you want to know more about operations related with
your account and websites management, read respective chapters of this guide.
Page 11

This chapter is intended for hosting service customers who previously used Parallels
C H A P T E R 2
Overview of the Main Changes Since
Panel 9
Plesk Panel version 9 and earlier. It describes the most important changes in the Panel
and addresses possible issues that the users might encounter after their accounts and
sites are moved to Parallels Plesk Panel 10 during the Panel upgrade.
What to do first after upgrade
Switch on auxiliary user accounts (former domain administrator accounts).
Panel 10 replaces domain administrators with the new type of accounts - auxiliary
users that are able to access Control Panel together with the customer who created
accounts for them. If you had domain administrator accounts in the previous version
of Plesk, they are most likely converted to user accounts and switched off. This is
done for security reasons: a customer's user who is allowed to log in to Control
Panel for managing websites is able to view and manage all sites belonging to the
customer. For this reason, you should decide which of the users can be allowed to
log in to Control Panel again, and then switch the corresponding accounts on.
If you need to collaborate with other people on website content without allowing
them to log in to Control Panel, then you can create separate FTP accounts for
them and specify the directories to which they will have access.
Move apps that used httpsdocs to the new directory - httpdocs.
If you used the option to keep SSL-protected and all other content in separate
directories, and had APS-packaged applications installed in the httpsdocs
directory of a website, then after upgrade, the Panel will switch on the compatibility
mode for that site. This will make the apps previously installed into httpsdocs
directory accessible to the Internet users, but the apps will not be manageable
through the Panel, and you will not be able to install new apps to the httpsdocs
directory.
In such a case, if you have the necessary technical skills, you can do the following:
1. Back up all content from the httpsdocs directory and save it to another
location. Do not move the files to httpdocs yet.
2. Back up databases used by applications installed in httpsdocs directory. You
can do this with the help of the mysqldump utility.
3. Remove applications from the httpsdocs directory.
4. Switch off the compatibility mode through the Panel (at Websites & Domains tab >
domain name).
5. Reinstall the required applications.
6. Upload the data you backed up on the step 1 to the httpdocs directory.
7. Restore the applications' databases by importing them to the MySQL database
server.
Page 12

12 Overview of the Main Changes Since Panel 9
If you are an inexperienced user, we recommend that you leave the previously
installed applications and uploaded content in the httpsdocs directory, and host
new applications on other websites. If you need to install apps on the site operating
in compatibility mode, you can install them to the httpdocs (http://) location on
that site.
The most important concepts you should know
Domain is replaced by subscription.
The concept of a domain has been replaced with a concept of a subscription - a
hosting unit able to run multiple sites (domains and subdomains) over given
resources and services. Multi-domain hosting within one subscription is limited to
one IP address. Customers who need to host sites on different IP addresses are
advised to obtain additional subscriptions.
Resources of a client are now resources of a subscription.
Customers no longer need to redistribute their resources across domains or
subscription: Each subscription is allocated a fixed set of resources according to a
hosting plan.
SSL certificates are typically shared among all domains of a subscription.
All sites in a subscription typically share the same SSL certificate. Customers who
want to protect all sites in a subscription should consider purchasing a multi-domain
(a wildcard) SSL certificate. It is also possible to have per-domain certificates in
case Panel supports SNI.
Peculiarities of SiteBuilder upgrade
Panel 10 ships with Web Presence Builder (former SiteBuilder), but you can use
SiteBuilder 4.5 as well.
Parallels Web Presence Builder is the Panel component focused on fast and
efficient creation of websites. When Plesk with SiteBuilder is upgraded to Parallels
Plesk Panel 10, the SiteBuilder component is not actually upgraded. Instead, the
new Web Presence Builder is installed on the server, and the SiteBuilder 4.5
remains operable, however, operations on websites created in SiteBuilder 4.5 are
limited to editing and publishing.
Transfer of websites from SiteBuilder 4.5 to Web Presence Builder is not
supported.
We recommend that you create your new sites in Web Presence Builder.
Changes in storing secure content
httpdocs is the only allowed directory for storing web content accessed over secure
SSL.
The option to use a separate directory for storing web content that should be
accessed over secure SSL connections is no longer available. All web content is
now stored in a single directory - httpdocs.
Page 13

Overview of the Main Changes Since Panel 9 13
The httpsdocs directory may remain in the webspace after upgrading to Parallels
Plesk Panel 10, however, we recommend that you place all content in the
httpdocs directory when uploading files to the webspace over FTP.
Page 14

According to latest studies, the Internet became the most popular source of information
In this chapter:
Set Up Your First Website ................................................................................. 15
Set Up Mail Account .......................................................................................... 20
View Site Visit Statistics .................................................................................... 36
C H A P T E R 3
Quick Start with Parallels Panel
in the world leaving far behind all traditional media like TV or newspapers. Nowadays,
the first thing people do when trying to find some service offers is searching them on
the Web. Thus, the proper web presence is vital for every business. You have a
number of possibilities to present your company on the Web. Web presence may be as
simple as a contacts page or as complex as a large company website with access to
an ERP system. In both cases, you should perform the same steps to get your
business online.
We assume that you have already completed these two necessary actions before
proceeding any further:
Purchased a hosting account from a hosting provider.
Your hosting account is the access to the services vital for web presence: Internet
connectivity, disk space to store your website content, and so on. For more
information about hosting accounts in Panel, refer to the chapter Hosting Account
Administration (on page 37).
Registered a domain name.
The name people will use to access your site from their browsers. Say,
www.example.com.
These two parts - a hosting account and a domain name - make up your website. In
this chapter we will explain how to create your first website, fill it with content, create
mailboxes for users of the site, and, finally, view the site visits dynamics.
Advanced Hosting Features
Once you feel yourself more comfortable with basic Panel capabilities, try out some
advanced hosting features: Expand website functionality by installing web applications
(on page 93), secure your sites with SSL certificates (on page 96), employ databases
(on page 156), and much more. Note that hosting providers can turn off some of the
advanced features to make your GUI look simple and user friendly. We designated the
sections about features that may be turned off with the (Advanced) prefix. If you require
one of the advanced options, contact your hosting provider.
Page 15

Quick Start with Parallels Panel 15
Set Up Your First Website
In this section:
1. Create Your Site ............................................................................................ 16
2. Preview Your Site .......................................................................................... 18
3. Submit Your Sites to Search Engines ............................................................ 19
Now when you have a hosting account and a domain name, the first thing you most surely
want to do is to create a website. There are two general ways to create a website:
Employ a web design studio to create a site for you and then just maintain its content.
Create a site by yourself using Web Presence Builder - the powerful tool that allows you
to create professional looking websites in few mouse clicks. Learn more in the section
Creating Websites with Web Presence Builder (on page 16).
If you purchased a site, you already have its content. In this case, you just should upload it to
Panel by one of the ways:
Upload files to your site using FTP. Learn more in the section Uploading Content over FTP
(on page 17).
Upload files using integrated File Manager. Learn more in the section Using File Manager
(on page 17).
When your site is ready, you may want to take a look at the result in your browser (on page
18).
Even the perfectly designed site will not be effective if no one knows about it. When all
design job is done, spare some time to submit your site to popular search engines (on page
19).
Page 16

16 Quick Start with Parallels Panel
1. Create Your Site
In this section:
Creating Websites with Web Presence Builder ................................................. 16
Uploading Content over FTP ............................................................................. 17
Using File Manager ........................................................................................... 17
If your hosting plan provides website creation and management service using Web Presence
Builder, you can create and publish sites using it. Or you can create your site content (web
pages, scripts and graphic files that compose your site) on your home or office computer and
then publish it to the server in any of the following ways:
Through an FTP connection (most common and easiest way).
Through the Control Panel's file manager.
Through a Secure Shell connection (only for users of Linux and FreeBSD operating
systems).
Through Adobe Dreamweaver or Microsoft FrontPage software (only for users of
Microsoft Windows operating systems).
Creating Websites with Web Presence Builder
You can create and publish websites using Web Presence Builder, if this option is provided
with your hosting service.
If your hosting service does not include any sites published with Web Presence Builder or
your reached the limit of published sites, you still can create a new website with Web
Presence Builder. In this case, all website editing options in Web Presence Builder will be
available to you. To publish this website, you will need to upgrade your hosting plan.
Web Presence Builder is a great tool that enables users to create professionally looking sites
without any knowledge of HTML markup or graphic design skills. Just pick a suitable page
design and content template, add your text to pages, and publish the site.
To start creating a website using Web Presence Builder:
1. Go to either the Home tab or the Websites & Domains tab, and click Launch Web
Presence Builder.
If you have only one domain name configured, Web Presence Builder will open in a new
browser window or tab.
2. If you have several domain names or subdomains, click the corresponding
link Edit in Web Presence Builder. The Web Presence Builder wizard will open in
a new browser window or tab.
Page 17

Quick Start with Parallels Panel 17
Uploading Content over FTP
To publish website through FTP:
1. Connect to your webspace on the server with an FTP client program, using
your FTP account username and password.
You can change your username and password in the Panel at the Websites & Domains tab
> Web Hosting Settings.
The FTP address should be ftp://your-domain-name.com, where your-domain-name.com
is your site's Internet address.
Enable the passive mode if you are behind a firewall.
2. Upload the files and directories of your site to the httpdocs directory. If you
use CGI scripts, place them into the cgi-bin directory.
3. Close your FTP session.
You can also set up additional FTP accounts if you need to collaborate on website content
with other users. For information, see the section Adding FTP Accounts.
Using File Manager
To upload files through the Panel's file manager:
1. If you are subscribed to several hosting packages and have access to
several webspaces associated with your account, select the required
webspace in the Subscription menu at the top of the screen.
2. Click the Websites & Domains tab.
3. Click File Manager.
4. Create or upload files and directories.
Place the files and directories of your site to the httpdocs directory. If you use CGI
scripts, place them into the cgi-bin directory.
To upload a file from your computer, click Add New File, click the Browse button to
locate the file, or specify the path to its location in the Path to file box, and then click
OK.
To upload a ZIP archive to the server and then extract its contents, click Add New File,
click the Browse button to locate the archive file, and click OK. After the file is
uploaded, select the corresponding checkbox on the left, and click Extract Files.
To create a new directory within your current location, click Add New Directory.
To create new files in the required directory, click Add New File, select the Create a file
option, specify the file name, select the Use html template checkbox, if you want file
manager to insert some basic HTML tags into the new file, and click OK. A page will
open allowing you to enter the content or HTML-formatted source of a new file. After
you finished, click OK.
Page 18

18 Quick Start with Parallels Panel
To add files to a ZIP archive, select the files you want to pack, click Add to Archive, and
specify the name of your archive file.
When you upload web content through File Manager or FTP, the Panel automatically sets
the appropriate access permissions for files and directories. On Linux-based servers, the
permissions are represented as three sets of symbols, for example, 'rwx rwx r--'. The first set
tells what the owner of the file or directory can do with it; the second tells what the user
group, the file or directory belongs to, can do with the file or directory; the third set indicates
what other users (the rest of the world, that is, Internet users visiting a site) can do with the
file or directory. R means the permission to read the file or directory, W means the
permission to write to the file or directory, and X means the permission to execute the file or
look inside the directory.
To modify permissions for a file or directory on a Linux-based hosting account, click a
hyperlink representing the set of permissions in the Permissions column. If you use a
Windows-based hosting account, click the icon . Modify the permissions as desired and
click OK.
To edit the source code of a file, click .
To edit the Web page in the built-in visual editor (available only to users of Microsoft Internet
Explorer), click . When editing an HTML file, the Panel opens internal WYSIWYG editor by
default. If you want to edit the source code of the HTML file, click HTML. To return back to
WYSIWYG mode, click Design.
To view the file, click .
To rename a file or directory, click . Type in a new name and click OK.
To copy or move a file or directory to another location, select the required file or directory
using the appropriate checkbox, and click Copy/Move. Specify the destination for the file or
directory to be copied or renamed to, then click Copy to copy, or Move to move it.
To update the file or directory creation date, click Change Timestamp. The time stamp will be
updated with the current local time.
To download a file, click the corresponding icon .
To remove a file or directory, select the corresponding checkbox, and click Remove. Confirm
removal and click OK.
2. Preview Your Site
After you uploaded website files to the webspace, you can check how it will look in a web
browser, even before the information about the new site has spread in the Domain Name
System.
To preview a site:
1. If you are subscribed to several hosting packages and have access to
several webspaces associated with your account, select the required
webspace in the Subscription menu at the top of the screen.
Page 19

Quick Start with Parallels Panel 19
2. Click the Websites & Domains tab.
3. In the list of domain names at the bottom of the screen, locate the website
that you want to preview and click the corresponding icon .
You site will open in a new browser window.
Note: For sites created with Web Presence Builder, protected access to site pages can work
incorrectly in Preview mode.
Sometimes, you may need to show your site to someone when your domain name is not
registered yet. There are several ways to do it without giving a person access to your hosting
account. Learn more in the section Previewing Websites (on page 90).
3. Submit Your Sites to Search Engines
To gain more visitors and drive traffic to your site after you publish it on the Internet, you
need to submit it to search engines.
To improve your site ranking in search results, consider optimizing web pages:
Include in the text contained in your web pages the frequently searched keyword
phrases, which are relevant to the topic of your site. For example, mention your product
or a topic of your interest several times in the text on a web page.
Add relevant keywords to the <title> and <meta> tags. Some search engines look for
keywords and descriptions in meta tags placed within web pages, and present these
keywords in search results.
For example, if you are selling hosting automation software, then you can include the
following tags in HTML pages of your website:
<HEAD>
<TITLE>Ordering hosting automation software
</TITLE>
<META name="keywords" content="order,hosting,software">
<META name="description" content="Ordering Hosting Automation Software">
</HEAD>
Separate the keywords with a comma without white spaces.
After you optimize the website and publish it to your hosting account, submit it to search
engines, such as Google, Yahoo, Bing, and other engines that you know to be popular in
your country.
To submit a site to Google, visit http://www.google.com/addurl/.
To submit a site to Yahoo, visit https://siteexplorer.search.yahoo.com/submit.
To submit a site to Bing, visit http://www.bing.com/webmaster/SubmitSitePage.aspx.
Page 20

20 Quick Start with Parallels Panel
Set Up Mail Account
In this section:
1. Create Mail Account ...................................................................................... 20
2. Access Your Mailbox ..................................................................................... 21
Once your website is ready, you can perform mail configuration. You may decide to create
several mail accounts, say a separate account for each of company employees.Note that a
number and size of mailboxes is limited by your hosting plan.
1. Create Mail Account
To create an e-mail address:
1. If you are subscribed to several hosting packages and have access to
several webspaces associated with your account, in the Subscription menu at
the top of the screen, select the required webspace.
2. Click the Mail tab.
3. Click Create E-mail Address.
4. Type the left part of the e-mail address before the @ sign, and, if you have
several domain names on your account, select the domain name under
which the e-mail address will be created.
5. Leave the Mailbox checkbox selected.
Clearing this checkbox makes sense only if you want to use this address as a mail
forwarder, which will forward all incoming mail to another address.
6. Specify the mailbox size or use the default size defined by the provider's
policy or your service plan.
7. Specify a password consisting of five or more Latin characters.
8. Click OK.
Page 21

Quick Start with Parallels Panel 21
2. Access Your Mailbox
In this section:
Access from Webmail ........................................................................................ 21
Access from Microsoft Office Outlook ................................................................ 22
Access from Microsoft Outlook Express ............................................................ 25
Access from Mozilla Thunderbird ...................................................................... 29
Access from Apple Mail ..................................................................................... 31
There are two ways to access a mailbox for sending and receiving e-mail messages:
Set up and use an e-mail client program on your computer.
Use a web browser to connect to the webmail interface. Webmail interface is provided by
Horde IMP Webmail software, which is installed by default. You can either use the default
Horde IMP Webmail, or install Atmail Webmail Lite software.
Access from Webmail
To access your mailbox through webmail, do any of the following:
In a Web browser, visit the URL webmail.example.com, where example.com is the
Internet address of your website. When prompted, specify your full e-mail address as the
username (for example, mail@example.com), and specify the password that you use for
logging in to the Panel.
When logged in to the Panel, click the Mail tab, and in the list of e-mail addresses, click
an icon corresponding to the e-mail address you need.
Page 22
22 Quick Start with Parallels Panel
Access from Microsoft Office Outlook
To set up Microsoft Office Outlook 2010:
1. Open Microsoft Office Outlook.
2. Go to File > Info > Account Settings.
3. On the E-mail tab, click New.
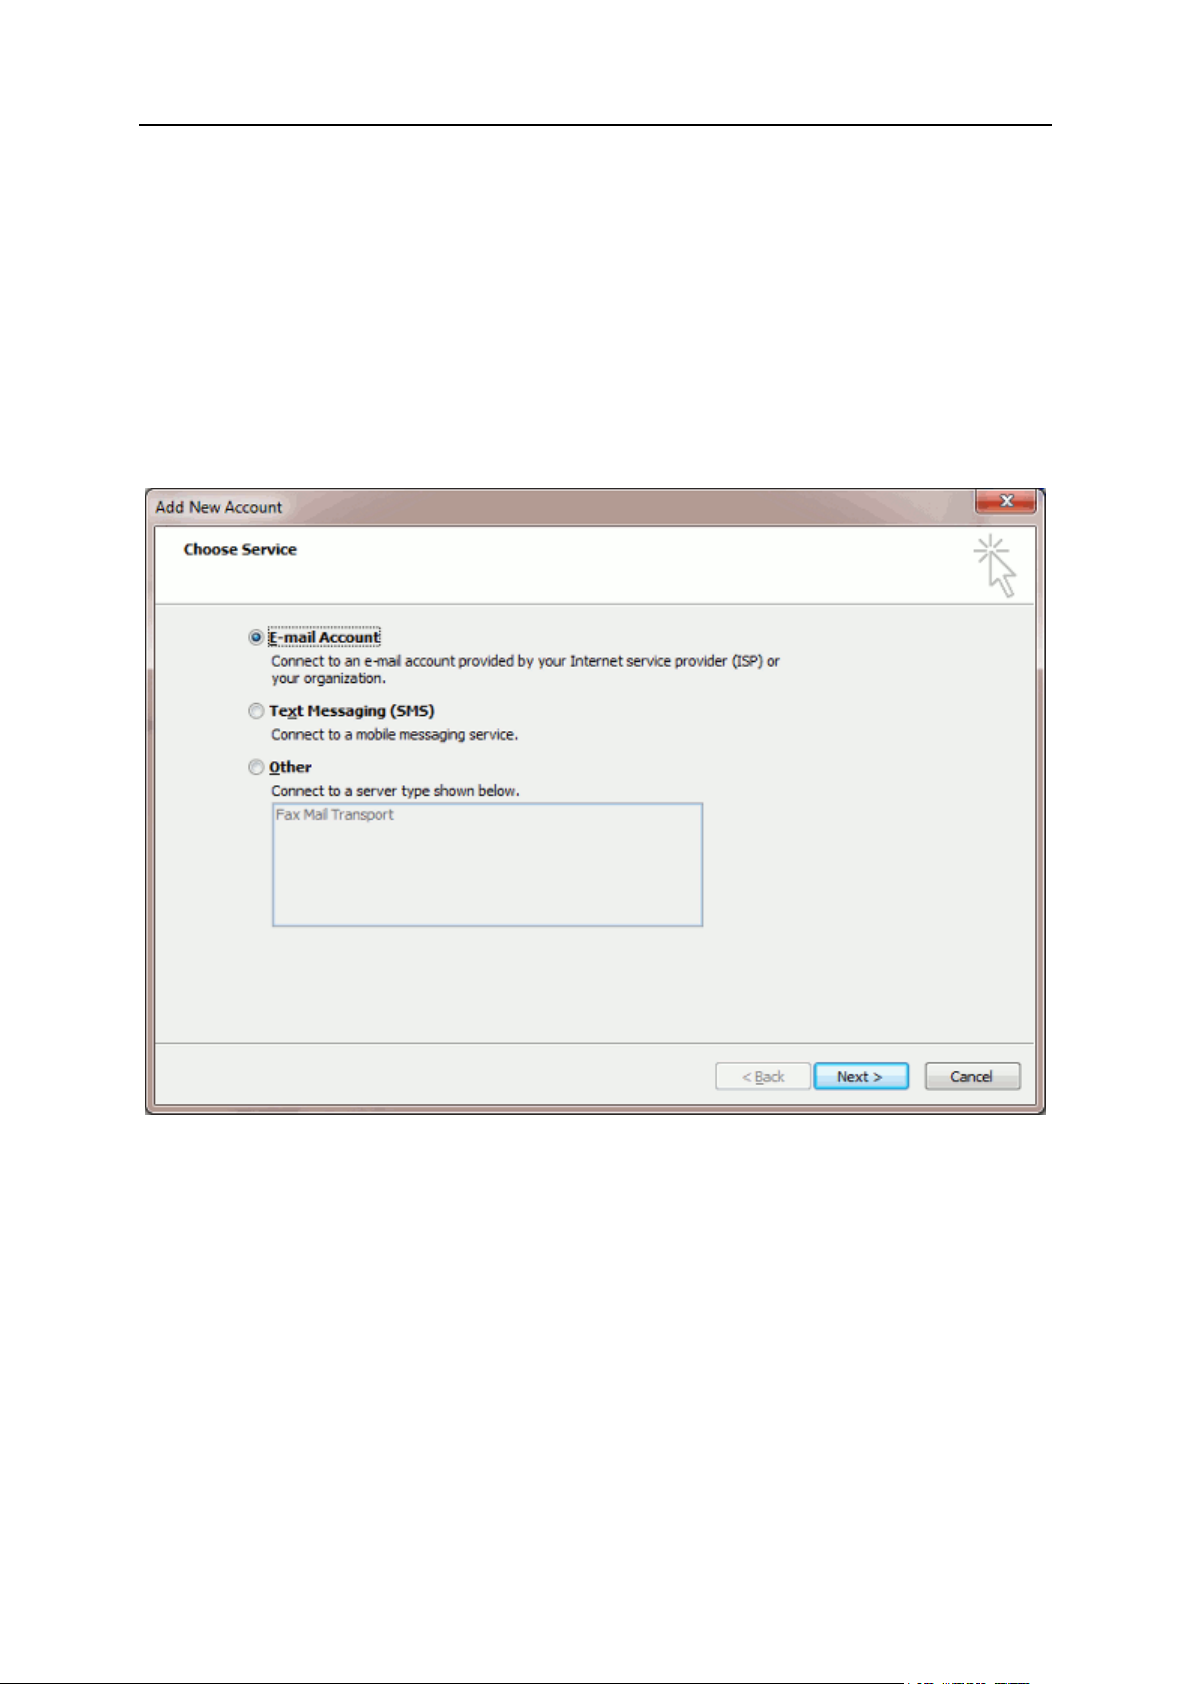
4. Leave the option E-mail Account selected. Click Next.
5. Select the checkbox Manually configure server settings or additional server types.
Click Next.
Page 23

Quick Start with Parallels Panel 23
6. Select the Internet E-mail option and click Next.
Page 24
24 Quick Start with Parallels Panel
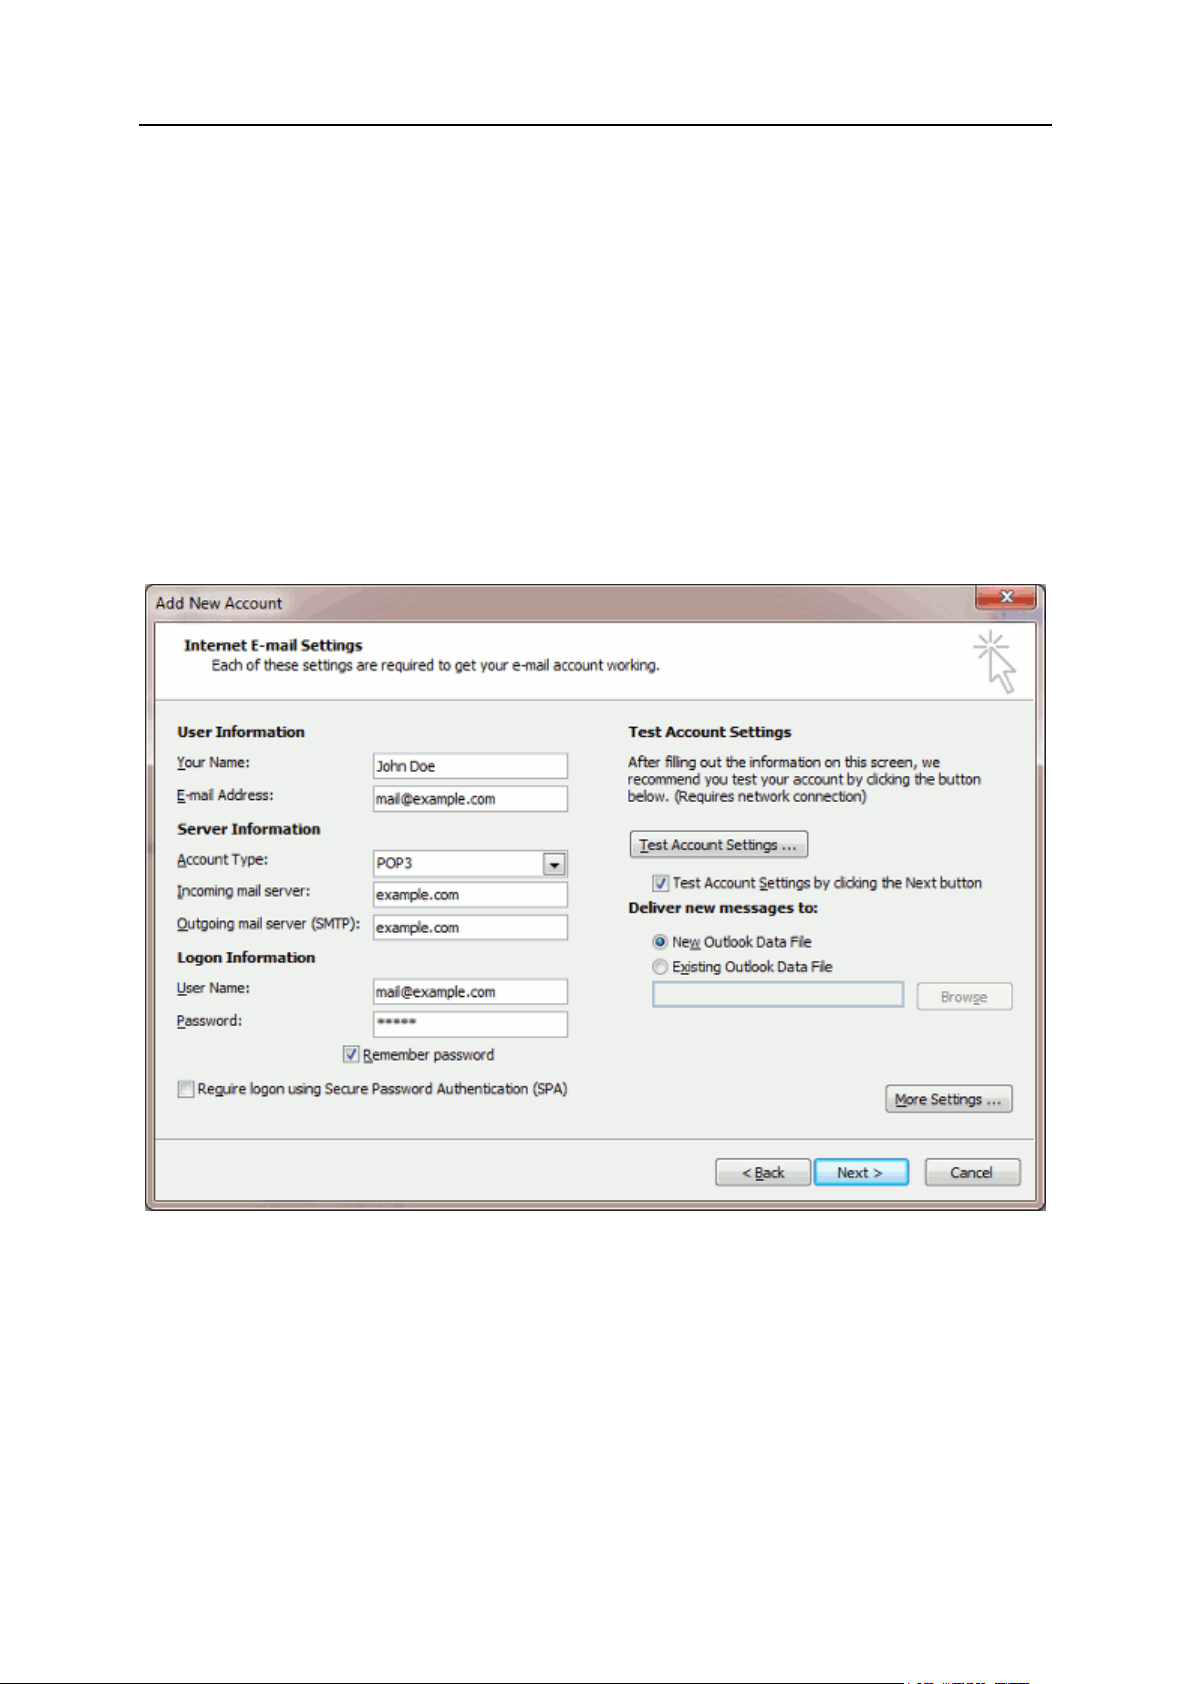
7. Specify the following:
Your name.
Your e-mail address.
Account type. If you want to keep copies of messages on the server, select the IMAP
option. If you do not want to keep any messages on the server, select the POP3
option. Selecting IMAP will also allow you to train the SpamAssassin spam filter on email messages you receive, if SpamAssassin is enabled on the server.
Incoming mail server. Type your domain name. For example, example.com.
Outgoing mail server. Type your domain name. For example, example.com.
Username for logging in to the mailbox. Specify your full e-mail address.
Password for logging in to the mailbox. Most likely, this password coincides with the
password you use for logging in to Panel.
8. Click Next.
9. Click Finish.
Page 25
Quick Start with Parallels Panel 25
Access from Microsoft Outlook Express
The instructions provided in this section were verified against Microsoft Outlook Express 6.
They might not work with earlier or later versions of Microsoft Outlook Express.
To set up Microsoft Outlook Express:
1. Open Microsoft Outlook Express.
2. Go to Tools > Accounts.
3. Click the Add button and select the Mail item.
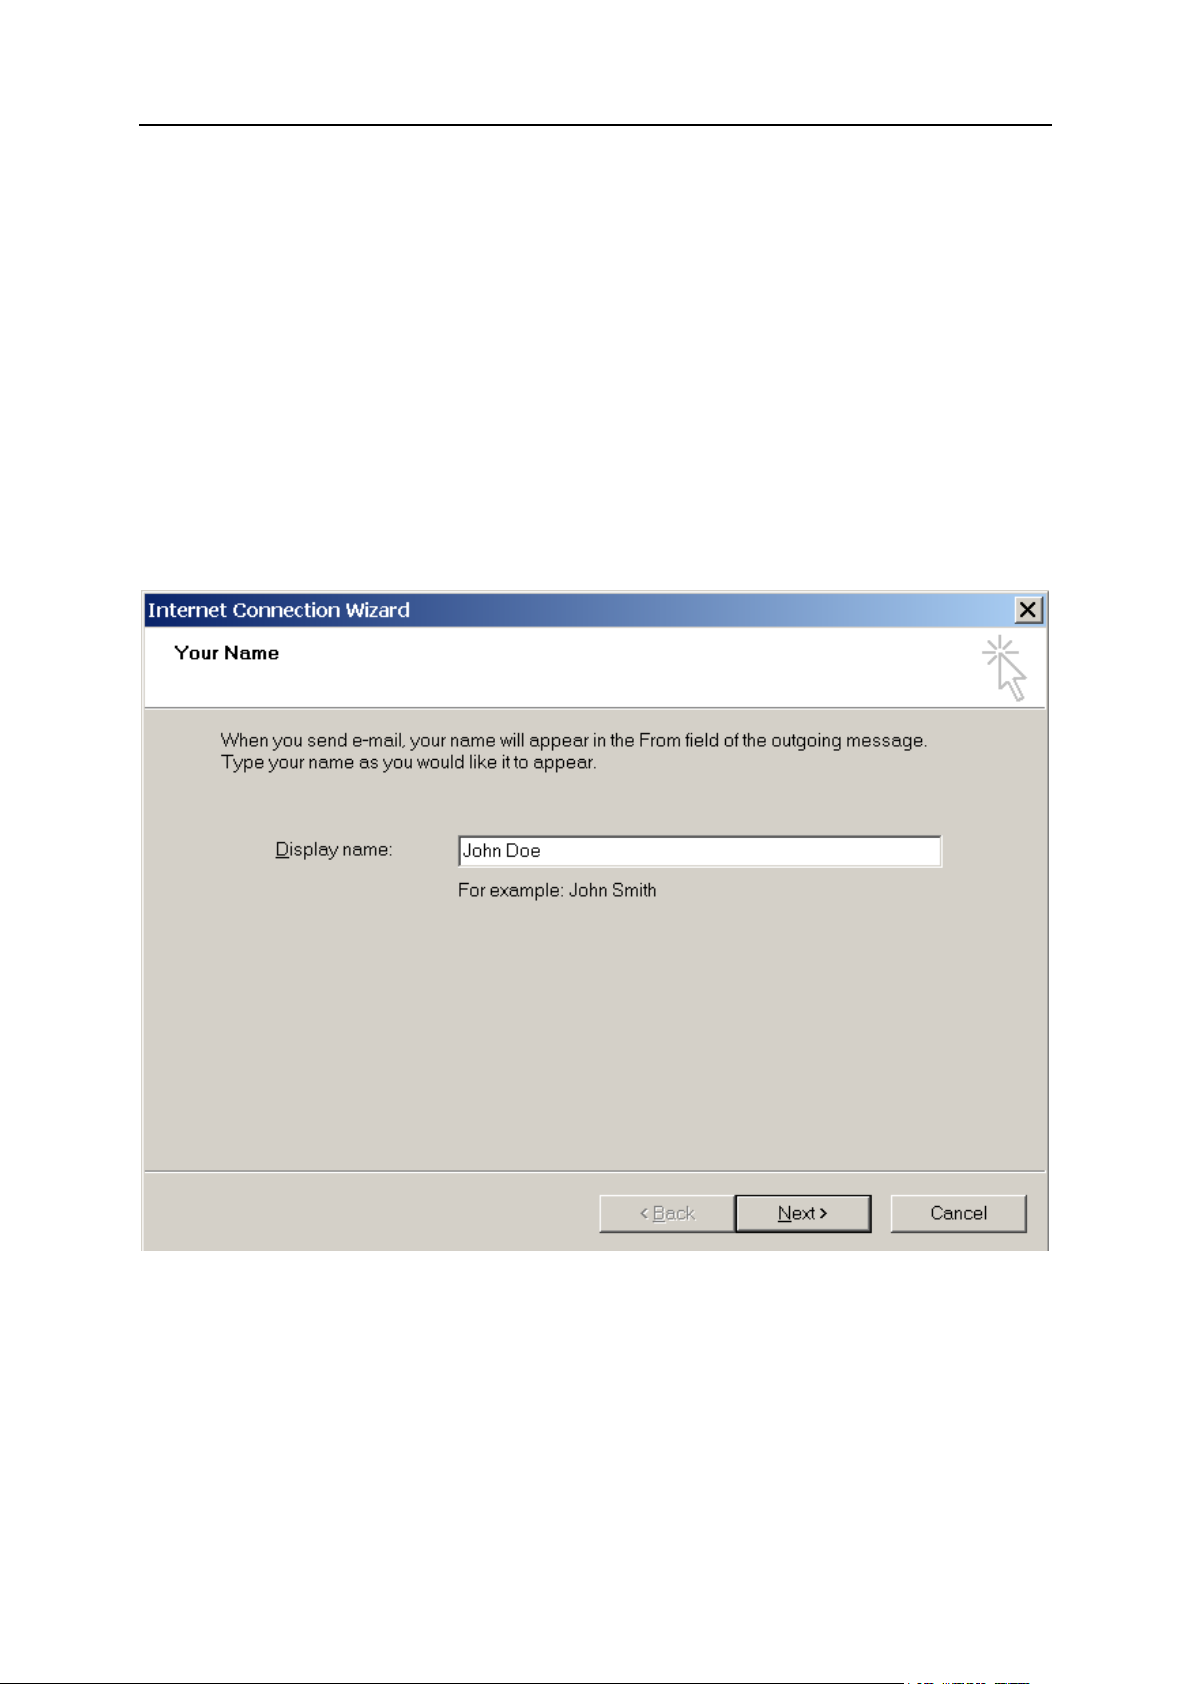
4. Enter your name as you want it to appear in any messages you send, and
click Next.
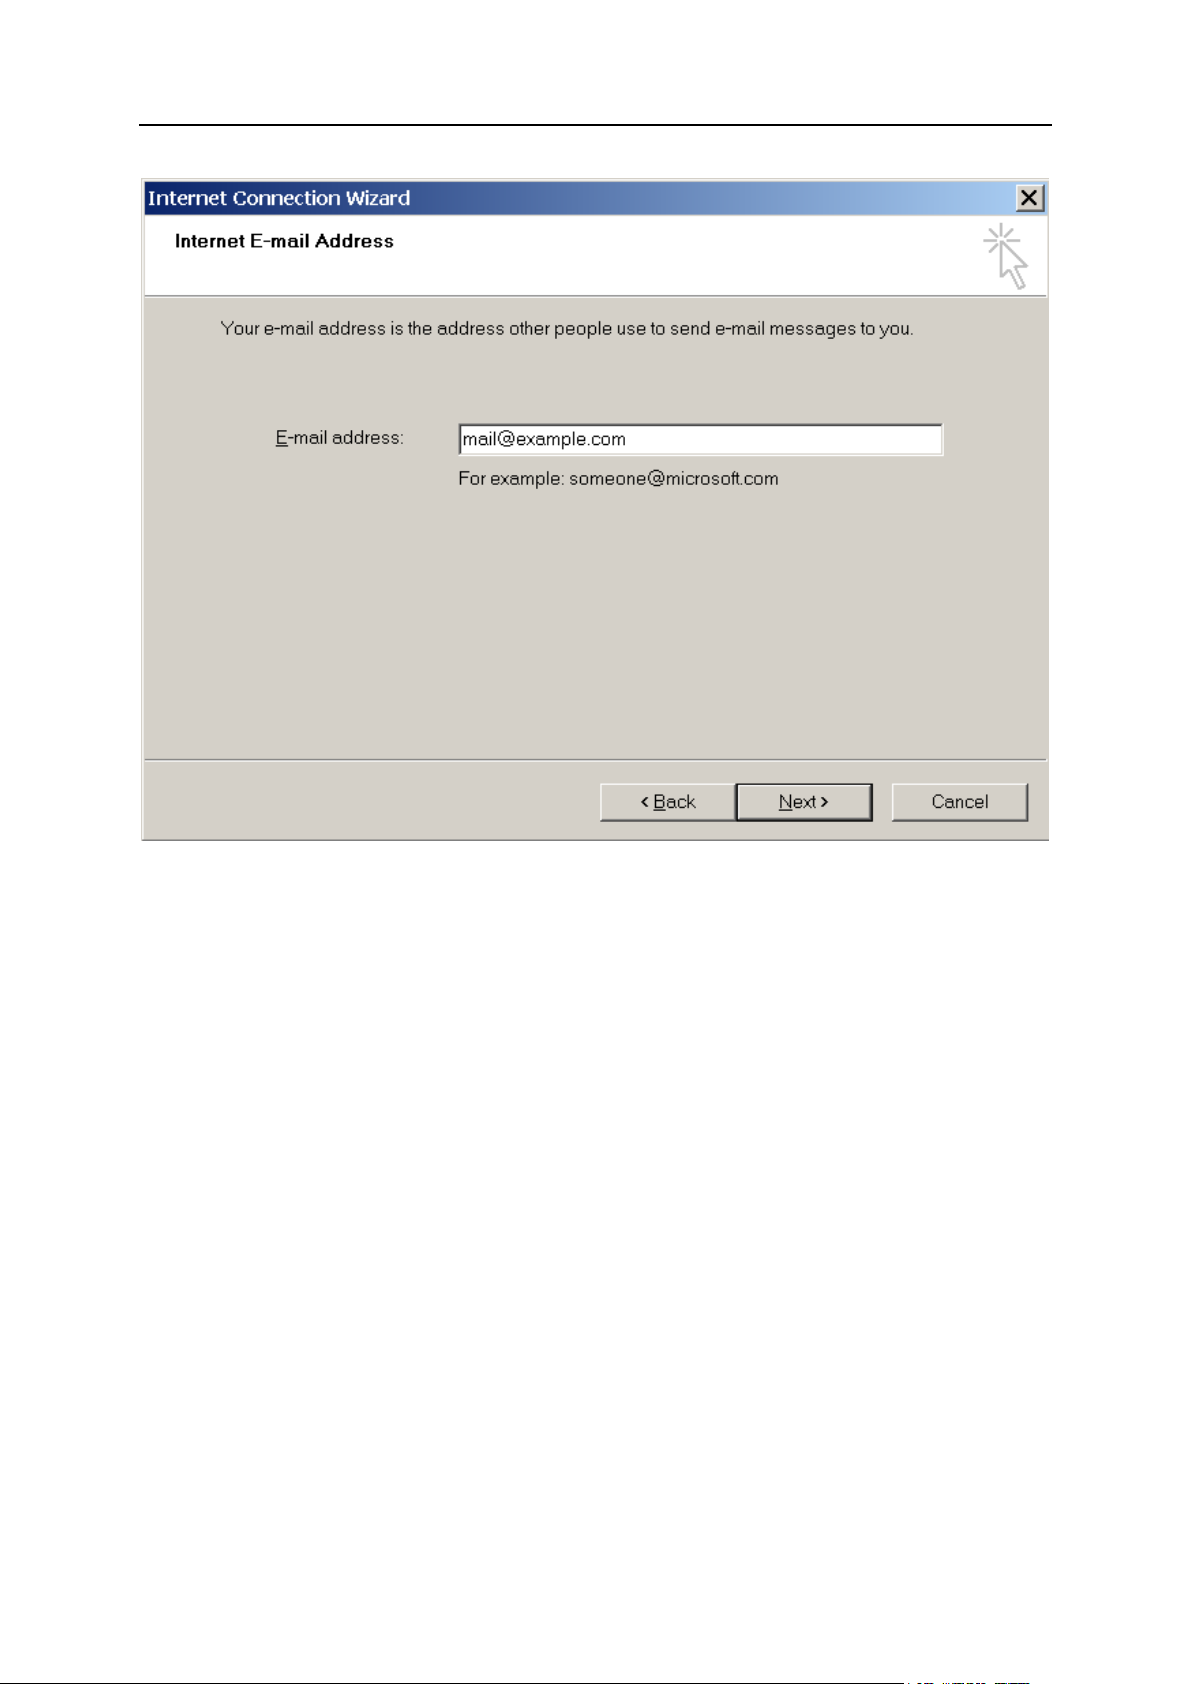
5. Type your e-mail address, and click Next.
Page 26
26 Quick Start with Parallels Panel
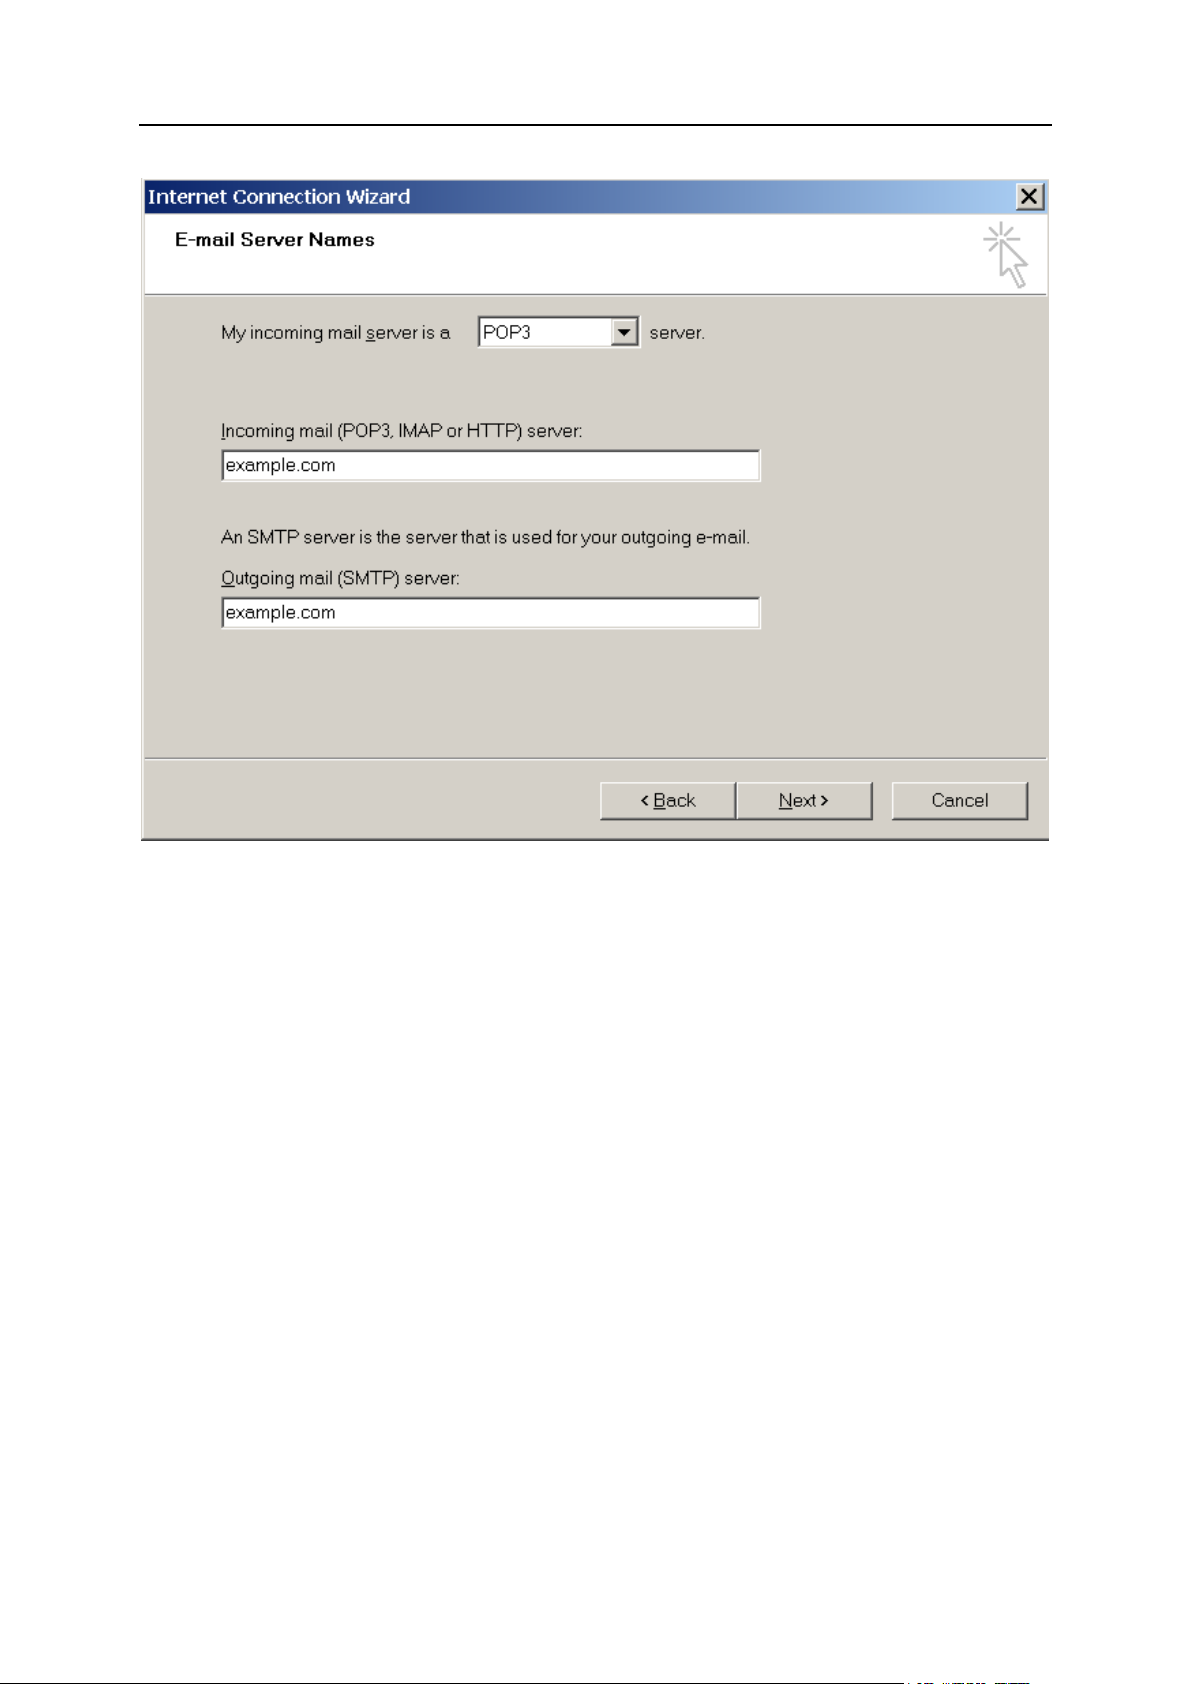
6. Specify the following settings:
Protocol of your incoming mail server.
If you want to keep copies of messages on the server, select the IMAP option. If you
do not want to keep any messages on the server, select the POP3 option. Selecting
IMAP will also allow you to train the SpamAssassin spam filter on e-mail messages
you receive, if SpamAssassin is enabled on the server.
Incoming mail server. Specify your website's Internet address.
Outgoing mail server. Specify your website's Internet address.
Page 27
Quick Start with Parallels Panel 27
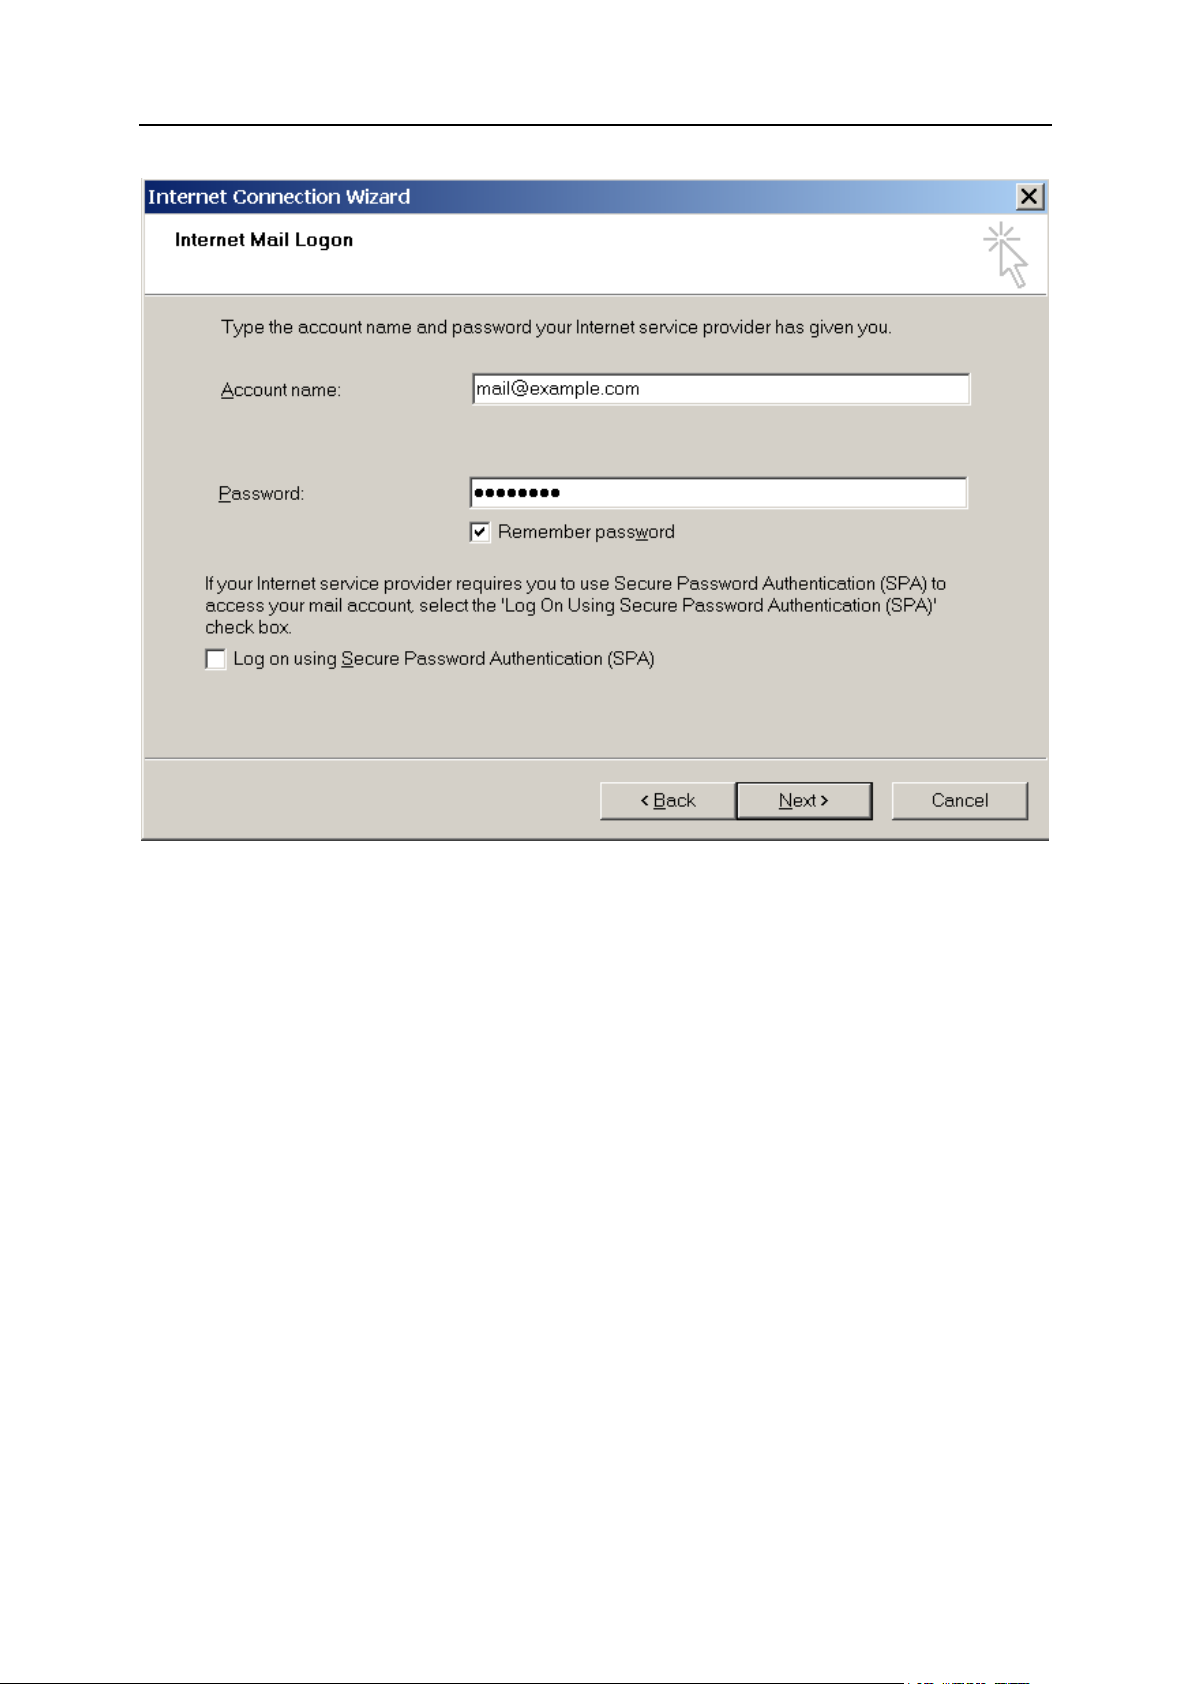
7. Click Next.
8. Specify the following:
Your account name. Type your e-mail address in the Account name box.
Your password. Most likely, this password coincides with the password you use for
logging in to the Panel.
Remember password checkbox. Leave it selected if you do not want to be prompted to
enter password each time your e-mail program connects to the mail server to check
for new mail, and click Next.
Page 28
28 Quick Start with Parallels Panel
9. To complete setting up your e-mail program, click Finish.
Page 29
Quick Start with Parallels Panel 29
Access from Mozilla Thunderbird
The instructions provided in this section were verified against Mozilla Thunderbird 3. They
might not work with earlier or later versions of Mozilla Thunderbird.
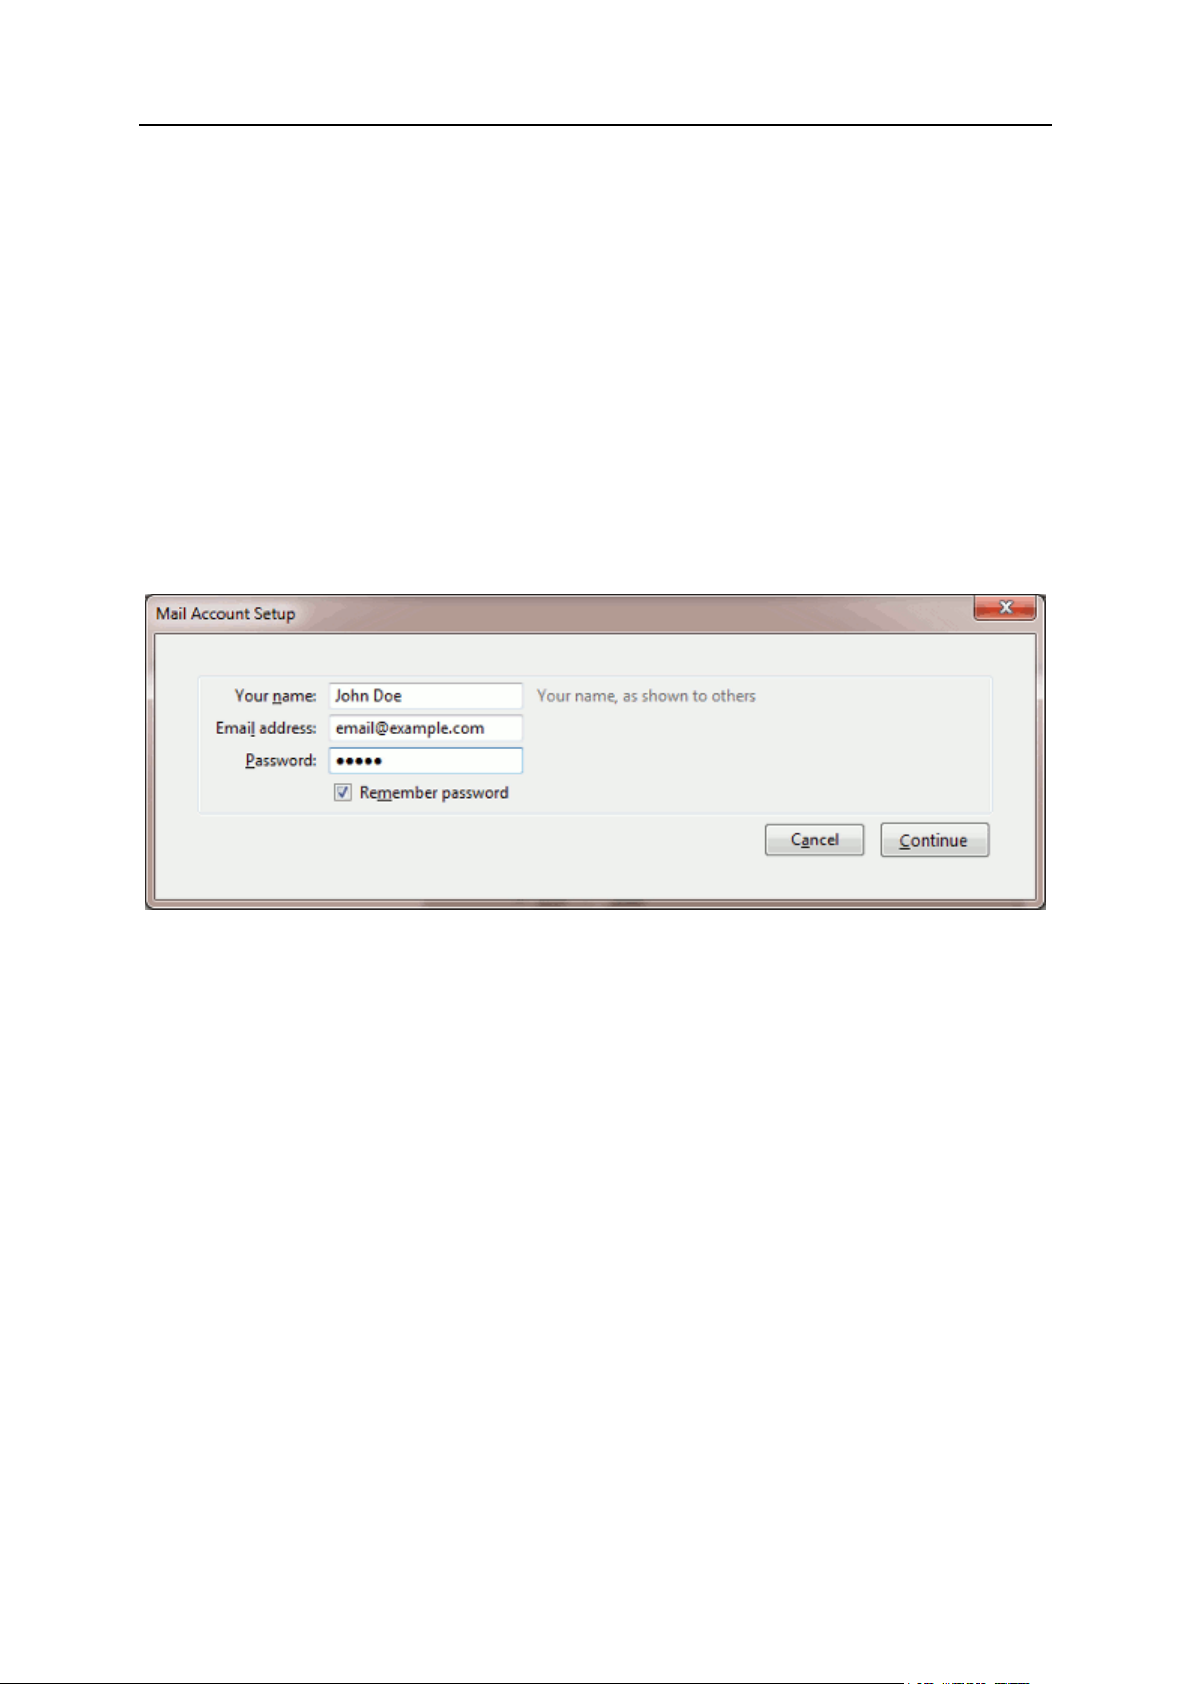
To set up Mozilla Thunderbird:
1. Open Mozilla Thunderbird.
2. Go to File > New > Mail Account.
3. Specify the following:
Your name, as you want it to appear in any messages you send.
Your e-mail address and password.
4. Click Continue.
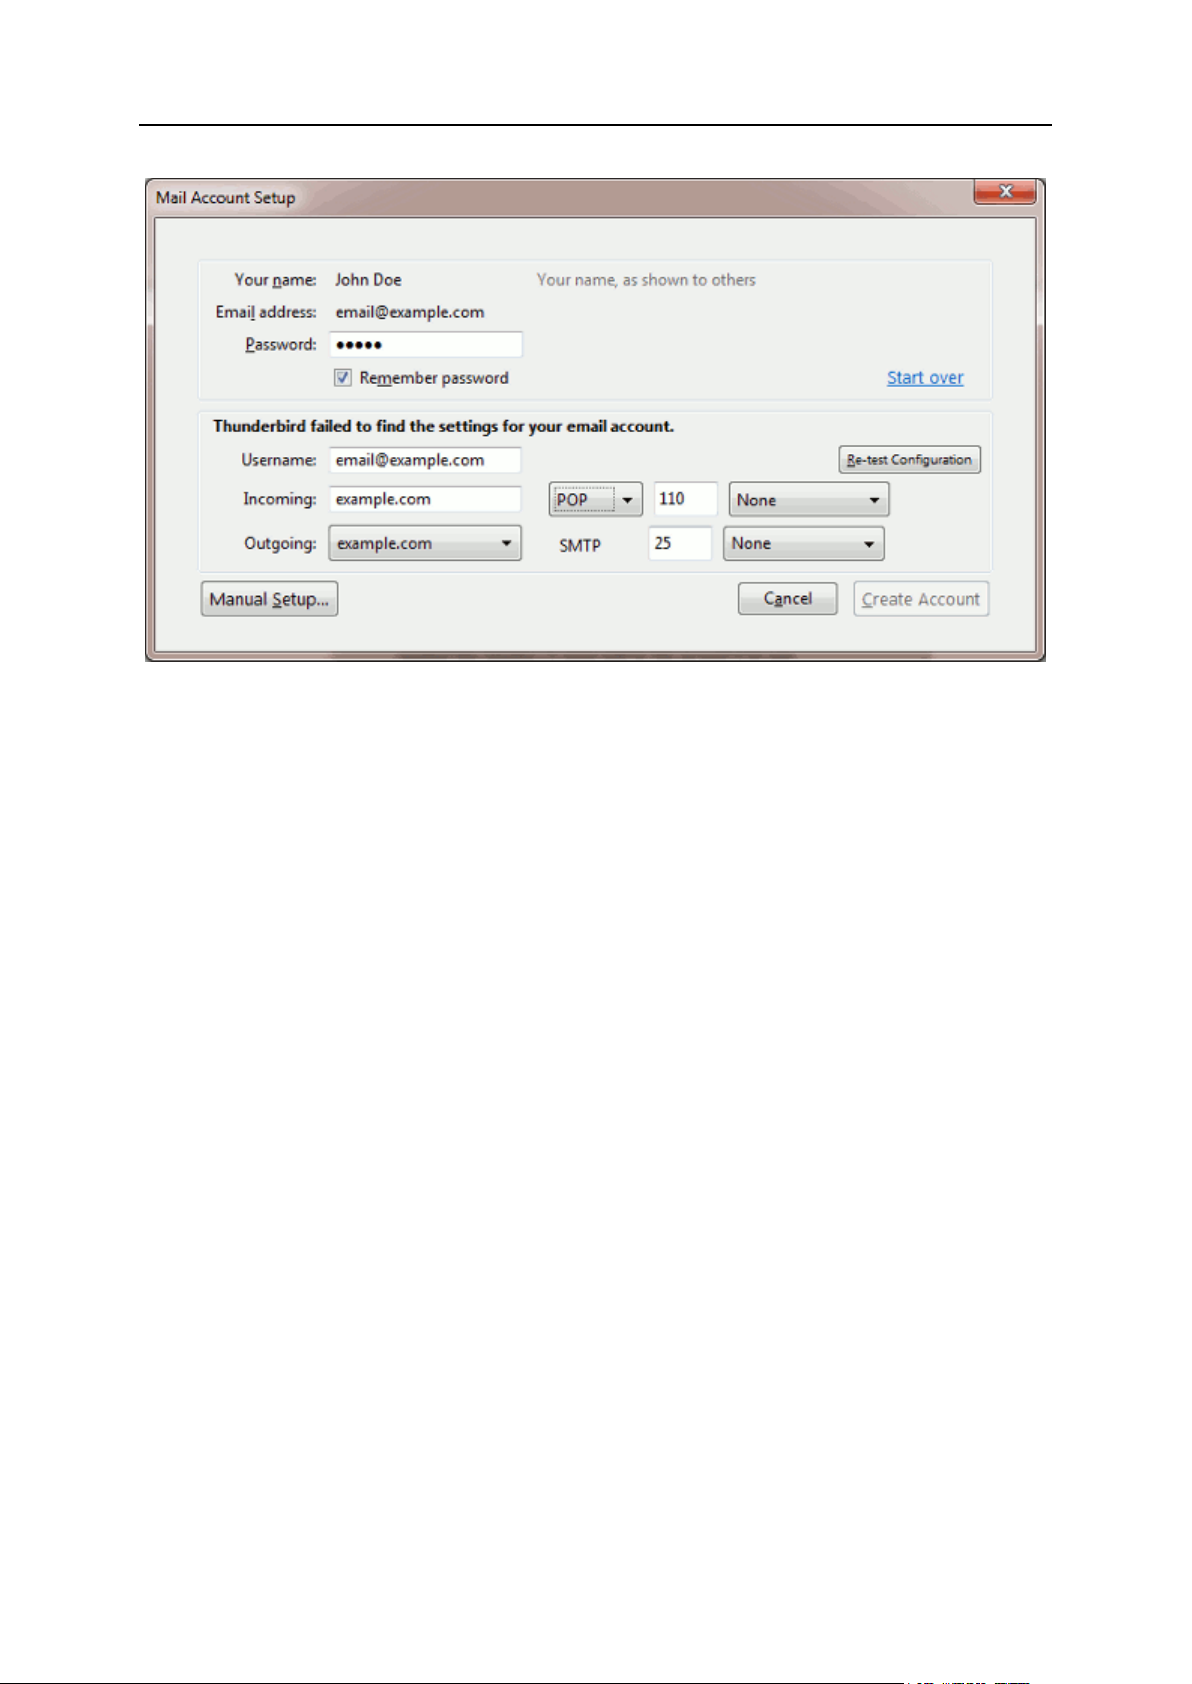
5. If Thunderbird fails to find the settings automatically, specify the following:
Protocol of your incoming mail server.
If you want to keep copies of messages on the server, select the IMAP option. If you
do not want to keep any messages on the server, select the POP3 option. Selecting
IMAP will also allow you to train the SpamAssassin spam filter on e-mail messages
you receive, if SpamAssassin is enabled on the server.
Incoming server address. Specify your website's Internet address.
Outgoing server address. Specify your website's Internet address.
Page 30
30 Quick Start with Parallels Panel
6. Click Create Account.
Page 31

Quick Start with Parallels Panel 31
Access from Apple Mail
The instructions provided in this section were verified against Apple Mail 3.6 (Leopard). They
might not work with earlier or later versions of Apple Mail.
To set up Apple Mail:
1. Run Apple Mail.
If you run it for the first time and do not have any mail accounts configured in it, skip the
next step: Apple Mail will take you directly to creating one.
2. Open the Adding Mail Account wizard:
a. Click Mail > Preferences....
b. Select the Accounts tab.
c. Click the + button at the bottom left corner.
3. Enter the account information:
Your full name
Your full e-mail address
The password you use to log in to the Panel.
4. Click Continue.
5. Fill in the following incoming mail server information:
Page 32

32 Quick Start with Parallels Panel
Account Type: select whether you want to use IMAP or POP protocol.
We recommend selecting IMAP if you use SpamAssassin as a spam filtering solution:
IMAP account is a requirement for SpamAssassin learning which messages are spam
and which are not.
Incoming Mail Server: type in the name of domain which serves your mail (which follows
the @ sign in your e-mail address).
User Name: enter your full e-mail address.
Password: leave it auto-completed (Apple Mail takes it from the previous step).
6. Click Continue.
7. (Optional) Specify the incoming mail security options:
a. Select the Use Secure Sockets Layer (SSL) checkbox.
b. Select the authentication method.
Keep the default method if you are not sure which to select.
Apple Mail displays this setup screen only if a mail server bundled with Parallels Small
Business Panel supports SSL for the selected account type (POP or IMAP).
Page 33

Quick Start with Parallels Panel 33
8. Click Continue.
9. Fill in the following outgoing mail server information:
Outgoing Mail Server: type in the name of domain which serves your mail (which follows
the @ sign in your e-mail address).
Use only this server: selected.
Use Authentication: selected.
User Name: enter your full e-mail address.
Password: leave it auto-completed (Apple Mail takes it from the previous step).
Page 34

34 Quick Start with Parallels Panel
10. Click Continue.
Apple Mail displays overall description of the mail account that is going to be created.
11. Select the Take account online checkbox and click Create.
Page 35

Quick Start with Parallels Panel 35
Page 36

36 Quick Start with Parallels Panel
View Site Visit Statistics
Finally, when your site works fine and search engines return it in search results it is the best
time to evaluate site efficiency by means of visit statistics.
To find out how many people visited a site, from what countries, and what
pages of the site they viewed:
1. If you are subscribed to several hosting packages and have access to
several webspaces associated with your account, in the Subscription menu at
the top of the screen, select the required webspace.
2. Go to the Websites & Domains tab > Web Statistics.
The site visitor statistics will show in a new browser window.
3. To view statistics for web pages viewed from the SSL-secured area of your
site, select SSL Web Statistics in the menu.
4. To view statistics for files downloaded over the file transfer protocol (FTP),
select FTP Statistics in the menu.
Alternately, you can view the visits statistics for a site by visiting the following URL:
https://your-domain.com/plesk-stat/webstat. When prompted for username and password,
specify your FTP account username and password.
Page 37

As described in the section Quick Start with Parallels Panel (on page 14), the first step in
C H A P T E R 4
Hosting Account Administration
establishing your company's web presence is a purchasing a hosting account or, in
other words, subscribing to a hosting plan. Hosting account is a personalized timelimited access to hosting services and resources, like mailboxes, disk space, or
monthly bandwidth.
Hosting Account and Multiple Subscriptions
Panel allows you to subscribe to as many hosting plans as you need. Say, if you do not
want your main site to share hosting resources with a company's branch site you can
subscribe to a hosting plan one more time. This new subscription will be available to
you under the same hosting account. In other words, hosting account is a personalized
access to all your subscriptions (see the picture below).
Another reason of using multiple subscriptions is that subscription is limited to only one
IPv4 and one IPv6 address. Thus, all domains within a subscription share the same IP
(v4 or v6). If you need to host sites on different IP addresses, you should additionally
order the same plan as many times as many IPs you need. This can be useful, for
example, if you want to protect each of your sites with a separate SSL certificate. To
get the details on how to purchase an additional subscription, refer to the section
Ordering More Resources (on page 49).
If you have multiple subscriptions under a single hosting account, you can easily switch
between them from the Account tab. To be more specific, the Account tab contains
actions that apply to all your subscriptions. All other tabs (like Mail, Users, or Domains &
Websites) are, on the contrary, subscription-wide. This means that to change mail
settings on a particular subscription, you should first switch to it and only after that click
Mail.
Page 38

38 Hosting Account Administration
Adding Resources to a Subscription
In this chapter:
Changing Your Password and Contact Information ........................................... 39
Viewing Account Information ............................................................................. 40
Managing Account Balance and Invoices .......................................................... 47
Ordering More Resources ................................................................................. 49
Viewing Statistics .............................................................................................. 50
(Advanced) Configuring Access to Hosting Account .......................................... 52
Purchasing a new subscription for extending hosting resources is not always
necessary. You may always improve just one of your subscriptions. Say, add to it an
SSL support or extra disk space. This can be made by switching to another hosting
plan or purchasing hosting plan add-ons. Learn more in the section Ordering More
Resources (on page 49).
Managing Hosting Account
Panel allows you to perform a number of administrative operations on your hosting
account:
Change an account password and personal information. Learn more in the section
Changing Your Password and Contact Information (on page 39).
View the list of services and resources provided by subscription in the Account tab.
For the detailed information about all subscription features, refer to the section
Viewing Account Information (on page 40).
Make payments to renew your subscription. Learn more in the section Managing
Account Balance and Invoices (on page 47).
View statistics on your account: Say, disk space or traffic usage. Learn more in the
section Viewing Statistics (on page 50).
Allow Other Users Access Your Account
If an amount of hosting maintenance operations is too large to be handled by one
person, you can delegate a part of them to other people. For this purpose, you can
create auxiliary user accounts grouped by means of user roles. Say, you can create a
group that is allowed to only upload content to websites. Users in this group will not be
able to perform any operations except sites content managing. For more information
about auxiliary users, refer to the section (Advanced) Configuring Access to Hosting Account
(on page 52).
Page 39

Changing Your Password and Contact
C H A P T E R 5
Information
To change your password for access to Control Panel:
1. Click a link with your name at the top of the screen.
2. Type a new password, and click OK.
To change a username or password that you use for connecting to your
webspace:
1. If you are subscribed to several hosting packages and have access to
several webspaces associated with your account, select the required
webspace in the Subscription menu at the top of the screen.
2. Click the Websites & Domains tab.
3. Click Web Hosting Settings.
4. Type the new username or password, and click OK.
To change your contact information:
1. Click a link with your name at the top of the screen.
2. Click the Contact Details tab.
3. Update your contact information and click OK.
Page 40

Viewing Account Information
C H A P T E R 6
When you subscribe to hosting services, a user account is created in the Panel to allow
you to manage your websites and mailboxes on your own.
You can view the following information about your account:
Current subscriptions to service plans.
You can be subscribed to a number of service plans at once, and, therefore, can
have several subscriptions associated with your account. If a billing system is
connected to the Panel, then you can also purchase additional subscriptions,
upgrade or downgrade them, and pay your invoices.
Allocated and consumed resources.
Hosting features available for your websites.
Operations you can perform in your Panel.
Account balance, unpaid invoices, and monthly fee for your hosting package.
To view the information about your account and your current
subscriptions:
1. Click the Account tab.
A list of your current subscriptions is shown.
2. If the billing system is integrated with the Panel, then the following
information is shown:
Account credit balance. This is how much money is available in your billing
account.
Due invoices balance. This is how much money you owe to your provider. Here,
you can pay all invoices at once by clicking Pay All Outstanding Invoices, or pay
one of invoices by clicking a Pay Now link in the list titled Latest Outstanding
Invoices. You can also view all invoices by clicking the link Show all invoices, or
print an invoice by clicking an invoice number and then clicking Print.
Latest to-do items. This shows reminders from the system about actions you need
to take.
List of all your subscriptions. You can use links in the list to perform the
following operations:
View subscription properties by clicking a link with subscription name.
Select a subscription that you want to manage through the Control Panel by
clicking the corresponding link Switch to Subscription.
Order an SSL certificate for a site by clicking Request SSL Certificate. This
operation is described in the section Ordering SSL Certificates (on page 99).
View properties of already ordered SSL certificates by clicking Show
Certificate Info.
Page 41

Hosting Account Administration 41
View or change domain information, contact information, and DNS settings
specified at a registrar's site, by clicking Show Domain Info. These operations
are described in the section Registrar's DNS Settings in Panel (on page 72).
3. To view detailed information about resource allotments, available
hosting options, and permissions for operations, click a subscription's
name.
4. Do any of the following:
To view a list of allocated and consumed resources, click the Resources tab.
To view a list of hosting features available for your account, click the Hosting
Options tab.
To view a list of operations that you can perform in your Hosting Panel, click the
Permissions tab.
Information About Your Account and
Subscriptions
The following subscription properties are shown in the Panel at the Account tab >
<subscription name>:
Subscription name. Each subscription in the Panel is referred by a domain name of
the first website created under that subscription.
Plan name. Name of the service plan to which you are subscribed.
Setup date. The date when the subscription was activated.
Price. This is a price of your hosting package stated for the subscription term.
Depending on your provider's policy and your subscription term, it can show a price
per one month, several months, or one year.
Latest renewal date. This is shown if a billing system is integrated with your Control
Panel. This indicates the last time when the subscription was prolonged and a new
term was started.
Next renewal date. This is shown if a billing system is integrated with your Control
Panel. This indicates the date when the subscription needs to be prolonged.
Status. This is shown if a billing system is integrated with your Control Panel. A
subscription can be in several statuses, and the most common of them are active,
pending, and failed. If a subscription is in the active status, then you can work with
your hosting account. If it is in the pending status, then you need to wait for some
time before you can start working with it. If it is in the failed status, then you need to
contact your hosting service provider for assistance.
Allocated and Consumed Resources
If you are subscribed to a number of service plans at once, then you have several
subscriptions. For each subscription, the following types of allocated resources are
listed in the Panel at the Account tab > subscription name > Resources tab:
Page 42

42 Hosting Account Administration
Disk space. This is the total amount of disk space allocated to your account with
subscription. This amount includes all data related to your websites, e-mail
accounts, applications, backups, and log files.
Traffic. This is the total amount of data in megabytes that can be transferred
monthly from all your websites.
Domains. This is the number of websites that can have separate second-level
domain names, such as, for example, example.com.
For information about setting up websites, refer to the sections Set Up Your First
Website (on page 15) and Adding Domains (on page 60).
Subdomains. This is the number of additional websites that can have third-level
domain names, such as, for example, news.example.com.
For information about setting up subdomains, refer to the section Adding Subdomains
(on page 62).
Domain aliases. This is the number of additional domain names that can be set up to
point to one of your sites. For example, example.fr and example.de can both point
to example.com.
For information about setting up domain aliases, refer to the section Adding Domain
Aliases (on page 63).
Mailboxes. This is the number of mailboxes that can be created under all your
websites.
For information about creating mailboxes, refer to the chapter Mail (on page 139).
Mailbox size. This is the amount of disk space that can be occupied by a mailbox.
Total mailboxes quota. This is the total amount of disk space that can be used by all
mailboxes under all your domains. This option is available only on Windows-based
hosting accounts.
Mailing lists. This is the total number of mailing lists that can be set up under all your
websites. Note that there are mailing lists and mail groups, which serve the same
purpose, but are slightly different in functionality. Mailing lists support archiving and
pre-moderation of messages, while mail groups can only be used for sending one
message to a number of recipients at once.
For information about setting up and using mailing lists, refer to the section Using
Mailing Lists (on page 148).
Additional FTP accounts. This is the number of FTP accounts that can be set up for
accessing the webspace, in addition to the main FTP account that was created
when your subscription was activated.
For information about setting up FTP accounts, refer to the sections Changing FTP
Access Credentials (on page 134) and Adding FTP Accounts (on page 135).
Databases (Linux hosting). This is the number of databases that can be hosted for all
your websites. Databases are a standard means of organizing data storage that
allows dynamic websites, web applications, and their users to store, search, and
retrieve information.
For information about working with databases, refer to the chapter (Advanced) Using
Databases (on page 156).
MySQL databases and Microsoft SQL Server databases (Windows hosting). This is the
maximum number of MySQL and Microsoft SQL Server databases respectively that
can be created on the Panel database servers and used by the subscription's
websites.
Page 43

Hosting Account Administration 43
MySQL databases quota and Microsoft SQL databases quota (Windows hosting). This is
the maximum amount of disk space (in megabytes) that the subscription's MySQL
and Microsoft SQL Server databases respectively can occupy.
Java applications. This is the number of Java applications packaged in WAR format
that you can install on your sites.
Sites published with Web Presence Builder. This is the number of sites that you can
create and publish using Web Presence Builder, if Web Presence Builder option is
included in your hosting package.
Mobile sites.This is the total number of websites that you can host with the UNITY
Mobile online service, which optimizes sites for viewing on mobile devices.
Web users. This is the number of user accounts that you can create for hosting web
pages for other users under your domains.
FrontPage accounts. This is the number of Microsoft FrontPage user accounts that
you can create for collaboration on site content using FrontPage. This option is
available only for Windows-based hosting accounts.
Shared SSL links. This is the number of websites that you can secure with an SSL
certificate shared by your provider. This option is available only for Windows-based
hosting accounts.
ODBC DSN connections. This is the number of connections to external databases that
you can create for web applications running on your hosting account. This option is
available only for Windows-based hosting accounts.
ColdFusion DSN connections. This is the number of connections to external databases
that you can create for web applications written in Adobe ColdFusion, which are
running on your hosting account. This option is available only for Windows-based
hosting accounts.
Hosting Features Available for Your Websites
Depending on your service plan, the following hosting features may be available for
your websites (listed at the Account tab > subscription name > Hosting Options tab):
SSL support. This allows you to secure connections to websites with SSL encryption.
For information about securing sites with SSL, refer to the section Securing
Connections with SSL Certificates (on page 96).
Web statistics. This allows you to view website visitor statistics presented in
diagrams and charts.
For information about viewing website visits statistics, refer to the section Viewing
Statistics (on page 50).
Custom error documents. This allows you to create custom HTML pages and
configure web server to show them instead of typical error messages, such as 404
Not Found.
For information about setting up custom error documents, refer to the section Setting
Up Custom Error Pages (on page 107).
Support for programming and scripting languages, such as PHP, CGI, Perl, Python,
Microsoft ASP, ASP.NET, Adobe ColdFusion, SSI.
Microsoft FrontPage support and Microsoft FrontPage over SSL support. These allow you
to use Microsoft FrontPage to create and edit website content. These options are
available only for Windows-based hosting accounts.
Page 44

44 Hosting Account Administration
Remote Microsoft FrontPage authoring (Windows hosting). This allows you to use
Microsoft FrontPage to create and edit website content directly on the server. This
option is available only for Windows-based hosting accounts.
Dedicated IIS application pool (Windows hosting). This provides isolation and improved
stability for web applications working on sites.
Additional write/modify permissions (Windows hosting). This option allows the web
applications to use a file-based database (like Jet) located in the root of httpdocs
folder.
Allow web users to use scripts. This allows scripting at web pages available at URLs
like http://example.com/~<username>/<webpage>, where <username> refers to a
web user. Web users are individuals who do not need their own domain names.
This service is popular with educational institutions that host non-commercial
personal pages of their students and staff.
The following is a list of permissions for operations that you can perform in your Panel
(shown at the Account tab > subscription name > Permissions tab):
DNS zone management. Manage resource records in the DNS zones of websites.
DNS stands for Domain Name System. It is a service that enables web browsers to
locate websites by domain names.
For information about configuring DNS settings for your websites, refer to the
section (Advanced) Configuring DNS for a Domain (on page 66).
Hosting settings management. Manage web hosting settings, such as support for
scripting languages.
PHP safe mode management. This option is available only for Linux-based hosting
accounts. It allows to switch PHP safe mode on or off for websites. Safe mode is a
security restriction that does not allow scripts written in PHP to perform potentially
dangerous operations on the server. You might need to switch off the safe mode for
PHP if you use some web applications written in PHP and they do not function
properly.
Management of access to the server over SSH and Management of access to the server over
Remote Desktop. Securely upload web content to the server through Secure Shell
(Linux hosting) or a Remote Desktop connection (Windows hosting).
Anonymous FTP management. Set up a folder on the server which should be
accessible to the Internet users over FTP protocol. This folder can have an address
like, for example, ftp://downloads.example.com. This feature is called anonymous
FTP because the users will not need to specify a username and password to
browse, download, or upload files.
For information about setting up FTP folder with unrestricted access, refer to the
section Setting Up Anonymous FTP Access (on page 137).
Scheduler management. Schedule execution of programs or scripts in the server's
operating system.
For information about scheduling tasks, refer to the chapter Scheduling Tasks (on
page 149).
Spam filter management. Set custom settings for protection from unsolicited
commercial e-mail, also known as spam.
For information about setting up spam filtering, refer to the section Protecting
Mailboxes from Spam.
Page 45

Hosting Account Administration 45
Antivirus management. Set custom settings for protection from viruses and other
malicious software that spreads itself through e-mail.
For information about setting up virus protection, refer to the section Protecting
Mailboxes from Viruses.
Data backup and restoration using the server repository. Use the backup and restore
functions of the Panel to back up and restore websites, mail accounts, settings, and
keep your backup files on the server.
For information about backing up and restoring data, refer to the chapter (Advanced)
Back Up and Restore Data (on page 162).
Data backup and restoration using a personal FTP repository. Use the backup and restore
functions of the Panel to back up and restore websites, mail accounts, settings, and
save your backup files to an FTP folder on another server.
For information about backing up and restoring data, refer to the chapter (Advanced)
Back Up and Restore Data (on page 162).
Web statistics management. Set custom preferences for visitor statistics reports.
For information about configuring and viewing website visitor statistics, refer to the
section Viewing Statistics (on page 50).
Log rotation management. Set custom preferences for recycling (rotation) of web
server logs. Web server records information about connections to your sites and
errors occurred on attempts to retrieve missing files. You can use these log files for
website debugging purposes.
For information about working with web server access logs, refer to the section Log
Files (on page 51).
Access to Application Catalog. View and install applications on websites. For
information about applications, refer to the section Employing Website Applications (on
page 93).
Setup of potentially insecure web scripting options that override provider's policy. This
allows you to override the hosting security policy, if it is applied by the provider.
Domain creation. Set up and manage new websites.
For information about setting up websites, refer to the sections Set Up Your First
Website (on page 15) and Adding Domains (on page 60).
Subdomains management. Set up and manage new websites with addresses like
forum.example.com.
For information about setting up subdomains, refer to the section Adding Subdomains
(on page 62).
Domain aliases management. Set up and manage additional domain names for a site.
For information about setting up domain aliases, refer to the chapter Adding Domain
Aliases (on page 63).
Additional FTP accounts management. Set up and manage additional FTP accounts. To
enable collaboration on website content, you can set up FTP accounts for other
users and specify which directories of the site should be accessible to them.
For information about setting up FTP accounts, refer to the section Adding FTP
Accounts (on page 135).
Java applications management. Install and manage Java applications distributed in
WAR archives and obtained separately from third-party vendors or application
developers.
Page 46

46 Hosting Account Administration
For information about installing Java applications, refer to the section Installing Java
Applications.
Mailing lists management. Set up and manage mailing lists.
For information about setting up and using mailing lists, refer to the section Using
Mailing Lists (on page 148).
Hosting performance settings management. Limit the bandwidth and number of
connections to websites.
For information about restricting bandwidth usage for sites, refer to the section
Limiting Bandwidth and Number of Connections to Websites (on page 114).
IIS application pool management. Set custom preferences for IIS application pool
(available only on Windows-based hosting accounts).
For information about setting up IIS application pool, refer to the section Setting Up
IIS Application Pool (Windows Hosting) (on page 131).
Additional write/modify permissions management. Set additional write/modify
permissions for websites that use file-based databases (available only on Windowsbased hosting accounts).
Shared SSL management. Secure connections to your sites with SSL protection by
using an SSL certificate shared by your provider.
For more information, refer to the section Using Shared SSL Certificates (Windows
Hosting) (on page 101).
Hard disk quota assignment. Adjust hard quotas on disk space if that is supported by
your hosting account.
Database server selection. Select a database server for creating databases, if multiple
database servers are available.
Page 47

Hosting Account Administration 47
Managing Account Balance and Invoices
The operations described below are available if your Control Panel is integrated with a
billing system.
To view your account balance and pay for hosting services:
1. Click the Account tab.
2. The following information is shown:
Account credit balance. This is how much money is available in your account.
Due invoices balance. This is how much money you owe to your provider. Here,
you can pay all invoices at once by clicking Pay All Outstanding Invoices, or pay
one of invoices by clicking a Pay Now link in the list titled Latest Outstanding
Invoices.
Latest to-do items. This shows reminders from the system about actions you
need to take.
List of all your subscriptions. You can use links in the list to perform the
following operations:
To view subscription properties, click a link with subscription name.
To select a subscription that you want to manage through the Control Panel,
click the corresponding link Switch to Subscription.
To order an SSL certificate for a site, click Order a Certificate. For more
information about this operation, see the section Ordering SSL Certificates (on
page 99).
To view properties of already ordered SSL certificates, click Show Certificate
Info.
To view or change domain information, contact information, and DNS
settings specified at a registrar's site, click Show Domain Info. For more
information about these operations, see the section Registrar's DNS Settings in
Panel (on page 72).
Page 48

48 Hosting Account Administration
To choose a payment method that you would like to use for paying for
services:
1. Go to the Account tab > Billing Accounts.
A record about the payment method that you used for purchasing the services for
the first time is shown.
2. Do any of the following:
To view or change settings for a billing account, click the corresponding link in
the Billing account name column, specify the information about your bank card or
account, and select the subscriptions that should be paid by it. Click OK.
To add a new billing account, click Add New Billing Account, select the payment
method, click Next, specify the required information about your bank card or
account, and select the subscriptions that should be paid by it. Click OK.
To remove a billing account, click the corresponding Remove link.
Page 49

Hosting Account Administration 49
Ordering More Resources
The operations described below are available if your Control Panel is integrated with a
billing system.
To add more resources to your subscription or upgrade to another service
plan:
1. Click the Account tab.
2. In the list of subscriptions, locate the subscription that you want to
upgrade to another service plan, and click a link with the currently used
plan's name.
3. Click Upgrade.
If there is no Upgrade link, then it means that you cannot upgrade to another hosting
plan from your Control Panel, and you need to contact your provider.
4. Do any of the following:
To add resources to your subscription without upgrading to another plan, select
the options you would like to add and click Adjust Add-ons.
To upgrade to another service plan, click Order Upgrade.
To reduce the amounts of resources or downgrade to another service
plan:
1. Click the Account tab.
2. In the list of subscriptions, locate the subscription that you want to
downgrade to another service plan, and click a link with the currently
used plan's name.
3. Click Downgrade.
If there is no Downgrade link, then it means that you cannot downgrade to another
hosting plan from your Control Panel, and you need to contact your provider.
4. Do any of the following:
To reduce the amounts of allocated resources without downgrading to another
plan, select the options you would like to reduce and click Adjust Add-ons.
To downgrade to another service plan, click Order Downgrade.
To subscribe to a hosting plan in addition to your main plan:
1. Go to the Account tab and click the Add Subscription link.
2. Select the hosting plan to which you want to subscribe, and click Buy
Now. Follow the instructions on the screen to complete the order.
Page 50

50 Hosting Account Administration
Viewing Statistics
In this section:
Log Files ........................................................................................................... 51
To view the reports on disk space and traffic usage by your account:
1. If you have several subscriptions associated with your account, in the
Subscription menu at the top of the screen, select the required subscription.
2. Click the Statistics tab.
The following information is presented in charts:
Disk space used by websites, mail accounts, databases, and other files located in
your webspace.
Traffic used by FTP, web, and mail services during the current month.
FTP field shows the information about the total size of files transferred to and from the
webspace over the file transfer protocol.
HTTP field shows the information about the total amount of data transferred from all of
your websites over HTTP protocol, that is, retrieved by web browsers.
POP3/IMAP field shows the total amount of data received by all mail accounts under
your domains.
SMTP field shows the total amount of data sent by all mail accounts under your
domains.
3. Do any of the following:
To view a report on the amount of data transferred to and from your sites over FTP,
click FTP Statistics.
To view a report on the amount of data transferred to and from your FTP directory,
which is accessed without authorization, click Anonymous FTP statistics.
To view a report on the amount of traffic used by services during a certain month, click
Data Transfer Statistics, and select the required month from the menu.
Page 51

Hosting Account Administration 51
Log Files
All connections to the web server and requests for files that were not found on the server are
registered in log files. These log files are analyzed by the statistics programs running on the
server, which then present graphical reports on demand. You may want to download these
log files to your computer for processing by third-party statistics programs, or view their
contents for web server debugging purposes.
To prevent these log files from growing too large, you should enable automatic
cleanup and recycling of log files:
1. If you are subscribed to several hosting packages and have access to
several webspaces associated with your account, in the Subscription menu at
the top of the screen, select the required webspace.
2. Go to the Websites & Domains tab > Logs (in the Advanced Operations group) > Log
Rotation.
3. Click Switch On. If you see only the Switch Off button there, this means that log
recycling is already switched on.
4. Specify when to recycle log files and how many copies of each log file to
store on the server. Also specify whether they should be compressed and
sent to an e-mail address after processing.
5. Click OK.
To view the contents of a log file or download it to your computer:
1. If you are subscribed to several hosting packages and have access to
several webspaces associated with your account, in the Subscription menu at
the top of the screen, select the required webspace.
2. Go to the Websites & Domains tab > Logs (in the Advanced Operations group). A list
of log files opens.
3. Do any of the following:
To view all entries in a log file, click the log file name. If you want to view only a few
last lines from the log file, type the number of lines into the input box under the Settings
group, and then click the log file name.
To download a file to your computer, click the corresponding icon .
To remove a processed log file from the server, select the corresponding checkbox
and click Remove. Confirm removal and click OK.
Page 52

52 Hosting Account Administration
To download log files to your computer via FTP:
In this section:
User Roles ........................................................................................................ 53
User Accounts ................................................................................................... 54
Custom Links .................................................................................................... 56
1. Connect to the Panel server via FTP and log in using access credentials of
the subscription logs of which you want to do wnload.
2. Go to the /statistics/logs directory and copy the log files to you
computer.
(Advanced) Configuring Access to Hosting
Account
If you want to allow other users to access the Panel for managing websites, installed
applications, or use e-mail services under your domains, then you need to create user
accounts for them.
Users and User Roles
User accounts are created based on user roles. The roles include privileges to access
certain areas of the Panel and perform operations in the Panel. There are several predefined
user roles called Accountant, Application User, Owner, and Webmaster. You can review and
modify the Accountant, Application User, and Webmaster roles to suit your needs, or you can
create your own custom roles. For more information on user roles and user accounts
creation, refer to the sections User Roles (on page 53) and User Accounts (on page 54)
correspondingly.
After user accounts are created, the users will be able to log in to their accounts in Panel and
use shortcuts in their Panels to access their mailboxes and work with applications. In
addition, you can extend the list of links available to your auxiliary users with your custom
links. That can be links to corporate resources, sites on the Web, and so on. Learn more in
Custom Links (on page 56).
Users and Multiple Subscriptions
Since Panel 10.4, if your hosting account includes more than one subscription, you can allow
users to access only a specified subscription. If the Access to subscriptions property of a user
account is set to a certain subscription, the user will always log in to this subscription and will
not be able to switch to other subscriptions.
Page 53

Hosting Account Administration 53
User Roles
To create a user role:
1. Go to the Users tab > User Roles tab > Create User Role.
2. Specify the following:
User role name.
Access to Panel services. Grant the required permissions for operations to the user:
Manage users and roles. Add, modify, and remove user accounts and roles. Note that
even if this permission is not granted to a user, the user will be able to browse
contact information of other users after logging in to the Panel.
Create and manage sites. Set up, modify, remove domain names and subdomains,
host websites and change web hosting settings.
Configure log rotation. Manage settings for recycling of web server access and error
log files. View, download, and remove log files.
Configure anonymous FTP service. Set up a directory accessible to all Internet users
over FTP without authorization.
Create and manage scheduled tasks. Schedule execution of scripts or programs on
your hosting account.
Configure spam filter. Set up spam protection for mailboxes.
Configure antivirus. Set up virus protection for mailboxes.
Create and manage databases. Add, modify, and remove databases stored on your
hosting account.
Configure and perform data backup and restoration. Back up and restore data related to
your hosting account, websites, and mailboxes under your domains.
View statistics. View reports on disk space and traffic usage by your websites, and
website visits.
Install and manage applications. Install applications on websites and manage them.
Design sites in Web Presence Builder. Create websites using Web Presence Builder.
Upload and manage files. Manage files and directories located in the webspace by
using the Panel's file manager.
Create and manage additional FTP accounts. Set up additional FTP accounts for other
users.
Manage DNS settings. Manage DNS settings for domains.
Install and manage Java applications. Install on websites third-party Java applications.
Create and manage mail accounts. Create, modify, and remove e-mail accounts.
Create and manage mailing lists. Create, modify, and remove mailing lists.
Access to apps. Select the applications that the user should be able to access and use.
All web applications installed on the server are listed in this area.
Page 54

54 Hosting Account Administration
For more information about installing applications and providing access to users, refer
to the section Granting Panel Users Access to Apps (on page 95).
3. Click OK.
To modify user role properties:
1. Go to the Users tab > User Roles tab.
2. Click a link with the role name that you want to change.
3. Change the role properties as required and click OK.
To remove a user role:
1. Go to the Users tab > User Roles tab.
2. Select a checkbox corresponding to the role you want to remove and click
Remove. Note that it is impossible to remove the Owner role and other roles
that are assigned to one or more users.
3. Click Yes to confirm the removal.
User Accounts
To create a user account:
1. Go to the Users tab > Create User Account.
2. Specify the following:
Contact name.
E-mail address. The e-mail address will be used as a username for logging in to the
Panel.
To create a new e-mail address for the user, select the option Create an e-mail
address under your account,
type the desired left part of the address which goes before the @ sign, and, if you
have a number of domains on your account, select the domain name under which
the e-mail address should be created.
To associate with this user account an external e-mail address, select the option
Use an external e-mail address, and specify an existing external e-mail address.
User role. Select the required user role from the menu.
Access to subscriptions. Allow a user to access only a specified subscription. The All
value grants them access to all subscriptions within your hosting account.
Password. Type the password for access to the Panel.
3. Leave the User is active checkbox selected. Otherwise, the user will not be
able to access the Panel and use applications on your hosting account.
Page 55

Hosting Account Administration 55
4. Click OK.
5. Now, if you want to add contact information for the user, click a link with the
user's name, and then click the Contact Details tab, and specify the user's
contact information.
6. Click OK.
Now you can notify the user about creation of his or her account and ability to access the
Panel. Provide the user with the address to open in his or her browser, the username (which
is the user's e-mail address), and the password that you specified in the account settings.
To change user account properties:
1. Click the Users tab.
2. Click a link with the user's name.
3. Make the required changes and click OK.
To suspend or activate a user account:
1. Click the Users tab.
2. Click a link with the user's name.
3. Do any of the following:
To suspend a user account, clear the User is active checkbox. The user will no longer
be able to log in to the Panel and access applications.
To activate a user account, select the User is active checkbox.
4. Click OK.
To remove a user account:
1. Click the Users tab.
2. Select a checkbox corresponding to the user account you want to remove,
and click Remove. Note that you cannot remove your own account.
3. Click Yes to confirm the removal.
Page 56

56 Hosting Account Administration
Custom Links
You can add custom hyperlinks to the Panel and make them visible for your users. The links
may lead to web resources, such as your corporate site, or to a web application that can
process online requests and accept additional information about the users who click these
links.
You can specify what information about users should be passed:
Subscription ID.
Primary domain name associated with a subscription.
FTP account username and password.
Customer's account ID, name, e-mail, and company name.
You can place the links in the following locations of the Control Panel, and decide who
should be able to see them:
On the Home page in the Control Panel, visible only to you. This is achieved by selecting
the Customer's Home page option in the link properties.
On the Home page in the Control Panel, visible to you and your users who are allowed to
log in to the Control Panel. This is achieved by selecting the Common access option in the
link properties.
On the Websites & Domains tab in the Control Panel, visible to you and your users who are
allowed to log in to the Control Panel. This is achieved by selecting the Websites & Domains
page of Subscription option in the link properties.
To add a custom hyperlink to the Control Panel:
1. Go to the Account tab > Additional Services, and click Add Link to Service.
2. Specify the following settings:
Type the text that will show on your button in the Button label box.
Choose the location for your button.
Specify the priority of the button. Your custom buttons will be arranged in the Panel in
accordance with the priority you define: the lower the number, the higher the priority.
Buttons are placed in the left-to-right order.
To use an image for a button background, type the path to its location or click Browse
to browse for the desired file. It is recommended that you use a 16x16 pixels GIF or
JPEG image for a button to be placed in the navigation pane, and 32x32 pixels GIF or
JPEG image for buttons placed in the main frame or desktop.
Type the hyperlink of your choice to be attached to the button into the URL box.
Using the checkboxes, specify whether you want the customer information and other
data to be transferred within the URL. These data can be used for processing by
external web applications.
In the Tooltip text input field, type in the help tip that will be displayed when the users
place the mouse pointer over the button.
Page 57

Hosting Account Administration 57
Select the Open URL in Parallels Panel checkbox if you want the destination URL to be
opened in the main frame of the Panel, otherwise, leave this checkbox cleared to
open the URL in a separate browser window or tab.
If you want to make this button visible only to you, select the Show to me only checkbox.
3. Click Finish to complete creation.
To remove a hyperlink button from the Panel:
1. Go to the Account tab > Additional Services.
2. Select a checkbox corresponding to the link that you want to remove and
click Remove.
Page 58

As described in the chapter Quick Start with Parallels Panel (on page 14), your web
In this chapter:
Domains and DNS............................................................................................. 59
Changing Hosting Settings ................................................................................ 74
Suspending and Activating Websites ................................................................ 81
Managing Website Content ............................................................................... 83
Employing Website Applications ........................................................................ 93
(Advanced) Securing Your Websites ................................................................. 96
(Advanced) Extended Website Management..................................................... 103
C H A P T E R 7
Websites and Domains
presence always starts from purchasing a domain name. The domain name (or simply,
domain) is the name people use to access your site from their browsers. Say,
www.example.com. The domain registration is made by authorized companies domain name registrars. Quite often hosting providers carry out this function. For the
detailed information about how to manage domains in Panel, refer to the section
Domains and DNS (on page 59).
But a domain is not a website yet. To make it accessible from the Web and fill it with
content, you should obtain web hosting account. That is to supplement your domain
with Internet connectivity, some disk space to store your content, mail services, and so
on. Thus, a website is a domain with provided hosting services.
Panel provides a full range of operations on domains and websites:
Adding and removing domains, subdomains, and aliases.
Managing the content of your websites.
Installing various web apps.
Securing connections to your websites and much more.
This chapter provides the detailed information on all possible operations on websites
and domains in Panel. Note that some of these operations may be unavailable in your
hosting plan.
Page 59

Websites and Domains 59
Domains and DNS
In this section:
Adding Domains ................................................................................................ 60
Adding Subdomains .......................................................................................... 62
Adding Domain Aliases ..................................................................................... 63
(Linux) Adding Wildcard Subdomains ................................................................ 65
(Advanced) Configuring DNS for a Domain ....................................................... 66
As described above, a domain name is the name that people type in their browsers to
access your website.
Domain name is hierarchical and may consist from a number of parts called labels:
The right-most label is called top-level domain. Say, com is the top-level domain of
www.example.com. The number of top-level domains is limited and all of them are
managed by responsible international organizations.
The second-level domain is the label that we mainly use to imply the purpose of our
website. In www.example.com it is the example part. The combination of a
second-level and top-level domain names specifies the exact location of your
website.
Each label to the left is the subdomain of the domain to the right. Say, www is the
subdomain of example.com. Subdomains may be convenient when you want to
isolate some content from the main site. Say, you can organize your personal blog
on myblog.example.com. For information on how to add subdomains in Panel,
refer to the section Adding Subdomains (on page 62).
If you want to host more than one website under your subscription you can purchase
more domains and add them to your subscription. For information on how to add
domains in Panel, refer to the section Adding Domains (on page 60).
In fact, domain names exist only for the people convenience and the real
communication between browser and web servers occurs with the help of IP addresses
- the numerical host identifiers. Say, the real address of www.example.com may be
192.0.2.12 (IPv4). To resolve domain names into IP addresses web hosts use the DNS
technology. For more details about how DNS is implemented in Panel, refer to the
section (Advanced) Configuring DNS for a Domain (on page 66).
DNS allows resolving several domains into one IP address. Such additional names are
called domain aliases. This is convenient when you purchased several domains that
you want to point to the same website. For information on how to add aliases to
existing domains, refer to the section Adding Domain Aliases (on page 63).
Page 60

60 Websites and Domains
Adding Domains
If your hosting package includes more than one domain name (website), then you can
easily add new domains to the server. Before you start adding a new domain that will
use a second-level domain name, like example.com, be sure to register that domain
name with your service provider or another domain name registration authority.
You can set up the following types of site configurations through Panel:
Website addressed by a second-level domain name. The following services are available
for websites:
A unique Internet address (domain name), like example.com.
Additional domain names (domain aliases).
Subdomains - divisions of a site accessible by easy-to-remember addresses
that are added to the main site, like mail.example.com.
Separate FTP accounts for collaboration on the site content. For every FTP
account, you can specify which directories can be accessed.
Creating content using Web Presence Builder.
Simplified deployment of applications, such as content management systems,
photo galleries, shopping carts, blogging platforms, and many more.
Secure data exchange implemented by SSL protocol. This requires that a site
be hosted on a dedicated IP address, which is not shared among other users
and sites.
Mailboxes and mailing lists.
Viewing statistics on site visits.
Website or a division of a website addressed by a third-level domain name (subdomain). This
is usually a division of an existing site. It has an Internet address comprising of
three parts separated by dots. The following services are available for subdomains:
Separate document root from the main site. Document root is a directory on the
server where web pages of a site are stored.
Access over FTP for content management.
Creating content using Web Presence Builder.
Simplified deployment of applications.
Secure data exchange implemented by SSL protocol.
Viewing statistics on site visits.
Page 61

Websites and Domains 61
Adding More Domains
To host a new website with a second-level domain name:
1. If you are subscribed to several hosting packages and have access to
several webspaces associated with your account, select the required
webspace in the Subscription menu at the top of the screen.
2. Click the Websites & Domains tab, click Add New Domain and follow on-
screen instructions.
Note: If you select the recommended option, you should connect the DNS settings
related and your domain name with the domain name at the registrar's side. To
achieve this, enter the Panel name server IP address into the respective NS record
of the registrar. The instruction on how to obtain the IP is as follows: go to Websites
& Domains > DNS Settings, find the NS record, and then find the A record
corresponding to the NS record value.
For example, if your NS record is
example.com. NS ns.example.com,
find the A record with ns.example.com, say,
ns.example.com. A 192.0.2.12
The resulting value, 192.0.2.12, is the Panel name server IP you need.
3. Click OK.
The new domain name is now shown in the list at the bottom of the screen.
4. If the operation of changing hosting settings is available for your
account, then you can click the domain name of the new website to
view or change the hosting settings, as described in the section
Changing Hosting Settings (on page 74).
You can now start creating your website with Web Presence Builder or upload your
web content to the webspace of the new website, as described in the section Managing
Website Content (on page 83).
Removing Domains
When you delete a domain from Panel, all data related to the corresponding site are
deleted from the server. The first domain name (default domain) that was created for
your account cannot be deleted; however, it can be renamed.
To remove a domain:
1. If you are subscribed to several hosting packages and have access to
several webspaces associated with your account, select the required
webspace in the Subscription menu at the top of the screen.
2. Click the Websites & Domains tab.
Page 62

62 Websites and Domains
3. In the list of domain names, select the domains or subdomains that you
want to remove and click Remove.
4. Confirm removal and click OK.
Adding Subdomains
If your hosting package includes subdomains, which are additional third-level domain
names, then you can use them to:
Organize logically the structure of your site.
Host additional websites or parts of a website on the same server without the need
to pay for registration of additional domain names.
An example of using subdomains:
You have a website your-product.com dedicated to promoting and selling your product.
For publishing information related to customer service and online order tracking, you
can organize the subdomain "orders" so that your users will be able to access this
information directly by visiting the Internet address "orders.your-product.com".
As subdomains have the same status with the additional domains, you can use the
same set of tools and services for working with subdomains. For example, SSL
protection, Web Presence Builder, web statistics, and so on.
To set up a subdomain for a site division or a separate site:
1. If you are subscribed to several hosting packages and have access to
several webspaces associated with your account, select the required
webspace in the Subscription menu at the top of the screen.
2. Click the Websites & Domains tab.
3. Click Add New Subdomain.
4. Specify the following:
a. In the Subdomain name box, type the portion of address that will
be added to the domain name of your main site.
b. In the Document root box, type the desired location of the
directory where all files and subdirectories of this site will be
kept. You can use the default directory of the main site, called
httpdocs, or specify another directory.
5. Click OK.
The new subdomain name is now shown in the list at the bottom of the screen.
You can now upload your web content to the subdomains webspace (directory on the
server), as described in the section Uploading Content over FTP (on page 84).
Page 63

Websites and Domains 63
Adding Domain Aliases
If you have registered with a domain name registrar several domain names that you
would like to point to the same website that you host on this server, you should set up
domain aliases.
To set up a domain alias:
1. If you are subscribed to several hosting packages and have access to
several webspaces associated with your account, in the Subscription
menu at the top of the screen, select the required webspace.
2. Go to the Websites & Domains tab.
3. Click Add New Domain Alias.
4. Type the desired domain alias name, for example alias.com.
Domain aliases can comprise letters, digits and hyphens. Each part of the domain
alias between dots should not be longer than 63 symbols.
5. Select the Synchronize DNS zone with the primary domain checkbox if you want
the domain alias to use the same DNS zone resource records as in
primary domain. With this setting, any subsequent changes in resource
records of the primary domain's zone will be applied to the DNS zone of
this domain alias.
6. Select the Mail service checkbox, if you want e-mail directed at the e-mail
addresses under the domain alias to be redirected to the e -mail
addresses under your original domain name.
Example: You have an e-mail address mail@yourdomain.com. You have set up an
alias for your domain name, for example, alias.com. If you want to receive mail to
your mailbox mail@yourdomain.com when it is sent to mail@alias.com, select the
Mail service checkbox.
7. Select the Web service checkbox. Otherwise, the web server will not
serve the web content to users coming to your site by typing the domain
alias in their browsers.
8. If you use hosting services based on a Linux platform, and you have
Java applications installed on your site that you want to make
accessible through the domain alias, select the Java web applications
checkbox.
9. Click OK.
To change the properties of an alias:
1. Go to the Websites & Domains tab.
2. Click the alias name you need.
3. Click Settings in the Tools group.
Page 64

64 Websites and Domains
4. Modify the domain alias properties as required and click OK.
To modify resource records in the DNS zone of a domain alias:
1. Go to the Websites & Domains tab.
2. Click the alias name you need.
3. Click DNS.
4. Add, edit or remove the resource records as required:
To add a resource record to the zone, click Add New Record. Specify the required
values and click OK to write the values to the zone.
To modify a resource record, under the Host column, click a hyperlink
corresponding to the record you need.
To remove a record, select a checkbox corresponding to the record you wish to
remove and click Remove.
To remove an alias from a domain:
1. Go to the Websites & Domains tab.
2. Select a checkbox corresponding to the domain alias that you want to
remove.
3. Click Remove.
4. Confirm removal and click OK.
Page 65

Websites and Domains 65
(Linux) Adding Wildcard Subdomains
Use wildcard subdomains to redirect visitors from non-existent subdomains to one of
your websites, commonly, to your main website. The typical use cases of this feature
are:
Improve website organization and run marketing campaigns.
For example, you don't have the vps-limited-offer subdomain but wish to forward
users from limited-vps-offer.example.com to example.com.
Help users reach your website even if they mistyped a subdomain name.
It is a widespread mistake to mistype a website name if it has the leading www
prefix (for example, type ww.example.com).
Finally, some website applications (WordPress) use wildcard subdomains to create
dynamic subdomains for convenience and better user experience.
Note: Traffic from existent subdomains will not be affected in any way if you add a
wildcard subdomain.
How to Add Wildcard Subdomains
You can add one wildcard subdomain per each of domain names under a subscription.
For this, go to the Websites & Domains tab and add a new subdomain which name is "*"
to one of your domain names. Example: *.example.com. If you wish this subdomain to
have a custom set of scripts or website content, specify a custom document root for
this subdomain.
Limitations of Wildcard Subdomains
Wildcard subdomains act like typical subdomains with the following exceptions:
Linux-only feature. Currently, wildcard subdomains are supported only on Panel for
Linux.
Renaming is not available. It is not possible to rename such subdomains.
No DNS zone. This type of subdomains does not have own zone record in the
Panel DNS server. Instead, they have the A record that points to the IP address
associated with a corresponding domain name.
Installation of APS apps is not allowed. Plesk users are unable to install APS apps
to wildcard subdomains.
No Web Presence Builder sites. Plesk users are unable to edit and publish sites to
these subdomains.
Page 66

66 Websites and Domains
(Advanced) Configuring DNS for a Domain
The Domain Name System (DNS) is a hierarchical naming system that translates
understandable domain names into the numerical identifiers (IP addresses) associated
with web hosts. Such translation is called resolving.
DNS Name Resolving
DNS is based on a hierarchical tree structure called the domain namespace. This
global namespace contains all possible domain names and is divided into logical parts
- domain zones (see the picture below). Domain zone is a part of namespace that
contains addresses of particular domains. Addresses are stored in a file on a separate
name server authoritative for that zone. Say, when a browser tries to access
www.example.com, it gets the site's IP address from a server authoritative for the
example.com zone. For more information about how DNS works, refer to the
respective documentation (say, Microsoft TechNet (http://technet.microsoft.com/enus/library/cc958978.aspx)).
When you purchase a domain, a registrar gives you the access to the DNS zone
responsible for your domain and its subdomains. You can either allow the registrar to
manage the zone or delegate the zone to Panel. Panel users mostly delegate their
zones, which gives them the ability to manage a zone right from their Panel hosting
account and other benefits. To get the details about how to delegate your zone to
Panel, refer to the section Panel as a Primary DNS Server (on page 67).
If you are an advanced user and already have a DNS server that you want to be
authoritative for your zone, you can set up Panel to be a secondary DNS server. In this
case, Panel just stores the copy of your zone and you do not have the ability to
manage it from Control Panel. The Panel DNS server will be used only if your primary
name server becomes inaccessible or inoperable. For the information about how to
make Panel act as a secondary DNS server, refer to the section Panel as a Secondary
DNS Server (on page 71).
Page 67

Websites and Domains 67
If you decided not to use Panel as a DNS server, all zone management should be
In this section:
Panel as a Primary DNS Server ........................................................................ 67
Panel as a Secondary DNS Server ................................................................... 71
Registrar's DNS Settings in Panel ..................................................................... 72
performed on a registrar's site. Some registrars provide the support for the remote DNS
zone management. If your hosting provider uses this feature, you still be able to modify
the DNS zone from Panel regardless your authoritative name server. To get the details
about how to switch off Panel DNS server and manage your zone remotely, refer to the
section Registrar's DNS Settings in Panel (on page 72).
Panel as a Primary DNS Server
For each new domain name, the Panel automatically creates DNS zone in accordance
with the settings configured by your service provider. The domain names should work
fine with the automatic configuration, however, if you need to perform custom
modifications in the domain name zone, you can do that through your Panel.
To view the resource records in a DNS zone of a domain:
1. Go to the Websites & Domains tab > DNS Settings.
2. If you have several domain names, select the domain name whose DNS
settings you want to manage.
A screen will show all resource records for a given domain.
To add a new resource record to the zone:
1. Go to the Websites & Domains tab > DNS Settings.
2. If you have several domain names, select the domain name whose DNS
settings you want to manage.
3. Click Add Record.
4. Select a resource record type, and specify the appropriate data:
For an NS record, which specifies the domain name of a name server that is
responsible for a DNS zone of a domain, you need to specify the domain name
(or a subdomain), and then the corresponding name server's domain name. If
you are defining an NS record for your main domain, then you should leave the
domain name field empty. If you are defining a name server for a subdomain,
then type the subdomain into the domain name field. After that, type the
appropriate name server's domain name into the name server field. For example:
ns1.mynameserver.com.
Page 68

68 Websites and Domains
For A and AAAA records, which associate IP addresses with domain names,
you need to specify the domain name and IP address. If you are simply defining
an record for your main domain, then you should leave the domain name field
empty. If you are defining a record for a name server, then type ns1 or ns2 into
the domain name field. Then specify the appropriate IP address with which to
associate the domain name.
For a CNAME record, which specifies which subdomains (or domain aliases that
look like subdomains, for example, www) should be associated in the Domain
Name System with the main domain address, you need to type the subdomain
name or www alias, and then, the main domain name.
For an MX record, which specifies the host name of the preferred mail server for
the given domain, you need to specify the mail domain (or subdomain), the
domain name of the mail exchange server responsible for receiving e-mail, and
the server's priority. For the main domain, you would simply leave the available
field blank. Then type the domain name of your mail server. If you are running a
remote mail server named 'mail.myhostname.com', then simply type
'mail.myhostname.com' into the Mail exchange server field. After that, specify its
priority: 0 is the highest and 50 is the lowest.
For a PTR record, which is required for reverse DNS lookup (an IP address is
translated to domain name), you need to enter the IP address/mask, and then
type the appropriate domain name for this IP address to be translated to.
For a TXT record, which is used for specifying arbitrary human-readable text,
you can type an arbitrary text string, or an SPF record.
For an SRV record, which is used for specifying location of services other than
mail, you will need to enter the service name, protocol name, port number, and
target host. Service and protocol names should start with the underscore
symbol. You can also specify the priority of the target host, and relative weight
(for records with the same priority) in the appropriate fields.
4. Click OK, and then click Update.
To modify the properties of a resource record:
1. Go to the Websites & Domains tab > DNS Settings.
2. If you have several domain names, select the domain name whose DNS
settings you want to manage.
3. Click the hyperlink in the Host column corresponding to the resource
record you want to modify.
4. Modify the record as required, click OK, and then click Update.
In addition to the resource records described above, there is also a Start of Authority
record. This record indicates that this DNS name server is responsible for the domain's
DNS zone. It also contains settings that affect propagation of information about the
DNS zone in the Domain Name System.
Page 69

Websites and Domains 69
To modify the entries in the Start of Authority (SOA) record for a domain:
1. Go to the Websites & Domains tab > DNS Settings.
2. If you have several domain names, select the domain name whose DNS
settings you want to manage.
3. Click SOA Record.
4. Specify the required values:
Refresh interval. This is how often the secondary name servers check with the
primary name server to see if any changes have been made to the domain's
zone file. The Panel sets the default value of three hours.
Retry interval. This is the time a secondary server waits before retrying a failed
zone transfer. This time is typically less than the refresh interval. The Panel sets
the default value of one hour.
Expire interval. This is the time before a secondary server stops responding to
queries, after a lapsed refresh interval where the zone was not refreshed or
updated. The Panel sets the default value of one week.
Minimum TTL. This is the time a secondary server should cache a negative
response. The Panel sets the default value of three hours.
Default TTL. This is the amount of time that other DNS servers should store the
record in a cache. The Panel sets the default value of one day.
5. Click OK, and then click Update.
Usage of serial number format recommended by IETF and RIPE is mandatory for many
domains registered in some high-level DNS zones, mostly European ones. If your
domain is registered in one of these zones and your registrar refuses your SOA serial
number, using serial number format recommended by IETF and RIPE should resolve
this issue.
The Panel-managed servers use UNIX timestamp syntax for configuring DNS zones.
UNIX timestamp is the number of seconds since January 1, 1970 (Unix Epoch). The
32-bit timestamp will overflow by July 8, 2038.
RIPE recommends using YYYYMMDDNN format, where YYYY is year (four digits), MM
is month (two digits), DD is day of month (two digits) and NN is version per day (two
digits). The YYYYMMDDNN format will not overflow until the year 4294.
To change the Start of Authority (SOA) serial number format to
YYYYMMDDNN for a domain:
1. Go to the Websites & Domains tab > DNS Settings.
2. If you have several domain names, select the domain name whose DNS
settings you want to manage.
3. Click SOA Record.
4. Select the Use serial number format recommended by IETF and RIPE checkbox.
Page 70

70 Websites and Domains
Note: See the sample of SOA serial number generated with the selected format. If
the resulting number is less than the current zone number, the modification may
cause temporary malfunction of DNS for this domain. Zone updates may be
invisible to the Internet users for some time.
5. Click OK, and then click Update.
To remove a resource record from the zone:
1. Go to the Websites & Domains tab > DNS Settings.
2. If you have several domain names, select the domain name whose DNS
settings you want to manage.
3. Select a checkbox corresponding to the record you want to remove.
4. Click Remove.
5. Confirm removal, click OK, and then click Update.
To restore the original zone configuration in accordance with the default
DNS template settings used on the server:
1. Go to the Websites & Domains tab > DNS Settings.
2. If you have several domain names, select the domain name whose DNS
settings you want to manage.
3. Click Restore Defaults.
4. In the IP address menu, select the IP address to be used for restoring the
zone.
5. Specify whether a www alias is required for the domain.
6. Select the Confirm the restoration of the DNS zone checkbox, and click OK.
To restore the default Start of Authority (SOA) serial number format (UNIX
timestamp) for a domain:
1. Go to the Websites & Domains tab > DNS Settings.
2. If you have several domain names, select the domain name whose DNS
settings you want to manage.
3. Click SOA Record.
4. Clear the Use serial number format recommended by IETF and RIPE
checkbox.
Note: See the sample of SOA serial number generated with the selected format. If
the resulting number is less than the current zone number, the modification may
cause temporary malfunction of DNS for this domain. Zone updates may be
invisible to the Internet users for some time.
Page 71

Websites and Domains 71
5. Click OK, and then click Update.
By default, transfer of DNS zones is allowed only for the name servers designated by
NS records contained within each zone. If you are using a Windows-based hosting
account, then you can change zone transfer settings.
If your domain name registrar requires that you allow transfer for all zones
you serve:
1. Go to the Websites & Domains tab > DNS Settings.
2. If you have several domain names, select the domain name whose DNS
settings you want to manage.
3. Click Zone Transfers. A screen will show all hosts to which DNS zone
transfers for all zones are allowed.
4. Specify the registrar's IP or network address and click Add Network.
Panel as a Secondary DNS Server
If you host websites on your hosting account and have a standalone DNS server acting
as a primary (master) name server for your sites, you may want to set up the Panel's
DNS server to function as a secondary (slave) name server.
To make the Panel's DNS server act as a secondary name server:
1. Go to the Websites & Domains tab > DNS Settings.
2. If you have several domain names, select the domain name whose DNS
settings you want to manage.
3. Click Switch DNS Service Mode.
4. Click Add Record.
5. Specify the IP address of the primary (master) DNS server.
6. Click OK, and then click Update.
7. Repeat steps from 2 to 6 for each website that needs to have a
secondary name server on your server.
Page 72

72 Websites and Domains
To make the Panel's DNS server act as a primary back:
1. Go to the Websites & Domains tab > DNS Settings.
2. If you have several domain names, select the domain name whose DNS
settings you want to manage.
3. Click Switch DNS Service Mode.
The original resource records for the zone will be restored.
Registrar's DNS Settings in Panel
If you have external primary and secondary name servers that are authoritative for
some of your websites, switch off the Panel's DNS service for each of these sites.
To switch off the Panel's DNS service for a site served by external name
servers:
1. Go to the Websites & Domains tab > DNS Settings.
2. If you have several domain names, select the domain name whose DNS
settings you want to manage.
3. Click Switch Off the DNS Service.
Turning the DNS service off for the zone will refresh the screen, so that only a list of
name servers remains. Note that the listed name server records have no effect on
the system. They are only presented on the screen as clickable links to give you a
chance to validate the configuration of the zone maintained on the external
authoritative name servers.
4. If you want to validate the configuration of a zone maintained on
authoritative name servers, do the following:
a. Add to the list the entries pointing to the appropriate name
servers that are authoritative for the zone: Click Add Record,
specify a name server, click OK, and then click Update.
b. Repeat the step a for each name server you would like to test.
The records will appear in the list.
c. Click the records that you have just created.
The Panel will retrieve the zone file from remote name servers and will check the
resource records to make sure that domain's resources are properly resolved. The
results will be interpreted and displayed on the screen.
If your Control Panel is integrated with a billing system, then the following operations
on domains might be available from the Panel:
Setting a password for access to domain management panel at a registrar's site.
Locking and unlocking domain name for transferring to another provider.
Page 73

Websites and Domains 73
Changing domain registrant and other contact information.
Changing DNS settings for domain zones served by a domain registrar.
Configure automatic renewal of the domain account at the domain name
registration company.
To set a new password for access to your domain management control
panel at a registrar's site:
1. Go to the Account tab.
2. Locate the domain name for which you want to change settings, and
click the link Show Domain Info next to it.
3. Click Change Domain Password.
4. Type a new password and click OK.
To lock or unlock domain name for transferring to another provider:
1. Go to the Account tab.
2. Locate the domain name for which you want to change settings, and
click the link Show Domain Info next to it.
3. Click Change Registrar Lock Setting.
4. To allow domain name transfer, clear the Lock checkbox and click OK.
To change domain owner's contact, technical, administrative, or billing
information:
1. Go to the Account tab.
2. Locate the domain name for which you want to change settings, and
click the link Show Domain Info next to it.
3. Click Edit Contact Info.
4. Make the necessary changes and click OK.
To change DNS settings for a domain:
1. Go to the Account tab.
2. Locate the domain name for which you want to change settings, and
click the link Show Domain Info next to it.
3. Click Edit DNS Settings.
4. Specify the domain name servers that serve the DNS zone for your
website and IP address of the server where the website is hosted.
Page 74

74 Websites and Domains
5. If the DNS zone of your website is served by your domain name
registrar, then you can also specify other resource records that affect
how your website's services are accessible over the Internet.
6. To save your changes, click OK.
To configure automatic renewal of the domain name:
1. Go to the Account tab.
2. Locate the domain name for which you want to change settings, and
click the link Show Domain Info next to it.
3. Click Automatic Domain Renewal.
4. To allow auto renewal of the domain registration, select the Turn on auto
renewal checkbox and click OK.
Changing Hosting Settings
Panel allows you to manage a number of various hosting settings:
Basic settings, like a domain name or hosting type.
Security settings. To secure connections to your site with SSL certificates, you
should activate the SSL support first.
Scripting settings. You can specify what scripting languages your site will support.
Learn more in the section Web Scripting Settings (on page 76). Moreover, Panel
supports custom per-site (per-subdomain) configuration for the PHP language. To
learn more about adjustable PHP settings, see the section PHP Settings (on page
77).
If you want to review the hosting settings or select the hosting features
and scripting languages that should be supported on your site:
1. If you are subscribed to several hosting packages and have access to
several webspaces associated with your account, in the Subscription
menu at the top of the screen, select the webspace where the website
is hosted.
2. Click the Websites & Domains tab.
3. In the list of websites at the bottom of the screen, click the website
address.
4. Review or change the following hosting settings and options:
Page 75

Websites and Domains 75
Hosting type. The type of hosting configuration selected by default is website
hosting, which means that the website is hosted on this server. You can also
choose to redirect visitors to another website (this setup is also known as web
forwarding); switch off web hosting service if you need to host only mailboxes
and mailing lists under that domain; or suspend the website and all mailboxes
and mailing lists hosted under the website's domain name.
If you want to redirect visitors to another site, click the Change link, select the
Forwarding option, type the destination site address, select the forwarding
scheme, and click OK.
If you want to switch off web service and use only e-mail services under that
domain, click the Change link, select the No web hosting option, and click OK.
If you want to suspend the website and all services associated with it,
including mail, click the Suspend link. When you need to bring that domain or
website back online, return to the Websites & Domains tab > domain name, and
click the Activate link.
Document root. The location of the directory where all files and subdirectories of
the site will be kept. You can use the default directory called httpdocs or specify
another directory.
Enable SSL support. Secure Sockets Layer encryption is generally used for
protecting transfer of sensitive data during online transactions on e-commerce
websites that run on dedicated IP addresses. SSL certificates that participate in
the encryption process are usually applied to a single domain name on a single
IP address, therefore, each site that needs SSL protection must be hosted on a
dedicated IP address. An exception to this is subdomains, which you can
protect with a wildcard certificate. Installing an SSL certificate on a web server
that hosts several websites with different domain names on a single IP address
is technically possible, however, it is not recommended: the encryption will be
provided, but users will get warning messages on attempt to connect to the
secure site. To allow SSL encryption for the website, select the Enable SSL
support checkbox.
Scripting languages. Specify which of the following programming and scripting
languages should be supported by the web server: Active Server Pages (ASP),
Microsoft ASP.NET, Server Side Includes (SSI), PHP hypertext preprocessor
(PHP), Common Gateway Interface (CGI), Fast Common Gateway Interface
(FastCGI), Perl and Python. By default, PHP is configured to operate in safe
mode, with functional restrictions that strengthen hosting security. To learn more
about PHP safe mode, refer to http://php.net/features.safe-mode.
Microsoft FrontPage settings. Microsoft FrontPage is a popular website authoring
tool. To enable content creation and publishing through Microsoft FrontPage,
select the options Microsoft FrontPage support, Microsoft FrontPage over SSL support,
and Remote FrontPage authoring allowed.
Web statistics. Select the web statistics software that you want to use for viewing
graphical reports and charts on website visitors. Also, select the corresponding
checkbox if you want to be able to access the statistical reports by visiting the
password-protected directory http://your-website/plesk-stat/webstat.
Custom error documents. When visitors coming to a site request pages that the
web server cannot find, the web server generates and displays a standard
HTML page with an error message. If you want to create your own error pages
and use them on the web server, select the Custom error documents checkbox.
Page 76

76 Websites and Domains
Additional write and modify permissions (available only for Windows hosting). This
In this section:
Web Scripting Settings ...................................................................................... 76
In this section:
PHP Settings ..................................................................................................... 77
ASP.NET Settings (Windows Hosting) .............................................................. 78
option is required if web applications on the site will be using a file-based
database (like Jet) located in the root of httpdocs directory. Note that selecting
this option will seriously compromise the website security.
5. When finished with viewing or changing hosting set tings, click OK.
Web Scripting Settings
For each website in your subscription you can specify which of the following
programming and scripting languages should be supported by the web server: Active
Server Pages (ASP), Microsoft ASP.NET, Server Side Includes (SSI), PHP hypertext
preprocessor (PHP), Common Gateway Interface (CGI), Fast Common Gateway
Interface (FastCGI), Perl and Python. Since Panel 10.4, you are able to configure PHP
settings individually for each website (or subdomain) in your subscription. This is
possible only if your subscription have the corresponding permissions. To get the
details about custom PHP configuration, refer to the section PHP Settings (on page 77).
Page 77

Websites and Domains 77
PHP Settings
PHP is one of the most popular scripting languages for creating dynamic web pages.
The majority of today's websites and web applications are based on PHP scripts. Thus,
site administrators should understand how they can control the execution of PHP
scripts. Typically, PHP behavior is defined by a number of configuration settings. These
settings specify various script execution aspects, like performance (for example, the
amount of memory a script can use), security (for example, access to file system and
services), and so on. Site administrators may adjust these settings for a number of
reasons:
Preventing a memory leak or server hang-up by poorly written scripts.
Protecting data from malicious scripts.
Meeting the requirements of a certain web app.
Testing own scripts and other.
Generally, PHP settings are defined by your provider's policy. Since Panel 10.4, you
have the ability to customize PHP settings individually for each website or subdomain
right from your Control Panel. In this case, provider's PHP configuration acts just as a
preset for your hosting account and you can override it at any time. Note that your
hosting plan must have corresponding permissions to allow you performing this action.
Next in this section we will discuss how you can set up custom per-website PHP
configuration.
Note: Custom PHP configuration of a website acts as a preset for all subdomains of
this site. You can perform further per-subdomain PHP configuration in the same way as
for the websites.
General PHP Settings
Before you proceed to custom PHP configuration for your website, select the site from
the list in Websites & Domains and ensure that PHP is supported and operates in one of
predefined modes:
ISAPI (only on Windows). This mode uses less server resources, but a website is
isolated only if it is operating in a dedicated IIS application pool.
Apache module (only on Unix). This mode uses less server resources, but it is the
least secure option. A site is isolated only if PHP safe mode is switched on.
FastCGI application. This mode is faster than CGI, but consumes more memory.
Provides site isolation.
CGI application. This is the slowest mode of operation, but it uses the least amount of
memory.
Note: Switching PHP from Apache module to FastCGI application may break functionality
of existing PHP scripts.
If you use Windows hosting, you can additionally choose a PHP version. Always use
PHP 5.x except the cases when you need PHP 4.x to host some old PHP apps.
Page 78

78 Websites and Domains
Customizing PHP Configuration for a Website
All customizable PHP settings are located on the PHP Settings tab of your website. For
convenience, all PHP settings are divided into two groups:
Performance settings.
These settings define how scripts work with system resources. For example: Use
the memory_limit parameter to limit the amount of memory for a script and, as a
consequence, to prevent a memory leak. Or prevent scripts from tying up the server
by limiting the maximum time scripts are allowed to run in max_execution_time.
Common settings.
This group contains other commonly used PHP settings. Generally, these are:
Security settings (for example, the PHP safe mode toggle or the permission to
register global variables), error reporting settings (for example, the directive to log
errors), and other.
Note: Your ability to customize PHP performance and common settings is controlled by
two separate permissions of your hosting plan. For example, if you do not have the
permission to manage common PHP settings, they will be available to you in the readonly mode.
You can set the value of each parameter in PHP Settings either by selecting a value from
a preset, typing a custom value, or leaving the Default value. In the latter case, Panel
uses the values defined by your provider. For the information about certain PHP
settings, refer to the respective documentation. For example,
http://php.net/manual/en/ini.list.php.
If you cannot find particular parameters among performance or common settings,
contact your hosting provider.
ASP.NET Settings (Windows Hosting)
To configure ASP.NET Settings for a site:
1. If you are subscribed to several hosting packages and have access to
several webspaces associated with your account, in the Subscription
menu at the top of the screen, select the required webspace.
2. Go to the Websites & Domains tab > ASP.NET Settings (in the Advanced
Operations group).
3. Set up the strings that determine database connection data for
ASP.NET applications that use databases. This option is available only
for ASP.NET 2.0.x.
When you open the ASP.NET configuration screen for the first time, sample
connection parameters with common constructions are displayed. You can
delete them and specify your own strings.
To add a string, enter the required data into the Name and Connection Parameters
input fields and click next to them.
Page 79

Websites and Domains 79
To remove a string, click next to it.
4. Set up custom error messages that will be returned by ASP.NET
applications in the Custom Error Settings field:
To set the custom error messages mode, select an appropriate option from the
Custom error mode menu:
On - custom error messages are enabled.
Off - custom error messages are disabled and detailed errors are to be
shown.
RemoteOnly - custom error messages are displayed only to remote clients,
and ASP.NET errors are shown to the local host users.
To add a new custom error message (which will be applied unless the Off mode
was selected), enter the values in the Status Code and Redirect URL fields, and
click .
Status Code defines the HTTP status code resulting in redirection to the error
page.
Redirect URL defines the web address of the error page presenting
information about the error to the client.
Due to possible conflicts, you cannot add a new custom error message with an
error code that already exists, but you can redefine the URL for the existing
code.
To remove a custom error message from the list, click next to it.
5. Configure compilation settings in the Compilation and Debugging field:
To determine the programming language to be used as default in dynamic
compilation files, choose an entry from Default web page language list.
To enable compiling retail binaries, leave the Switch on debugging checkbox
empty.
To enable compiling debug binaries, select the Switch on debugging checkbox. In
this case, the source code fragments containing error will be shown in a
diagnostic page message.
Note. When running applications in debug mode, a memory and/or performance
overhead occurs. It is recommended to use debugging when testing an application
and to disable it before deploying the application into production scenario.
6. Configure encoding settings for ASP.NET applications in the Globalization
Settings section:
To set an adopted encoding of all incoming requests, enter an encoding value
into the Request encoding field (default is utf-8).
To set an adopted encoding of all responses, enter an encoding value into the
Response encoding field (default is utf-8).
To set an encoding which must be used by default for parsing of .aspx, .asmx,
and .asax files, enter an encoding value into the File encoding field (default is
Windows-1252).
Page 80

80 Websites and Domains
To set a culture which must be used by default for processing incoming web
requests, select an appropriate item from the Culture list.
To set a culture which must be used by default when processing searches for a
locale-dependent resource, select an appropriate item from the UI Culture list.
7. Set a code access security trust level for ASP.NET applications in the
Code Access Security field.
CAS trust level is a security zone to which applications execution is assigned,
defining what server resources the applications will have access to.
Important: When an assembly is assigned a trust level that is too low, it does not
function correctly. For more information on the permissions levels see
http://msdn.microsoft.com/library/enus/dnnetsec/html/THCMCh09.asp?frame=true#c09618429_010.
8. Enable the usage of the auxiliary scripts in the Script Library Settings field.
Specifying the script library settings is necessary if the validation web
controls are used on your web site. This option is available only for
ASP.NET 1.1.x.
If you need to use auxiliary scripts (specifically, scripts implementing objects for
validating input data), provide the settings for .NET framework script library. To
do so, enter the path beginning with the domain root directory preceded by the
forward slash into the Path to Microsoft script library field, or click the folder icon
next to the Path to Microsoft script library field and browse for the required location.
To initiate the auto-installation of files containing the scripts to the specified
location, select the Install checkbox. If the files already exist there, they will be
rewritten.
9. Set client session parameters in the Session Settings field:
To set up the default authentication mode for applications, select an appropriate
item from the Authentication mode list. Windows authentication mode should be
selected if any form of IIS authentication is used.
To set up time that a session can remain idle, type the number of minutes into
the Session timeout box.
10. Click OK to apply all changes.
Page 81

Websites and Domains 81
Suspending and Activating Websites
In this section:
Suspending Websites for Maintenance ............................................................. 82
When a website is suspended, it becomes inaccessible over the Internet, and e-mail
addresses under the site's domain name stop working.
To suspend a website:
1. If you are subscribed to several hosting packages and have access to
several webspaces associated with your account, select the required
webspace in the Subscription menu at the top of the screen.
2. Click the Websites & Domains tab.
3. Click the domain name of the site that you want to suspend.
4. Click the Suspend link next to the Hosting type field.
To activate a website:
1. If you are subscribed to several hosting packages and have access to
several webspaces associated with your account, select the required
webspace in the Subscription menu at the top of the screen.
2. Click the Websites & Domains tab.
3. Click the domain name of the site that you want to activate.
4. Click the Activate link next to the Hosting type field.
Page 82

82 Websites and Domains
Suspending Websites for Maintenance
If you want to shut down a site for maintenance and let your visitors know that it is
temporarily unavailable and will be back online later, switch on the site maintenance
mode. When a site is in the maintenance mode, the "503 Service Unavailable" error
document is shown to website visitors instead of the actual site pages.
If your hosting plan provides the option to customize web server error documents (the
"Custom error pages" option), then you can use File Manager to open and customize
the error page: Instead of the "Service Temporarily Unavailable" message, you can
write your own message like "The site is temporarily down for maintenance, it will be up
soon."
When maintenance work is finished, switch the maintenance mode off for the site to
make it available to the visitors.
To switch on the maintenance mode for a website:
1. Go to the Websites & Domains tab.
2. Click Website Maintenance Mode (in the Advanced Operations group).
3. If you have several websites, locate the site you want to temporarily
suspend, and click the corresponding Manage link.
4. Select the Switch on the maintenance mode for website checkbox.
5. Click OK.
If the custom error documents option is switched on for the site, then you can edit the
"503 Service Temporarily Unavailable" document to include your own text. For
information about customizing error pages, refer to the section Setting Up Custom Error
Pages (on page 107).
To switch off the maintenance mode and put a site back online:
1. Go to the Websites & Domains tab.
2. In the list of your websites, locate the website you want to put back
online. It should be accompanied by the Switched off for maintenance status
indicator.
3. Click the corresponding Change link.
4. Clear the Switch on the maintenance mode for website checkbox.
5. Click OK.
Page 83

Websites and Domains 83
Managing Website Content
In this section:
Creating Websites with Web Presence Builder .................................................. 83
Uploading Content over FTP ............................................................................. 84
Using File Manager ........................................................................................... 85
Previewing Websites ......................................................................................... 90
(Advanced) Restricting Access to Content ........................................................ 91
If your hosting plan provides website creation and management service using Web
Presence Builder, you can create and publish sites using it. Or you can create your site
content (web pages, scripts and graphic files that compose your site) on your home or
office computer and then publish it to the server in any of the following ways:
Through an FTP connection (most common and easiest way).
Through the Control Panel's file manager.
Through a Secure Shell connection (only for users of Linux and FreeBSD operating
systems).
Through Adobe Dreamweaver or Microsoft FrontPage software (only for users of
Microsoft Windows operating systems).
Creating Websites with Web Presence Builder
You can create and publish websites using Web Presence Builder, if this option is
provided with your hosting service.
If your hosting service does not include any sites published with Web Presence Builder
or your reached the limit of published sites, you still can create a new website with Web
Presence Builder. In this case, all website editing options in Web Presence Builder will
be available to you. To publish this website, you will need to upgrade your hosting plan.
Web Presence Builder is a great tool that enables users to create professionally
looking sites without any knowledge of HTML markup or graphic design skills. Just pick
a suitable page design and content template, add your text to pages, and publish the
site.
Page 84

84 Websites and Domains
To start creating a website using Web Presence Builder:
1. Go to either the Home tab or the Websites & Domains tab, and click Launch
Web Presence Builder.
If you have only one domain name configured, Web Presence Builder will open in a
new browser window or tab.
2. If you have several domain names or subdomains, click the
corresponding link Edit in Web Presence Builder. The Web Presence Builder
wizard will open in a new browser window or tab.
Uploading Content over FTP
To publish website through FTP:
1. Connect to your webspace on the server with an FTP client program,
using your FTP account username and password.
You can change your username and password in the Panel at the Websites &
Domains tab > Web Hosting Settings.
The FTP address should be ftp://your-domain-name.com, where your-domainname.com is your site's Internet address.
Enable the passive mode if you are behind a firewall.
2. Upload the files and directories of your site to the httpdocs directory.
If you use CGI scripts, place them into the cgi-bin directory.
3. Close your FTP session.
You can also set up additional FTP accounts if you need to collaborate on website
content with other users. For information, see the section Adding FTP Accounts.
Page 85

Websites and Domains 85
Using File Manager
To upload files through the Panel's file manager:
1. If you are subscribed to several hosting packages and have access to
several webspaces associated with your account, select the required
webspace in the Subscription menu at the top of the screen.
2. Click the Websites & Domains tab.
3. Click File Manager.
4. Create or upload files and directories.
Place the files and directories of your site to the httpdocs directory. If you use
CGI scripts, place them into the cgi-bin directory.
To upload a file from your computer, click Add New File, click the Browse button to
locate the file, or specify the path to its location in the Path to file box, and then
click OK.
To upload a ZIP archive to the server and then extract its contents, click Add New
File, click the Browse button to locate the archive file, and click OK. After the file is
uploaded, select the corresponding checkbox on the left, and click Extract Files.
To create a new directory within your current location, click Add New Directory.
To create new files in the required directory, click Add New File, select the Create
a file option, specify the file name, select the Use html template checkbox, if you
want file manager to insert some basic HTML tags into the new file, and click
OK. A page will open allowing you to enter the content or HTML-formatted
source of a new file. After you finished, click OK.
To add files to a ZIP archive, select the files you want to pack, click Add to
Archive, and specify the name of your archive file.
When you upload web content through File Manager or FTP, the Panel automatically
sets the appropriate access permissions for files and directories. On Linux-based
servers, the permissions are represented as three sets of symbols, for example, 'rwx
rwx r--'. The first set tells what the owner of the file or directory can do with it; the
second tells what the user group, the file or directory belongs to, can do with the file or
directory; the third set indicates what other users (the rest of the world, that is, Internet
users visiting a site) can do with the file or directory. R means the permission to read
the file or directory, W means the permission to write to the file or directory, and X
means the permission to execute the file or look inside the directory.
To modify permissions for a file or directory on a Linux-based hosting account, click a
hyperlink representing the set of permissions in the Permissions column. If you use a
Windows-based hosting account, click the icon . Modify the permissions as desired
and click OK.
To edit the source code of a file, click .
Page 86

86 Websites and Domains
To edit the Web page in the built-in visual editor (available only to users of Microsoft
Internet Explorer), click . When editing an HTML file, the Panel opens internal
WYSIWYG editor by default. If you want to edit the source code of the HTML file, click
HTML. To return back to WYSIWYG mode, click Design.
To view the file, click .
To rename a file or directory, click . Type in a new name and click OK.
To copy or move a file or directory to another location, select the required file or
directory using the appropriate checkbox, and click Copy/Move. Specify the destination
for the file or directory to be copied or renamed to, then click Copy to copy, or Move to
move it.
To update the file or directory creation date, click Change Timestamp. The time stamp will
be updated with the current local time.
To download a file, click the corresponding icon .
To remove a file or directory, select the corresponding checkbox, and click Remove.
Confirm removal and click OK.
Setting File and Directory Access Permissions (Linux Hosting)
To review or change the permissions set for files and directories:
1. If you are subscribed to several hosting packages and have access to
several webspaces associated with your account, select the required
webspace in the Subscription menu at the top of the screen.
2. Click the Websites & Domains tab.
3. Click File Manager.
The permissions set for files and directories are shown in the Permissions column.
They are represented as three sets of symbols, for example, 'rwx rwx r--'. The first
set tells what the owner of the file or directory can do with it; the second tells what
the user group, the file or directory belongs to, can do with the file or directory; the
third set indicates what other users (the rest of the world, that is, Internet users
visiting a site) can do with the file or directory. R means the permission to read the
file or directory, W means the permission to write to the file or directory, and X
means the permission to execute the file or look inside the directory.
4. Locate the file or directory for which you want to modify permissions
and click a hyperlink in the Permissions column.
5. Modify the permissions as desired and click OK.
Page 87

Websites and Domains 87
Setting File and Directory Access Permissions (Windows Hosting)
To set access permissions for a file or directory:
1. If you are subscribed to several hosting packages and have access to
several webspaces associated with your account, in the Subscription
menu at the top of the screen, select the required webspace.
2. Go to the Websites & Domains tab > File Manager.
3. Locate the file or directory for which you want to set access
permissions, and click the corresponding icon .
4. Do the following:
To make the file or folder inherit permissions from a parent folder (if it does not),
select the checkbox Allow inheritable permissions from the parent to propagate to this
object and all child objects. Include these with entries explicitly defined here.
To make the files and folders, which are contained in this folder, inherit the
folder permissions you define, select the checkbox Replace permission entries on
all child objects with entries shown here that apply to child objects.
To change or remove permissions from a group or a user, click the required
name in the Group or user names list. If the group or user is not listed in the Group
or user names list, select the required user or group name from the menu located
above the list and click : the user/group appears in the list. Select it.
To allow or deny permissions to a selected group/user, select the Allow or Deny
checkboxes corresponding to permissions listed under Permissions for <user/group
name>. If the checkboxes in Allow or Deny columns are shown in grey, it means
that the corresponding permissions are inherited from a parent folder.
To deny the permissions, which are inherited from a parent object as allowed,
select the required checkboxes under Deny. This will override inherited
permissions for this file/folder.
To allow the permissions, which are inherited from a parent object as denied,
clear the Allow inheritable permissions from the parent to propagate to this object and all
child objects. Include these with entries explicitly defined here checkbox: this removes
the inherited permissions. Then select the required checkboxes under Allow and
Deny.
To remove access permissions from a group or user, select the required name
in the Group or user names list and click the icon next to it.
5. If you need advanced fine-tuning of permissions, click the Advanced
button, and do the following:
To create a permission entry for a group or user, select the required name from
the Group or user names list and click .
To set or change file/folder permissions for a group or user, select the required
name from the Group or user names list, select the required Allow and Deny
checkboxes corresponding to permissions listed under Permissions for <user/group
name>.
Page 88

88 Websites and Domains
To remove a permission entry for a group or user, select the required name from
In this section:
Setting File and Directory Access Permissions (Linux Hosting) ......................... 88
Setting File and Directory Access Permissions (Windows Hosting) ................... 89
the Group or user names list and click .
To make child objects of a folder inherit its permissions defined under
Permissions for <user/group name>, select the Replace permission entries on all child
objects with entries shown here that apply to child objects checkbox, and select
checkboxes in the Apply to list which correspond to the objects that must inherit
the permissions.
6. Click OK.
Setting File and Directory Access Permissions (Linux Hosting)
To review or change the permissions set for files and directories:
1. If you are subscribed to several hosting packages and have access to
several webspaces associated with your account, select the required
webspace in the Subscription menu at the top of the screen.
2. Click the Websites & Domains tab.
3. Click File Manager.
The permissions set for files and directories are shown in the Permissions column.
They are represented as three sets of symbols, for example, 'rwx rwx r--'. The first
set tells what the owner of the file or directory can do with it; the second tells what
the user group, the file or directory belongs to, can do with the file or directory; the
third set indicates what other users (the rest of the world, that is, Internet users
visiting a site) can do with the file or directory. R means the permission to read the
file or directory, W means the permission to write to the file or directory, and X
means the permission to execute the file or look inside the directory.
4. Locate the file or directory for which you want to modify permissions
and click a hyperlink in the Permissions column.
5. Modify the permissions as desired and click OK.
Page 89

Websites and Domains 89
Setting File and Directory Access Permissions (Windows
Hosting)
To set access permissions for a file or directory:
1. If you are subscribed to several hosting packages and have access to
several webspaces associated with your account, in the Subscription
menu at the top of the screen, select the required webspace.
2. Go to the Websites & Domains tab > File Manager.
3. Locate the file or directory for which you want to set access
permissions, and click the corresponding icon .
4. Do the following:
To make the file or folder inherit permissions from a parent folder (if it does not),
select the checkbox Allow inheritable permissions from the parent to propagate to this
object and all child objects. Include these with entries explicitly defined here.
To make the files and folders, which are contained in this folder, inherit the
folder permissions you define, select the checkbox Replace permission entries on
all child objects with entries shown here that apply to child objects.
To change or remove permissions from a group or a user, click the required
name in the Group or user names list. If the group or user is not listed in the Group
or user names list, select the required user or group name from the menu located
above the list and click : the user/group appears in the list. Select it.
To allow or deny permissions to a selected group/user, select the Allow or Deny
checkboxes corresponding to permissions listed under Permissions for <user/group
name>. If the checkboxes in Allow or Deny columns are shown in grey, it means
that the corresponding permissions are inherited from a parent folder.
To deny the permissions, which are inherited from a parent object as allowed,
select the required checkboxes under Deny. This will override inherited
permissions for this file/folder.
To allow the permissions, which are inherited from a parent object as denied,
clear the Allow inheritable permissions from the parent to propagate to this object and all
child objects. Include these with entries explicitly defined here checkbox: this removes
the inherited permissions. Then select the required checkboxes under Allow and
Deny.
To remove access permissions from a group or user, select the required name
in the Group or user names list and click the icon next to it.
5. If you need advanced fine-tuning of permissions, click the Advanced
button, and do the following:
To create a permission entry for a group or user, select the required name from
the Group or user names list and click .
Page 90

90 Websites and Domains
To set or change file/folder permissions for a group or user, select the required
name from the Group or user names list, select the required Allow and Deny
checkboxes corresponding to permissions listed under Permissions for <user/group
name>.
To remove a permission entry for a group or user, select the required name from
the Group or user names list and click .
To make child objects of a folder inherit its permissions defined under
Permissions for <user/group name>, select the Replace permission entries on all child
objects with entries shown here that apply to child objects checkbox, and select
checkboxes in the Apply to list which correspond to the objects that must inherit
the permissions.
6. Click OK.
Previewing Websites
After you purchase a domain, its registration can require some time. The reason of the
delay is that name servers update their zone information periodically. Thus, until all
name servers get information about your zone, you will not be able to access your site
by its domain name. Nevertheless, you can always access your site during domain
name propagation using the button on the Websites & Domains tab.
During domain name propagation other people can access your site too. For this
purpose, Panel registers your website as a subdomain of one of provider's sites. For
example, if your website is my-domain.tld and a provider has configured the preview
service on provider-domain.tld, you can access your site on my-domain.tld.192-0-2-
12.provider-domain.tld. Here 192-0-2-12 is the site's IP address where dots are
replaced with dashes.
Note: If you do not have the site preview button on the Websites & Domains page,
contact your hosting provider.
Page 91

Websites and Domains 91
(Advanced) Restricting Access to Content
If you have directories in a site that only authorized users should see, restrict access to
these directories with password protection.
To protect a directory in your site with a password and to specify
authorized users:
1. If you are subscribed to several hosting packages and have access to
several webspaces associated with your account, in the Subscription
menu at the top of the screen, select the required webspace.
2. Go to the Websites & Domains tab > Password-protected Directories (in the
Advanced Operations group).
3. Click Add Protected Directory.
4. In the Directory name box, specify the path to the directory that you want
to protect with a password.
This can be any directory existing in the site, for example: /private. If the
directory that you would like to protect has not yet been created, specify the path
and the directory name – the Panel will create it for you.
5. If you are using a Linux-based hosting account, you can also protect
your CGI scripts stored in the cgi-bin directory. To do this, leave '/' in
the Directory name box and select the cgi-bin checkbox.
6. In the Title of the protected area box, type a resource description or a
welcoming message that your users will see when they visit the
protected area.
7. Click OK. The directory you specified will be protected.
8. To add authorized users, click Add New User.
9. Specify the login name and password that will be used for accessing
the protected area. The password should be from 5 to 14 symbols in
length. Click OK.
To add an authorized user of a protected directory:
1. If you are subscribed to several hosting packages and have access to
several webspaces associated with your account, in the Subscription
menu at the top of the screen, select the required webspace.
2. Go to the Websites & Domains tab > Password-protected Directories (in the
Advanced Operations group).
3. Click on the name of the directory you need.
4. Click the Add New User icon.
Page 92

92 Websites and Domains
5. Specify the login name and password that will be used for accessing
the protected area. The password should be from 5 to 14 symbols in
length.
6. Click OK.
To change password for an authorized user of a protected directory:
1. If you are subscribed to several hosting packages and have access to
several webspaces associated with your account, in the Subscription
menu at the top of the screen, select the required webspace.
2. Go to the Websites & Domains tab > Password-protected Directories (in the
Advanced Operations group).
3. Click on the name of the directory you need. A list of authorized users
will open.
4. Click on the user’s name.
5. Specify the new password and re-type it for confirmation.
6. Click OK.
To revoke a permission to access the protected directory from a user:
1. If you are subscribed to several hosting packages and have access to
several webspaces associated with your account, in the Subscription
menu at the top of the screen, select the required webspace.
2. Go to the Websites & Domains tab > Password-protected Directories (in the
Advanced Operations group).
3. Click on the name of the directory you need. A list of authorized users
will open.
4. Select a checkbox corresponding to the user’s name.
5. Click Remove. Confirm the operation and click OK.
To remove password protection and make the resource available to the
public:
1. If you are subscribed to several hosting packages and have access to
several webspaces associated with your account, in the Subscription
menu at the top of the screen, select the required webspace.
2. Go to the Websites & Domains tab > Password-protected Directories (in the
Advanced Operations group).
3. Select a checkbox corresponding to the name of the directory, from
which you want to remove protection.
Page 93

Websites and Domains 93
4. Click Remove Protection. The protection will be removed and the contents
of the directory will be accessible to the public without restrictions.
Employing Website Applications
You can significantly increase your website functionality by using different web apps.
Apps being installed on a website can solve a number of tasks. If you are an individual
user, you may, for example, present yourself with a blog or organize an online storage
of your media files. Companies can move a part of their business online by using the
webmail, e-commerce, or CRM web apps. All these apps are available for installation
right from your Control Panel.
The list of available apps is regulated by your hosting plan. For example, it may include
only free apps or no apps at all. For more information on available apps, refer to your
hosting provider.
App Types
There are two types of web apps:
Apps that are installed directly on a website (say, the WordPress blogging platform
or the Joomla! content management system).
Apps that do not require a website for the installation. These are, generally,
external apps located somewhere in the Web that only provide a link to their
services (say, OfficeDrive - an online office suite or the iMind videoconference
service).
App Installation and Maintenance
The process of installation does not require any specific skills. You just fill in app
settings (say, administrator credentials), and Panel installs the app for you. The further
app management is also eased as you can update or remove apps right in Panel.
Moreover, you are able to access some functions that apps expose to Control Panel
(without the need to log in to an app). For example, you can add SugarCRM user
account right from your Control Panel. Such part of app functionality is a service
provided by the app.
After you install the app, grant access to it to other Panel users, if you want them to use
the app. To get started with apps managing, see the section Managing Apps.
Access to Apps
Make your apps available to certain users by adjusting their permissions. Once you
allow a user to access an app, the link to the app appears on their Home page. Note
that you can control app access only for user groups, so you either should modify
permissions of an existing group or create a new one, and then assign users to it. For
more details on access to apps, refer to the section Granting Panel Users Access to Apps
(on page 95).
Page 94

94 Websites and Domains
By default, the app administrator in Panel is a user with the Owner role. This user can
In this section:
Configuring Apps ............................................................................................... 94
Granting Panel Users Access to Apps ............................................................... 95
Linking App and Panel Accounts ....................................................................... 95
Updating Installed Apps .................................................................................... 95
not only access apps from the Home page but also install and manage apps within a
subscription. These administrative tools are found in the Applications tab that is
available only to app administrators. You can grant access to these tools to other
subscription users. To get details on this operation, refer to the section Granting Panel
Users Access to Apps (on page 95).
Apps and Panel User Accounts
Some apps let you create and manage user accounts directly in Panel. For example,
the SugarCRM app allows you to add SugarCRM users without logging in to the app.
All apps with such "account services" can associate their accounts with users of a
Panel subscription (auxiliary users). To perform such association, you should grant the
Panel users access to that account service (same as you grant access to apps). For
more details on account association, refer to the section Linking App and Panel Accounts
(on page 95).
Panel allows you to perform a number of operations with apps. You can install,
configure, update, and remove apps right in Panel.
Configuring Apps
Generally, all apps allow the configuration of their main parameters directly in Control
Panel. You can access app settings by selecting the app from the list in Applications >
Manage Installed Applications. After you select an app, you can perform the configuration
of its:
General settings.
These are basic app settings (say, administrator password) that can be changed
with Change Settings.
Service settings.
If an app provides a part of its functionality to Panel by means of services, you have
the option to configure them. Say, the SugarCRM app allows creating of user
accounts and provides this ability as a service in Control Panel. After you select this
service in Provided services, you can view all app user accounts and create new
ones.
For some apps, you can associate the app accounts with Panel user accounts.
Learn more about account association in the section Linking App and Panel Accounts
(on page 95).
Page 95

Websites and Domains 95
Granting Panel Users Access to Apps
By default, after you install an app, only users with the Owner role can access it. To
allow other subscription users to access the app:
Grant the permission to access the app to a certain user group in Users > User Roles.
Be sure to add users of your choice to the group.
Once you allow users to access the app, the link to the app appears on their Home
page.
By default, the app administrator is a subscription user with the Owner role. This user
can not only access apps from the Home page but also install and manage apps within
a subscription. For these purposes, their interface has the additional Applications tab.
You can provide the same administrative privileges to other subscription users by
granting the Install and manage applications permission to their role in Users > User Roles. It
gives users full administrative access to all apps within a subscription. As well as the
administrator, the users with this permission can install, configure, update, and remove
apps through the Applications tab in their Control Panel.
Linking App and Panel Accounts
Some apps let you create and manage user accounts without logging in to the app. If
an app provides such "account service", you can link users of a Panel subscription with
accounts in the app. To perform such association:
1. Organize the users into a certain group (Users > User Roles).
2. Grant one of these group permissions:
Public access.
If granted, all users from the group will have access to the app through the link
on the Home page.
Personal access.
If granted, the app will automatically create accounts for all users from the
group. After that, users' Home page will contain an additional link that allows
logging in to a personal account in the app. Note that if you deny the Personal
access permission, the app will automatically remove all accounts associated
with this group.
Updating Installed Apps
Basically, your service provider is in charge of apps updates maintenance. If the
update is available, your provider can perform it for you or, by convention, you can
perform it by yourself. The last case is relevant if you want to review the changes
available in the new version and decide whether to update the app or leave the current
version. The update link appears in Applications > Manage Installed Applications.
Page 96

96 Websites and Domains
(Advanced) Securing Your Websites
In this section:
Securing Connections with SSL Certificates ...................................................... 96
Protecting Sites from Hotlinking (Windows Hosting) .......................................... 102
Securing Connections with SSL Certificates
For every e-commerce website hosted on the server, you should purchase and install
an authentic digital SSL certificate.
SSL certificates are used for establishing secure communication channels on the
Internet and for verifying website identity: When users visit your secure online store,
they are notified that your website is really what it claims to be and that all sensitive
data, such as credit card numbers, will be transferred over a secure channel.
You can choose any of the following ways for purchasing and installing SSL
certificates:
Use a link in the Panel for purchasing SSL certificates. The link in the Panel, by
default, refers to the MyPlesk.com online store which simplifies purchasing SSL
certificates from Comodo, GeoTrust, Inc, and GoDaddy. This link can be modified
by your provider to refer you to their own site.
Create a certificate signing request (CSR) from the Panel and submit it to the
certification authority of your choice, which will create an SSL certificate for you.
To purchase an SSL certificate using the links in the Panel, and secure a
site:
1. If you are subscribed to several hosting packages and have access to
several webspaces associated with your account, in the Subscription
menu at the top of the screen, select the required webspace.
2. Click the Websites & Domains tab.
3. Click Secure Your Sites. A list of SSL certificates that you have in your
repository will be displayed.
4. Click Add SSL Certificate.
5. Specify the following:
Certificate name. This will help you identify this certificate in the repository.
Encryption level. Choose the encryption level of your SSL certificate. We
recommend that you choose a value more than 1024 bit.
Your location and organization name. The values you enter should not exceed
the length of 64 symbols.
Page 97

Websites and Domains 97
The domain name for which you want to purchase an SSL certificate. This
should be a fully qualified domain name. Example: your-domain.com.
The website administrator's e-mail address.
6. Make sure that all the provided information is correct and accurate, as it
will be used to generate your private key.
7. Click Buy SSL Certificate.
Your private key and certificate signing request will be generated. Do not delete
them. MyPlesk.com or another online store configured by the provider will open in a
new browser window or tab.
8. Register or log in to an existing account and you will be taken step by
step through the certificate purchase procedure.
9. Choose the type of certificate that you wish to purchase.
10. Click Proceed to Buy and order the certificate. In the Approver E-Mail drop-
down box, select the correct approver e-mail.
The approver e-mail is an e-mail address that can confirm that certificate for
specific domain name was requested by an authorized person. This is the e-mail
address listed in the domain owner or domain administrator's contact information in
the WHOIS database.
11. Once your certificate request is processed, you will be sent a
confirmation e-mail. After you confirm, the SSL certificate will be sent to
your e-mail.
12. When you receive your SSL certificate, save it on your computer.
13. Return to the SSL certificates repository (Websites & Domains tab > Secure
Your Sites).
14. Upload the SSL certificate: Click Browse in the middle of the screen and
navigate to the location of the saved certificate. Select it, and then click
Send File.
This will upload and install the certificate against the corresponding private key.
15. To install the certificate on a site, return to the Websites & Domains tab,
and click the domain name of the website that you want to to secure.
16. To switch on SSL protection, select the Enable SSL support checkbox.
17. From the SSL certificate menu, select your SSL certificate and click OK.
Page 98

98 Websites and Domains
To obtain an SSL certificate from any certificate authority of your choice,
and secure a site:
1. If you are subscribed to several hosting packages and have access to
several webspaces associated with your account, in the Subscription
menu at the top of the screen, select the required webspace.
2. Click the Websites & Domains tab.
3. Click SSL Certificates. A list of SSL certificates that you have in your
repository will be displayed.
4. Click Add SSL Certificate.
5. Specify the certificate properties:
Certificate name. This will help you identify this certificate in the repository.
Encryption level. Choose the encryption level of your SSL certificate. We
recommend that you choose a value more than 1024 bit.
Your location and organization name. The values you enter should not exceed
the length of 64 symbols.
The domain name for which you want to purchase an SSL certificate. This
should be a fully qualified domain name. Example: your-domain.com.
The website administrator's e-mail address.
6. Make sure that all the provided information is correct and accurate, as it
will be used to generate your private key.
7. Click Request. Your private key and certificate signing request will be
generated and stored in the repository.
8. In the list of certificates, click the name of the certificate you need. A
page showing the certificate properties opens.
9. Locate the CSR section on the page, and copy the text that starts with the
line -----BEGIN CERTIFICATE REQUEST----- and ends with the line -----END
CERTIFICATE REQUEST----- to the clipboard.
10. Visit the website of the certification authority from which you want to
purchase an SSL certificate, and follow the links on their site to start a
certificate ordering procedure. When you are prompted to specify CSR
text, paste the data from the clipboard into the online form and click
Continue. The certification authority will create an SSL certificate in
accordance with the information you supplied.
11. When you receive your SSL certificate, save it on your local machine or
network.
12. Return to the SSL certificates repository (Websites & Domains tab > Secure
Your Sites).
Page 99

Websites and Domains 99
13. Upload the SSL certificate: Click Browse in the middle of the page and
In this section:
Ordering SSL Certificates .................................................................................. 99
Using Shared SSL Certificates (Windows Hosting) ............................................ 101
navigate to the location of the saved certificate. Select it, and then click
Send File.
This will upload and install the certificate against the corresponding private key.
14. To install the certificate on a site, return to the Websites & Domains tab,
and click the domain name of the website that you want to to secure.
15. To switch on SSL protection, select the Enable SSL support checkbox.
16. From the SSL certificate menu, select your SSL certificate and click OK.
Ordering SSL Certificates
If your Control Panel is integrated with a billing system, then you might be able to
purchase an SSL certificate for a site from the Account tab.
To purchase an SSL certificate and install in on a site:
1. Go to the Account tab.
2. In the list of subscriptions, click the Add Subscription link.
3. Select the option or plan related to SSL certificates and click Buy Now.
Follow the instructions on the screen to complete the order.
4. Go to the Websites & Domains tab > Secure Your Sites, select the domain
name you need, and click Add SSL Certificate.
5. Specify the certificate properties:
Certificate name. This will help you identify this certificate in the repository.
Encryption level. Choose the encryption level of your SSL certificate. We
recommend that you choose a value more than 1024 bit.
Your location and organization name. The values you enter should not exceed
the length of 64 symbols.
The domain name for which you want to purchase an SSL certificate. This
should be a fully qualified domain name. Example: your-domain.com.
The website administrator's e-mail address.
6. Make sure that all the provided information is correct and accurate, as it
will be used to generate your private key.
7. Click Request. Your private key and certificate signing request will be
generated and stored in the repository.
Page 100

100 Websites and Domains
8. In the list of certificates, click the name of the certificate you need. A
page showing the certificate properties opens.
9. Locate the CSR section on the page, and copy the text that starts with the
line -----BEGIN CERTIFICATE REQUEST----- and ends with the line -----END
CERTIFICATE REQUEST----- to the clipboard.
10. Return to the Account tab.
11. In the list of subscriptions, locate the link Request SSL Certificate and click
it.
12. In the Certificate signing request field, paste the text from the clipboard that
you previously copied at the step 9.
13. Click Next.
14. Verify that the information in your request is correct and click Next.
15. Select the administrative contact e-mail and click Next.
16. Specify technical and billing contact information and click Next.
17. Review the information presented on the screen and click Submit
Certificate Request.
18. After you receive your certificate by e-mail, return to the Websites &
Domains tab > Secure Your Sites, and select the domain name for which
you ordered the certificate.
19. Upload the SSL certificate to the Panel: Click Browse in the middle of the
screen and navigate to the location of the saved certificate. Select it,
and then click Send File.
This will upload and install the certificate against the corresponding private key.
20. To install the certificate on a site, return to the Websites & Domains tab,
and click the domain name of the website that you want to to secure.
21. To switch on SSL protection, select the Enable SSL support checkbox.
22. From the SSL certificate menu, select your SSL certificate and click OK.
 Loading...